


PrimoDude
-
Posts
33 -
Joined
-
Last visited
Content Type
Profiles
Forums
Gallery
Events
Posts posted by PrimoDude
-
-
Janet, you have great dexterity and talent in your hands.. Wonderful work.
Thumbs up...
"Woody"
-
I am envious...Beautiful work, congratulations.
-
Best regards Jerry, and it sounds like a fine repair job. You will be fit to sail again shortly.
"Woody"
-
-
No matter the size, tis still a beauty.. I may have to check out Hobby Lobby here.
Cheers... it looks fine.
-
Thumbs up Jerry... they do excellent spinal surgeries today.. Much better results than 40 years ago.
Wishing you the best of success and regained health.
Cheers..
Woodchipper
-
As well as the rest of the crew.. welcome home. And also I share your pain thoughts. I too have ruptured disc with L1 and
L5 in the pain dept. since 1978.
I will be adding a Lathe to my armory machines tomorrow to do my future masts turnings.
Looking forward to more of your expertise.
"Woodchipper"
Woody
-
Congrats rich... How do you hide something this big.. and build noisy.. ??
Hey.. That's exactly the sander I use here too.. In the USA. And thanks for the 4th Greetings.
God Bless the Queen as well.
Another toy that I find indispensable is the small Dremel rechargeable drill. I cannot get along without it putting on the side planks. I predrill my holes partially, and then the nail.. and a hammer.
Forget the push pin gizzy.. I started with it, then got the drill. No regrets..
Again. congrats.. I rarely give structural advice, as there are super model builders here to do that.
Thankfully. I lean on them a lot.
"woodchipper"
or "Woody"
-
Congrats and welcome to the HMS Victory Club.. I am about 1 month into the slow but sure build.. Enjoy, and there are
several great builders here. Just a minor league starter myself.
Woodchipper
-
Yo Jerry...good work...mistakes or not, your still a master for the details...Appreciated here at the beginners bench.
:-)
Happy sailing next week.
-
Many thanks Dan.. I found not many areas that needed any work and very little at that so I abstained from anything
anything. simply reset and re glued the problem site.
All three gun port's (270, 271, and 272) are on the bulkheads and planking has begun. I am using nails and glue for the
initial planking start planks. Just for grins.
It seems to work much faster.
Oh.. I use a very tiny predrill prior to the nailing. Dry hole, then glue, then nail applied.
Hope that is o.k. 3 more planks in the bender rig as I type.
High fives and regards.
Woody
-
Nice so far Rich. I hope I too can equal your successes....Keep it up..
"Woody"
-
Hello once more.. just a update.. I finished the bow area on starboard side today on the last gun port.
I pre formed with a jig, the curved bow gun ports. Seemed to work very well.
I also nailed the ports in place as well as glued. Nice and solid now.
Thanks Jerry...I will surely follow your build as well as Gil and Shipyard Sid. S'Sid, saved me from a very improper start.
Had to strip off the first set of top ports..
Yikes.
"Woody"
-
My compliments to you sir, are well deserved. Exceptional work on your ship.
"Woody"
-
beautifull Jerry... I will follow your build as well as Sids, and Gils as well as others.
Photos soon of my own progress.. now just ready again to do the initial planking. AFTER I bevel the bow and prow bulkheads.
Cheers..
-
Yo Jerry...great job your doing. I check in every once in a while... Getting myself out of the brig here and working past
doing KP duty.. after my first mistakes. Shipyard Sid has me playing a new tune. So far.. so good. In a year from now, I
might be where you are now. Hopefully.. that is.
Best regards...
"Woodchipper" in Iowa.. "Woody"
-
Don't stay away too long Jerry...This old bird will be calling for a life ring.. :-)
Your doing a fine job on your ship.. My admiration.
"Woody"
-
Ship wrecked... ran into foul weather...ran aground.. Limping back to port.
Well, the story here is that my first glue job, went afoul. Part 270, even after many hours of search on the build forums here, I still messed up.
But, I learned a new (possibly) repair technique. How to remove all the contact points on the sides of the
17 bulkheads and still keep viable parts. Hmmmmmm. I rested my ship for 3 days after my new shipmate and
Friend Dave (Shipyard Sid)shouted with dismay, followed by a photo and drawing of the way is should be.
Many thanks for that one DAVE.... now the struggle begins...
There is a product, yet to arrive, called cable or string saw. I order two of those, but I already have one side removed.
I found that a single edge razor, pressed in from the top, then the bottom and progressed with a flat edged
small size screwdriver did the trick.. Care needs to be used..as those single edge razor blades are sharp.
Machine gun rapid taps on the blade induced it to move through the set up glue. But watch it as you may
start into timber. If so.. restart. I went from both top side and underside of the glued area's.
Took me about 2 hours to remove one side of the part 270.
Now on to the other side.
Then finish work to remove old glue, and splinters. A product called wood filler (brand later) or powdered
wood fill, mixed with water will be used to repair holes...and there are a few.
So.. bail for me..
"Woody"
-
Hello Jerry... tis a newbie here and I am also starting the HMS Victory 1805 kit. Like you, my thoughts were, "What did I
get into here when I opened this 30 lb. box of wood parts". So far, so good and happy with the kit.
I will track your progress and hopefully one day, I too can launch this puppy into the display case. Properly done.
Many thanks for your photos and progress reports.
Iowa Corn Fields here. :-)
"Woody" alias Woodchipper
-
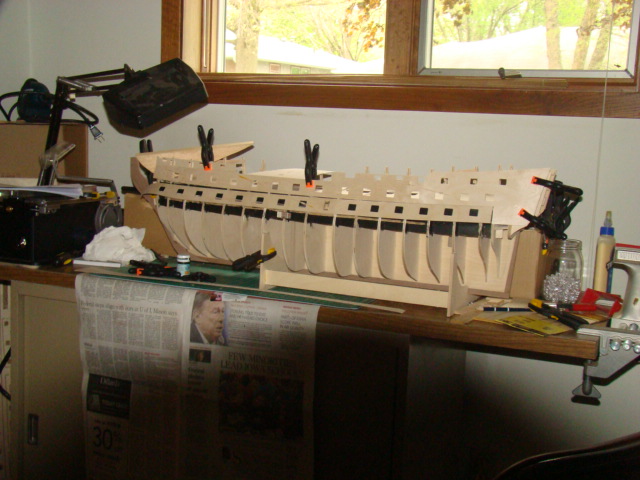
Everything except the bulkheads and frames are dry fitted and not fastened.Will try to upload a few pictures of the progress so far.
-
-
catching up just a tad bit. Been a bit of a puzzle getting the gunport patterns lined up on the bulkheads to suit me.
Did some jigging with rubber bands and was able to adjust to a reasonable fit. Started the glue up of the gunport patterns to the bulkheads this eveing. One bulkhead at a time.. slowly.
I want the patterns to fit the curvatures of the bulkheads as much as I can. Thanks to Dave, for a few tips.
Going much by the book 1, as provided to this novice.. :-)
Pictures when I can. So far, its been posted in builds of the Caldercraft "professionals" here before.
"
-
And Hello Anja... I overlooked you for a bit.. Excuse my senility. Just a update here. And perhaps a
question. Whats the proper positioning for the side gun ports. Prior to the planking. Maybe there are some
suggestions other than the manual.
I am close, but wish to be on the dot.
I painted the gunport backfgrounds today, and soon to post photos.. to catch up.
Its pretty much routine in the frame setups.. and been done here before.
Its a classy ship to build.. I am getting rather fond of her already.. :-)
-
Aye mate, that display case has me a bit worried. But I think I have a spot for it.. My wife may not agree.
:-) A year or so down the road.. I am admiring a few of the great builds in progress of this ship.
Weather alerts tonight.. tornado prospects. Batten down the hatches..
"Woody"

WTB : HMS Warrior Vol.2 by Romero
in Traders, Dealers, Buying or Selling anything? - Discuss New Products and Ship Model Goodies here as well!!
Posted · Edited by PrimoDude
new info
I have a copy but not sure of the volume. I will check and see. Hope it fits.
addendum .... I am sorry, its from Harold M. Hahn, "The Colonial Schooner 1763-1775"
Good luck with your search