HOLIDAY DONATION DRIVE - SUPPORT MSW - DO YOUR PART TO KEEP THIS GREAT FORUM GOING! (Only 20 donations so far - C'mon guys!)
×


6ohiocav
-
Posts
543 -
Joined
-
Last visited
Content Type
Profiles
Forums
Gallery
Events
Everything posted by 6ohiocav
-
 Mike, Home made twist ups using 26 gauge black wire.
- 648 replies
-
- 3
-

-
- niagara
- model shipways
- (and 1 more)
-
Mike, That's easy. If it is based on time, Gun rigging takes the cake. Deck was one day, hull planking was three days. gun Rigging was a month.
- 648 replies
-
- 3
-
-
- niagara
- model shipways
- (and 1 more)
-
Mike, I would go with the smaller - .012. The difference between the two will be difficult, if not impossible, to discern on the model, and the smaller will be easier to pass through the blocks. I have found that if you have to bore too large of a hole on those small blocks, they can split. As I have discussed my tackle lines are even smaller in diameter and I think they look to scale to me.
- 843 replies
-
- 2
-
-
- niagara
- model shipways
- (and 2 more)
-
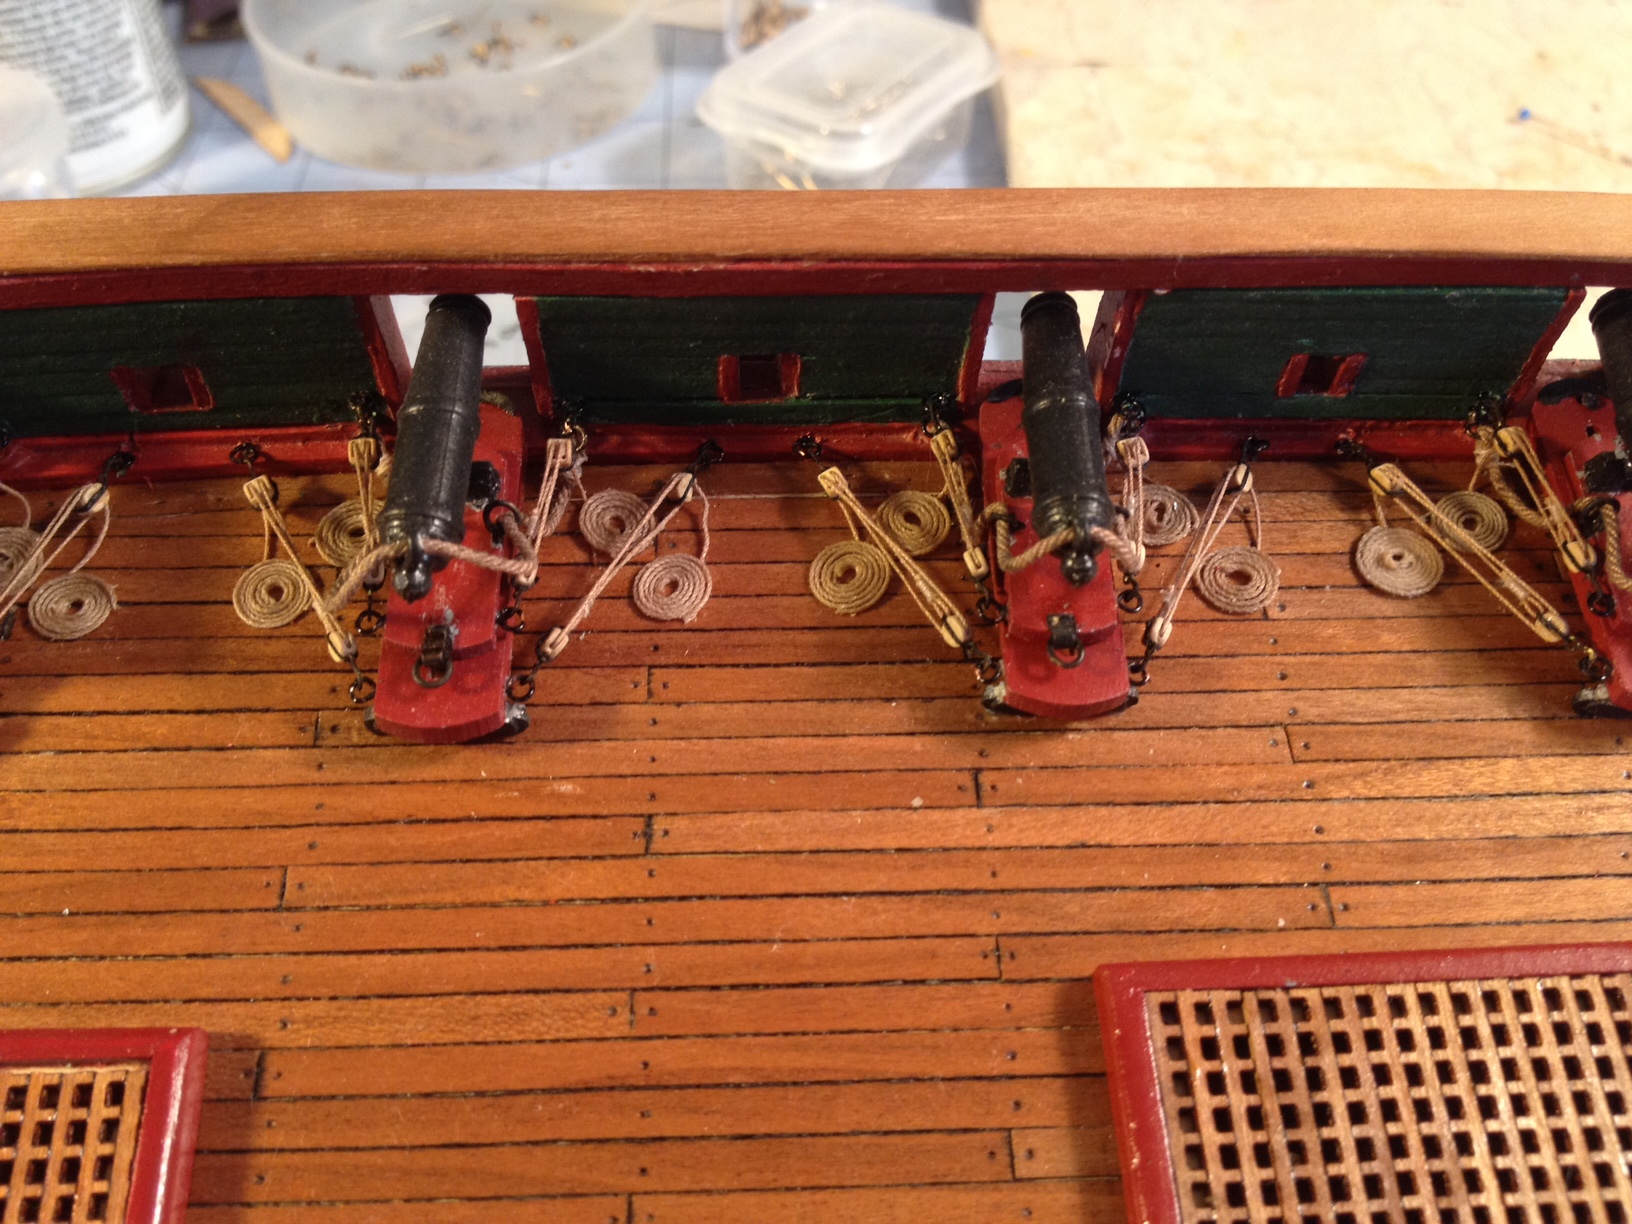
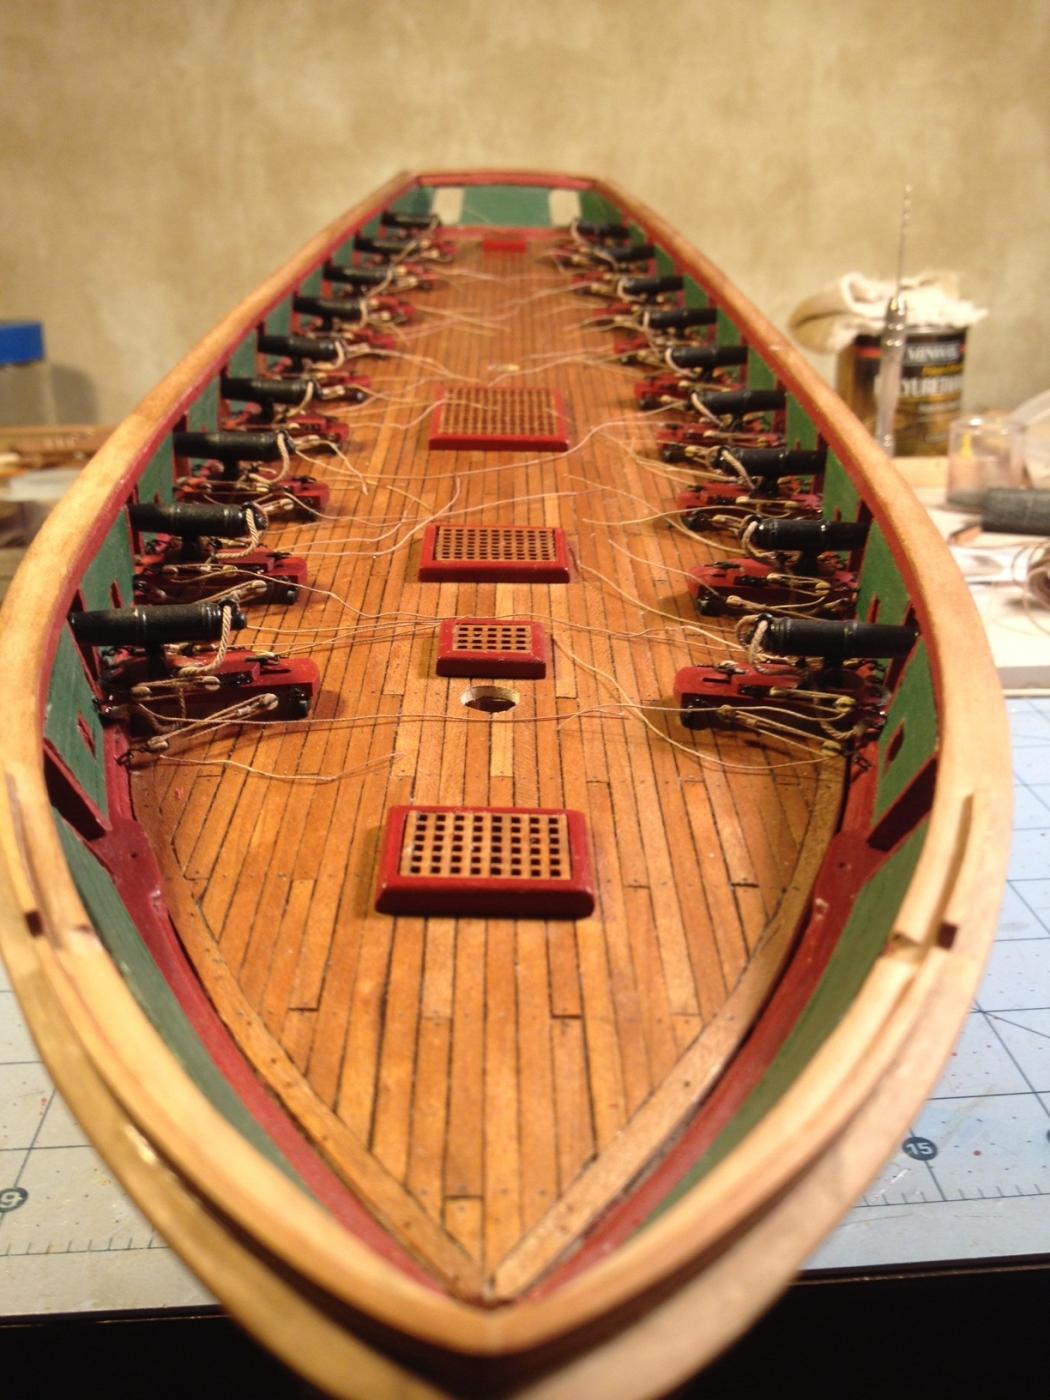
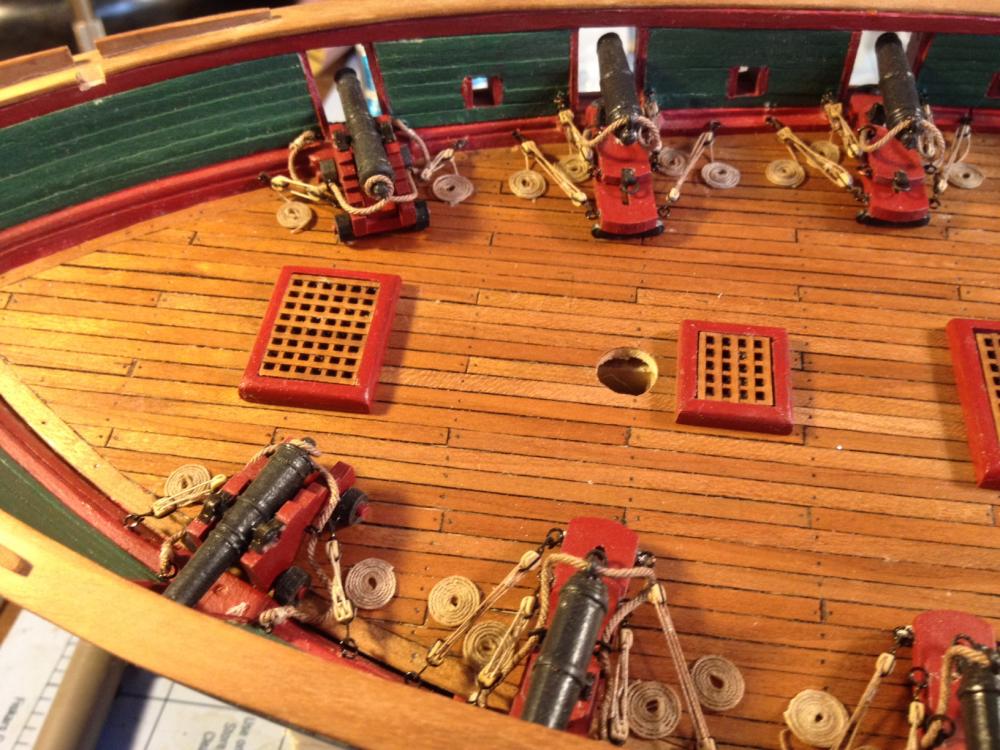
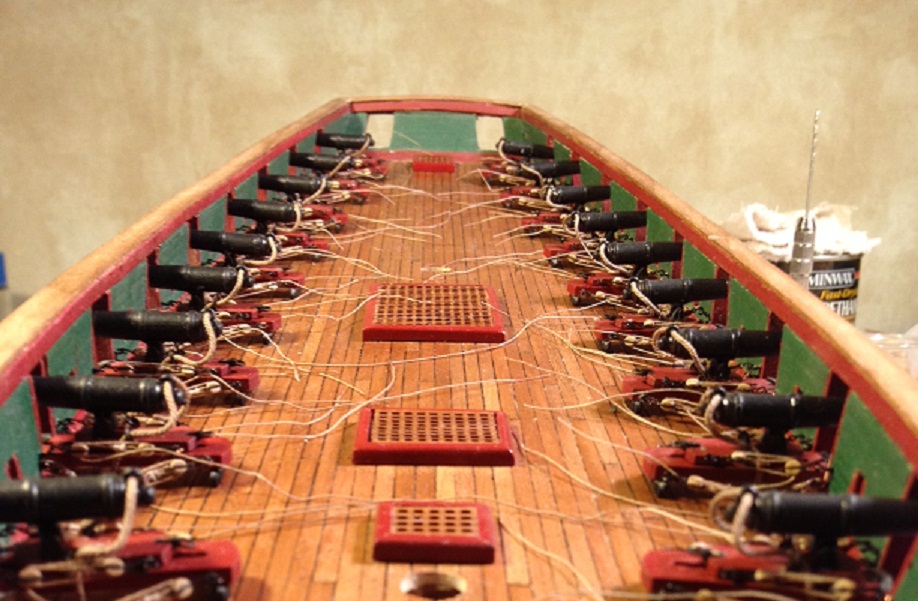
Rope Coils I decided to clean up the deck of all of the loose tackle ropes and create rope coils. I perused this forum for techniques and found a bunch of different approaches. I pretty easily discarded the notion of rolling the existing lines on the deck. They will not stay rolled without a solution of water and glue, and the deck is not the place for that mess. Besides, the intricate locations for the lines made it nearly impossible anyway. I therefore decided to roll them off the ship. I used a 50/50 solution of white glue and water. I thoroughly submerged a 3 inch piece of rope, using inverted sharp point tweezers to grip the very end. I rolled the rope on a glass plate. I found that as long as the rope stayed in the small puddle of glue solution, it would stay down on the glass, and it would allow me to roll the rope and stay flat. Extracting the tweezers without pulling the inside rope end out of the coil was a challenge. I accomplished it by using the back end of an x-acto knife and slipping it gently between the two ends of the tweezers and holding the coil down as I pulled the tweezers away. I also learned that you CANNOT touch the coil until it is completely dry - and I mean 5 hours dry. The watered down solution takes forever to dry, and it is so sticky, any attempt to touch it before so simply ruins it. Patience, patience, patience. By the way, I will say again that the Syren rope is an outstanding product. It rolled very well. The kit supplied rope was too stiff and would not stay rolled, even when soaked with the glue/water. Of course, I ran out of rope again, and will be placing another order to replenish my shipyard stores. Laying them on the deck wasn't easy either. I placed a medium drop of medium CA on the deck, and carefully positioned the end rope of the tackle in such a place that made it look like it merged into the coil. I then dropped the coil down on the end of the rope. Not always an easy task with all of the enclosed places. What I reasonable thought would take an afternoon took most of three days. Here are some photos of the finished product.


- 648 replies
-
- 8
-
-
- niagara
- model shipways
- (and 1 more)
-
Mark, We did. We had period civilians in horse-drawn carriages follow the Union Army to watch the battle unfold. When we routed, we swept them up and we all "headed back to DC." Very authentic.
- 648 replies
-
- 3
-
-
- niagara
- model shipways
- (and 1 more)
-
Indeed he did. He figured he had had enough of war, and decided to move to the quiet little town of Appomattox where he figured he would never have to experience the horrors of the battlefield ever again. It is said the war started in his parlor and ended there. How ironic. This could only happen in history. No one would think of making this up. By the way, bringing this period of history into perspective for us fans of the age of sail, the Confederate Army's advance north towards Manassas caused panic all along the coast. In reaction (perhaps OVER reaction) the US Navy decided to burn the USS Pennsylvania (140 guns), USS Columbus (74 guns), USS Delaware (74 guns), USS New York (74 guns) and a host of other smaller ships in order to prevent them from slipping into Confederate hands. What a terrible loss to posterity, all in one day in April 1861.
- 648 replies
-
- 3
-
-
- niagara
- model shipways
- (and 1 more)
-
I am back from Virginia. It was quite hot, and we faithfully recreated the Battle of Bull Run - the Union Army got whipped badly. I commanded the Union Army (as Maj. Gen. McDowell) and President Lincoln will soon relieve me. Here are a few photos taken over the weekend. I am on the black horse with the yellow breast strap. http://www.joshellerphoto.com/p498058465/h7b155761#h7b155761 http://www.joshellerphoto.com/p498058465/h7b155761#h72d9394e http://www.joshellerphoto.com/p498058465/h7b155761#h739b3f44
- 648 replies
-
- 5
-
-
- niagara
- model shipways
- (and 1 more)
-
Gents, A quick check of the plans and some research and I stand corrected - 12 pounders it is. I will have to send my barrels back to the Brittania foundry to be recast. Just kidding of course. Proper syntax suffers when I work on the build log away from build project with all of the plans.
- 648 replies
-
- 3
-
-
- niagara
- model shipways
- (and 1 more)
-
Brian, Thanks for the tip. I put a drop of glue on top of the cascabel to hold the loop in place but I know I can tighten it up some. I'll give the glue mixture a try. I need to mix some up anyway for the rope coils.
- 648 replies
-
- 3
-
-
- niagara
- model shipways
- (and 1 more)
-
Mike, Did you notice that the 3/32 blocks are about half the size of the wheels, just like your photo. Yes to the pin rails. I did them months ago. I also have to add the additional eyebolts, and as soon as I figure out how to color the Brittania cleats (paint or brown blackening product), I will be dressing up the bulwarks. Then I have to work on the rudder and tiller. Then add the deck furniture. The only thing I still have to build is the capstan. All of the rest are done waiting to be installed. Should make some significant progress in the next couple of weeks.
- 648 replies
-
- 3
-
-
- niagara
- model shipways
- (and 1 more)
-
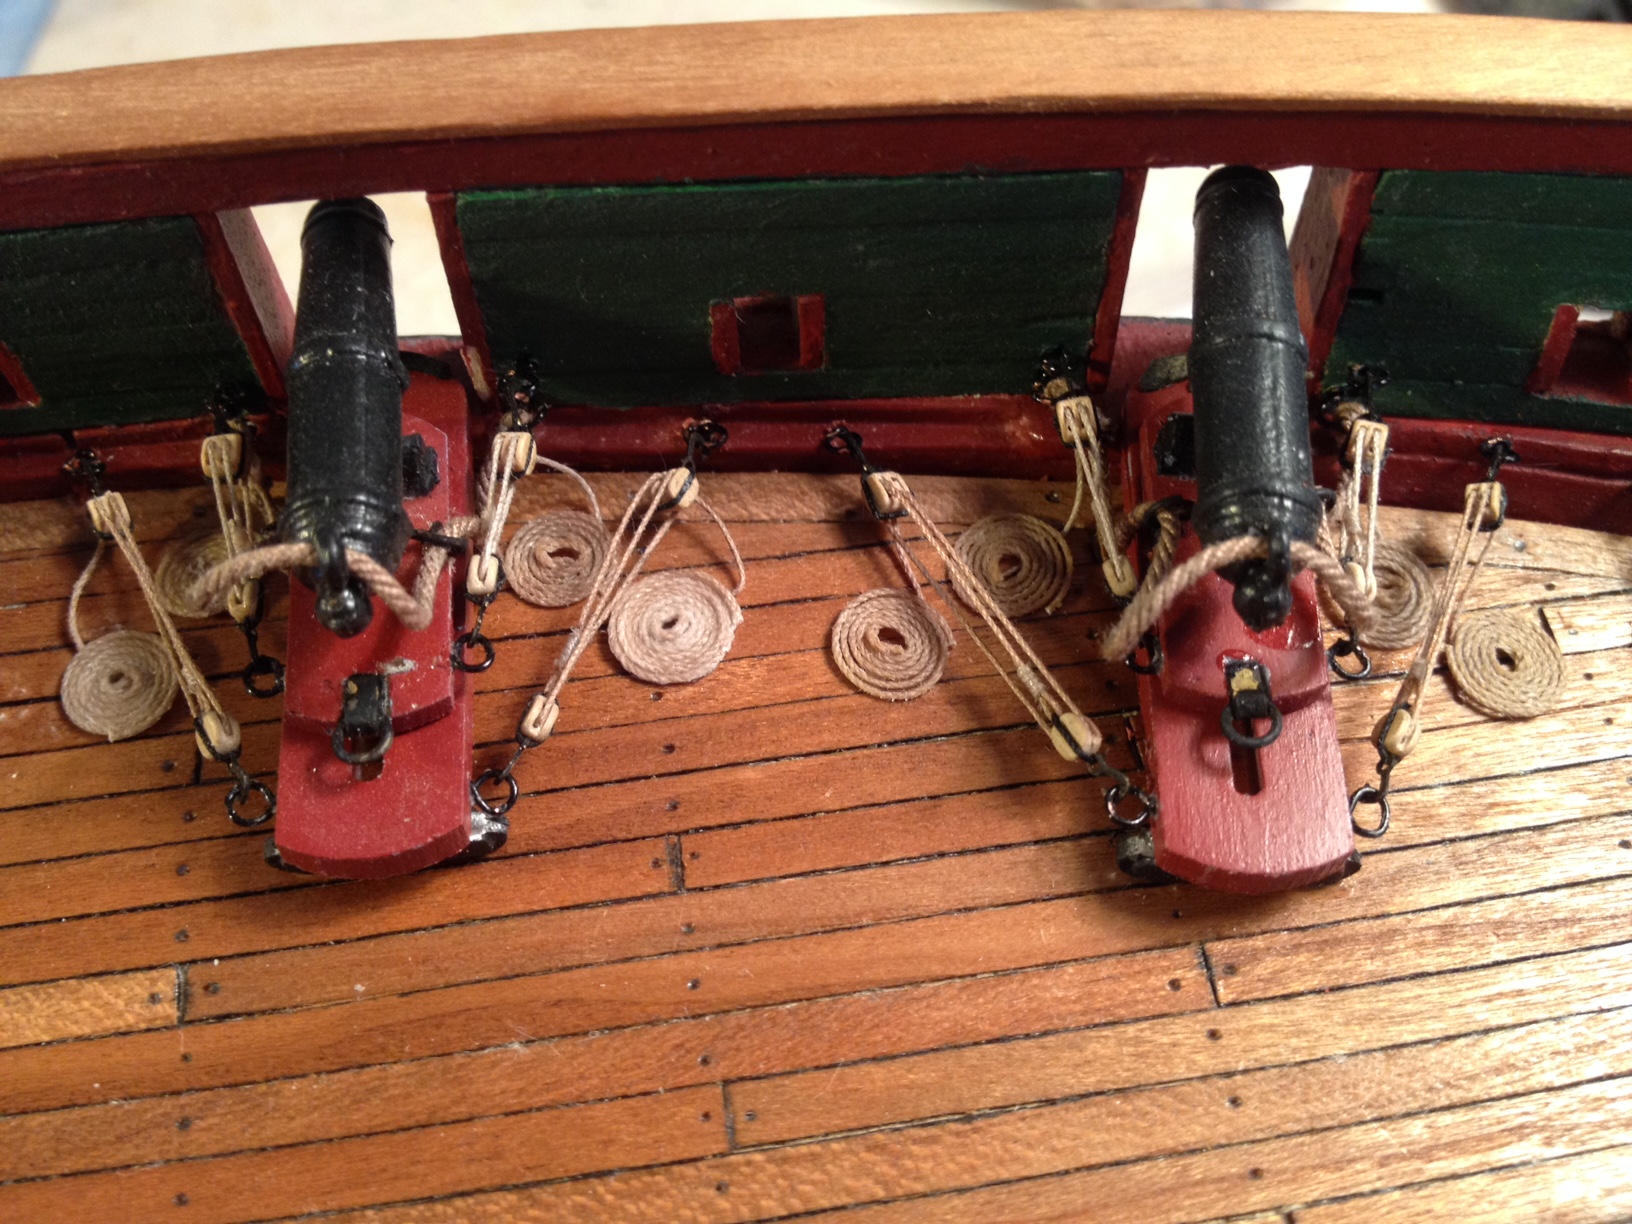
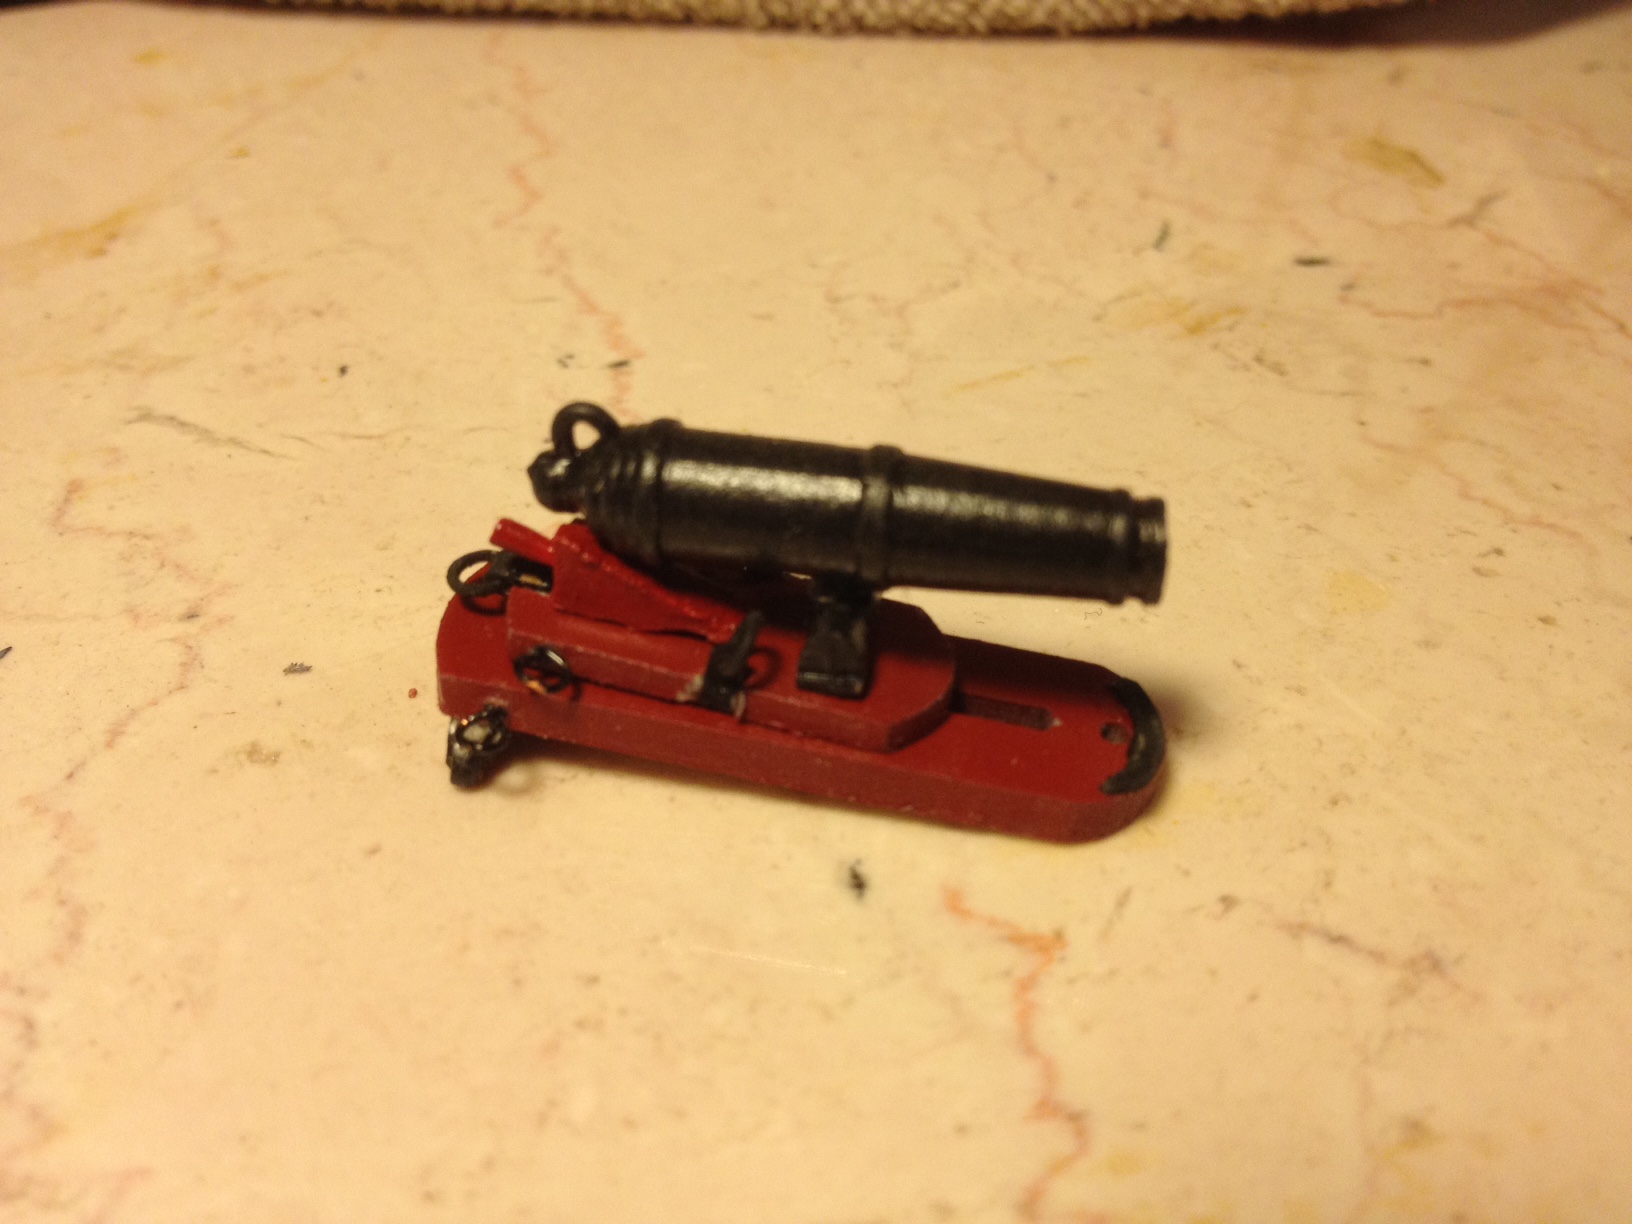
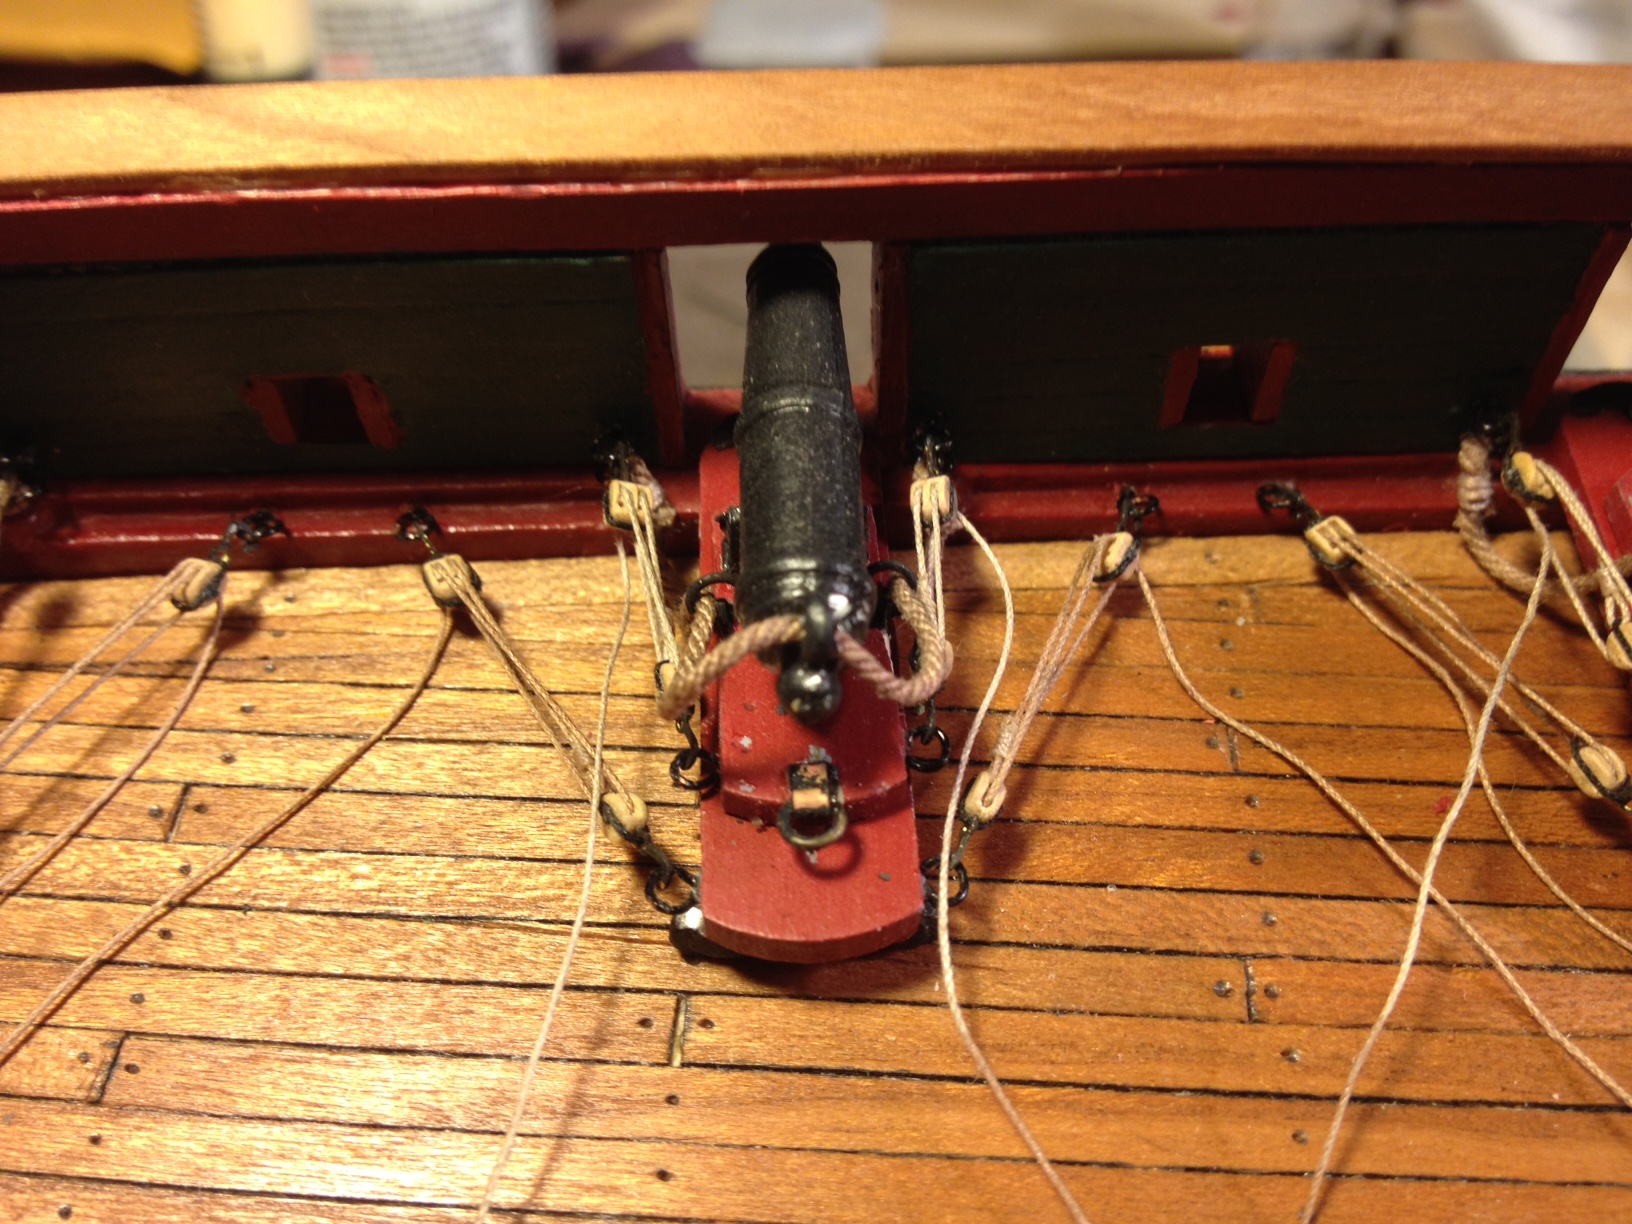
Long Gun Rigging Before heading out for the weekend, I had the chance to construct and rig the two 9 pound long guns. Took all night. My ship is now fully armed. Beware Commander Barclay!


- 648 replies
-
- 5
-
-
- niagara
- model shipways
- (and 1 more)
-
It may only be a lake, but I can tell you from experience having been raised near Lake Erie, that it can be a beast in bad weather. The lake is relatively shallow and when the wind picks up, you can expect high waves. There have been epic storms on the lake. Securing equipment to the deck was definitely a concern of Commodores Chauncey and Perry and their officers in the US Great Lakes fleet.
- 648 replies
-
- 3
-
-
- niagara
- model shipways
- (and 1 more)
-
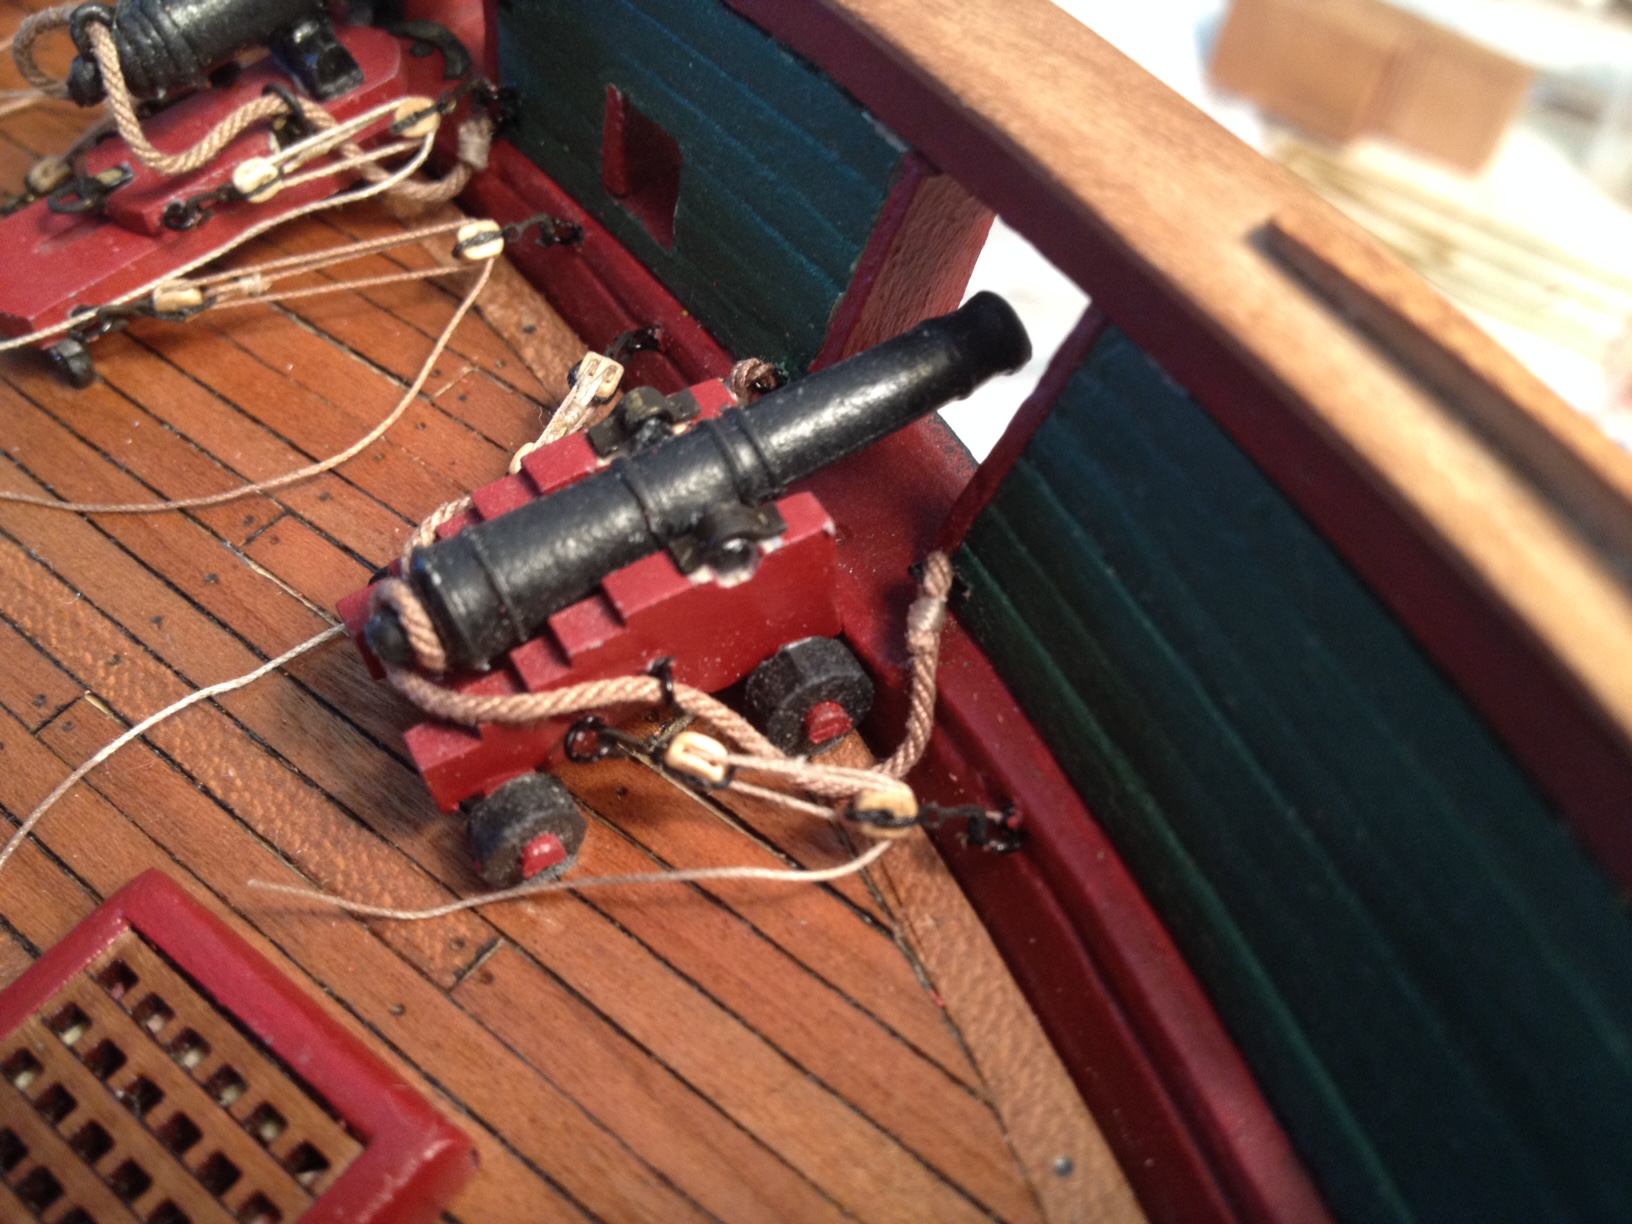
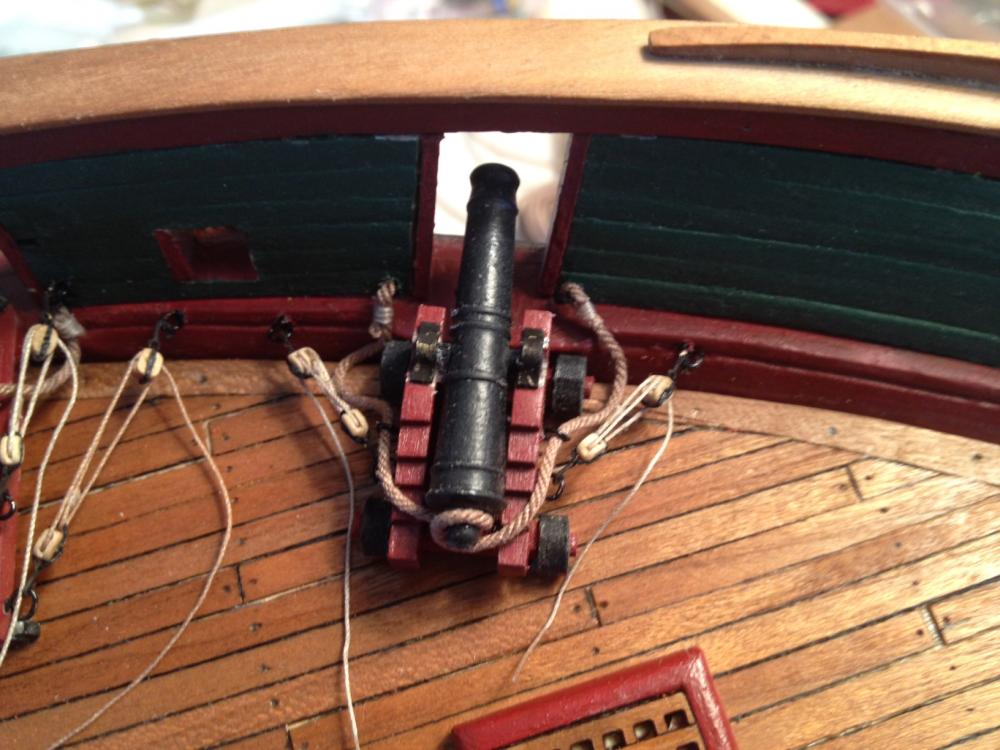
Lesson learned - don't create the quoins until you have mounted the guns.
- 648 replies
-
- 3
-
-
- niagara
- model shipways
- (and 1 more)
-
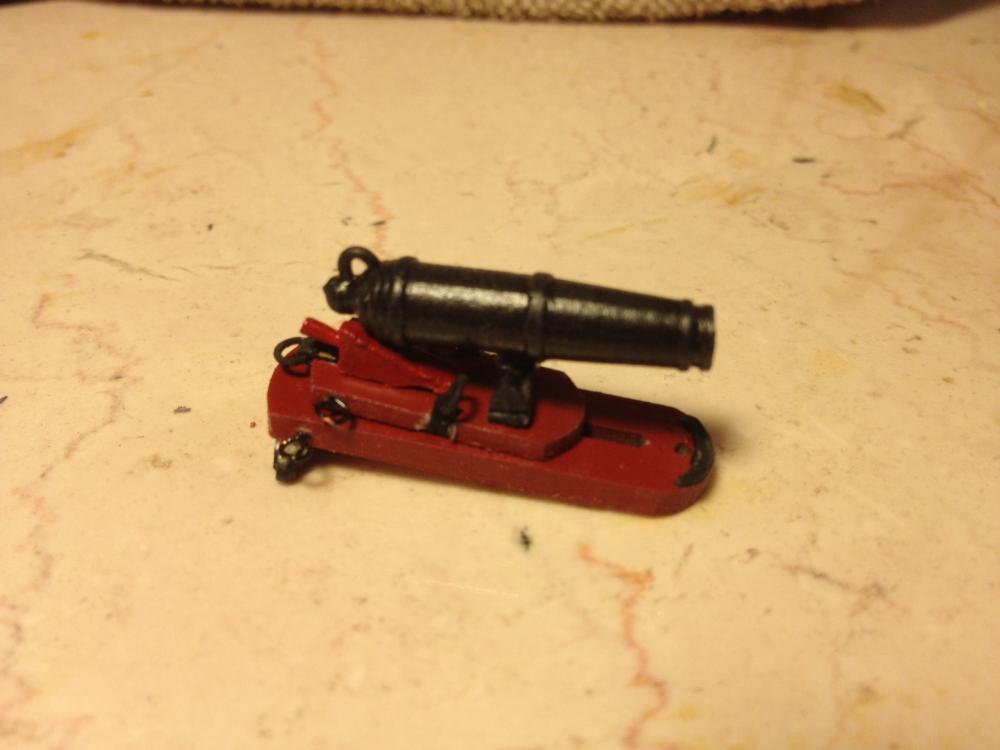
Mike, I just went back through my log, and as I thought, I posted a picture of a completed carronade with a quoin in post #17. And I think I figured out my problem. Sitting on a flat surface caused the trucks to raise the back of the gun. With the barrel level, that causes the quoin to fit snuggly. However, that is not how the guns sit on the ship. The plank sheer where the front mounts raises the front of the carriage to offset the height of the trucks. My carriages on the ship are about level. Heck, my deck is actually 1/16 higher already. If I had simply laid planks on top of the bulkheads, this would actually be worse. Is the planksheer to high? There is no way. It too sits on top of the waterway and on top of the bulkheads. It can't be anywhere else. Because the back of my carriages are no longer raised, the quoins simply don't fit. I never saw this coming. More redo work.
- 648 replies
-
- 4
-
-
- niagara
- model shipways
- (and 1 more)
-
That thing looks awesome. In fact if I didn't know how actually tiny that was, I would think that was a full size tackle. I can't wait to see how that looks on the ship.
- 843 replies
-
- 3
-
-
- niagara
- model shipways
- (and 2 more)
-
Mike, I will be interested in seeing how the frapping works out. Having handled these tackles, I suspect that it is going to be pretty difficult. I don't think doing the frapping off the ship would work, since you would have to loosen the tackle some to drop the hooks in the eyebolts and then tighten them. Doing that while they are in place might work ok with the train tackles, since there is some room to maneuver, but the gun tackles, being tucked in tight to the gun, would be a challenge. Of course, it may be easier than making coils.
- 843 replies
-
- 2
-
-
- niagara
- model shipways
- (and 2 more)
-
Oh, and by the way, no matter how hard I tried, I did damage the guns, sleds, bulwarks and deck. I will have a lot of touch up painting to do, especially now that I have seen my photos. I am amazed what the photos reveal. The worst thing was that I knocked two barrels off of the base while torqueing the breech line eyebolts into the hull. I still have to fix the stern most port gun. A couple of pointers. Make sure that the holes in the bulwarks that are accepting to eyebolts are large enough - even oversized. I opened my holes. The eye bolts have to slip in easily. It is to hard to force them, and when you do, be prepared to do some damage when your tweezers slip off. Even though the holes were larger, the medium CA that I used for attaching worked fine. None of the eyebolts were pulled out when I was tugging on the tackle ropes.
- 648 replies
-
- 4
-
-
- niagara
- model shipways
- (and 1 more)
-
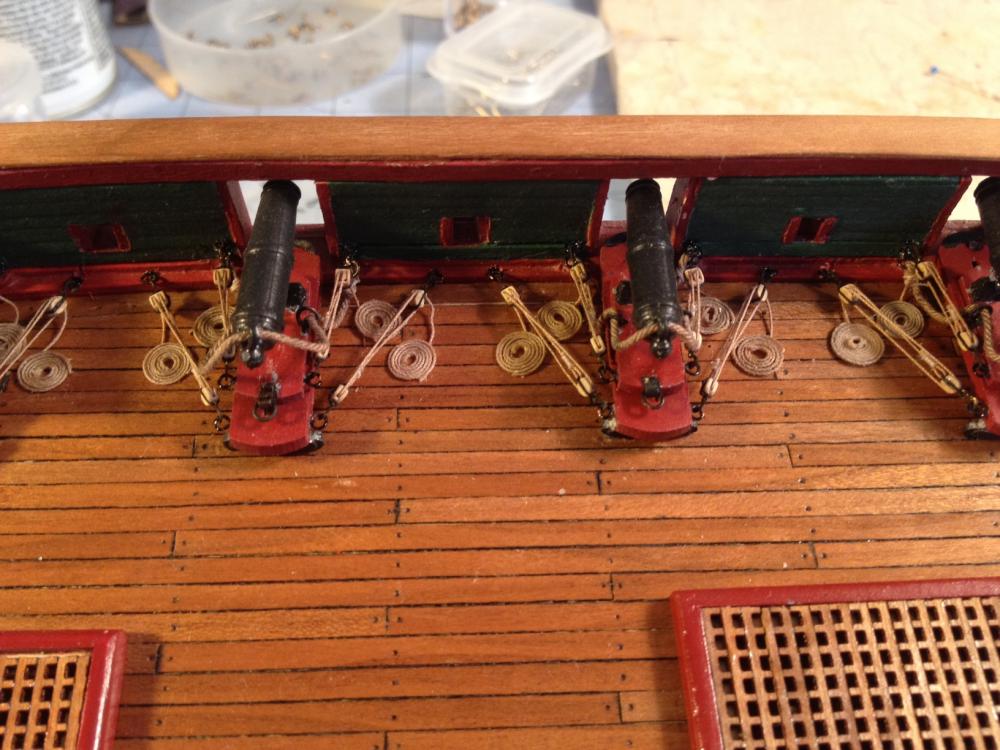
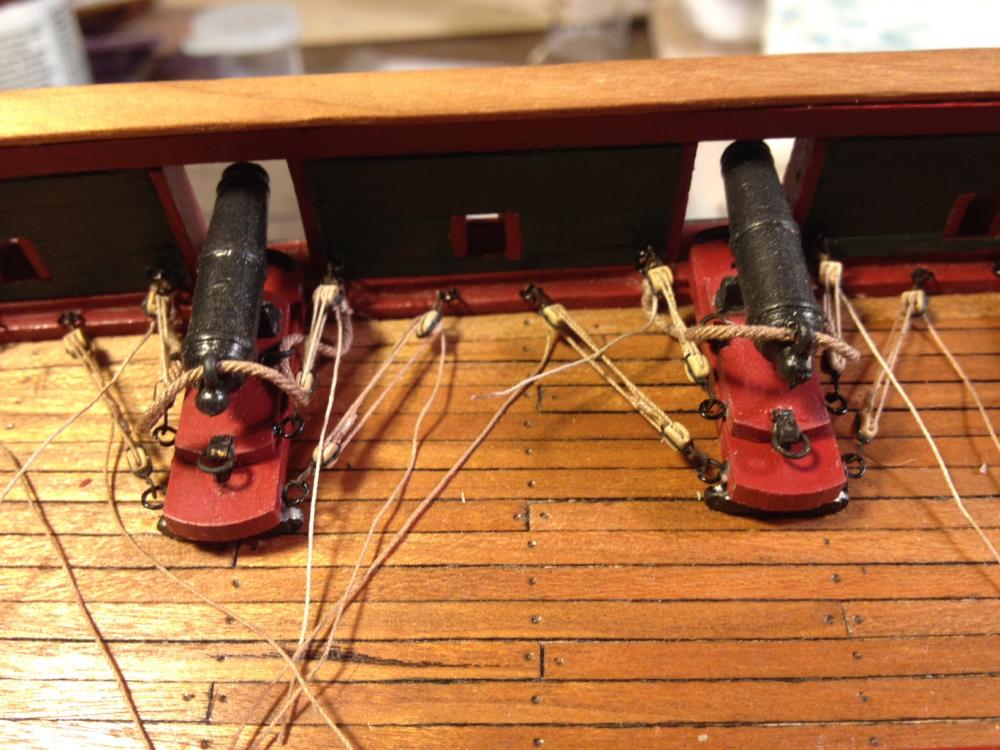
Thanks for the input and encouragment Mike, Joel and Brian. Mike, I will be making faux coils - only need about 100. I have not exactly decided how to do it. I have seen some great techniques on this forum. I will be experimenting with that later this week. I have absolutely ditched the idea of coiling the rope tails on the ship. No room. I have the barrels of the guns nearly flush with the outside of the bulwarks. I have to assume the guns would be out further when fired, but I chose this position since it gave me the best look on the tackles. If I put them out further, the gun tackles would be so short, that the blocks would essentially touch each other. Note that the two forward gun sleds are pushed farther out due to the curvature of the hull. The new problem I discovered is that all of my quoins that I produced are not high enough. I built them to size based on the plans. I am wondering if perhaps my deck sits too low. A higher deck would elevate the back of the carriages and force the guns to point a bit downward and the quoins would fit. As I look at it now, there are going to have to be much larger. I haven't decided whether to add a piece to the existing ones, or create new ones. Mike, CA, On my breaching line, I actually measured it to be correct. Before I decided on the length, I pulled a sled all the way back on the carriage, and then stretched the line through the eyes to the bulwarks. From memory, I think that was 3 inches. There is a lot of slack on the breeching lines. Figuring that this was a heavy rope, I have tried to press it down to drag on the deck as best I can. I used Syren rope. Great product. At this size, it won't hang on its own, but if you place it to where you want, it will stay there.
- 648 replies
-
- 3
-
-
- niagara
- model shipways
- (and 1 more)
-
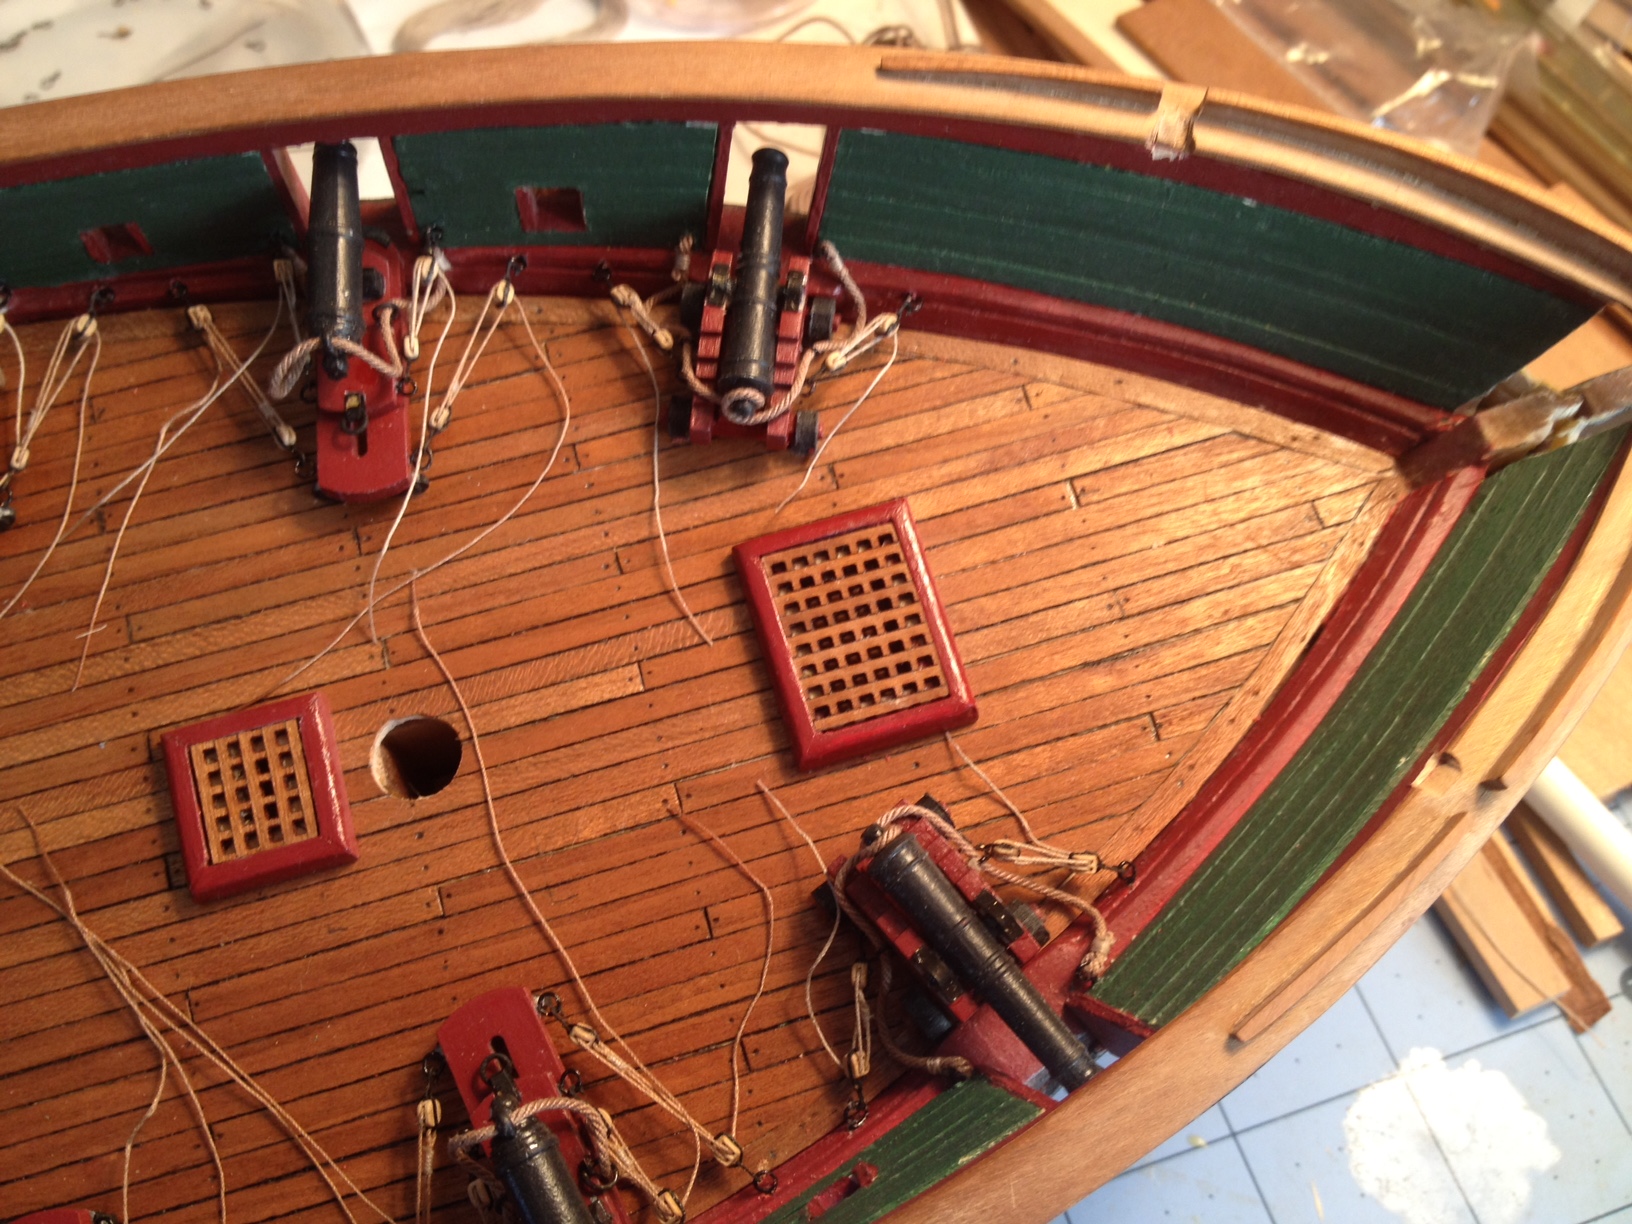
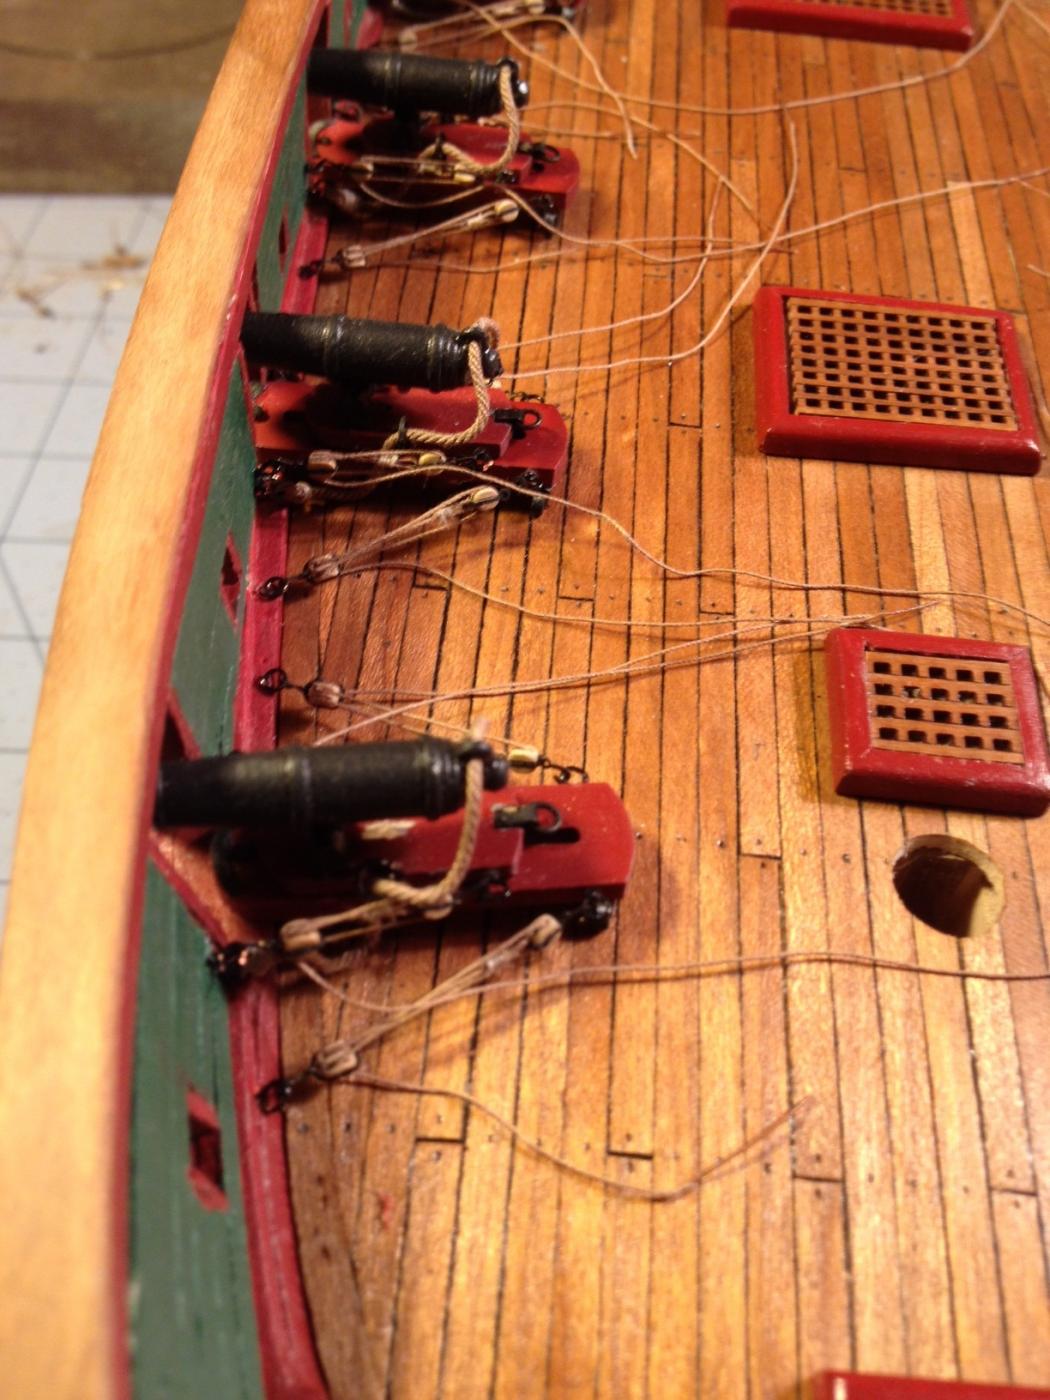
I put my nose to the grindstone and knocked out the rigging of my 18 carronades. What a challenge. The breech line was by far the most intricate. I had to seize a eye bolt on one end, then thread the line through the carriage and carronade and then seize the other end. I set up two vices to string the very short line, and did my best to wrap the seizing line. I actually got the hang of it after about 5 efforts. Then I had to install the eyebolts to the bulwark. I only broke of 2 guns off their bases. My thumbs are simply too big. I still have to do the inhaul tackles, but thought I would wait until I install all of the other deck structures to make sure so that I can properly place the deck eyebolts. I have the blocks stropped and waiting. I also have to rig the two long guns. My eyes are shot, so that will have to wait. Here are some photos.


- 648 replies
-
- 7
-
-
- niagara
- model shipways
- (and 1 more)
-
Just opened my package from Syren. Thanks again Chuck. Back to the Shipyard for some intricate stropping and seizing. Oh Joy!
- 648 replies
-
- 3
-
-
- niagara
- model shipways
- (and 1 more)
-
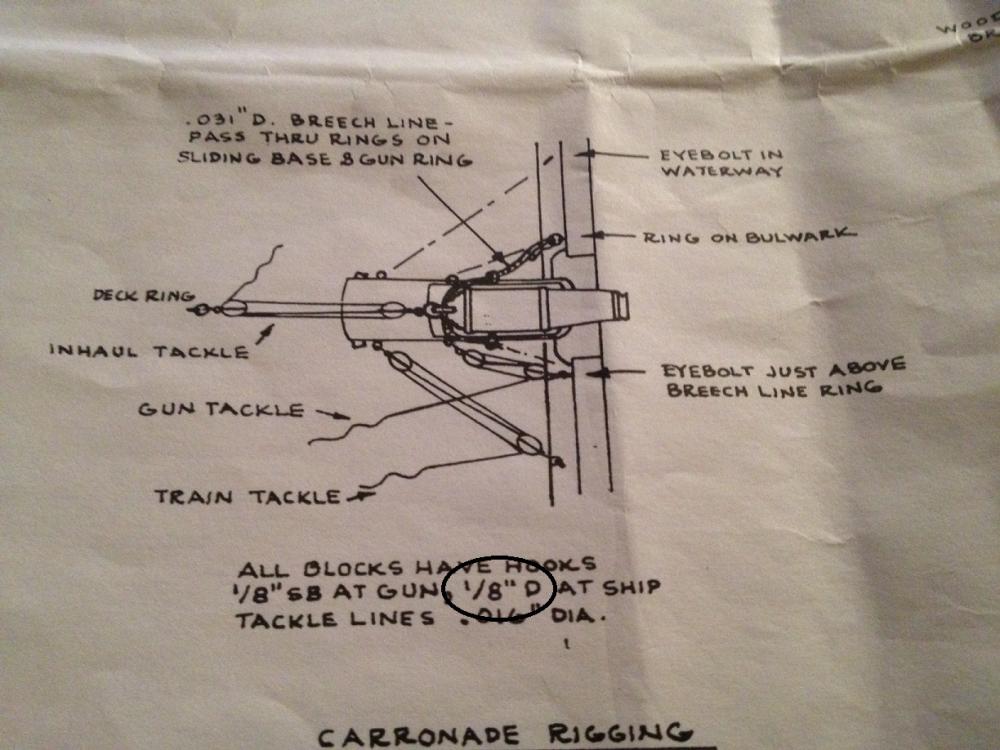
I have missed more than my share as well, some mentioned on this log, but most buried in the confines of my own embarrassed mind. I believe the 3mm blocks I purchased from Syren are also listed as 1/8. If you can handle the minuteness of these little buggers, I recommend them. I believe the finished product is to scale and looks really good. I am very pleased with the result. Functionally, I can see why there would be a double block instead of a single one at the ship wall. Moving these heavy carronades in and out, left and right, would be a real chore, and would warrant a heavier rigging. The miniature double blocks also look real neat. There is no additional work, and the doubles are actually easier to handle - at least I have not dropped as many as the little singles.
- 648 replies
-
- 2
-
-
- niagara
- model shipways
- (and 1 more)
-
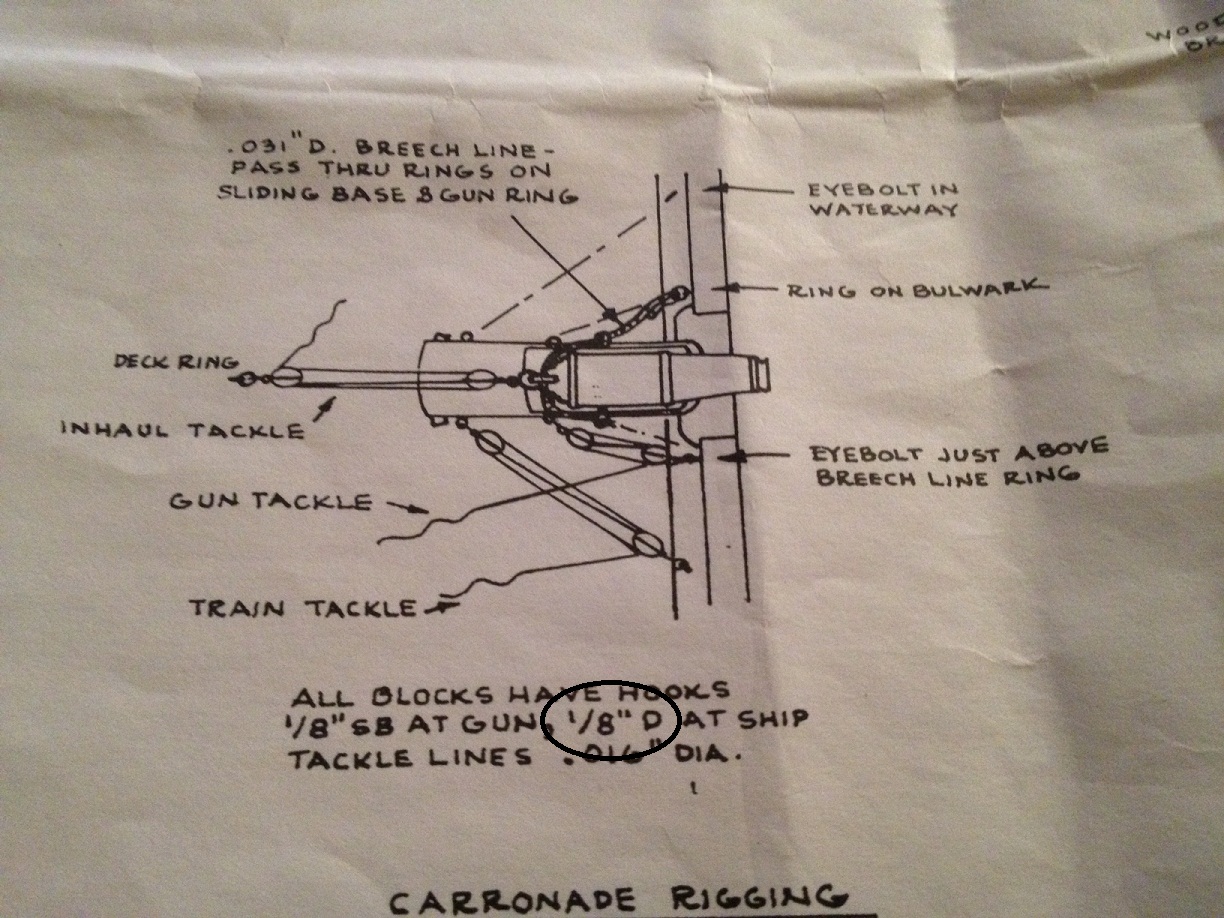
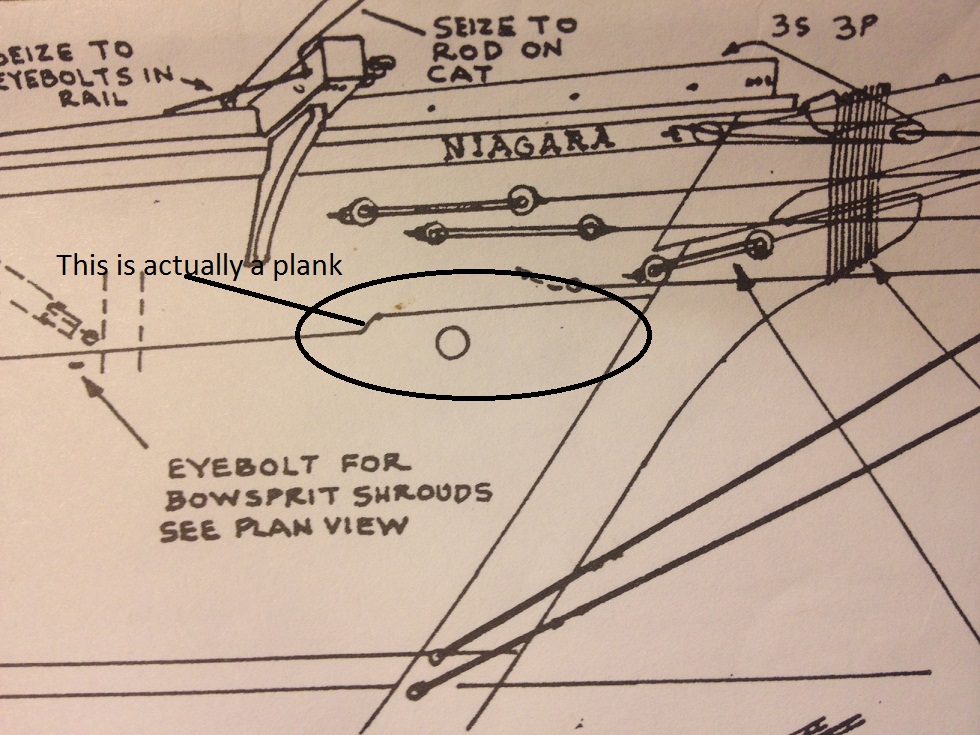
This is what guided my decision to use a double block at the bulwark.
- 648 replies
-
- 5
-
-
- niagara
- model shipways
- (and 1 more)
-
Mike, It looks like you are using single blocks on both ends. I am using single and doubles. I seize the looped rigging rope to my single blocks when I strop the hook (see the photos on post 99). The photos just above are from the double blocks that don't get the rigging rope. I start my rigging by attaching the single block to the gun, then run the rigging rope to the double block hooked to the bulwark, then back to the sheave hole in the single block, then back to the double, then loose to be coiled. I ran out of rigging rope after making 50 looped strands. I am waiting on a new supply from Syren. With this process, I am getting 25 blocks done in just over an hour. However, the most important advice I can give is that after I work my way through a set of 25 blocks, I take a break and strop my favorite cold one and rest my eyes and brain. I finally see some light at the end of the tunnel. One consolation - the end products are really neat looking. Syren makes an incredibly great product, and since I understand that they are each made by hand, who am I to complain how hard they are to strop.
- 648 replies
-
- 4
-
-
- niagara
- model shipways
- (and 1 more)
-
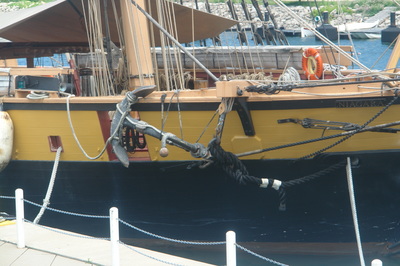
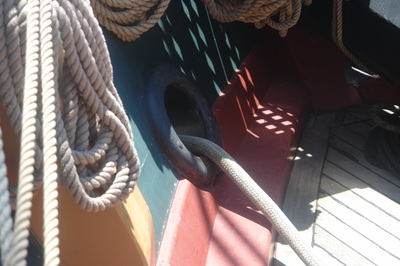
Mike, I guess it is not real clear, but here is the portion of the plan I was thinking of. This is put into perspective when you see pictures of the actual ship. I am sending a few courtesy of our friend John Texxn5. I posted a practicum of how I stropped my 180 blocks. It might help some. Happy building
- 843 replies
-
- 3
-
-
- niagara
- model shipways
- (and 2 more)
-
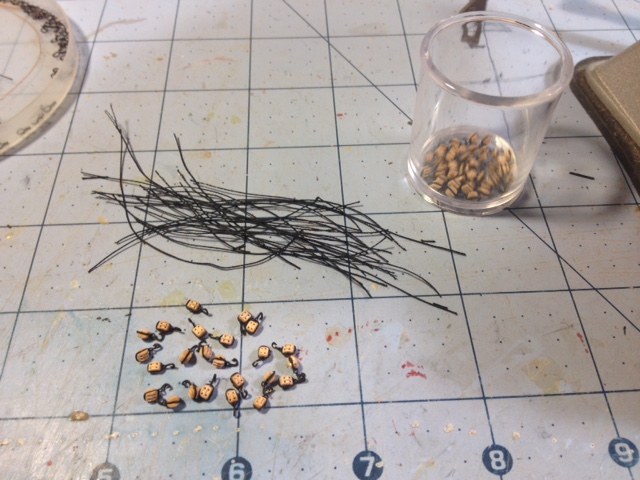
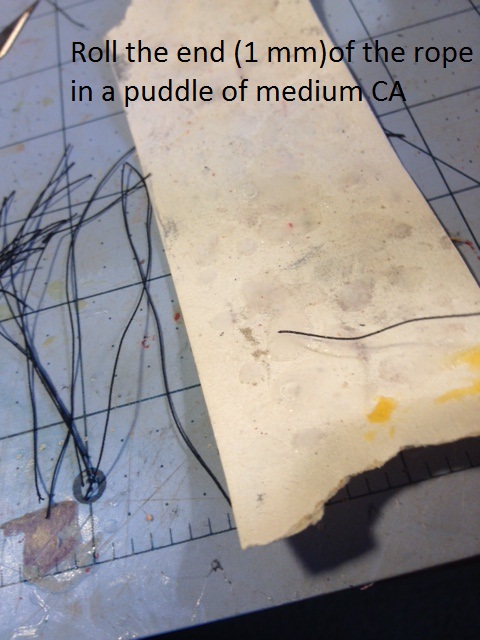
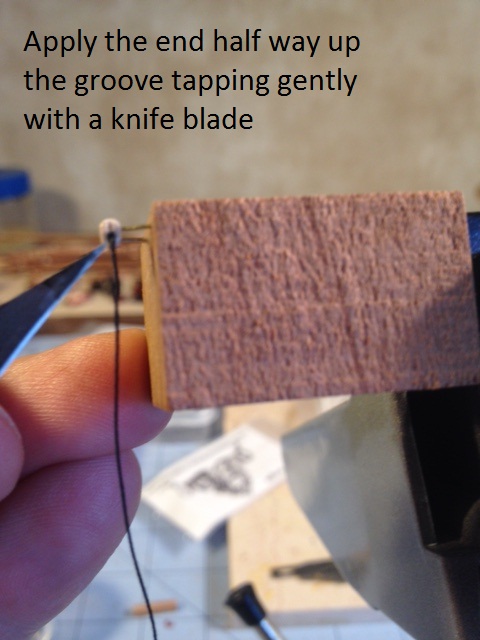
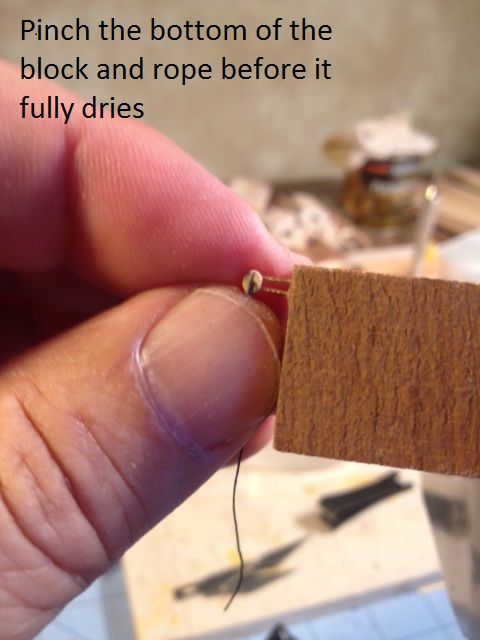
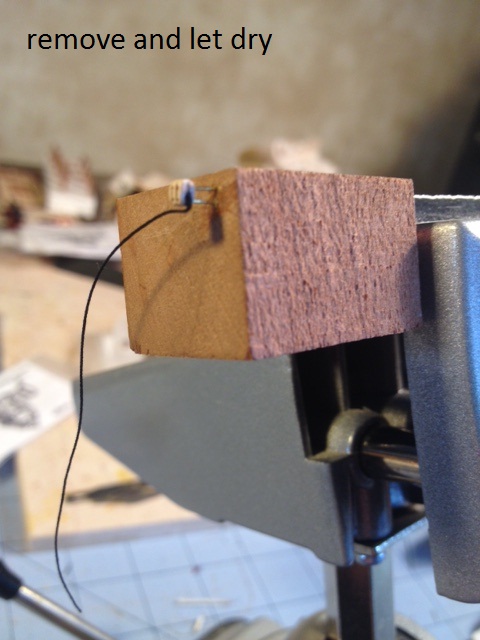
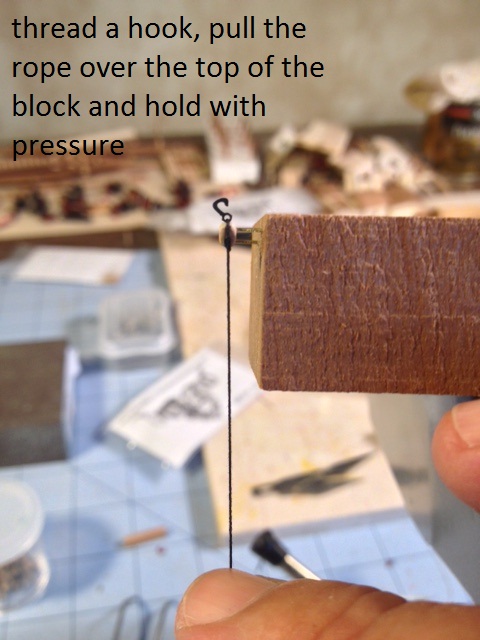
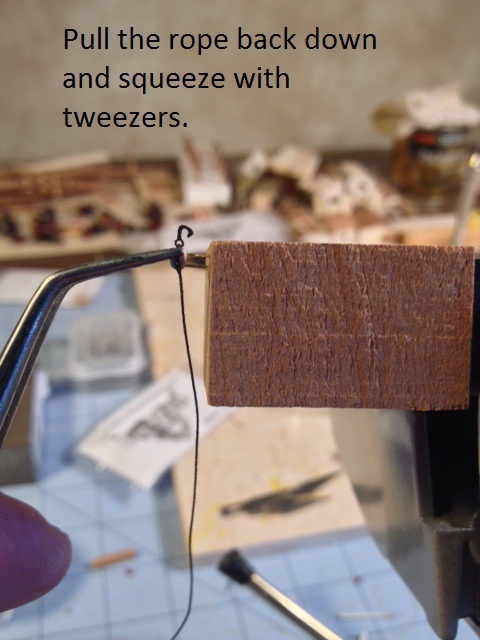
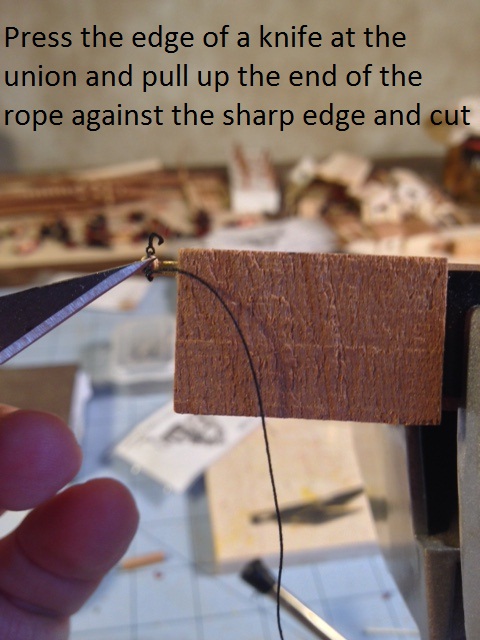
Stropping a 3mm block I thought I would post a practicum on how I stropped the 3mm blocks with a 3mm hook. Not because I am an experienced modeler - far from it - but because when you have to do something 180 times, you figure out some things. Everything I did, I learned from the masters on the site. I combined some things and used techniques that worked for me. A list first and some annotated photos. 1. I work on 25 at a time. I purchased my blocks from Syren, and the packs come in groups of 25. 2. Cut 25 strands of .008 black rope in about 3 inch lengths. Don't worry about how long they are because you will be reusing them. The longer the easier they will be to handle. 3. Place a drop of super thin CA on a plastic top and role one side of the rope (about 5mm) to freeze the end. You are going to use this end to thread through the hook. Do all 25 at the same time. It saves on your glue. 4. Place your block in a jig. I use the ends of two small pins embedded in a block of hardwood. 5. Place a drop of medium CA on your plastic and role the tip (about 1mm) of the other end of your rope in the glue, making sure you don't pick up too much. 6.Apply the glued end in the groove of the block placing it half up the bottom end of the block. Tap it lightly with an exacto blade enough to seat it. It will only take a second or two for the glue to hold the end in place then let go and let it hang. 7. After a few more seconds, press a metal flat surface against the glued end to push it more into the groove. I use the butt end of my exacto knife. 8. I then immediately pinch the rope against the bottom of the block. If you don't, some of the glue may straighten out the rope and make it harder to wrap it around the block later on when it fully dries. 9. I then remove the block from the jig to let dry. I do this 25 times. 10. I then reinsert the block with the rope tail hanging straight down back into the jig. 11. I pull the rope around the back and up the block holding it in my right hand and with the tweezers in my left, thread the frozen rope through a hook. 12. I then pull the rope tight positioning the hook to the top of the block with the tweezers. 13. I then lift up the rope slightly and apply a drop of medium CS with a push pin. 14. I pull the rope down into the groove while repositioning the hook in the proper position. I then squeeze the rope in the groove with the tweezers. 15. After at least 15 seconds of drying, I then firmly press the sharp edge of a new exacto knife blade (this has to be very sharp) against the union position on the block and pull the rope straight up against the knife and cut off the end. If the blade is sharp enough, just raising the rope against the blade will cut it. 16. keep the cut ends. You are going to reuse them for the next 25 and the next 25 and the... you get the picture. 16. Then do this another 179 more times. Here are some photos.


- 648 replies
-
- 6
-
-
- niagara
- model shipways
- (and 1 more)