HOLIDAY DONATION DRIVE - SUPPORT MSW - DO YOUR PART TO KEEP THIS GREAT FORUM GOING! (Only 20 donations so far - C'mon guys!)
×


6ohiocav
-
Posts
543 -
Joined
-
Last visited
Content Type
Profiles
Forums
Gallery
Events
Everything posted by 6ohiocav
-
 If you are talking about the vertical chamfers (half moon shaped), I used a micro half round file and did it by hand. The size of the file fit perfectly to the design. As long as you start it in the right place, and monitor the depth, you have a chance to get them even. The top chamfers were done by hand with a flat file. Neither was easy, and I have a pile of scrap pieces to prove it. Trying to keep the sizes consistent at such a small scale is a chore. Hope this helps. Have you painted your pins yet? Has the paint held to the brass well? Good point on the rope covering them up.
- 648 replies
-
- 3
-

-
- niagara
- model shipways
- (and 1 more)
-
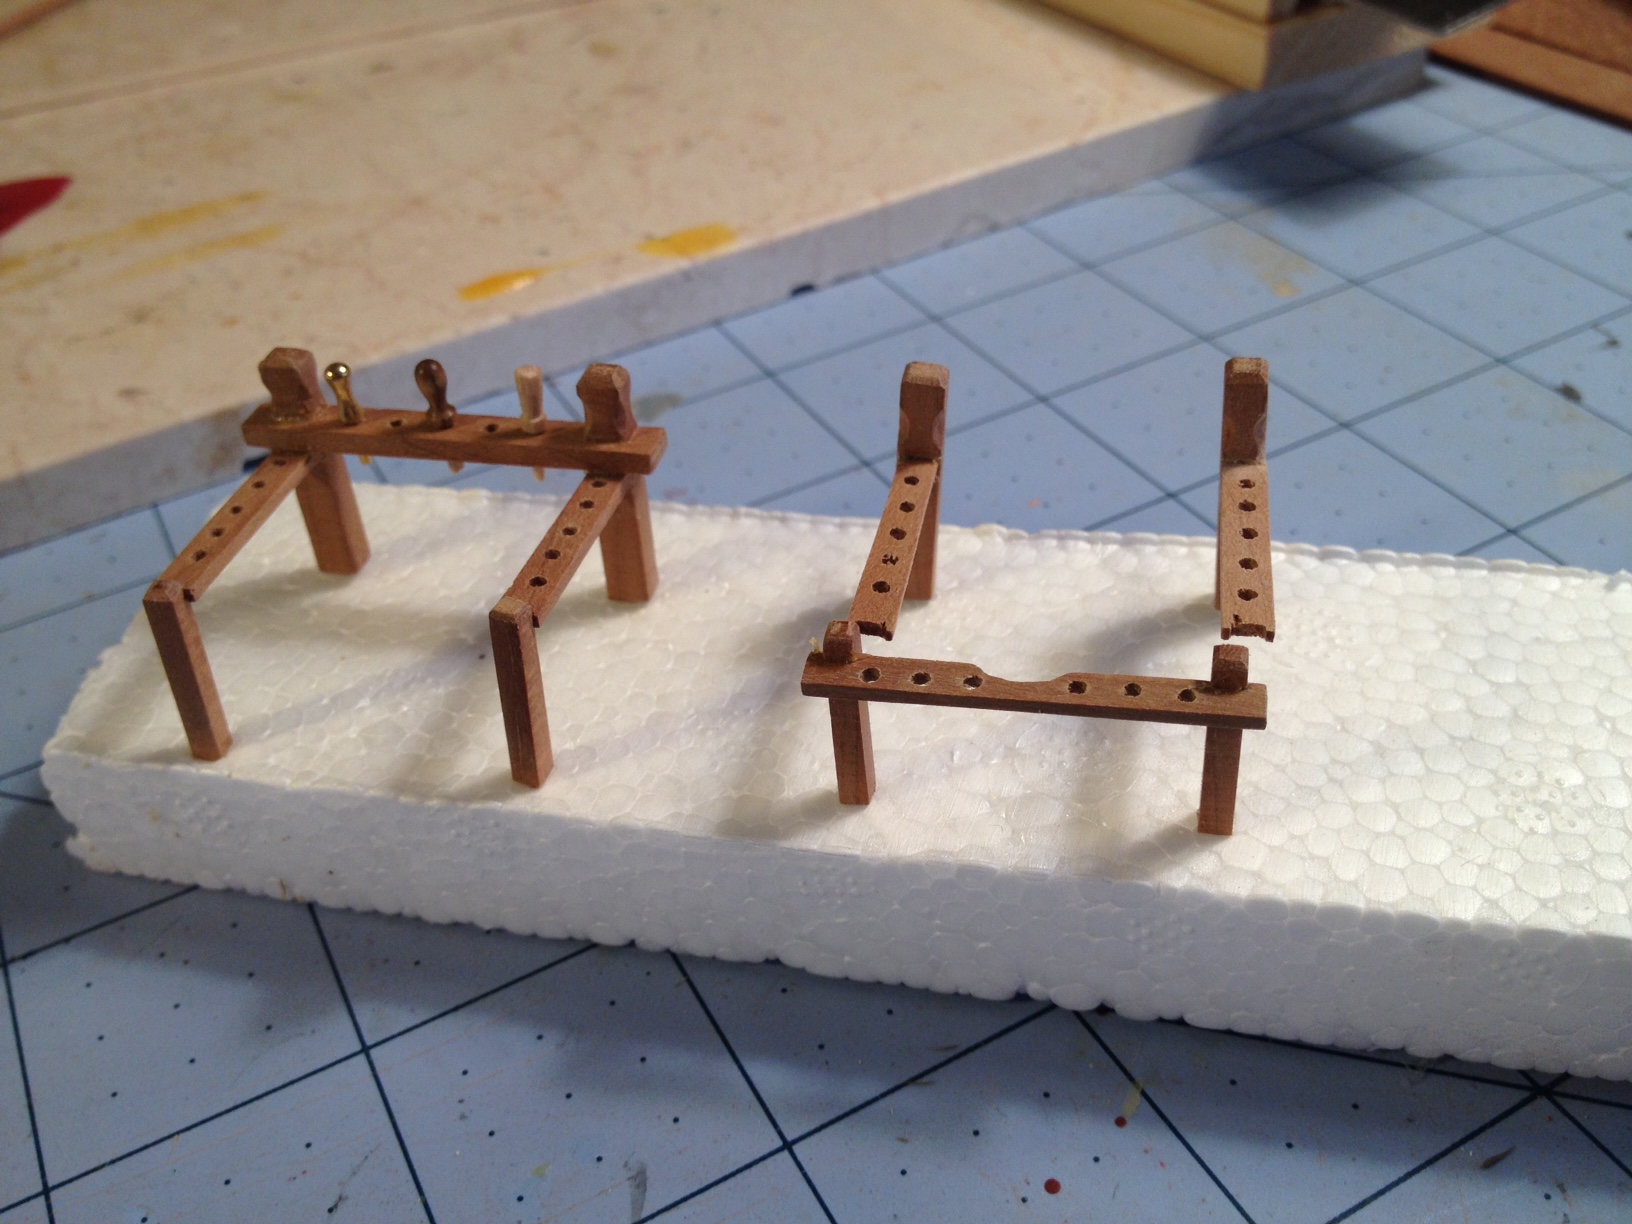
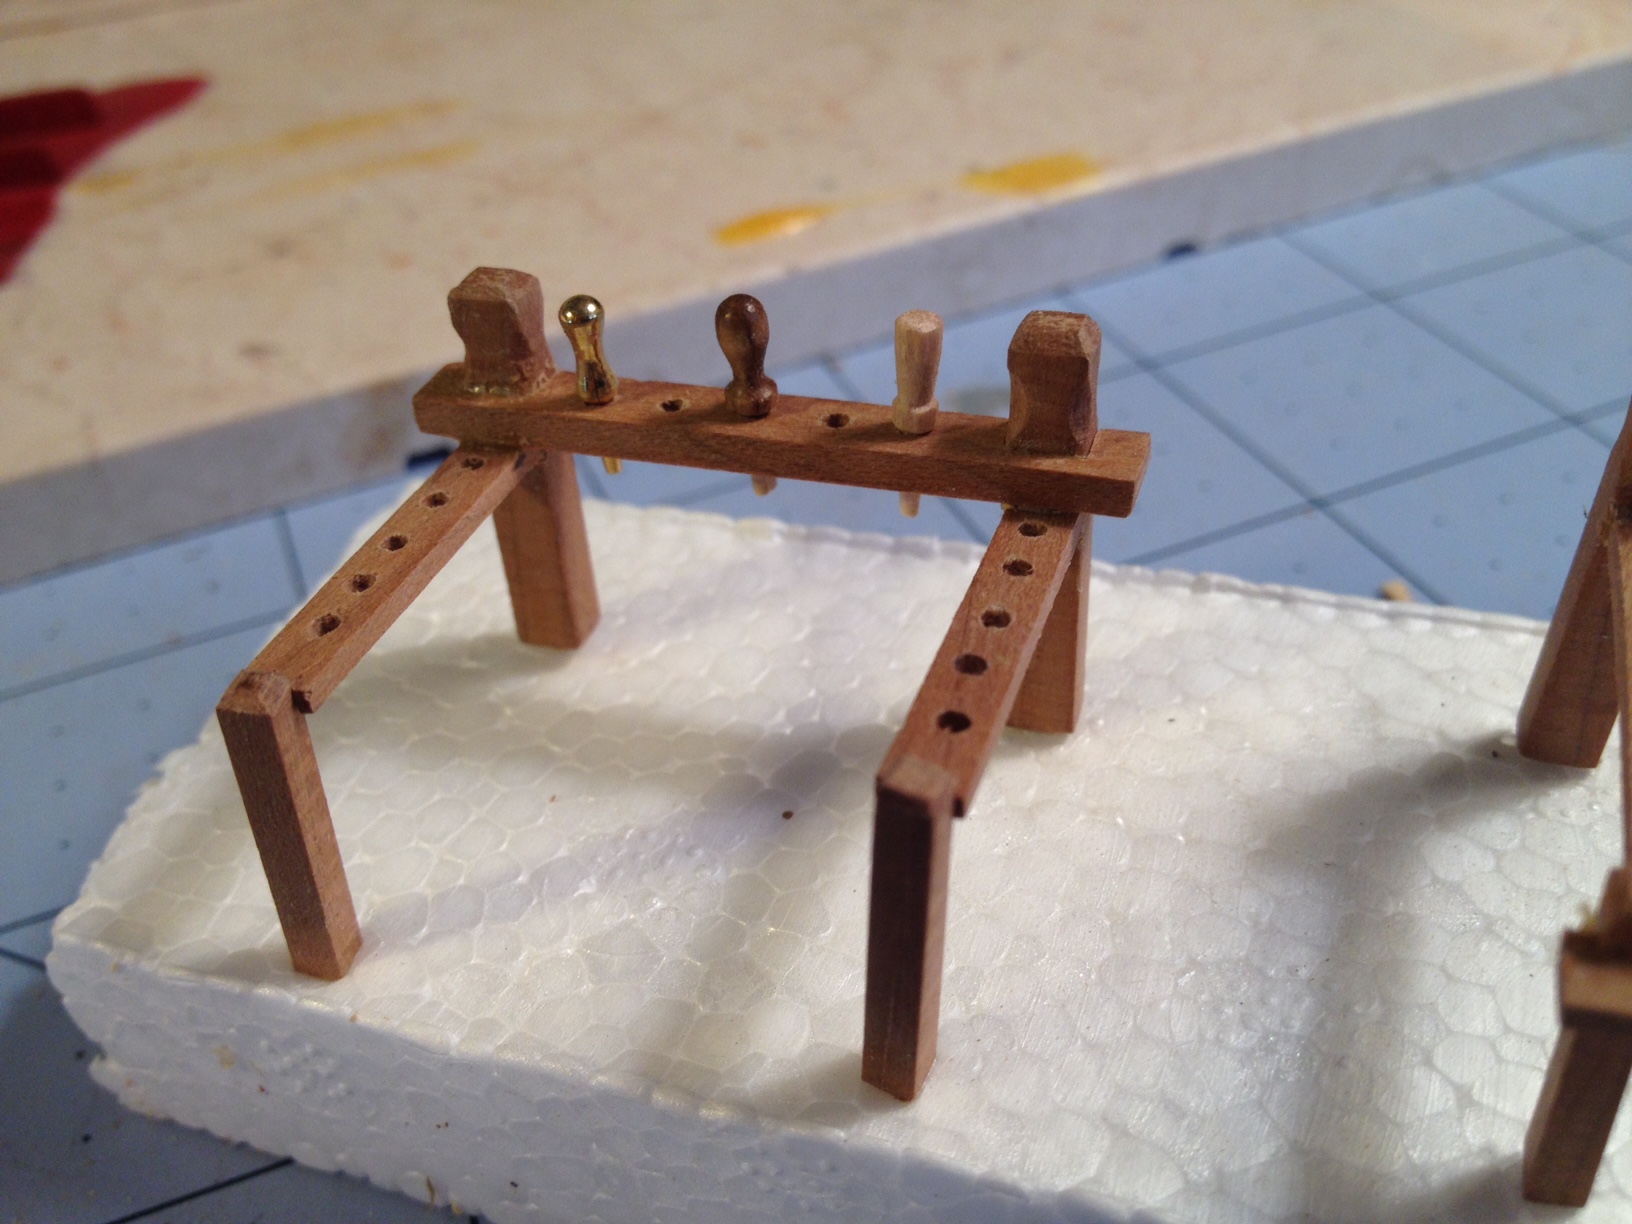
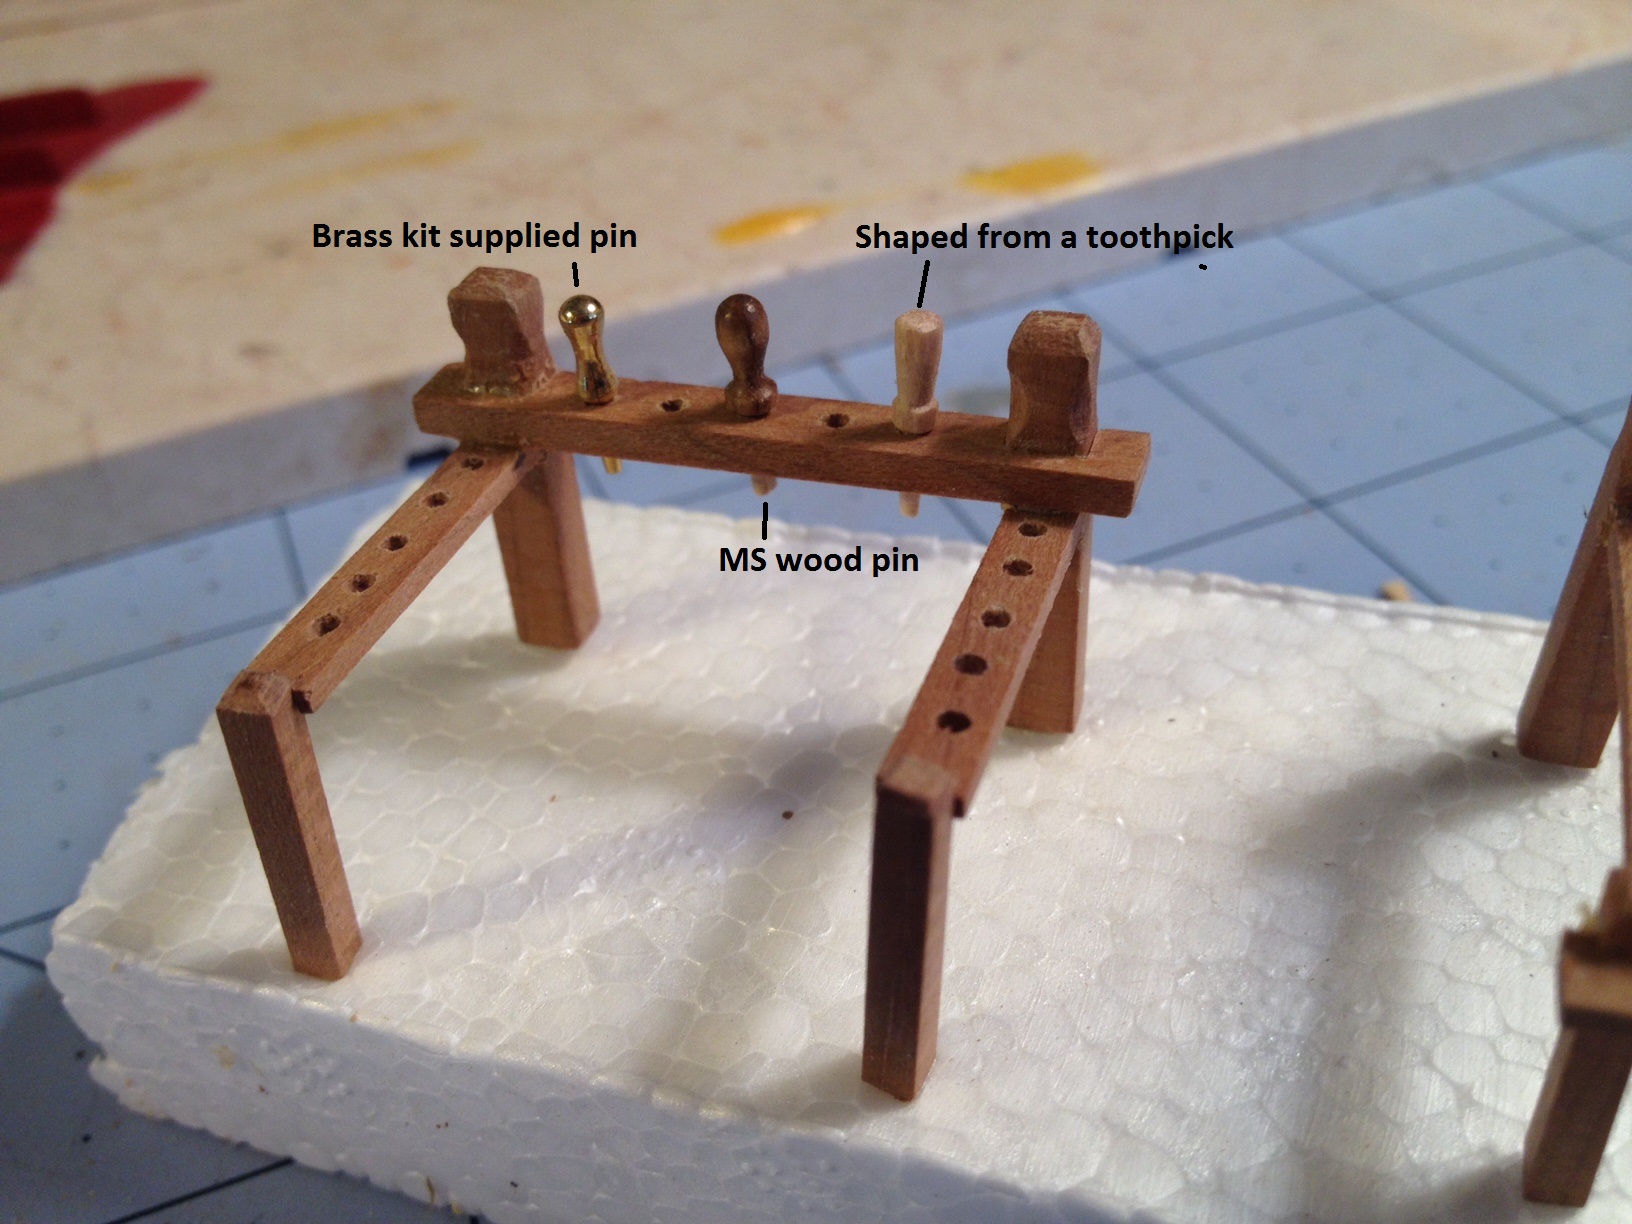
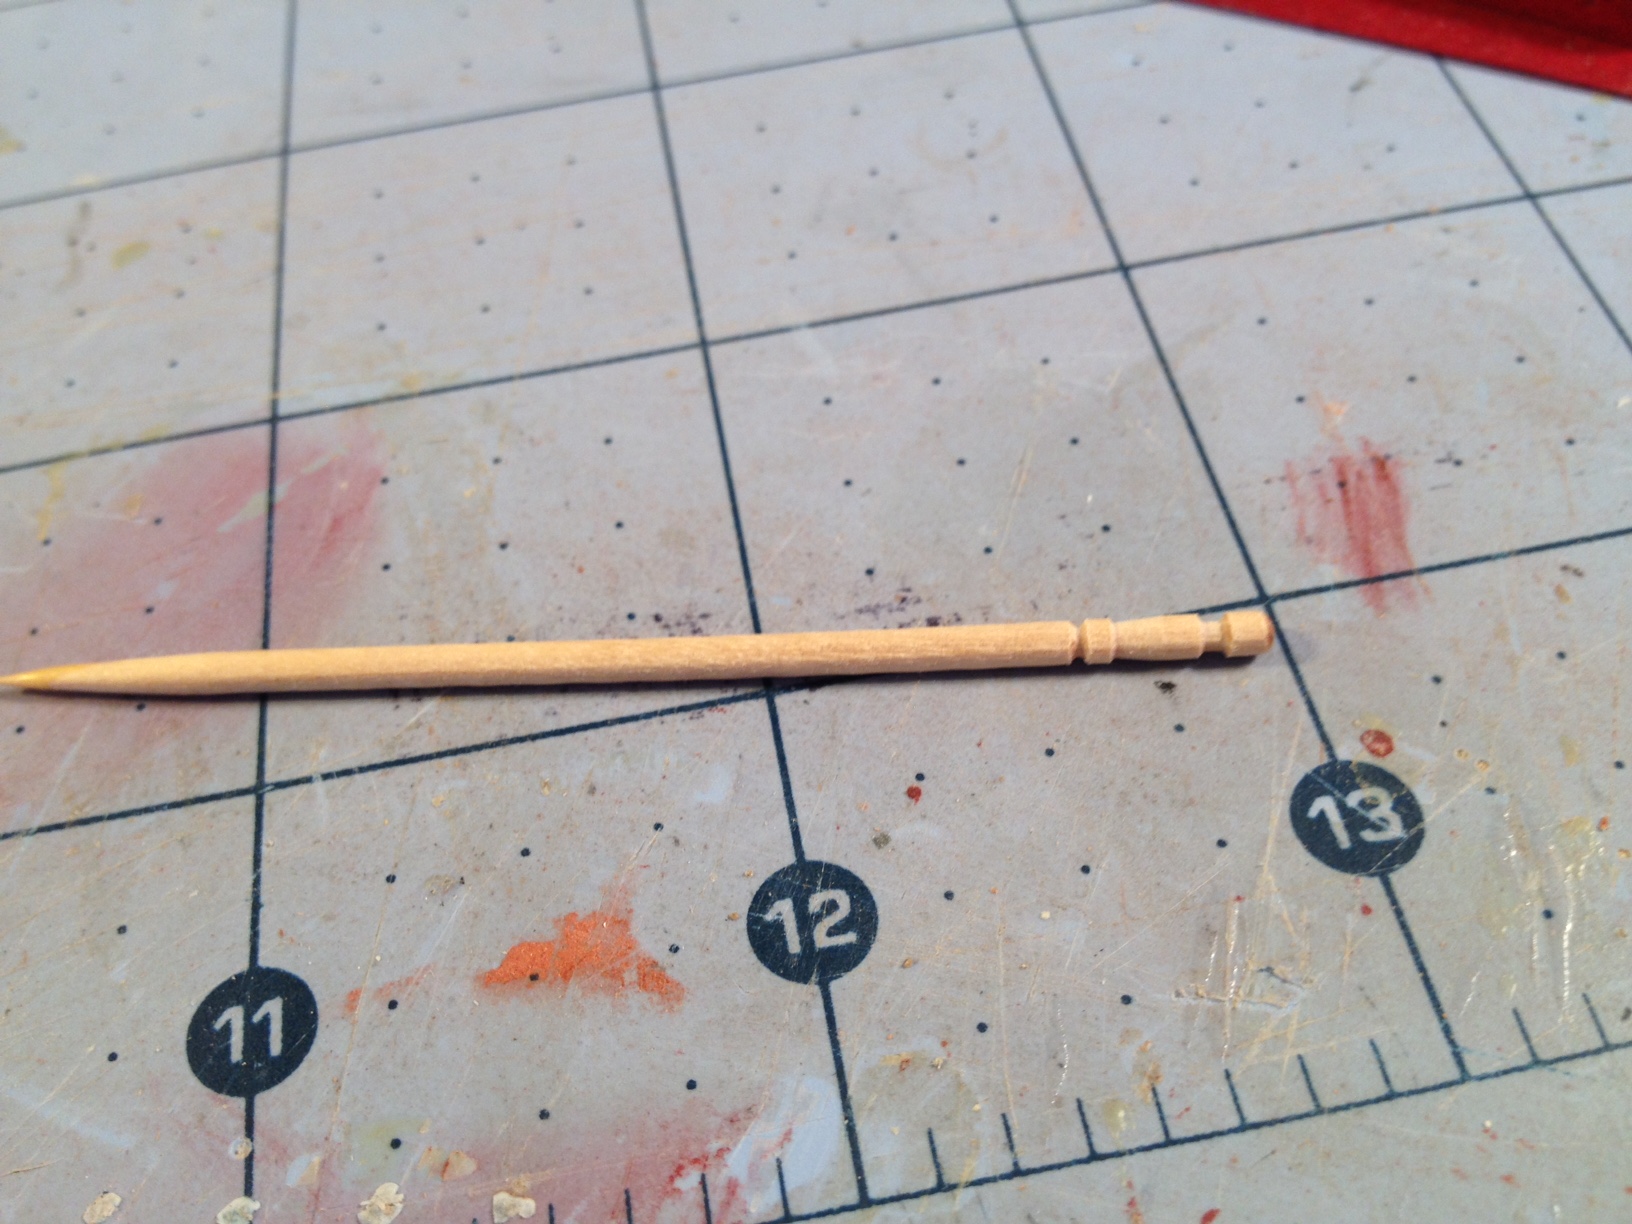
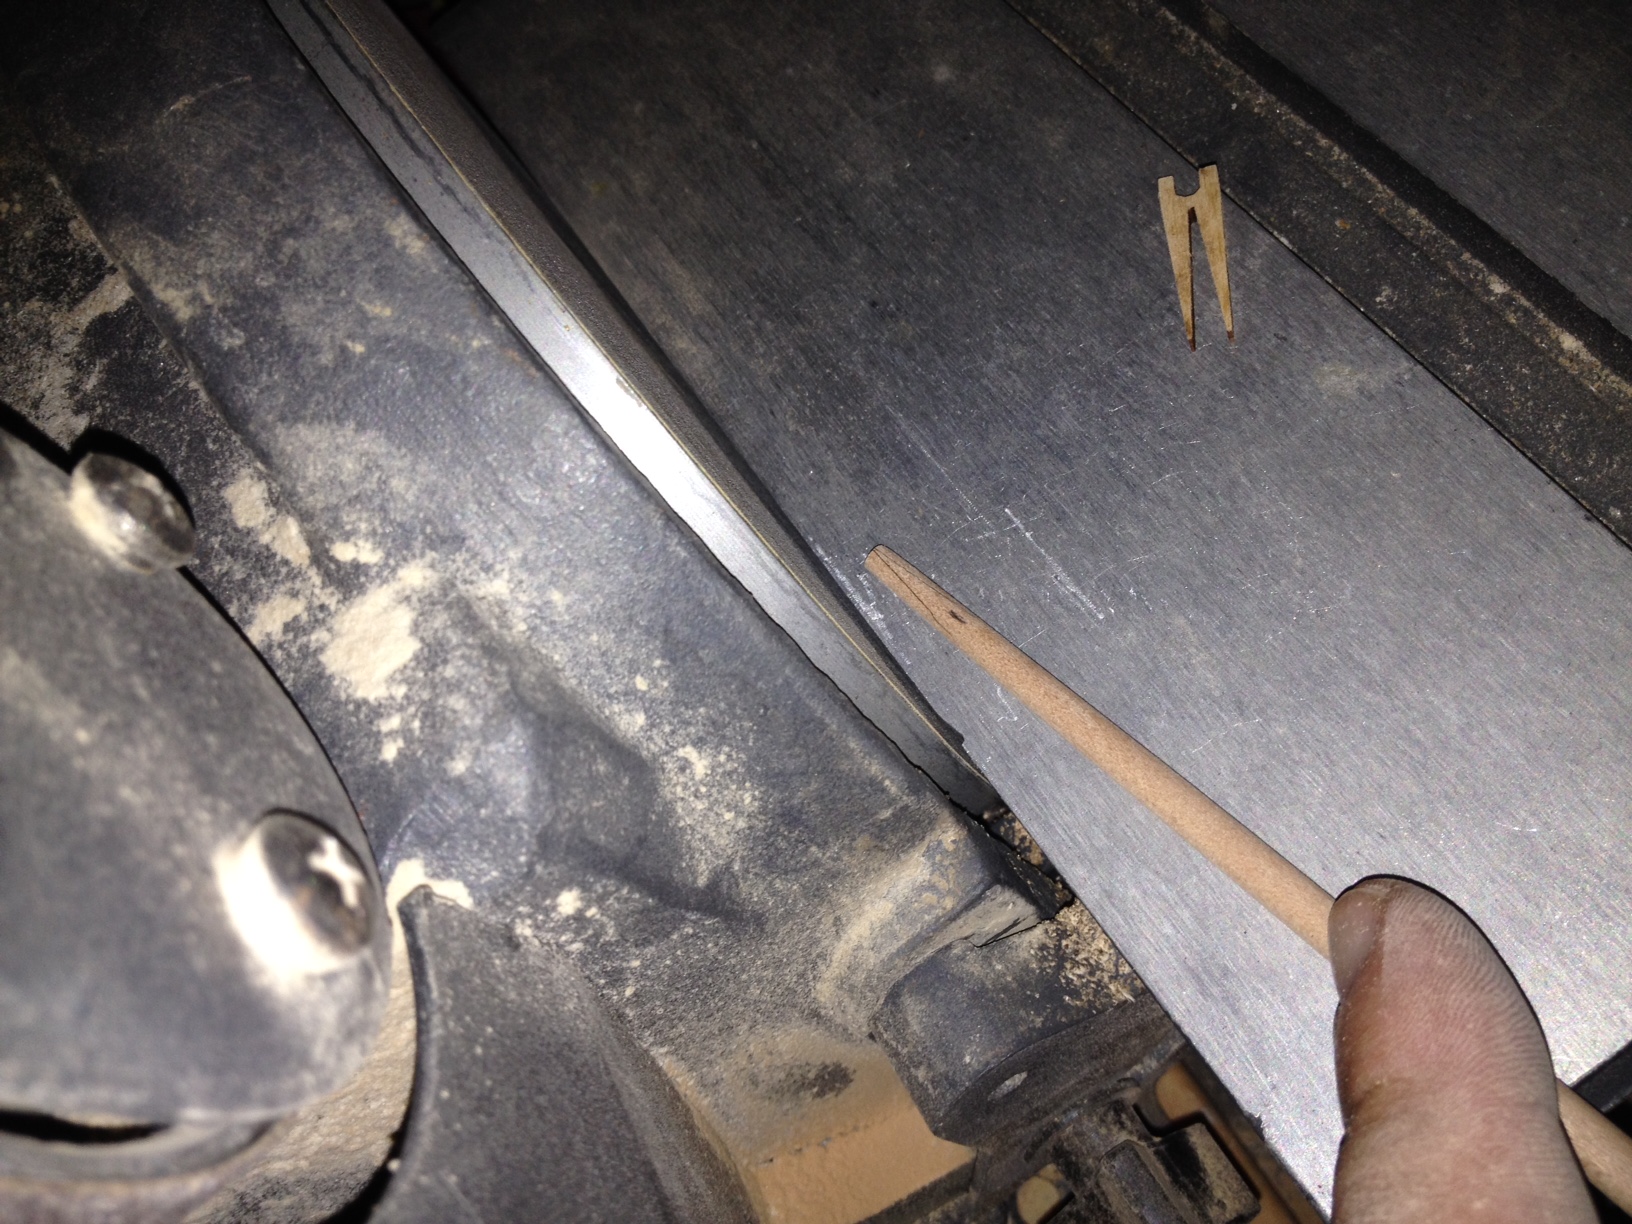
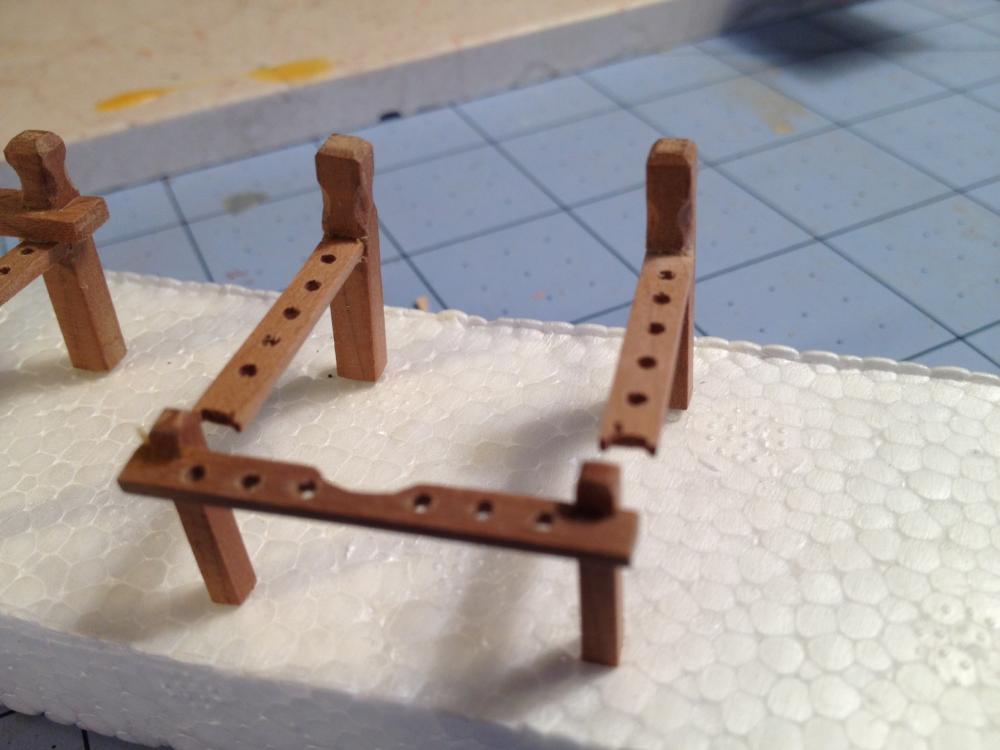
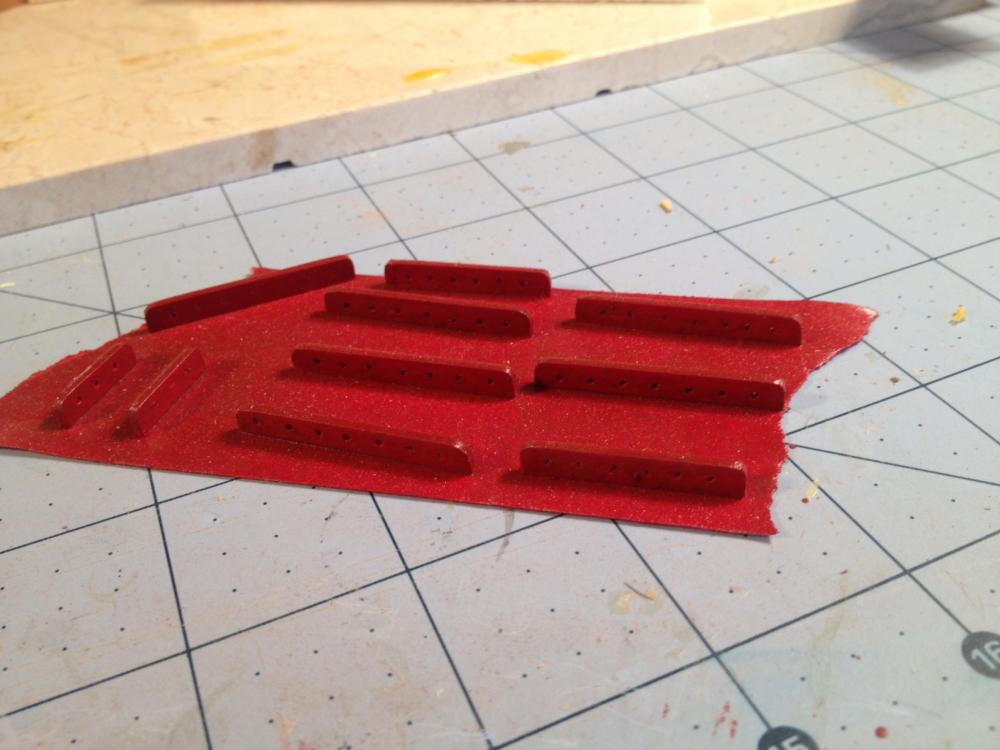
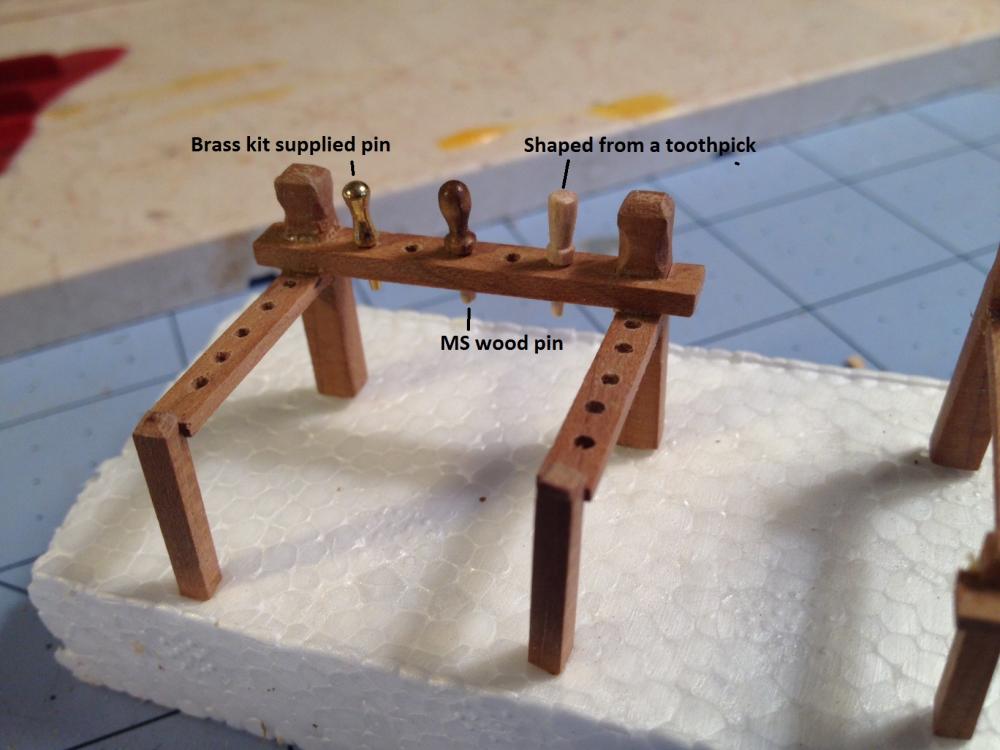
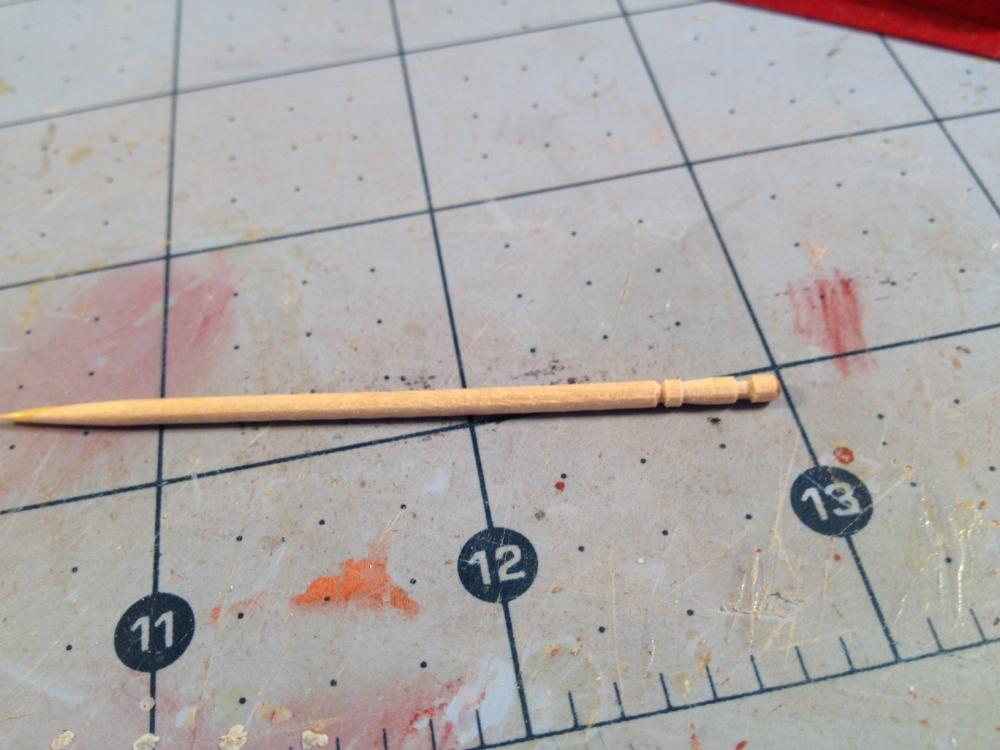
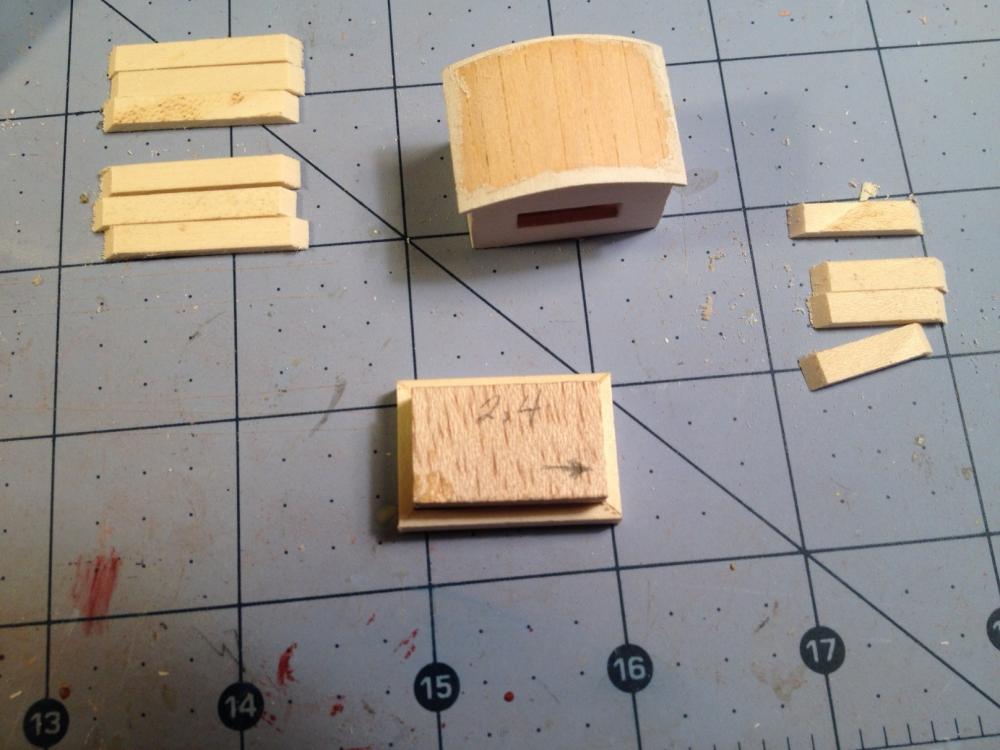
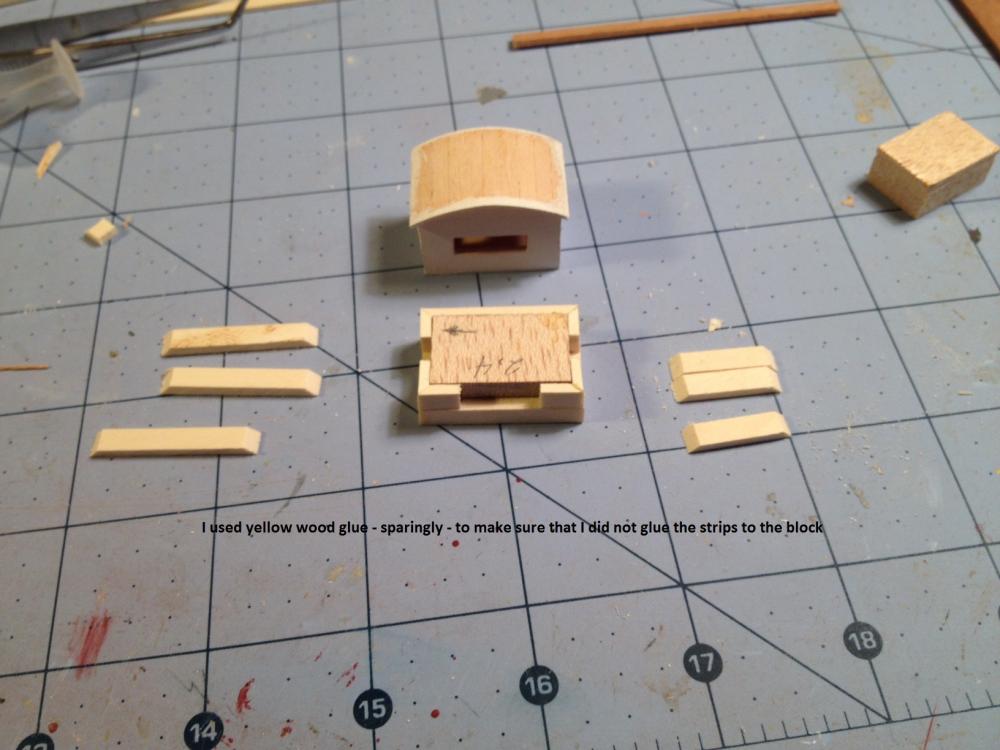
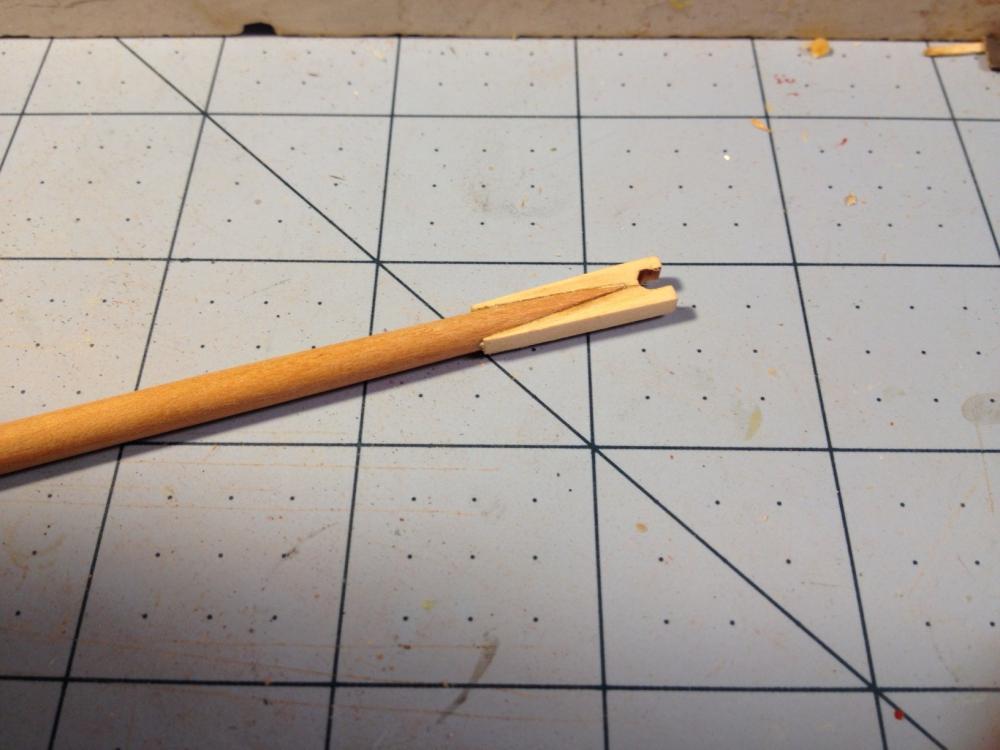
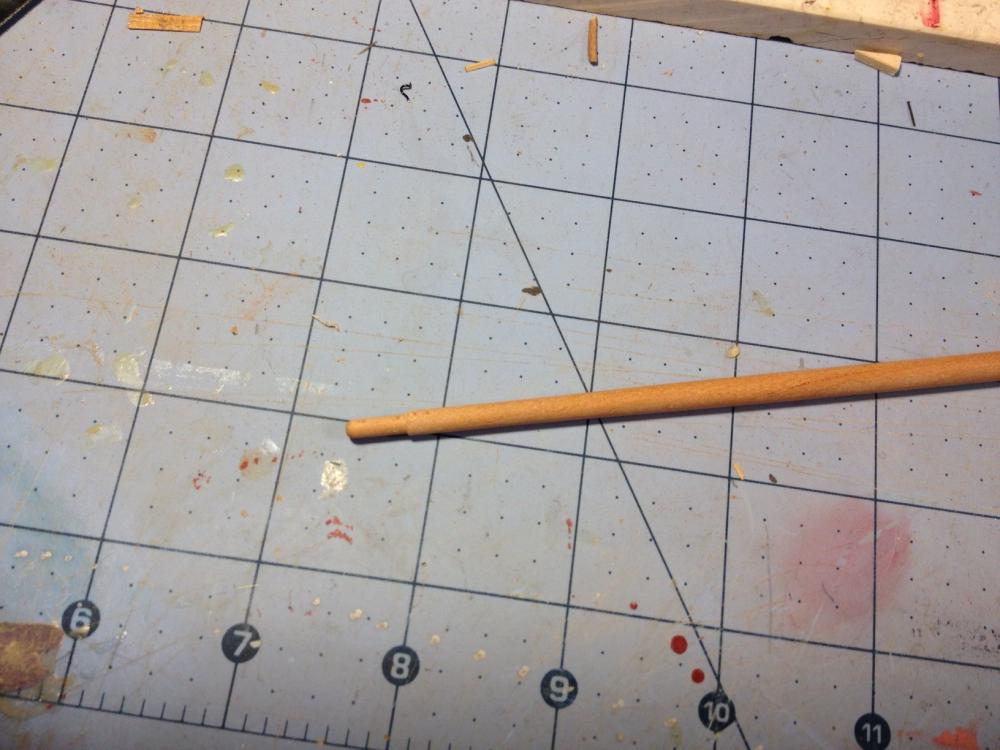
Fife and Pin Rails I worked on the fife rails yesterday. I made them from my cherry stock. My wood joinery skills were put to a real test in the micro size of these things. I also made the pin rails. I used bass wood strips and spray painted them with my airbrush. I have also given consideration to the kit supplied belaying pins. They are made of brass, and of course must be painted or blackened (or browned, but I don't have that product). So last month, while on business in Sandusky, I had the opportunity to stop in the local hobby store, and to my surprise, they actually had a rack of model shipway parts and such. I picked up 4 bags (all they had) of wooden belaying pins. They are already stained dark, but I don't have enough of them. I suppose I could order some to complete the set, but decided to consider another alternative. I found some decorative toothpicks, with a head, when cut and shaped, works pretty well as a belaying pin. I have attached pictures of all three. At some point, I will decide which ones to use. The size is an issue, since the wooden ones, especially the model shipway pins, look a bit out of scale (large). Any suggestions? PS. Please forgive me for my sloppy use of sailing terminology. I am learning.


- 648 replies
-
- 3
-
-
- niagara
- model shipways
- (and 1 more)
-
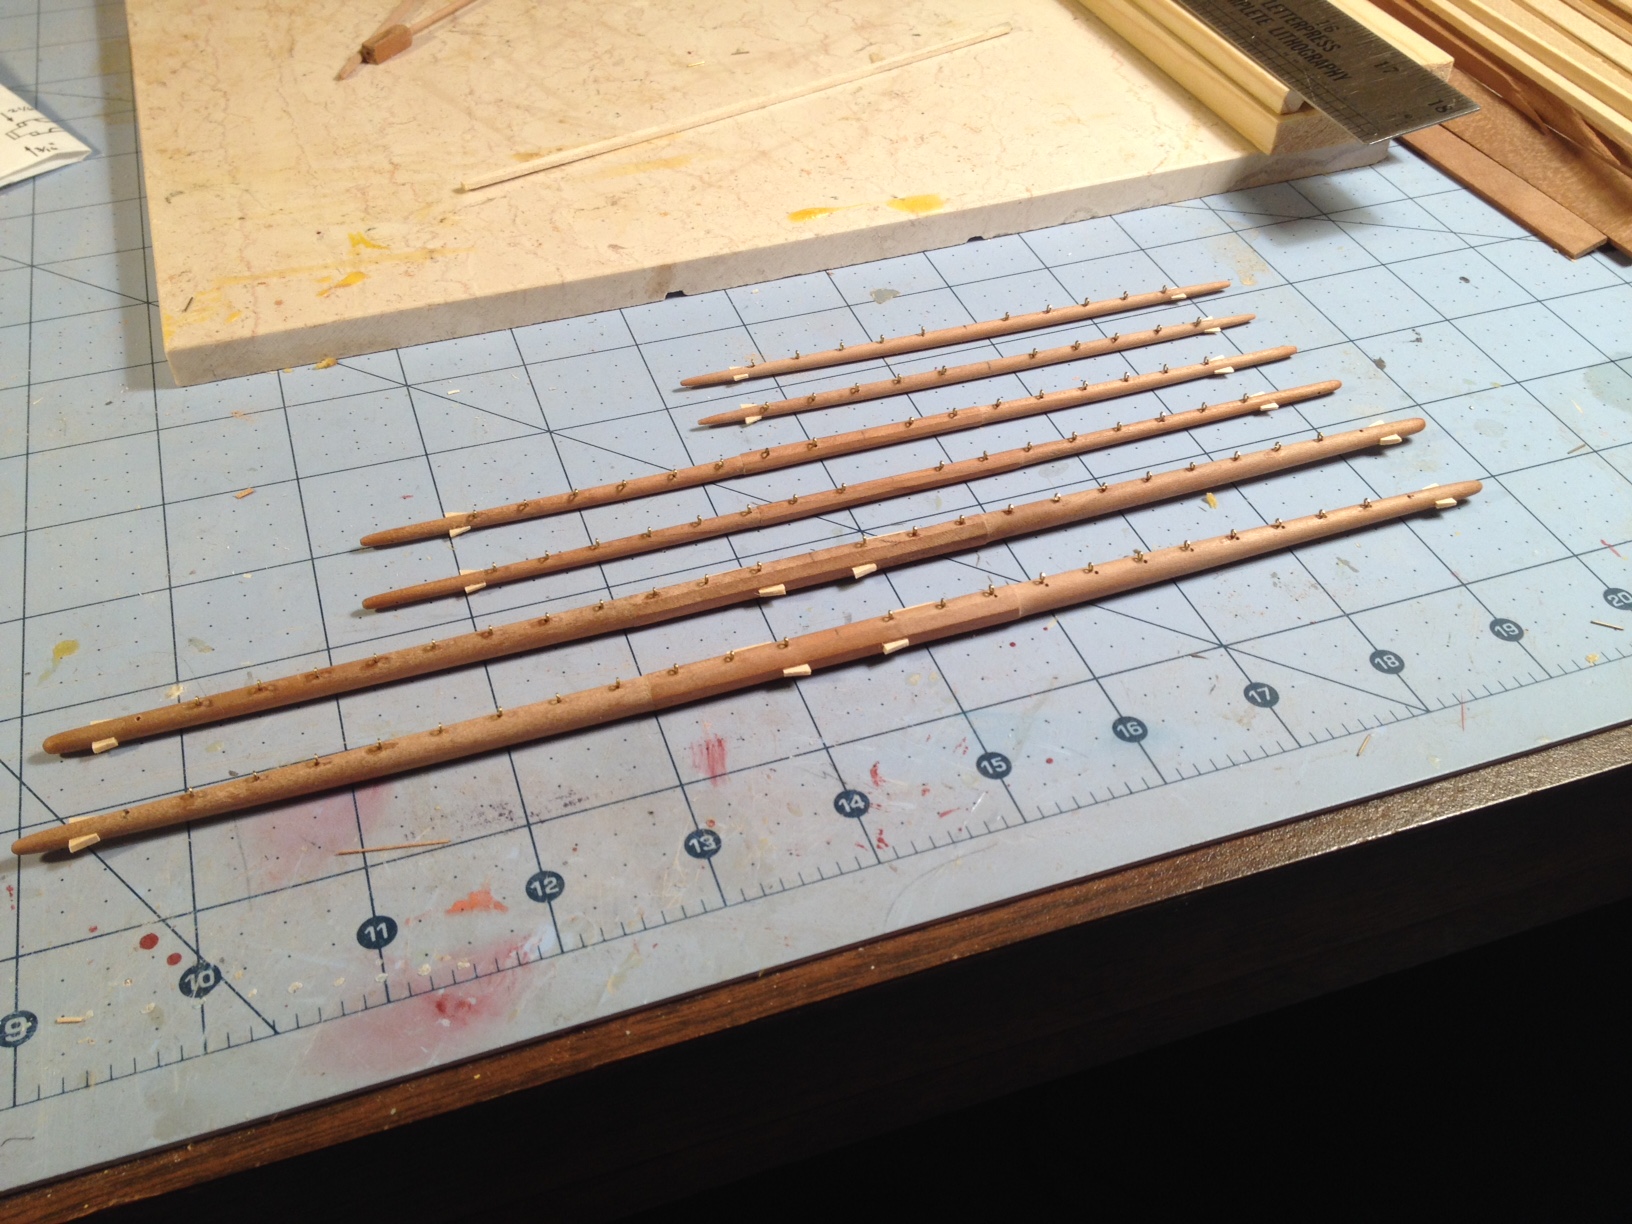
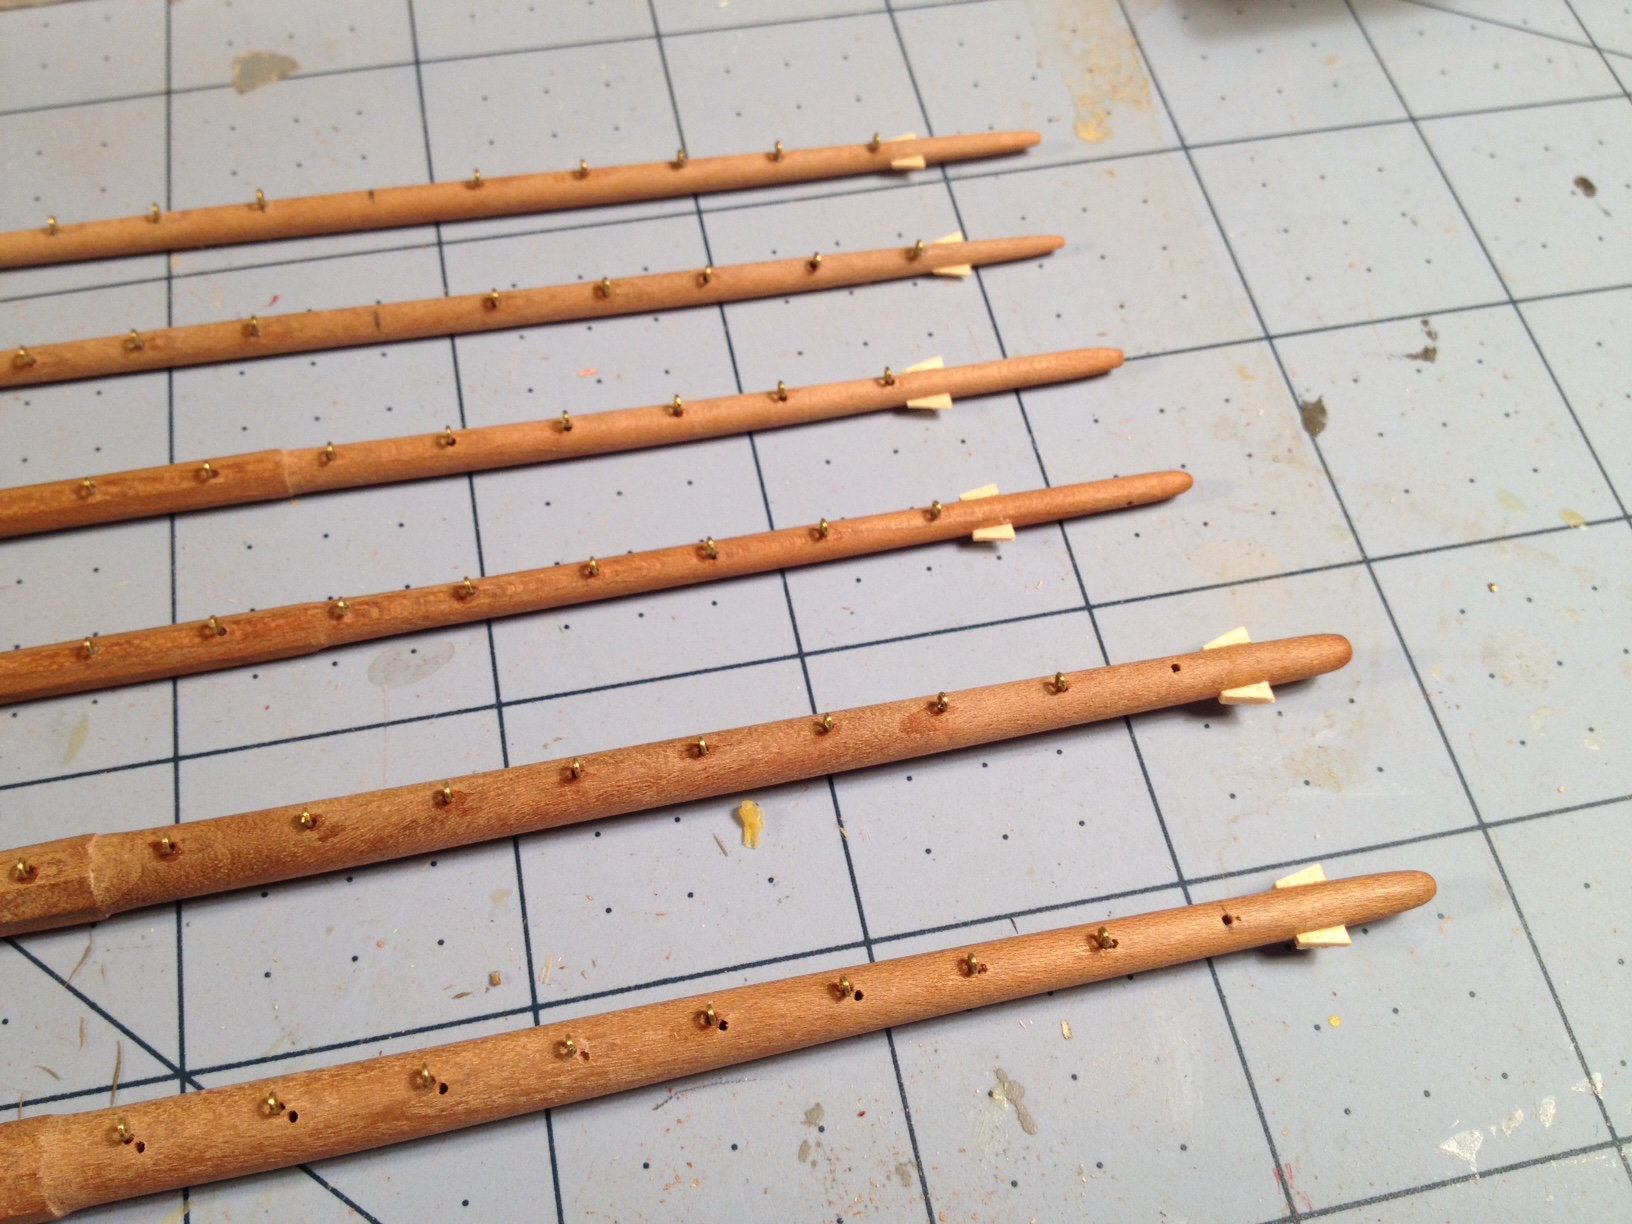
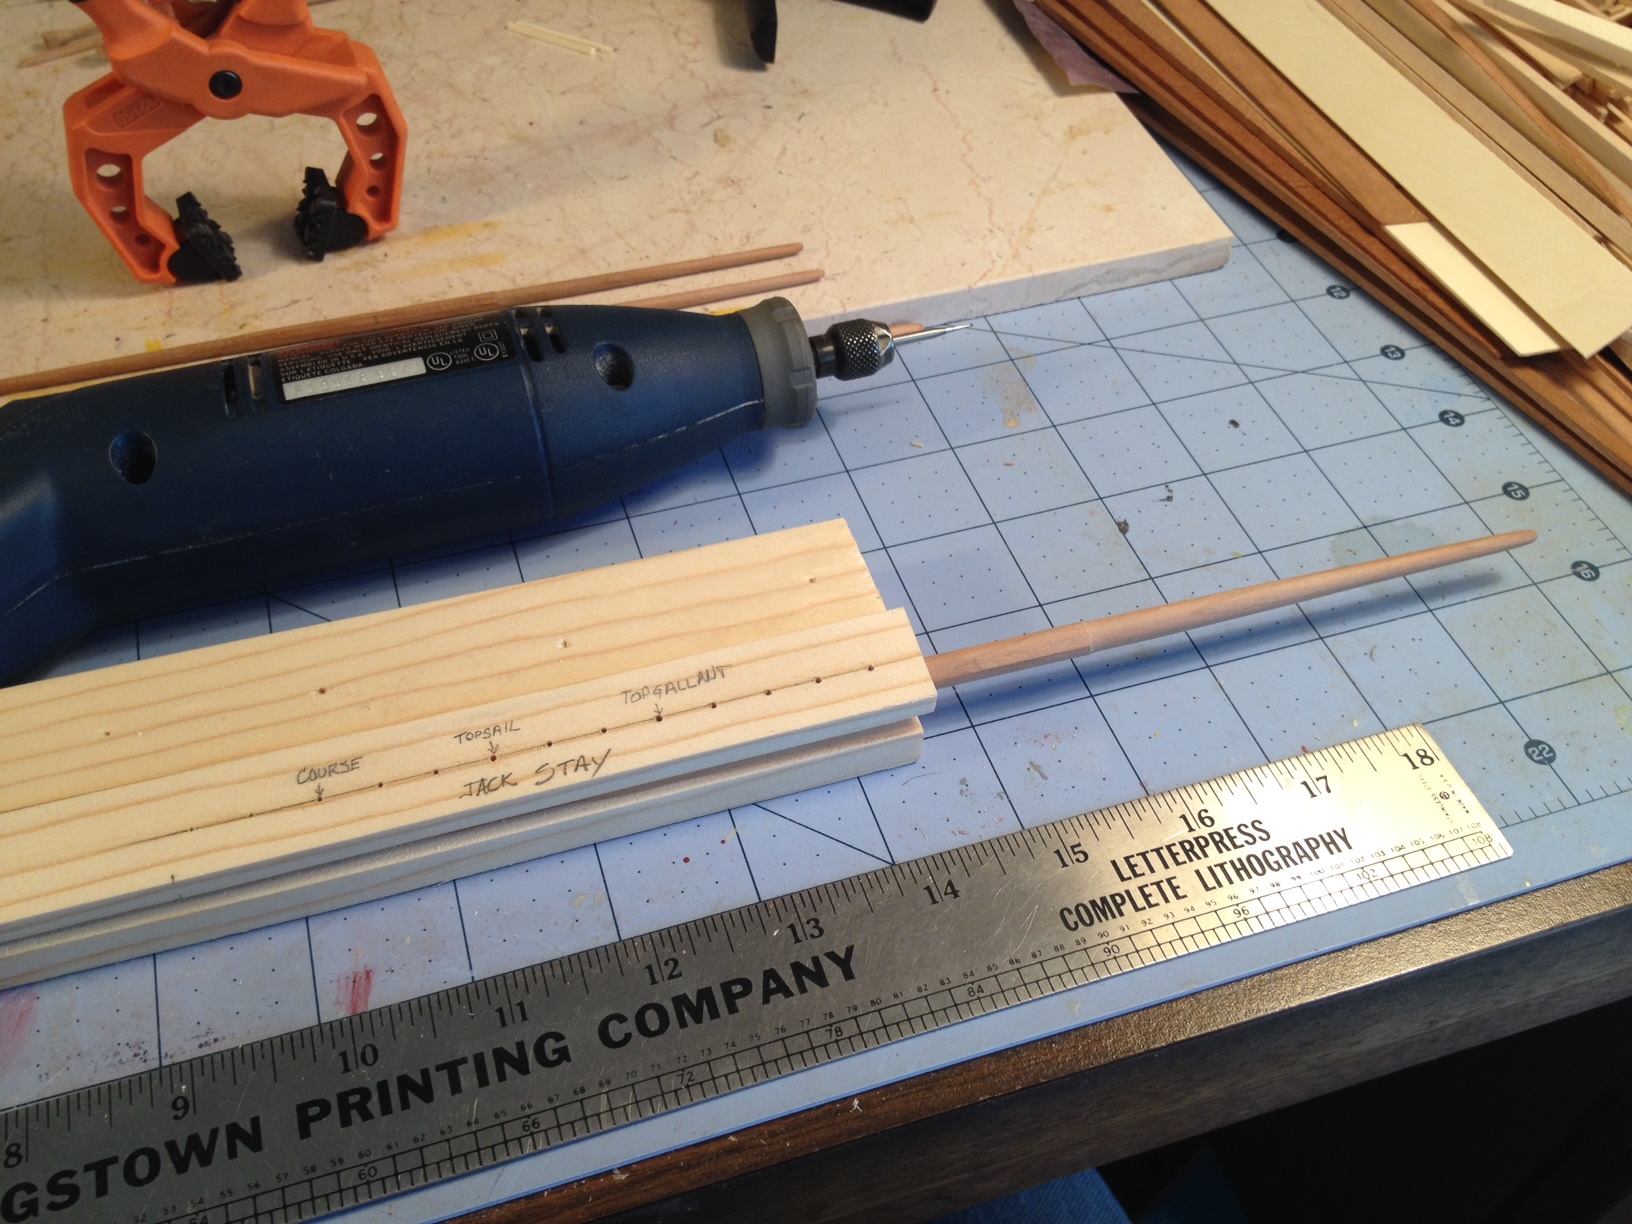
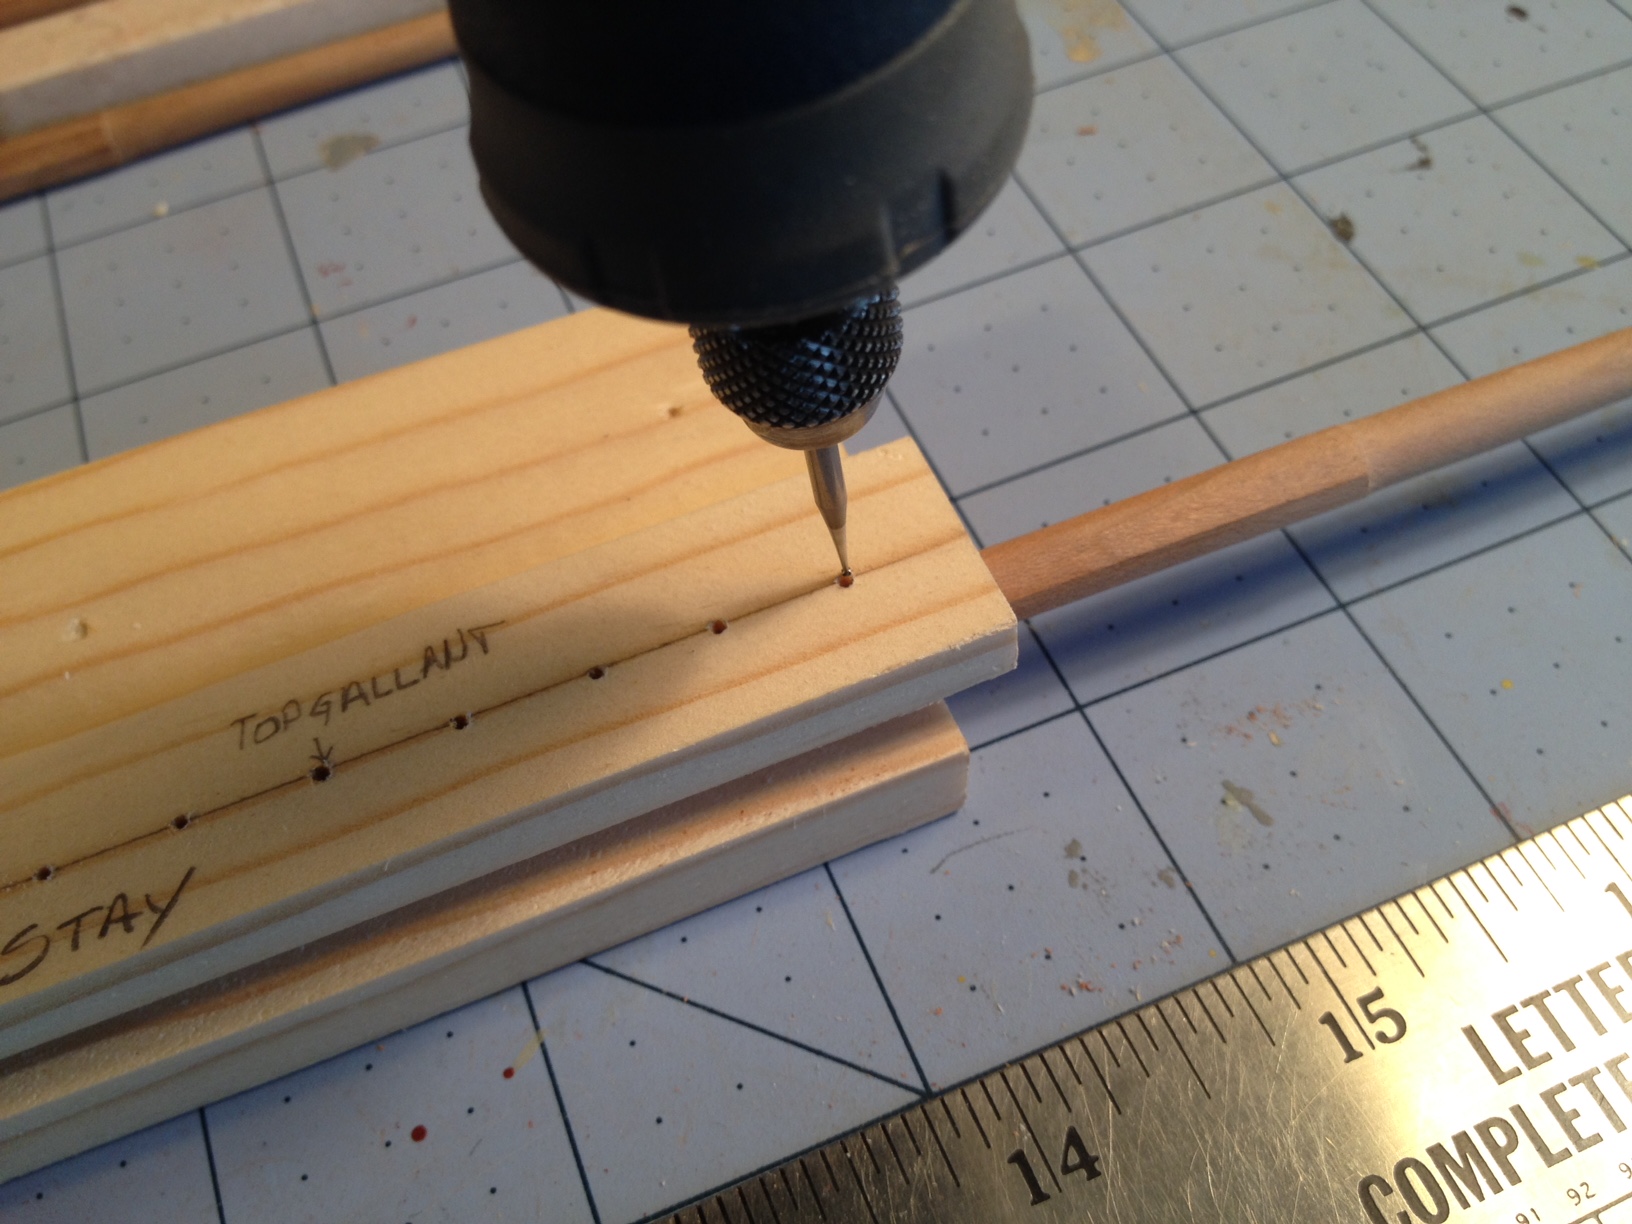
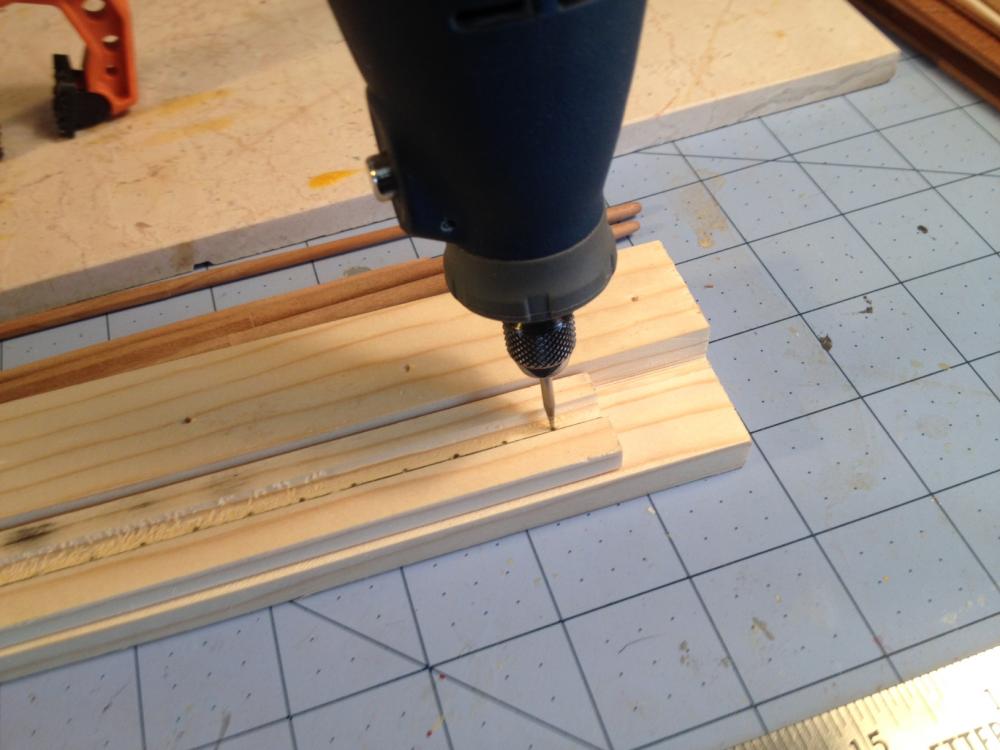
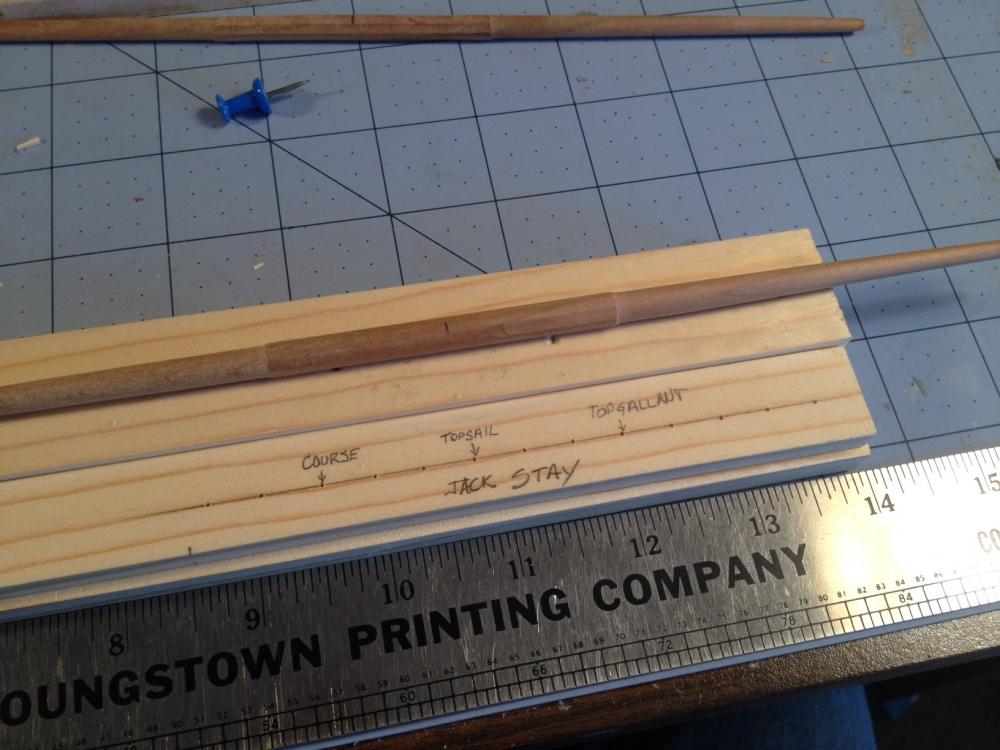
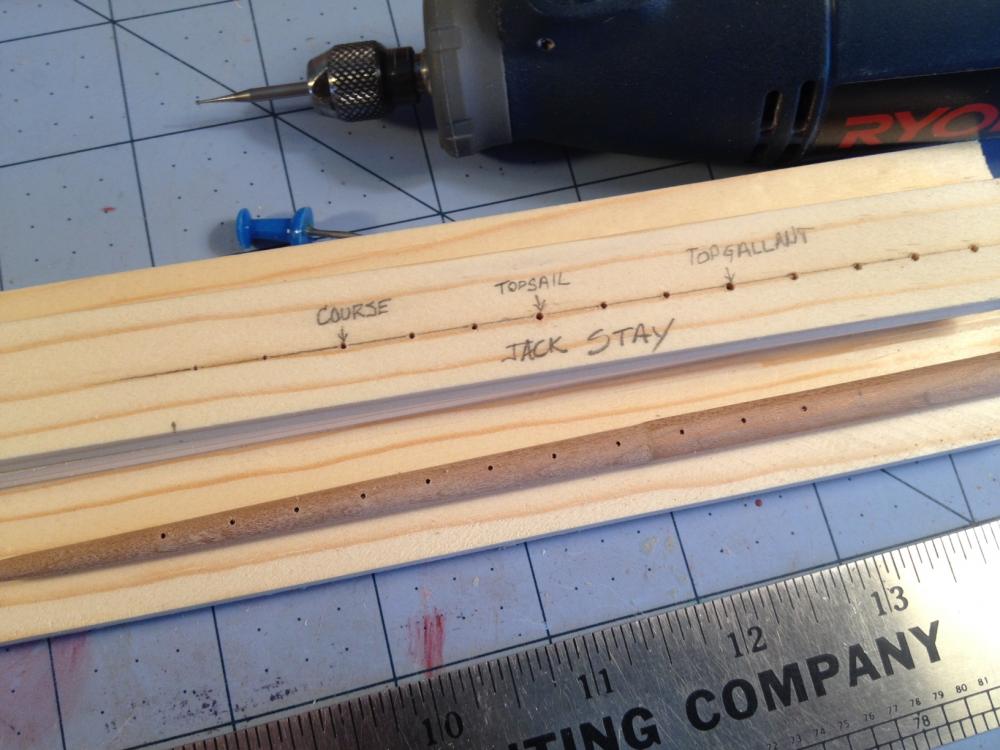
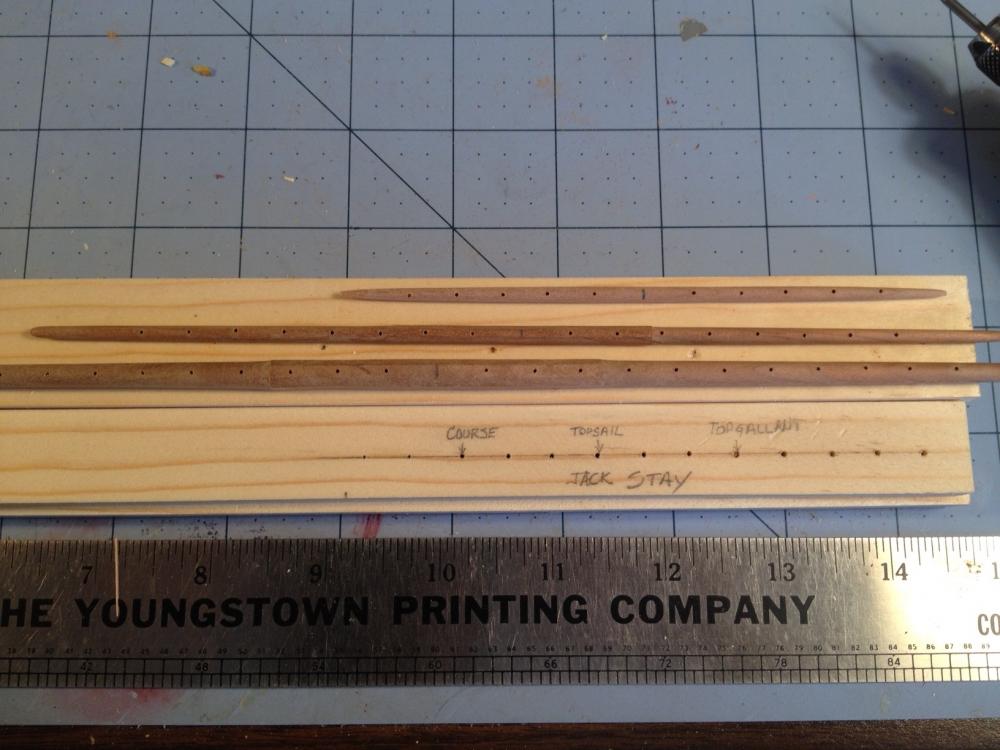
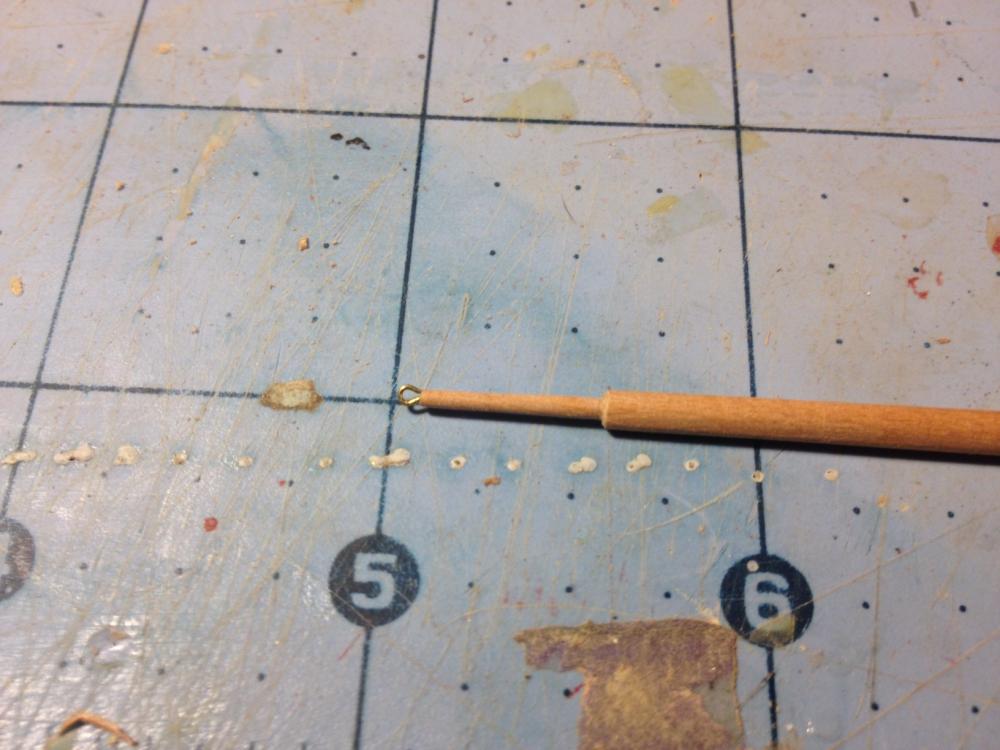
Jackstays I worked on the masts today, trying to get everything ready to paint. I had an idea to make a jig for drilling all of the holes for the jackstays. Iplaced a round tip bit into the router table and cut a half circle bead on a piece of scrap. I would use that to seat the masts. I then marked and drilled a series of guide holes a centimeter apart as per the plans. Once the masts were secured to the jig, I used the guide holes and with my diamond tipped bit on the dremel, plunge drilled the jackstays holes in the masts. It worked on all of the masts. Once done, I used the small eyebolts from the kit, cut them to size, and glued them in place with medium CA. The jackstays came out straight and evenly spaced. I also saved a good amount of time. Here are some shots of the process.


- 648 replies
-
- 4
-
-
- niagara
- model shipways
- (and 1 more)
-
Mike, Good points all. The plans call for baseboard trim pieces around all of the structures, so I may be able to hide any gaps created by the crown.
- 648 replies
-
- 3
-
-
- niagara
- model shipways
- (and 1 more)
-
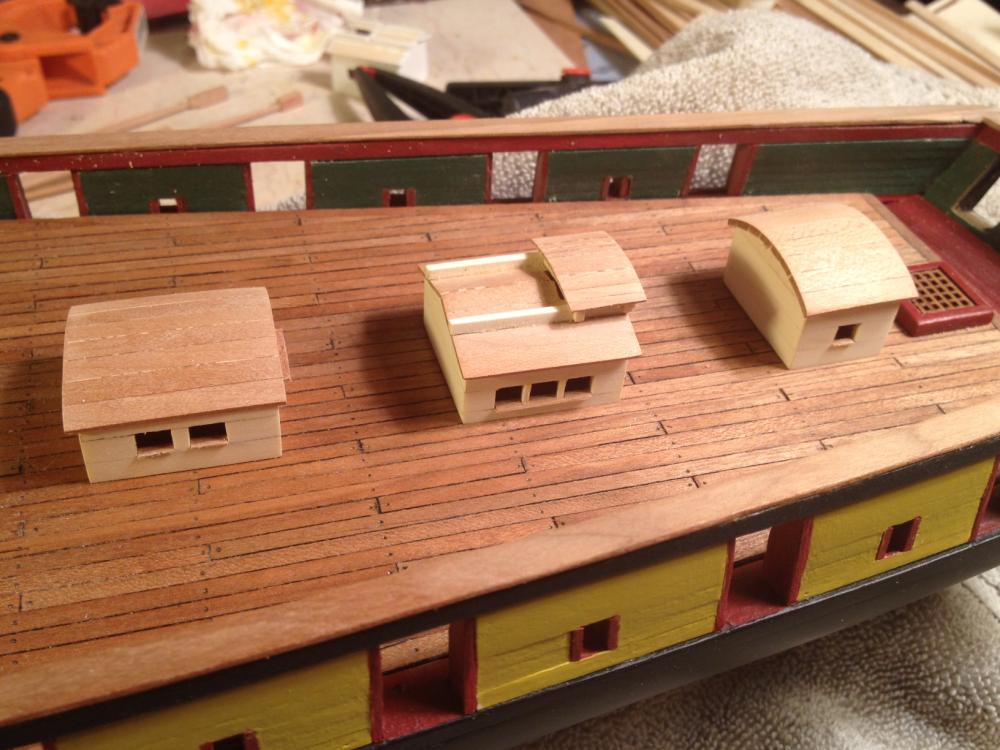
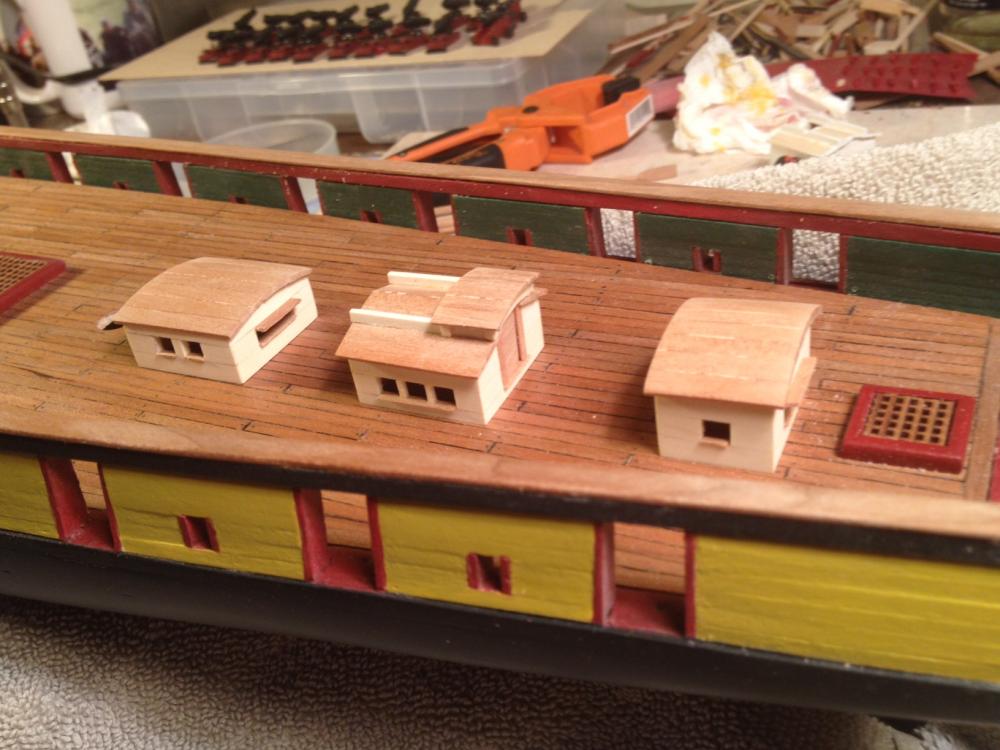
Companionway II Well I finally finished the companionway and the captains quarter skylight. I trimmed out the windows in cherry stripwood, I built the hatch rails and hatch frame out of holly. I finished the hatch roof and door out of cherry strips. This was a chore, and for those of you that have the Niagara plans, you will note a big mistake in the structures, Not a real big one, but since I made the same mistake twice, I had to reveal it. I created the companionway with three windows per side, BUT, the plans only call for two windows per side. The salon skylight callsefor three windows, and I only put in two. If you have followed this log, you will remember that I REBUILT these structures. The first time, I made the same mistake, and when I decided to rebuild them, I figured I would fix this. Well........ In my haste to get these things done (like trying to hurry doing a chore that took three days), I made the very same mistake again. Arghhhh. I have to keep reminding myself to look at the plans once and a while. Here are some photos. I had to see what they looked like on deck, so I simply put them in place. Up next, pin and fife rails.

- 648 replies
-
- 5
-
-
- niagara
- model shipways
- (and 1 more)
-
Mike and Joel, Again, thanks for the research. I am going to find a great bottle of Lake Erie wine and read that wonderful link that you sent this weekend. I need a break from working on buildings the size of a nickel.
- 648 replies
-
- 2
-
-
- niagara
- model shipways
- (and 1 more)
-
Guys, This discussion begs a question - Are there any period documents, diagrams, plans, wood cuts, paintings etc of either the Niagara or her sister ship the Lawrence?
- 648 replies
-
- 3
-
-
- niagara
- model shipways
- (and 1 more)
-
Companionway Finished the second skylight and began working on the companionway. Even though I have already built one of these, I worked most of the night just to get to this point. I still have to build the slide brackets and top, and then get it all to fit, then the door and the trim. I truly believe I could build a full sized companionway in a shorter time. At least I could see what I am doing. This darn thing is small. Interesting observation on the capstan Joel. You are spot on. With all of these deck structures, and the capstan wedged inbetween the salon skylight and the companionway, you can't. While the capstan bars appear to be mounted above the tops of the two structures, unless the men are prepared to step onto the roofs, it would be impossible. As I look at my build, I am not sure that my companion way will be low enough to clear the bars, making this even more of a problem. I am sold. CASE CLOSED. The skylights and companionway are clearly a modern anomoly. Great point Joel.


- 648 replies
-
- 7
-
-
- niagara
- model shipways
- (and 1 more)
-
Brian and Mike, Thanks for stopping in. While it might be obvious, I failed to mention that I remove the block after the walls are constructed. The block not only keeps the structure square, it also allows you to keep the vertical walls plumb. I glue the butt joints and the horizontal surfaces which allows you to build these things without a frame. Laying the structures along the cherry deck looks pretty good. I have to work on the companionway tonight. That is a much more complicated structure with the sliding roof and door way.
- 648 replies
-
- 3
-
-
- niagara
- model shipways
- (and 1 more)
-
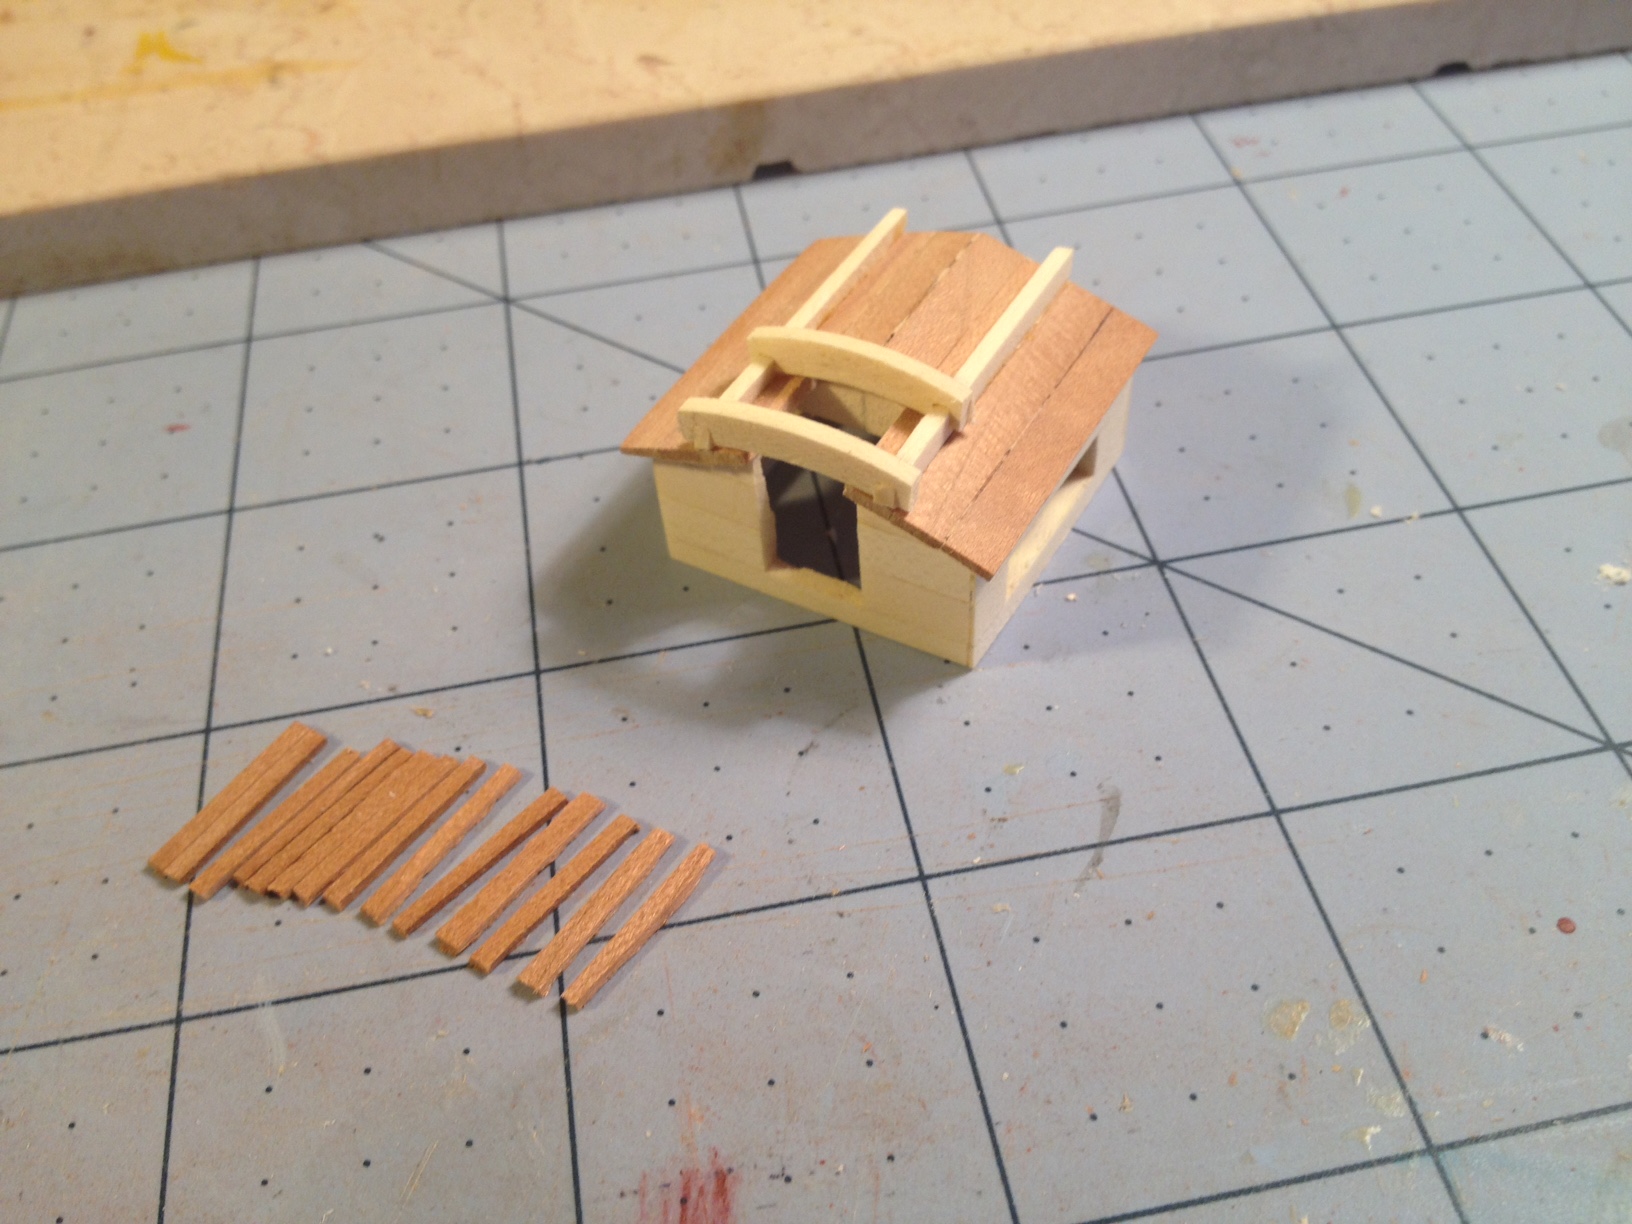
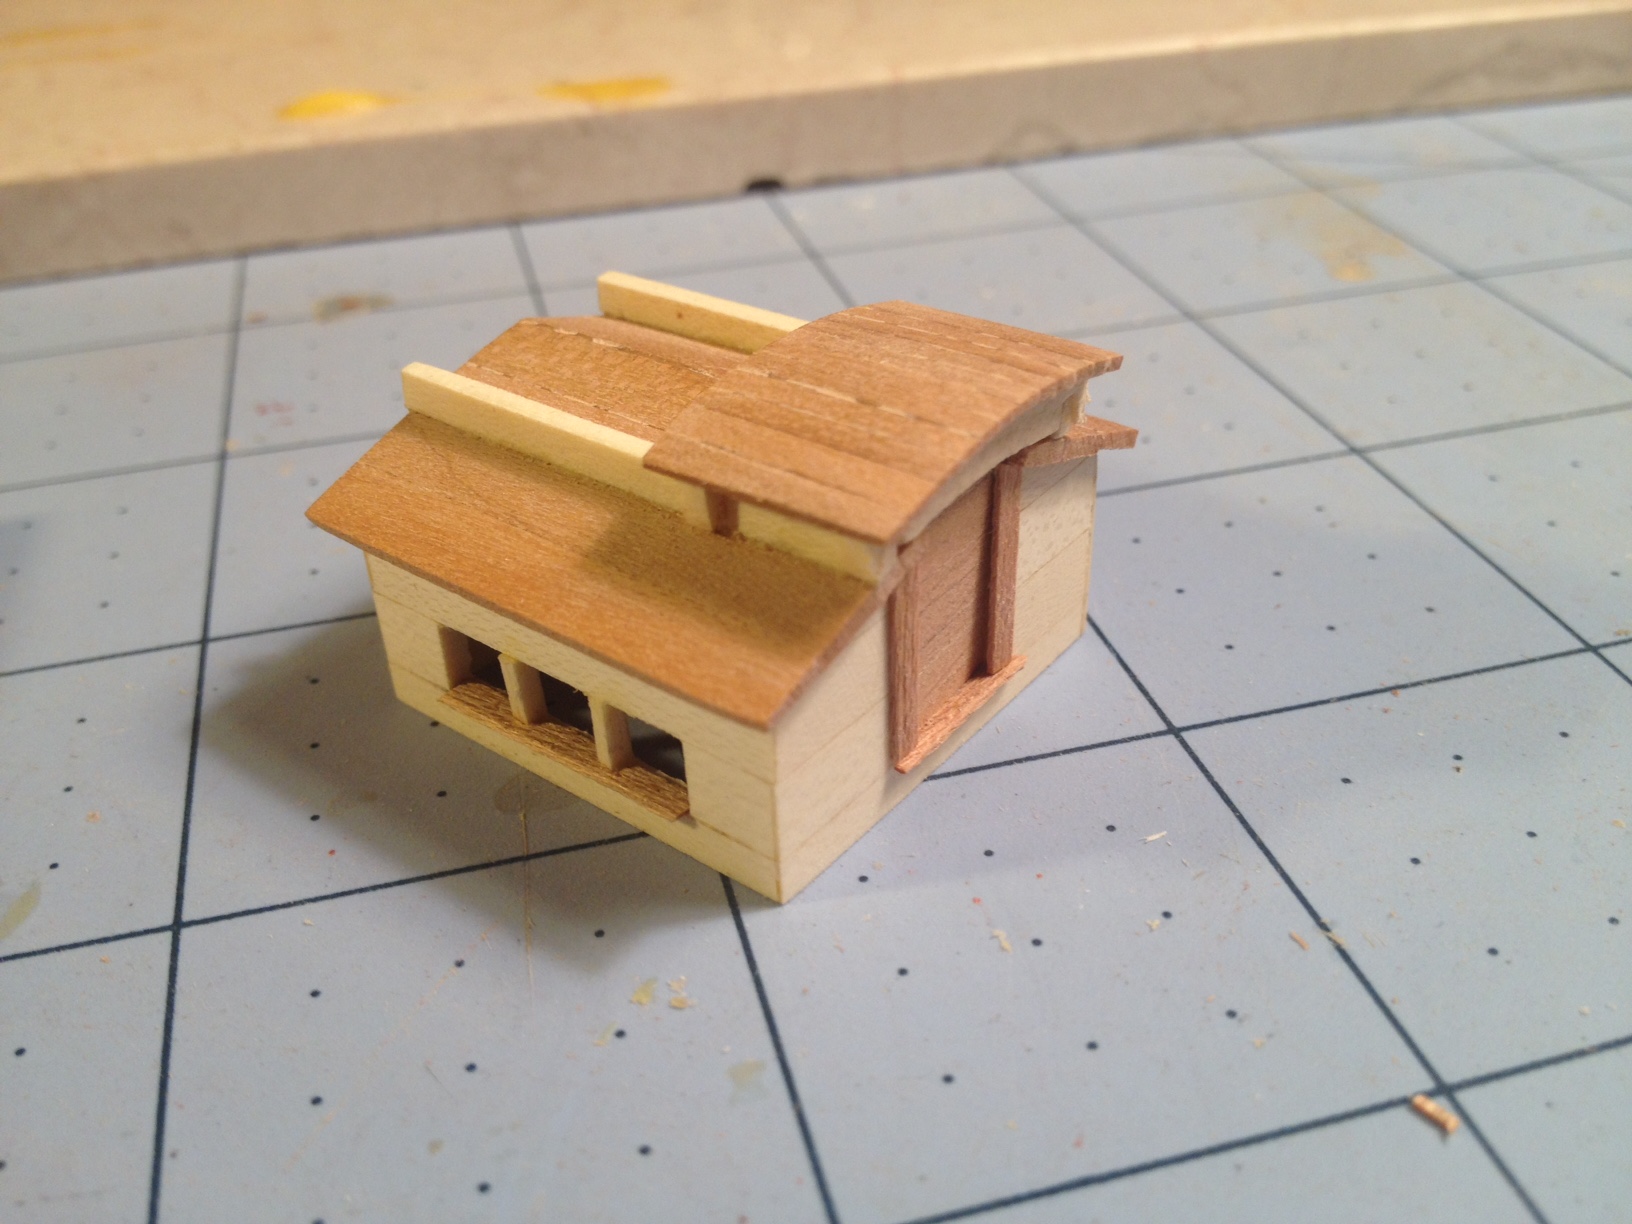
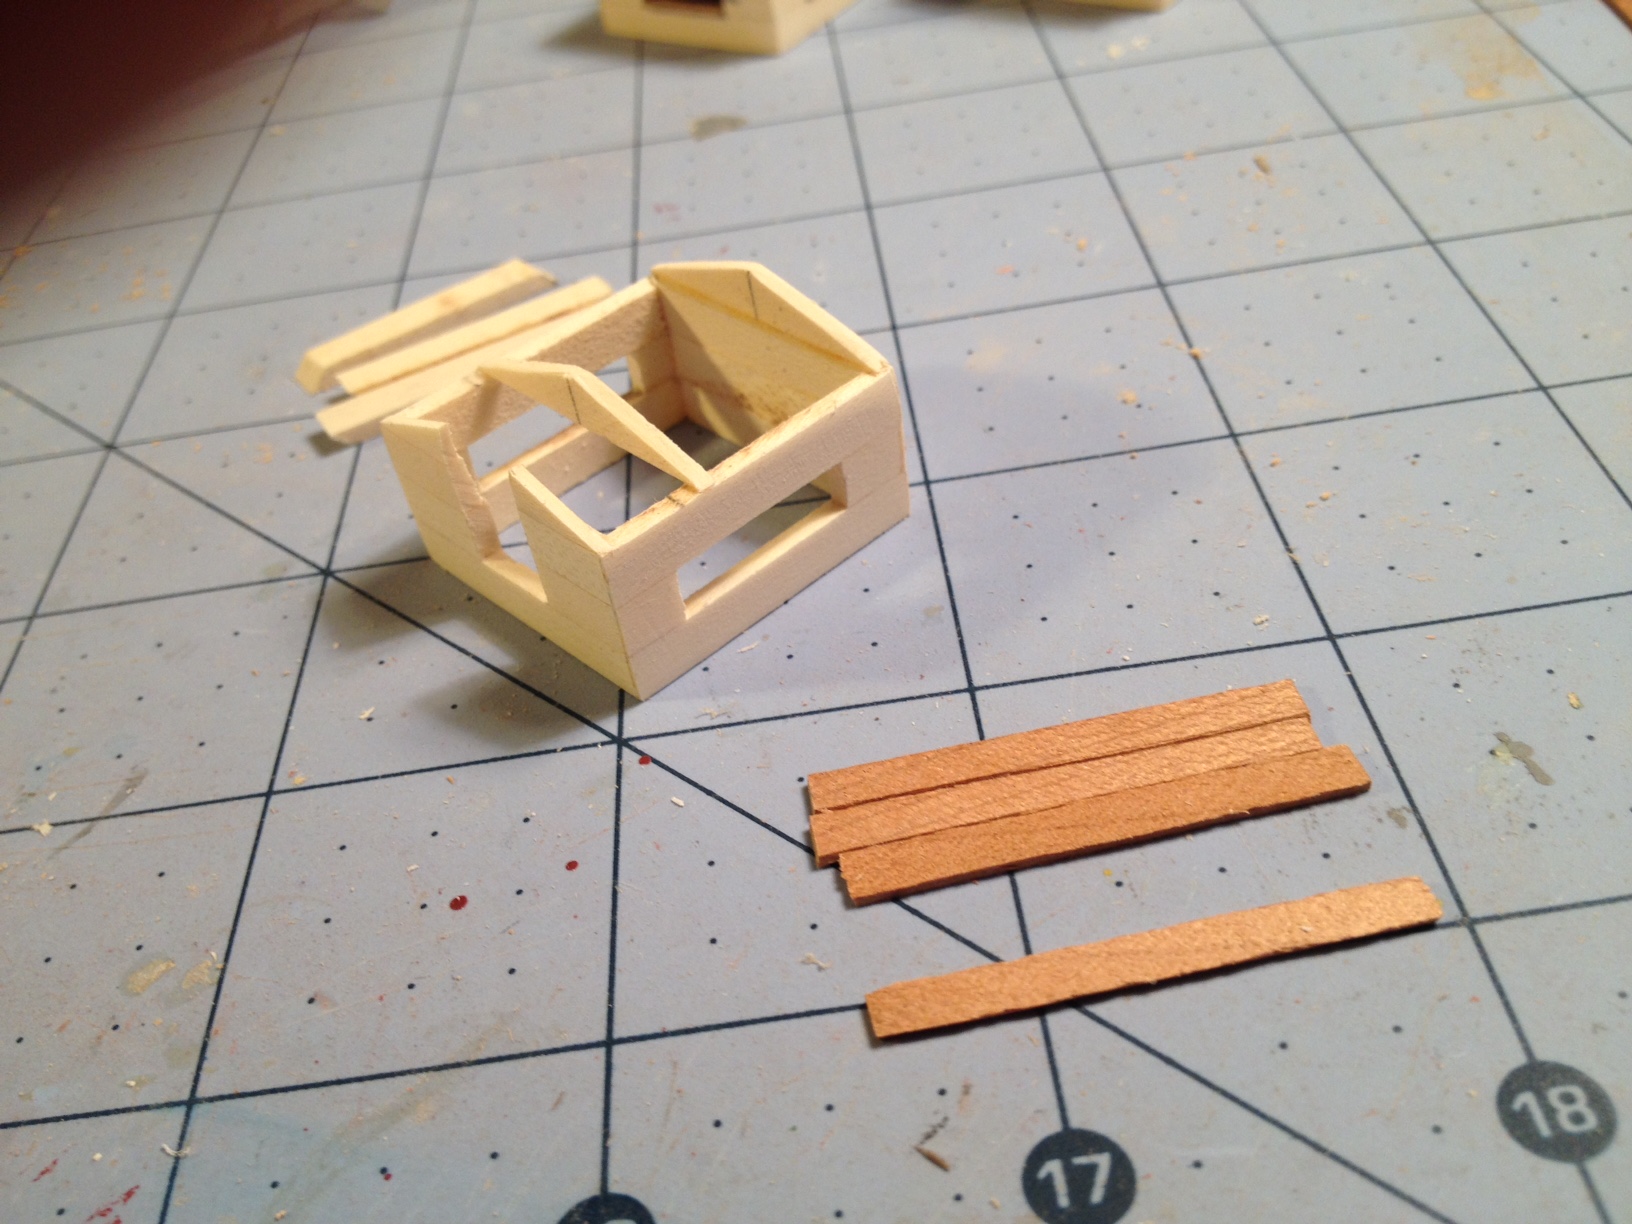
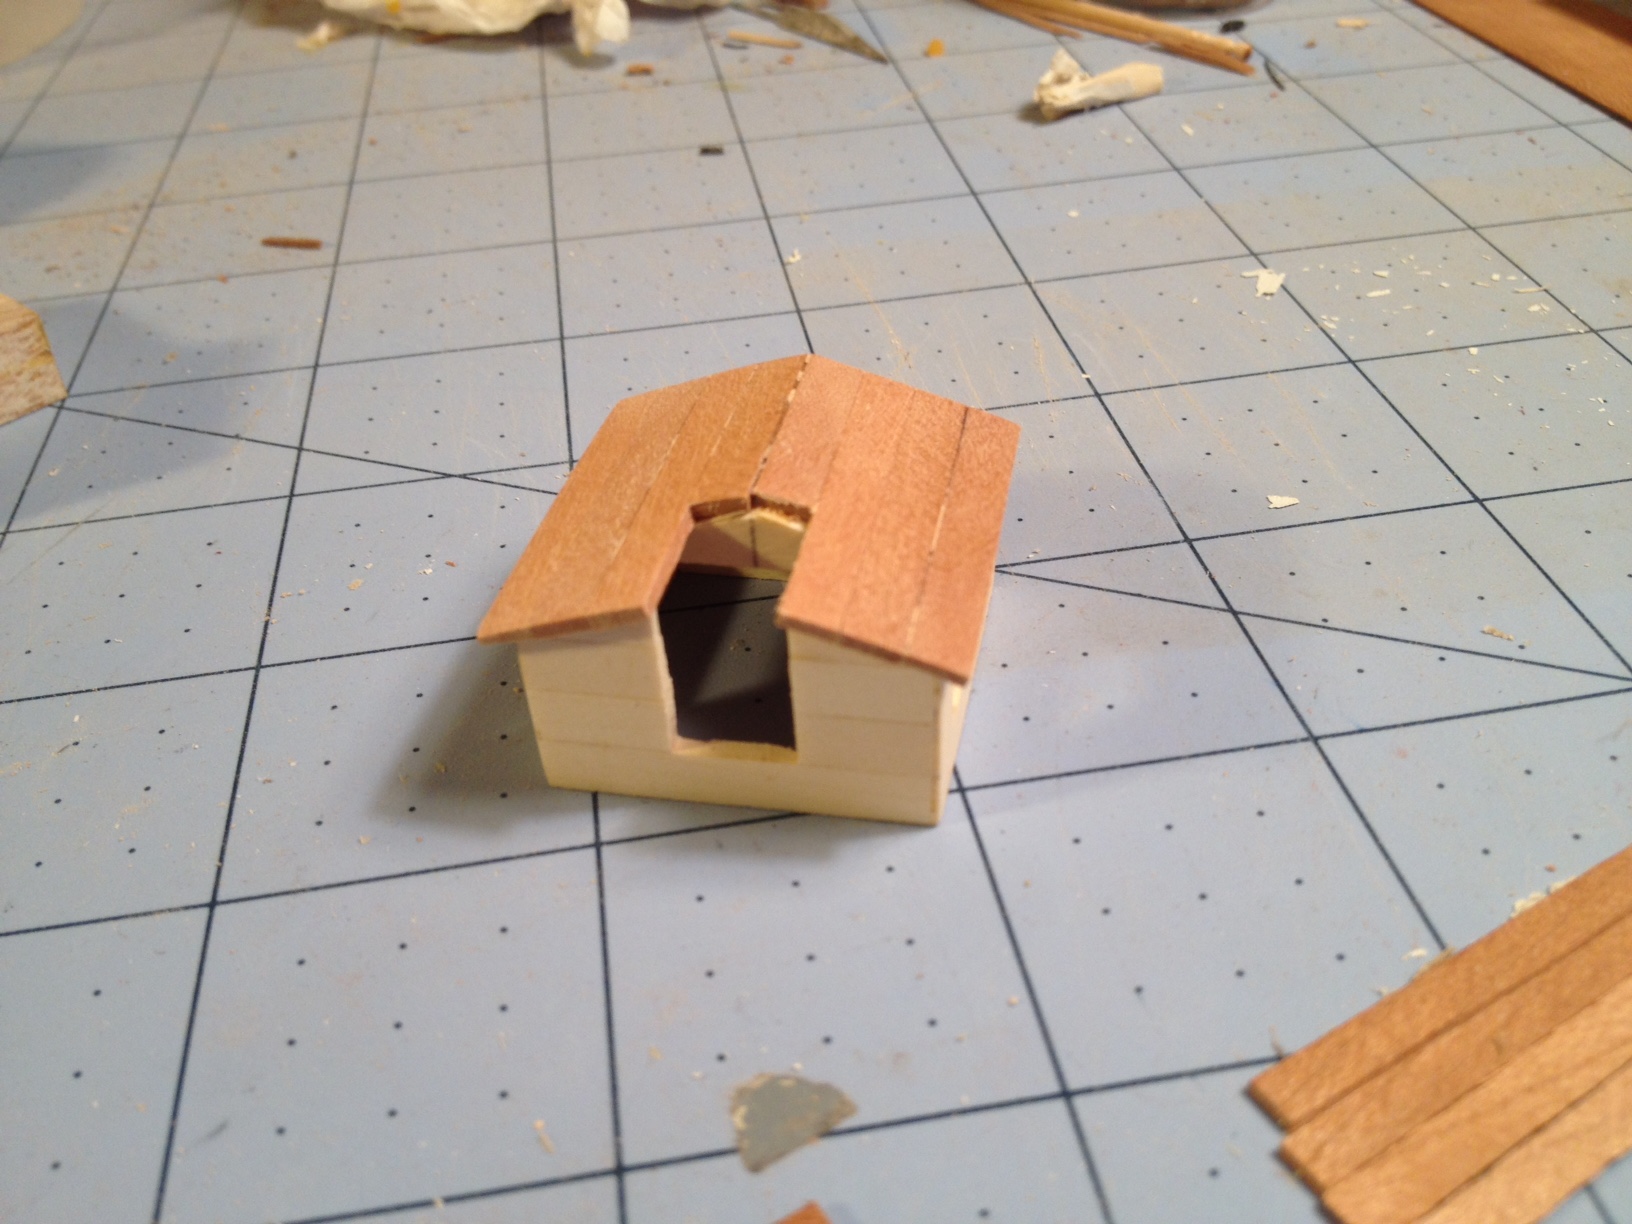
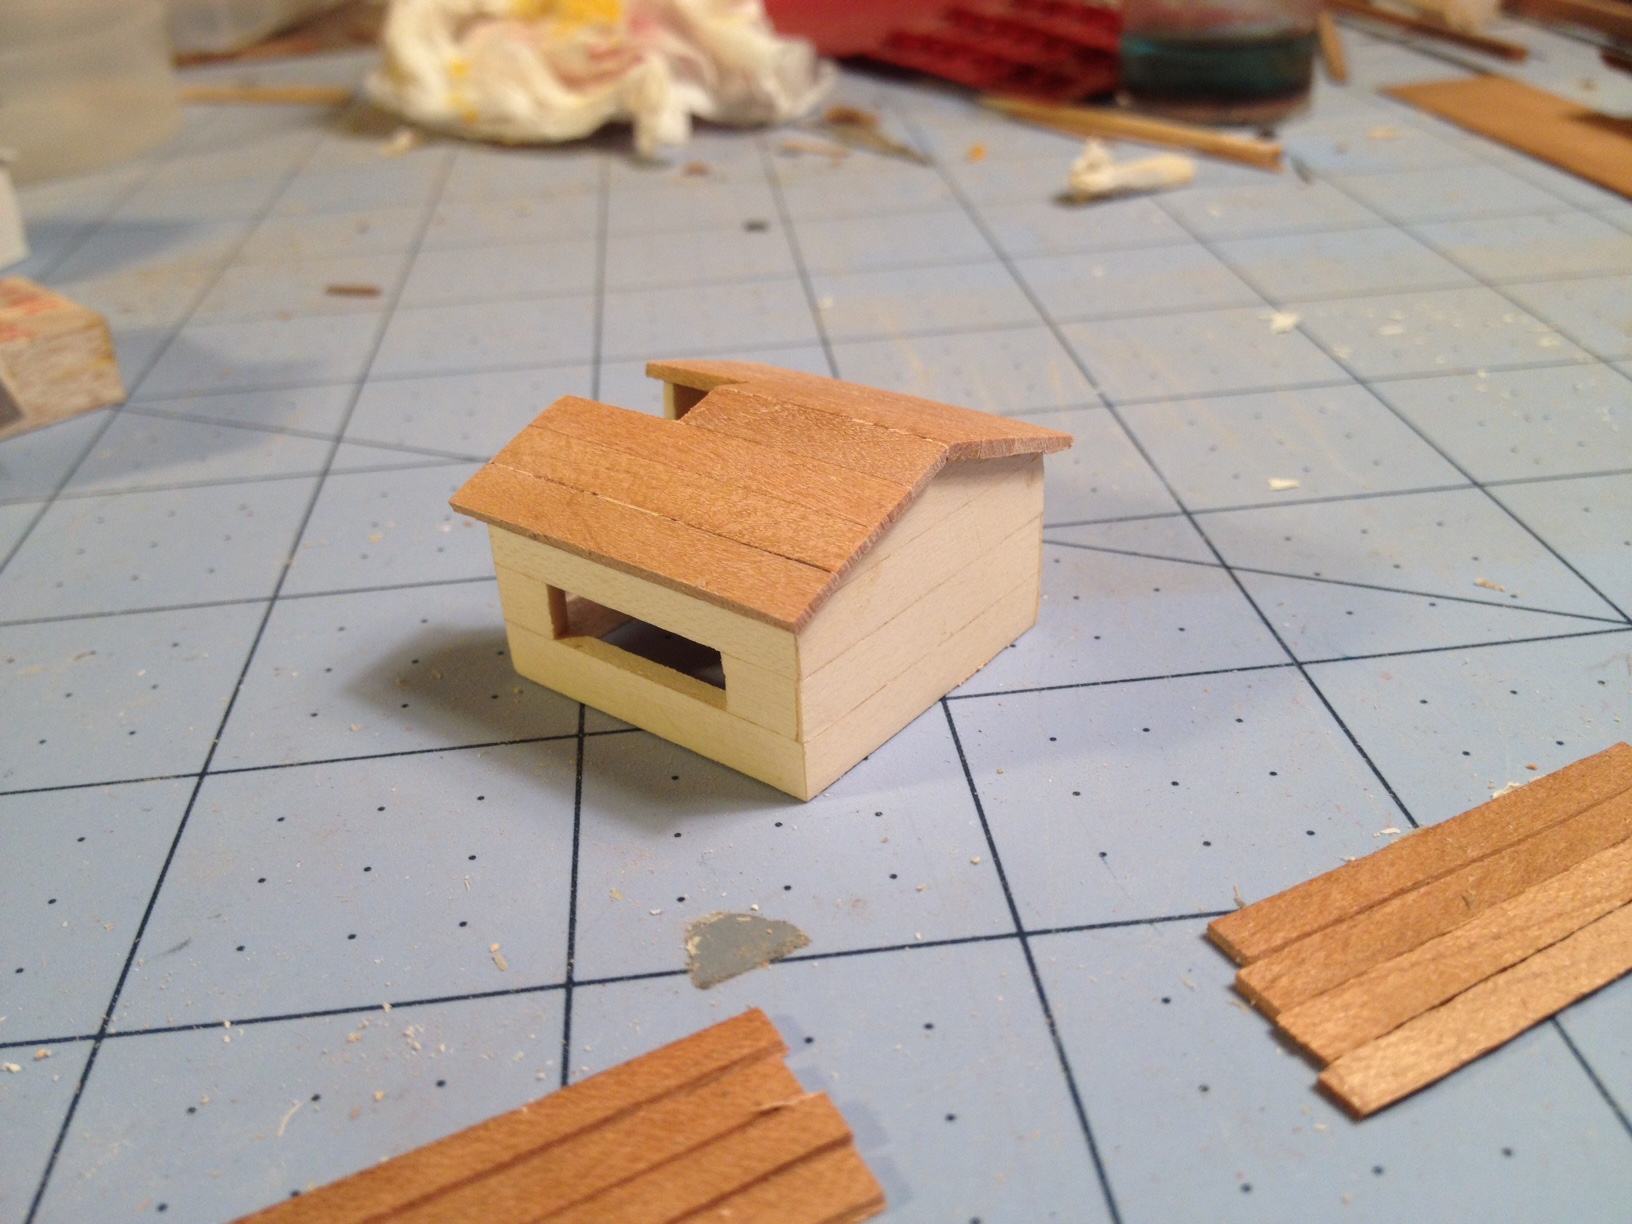
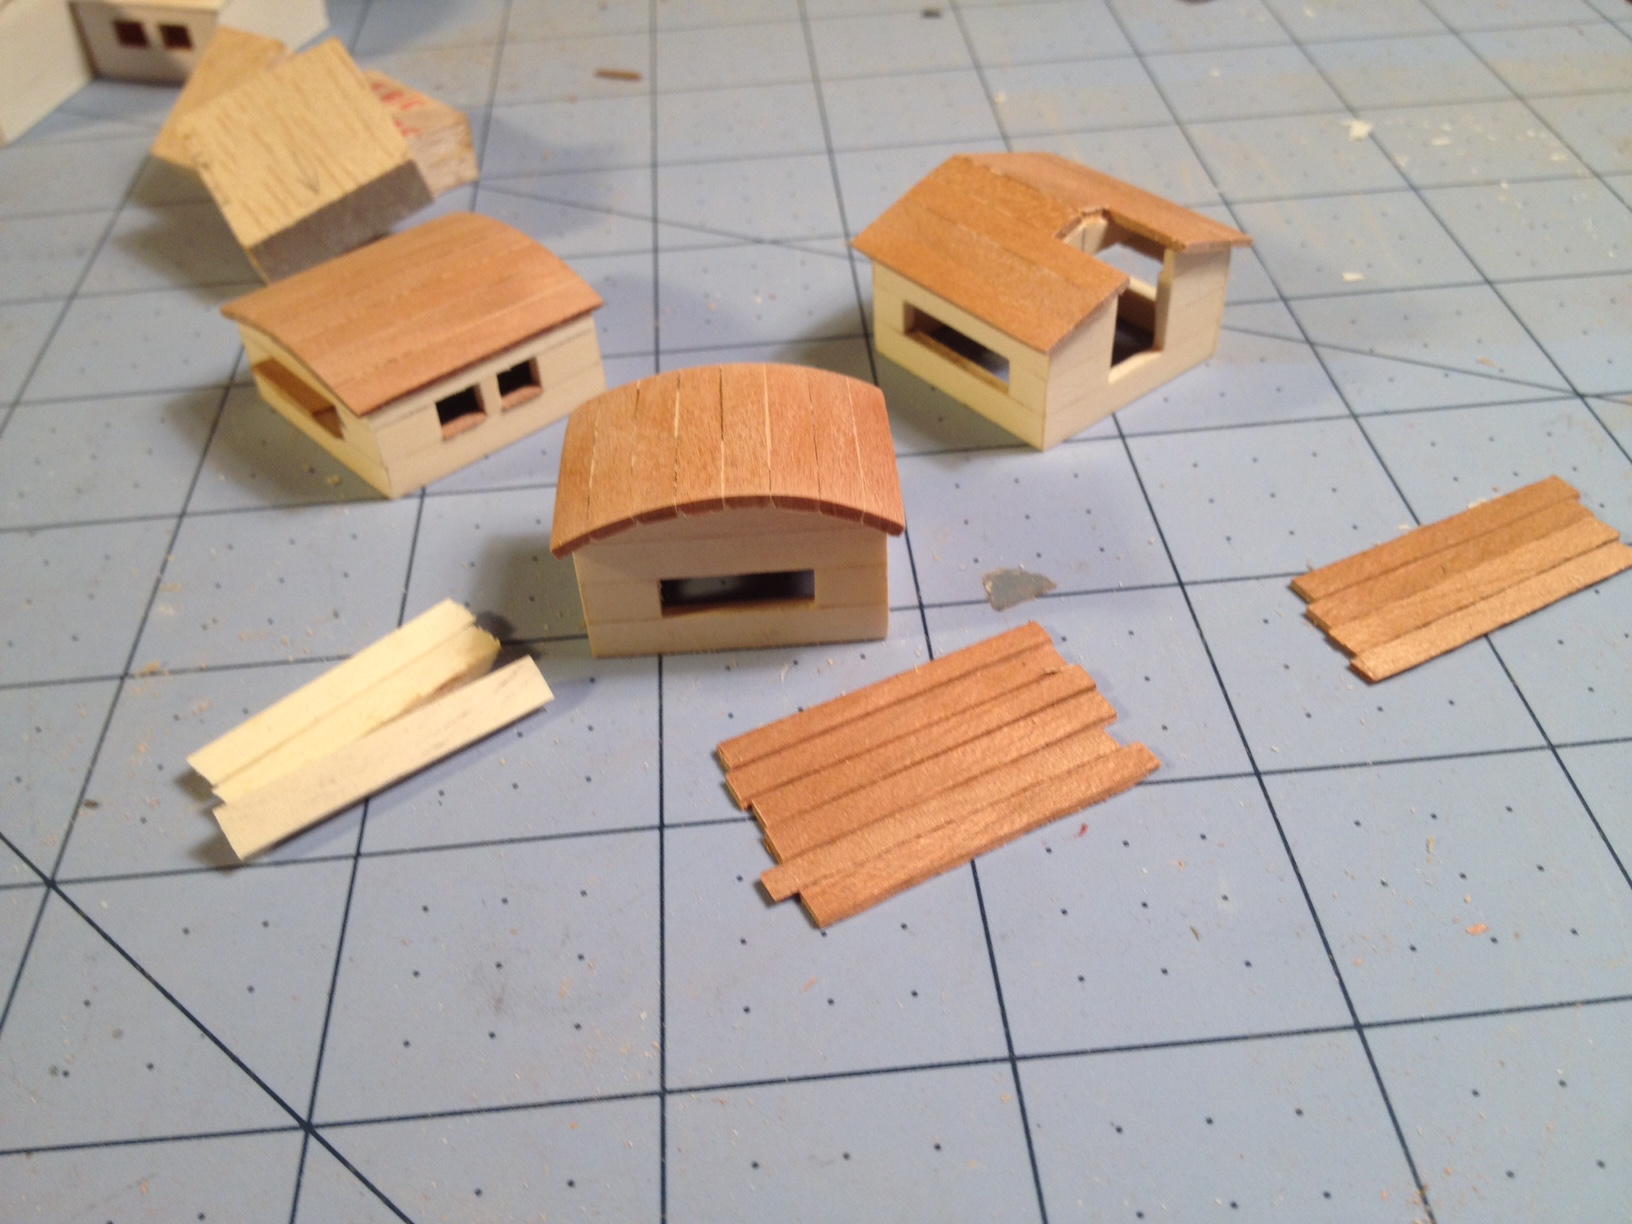
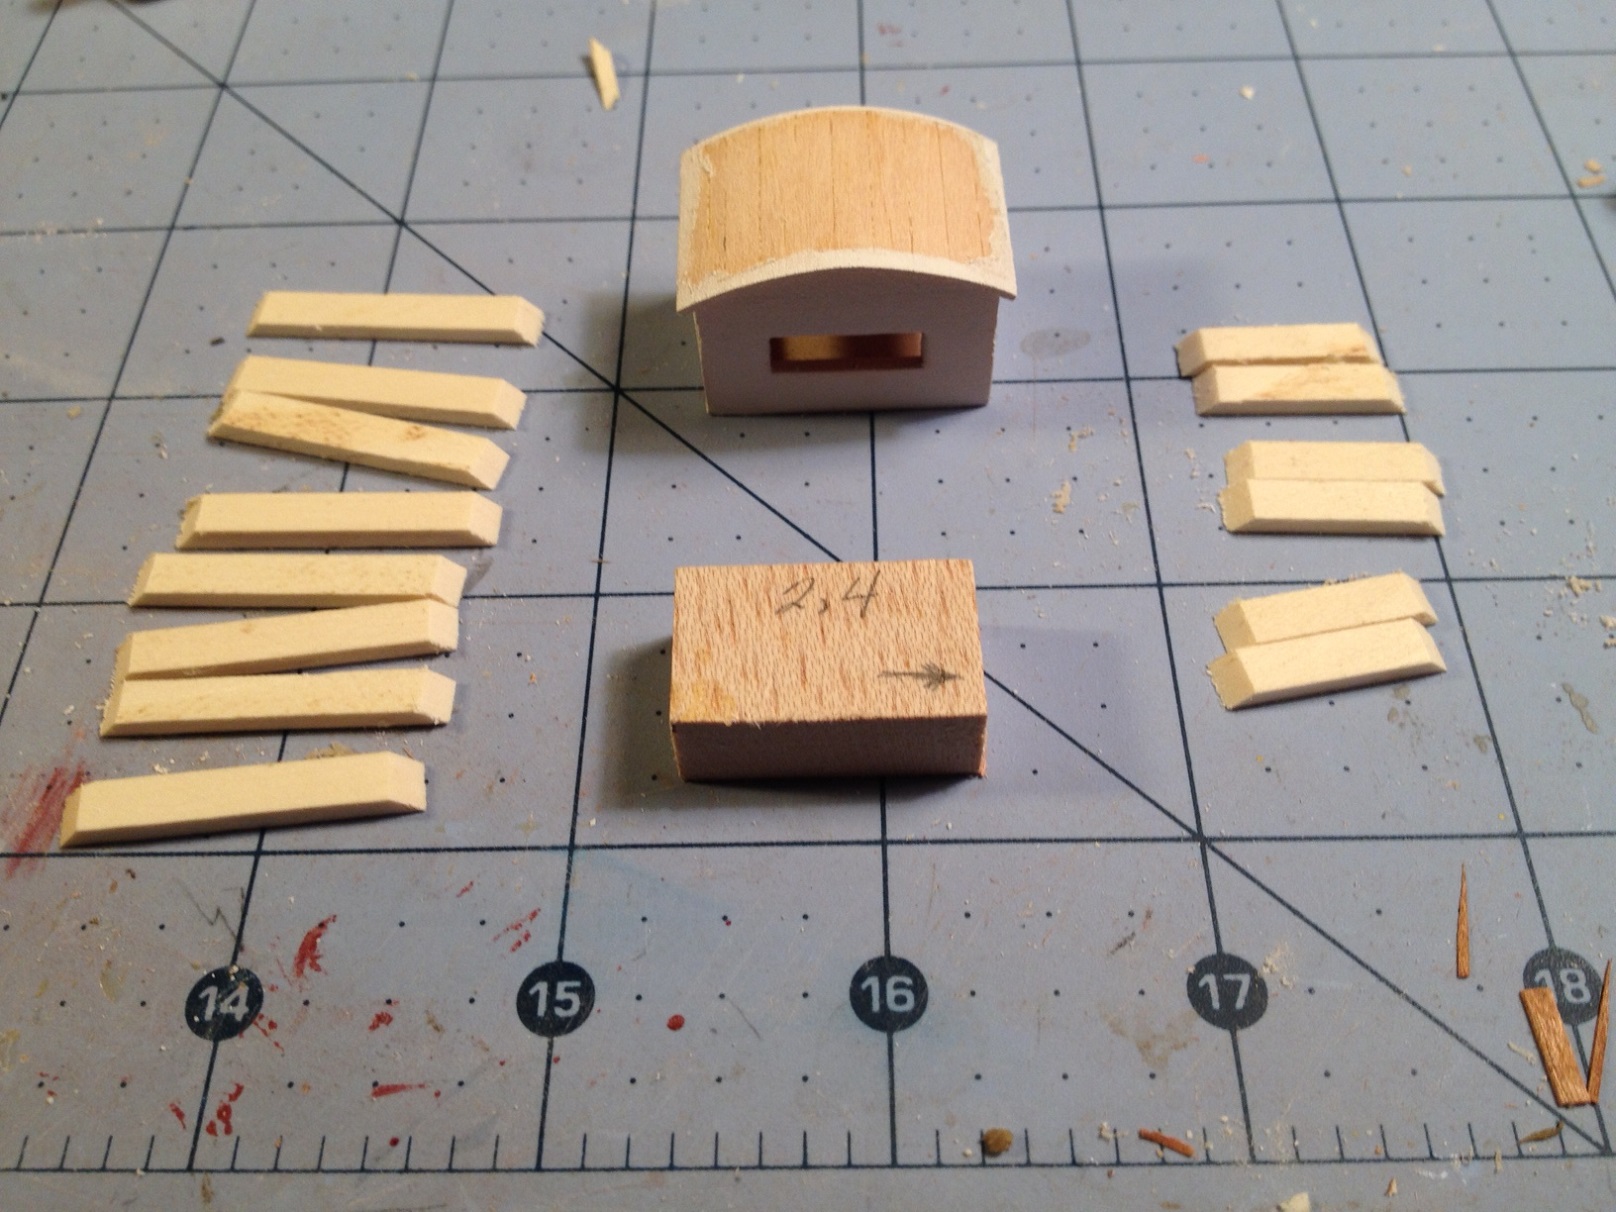
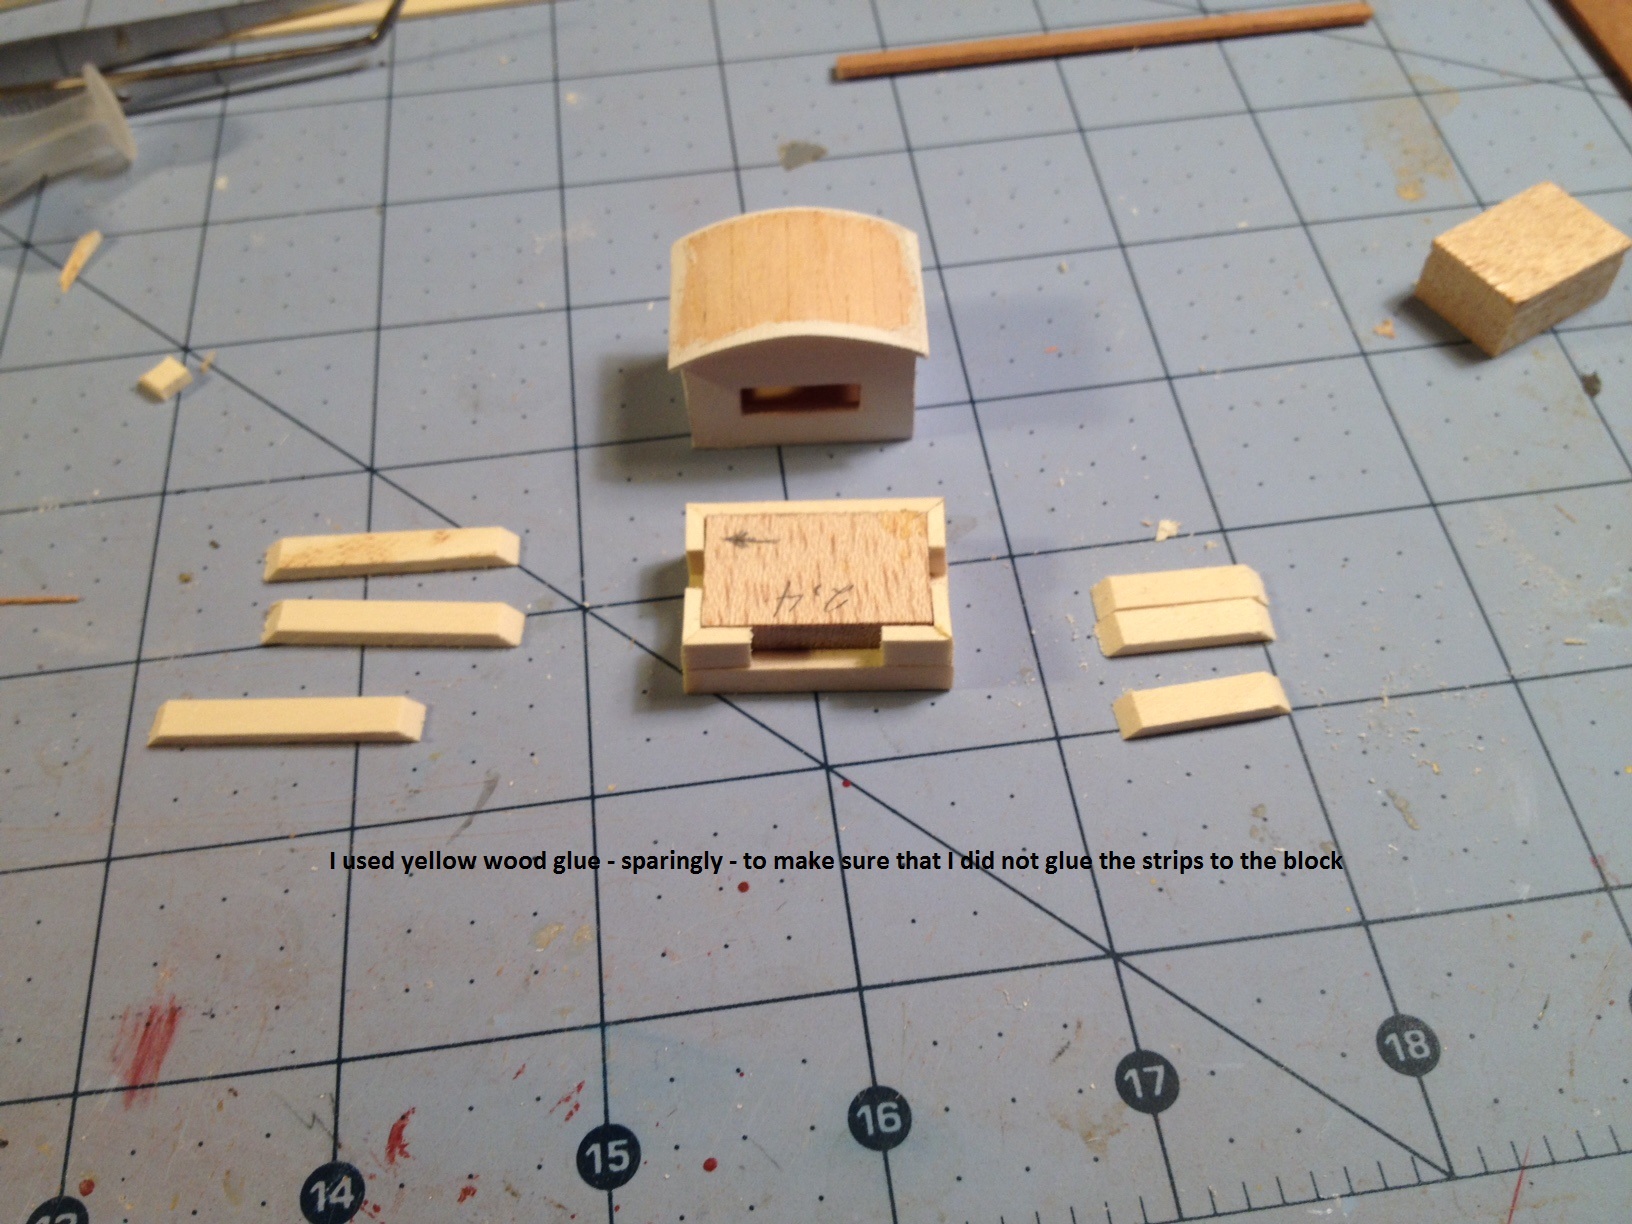
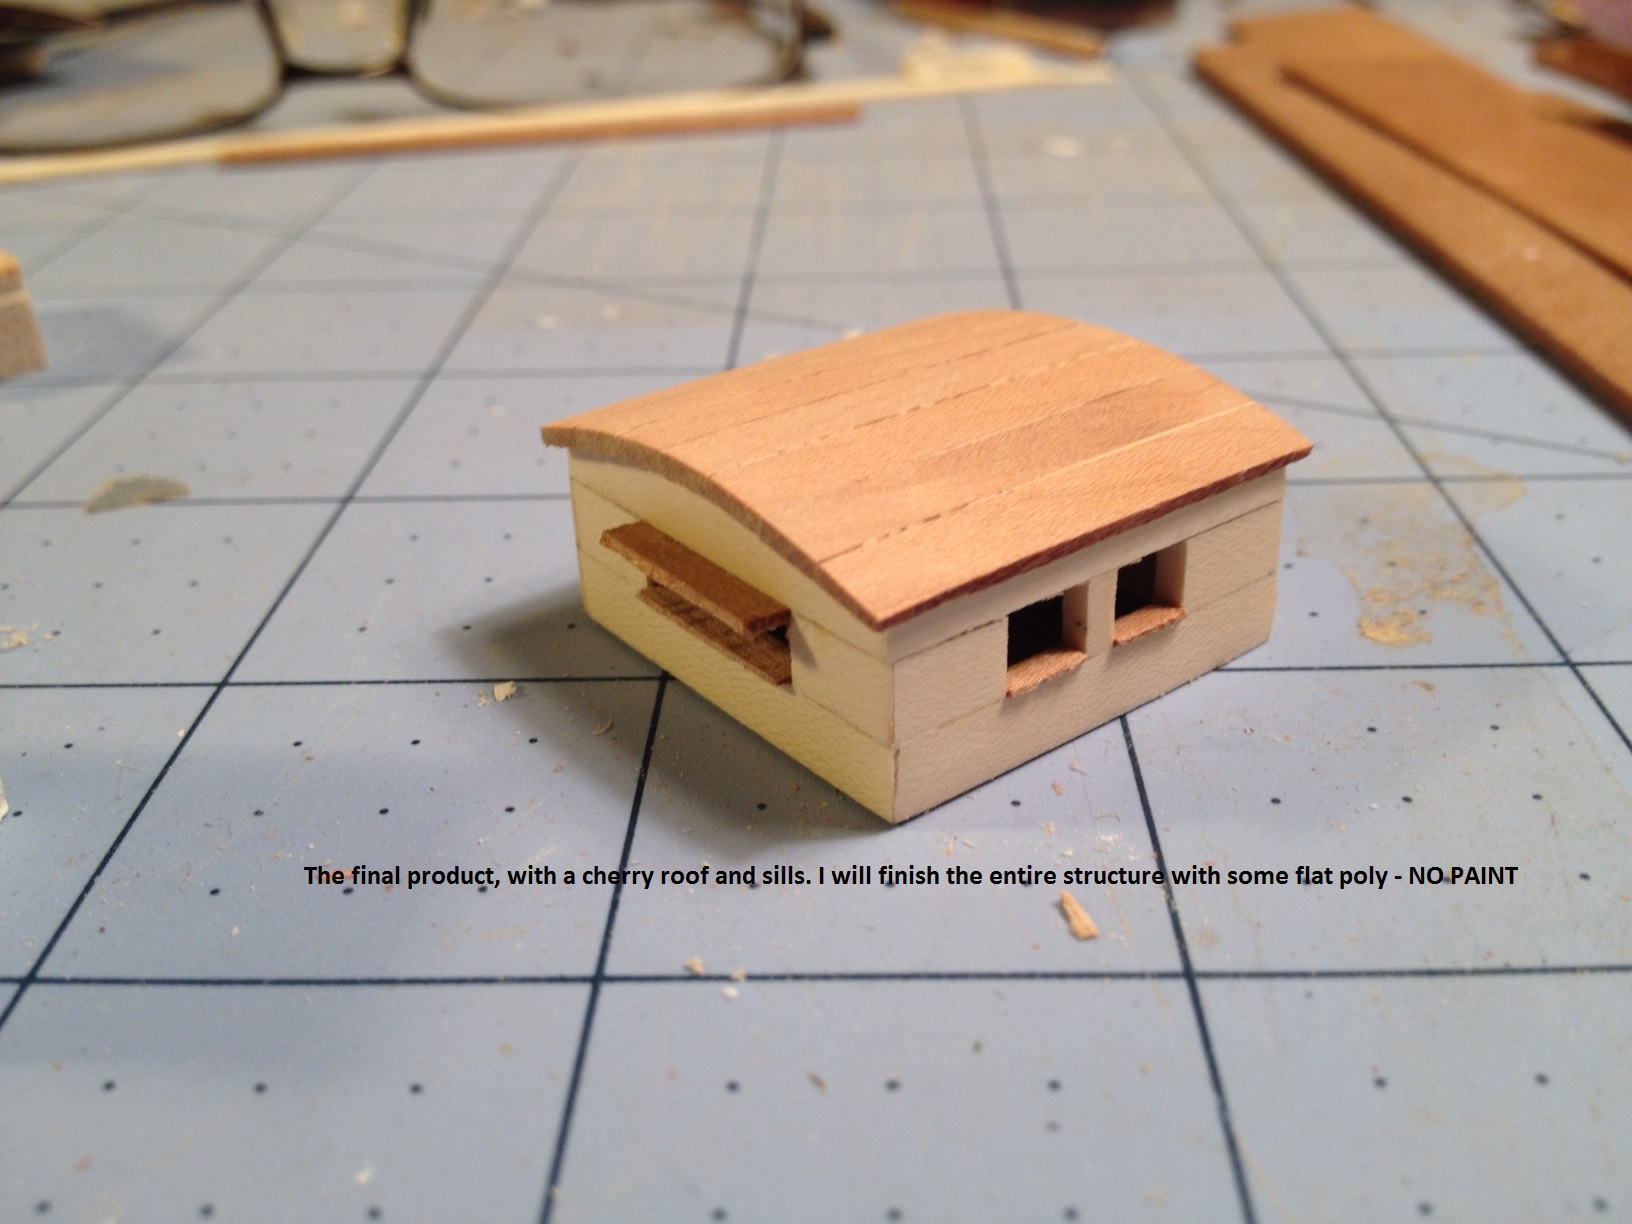
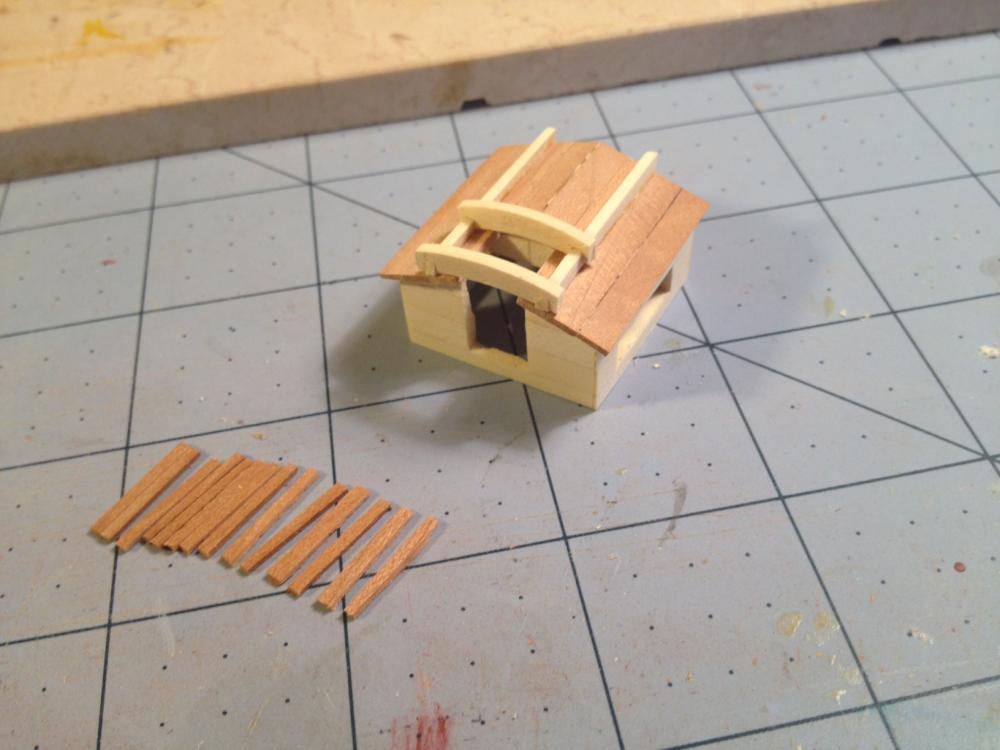
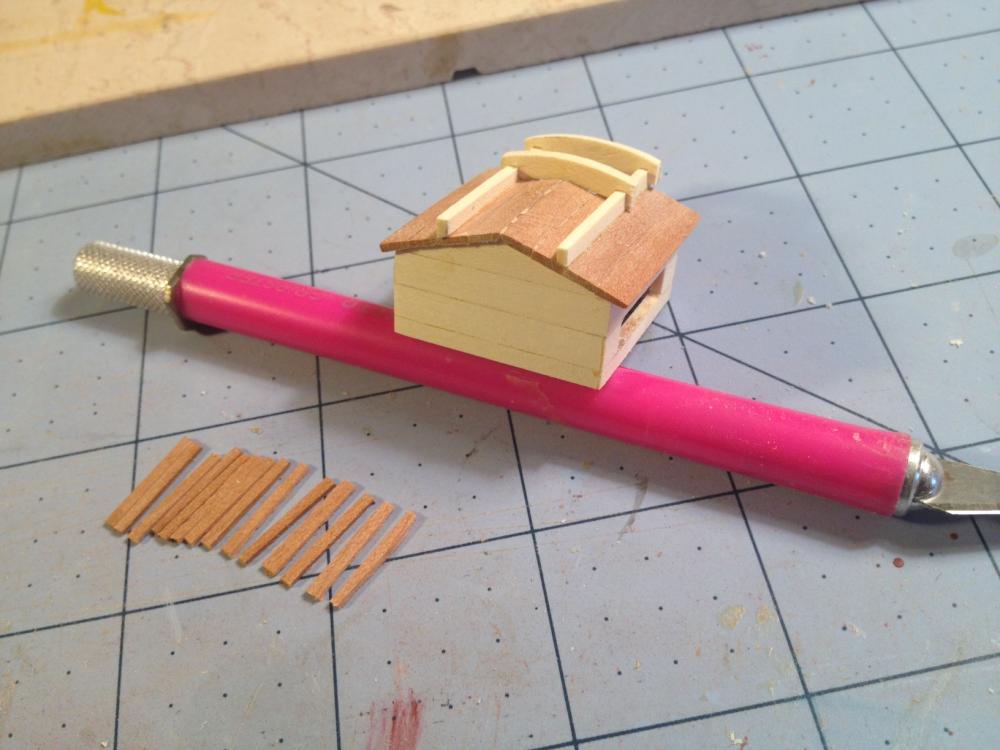
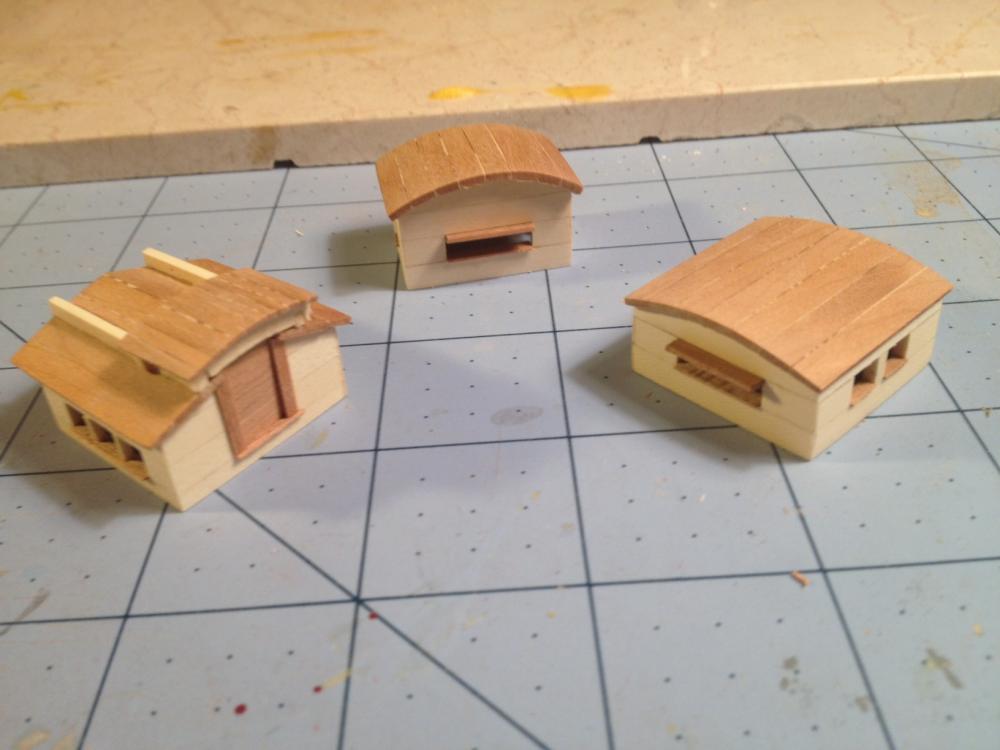
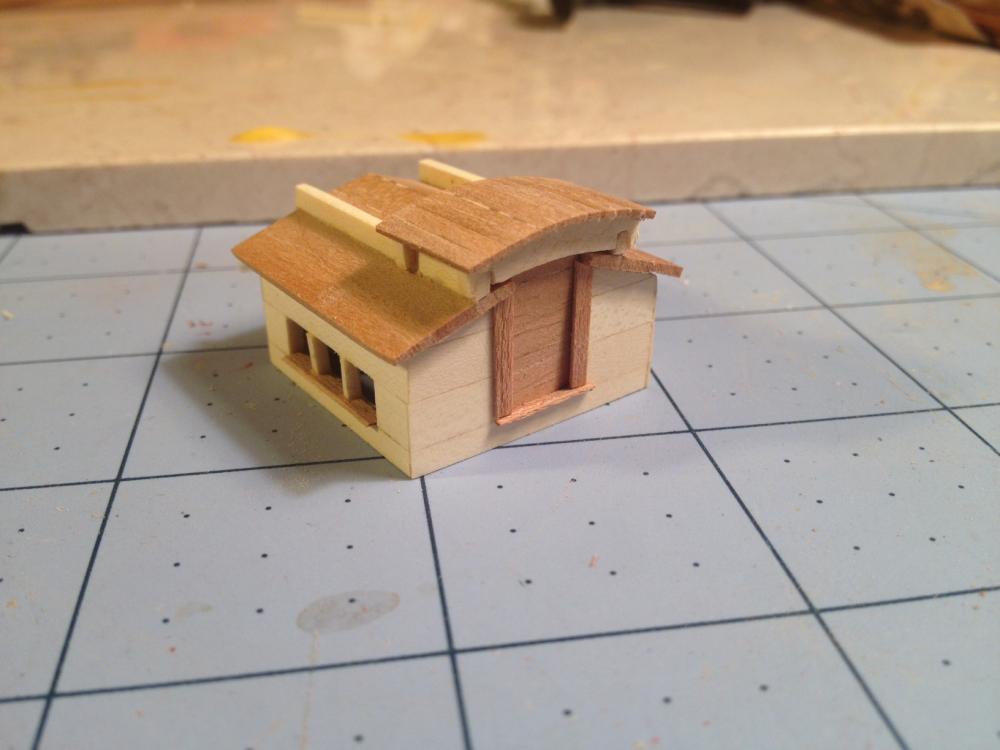
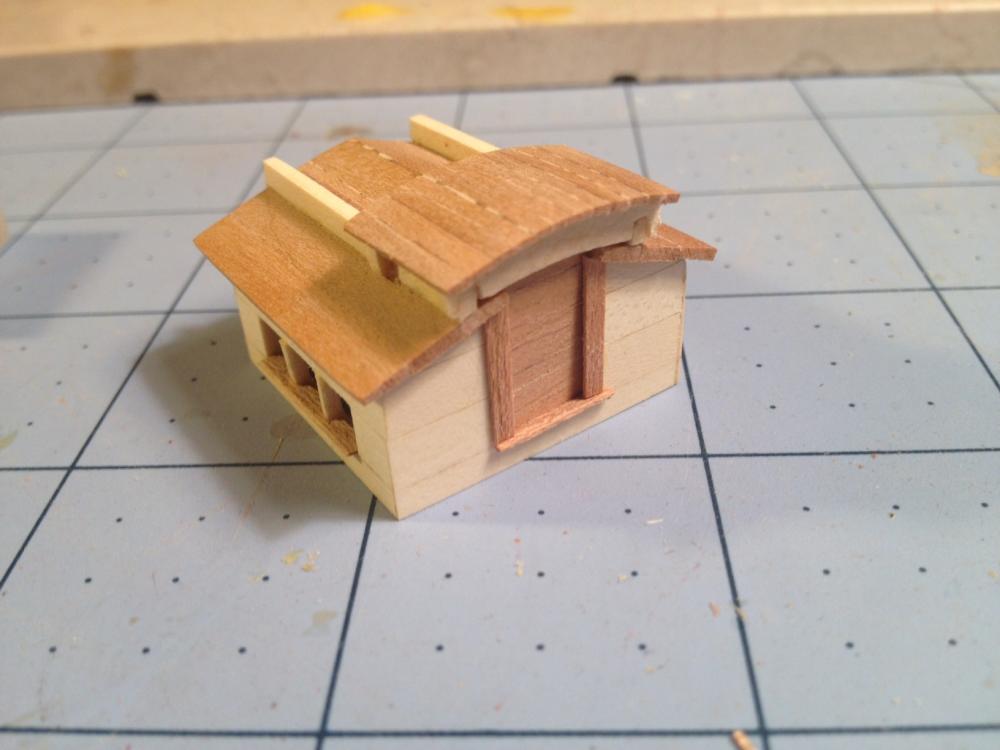
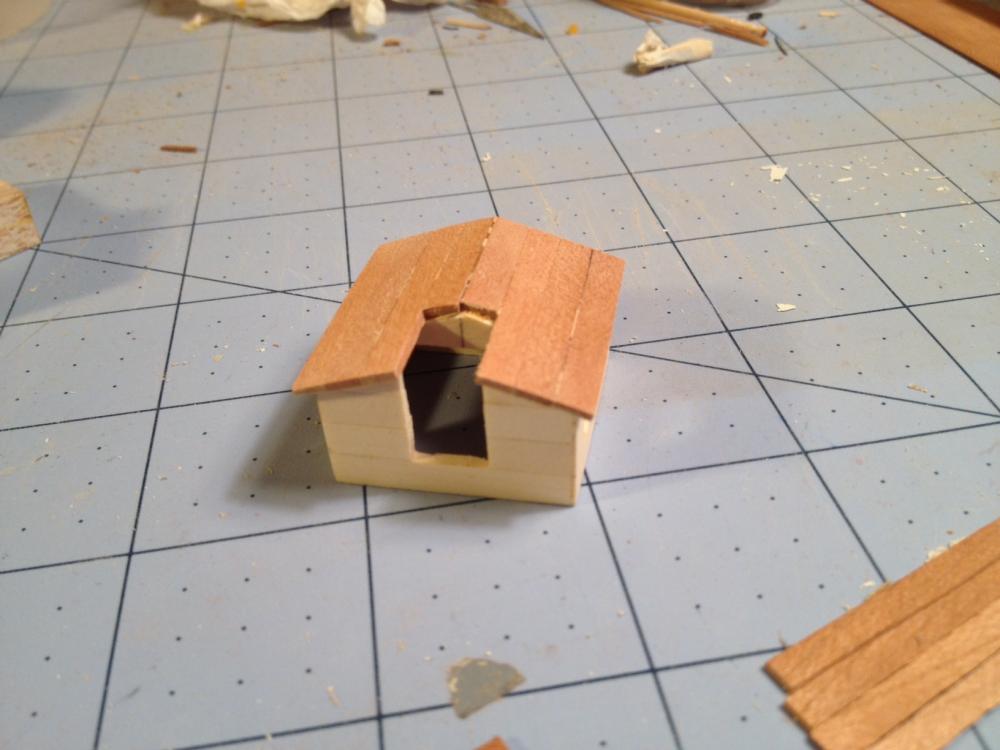
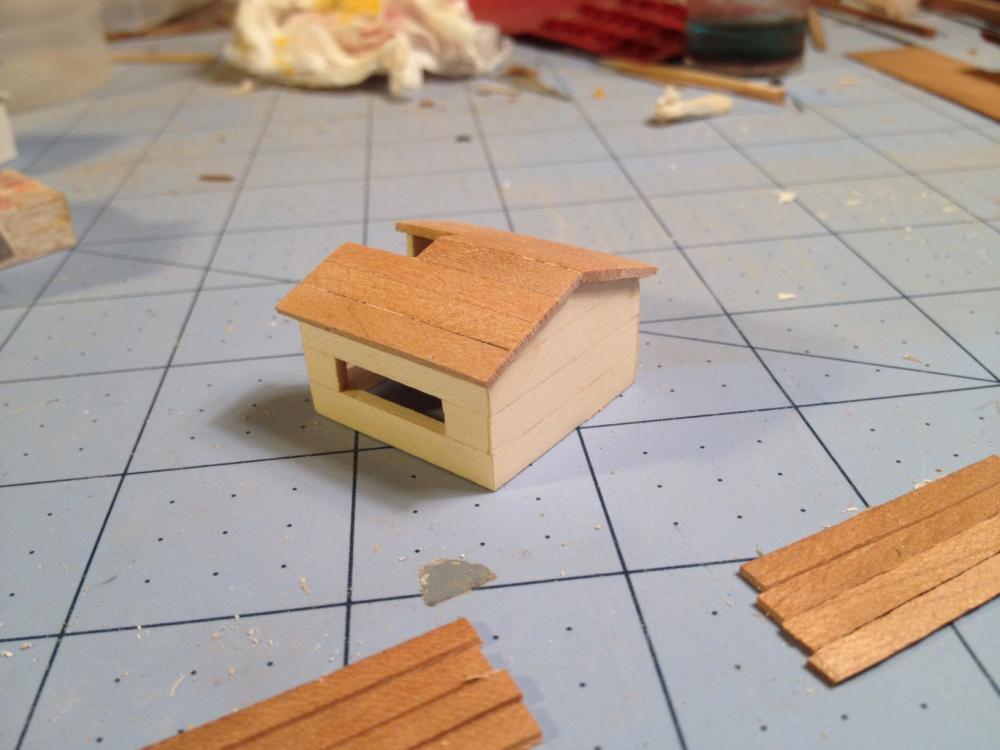
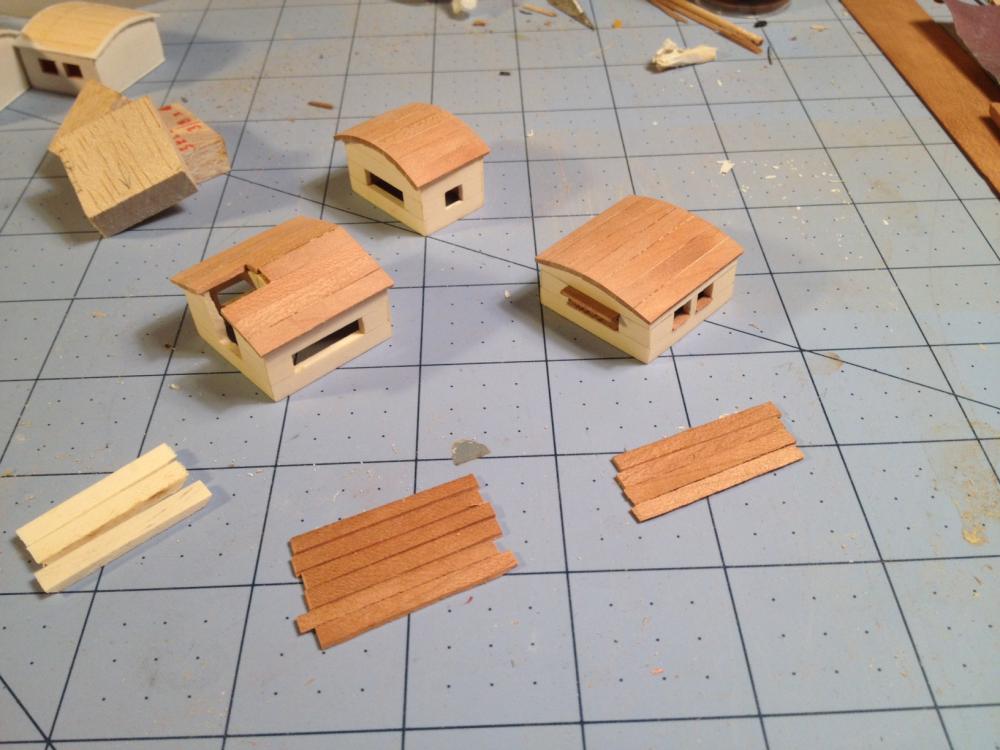
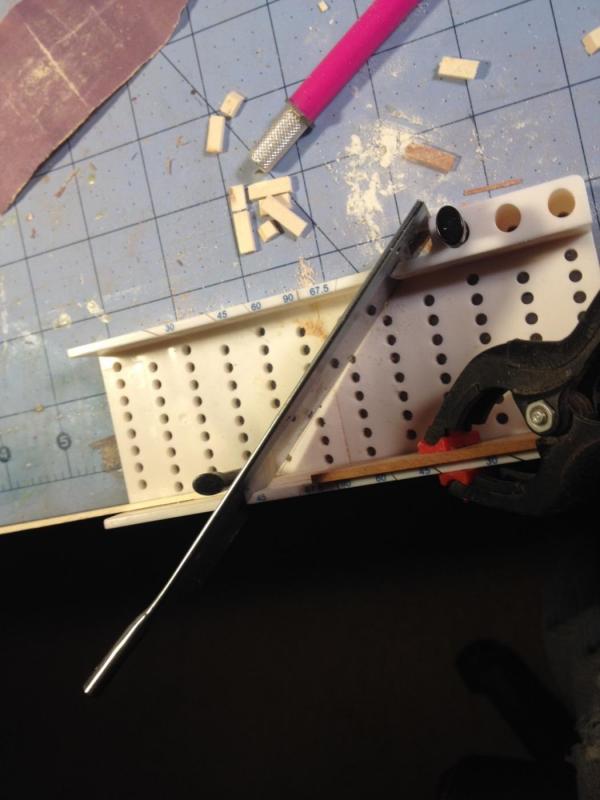
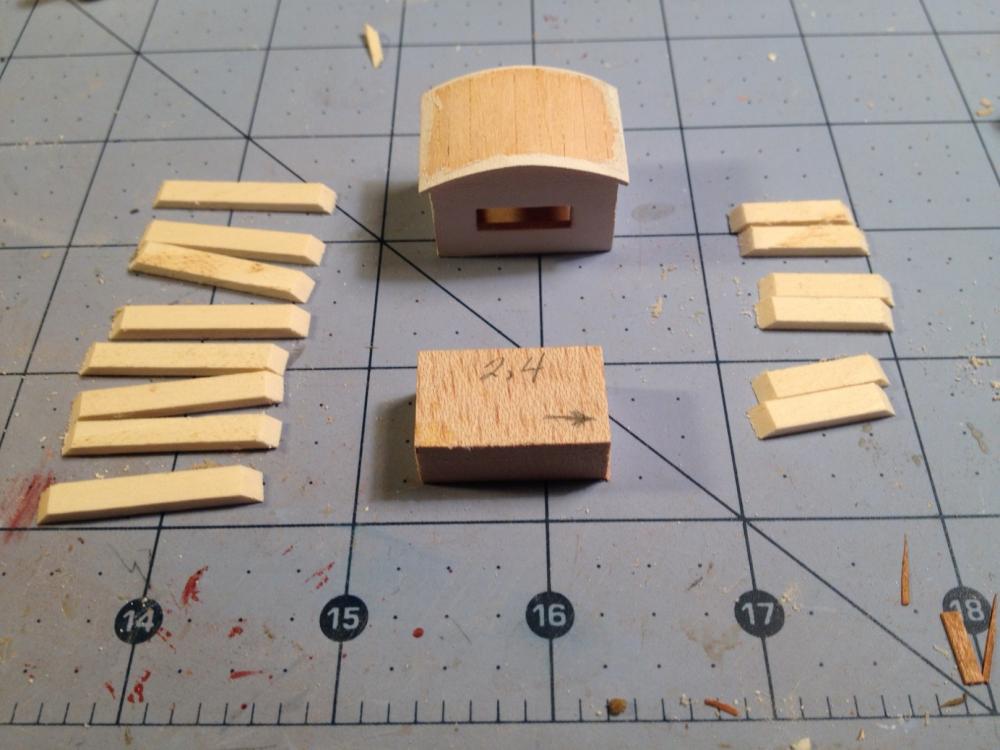
Skylights Still working on deck structures. Months ago, I built the three skylights. I built them out of bass wood strips per the plans. This was a tedious project that took me days to accomplish. The plans call for the structures to be painted, and all one color, walls, frames and roof. To be fair, the current ship's skylights are indeed painted a light brown - and all one color. I have viewed posts on this site, and agree with the commenters that these skylights are probably a modern addition, and would not have been present on the 1813 version, at least in this form. I would imagine however that there would have been some form of structure that would allow light in the hold and protection from rain. Deciding to go with the structures as planned, I decide to forego the all one color. I elected to line the roofs with cherry strip wood, that I would not paint. I masked off the roofs and sanded and primed the walls, and they sat in my make-shift paint booth waiting for me to find an acceptable beige paint. I looked at those skylights for weeks, and every time I did, I just did not think I could paint them to look good enough. So, I decided to scrap the existing structures and start over. I have learned that anytime I can avoid painting something, that is a preferable way to go. This time, I would build the walls out of of holly, and would mill some small cherry strip wood for the roofs, window sills and window covers. As I learned the first time around, I cut out balsa blocks to the size of the skylights and used that as a support to build around. It assured that the structures were square, and made the work with the small strips easier. I cut 45 degree but joints on my mini miter box. Getting the right size is a challenge, but once achieved, a block clamped to the fence allowed me to cut multiple even sized strips. I have provided pictures of the process. The built skylight at the top was the first version out of bass wood with a coat of white primer. The end product of the new design out of holly and cherry was much more acceptable.

- 648 replies
-
- 7
-
-
- niagara
- model shipways
- (and 1 more)
-
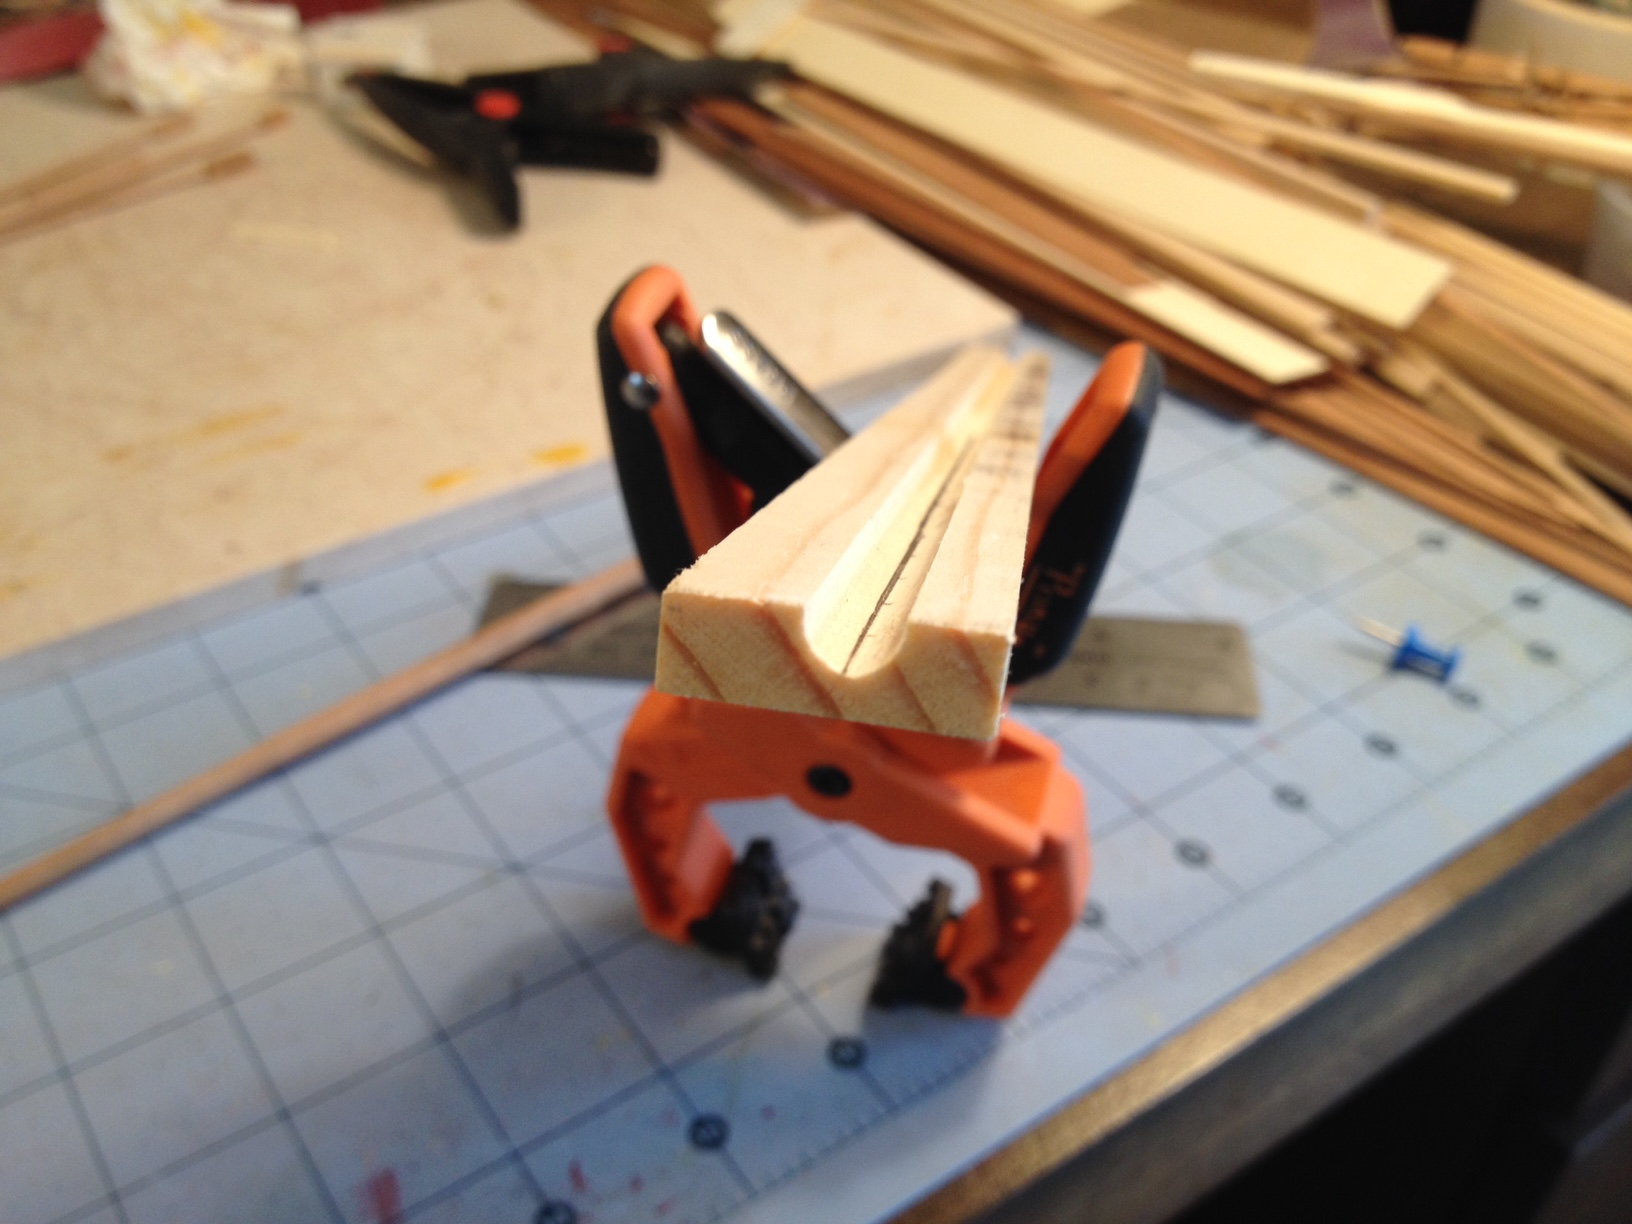
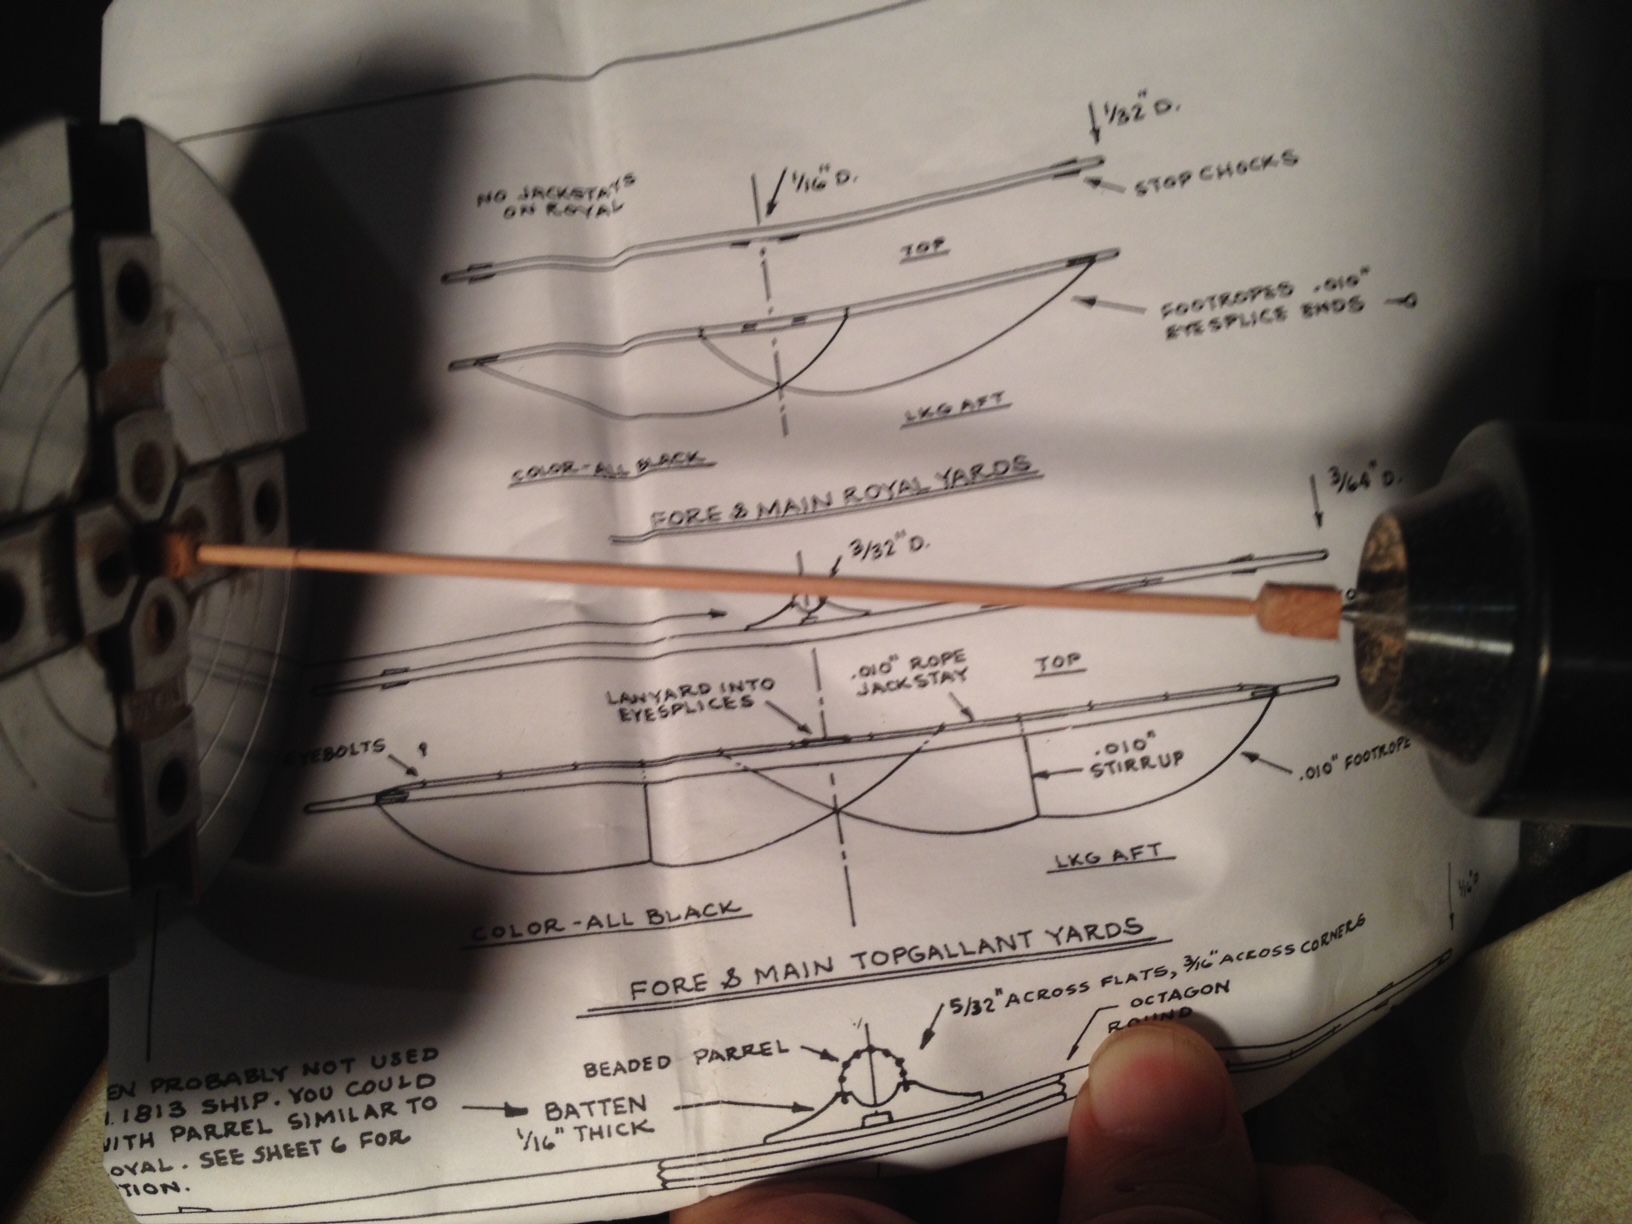
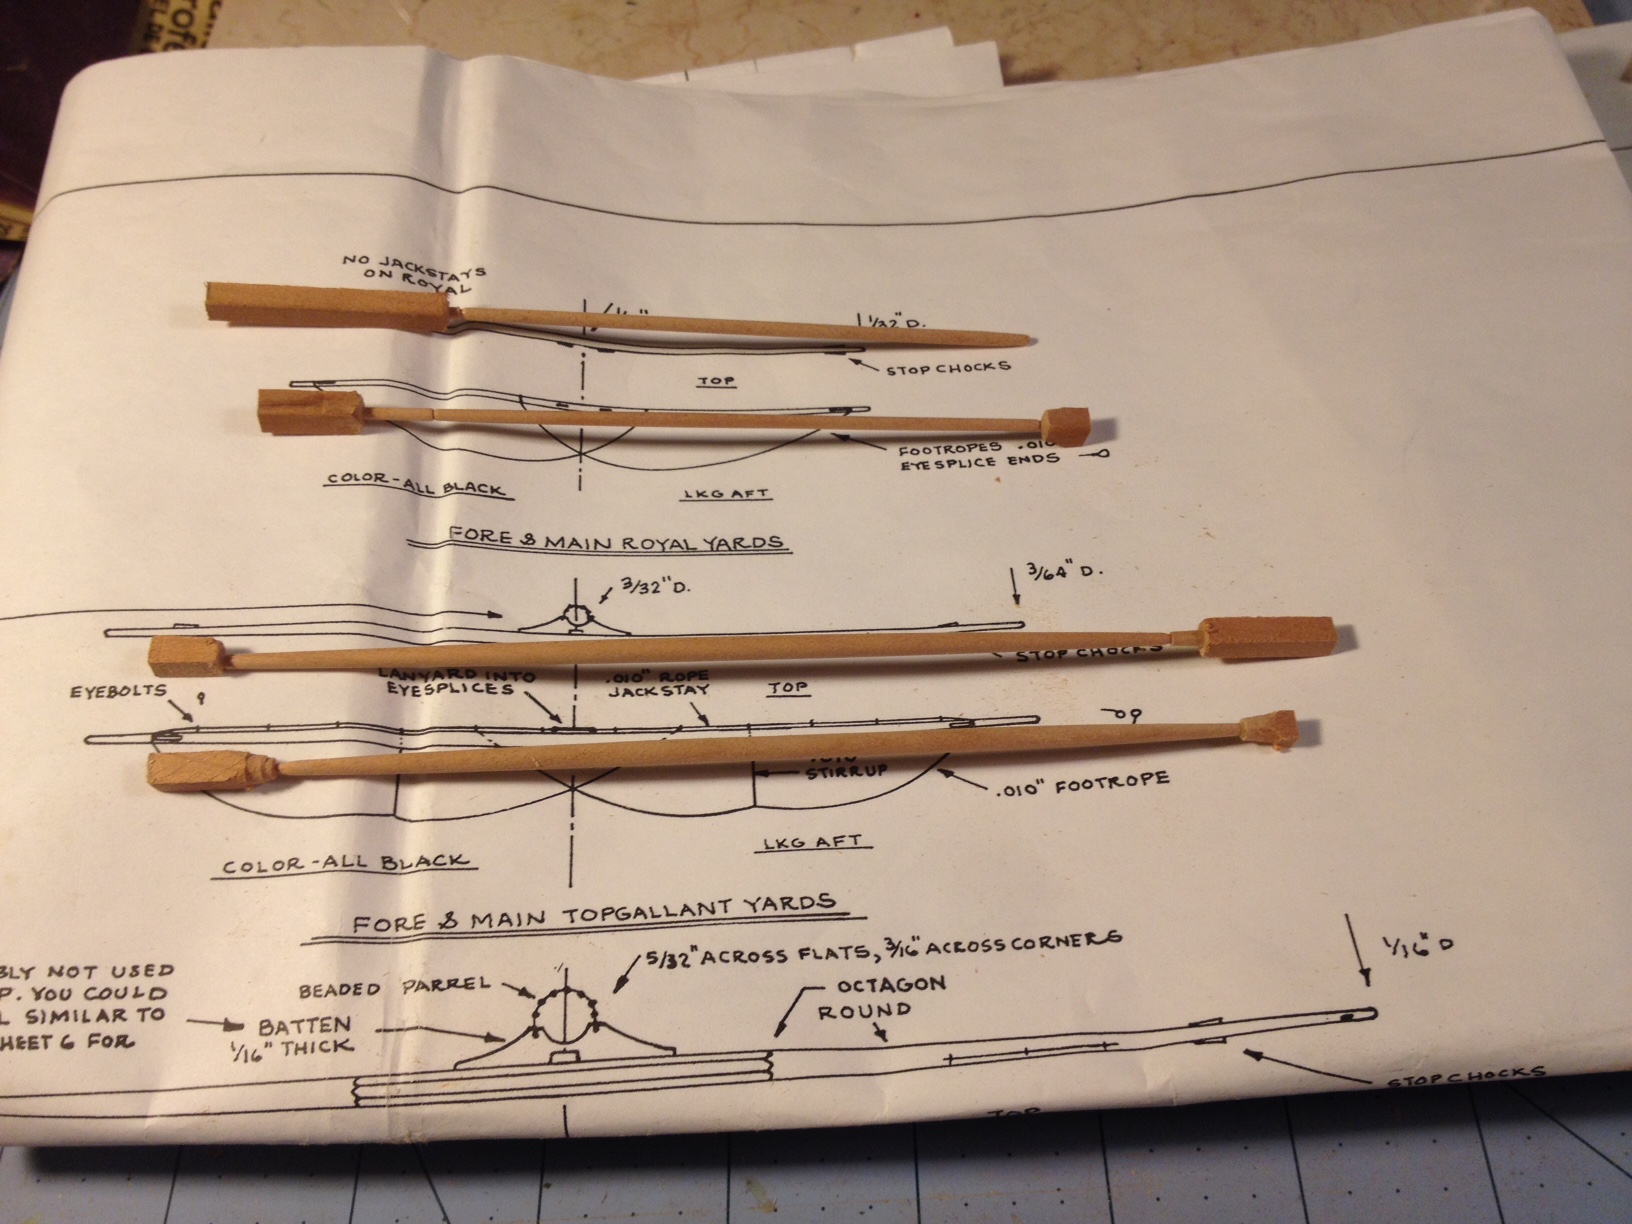
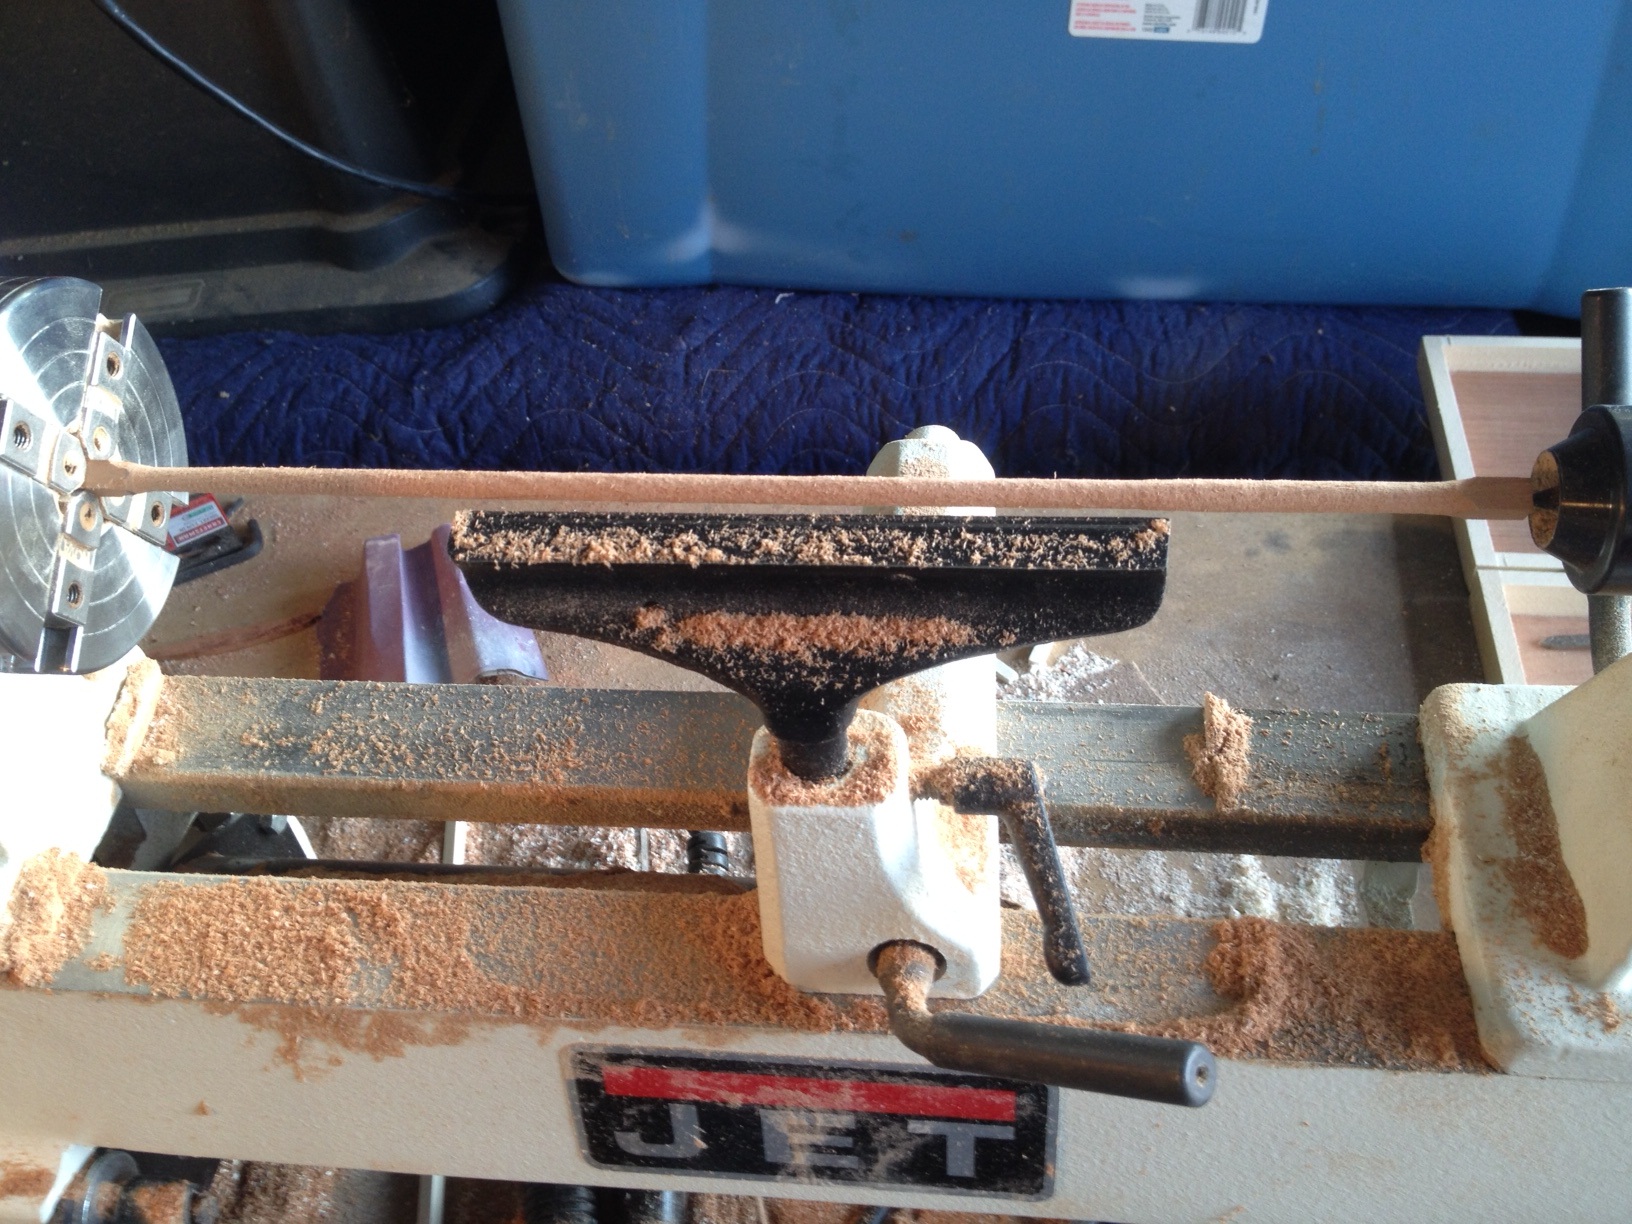
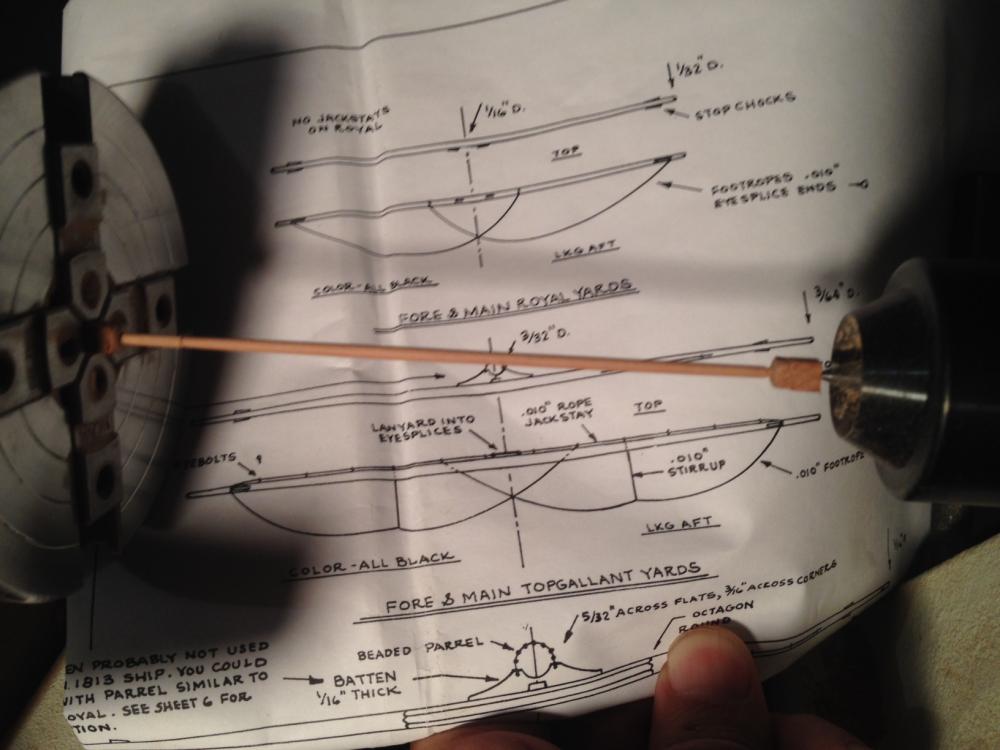
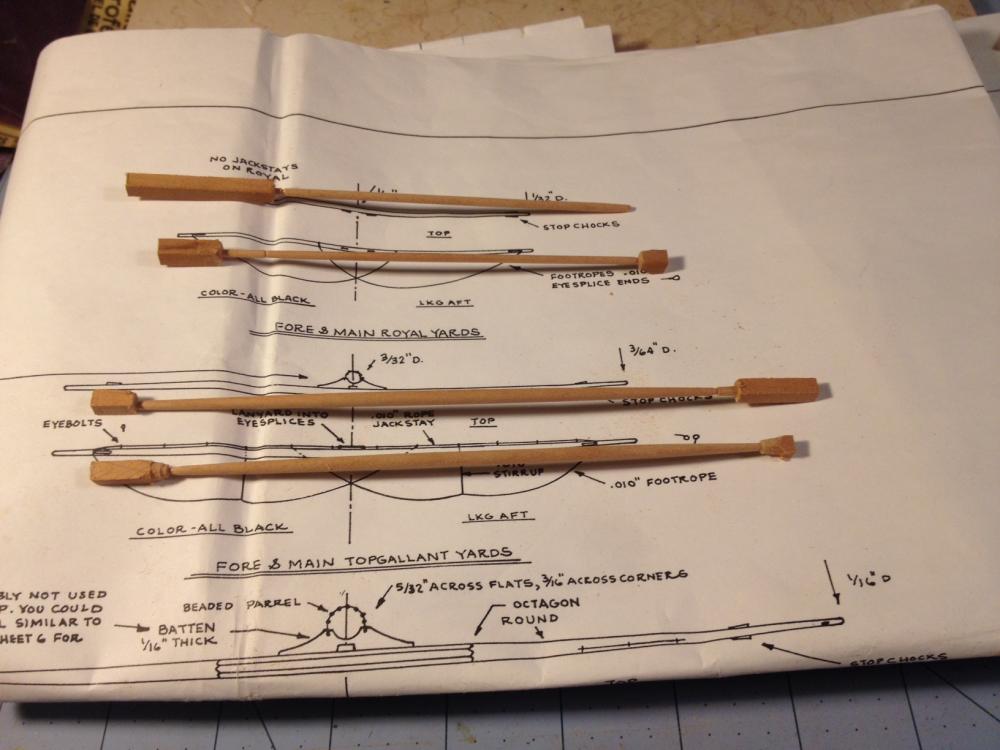
Royal and Topgallant Yards, I worked on the final set of yards. These were the toughest, due to their small diameter. Again, done in cherry, done slowly on the lathe with a sharp mini gouge, files and a lot of sanding. Next up are a series of eye bolts for jackstays on the Course, Topsail, and Topgallant yards. I have an idea for a jig to use with my plunge bit for the dremel. I will be working on that tomorrow. After that, off to the paint booth with all of the masts, bowsprit and yards.

- 648 replies
-
- 4
-
-
- niagara
- model shipways
- (and 1 more)
-
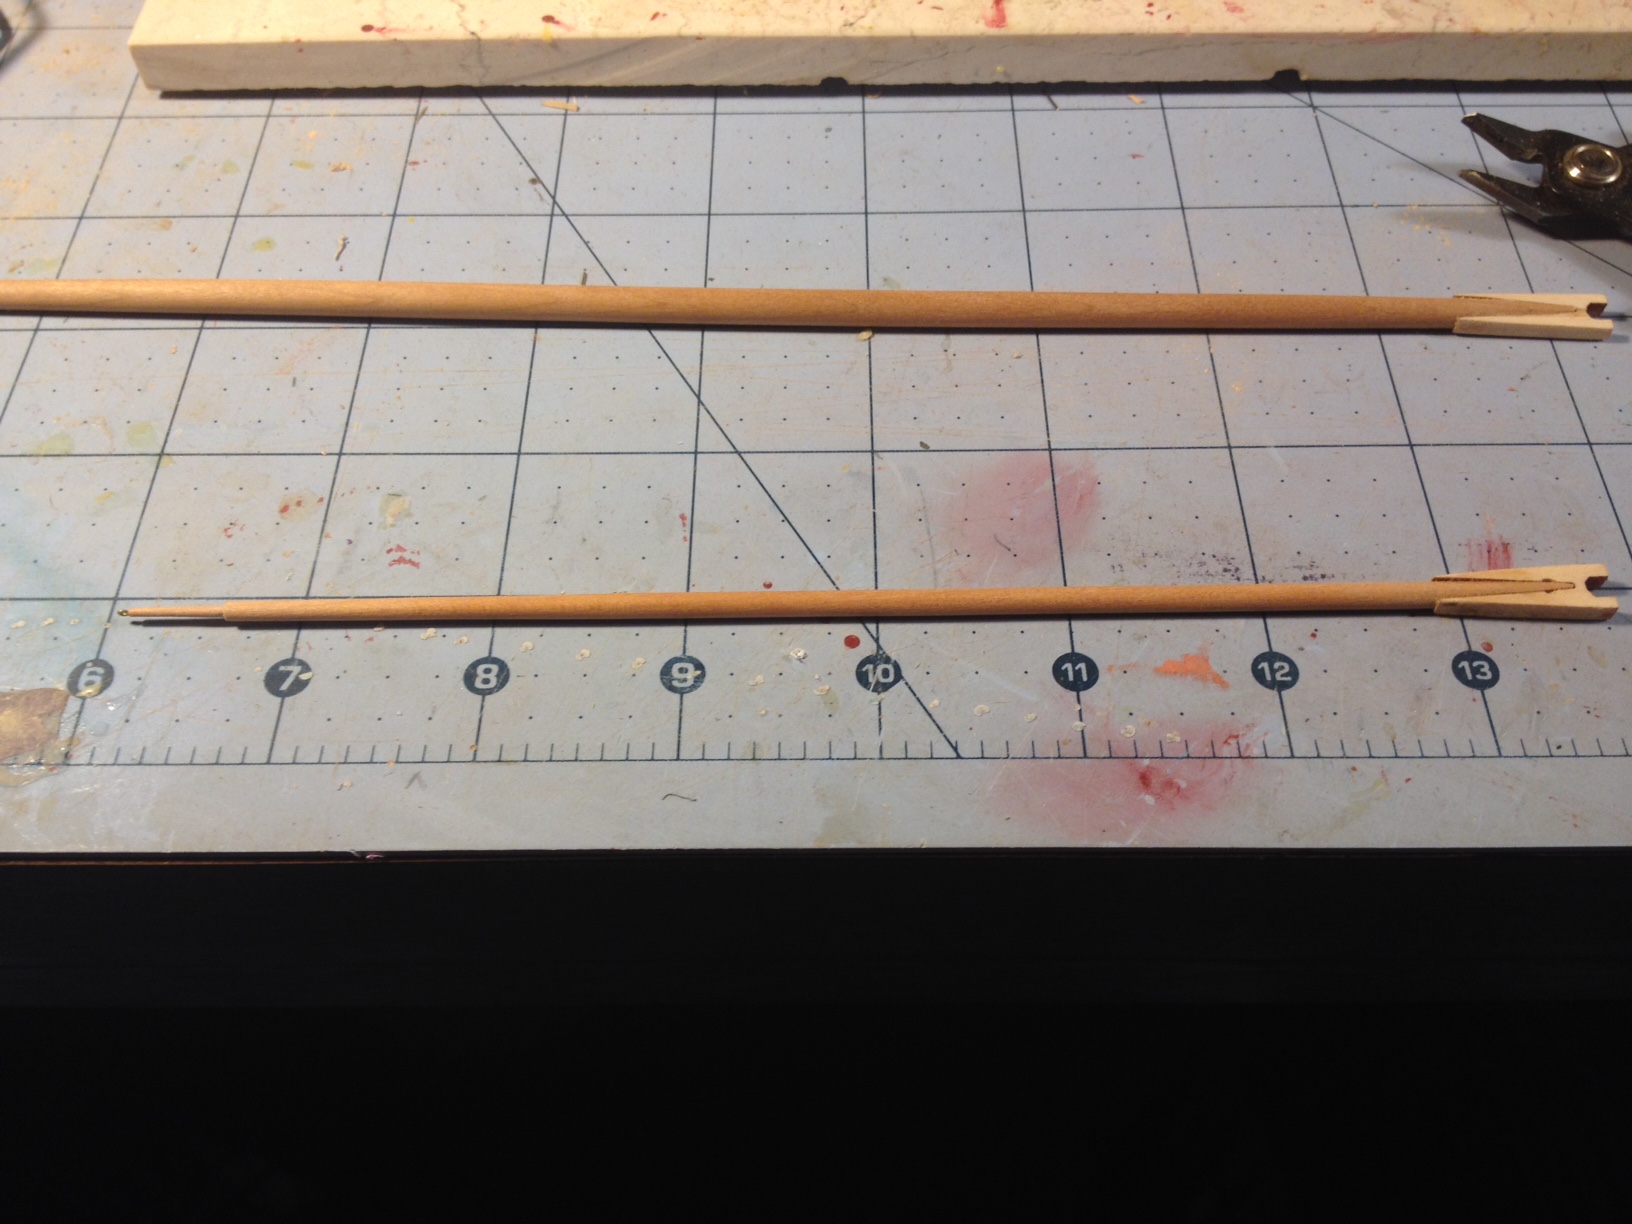
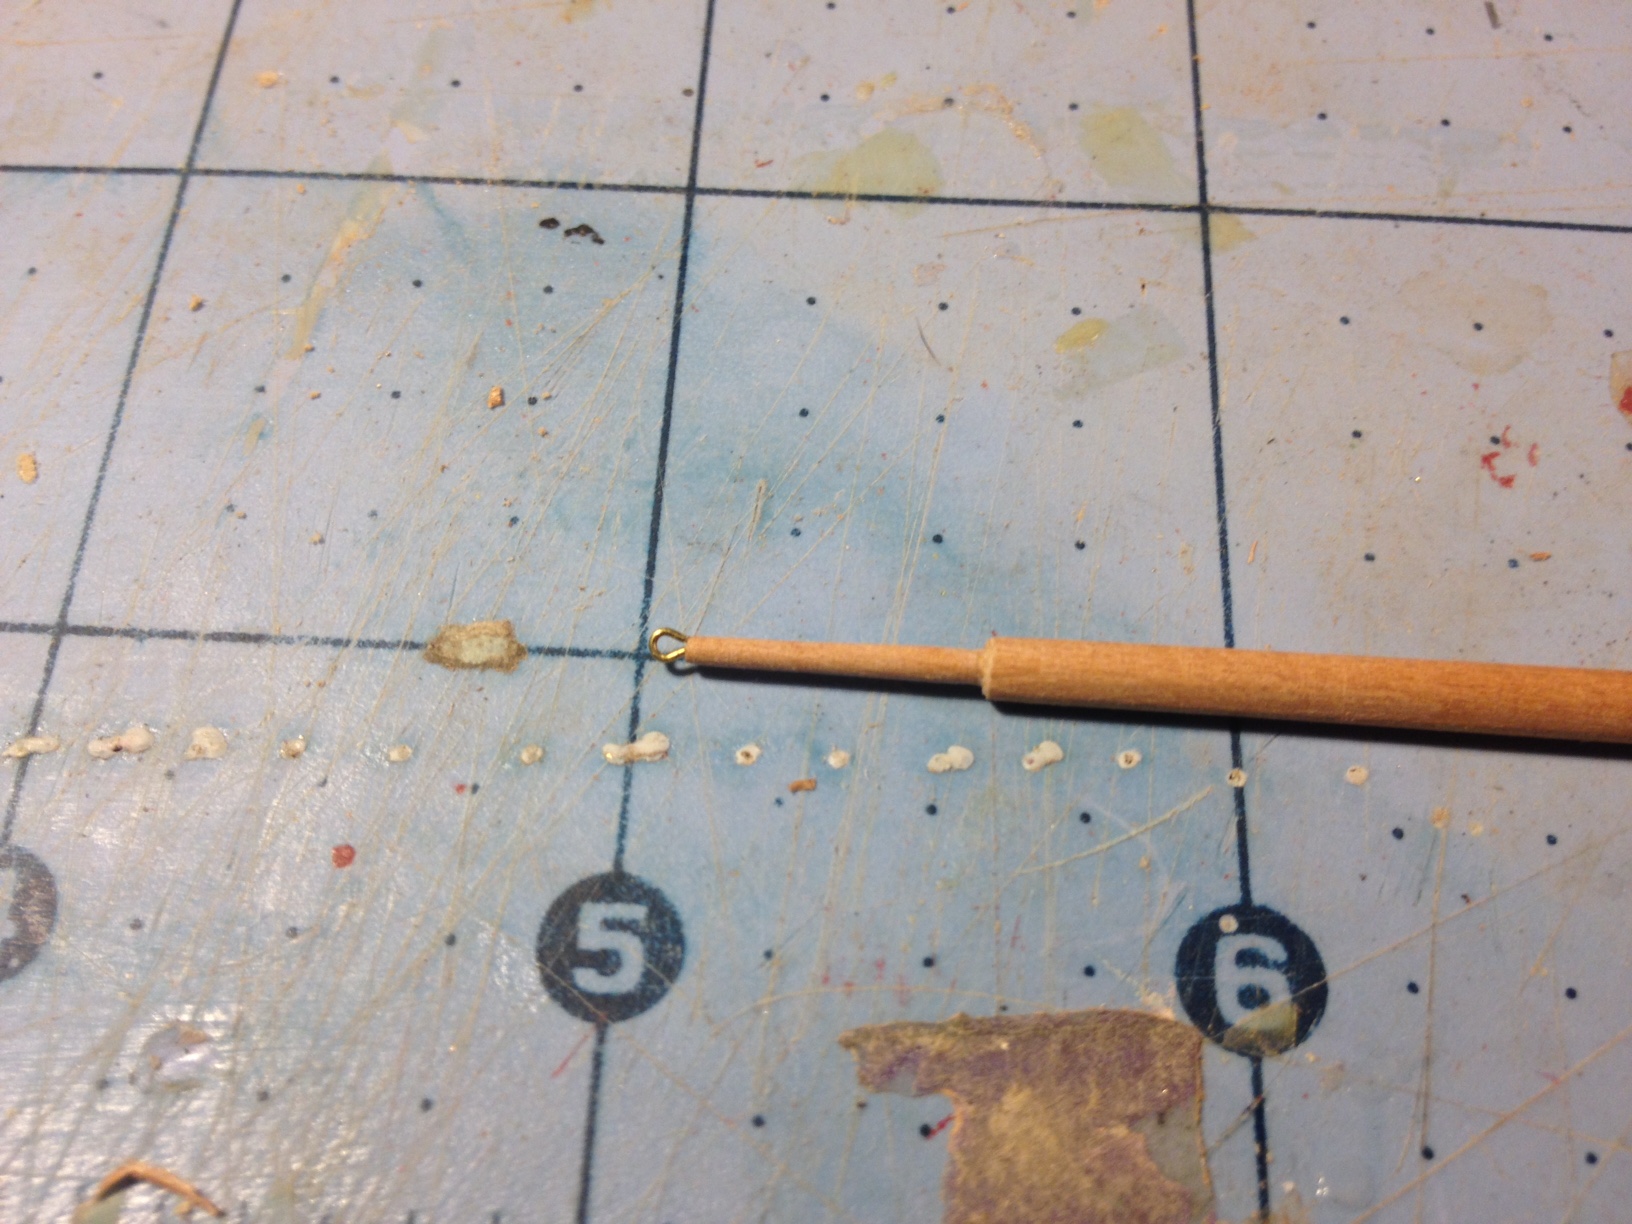
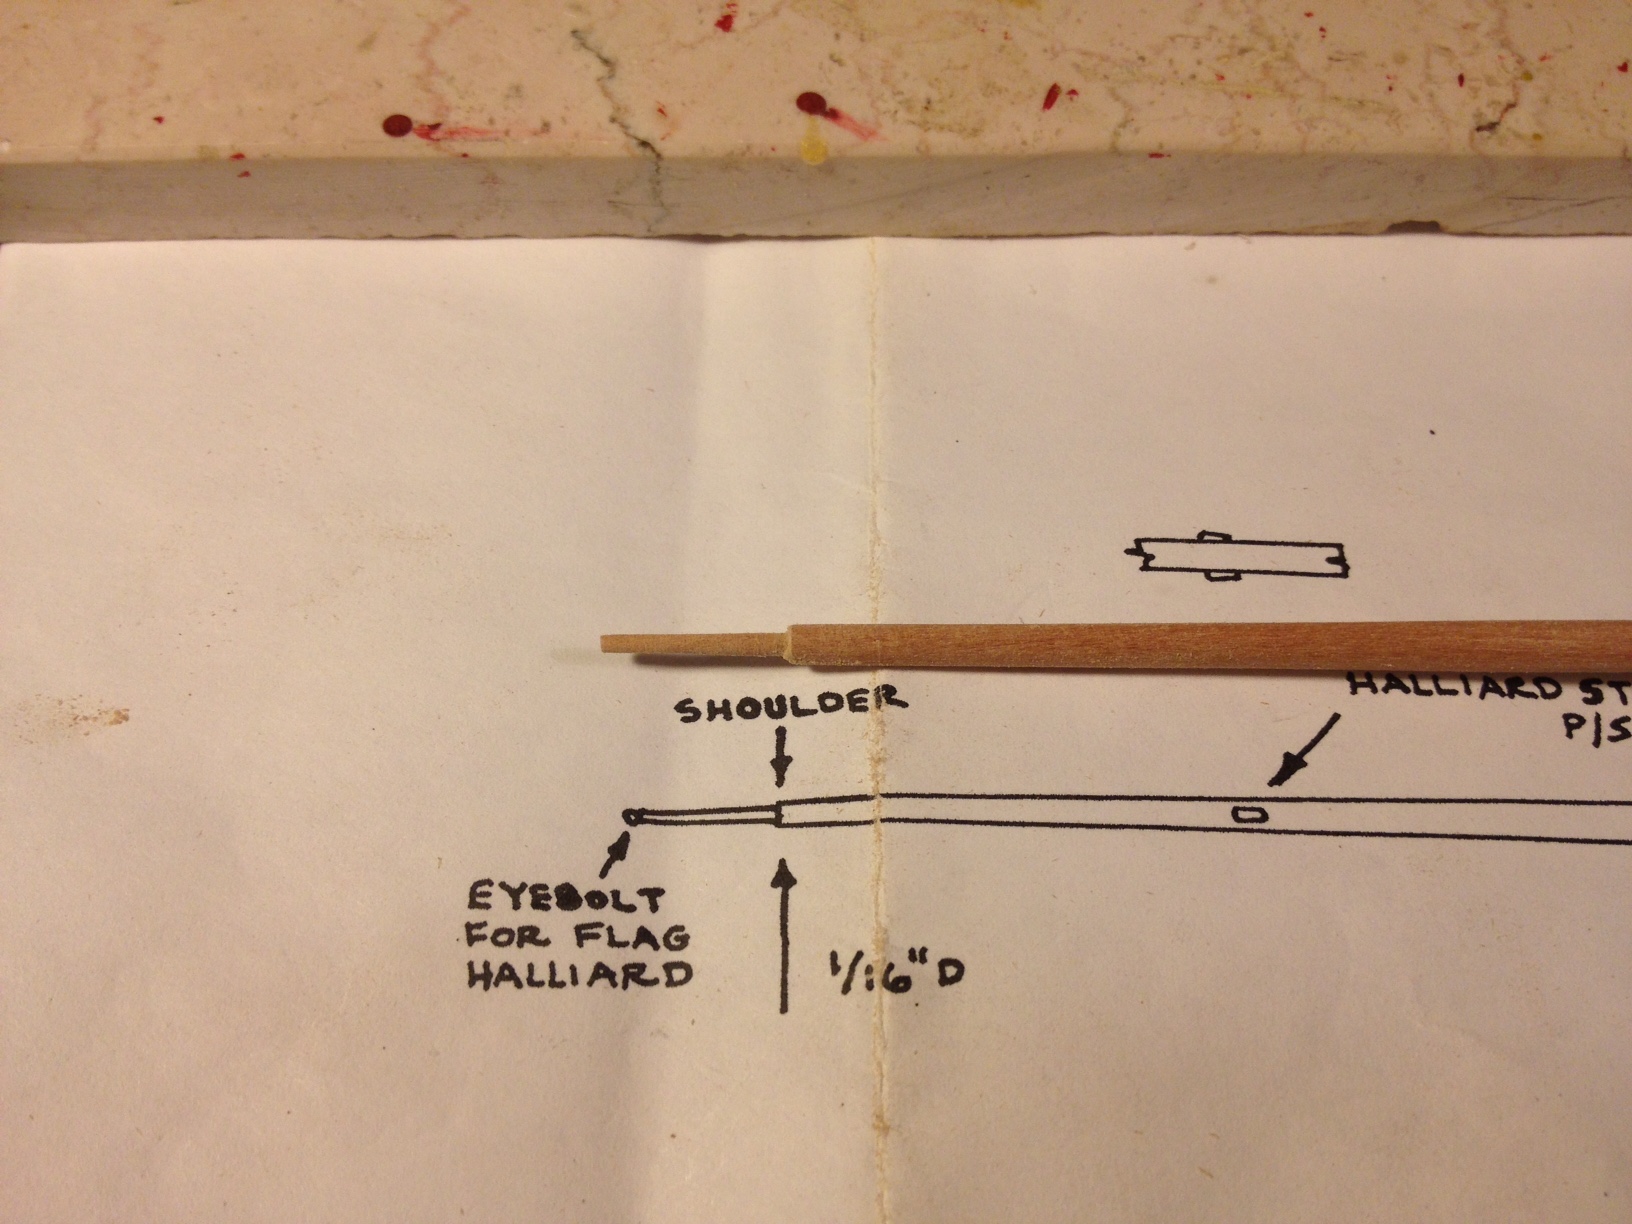
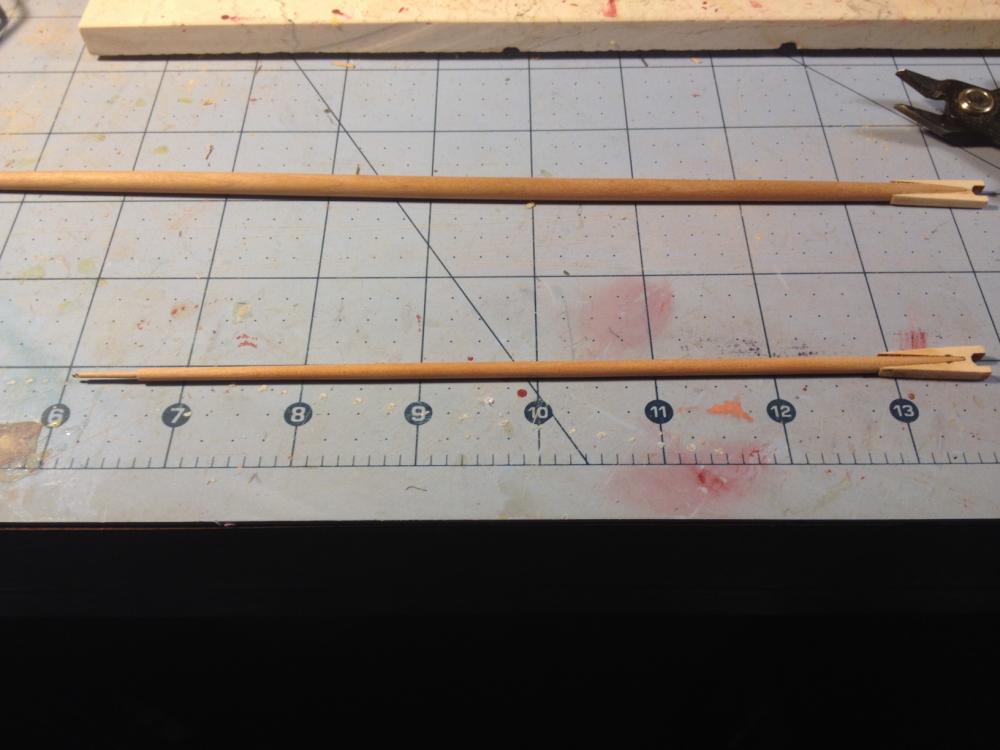
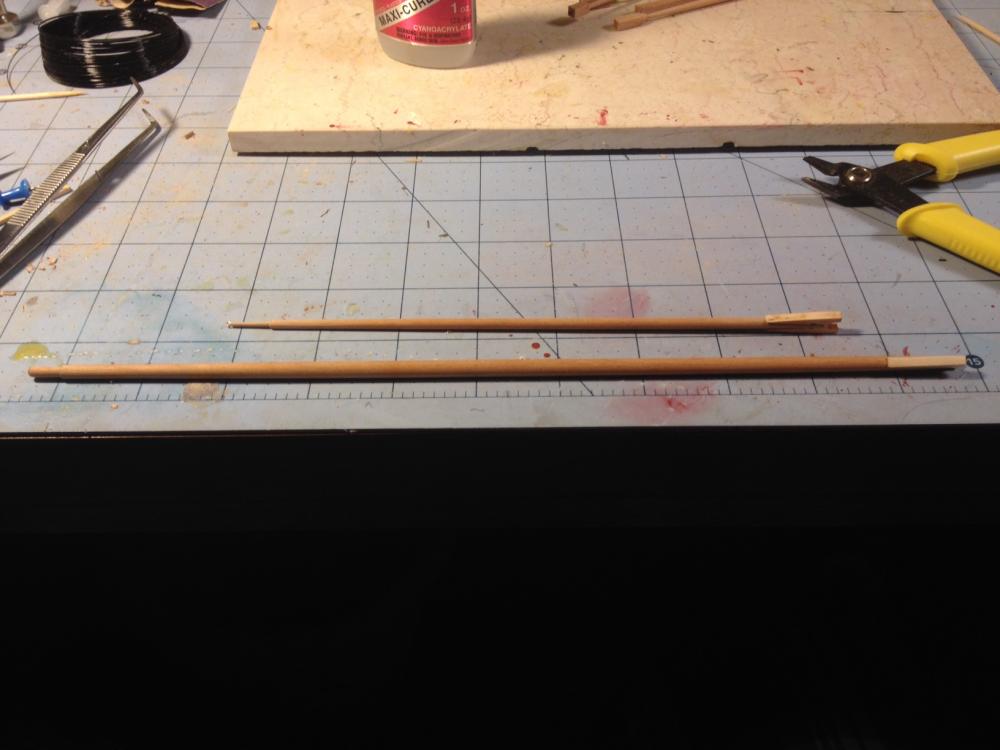
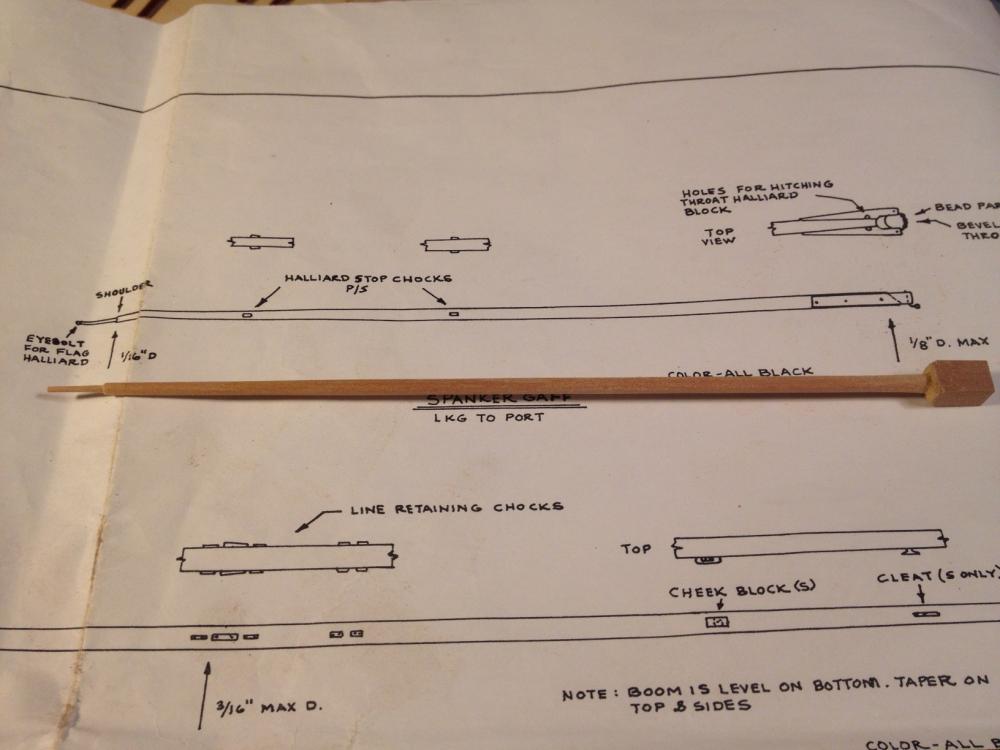
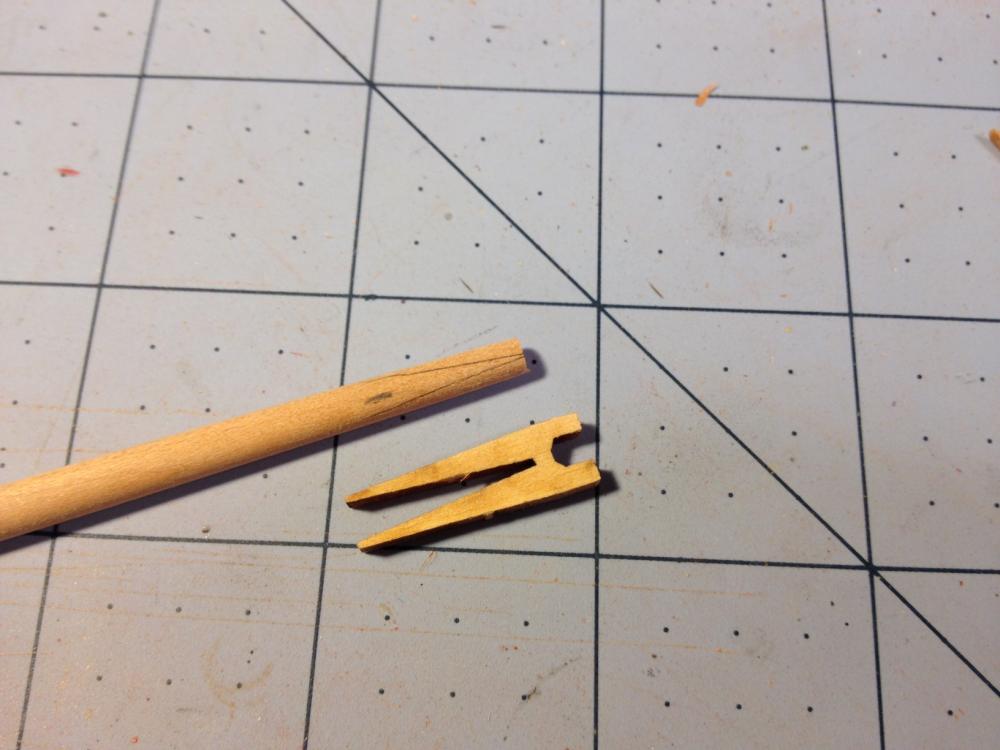
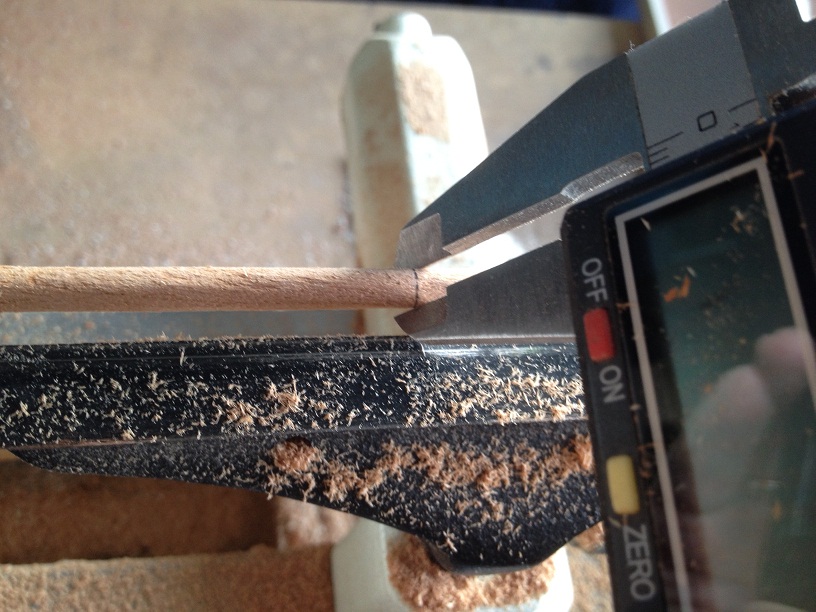
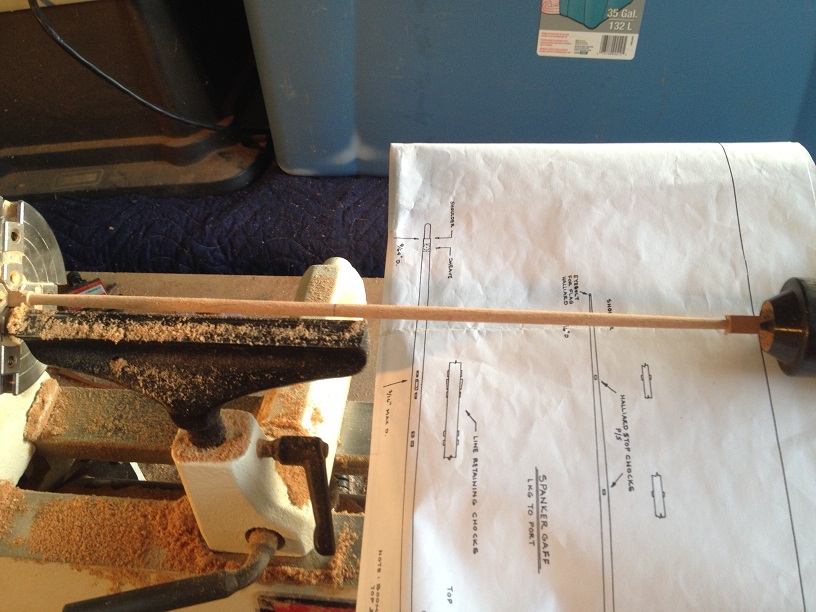
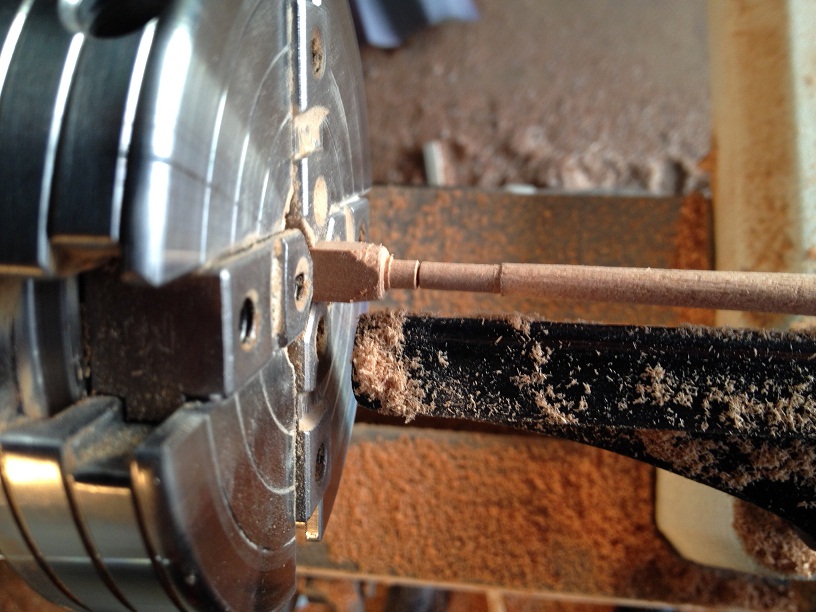
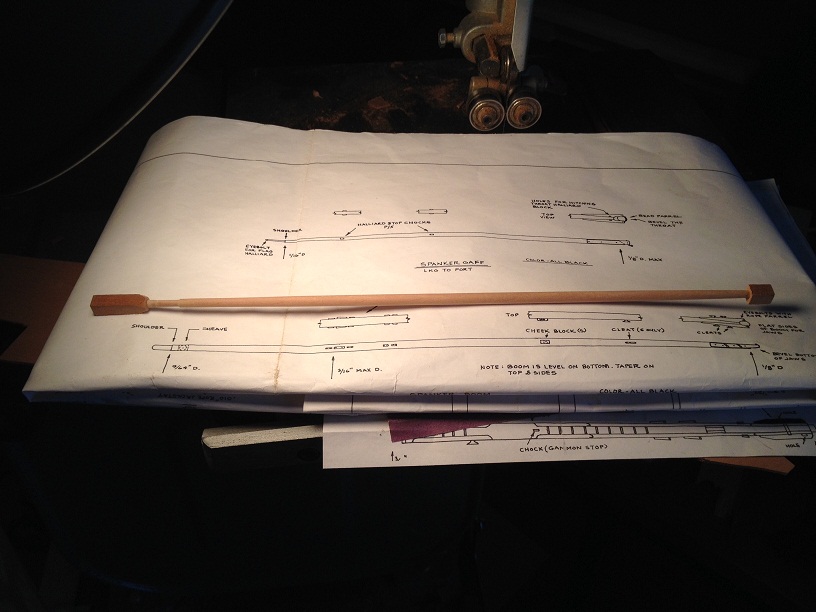
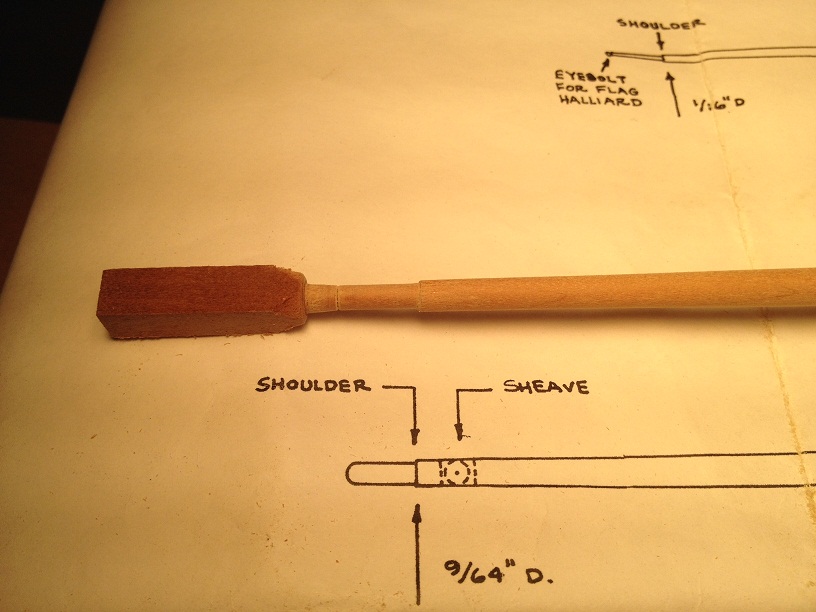
Spanker Gaff I did some further work on the spanker gaff. As I did with the spanker gaff, I carefully sanded the ends on the bench sander and glued on the jaws. I also inserted and glued the eye bolt.

- 648 replies
-
- 4
-
-
- niagara
- model shipways
- (and 1 more)
-
Welcome to the forum. I felt compelled to jump in to let you know that we have all felt the anxiety of "the first build." However, the folks on this forum are true craftsmen and always willing to lend a hand. It is the only way I could have overcome the many challenges of a POB wooden ship kit. You build board looks great. I have made mental note, since I used a table vice, and your rig would have been better. Get ready to face snags in the build process. Model Shipways makes great kits, and their customer service is outstanding. But all kits require the "impromptu" actions. If your Keelson piece does not meet the shape of the plan, consider cutting the shape out of the plan and tracing it on a some scrap sheet material from the kit (if there is enough on the periphery). Just a suggestion that most of us have had to do from time to time. I have been doing that a lot since I have decided to replace all of my basswood and plywood parts from my Niagara kit with cherry. Having access to a jig saw helps. I am not sure I understand your question regarding the deck "camber," but doing things by eye are pretty routine, so getting good at that will serve you well throughout the process. Good luck and happy building. Feel free to stop in anytime.
- 45 replies
-
- 4
-
-
- model shipways
- willie l bennett
- (and 1 more)
-
Spanker Gaff and Spritsail Yard More turnings. I wanted to knock out some of the more delicate pieces on the lathe. The spanker gaff was a real challenge. I broke the first one trying to turn the small shoulder, and then on the second, I discovered a defect in the cherry stock right about the time that I got to the desired radius. On my third try, I simply turned the stock to the1/8 diameter, and then decided to carve the shoulder by hand. The plans call for an eye bolt at the end of the spanker, so I drilled the hole BEFORE I tried to carve the end down to 1/16. After some careful work with the x-acto knife and sanding pads, I obtained a desirable result. The spritsail yard was a little more routine. Careful work with the gouge and some sanding. These two parts took all night. Tomorrow, I hope to sucessfully attach the bee to the spanker gaff.

- 648 replies
-
- 4
-
-
- niagara
- model shipways
- (and 1 more)
-
Mike, If you were to place an order to Syren for rope and blocks, what would you order. I note that the material you are using is from there, so perhaps you have already placed that order. Would you mind giving me a suggestion on what I should order. Time to break down and get it done. Thanks.
- 843 replies
-
- 2
-
-
- niagara
- model shipways
- (and 2 more)
-
Mike, Thanks for the insights. 180 of these!!! I can't wait.
- 843 replies
-
- 2
-
-
- niagara
- model shipways
- (and 2 more)
-
Mike All of the parts and masts are from the same board. Everything is the same color. I am taking pictures with two different cameras and it is the light. I don't have a steady rest, but sure could use one. Sounds like a good father's day present to myself.
- 648 replies
-
- 3
-
-
- niagara
- model shipways
- (and 1 more)
-
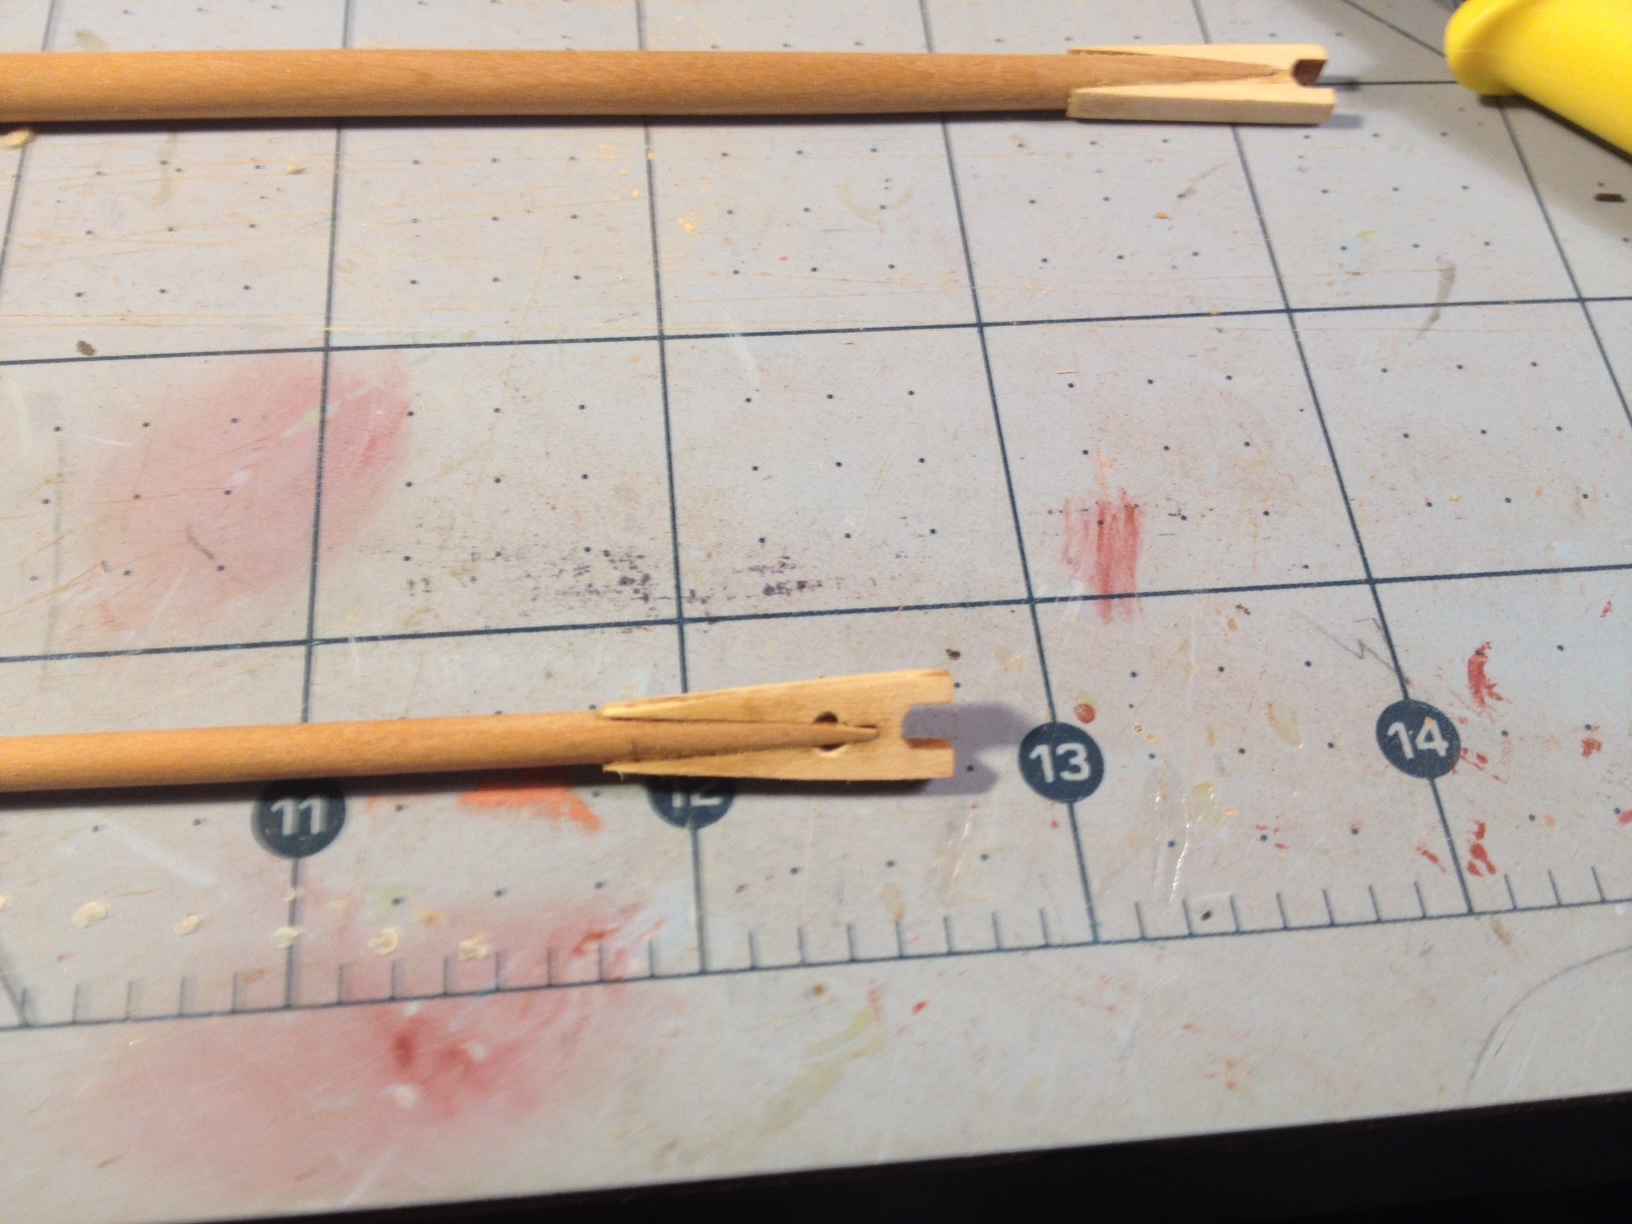
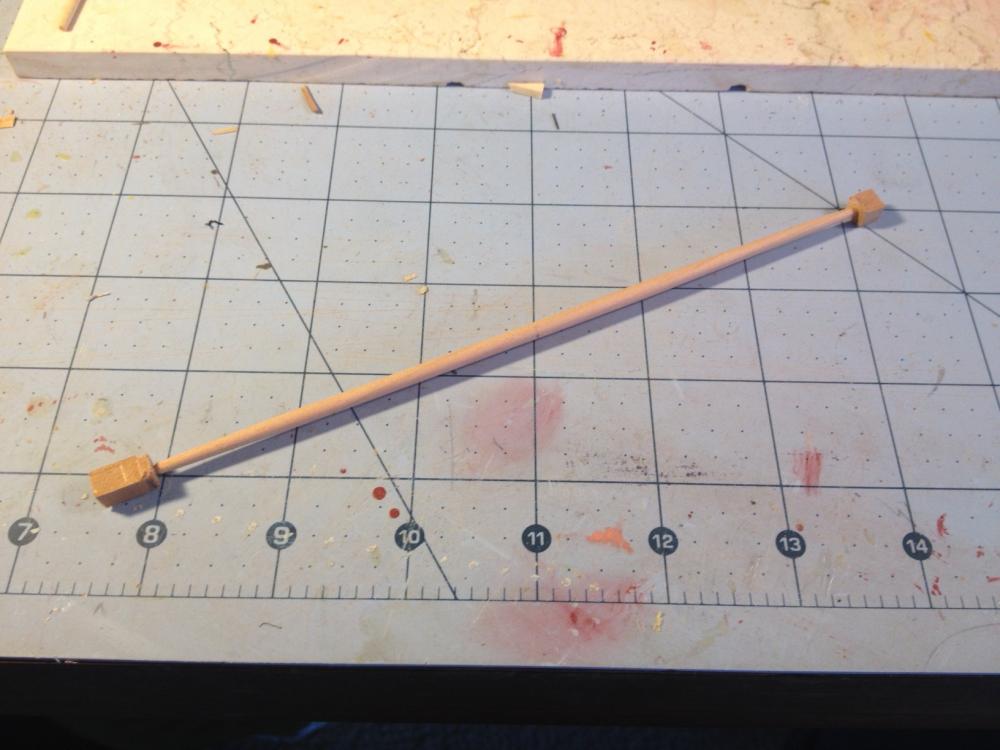
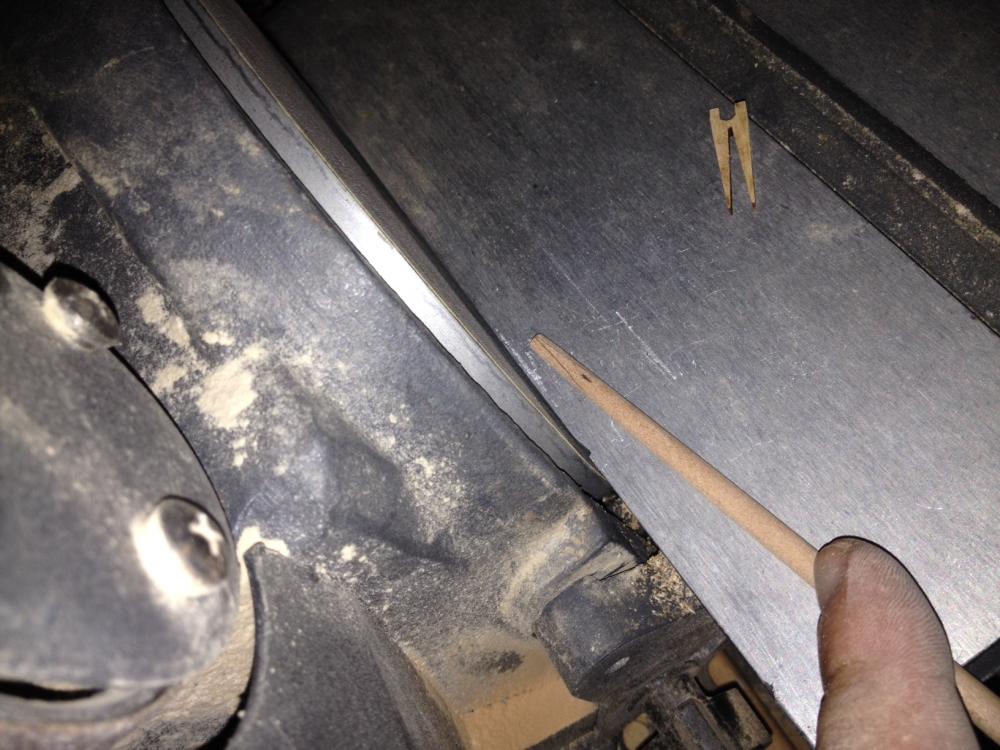
Spanker Boom Jaws This is a challenge. Screw this up and you will back at the lathe to turn a new spanker boom. Since this is going to be painted black, I chose to use the laser cut jaws (one less piece to cut from my cherry). I used the piece to trace the taper on the boom. I made a tick mark at the top of the boom to use as a reference point while I sand the sides flat to accept the jaws. Then I carefully take the end down on my bench sander. I put a 400 grit pad on the disc so that it doesnt take too much. But you still have to be careful. It will remove material pretty quick. After some hand sanding, I got it to fit and glued it up.
- 648 replies
-
- 4
-
-
- niagara
- model shipways
- (and 1 more)
-
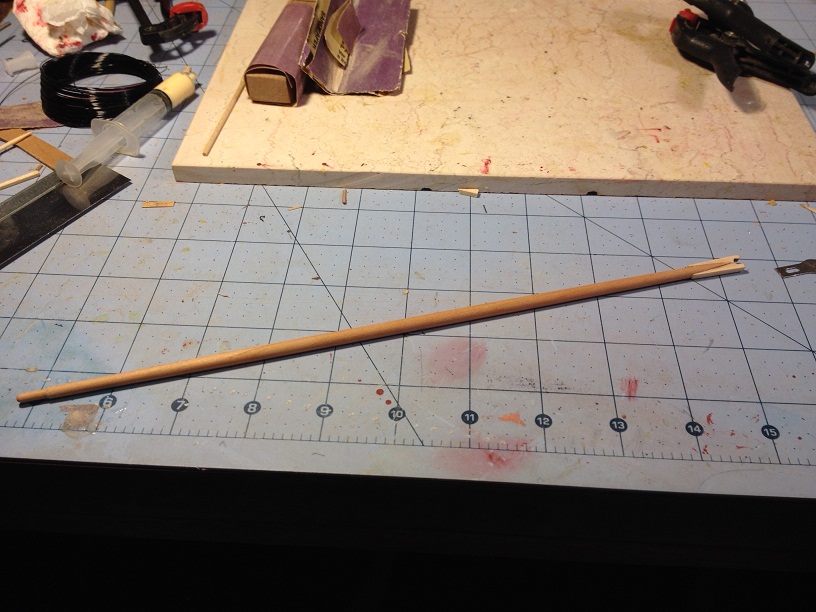
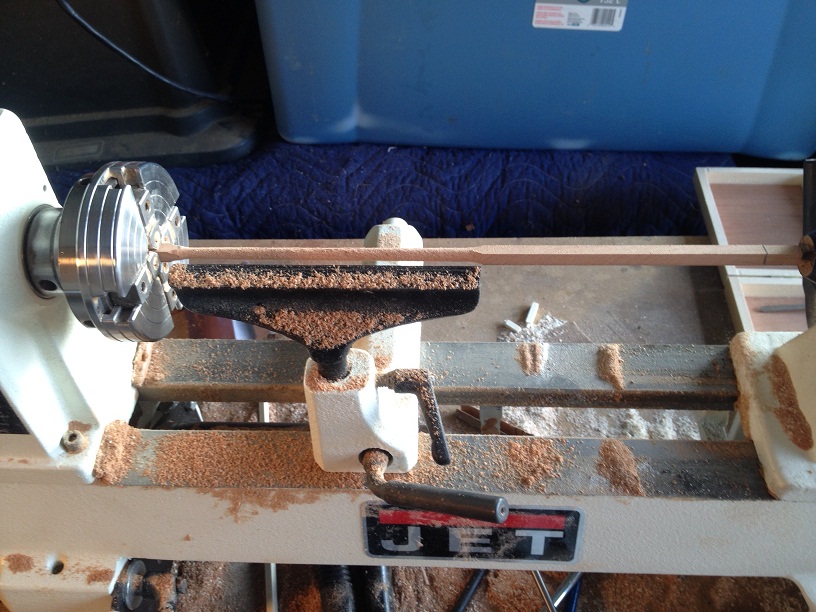
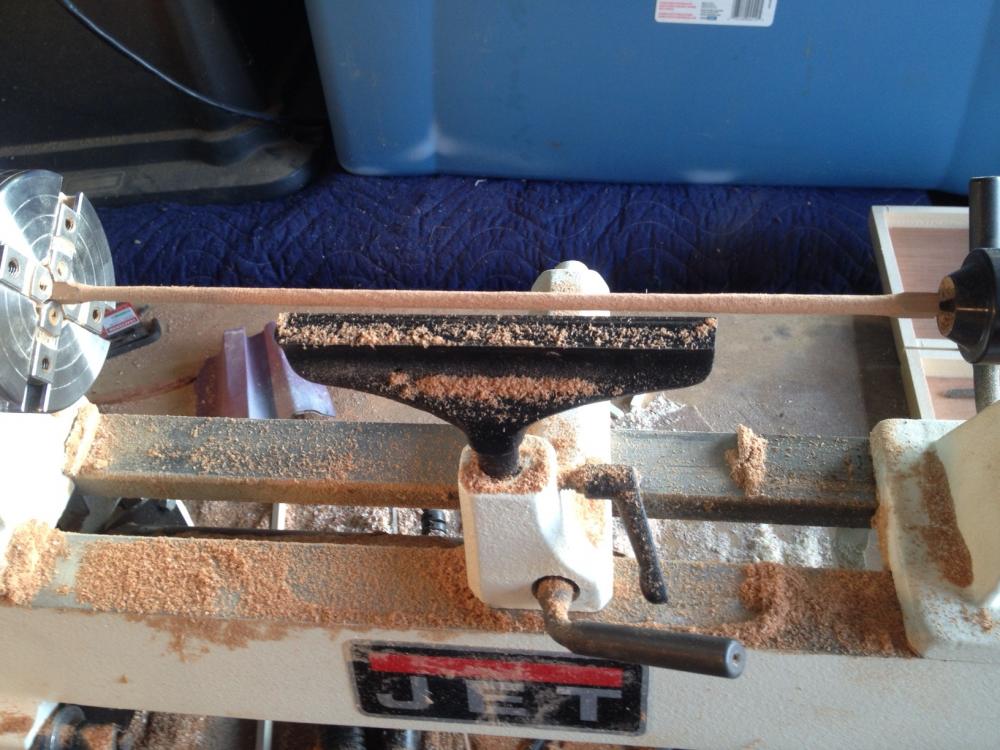
Spanker Boom Back to the lathe where I feel comfortable to get a break from the tedious gun mounting project. This is a tough piece to turn. It is 11 inches long with a 3/16 inch max diameter. That makes the piece unstable and subject to wobble. The key, sharp tools and take your time. 1. Get the middle down to 3/16. 2. Turn the outside end to 1/8 and cut the taper. It is always better to work on the side on the spindle first, since it will be the most unstable. Keeping the beef at the chuck end will help keep the stock stable 3 Turn the side on the chuck to 1/8, cut the taper and create the shoulder. Some photos of the process. Again, all made out of cherry

- 648 replies
-
- 3
-
-
- niagara
- model shipways
- (and 1 more)
-
I have the same two sized pins. I had no idea what they were for. Were you thinking of gluing the carriages to the deck?
- 843 replies
-
- 2
-
-
- niagara
- model shipways
- (and 2 more)
-
Mike, I am avid military history reader and civil war reenactor. I am currently reading or have read everything I could find on the Age of Sail Just finished. Six Frigates - Ian Toll (his trilogy on the Pacific War is real good too) Ships of Oak, Guns of Iron - Ronald Utt 1812: The Navy's War - George Daughan Broadsides: The Age of Fighting Ships - Nathan Miller Struggle for Sea Power - Sam Willis In the Hour of Victory - Sam Willis A Brief History of fighting Ships - David Davies Currently Reading Give me a Fast Ship - Tim McGrath I am always looking for suggestions, so fire away. I would recommend all of these books.
- 648 replies
-
- 3
-
-
- niagara
- model shipways
- (and 1 more)
-
Ken, I have been a Keim's customer for years. The exotic wood section is incredible. It is like a candy shop for us. I get all of my curly maple there for my other hobby. I got my Holly board there. Most of my high end power tools are from their. The rest were purchased at the annual Hartville Hardware Tool Sale. You probably know that place as well. Being so close to Ohio Amish country, and with good connections, wood stock is plentiful and reasonable. By the way, Keims has a 5 inch diameter unmilled American Boxwood crotch log that they tried to sell me last month. If you go to the site you listed and search "Boxwood", you can see it. They wanted $900 which shocked me, but would give me a good discount since I am a customer. I thought about it.....but figured you were paying a premium for the crotch, which probably means more grain than we want. I can probably get it for half price. Anyone interested in splitting it (literally).
- 648 replies
-
- 2
-
-
- niagara
- model shipways
- (and 1 more)
-
Mike, I have another question. Have you given any thought on how you are going to secure the carronades/cannons to the deck. What pins were you going to use for the carronades? and were you going to glue down the carriages?
- 843 replies
-
- 1
-
-
- niagara
- model shipways
- (and 2 more)