


Benjamin Raule
-
Posts
0 -
Joined
-
Last visited
Reputation Activity
-

 Benjamin Raule reacted to Brinkman in One more small cog c. 1410 by Brinkman - scale 1:13
Thank you for the likes!
Mark: Thank you, and it will be very interesting when doing the crew and cargo and see how that effects the sense of scale.
My work place has a photo competition and my contribution is of me working on this ship. I work in a design department and many are into photographing and photoshopping, so only unedited mobile phone images was allowed to level the playing field.
I really dislike photos where people obviously are fake working, but I did it anyway here...
-
Benjamin Raule reacted to Valentina in Deck-Boat St.Gabriel by Valentina - FINISHED - Master Korabel - 1/72 - Article MK0301
MK0301 Deck-Boat St.Gabriel Wooden ship Kit 1/72
Wooden ship model kit
Recommended Age Range 8+
Article: MK0301
Scale: 1/72
The dimensions of the finished model (the ship) - 35,0 * 15,0 * 30,0 cm / 13.78 x 5.9 x 11.81 in (Length x width x height, cm)
Dimensions of the box - 38 * 24,0 * 5,5 (Length x width x height, cm)
Museum Quality. 2016 World Ship-modelling Championship Winner - Gold Medal
Complete Do it Yourself assembly kit
Ship wooden kit features:
· All hull planking and details are laser cut
· Double planking
· The marked bevel on frames
· A special hull design that compensates the materials deformation
· Detailed photo instruction and drawings
· Patterns and cloth for the sail sewing. You can also buy ready-made sails: MK0301-S Sails for Deck-Boat St.Gabriel Wooden ship model kit, scale 1/72
Made in Russia, shipped from US fast.
Instructions are in Russian and English, include many pictures!
-
Benjamin Raule reacted to Ab Hoving in A Dutch 17th century pleasure vessel by Ab Hoving - CARD
No Marcus, it's not a cat. It's a herring buss. A small three-masted vessel, built for herring fishing. There were thousands of them, fishing near the English coast, which is why they were often protected by war ships. You can find more information here: http://www.papermodelers.com/forum/ships-watercraft/36353-another-17th-century-dutch-workhorse-12.html
I'm not really following the types in my book, it's just an ongoing process. Soon I will be out of small ship types and I will have to build the bigger ones. 🙂
I like to illustrate my posts because the founder of the Navy collection in the Rijksmuseum, Jochem Asmus, once stated that a model explains more than a thousand words. In my opinion a picture of a model explains at least more than a hundred words. Which keeps my postings short. 🙂
-
Benjamin Raule reacted to RdK in A Dutch 17th century pleasure vessel by Ab Hoving - CARD
Hi,
My method of sails is quite 'amateur' by stitching them, simply for the relaxing joy of stitching and I like the structure of the wrinkled cloth in the end.
But apart from that, tea for dyeing - the more tea the darker - and I use Lord Nelson's black tea... Then I shape them with the clear varnish as described here. Then I use diluted oil paint (diluted with turpentine) to alter - the less the better - and the thinner the better. I guess acrylic paint is good too and you can use some alcohol, if it does not dilute the starch as much as water..? I also noticed that just a bit of some dirty water does the trick also. After all, the sail cloth for our models is just like a piece of fabric so why not behave like little children again and get a little bit messy?
Druxey, I alter my sails after shaping...😊
On a bit more professional note: Patches do not necessarily have to be brighter than the rest of the sail. Look what detail I've found on a Willem van de Velde II painting (you know it probably already):
Maybe just paint/draw some different color patches on the sail? Maybe that can be accomplished with white paint, too?
Here's an example of my first try to imitate some patches on the foresail of my Mayflower model (I might try some other color next time) 😅:
Just some suggestions. Working on finishing my sails right now and hope to posting some progress on my own build soon.
Thanks Ab!
-Radek
-
Benjamin Raule reacted to Ab Hoving in A Dutch 17th century pleasure vessel by Ab Hoving - CARD
Hi Phil,
I suppose you are referring to the pictures of the man-of-war I showed in the background in one of my previous posts?
Ooops! The build of that model went so fast that I forgot to take pictures. For the upper gun deck I glued a length of wood 2 x 3 mm to both sides of the hull to support the deck. I made the decks from 1 mm card, which I gave its right camber and I glued some deck-beams underneath to keep the shape. Once all the deck items underneath the decks are ready, I simply glue the deck to the wooden supports. For the upper decks I can only produce photos of the last stages. I used strips of 2 mm thick card. Up to the stage of making details the work progresses extremely fast. This hull took me a little over two weeks. It is nice doing 'the big parts' before getting stuck in details like gun carriages, capstans, gratings, stairs and all the rest of the small parts.
I can imagine many modelers will object against not detailing the inside of the ship, but I don't think it is very productive to make all kinds of details nobody will ever see, unless he will take the model apart. I am not against doing things that will be invisible in the end. On the contrary, I did that many times during my career. My 134 foot pinas which is in a museum even has all the deck-beam knees, I think they are over 40 and all the carlings and ledges underneath the decks. Nobody will ever see them. But for this sort of models, which only aim for a realistic outside look I take every shortcut I can think of. I know the construction of period ships, 'been there, done that'. It is all a matter of what you aim to get from your models. Nowadays I just want to make models that look real. Like on these recent pictures by my son:
But perhaps this is a subject for another thread...:-)
-
Benjamin Raule reacted to Ab Hoving in A Dutch 17th century pleasure vessel by Ab Hoving - CARD
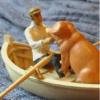
I start with a wire skeleton.
Next is shaping a rough body without the limbs from a two component stuff called Magic Sculpt (Google that).
After the body has hardened it can be handled and I add the arms, legs and head. Hands and feet are added once the crew is seated, to get a good connection with the floor and the oars. Here is a picture of the crew of a sloop I could not find commercial models for.
I needed a sloop in the fore ground of a 'photoshop painting' by my son about an Anglo-Dutch war scene we were making. Hardly visible on this tiny picture, but necessary...
-
Benjamin Raule reacted to Ab Hoving in A Dutch 17th century pleasure vessel by Ab Hoving - CARD
Hi Marcus,
The plans for the 'speeljacht' are progressing, but the model itself is a bit stuck, due to failures from my side and the sudden urge to build another hull, a 143 feet long man-of-war with 60 guns, which took me two weeks. I guess I could finish the yacht within a day, but several things withhold me. Private ones on one side (worries about my youngest daughter who had to go through some serious surgery), but also technical ones. One of them is the 1/44 scale. I have to make the 'crew' for this little ship from scratch and making a 17th century family is almost as complicated as keeping my real family healthy. 🙂
The man-of-war is about to be planked, after I make all the necessary parts for the decks. A lot of repetitive work and my head is looking for something to stay busy to keep the worries away. Too much of the same allows the mind to go astray...
Good luck with your efforts.
-
Benjamin Raule reacted to Ab Hoving in A Dutch 17th century pleasure vessel by Ab Hoving - CARD
In the mean time work piles up on my work bench.
An old project, a 160 foot VOC East India man waits for a long time to get finished, a late 16th century vessel, a vlieboot, has temporarily run aground as a result of my ignorance how to install a gratings deck all over the hull, another project, a 'wad-konvooier' ( a small armed ship to escort unarmed freighters over the inland seas in the north) got stuck because of doubts about the decorations and finally the pleasure vessel, for which I am making decorations and crew at the moment. Very little speed in it all, which makes me impatient.
-
Benjamin Raule reacted to Ab Hoving in A Dutch 17th century pleasure vessel by Ab Hoving - CARD
A Dutch 17th century pleasure vessel
Pleasure vessels’ penpainting by Willem van de Velde.
Sailing with no other purpose than pleasure is probably of all ages. But it is a remarkable fact that the Dutch were the first people to design ship types especially for that single activity. Early in the 17th century in certain circles wealth grew so high that pleasure yachts appeared on the Dutch waters. Vessels especially designed for fun! The Amsterdam lord mayor Nicolaes Witsen presents a drawing in his book Aeloude en Hedendaegse Scheepsbouw en Bestier (Old and Modern Shipbuilding and Managing) from 1671, together with a simple specification contract.
Witsen’s text
Witsen’s drawing
Over thirty years ago I was very interested in methods of shipbuilding and reading the old literature it gave me the conviction that the data in the contract for this relatively simple vessel were enough to do an experiment. There are no frames on Witsen’s drawing, but my theory was, that for building a ship shell-first, which was the method used in Holland at that time, a body plan was not necessary. In that system the builder starts with the hull planking before adding frame parts.
I was quite confident that I could do that trick in model-scale and I wanted to record what I did to compare the results with another building method, partly frame-first, which was described by a second contemporary Dutch author, Cornelis van Yk in his book De Nederlandsche Scheepsbouwkonst Open Gestelt (Dutch Shipbuilding Unveiled) from 1697. Here the builder starts with some frames before planking. Nobody ever noticed that both writers described different methods of how to build a ship. For historians the texts are too technical, for professional shipbuilders they are too historical and no longer interesting within nowadays construction systems. I wanted not only to test both methods, I also wanted to show the difference for scientific purposes.
Shell-first building method. Planking before frames.
Another stage in shell-first building
Frame-first building. Frames before planking.
Splines help the builder to find the shape of the futtocks
It took me several efforts to produce a model that could reasonably withstand the comparison with the few sources I had. Due to the fact that my camera repeatedly let me down I even had to go through the process three times, which taught me a precious lesson: building shell-first without plans, needs experience. The third time I built my model I did it in far less time and the shape of the model improved a lot.
I ended up with giving a presentation about the two ways of construction at the International Symposium for Ship and Boat Archaeology in Amsterdam in 1988 and the immediate result was that I was offered a job in the Rijksmuseum in Amsterdam as head of the Restoration Department of Dutch History.
This little pleasure vessel had changed my life forever.
The finished model, built in 1988.
Looking back at the impact of this model on my life I am surprized that I never cared to make a lines plan of this little yacht. As I am planning to give it a new try, this time in paper, I can finally correct this deficiency. Of course Rene Hendrickx, my faithful Belgian help in 3D constructions did me the favour of helping me out with his magical command of the free shipbuilding program Delftship.
It all started with a free hand sketch, which I based on the specifications in Witsen’s book.
Freehand sketch based on the specifications in Witsen’s book.
Soon enough it became clear that working drawings of this vessel might bring a lot of pleasure to many ship model builders. Therefore we executed every part of the vessel in 3D, making it possible to make any kind of model, be it static, big, small, or even (with some improvisation by the builder) as a working radio-controlled variant. The rig is extremely easy to handle, with only sheets to control the sails and halliards for the leeboards, so it won’t cause any technical problem. But building radio-controlled vessels is not my trade. I am happy when I come off with a good-looking paper craft nowadays. Anyone interested in the draughts in pdf. or in dxf. can send me a PM and I will send the plans over for free as soon as they are ready.
The scale I use for all my models is 1/77. For a 42-feet long vessel (11.89 m) that gives an overall length of 15,5 cm., which is a bit small for me and I chose a 1/44 scale for this project. These scales might look odd for anyone who does not know that the Amsterdam feet (28,3 cm) consisted of 11 inches (2,6 cm), so a 1/44 scale means that every inch at the model stands for 4 feet in real life, which gives a total length of 27 cm for the model.
The old well known system of building (see my previous threads) has to be adapted in this case, because the deck in the middle of the vessel is extremely low, leaving a big part of the hull without sufficient support during building. So we have to think a bit more in advance and prepare both the longitudinal spine and some of the frames.
Elevation view in Delftship, drawn by Rene Hendrickx
Bodyplan in Delftship, drawn by Rene Hendrickx
I did not make too many pictures. Partly because I forgot, partly because I have become a bit shy presenting the various stages of my efforts. Too many people show their progress here with unfinished models that look like a million bucks. Mine always look sloppy, with fluffy edges, stains and overlapping parts. I know that in the end they mostly show up quite well, but during construction I have the impression that the main reason why I go over to a next stage in building is to hide the mistakes I made in the previous ones. But anyone who is interested in my methods can find them in my tutorial about building with card in: https://modelshipworld.com/topic/19467-fish-hooker-after-chapman-by-ab-hoving-finished-how-to-scratch-build-from-paper-card/ and threads like http://www.papermodelers.com/forum/ships-watercraft/35441-17th-century-dutch-fluit.html, http://www.papermodelers.com/forum/ships-watercraft/36353-another-17th-century-dutch-workhorse.htmland more on the Papermodelers forum.
I have built in wood for most of my life and now I am getting old I go for the easy stuff, building in card. Once the hull has its shape I cover the outside with self-adhesive plastic foil. If a hair-dryer is used the strips can be bent in every possible shape. The rest is painting.
I’ll keep you informed about my progress.
First stage in building in card. The parts outside the compartments have been doubled.
Ready to be covered with plastic strips
The hull below the upper wale is covered and painted for the first time.
-
Benjamin Raule reacted to jose_b in Le François 1683 by jose_b - Scale 1:48
Although very from time to time (lack of time due to job matters), I keep on with my model.
-
Benjamin Raule reacted to Drazen in De Zeven Provinciën 1665 by Dražen - Scale 1:45
... and here how it looks on the ship.
Drazen
-
Benjamin Raule reacted to Drazen in De Zeven Provinciën 1665 by Dražen - Scale 1:45
... than the curvature from front/stern view... and than the shapes in between (under 45°). One can easily control the shape by following the joint-/gluing-line of the original pieces of wood.
Drazen
-
Benjamin Raule reacted to Drazen in De Zeven Provinciën 1665 by Dražen - Scale 1:45
Do the curvature/outer shape first from the side view...
Drazen
-
Benjamin Raule reacted to Drazen in De Zeven Provinciën 1665 by Dražen - Scale 1:45
Adjusting the shape to the side gallery where they touch - done with a Proxxon grinding tool.
Drazen
-
Benjamin Raule reacted to Drazen in De Zeven Provinciën 1665 by Dražen - Scale 1:45
... giving it the approx. 8° angle towards the ship hull... (The galleries are standing vertically to the earth, not parallel to the ship's sides. - most probably.)
Drazen
-
Benjamin Raule reacted to Drazen in De Zeven Provinciën 1665 by Dražen - Scale 1:45
... than glue together with epoxy and grind till they fit nicely...
Drazen
-
Benjamin Raule reacted to Drazen in De Zeven Provinciën 1665 by Dražen - Scale 1:45
... coarse and fine removing of the material to get the right shape.
I used three templates of cross sections and the side plank to check the form.
Drazen
-
Benjamin Raule reacted to Drazen in De Zeven Provinciën 1665 by Dražen - Scale 1:45
gluing the wood pieces together and cutting/defining the outer shape...
The small bolts position the piece always on the same place on the hull - this I need for frequent checking the shape.
Drazen
-
Benjamin Raule reacted to Drazen in De Zeven Provinciën 1665 by Dražen - Scale 1:45
Small step forward in the project - small steps on the side of the ship
Drazen
-
Benjamin Raule reacted to Drazen in De Zeven Provinciën 1665 by Dražen - Scale 1:45
Final protection by varnish (also by Royal Talens)
After several months drying, I apply
- Talens picture varnish matt 003 for all surfaces
and
- mixture of 1:1 picture varnish matt 003 with picture varnish glossy 002 on all decorations. In the reality, the decorations have been painted glossy in order to simulate gold, but on the model, the 100% glossy does not look real. So, a semi-matt shade looks much better and more realistic.
I apply final coat by airbrush. This removes partly the brush strokes or imperfections, by at the same time keeping the surface real (because of previous hand-brush application).
Drazen
-
Benjamin Raule reacted to Drazen in De Zeven Provinciën 1665 by Dražen - Scale 1:45
... and how it looks...
Note, this is the length of exact 90 mm. So, try to look at the real size on the screen to get the real impression.
Drazen
-
Benjamin Raule reacted to Drazen in De Zeven Provinciën 1665 by Dražen - Scale 1:45
Luckily, the pattern was similar as I have on my plans. So, I cut the part of the plan and check if it fits into my frame
Drazen
-
Benjamin Raule reacted to Drazen in De Zeven Provinciën 1665 by Dražen - Scale 1:45
.. difficult process on deciding on the decoration form/pattern. There are different decorations on the van de Velde drawings for the same ship. Also the models from the museums are not following the same pattern.
I decided to follow the drawing here - second from above.
Drazen
-
Benjamin Raule reacted to Drazen in De Zeven Provinciën 1665 by Dražen - Scale 1:45
… following 3 drawings of 7P, than some other Dutch ships from this age.
English ships have less fittings on van de Velde drawings.
Otte Blom has even 11 in his plans.
Dražen
-
Benjamin Raule reacted to Drazen in De Zeven Provinciën 1665 by Dražen - Scale 1:45
… mounting the whole on the sternpost…
and the rudder is ready.
Dražen