

.jpg.d84ec4dad1d7791e855dca06210ab6f3.jpg.40b7a0ea2cc62bf0a3ec2a716005383a.jpg)
hollowneck
-
Posts
1,351 -
Joined
-
Last visited
Content Type
Profiles
Forums
Gallery
Events
Image Comments posted by hollowneck
-
-
Robin,
Double-click the photo at the top of the column and then scroll downward. You'll see that the photo you've clicked will be enlarged by approximately 50%. This helps.
Interesting build!
Ron
-
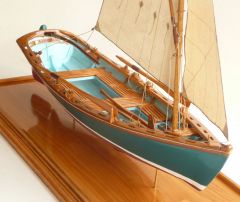
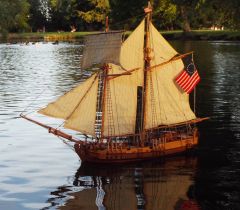
Hey Jack,
Nicccceeeee.....I saw this beauty at the club's meeting too! What a nice looking model. You took good photos too.
For others here, Jack's model is a replica of his full-size boat he also built! He can be seen sailing the "Carianne" in the L. I. Sound during the sailing season.
Ron
-
Cal,
Just checking-in- sorry I didn't respond sooner but this summer has been chock-a-block! I'm happy that my build of Diana was some inspiration to you; that is such a nice compliment considering how beautiful your same build turned out. I too, spend little time here now since the "overhead" can be huge, especially if well-intentioned efforts simply disappear - that was my wake-up call too.
I've recently posted my near-scratch build of HMS Ardent (64). I used the Caldercraft Agamemnon hull bulkheads and keelformer, but the balance of the model is mostly scratched from the excellent plans from the kit and from the NMM. I've written an extensive article for the NRG Journal with many photos. It is an interesting history as well as discussion of how I built the model- but not a "build log" per se. I anticipate that it will be published this Winter (Jan 15) or perhaps, Spring 2015.
Thanks again for your kind comments.
Good luck on the HMS Fly- this is an excellent kit too that lends itself to creative improvements!
Ron
-
Interesting. Is this a complete model or a work-in-process? Presumably this is a Japanese nautical model, yes? Warship? Commercial ship? Era?
Thanks for more information.
Ron
-
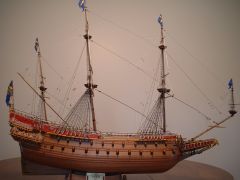
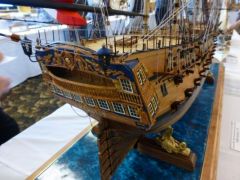
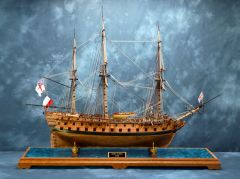
Very nice build of this kit. I like your color choices for the decorative bits. The tendency with this model is to go over the top. Having seen the real Vasa last summer - and discussed with Fred Hocker the museum's "semi-official" conjectures on what the ship may actually have looked like with extensive painting of ornamentation - I think you've done very nicely with the natural colors in combination with the discreet painted ones.
Did you use a published guide or reference for the finishing?
The rigging looks quite good too - and the flags look nice as well.
Ron
-
Thank you.
-
Bravo! Very nice job on the restoration. I hope you are displaying a photo alongside of how she looked when you got your hands on her.
Nice job on both hull and rigging.
Ron
-
Good job on the rigging too!
Ron
-
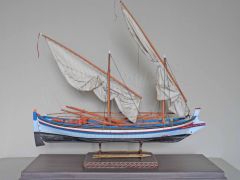
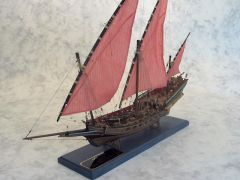
Very nice model. Your color treatments are very appealing. I also like the positioning of the sails and yards. I can hear the bouzouki and taste the moussaka!
-
koolbeanz.
Nice.
-
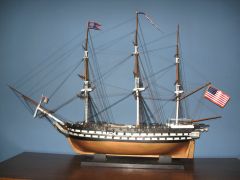
Thanks JesseLee. It seems so long ago that I did her sails.... but, in fact, it's just a couple years ago! I wanted to make a ship that would have been the direct adversary of the Syren, my first ship model ever. I liked them idea of being able to show both sides of the coin, so-to-speak. And the fact that the conflict between the West (Europe and her "progeny" - i.e. the U.S. of A.) and other regions of the world hasn't just been a late 20th to early-21st century development!
In fact, one of the duties of the U.S. brig Syren was to transport “tribute money" from the U.S. Treasury to the sultans of the Barbary Coast. So much technological change surrounds us that we forget how little has changed with the social dimensions in the world.
Thanks again, very fun build, quick too - took me about 4 1/2 months if I recall. I could probably build another one right now in 2 and some change.
Ron
-
Mike,
Catching-up on the forum....
Many thanks. I'm fortunate in that I can spend approximately 3-4 hours per day in my shop. It's like a part-time job, but one that I love and can't wait to make my commute... (downstairs!)
I poured my soul into this one- she is a beautiful (and BIG) ship.
Ron
-
What great photos!
-
Almost one year to the day for a reply to your kind comments: Thank You.
Better late than never!
Ron
-
Thank you Duffer. I have a colleague in my Model Ship building club who executes my designs for all my display plinths with excellence. He's done my Diana (maple inlay baseboard), my Confederacy (bubinga wood with incised compass) and now the Ardent (elevated cherry rails, brass inset surround and simulated Aegean marble).
His skill with the bandsaw, the planer, the lathe, the vertical mill, the scrapers, glue gun, electric drill, hammer, screwdriver and last but not least, Elmer's white glue have helped realize my artistic vision and design.
Any other MSW members who are seeking skilled execution of their designs should contact Duffer here for a price quote and timeline. Highly recommended.
-
oops- My Apologies Klaus, I forgot to thank you for your comment about the model. I got hung-up explaining why I like 1/64th scale!
-
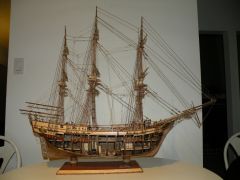
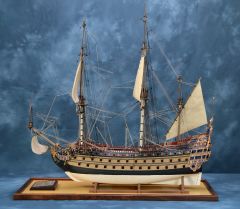
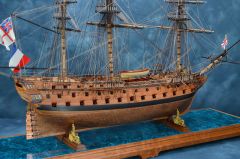
I believe I included the scale in my gallery folio notes: 1/64 or 3/16" = 1' This is a favorite scale for me. I love 1/48 models (1/4"=1') however, since I love to mast and rig my models, the size is enormous. If this model were built 1/48 it would be approximately 70-72" long. Across the main course: 26"
-
Thank you Schnu.
I used the decent plans, the keelformer pieces and the bulkheads from the Caldercraft kit of the Agamemnon; the HMS Ardent preceeded the Aggy and was the first of the "Ardent Class" of early 64's.
Virtually everything else on the Ardent was scratch built - after constructing the basic "skeleton" from the kit. I debated whether or not to place these photos in this gallery rather than the MSW Scratch Gallery. Obviously, I decided to put photos of my model here partly to encourage kit bashers like me who would like to "raise their game."
Personally, I find it completely unnecessary to build a skeleton from scratch if good pieces exist. Yes, the expense has to be considered however there are lots of uses for the other contents in a good quality kit. In my opinion, quite decent plans are one hallmark of the Caldercraft kits.
One tip about my "hybrid" building style: DO NOT dimension- that is, take precise measurements from the paper plans in anyone's kits! They are often wrong and the tolerance accumulations can destroy your final result; a colleague of mine had to recently disassemble his near-completed hull because he measured off the plans for the gunport positions which were way off.
For many builders of this sailing era (my favorite), the real challenge is the masting and rigging. I often tell others who are beginners to this hobby that when they have completed the hull, they are at about a halfway point in a "complete build." Easily, an equal number of hours will need to be invested in finishing a multi-masted, square rigged ship.
Personally, I love the masting/rigging building process. Hopefully, it shows in my photos!
Regards,
Ron
-
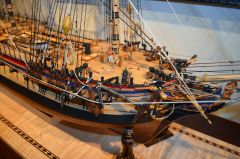
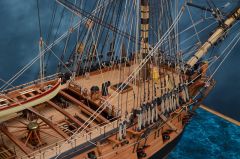
The cable has been hauled and put away. Hawse bucklers plug the hawse openings in the bow (rough seas coming). The Officer's pinnace is being hoisted for off-loading to clear the midships for action. The capstan bars are still in place for helping with lifting the swivel guns up to the fighting tops. The Captain of the Ardent has a custom crafted brass drumhead affixed to the capstan itself - replete with a cast English Crown in the center to remind everyone who they work for.
-
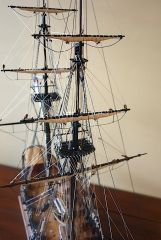
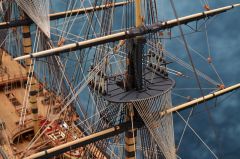
I have depicted the Ardent in an "action" configuration which shows chain (iron) slings around the main courses. Also, in both the fore and main fighting tops, swivel guns have been hoisted up and mounted in their stirrup supports. Marines seldom climbed up to the tops; sharpshooting sailors manned the swivels.
A capitol ship was worth far more as a prize than being sunk so enemies aimed "high" - for the serious business that supported the yards and of course, the masts themselves. Without propulsion, a ship could be taken quite easily - "dead in the water" would be a good term. The iron slings temporarily replaced or were used in addition to normal rope slings to provide some extra protection for the main yard support rigging.
-
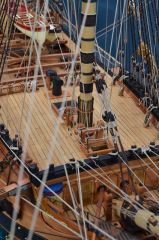
The hammock cranes in midships would not have necessarily been used for stowing the crew's beds because during action a large net was draped across the skid beams to keep the sailors safe. Boats were often removed from their skids and towed astern when in combat. Also, the metal cranes, a rail of wood and rope as well as the rope netting itself kept crew members (especially intoxicated ones) from falling overboard - a far greater problem for a captain.
Where crew members would have been more exposed to musket fire or enemy cannon fire (the quarterdeck, poop and foc'sle) during action, hammocks were stored along the cap rails which extended from midships all the way to the stern - and on most 3rd rates, additionally in the cranes across the poop deck taffrail.
-
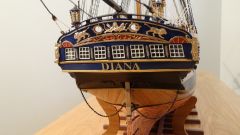
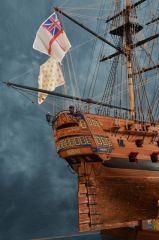
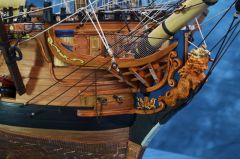
In this photo one can see the "hawse plugs," with their quick release chains, the "gripe" on the cutwater and rope netting around the head area. There is also a "cant wash" mounted below the hawse cheeks and lower headrail but it's black and can't be seen here. The abalone (mother of pearl) decorative elements (catheads and headrail supports) are purely for modelheads; the actual ship would not have had these pieces mounted - obviously. LIke so many ships from this period, the detail about the figurehead is lost to history. I made a choice to show a leaping lion since I could not find any reference for the actual Ardent one.
-
Note the boarding pikes arrayed around the foremast. Sharp pointy things designed to help keep the Bad Guys from hopping aboard.
-
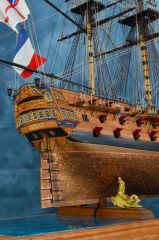
The French flag in this photo has been superceded by another shot showing the CORRECT flag of 1782, the Bourbon flag. The Monarchy was still in control at this time and the flag would have been a solid white field with a pattern of FleurdeLis.
Corrected on my model after MSW's member Stockholm Tar brought this to my attention. Tre' bon, mon Ami!


Trata 2
in Gallery of COMPLETED Scratch-built models
Posted
This is a beautiful model. Congratulations.
The detail is exquisite, the choice of colors is superb and the simple baseboard with acrylic pillars is just the right touch.
What is the scale? I am assuming this was crafted from scratch and based on the B/W photo you included in your gallery.