
HOLIDAY DONATION DRIVE - SUPPORT MSW - DO YOUR PART TO KEEP THIS GREAT FORUM GOING! (89 donations so far out of 49,000 members - C'mon guys!)
×


Paul_S
-
Posts
26 -
Joined
-
Last visited
Content Type
Profiles
Forums
Gallery
Events
Everything posted by Paul_S
-
I'm not really worried about historical accuracy(not sure if that will get me banned or shot or something!), but might take a look at it. I just want to make something that looks nice. So mostly interested in making it look less plasticy
-
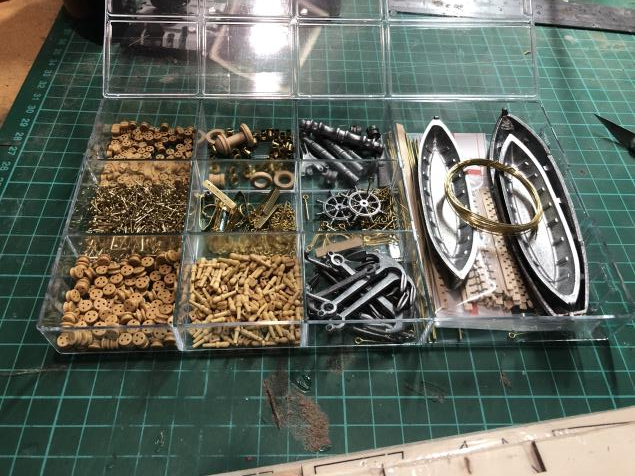
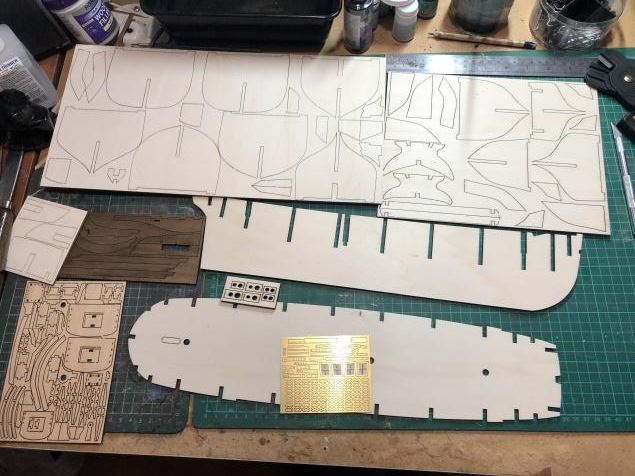
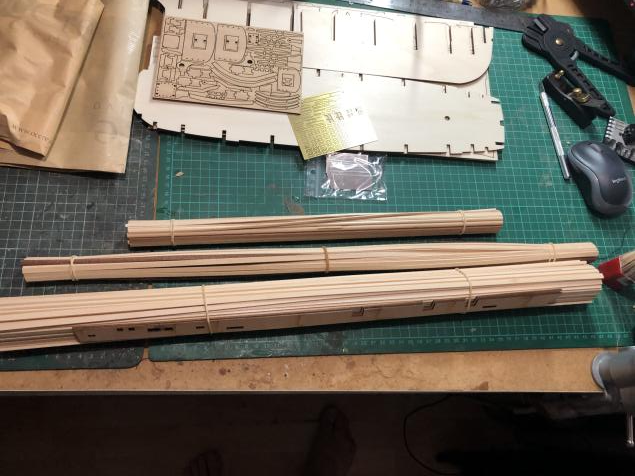
Hi all Having completed my last build, the Lady Nelson and being pretty chuffed with the outcome, I'm moving on to the next which arrived today. My nephew has been fascinated with my last build and has been begging me to make a boat for him so i let him have a look through a list of models and pick one he likes. He saw HMS terror and said 'I'm a terror, I want that one' so thats the one he gets. It also seems like a decent natural progression to move from a single masted ship to a double masted with the extra complexity that brings. The box arrived today and looks quite pretty with a little display window for the fancy bits and a close up of the fancy bits A lot of these seem to look a bit plasticy so I'm considering ditching them and replacing with some wooden ones as they seem to look quite a bit nicer. I'm also not keen on the little metal boats so I reckon I'm going to try scratch building some (Dunno how easy that will be to do such small ones so that might change) That will be a first for me so will be interesting for sure. The main parts Seem to all be in decent shape and none of the warping that i've heard from some accounts on here. A little worried about the gap in the dark brown one hoping its intentional and not a missing piece. The threads and the sails. This will be my first time using sails, and still not 100% sure I want to use them as I like the sail-less look, but I guess that will be up to my nephew. Finally the wood, looks really nice, no bits chipped off or flaking, the thin veneer for the 2nd planking looks really nice and bendy so should go on really easily. The instructions at first glance look to be very pretty but also seem to have lots of random pictures of someone gently caressing the model with a dry brush and not so much info on how to actually go about building it I'm also going to try something a bit different and live stream some of my building efforts. If anyone wants to have a look, offer advice, or mock what i'm doing i can found at http://www.twitch.tv/sirrod (I know a lot of places have rules against self promoting streams and apologies if that is the case here). I do stream other stuff there too so if i'm not building you might catch something weird. Overall I'm looking forward to building this one, the step up in difficulty should be fun especially if I have to wrestle with the instructions to make progress -Paul

-
No other pics atm but will try get some, that ones a bit blurry. My nephew has been fascinated by me building it and has asked me to make one for him. Hes pretty lively so i think HMS Terror will fit him perfectly so will be making that for him. If he can stay patient long enough for me to finish it
- 50 replies
-
- 4
-

-
- lady nelson
- victory models
- (and 2 more)
-
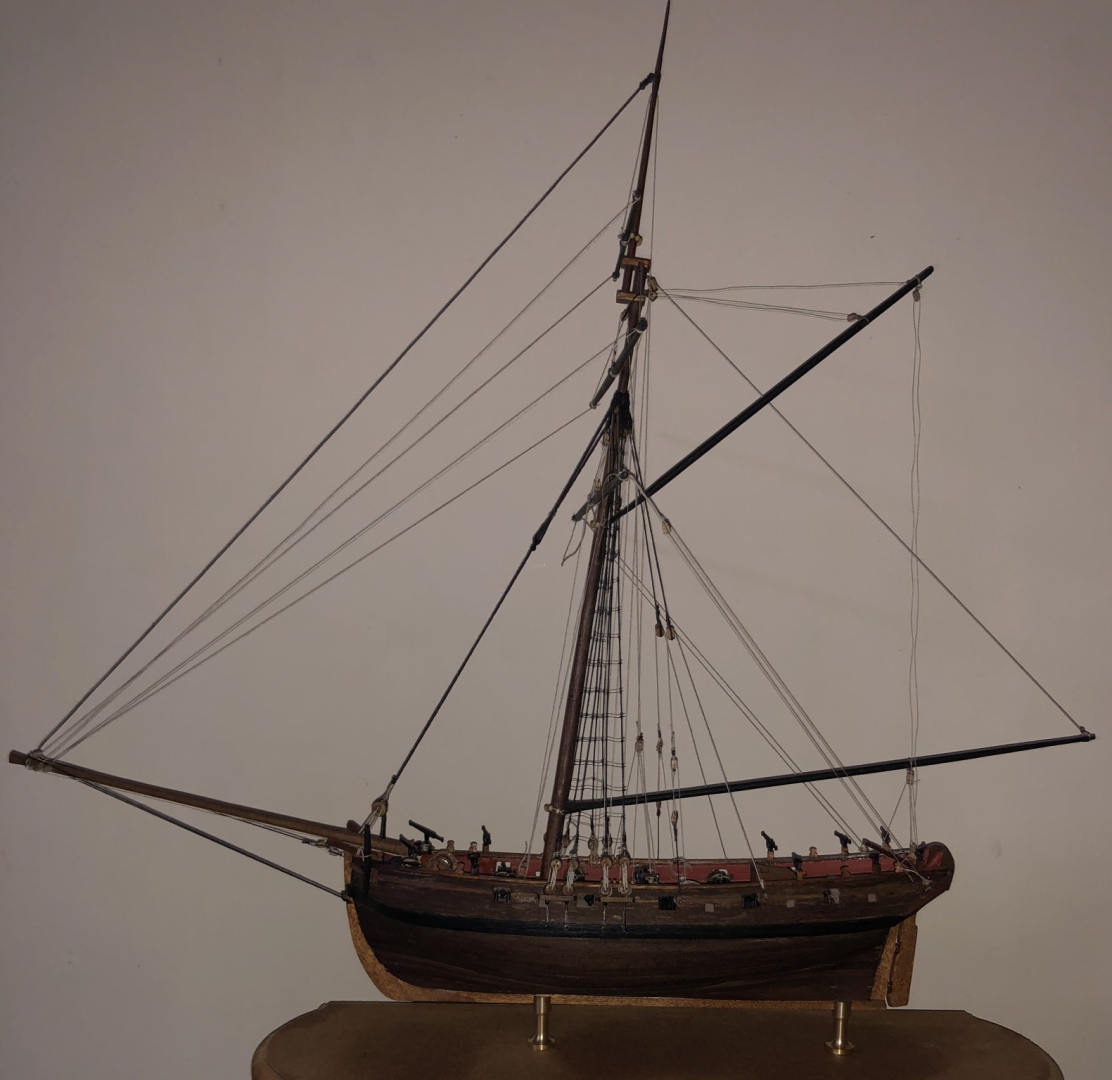
Well. Didn't get many chances to post updates but i've finally finished it Well pleased with how it turned out. Onto the next!!!
- 50 replies
-
- 10
-
-
- lady nelson
- victory models
- (and 2 more)
-
Finally got all the deck furniture done. Took so much longer than I expected. On to the masts now and figuring out how to taper them Not entirely happy with the big thing near the front, looks very plastic-y and not sure how i can fix it, otherwise pretty chuffed with how its going
- 50 replies
-
- 6
-
-
- lady nelson
- victory models
- (and 2 more)
-
Spent a few days messing around with treenails and couildn't come up with a method i was happy with so decided to forego them for now. Maybe next model.. Got a few other parts done now Wales are done although the measurements on my model didnt quite match up to the plans I think they are ok. Capping rails ar e on but were too short, definetly messed up the back end somehow can see where it looks a little uneven but i think i've managed to hide it. Seems to be a consistent theme for me, hiding where I ballsed it up. Red bits are painted as well as the wales. I think im going to leave the rest natural wood rather than paint it white, bit scared the paint will show up errors a bit too much, and i think the wood looks nicer. Started working on the deck furniture now with the hatches Quite pleased with this!
- 50 replies
-
- 8
-
-
- lady nelson
- victory models
- (and 2 more)
-
I need an opinion, should i do Tree nails or not? WIll it look better, will it justify the crazy amount of work?
-
So I planked the inside of the bulkheads which was pretty easy and have also planked the deck. I randomly chose a planking pattern and decided i was goign to try 'joggling' ( i think thats the name). I think its turned out pretty well I caulked each plank with a pencil to get some lines in between Halfway point Not too happy about how the ends of boards lined up at the top left leaving me with the small pieces, but not sure how to avoid that. Finished, can you spot the 2 deliberate errors? and post sanding
- 50 replies
-
- 6
-
-
- lady nelson
- victory models
- (and 2 more)
-
I'm a few steps ahead of you in this build. I put the keel and bow on after the first planking and put a rabbet in them which worked really well. What i should have done is put the stern post in as well and sanded the back of the first planking down to give me a sort of rabbet there
-
I sanded a bearding line in but with 1mm of first plank and 0.5 mm of second plank x 2 meant i needed to sand it down by 3mm total which is the thickness of the false keel so that didnt seem possible, i got it down pretty thin already and it still stood proud
- 50 replies
-
- 1
-
-
- lady nelson
- victory models
- (and 2 more)
-
So i tried what i suggested. Fixed a vertical piece over the horrible parts I then cut it back so it was level with the rest of the hull and sanded it down a little, then marked the lines of the planks with my blade in the new piece and sanded a little more To give this Which looks way better than it did when i started, probably not perfectly accurate as the top planks especially are standign quite proud of the keel post but it looks prettier Im struggling to see a way to not have this repeat itself in future though. The false keel is the same thickness as the keel post so when i put 2 thicknesses of planks on it will always stand proud and I couldnt see an easy way to rabbet it. How do i go about this in future?
- 50 replies
-
- 5
-
-
- lady nelson
- victory models
- (and 2 more)
-
So the planking is done and i'm pretty happy with how its turned out. It's not perfect by any means but didn't need any filler or anything and looks pretty solid. I had the stem and the keel to butt up to and that seemed to help, I didn't mask it off but I think it's ok. I am planning to put some oil on it which should make it look a little nicer The bit im not too happy with is the back Not entirely sure how to tidy this up, the post to put into here doesnt fully cover the mess so don't really know what to do. Im thinking I will put a plank vertically and shape it to cover and hopefully that won't look too garbage. Thoughts?
- 50 replies
-
- 8
-
-
- lady nelson
- victory models
- (and 2 more)
-
Started by putting the top couple of planks on full then the garboad plank full on the bottom. THen measured the gaps at each bulkhead and divide into 16. Spent ages marking out all the ticks on the bulkheads then cutting each plank to these marks and seems to be going better. I've not put any battens across as it can make sure my progress is correct with the tick marks, is this a bad idea for some other reason. Ive soaked each plank before ironing an edge bend on, havent needed much of a bend front to back yet ] Really no idea what the dark patch on the front is, doesnt appear in reality, maybe a shadow?
- 50 replies
-
- 6
-
-
- lady nelson
- victory models
- (and 2 more)
-
I was subdividing and marking all of the bulkheads My main issue was where iw as measuring to and from. I was putting a batten across essentially in a random place where it sat nicely then measuring to that, i guess i misunderstood that part. I had widely different gaps between each one
- 50 replies
-
- 1
-
-
- lady nelson
- victory models
- (and 2 more)
-
Awesome thanks. Ill give it a try on the second planking. I got the 0.5mm thickness wood recommended comign but went for walnut so it matches the kit components. Will prob ask for help when it all goes wrong!
- 50 replies
-
- 2
-
-
- lady nelson
- victory models
- (and 2 more)
-
So you measure the whole width and divide it up first? I was placing the battens where they fitted easily and then measuring between them, that might help. Presumably you measure on the centre bulkhead, which woudl leave stealers on the stern if it was wider?
- 50 replies
-
- 1
-
-
- lady nelson
- victory models
- (and 2 more)
-
So i've done the first layer of planking but i really couldn't get the hang of it. I need to sand it down and fill some gaps, it looks OK but my technique was appaling I started at the top and tried to do what Chuck's guide said, marked off some battens, measuredo ut between and divided them, used tick sheets etc but they just wouldn't fit, i ended up with planks 1mm wide at the front and huge gaps at the back. Unfortunately the top plank was glued on when i realised it wasnt working so i tried working up from the bottom and having another go. The garboard plank went on fine but the rest just wouldnt fit in between the battens properly no matter what i did. Not sure if you can see on the photo but i ended up with lots of triangle shaped extra planks at the back and even one at the front even though theres no room there as the planks just wouldnt sit nicely otherwise. At this point i gave up on doing it properly and just aimed to get a decent finish for the second plank. so i got the planks curving into the top rather than finishing at the front. I think my issue is putting my battens across, there doesn't seem to be any guidance that i can see on where they go other than 'place a strip so it sits naturally' theres like 100 places that could go naturally and i have no idea which to go with. Any tips would be massively appreciated Paul
- 50 replies
-
- 3
-
-
- lady nelson
- victory models
- (and 2 more)
-
Used a square as suggested to check the bulkheads and they seem to be pretty close. Spent ages sanding down the sides to make it all nice and even. The filler pieces at the back caused me some problems as they didnt fit super well and needed trimming down a lot, hope i didnt fluff it up too badly Deck is glued down and the bits at the back are on I photocopied the plans and cut out the side top bits and tested them for fit and they all fit pretty well and neatly. Next job is fitting them properly, this is definetly the bit of everything i'm worried about Planking my longboat was pretty easy as i didnt need to worry about stealers and stuff, it was all just single lengths. Not really sure how you decide what the correct 'run' for the planks is and when you decide to not just butt up against the previous one and instead leave a gap that needs a stealer. Any tips anyone can give me?
- 50 replies
-
- 6
-
-
- lady nelson
- victory models
- (and 2 more)
-
I've got the Bulkheads attached and i think they are square (more hope than anything) I wasn't happy with the way the back one fitted so i drilled through it and fitted a small pin to hold it on better then filled the hole with a sawdust and glue mixture which has hidden it really well Next step is to sand down the sides and make them even, i already did some sanding before i fastened the bulkheads so hopefully it wont need a lot of sanding down
- 50 replies
-
- 3
-
-
- lady nelson
- victory models
- (and 2 more)
-
Brill thanks, that what i wanted to know. I did that on my longboat but i couldnt see any mention of it in the instructions or any build logs
- 50 replies
-
- 2
-
-
- lady nelson
- victory models
- (and 2 more)
-
Should i sand a rabbet? on the bottom of the keel to help them fit, otherwise the planking will stand proud of the keel
-
I've photocopied the plans and marked out the line at the bottom of the supports, the bearding line? maybe? On my longboat i sanded this down then made a groove for the planks to sit in before i attached the keel. Should i be doing this on this one too? I have 2 sets of planking on this model so that implies my groove should be twice as deep, but thats probably more than the thickness of the middle support, so not possible. How about if i cut it out for the first set of planks, then after cut a groove in that set so the second set fit into it?
-
Hi Hopefully i've set my title correctly. First time doing a build log of anything online before, hoping it will be itneresting to others and me. I've made a few plastic models of various things over the years but am using my incalculable time sat on my own at home to take up a new hobby, building boats out of wood and string. I started a few weeks ago with an 18th century longboat and was genuinely surprised at how well it turned out, so i've moved onwards and upwards and am now tackling The HM Cutter Lady Nelson by Victory Models. I've seen quite a few logs of this ship by new builders so hopefully it was a good one to chose, the box says 'A perfect introduction' so maybe it won;t scare me off I believe it is customary to show some pictures of the box and the contents It honestly looks like a pile of not very much at the moment and the instructions just say stuff like 'Using the drawings make up the bowsprit, bits and belaying racks' and if i'm honest i don't really know what any of those things are but i plan to follow the order of things from the Longboat and hopefully i'll figure out the other stuff as i go along
- 50 replies
-
- 6
-
-
- lady nelson
- victory models
- (and 2 more)
-
Realised i didnt say anythign about myself, very rude. I'm a teacher from the UK, late 30's (very, very late, is thirty eleven a number?) Have literally no background in working with wood at all, except for a cd rack i made for my GCSE Graphic Design course. I plan to put a build thread up for my Lady Nelson as it seems to be quite a step up from the little longboat

