histprof1066
-
Posts
69 -
Joined
-
Last visited
Content Type
Profiles
Forums
Gallery
Events
Everything posted by histprof1066
-
Good evening, I have done some work, though I haven’t finished the sails. It has been slow going with the wife having surgery and all. I have gotten all of the blocks attached to the yard arms and the masts. All I really need to do in order to continue is work on the sails. I’m thinking of using pencil to lightly make the marks on the fabric (as pencil can be erased) and tracing on top of the paper template. Once they have been traced, cut and use a watered down white glue solution to keep the edges from fraying until I can get the sails sewn. I would like to try my hand at billowing sails, what do you all use to get them to billow? I have researched white glue mixed with water…but… what do I lay them over to create a good form?
-
Finished the lifeboats/launches for the model today, already on to stropping the blocks for the foremast. I have 3 of the 4 completed, just need to complete the assembly for all masts, and then I can attach blocks to the masts before making the sails, and affixing them to the yard arms. does anybody have any tips on making the sails? I have laid the sail cloth flat, and am planning on leaving a 5mm edge around the sail area to hem. I specifically would love to know anything about the work on corners, and reef point simulation. Thank you in advance for your assistance.
- 88 replies
-
- 1
-

-
- Constitution
- billing boats
- (and 1 more)
-
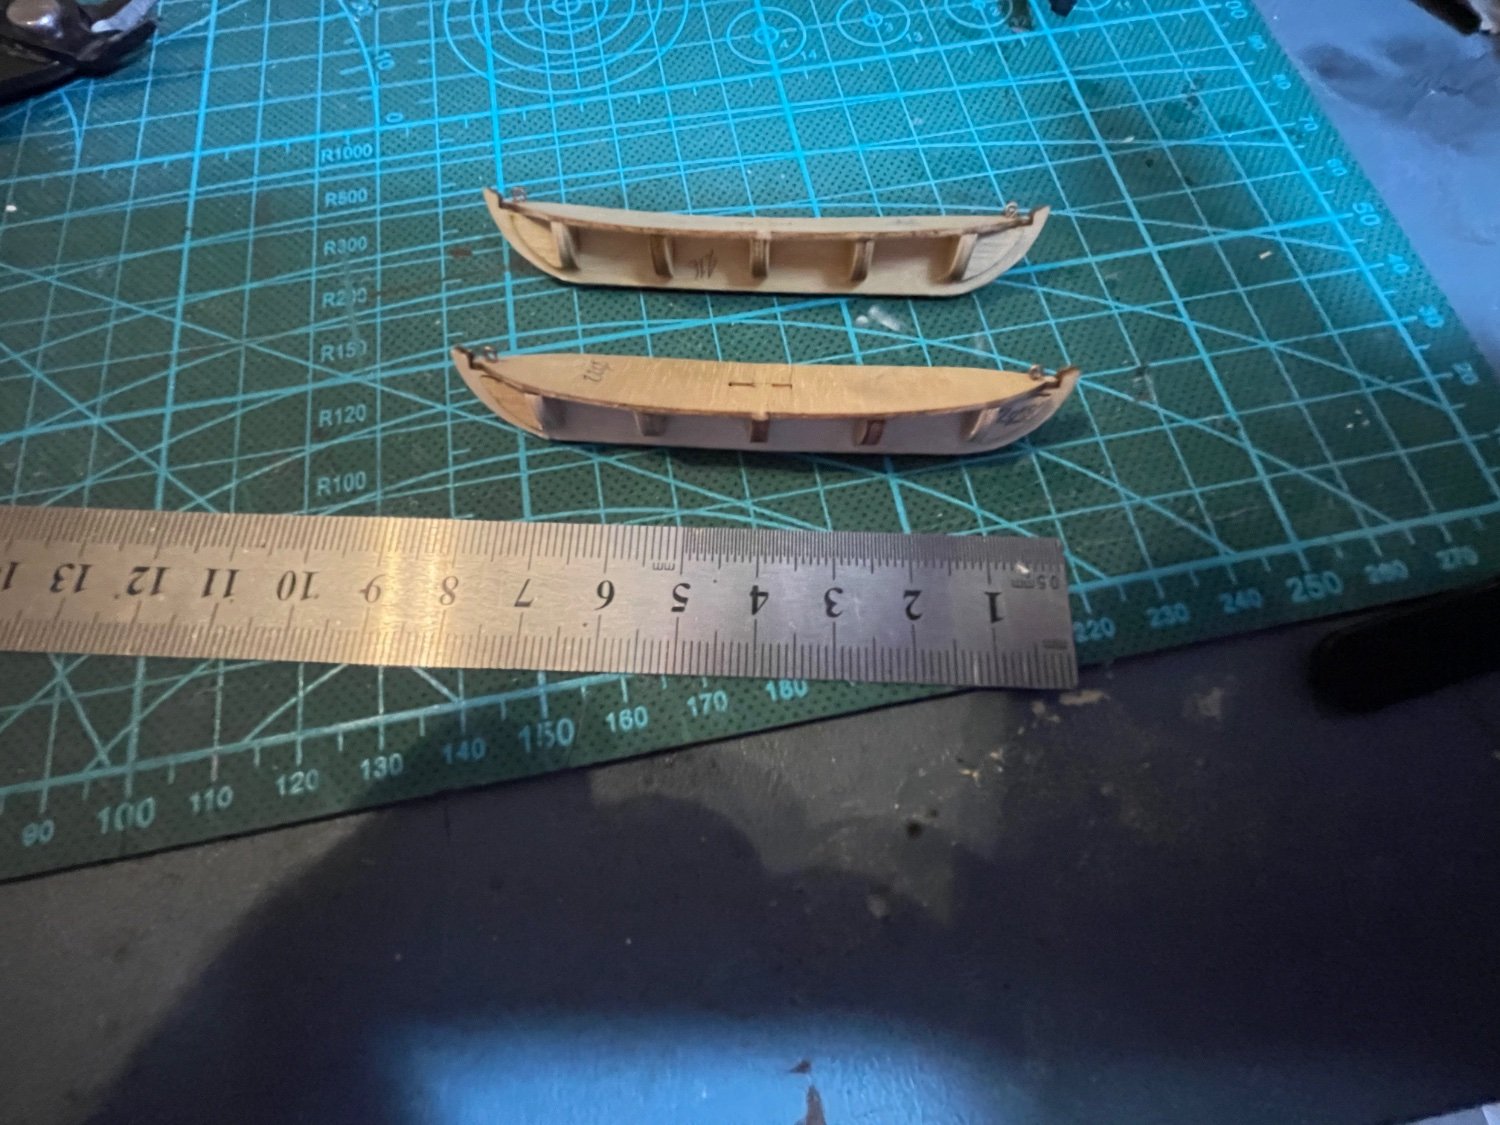
I’m finally finishing off the lifeboats. I finished off the anchors and the like in my last posting, and I have but only one lifeboat planked, painted, and rigged on the hull. What do you think of the the work? The building schematic was mum on how the lifeboats are supposed to be attached. The in house model pictures have a completely different fitting - not shipped with the kit. I improvised and this is what I came up with. All be told, I am happy with the results.


- 88 replies
-
- 2
-
-
- Constitution
- billing boats
- (and 1 more)
-
Thank you The trailboard was part decal from the manufacturer and my work. I added a few embellishments though I cannot take credit for a chunk of it. Every other item has been hand painted. Now, I am having a devil of a time planking the lifeboats...just got the balsa installed on them to fill the gaps between bulkheads, and shaved down with a multi tool.
-
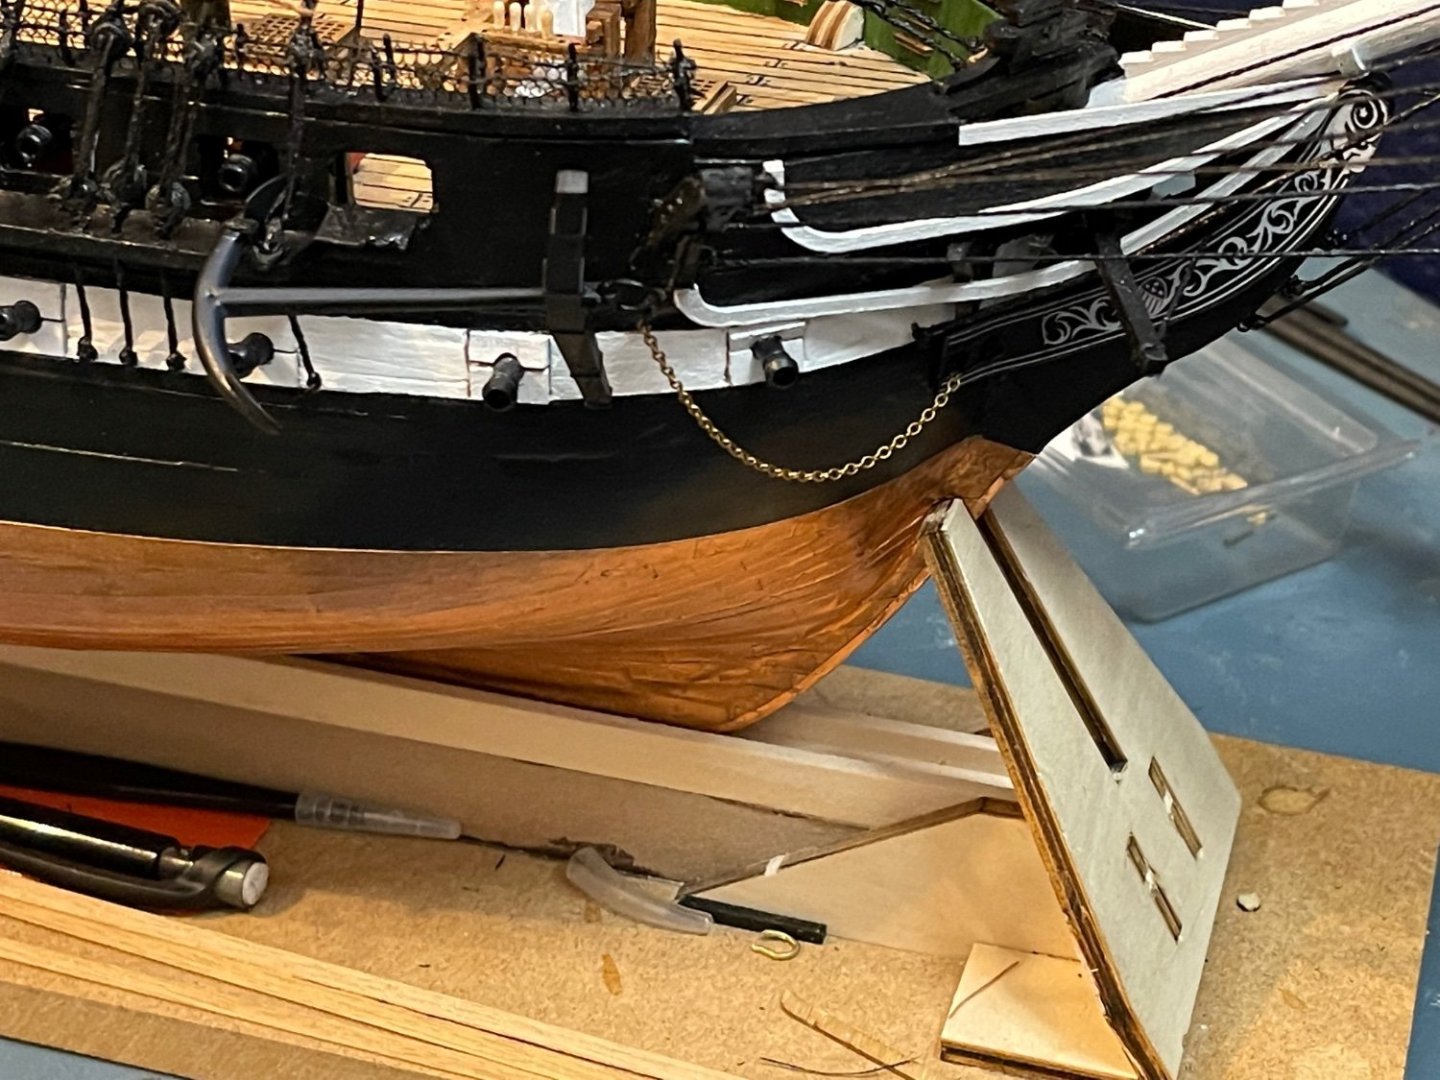
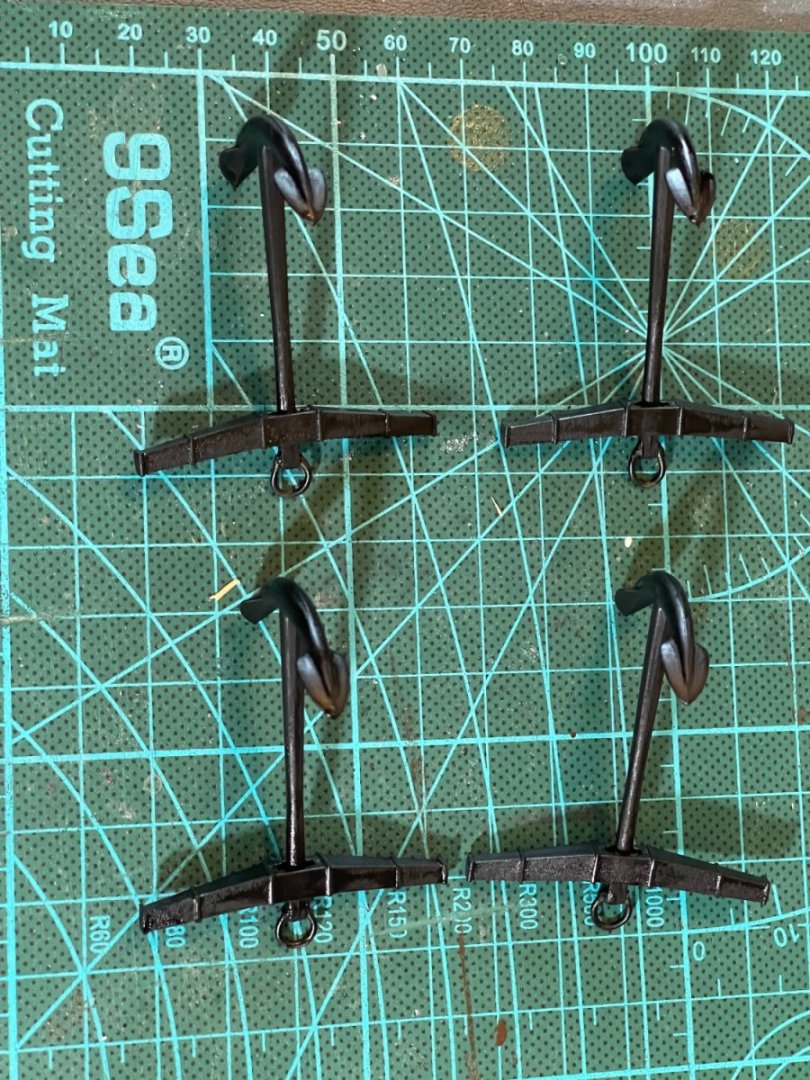
It has been a few days since my last update. I have made four anchors, installed the starboard side, and begun working on the lifeboats. I’m not sure entirely if I want to paint the chain I added for the anchor. It adds a bit of colour to the bow.

- 88 replies
-
- 1
-
-
- Constitution
- billing boats
- (and 1 more)
-
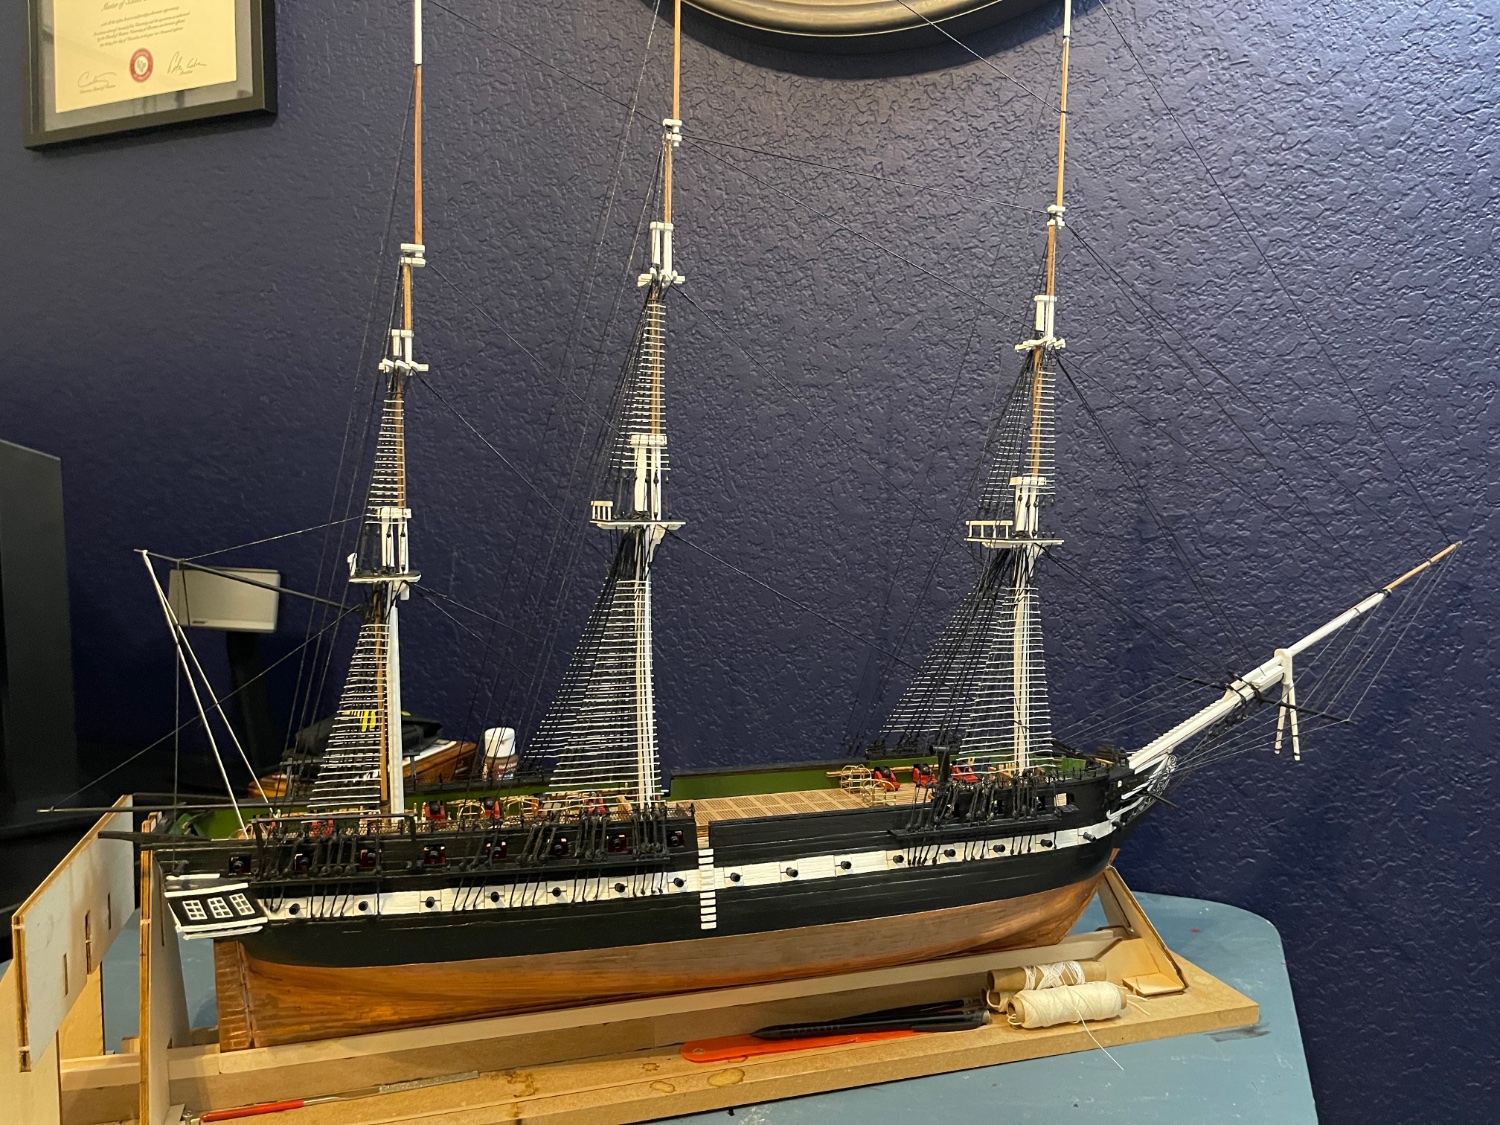
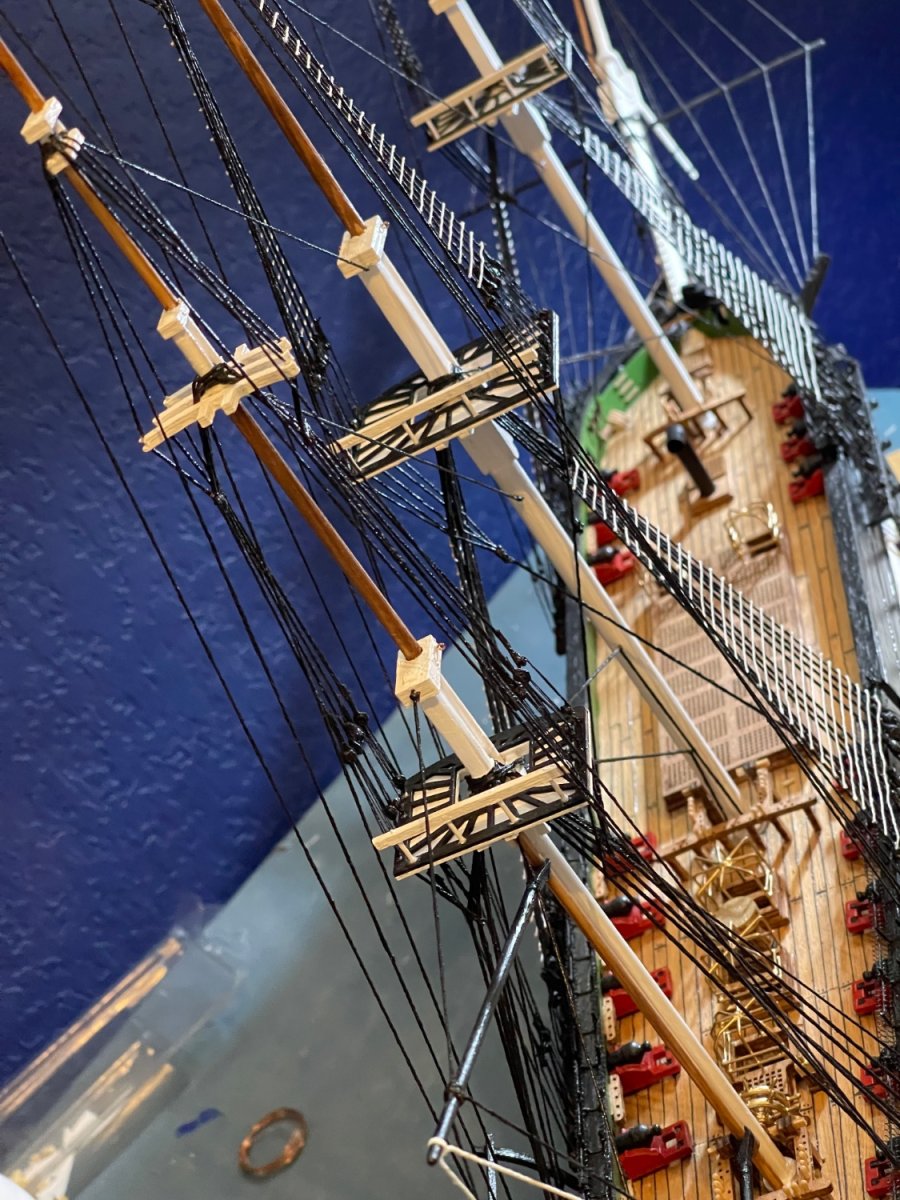
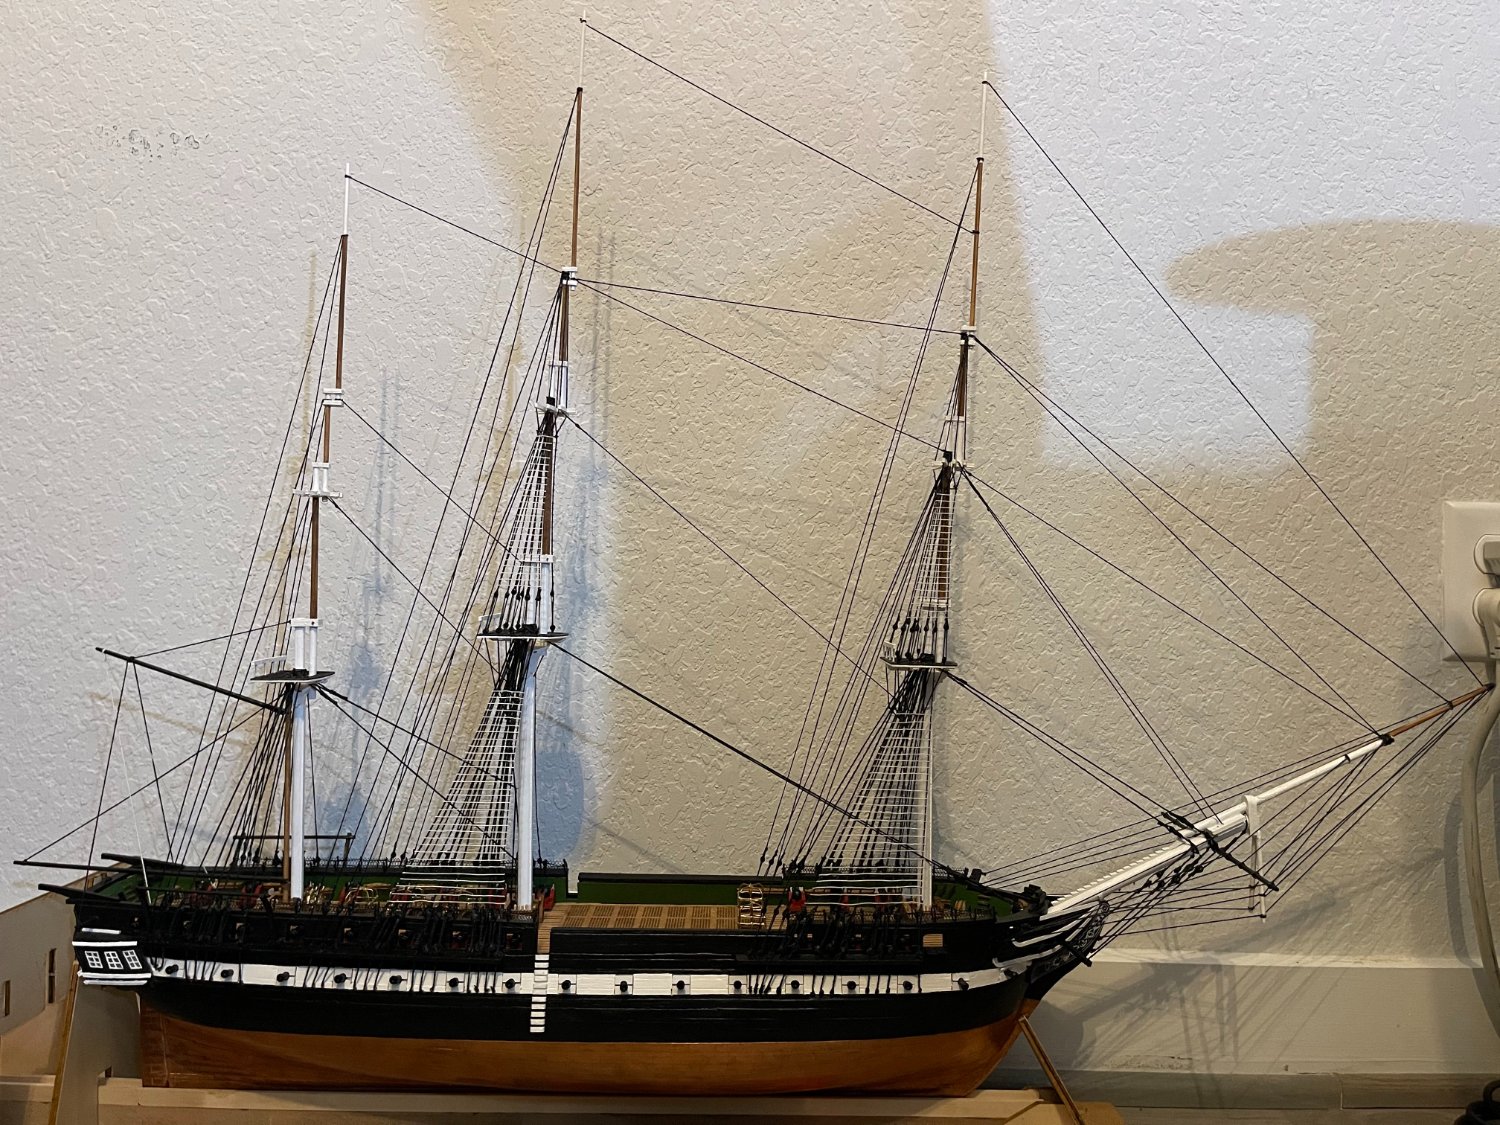
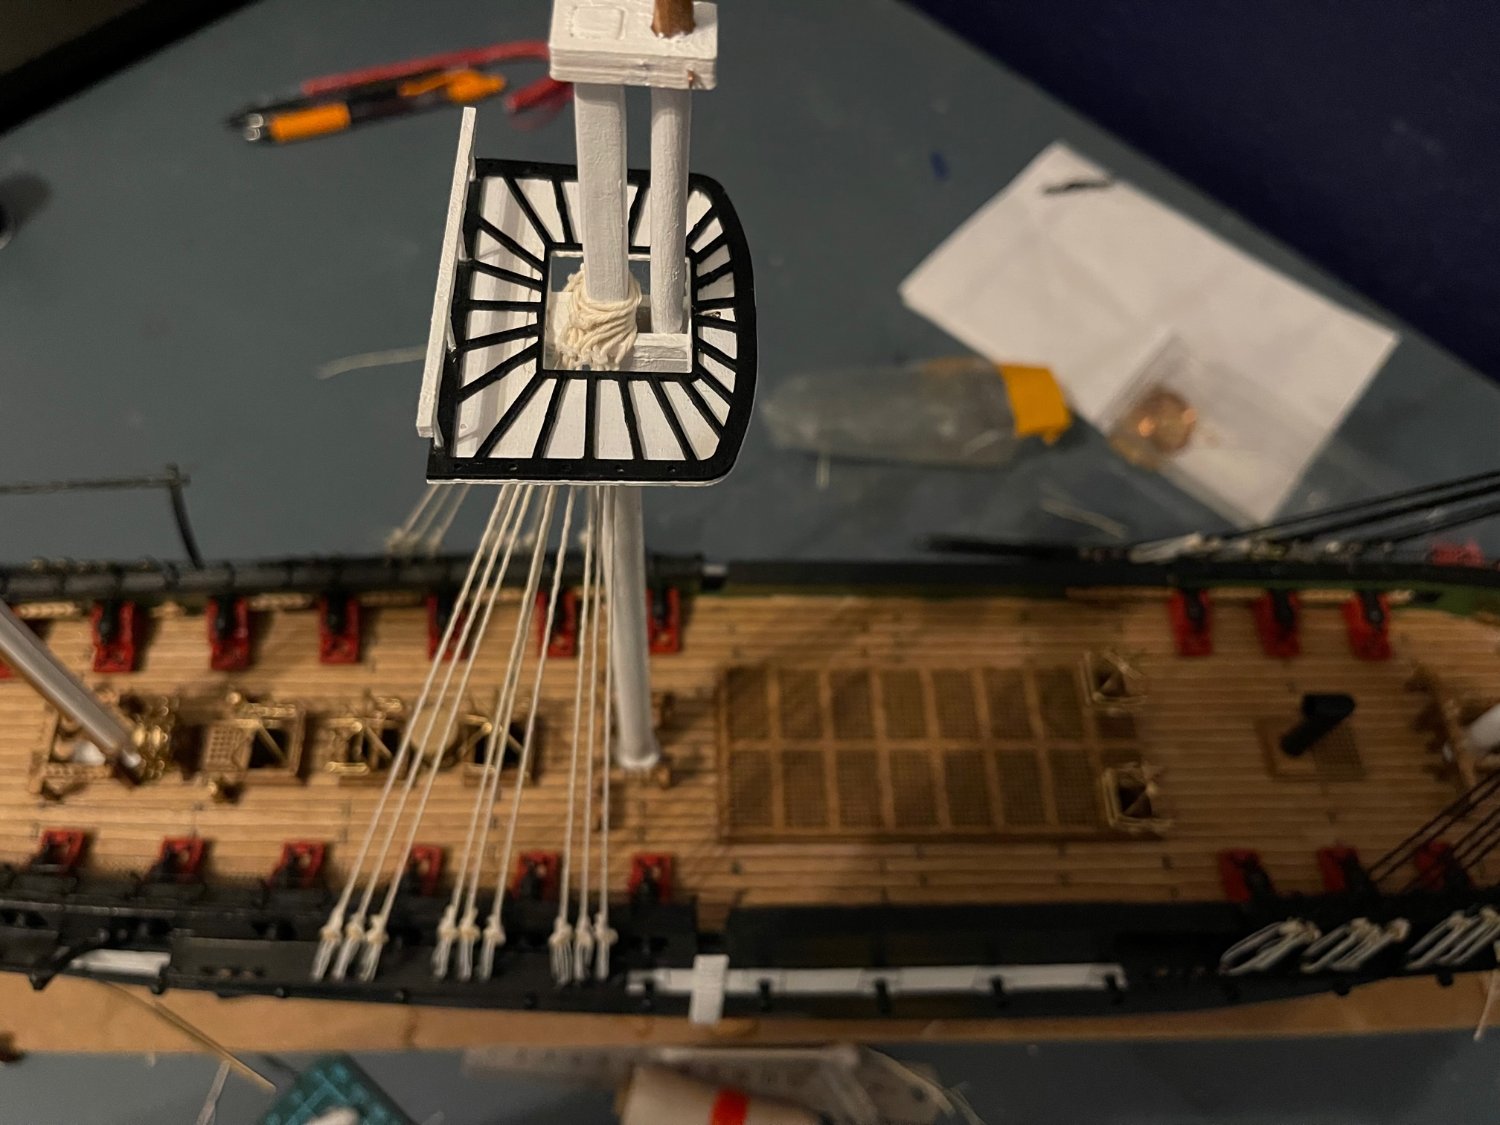
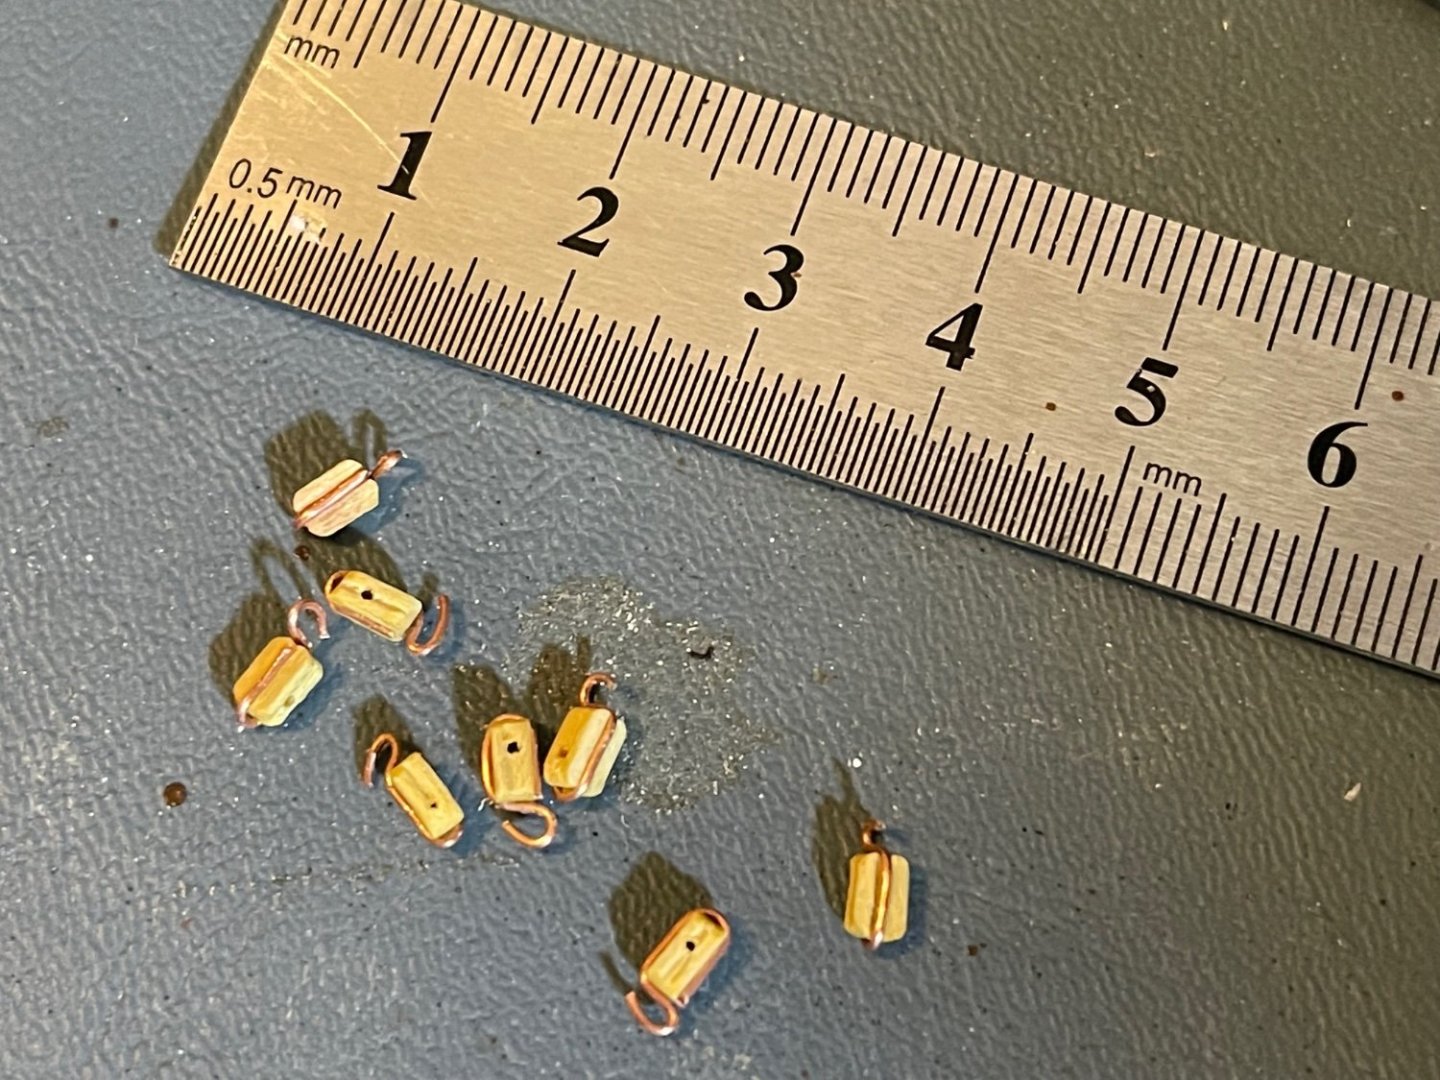
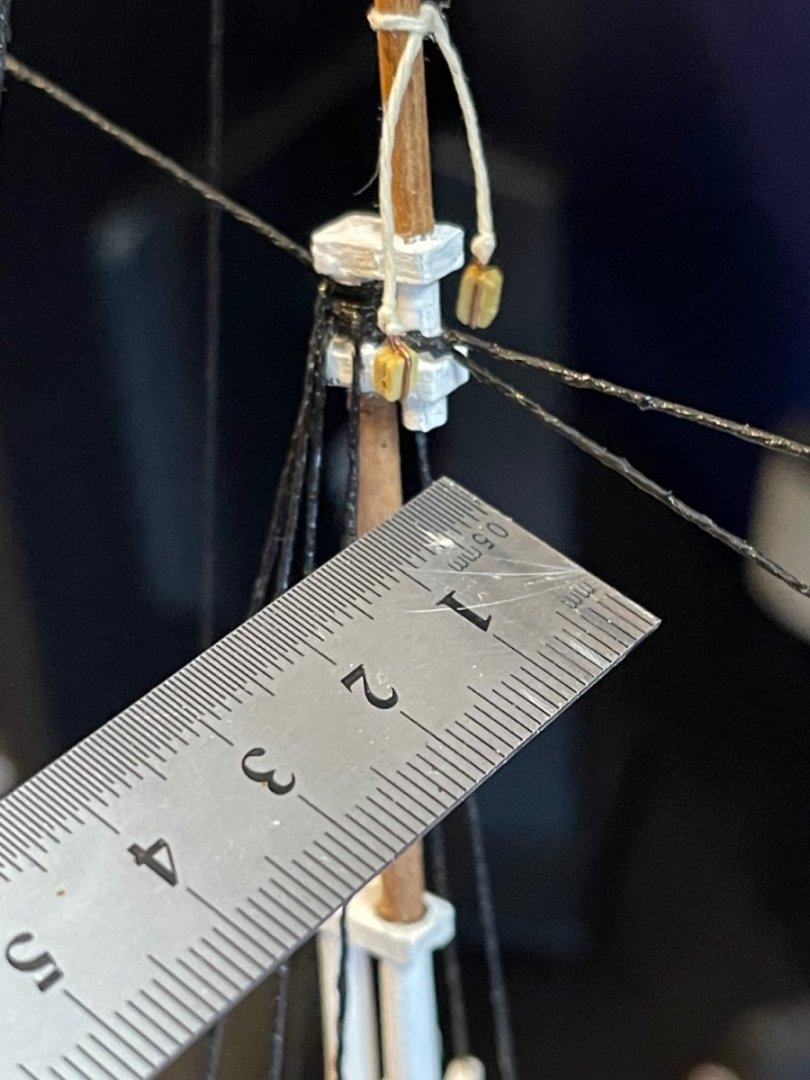
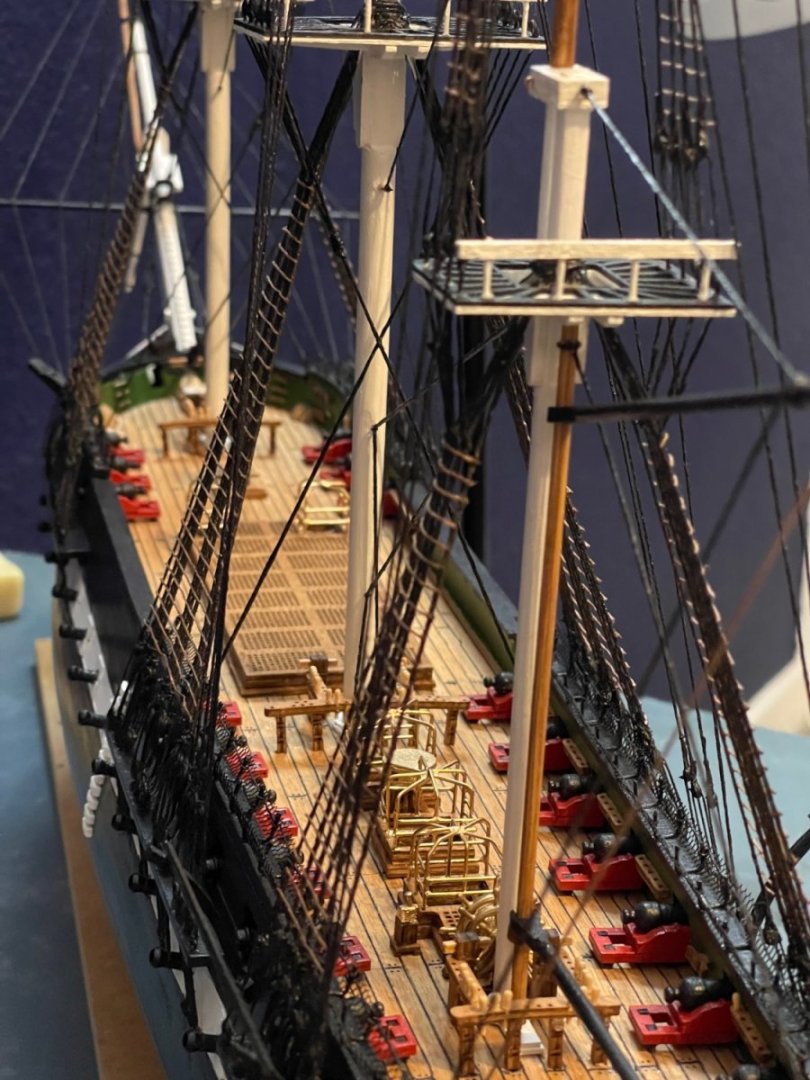
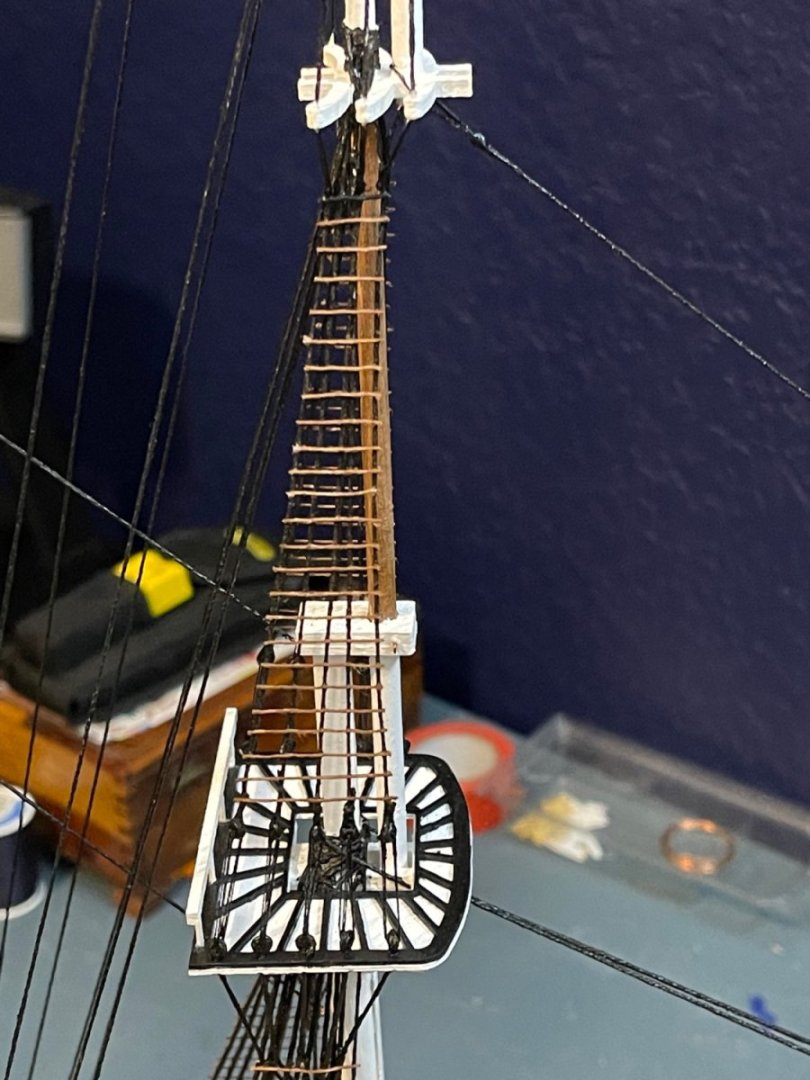
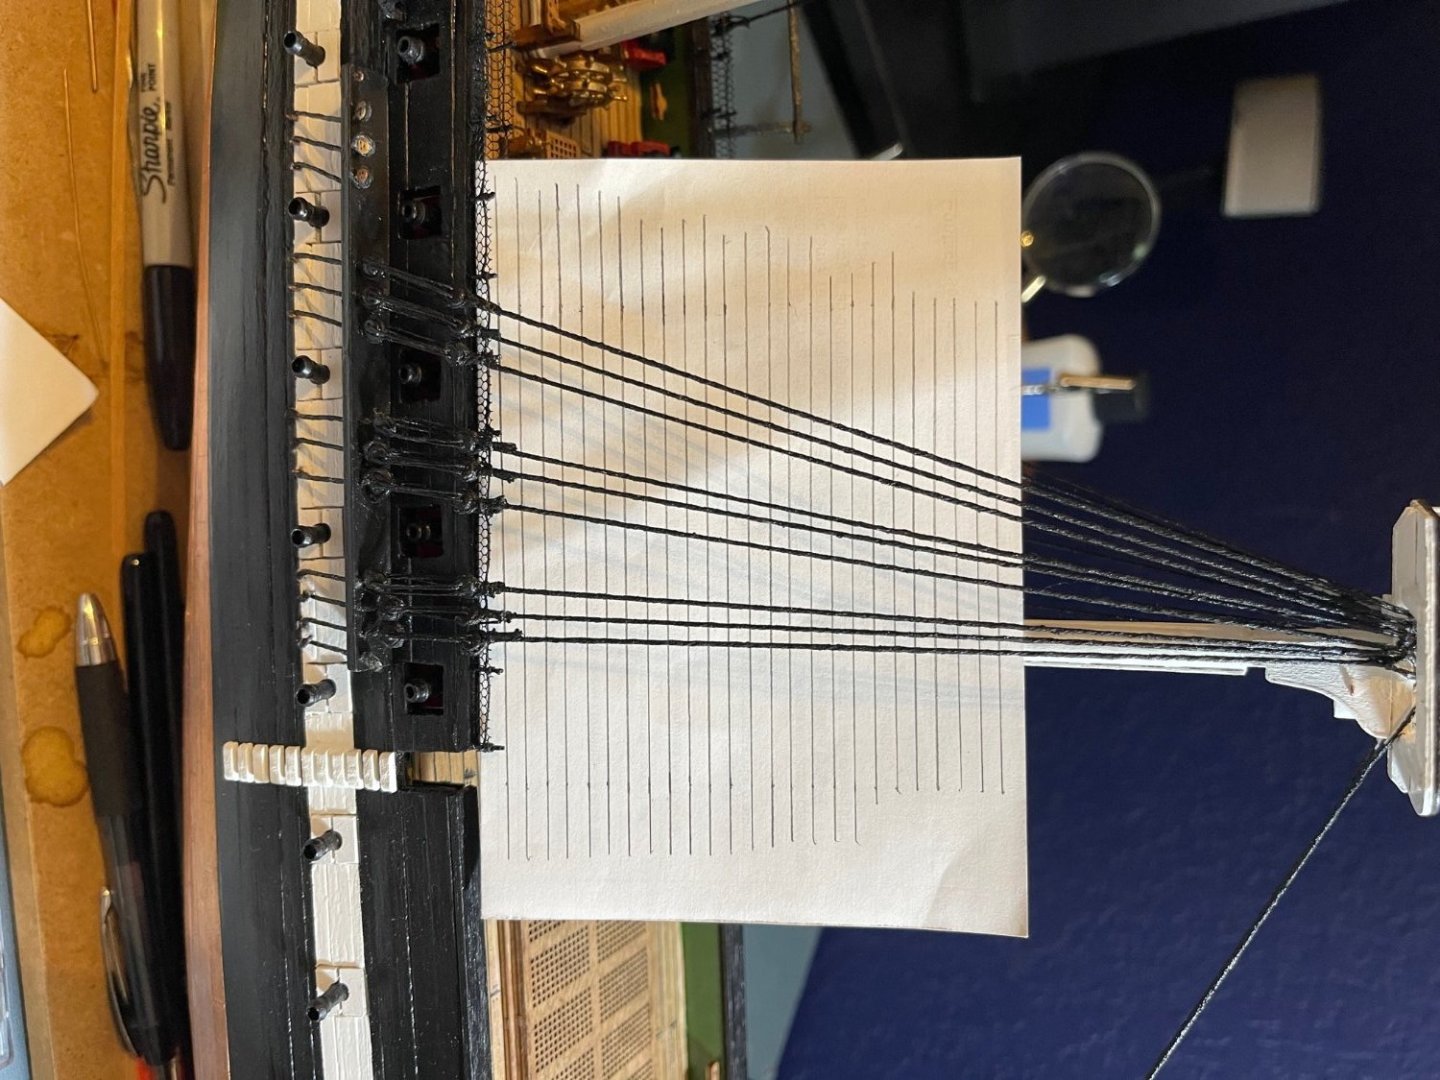
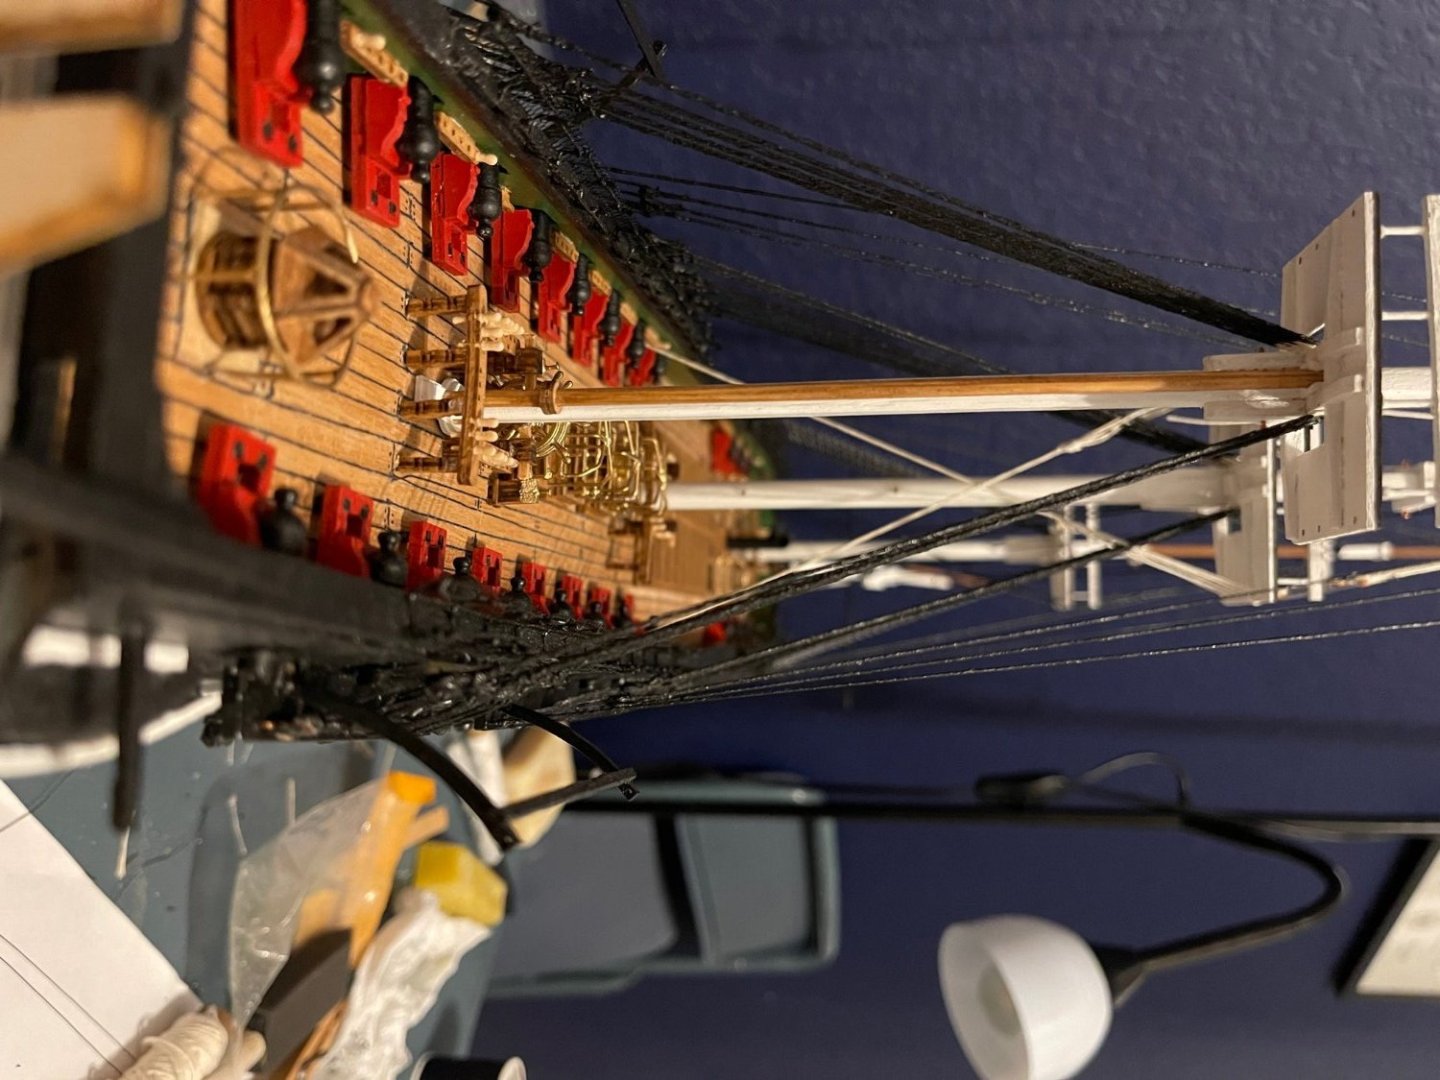
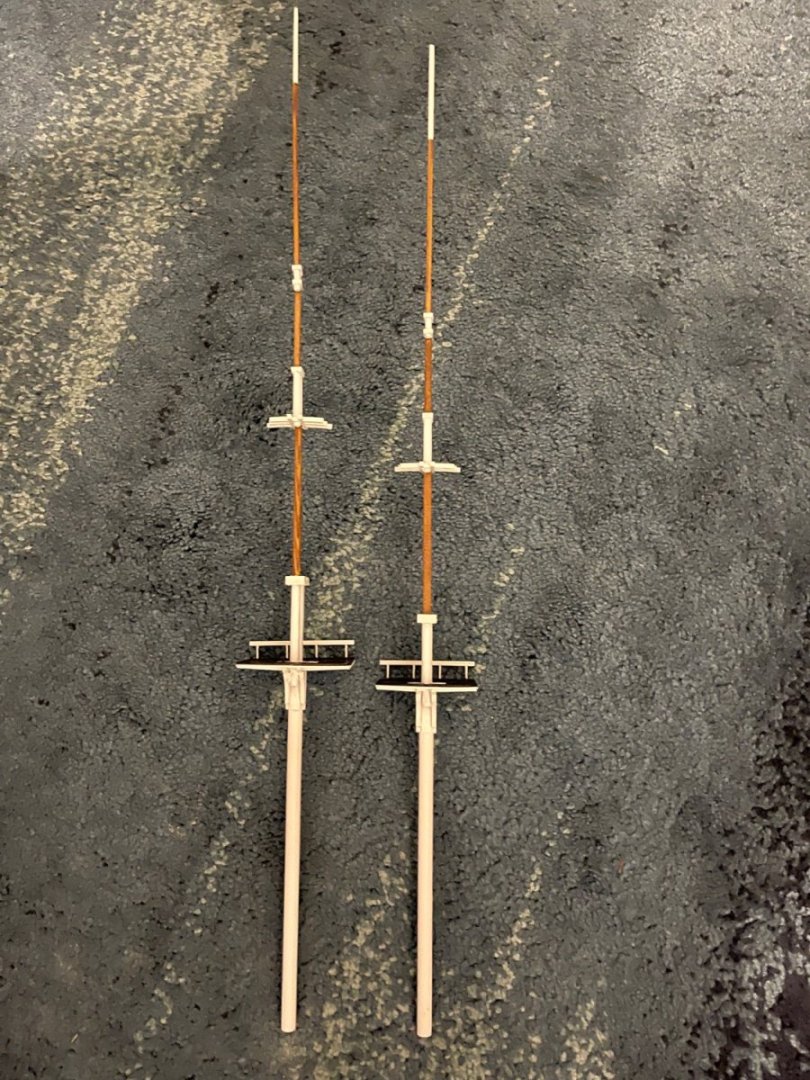
I have taken a couple of days to stain the thread. It is a bit darker than I was hoping for it to be, though when I see pictures of hemp rope, it has been anything from darker brown to almost white - from bleaching I can assume. I used a small brush with water based stain. I’m not the best with a brush, so to make sure I got the stain off of the shrouds, I dabbed the excess off with a sponge brush. It also gave segments a more uneven/natural look to the ratlines in my opinion. Next, I’m finally on to the yardarms/running rigging. I can’t wait! If I see another deadeye or ratline, I think my eyes will stay permanently crossed. No, the question is: Do I start at the bottom and work up or the reverse? Does anybody have any suggestion on that end? I am including photos of the yard arms I tapered in the drill, and a few shots of the completed work so far, and an up close shot to show detail of the ratlines.

- 88 replies
-
- 3
-
-
- Constitution
- billing boats
- (and 1 more)
-
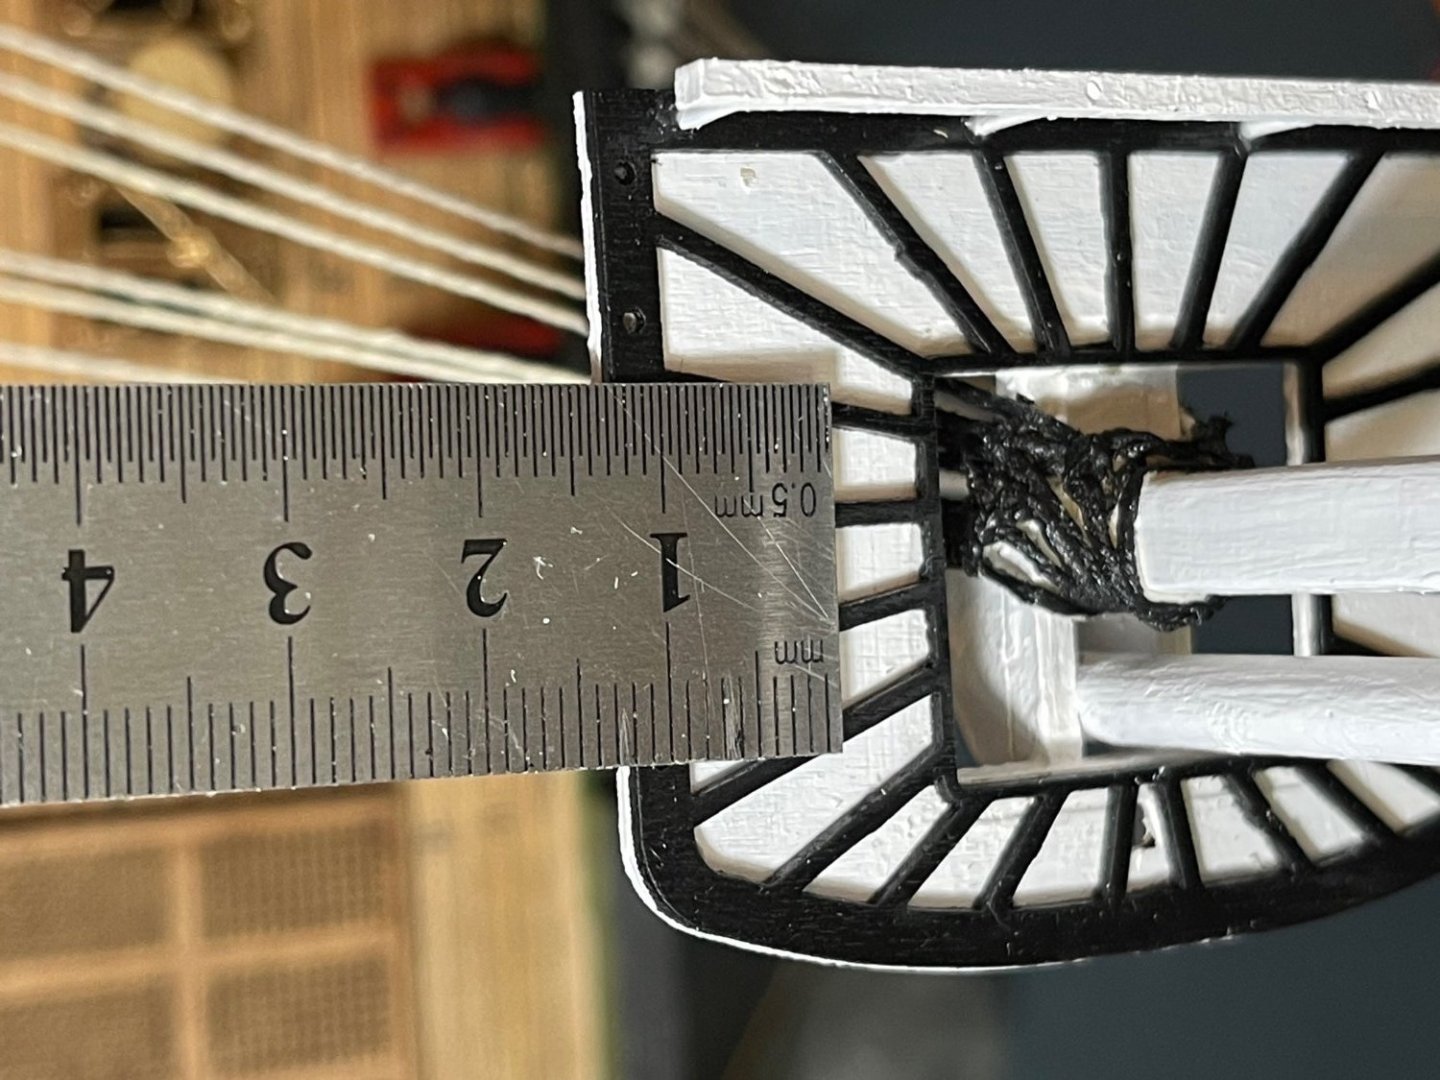
I have finally finished rattling down as it were. On the mizzenmast, there are somewhere in the neighborhood of 40 lines total on port, another 40 on starboard. I am so tired of ratlines. Now that I have everything installed, the next step I am told is to make sure the ratlines are darkened to a hemp color. The only way I have to do that is to stain it with a water based oak color. It will come out about the color of the deck. I’m not sure if it will be too dark though. I have included a picture of the deck so that you can compare and let me know what you think.


- 88 replies
-
- 3
-
-
- Constitution
- billing boats
- (and 1 more)
-
I am finally ready to ‘rattle down’ on the mizzenmast. I have gotten some helpful suggestions on what to do next and I appreciate the assistance!

- 88 replies
-
- 3
-
-
- Constitution
- billing boats
- (and 1 more)
-
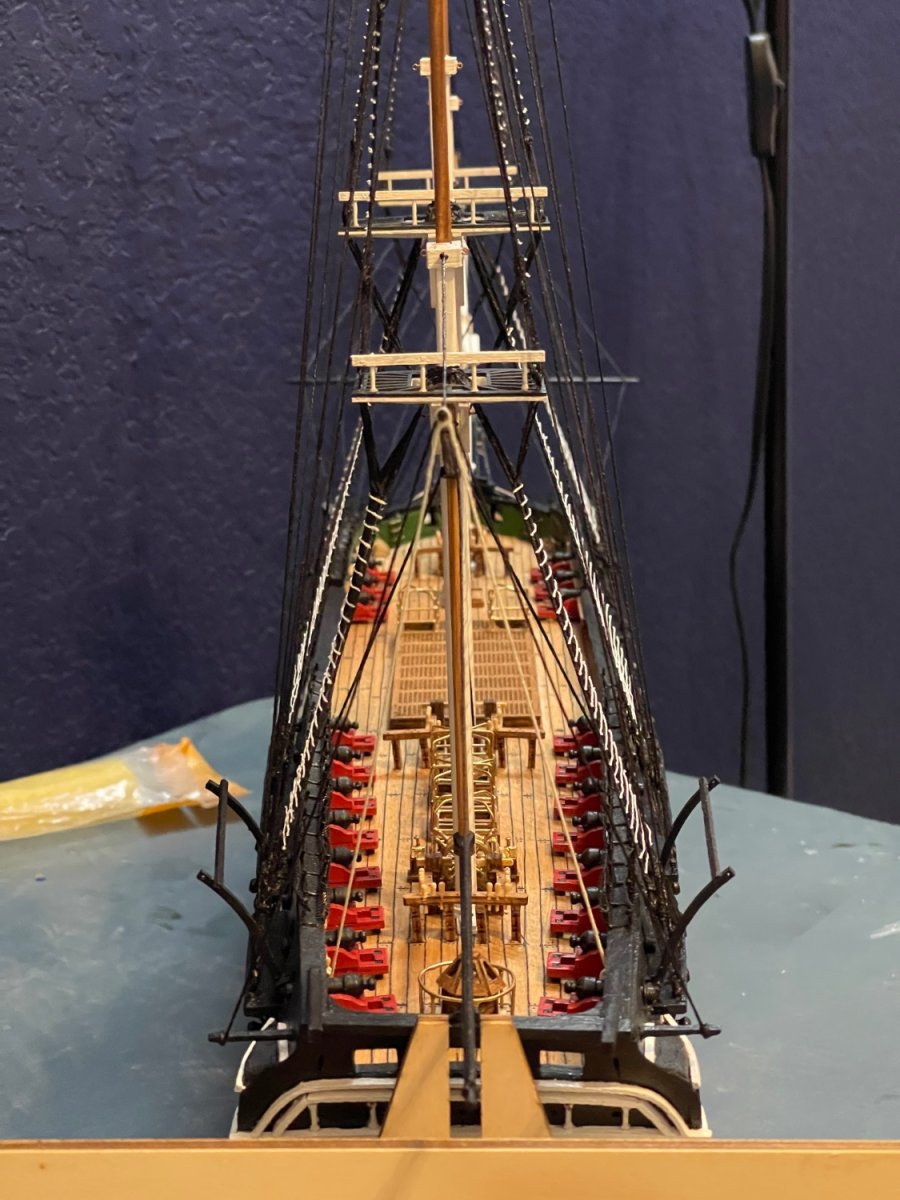
I have made some progress toward the completion of the model. While I have not done what seems like a lot, I have run quite a few mines, and manually painted them all. I promised better photos, and I have one against a light wall. After the work you see in the photo, I have the upper shrouds to install, paint, rattle down, and then I can stain the white threads a light brown to simulate hemp. Though I like the white color. What is your opinion of the brown versus the white? I mean how far off will the color be at that point?

- 88 replies
-
- 3
-
-
- Constitution
- billing boats
- (and 1 more)
-
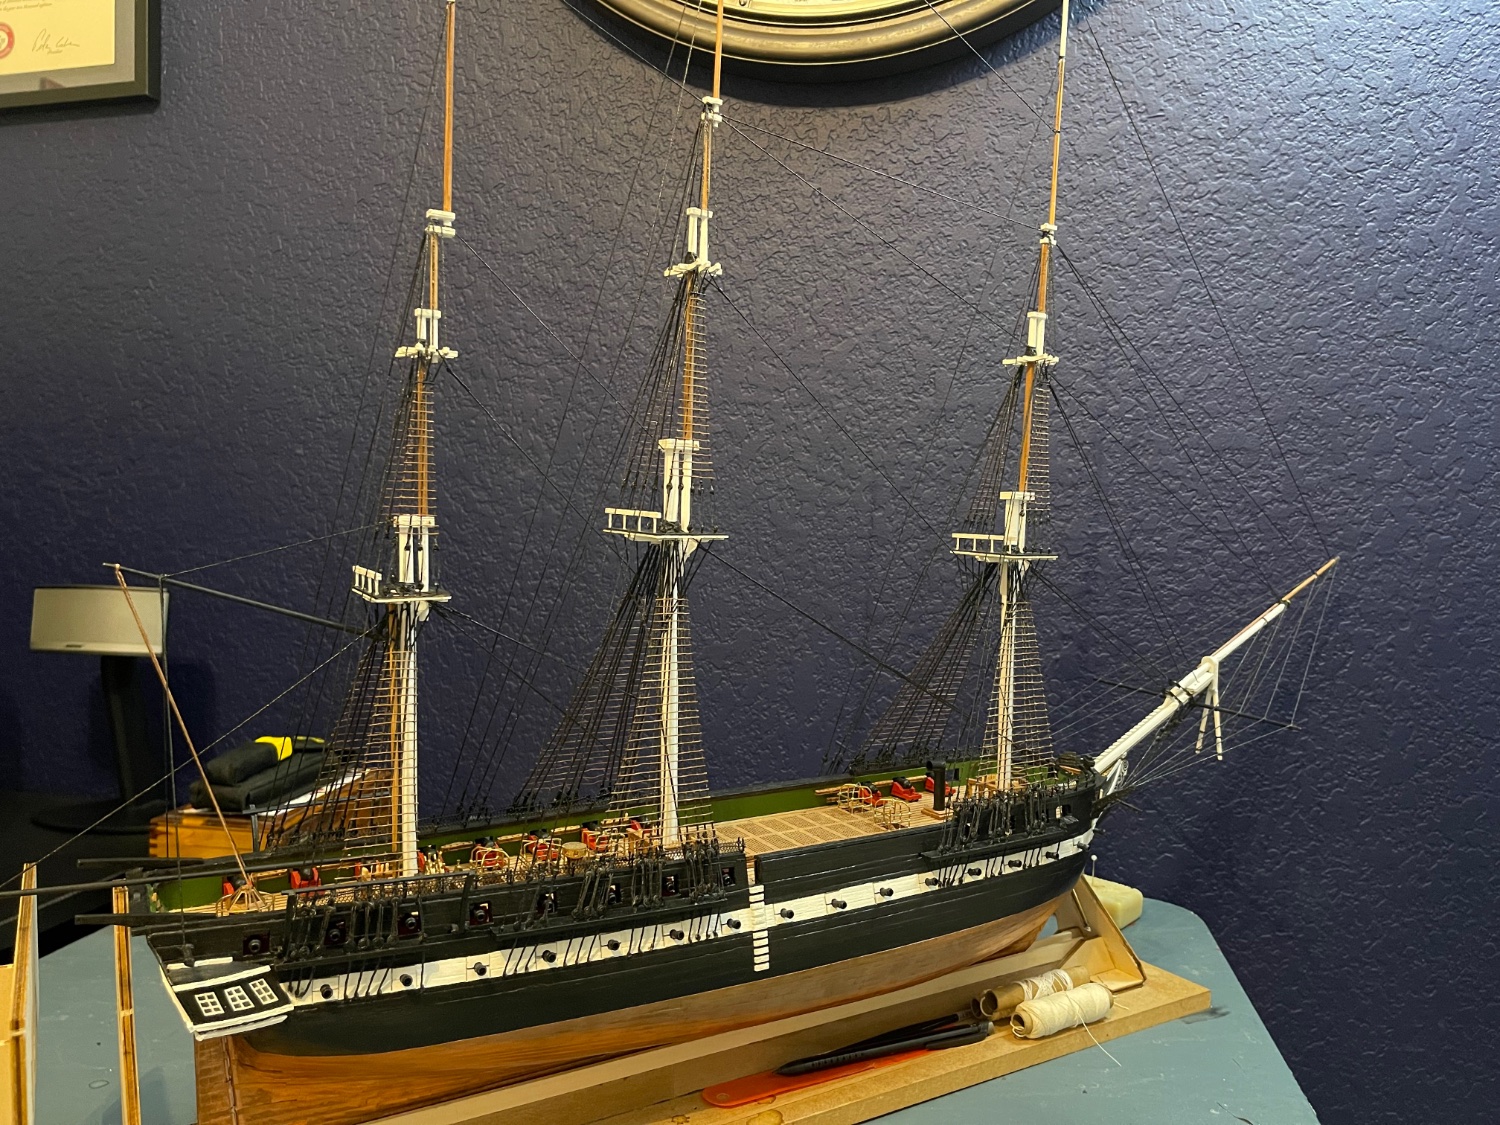
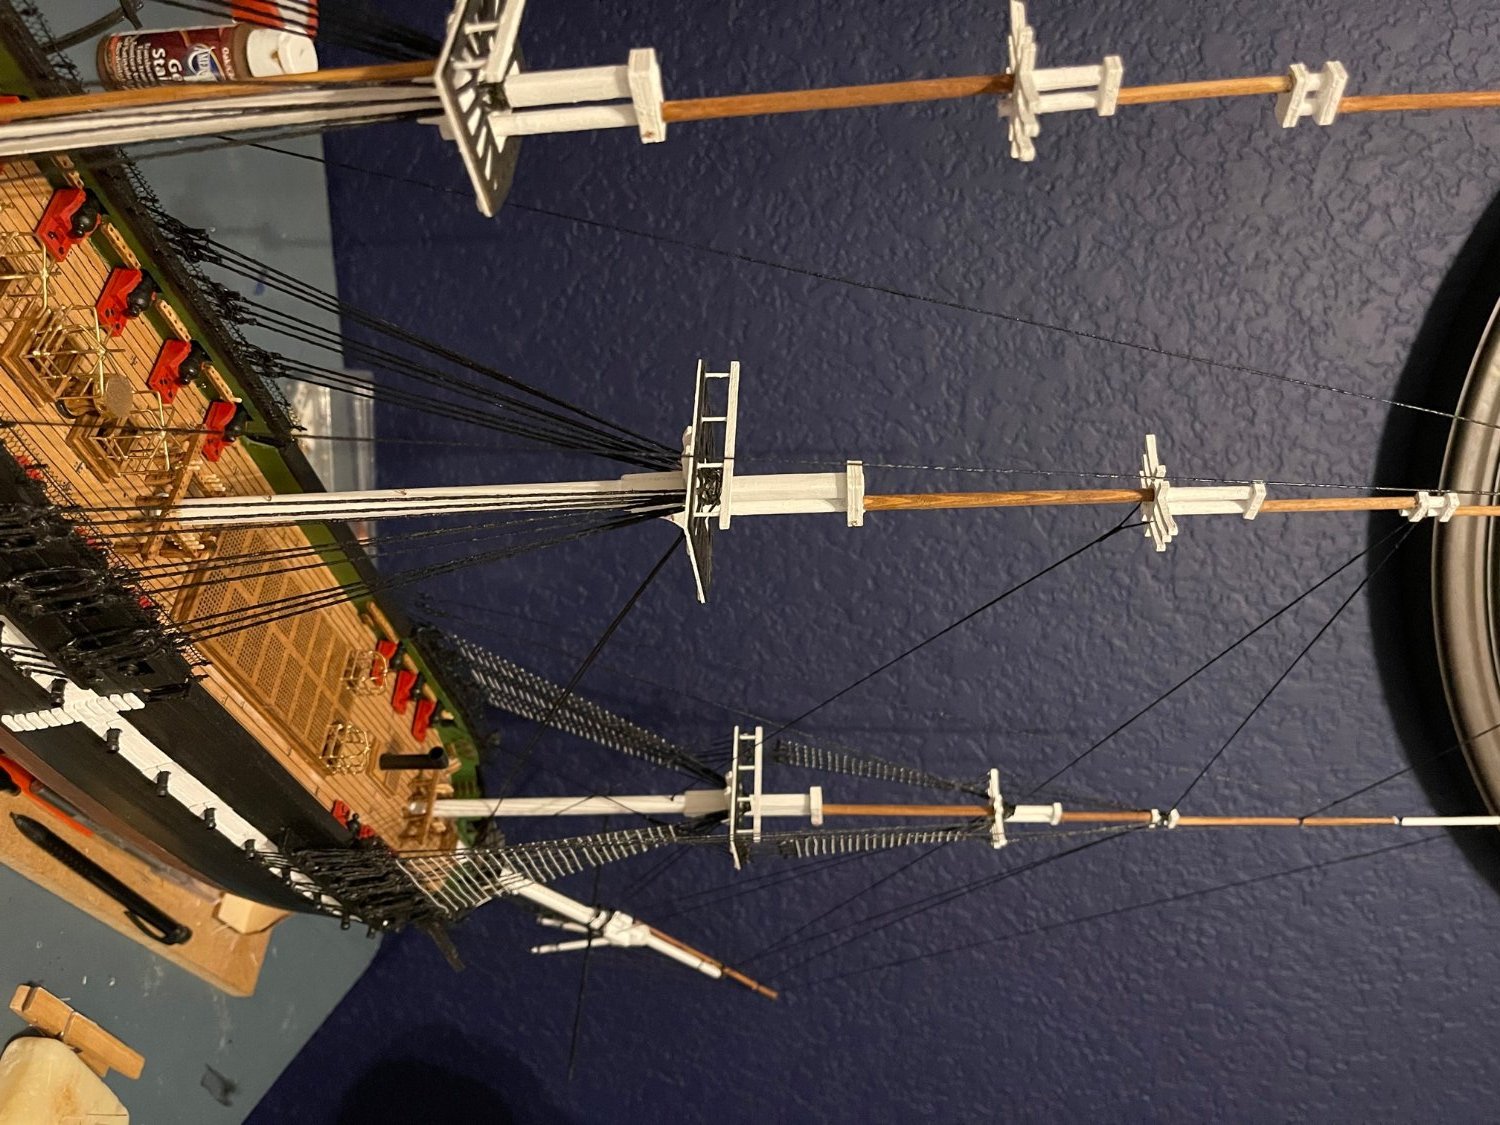
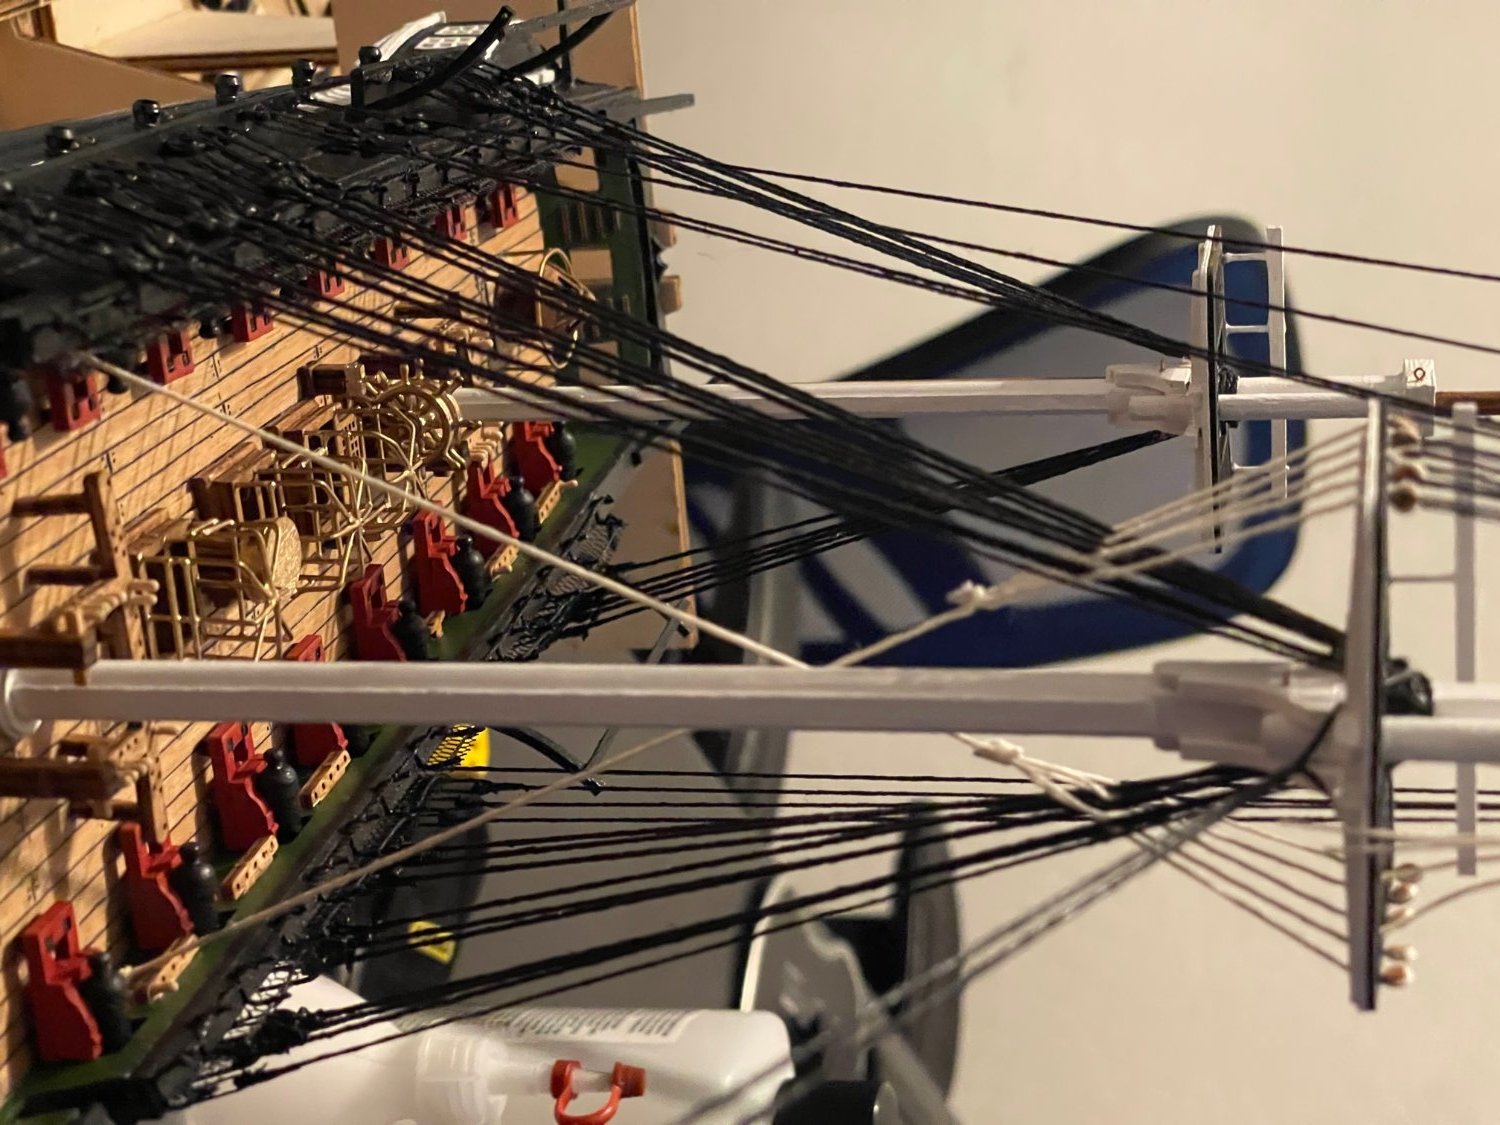
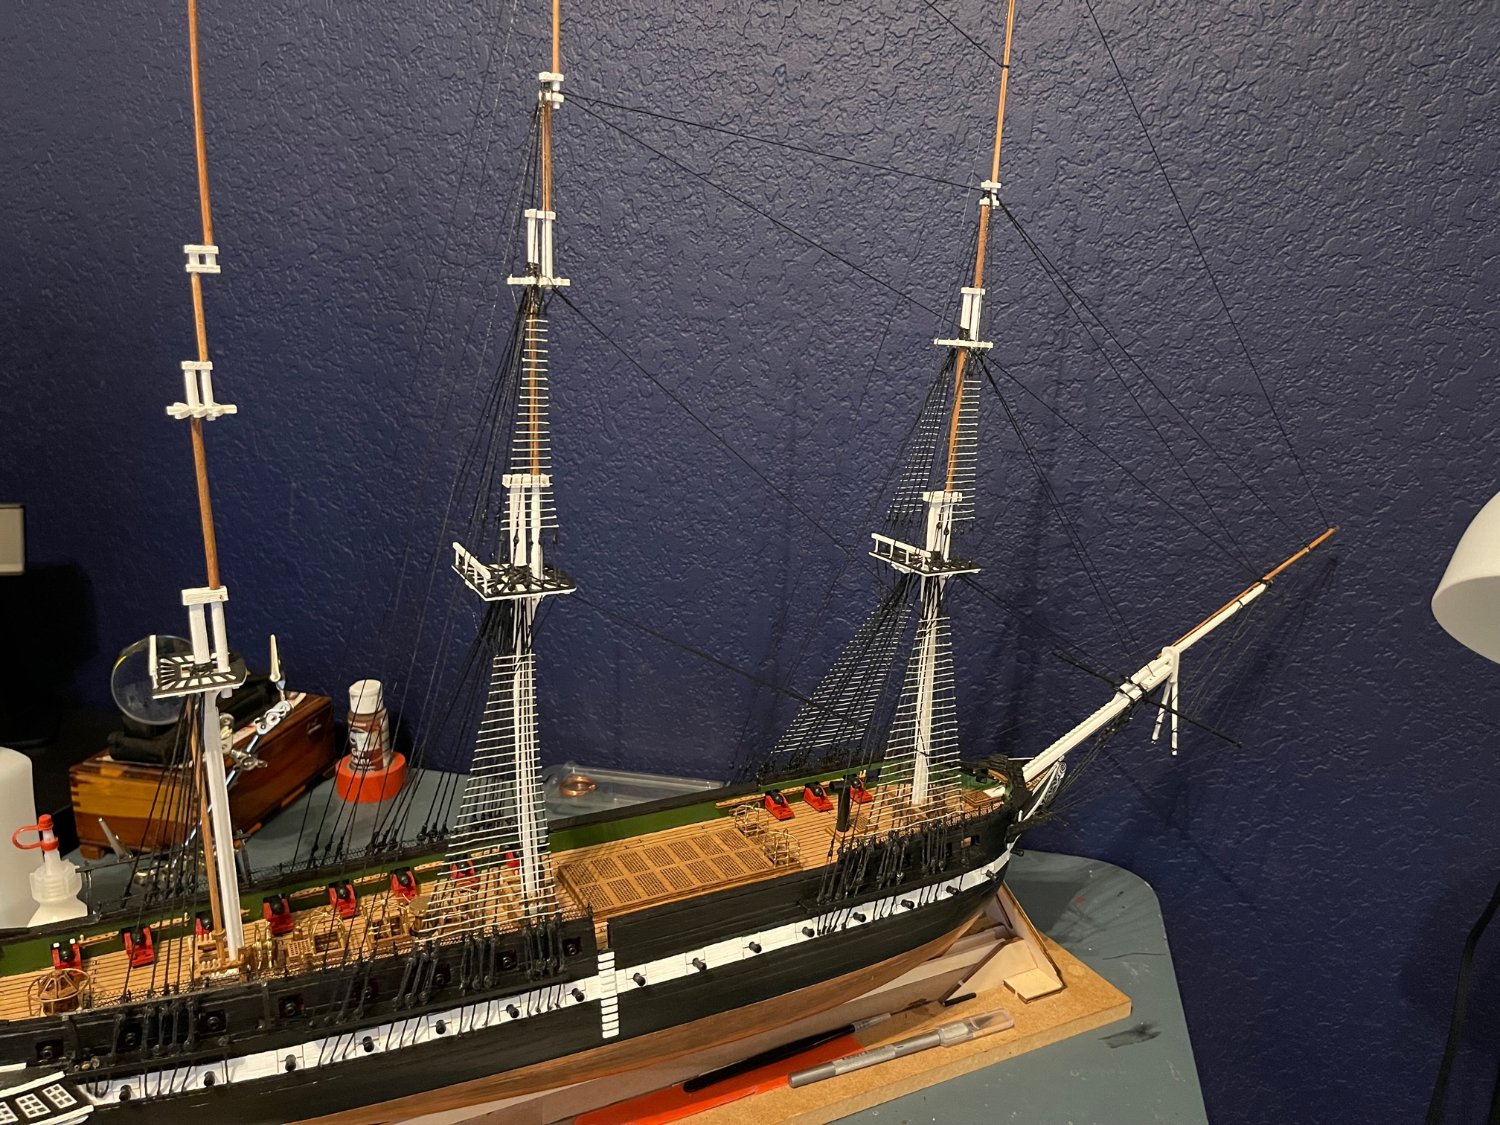
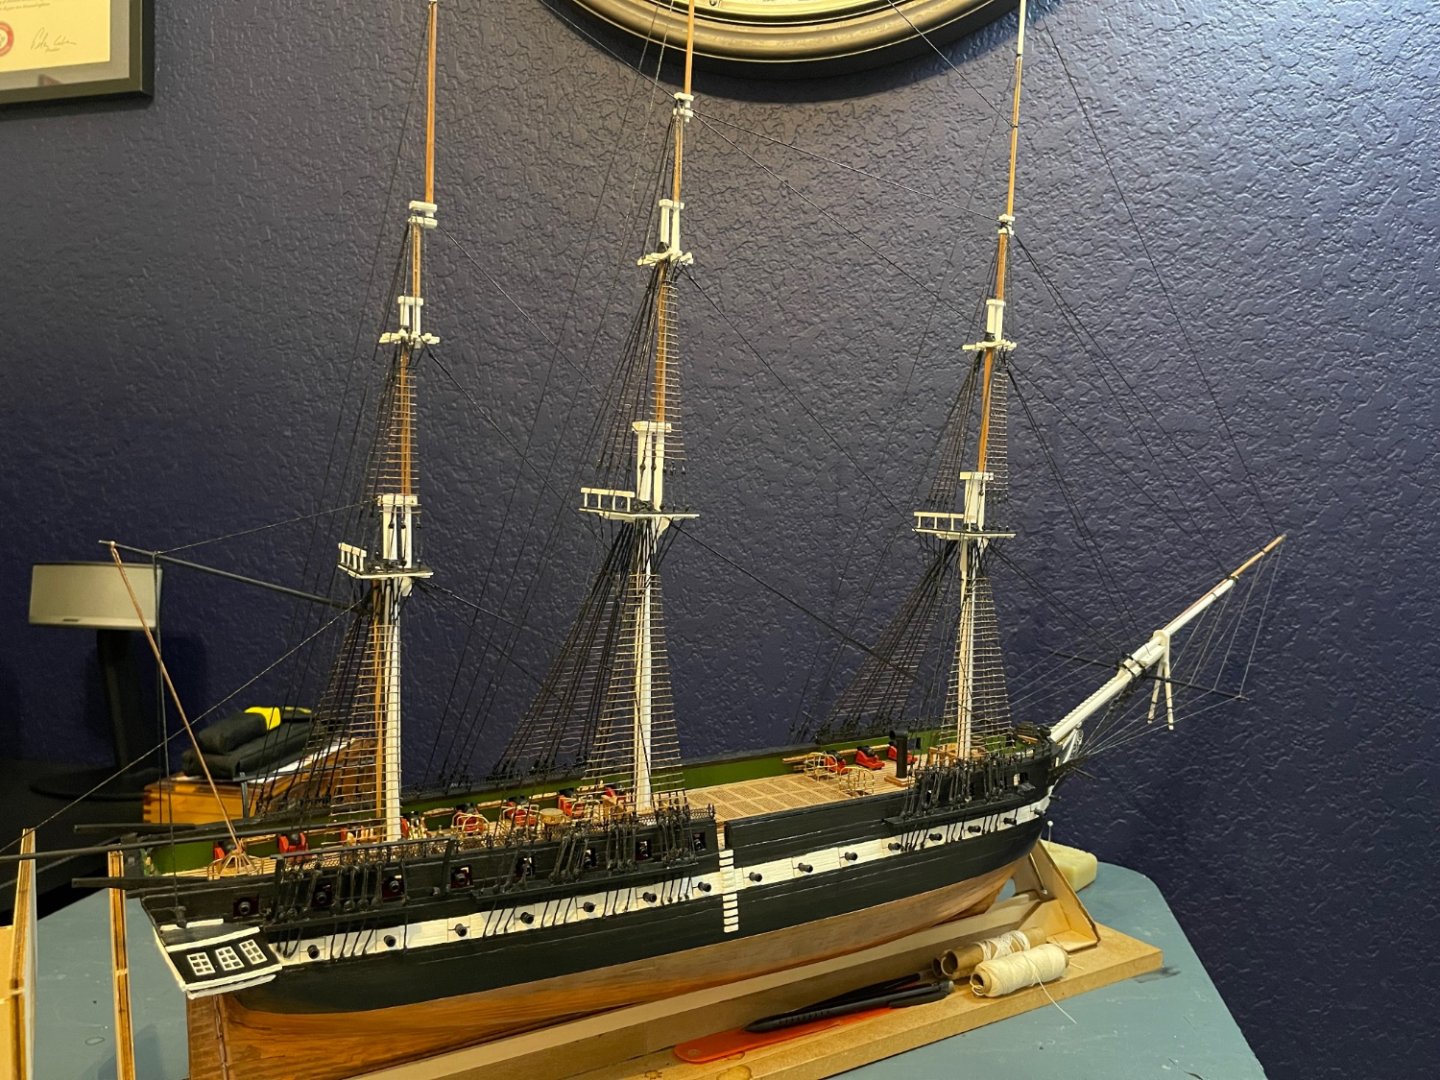
It has been a while since I last went and updated this page. I wanted to catch you up where I am in the construction process. It has taken a long time to get the standing rigging completed - I am still working on it. I have one more mast to go (after I complete ratlines on the main mast). Then the real fun begins with the yard arms and the like. I have had to paint/stain the cordage sent by the model company, and I almost wish that they had sent other cordage or I had gone out and bought my own. Living here in the states, it is a bit difficult to find metric sized cording in colors I need unless I go online and shop overseas. I am attaching the work I have done and I am currently working on the ratlines on the main mast. Once that is done, I will be moving onto the mizzenmast. You can see from the photos the details I have needed to paint around, how I have installed the deadeyes, how I worked out doing the ratlines, a couple of glamour shots, and the last photo (as I see it uploading) will see the ship as it is. I do not have a white wall in this room that will be clear. as to what the lines look like, I do apologize. I shall have that when I complete my model.


- 88 replies
-
- 5
-
-
- Constitution
- billing boats
- (and 1 more)
-
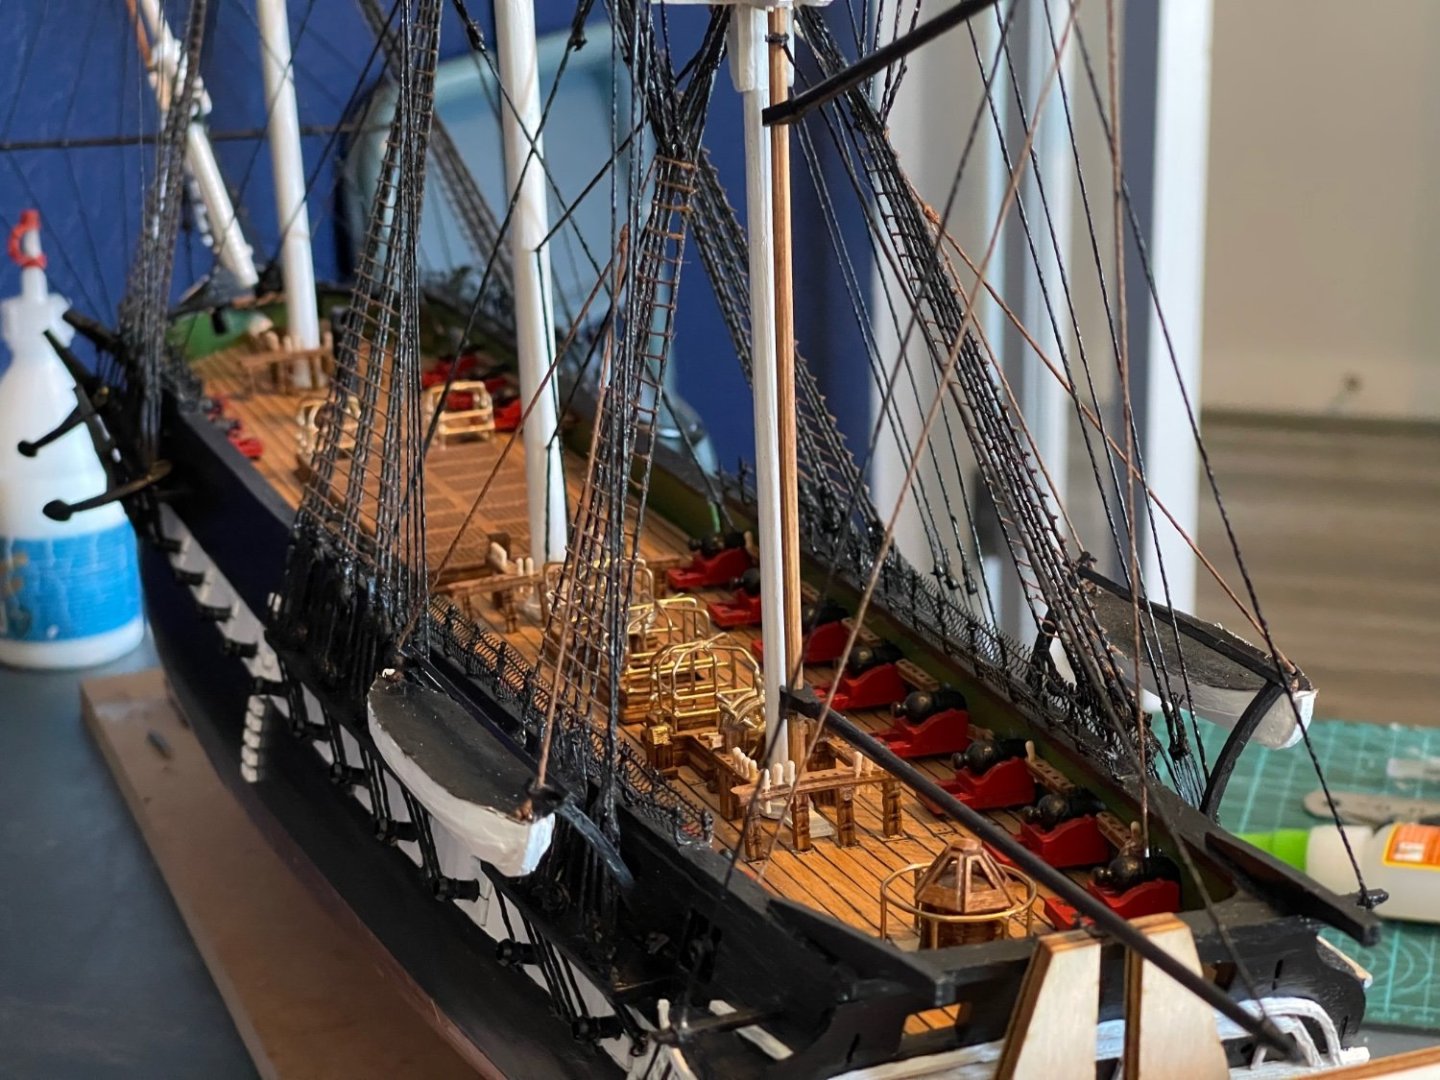
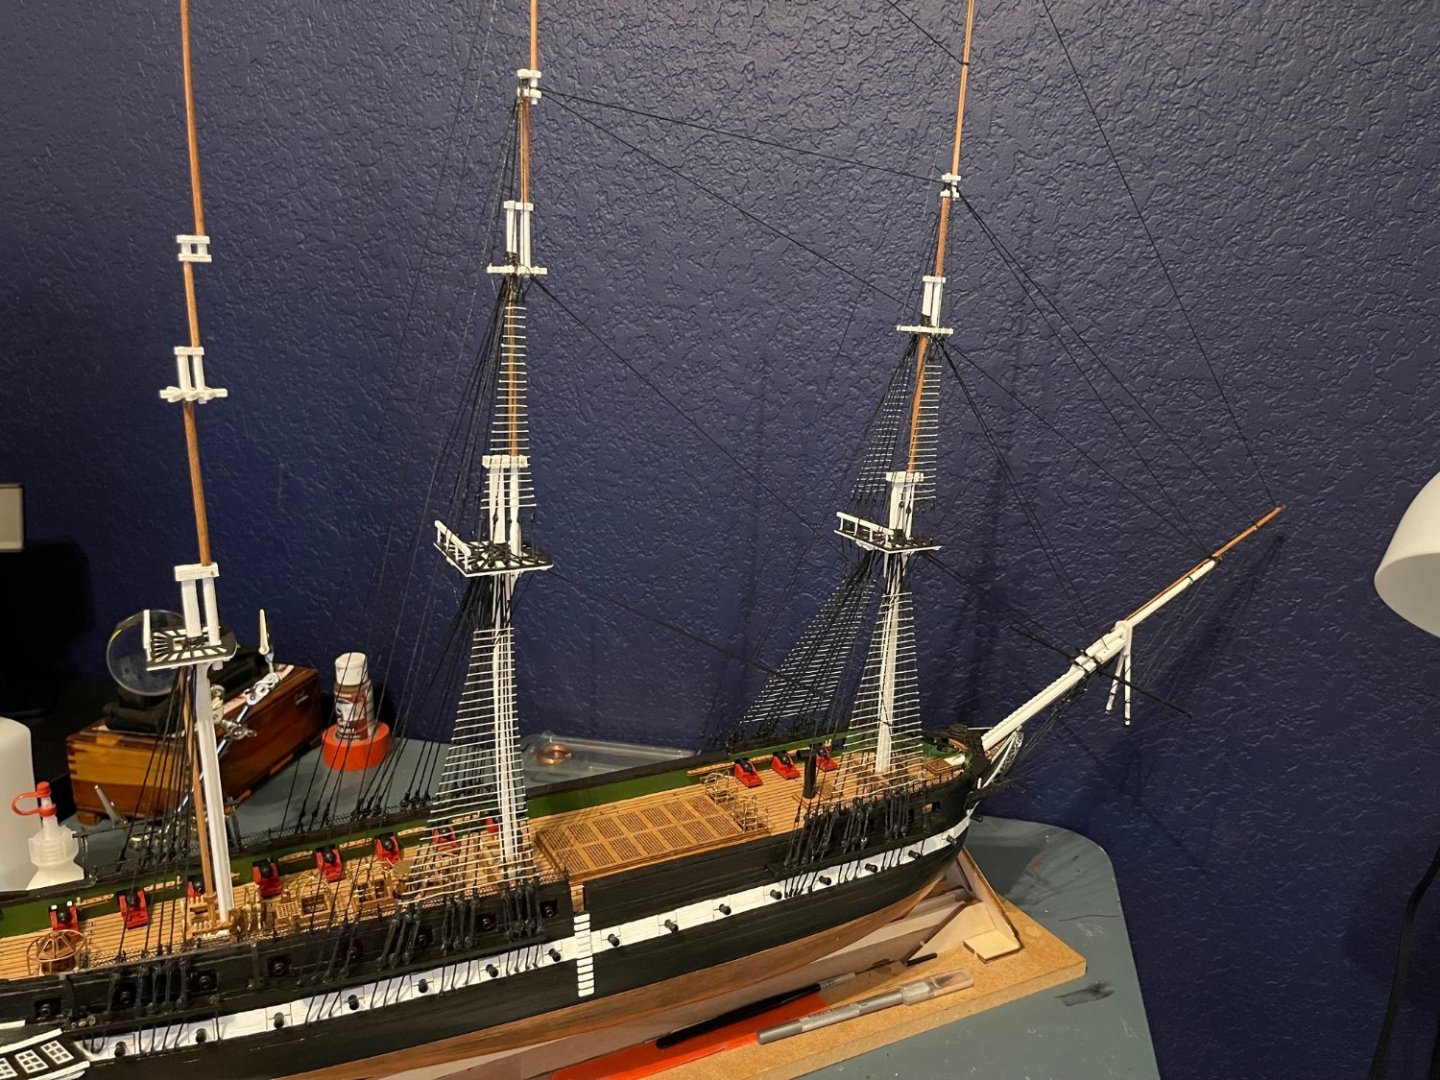
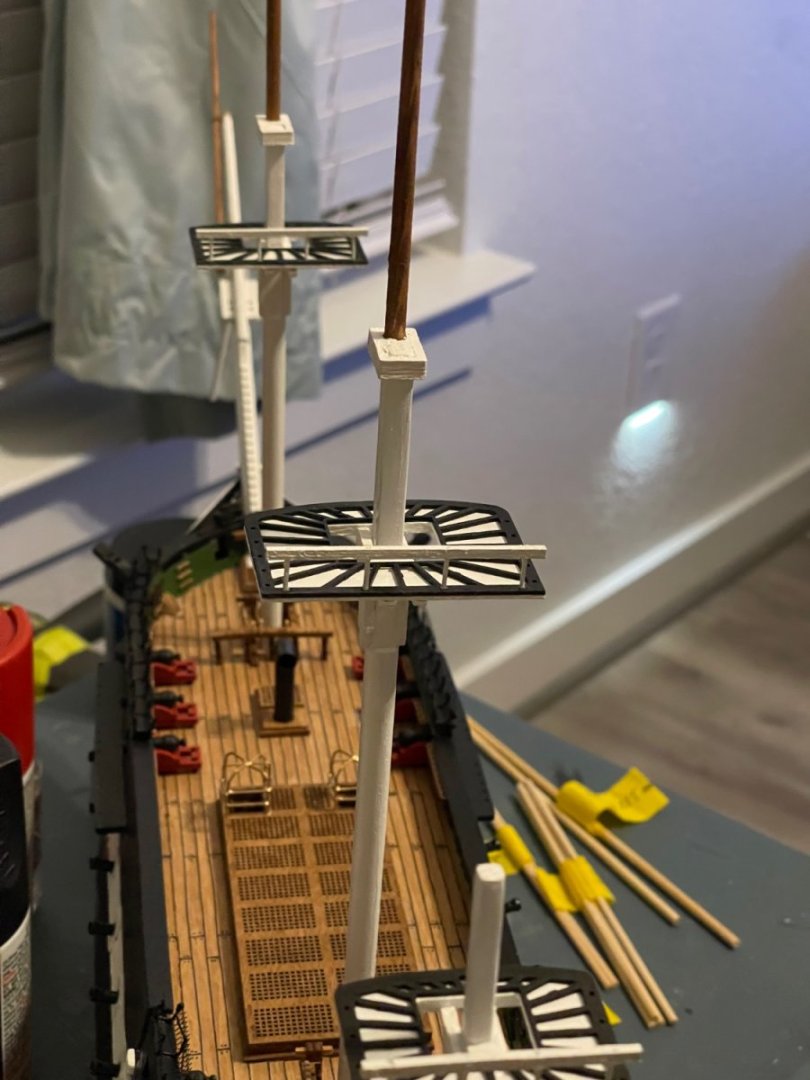
So it has been a while since my last update to my ship construction, I have since been able to construct the foremast, mainmast, and half way through the mizzenmast. It does not seem like a lot but considering the sheer amount of detail work, sanding, and painting, it is a bit rough being dad to a new baby and working full time. I have also installed the ship’s ladders for boarding at mid-ships. Once I have completed the mizzenmast, I still have the yardarms on the main and mizzenmast to sand down and paint. All be told, that ought to take me about 3-4 hours with paint drying (I hope to be honest). I have hand painted the masts and the trim where it is possible. Here are some pictures of my latest work.


- 88 replies
-
- 1
-
-
- Constitution
- billing boats
- (and 1 more)
-
Thanks for the idea, I will see if I can note a difference between the thickness of the sail material. Most of the sail material have seen in the kits I have experience with are always not thin enough to see the mast shadow.
-
Thanks for the suggestion, I wanted to do full sail instead of furled sails, the material they sent is a type of rough cotton weave or something though it doesn’t look like a broadcloth weave. The material is the same as what I have on my last model so it looks fine but the scale is 1:75 I think…would the change in scale from 1:75 to 1:100 cause much of a difference you think? p.S.: I like the technical term lol.
-
In completing the netting, I am satisfied with the look, though I may or may not include hammocks. Nowhere in the actual parts does it tell me what the netting was for, so I had to conclude. Anyway, I agree that I will probably need to work on the bowsprit rigging a little but only after I complete the assembly of the masts (need to taper the dowels, paint, and then construct). I was thinking that it would be a lot easier to attach the sails while the masts are flat on a table, but am wondering how that may get in the way of rigging. especially when working on the shrouds and such. I have gotten a book and been reading about how to go about some of the rigging, but it seems with the sails added into the mix its a balancing act about which area to progress and when lol. Should I just wait until the masts have been stepped before attaching the sails on the yards?
-
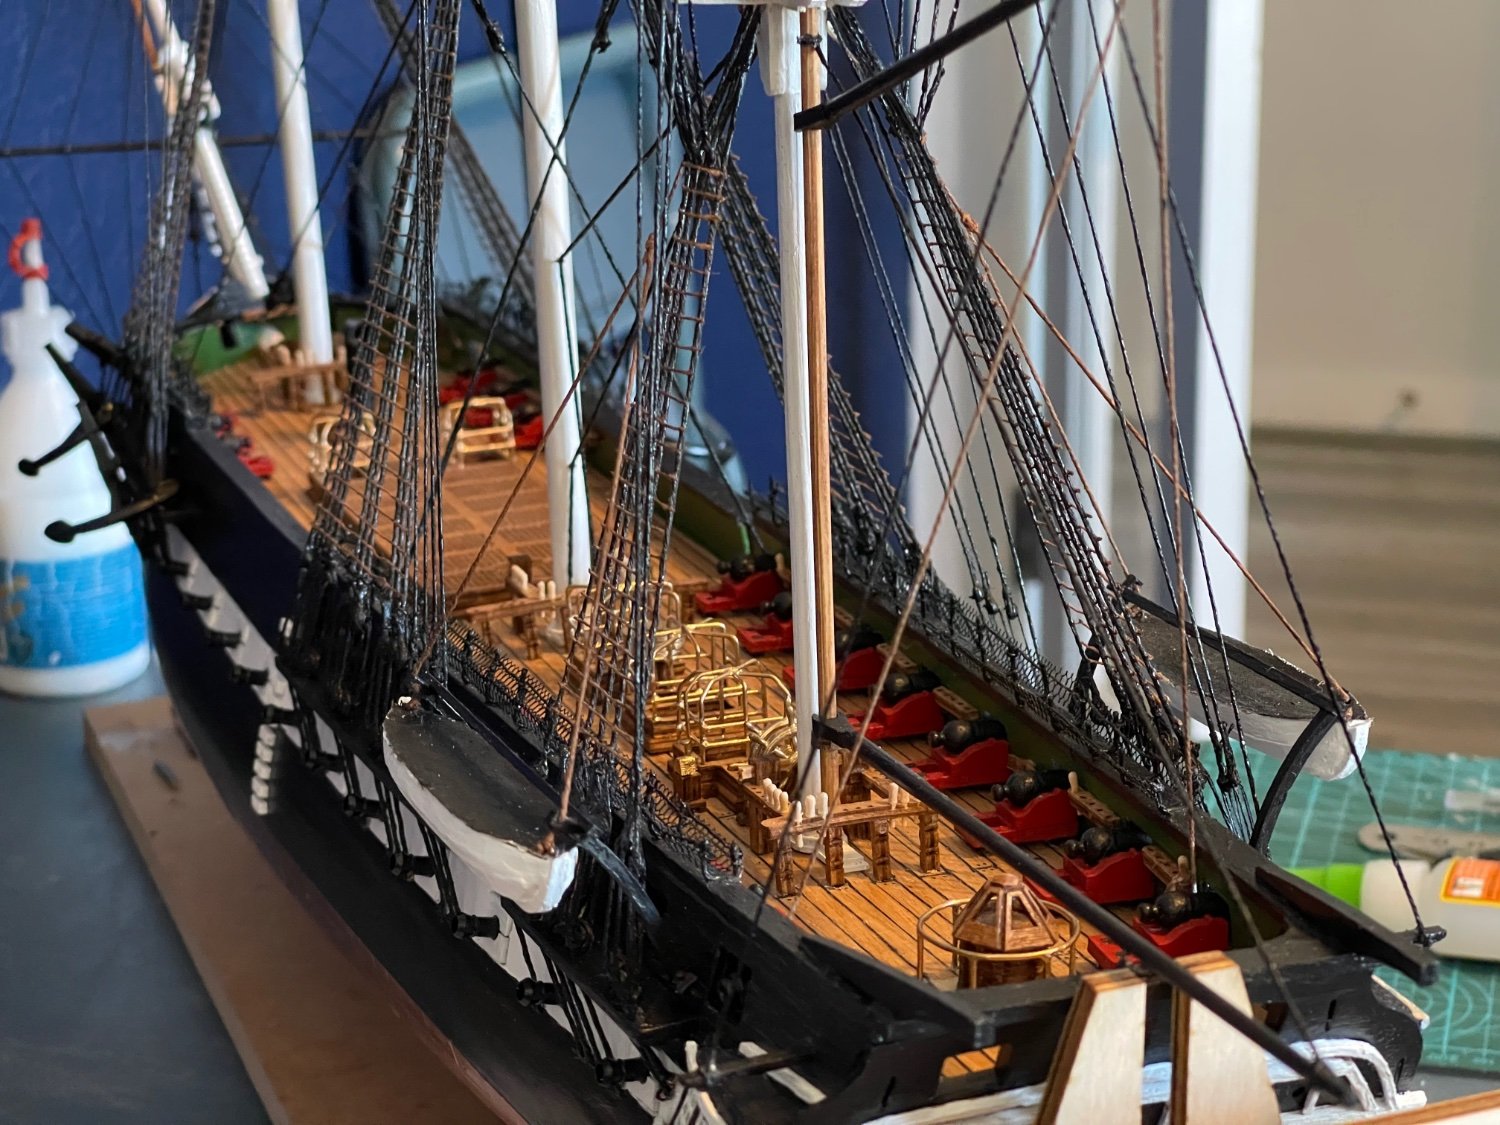
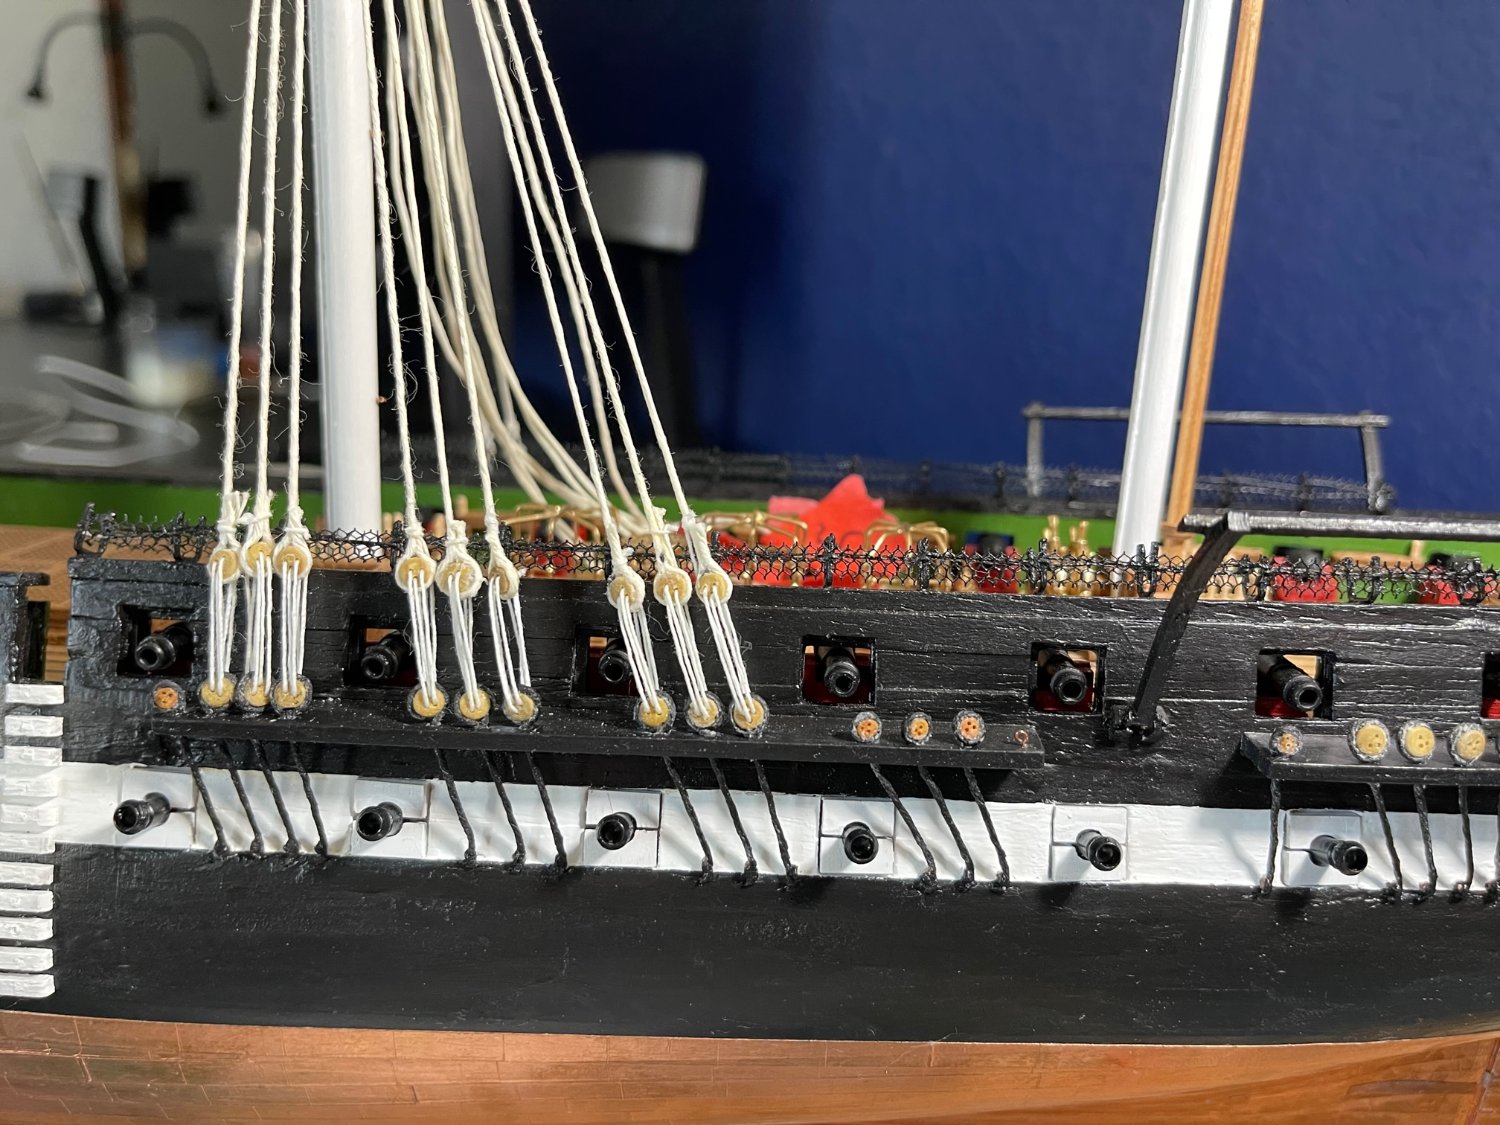
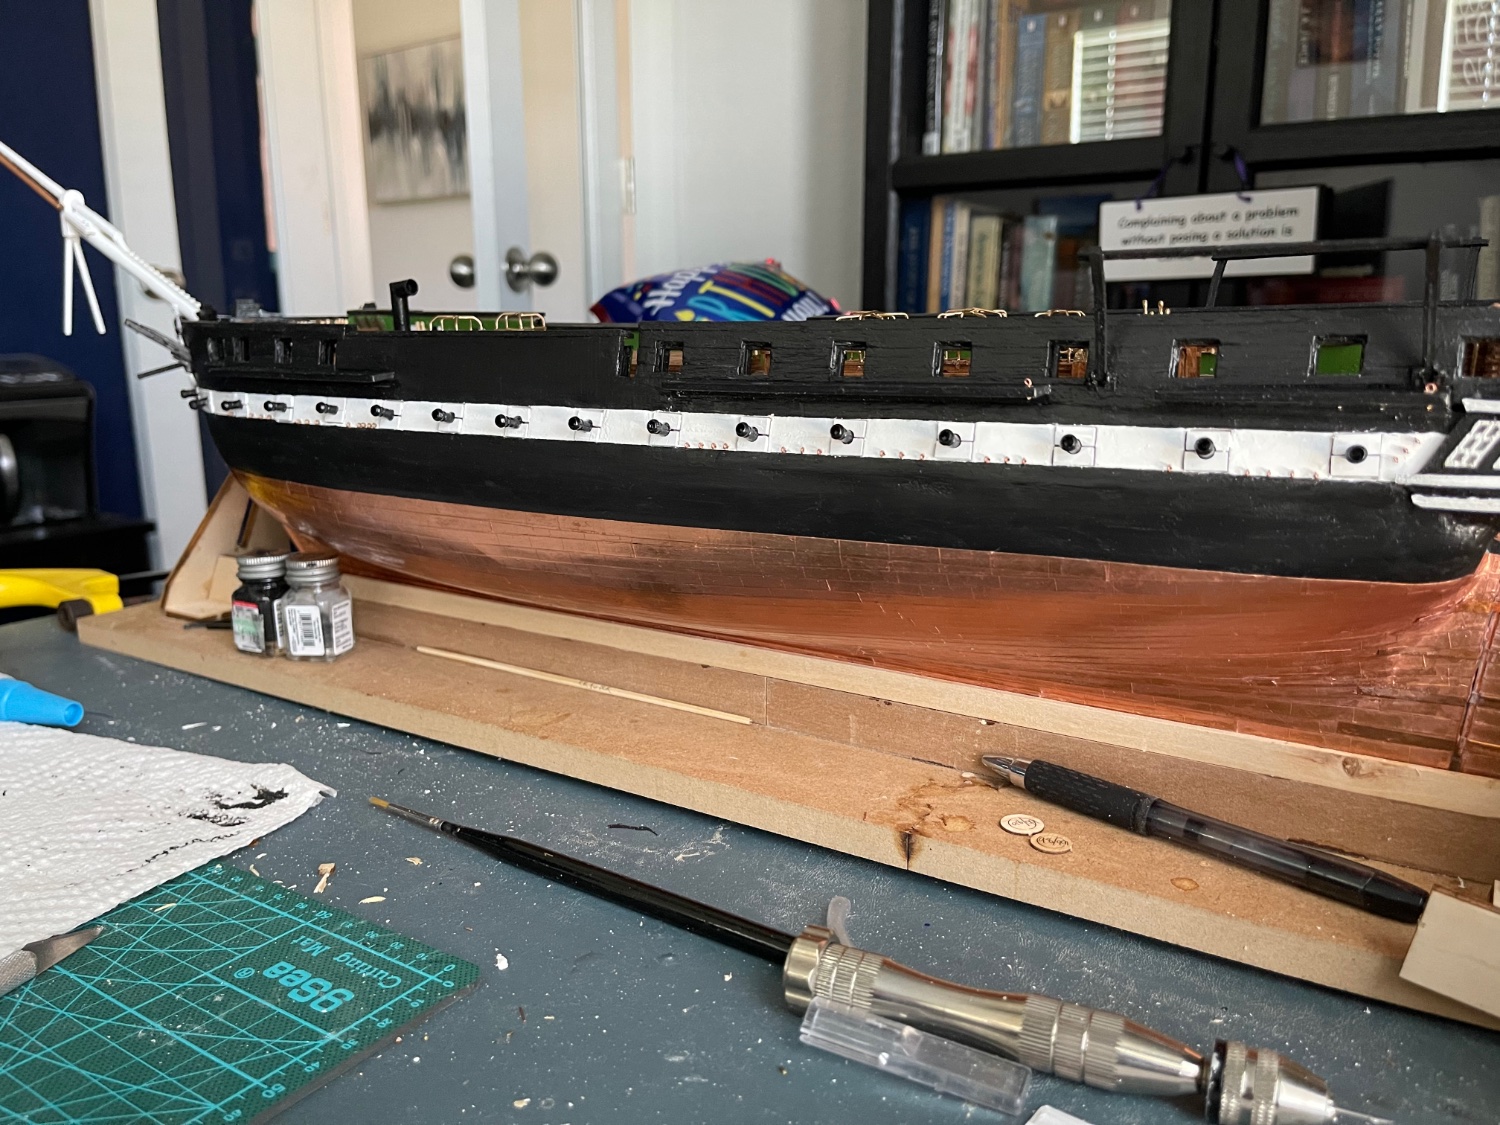
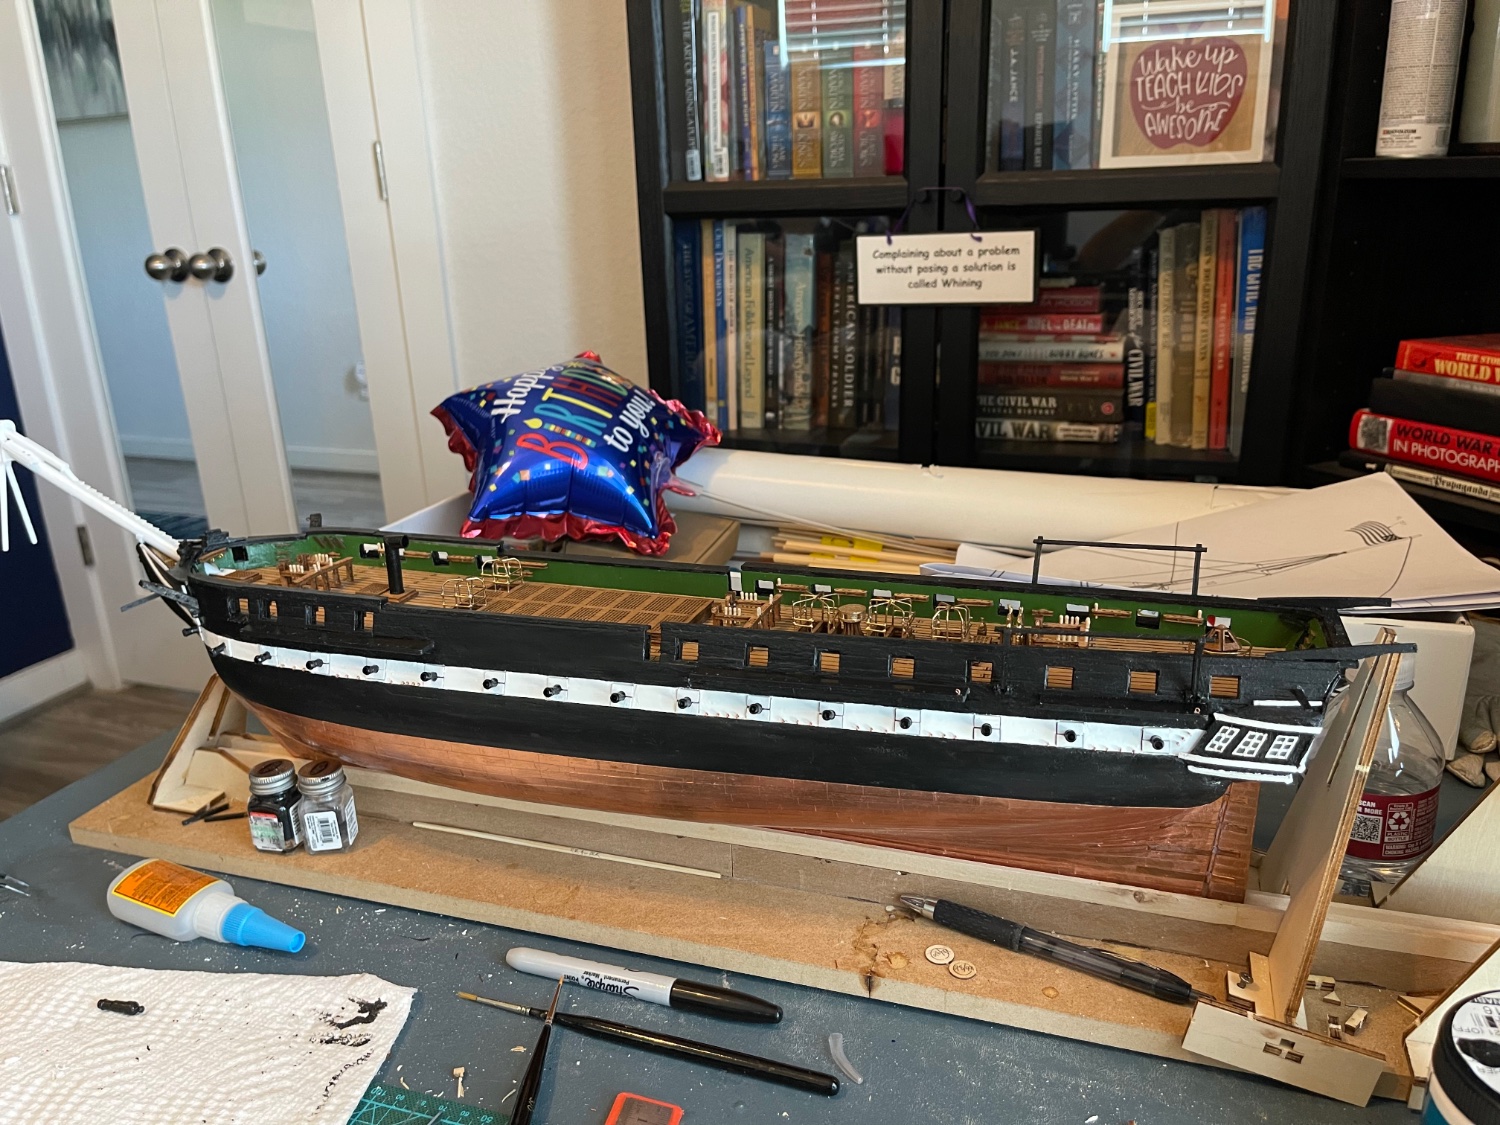
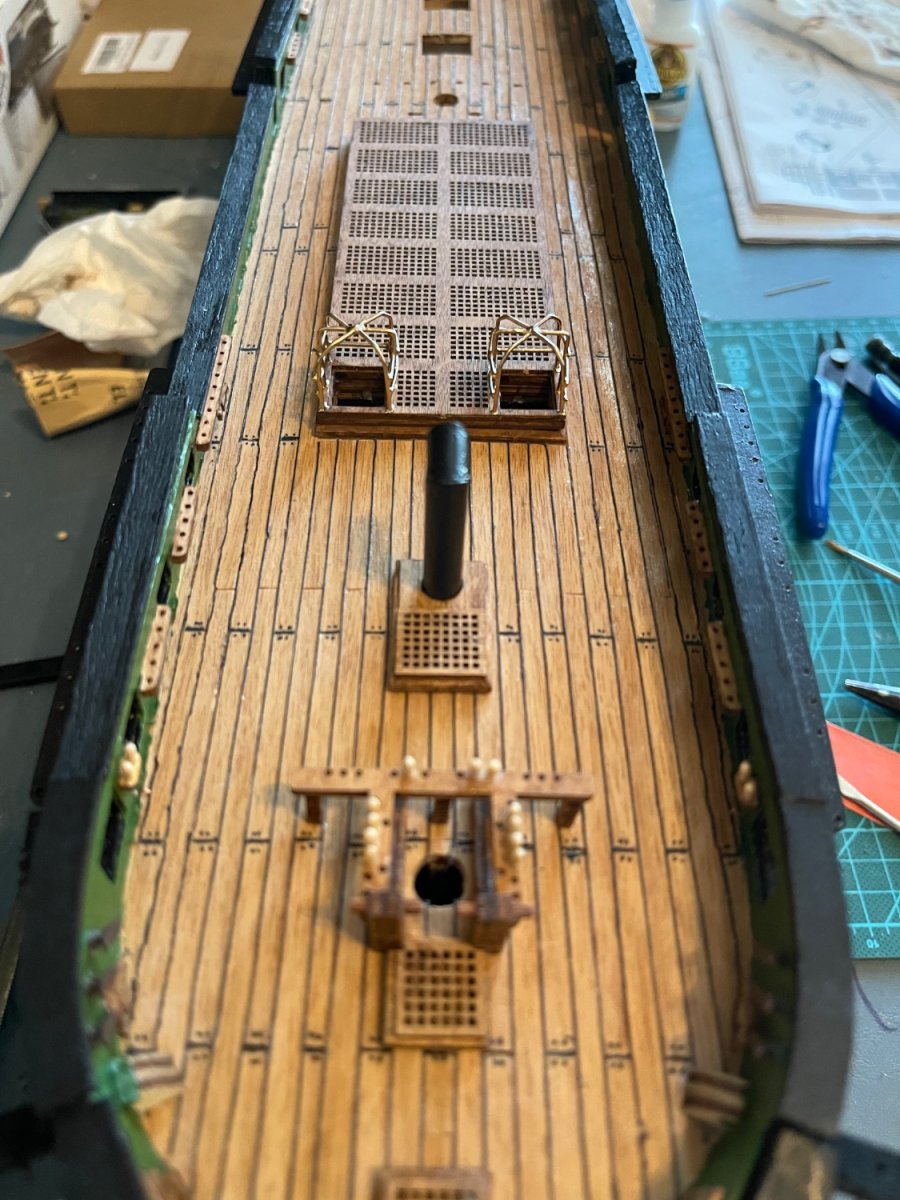
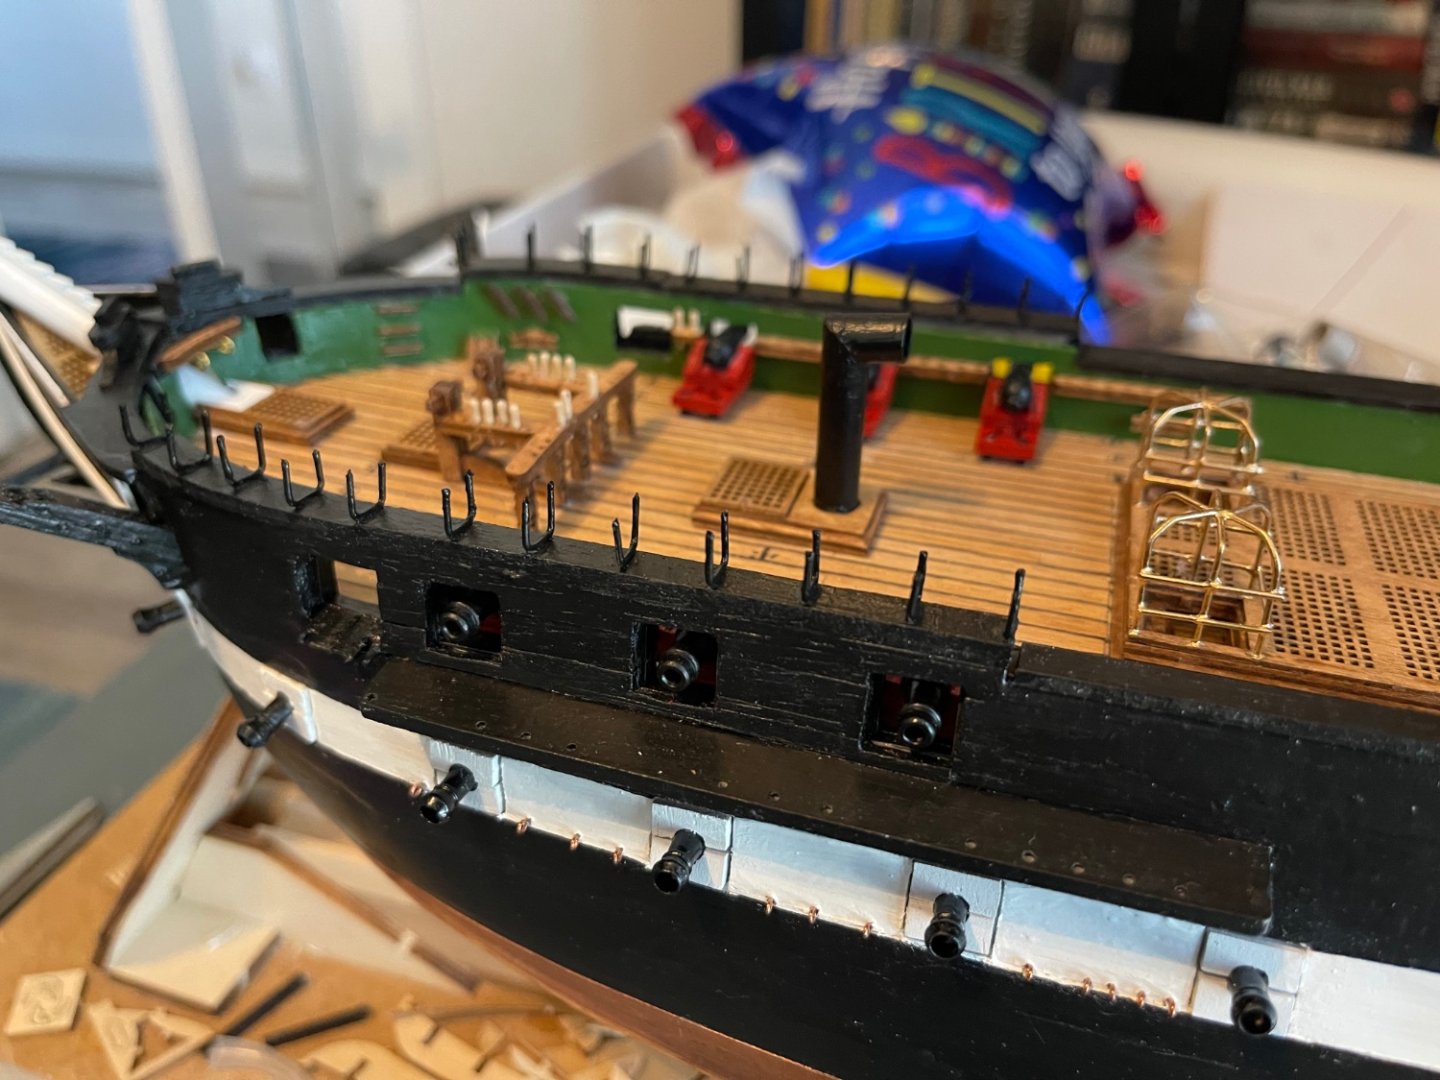
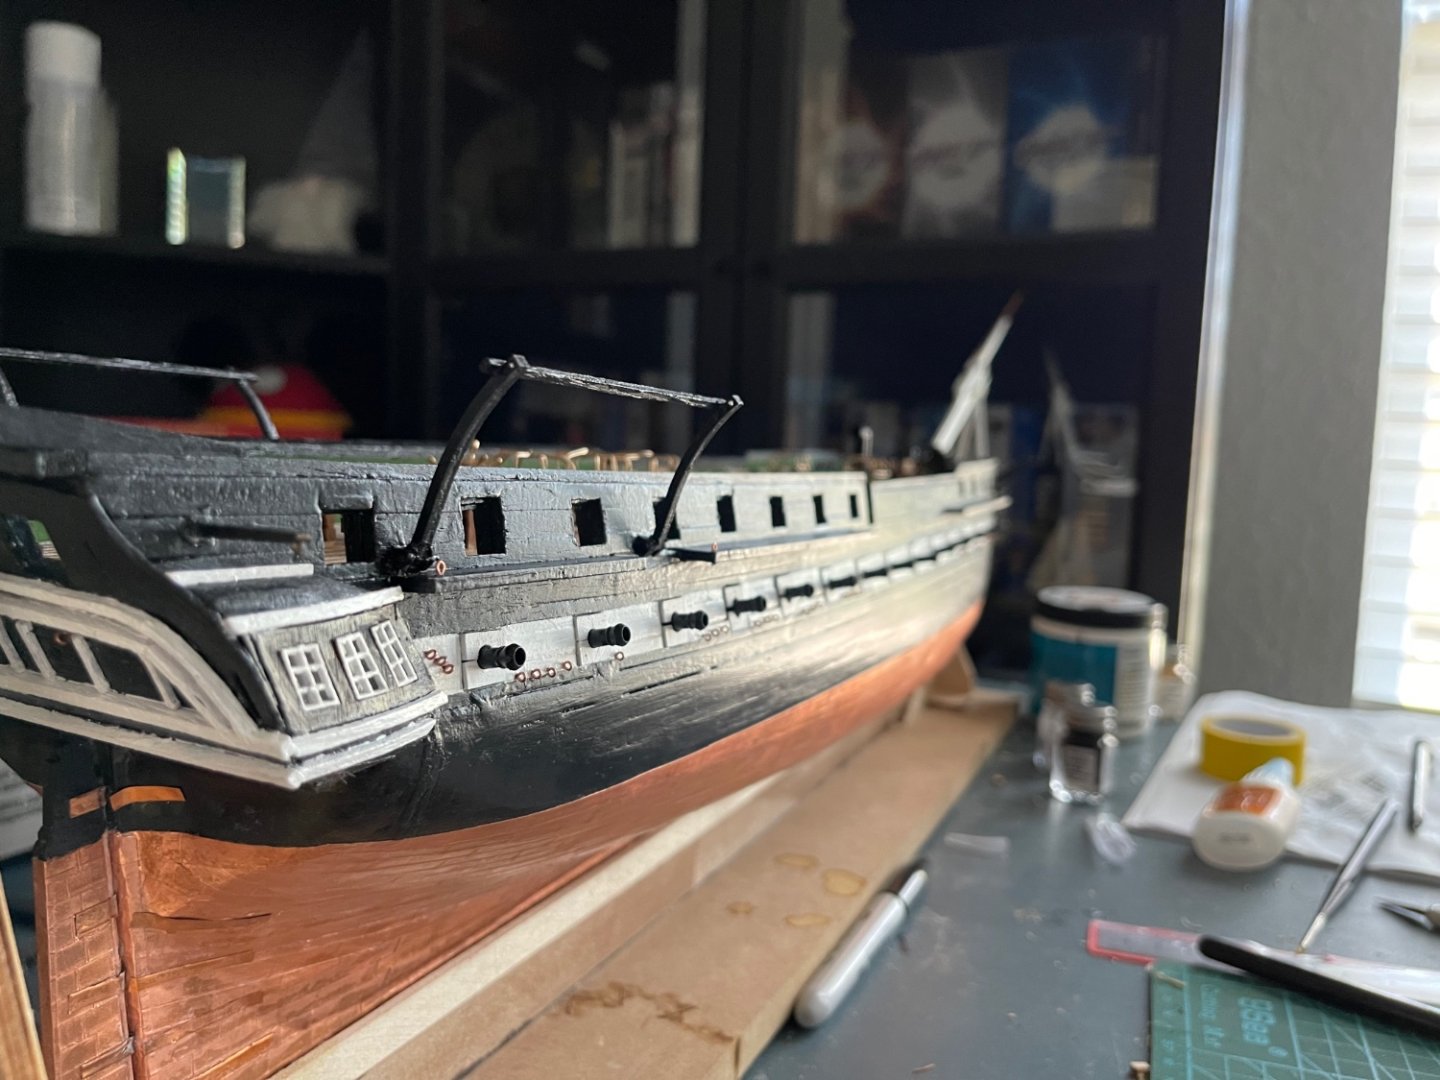
Good evening, I have made some progress onboard the ship in the past week. I have only had a few days to work on the vessel, and will have limited time going forward after this next week - school starting back up. Anyway, I have completed the faux cannon, installed them with the shutters, made and installed the deck cannonade with the help of some of our forum members providing photos. I have also completed the ballistic netting that goes on the rail above the cannon. I must say that in the kit, the diagram only gives a general understood how to put something together, and I really like specifics. I have been told other models are the same way - but meh, I made do with attaching the netting by finding photos of the in house model and the historic ship. The hull is almost complete, the only things I have left to work on besides the masts and rigging (as if that is so quick and easy eh?) would be the crafting of the life boats (which use sail cloth for tarpaulin so I am putting this step off until I make the sails). Besides this, I have the anchors, which will need to be constructed and fitted after the rigging to make life much simpler, and the installation of the vessel’s ladder, affixed midship on the exterior of the hull. Once the ladders are done, I literally can start working on the masts. Couple of questions though, should I begin rigging the bowsprit before the foremast is constructed or should I wait until I step the masts? Also, when I am dyeing the thread (which I figure using minwax would be okay - I have espresso gel stain already…water based so I don’t have to use solvent!!! Woo hoo!), should I keep the thread from moving whilst drying or dye a bit, let part dry, and then come back to it and move it? As well, when should I apply beeswax or some other conservator wax after the staining? Again, thank you for your help. I am including some photos of my build progress, I hope it is good - enjoy!


- 88 replies
-
- 4
-
-
- Constitution
- billing boats
- (and 1 more)
-
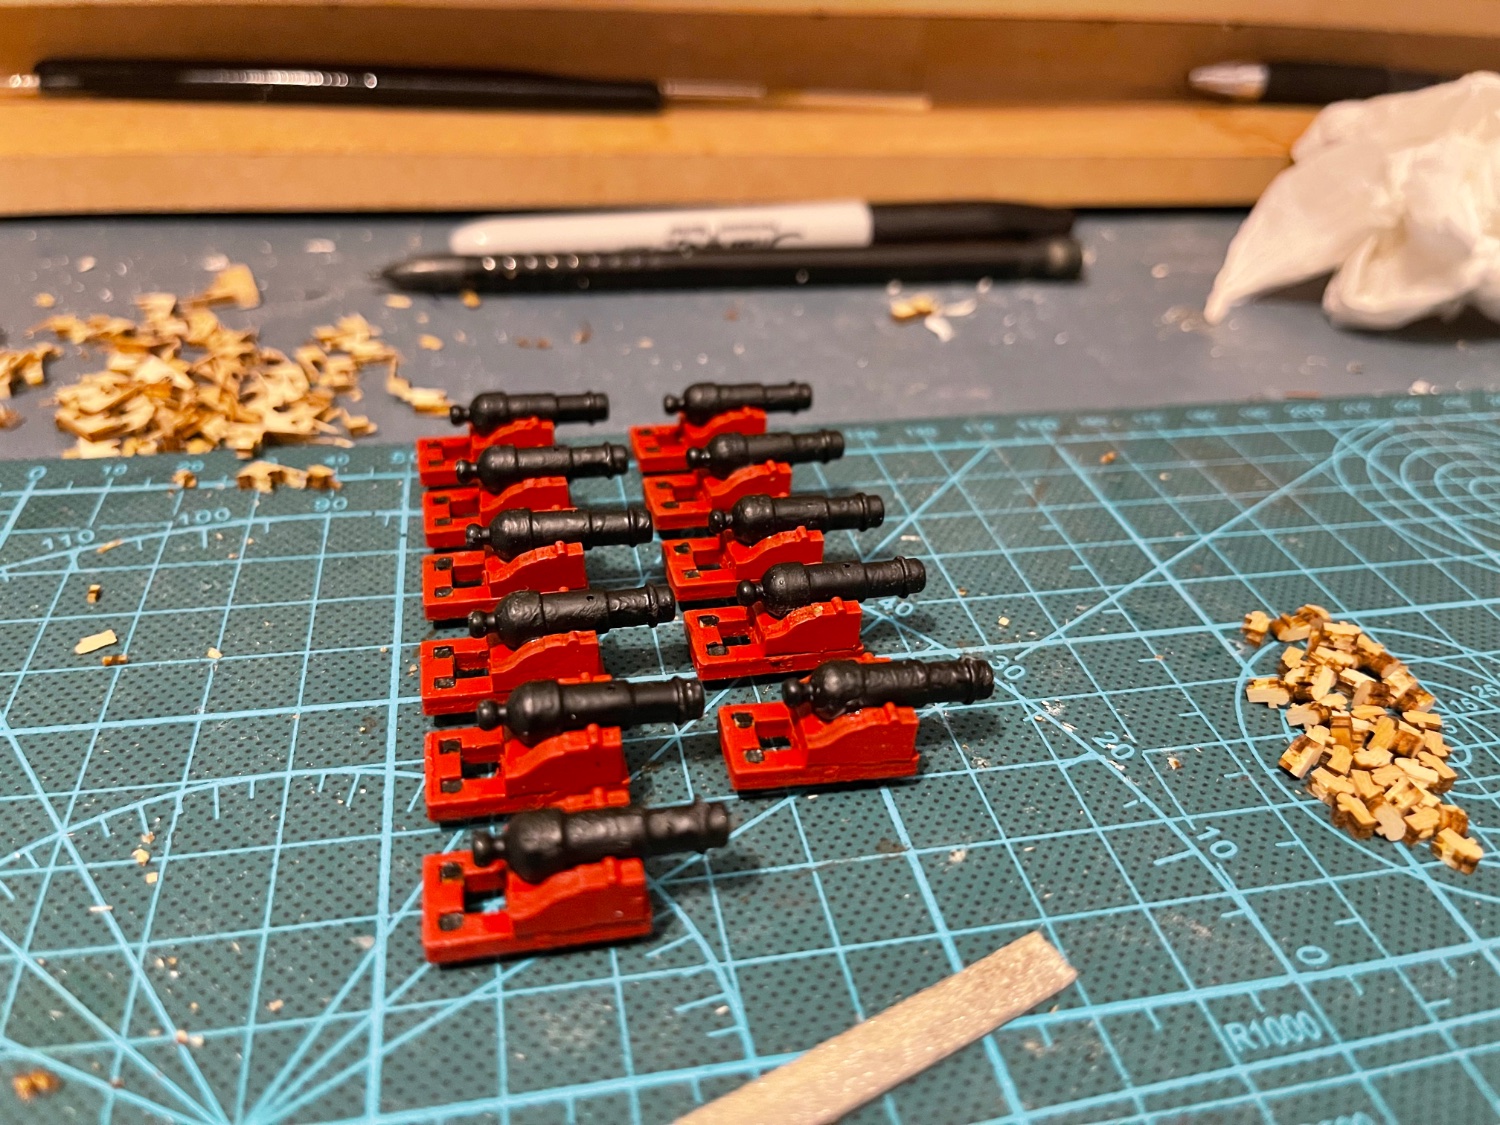
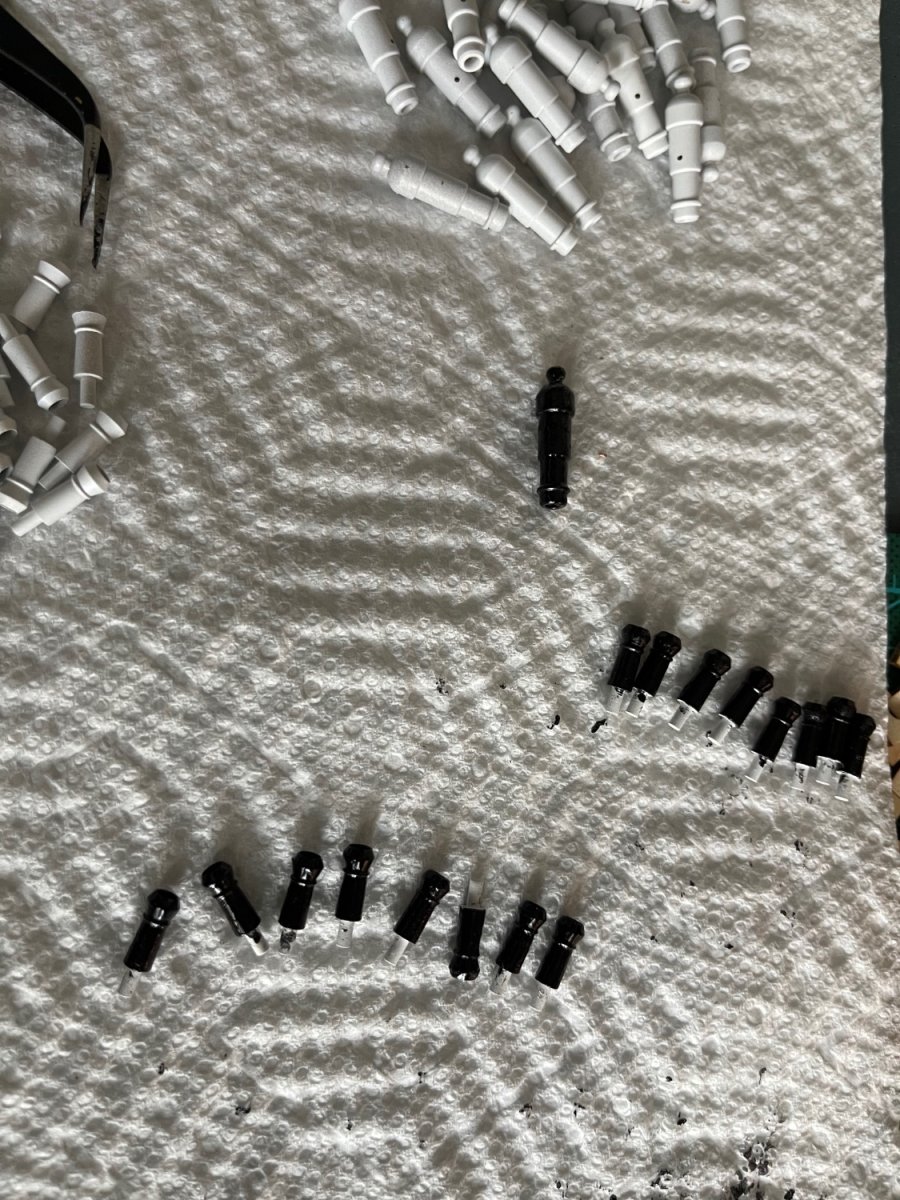
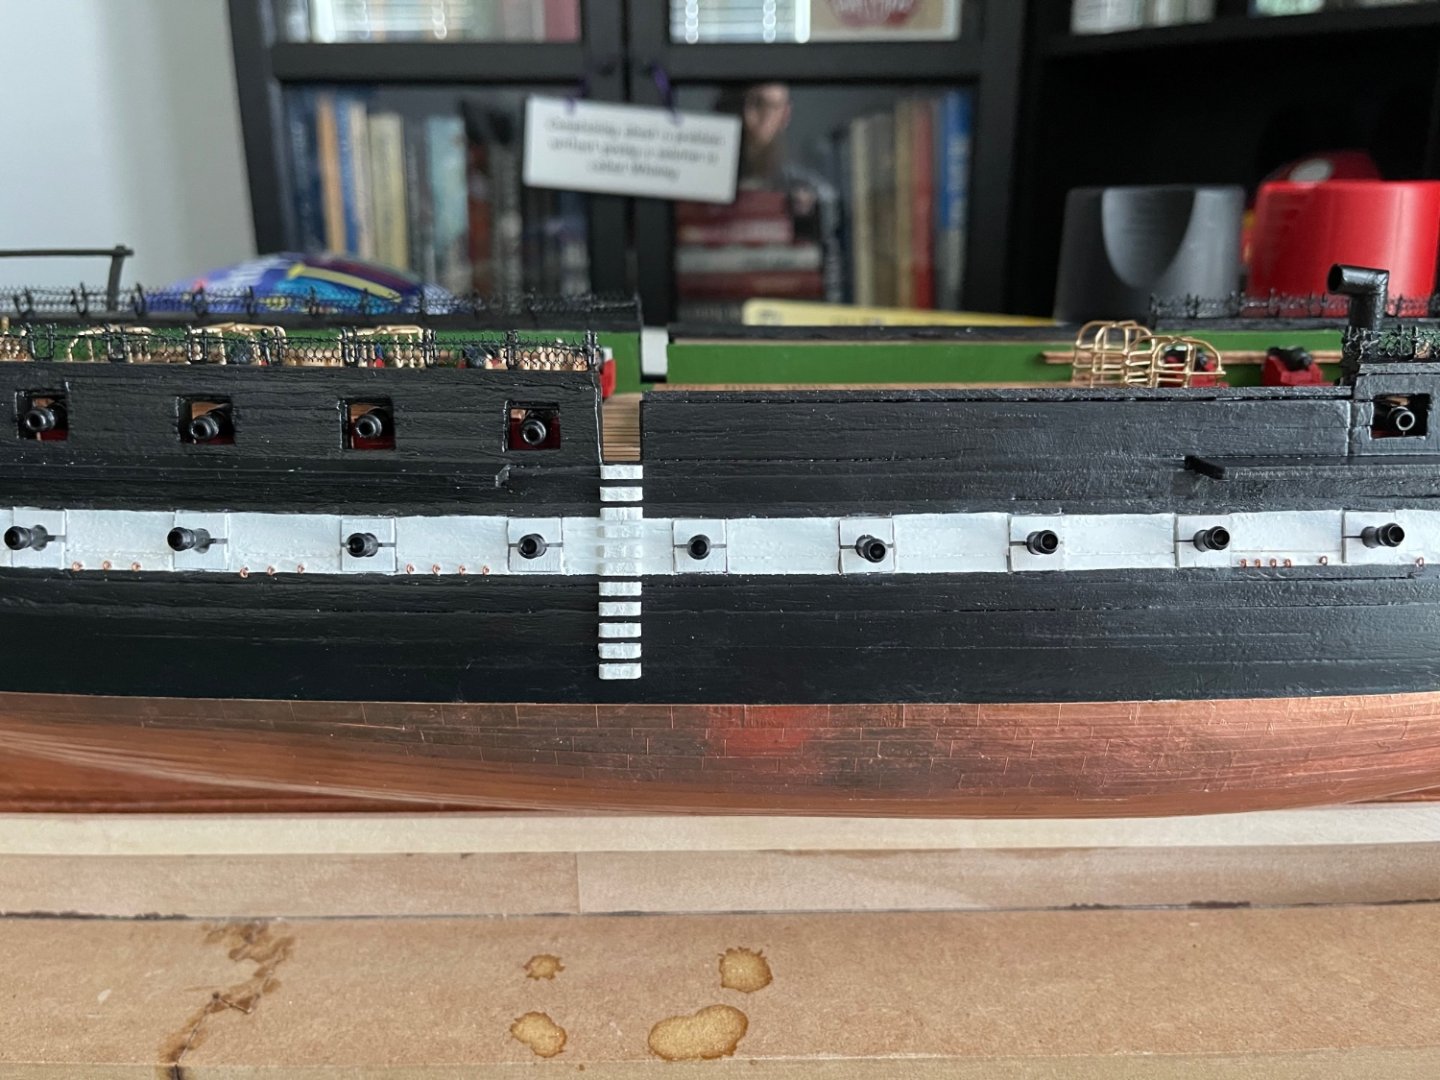
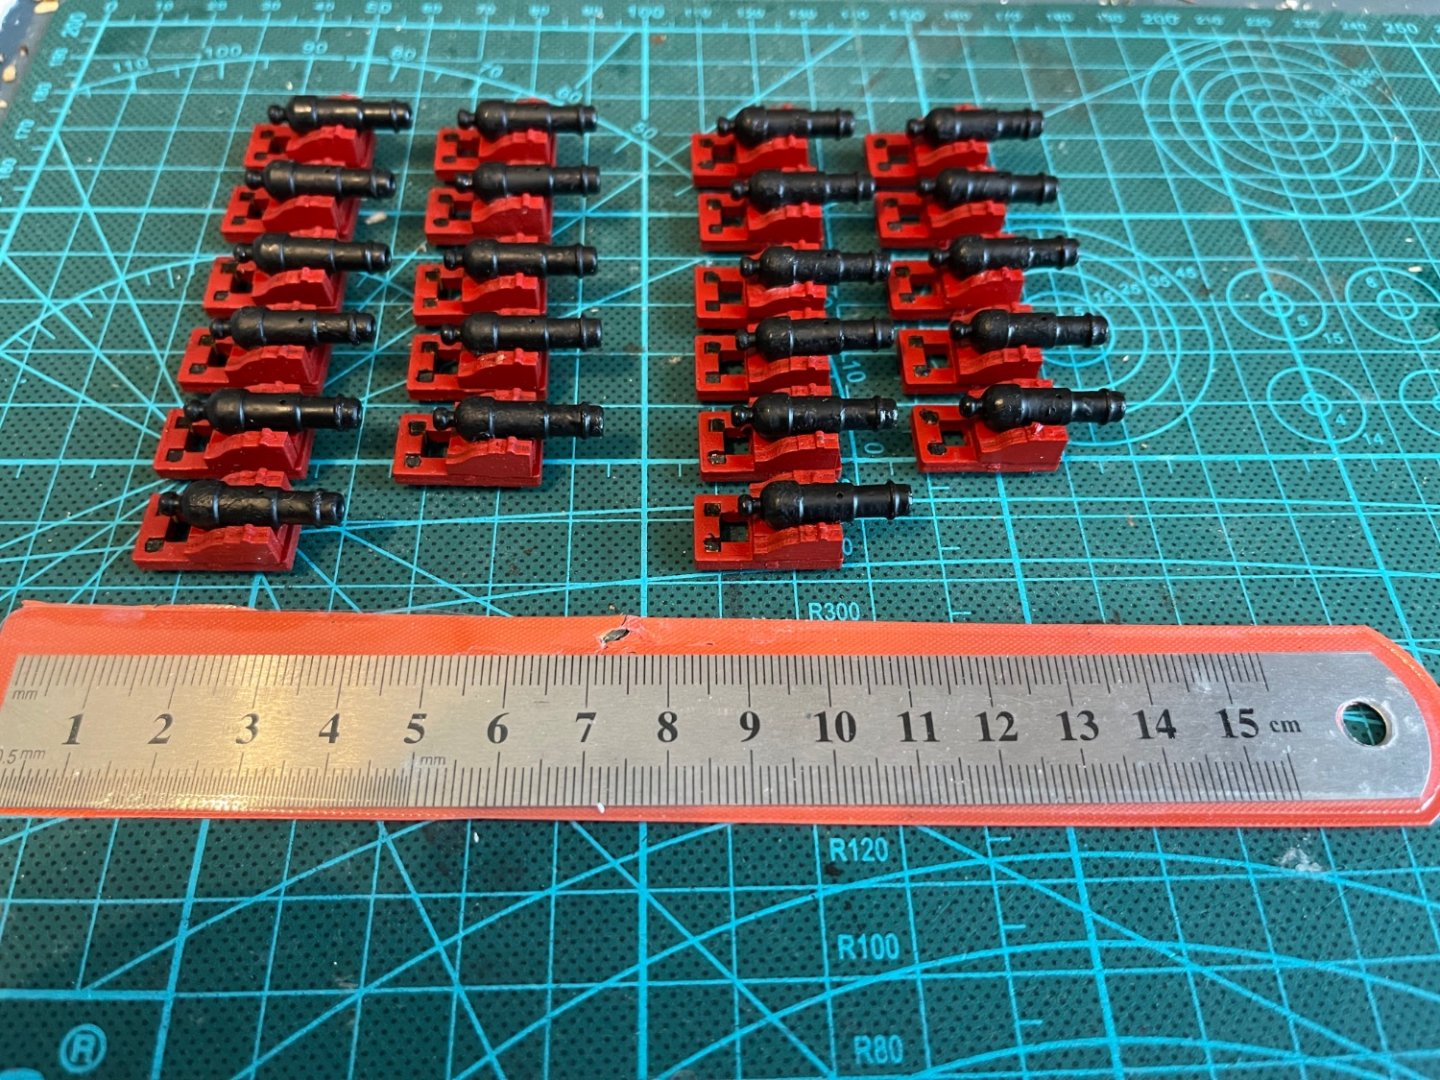
Good early morning, I have not had a ton of progress in the shipyard but I have had progress nevertheless. According to the BB instructions, I am to fit the faux cannons and ports onto the ship, along with the cannonade and such. So far, I have completed the port side faux cannons and starboard has but one cannon remaining. I am painting the cannonade, and seriously considering not hand painting the 22 cannon sleds, but using a spray paint. I can see where an airbrush comes in handy for sure lol. Anyway, maybe for Christmas eh? Here are a couple of photos showing the faux cannons on port and starboard. Mind you that maybe 4 total cannon on port are not aligned properly - I am still learning…by the time I got to the starboard side though, you can see everything is aligned properly. Please let me know what you think. As well, I am wondering the best way to change the colour of the rigging thread. I have read other places on this forum to use minwax for the colour. Has anybody used this route and can share some tips? I am also looking for a colour for the running rigging thread that won’t look golden - since golden oak is the most suggested colour mixed with something else. Again, I appreciate your help.


- 88 replies
-
- 3
-
-
- Constitution
- billing boats
- (and 1 more)
-
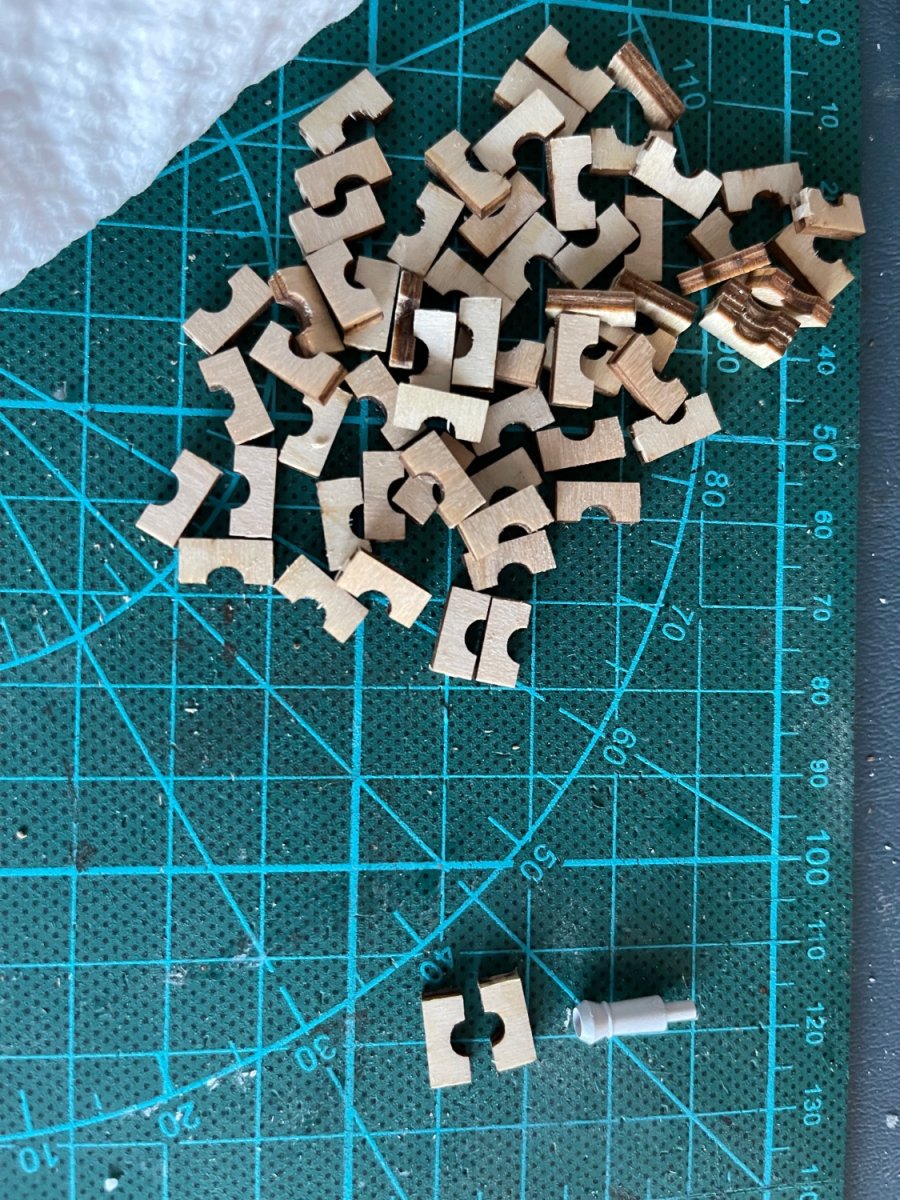
I have seen your model, and you have a good deal bigger skill set than I do at present. I had been thinking about ways to make pieces and how I can get the needed parts for the gun carriages and doing the math, I will need about 150 more eye bolts and about 200 blocks. I’ll mull over what I can get with supply issues being what they are with COVID. Thanks for your vote of confidence and support!
-
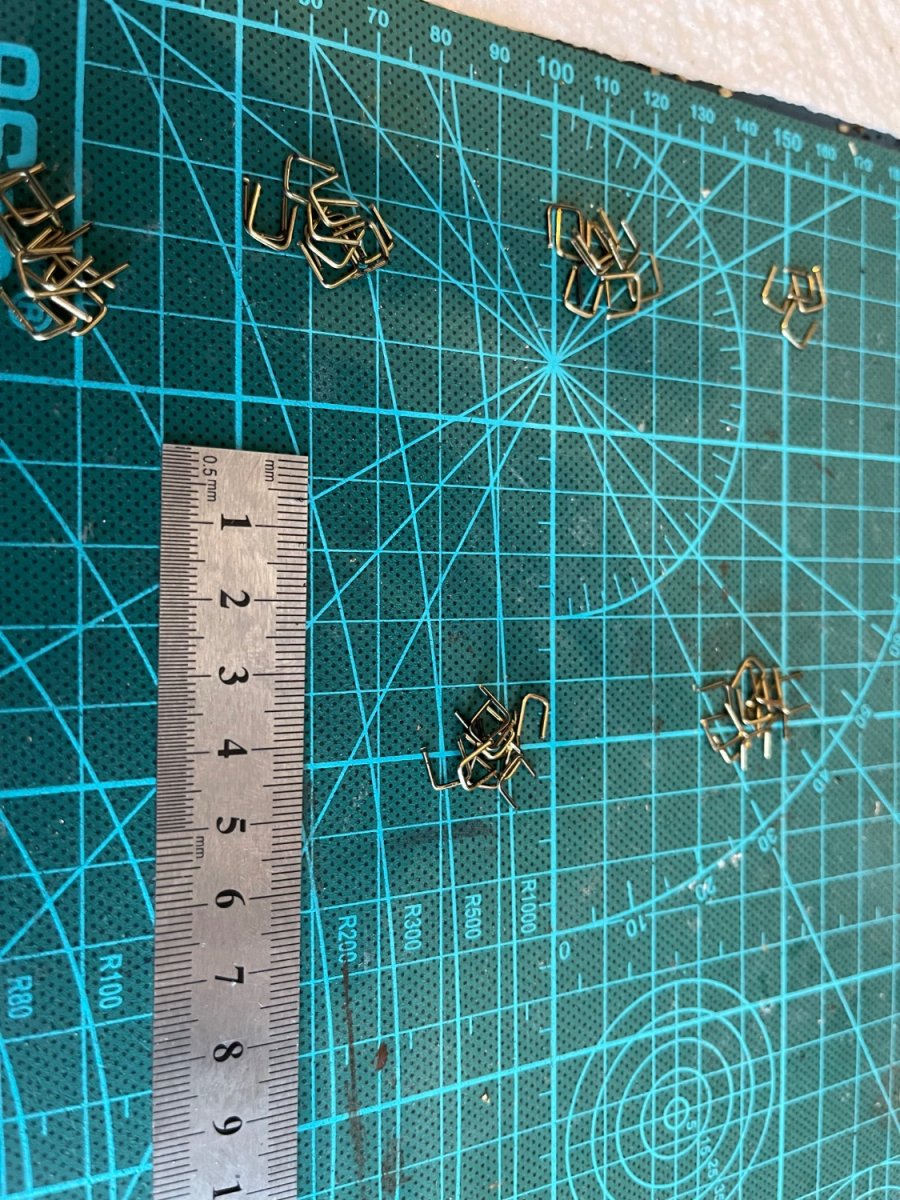
Good morning, Since the stanchions were going to be painted, I used a Gorilla Glue brand superglue. The glue can be applied to a variety of materials and is supposed to dry clear, but dried an opaque colour in some areas where I applied a bit more. I used the supplied schematics to measure, marked with a sharpie, and bent with needle nosed pliers to replicate the bends I saw in photos. I did make some of the bends a bit more angular than what appear in the historical ship. However, I feel I did pretty good seeing that this is my first attempt. Anyway, I cut pieces a section at a time and glued them slowly one piece at a time. The glue allows the piece to be held on in as little as 10 seconds BUT its set enough to allow you to proceed in 30-60 seconds. The only tricky bit were the horizontal railings, and I did those after allowing a bit of time to let them dry (about 5-10 minutes) as I continued working on other deck fittings. I misunderstood the cannons on the deck, thinking they were supposed to be long range guns on different carriages. Now that I see the historical ship photos, I understand why they did what they did on the model pieces. Your first shared photo looks to be what Billings supplied in the kit, and I think I shall mimic that as much as I am able. They did not include a lot of extra parts, so I am unsure if I would even have the thread OR blocks/eyebolts to do the gun rigging. That being said, I am not saying it is impossible to do, just that I lack the skills or tools to rig the cannonade probably. I am sure with some help from the forums I could figure it out, but I figure I shall take it one issue at a time. That being said, the chain plates on the side of the ship do not have actual chain plates in the kit - I am to manufacture my own with thread with an eyebolt installed in the hull of the ship. The schematics show the bolts in the white belt whereas the BB model show photos of the bolts in the black area just below the bottom of the white belt. What do you suggest I do, follow the schematic that BB included? Thank you for your assistance - I am still learning. P.S.: Which colour of red should I be using for the gun carriages? I see an almost orange in the photos, whereas in others it looks almost like a fire engine red. The kit shows closer to the latter.
- 88 replies
-
- 1
-
-
- Constitution
- billing boats
- (and 1 more)
-
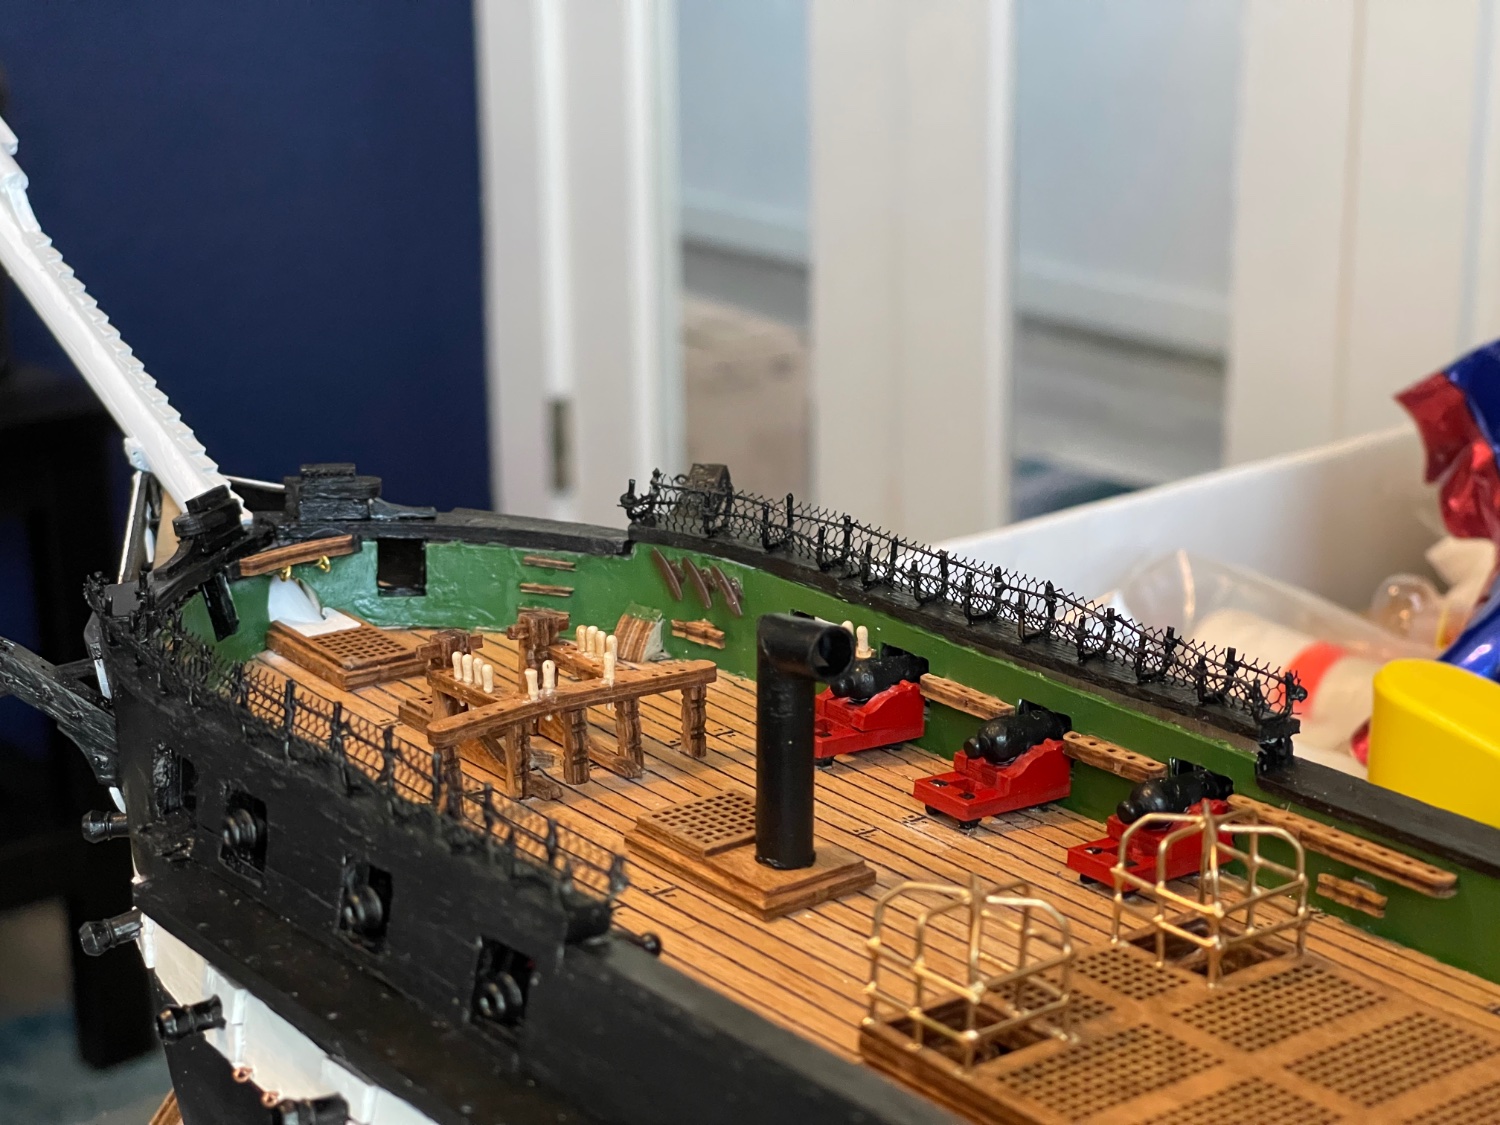
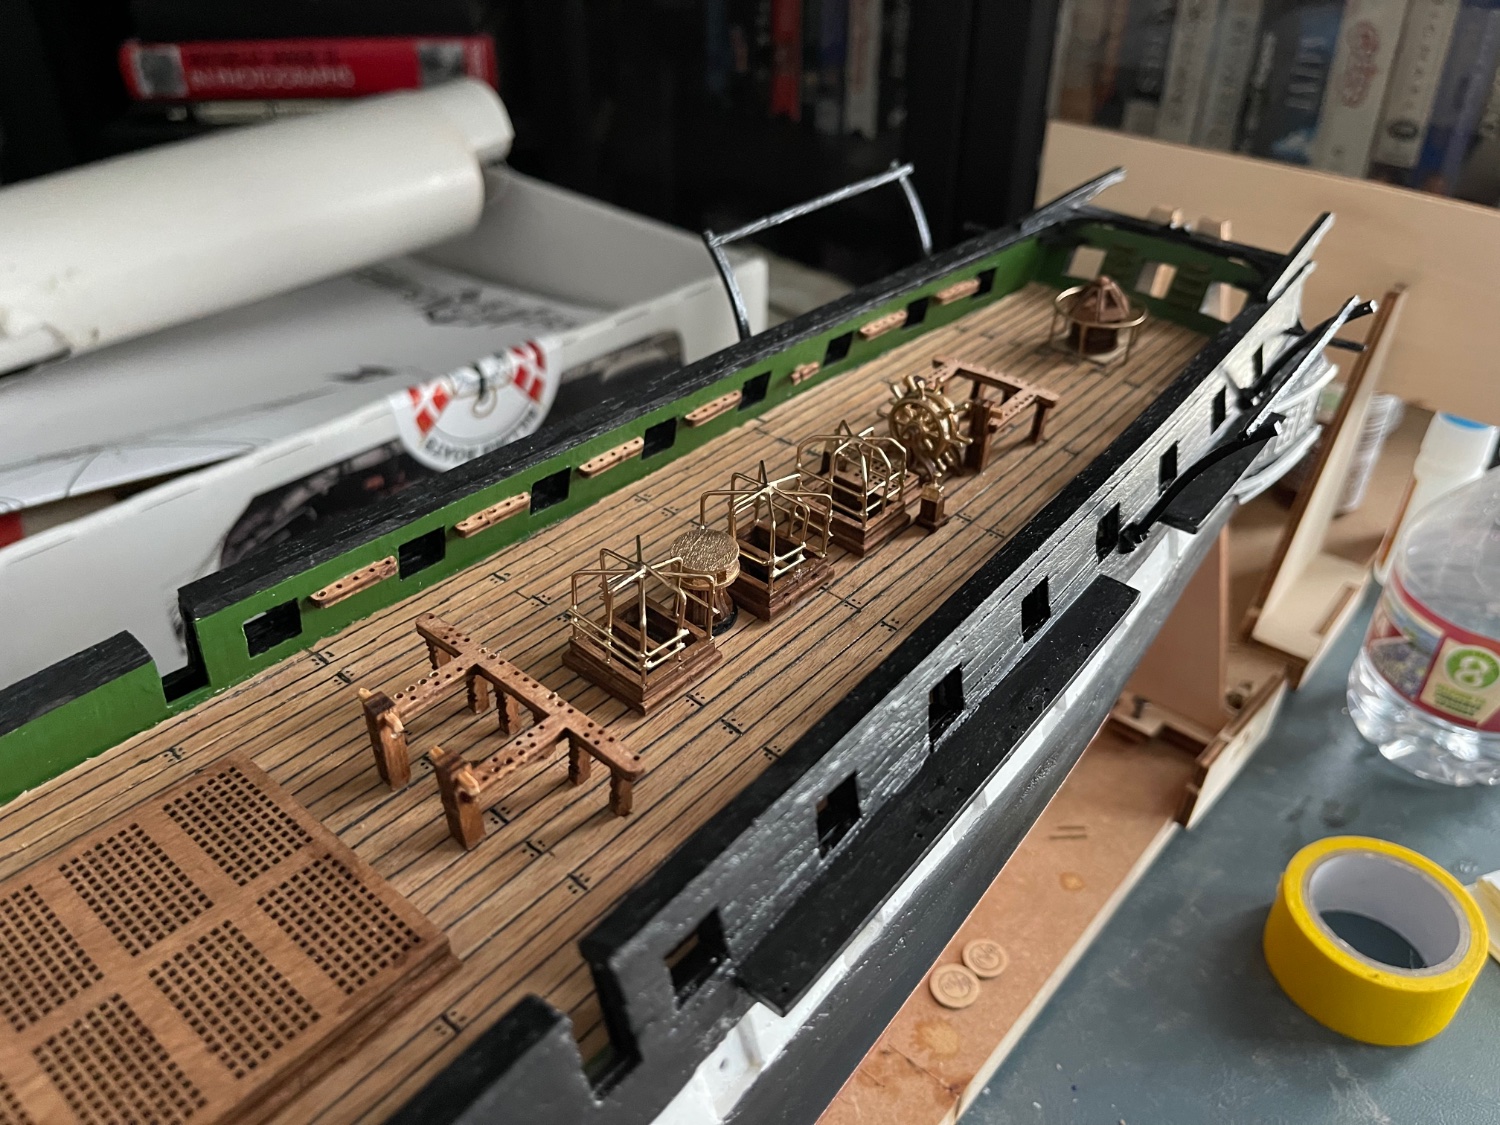
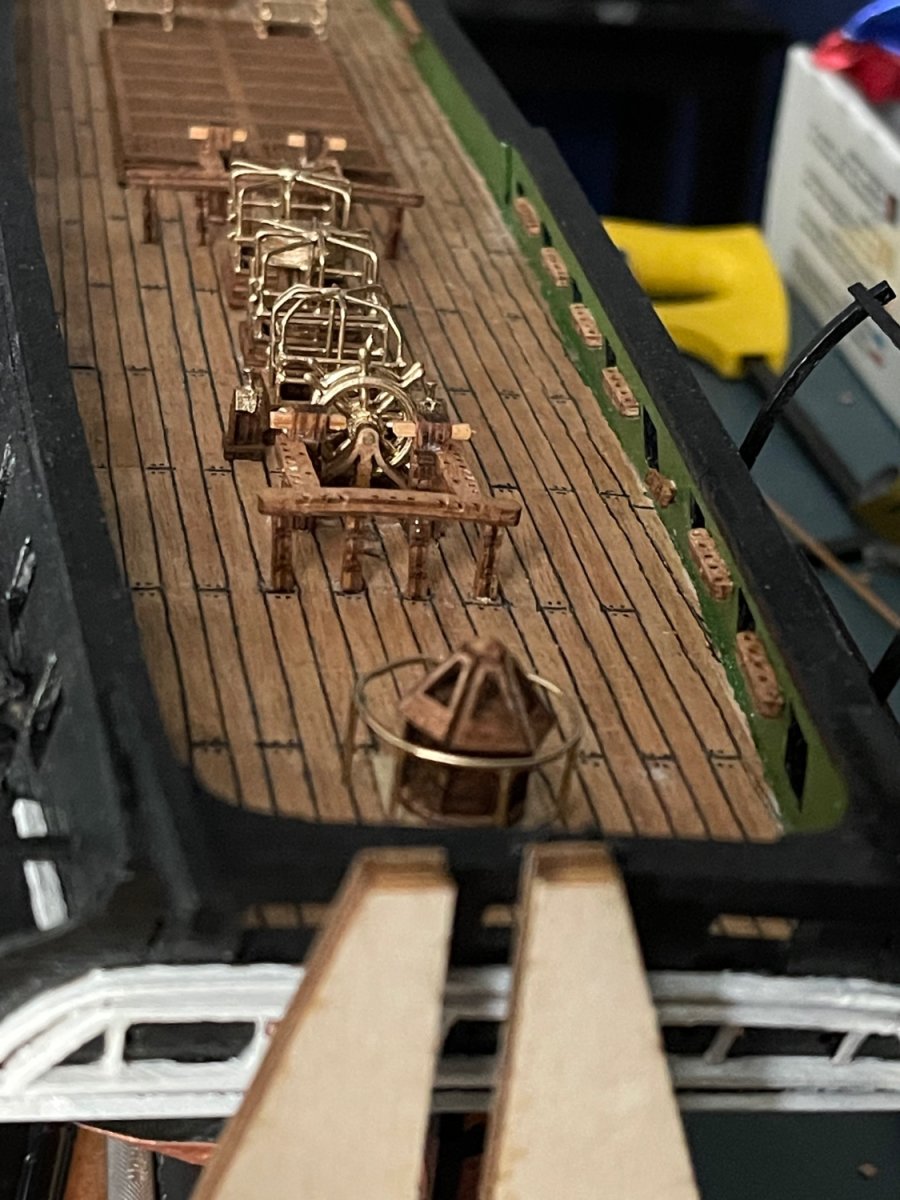
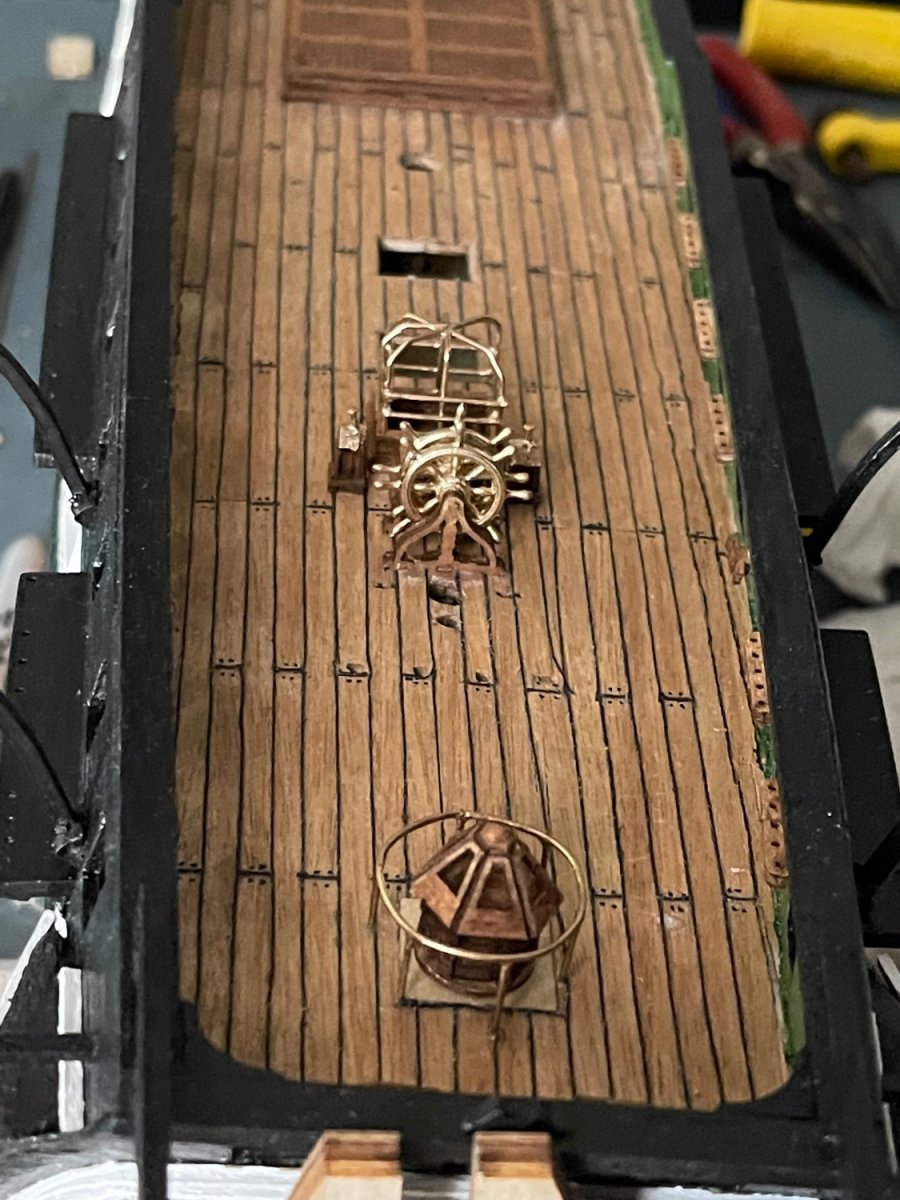
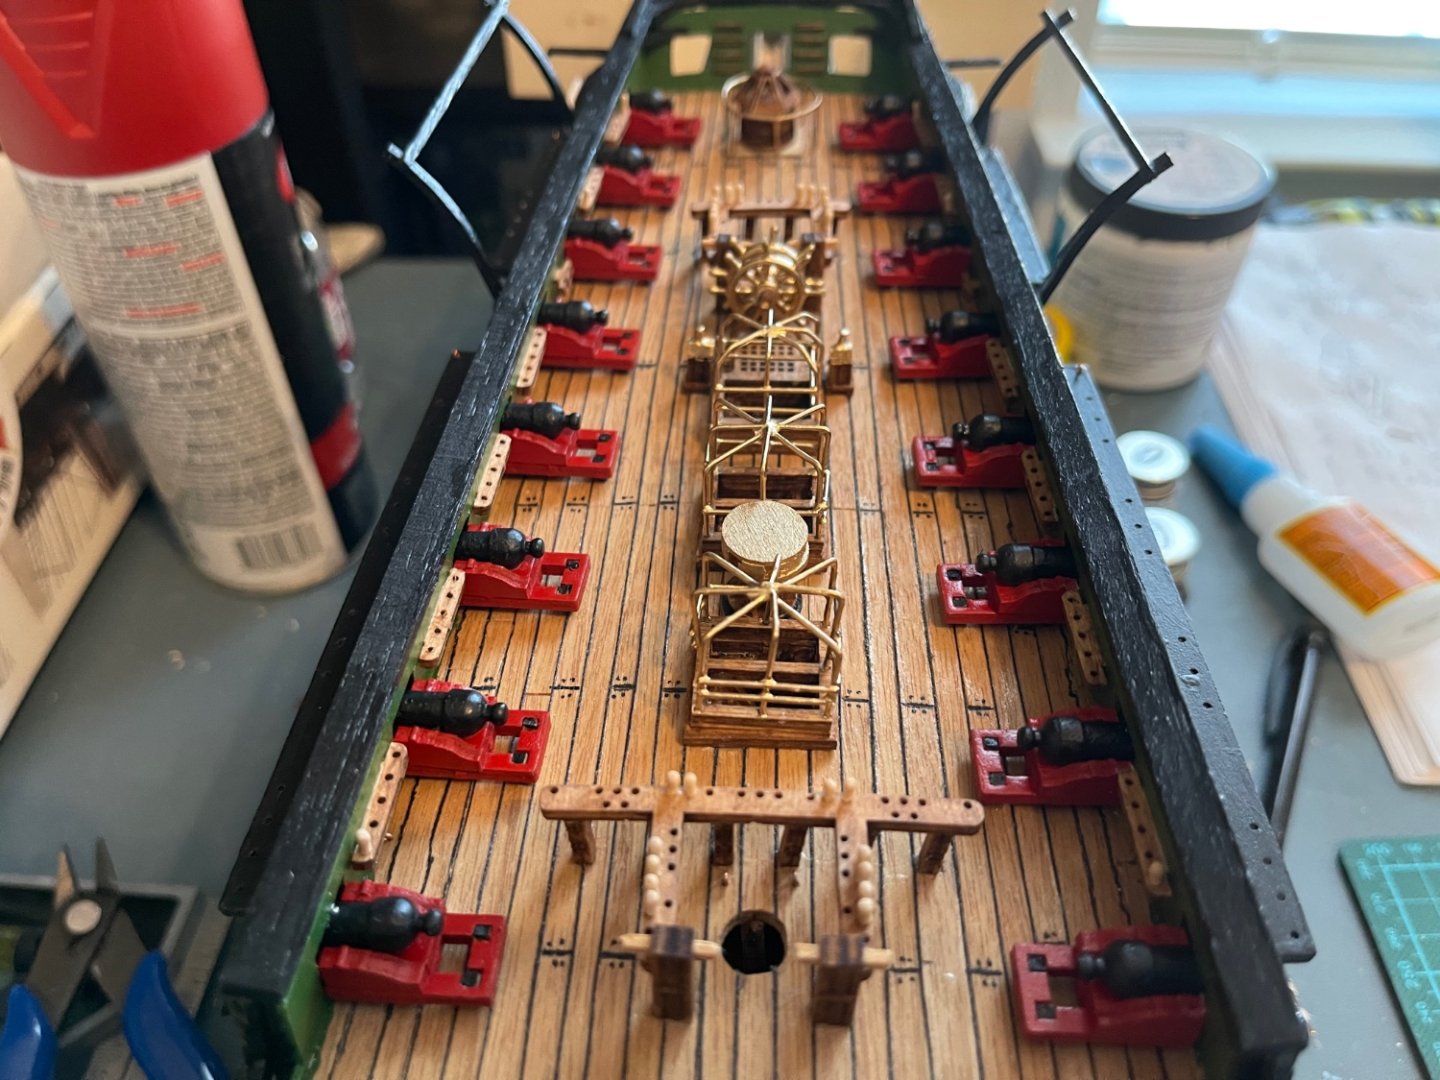
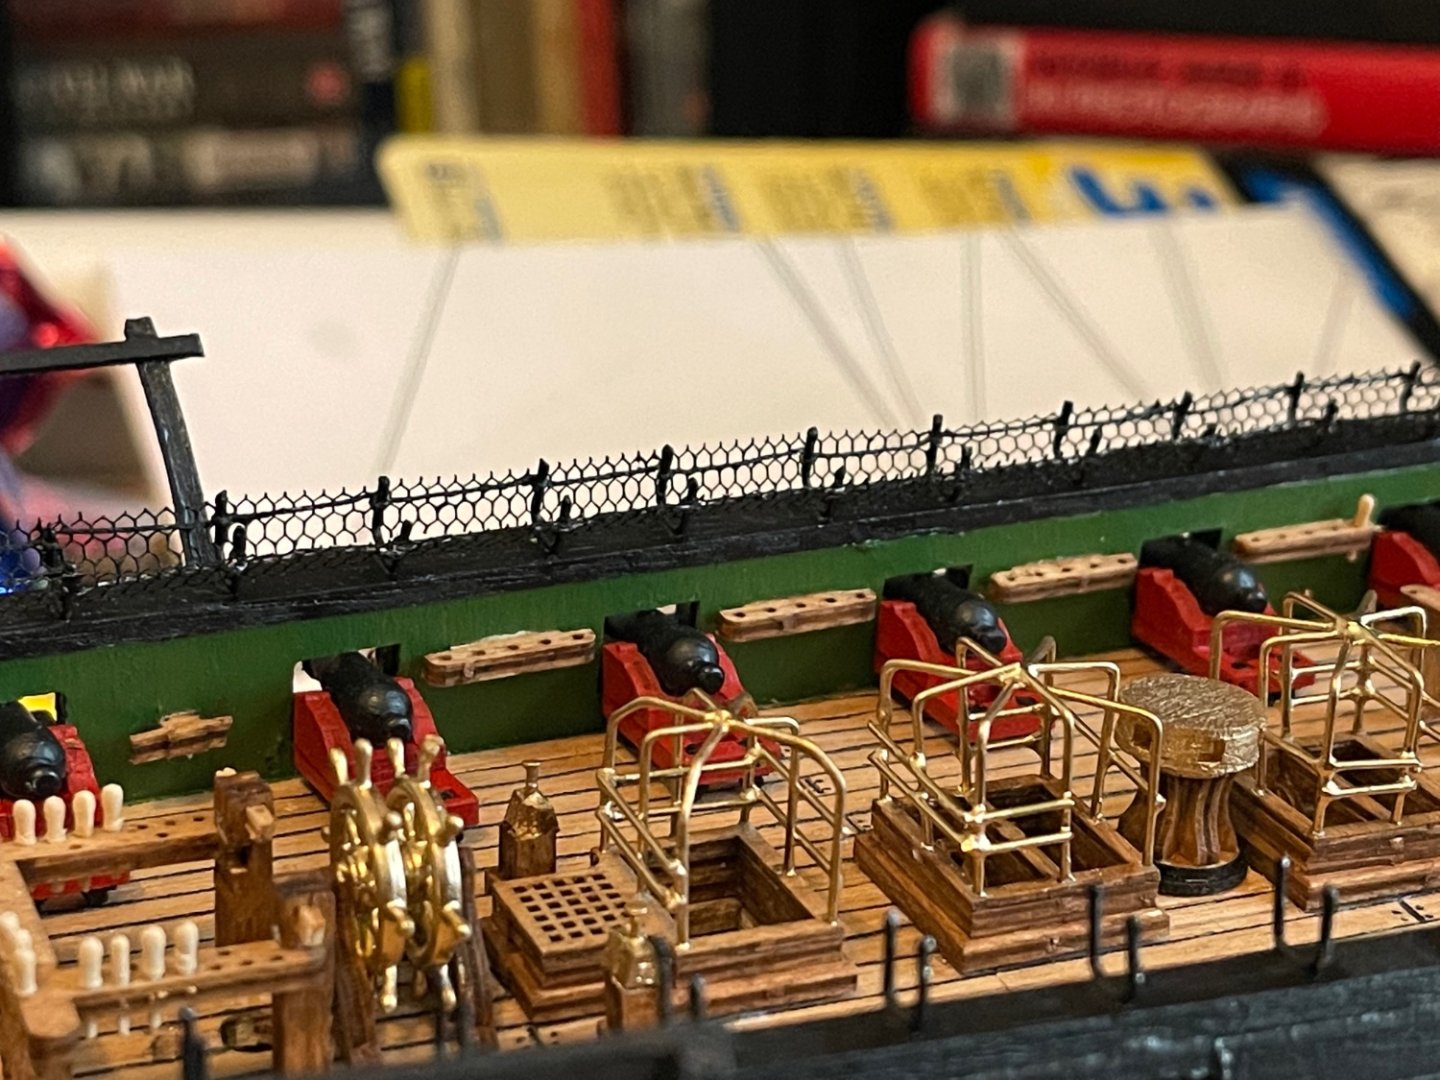
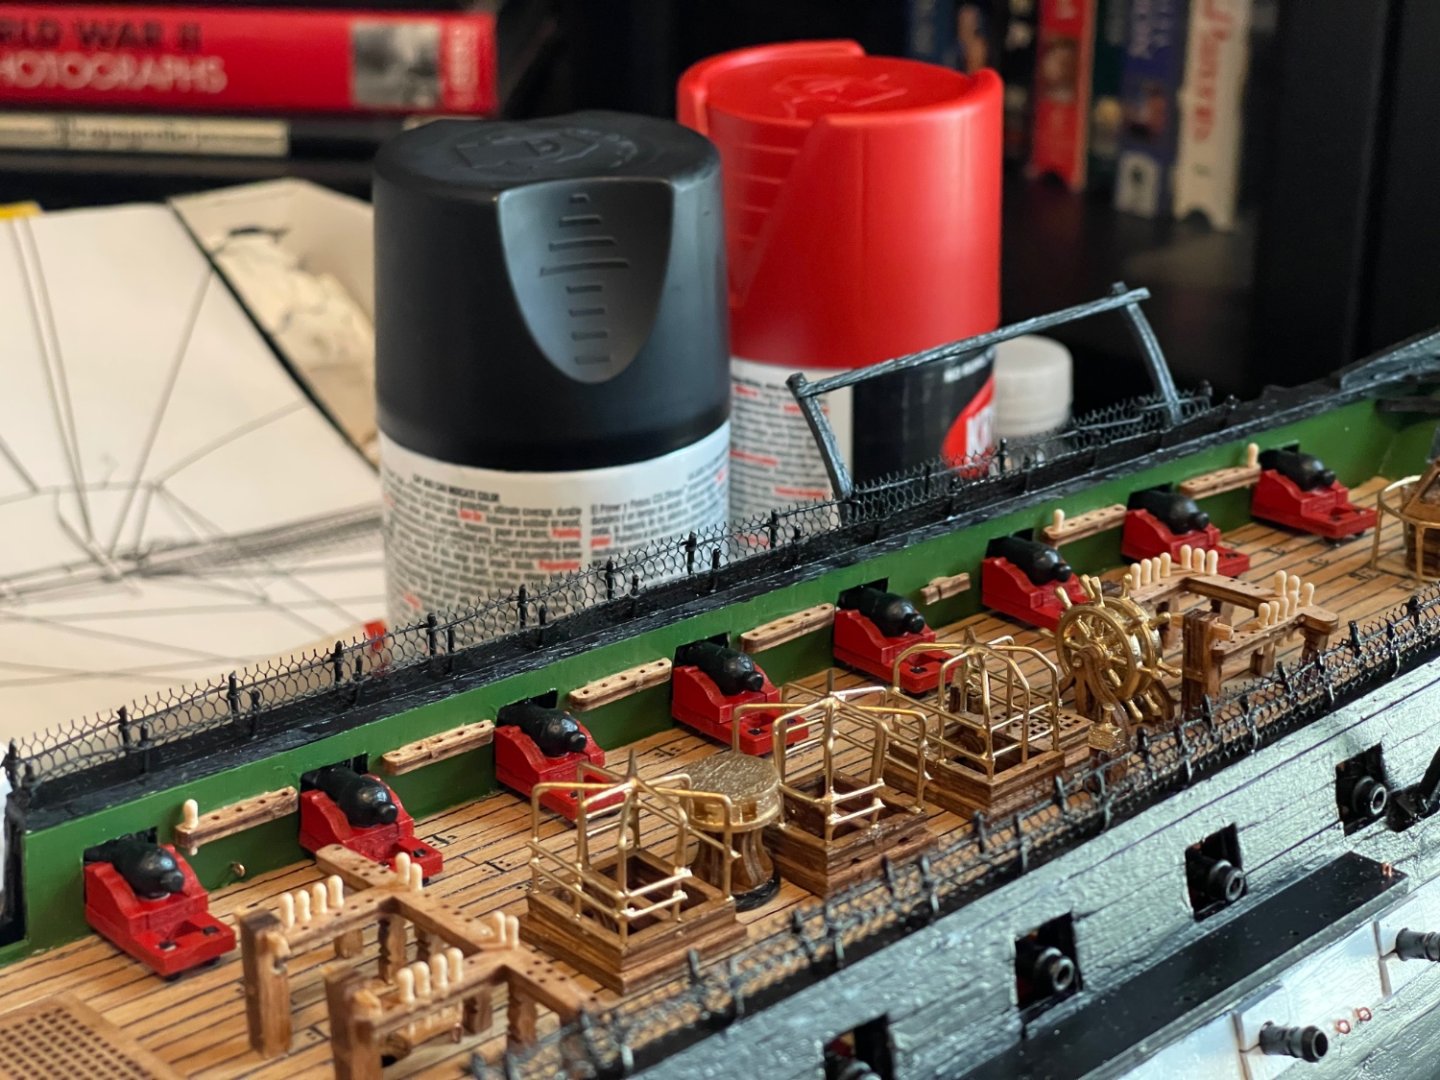
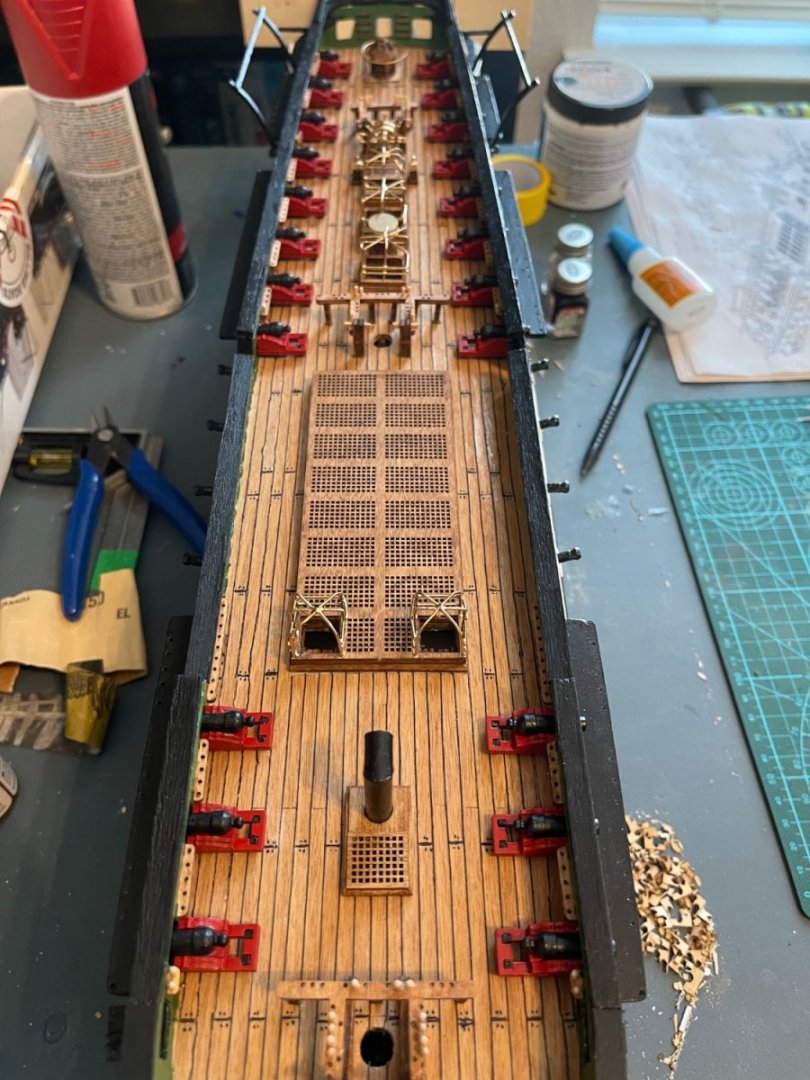
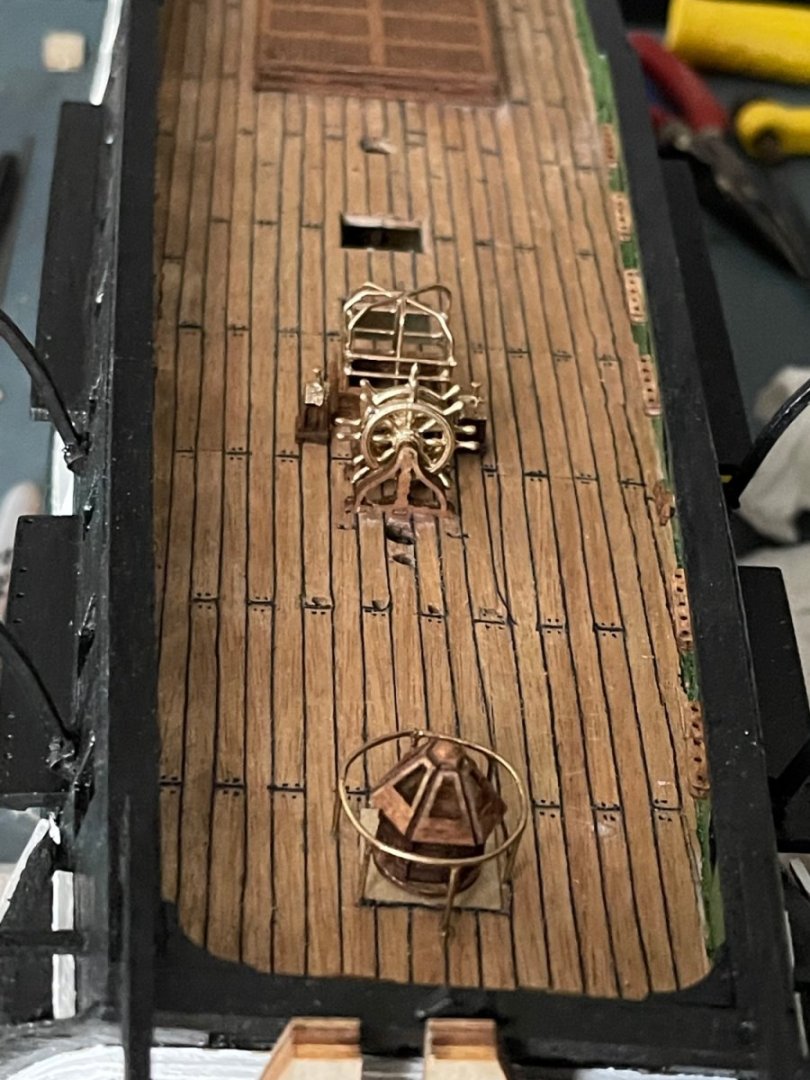
Been a while since I updated my progress, though I am mostly done with the main deck fittings - I still need to finish the 34 belaying pins, some eyebolts, and of course the cannons, netting and such. This is before I start on the rigging proper. I installed the stanchions cages and hatches for the main and aft sections, the fore, main, and mizzenmast pin rails, the capstan, and ship’s wheel. The wheel was painted like the stanchions because Billings used a metal piece for the wheel and wanted it painted tan. I didn’t like that look. Yes, I know it isn’t exact to the historical ship. I hope you like my work. I don’t like the fact that the cannons are not on wheels in my kit, nor is there anything to allow the cannons to be tied like they are in the historical ship.


- 88 replies
-
- 4
-
-
- Constitution
- billing boats
- (and 1 more)
-
Thank you for your help. I was thinking that would be helpful to have for rigging and other such parts of the ship.
- 88 replies
-
- 1
-
-
- Constitution
- billing boats
- (and 1 more)
-
Thank you for providing this, it helps a bunch. It seems that the Billings plans have the length too long. I can always go back and trim them - it looks as though the ones I have installed need to be trimmed by about 20%
-
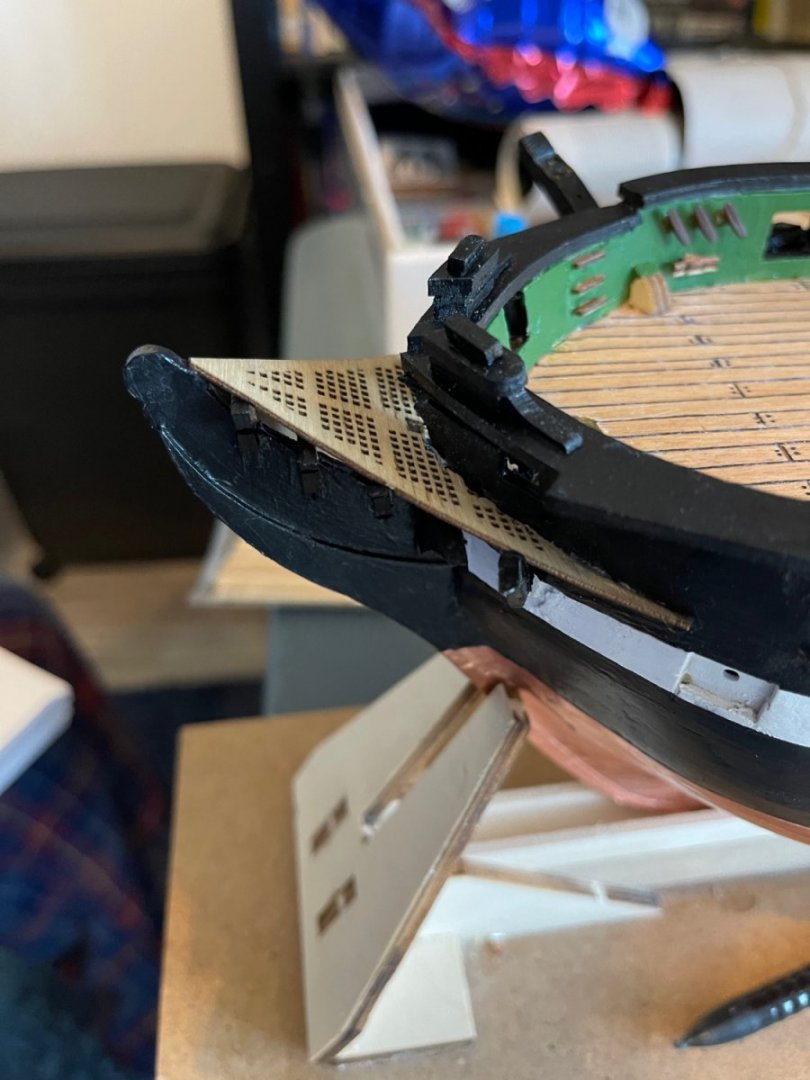
I definitely have to see what I am doing as well, and I am referring to many historical and internet pictures to complete the job as accurately as I can with my developing skills. I did not know that about using a small torch, I will look into it - thanks for your help! I sometimes wonder if the Billings model has all of the pieces in the right scale or position. I mean I understand it is not a very expensive model and the detail isn't exactly what I have seen in other brands, but there are times I wonder about the length of parts and such. For example, I am including a photo of the bumpkins I installed on the hull. The parts match the diagram that Billings supplies with the instructions also. However, I cannot find a photo of the bumpkins being so long. If it looks bad, I can always trim it, am I right? Thank you for your praise. It is my second wooden ship model . I have good ideas and can implement some of them. I try to be perfect in what I do, but in practicality my skills are not where some of the other modelers are at for sure.


- 88 replies
-
- 2
-
-
- Constitution
- billing boats
- (and 1 more)
-
Those are the choices I was thinking I would have to make. I have not worked joining metal before, so everything has been a learning experience for me. I had been thinking that using CA glue, joining the parts, sanding the excess, and then painting would be the route I would have to go. I don't have a soldering iron nor do I have the solder so I was thinking of ways to make it work with what I had. Thank you for the advice. Another thing I am wondering on is the best way to dye the rigging thread. I have been reading the forums with everybody suggesting everything from dyes to using Minwax stain. I have the beeswax to roll over the line to keep it from fraying, it is just the color I have needed to work on. My last kit actually came with the colors I needed fortunately. Bill, thank you for your comment. The time period of the ship model 1750-1800, though the ship was initially constructed in November 1794, with a launch date of October 1797 - if my research is to be trusted.
- 88 replies
-
- 1
-
-
- Constitution
- billing boats
- (and 1 more)
-
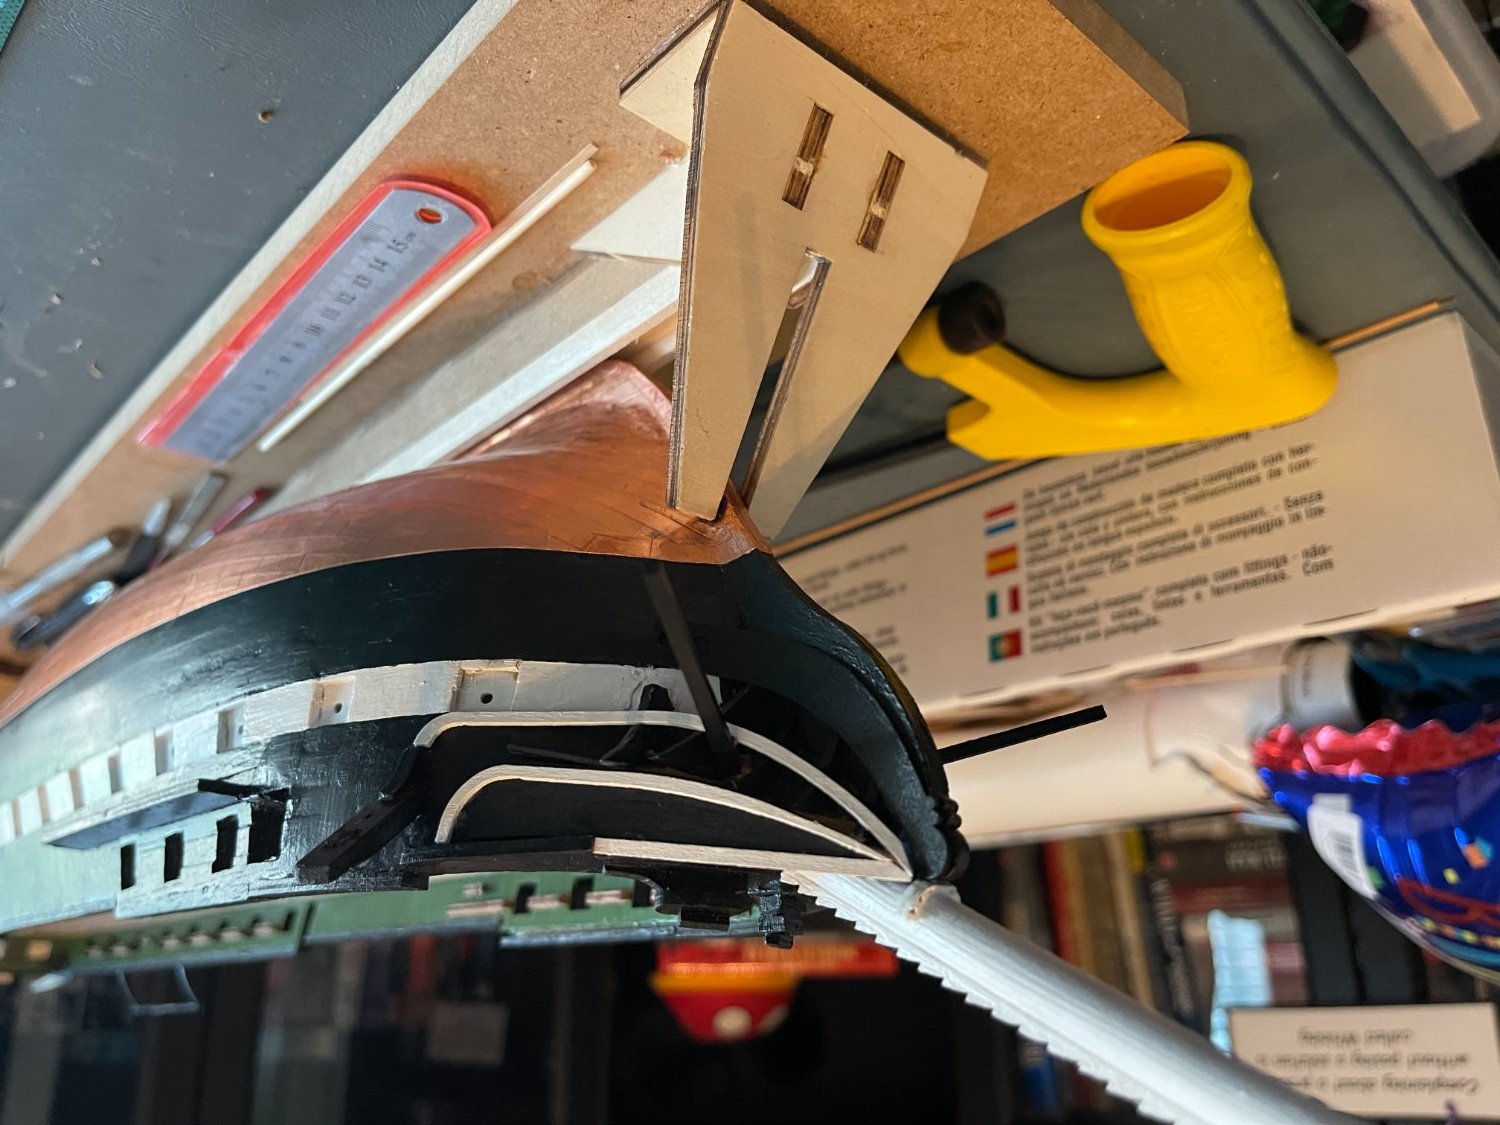
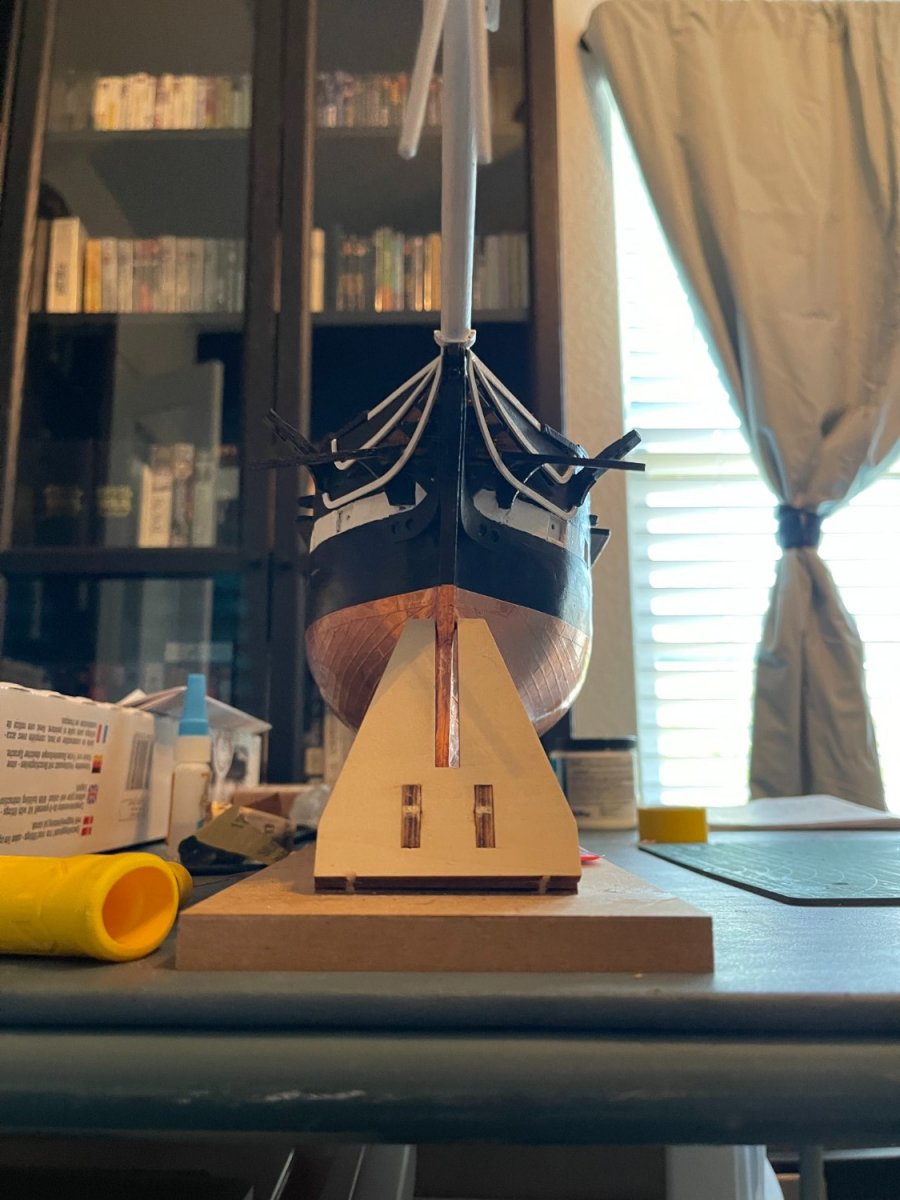
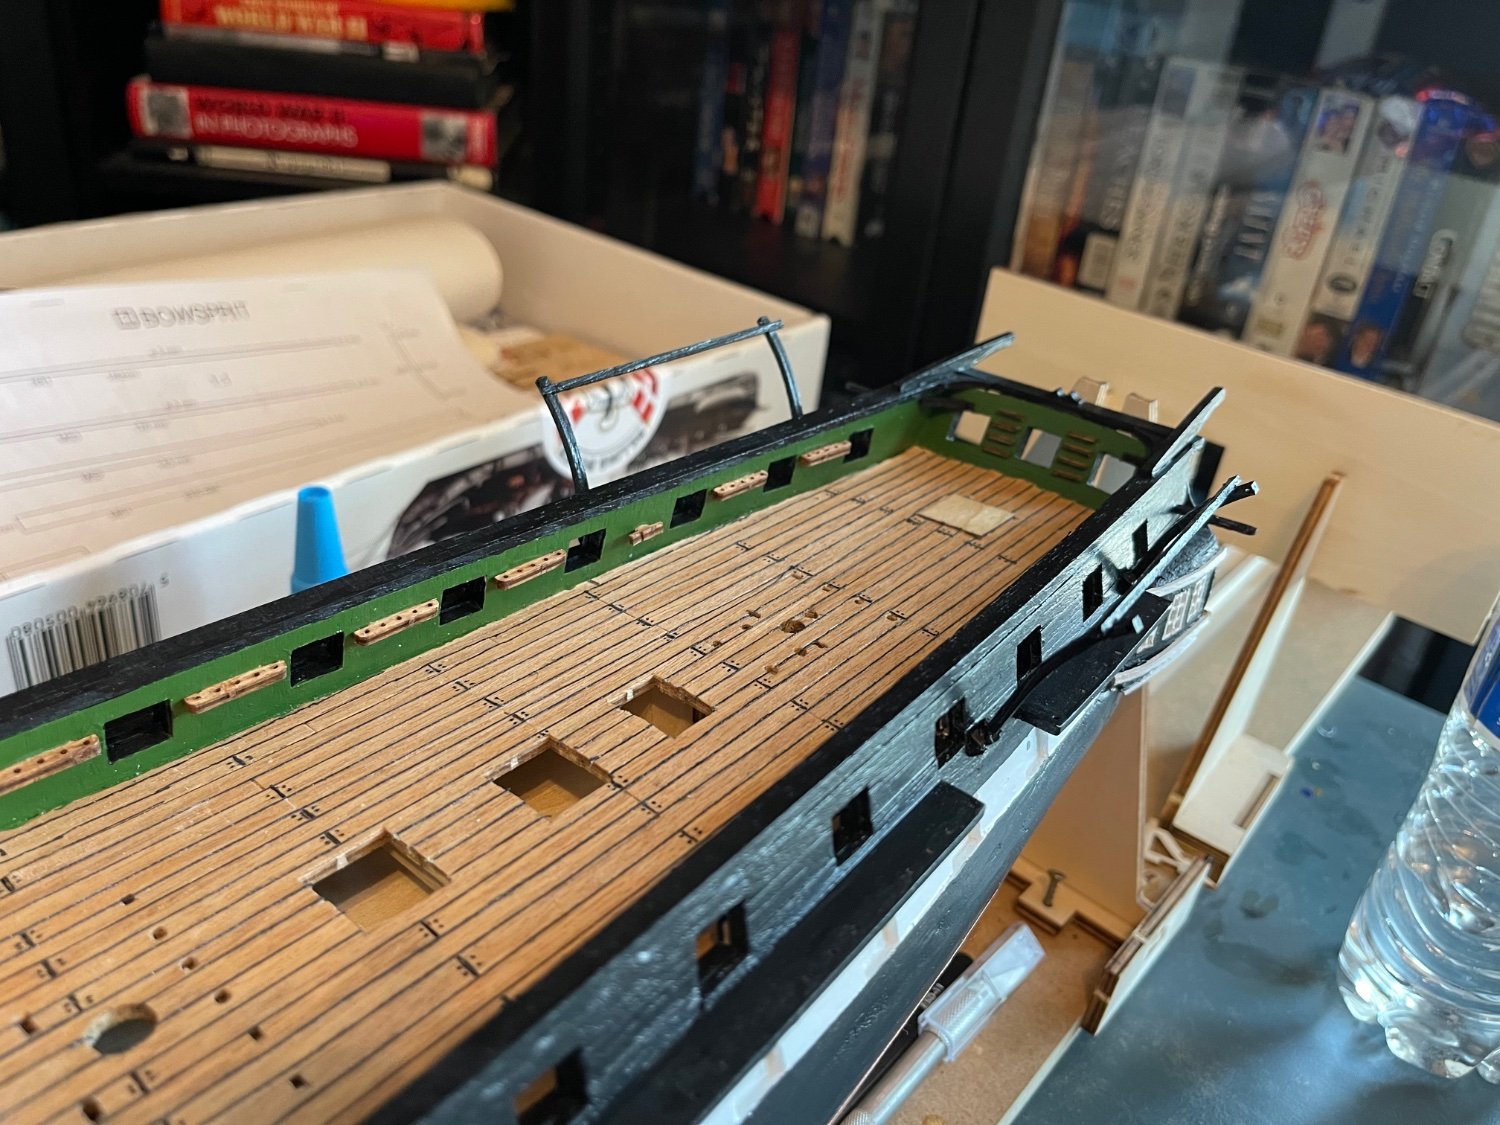
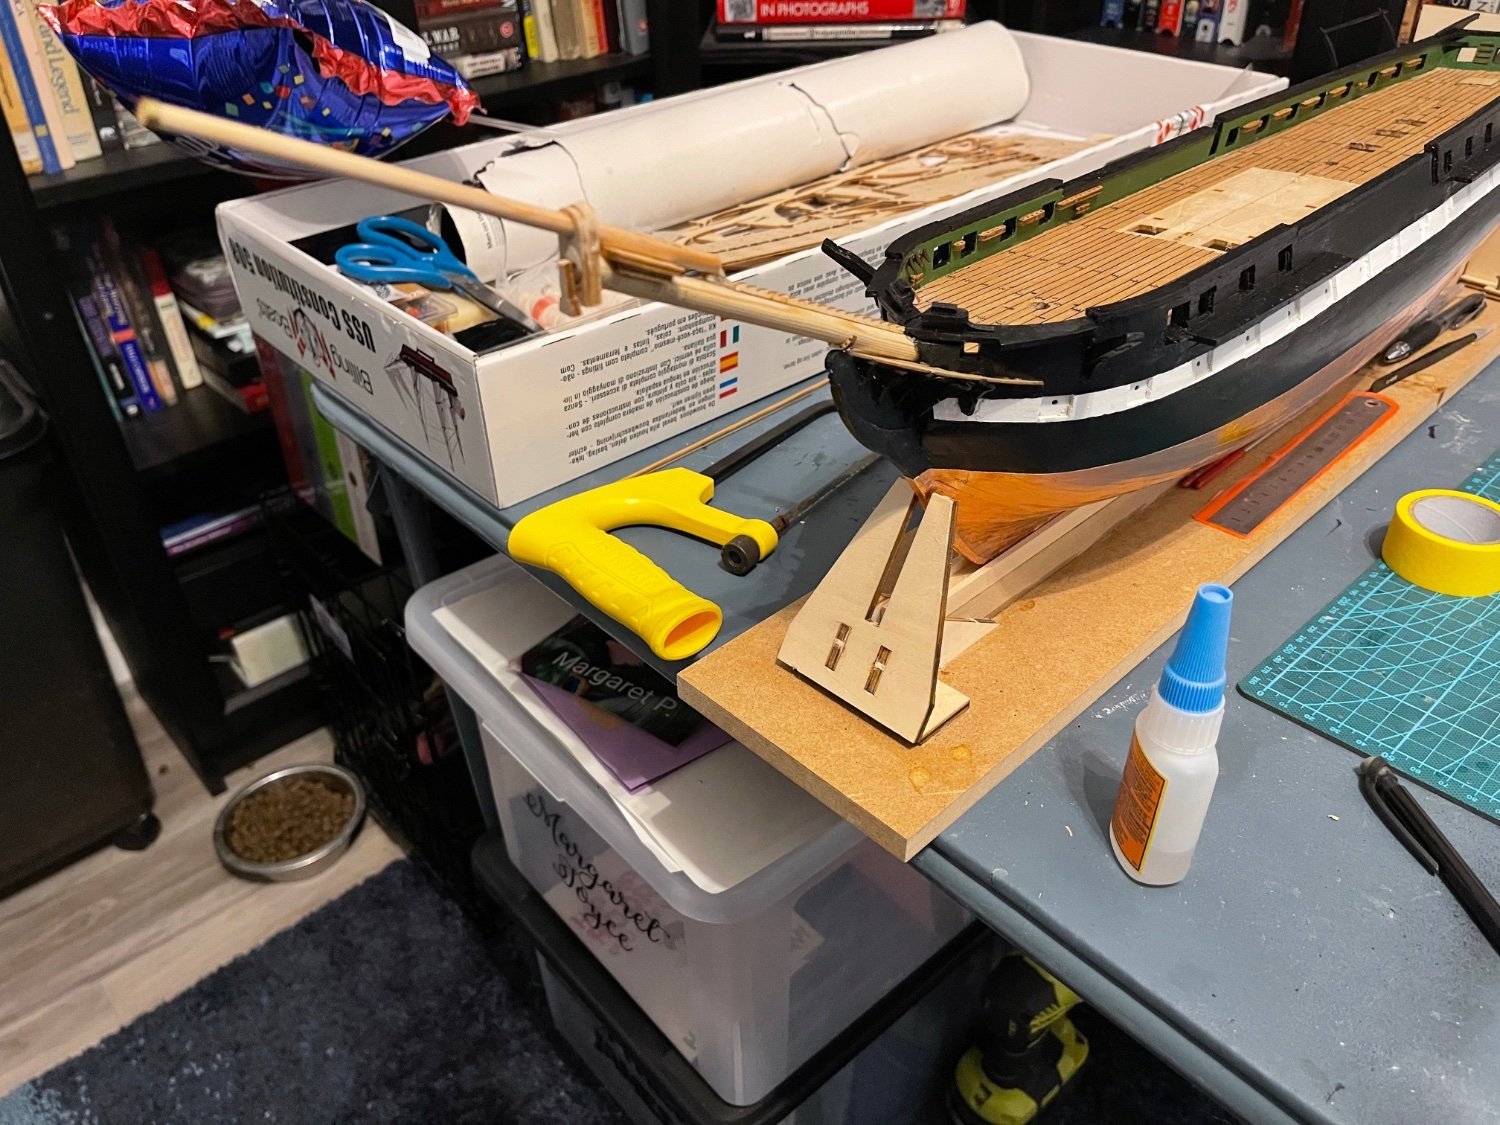
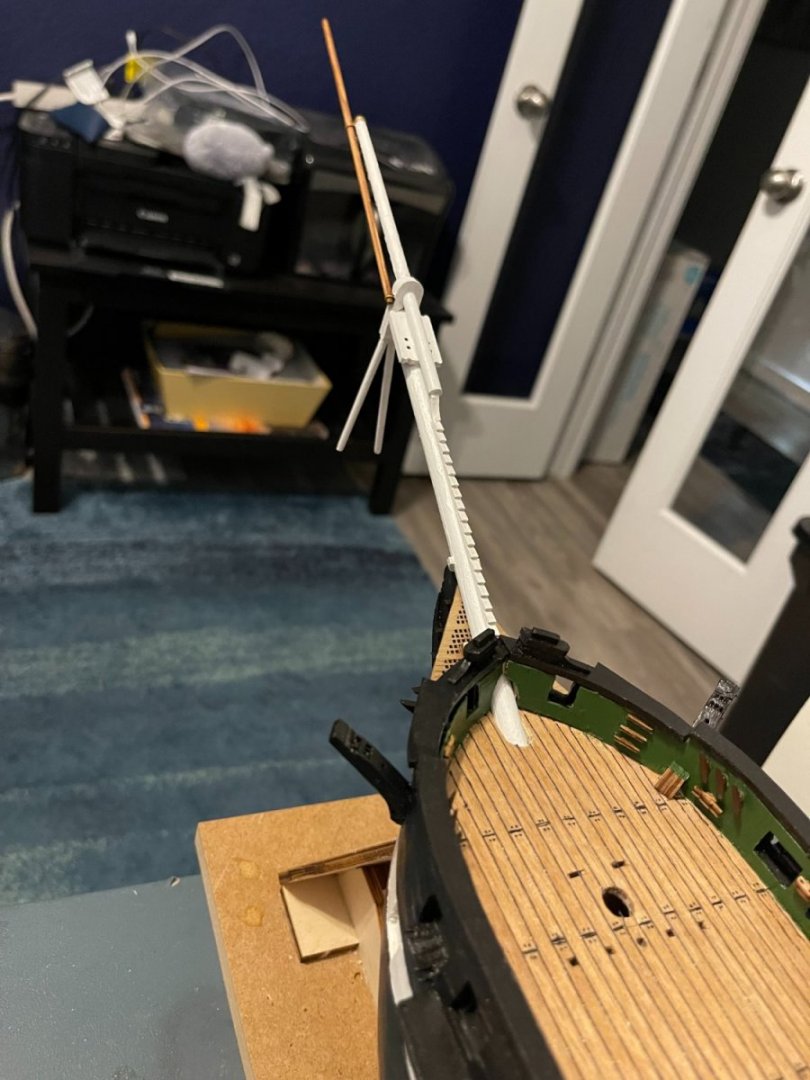
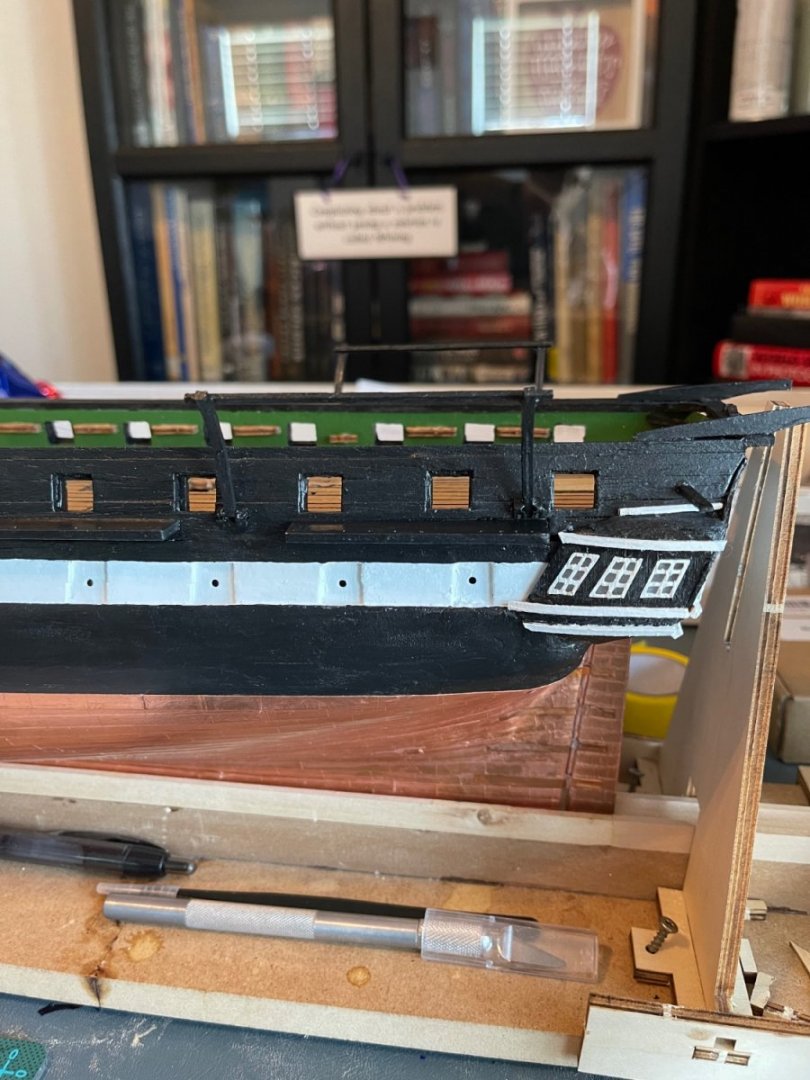
Some progress has been made, though some of it not completely accurate to the historical model. I have completed the installation of the bowsprit, billethead, and trailboards. The photo show that I have painted the bowsprit a bit differently than the model - though I have found some conflicting data that show the bowsprit to be mostly white. I like the white look, and am keeping it as such. I was tempted to paint the steps leading up the bowsprit - as the current version of the historical ship has black treads - though I did not like the look of this and decided against it. Billings does an okay job at the trailboards and the billethead pieces - I would love to see them as they ought to be (see ship building logs for the Model Shipways builds). I only needed to soak the billethead pieces for a short period of time - 20/30 minutes before they were pliable enough to blot off and attach to the bow. I still have some more bow décor to finish - the middle trim pieces, install the 15 eyebolts, and clean up of some paint around the glue application spots. However, on the whole, I would say that after this step is done, I can really shine on the deck fittings, masts, and rigging. Especially since my construction thus far has not been the best. One thing to note, I am looking at the Billing Boats assembly instructions, and I see that they wish for me to construct the cages for the stairwells. Does anybody have a good method for constructing these that does not require a torch?

- 88 replies
-
- 6
-
-
- Constitution
- billing boats
- (and 1 more)
-
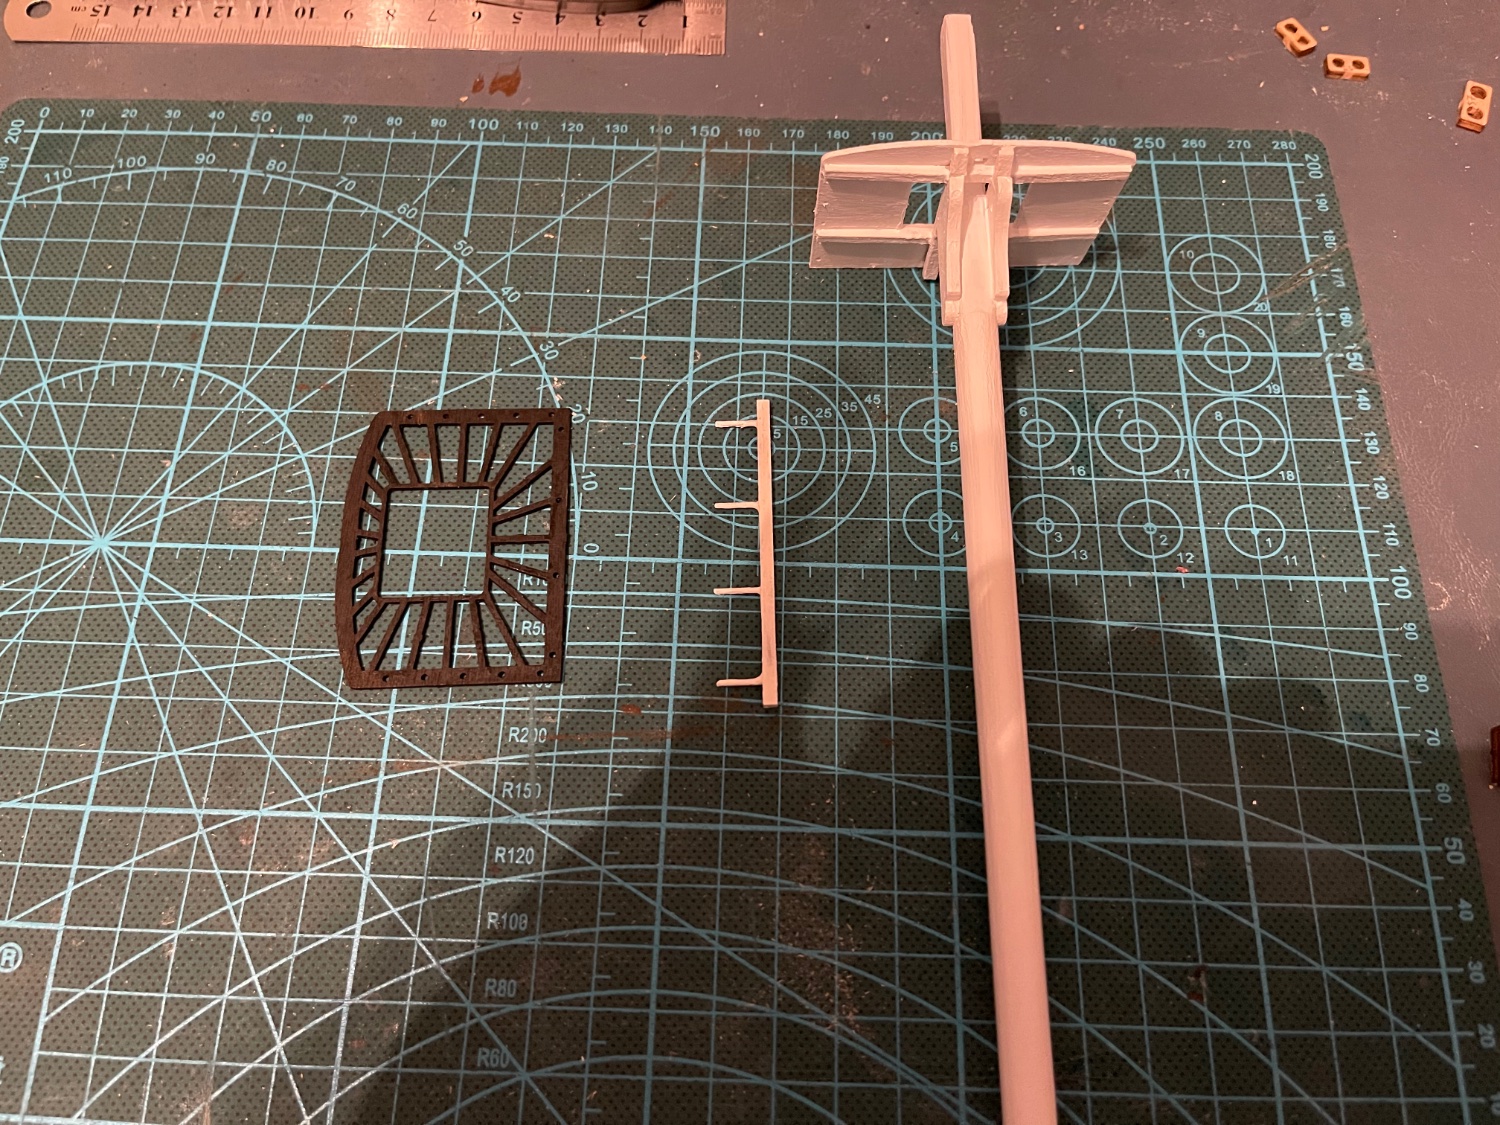
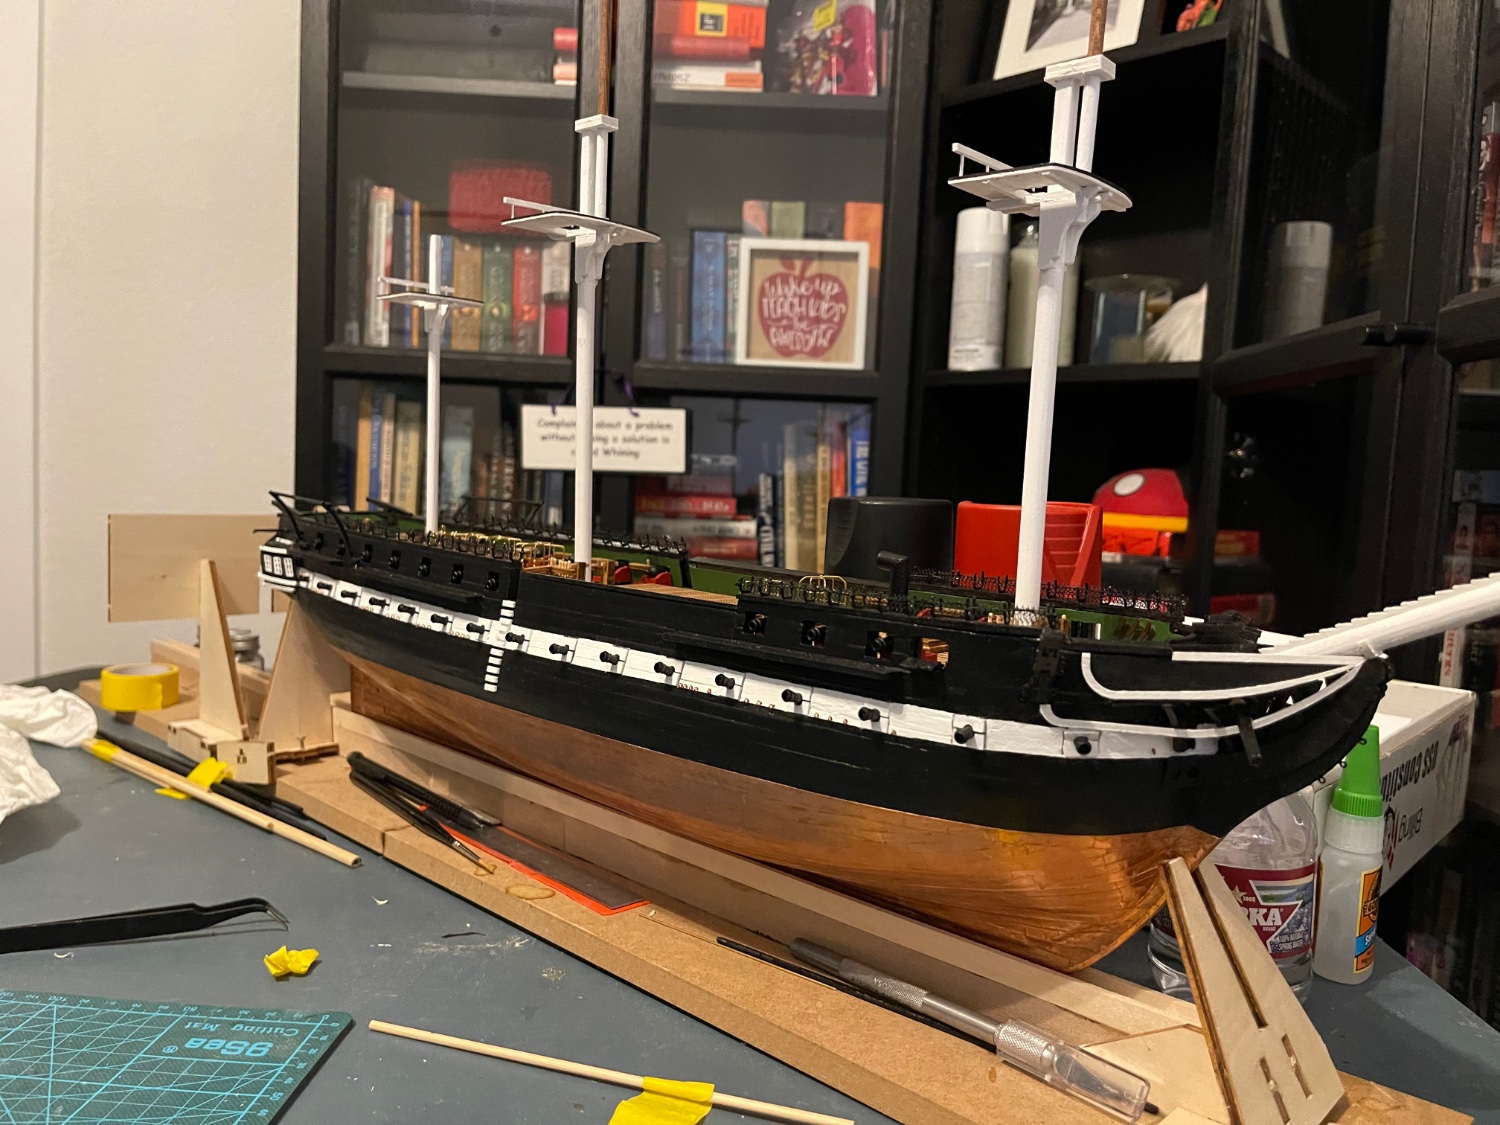
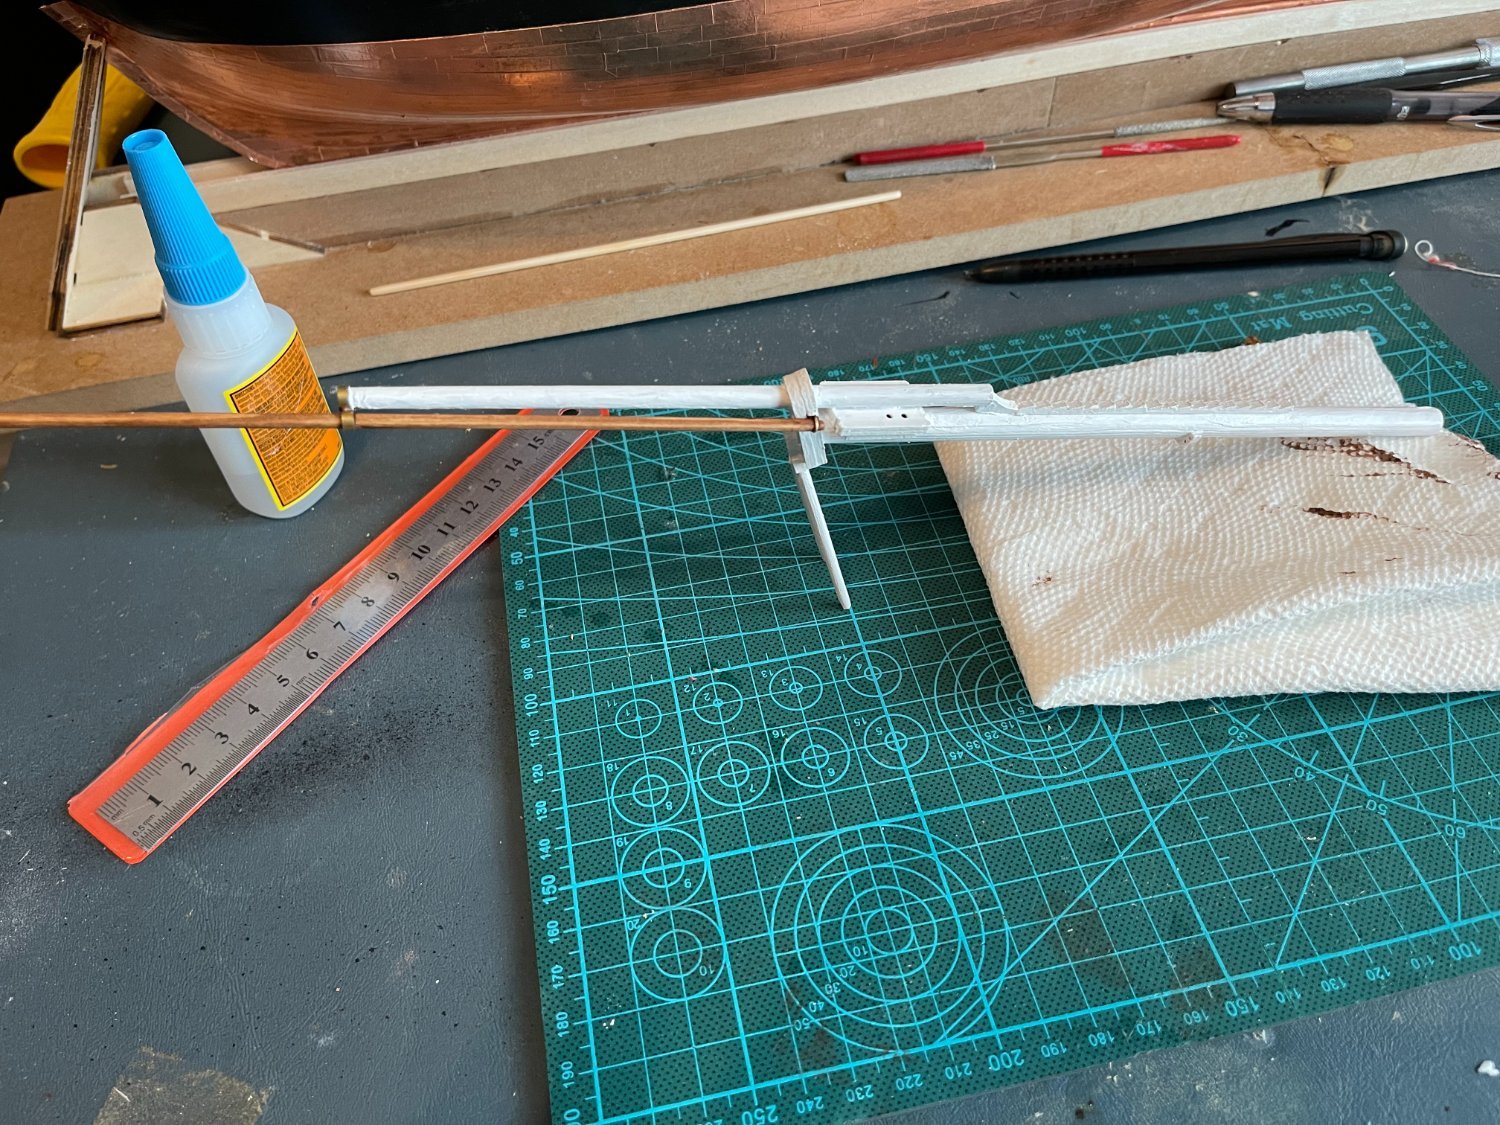
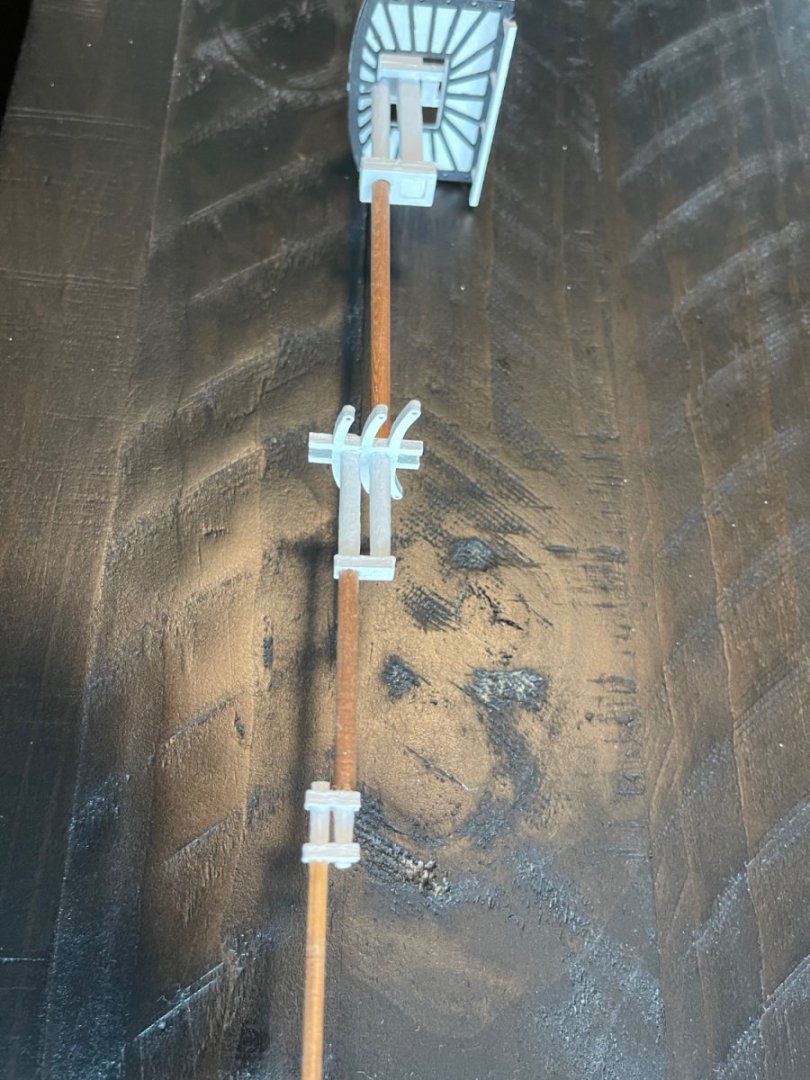
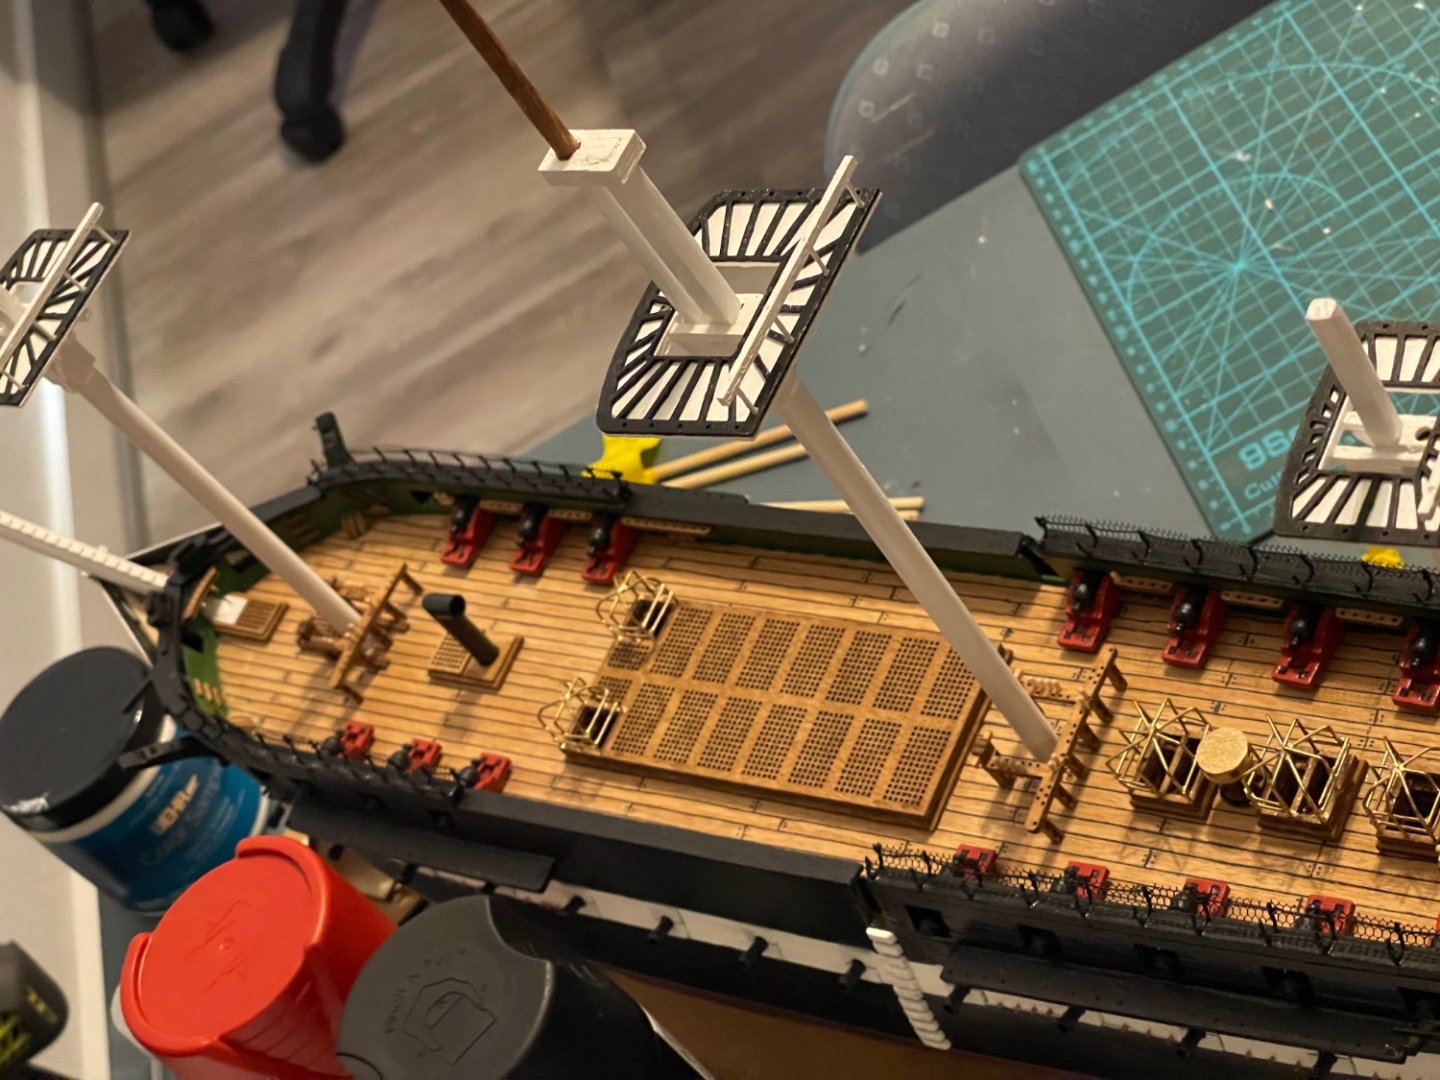
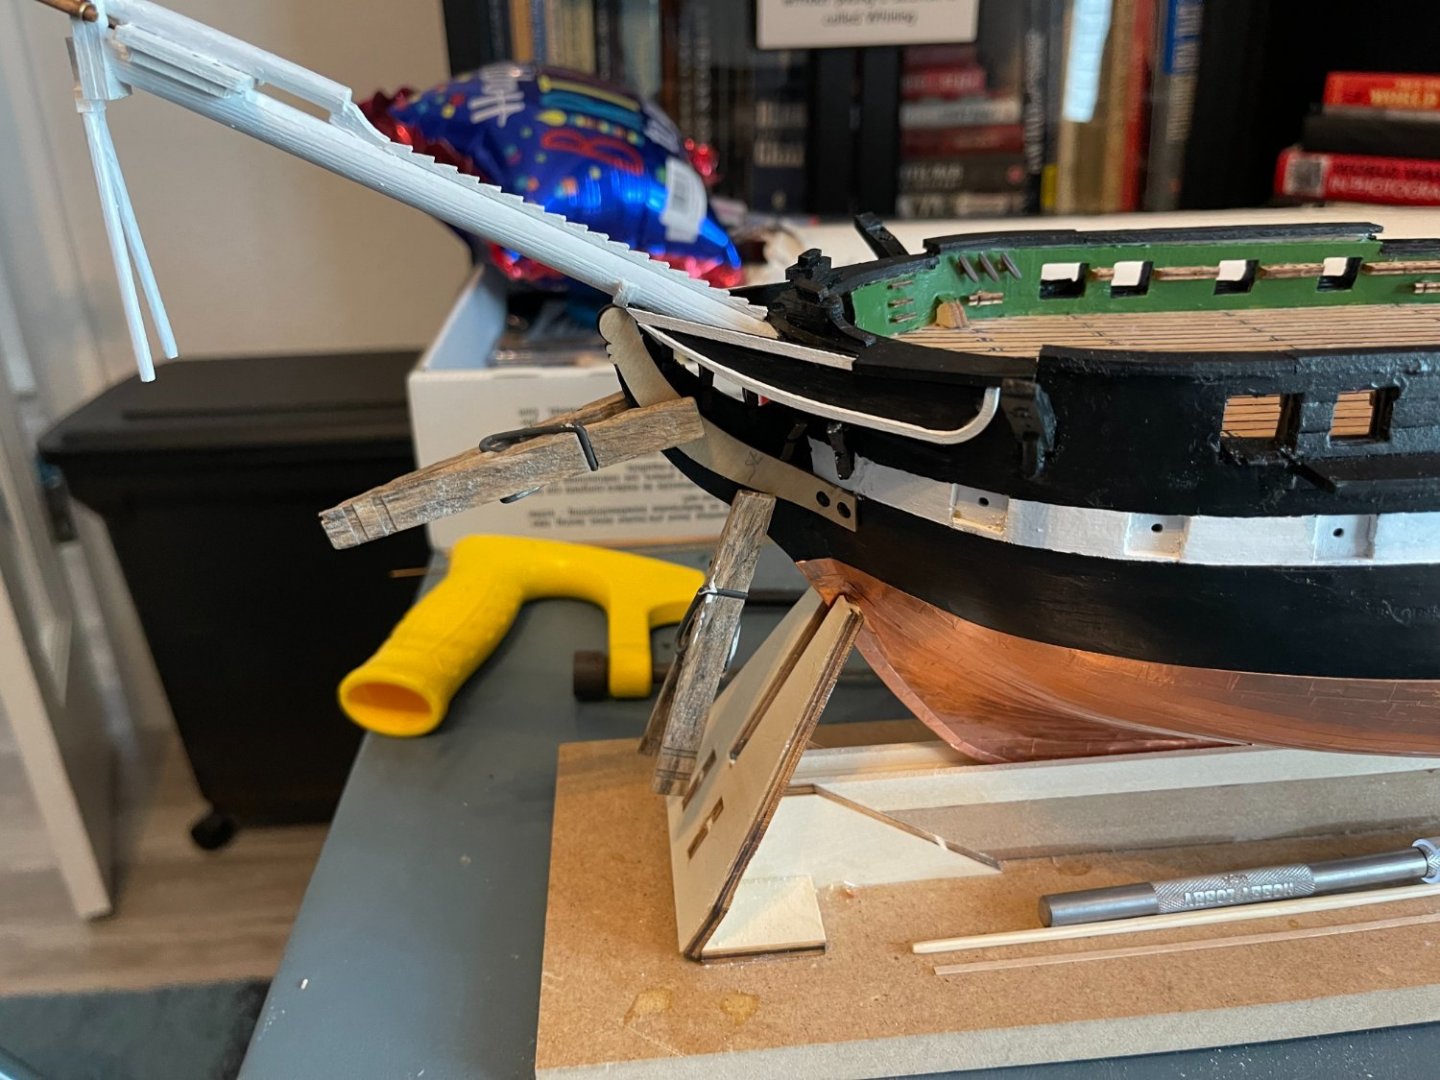
I have been able to do some more work n the ship. I am in the progress of working on the bowsprit and the cladding around it. I have installed the lifeboat davits, and the bowsprit grating. The Billings model does not include pin striping for the decking support braces (don’t know exactly what they are called). The only decoration would be a decal that goes from the figurehead to the hawes holes. I’m wondering how best to go about the pin striping. Would it be best to use a bit of tape and do the lines separately? I am currently in progress of building the bowsprit as you can see, it is not completed and the photo included is a dry fit of the bowsprit. I am using a drill on lowest speed to sand down the round dowels for the pieces. I actually got the idea from the forums here. It’s my first time and it’s slow going, but I figure it’s best to go slow and check every so often to avoid issues going ahead. Let me know what you think.


- 88 replies
-
- 6
-
-
- Constitution
- billing boats
- (and 1 more)