AyathTheLoafer
-
Posts
12 -
Joined
-
Last visited
-
 GrandpaPhil reacted to a post in a topic:
Endeavour by AyathTheLoafer - OcCre - scale 1:54
GrandpaPhil reacted to a post in a topic:
Endeavour by AyathTheLoafer - OcCre - scale 1:54
-
Fernando E reacted to a post in a topic:
Endeavour by AyathTheLoafer - OcCre - scale 1:54
-
 Just a quick revisit to make a comment on "thinking ahead". I managed to shape the bow very nicely using my method for creating a template. I was really chuffed with how it turned out. Next bit was using some filler to smooth the hull. I was being smart, so I put filler in areas, I knew would need to be fixed and being really clever I did that over the whole of the hull. Well. As it turns out - that is not smart. In fact it was really dumb. Using a sander on large areas of filler also produces large amounts of dust. Fine dust. VERY fine dust. Not only does it spread around the living room, but it also spreads to parts of the model, you don't want covered in fine dust. Like the fine work just done on the deck. Like the attempt at giving the deck a nice weathering. Ruined. Covered in dust that has discoloured the bits. Oh. Most of it can be fixed, but I wish I had thought ahead and covered the deck with some plastic and painters tape. Ah well. One learns. My motto have changed. It is now: It is great to learn from your mistakes, but it doesn't beat learning from other people's mistakes. Just thought I'd help you learn from my mistakes. helpful hint: Sand. A little filler. Sand. A little more filler. Sand. And so on. Baby steps. It's going to take a year anyway. What difference will a week make. So now I am waiting for the frost to go away, so that I can go outside when I continue the sanding.
 -
Fernando E reacted to a post in a topic:
Endeavour by AyathTheLoafer - OcCre - scale 1:54
-
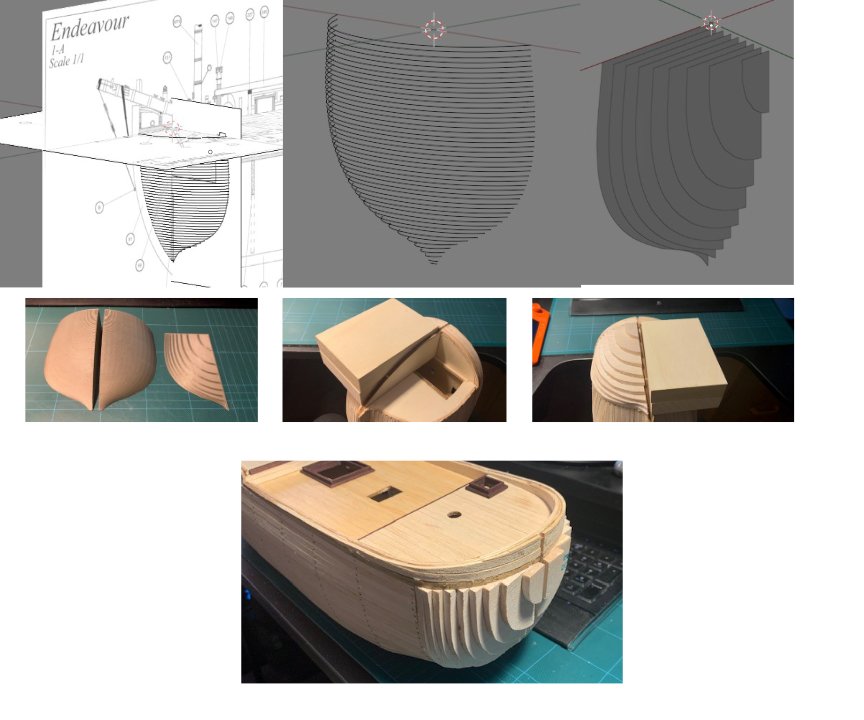
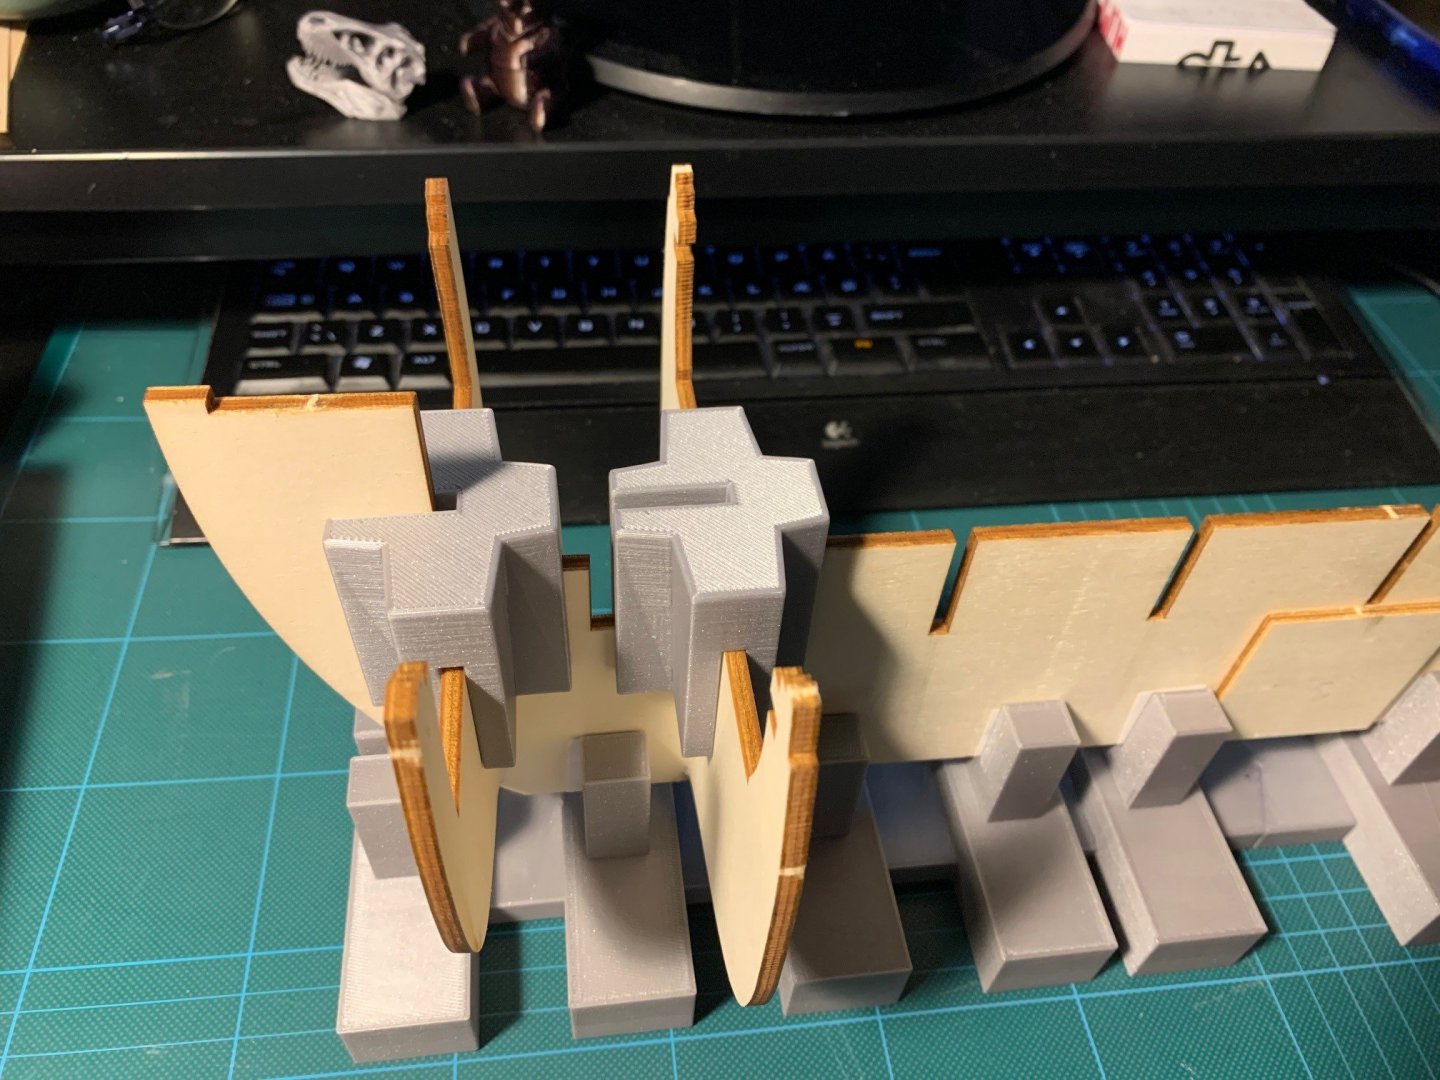
Phew. A couple of days celebrating Christmas and New Year. Just the wife and I. Kids have their own lives and left it at that. Not that I grumble, no, no. They have their own kids and own problems with working and getting stuff done under difficult circumstances. BUT! I could build on the ship. And I did. Hull is covered in first layer and I had to tackle the long dreaded problem of shaping the bow. As you guys might know, the kit includes some shapes for the stern to help with the shaping, but the bow is supposed to be shaped from two thick blocks on either side. Not the best thing for a person that already dreads the process. So I went to work in Blender (free app) and made a template that eventually got 3D printed with some neat slits to help with the shape of the different layers. It is meant for 5 millimeter thick pieces. I got some Balsa Wood for that bit. Picture is from the process and I feel a lot better now. I am fairly certain that the bow will be the correct shape. At least I can say that I have a significant head start. I've included the two main STL-files. The bow as it should look and the template for the cutting. bow.stl bow_template.stl
-
mtaylor reacted to a post in a topic:
Warped false keel on new model - moved to proper forum area by moderator.
-
AyathTheLoafer changed their profile photo
-
I'm looking through the pictures for later on, while the parts I just glued in dries and sets. And when I look at the transom it strikes me that the photographic angles of the pictures make it look different every time. So. The aft part of the quarterdeck is slightly curved. Makes sense that the transom should follow that curve. It would also tie in nicely with the curve slightly lower down where the rudder shaft goes in. One of the pictures show that you should file/sand the "outside" of the transom in a slight curve, which seems to indicate that the transom while munted is curved. However, in several pictures later on the transom looks absolutely straight. That is especially visible in the pictures where the trimming on the transom is mounted. So what is correct? Curved or straight transom? Curved transom with straight trimmings?
-
I am absolutely new to building wooden model ships, but I faced the same problem as you, only with one of the frames. Badly warped. My solution ended up being this. Soak it in water for half a day. Lay it on a newspaper. Warp facing up. Place the paper and frame on the grill plate in your oven. Place another grill on top. Weigh it down with something. I used some metal wire to tie the two grills tightly together in several places around the frame, thus forcing the frame to sit straight. Set the oven for something like 60 degrees celcius for an hour or two. If it is a warm air oven it is even better. My frame ended up straight.
-
Fernando E reacted to a post in a topic:
Endeavour by AyathTheLoafer - OcCre - scale 1:54
-
Fernando E reacted to a post in a topic:
Endeavour by AyathTheLoafer - OcCre - scale 1:54
-
Fernando E reacted to a post in a topic:
Endeavour by AyathTheLoafer - OcCre - scale 1:54
-
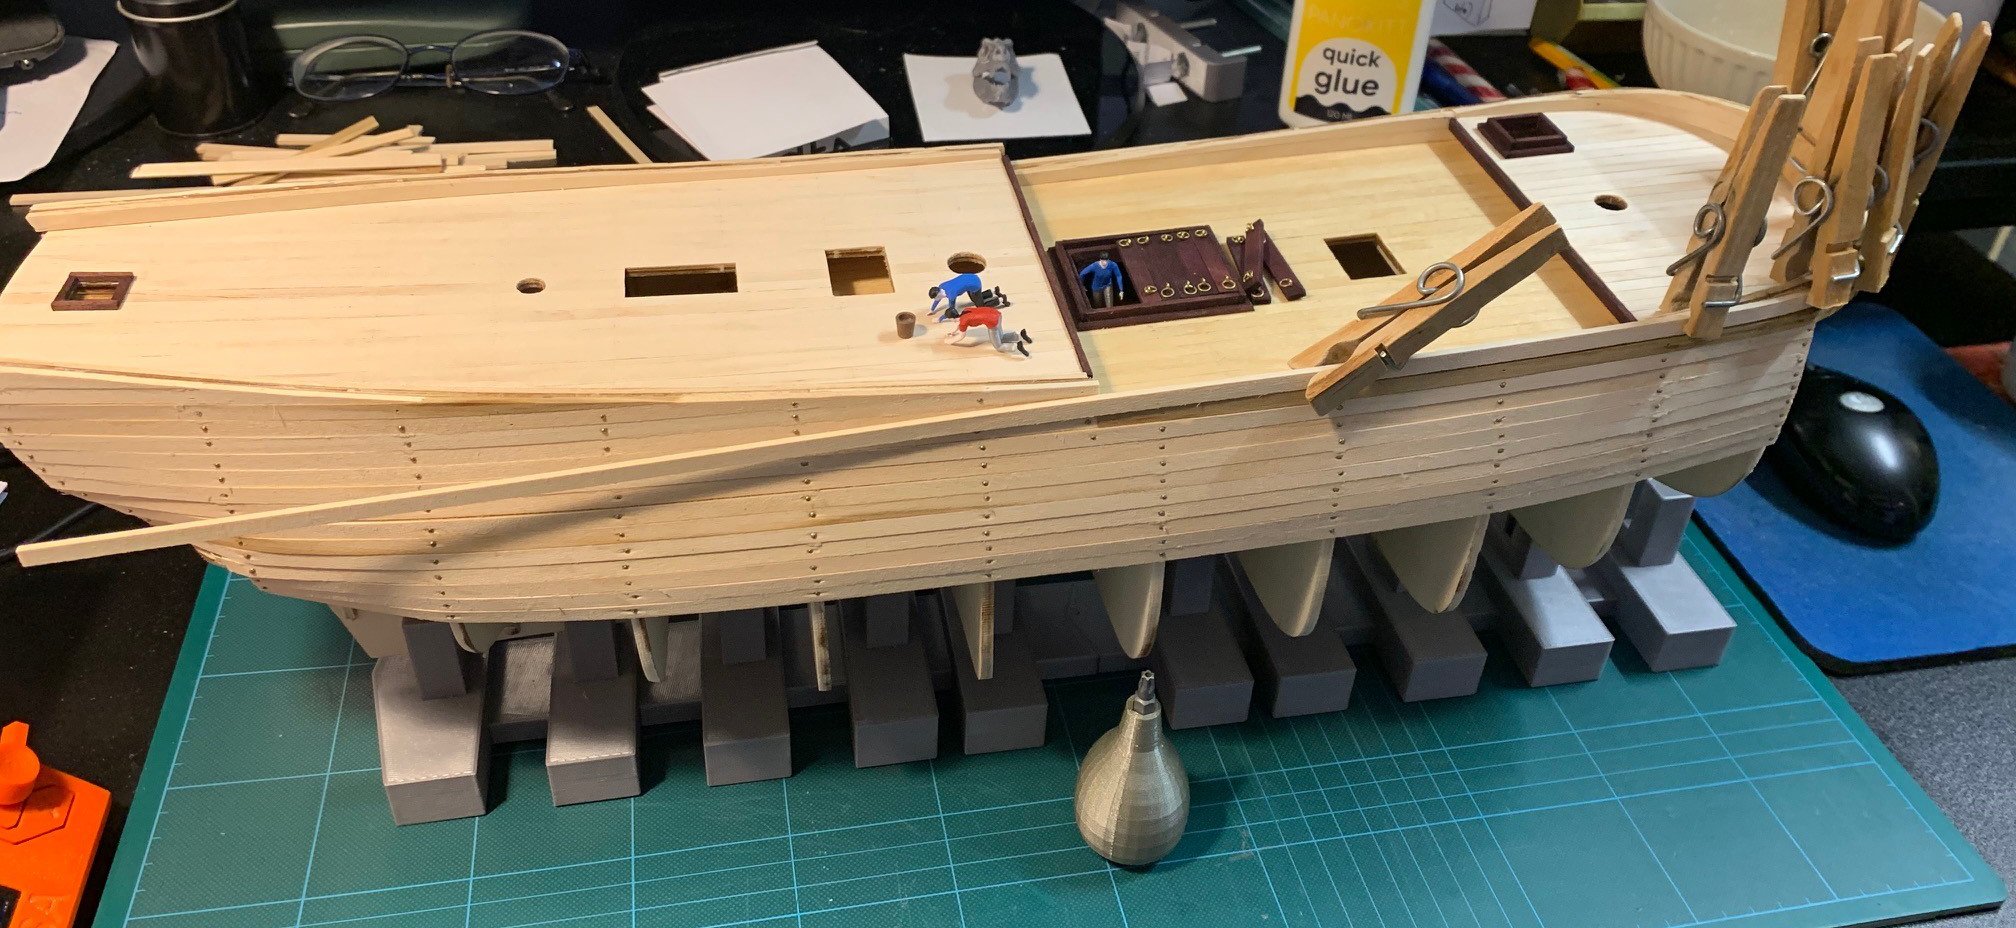
Christmas days without family (except the wife of course) and in lockdown. Not very nice, but it gives me plenty of time to sit with my project. Got to a point yesterday where I almost cursed. I hadn't noticed two reinforcements on the aft frames. They weren't mentioned in the text and they weren't referenced in the pictures. Only a careful look at picture 42 (for those of you with access to the manual) revealed their location. Luckily I spotted them while fretting over how to make sure the aft section was formed correctly. Anyway. Panic over and I got on with the job as you can see in the picture. Some sanding required and of course some filler work, but all in all, I think it looks OK. As for the passengers, they are husband and wife who decided to take a trip on this replica. "Go on. It'll be fun" he said. "For you maybe, but being on a ship is hard work" she said. Guess she was right. And I almost regretted not getting the pin-driver - that is until I remembered that some of my torx-bits have a hole in the tip for those special security screws. Design - 3D print - finished. And it works. You can see it in the picture foreground. I have included space in the STL for a tiny magnet (3xø8 millimeter) to be inserted inside the handle during printing. Pause the print at the right spot. Glue in the magnet and continue printing. Just thought I'd publish another picture - because you guys, being really good at model building, will be able to stop me before it is too late, if I am totally going in the wrong direction. YEAH. They have just extended the lockdown until January 17. More time to build and too cold for garden work. nailer.stl

-
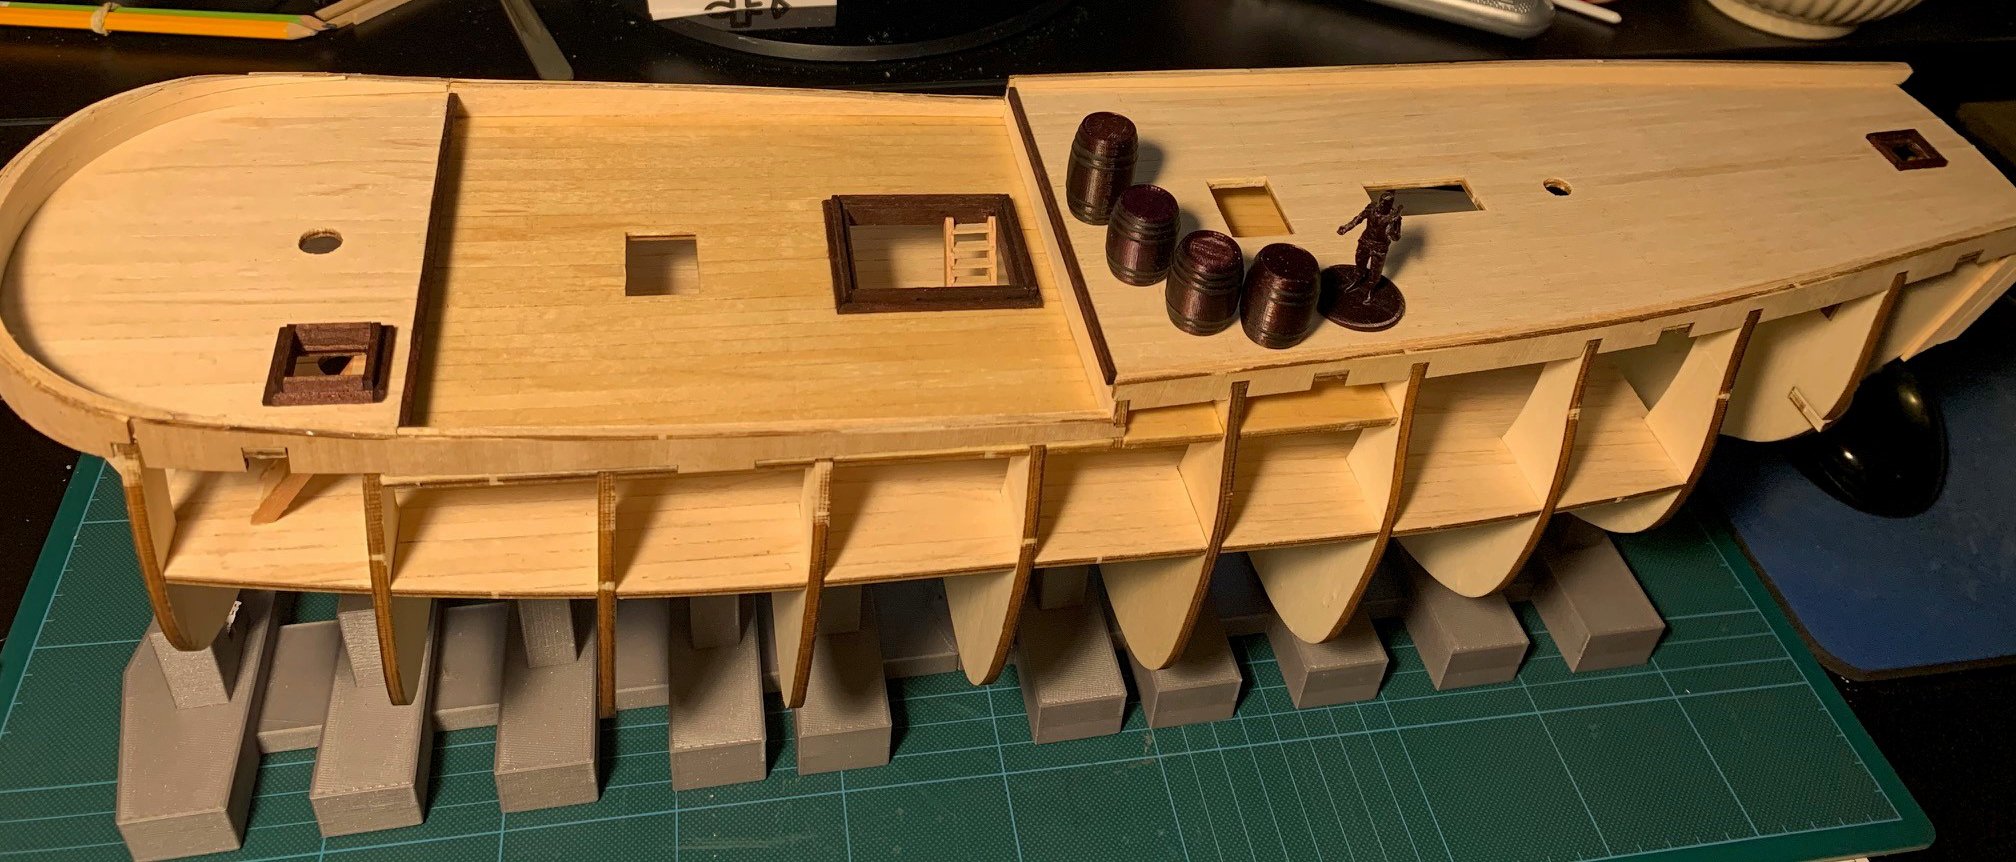
Hi there - dare I say - fellow model ship builders. I am progressing slowly but surely, and am getting hooked on building models. My model building experience is from about 50 years ago when I build Airfix model airplanes. My only recollection is something about using too much glue in places (and fingerprints in the paintwork). On Endeavour I have just finished putting on the reinforcements along the false keel and am about to consider the best way to approach the sanding of the frames. I shall have to construct a specialized sanding block - flat on one side and rounded on the other. My first major problem was that I was supposed to use a .75 millimeter drill bit for some eyebolts for the central hatchway covers. I couldn't find any smaller than 1 millimeter at my local stores and because of the lockdown I would not be able to get any from anywhere else for a long time. Invention is the name of the game, and it turns out that my wife has some sewing needles, and one of them was .78 millimeter. So I clipped the tip off and managed to drill the holes with that. Lucky me. During the build so far, I have devised som helping hands in the form of some 3D printed bits. I noticed in the manual pictures that a flight of steps would lead into the cargo hold, and because of that I designed a barrel to fit the scale. Two sizes - a tun and a butt. Now I shall glue them to the deck below so they can be seen through the open hatch. And because I think that some future builder might like to have these stl-files I include them here. I am also working on a 3D model of the bow. This I shall use to make some 5 millimeter thick templates of diminishing sizes. It is looking very promising at the moment. Maybe I'll still finish the model in late 2021. As for the building manual... A bit weird in places. It is definitely important to look at the pictures very very closely and compare them to pictures a number of pages further in. The written parts are very brief and the pictures are often "this is what it looks like, now find a way to create that". angle block - inside.stl angle block - narrow.stl angle block - wide.stl barrels - butt.stl barrels - tun.stl

-
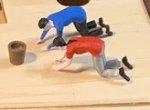
FINALLY! I've started putting it together. The first two frames are in place and the curved one is on the mend. As it turned out, the advice I read on these very forums about heat being the only neccessary remedy for bending wood... was inaccurate. Or in this case. Perhaps inaccurate because of the thickness of the frame. In any case. Soaking it and then drying it between some newspaper and old shelves fixed with two massive clamps, did the trick. (so far) In the picture I am showcasing the angle-blocks I have printed to assist me in getting the frames squared up while the glue dries. You can also just see the keel_build_support I have designed. While laying the decks I am contemplating the "nailing effect", which I initially thought looked great. On reflection, I have come to the conclusion that none of the tall ships I have been aboard had very visible nails or pegs. Mostly the decks were grotty and weathered with only a hint of planks and pegs. So that is the way I am going. I shall make some very faint pencil marks, but they will be all but covered with a wood stain or weathering effect. And since I have a 3D printer with a small nozzle, I intend to make some small figures to make it all a bit more interesting. Some of those figures will be crew on their hands and knees scrubbing the planks. I must remember to stain the planks in a way that suggests an area already scrubbed. Anyway. I'm rambling. I am simply so happy to be on the long long road to building this model. My brain is brimming with details I'd like to add to make it more "real". If you ever visited Wunderland in Hamburg, you know what I mean. Have a look. It is truly inspiring. right angle support block.stl
-
Thank you very much. I am aware that it will be a huge challenge. In some ways it might be good, because it will force me to consider and reconsider every step. There will be none of "this is easy and I'll just..... OH BUGGER!". As with the curved frame. I am not gluing the others in untill the curved one is fixed. And we all know what that means. Finding a way to straighten it or making a new one. I have no doubt this will be a multi year project where I will learn an awful lot of useful stuff from you guys. Greetings from Up Over.
-
Hi there, This is my build log for the mighty ship Endeavour. I've lurked a bit in the background (after I bought the kit) and have taken note of some great advice. Holy Moly, you guys are good. The first advice I noticed was the need for at straight keel to make sure that the ship is straight. Sound like a good idea and since I own a couple of 3D printers, I decided to design a straight stand. The printer is still working on it. And as I could not wait to start, I took out some parts from the box and assempled the spine straight away. Putting the frames on loosely, only served the purpose of showing my wife how great the ship would look when finished. After standing for two days like that I, met my first problem of many. One of the frames developed a distinct curvature. My guess is that it would be difficult to lay the decks and maintain a perfectly curved hull (I am still dreading the forming of the bow). At the moment the frame is in press between two shelves from the cupboard after spending some time in the oven at 50 degrees celcius. EDIT: no good. And 100 degrees didn't help either. Guess I'll have to print some braces. While I'm waiting I am designing some helpful tools for 3D printing. A couple of "cross-blocks" to help with keeping the frames at right angles when I eventually decide to glue them in place. A couple of right angle bits to help later on. If anyone think they can use them, I'll be happy to share. I wasn't even supposed to build a ship. I was actually searching for a 3D model of a small boat that I could print as a gift wrapper for a present for my grandson - and no - Benchy was not going to cut it (3D printer insider joke). I just happened to spot the OCCRE kit and clicked on the link. As I was drooling and thinking back to my dad's attempt at the Wasa back when I was 7 years old, my wife happened to glance at the screen. She was impressed and within minutes she urged me to buy it. We usually contemplate for weeks before we buy anything, so I am convinced that she also liked the model. So I clicked on pay, and here I am. No experience in building a model ship. Whatsoever. No toolshed with loads of specialized tools. Just a desire that I have had for more than 50 years. Now is the time. Wonder how many years this will take me.... p.s. My dad got the hull finished and sanded. That was it. He gave up.