MangoFox
-
Posts
28 -
Joined
-
Last visited
-
 Mr Whippy reacted to a post in a topic:
A few questions about lining off / planking / planking fan
Mr Whippy reacted to a post in a topic:
A few questions about lining off / planking / planking fan
-
Mr Whippy reacted to a post in a topic:
A few questions about lining off / planking / planking fan
-
Mr Whippy reacted to a post in a topic:
A few questions about lining off / planking / planking fan
-
Mr Whippy reacted to a post in a topic:
A few questions about lining off / planking / planking fan
-
MangoFox reacted to a post in a topic:
Question about the planking
-
Ryland Craze reacted to a post in a topic:
Question about the planking
-
mtaylor reacted to a post in a topic:
Question about the planking
-
Paul Le Wol reacted to a post in a topic:
Question about the planking
-
iMustBeCrazy reacted to a post in a topic:
Question about the planking
-
Hi all, Just to clarify some points. This is a double planked 1:64 model of the HM Lady Nelson. This is my first ship, new to every aspects of both ships, models and woodwork. When I said "I didn't bother ticking off the bulkheads". I noticed problems with ticking off straight away and don't have the experience to know how to overcome them. I made several tick strips for all the bulkheads. Below are photos for the first and second bulkhead from the bow. Even though I haven't transferred the ticks over, I'm still pretty close to what I expected at the second bulkhead. When compared to the tick strip, the planks on the first bulkhead appear as though they could and should be a bit thinner. However the tick strip for the first bulkhead has the same number of planks as the mid-ship bulkheads, which will include the garboard strake. From the resources I have read, bringing the garboard strake all the way up to this point (the first bulkhead) will cause other problems (i.e un-natural curvature in the strakes or, the "smiley face" effect). This is why I chose not to transfer the marks. The plan was to lay the first 4 planks from the gun-port patterns on each side, then the garboard and broad strake (with no tapering on the garboard + broad strake as per the advice on many instructions / video guides). I was then going re-measure the gap/band left over and taper as required. I wanted to break the hull into 3 bands and create smaller more manageable strips before laying any planks. However being my first model I had too much trouble visualizing (or guessing) which point the band should start at the bow, cross mid-ship and terminate at the stern. When I said "I used the MSW guys measurements as they were all within 1mm of my own". This wasn't per plank. If the guy in the video guide (Which is for the same model) measured from false deck to false keel and got 65mm, my measurement came out at 66mm. That's 1mm over 13 planks, roughly .076mm difference per plank. The only exception being the stern most bulkhead. That's mainly the measurement that I ripped off from him. For some reason the MSW guy got a wildly different measurement at the stern. I chose to follow the guide as his model turns out pretty good. I have been reading and watching a tonne of guides and after stalling on planking for quite some time it was time to dive into the process. I decided to trust he had a reason to get that measurement, his model turns out good after all. See the photo below, at the final bulkhead the MSW video guide got 41mm, as if he forgot to measure the actual bulkhead. If you include the final bulkhead under the transom in you measurement its 76-77mm. I'm currently not experiencing problems at the stern. My issue remains at the second bulkhead from the bow. In regards to my faring being off. Yes, it probably pretty far from perfect. This was likely emphasized due to the fact I took a photo after adding the packers and not sanding them (it was close to bed time). I did clean up the packers I added to the first 2 bulkheads since then, see below. As you might notice I felt the need to pack out the first bulkhead twice, then the second bulkhead once. After noticing that this didn't help with my problem I came here for advice. Just a note though, my planks all sit fare on all the other bulkheads. Just BH-2 causing me problems at the moment. "First I suggest you watch videos 24, 25, 78 and 85 at https://sampsonboat.co.uk/" + the additional advice. From user "IMustBeCrazy" Thank you for the resources, I haven't seen these ones yet so I will have a good look. "Don’t get caught up in trying to follow multiple different methods and techniques for planking". From user GLBarlow Couldn't agree more. I've seen other users offer this advice before as well. I've read and watched so many different videos at this point I've ended up struggling to differentiate all the techniques. Some guides just confused me more. This was one of the reasons I decided to dive in and get some planks on the model, then deal with the issues when they arise. I've been trying to primarily follow Chucks guides. I have found a lot of guides, including Chucks, have a tendency to be very vague, require tools/equipment I do not have or just not be relevant to my model for certain reasons. leaving me with more questions then answers. When you're really good at something, its hard to remember what its like to be a beginner and know nothing. In regards to the filler block + additional advice. From user Snug Harbour Johnny I have seen some modelers using filler blocks. I don't have many woodworking/modelling tools, just some basic modeling tools I got with a kit. I certainly don't have access to anything precise enough to cut to appropriate size and shape. My planks do have a tendency to straighten out between the first and second bulkheads. My plan is still to use wood filler to do a lot of the heavy lifting on this first planking. I'd like to minimize just how much I will need by overcoming the current issue in the 'most correct' way possible. In regards to the posts from User RudyBob Mate we are 2 peas in a pod. It's somehow quite heartening to see someone experiencing the same issues I am. We will get there. Just wanted to thank everyone for their advice thus far. Still not sure what I can do besides making the plank just a touch thinner at the bow. (though that will reduce my plank to less then half its original width, something I've seen multiple guides say to avoid). Cheers, Mango.
-
rudybob reacted to a post in a topic:
Question about the planking
-
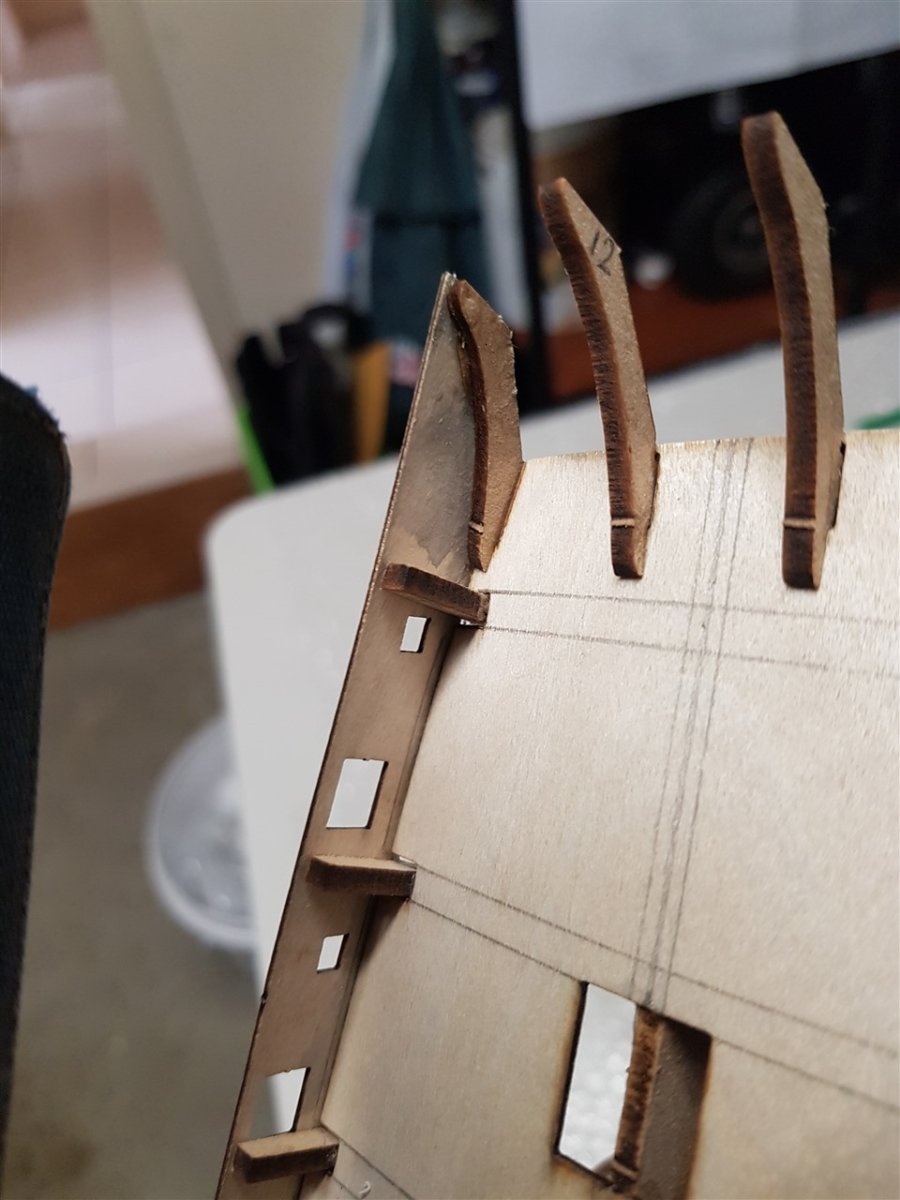
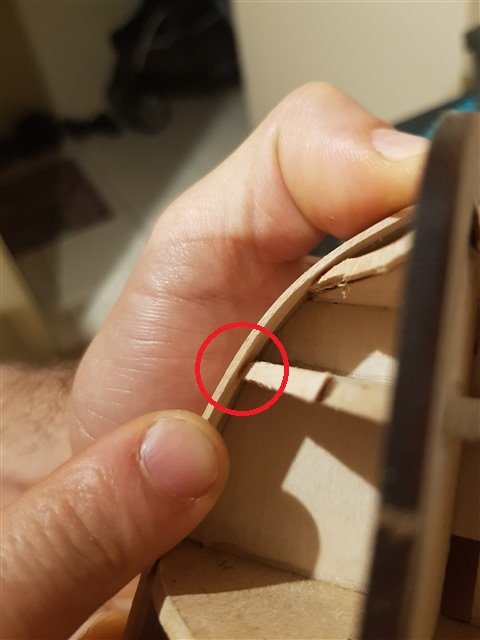
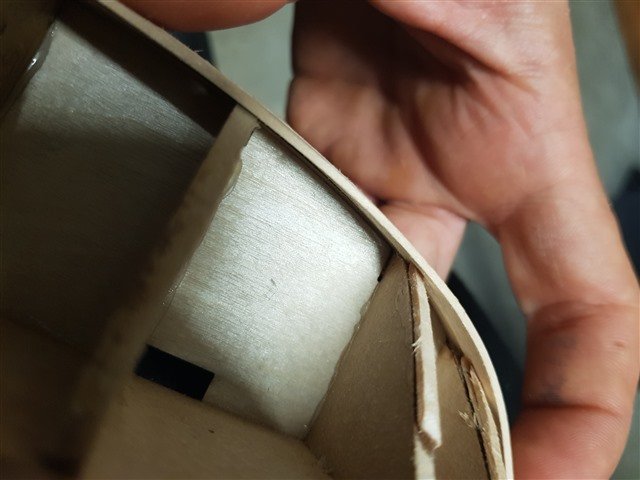
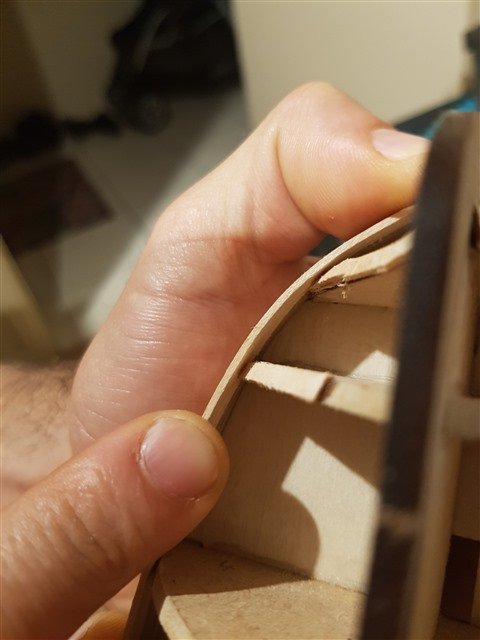
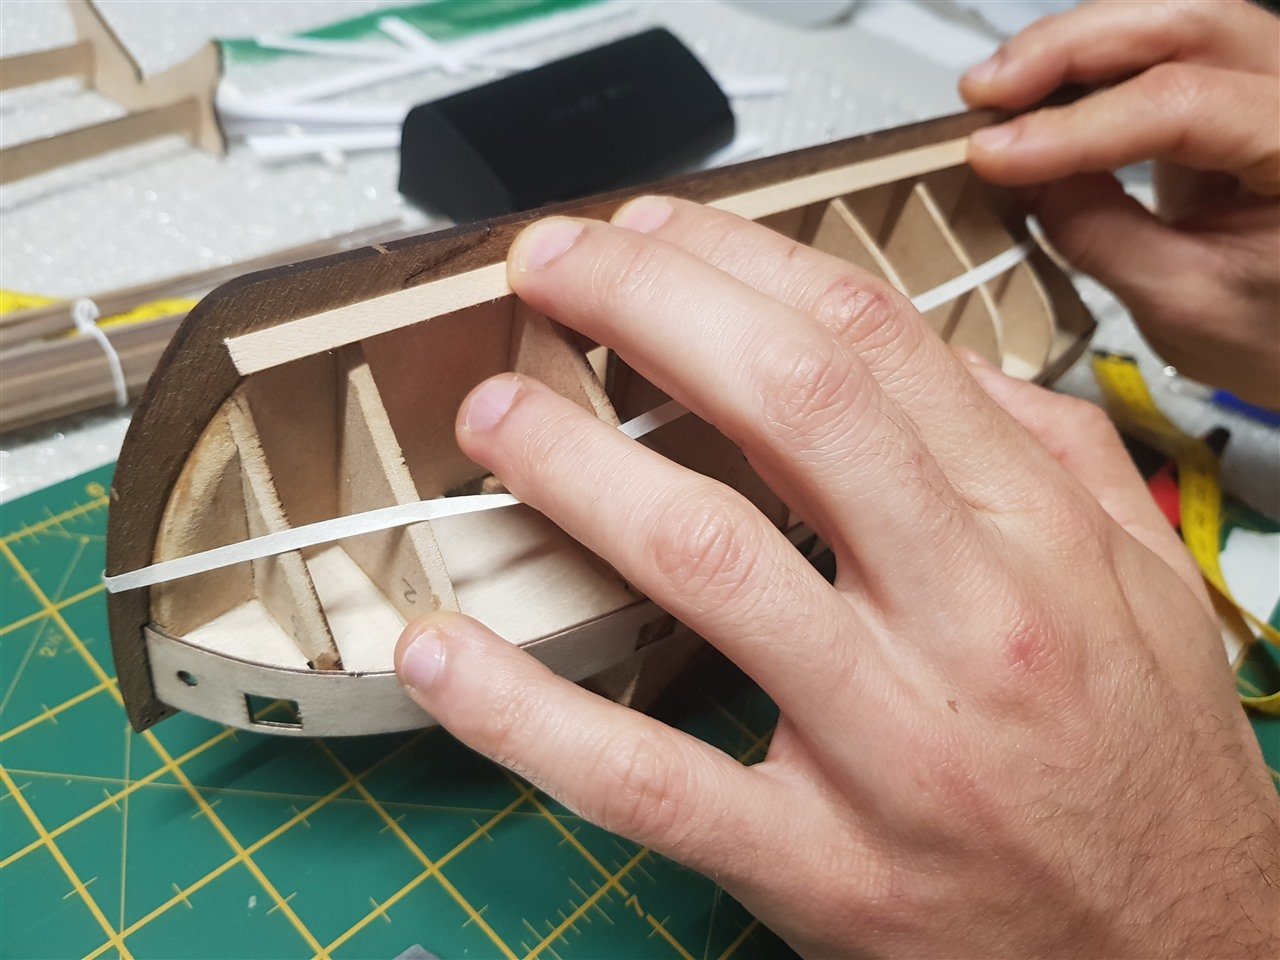
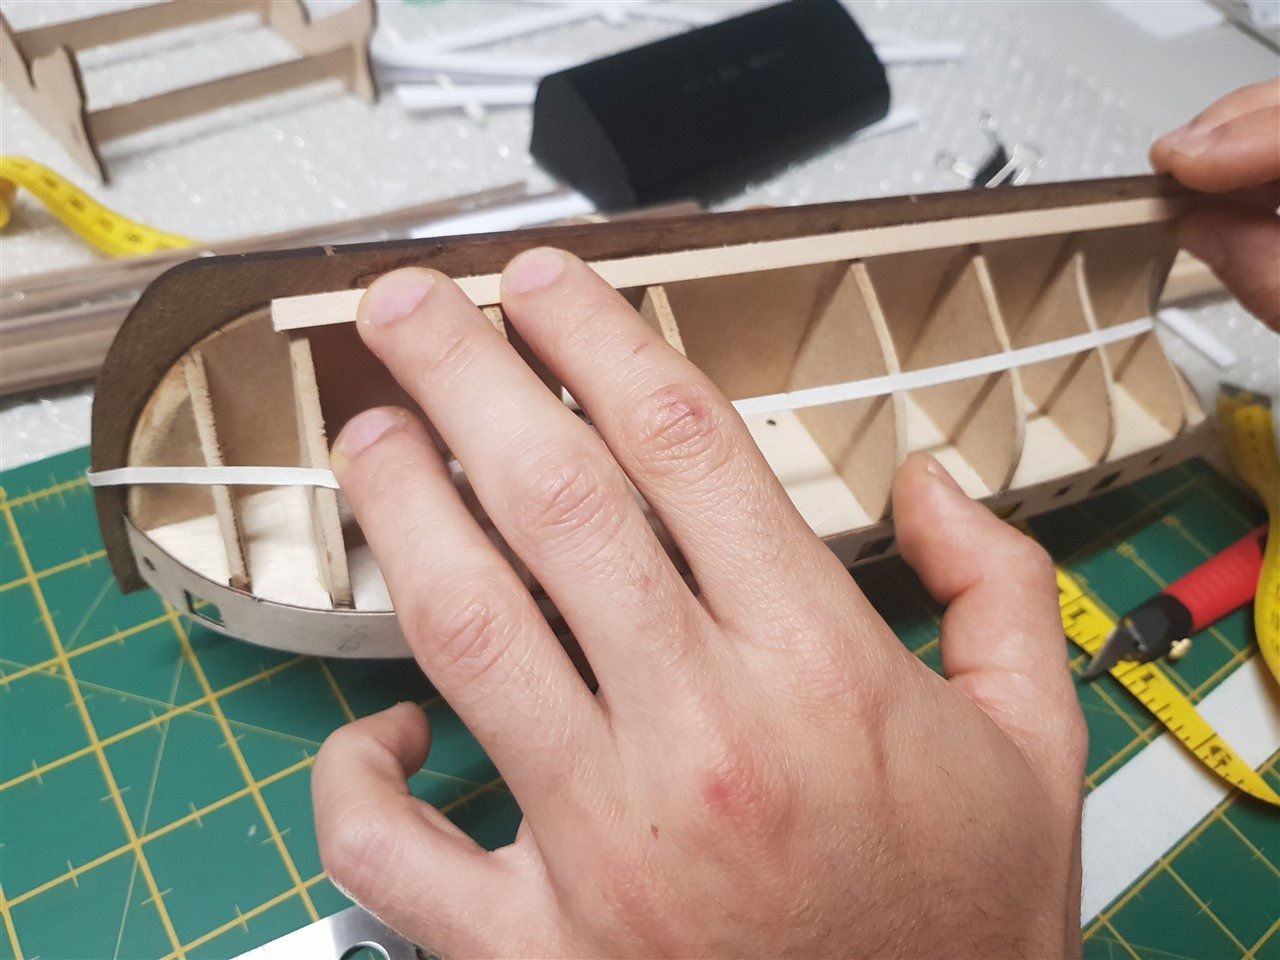
Hi all, So I thought i was posting this in the planking questions thread I started a while ago, guess we will just roll with it being here now though. Clearly I needed to add more photos, let me know if you need to see from a certain angle for better context. So it was the second bulkhead from the bow (not the stern) as you can see I've glued on some strips to pack out the bulkhead a bit, originally I thought I under cut the first two bulkheads (i was super careful so if i undercut them a little it wasnt enough to cause the problem im having). I know i need to sand the packers i added nice and smooth, make sure they run fare and also taper flush to the original bulkhead. but I honestly don't think that's where my problem was coming from as i was having this problem from the second plank. I didn't bother ticking off the bulkheads, I ended up using the MSY guy's measurements as they were all within a millimeter or 2 of mine (except for the very last bulkhead at the stern where for some reason he measured 44mm). You can see below the planks lay fare on all the other bulkheads (ignore the blood on the stern, i got myself with the scalpel while i was gluing) This photo below makes my work look pretty terrible, a bit of sanding will get those bulkheads looking correct again, i just havent done it yet. Looking for a bit of guidance on the issue im trying to resolve first. Just notice the clinker effect i was getting. And below is the plank im trying to lay. Arrows point to the tapered edge. Below is the problem area, second bulkhead from the bow. I keep getting this gap. Its big enough that the next plank will want to fall into it. This is the reason i packed out the bulkhead in the first place. I've been under the impression this was what Chucks bending was supposed to eliminate, so I think this is a problem with how I am edge bending. Hopefully these pics make it a bit easier to understand the problem im having. If you need more info or different angles of the model let me know. If all else fails I might clean up the bulkheads a bit and post in a fresh thread to get some advice cause i know those ugly packers I glued on are going to draw your attention away. Just be aware they were put there after I noticed the planks were barely making contact with the bulkhead. Regards, Mang.

-
mtaylor reacted to a post in a topic:
Question about the planking
-
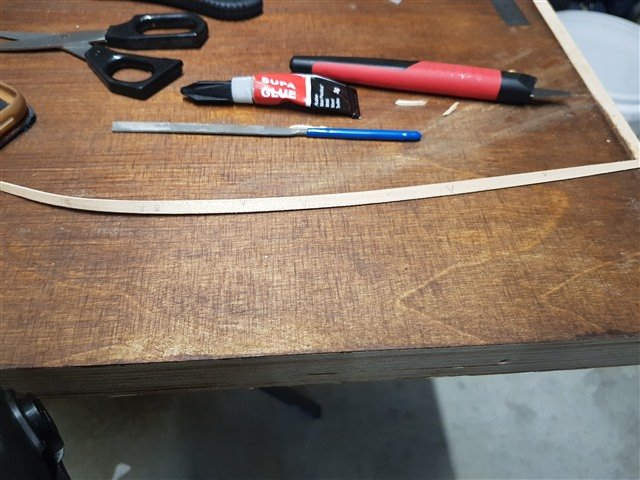
Hi all, I've got a few planks on, using chucks edge bending technique, but seem to be running into a problem where on the second bulkhead from the stern my plank ends up barely making contact. I tried packing out the bulkhead cause I had assumed I undercut the (first two) bulkhead(s) during fairing. Think I might be missing something though. First two planks went on each side went on not so bad. Could be better though. The faring might be a tiny bit off but I think something else is causing the issue. After packing out and putting a plank on I'm finding would need to pack it out again for the next plank, then again for the one after that and so fourth, obviously thats going to mess up my shape. Any ideas where I messed up and what i need to do to fix? Not having this problem for any of the other bulkheads, planks lay nice and flat on those. See some photos below for context. Ignore the fact I haven't sanded them down near the keel. Cheers for the help. Mango.
-
Thanks for the tips, the reference photo helped a lot too, I appreciate you taking the time to reply to all the question. Feeling much more confident about the process and ready to start the next full day I get to chip away at it. Cheers, Mango.
- 20 replies
-
- 3
-
-
- Planking
- Lining out
- (and 2 more)
-
Thanks Toni, I'm sure for this part I can just reference some logs of the Lady Nelson + some experienced modellers. The tapering and the measurements from the MSY guide was really what had been throwing me off. Feeling more confident about it after all the useful info everyone provided in this thread. I appreciate the time you took to read and reply. Cheers, Mango
- 20 replies
-
- 2
-
-
- Planking
- Lining out
- (and 2 more)
-
Thanks Kevin, I'll give them a watch, I'm sure pick up quite a bit. Cheers, Mango.
- 20 replies
-
- 1
-
-
- Planking
- Lining out
- (and 2 more)
-
Thank you Toni, Out of all the instructions/guides I've read and watched so far, this reply makes the most sense . I can see how this would allow me to make tick strips that will act as a good guide for where the planks need to lay, and give me a better idea where the stealers are going to land. I had so far assumed the ".2" of a 5mm plank would only end up being 1mm over the whole hull and probably not visible without close scrutiny, but adding the extra plank makes sense. Just a few additional questions; - I've seen a few guides that say to leave the garboard strake full width (except for where it needs to be shaped at the bow). I've heard the same for the first plank from the deck (in my case directly below the gun-port pattern), and the broad strake. Is that sound advice for reasons I don't understand yet, or is it just because they're generally bigger strakes on the real ships, and a lot of modellers are going for scale accuracy (which I'm OK to let slide for a first model)? Either way, if no tapering should occur on those planks, does it make sense to lay those 2 or 3 planks first, then take all the measurements? - I've also seen a few log's / guides (even a comment from SpyGlass above) mention that "tapering the planks too early" caused them issues. So how do you determine what point is the correct one to start the taper? Finally; - Would I be correct in assuming that "Not letting the garboard / broad strake run too high" isn't in the tapering or narrowing, but in the positioning of the plank, (basically the difference between the 2 pictures below)? Below: Run up too high (after being shaped at the bow) Below: Closer to correct (after being shaped) Cheers for the replies, you've all been extremely helpful. Mango.
- 20 replies
-
- 3
-
-
- Planking
- Lining out
- (and 2 more)
-
The first layer is 1mm x 5mm Limewood, the second is 1x4mm Walnut Cheers, Mango.
- 20 replies
-
- 1
-
-
- Planking
- Lining out
- (and 2 more)
-
Hi SpyGlass, Cheers for the advice. You mentioned in your quote above. "You should not need to narrow strips at the stern but you will almost certainly need stealers". This really is the bit that I got stuck on, how much to taper from mid-ship to stern. As I've mentioned in a post above, midship to bow seems a bit more straight forward as each bulkhead gets progressively smaller towards the bow. As it widens towards the stern, you would assume no tapering needed, but the instructions / videos I've seen, one specifically for the Lady Nelson I might add, has the modeller tapering both ends of the plank. Just want to make sure I'm able to achieve a consistent width between planks at the bow, midship and stern. as opposed to having a bunch of planks growing and shrinking causing a 'wave' effect along the hull. You also mentioned "the first planking does not have to be perfect". Totally agree, I know it will not be perfect, I'm sure wood filler is going to be doing some heavy lifting at one point or another. Just want to achieve some precision so I don't end up with a clinky warped hull that I have to unglue or fight for all of the second planking. As for "terminating some of the first planking strakes before the sternpost". I will more then likely have to do this. The plan so far is to just "feel this part out" - or bring them to the end of the false keel and sand them back however much is necessary. I haven't glued on the sternpost yet (because of other peoples sound advice) so sanding back shouldn't be a challenge. Cheers for the help, all the advice is greatly appreciated. Wouldn't stand a chance at completing this without you lot. Cheers, Mango.
- 20 replies
-
- 1
-
-
- Planking
- Lining out
- (and 2 more)
-
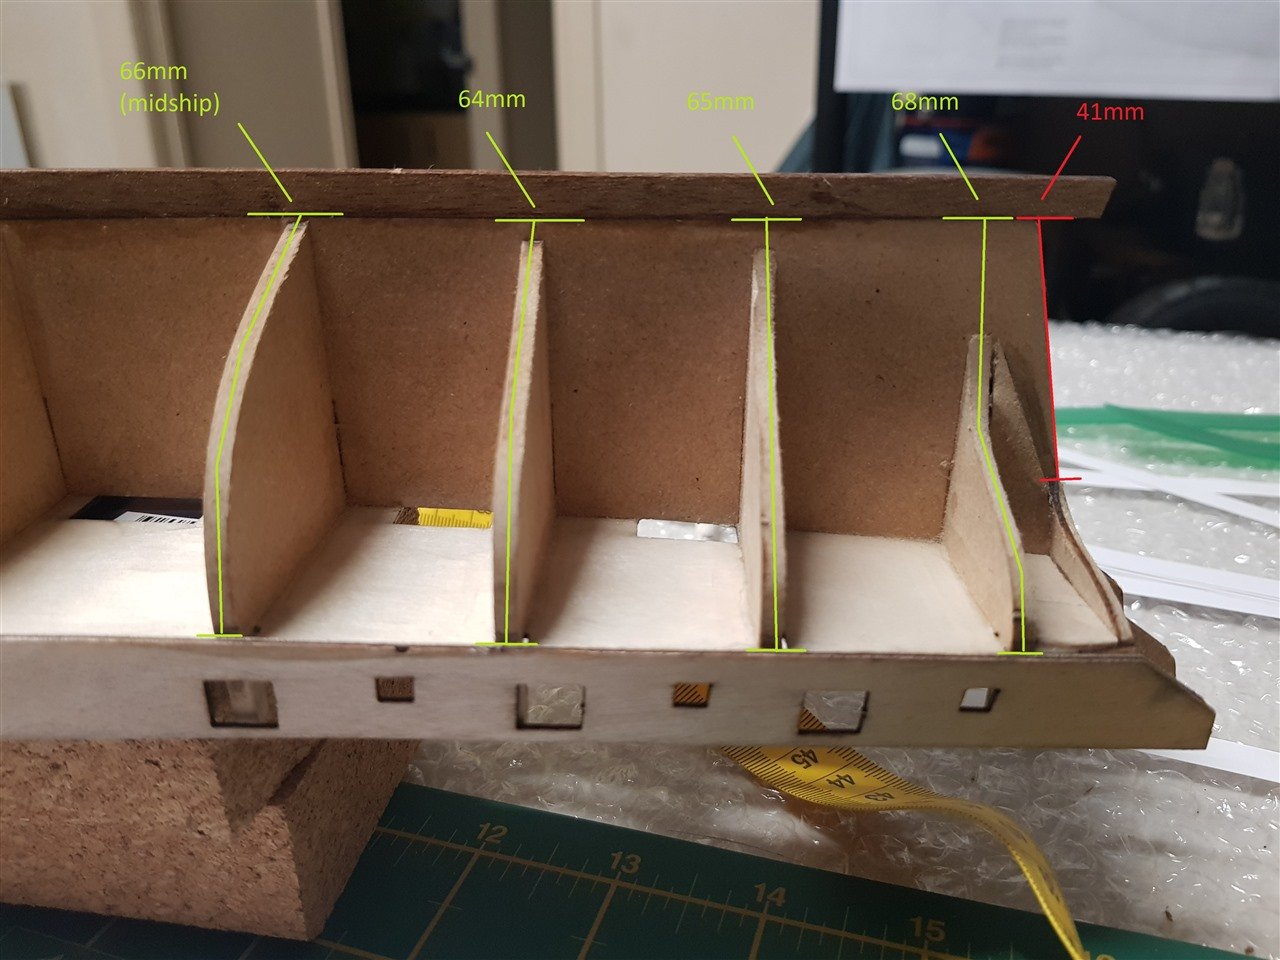
Hi Toni, Thank you for linking the log. I've read through the whole thing, the explanations of your method are a fantastic guide. The Lady Nelson is a double planked hull. As this is the first layer I don't think a butt shift pattern is necessary and might complicate the process a bit. I like the final result of the butt shift pattern so will consider that for the second layer ....if I'm ready for a "second layer of challenge" ha!. Just in regards to the last part of your comment "the aft ends of the other planks will need to be wider than at the midship area". This is where I'm struggling most. - The planks supplied in my kit are 5mm. The midship is 66mm, therefore requires 13.2 (5mm) planks. - The transom counter bulkhead measurement (the red measurement from before, when measured like the other bulkheads) is 77mm. So 15.4 (5mm) planks. (thus the need for stealers). Just for reference, from the midship bulkhead, back towards the transom counter bulkhead, my measurements are: 66mm, 62mm, 60mm, 68mm, 77mm. This isn't causing me an issue when considering the width of the planks from midship to bow, because every bulkhead measurement is smaller then the last, indicating that its just going to be a gradual taper from midship to bow. (Just a note here; if someone could tell me which measurement to divide by 13.2 (planks) to determine the taper from midship to stern, and how you came to that conclusion, that's probably all I need to get moving. Currently I'm thinking of using the 60mm measurement divided by 13.2. Logically, that would allow my 13 planks to fully cover the 2 midship bulkheads, then next 2 bulkheads towards the stern, before the planks start to sperate out again and require stealers). Otherwise: Those measurements make it seem like my plank (at midship) starts at the full 5mm width, begins to taper for the next 2 bulkheads, then returns to its full 5mm width, with stealers needed at the sternpost. It leaves me with these questions: Should the aft end of all the planks be the full 5mm width? OR Should I slightly taper the planks (using the 60mm measurement divided by my 13.2 planks so the strakes don't shrink then widen again), then add stealers when it becomes necessary? OR Should the planks at midship not be the full 5mm? After reading your half hull thread (which I'm going to read again). I'm thinking my best course of action is; - Lay the first 4 planks from the false deck down. From midship to transom, use the 60mm bulkhead measurement, divided by 13.2 planks (gives me 4.5mm), so taper .5mm off each plank from midship towards the stern. - Lay the garboard plank (which I will leave the full 5mm except for where it terminates at the bow). - Lay the broad strake (also full 5mm width) - Re-measure the un-planked gap at mid ship, taper the planks to whatever measurement necessary towards the bow. Still only taking of .5mm from midship to stern. -Check to make sure I'm not getting a "Smiley face" at the bow, and if I am, cut away the curvature so that the next strake has a horizontal line to follow. -Allow planks at the deadwood section to lay naturally, eventually filling those gaps with stealers. Sorry for the long-post. I hope this was coherent. I know there is an element of "Get in there and learn by doing". I thought planking was going to math, starting to realise its art. Very much appreciate the input from all of you. Cheers, Mango.
- 20 replies
-
- 3
-
-
- Planking
- Lining out
- (and 2 more)
-
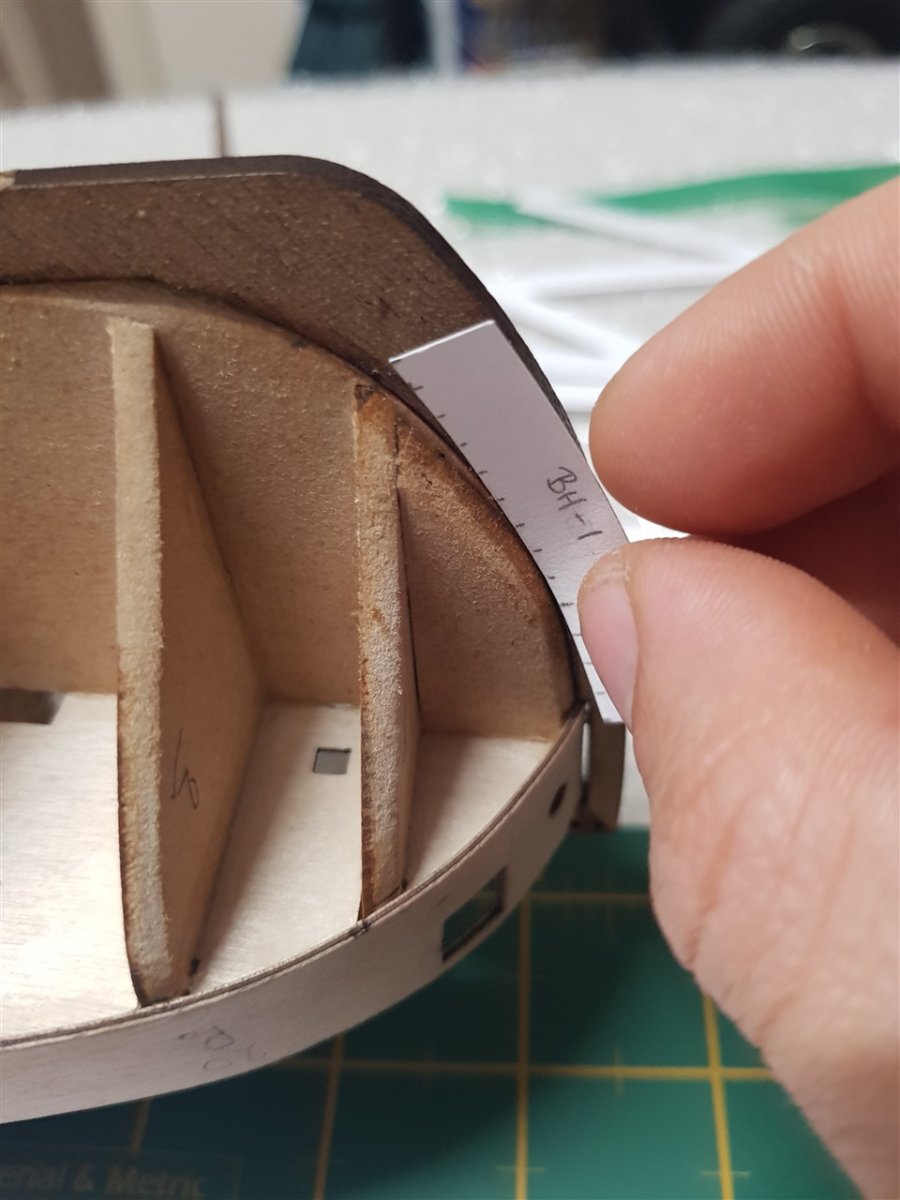
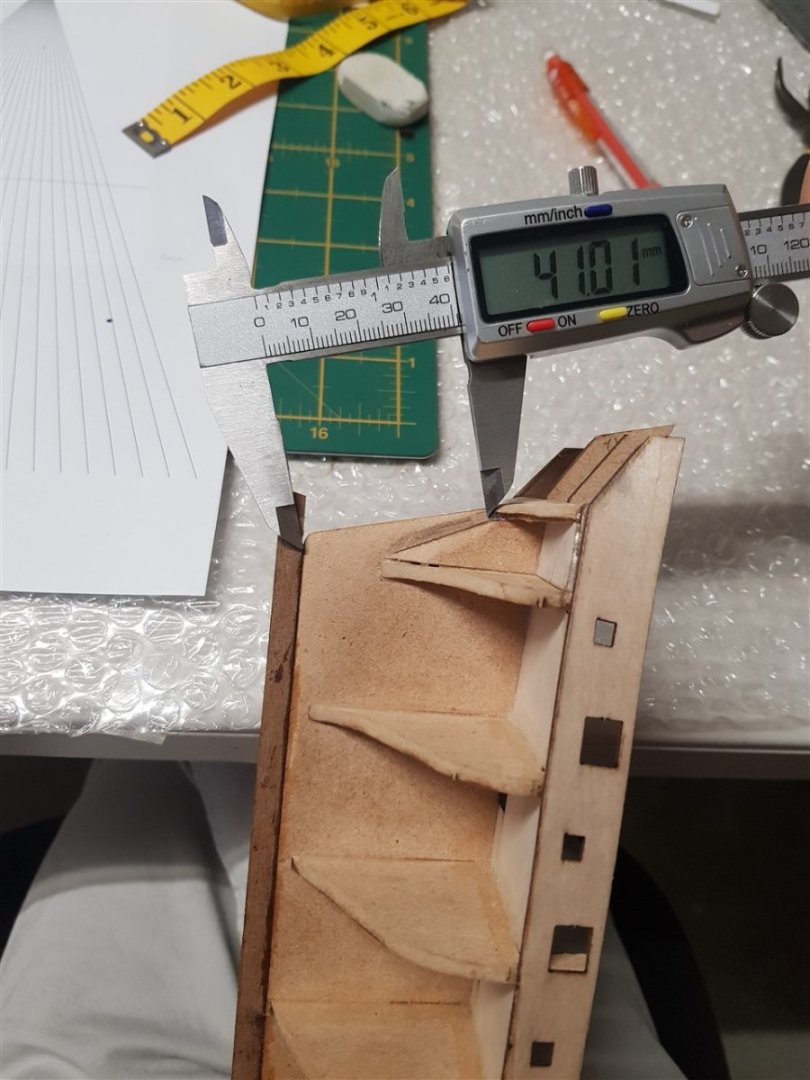
Just to add some context, These are the MSW videos measurements (and all within 1mm of my own measurements) That final measurement in red is throwing me off. First, I'm not understanding why suddenly we are not measuring the bulkhead under where the red measurement stops. The rule changed without explanation. Second, if I'm dividing 41mm by 13.2 planks (3.1mm) to form my taper at the stern, wouldn't that create too much of a taper at the second last (68mm) bulkhead, which will already need stealers. Additionally, how does it account for the area not measured on the final (red measurement) bulkhead? Still struggling to wrap my head around the end result, tried counting the planks in other peoples build logs to get more of an idea but the pics are either too poor a quality or the stealers throw a spanner in the works. I'd prefer to understand this as correctly as possible before proceeding, I don't want to have to "unglue" a bunch of planks, and risk swelling the false keel when I finally figure out the piece of the puzzle I'm missing. Cheers for the comments so far, still not getting it. Mango.

- 20 replies
-
- 2
-
-
- Planking
- Lining out
- (and 2 more)
-
I get that, so that would mean if at midship I need 13 planks, then bulkhead 2 may only need 11 or 12, because the garboard plank (and possibly next plank up) will terminate before bulkhead 2? right?
- 20 replies
-
- 1
-
-
- Planking
- Lining out
- (and 2 more)
-
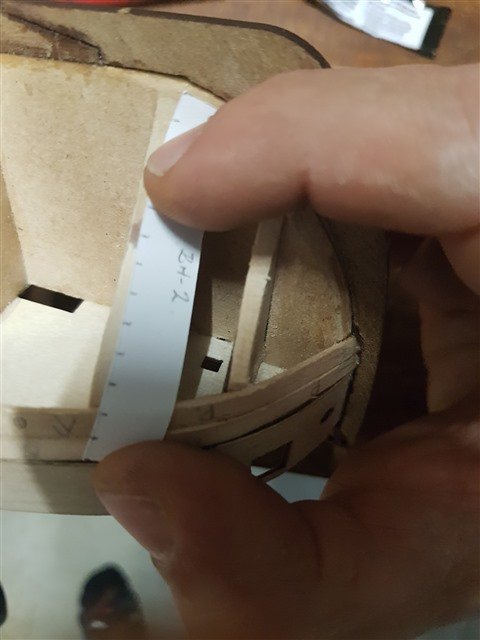
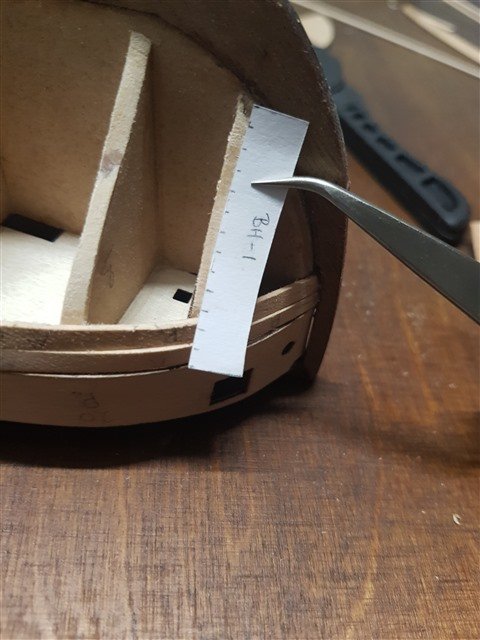
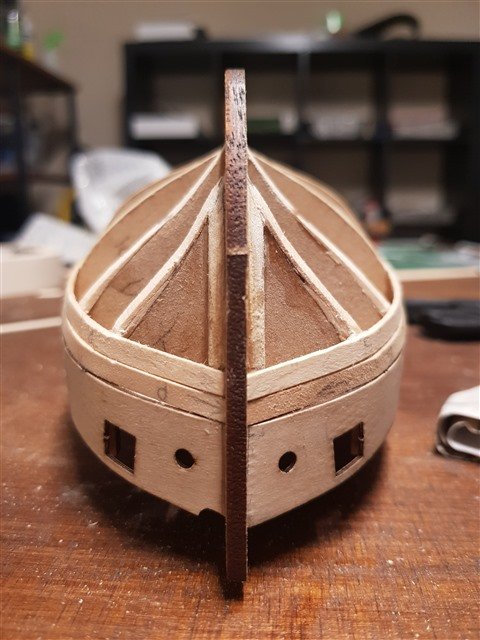
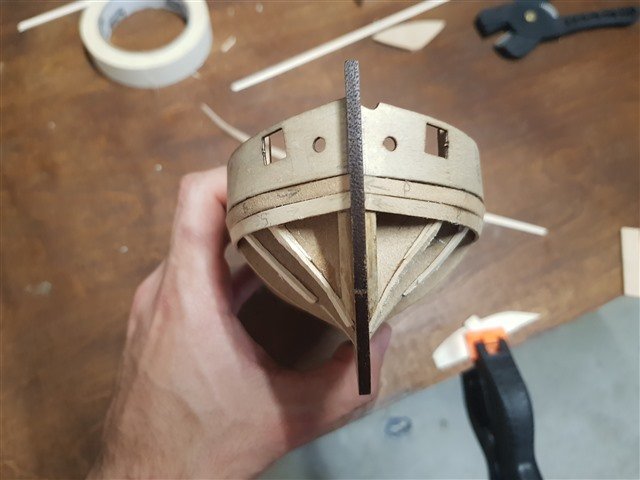
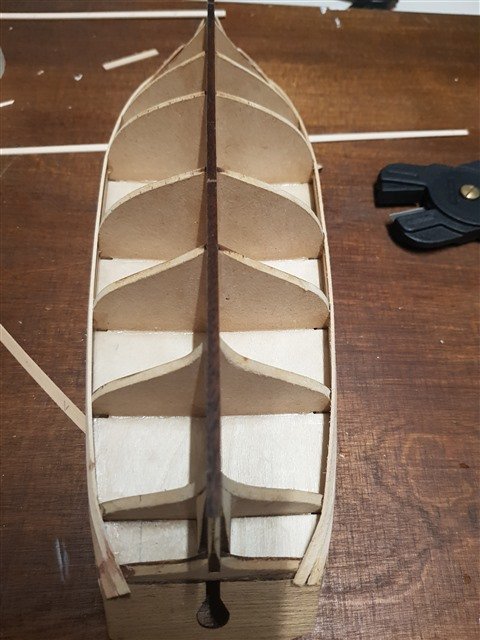
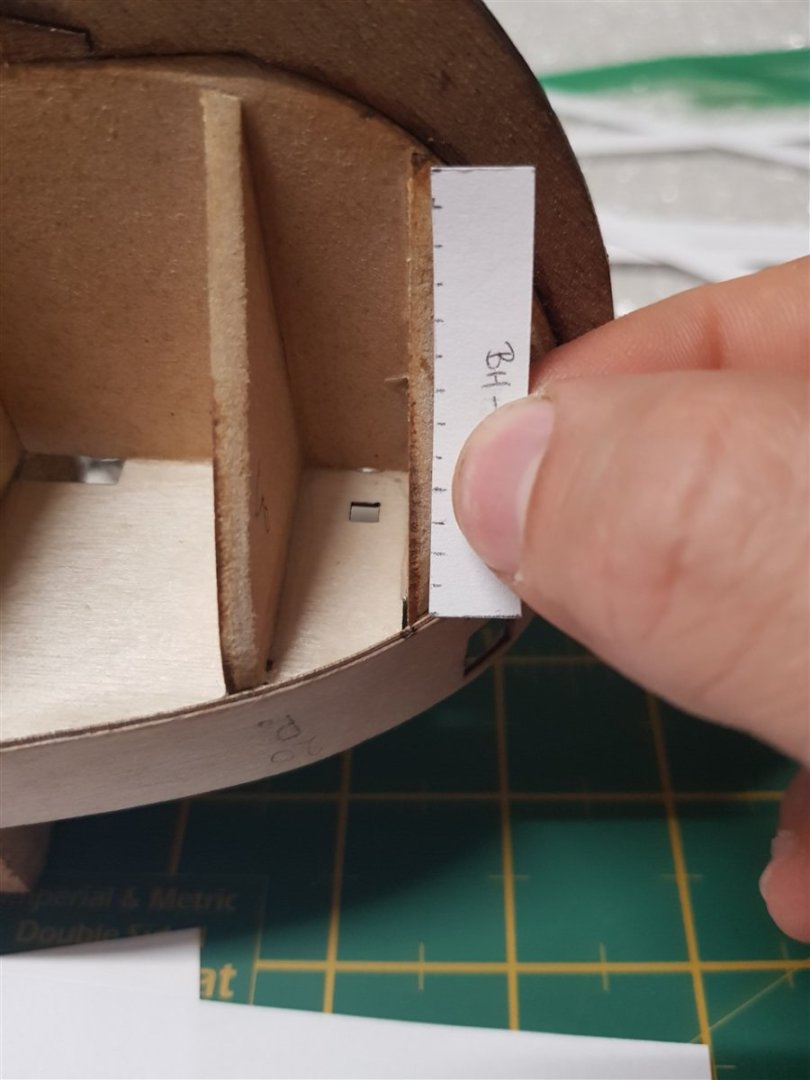
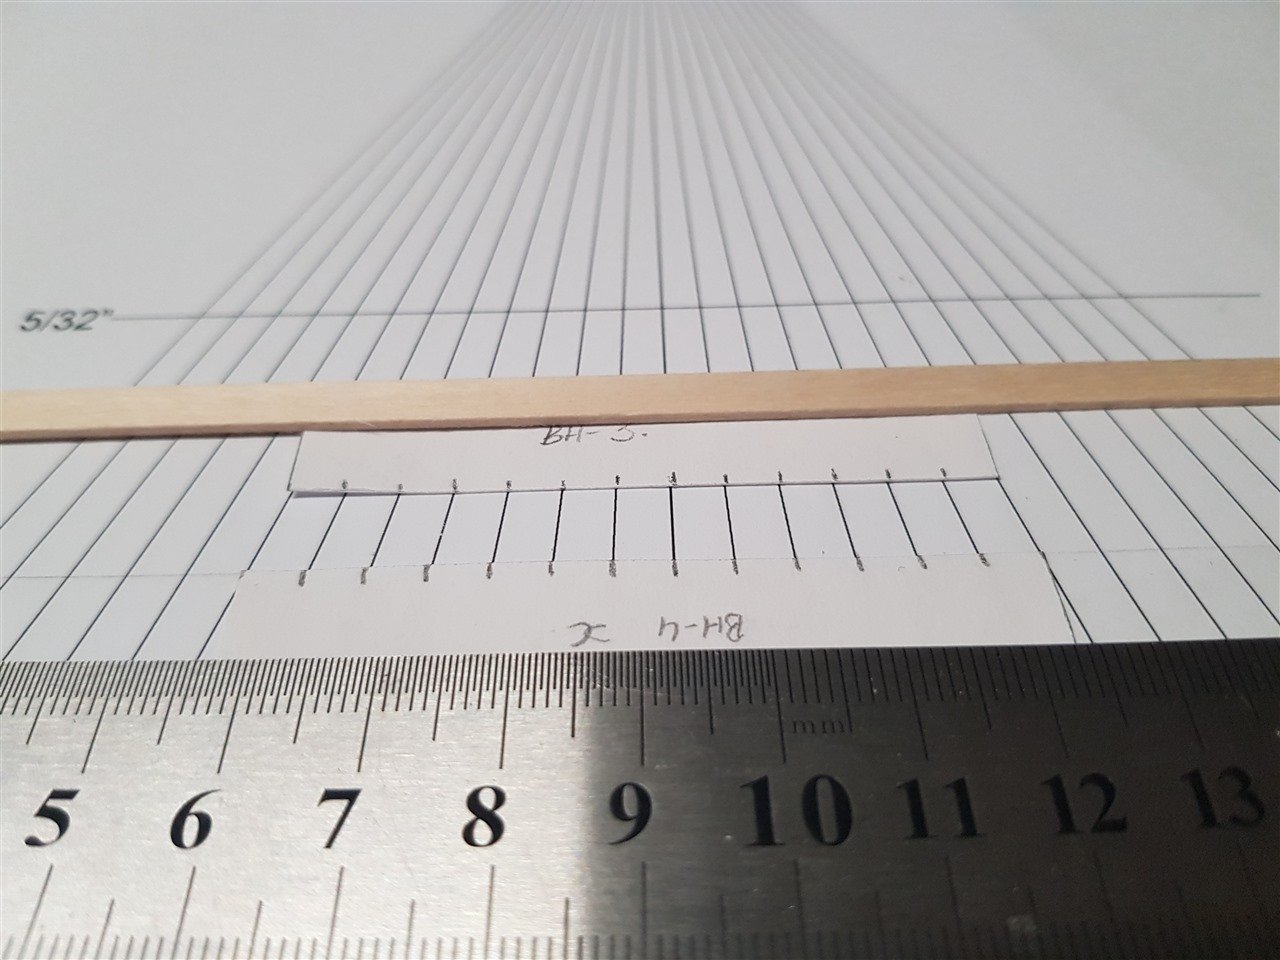
Hi all, I'm about to start first planking on my first model, the HMS lady nelson. I'm a bit stuck on a few points, I've been reading and watching a bunch of material, but everything I learn seems to add another question. So first, I know I will need 13.2 planks at midship. I measured all the other bulkheads, cut out some strips of paper to their sizes and laid them on the planking fan (pictured below) so that 13 planks fit into them, then marked them off. (ruler and plank was just to hold down the strips while I took the picture). Is this how the planking fan should be used or did I miss something entirely? What is the significance of 5/32" ? After completing all these strips I noticed something was wrong with the stern measurements. I re-watched the Modellers Shipyard video. On this final bulkhead the guy got "41mm" (without showing you where he measured between). All the other bulkheads are measured from the base of the gun port pattern to the base of the false keel. I measured from the base of the false keel up 41mm at landed the lower part of the bulkhead, pictured below (so I guess this is the measurement the MSY guy got). I'm not sure why he didn't also measure the bulkhead. I'm missing something about how this area is divided/lined off. (I measured with the seamstress tape in the background, just used the callipers for the photo) How do you account for the rest of the final bulkhead / tick it off correctly? If I'm tapering down from midship (full plank width) to the widths required at the first and final bulkheads; are the measurements/tick strips for the bulkheads in-between just a guide for when you lay your plank? Finally, I created a trick strip for the forward most bulkhead (using the planking fan as I mentioned before). To mark off the bow termination pattern, do I transfer the marks to that first bulkhead (picture below), then use the same measurements for the termination pattern? (2nd picture below) I considered dividing the hull into bands, but its a small model and I haven't got my head around the finer points of that process either. (i.e. making sure the bands are in the right spot at both the bow and the stern). Plus, as this is my first ship, I currently have no spare planks laying around. Just an FYI, I'm new to modelling, new to woodwork, and new to ship terminology, so I'm learning at lot all at once here. Please be gentle, and I may have some follow up questions. Cheers, Mango.


- 20 replies
-
- 3
-
-
- Planking
- Lining out
- (and 2 more)
-
MangoFox reacted to a post in a topic:
Question about the planking
-
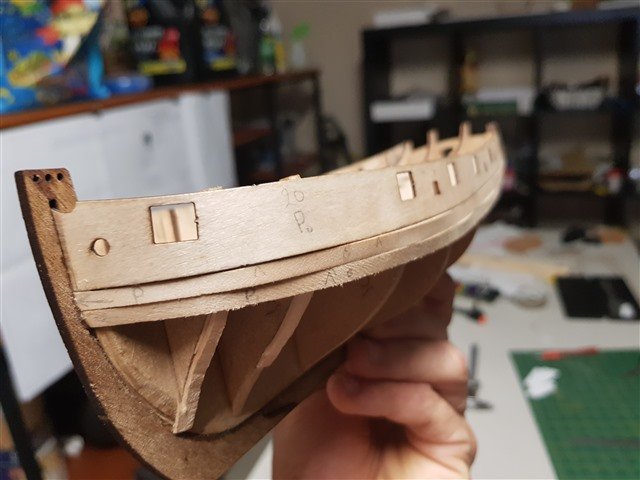
HI all, So I'm about to start the first planking, but considering some of the challenges I've had on what appears to be the easier stuff, I thought I would seek some advice on the below before committing to the process. 1) I do not have a rabbet all the way down the false keel. The instructions never mentioned it, and the modellers shipyard guy didn't do one in the video guide. However he does briefly say "and we have a rabbet all the way down the keel" right before he starts explaining his planking technique. I just have my deadwood area at the stern sanded, and a touch of deadwood at the bow, pointed out in the MSY video guide sanded down. 2) My gun port patterns are not perfectly symmetrical. The instructions say to start the first plank right up against the bottom of the bulwarks, and the MSY guy plains down 2 planks at a time (port and starboard), I guess to maintain consistency. My thought on this one is I will have to just make one side at a time and my tick strips will be slightly different for each side. The difference isn't much but I know if I was to try to make 2 strakes at a time I will run into issues. 3) I've noticed in some build logs, some people stop the first planking shy of the stern deadwood area, others do not. Which is correct, which is easier for a beginner? 4) What are some other common issues I might run into that I might not be aware of. I'm planning on using Chucks bending technique as so many have suggested. Over the next few days I'll be sorting out an area to bend and any equipment I might need. I'll also be making a few tick strips and generally preparing as best as I can for the process. Tips/tricks/advice very welcome. Cheers, Mango.
- 17 replies
-
- 1
-
-
- first build
- Lady Nelson
- (and 2 more)
-
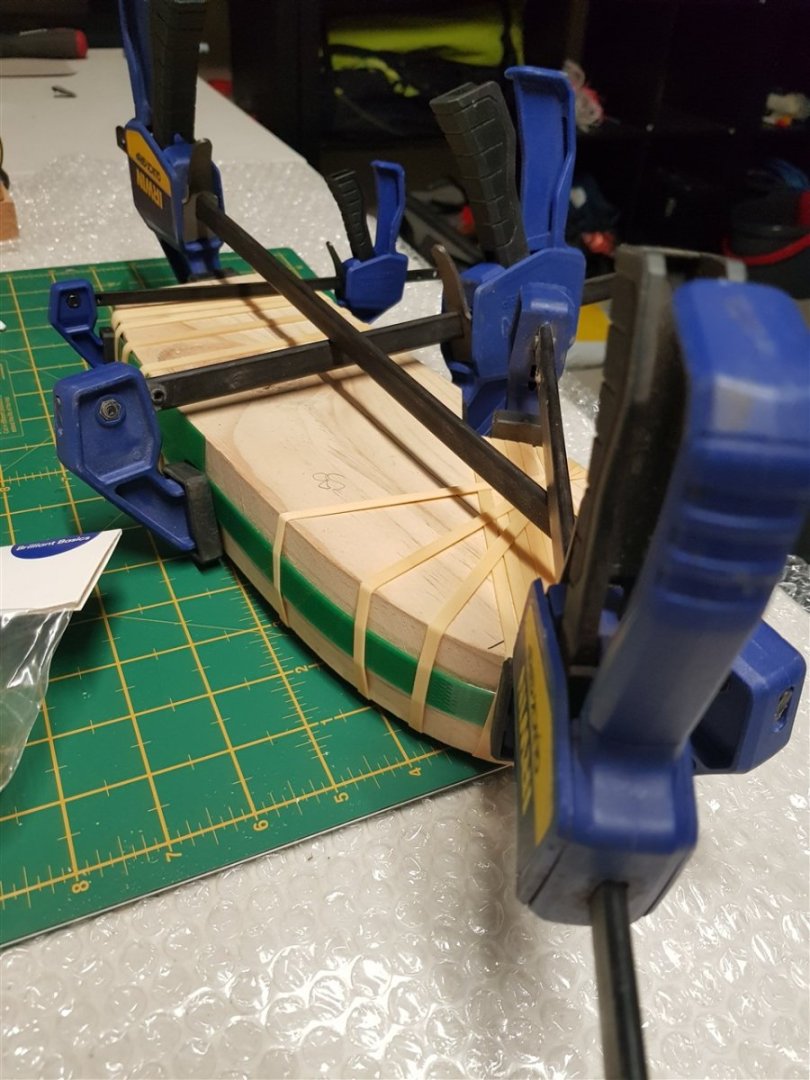
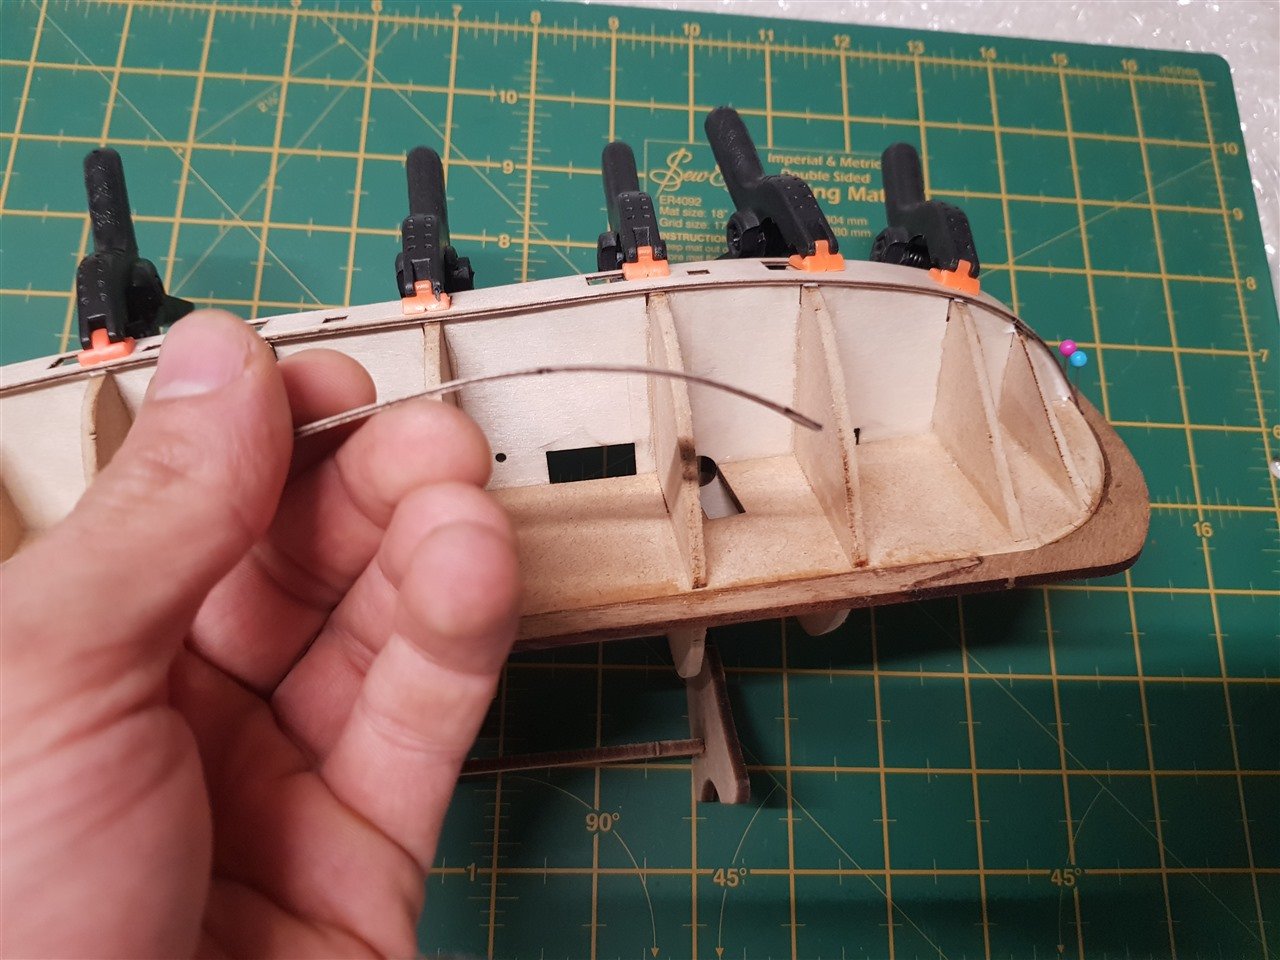
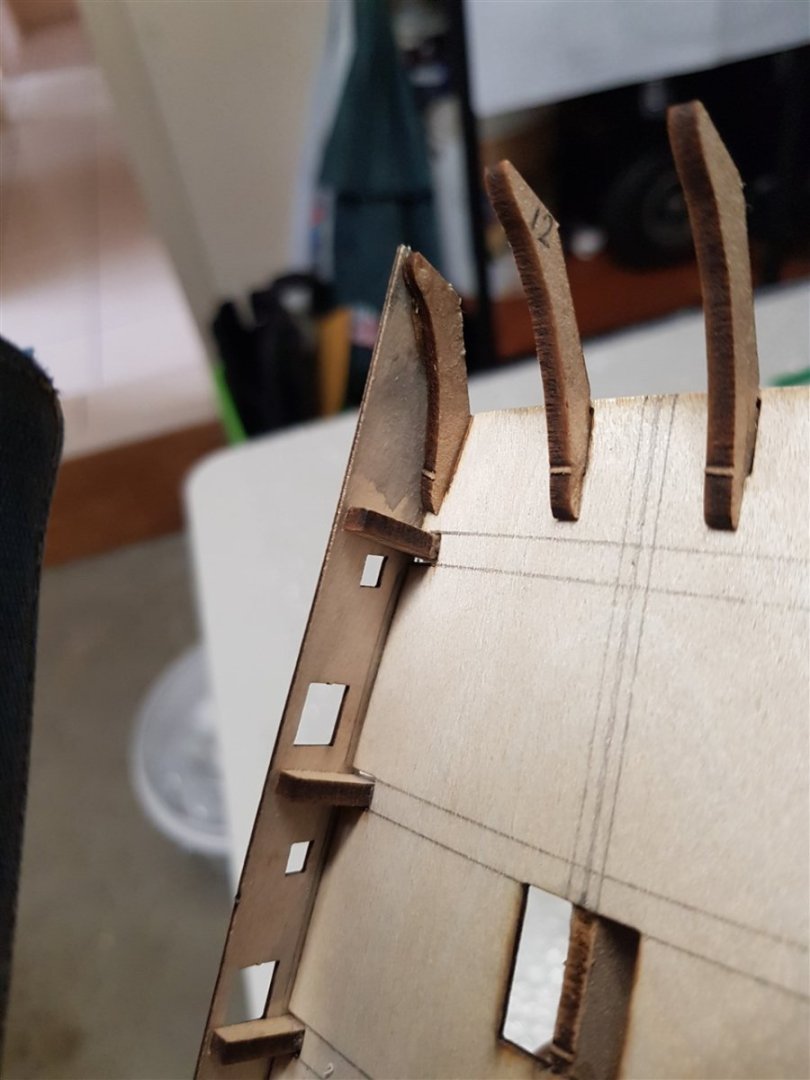
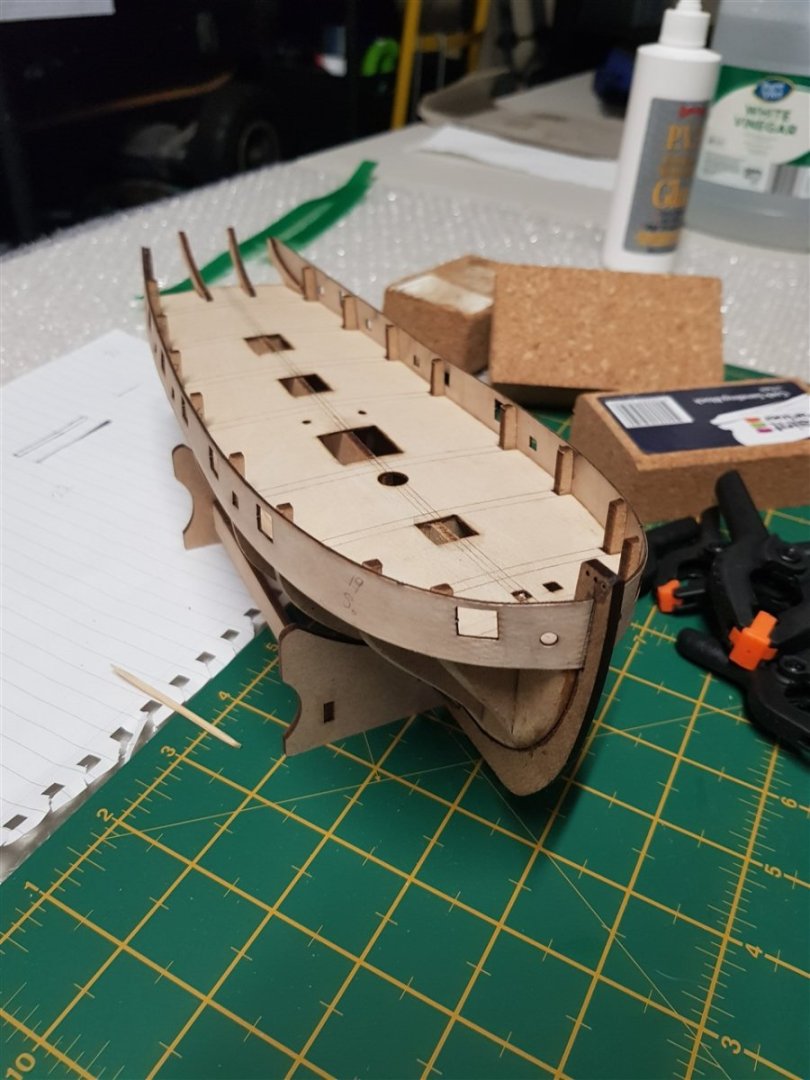
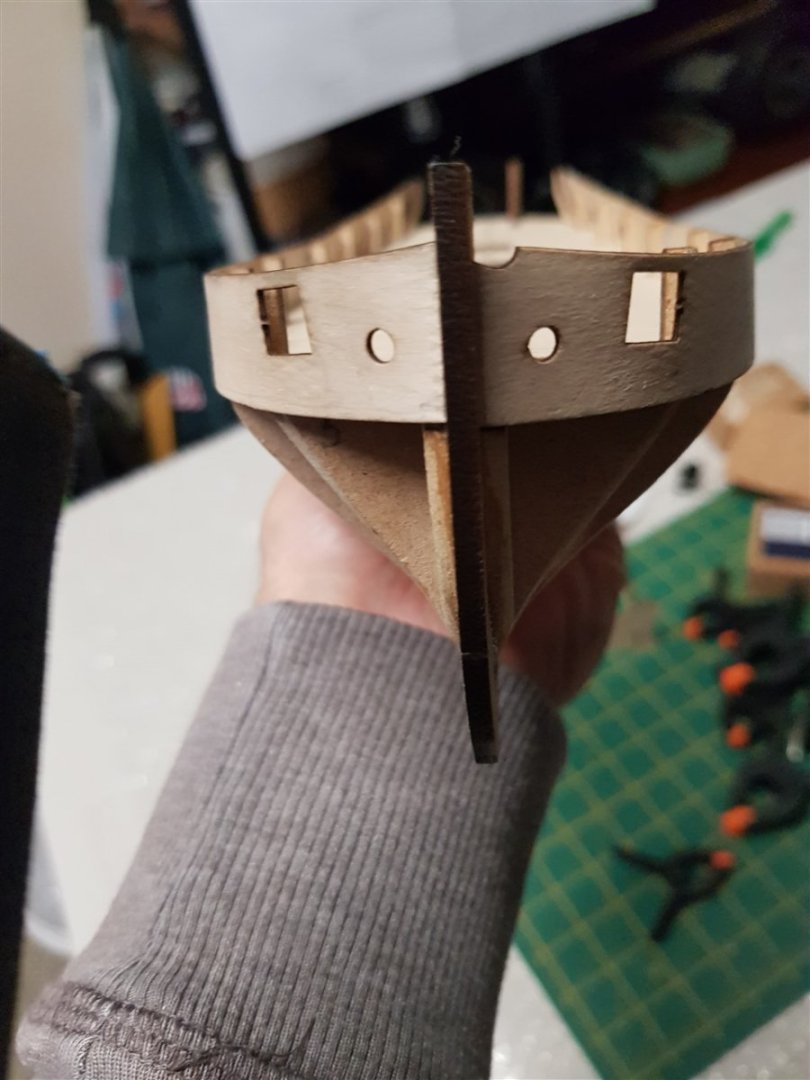
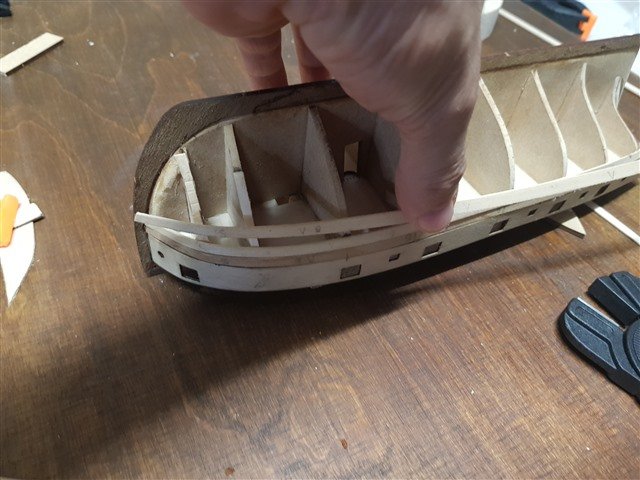
Hi all, I ended up reshaping the gun port patterns using a timber block cut into the shape of the false deck. I also used a plastic strip (the stuff they tie down boxes/pallets with) to keep it nice and evenly compressed. This was mainly to rectify those problematic kinks in the gun ports closest to the bow, a result of my last bending attempt. I'm pretty happy with the results. Then I applied the gun port patterns to the model. I personally found this quite difficult. None of the other build logs mention it being hard, in fact most people seem to breeze though it. But for me, aligning them into the slot in the prow equally, and having them stay there was a challenge (next time I will use a spare clamp at the tip of the prow to provide more surface area to hold them there. The map pins I used in the picture above worked, but were not ideal. Too much risk of splitting the prow). I ended up using a tiny bit of super glue at the bow, applied to the gun ports where they would slot into the prow, along the edge of the false deck and at the first bulkhead (part 2 on the plans). I then used regular PVA wood glue for the rest of the length so I would have more time to adjust any alignment issues. The main challenges I had here was only having a few appropriately sized clamps. I had to do one side at a time, making sure the other would line up and have space in the slotted area of the prow, but I had no way to hold them both in place at the same time to gauge the end result. Strategically using a limited number of clamps is not ideal so I will have to get some more. At the starboard transom, after the glue had finished curing, I noticed one of the bulwarks was too low, so I had to use white vinegar, a scalpel and quite a lot of patience to dissolve the glue back about 2 bulkheads and reposition it. This caused the MDF to expand and split, a bit like a sponge. A bit of wood glue and some hope got me through though. Below is the end result of that fiasco. Its sitting much better now, the first try was significantly lower. Not sure how I didn't notice the error, I did have a bull clip holding down that area though so I probably just couldn't see. Rookie mistake. I did notice that they are not perfectly aligned. Its most evident staring straight at the bow. Its close enough though and I don't feel like its out far enough out to warrant backpedalling. I feel this is something I can mask during planking. And now both gun ports are on, here is the Lady waiting for the next step, first planking. I honestly found this more difficult then I expected, which has me a bit worried about planking. I'm going to watch some more videos and read some more guides but in the next post I'm going to add some of my concerns about the process and would like any input you think may help. Cheers, Mango.