Cpt. Jack
-
Posts
27 -
Joined
-
Last visited
-
 Boerscht reacted to a post in a topic:
Polaris by Cpt. Jack - OcCre - 1:50 - first build
Boerscht reacted to a post in a topic:
Polaris by Cpt. Jack - OcCre - 1:50 - first build
-
Vlax reacted to a post in a topic:
Polaris by Cpt. Jack - OcCre - 1:50 - first build
-
Bill Saindon reacted to a post in a topic:
Polaris by Cpt. Jack - OcCre - 1:50 - first build
-
Mr Whippy reacted to a post in a topic:
Polaris by Cpt. Jack - OcCre - 1:50 - first build
-
Cbrand02 reacted to a post in a topic:
Polaris by Cpt. Jack - OcCre - 1:50 - first build
-
ibozev reacted to a post in a topic:
Polaris by Cpt. Jack - OcCre - 1:50 - first build
-
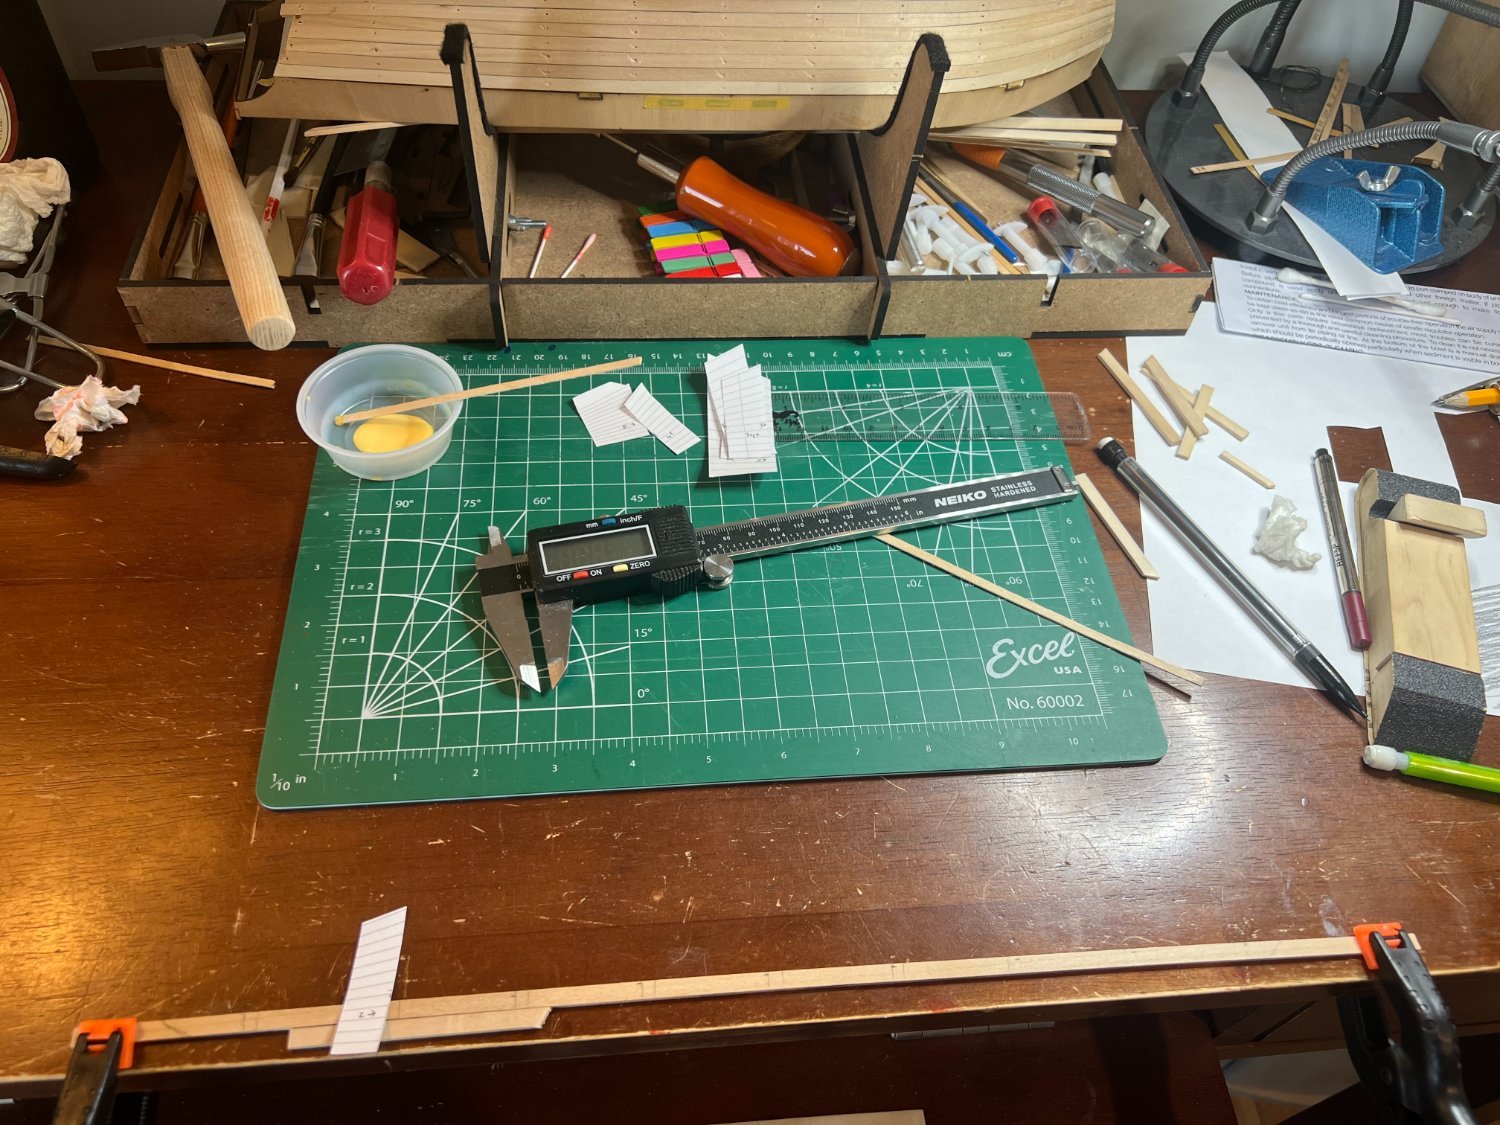
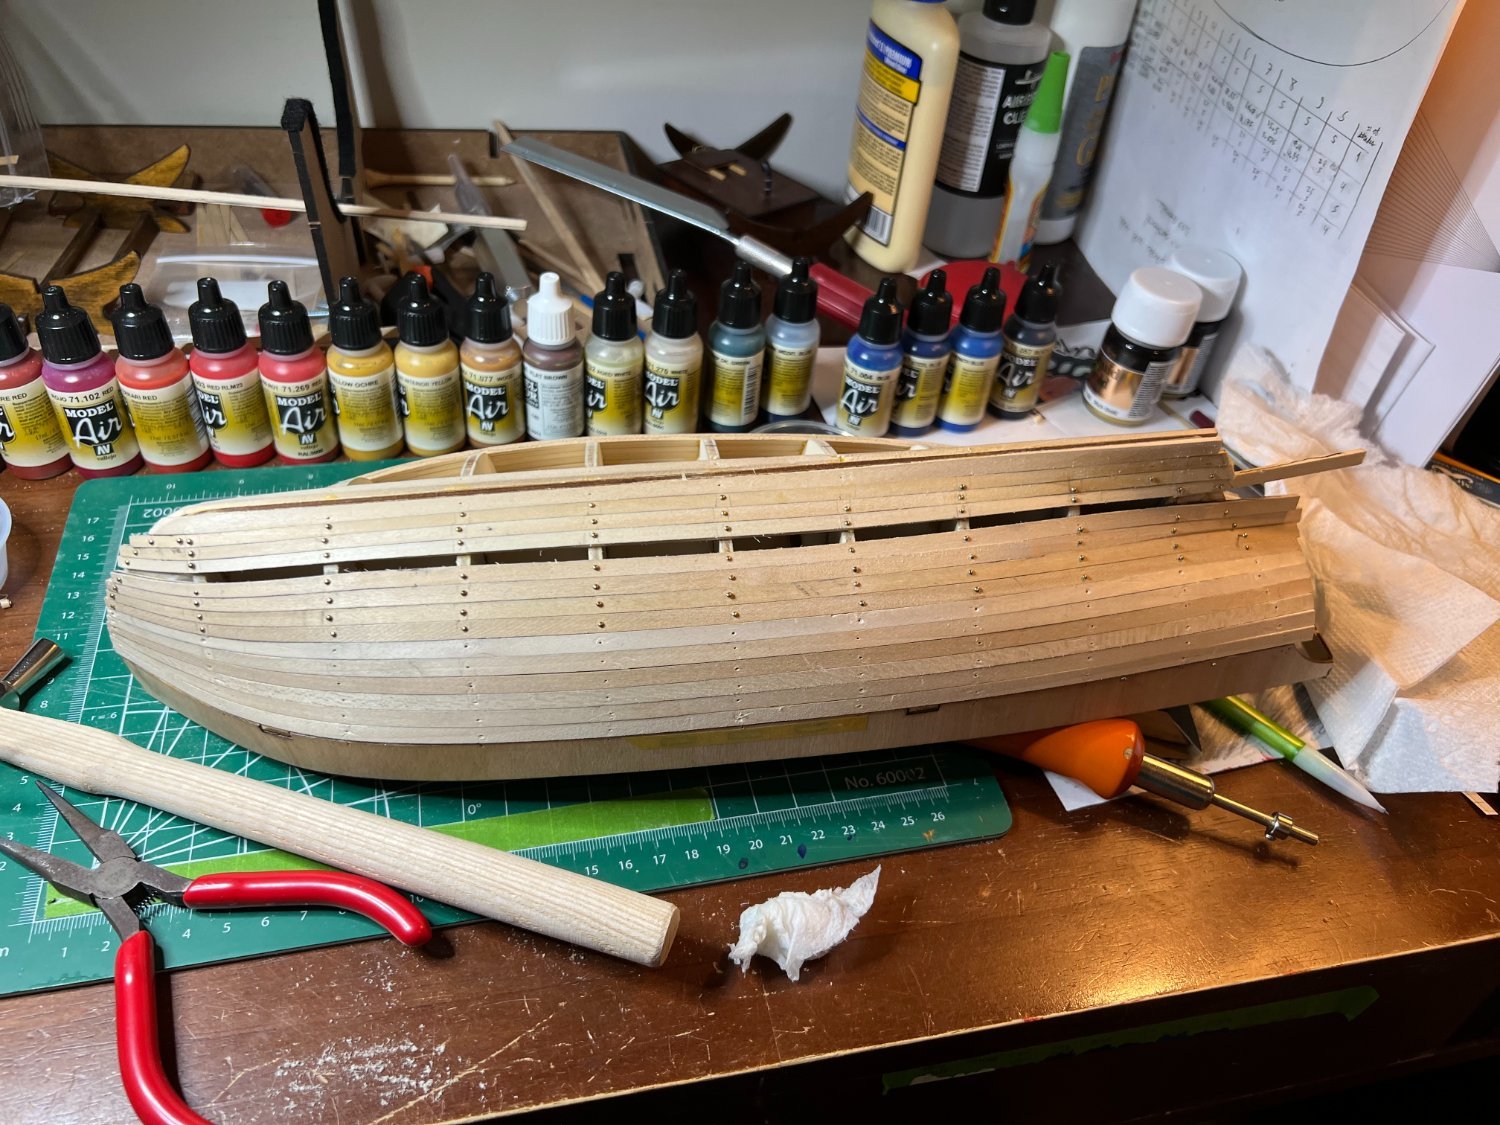
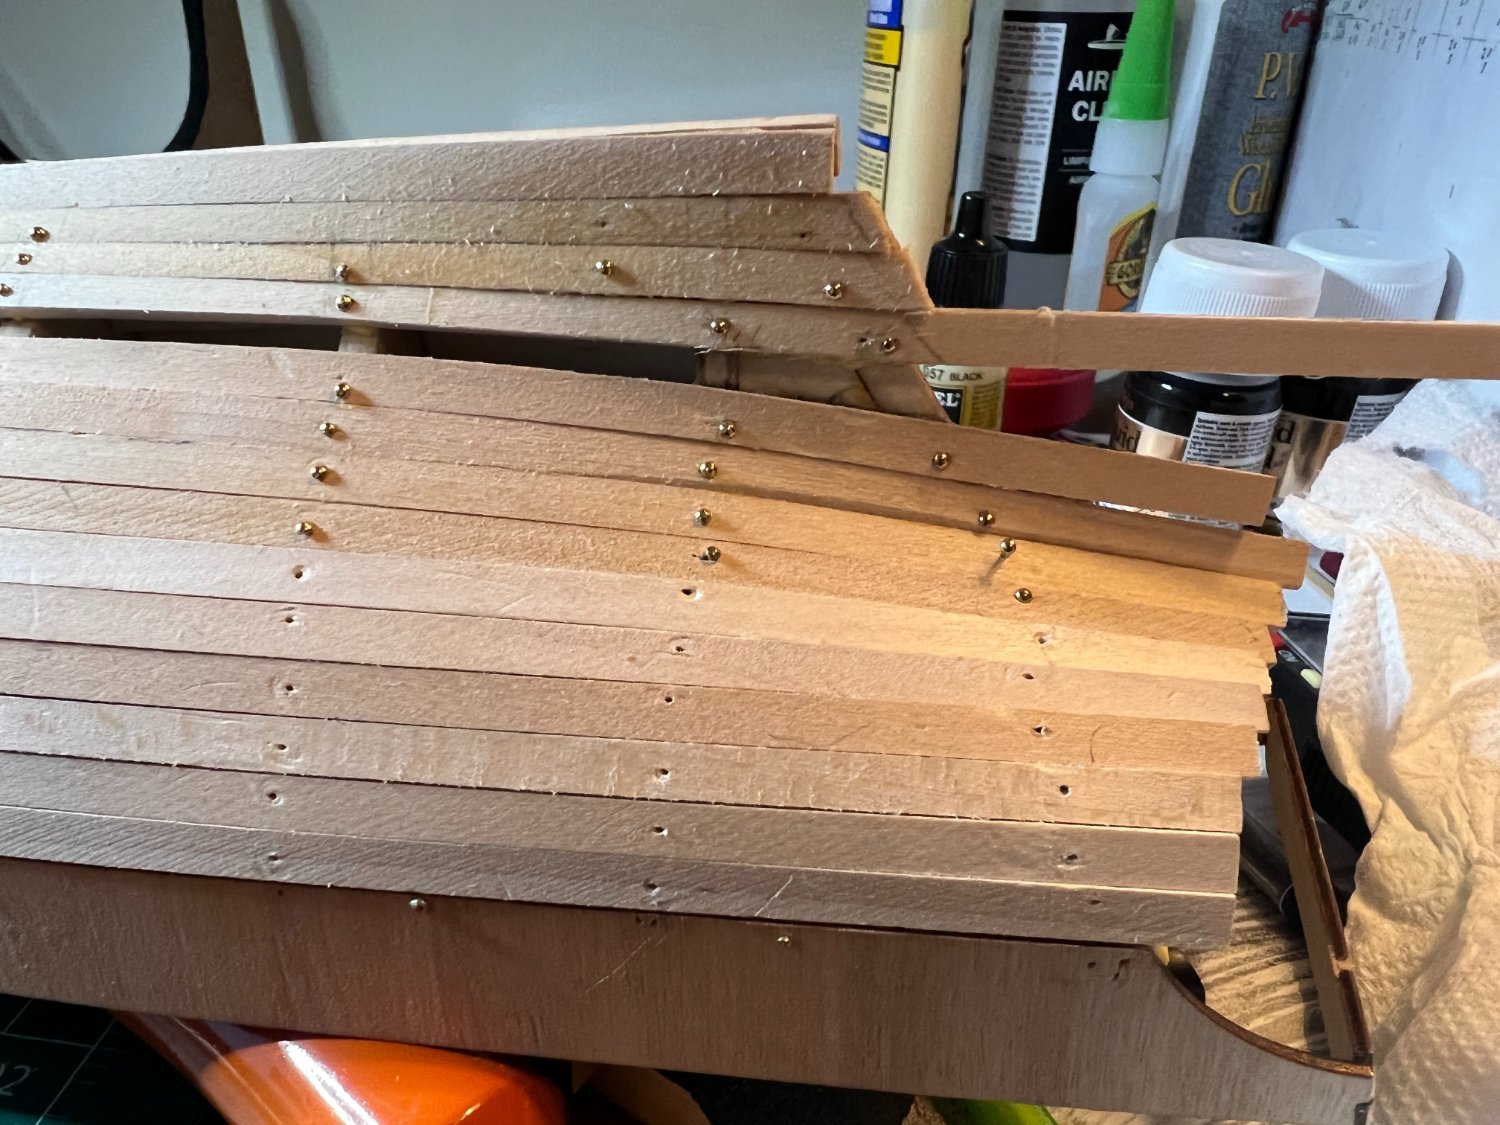
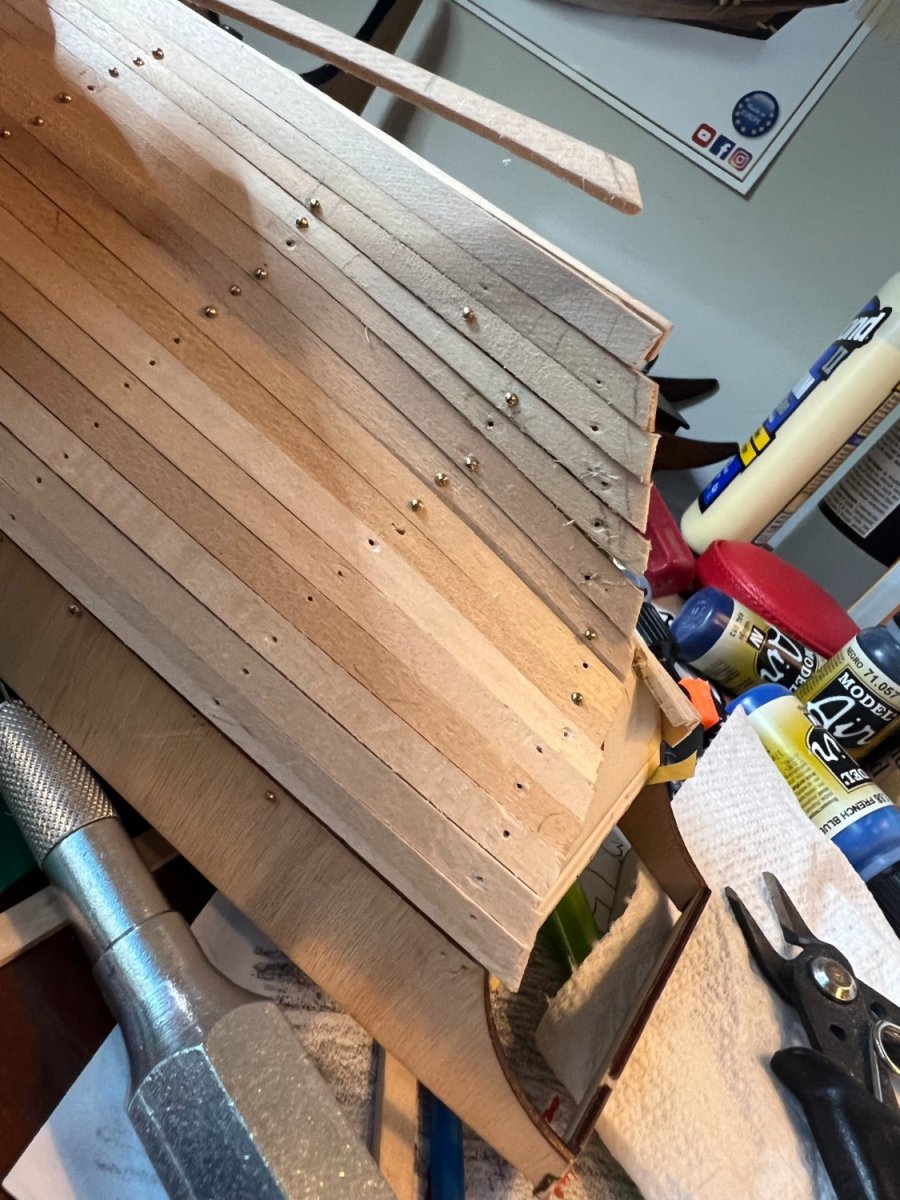
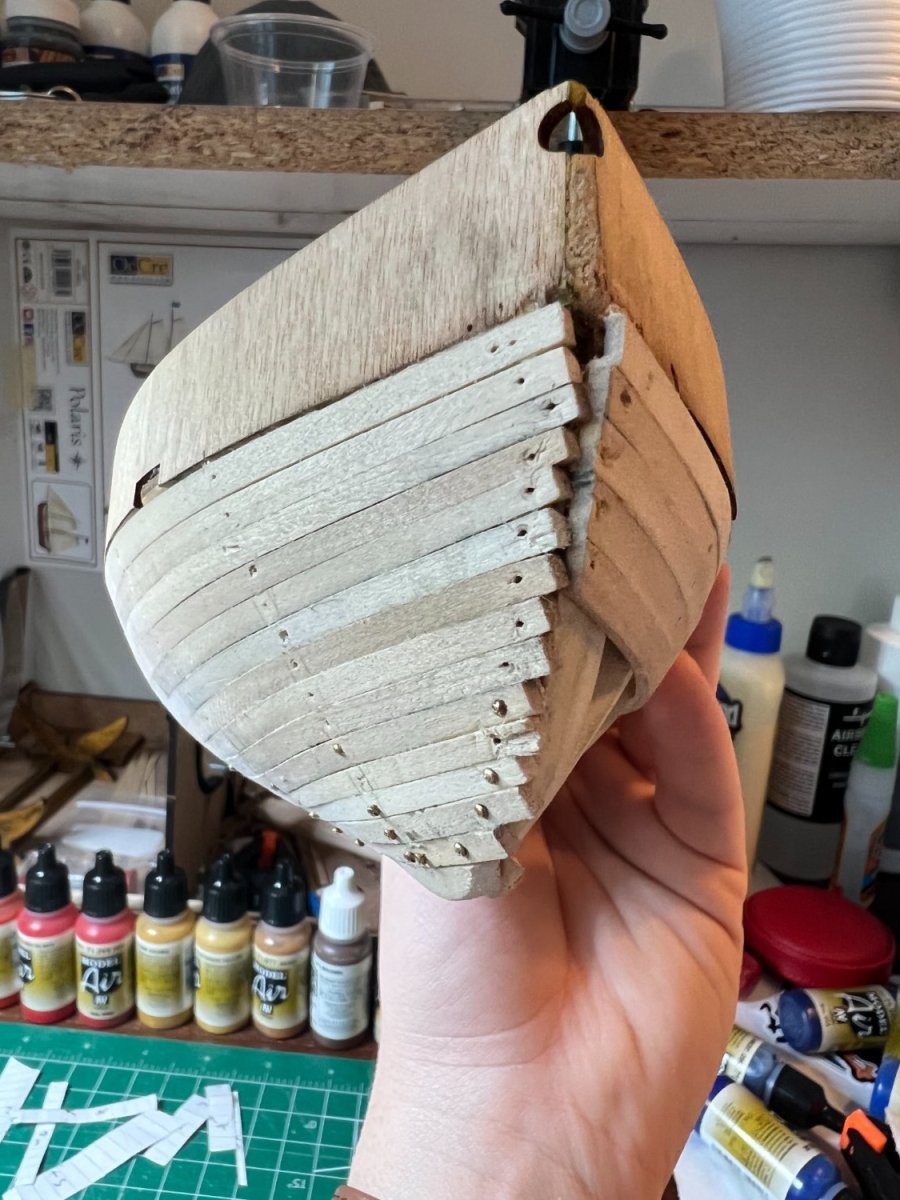
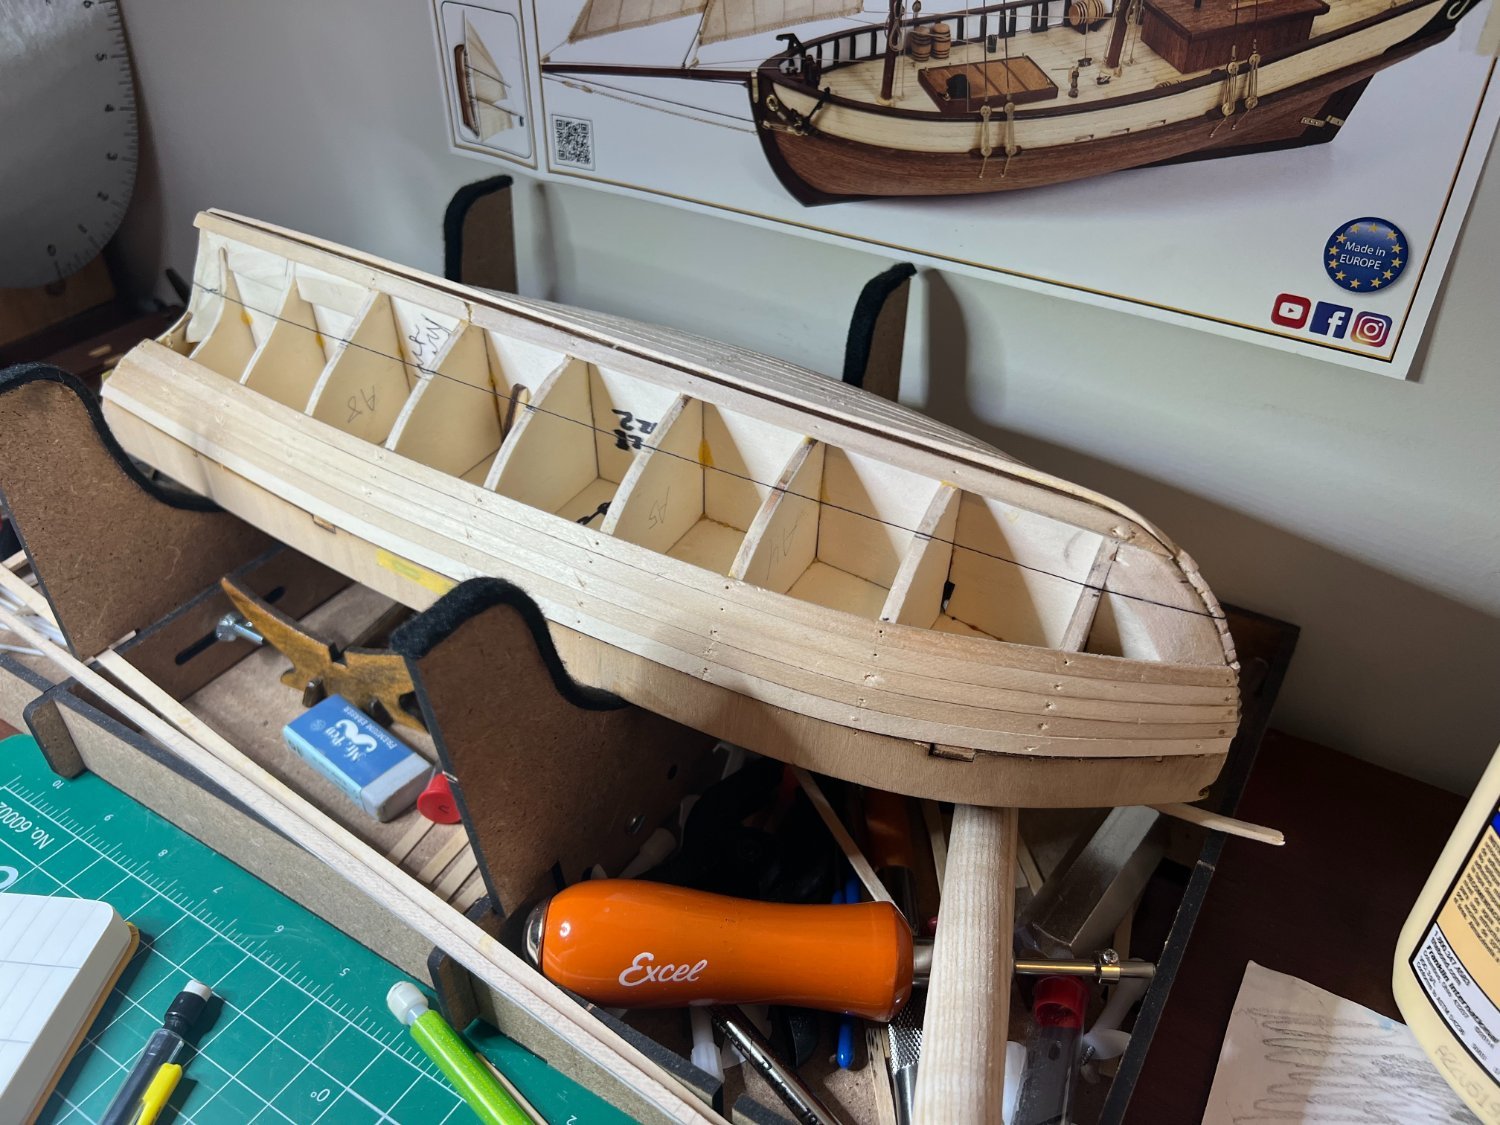
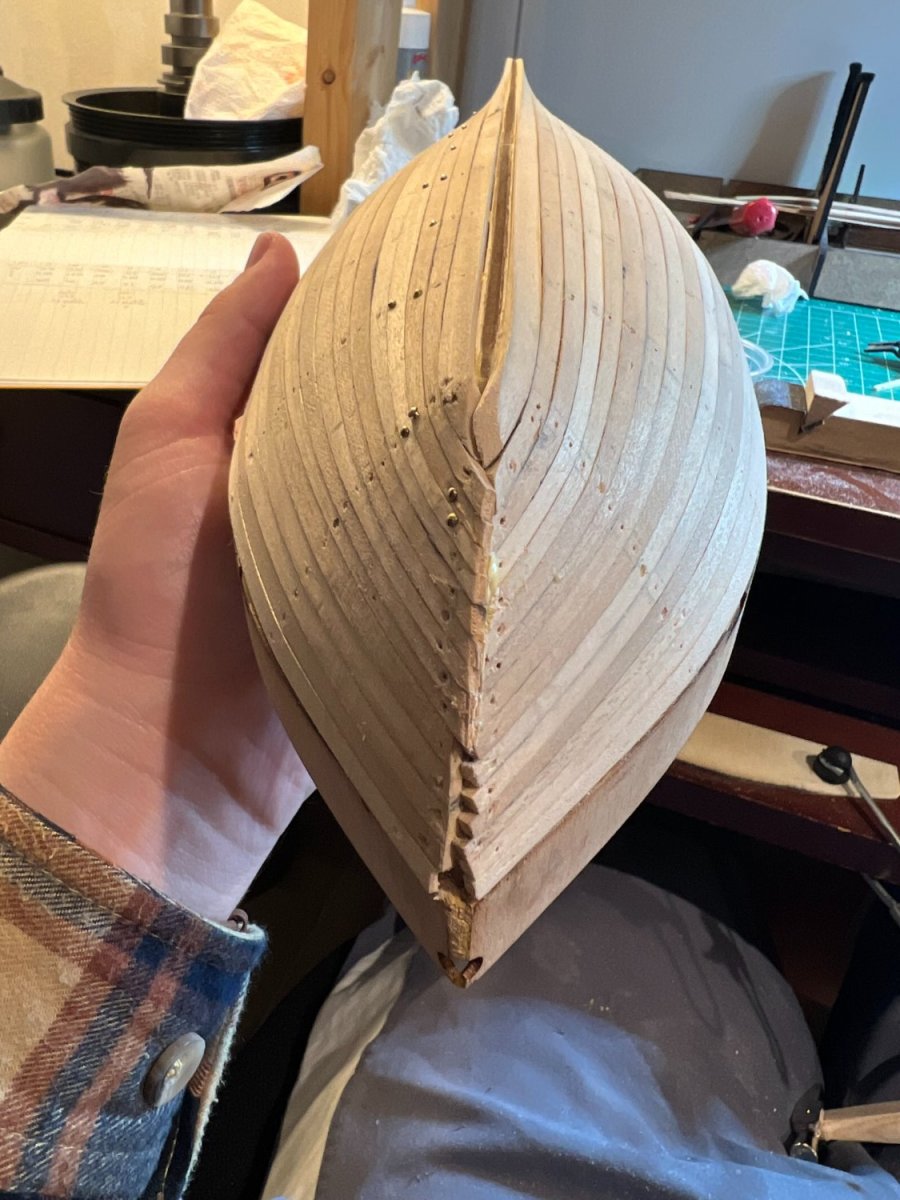
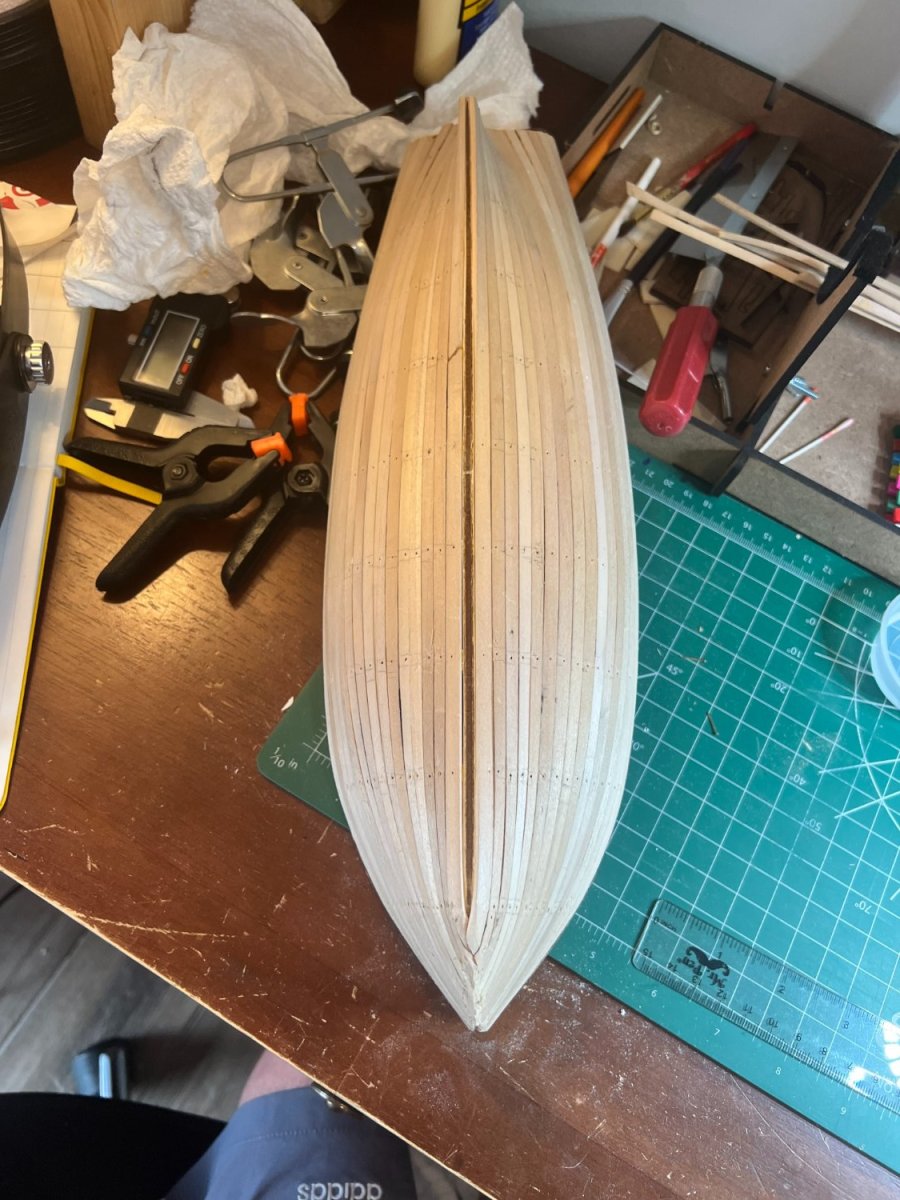
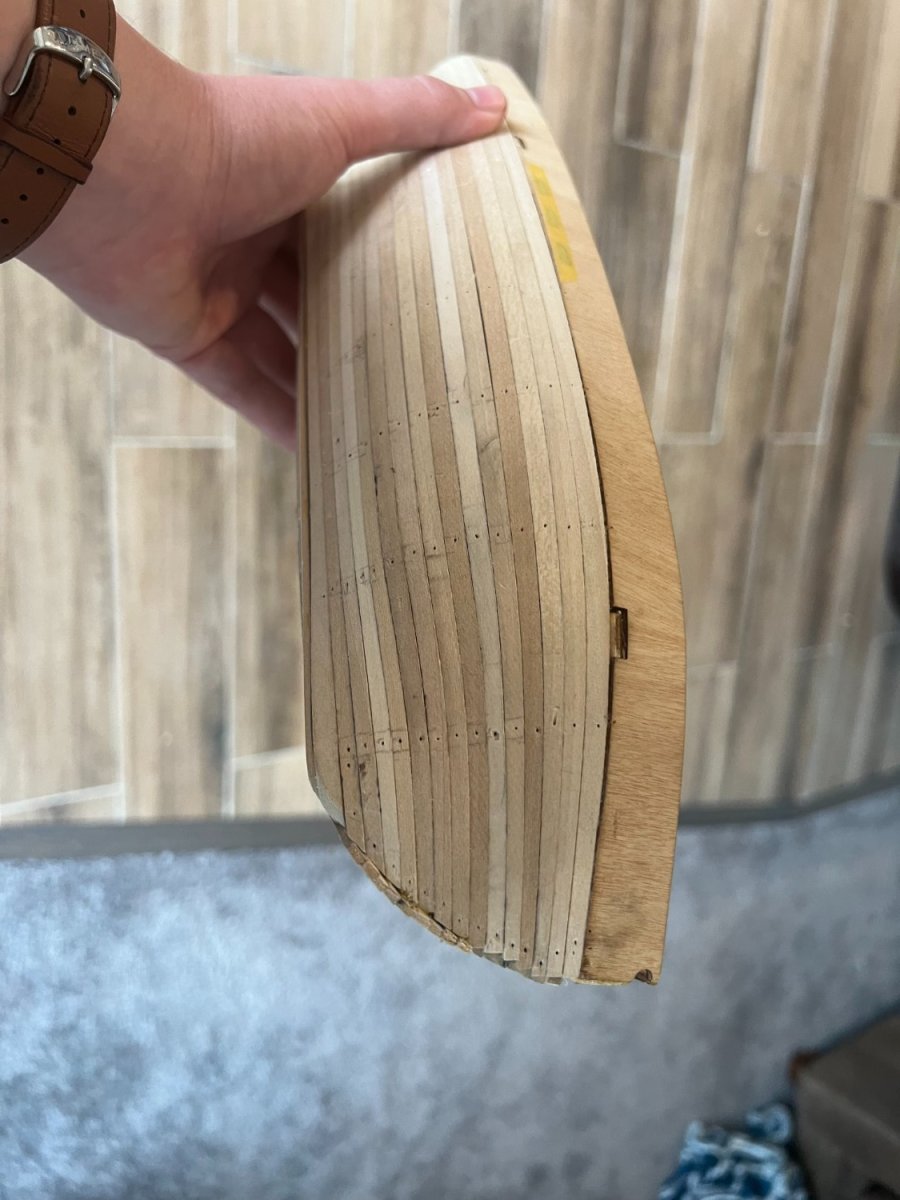
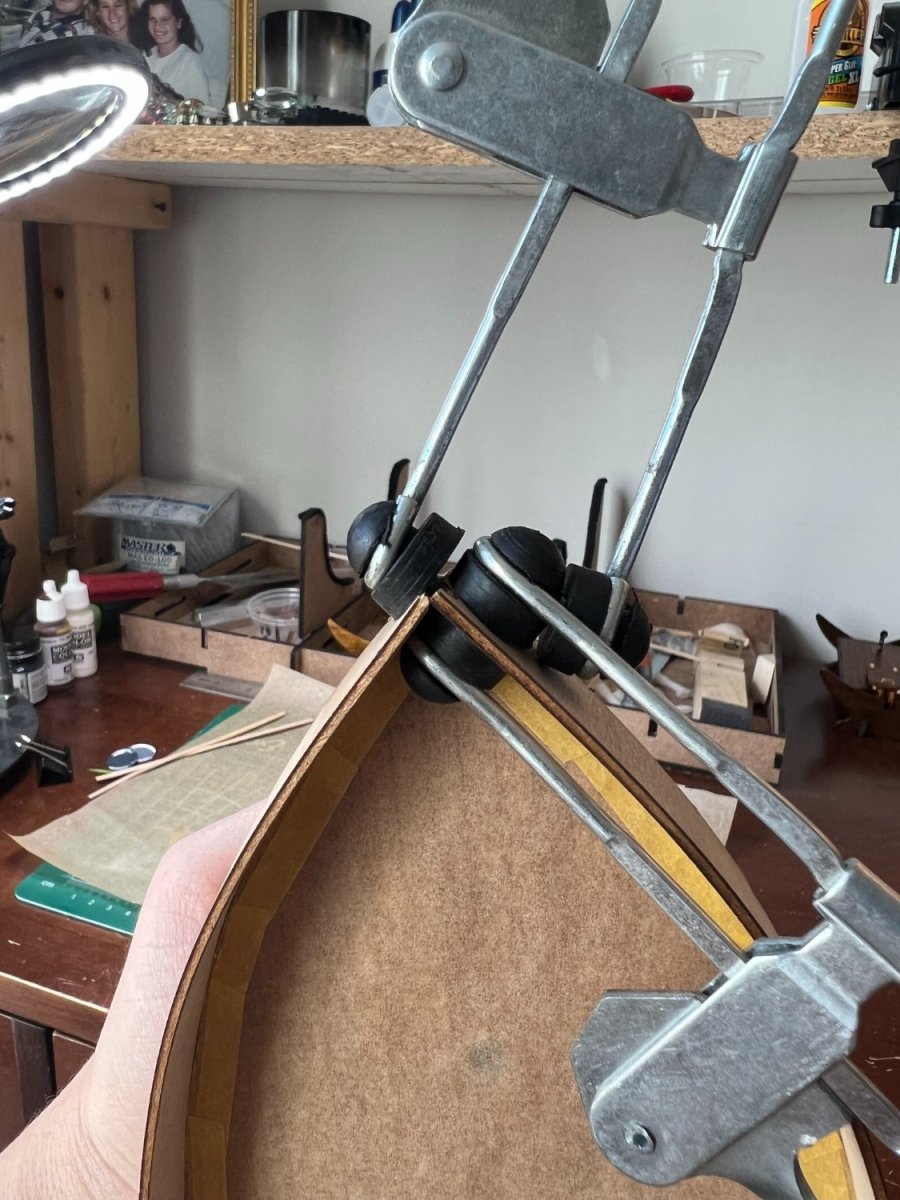
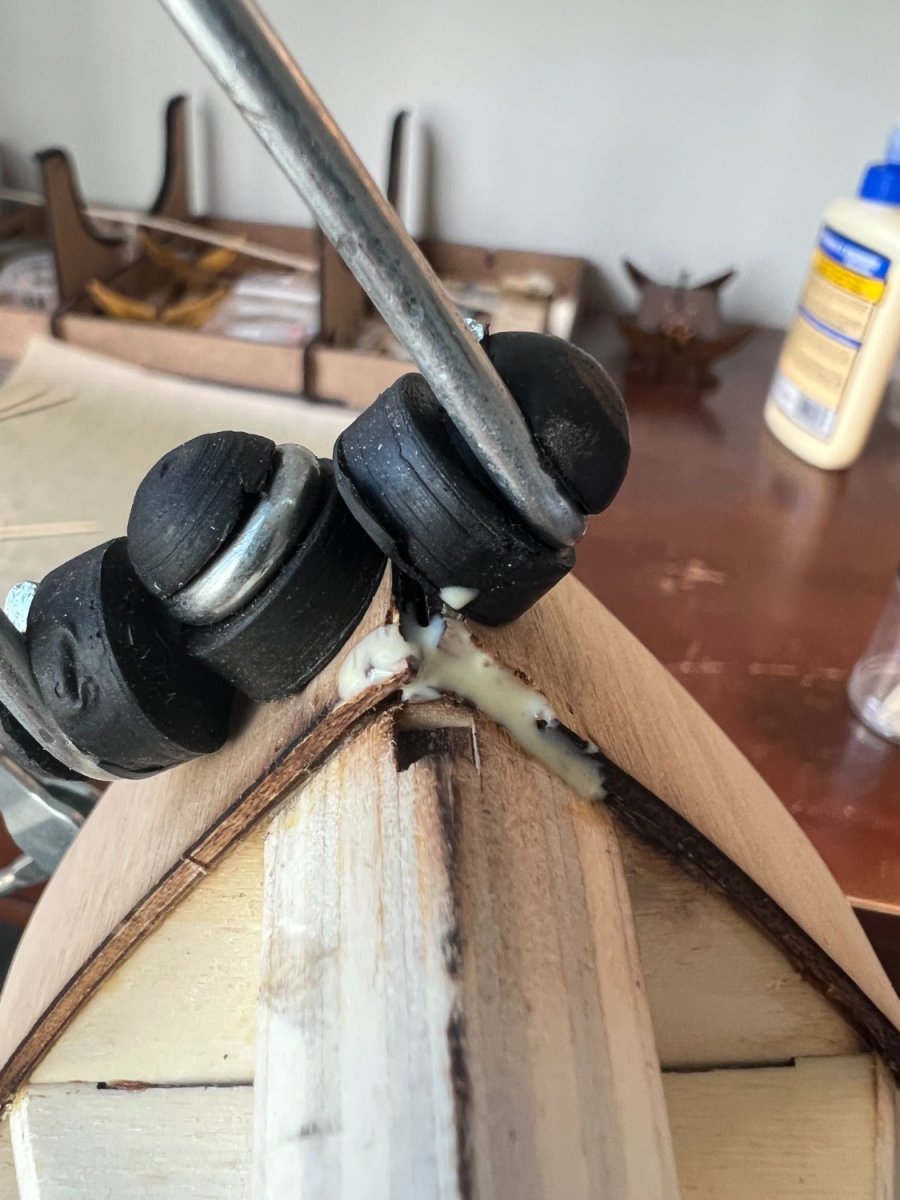
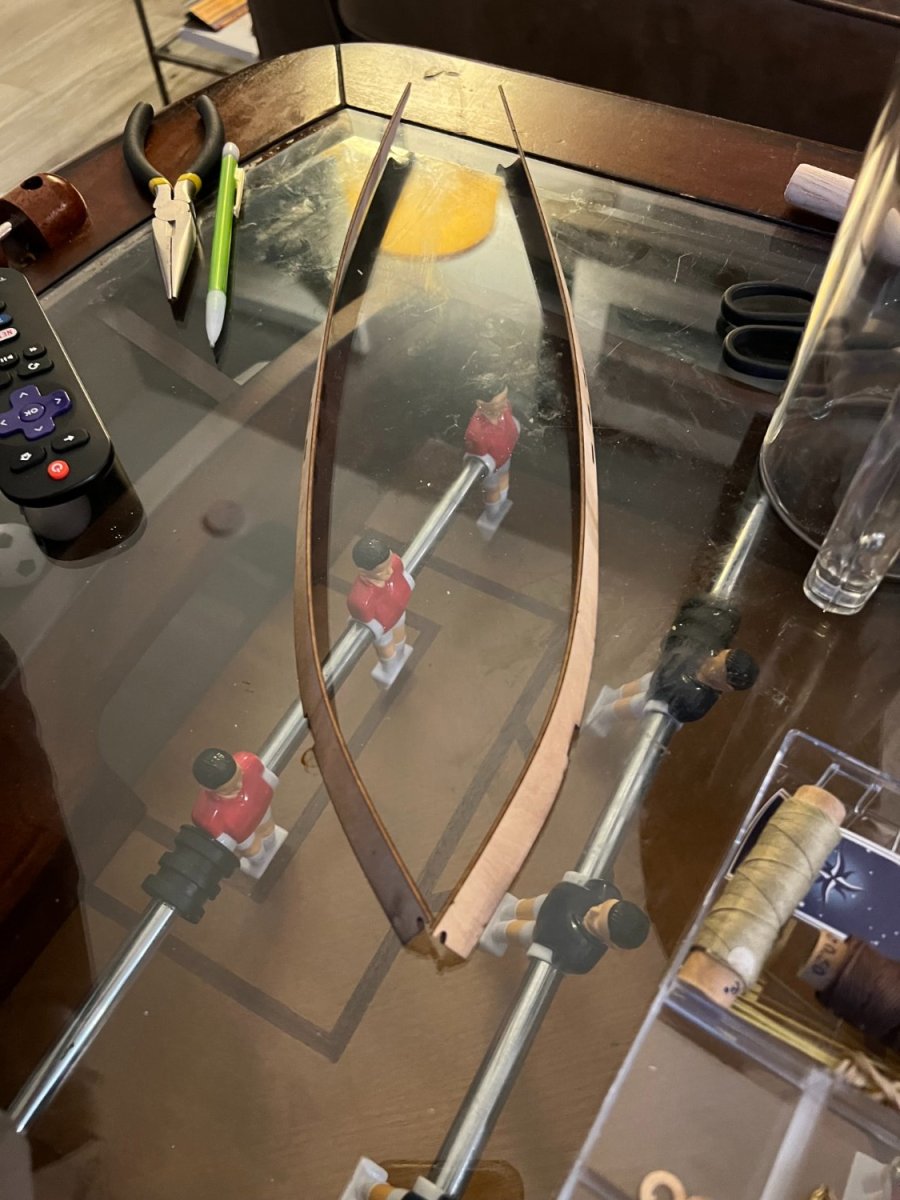
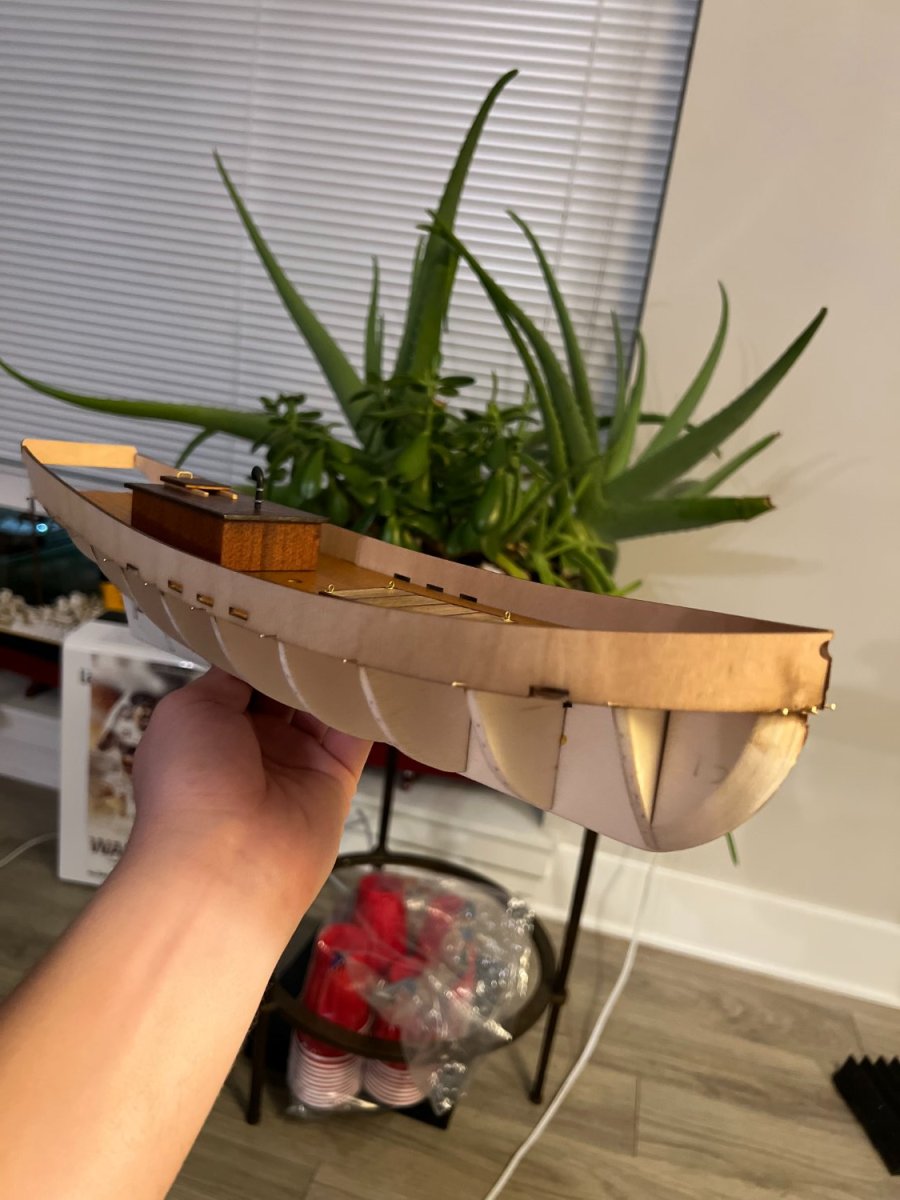
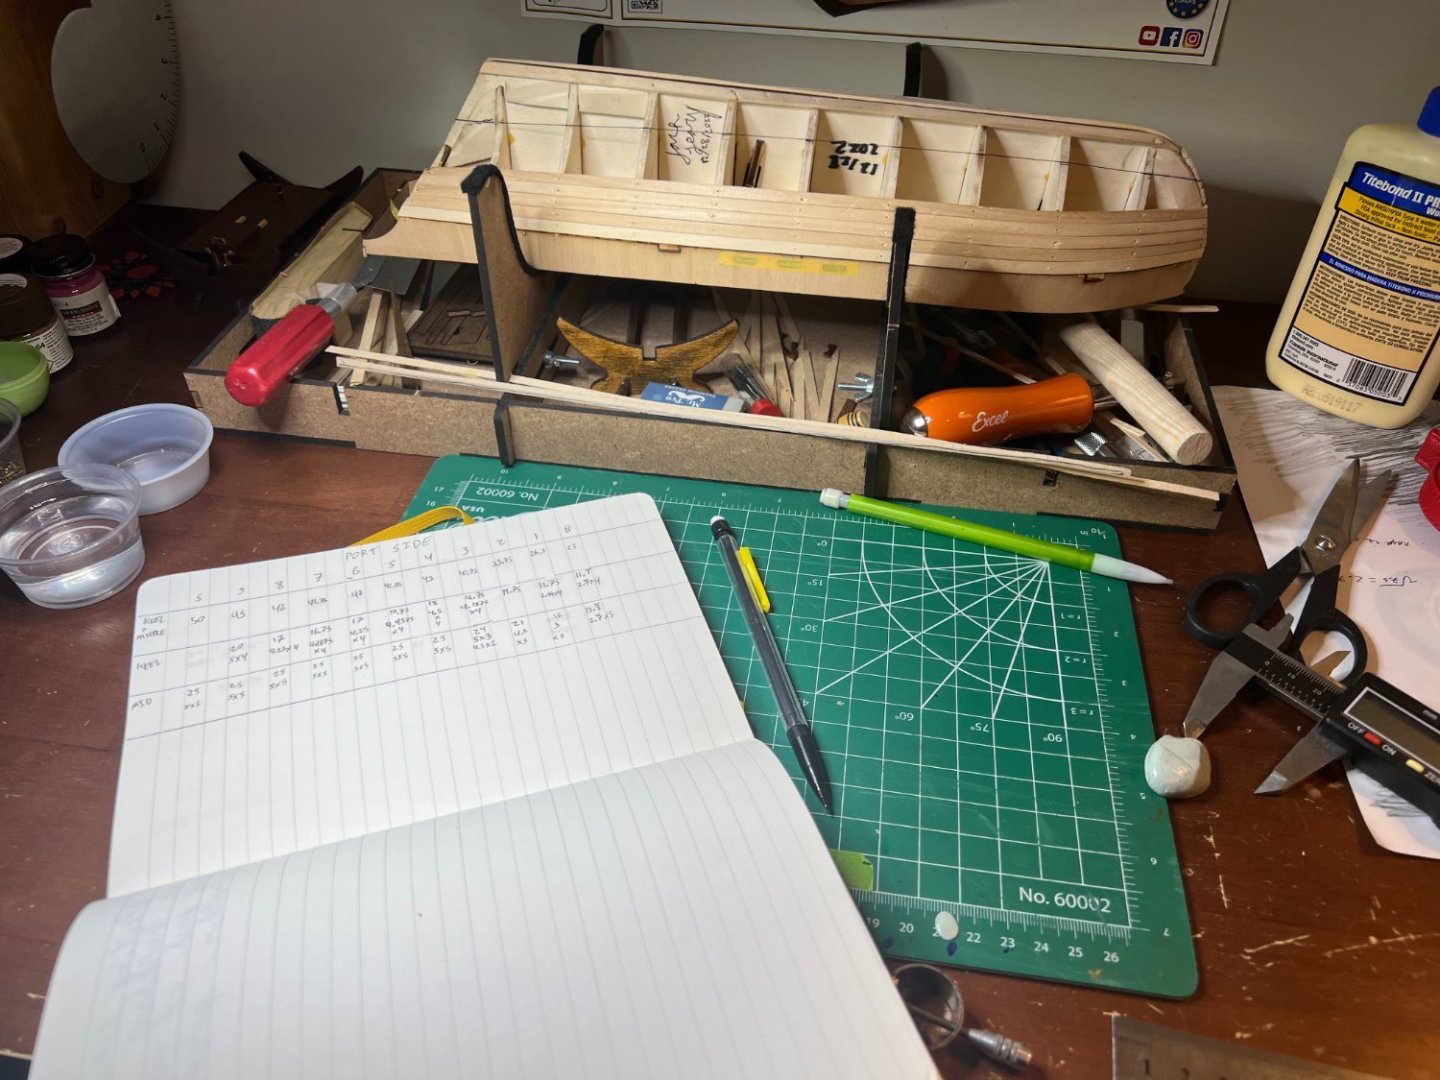
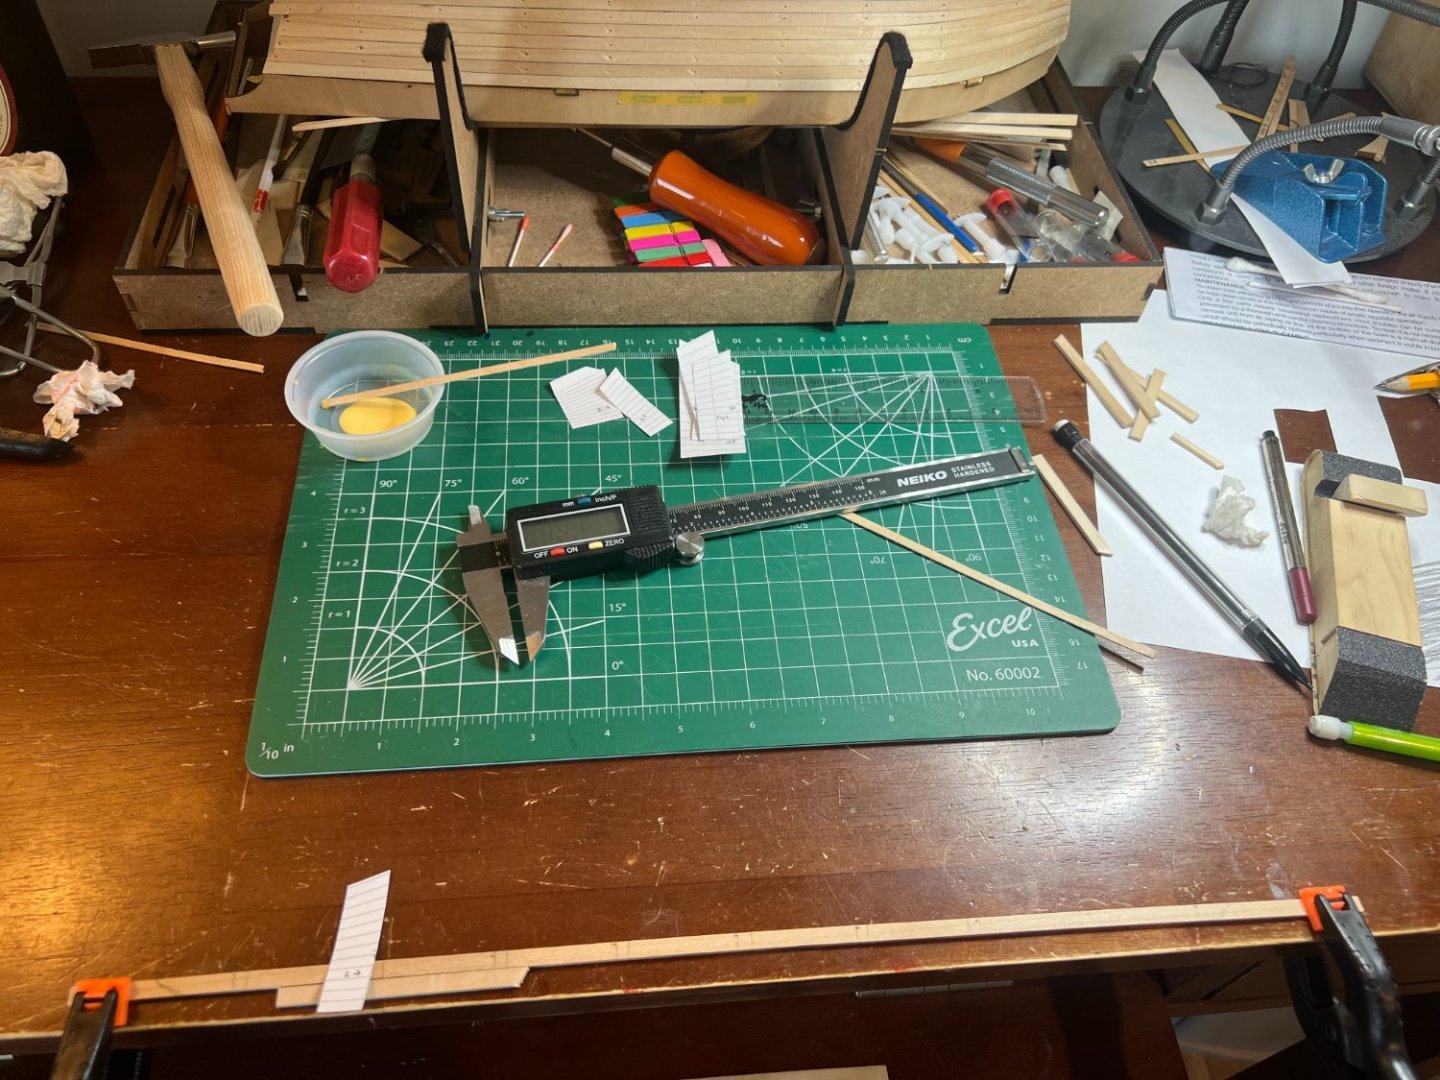
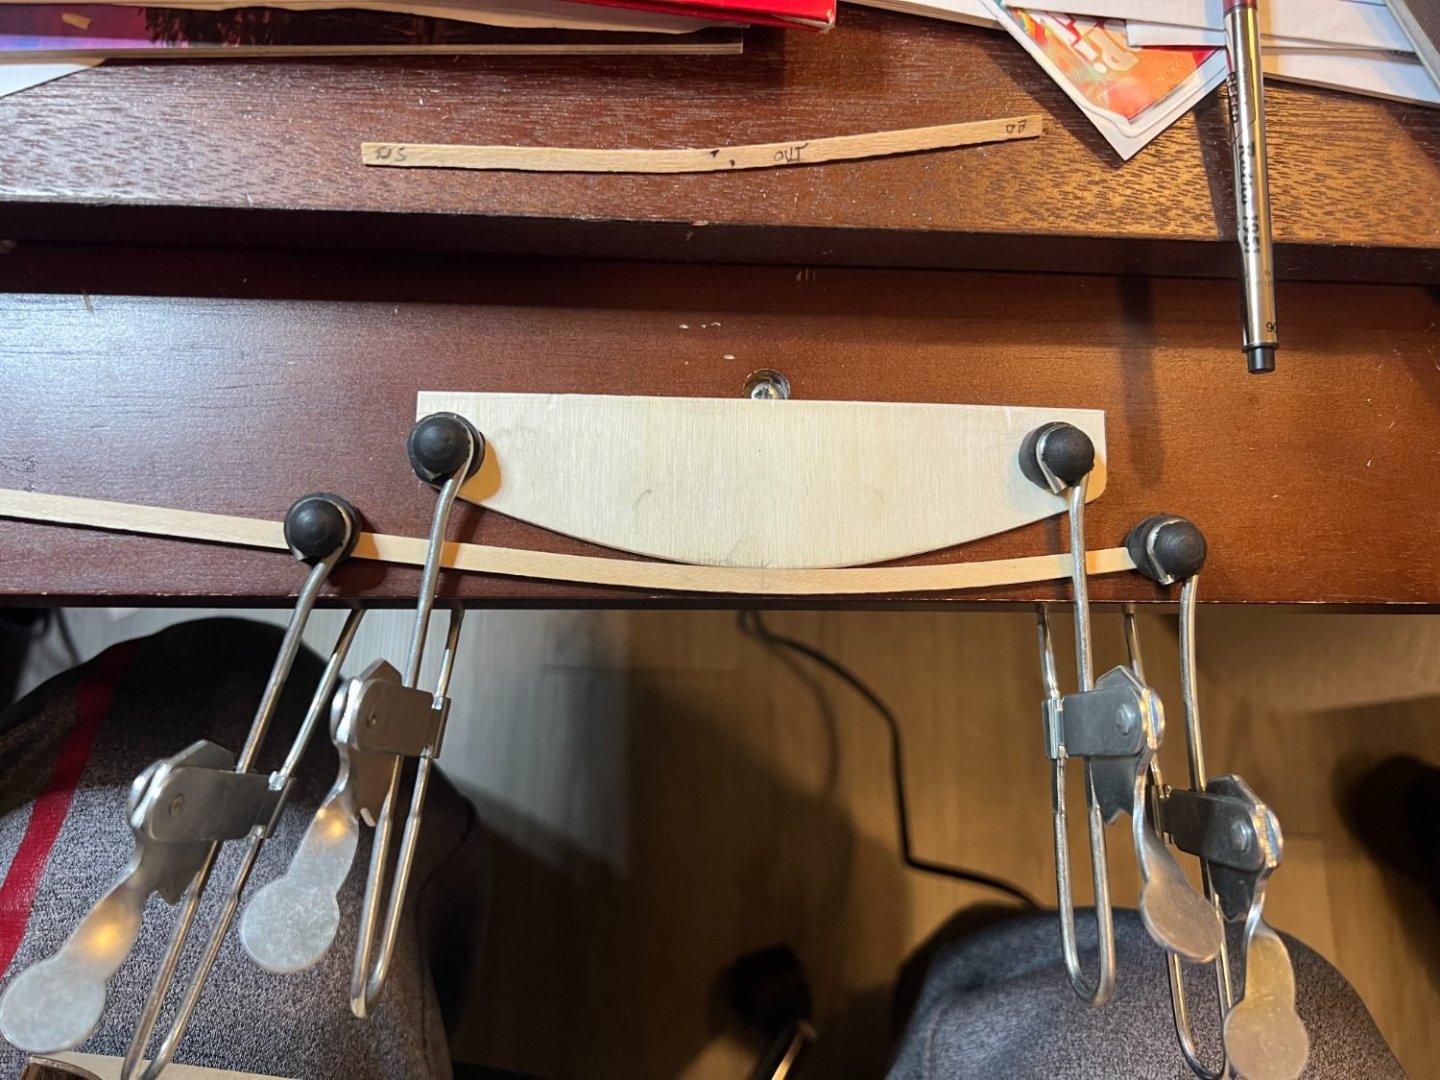
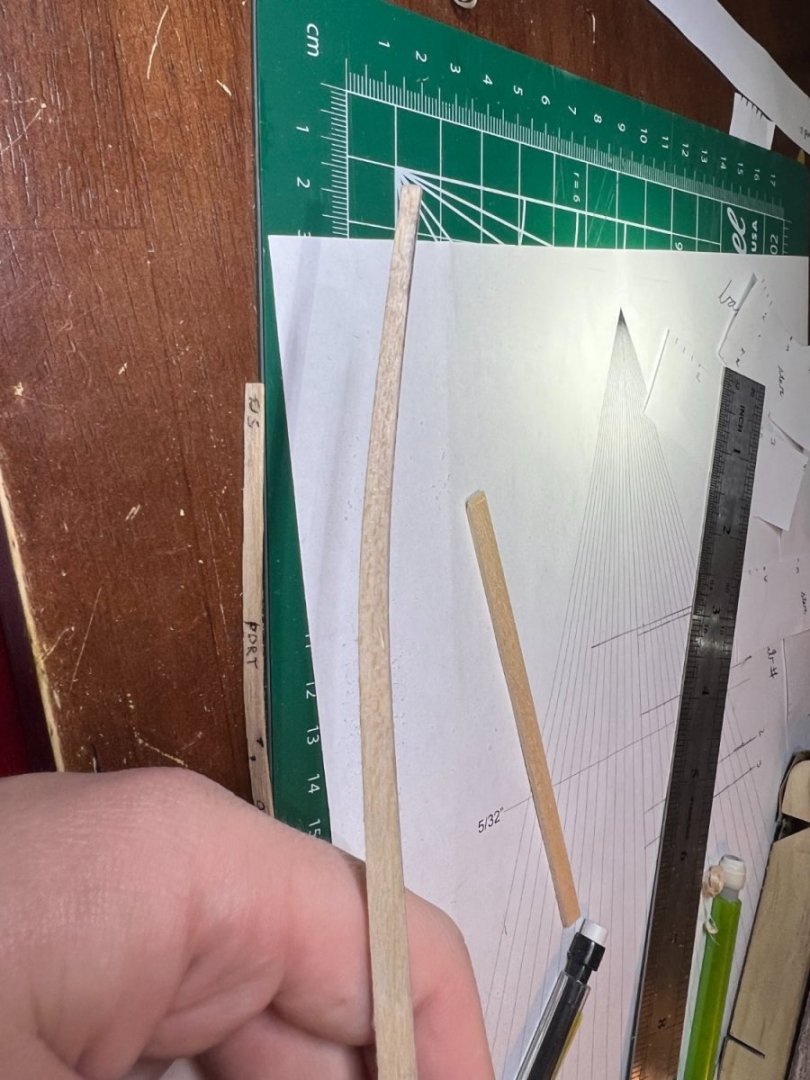
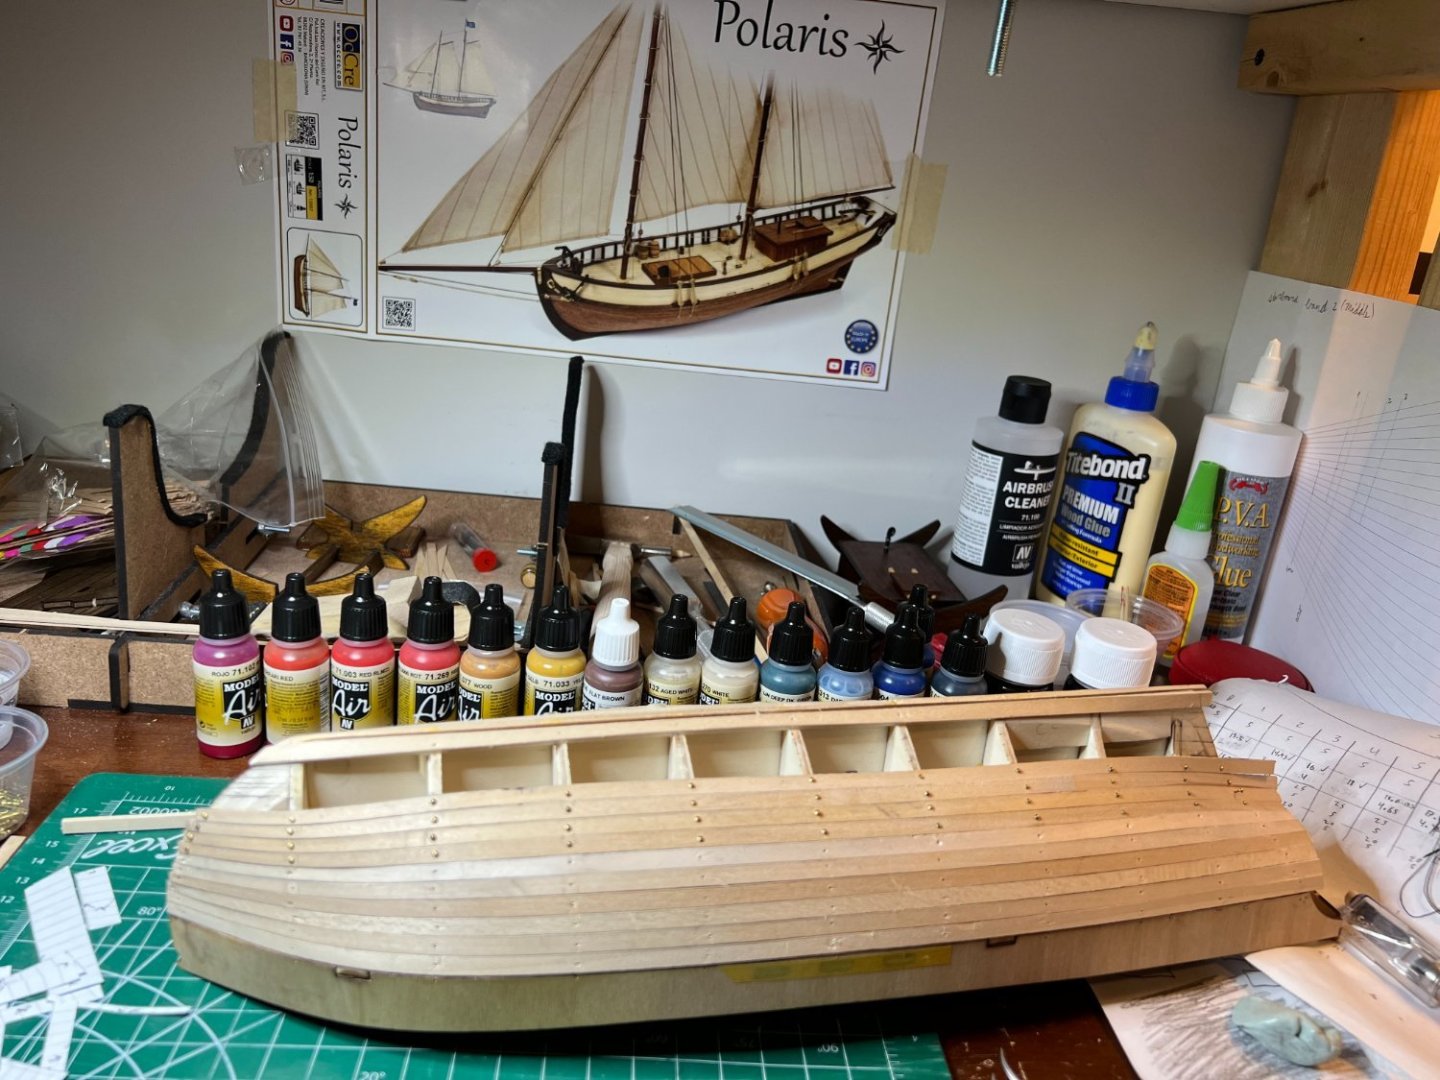
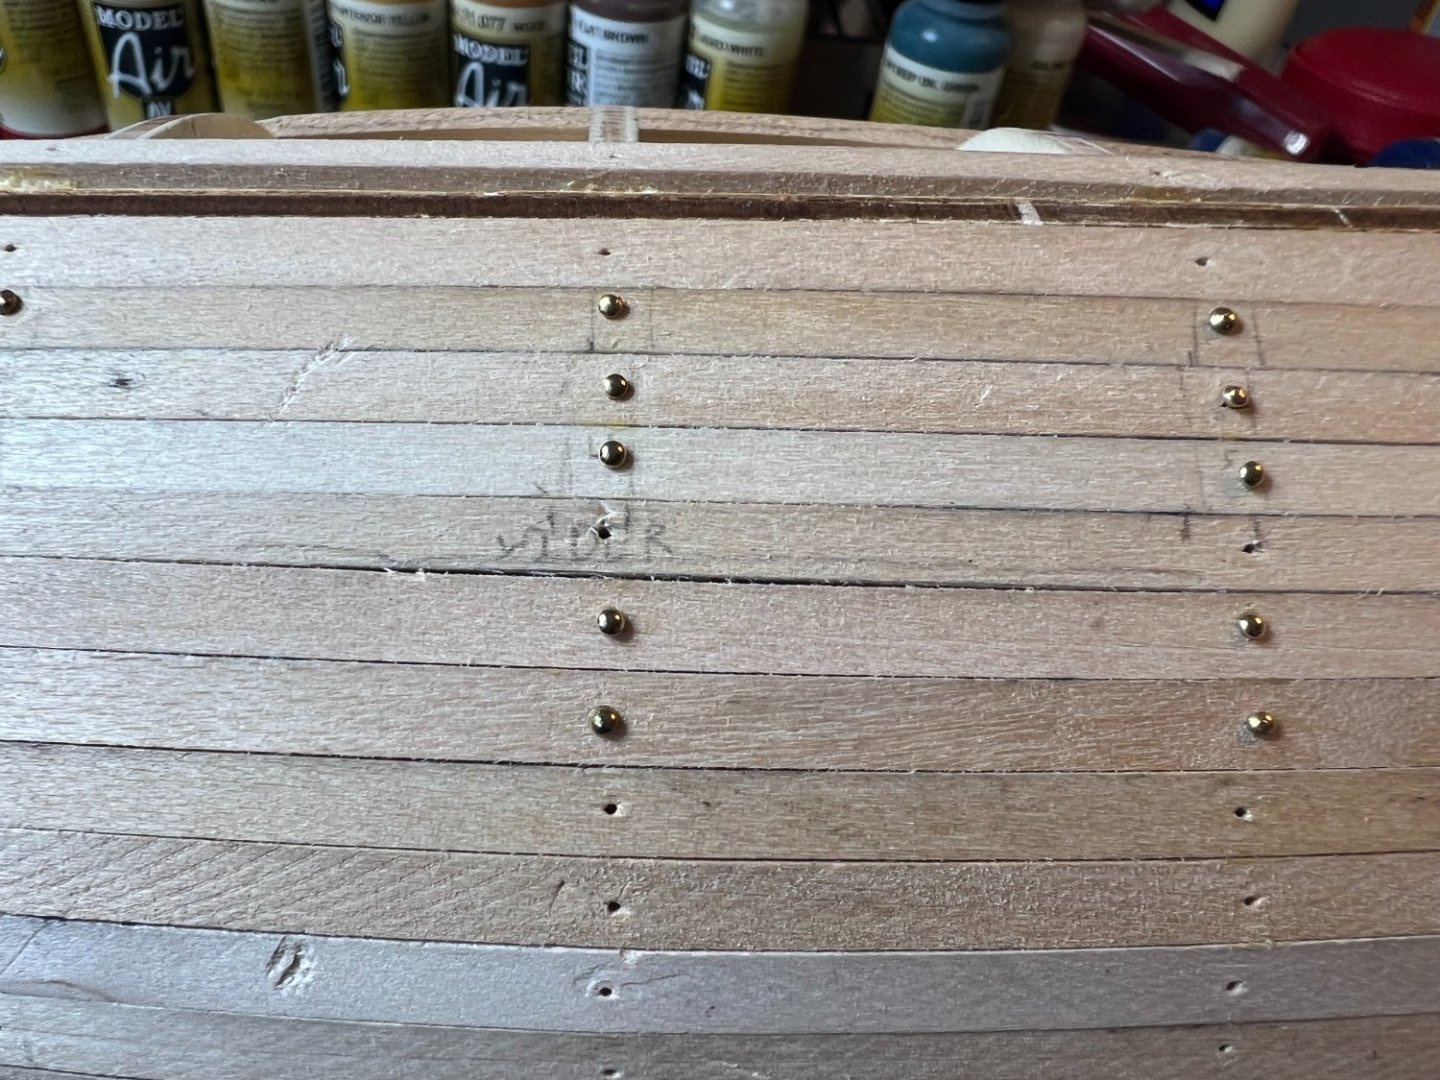
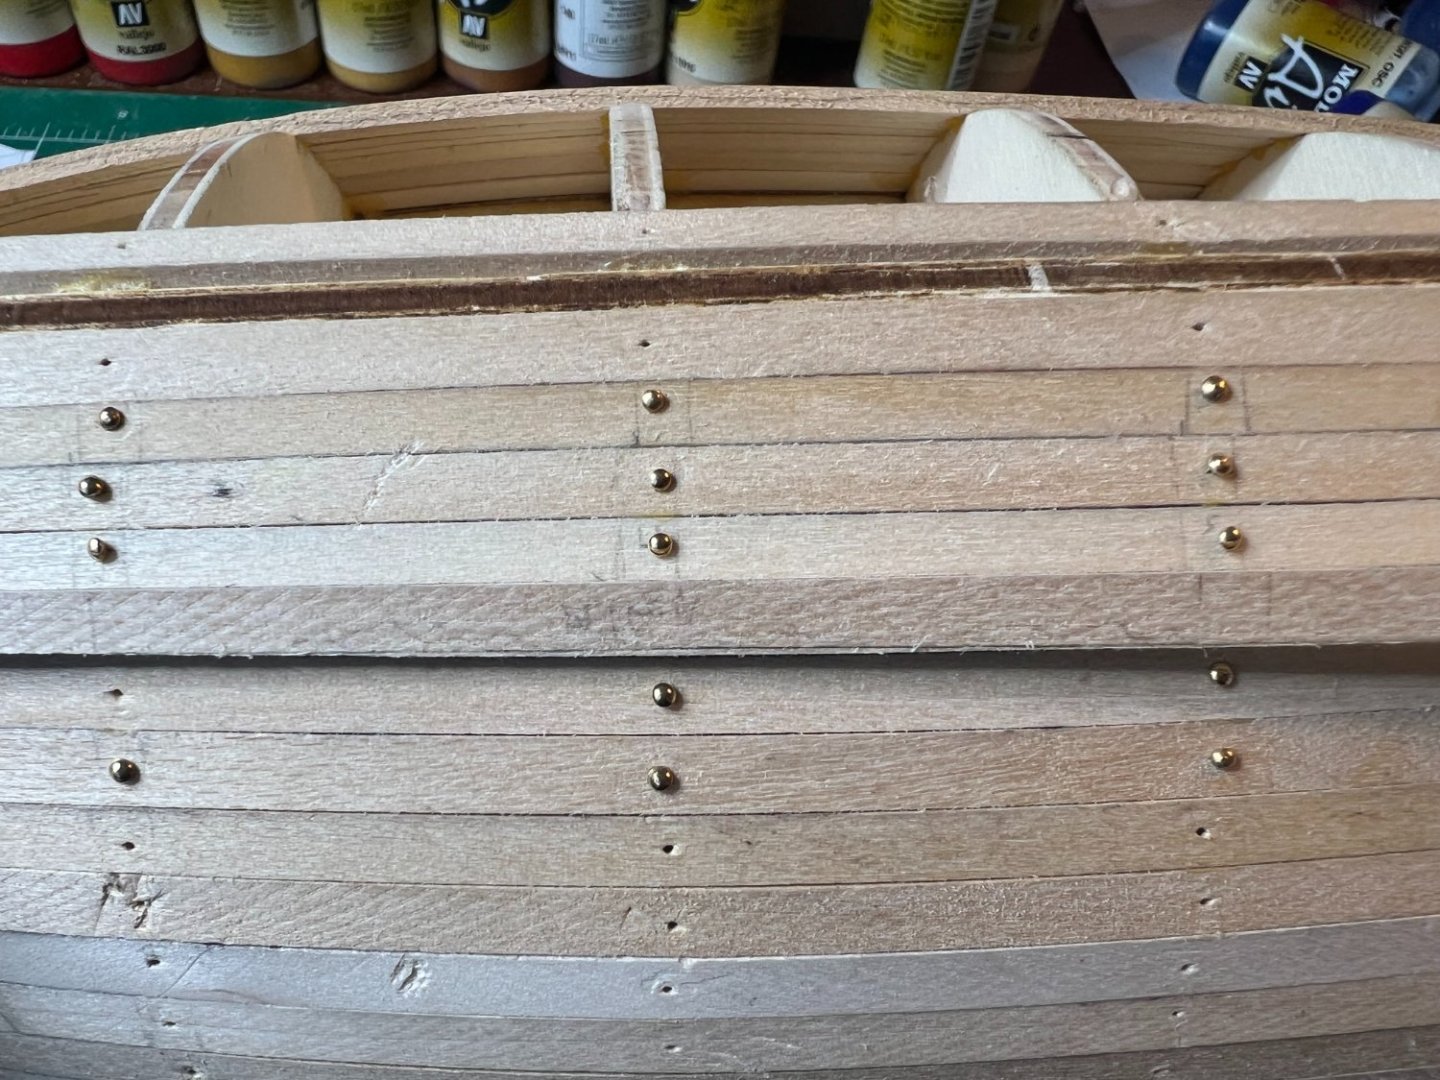
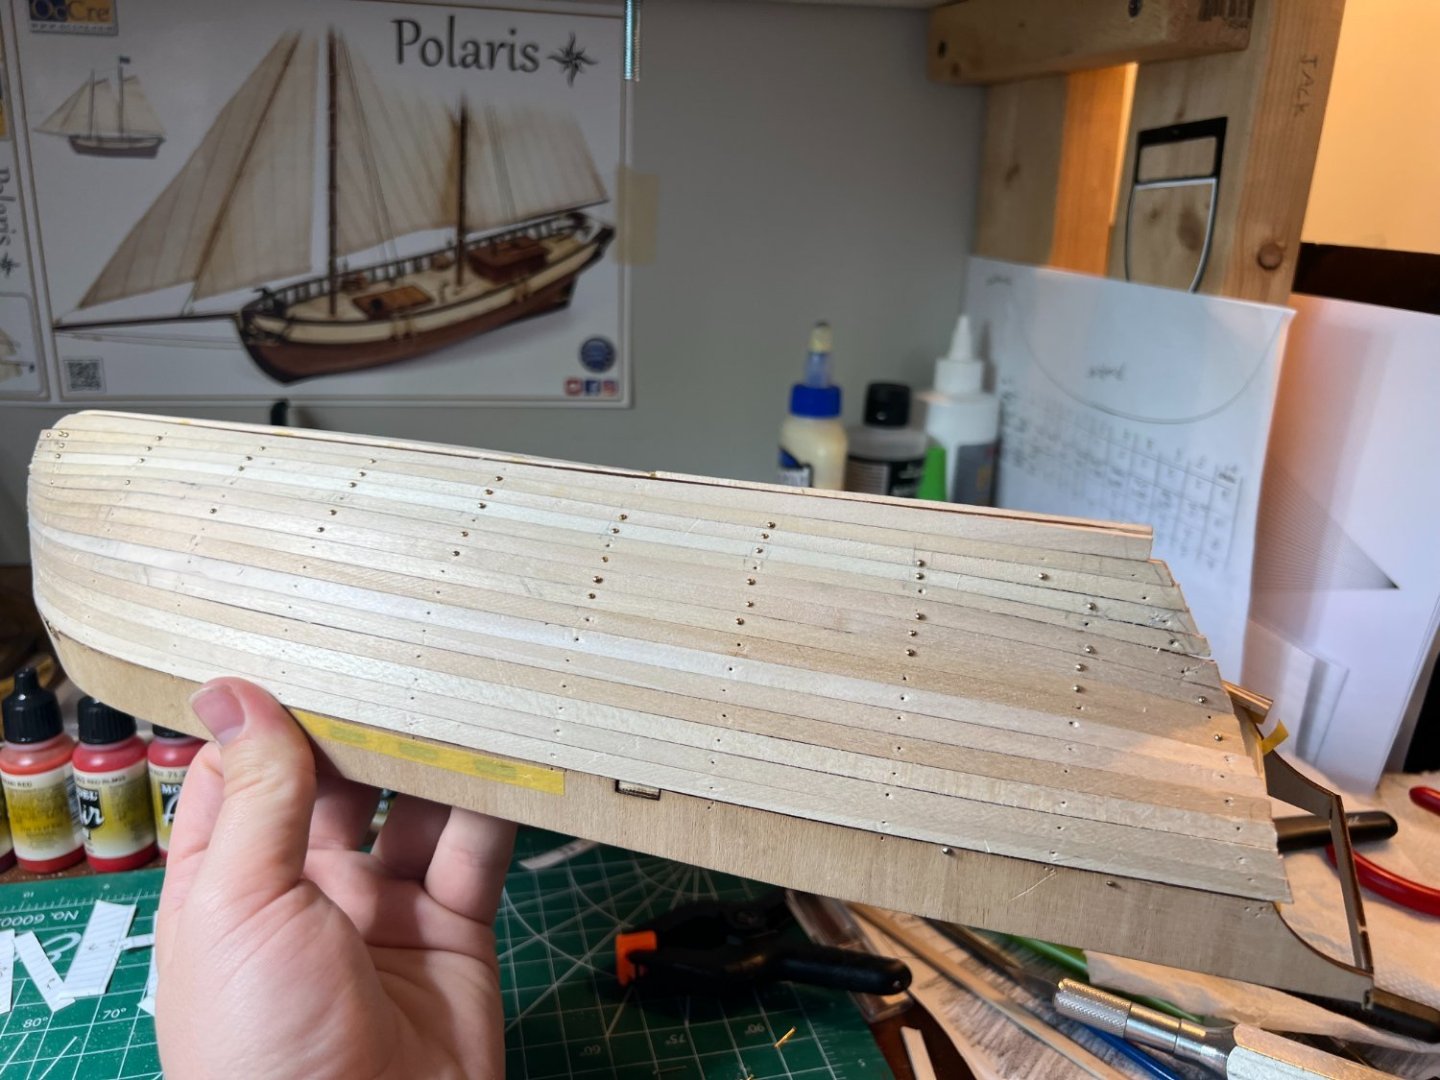
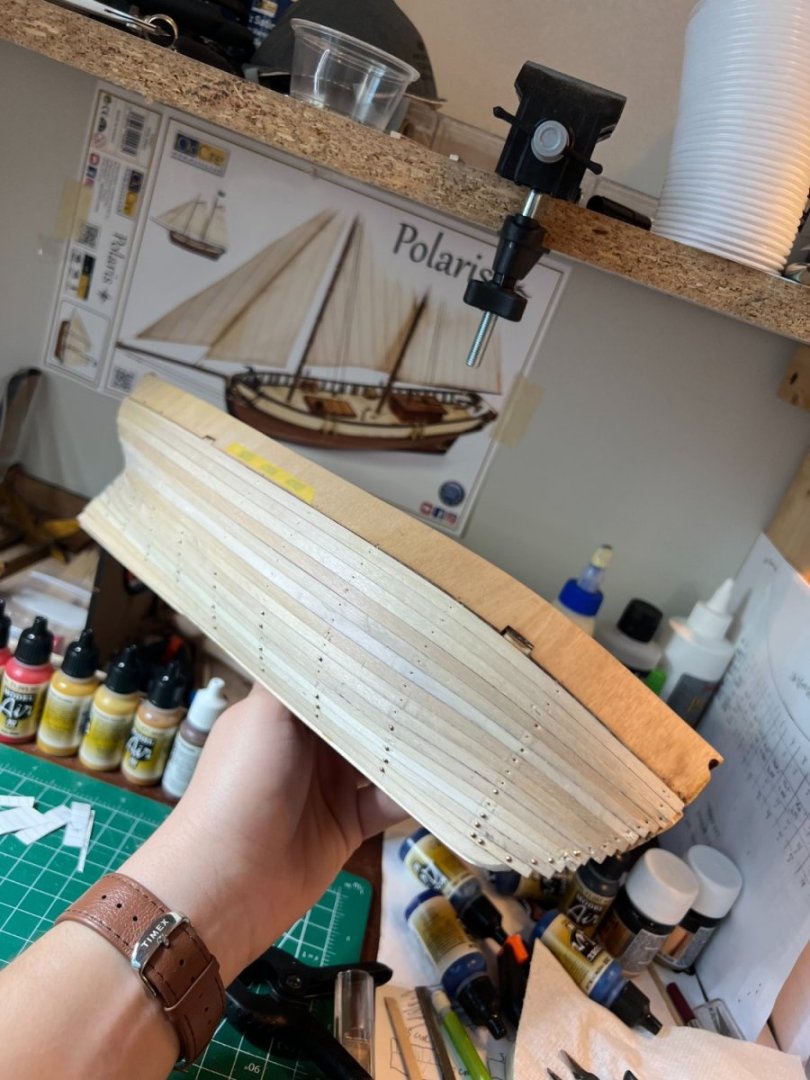
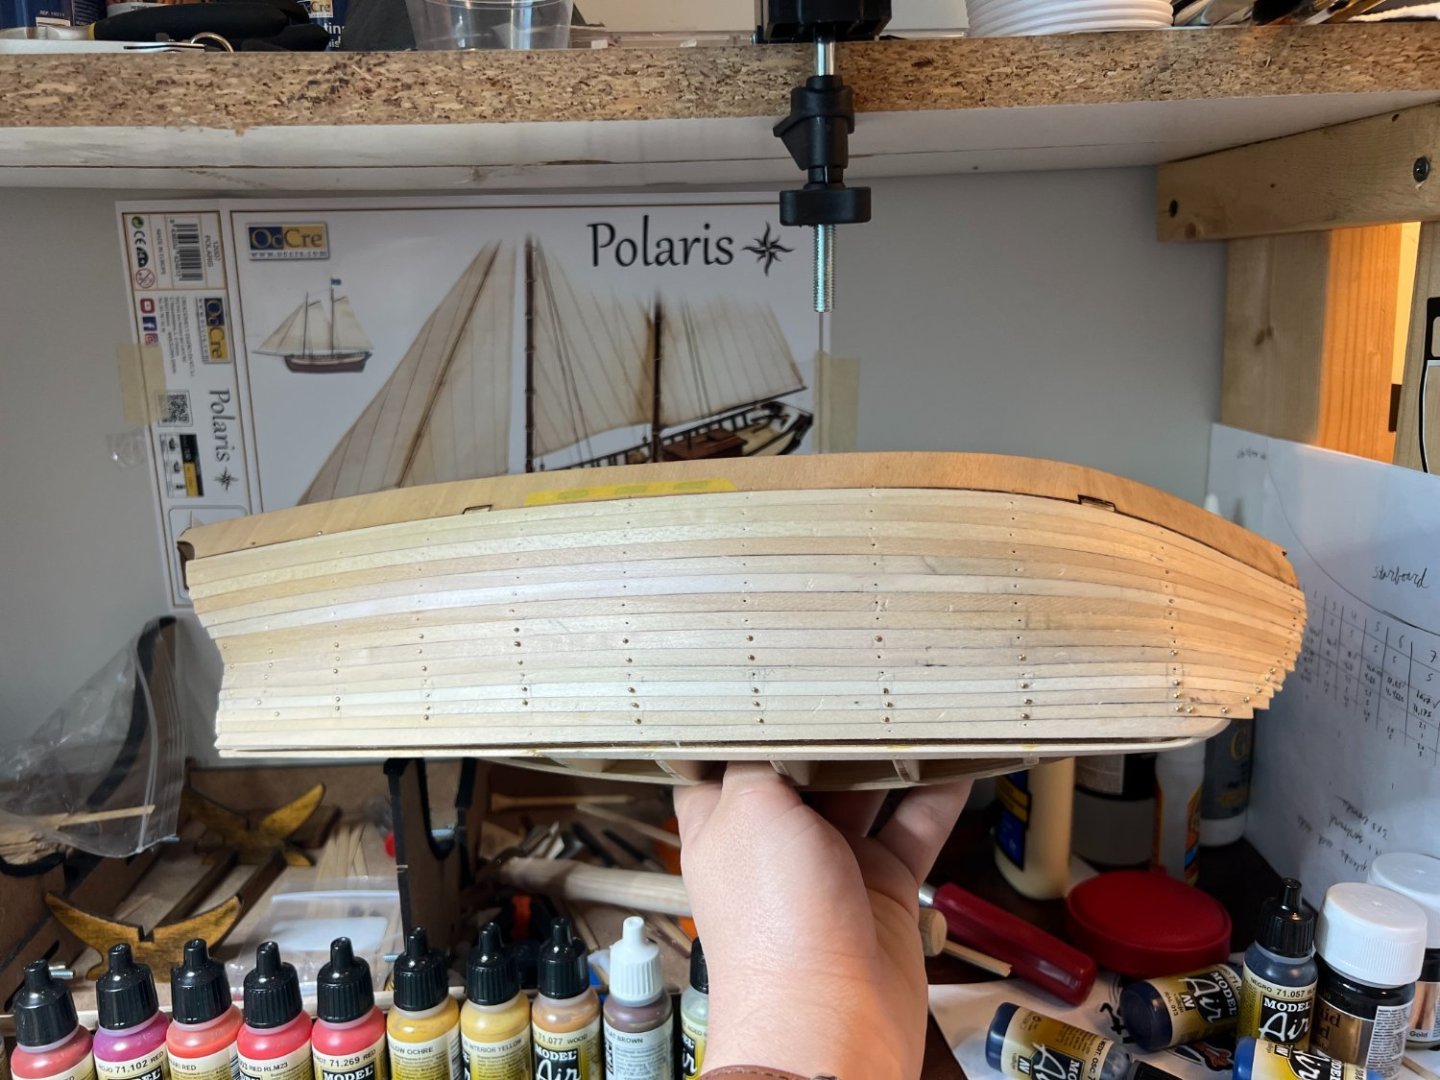
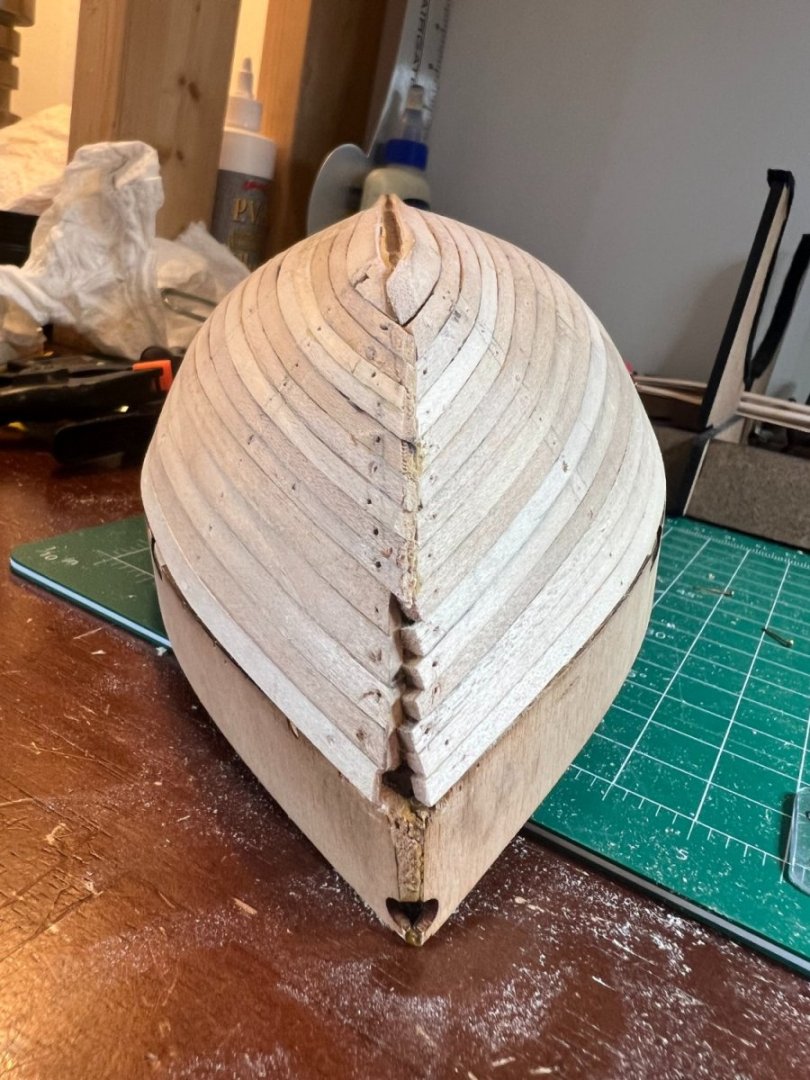
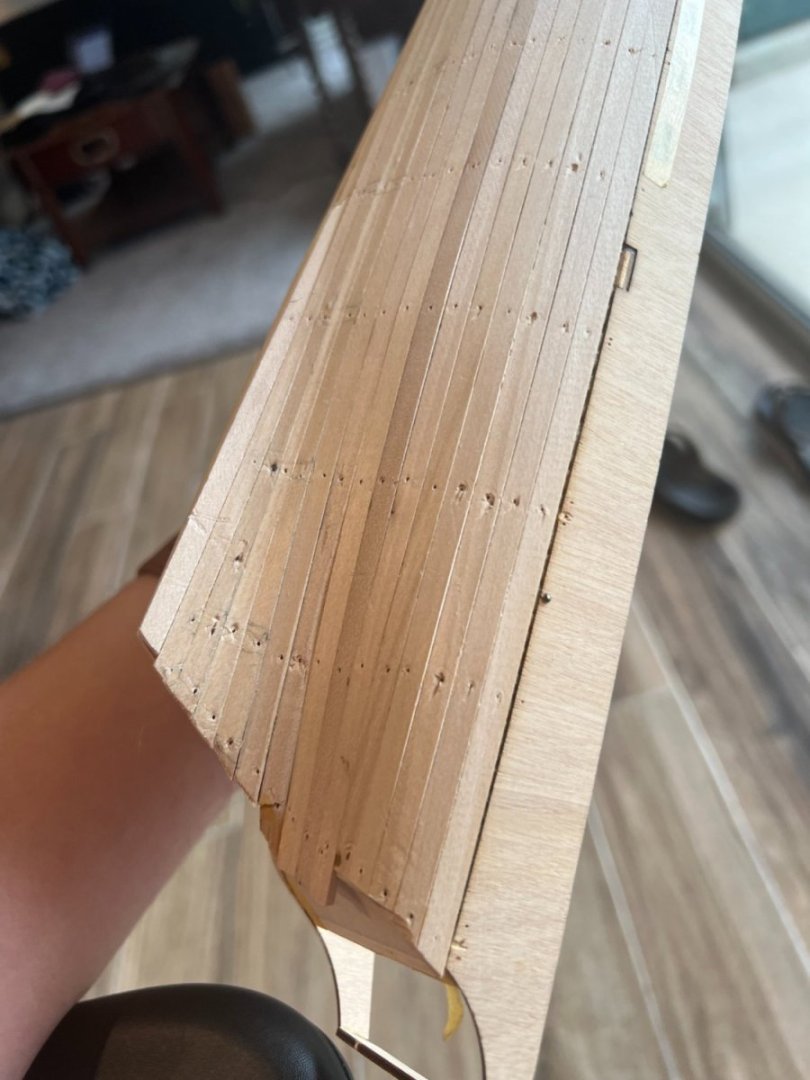
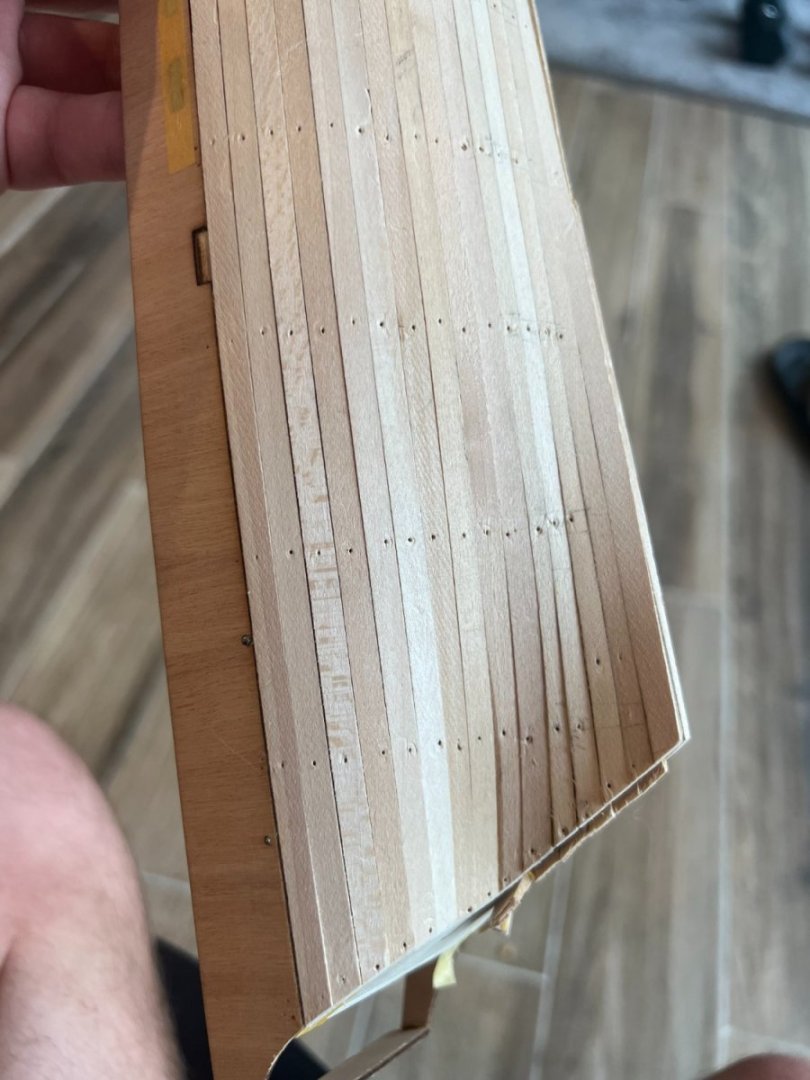
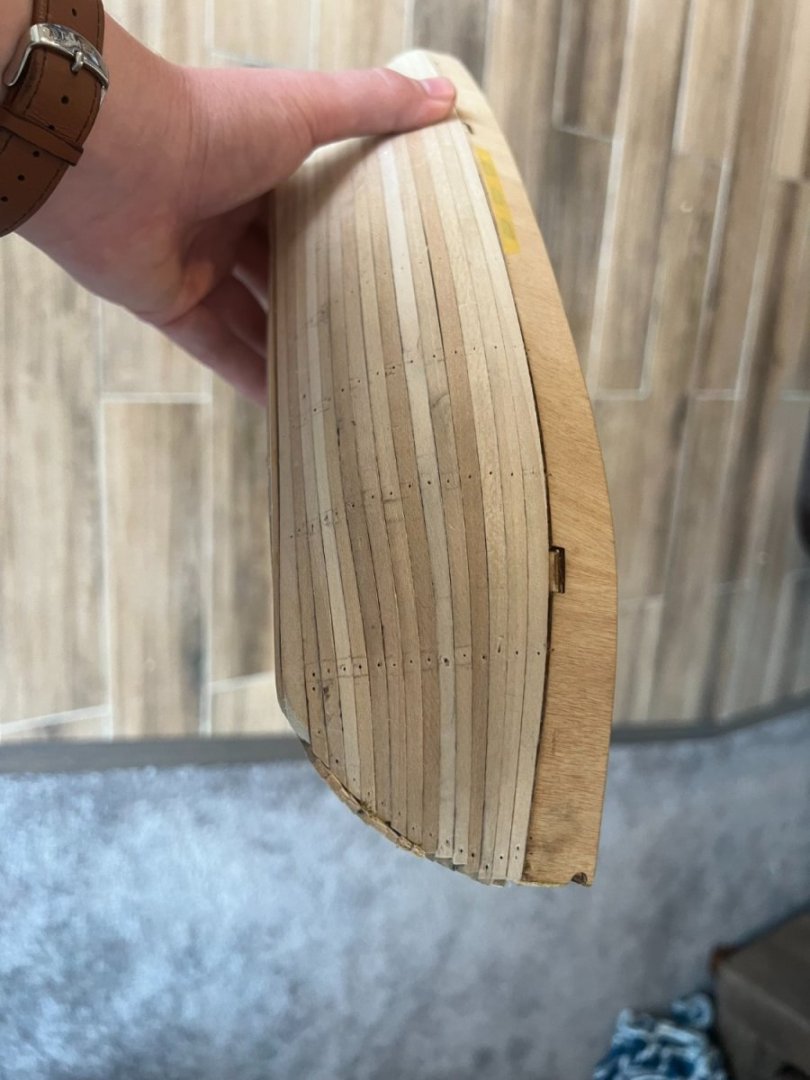
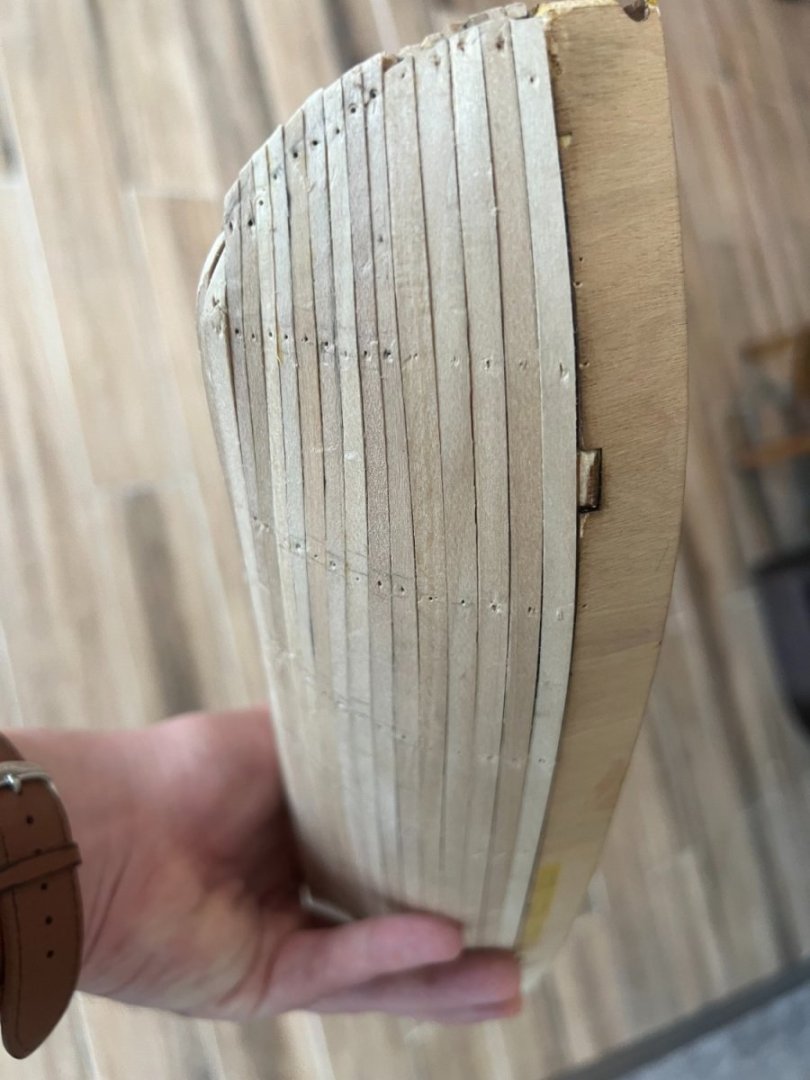
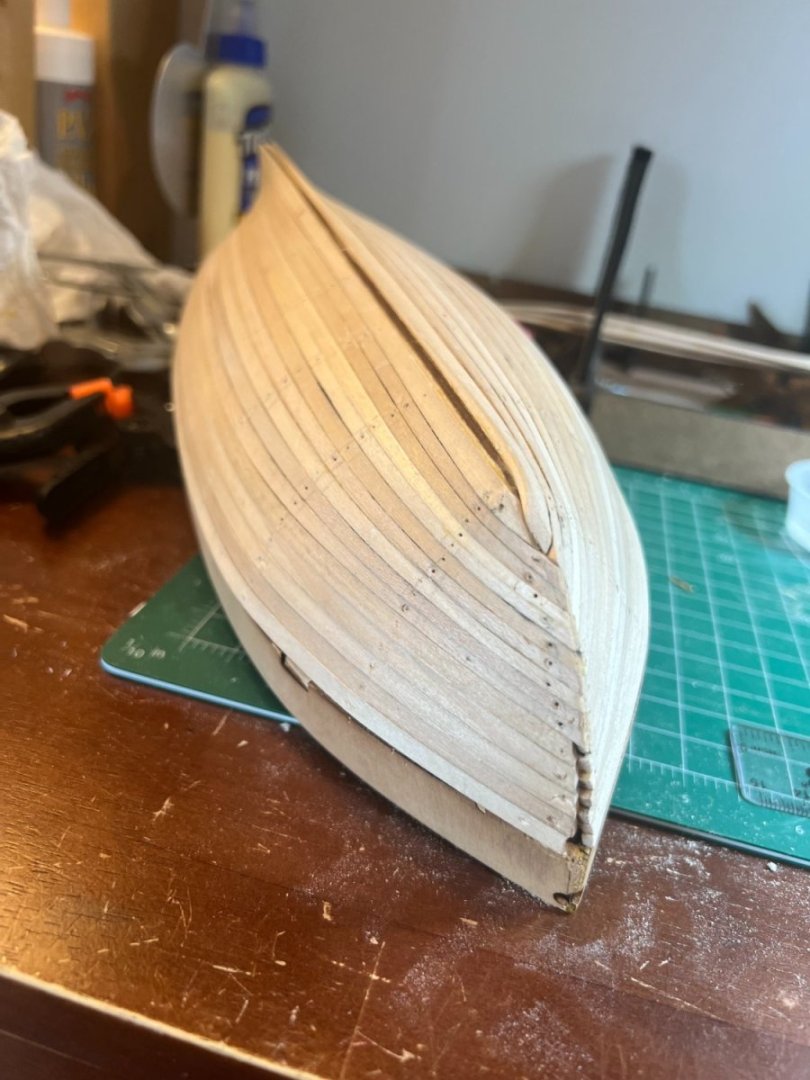
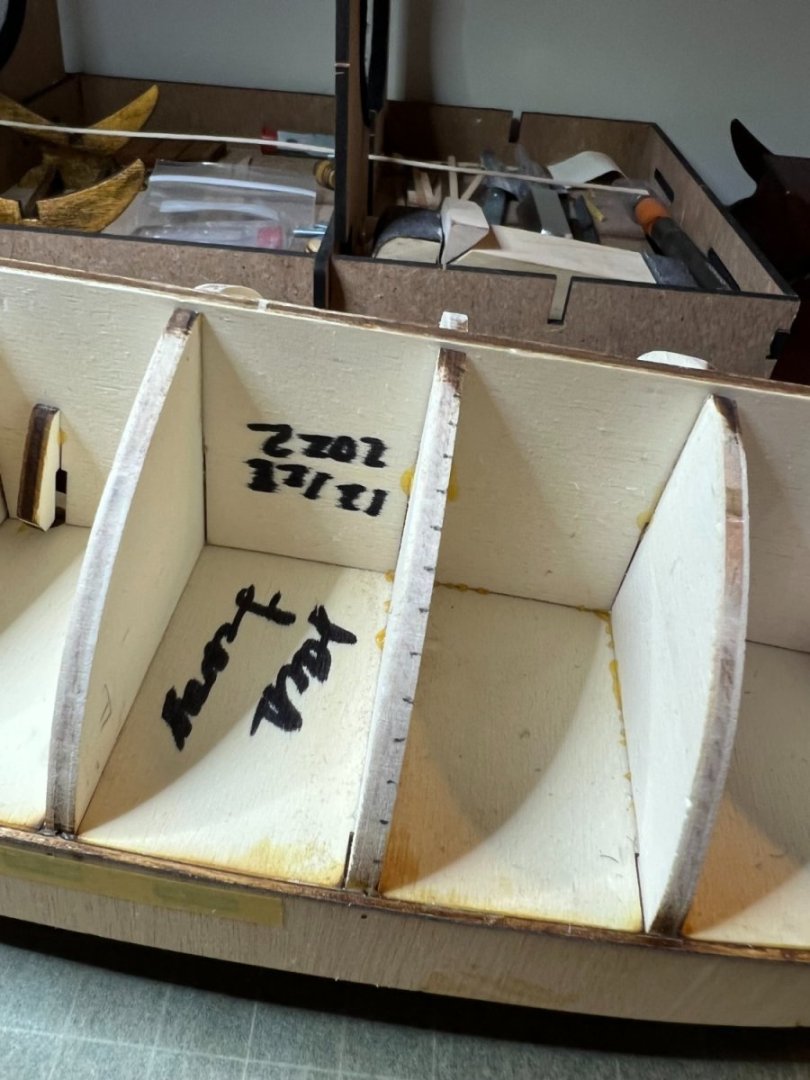
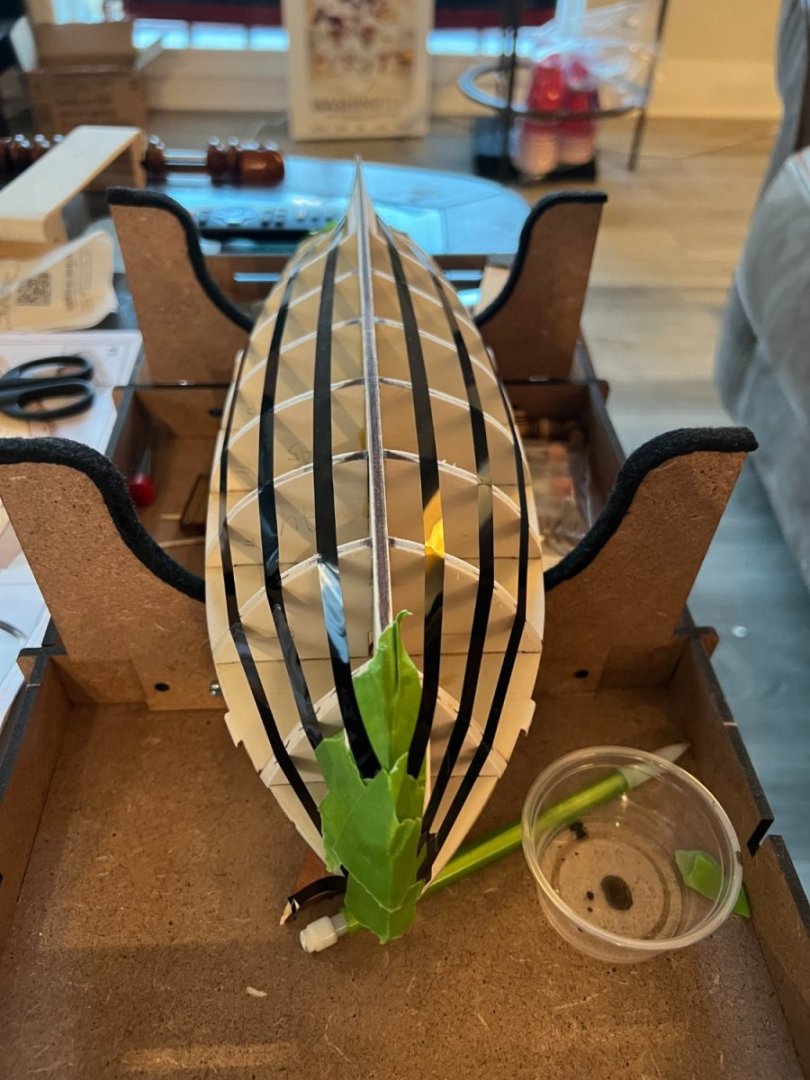
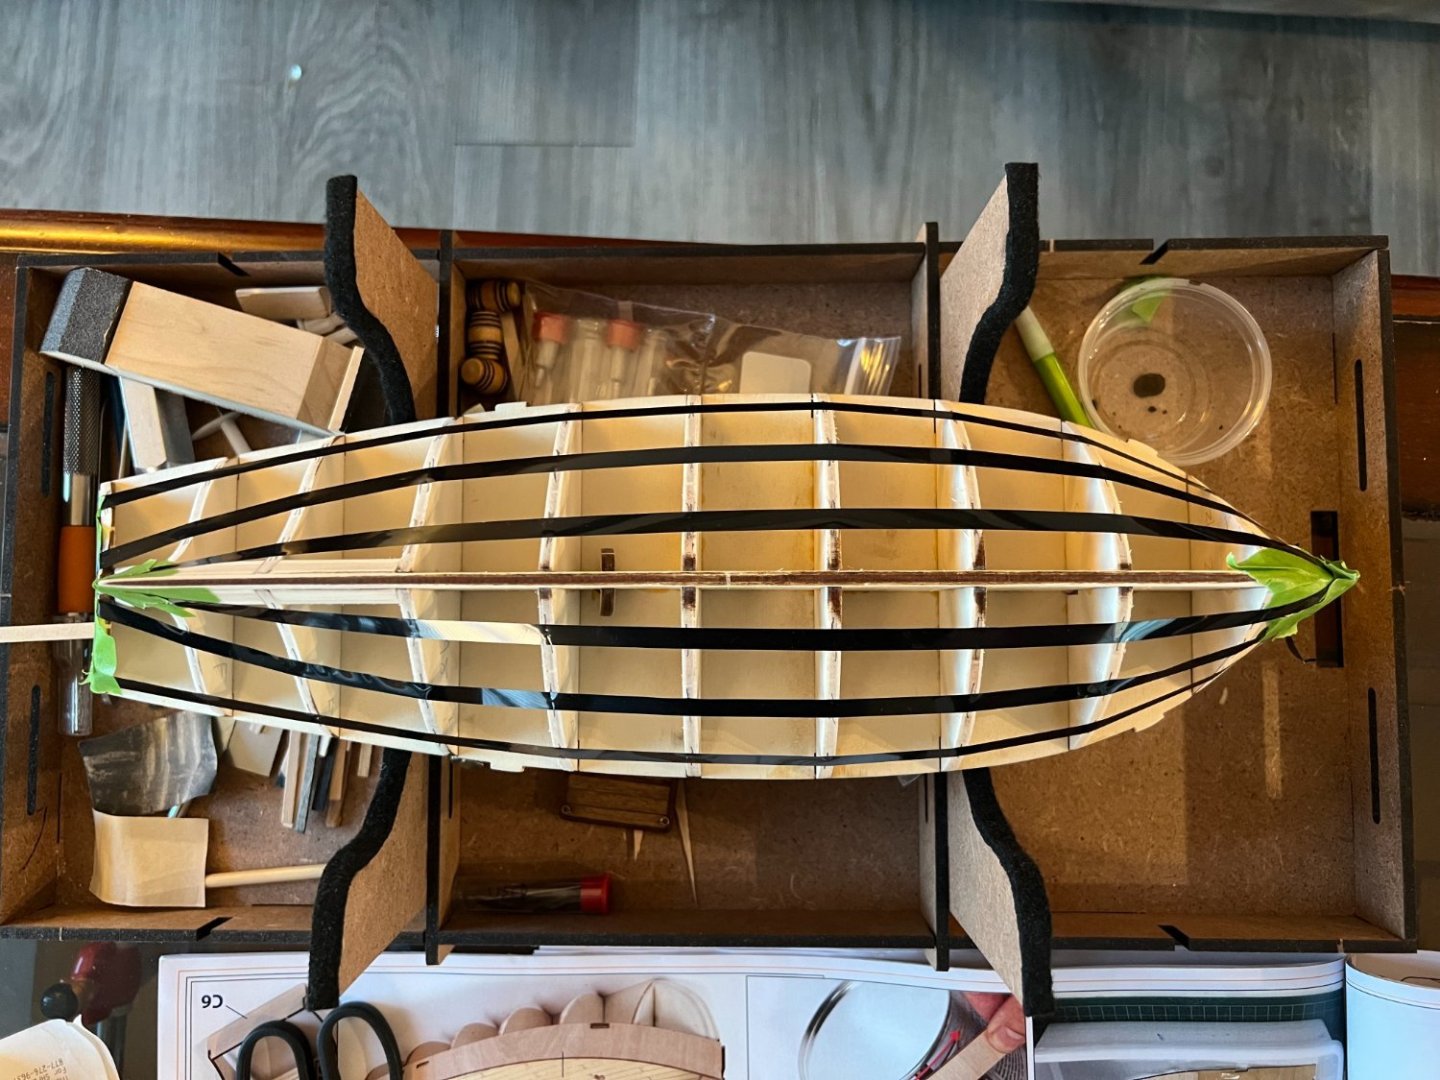
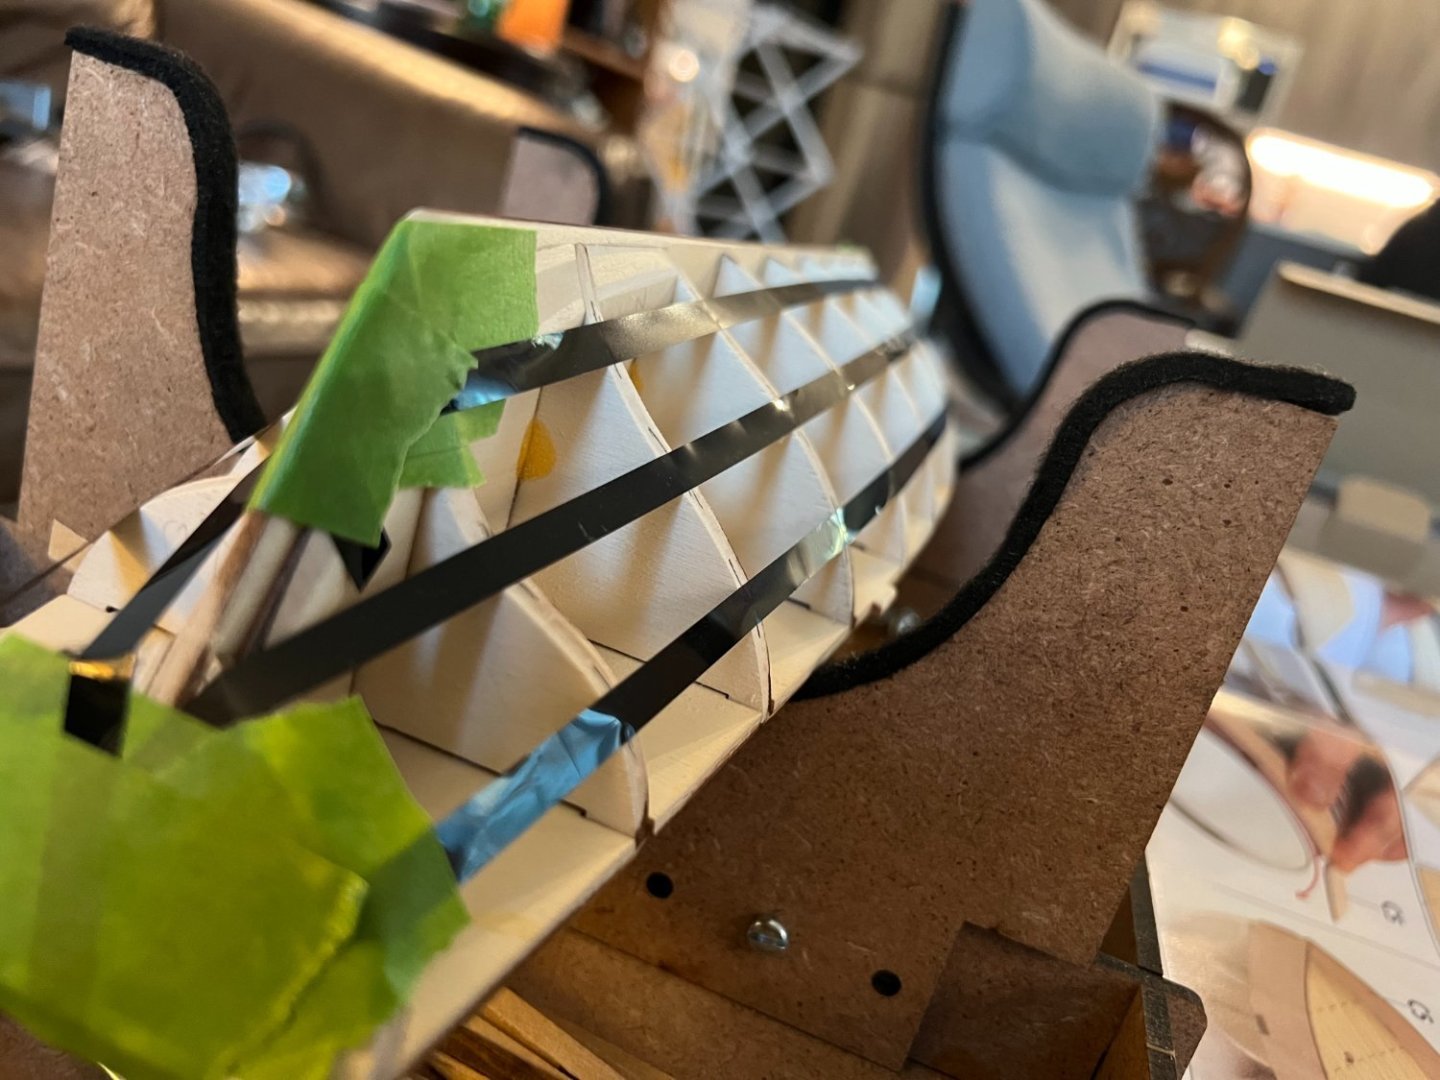
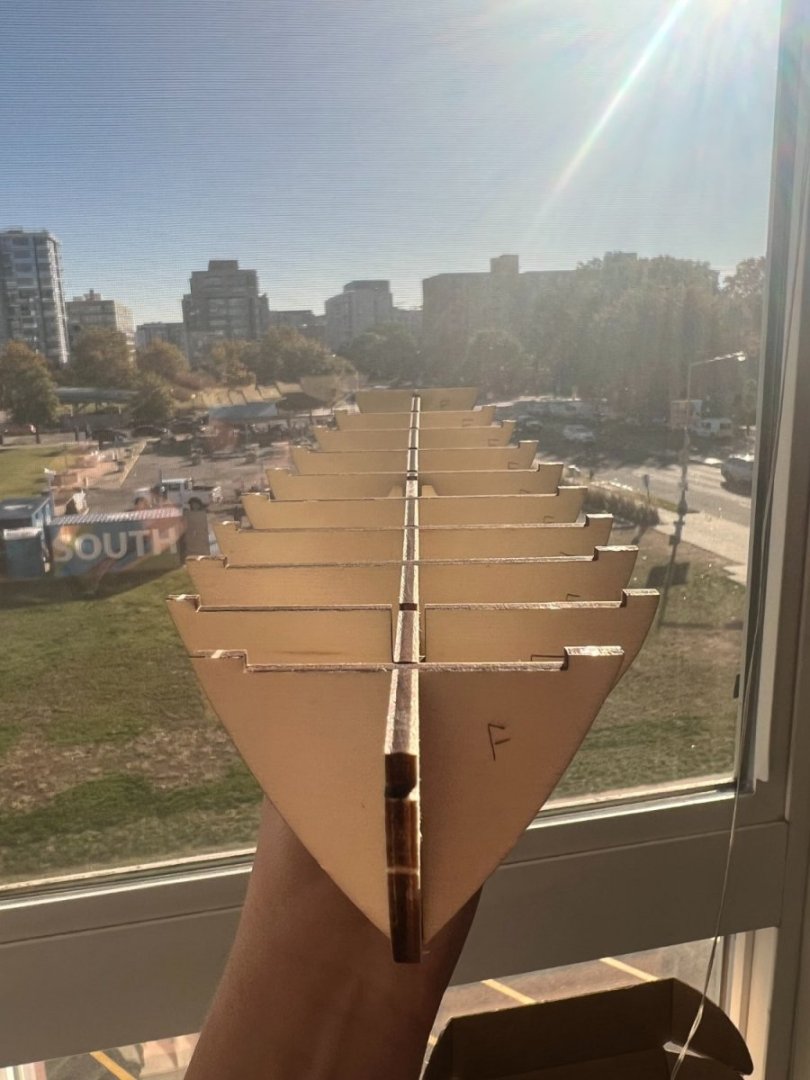
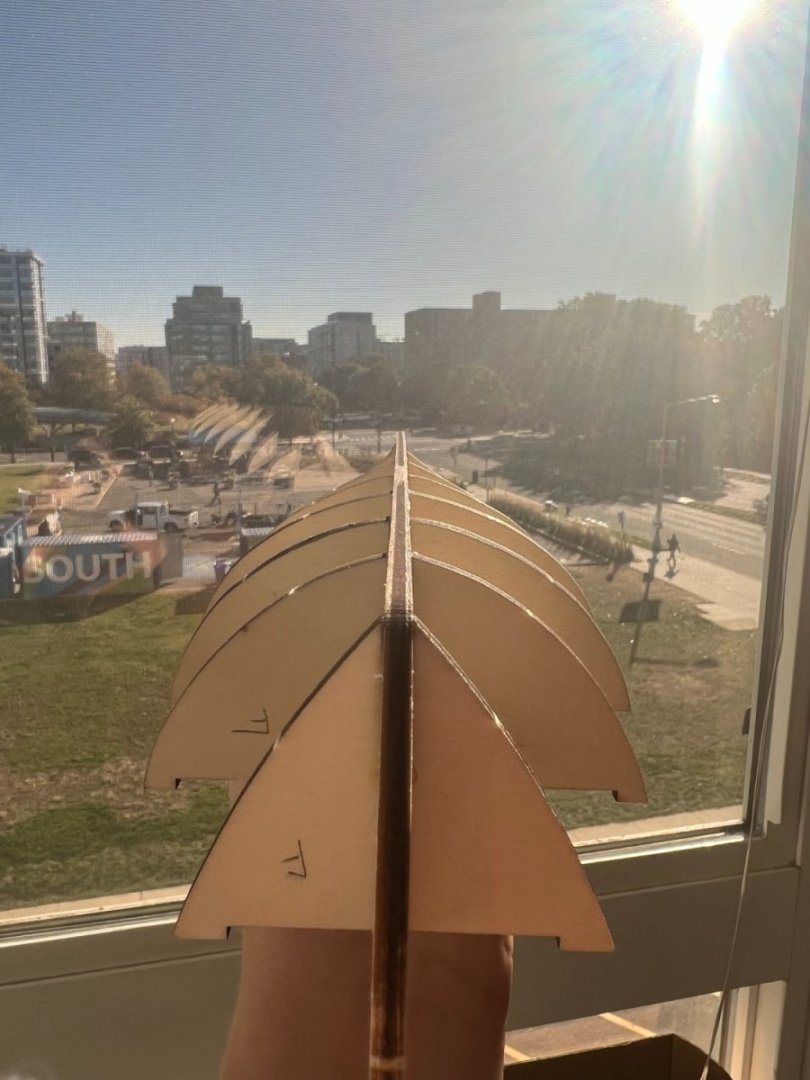
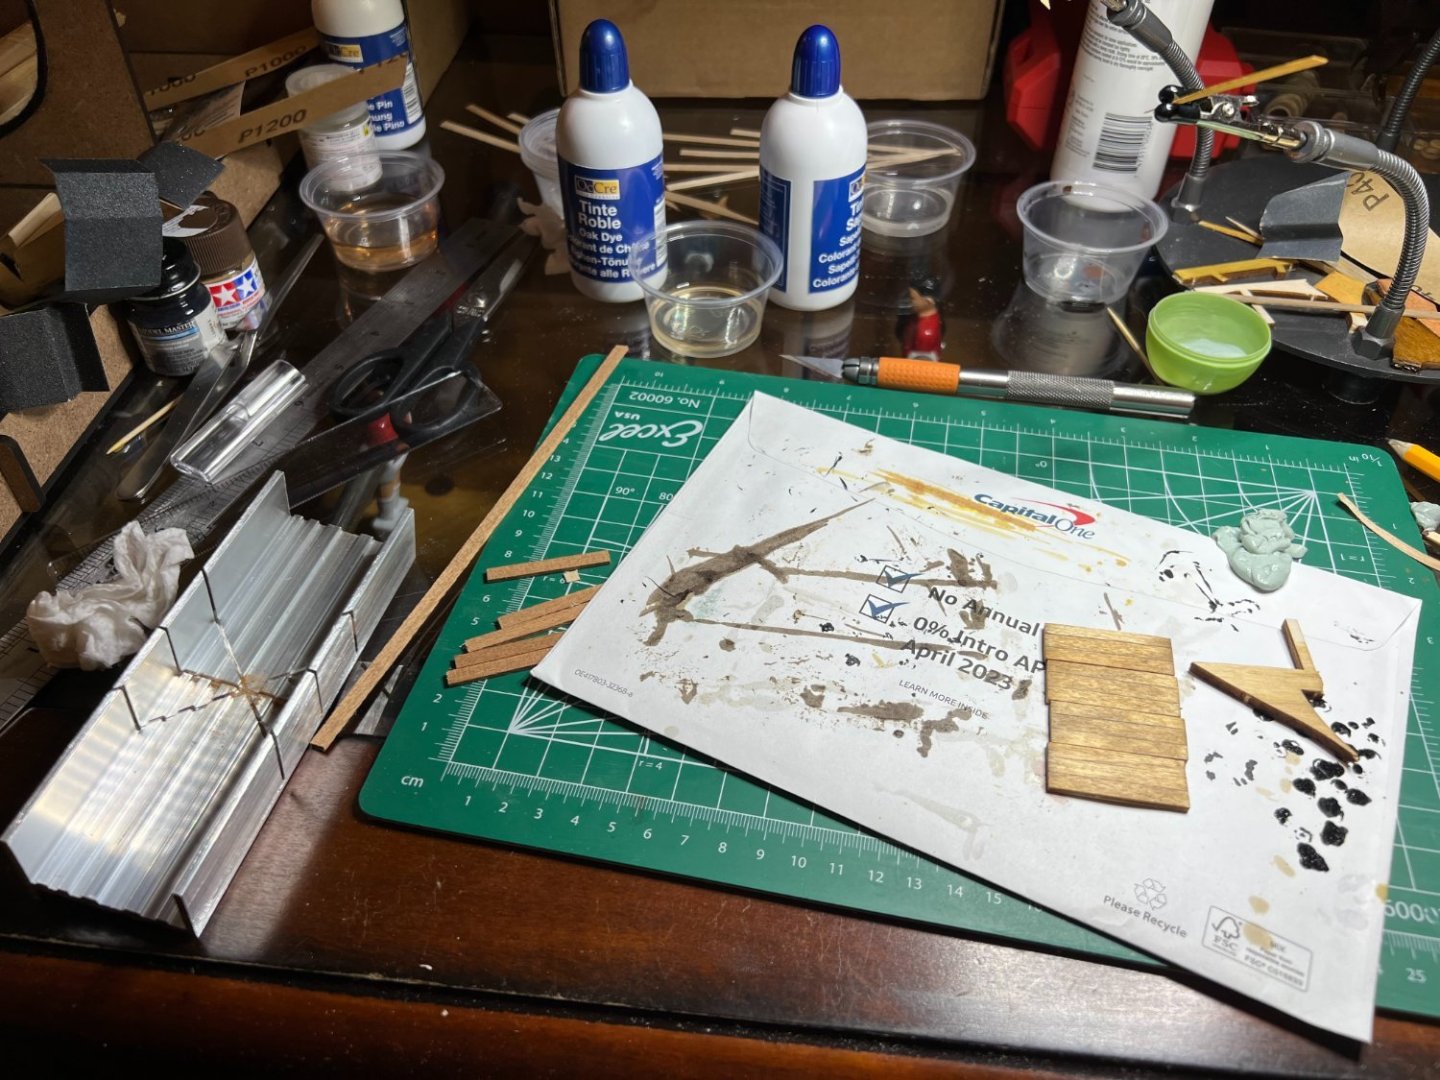
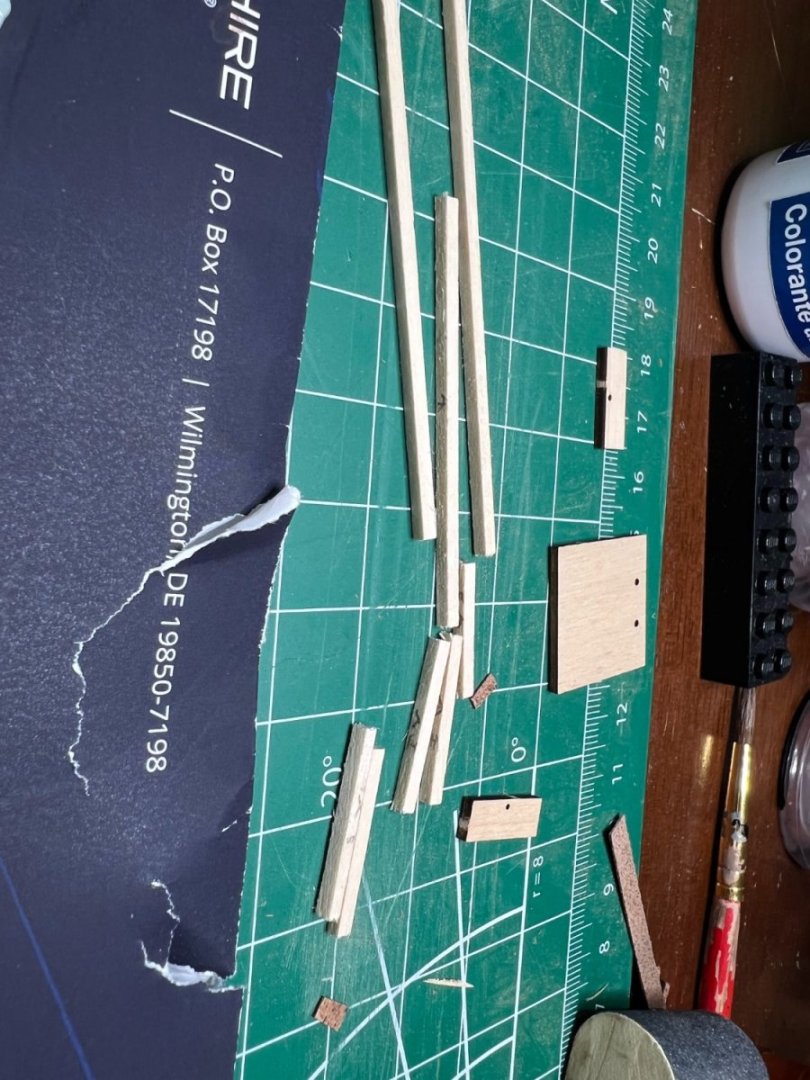
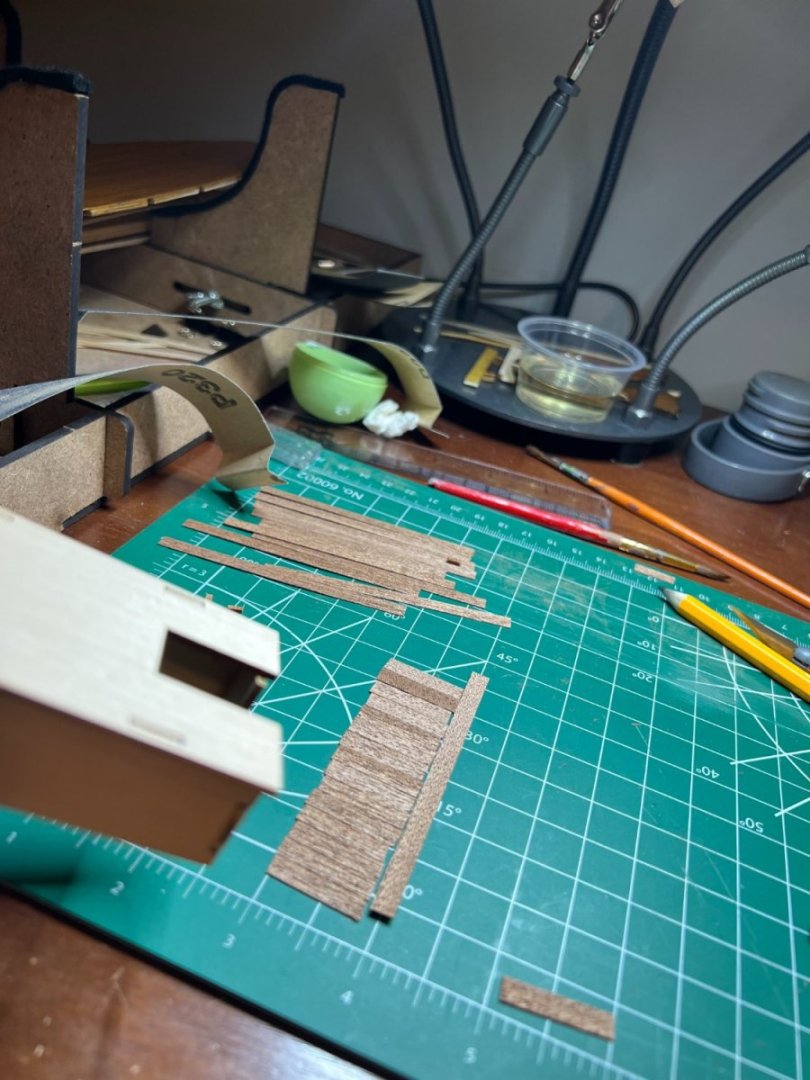
First Hull Planking I have mentioned a few times that I am trying to learn as much as I can from this model, so I decided to treat my first planking as if it was the only planking I would be doing. In other words, going at it as if this was a POB model. This took SIGNIFICANTLY more time and effort, but I am very glad I did it this way because it was a great learning experience and I got better as I practiced. In hindsight I probably should have mentioned that at the start of the "lining off the hull" chapter. Like I said earlier, everyone has their own style for planking and it has taken me a while to figure out mine. The tools I used were: a digital caliper, a mini plane, a sanding block with 180 grit paper, a travel iron, clamps, a bending form I made, planking fans, a mechanical pencil, wood glue, planking nails, a nail pusher, a jewelers hammer, needle nose pliers, and an old chisel blade exacto knife. The method I arrived at (after some trial and error) can be simplified down to the following steps: 1. Determine band width and number of strakes at each bulkhead. Record these measurements in tables. 2. Use calipers to mark one band width at each bulkhead on a planking fan (it is easier and more accurate to use the entire band width instead of an individual strake's width, just make sure to include the right number of strakes). 3. Use an exacto knife to slice out the mark for each bulkhead from the planking fan. Make sure to indicate which side of the cutout is your measured side. 4. Choose a plank and mark one edge to be the untouched factory straight edge. I used a pen for this. 5. Hold the plank up to the ship's hull so that it overhangs on both the bow and stern and there is no gap with the side piece (I started from the top down). Mark where the plank intersects the front edge of each bulkhead and the bow and stern. 6. Clamp plank flat against workbench. Carefully overlay planking fan cutout and mark on the plank the proper width at each bulkhead. Be very careful to use the width from your marked edge that will not be touched! 7. Connect the marks at each bulkhead with a ruler. At the stern you may want to use a French curve for big shifts. 8. Use a mini plane to shave off the majority of the extra material. MAKE SURE NOT TO SHAVE THE MARKED STRAIGHT EDGE! Once you get close to the pencil mark, use the digital caliper to check the width at each bulkhead. At this point it should ideally be slightly wider than the calculated strake width. 9. Use a sanding block to carefully sand the plank along its length to smoothly and accurately reach the desired width at each bulkhead and the bow and stern. Check with calipers regularly to prevent over or under sanding. Try to be close, but don't worry if you are a little off. 9.5. You can sand the inside edge corner of the plank a bit to try to get a better fit (champfer? bevel?). This helps in some areas, but I am still figuring out if it is worth the effort and where it is best used. 10. Clamp the plank bending form to the workbench. Clamp one end of the plank to the bench with some spot between the first and second bulkhead at the apex of the form curve. The marked, untouched edge should be the inside edge of the curve, aka the edge touching the bending form. I dipped my finger in water and rubbed it on the upwards face of the plank to assist in the bending. 11. Using the travel iron turned up to full, carefully apply heat and use the form to curve the plank. I used a plank trimming to get under the travel iron and keep the forward edge pushed up against the curve. Heat only needed to be applied for around 30 seconds to a minute. 12. After this I rubbed a bit of water on the plank again to rehydrate it and add some flexibility. I then held it up to the hull while it was still warm (not a requirement, but it helps) to set the correct shape. Be very careful at the thin bow area. I accidentally snapped like 3 planks at this step trying to set the correct curve (which is very frustrating considering all the preceding work). That's how I learned that adding a little water after bending helped prevent this. 13. Get your planking nails, pin pusher, mini hammer, and wood glue. Put wood glue on the bow area and the first bulkhead. For the first strake (at the side pieces) I would definitely recommending adding glue to the bottom of the side pieces where they will join with the strake for added strength. Line up the bow mark and the first bulkhead mark. Lay the front of the first strake at the bow and push a nail in as far forward as practical without breaking it or missing the hull. Don't feel like you have to push the nail all the way in with the pin pusher, sometimes you can slip up and bend a nail or worse, break the plank. If necessary just push it in far enough that it is through the plank and into the ship, then use the mini hammer, which offers greater control and less force, to get it the rest of the way in. For my method it is important not to push or hammer the nails to the point they are completely embedded in the strake. 14. Add glue around two or three bulkheads at a time and progressively nail the strake moving bow to stern down the length of the hull. At the stern add glue as necessary to secure the strake to filler blocks. 15. Rinse and repeat for each strake. 16. The full width Garboard strake at the bottom along the keel should be one of the first added, even if it is by itself. It will give you a good point to measure to for future band determinations and adjustments. Be careful not to let it curve upwards and rise too high at the bow. I accidentally snapped one of my garboard strakes due to the dramatic twist it takes. 17. Here is where my method deviates from most others I have seen: Once a planking band is completed and the glue is all dry, I pull the nails back out. I used a very old, dull chisel blade exacto knife to get under the head of each nail and pry them up just a bit. I then used a pair of needle nose pliers to pull the nail out entirely. Are there better tools for this job? Probably, but I don't know what they are. Use this method at your own risk, it is dangerous and I got pretty close to slicing myself badly a few times. I decided on this method for a few reasons. First, I thought it would make sanding easier and more uniform. Second, I didn't have very many nails and I wanted to reuse them if they were still straight. Third, it would keep metal dust out of the equation when sanding. Although risky, I am happy with how it turned out! That pretty much sums up my planking method. It worked out well for me once I started to wrap my head around it. Now to speak about my personal experience planking my first wood model ship. I did not line off the hull completely correctly and my understanding of the entire process was not solid when I started. As a result, the first band I placed (port side top) was too wide at the bow and tapered to full width too quickly. This resulted in some odd geometry and headaches as I worked further down the hull. I noticed the issue after I finished the first band, added the garboard, and took my bulkhead measurements again. I realized that my other bands were going to need to be significantly thinner that the first band for much of their run. I decided to hold off on the other port side bands and give the starboard side a shot. I was determined not to make the same mistake twice. I made an excel model that used formulas, ratios, and models representing the ships side to help me create dimensions that would create the look I wanted. Once I found a balance of band dimensions I was happy with, I re-lined the starboard side. Then I added the garboard and the first strake. From here I re adjusted my lining a few times before getting to something I was happy with. I am still figuring all this out, but I am proud of how the Starboard side turned out, with one minor exception. The last strake that needed to be placed ended up being in a good, somewhat hidden, position under the curve of the hull. However I still wanted to get it perfect. The first strake I made to fit the gap was just a bit over-sanded in a couple spots. Not a big deal, but since it was the last strake and the side looked so good, I decided to make another strake that would fit perfectly. I did this and when I dry fitted it, indeed it fit perfectly after some sanding. I took a break to get some food. Then I returned and glued and nailed it in place. But I noticed something weird. There was still a little gap. I discovered, to my despair, that somehow I had accidentally picked up and glued into place the not quite perfect first edition strake, and my V2 strake was laying on the workbench. Wellllll... oh well it still looks good! I used my excel model and some eyeballing to return to the port side and fix the bands the best I could. I re-lined the hull and got to planking. It took more work because of my earlier mistakes, but the result still looks pretty good. Planking took me a long time to get done, and the next post will probably be a short one covering some of the things I did to break it up so I didn't start rushing it or give up. But overall I learned a ton, and I am very happy with how it came together.


-
Cpt. Jack reacted to a post in a topic:
Polaris by Paula - OcCre - 1:50
-
Cpt. Jack reacted to a post in a topic:
Polaris by Paula - OcCre - 1:50
-
ibozev reacted to a post in a topic:
Polaris by Cpt. Jack - OcCre - 1:50 - first build
-
ibozev reacted to a post in a topic:
Polaris by Cpt. Jack - OcCre - 1:50 - first build
-
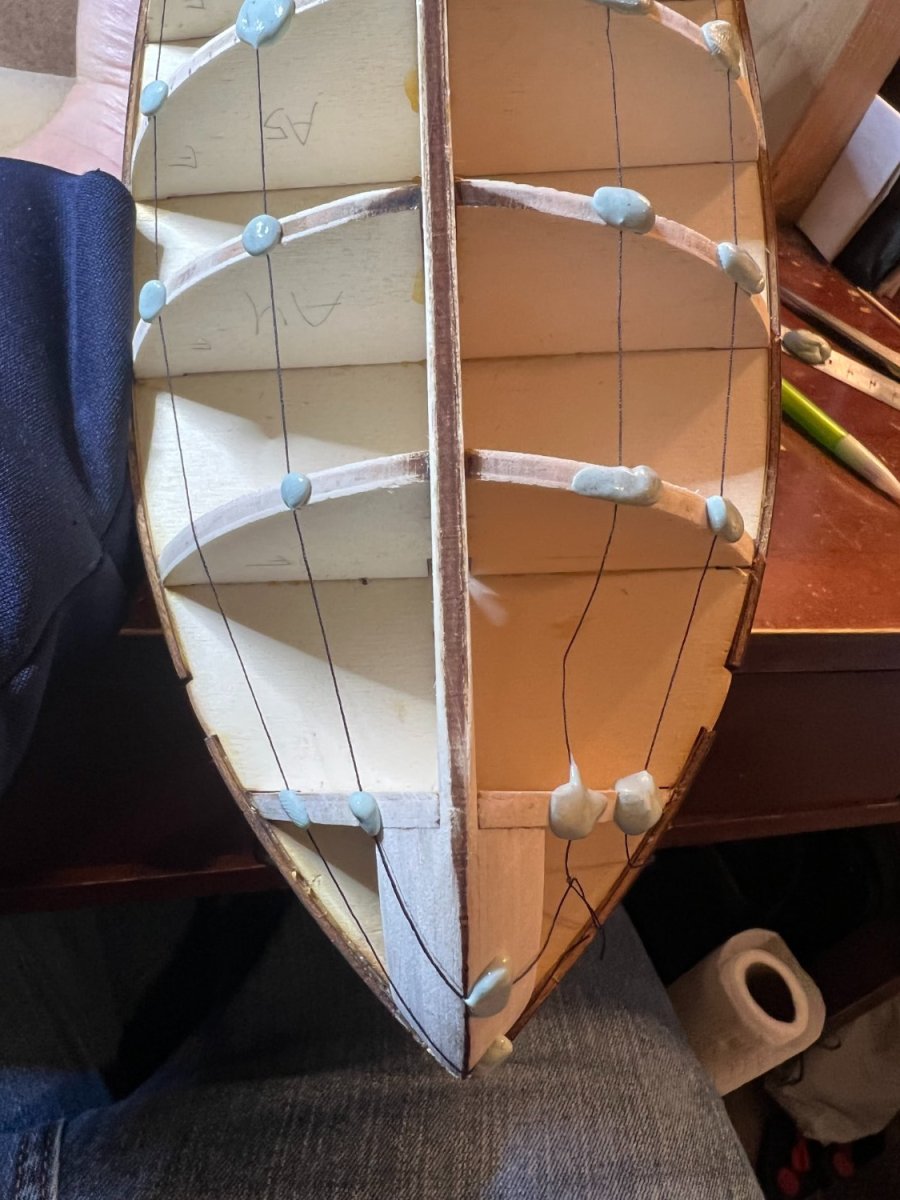
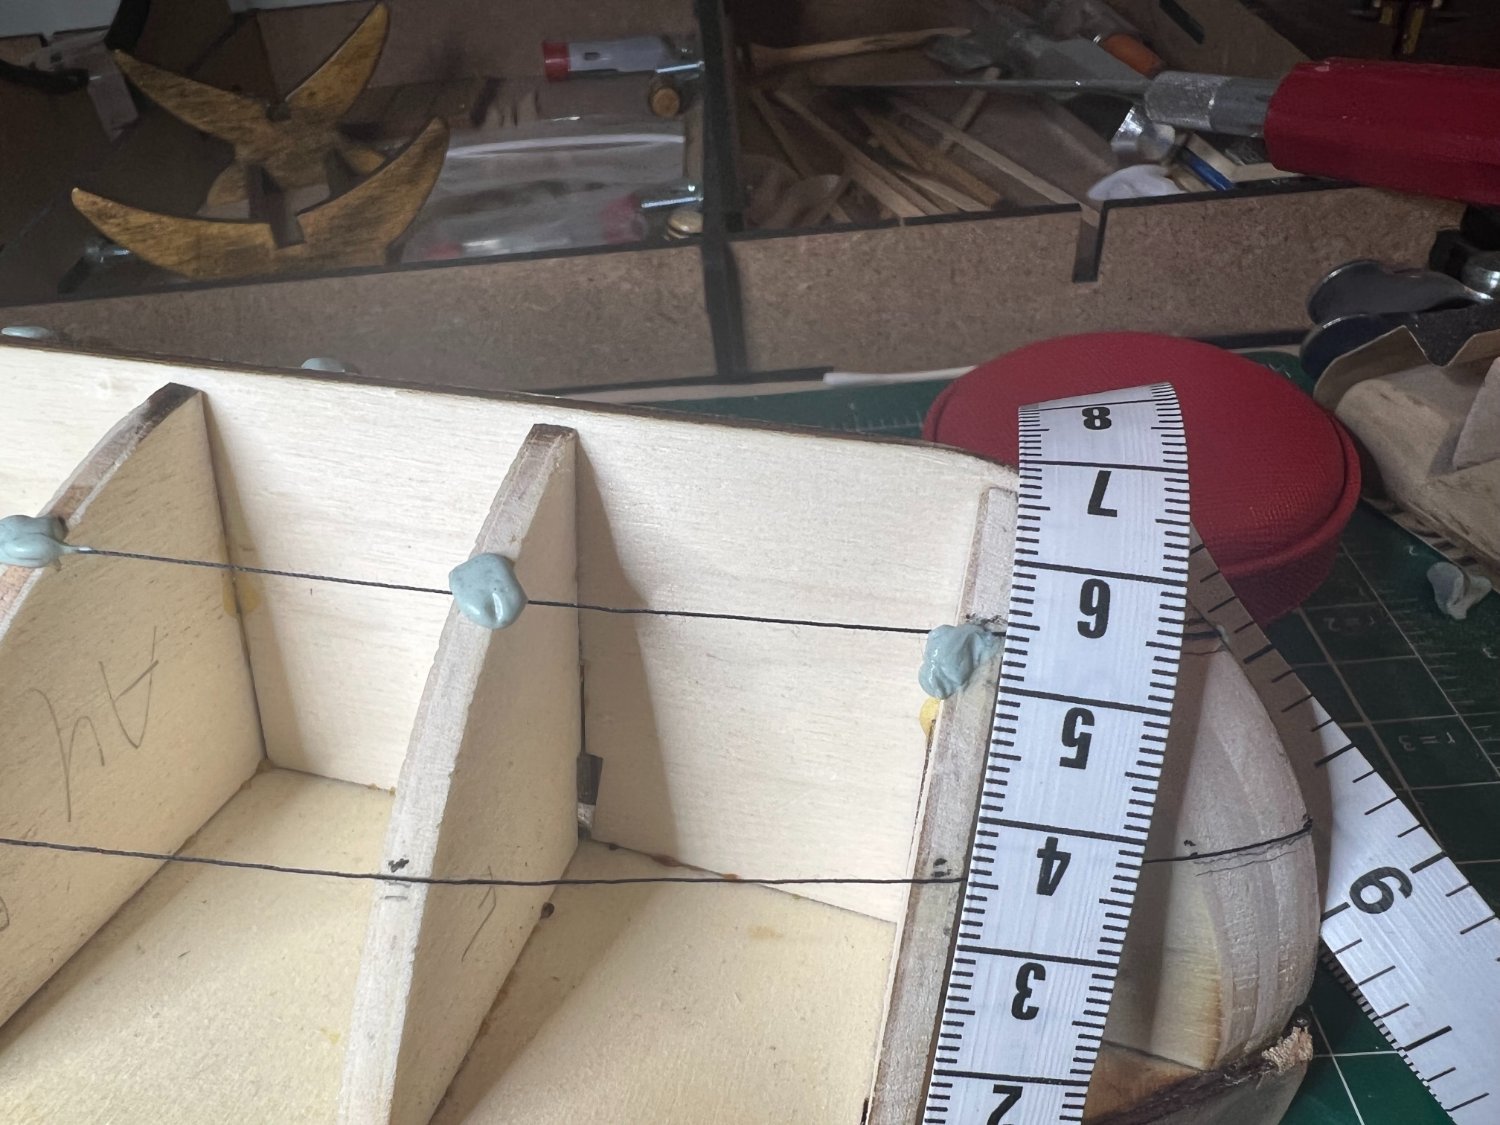
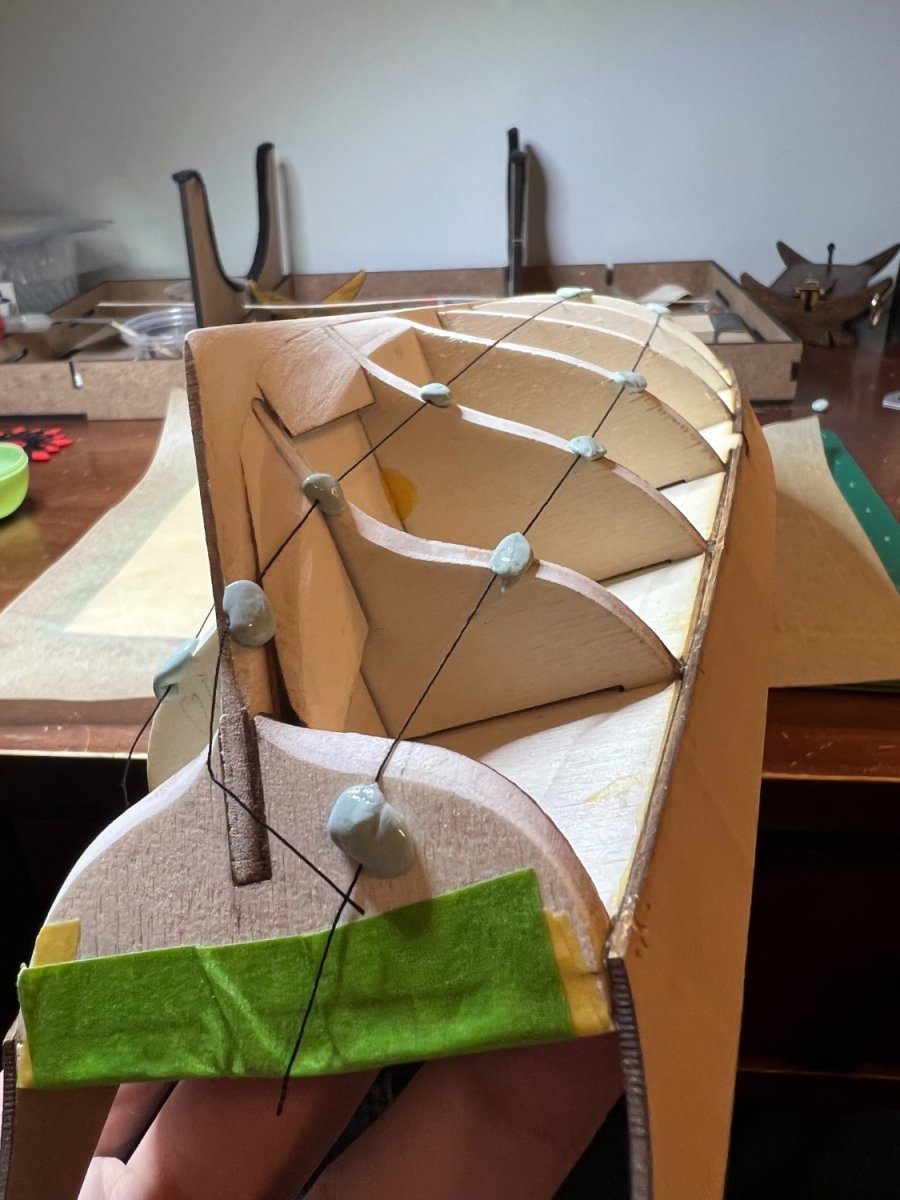
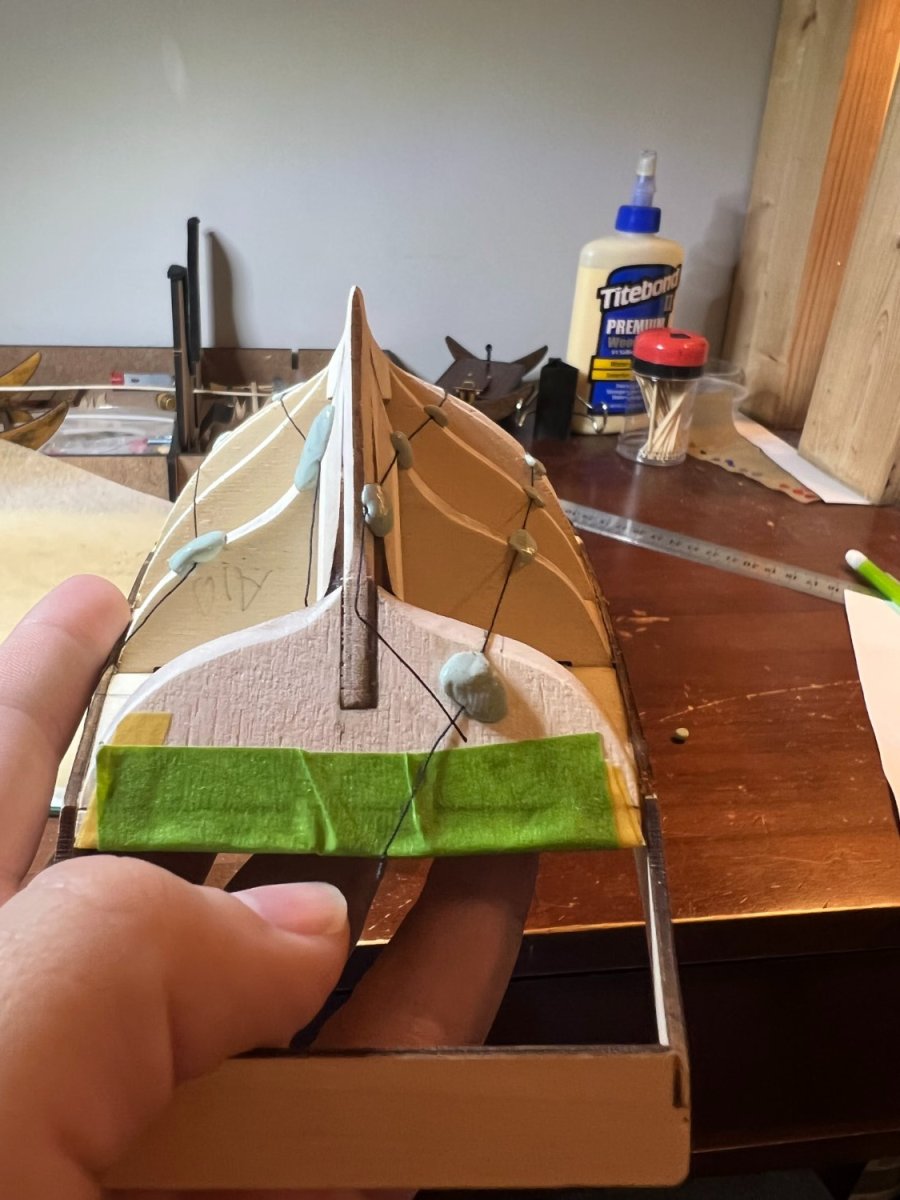
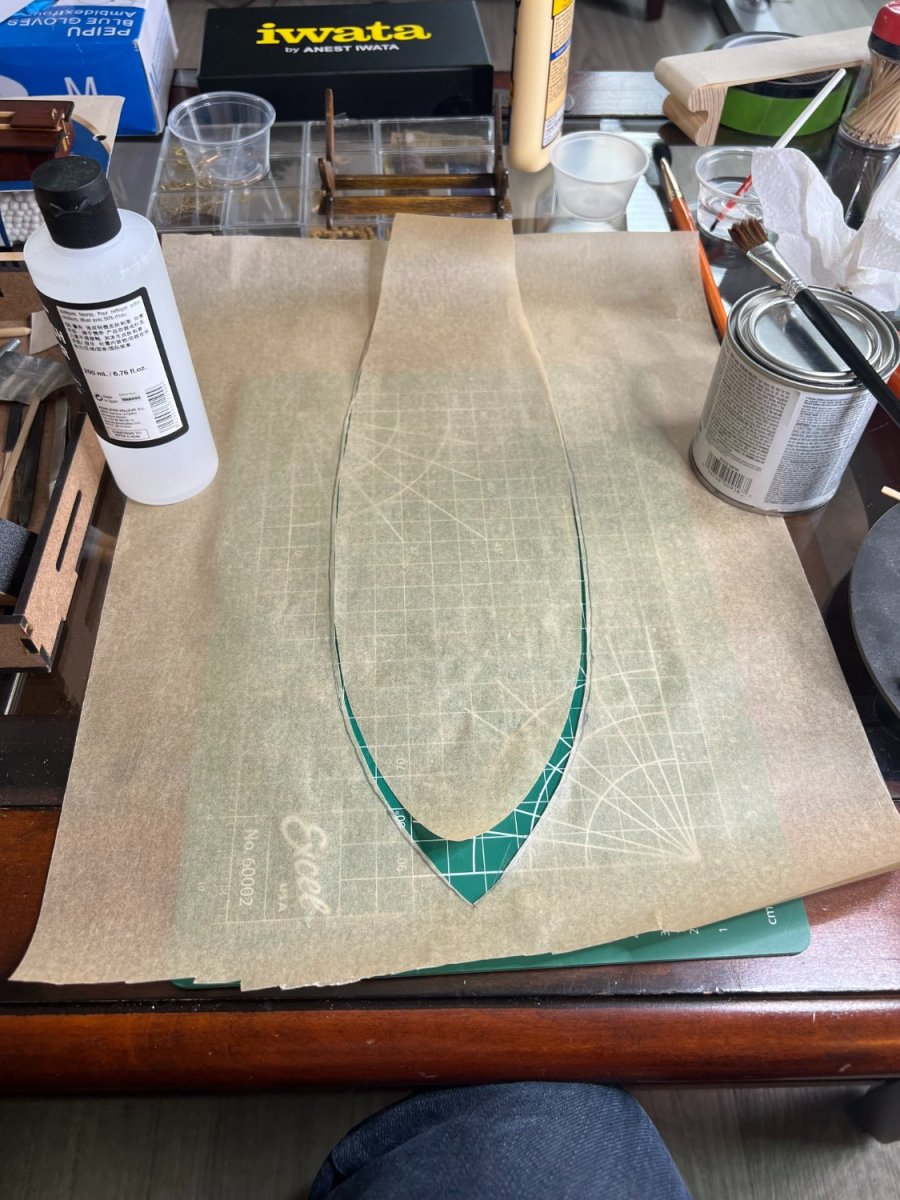
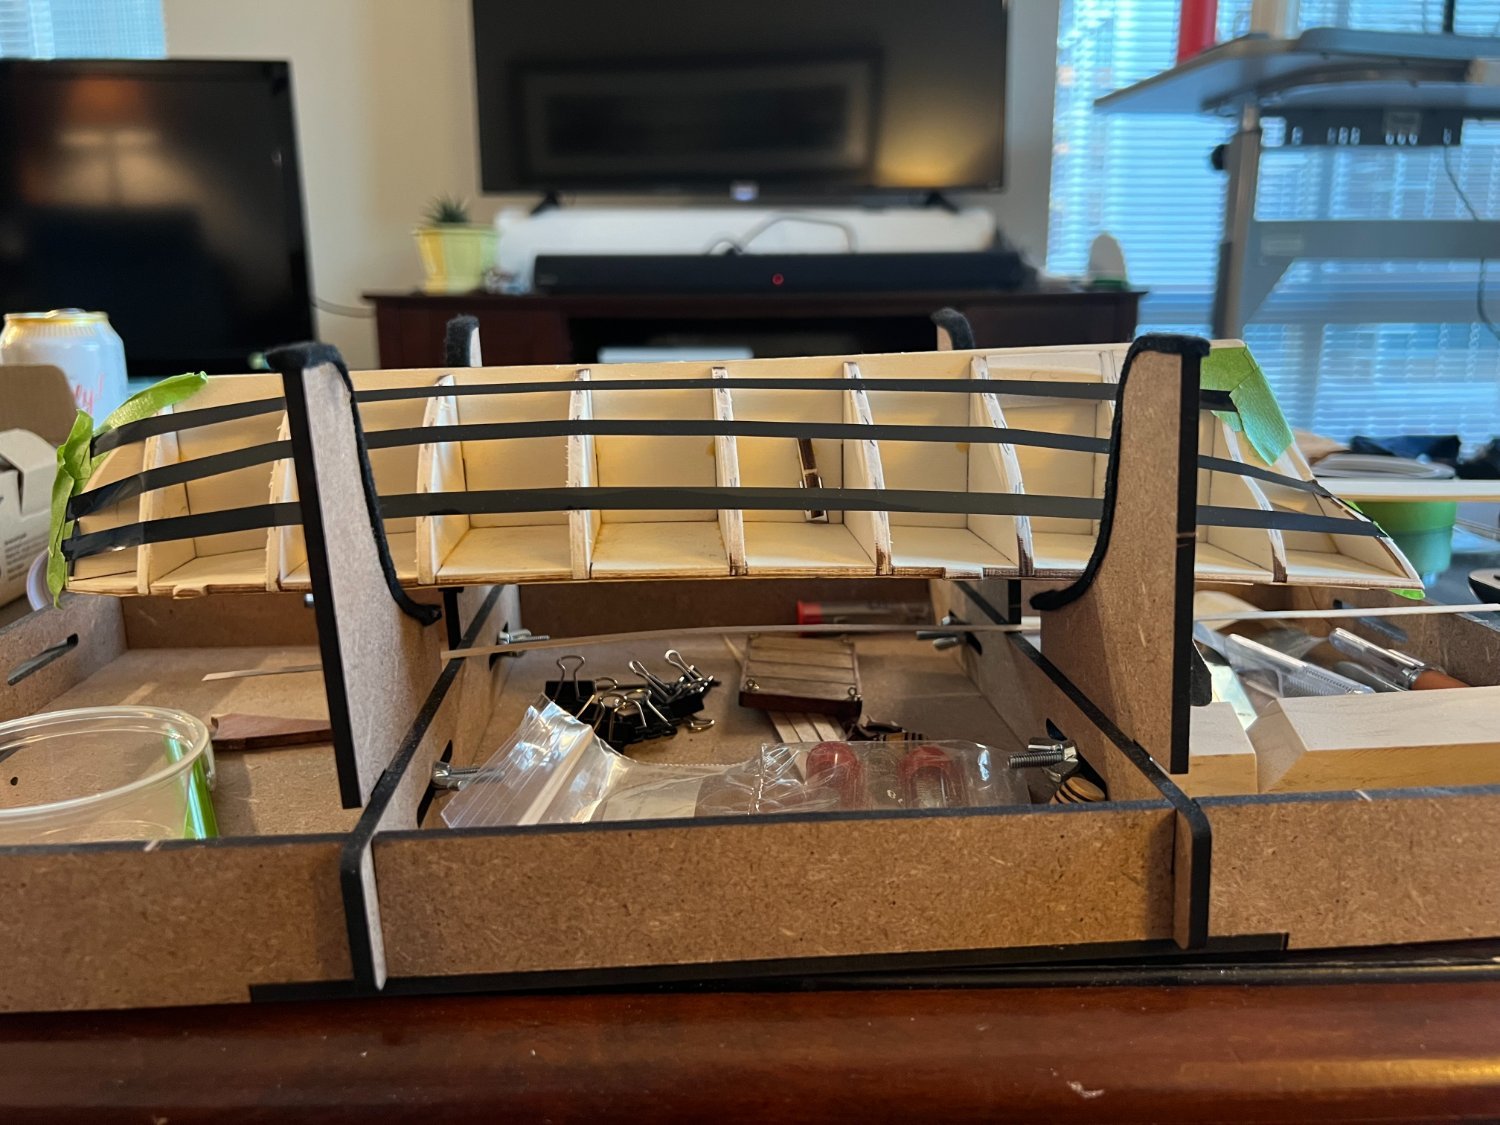
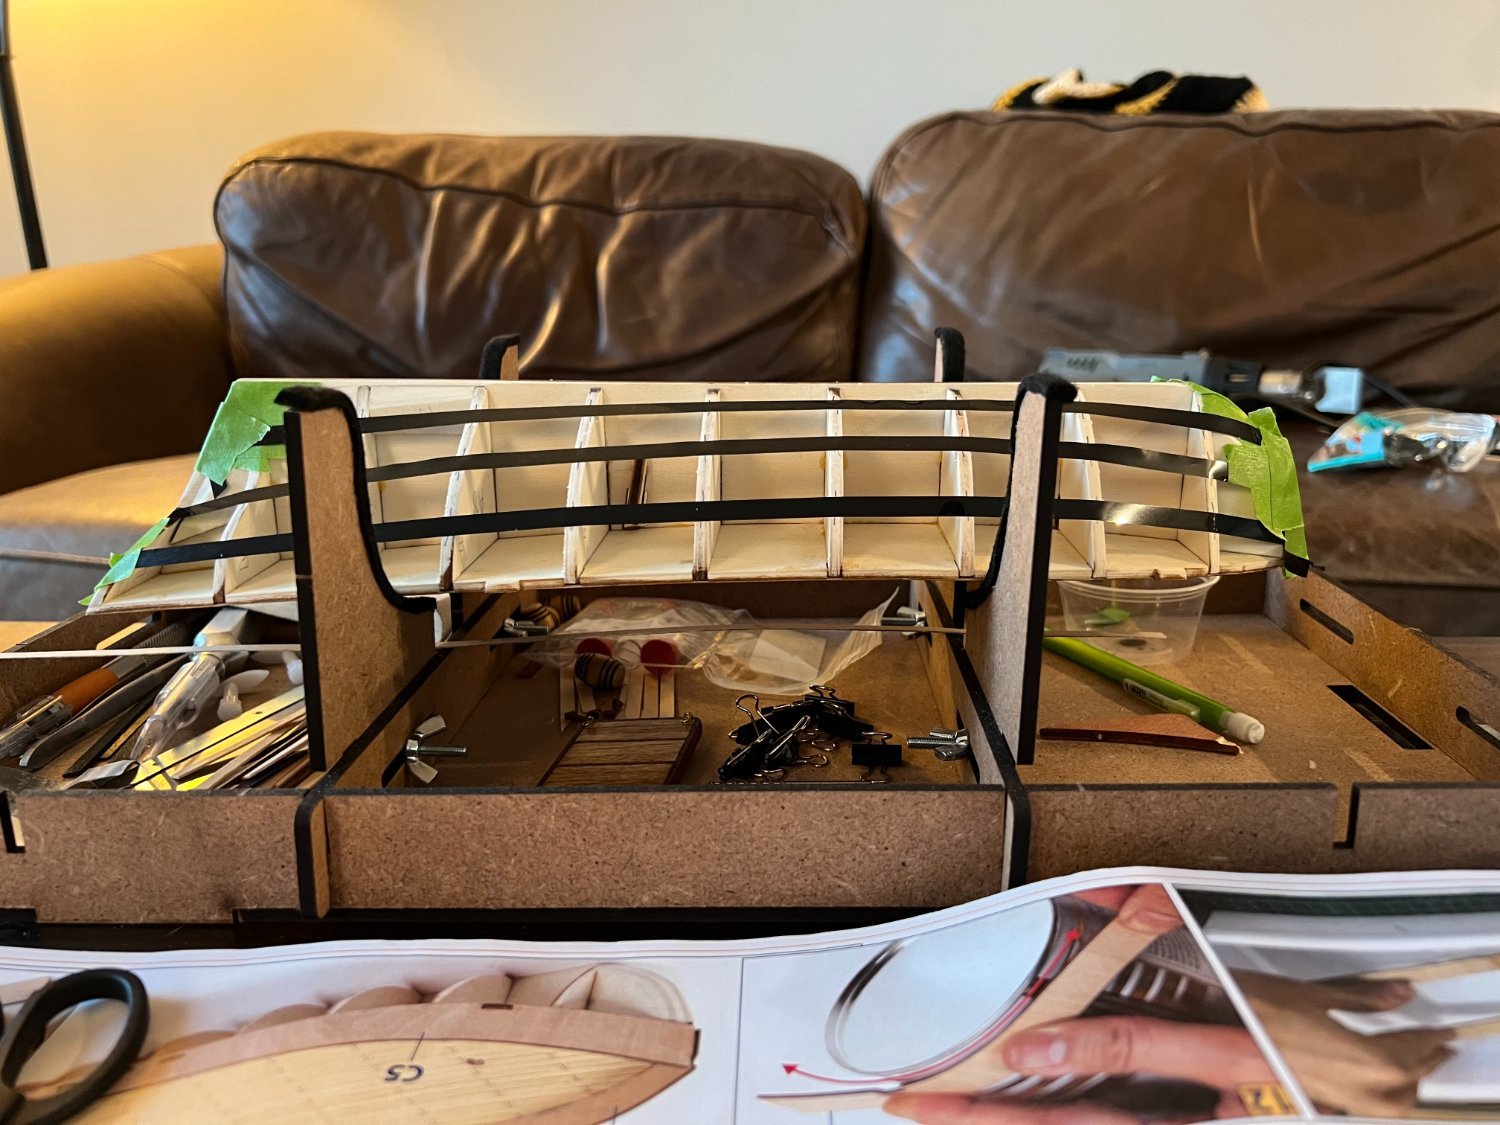
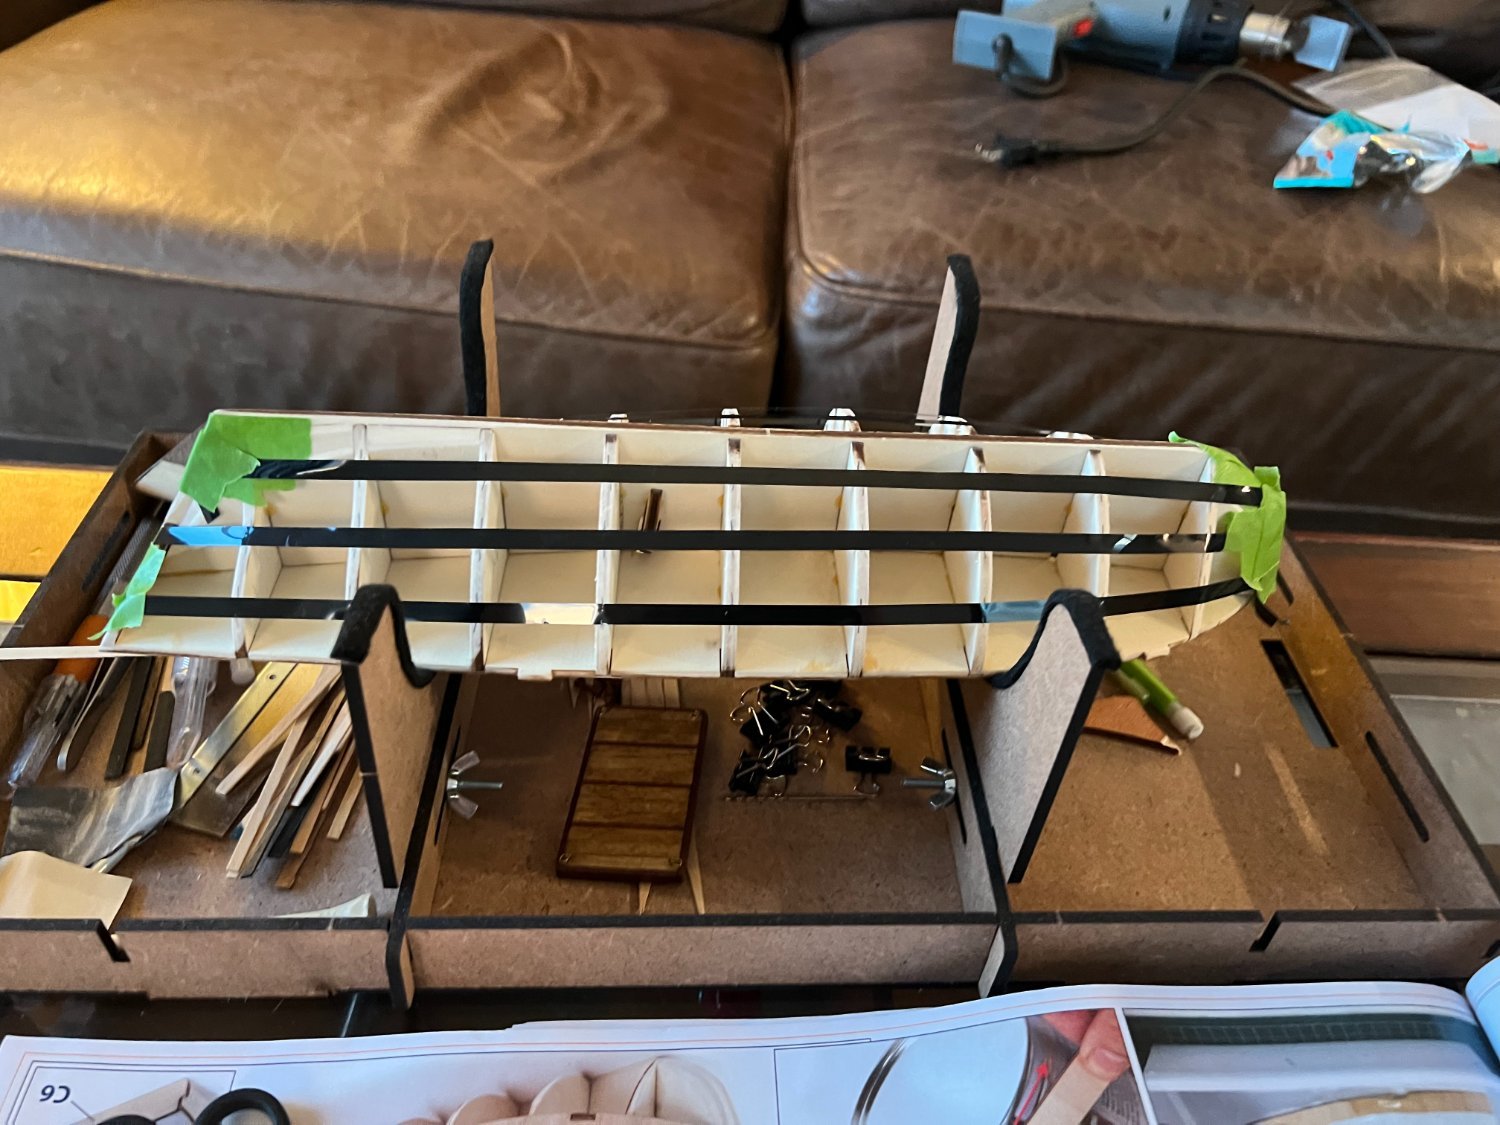
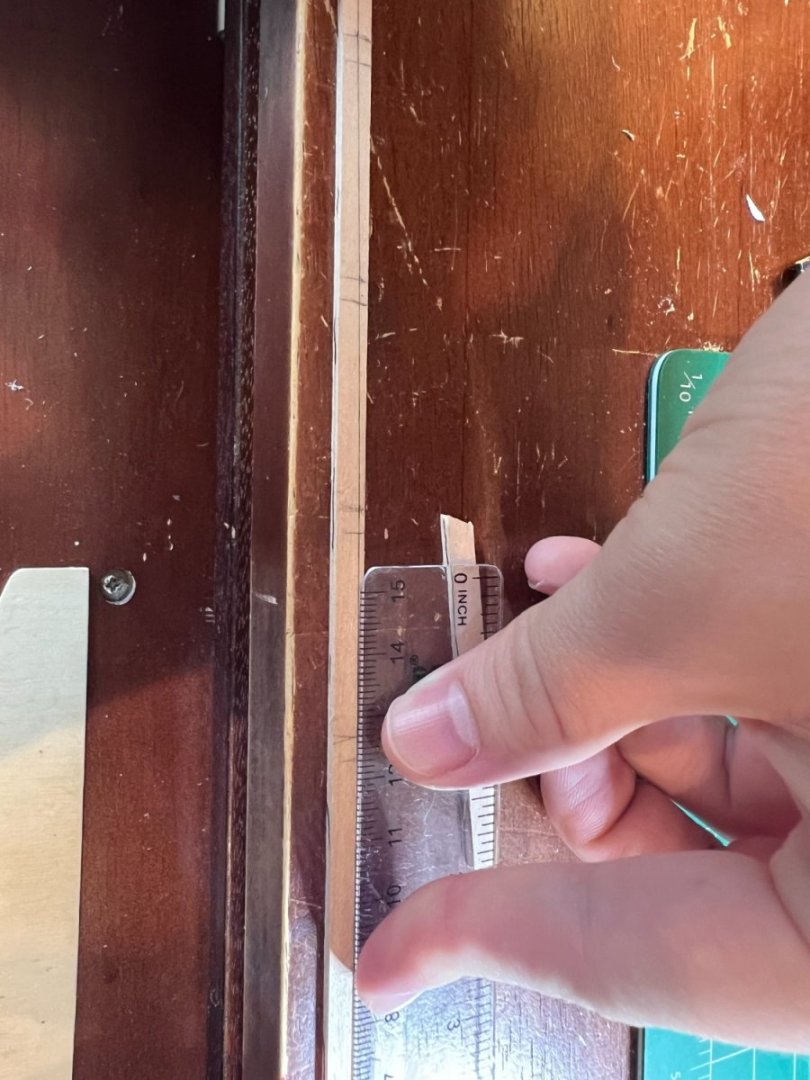
First Attempt at Lining the Hull Here it is folks, planking. Time to get going in earnest. I was pretty nervous about this step and I was intimidated going into it without experience. I am so grateful for the many excellent guides and build logs on MSW. As I stated in an earlier post, I mainly followed the "Simple Hull Planking Techniques for Beginners" guide for my work. I also looked at many different build logs. It is true, however, that you come up with your own style as you go. The first thing I did was measure the bulkheads amidships to determine the widest distance; this determines how many 5mm planks I will need to cover the hull (I also added my signature and the date, inspired by Ilia (Ibozev) and Havelock). I measured around 75mm at the widest point on each side, necessitating 15x5mm strakes per side. I decided to separate out 3 planking bands of 5 strakes. Now I just needed to figure out the run of the planking bands... Let me begin by saying I did this wrong at first. I think experience really does help here. Although I did spend a great amount of time and effort, I did not lay out my planking bands quite right. It takes some eyeballing, but there is also math and restrictions involved. Convention dictates that no plank should narrow to less than half its full width, aka 2.5 mm in this case. Also, I wanted to avoid stealers or drop planks (not really a necessary restriction, contemporary models definitely have them. I am pretty sure real ships had them as well. But still, that was my goal). That meant that no band could be narrower than 12.5mm or wider than 25mm at any point along the hull (assuming each band is made up of exactly 5 strakes). This was a restriction I didn't fully grasp at first, resulting in some errors. However, if properly recognized beforehand (again I hope this log can help some people out there), that restriction can actually be useful for establishing some necessarily fixed points for your planking run. For example: The extreme stern (I believe it is called the deadwood) area was about 75 mm, and thus each planking band had to land in 25mm increments. This was also true amidships where the bulkheads were 75mm. That gives you two fixed points to connect, which should give a relatively intuitive run between them. I do understand that this is not quite proper, that there should be some thinning strakes and some strakes that widen quite dramatically at the stern, but it suited my first planking needs just fine. After the earlier tests with the 5mm black tape, I decided string would be better for laying out the planking bands because it easily bends and curves in any desired way. The strakes will need to curve on two axis for a proper run, which was hard to represent with the tape. I mentioned in an earlier post how useful silly putty can be to modelers, and here I used it once again as a temporary and easily adjustable adhesive for my string lines. In the above photo you can also see the wood filler at the bow gap. It definitely looks a little rougher in the pictures, but the ugly outside section is going to be covered up later and it does its job well. The more problematic area for me was the bow. I had some difficulty figuring out the proper flow here. I read that you really don't want the planks curving upwards and creating a "smiling" bow. Accordingly I put some serious effort into avoiding this. However, in hindsight the string lines seem to be misplaced. The band closest to the deck and the middle band should be narrower than I laid it out. I was worried this would create the upward sweeping plank issue, but I over-corrected and realized later that I did not leave enough room for the keel planking band. Although I did (attempt to) measure each band to ensure it did not narrow to less than 12.5mm, I failed to account for the garboard strake, which should be wider than the rest. I also learned that it is very difficult to accurately measure the very bow and stern of the ship due to the angle/ curve down the length of the ship. Tips on this point are very welcomed. Additionally, I was being a bit lazy and wanted to taper the strakes as little as possible. Thus the first two bands were held at 25mm width as long as they still looked 'acceptable' to my inexperienced eye. All of these factors lead to a somewhat inaccurate lining of the port side bow. Although not my proudest post, I learned a lot about the process of lining off a hull and I feel that it was necessary to make a go of it even with my limited understanding at the time. For me, I just had to do it to understand it. I had read up quite a bit, yet still on multiple occasions I found myself confounded by odd minute issues that were not covered in my readings. In my opinion some things just require hands on experience, and I am grateful for my little Polaris helping me find my way through. Next up: My very first attempt at planking a hull.


-
ccoyle reacted to a post in a topic:
Polaris by Cpt. Jack - OcCre - 1:50 - first build
-
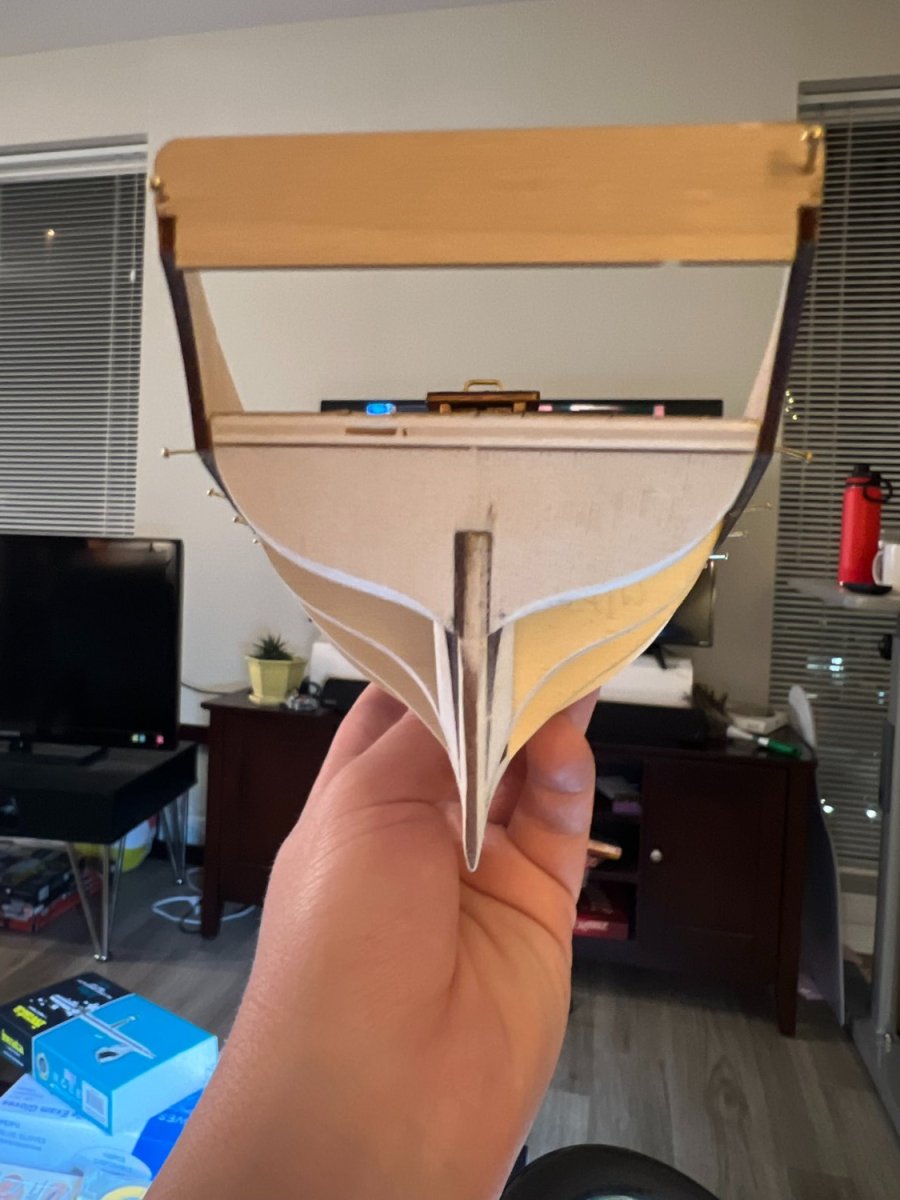
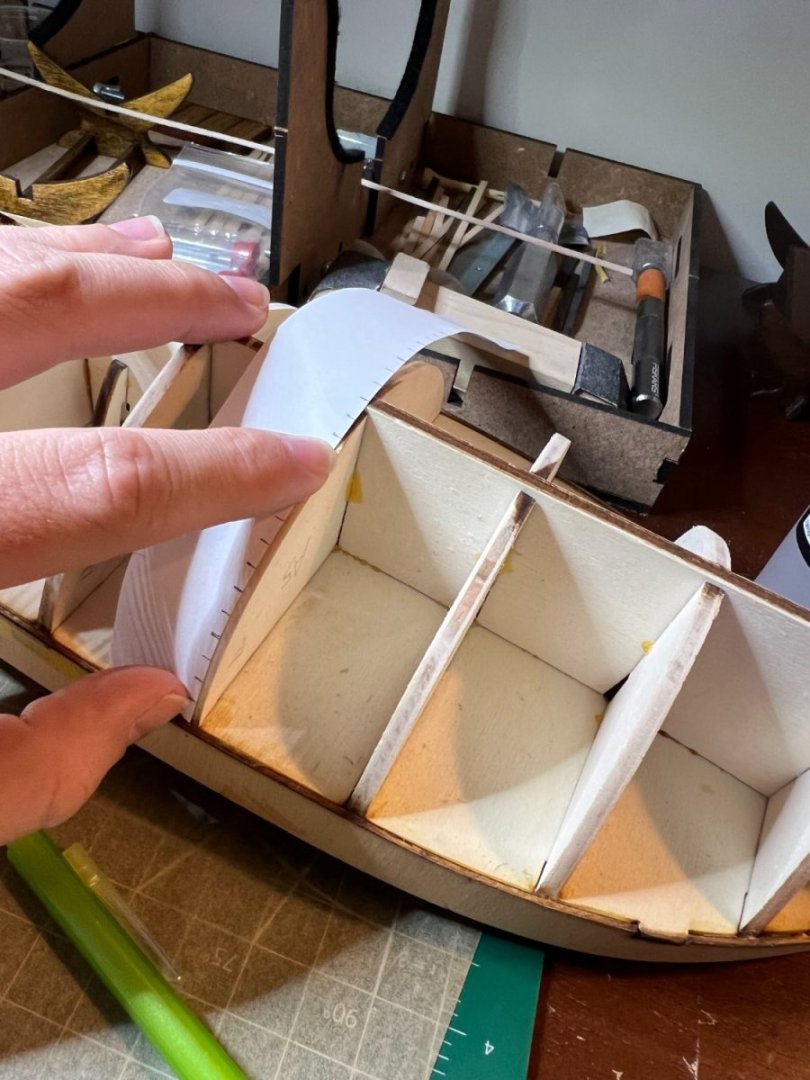
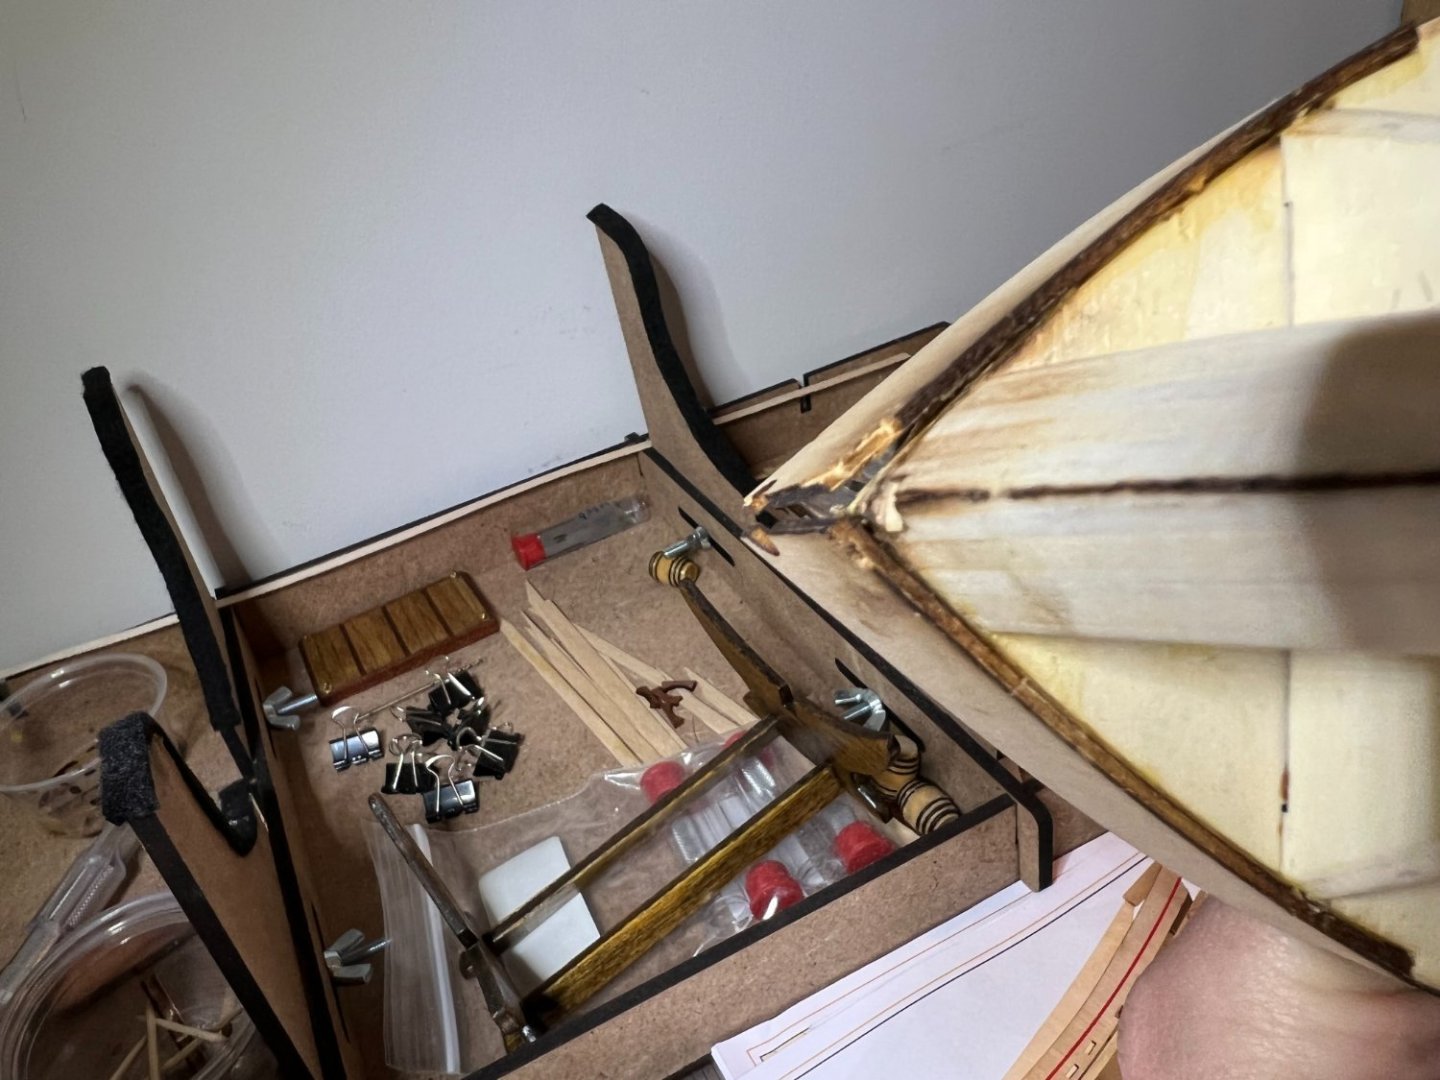
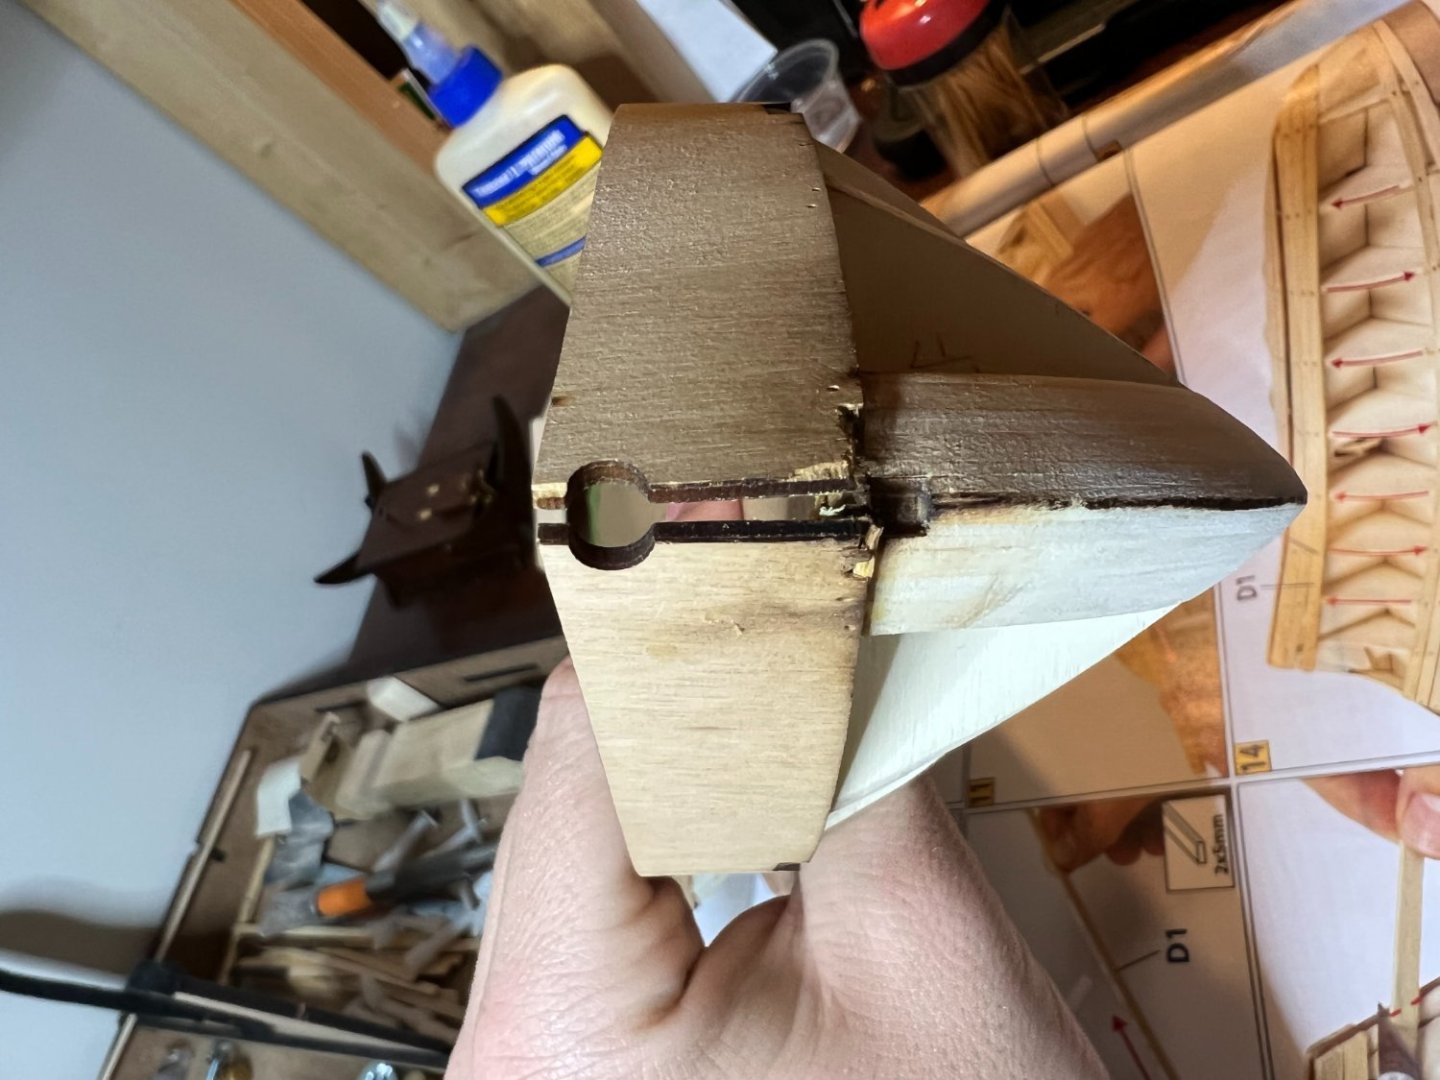
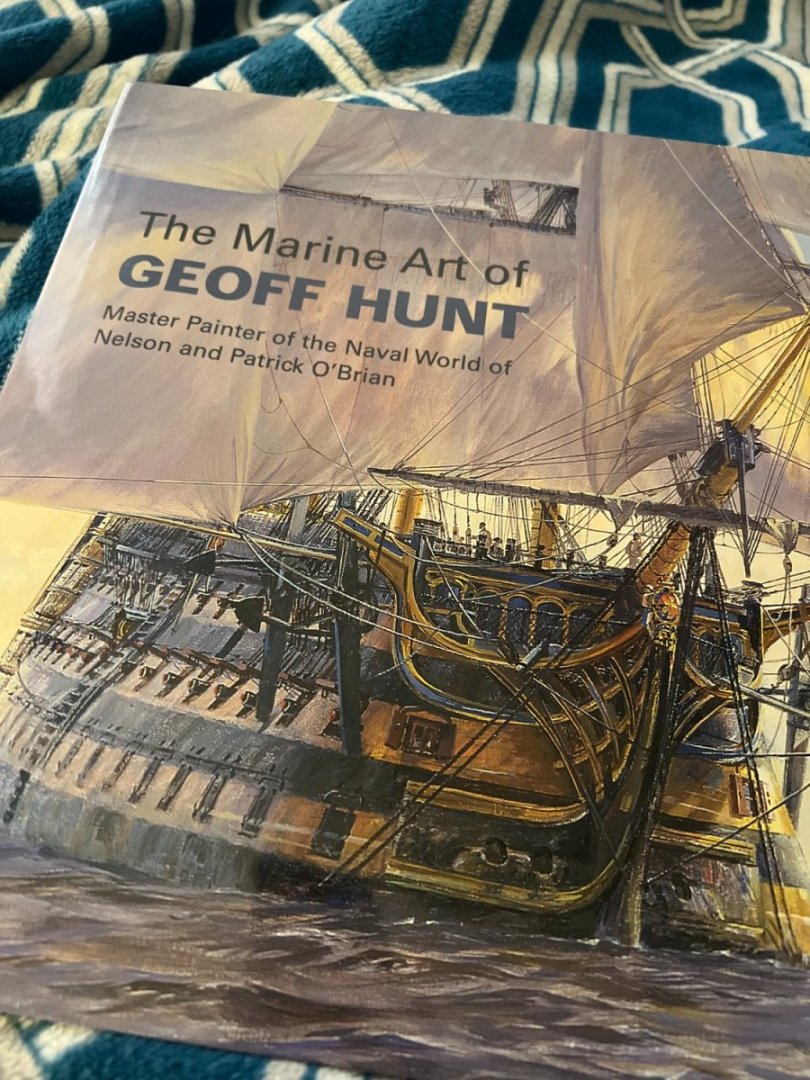
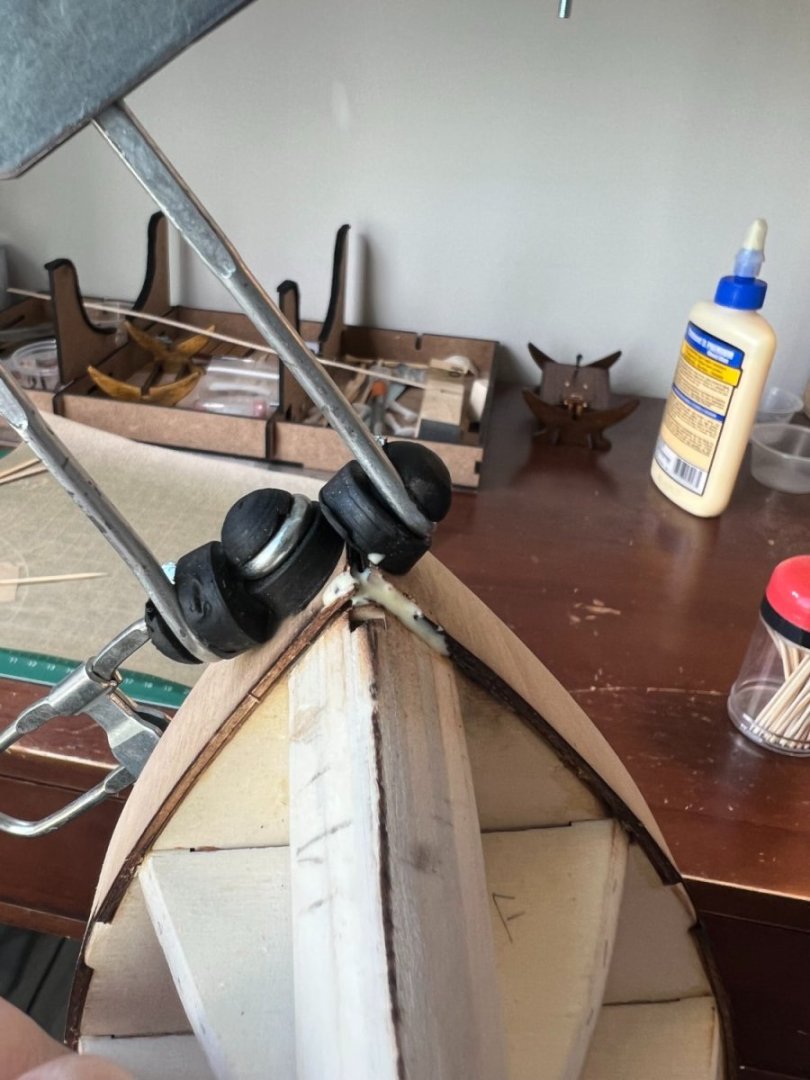
Mind the Gap Although I was very happy with the flow of the side pieces, they ended up not quite meeting up perfectly in the front. There was also some damage at the front corner where ham-fisted pinning had ripped through the fragile, baked wood. I wrestled with whether or not this required fixing. The exterior of this area has some trim pieces along with the stem, which I thought I might be able to cover the gap with. However, after looking forward in the manual and at some of Ilia's (@ibozev) great photos, I came to the conclusion that if I didn't fix it, there would be an ugly crack on the interior. This crack might be conspicuous since the area is painted white. It may also affect the hull shape at the bow slightly. I have been working to be patient on this project and do things properly, and so ultimately I decided that this definitely needed to be fixed. One intermediate step I took was to cut out some parchment paper and cover the deck with it to protect it during construction. This actually took a while because taping it to the deck without leaving gaps was challenging with the curving edge. Also a small aside, I picked up Geoff Hunt's art book for some inspiration and it is amazing! Highly recommend. Okay back to the topic at hand. In order to address the gap, I had to get the side pieces clamped together at their extreme end and glue them. I prefer to use wood glue, so the connection needed to be held stable while everything dried. This required some creativity with the clamps. I purposefully over-glued everything for two reasons. One: to ensure a strong connection at a place with constant tension. Two: to fill in some of the damaged areas. This will be sanded, planked over, and covered up later, so it didn't need to be pretty. The re-work significantly reduced the gap at the bow and the more problematic port side piece now follows the deck shape properly. However a small gap still existed at the bow. I addressed this with Minwax's stainable wood filler. I filled in the remailing small crack and lightly sanded it smooth. Now there is no gap at all and from the interior it is almost completely unnoticeable that filler was used. Unfortunately I do not have pictures specifically for this step, but the pictures in the next post will clearly show the result. Thanks again for tuning in! Next post will be an interesting one, it's lining the hull for the first planking!


-
Prowler901 reacted to a post in a topic:
Polaris by Cpt. Jack - OcCre - 1:50 - first build
-
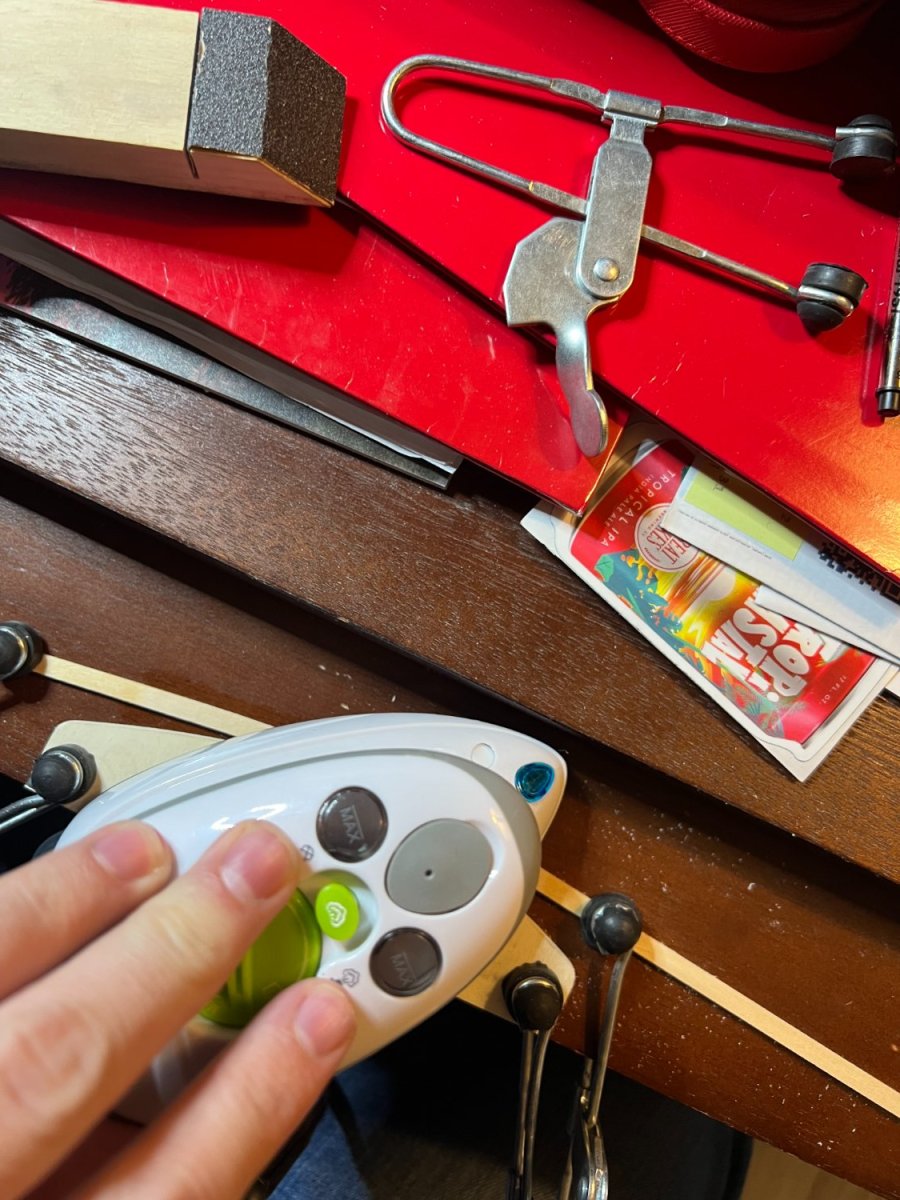
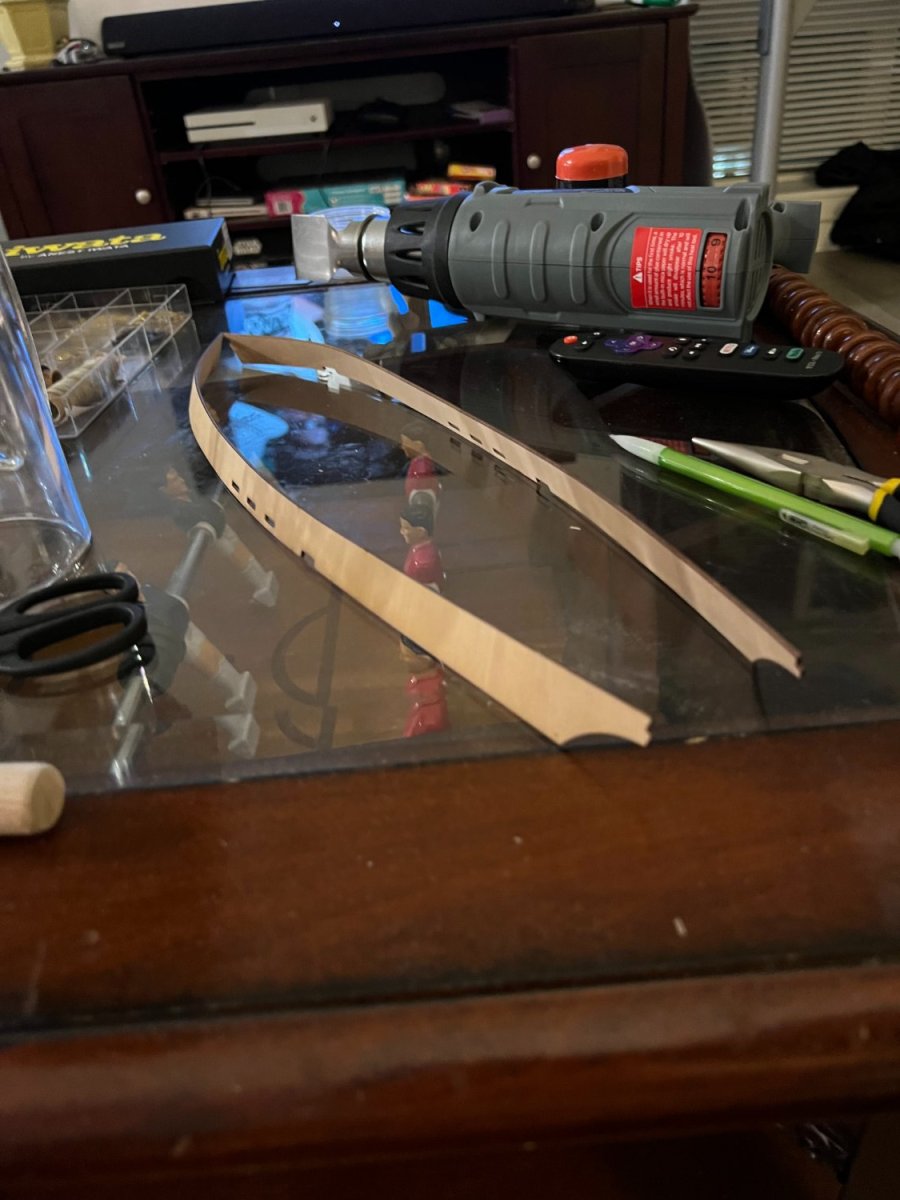
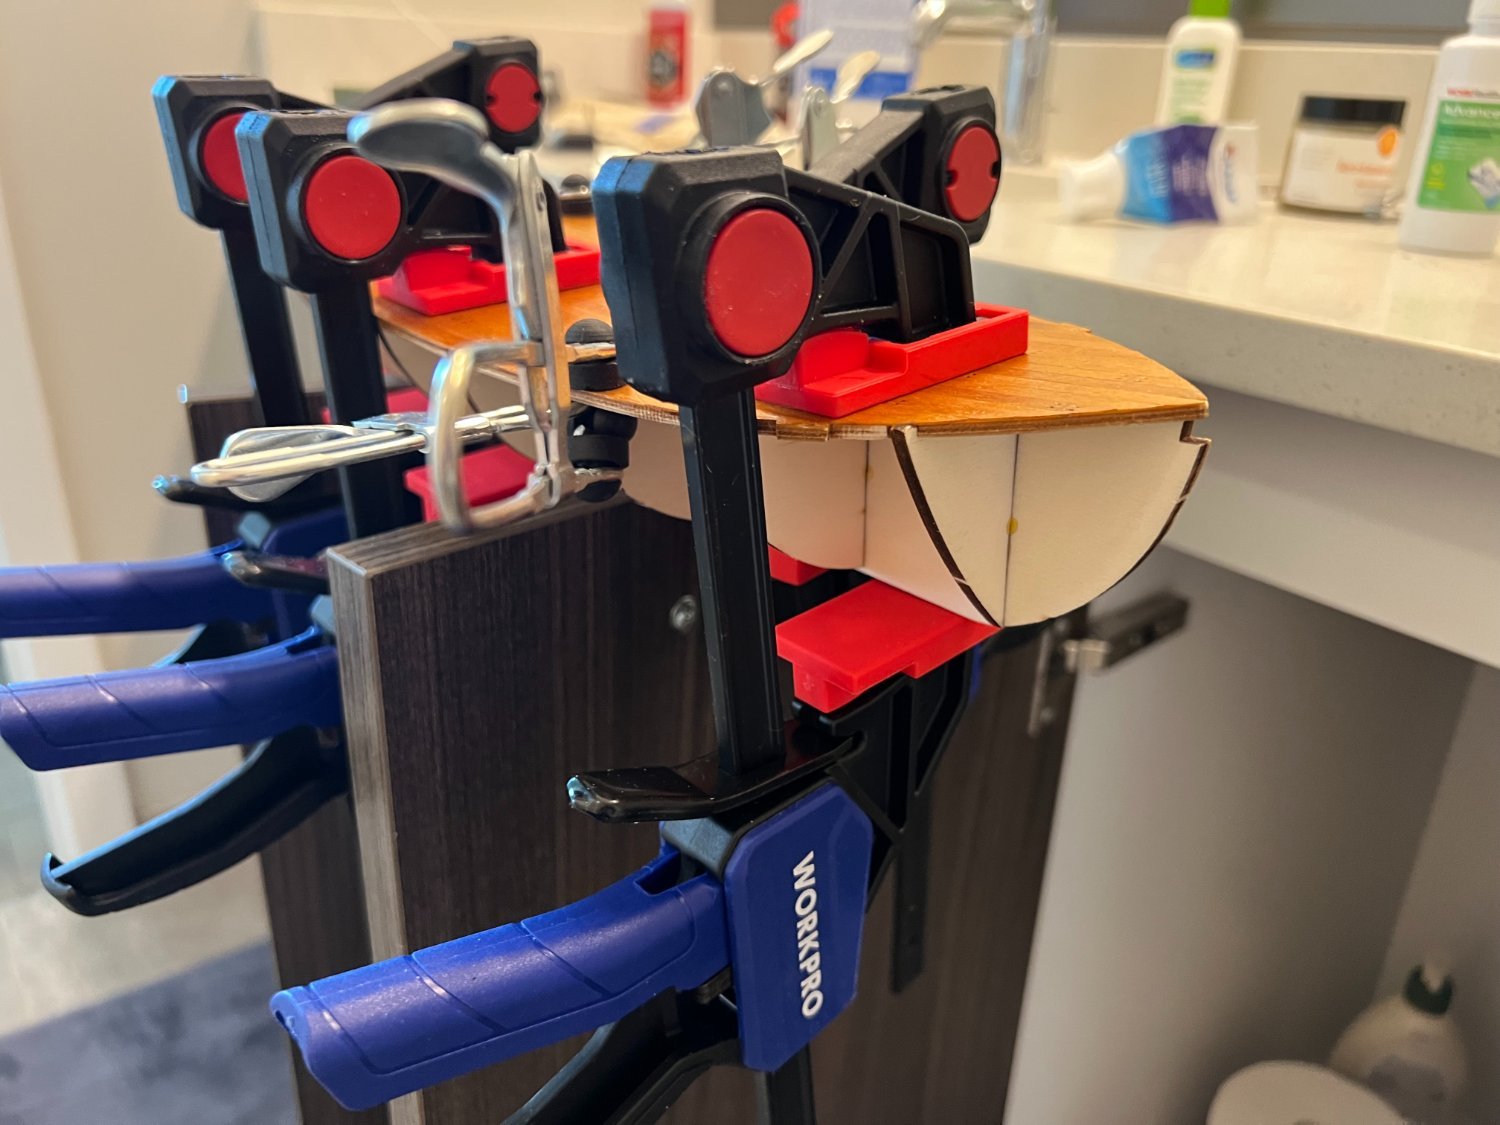
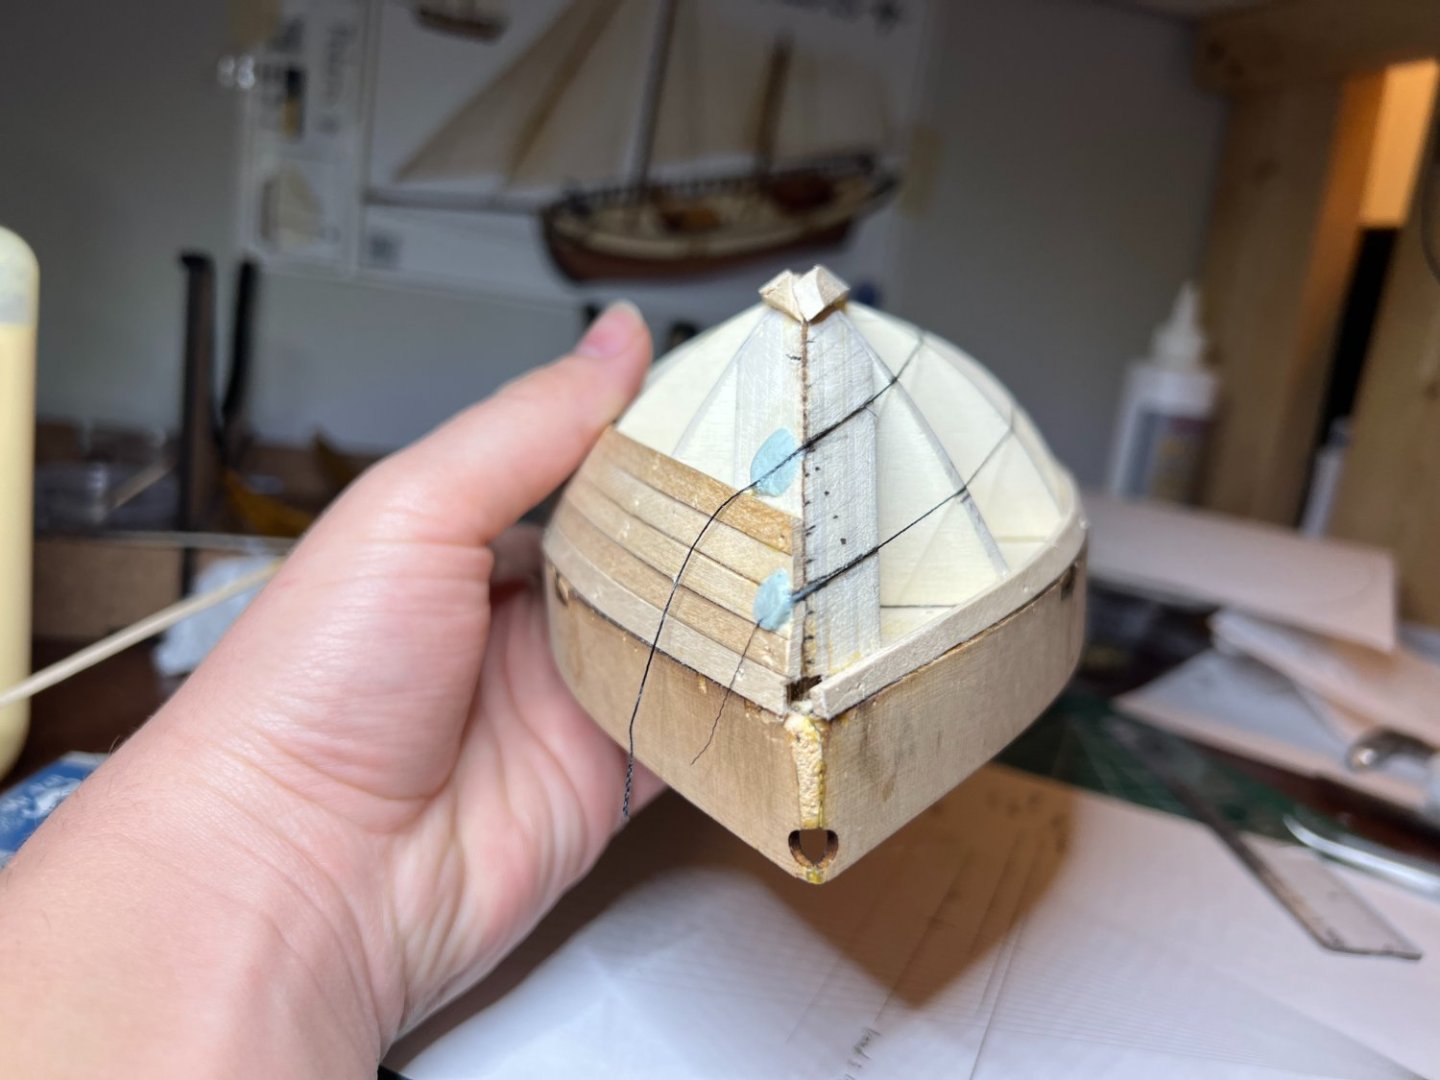
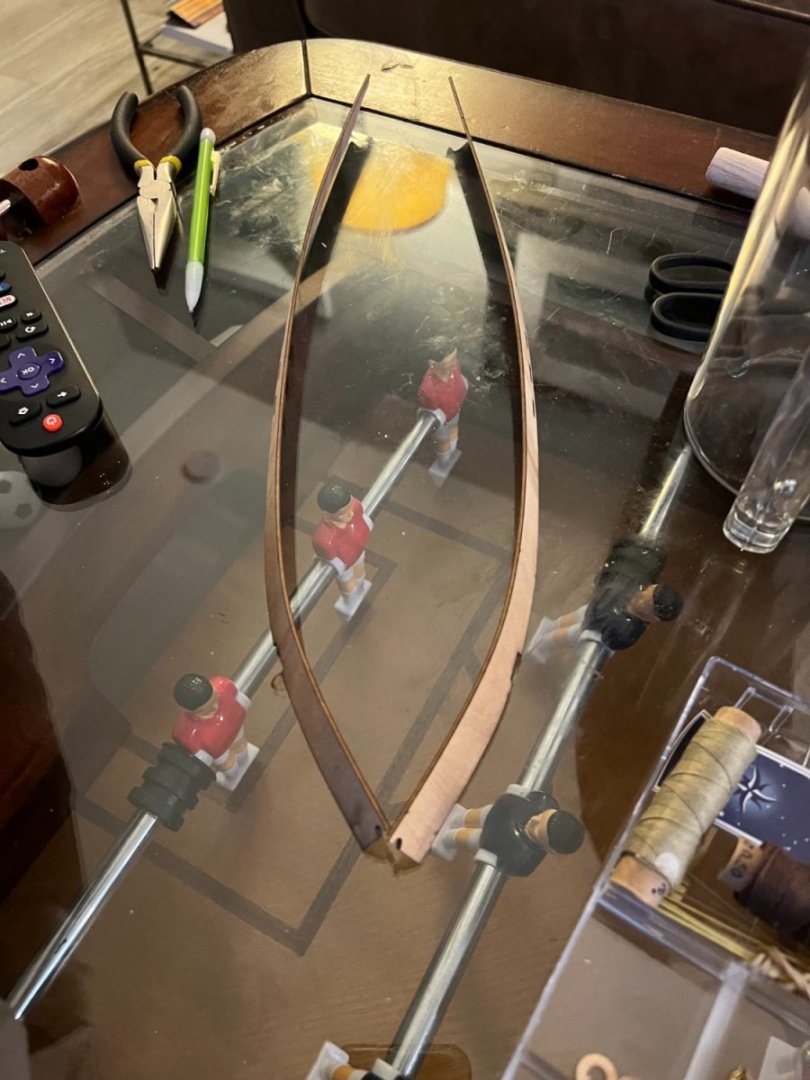
Installing the Side and Rear Pieces Moving right along, it was time to install the side and rear pieces. The side pieces needed to be formed to properly fit on the hull. The instructions advise soaking the pieces in water and bending them over a large diameter can. After my less-than-ideal experience with trying to soak the first keel of my Polaris, I was reluctant to rely on soaking anything again. I also didn't want to deal with any expansion and subsequent contraction caused by the water, or wait for the water to dry. Additionally, I didn't love the imprecision of bending it over and rounded object; I felt like there was a good chance of it ending up wavy. With all of this in mind I decided to try dry heat instead. I bought a relatively cheap heat gun with adjustable temperature from something like 150 degrees F to 1000 or so I believe. I very carefully (SLOWLY) dry fitted and pinned the side pieces onto the hull of the boat. I then applied heat using the heat gun over the entire surface (front and back) of both pieces. I was using the heat gun on a pretty high setting (8/10 if I remember correctly), making sure not to apply heat to one place for too long. I probably could have kept it moving a bit more or turned down the heat a little, because some parts of the wood did get 'baked' a little (not quite charred, but a liiittle darker than previously). However, in my opinion the results speak for themself: I think its a pretty nice curve! Then I glued them on. Two pieces of advice from a beginner here: 1. use a very strong glue and don't be shy about it. Since I have been working on the first planking I have accidently almost caved the sides in multiple times, sometimes requiring minor repairs. So make the joint as strong as possible. 2. If starting at the back make sure you are really stretching the piece forward before pinning, because I ended up with a gap at the bow. After the sided were glued on securely I added the stern piece. This was pretty straight forward and went nicely. However, similarly to my advice concerning the side pieces, Make sure you use a strong glue and plenty of it. I have broken this piece off three times working on the first planking! I recommend cutting the head off some nails, pushing them in parallel to the side pieces, and leaving them there permanently to add strength. Since I did this it hasn't broken off. Also as a small aside I really wasn't happy with how the espresso stain looked on the deckhouse trim, so I decided to change it. I very carefully sanded down the small pieces until they were more or less bare: In hindsight I actually like the lighter trim color and I feel like it would look nice with just natural stain and poly. However, at the time I had decided on a dark trim color, and it did help to cover up the leftovers of the previous stain. I used many coats of Occre's walnut stain applied with a fine brush until it was very dark. After adding the side and stern pieces I decided to admire my work: Sorry some of the pictures are a bit out of focus, I didn't realize until now. Tricky one handed photography! Another step in the right direction! The next post will be a short one about fixing the gap at the bow, but I am out of time so it will have to wait. Thanks for following along!


-
Unfortunately I am most of the way through the first planking already 🤷♂️. But thanks for the advice Ilia! And keep it coming! I do appreciate it, and it makes this build log more useful to myself and others. I will just have to hope I didn't overdo it with the bow sanding, otherwise I'm sure I could use your advice on how you made it work.
-
To whom it may concern: Pictures have been added!
-
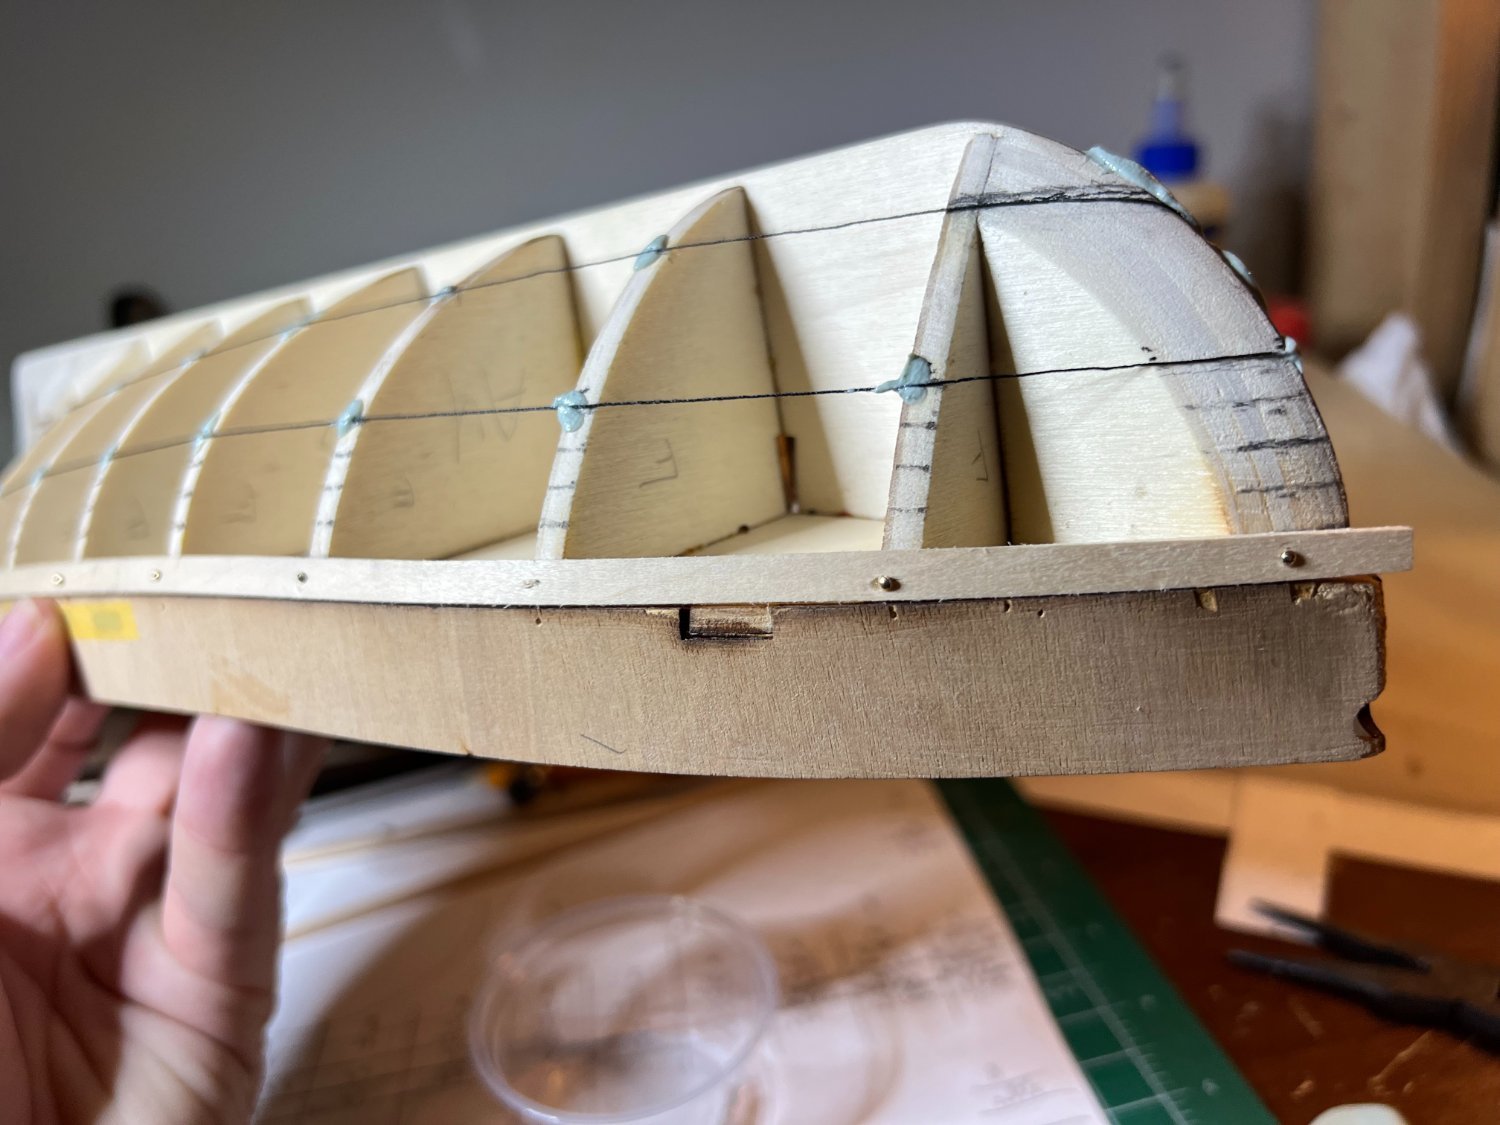
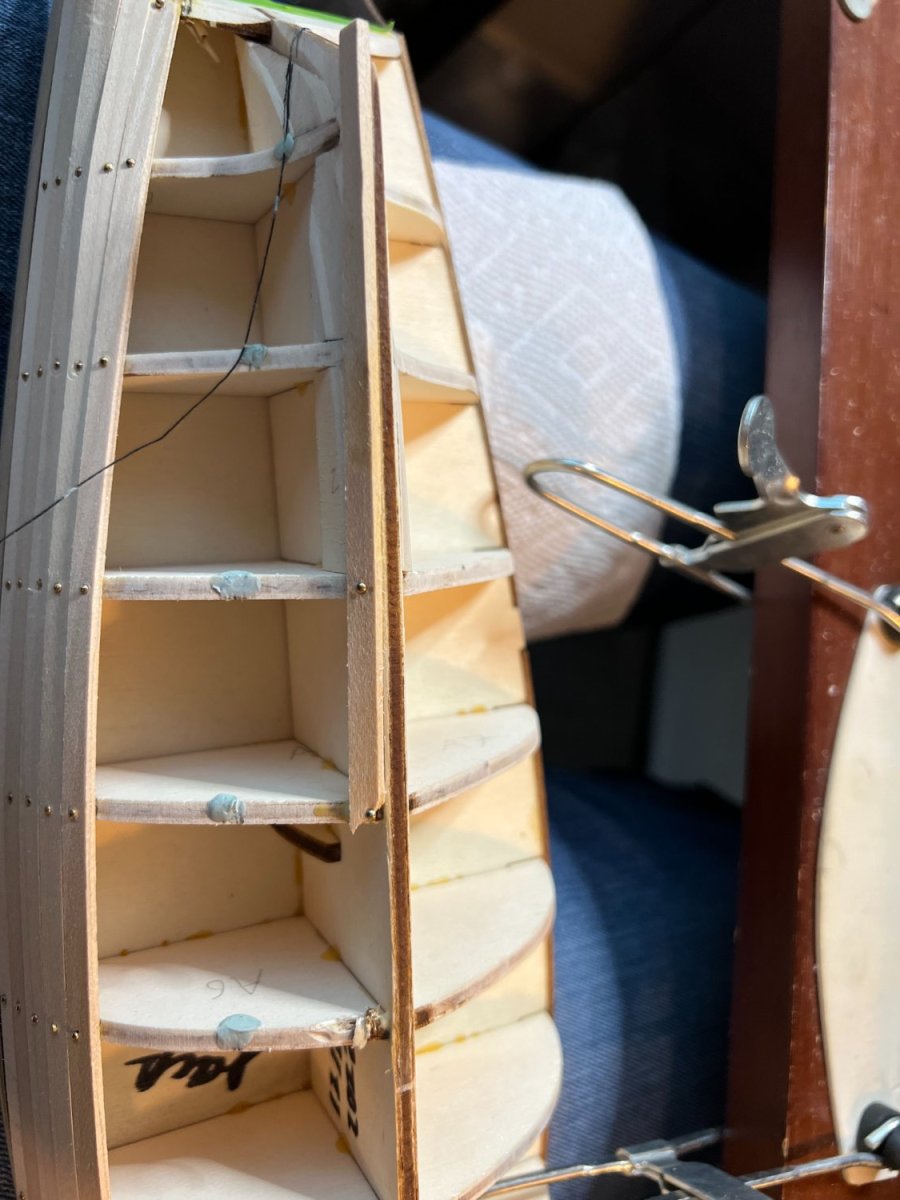
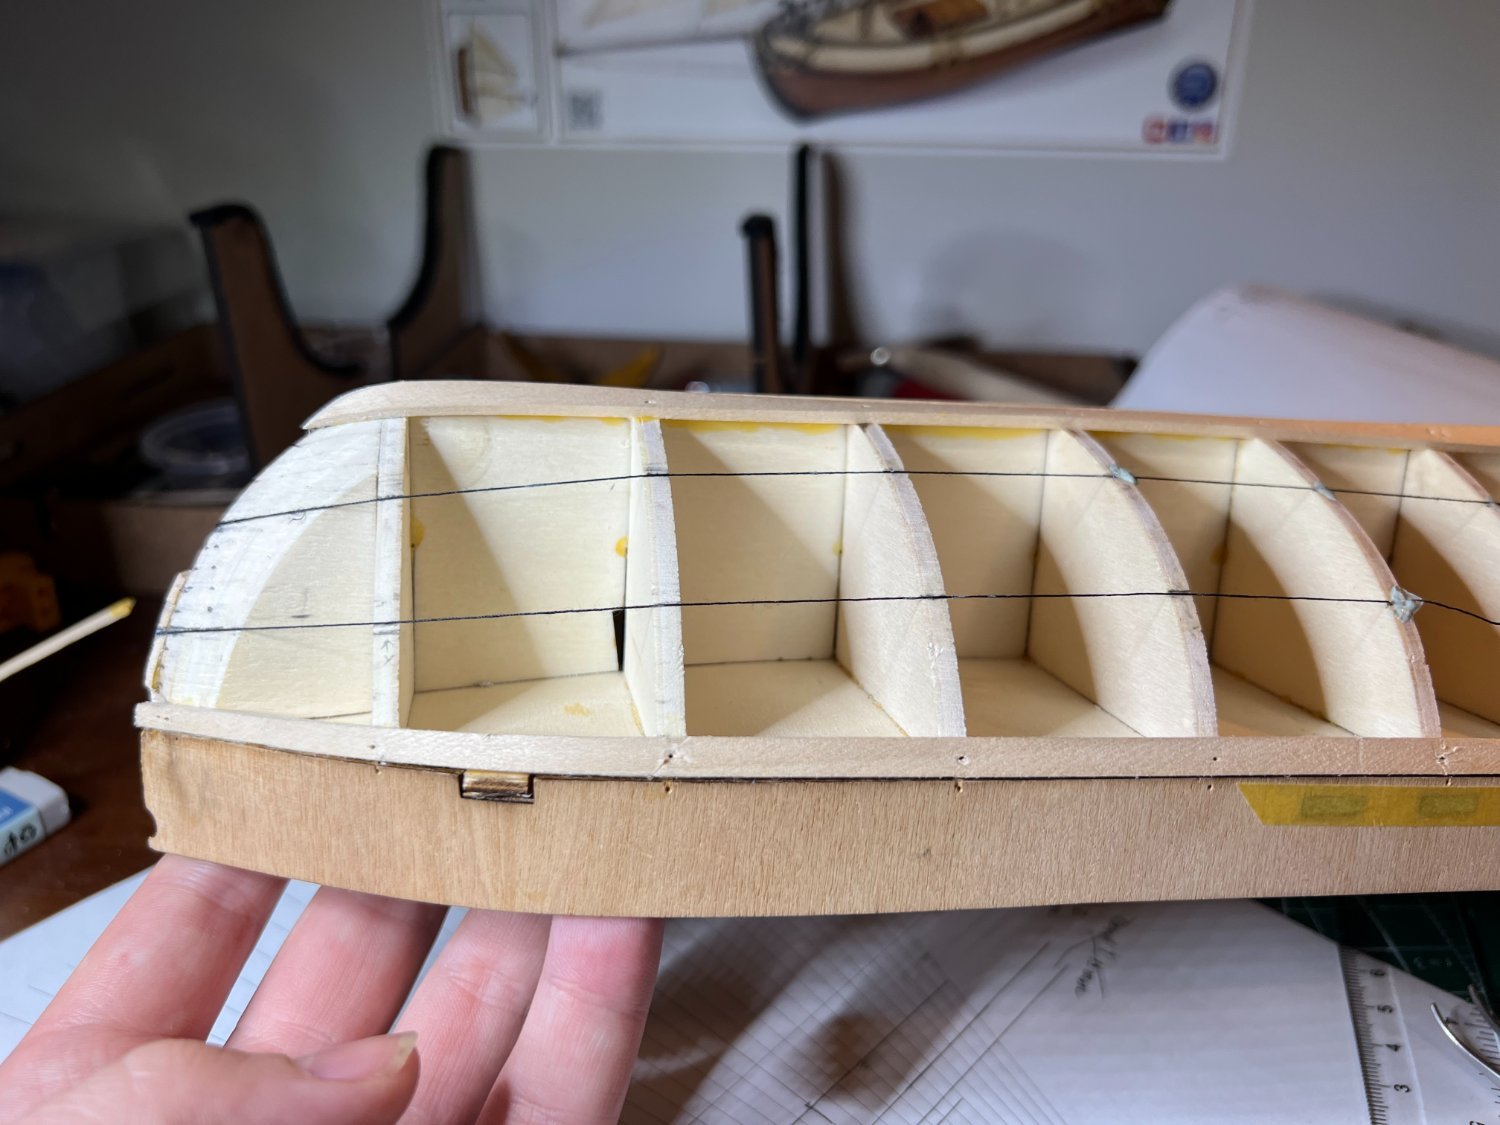
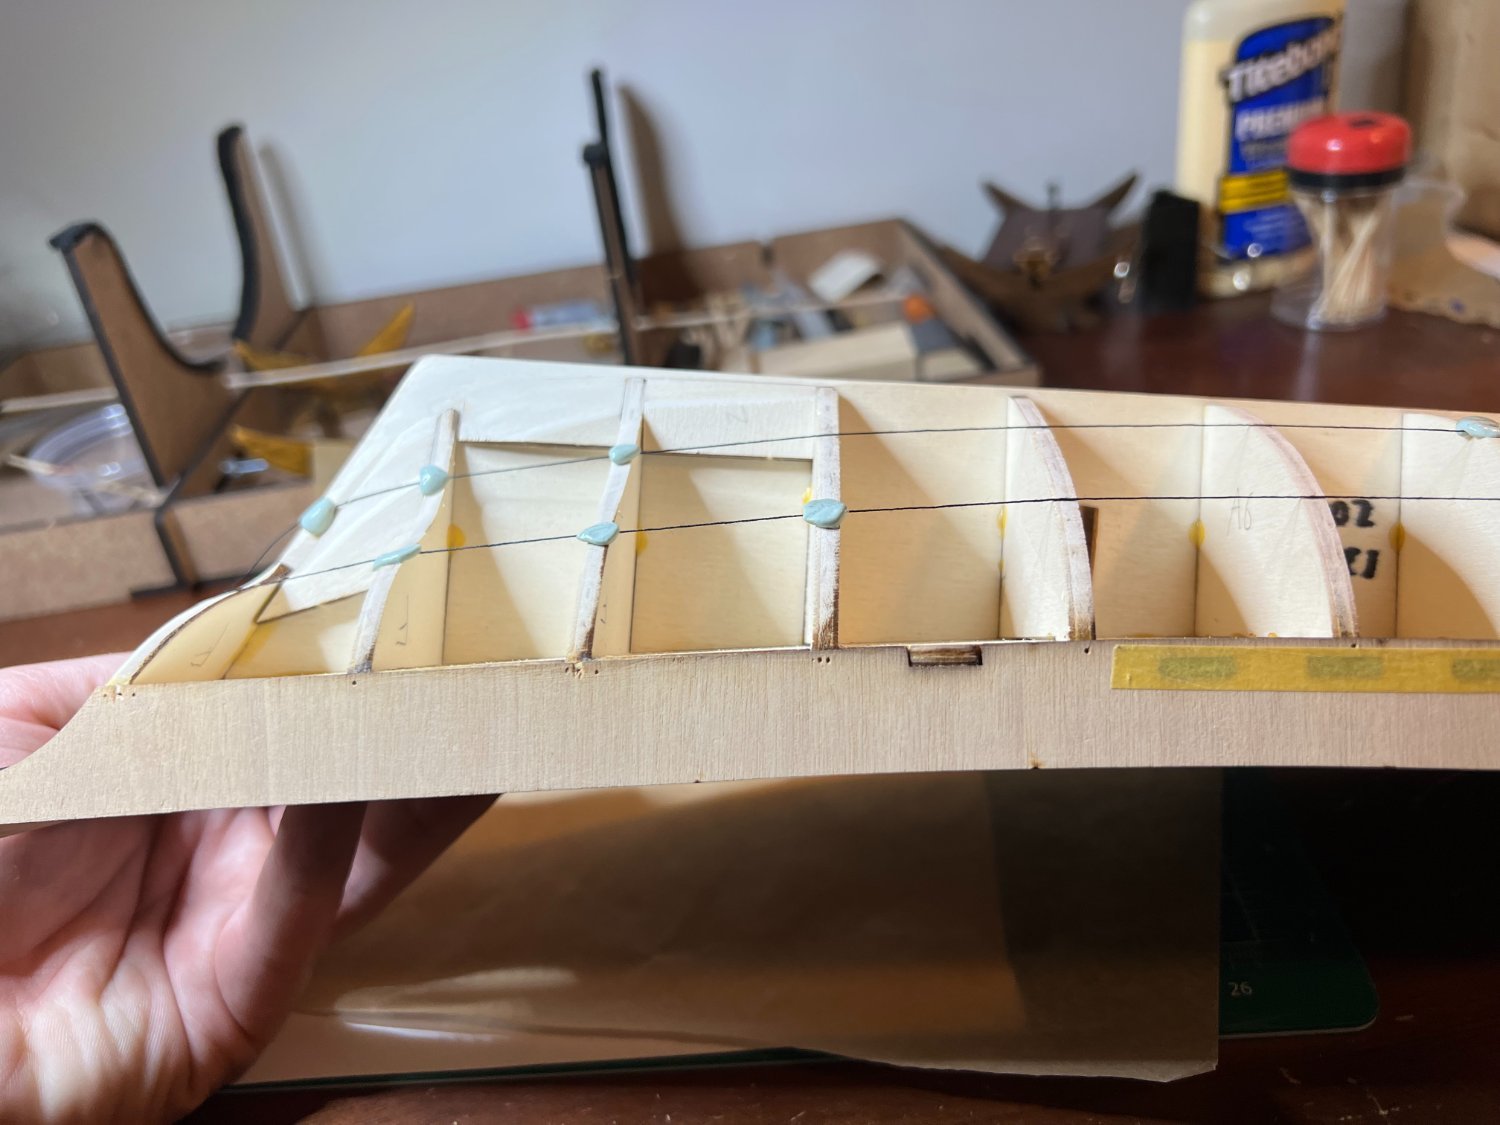
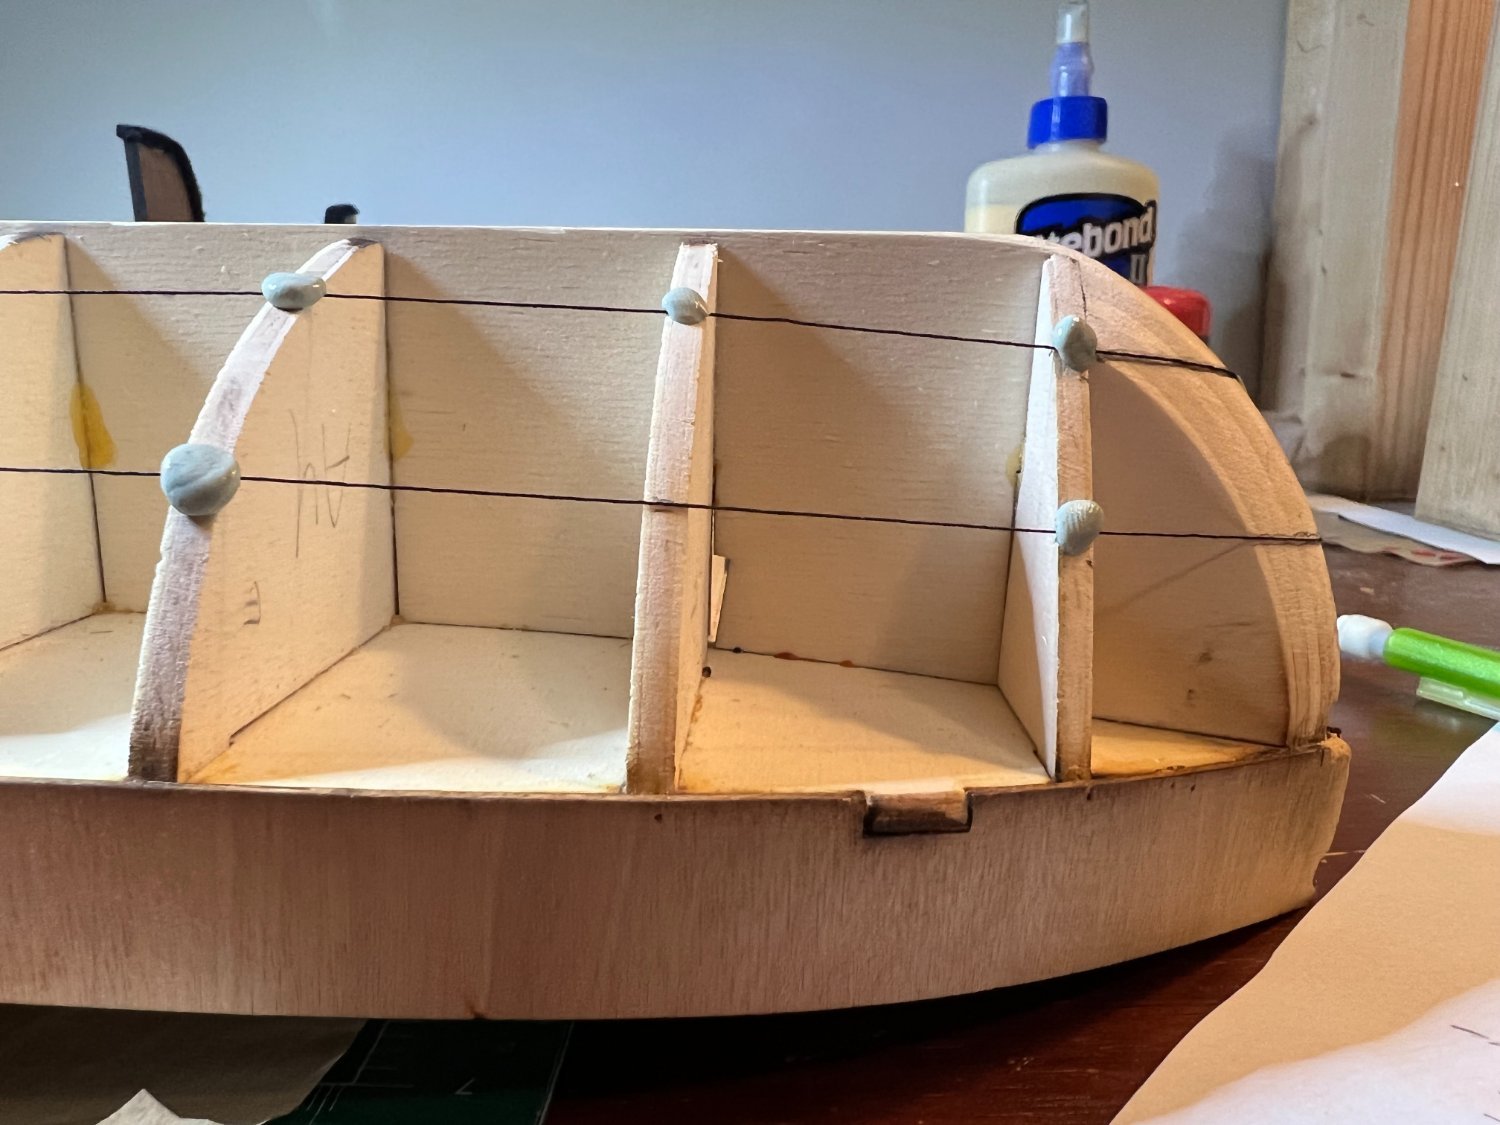
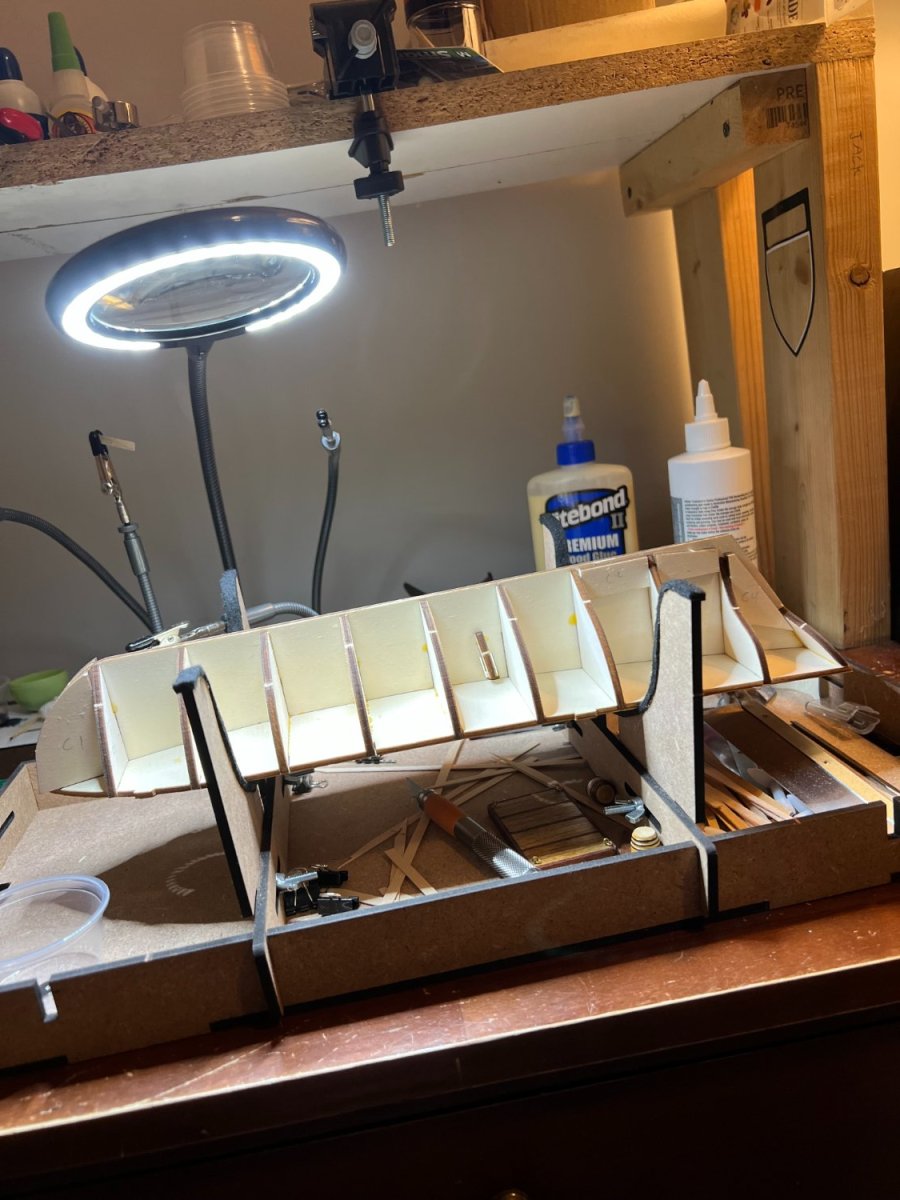
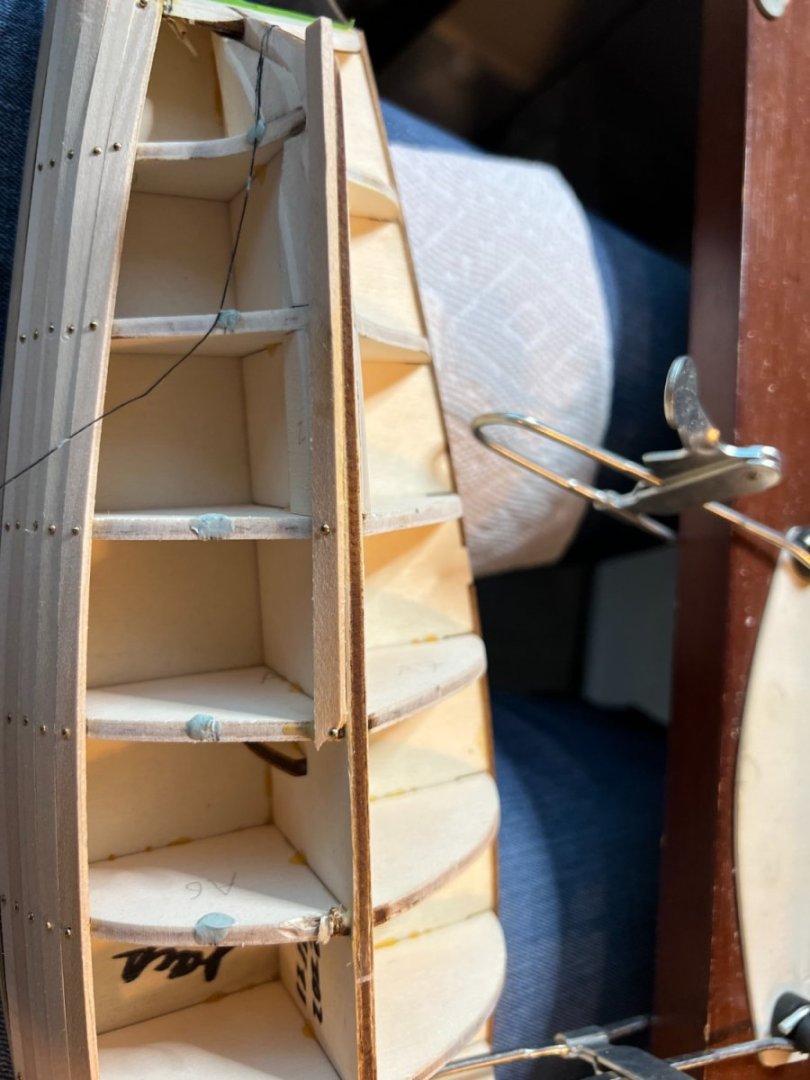
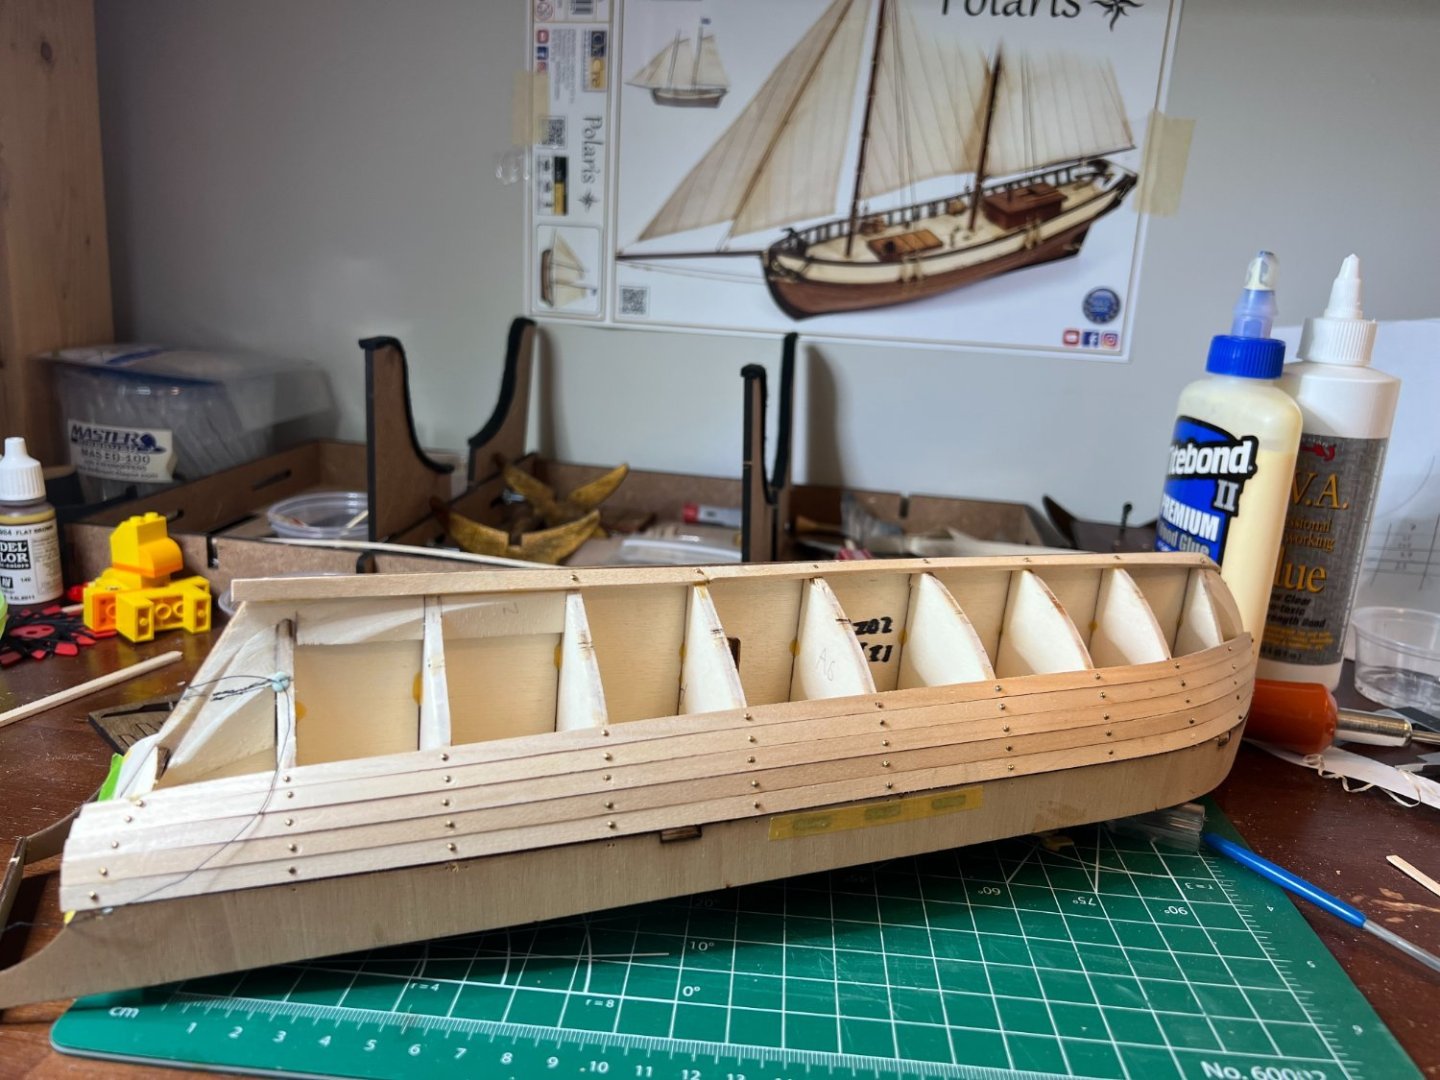
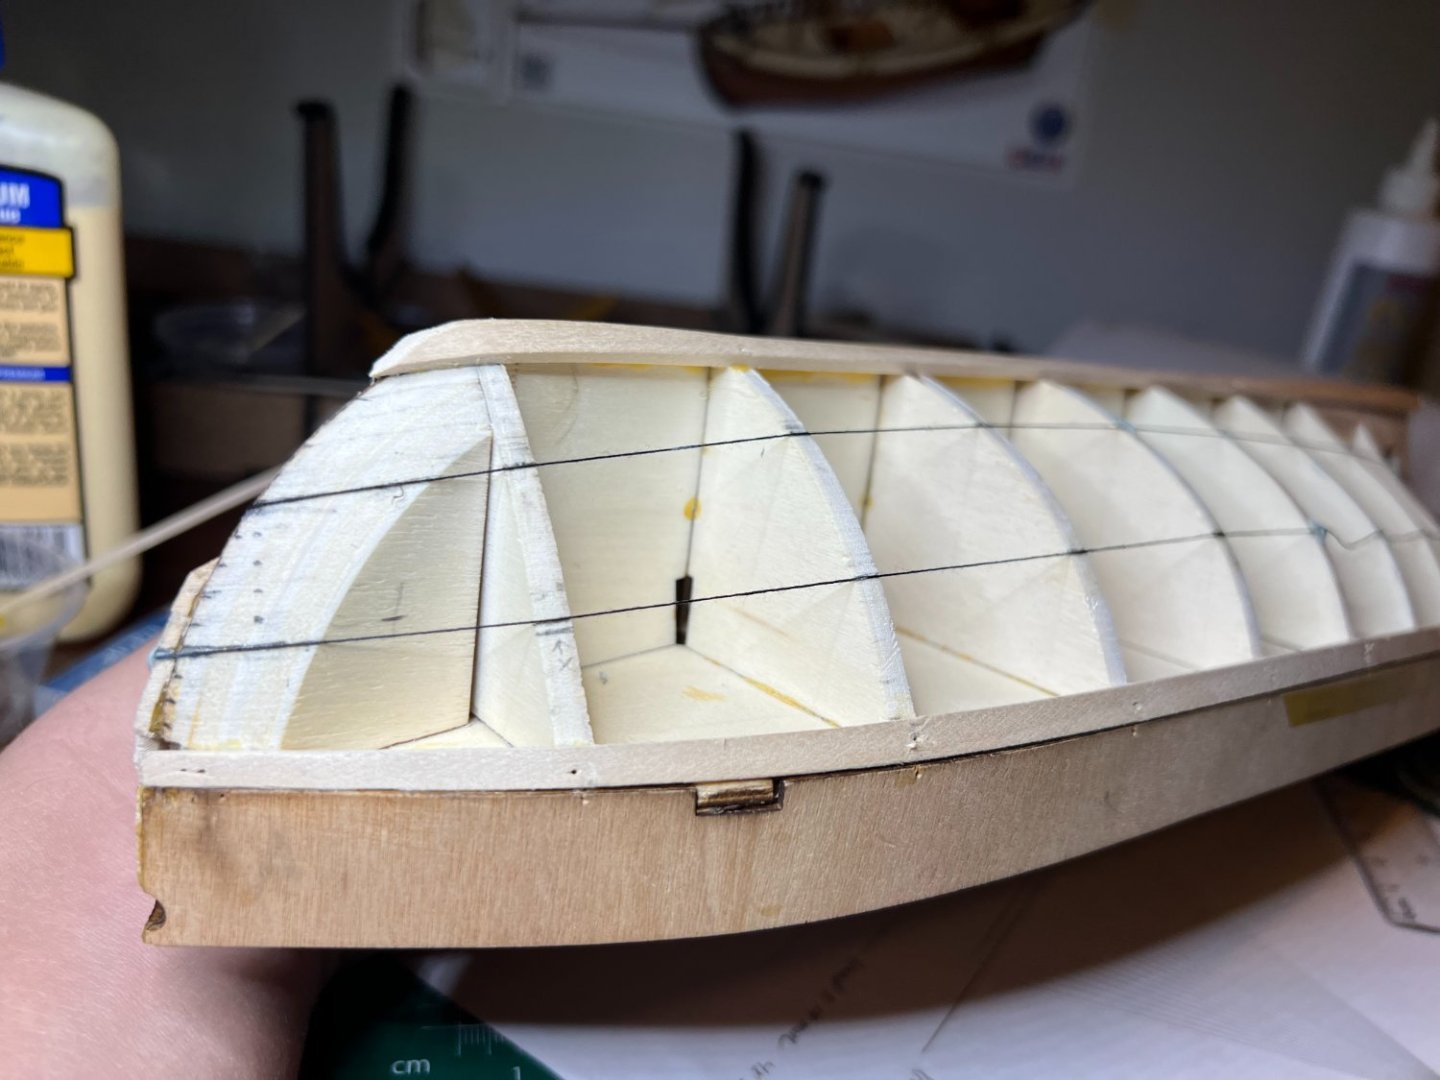
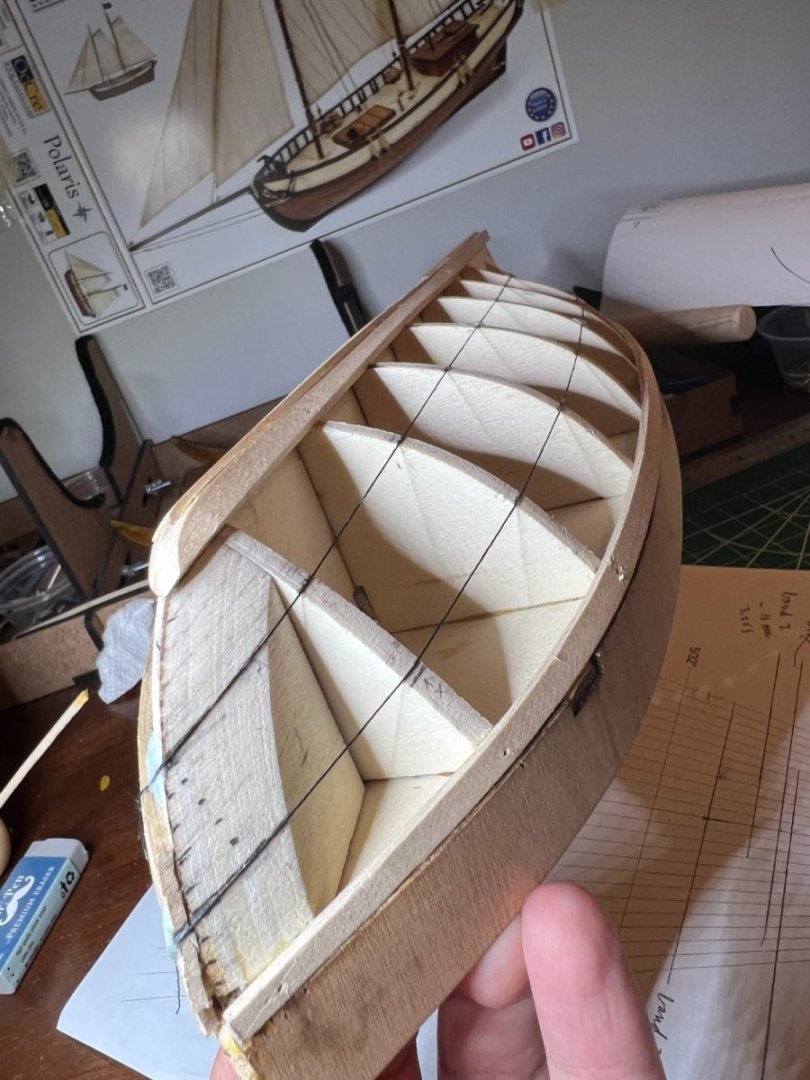
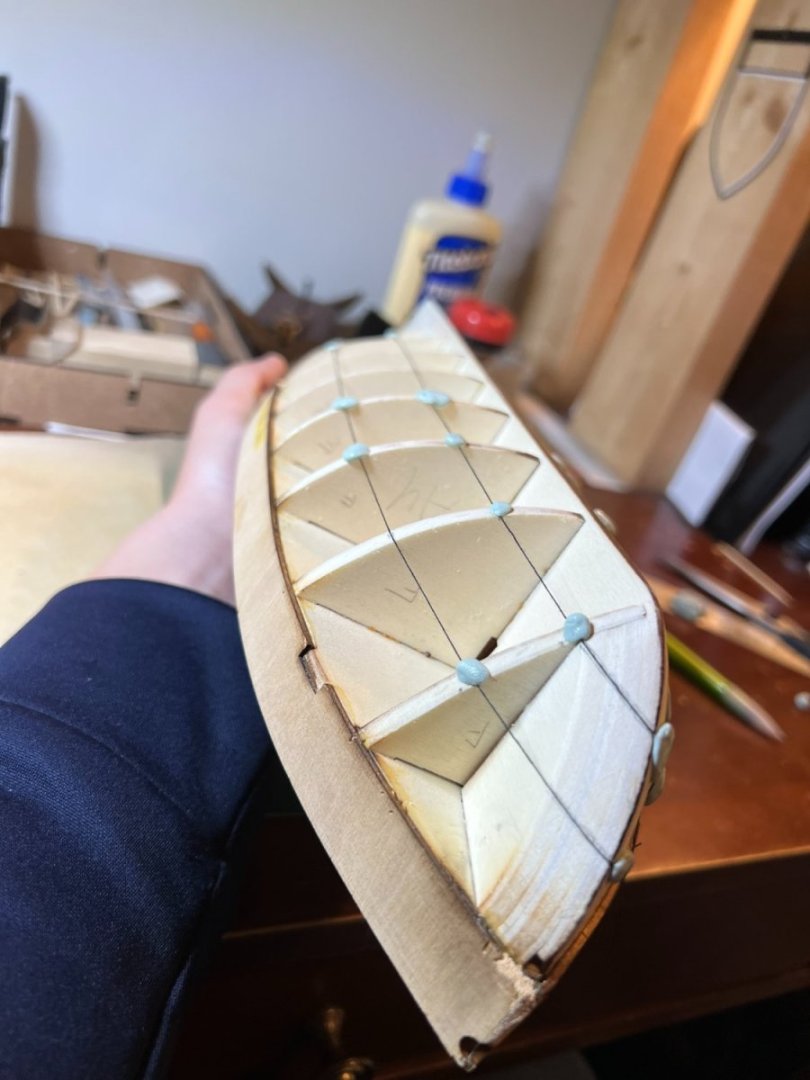
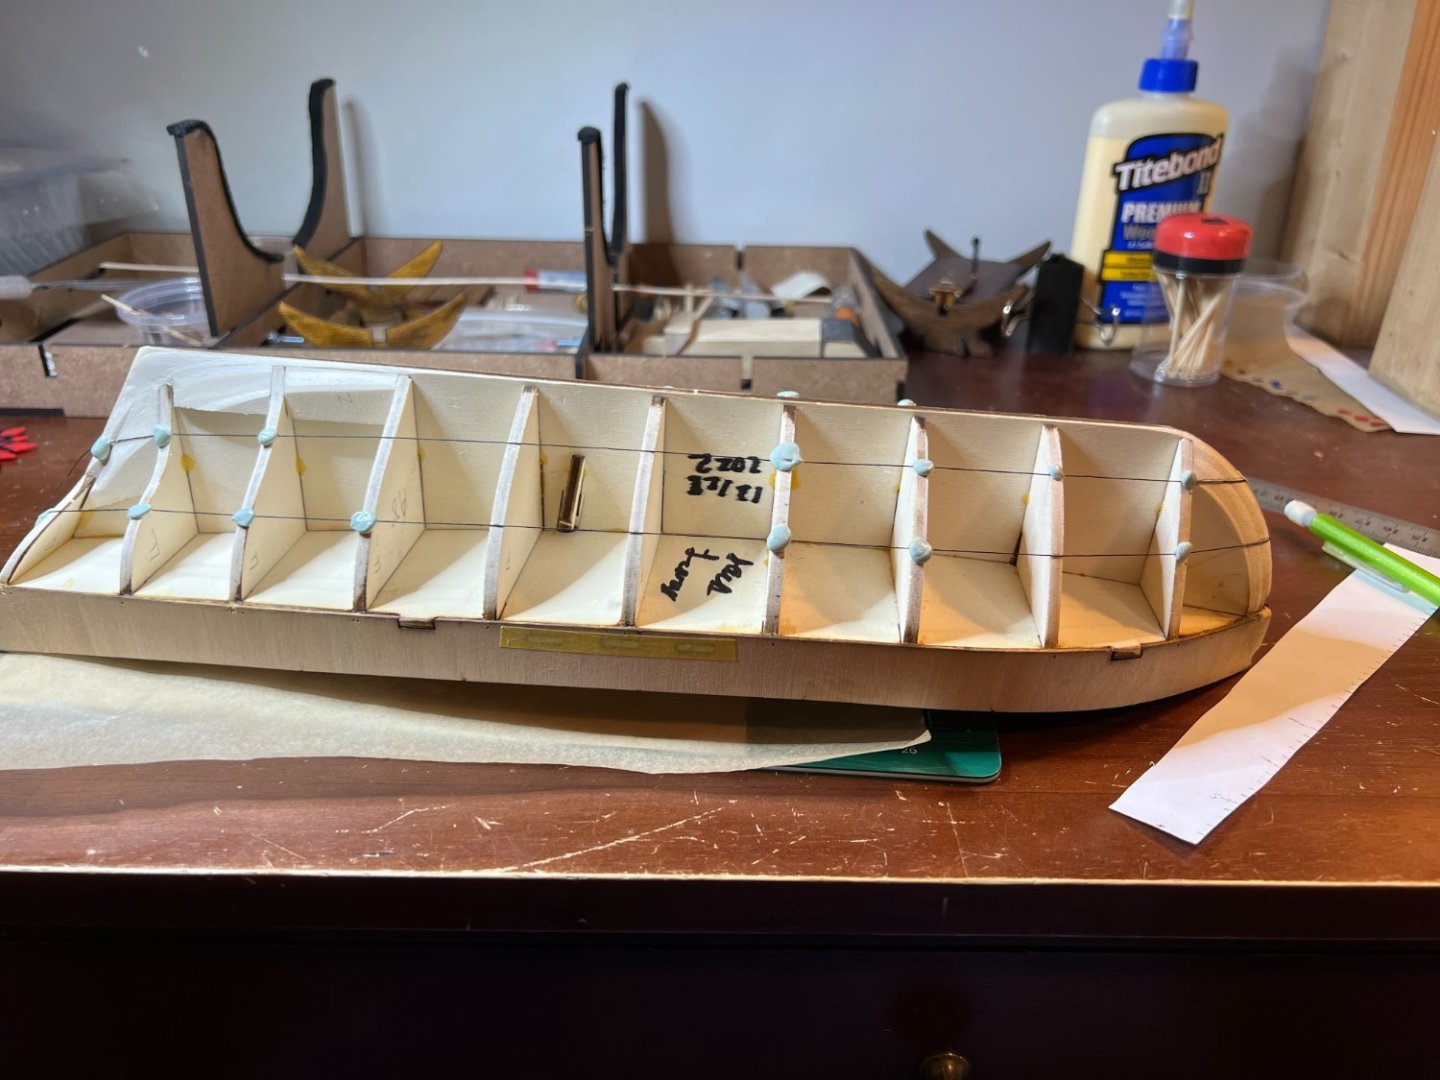
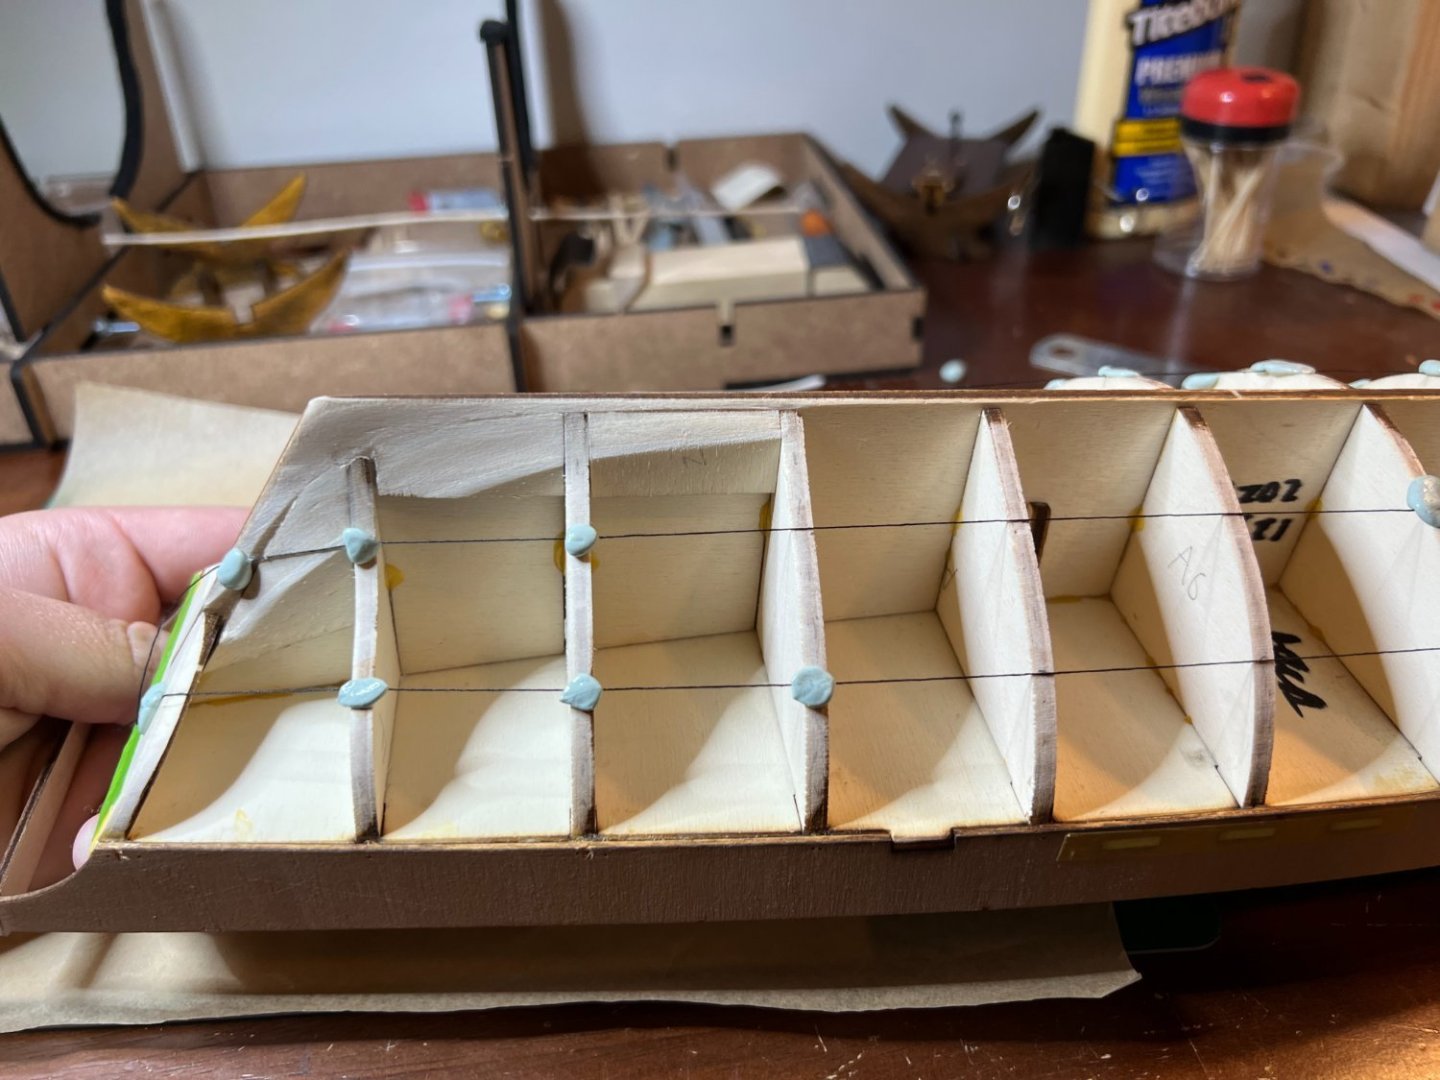
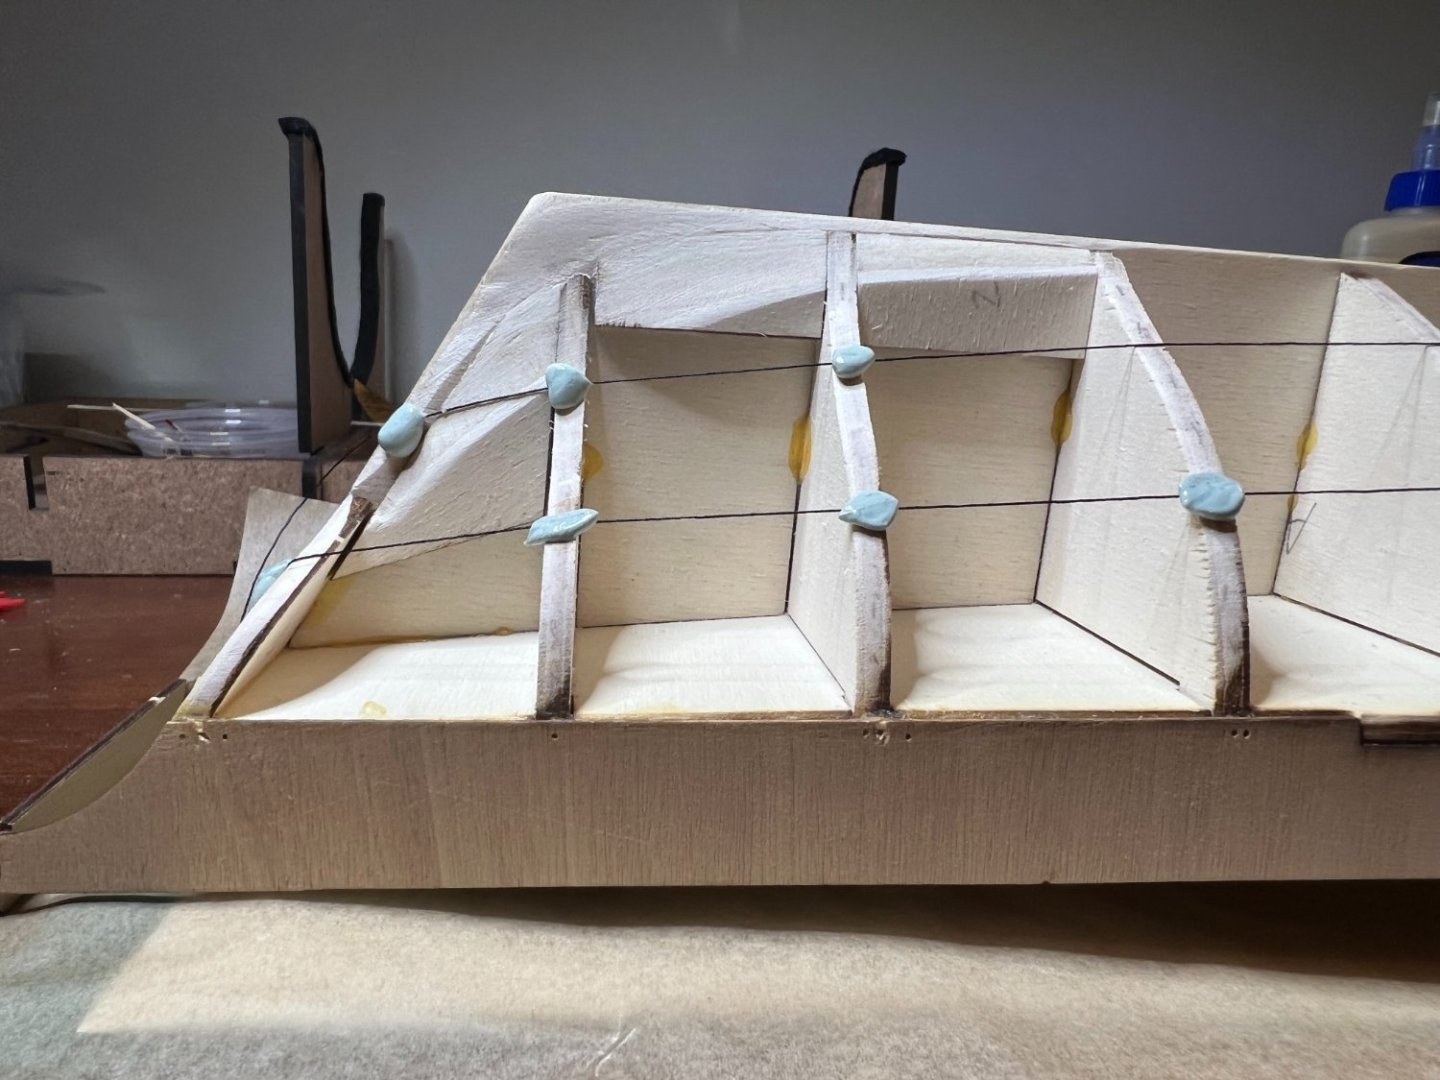
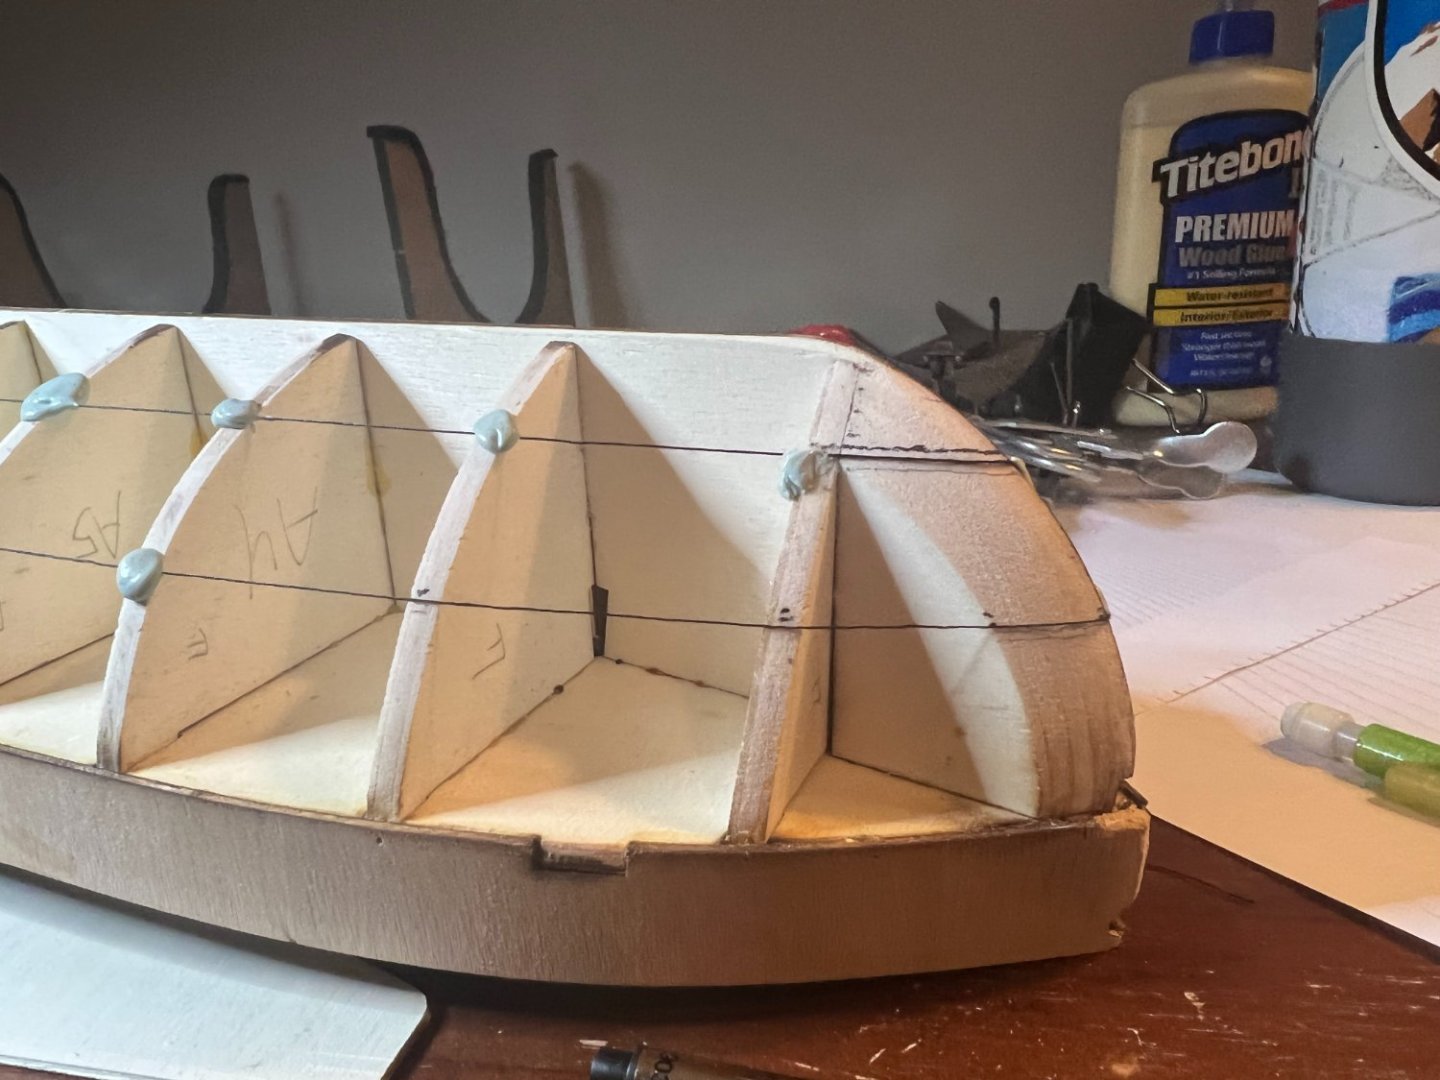
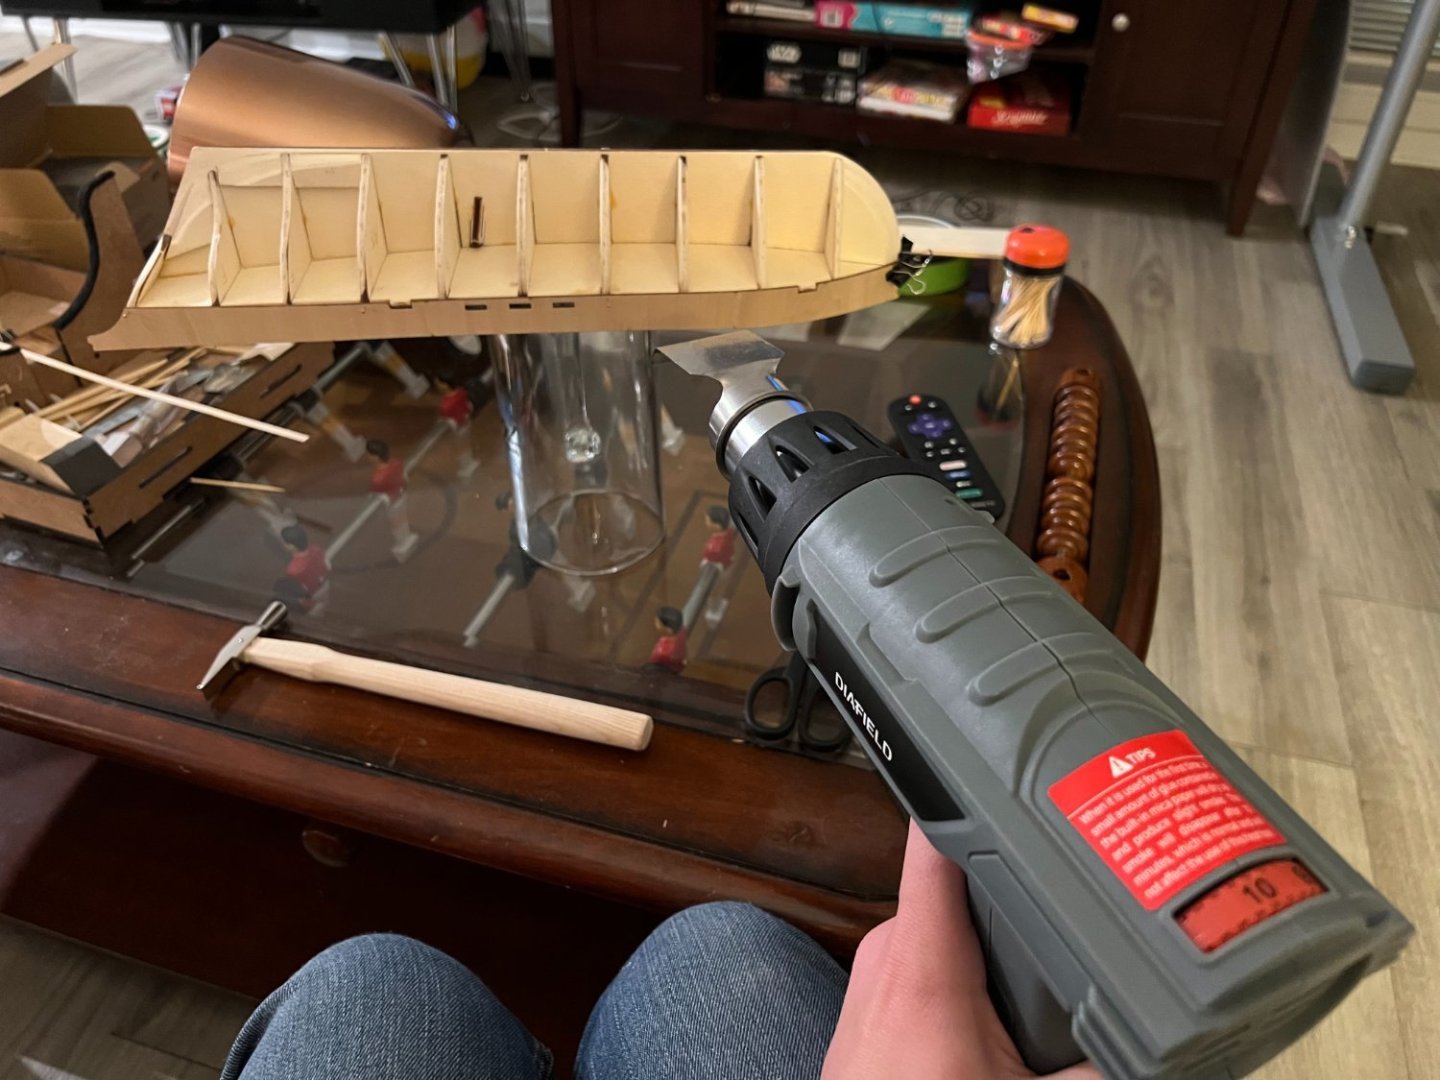
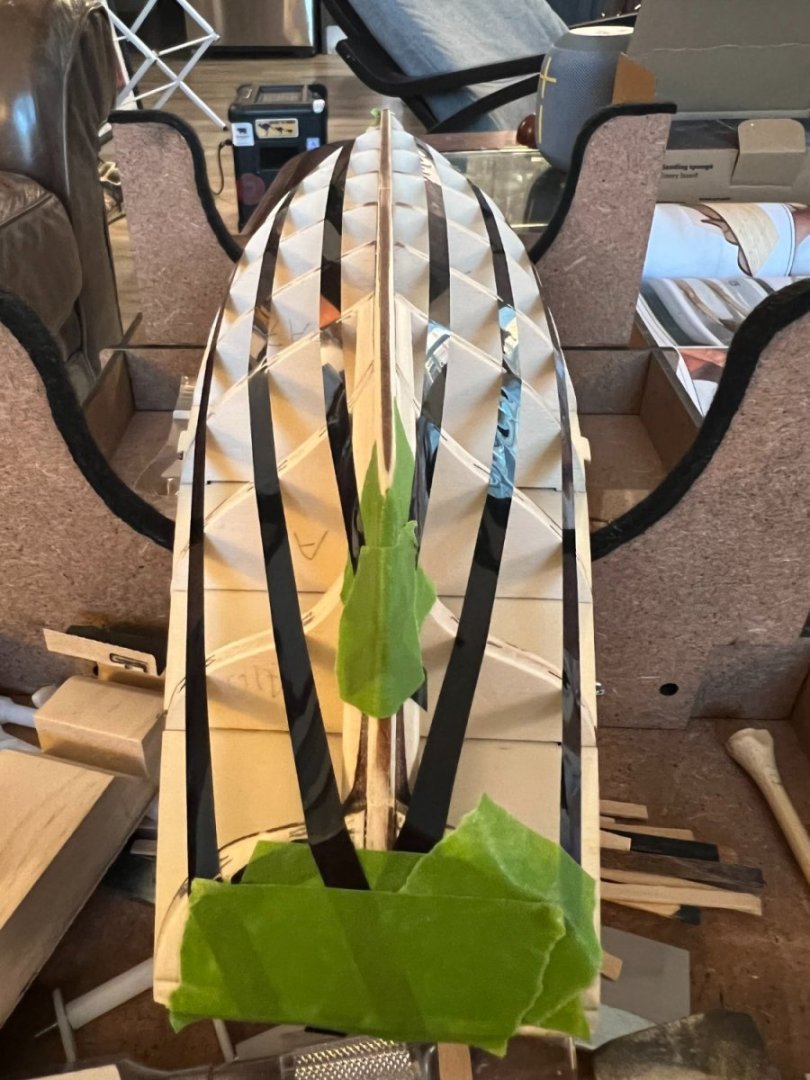
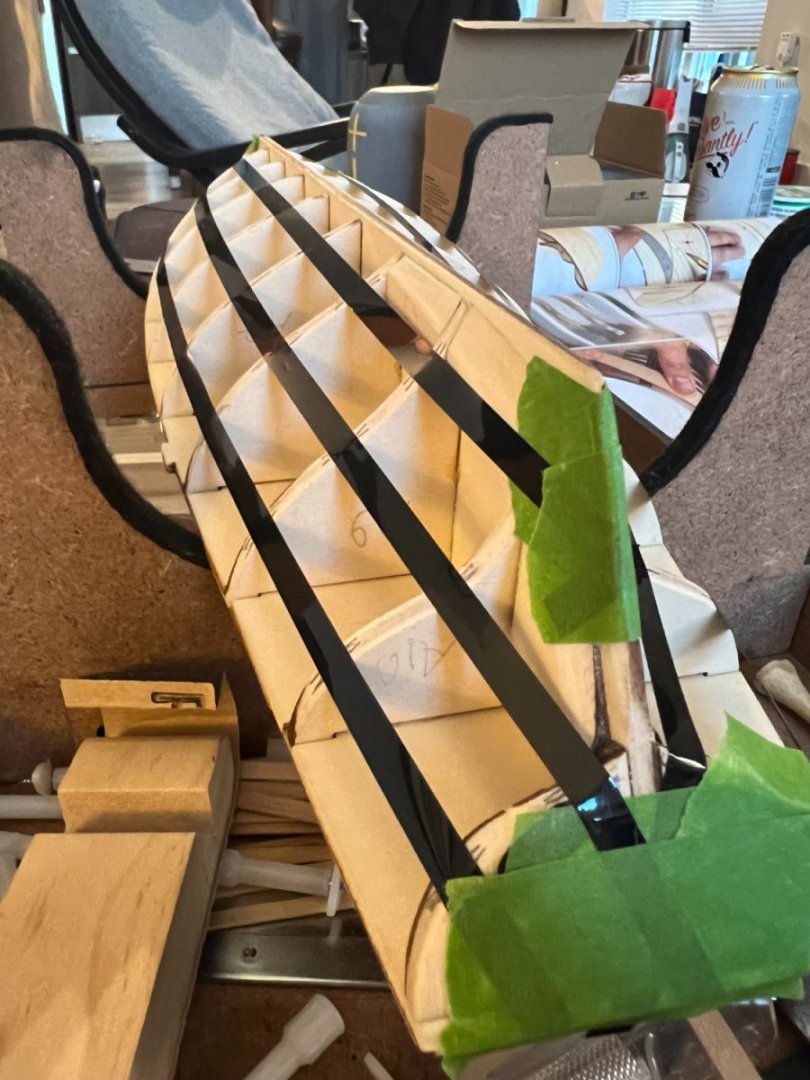
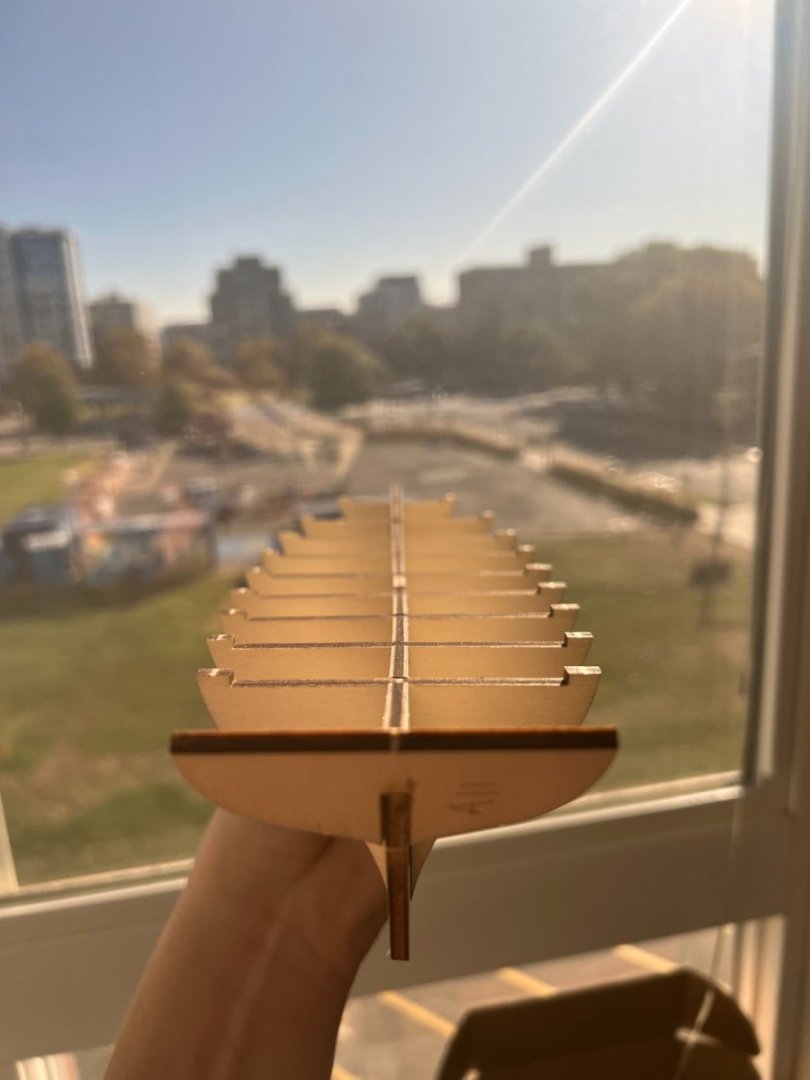
Faring the Hull Now that I had the basic hull shape in place, The next step was smoothing it out so that the planks made full contact with the bulkheads. FYI for most of the work I have done so far I have followed the instructions in "Simple Hull Planking Techniques for Beginners," which can be found here (Along with some other very useful resources) : I used the thin 5mm planks as battens. In hindsight it may have been better to use the thicker 5mm planks, but everything seems to have turned out just fine. I used the laser char on the bulkheads as an indicator to prevent over or under fairing. Like everything else in wood model building, this process took longer than I expected, and I expected it to take a while. A couple of times I considered it 'done' at the end of the night, just to wake up the next day and work on it some more. I believe it is very important to spend a lot of time on this part of the build and take the occasional step back so that you can come at it again later with a fresh mind. Once I had 'finished,' checked, and come back to fair some more a few times over, I arrived at something I found very pretty. Treating each part of the build as its own mini-project has really helped me take it slow, put in a lot of care, and be satisfied with each accomplishment I achieve. To check my fairing and start visualizing a lining off of the hull, I used some 5mm (I think) strips of black tape. I did some more fairing in spots where I wasn't entirely satisfied, always being careful to leave one edge of the bulkheads more or less untouched in order to maintain the proper shape of the hull. (PLEASE NOTE: these tape lines do not represent "lining off the hull" and should not be used by anyone as a reference for that process.) After looking at it from many angles and running wood battens up and down and laying out tape, I finally felt that it was properly and fully complete! This was a very fun and satisfying part of the build for me and I think it turned out very well. Advice from a beginner: take your time; don't stop the first time you think its 'good enough,' take a break and come back; use battens to make sure strakes will lie fully against the bulkheads when they are added; use char to prevent sanding too much off the bulkheads and thus changing the shape of the hull. Up next: Adding the side and back pieces


-
FYI update: still working on Polaris. Most of the way through the first planking. Sorry I have been pretty busy even on weekends so I haven't gotten around to developing this build log in a while. Hopefully I can soon. Thanks for the encouragement everyone!
-
Wow! Congratulations on completion of your Polaris! It turned out beautifully. Amazing craftmanship. Additionally, this build log will be such an excellent guide for so many people in the future, myself included! Really looking forward to seeing your future work as well.
-
 Cpt. Jack reacted to a post in a topic:
Polaris by ibozev - FINISHED - OcCre - 1:50
Cpt. Jack reacted to a post in a topic:
Polaris by ibozev - FINISHED - OcCre - 1:50
-
Thanks for the tips! I'll be sure to check out Mastini's book and those youtube videos and see which books seem like the best fit for me. Good luck with the renovation! I am also going to have to wait to start my second ship until I have moved out of my relatively small urban apartment in May 2023 (assuming I have finished Polaris by then!). I don't have any outdoor space or a workshop, so operations like sanding and painting can get tricky. For better or worse, I already ordered my next ship: HMS Flirt by Vangaurd Models. I couldn't help myself. The reviews and build logs are all so stunning! But I am also reading the book "Endurance" by Alfred Lansing (great read, highly recommend), and that has me considering OcCre's Endurance as a potentially good middle step. I think it will depend a lot on how my Polaris turns out.
-
Some very impressive and hugely helpful work (as always), Ilia. What would you say is your go-to reference material for rigging? Thanks for creating such a comprehensive log that has been a huge guide for me, and for others too it seems! I really look forward to seeing whatever project you take on next; any ideas?
-
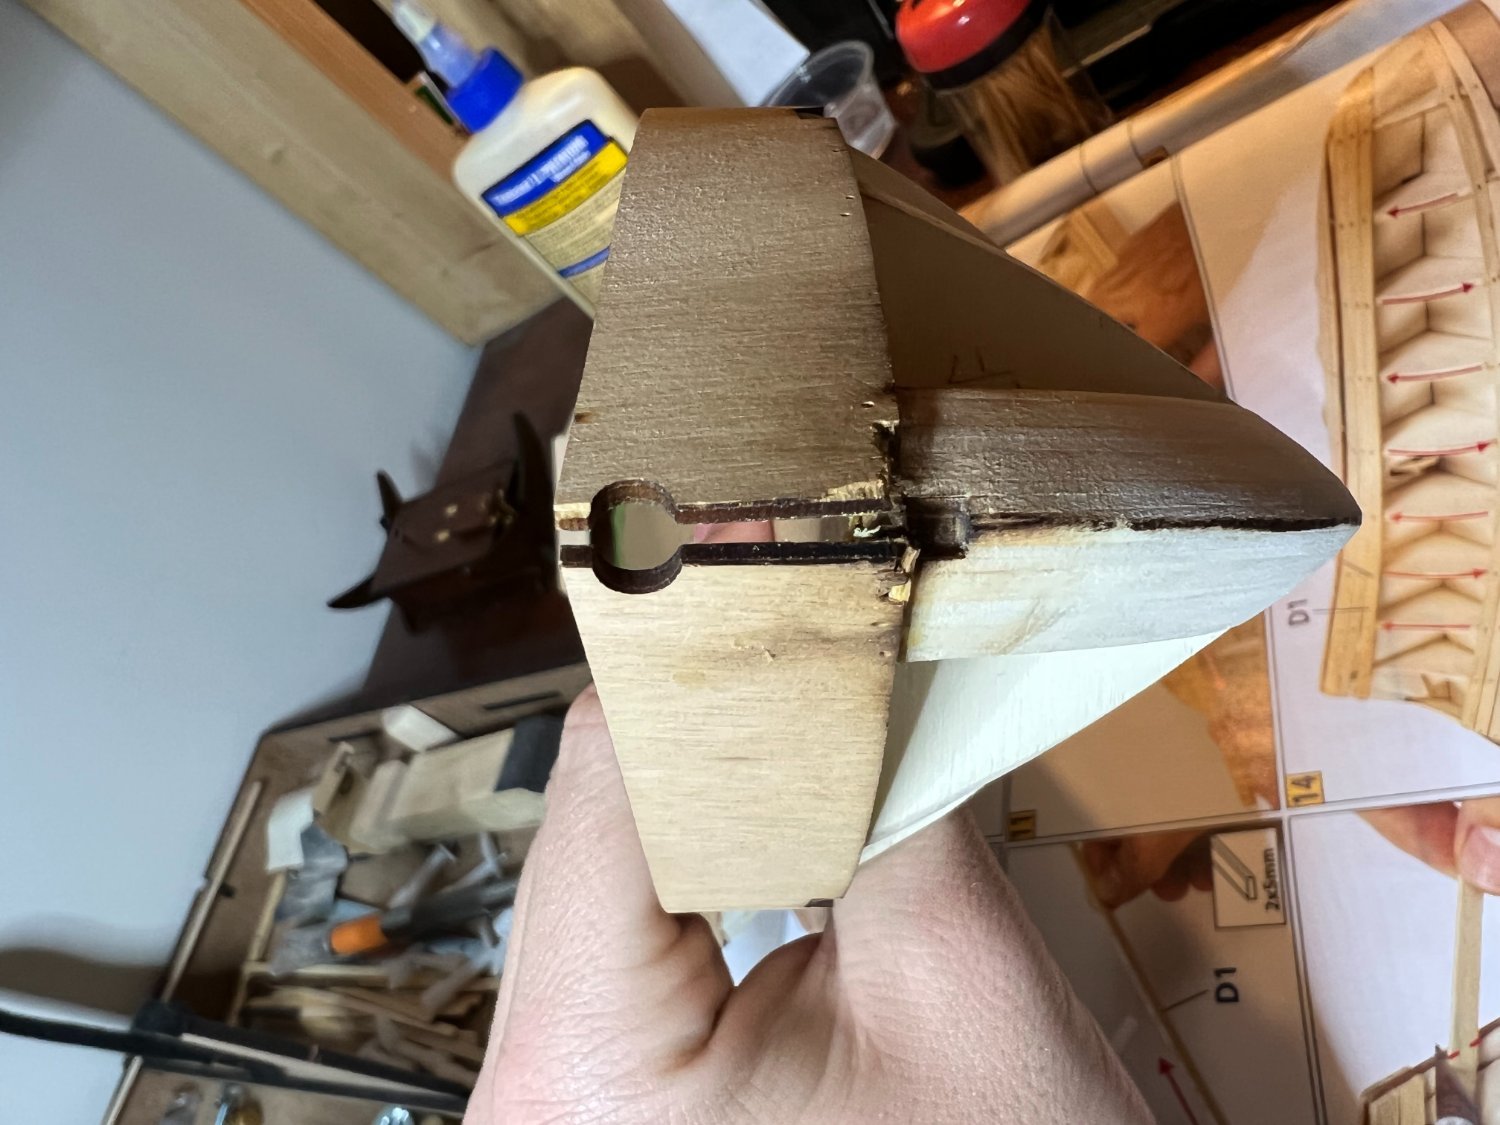
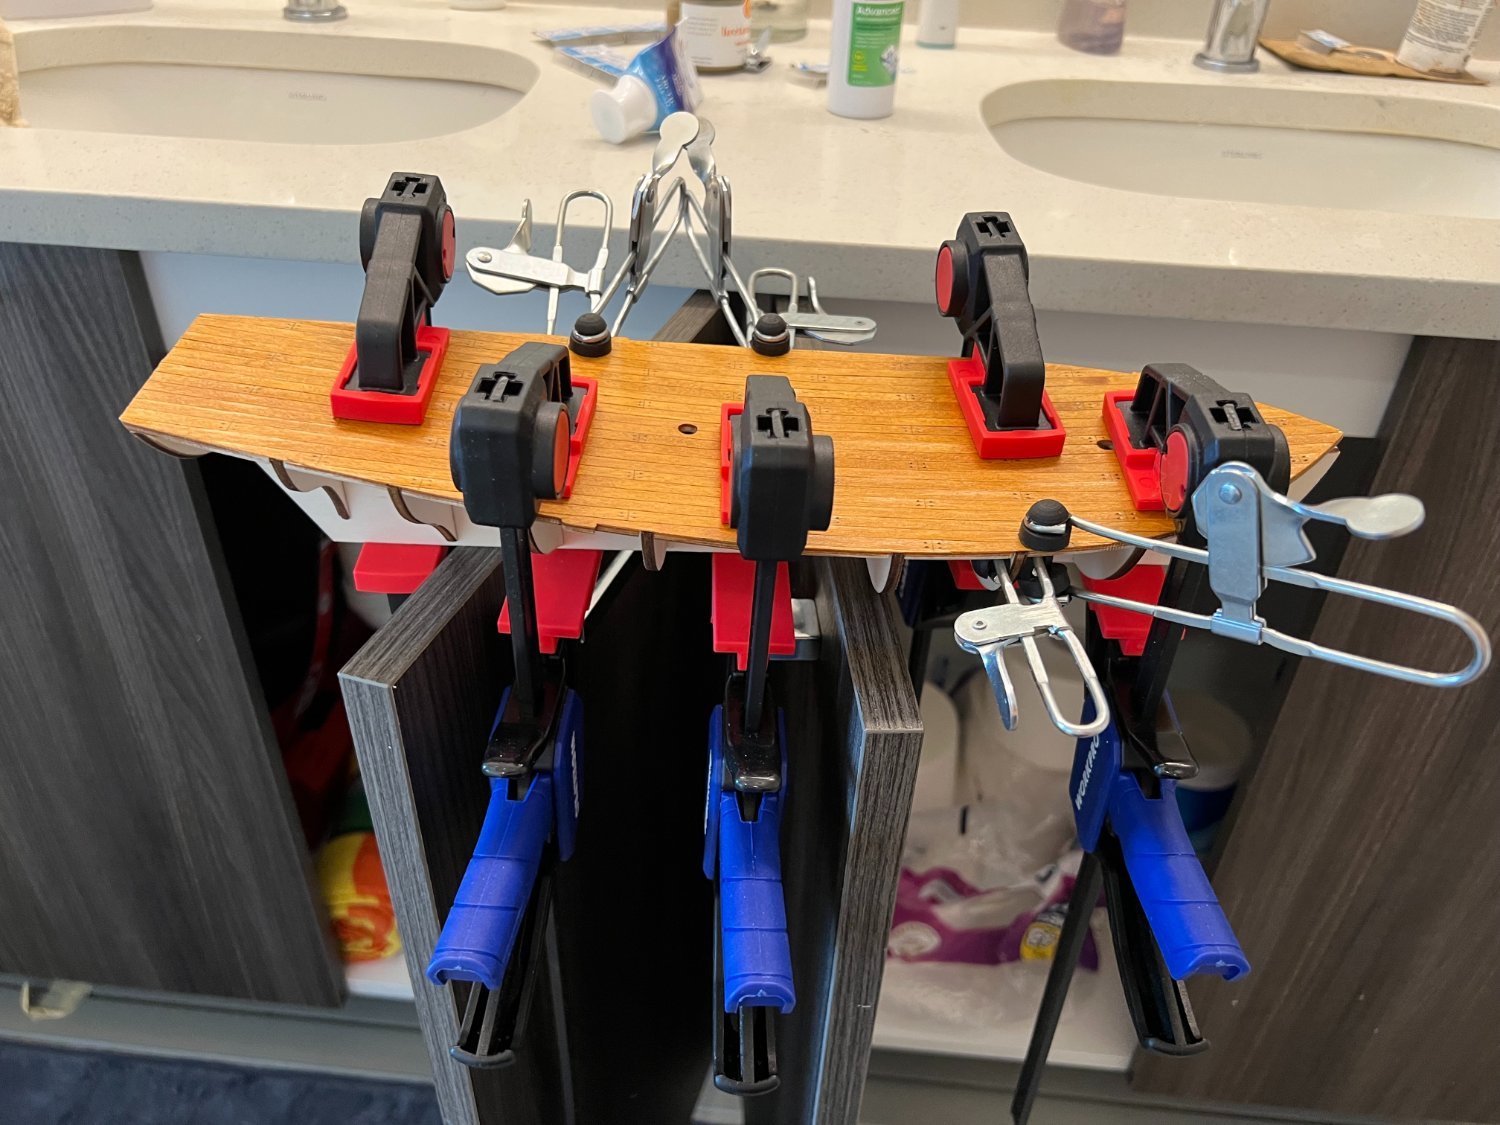
Ship's Hull: Redux Finally! My new keel and ribs arrived from OcCre! It took about three or four weeks, which is really not so bad. They didn't charge me for shipping or for the parts and the whole process was pretty simple, besides requiring some patience. The new keel was still a bit warped, but not even close to what I had made the original one into (a monster), and I felt confident that once the ribs were added and the deck was fixed on, things would straighten out. I attached the ribs using a Lego brick as a small square, a trick I picked up from someone else's build log (I read it a while back and can't remember who to credit, apologies). Lego bricks have very tight tolerances, come in a variety of sizes, are lightweight, and are readily available, making them pretty convenient little squares for modelling. Once the ribs were in place and allowed to dry overnight, I took another look at the overall shape of what was to become the hull. The curve of the keel seems to become more apparent with the ribs added. However, the warp was still much more mild than my first attempt and I remained confident that the addition of the deck would straighten things out. Luckily the warp was most apparent on the top of the keel, where the deck would have the greatest influence; the bottom edge was pretty straight. Since I lack anything that could be called a 'workshop,' as with my work on the first attempt at the hull, I had to get somewhat 'creative' with my methods when gluing on the deck. I used PVA glue to affix the deck to the keel and ribs, along with a number of small and large clamps. Sure enough, it took a bit of finagling to get all the ribs in their slots and the deck in full contact with the skeleton, but after a bit of work things were all in place. The deck was, in fact, doing a great job of forcing the keel straight. To my eye, everything looked pretty close to perfect. Now the challenge was making sure it stayed that way while the glue dried. The 6" and 12" woodworking clamps I was using required space to extend. I hadn't really prepared for this, so for a while I was just holding the porcupine-like structure in my hand, doing my best to keep the noticeable weight of the clamps evenly distributed so the whole thing wouldn't warp while drying ( I was careful to make sure the weight of the clamps was fairly balanced on both sides of the hull). However, I obviously couldn't hold the thing overnight while the glue fully set, so I had to figure something out. I couldn't put it on a flat surface or lay it sideways because then the clamps would exert a torque on the keel. I had no stand that was tall enough to extend past the clamp bars and hold it by the keel. I tried putting it on a lamp shade (HA!) but none of them had a large enough diameter to get around the clamps. Finally I came up with a simple solution. My bathroom has two sets of cabinet doors. I opened them up such that the keel could rest on the tops of the two opposing doors with the clamp bars extending between them. The next day I picked it up, removed the clamps, and... success! Things were looking very good. Viewing it head-on, the ribs seemed to be even on each side, and the keel looked straight. This was a big step in the right direction and a good lesson learned. It was worth going through the process of getting the replacement parts and waiting. It felt like I had done things the right way and that it had paid off. This second hull skeleton was far better than the initial one, and I believe that the effort will show in the final result. Next up: faring the hull!


-
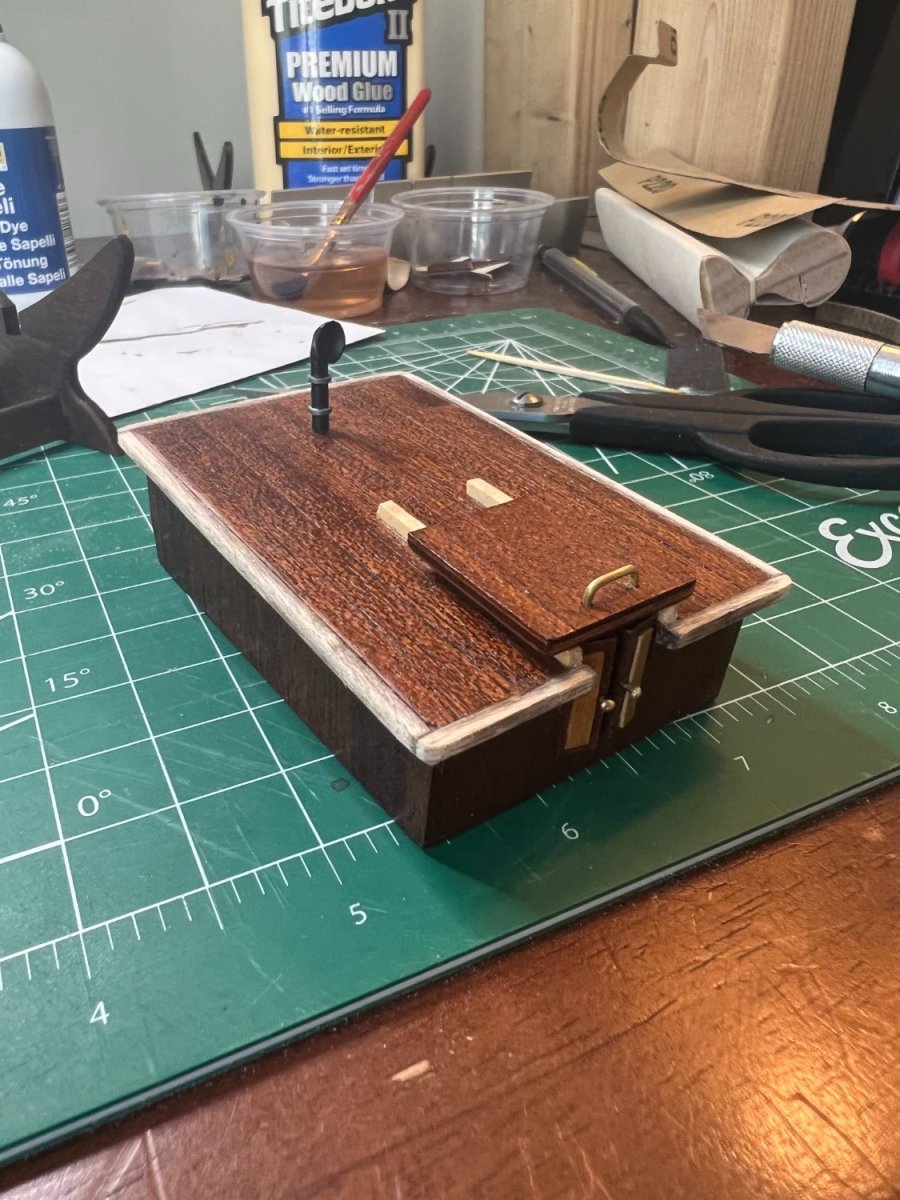
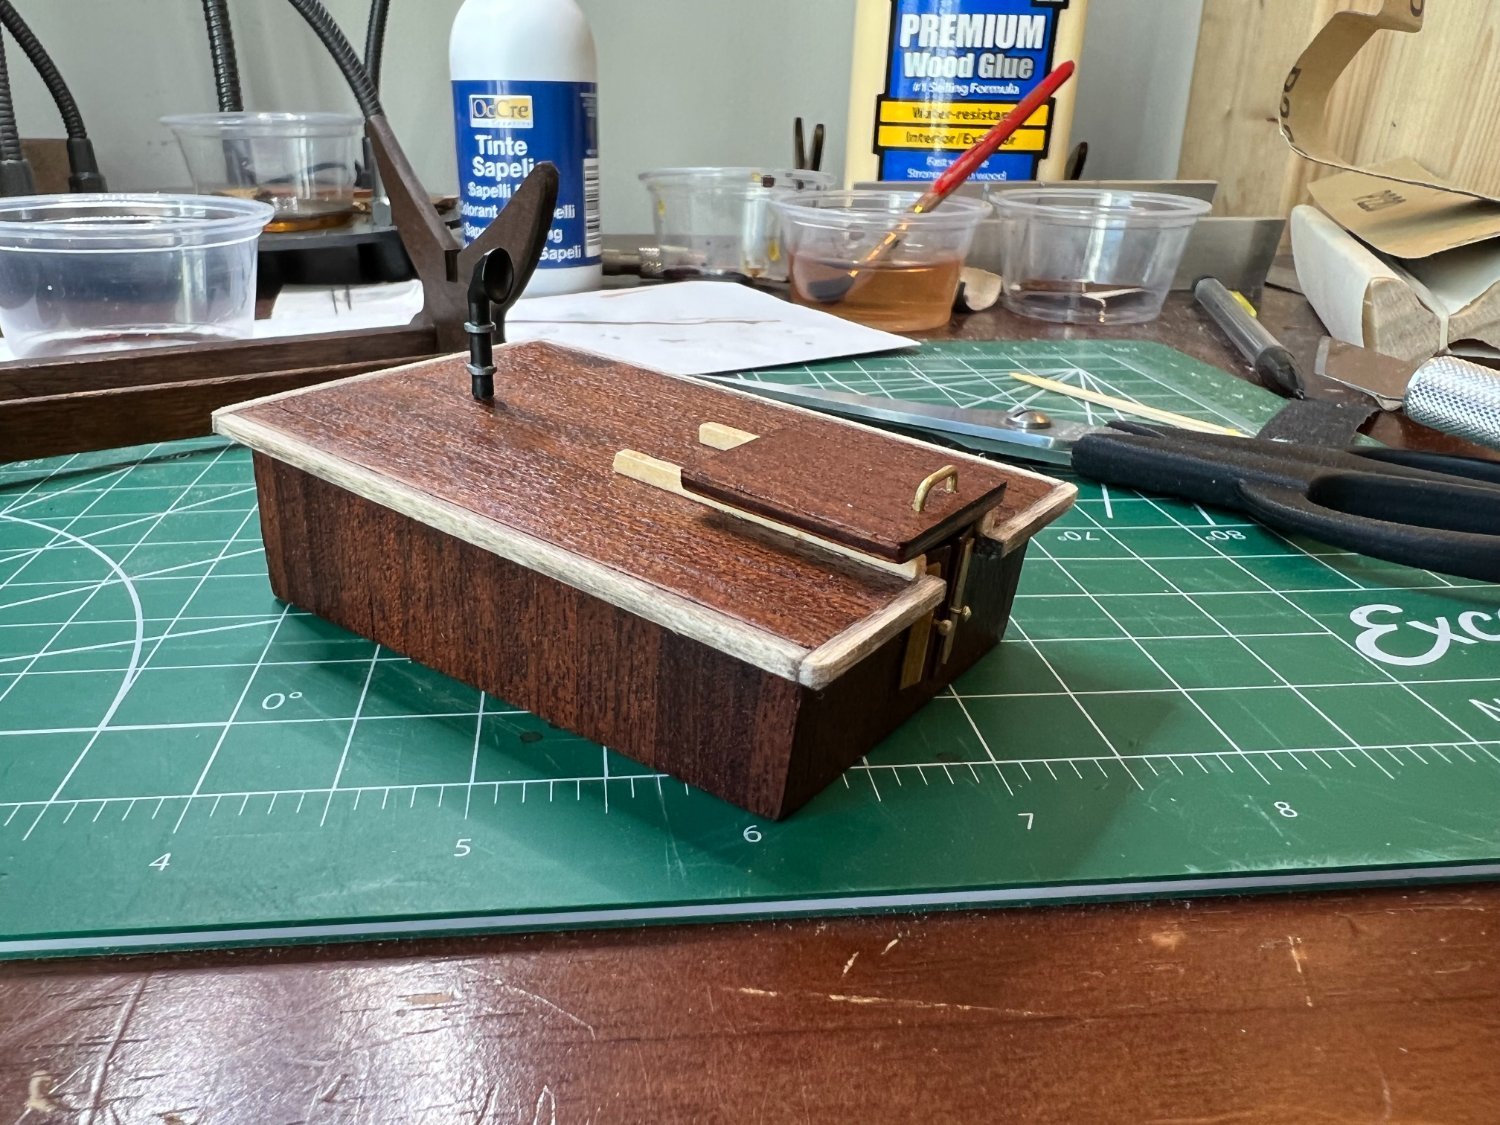
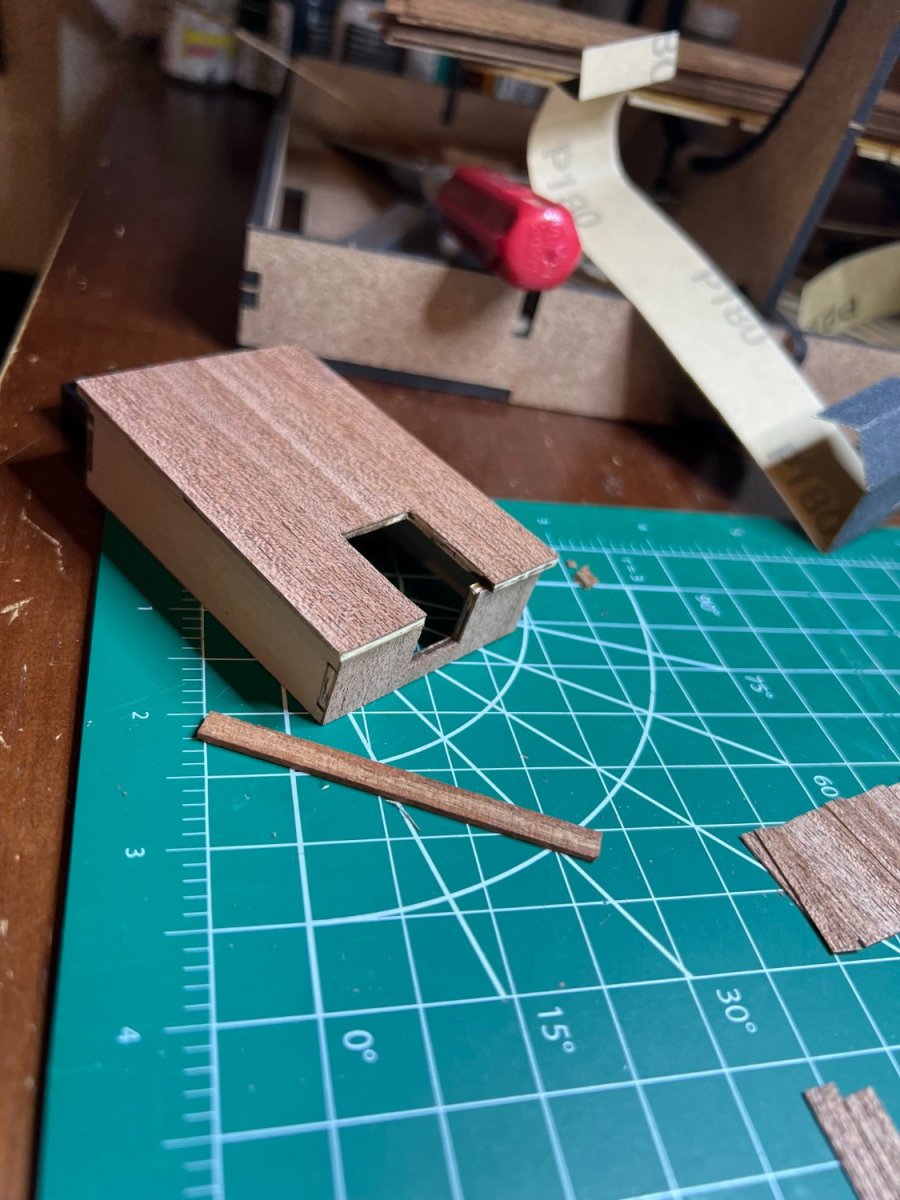
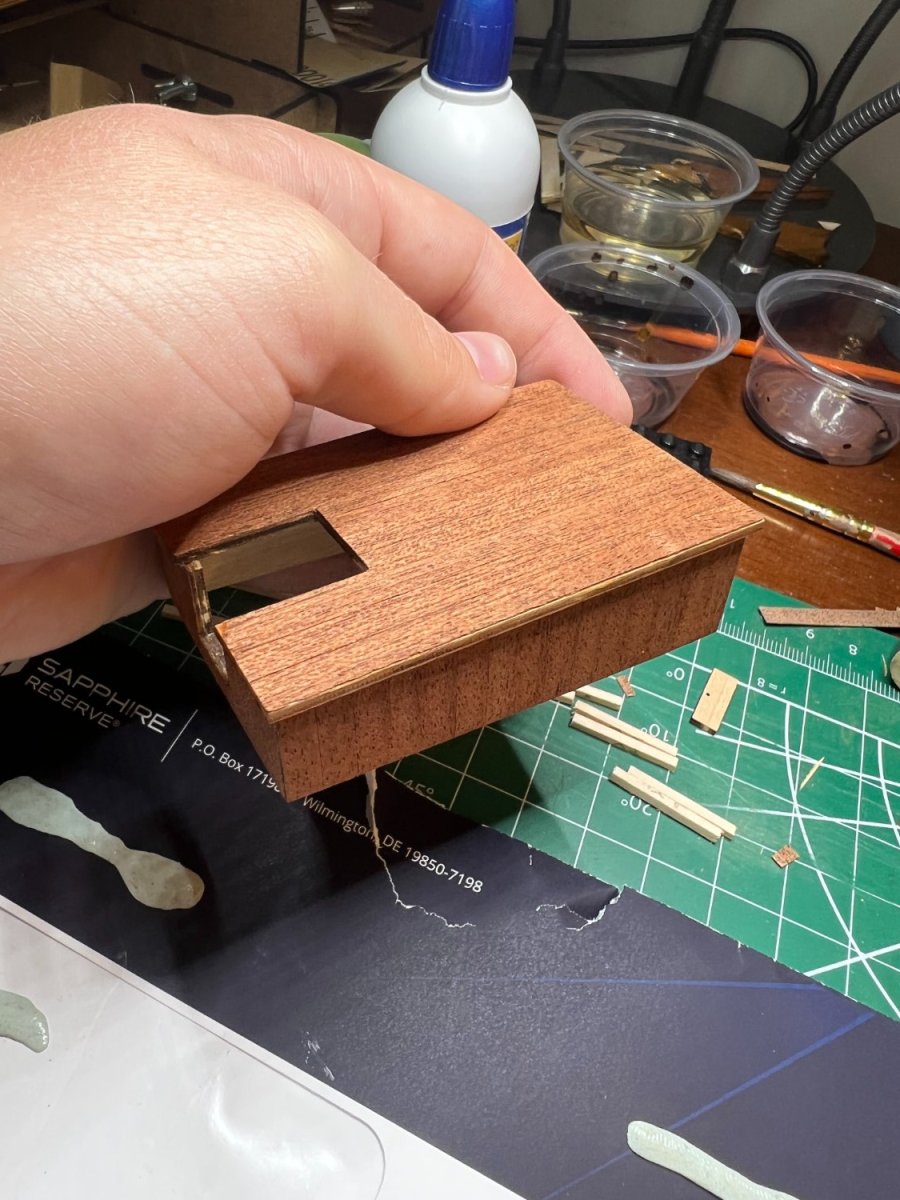
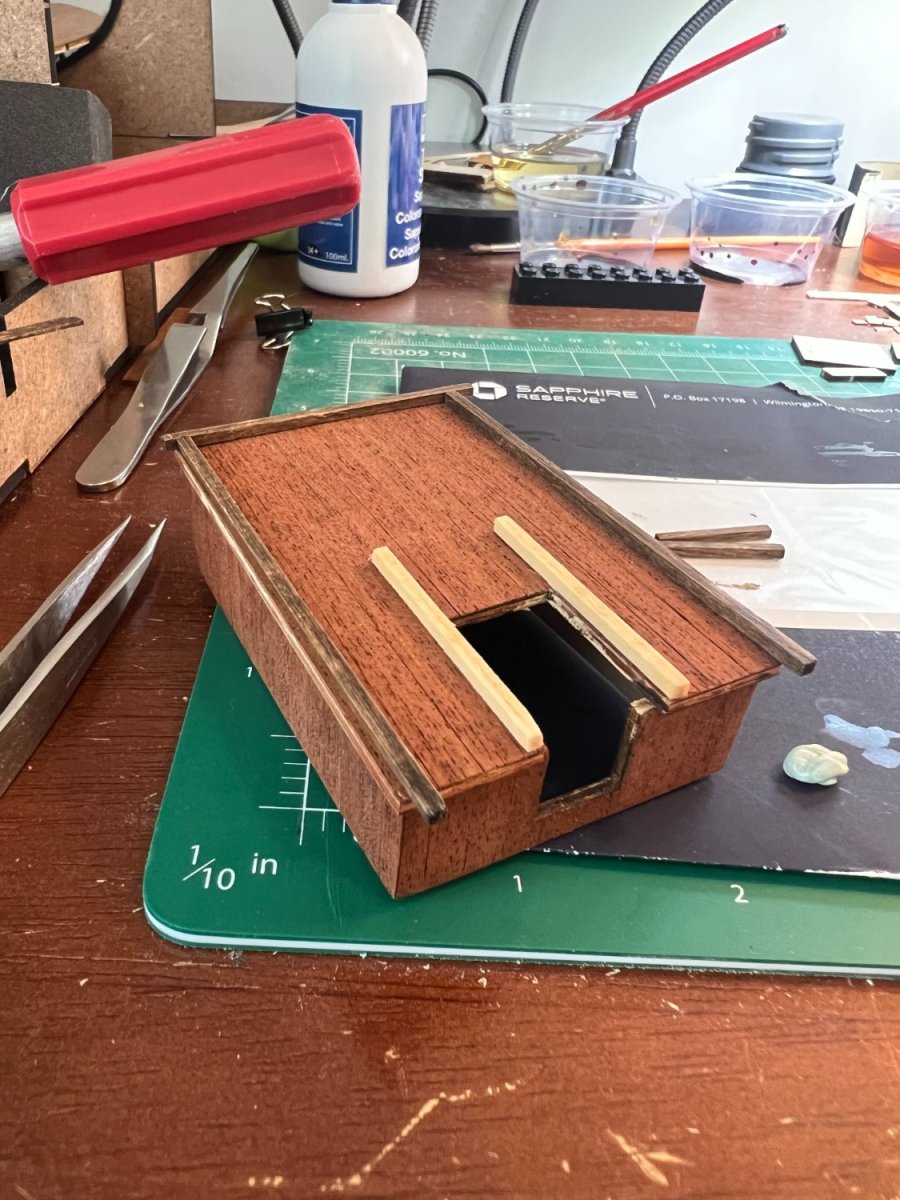
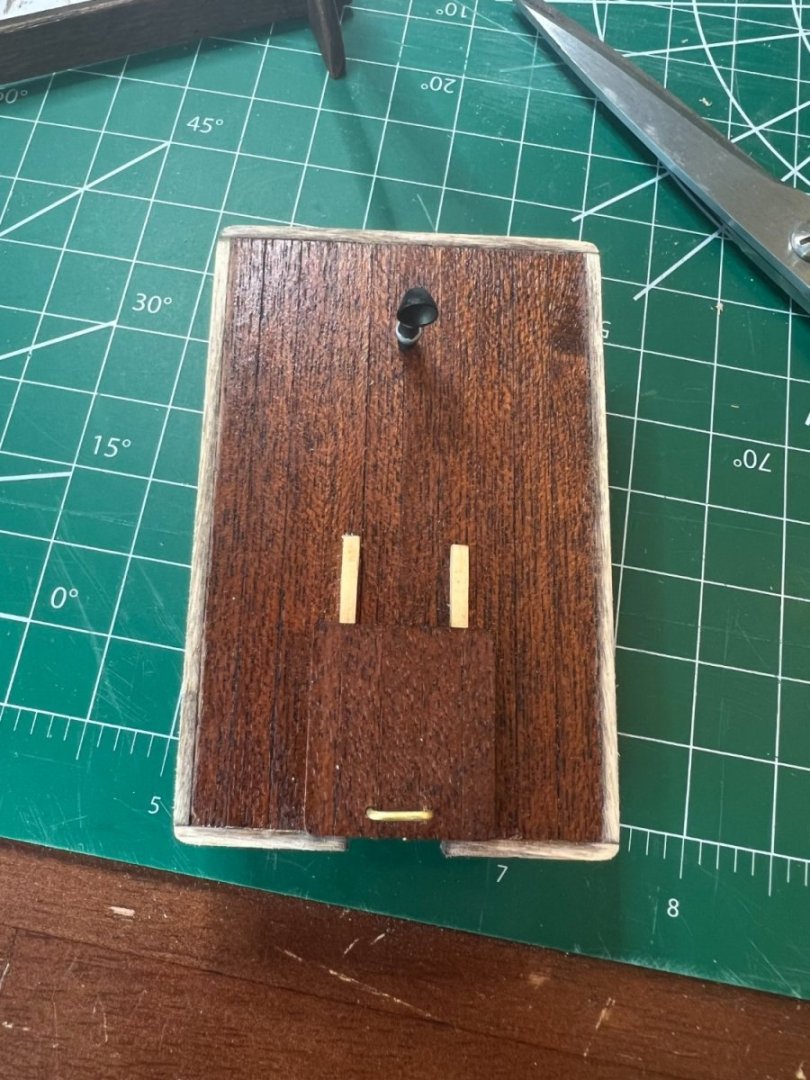
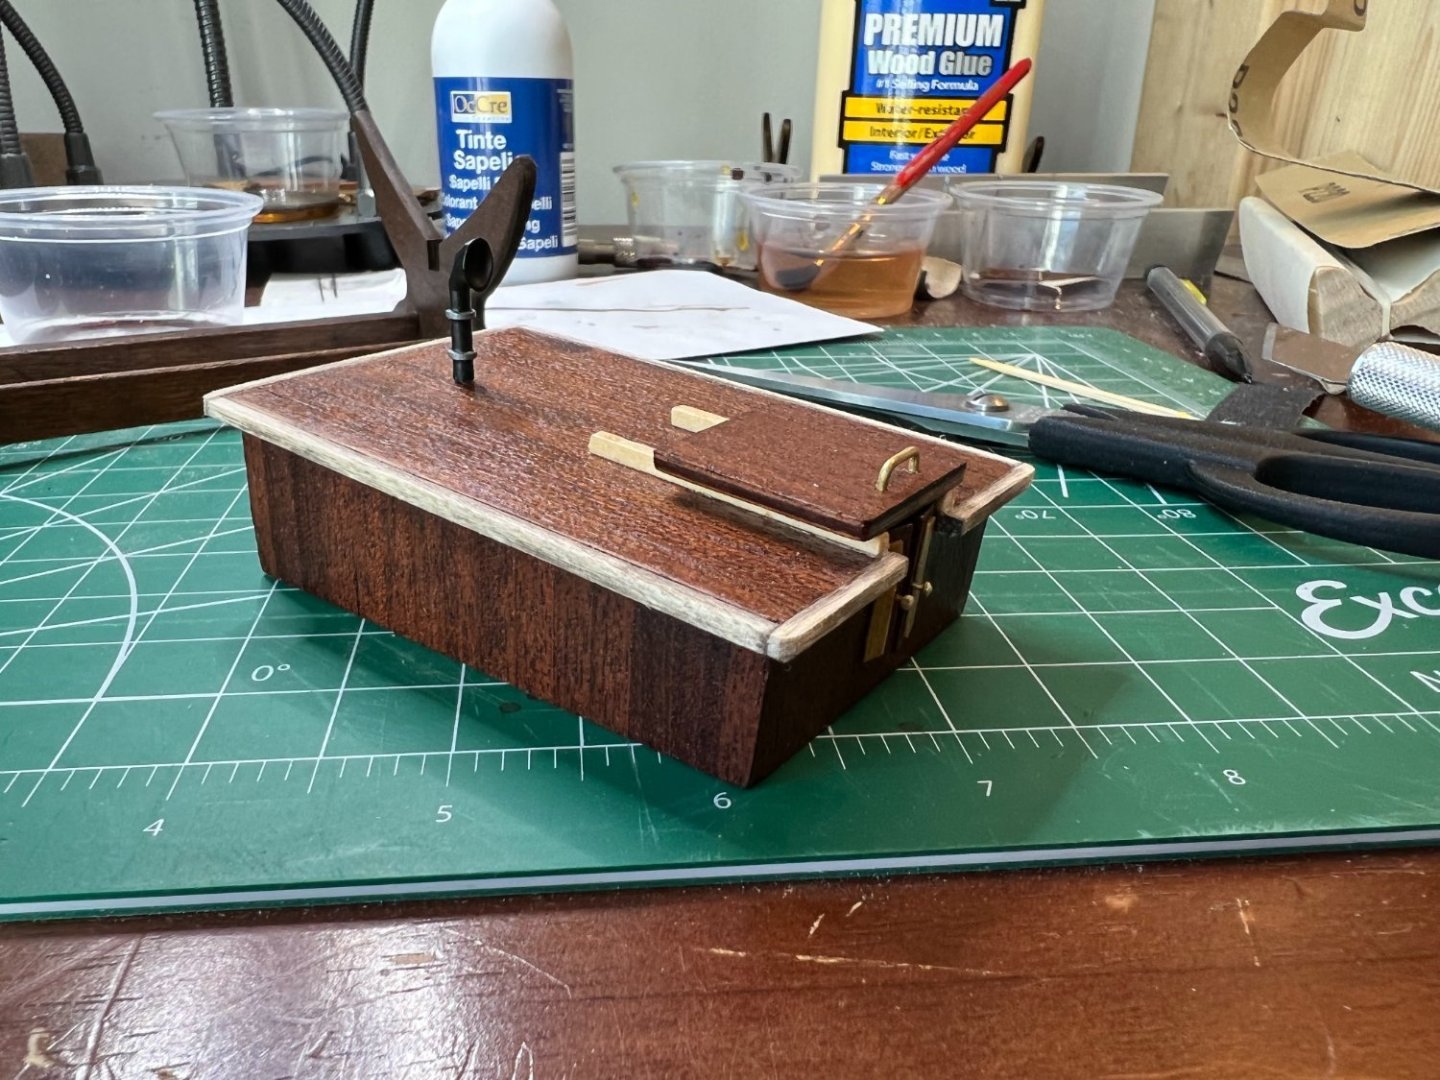
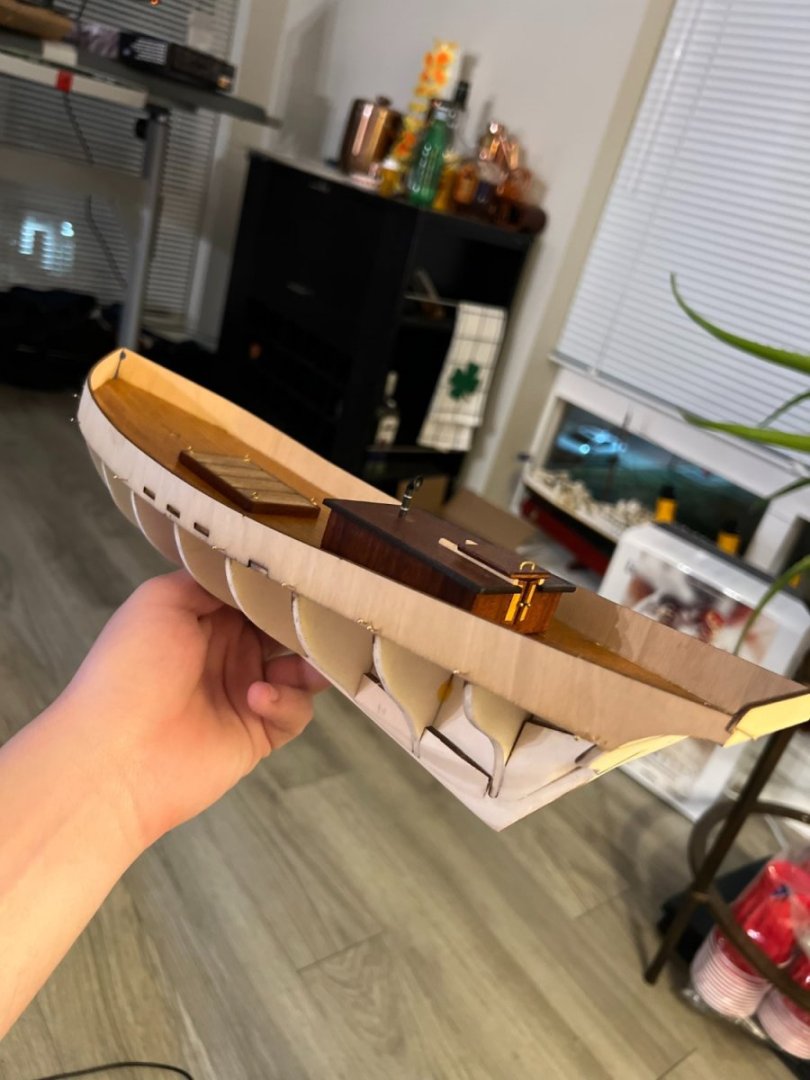
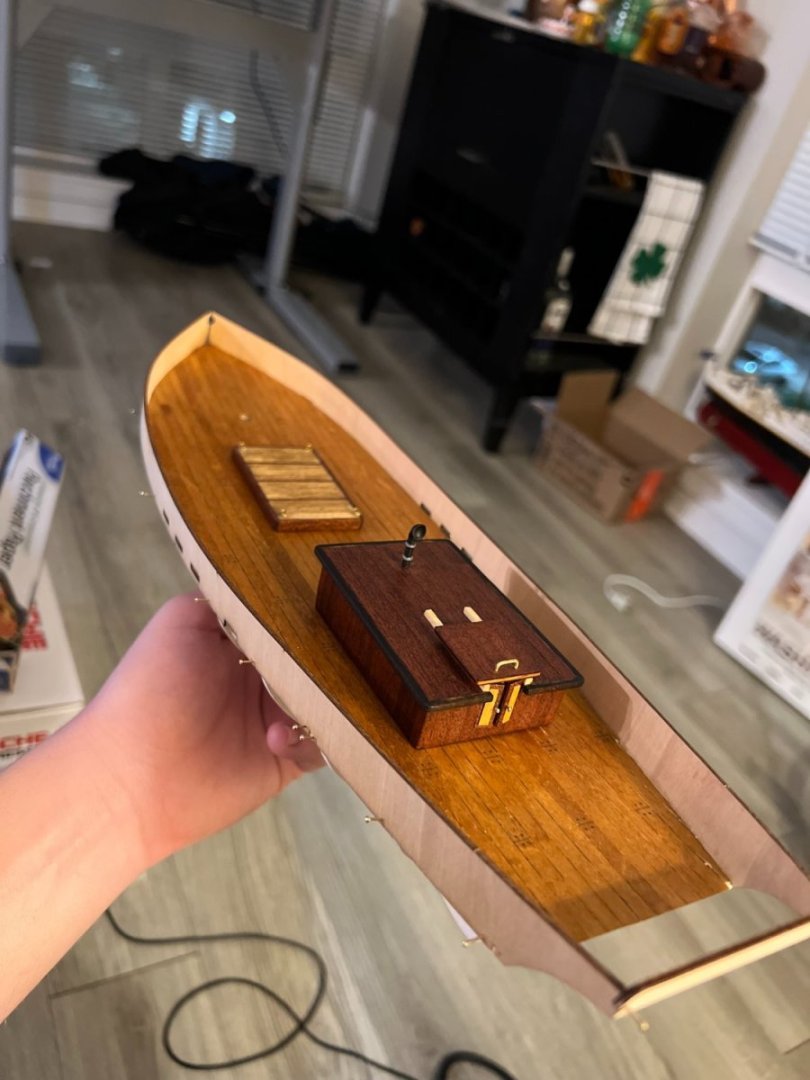
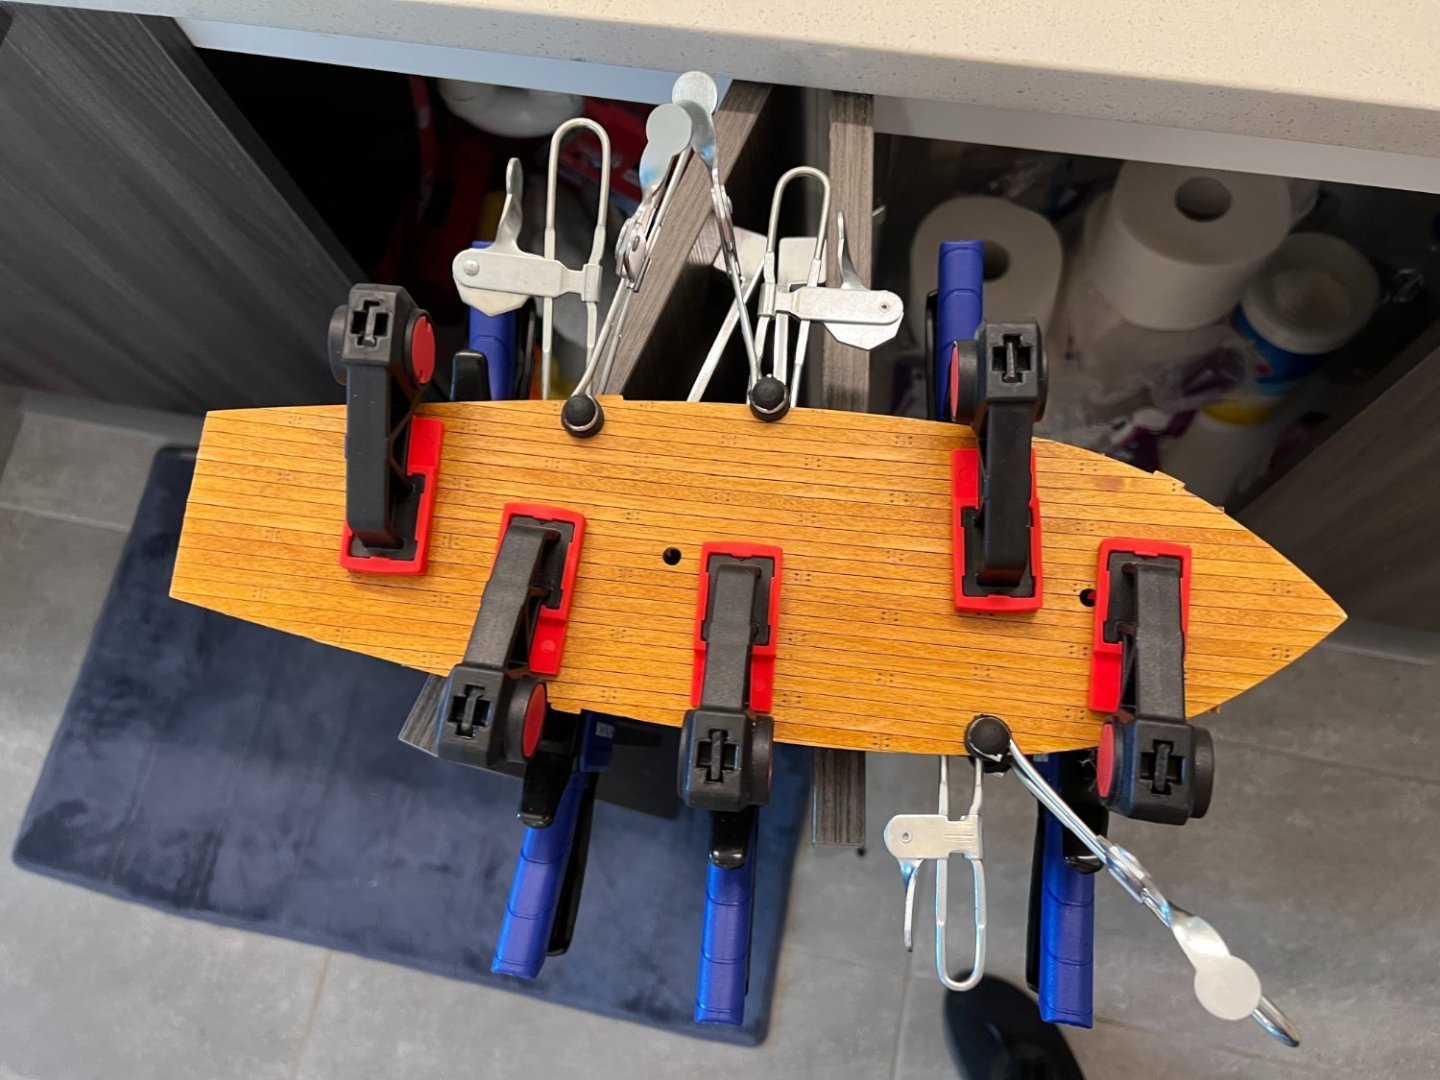
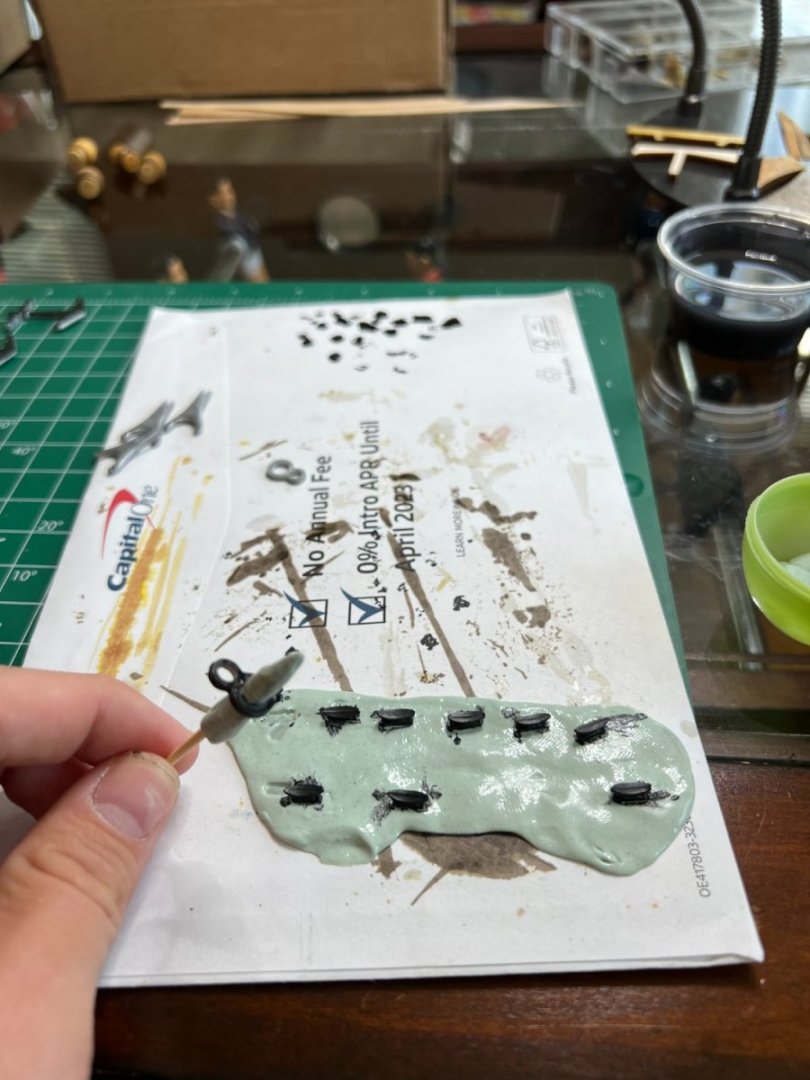
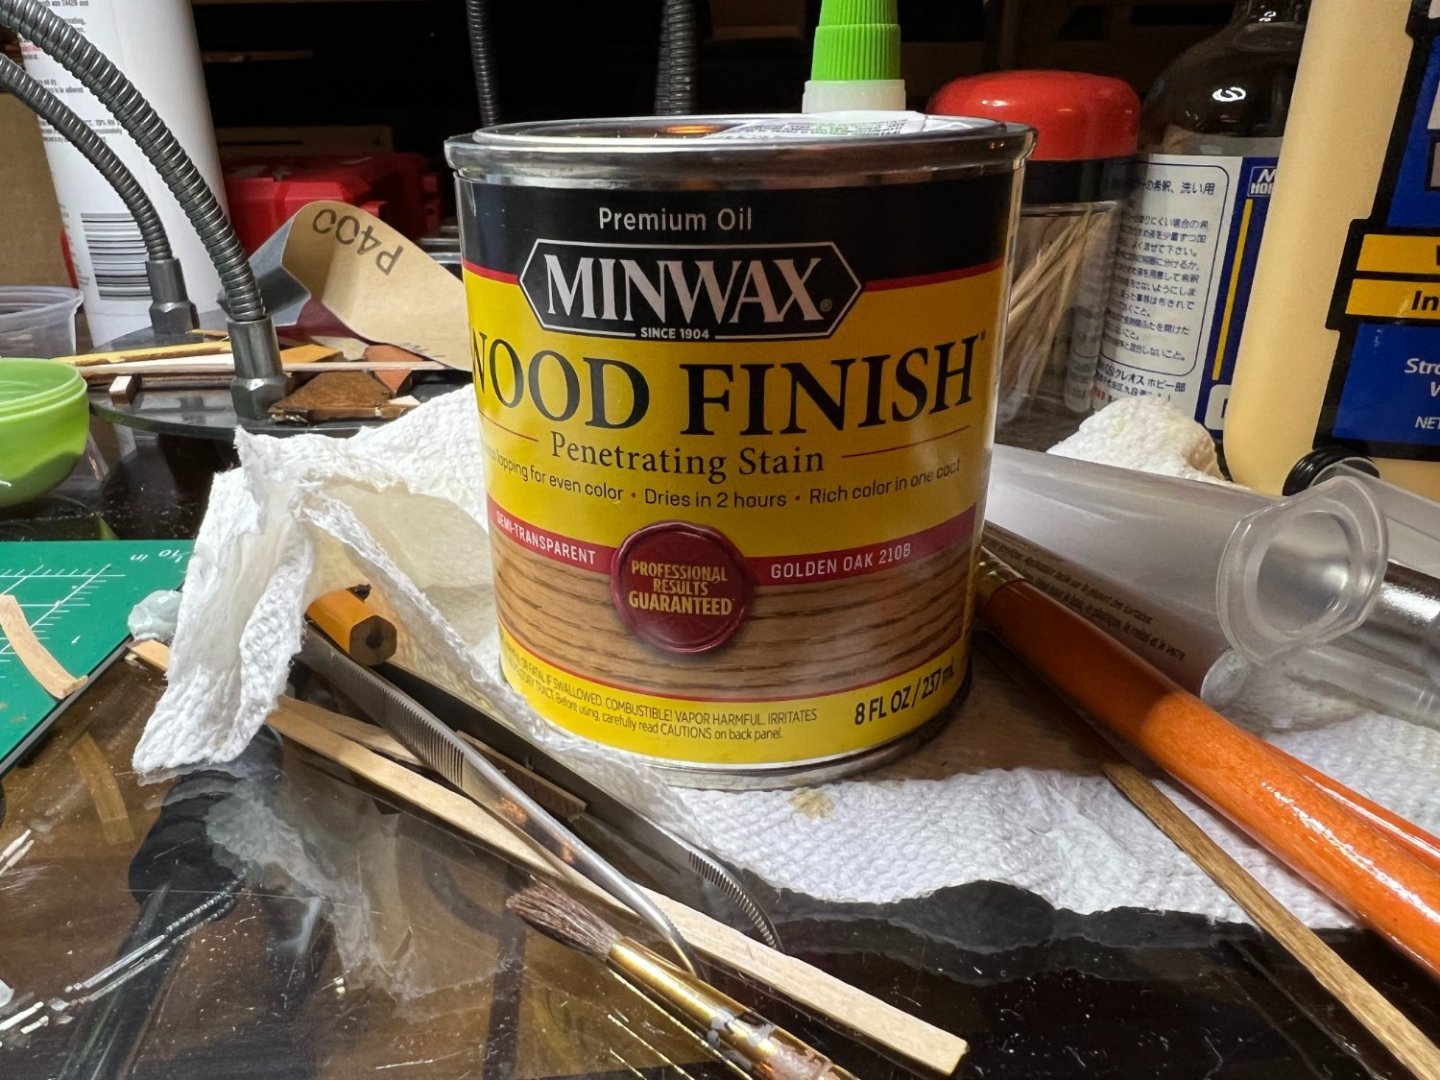
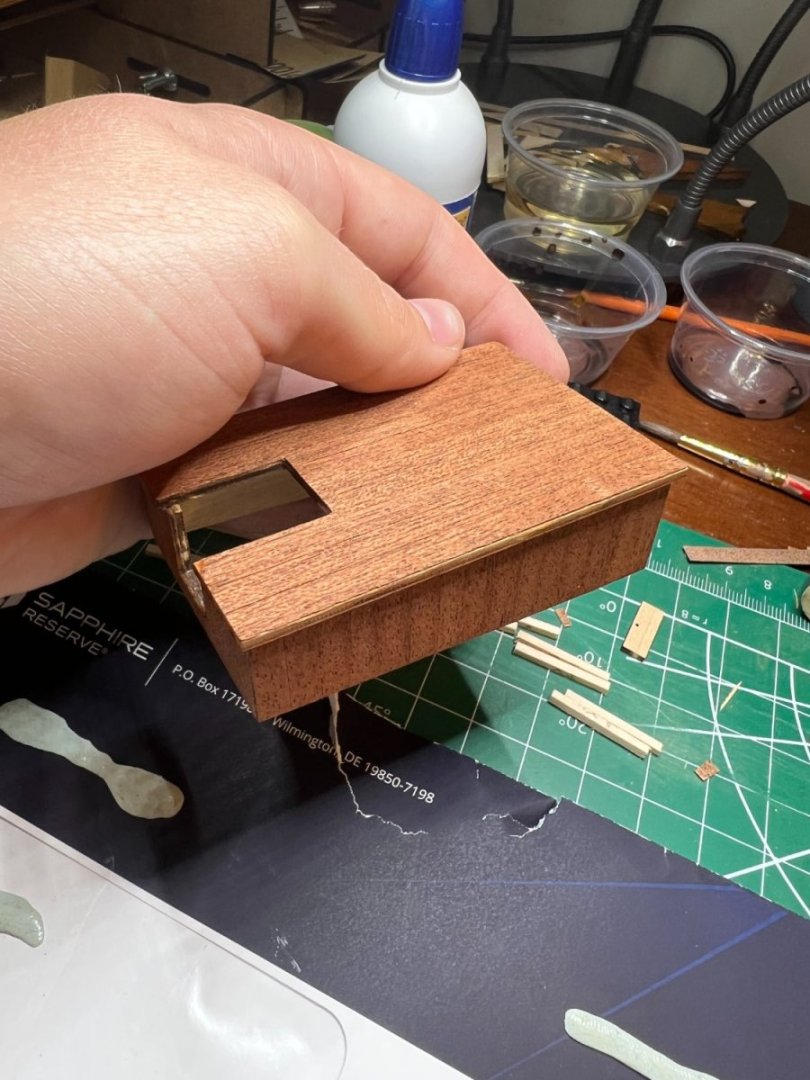
After completing the deck I was still waiting on the new keel to arrive, so I decided to do some work on the details. I started by painting the cleats and other various cast parts. Here I used what has (strangely) proved to be one of my favorite modelling tools: silly putty! I made a thin patch of silly putty and stuck the small cleats and other parts in it so that they would be temporarily held in place while I painted all sides of them. Silly putty works great because it never dries out, its tacky enough to hold small things decently well, and if you get paint on it you just wait for it to dry and then mix up the putty and it disappears! In plastic modelling I use it all the time for masking odd geometry areas like landing gear bays for airbrushing. I do highly recommend giving it a shot. It took me very little time to paint the cast parts, the majority of them are entirely flat black. At this point I also painted the black rings on the barrels. This was a bit of a challenge for my slightly shaky hands. Initially I used a black paint pen, however the paint kept dying on the tip or coming out unevenly, and it was gloss black instead of the matt black I was looking for. So I decided to break out my 00 paintbrush and go at it the old fashioned way. This gave me much more control and I think the results were better. To be honest I think the paint job on the barrels could have been a little cleaner, but I'm ok with how they turned out. Next I set about building the forward hatch. Here I made the mistake of over-sanding the edges of the planks on top, which in hindsight was totally unnecessary since they are bordered by edge pieces anyway. I was trying to make sure everything was perfectly square, but in the end I had a hatch that was slightly shorter than it should be. If you look closely you can see that the first and last plank are not quite as wide as the rest. Not a big deal, but something to look out for on your own builds. For the forward hatch I decided to stain the planks with Miniwax golden oak. In person I thought it looked a little ugly, but it shows up well in pictures, so we'll see how I feel about it in the end. A mistake I made here was not matching up the planks ahead of time. This makes a big difference when you add stain (ie one dark plank next to one light one), so I definitely recommend planning ahead and matching planks with similar colors and grains at the start of whatever you're doing. For the frame of the hatch I used some of the pre stained sapelli planks, as per the instructions. However I also very carefully added two more coats of sapelli dye to the frame. I think this did a good job of adding more color and depth. Once everything was dry I brushed on two coats of miniwax satin poly. This time, if I recall correctly, I was finally starting to get the hang of the brush-on oil-based poly. My coats were relatively thin, even, and allowed ample time for both the stain and first coat to dry. I think the oil based poly did a great job of enhancing all the colors and grain on the little hatch. After the relative success of the hatch, I felt ready to tackle the deckhouse. I had learned my lesson and this time I matched up similarly colored/ grained pre-sappelli-stained planks ahead of time. In the process I made a discovery that surprised me, but I'm sure woodworkers know; sometimes a plank would appear to have a different color from the one next to it, but when rotated horizontally 180 degrees, their colors and textures matched up nearly perfectly! I did not expect that! Something about the way light hits and is reflected off of the wood is directional. Thus making sure the grain (or whatever it was) of the planks was all in the same direction made a huge difference in achieving a uniform color and look. To summarize, factors that influence how a plank looks include: 1. face (front face vs. back face) 2. direction (up vs. down) 3. inherent color 4. inherent grain. Before I made this discovery I though only 3 and 4 affected the look and I was nearly resigned to the idea that the planks provided just varied widely. It turned out that they were much more uniform than my first attempt at sorting implied. This concept is difficult to express in writing, and I don't think I was able to capture pictures that are capable of really showing what I mean, but I hope my explanation makes SOME sense. Anyway, I am very happy with how the deckhouse planking turned out. I used undiluted PVA, thinly spread in small sections at a time. I am getting better at this, and I got the smaller areas planked before the glue started to dry, allowing me to use less glue and preventing any issues with the planks absorbing water in the glue. I ended up with what I think is a very neat little deckhouse. Once again I decided to apply a couple extra coats of Occre's water based sappelli dye to the pre stained planks. I do believe this improves the effect. For the edge trim I wanted to use a different stain color. I really liked examples I saw of a very dark stain/ paint on the edge trim, and I decided to attempt that on my model. I used miniwax's espresso stain. At this point I will say this: I really don't like that stain! I applied a couple coats to the trim which produced a decent effect that can be seen in the initial photos. Once everything had dried I sealed the whole thing with a couple coats of minwax's poly. This, ladies and gents, is the first time that I really feel like I did a good job with the brush on poly. I was very pleased with my progress with that particular material when I looked at the final result. It is not too shiny, but not too dull. I think the color looks beautiful, deep, and uniform (except for the espresso trim, which I was not happy with). And with that, this build log is finally caught up with where I was when I first started writing it!! Take a look back at those initial photos! I feel like that is a pretty big deal! However, I have done more work since then, so it isn't quite caught up to real life yet. But now, at least for you, dear reader, all the writing and pictures ahead will be about sights and experiences unseen. Thanks for your support! This blog has really helped keep me motivated and accountable, as well as being a great resource for me to look back at in the future to remember what my journey has been like and what I've learned! Thanks again, Jack


-
Thanks @Dazliare, I appreciate your comment! Hope it helps some!
-
Hi everybody, sorry it's been so long since my last post. I've been pretty busy lately with other things in my life, so I haven't gotten time to work on Polaris in a while. However I am by no means giving up on it! I am still very much enjoying the build and I remain committed!