
HOLIDAY DONATION DRIVE - SUPPORT MSW - DO YOUR PART TO KEEP THIS GREAT FORUM GOING! (Only 13 donations so far - C'mon guys!)
×


LED
-
Posts
81 -
Joined
-
Last visited
Content Type
Profiles
Forums
Gallery
Events
Everything posted by LED
-
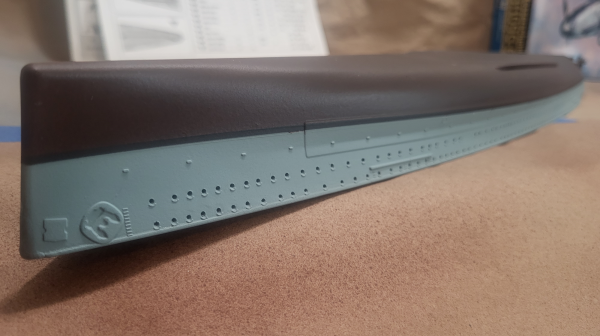
 It's been a LONG time. Life happens. Not bad thangs, but... And, sometimes - sometimes for very long times - you just ain't got the modelling bug... And, then, It happens... This will be my first wood deck. David, of 'David's Ships' YouTube site has a GREAT presentation regarding the application of a wood deck. He covers a lot of territory. He discusses potential mistakes with lessons learned. The following video covers the wood deck installation for his wonderful HMS Hood build playlist: Wow, that's huge, whateva' So, my first photo in forever. The 1/350 ArtWox deck and the hull of the 1/350 Academy Admiral Graf Spee: I have to say that cutting the deck from the backing has been a breeze so far. ArtWox has done a great job to this point. Pray for me, this is a one way, one shot deal😔
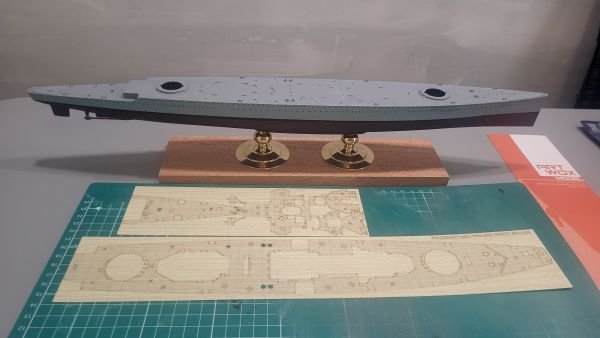
- 50 replies
-
- 5
-

-
- academy
- Admiral Graf Spee
- (and 5 more)
-
Amazing work @king derelict Amazing... My damn cat ate the superstructure of a HMS Nelson. I was down, flat on the bed, with two shoulders with rotator cuff injuries. Heard a cat jump up on my modeling bench and then the dreaded chomping noises. Lucky thing was that the kit was kinda crapola. Weird build, poorly detailed, and that dark north sea grey-blue of the home fleet washed out the details that were there. So, all was good.
-
Looking good... Personally, I find most folks overweather their decks. My Graf Spee won't look like some dude stained each plank with whatever was in the closet at the time. I think they would be a bit pickier. I think your deck job is fantastic. My Graf Spee will incorporate my first PE railing. Looking at how they are installed via YouTube, I don't think it will be a horrid process. Just measure twice, and install/glue stanchion by stanchion. At least that's the plan!!!
-
Wow, I see what @Brett Slater was talking about. Not much plastic remains of the superstructure 😊. Love the work on those chaser guns. It's odd they weren't built into the kit, they are so unique. The Emden is an awesome topic. I wonder if there is a WWI Scharnhorst kit out there... I'm restarting my Graf Spee build again - hopefully the brother-in-law won't be visiting soon - for a month. Ugh. Great guy, but... Anyway, maybe I'll join you and @king derelict with the famous ships of WWI theme. I was going to build the Prince of Wales, but I also have a cool 1/700 scale Derfflinger, Luetzow, Zeppelin combo kit from Takom I hear Takom kits are a bit complex, but I think I can handle it after looking over the sprues.
- 81 replies
-
- 3
-
-
- Micromaster
- Eduard
- (and 4 more)
-
That is a beautiful build. And, I would love to see an Iron Duke. You would then be 'well' on your way to completing the 'Battle of Jutland' scenario we always dream of 😁
- 78 replies
-
- 4
-
-
- Derfflinger
- Flyhawk
- (and 2 more)
-
Nicely done. Your deck looks great and covering it now with a wood deck would be a shame. I don't think it can be improved on... That is an awesome clock. I mean, I thought it had to be some kind of clock - but, it is so unique.
- 78 replies
-
- 3
-
-
- Derfflinger
- Flyhawk
- (and 2 more)
-
Watching the build right now on your Twitch channel.
-
Love the doggie cam @Scott Crouse For those who want to watch him build real-time, here is his Twitch channel: https://www.twitch.tv/bartbandy Side view watching and listening to the most recent VOD. Kinda relaxing after coming close to tossing my stuff out the window 😄
- 50 replies
-
- 2
-
-
- academy
- Admiral Graf Spee
- (and 5 more)
-
Gonna start poking around on the Iwatas - they have quite a selection. Many thanks @Landlubber Mike and @vossiewulf
- 50 replies
-
- 2
-
-
- academy
- Admiral Graf Spee
- (and 5 more)
-
Thanks for the offer Scott. The problems may be about those issues you mentioned, but I have taken as much of the variance out of it that I can. My model shop has a great Vallejo Model Colors selection and a very good Vallejo Model Air selection so I'm kinda married to those paints. I am now using the Vallejo thinner and airbrush improver. I mix the Vallejo Model Color paints to about 50/50 with the thinner. Pretty religious about the cleaning. I may be too rough on the needle/nozzle though. The Badger I used 40 years ago was built of metal and could be dropped, stepped on, and strangled to within an inch of it's life - maybe this one is more fragile. I am going to go to a modeling workshop at the Hobby Shop later this month to see what I see. I'm starting to think, however, that the airbrush I have may actually have a defect in it. Anyway, I noticed your signature pointed to Twitch. I just followed you 😄. That might be a good way to connect.
- 50 replies
-
- 2
-
-
- academy
- Admiral Graf Spee
- (and 5 more)
-
Nicely done, Alan... Can I ask the brand/model of the airbrush you are using. From earlier in the thread it is apparent you are using Vallejo paints. I am having a heck of a time with that grey (I think you are likely using 70.990 Light Grey). My airbrush seems to like to spatter and separate with it. Looking to upgrade...
- 78 replies
-
- 2
-
-
- Derfflinger
- Flyhawk
- (and 2 more)
-
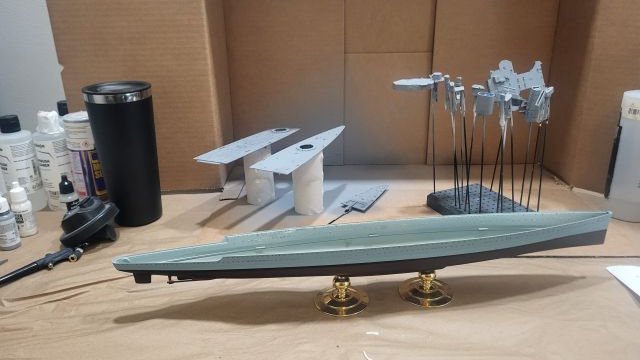
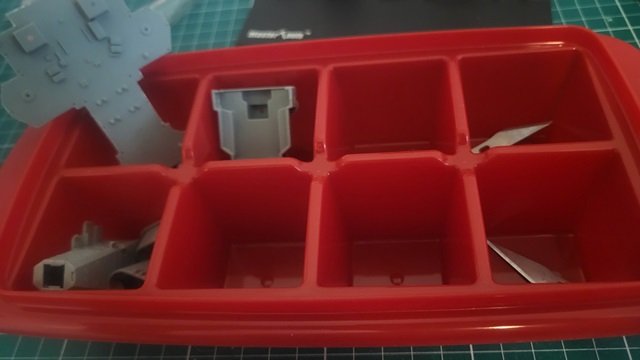
Ok, picking up the 'Bag of Bones' again. I learned to hate my Badger 350. There has to be something wrong with the airflow. All three of the tips seem to have the same problem - the paint on large surfaces seems to speckle and be inconsistent when it isn't speckling. Any ideas out there for a replacement airbrush would be appreciated. This brush is killing my desire. It doesn't seem to have much of a problem on smaller models or parts, but yowser. The paint went on a bit better. At least it is didn't separate and it is smoother. The only speckling is on the deck and the wood deck will cover that. And, this time, as noted, the paint did not separate so the raised details that will be visible after placing the deck will look fine. Anyway, here are the bigger assemblies in 'Bag of Bones' paint drying format for your viewing pleasure: Also, I am serious about recommendations for an airbrush replacement. I enjoy the 350 when it works, but when it doesn't I want to throw it and the model against a brick wall...
- 50 replies
-
- 2
-
-
- academy
- Admiral Graf Spee
- (and 5 more)
-
That MIG Ultra Glue does the trick. After watching how 'Dave' is attaching his PE to the Hood in the YouTube Hood build, I decided to give it a try. David is using heavy super glue because of the slow(ish) drying time and then fixing it into place with extra thin super glue. The thick glue gives him time to move the part around, the thin glue locks it into place. I was all set - but my thick glue managed to become set in the bottle over time. So, no bueno. Had to try the Ultra Glue. It works great for the purpose of a slow drying fix. It dries clear and it doesn't seem to be nasty on the residue. Then, I lock the part into place with the extra thin. We shall see. My first PE is a bit messy, but starting to get the hang of it. I haven't painted any of it yet. Again, we shall see.
-
Beautiful job weathering that wood deck. My build will be lightly weathered because the Admiral Graf Spee did not take fire till the 'Battle of River Plate'. I am either going to model her as she left Germany or as she looked before she sported the bow wave and the second darker grey camo pattern. I love the bow wave, but that is how most model her and I hanker to be different... Anyway, if you could summarize the techniques you used to weather those wood decks I would be forever in your debt. I have never implemented a wood deck and paralysis by analysis is starting to take hold🤪
-
The build is going slow, but reasonably well. Got a growing bag-of-bones awaiting sanding, puttying, priming, and painting. Since you all like photos, here is a sample of the contents in that old bag: So exciting. I'm actually in a bit of a holding pattern. The wife noticed that I was eying some nice barrels for the 150mm secondaries and some brass masts. She thought that would make a nice gift. Man, I want the barrels but I NEED the masts. I break masts like crazy. I have never had a mast survive my ten thumbs. So, that was nice of her. I also kinda glammed some paint that is supposed to be a match for the metal decks. That wasn't too important when I started, but research indicates that the Admiral Graf Spee sailed out of Germany with Hellgrau 50/51 pre-war colors, got a camo pattern on the superstructure with Hellgrau 51, and later sported the dark grey used on the steel decks in other superstructure patterning. At the end, she was given the bow wave. So, now there is a chance I will need a better match for the steel deck grey since I may be using it for more of the ship. That decision is coming soon...
- 50 replies
-
- 4
-
-
- academy
- Admiral Graf Spee
- (and 5 more)
-
Man, the Hood is a stunning ship. Look at her. You are doing her justice... 🫠 While it may not be anything you can use, there is a YouTube modeler videoing his 1/350 build of the Trumpeter Hood. His site is "David's Ships". Even though he is building to a different scale, a different manufacturer, and likely has different goals there might be a tidbit in there that is useful. I know his build series has been helpful in my Graf Spee. Helped me organize things for my most adventurous project yet. I kinda like how he discusses mistakes and how to fix them. I know you won't make any, but...
-
My first photo etch!!! I think I'll keep it pretty much hidden till I get a coat of paint on it🤪. What a chore. I'm starting to figure out ways of doing things, but... I don't think I am going to use the photo etch for those square 'windows' to the front of the superstructure. That is what paint or a heavy wash is for!!! It seems like such a waste to file off the hatches just to apply PE hatches. In fact, as this time I don't see the benefit. Since I am modeling the ship underway, her hatches will be closed. And, the closed hatches have very little detail. On the other hand, I think the catapult and cranes will look great in PE.
- 50 replies
-
- 3
-
-
- academy
- Admiral Graf Spee
- (and 5 more)
-
So, the Bro-In-Law has vacated the premises and I am grinding to start afresh on the Admiral Graf Spee. This video is from a site showing their build of an HO scale model train environment - the engines, the cars, the roadbed, the scenery, etc... I am slowly grinding my way through some of them. I think some of you folks will find the weathering techniques useful: Sometimes you can find the crown jewels in unexpected places. Her most recent video is about heavily weathering an diesel engine. That weathering job makes some of @RGL's stuff look like it came off the showroom floor 😁 BTW, I might have corrected my initial entry or maybe I didn't, but... The Admiral Graf Spee was out to sea for months before her sinking. She was active off the West and East African coasts, around the Indian Ocean, and then all the way to South America. Those paint fade weathering techniques mentioned in the above video will be implemented. They look quite doable. Finally - and this is scary - some of those engines she is painting can cost upwards of $1,000. Oftentimes higher if brass. Yowser, you have to have some serious brass nuggets to start detailing on those models. Before I touch an engine with a paintbrush I will have to KNOW I am pretty good. Not yet, not quite yet😶
- 50 replies
-
- 4
-
-
- academy
- Admiral Graf Spee
- (and 5 more)
-
Yup, pretty slow... And, my Bro-In-Law is dropping by... So, gotta box the Spee and set things up for him...
- 50 replies
-
- 3
-
-
- academy
- Admiral Graf Spee
- (and 5 more)
-
Wow, this is going to take some TIME... I didn't realize that the doors and 'windows' had to be drilled out. I thought they just had to be flattened or filed off to get the PE on. I've never done that before. Is that what you guys do? It sure looks like that is the process.
- 50 replies
-
- 4
-
-
- academy
- Admiral Graf Spee
- (and 5 more)
-
Am I the only one looking down the funnels at those 'details' and noting a ladder... I think we just found the absolute worse job on the Dreadnought. Yowser, that would not be fun...
-
Came out great!!! Little fix-ups needed here and there. A little work on the stern, and some bleed of hull red into the hellgrau 51, but tiny stuff that can be fixed after the paint completely cures. The only unhappiness is that the hull red - although I lightened it a bit - is very dark and the waterline is not contrasting very well. Regardless... Couldn't be happier with the results. Those drilled out portholes are pure happiness in the end. It wasn't as much a task as I thought it would be. Just a bit monotonous, but spread out over a few days it wasn't too bad. Now to do the sharpened pencil thang, fix the minor flaws in the paint, and apply a matte clear coat. Then off to either the superstructure or my first wooden deck.
- 50 replies
-
- 6
-
-
- academy
- Admiral Graf Spee
- (and 5 more)
-
Pray for me... The time is nearing for when I must pull the tape off. Will there be a nice, level waterline - or... something worse, much worse One more hour till yank time...
- 50 replies
-
- 4
-
-
- academy
- Admiral Graf Spee
- (and 5 more)
-
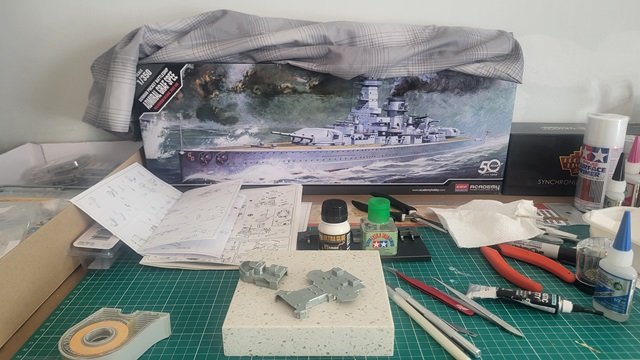
We all just have to be adult enough to look at What we want out of the kit What our skill level is and, our budget I lurked this site for about a year before I built my first model in 30 years. So, the 1:700 Tamiya HMS Repulse it was. I didn't want to spend over the kit price for something I wanted displayable, but not museum quality - especially since this was going to be a new experience for me. So, I had to step back from trying to duplicate the quality of RGL and others in that build. I don't think I will ever get there, but small steps and time may get me closer. You have to know what you want out of a kit. However, with the basic skills down and the enjoyment of the subject and the fact that this will be my first real 1:350 build, I am willing to spend the kit price on aftermarket for the Graf Spee. It won't be museum quality, but it will be presentation quality for my case (that I haven't built yet😶. So, the overall cost will be about double the cost of the kit alone. That is not a bad investment for what will likely be 4 - 6 months of 'enjoyment'. Not every kit will need this effort and expense. Some will just be a break, some have no chance of getting there, some will not get there for financial reasons - but, some will. GLHF
-
Some amazing photos of the Admiral Graf Spee throughout her career: 'German Heavy Cruiser Admiral Graf Spee', Destination's Journey These cover her from christening through scuttling. Well worth reviewing if you want to see how refits affected her. Not going to post any of these photos. I know some are in the public domain, but others...
- 50 replies
-
- 3
-
-
- academy
- Admiral Graf Spee
- (and 5 more)