HAIIAPHNK
-
Posts
234 -
Joined
-
Last visited
Content Type
Profiles
Forums
Gallery
Events
Everything posted by HAIIAPHNK
-
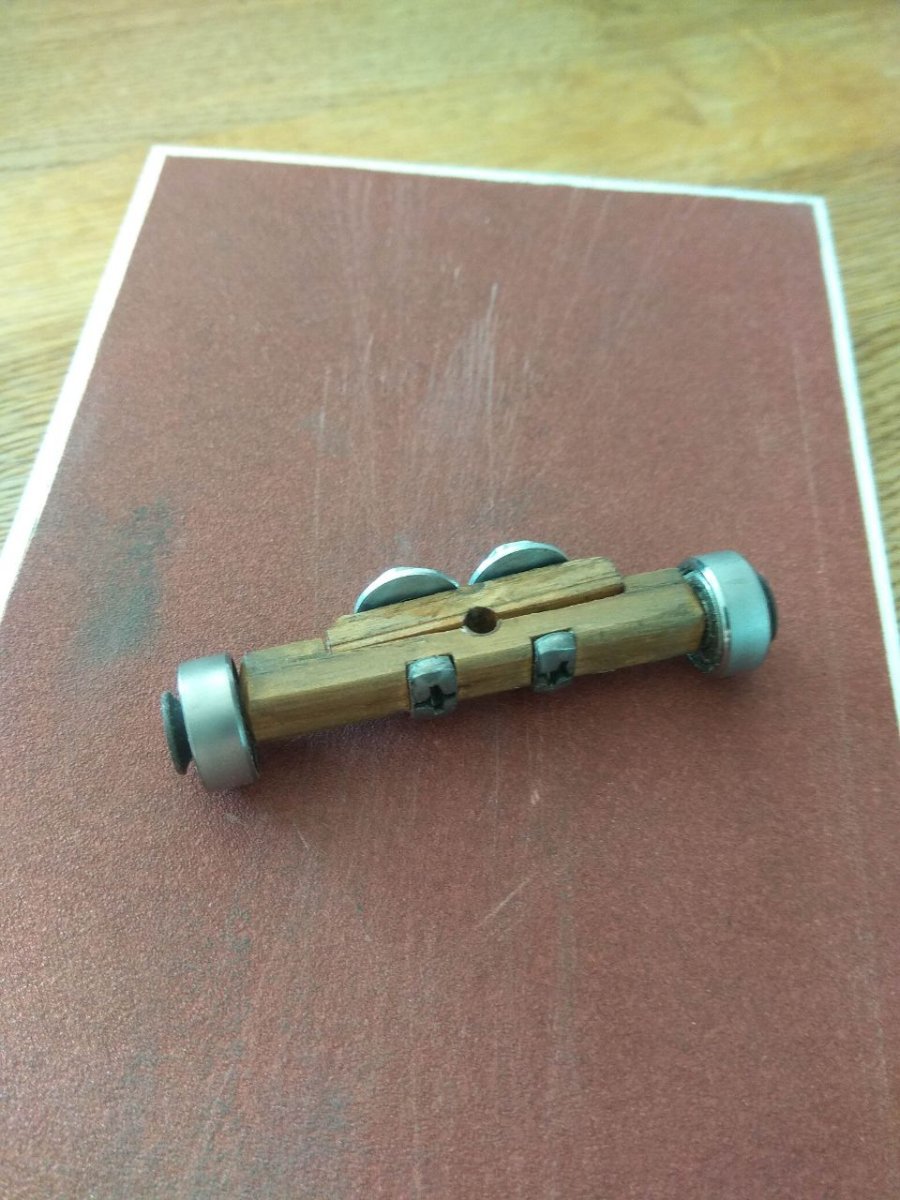
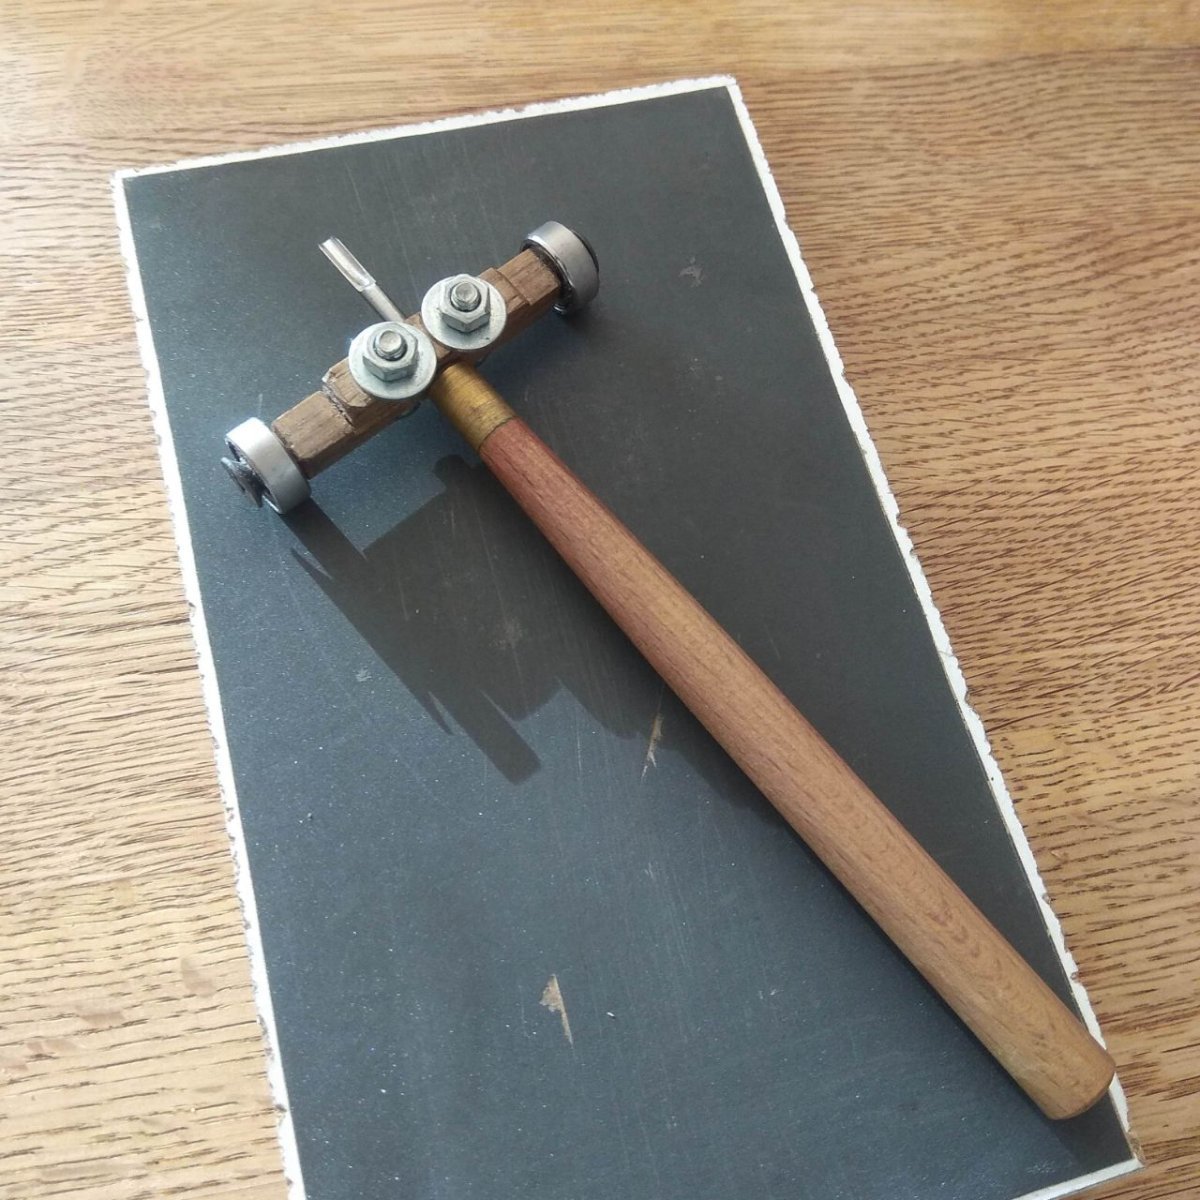
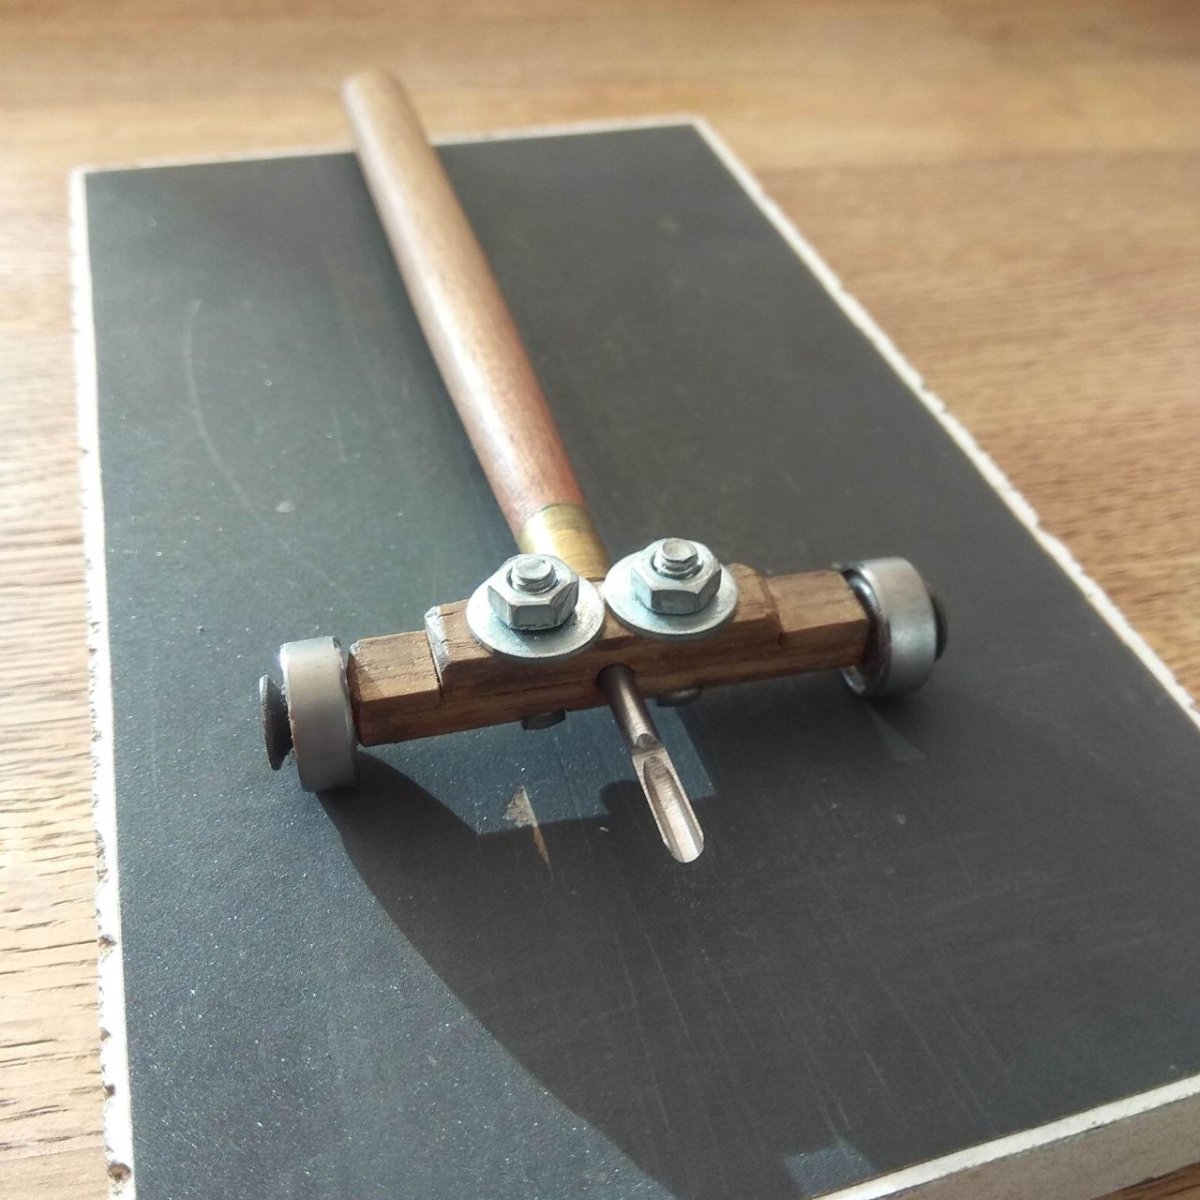
 Yeah, that's pretty much how I operate, too. This is what my cart looks like. Straight blades are sharpened with the fastener fully clamped. When sharpening semicircular ones, I loosen the nuts slightly so that the tool barrel can rotate. I roll the cart forward with one hand and rotate the tool in the slot with the other hand. The overall result is good. And you can cut. But as I said it all depends on how many sharpening cycles have passed. Little minuses gradually accumulate. This can not be avoided with this method of sharpening. I'm looking for a more precise option than this.


-
The 2nd option is much more complicated. It is based on a different principle. If the first is purely mechanical sharpening by hand with the help of devices, the second option can be called machine sharpening. And this principle can also be divided into several variants. The basis is a general principle. You need a rotating abrasive. And you need a bed in which the tool is loaded. This bed also rotates. And as a result, the sharpening will take place with a precise radius. Then the options for achieving this can vary. For example, there is an option where the tool is loaded into a cart. But it does not hold the chisel rigidly, but can rotate around the axis. At the same time, the wheels on which this cart rides transmit the rotation to the tool mount. Which will add up to a proper radius sharpening. This method can be transformed into different shapes. For example, small motors can be used. One will rotate the disk with abrasive, and the second will rotate the chisel. Such a variant is even easier to make than an overly complicated rotating cart. There are too many different connections, and each element has to match perfectly with the others. Because any backlash will lead to poor quality work. And such a mechanism can only be made with precise equipment, which I don't have. Even two motors would be easier to connect. I looked at different spare parts on amazon and theoretically such a device can even be tried and built. However, I already know that in the process there are bound to be problems that I don't even know about now. And in the end, probably, it will be cheaper for me to buy a real machine than to build something from separate elements on my knees. I remember very well how I recently made a homemade sanding planer and what problems and questions arose in the process. I don't know, maybe I wasted my time for such an overly detailed description. I am not good at expressing my thoughts in a short form. But maybe this will make sense. Someone will suddenly suggest something useful. That would be great.
-
1 way let's call conditionally simple method. It requires 2 components. 1 is a cart, which will firmly hold the tool and give the desired angle of the blade. 2 component - a shaped bar with abrasive. This is a fairly common method of sharpening such tools and usually such bars can be easily made from a block of wood. Then abrasive paper is placed in a groove on this bar. That's it. But with such a small tool, this method will not work. The groove is so small that no paper can be placed in it. I thought that instead of paper, I could use sanding stones. If you can make a ball mill of the right size in it, you can get the grooves you need. You could make a small bed into which the slats with the stones would be inserted. Each diameter has its own grinding bar. You can take several variants of stones with different grits, which will allow you to more accurately make sharpening or polishing. In theory, such a method should work quite acceptably. However, I have a few buts. In order to do this I need at least a small milling machine, for example from Proxon. I even tried to buy one of these on private sale. But I fell for scammers and my money went into a dishonest pocket, I was not careful enough. So for now I can't realize this idea myself. Also, there are questions as to how much grinding stone grinding is even possible. They vary in hardness. I don't know how the cutters will behave, there is a possibility that they will wear themselves off against the abrasive and end up with nothing. In any case, the answers to such questions can only be solved by practical method. Try and see. Otherwise, nothing will work out.
-
Yes, I was talking specifically about Mikhail Kirsanov's instruments. I have 3 sets of his tools at the moment. One with thin handles, that's what I use. There is also a set with almost "adult" sizes. And this set has pear-shaped handles, sometimes they are also jokingly called enemas. It was once an experimental set, and Mikhail gave it to me as a gift. I have not met such a set on sale, although I may be wrong and he also makes such sets for sale. Not everyone shows their tools or publishes their hobby at all. I have one more set lying around as a spare. It has short and thick handles. And because of this, the chisels require more space in the box. That's why I have this set in two separate packages. I once ordered this set as a gift for my father. But he died and never got to use it once. So the set came back to me. And I keep it as a memory. So I have a rich experience with tools from this master. The question of sharpening is quite complicated. First, it is important to realize that everyone uses such tools with different frequency. Someone takes it out occasionally and makes a couple of cuts where no other tool can get through. I, on the other hand, use chisels a lot when I'm working on carving. They literally get hot from the intensity of the work. Accordingly, everyone's need for sharpening is different. There are also different sharpening needs. Ideally, it's a little straightening, and a couple of strokes make the tool sharp again. But even a couple light touches of the most delicate abrasive gradually imposes small inaccuracies. I've made a little cart for myself that helps with sharpening, but it doesn't produce perfect results either. There are complications. Straight chisels are easier to sharpen, but there are problems with them too. When the width of the tool is very small, the slightest misalignment causes the angle of the grind to go wrong. At first I was frustrated, everything seemed to be correctly pressed and measured, so how could the curvature appear? And I tried to correct it. But then I realized that every next attempt to correct erases the metal. It's easier to leave the sharp blade alone and work with it, and tolerate the fact that the edge is not at 90 degrees, but with a small slope. It will be more expensive to correct this disadvantage. With round chisels it is much more complicated. Any theory of sharpening can be described by the following formula. For an ideal edge, the entire length of the blade must be in contact with the abrasive for the same amount of time and experience the same pressure force on any part of the blade. As soon as either of these two parameters are violated, the blade will be defective. Semi-circular chisels need to be run across the sharpening stone and rotated at the same time. It ends up being a lot of fun. Like I said, sharpening errors can accumulate, and in the initial stages you can't see them. But the further along you get, the more they affect you. At one point, the inevitable finale will come - the tool needs to be resharpened, not just corrected. The beauty and power of Michael's instruments is precisely that they are made with jewel-like precision. On precise equipment. And of course the man himself has a steady hand. You can't get such perfection by hand. If someone has experience in sharpening and can share methods, I will gladly accept any advice. Now I am trying to make a different kind of sharpening device. And I see two possible ways to go about it. Since the more complicated issue is with the semi-circular tool, I will describe these methods with this particular type of chisel in mind.
-
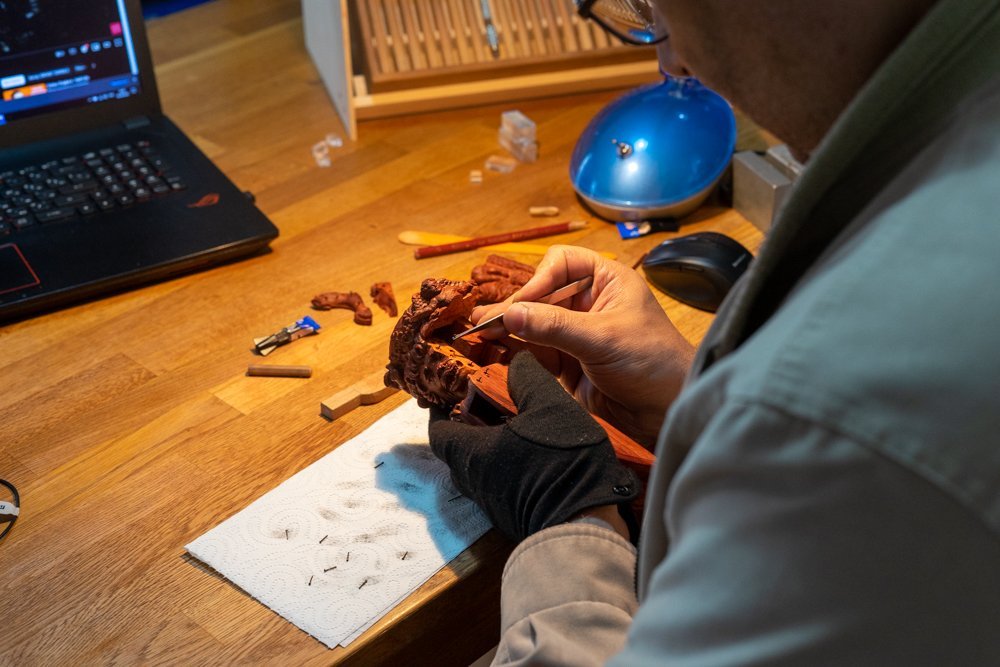
Speaking of which, I'm just now trying to solve a difficult problem. I'm doing my carving with mini chisels. They're unique. Chisel sizes start from 0.5mm up to 3 or 4mm. The smallest one I have is a 0.3mm semi-circular chisel. I once had them made to order by a craftsman from Moscow. A very handy and high quality tool. However, it has its own peculiarities. Such a small tool is very difficult to sharpen. The slightest misalignment and the sharpening will be uneven. And now imagine, if the total size of the blade is 0.3 - 0.5 mm, what is the thickness of the metal? The tool is very thin and every rework of a wrong sharpening will wear the metal very quickly. Can you imagine what a challenge this is. This is where you need devices that will make the sharpening movements error free. In terms of precision, these are almost jewel-like tolerances and backlashes. And I am now in a state where, after repeated sharpenings on my hands, the tool has accumulated so many errors that it will soon be possible to correct everything only with serious equipment. And I am trying to find a person who could help in this task. There are two options here. The first option is to make the device itself, so that I could sharpen my chisels with its help. Or the second option is to sharpen the tool on someone else's equipment, if the master works as a jeweler. Now I am asking everyone who theoretically can be useful. But so far without results. It's a complicated subject.
-
Of course, people who know how to work with machine tools, make unique tools or make some individual elements for ship models exist. The only problem is that it is sometimes not so easy to find them. I know several specialists in Russia or Ukraine who cooperate or used to cooperate with other modelers. And sent orders to different countries of the world. But now many connections have broken down. And even if the person himself is still engaged in production, it is almost impossible or very problematic to send parcels. Finding contacts used to be easy. On forums, on special sections there were announcements where masters offered their services. You could buy or sell your tools if you didn't use them. Or books. But I find it difficult to navigate in the current environment. I don't know if other sites or forums have similar sections? And in general, are there people who want to collaborate with others and make something to order?
-
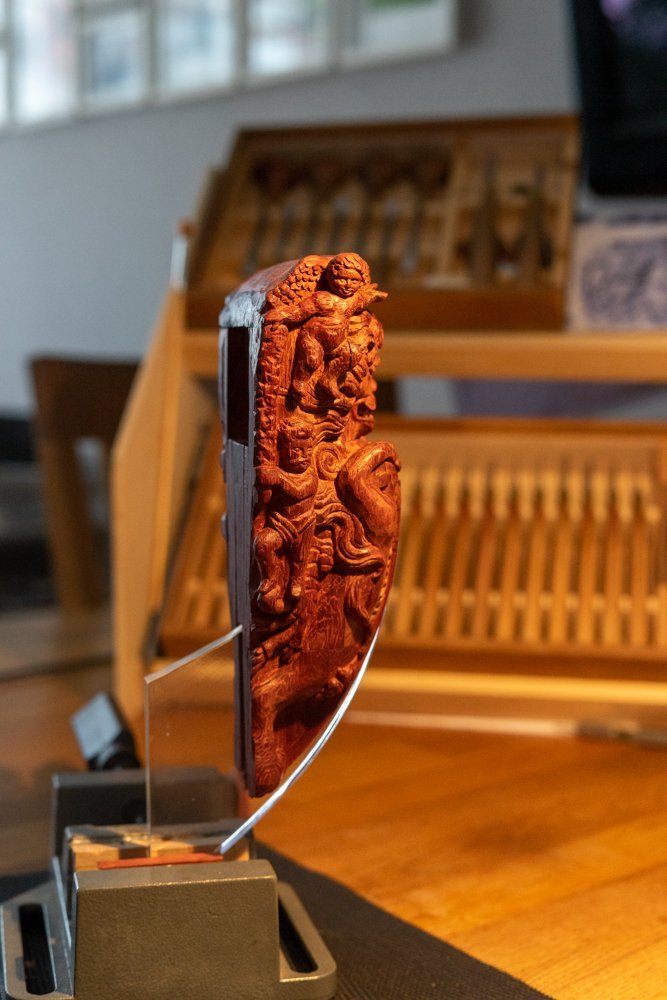
Thanks for the review. I am very glad that you liked the idea of showing the sculpture in a not quite standard way.
-
It's impossible to buy such a set nowadays. The master has long since stopped producing them. At least I haven't seen any mention of them on the internet for a long time. I bought this set about ten years ago from a master from Sevastopol.
-
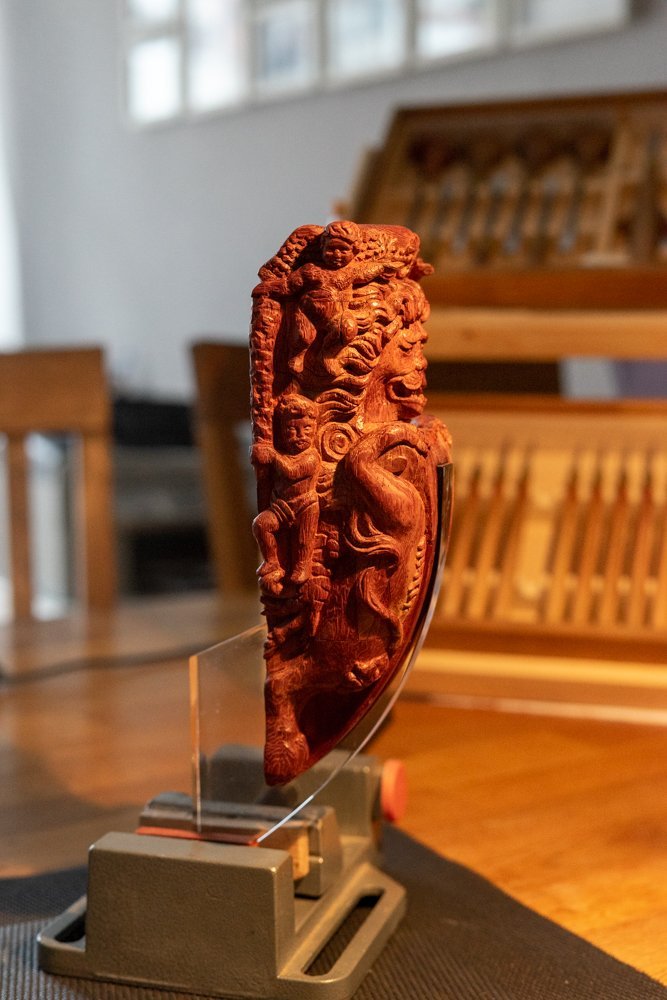
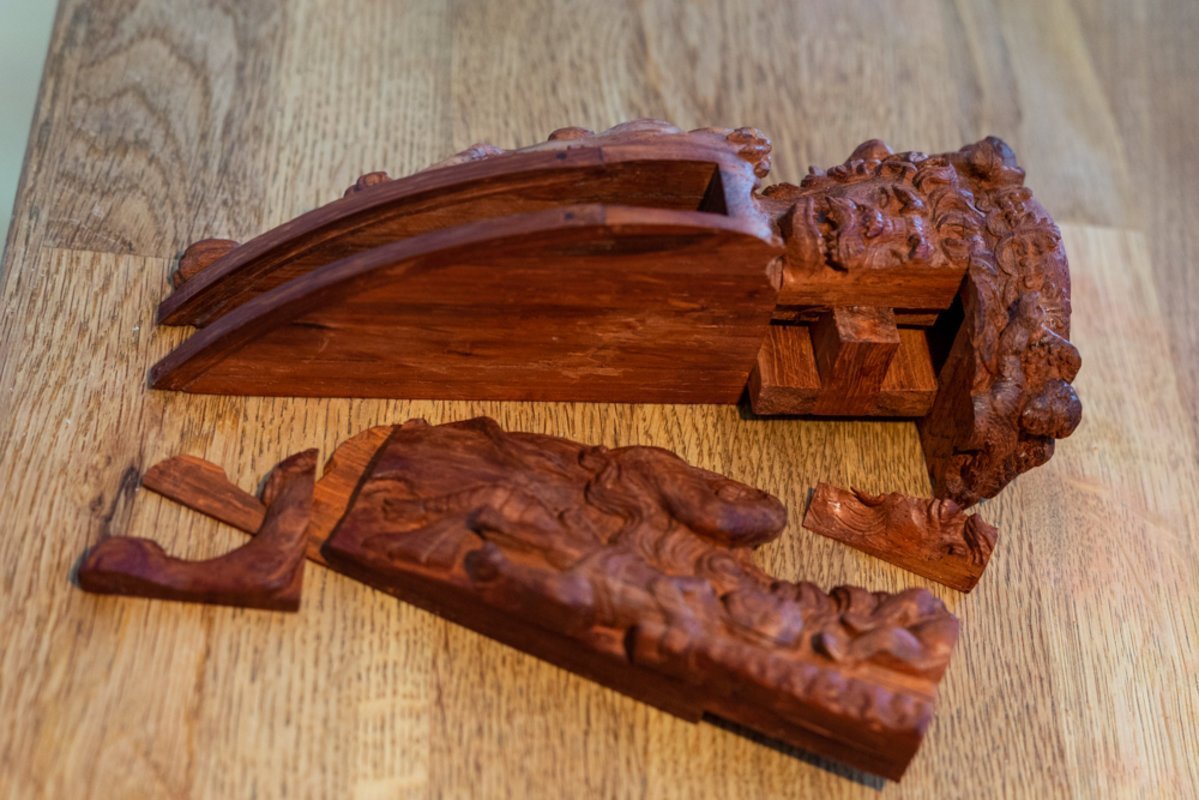
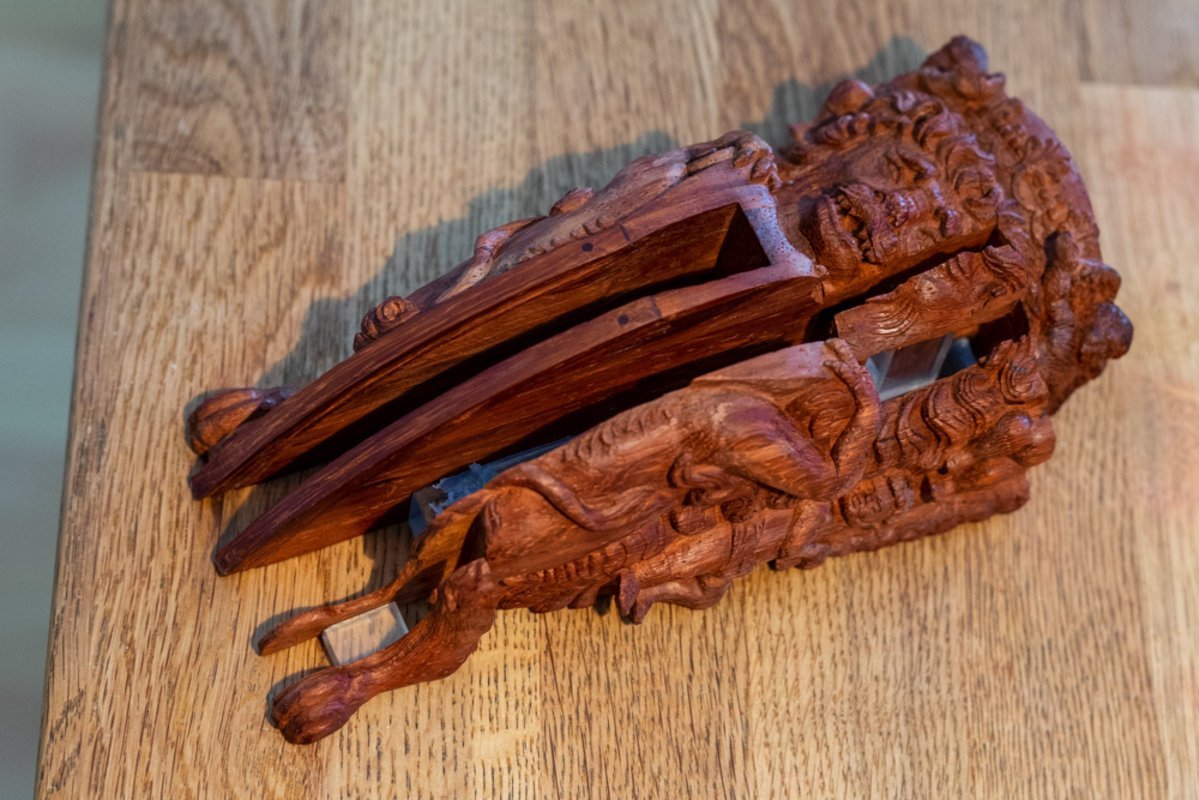
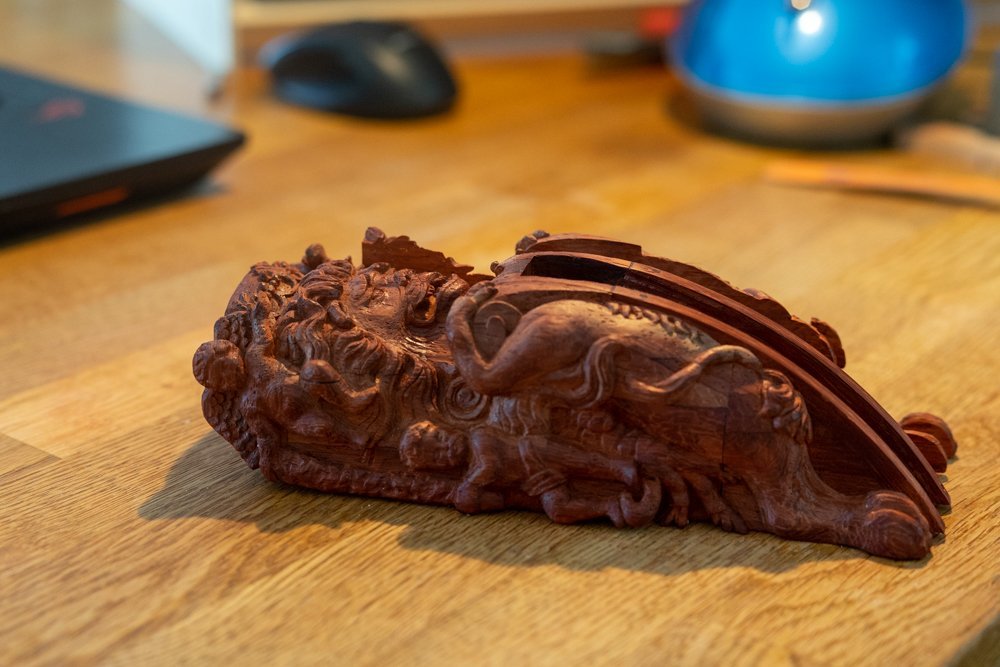
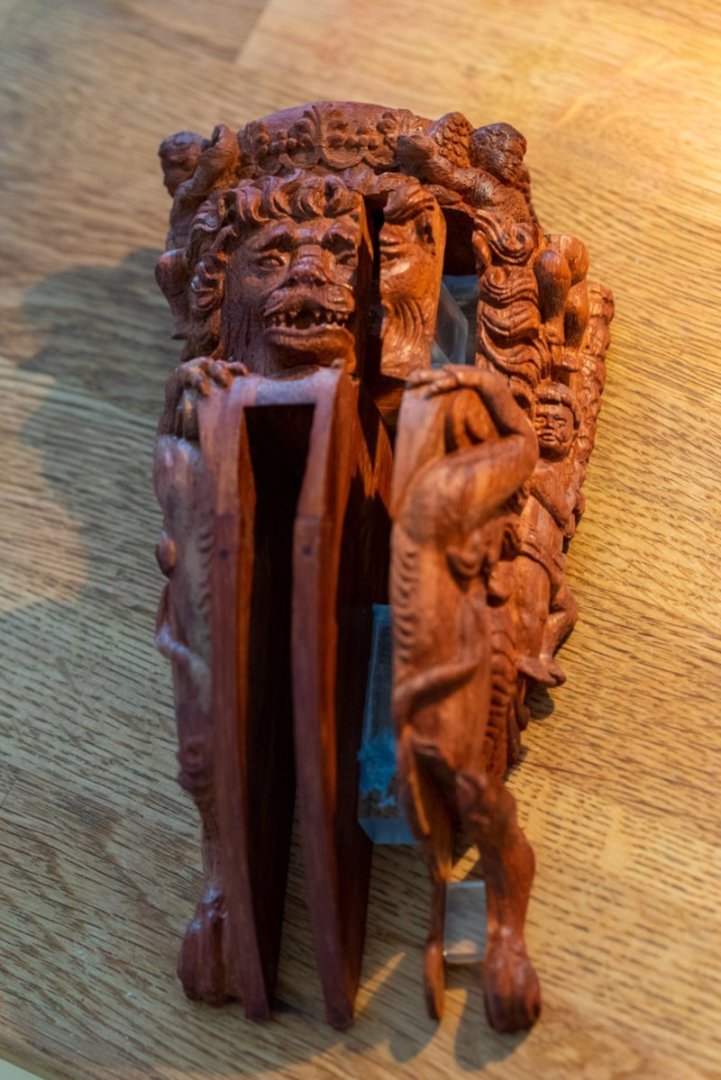
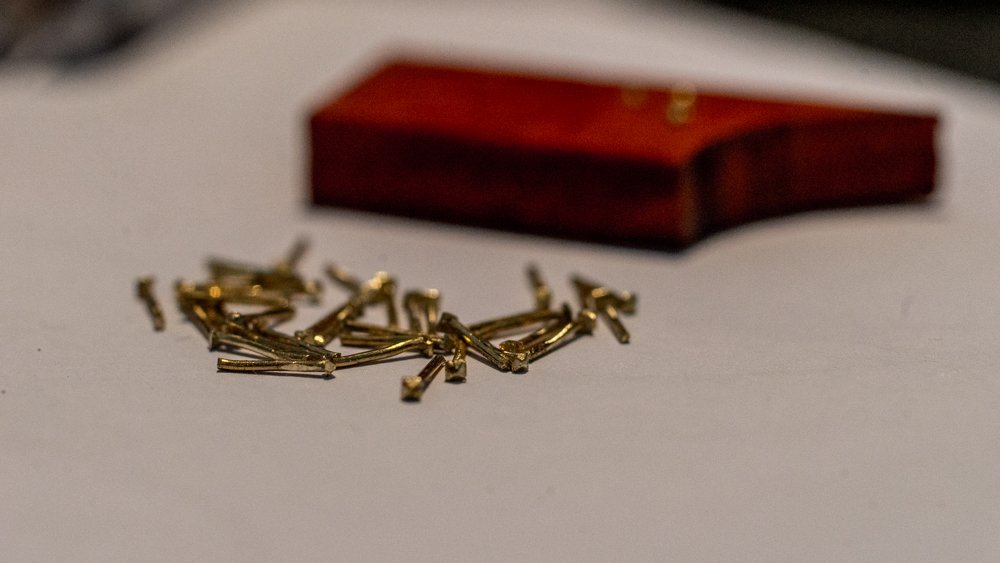
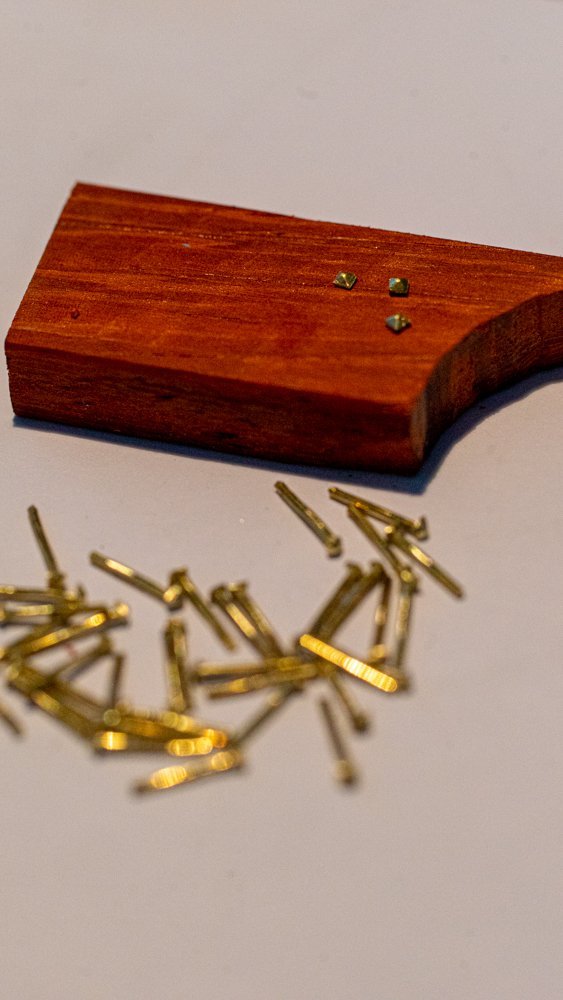
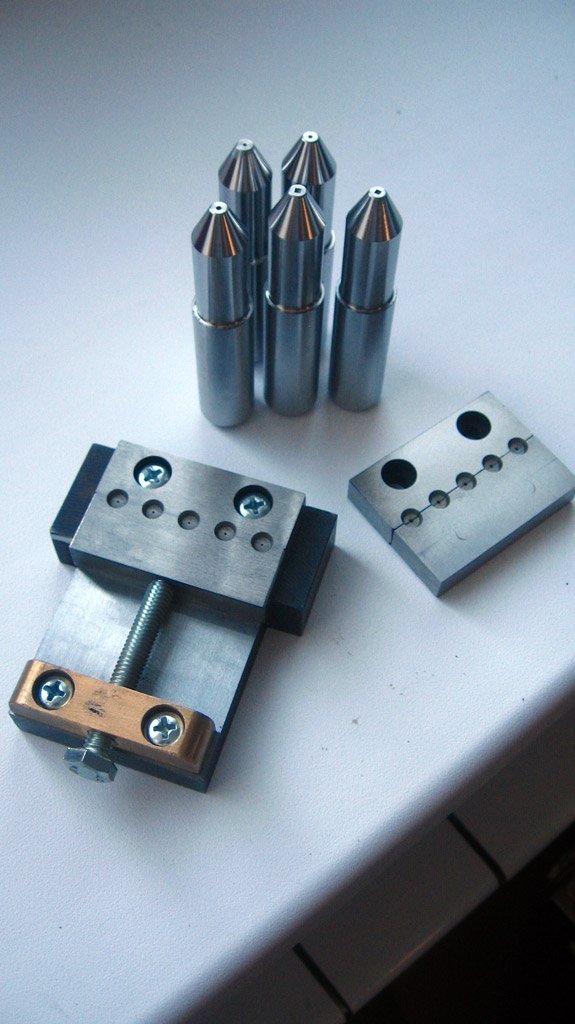
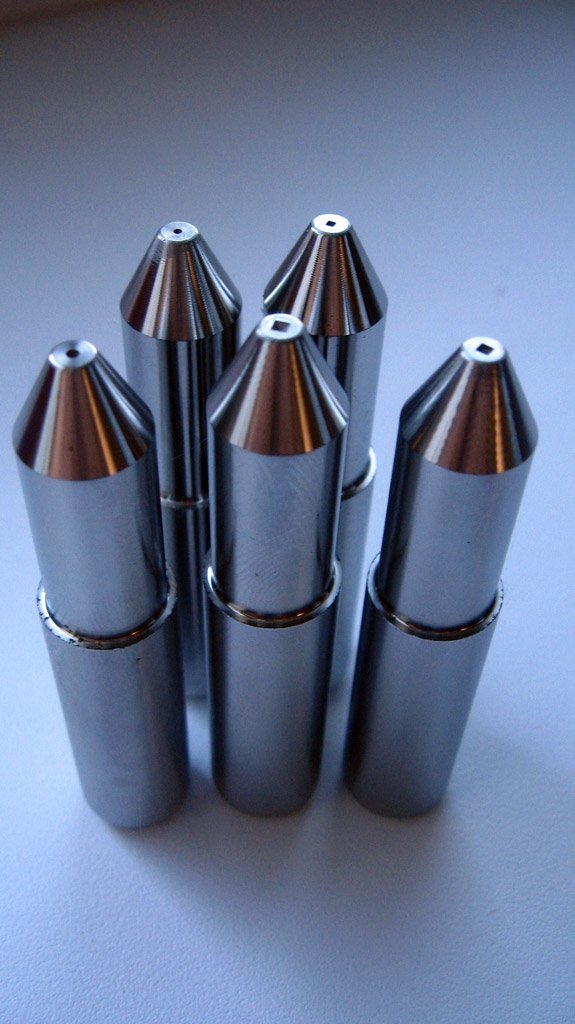
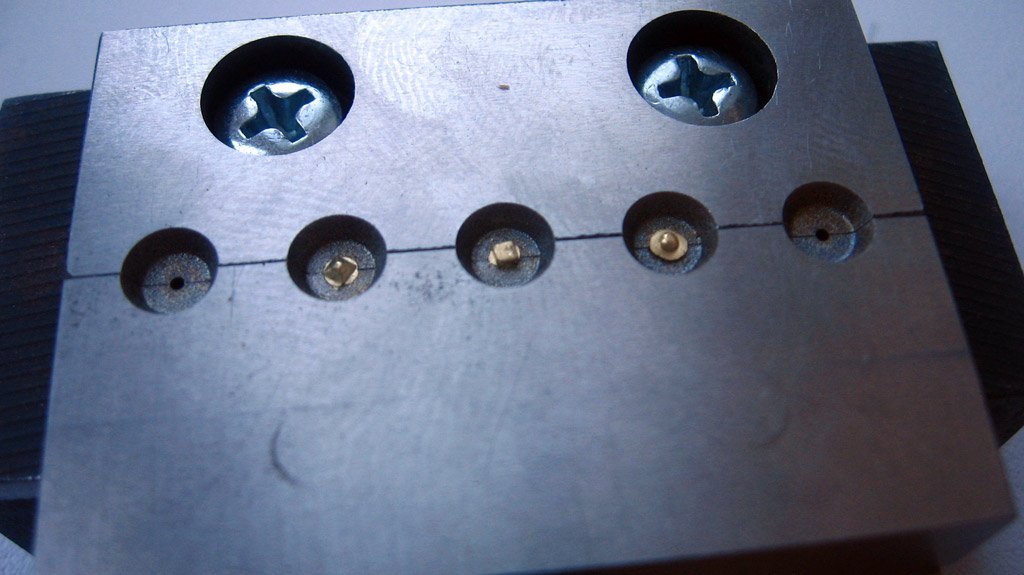
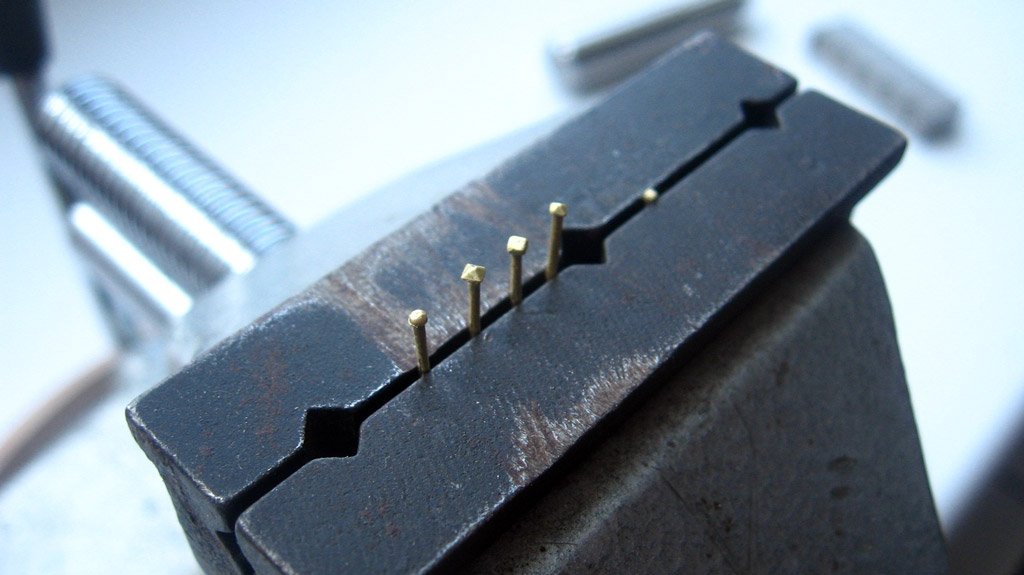
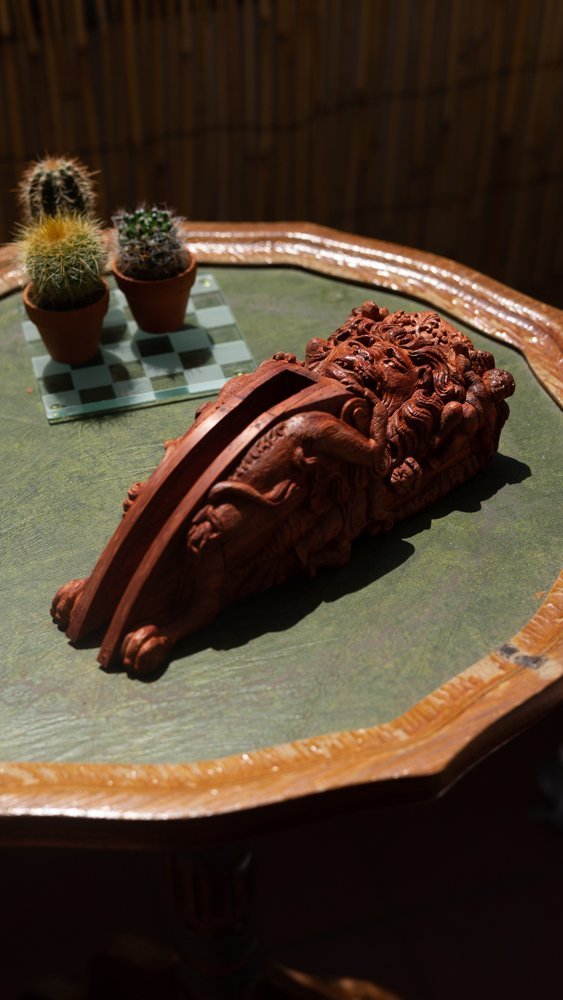
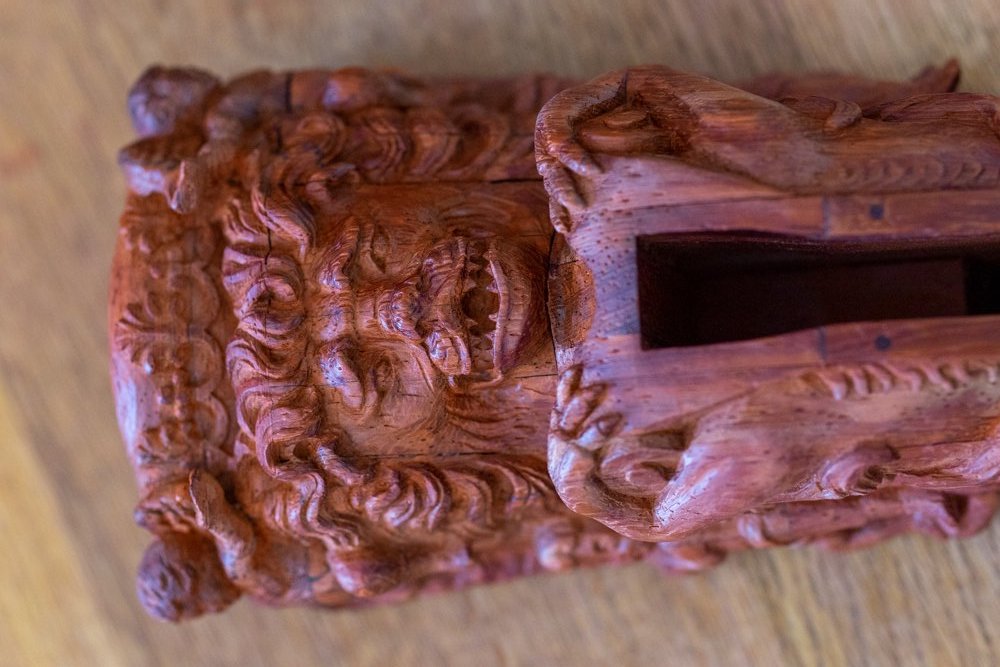
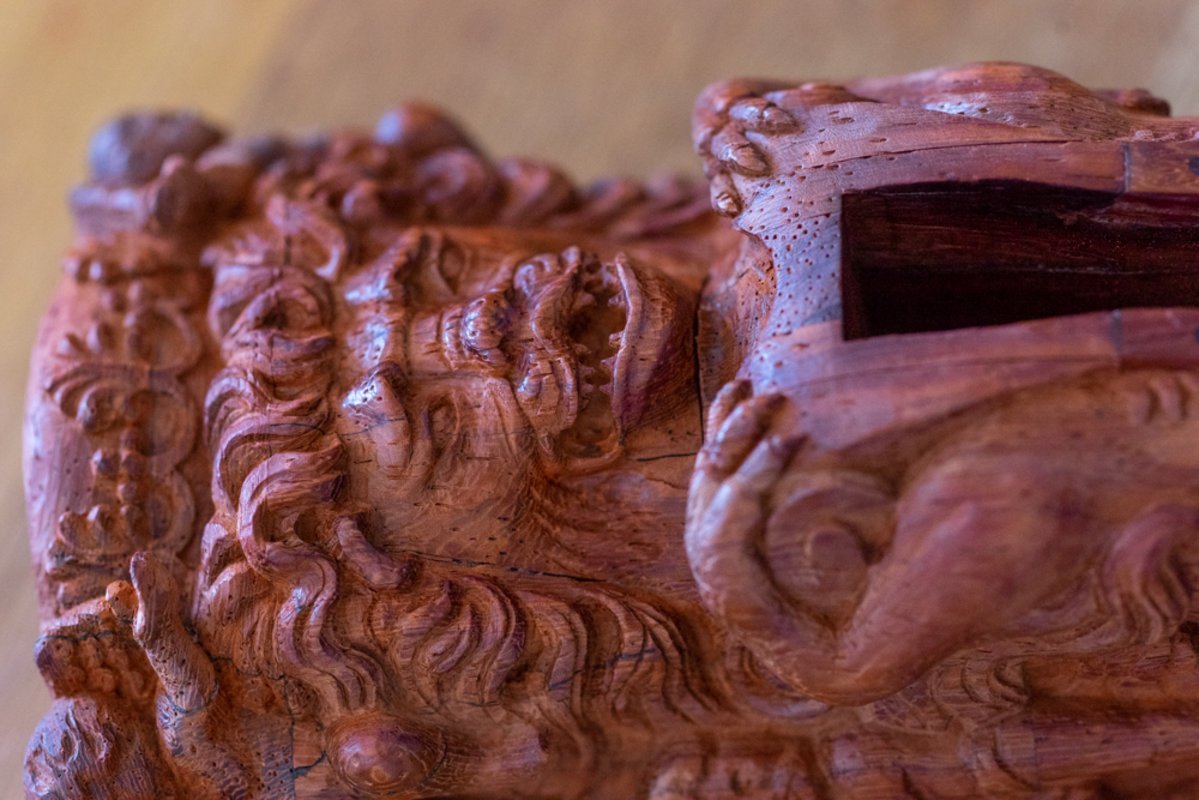
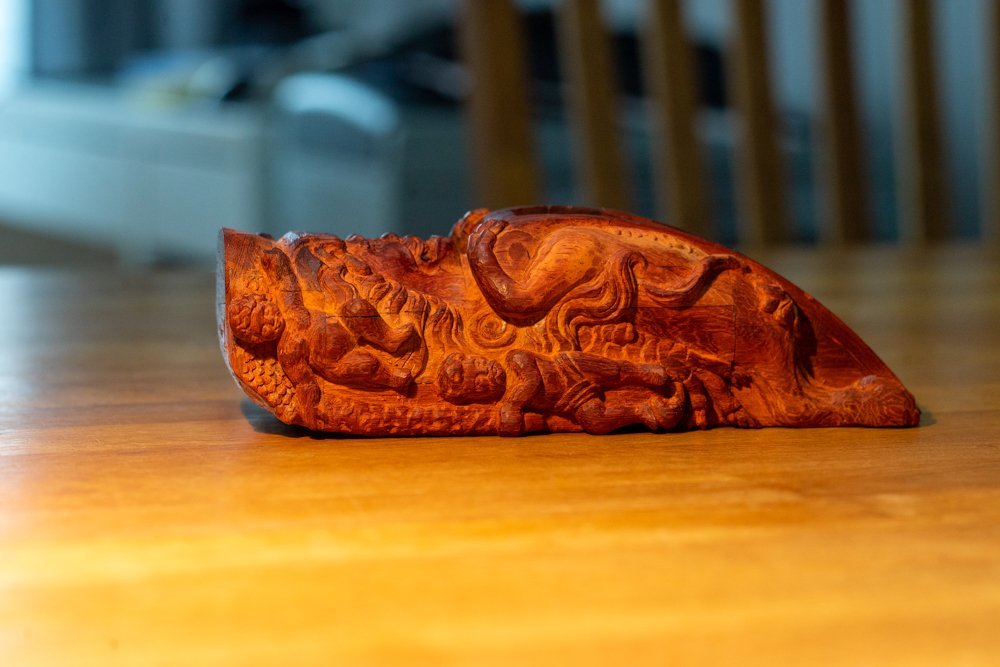
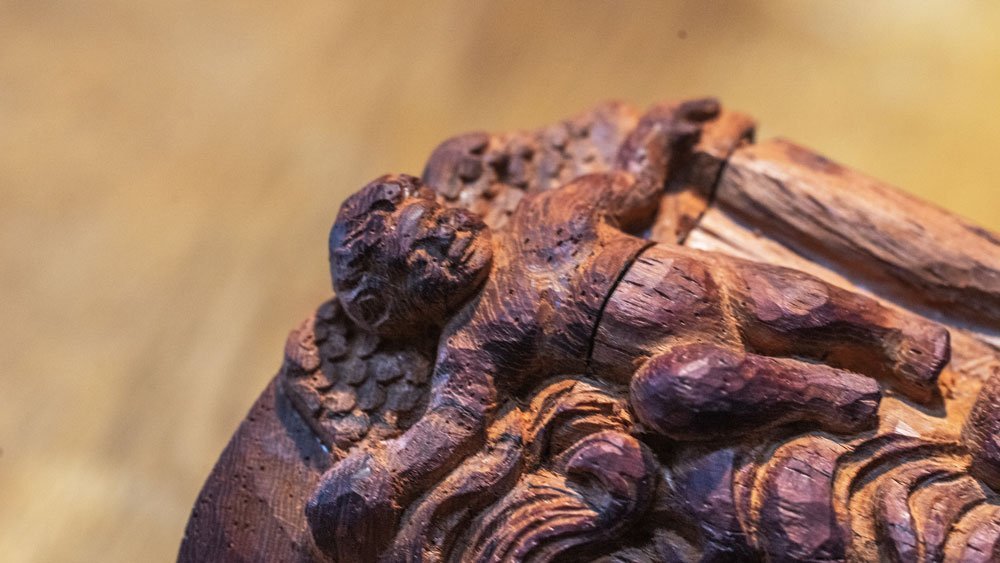
... But that's not to say the work is over. There's more to do. Good stories have unexpected twists, plot changes. Just when you were looking at a story with the same mood, suddenly everything changes. Something minor suddenly becomes major or vice versa. And since we're writing this epic with a Star Wars tinge, it's a good time for: "Luke, I'm your father!" - "Noooooo!" Agreed, a good twist in a narrative is then especially good when it didn't just fall out, but when there were some hints before. But at one time they were not noticed or given any importance. And only when the twist is realized, you suddenly realize that all this time the true state of affairs was under your nose all along. That's when it's not just a primitive Luke-I'm your father, that's when it's something more thoughtful, meaningful and interesting. I don't know what analogy to pin it on, but I hope for your imagination, choose the twist that tastes better to you. Some people are closer to the fact that the killer is a gardener, some people are closer to the fact that Jon Snow is a Targaryen or that DiCaprio is not a detective on the Island of the Damned (sorry for spoilers). I won't say that my stories claim to be recognized as geniuses. But hobby stories could use a little twist, too. Now it's time to get back to where it all began. The rubik's cube. After all, a lot of people have asked why did I bother so much? Why did I have to do so much? Just take a block and work. But for me, that was the whole point! And in those moments, when I told how I cut out the face, that I repeatedly disassembled the blank, pulled out the segments from the very middle, I inadvertently opened the veil of the future twist. Now is a good time to remember these episodes. To ask the question, and indeed, how is it that the glued billet was so easily disassembled? Why? Doesn't that say something? Yeah, yeah, I know no one thought so. Who needs to remember that? But as the author of the twist, I just have to blow the fog. "This is the way" and all that. Anyway, all of the above led to this particular stage in the work. If the lion from Vassa was as close as possible to the state at the time of lifting from the bottom, a copy of his museum original, then Chewie I wanted to represent the sculpture at the time of installation on the bow. The actual dimensions of the sculpture piqued my interest at this particular stage. How was such a huge structure built? How was the blank prepared? How was it installed? In my opinion, this way the overall collection will be more multifaceted and interesting. When different figures will show different things, and not just a line of lions. I haven't decided yet what will happen with the next lions, but now we're talking about Cheubaka, so we'll come back to him. I decided that just drawing the figure on the seams would not be enough. It is necessary to open some joints and show these divisions. In fact, this figure can be called an admiralty figure. To be able to see some technical elements that are usually hidden from the eye. And if I'm showing the "insides", how can I leave out the carnations? I have to show them too. I decided right away that there will not be any "hedgehog" - when every single nail is present according to the staff schedules and places. Once in a while will be enough. More of a hint that they were. So I didn't have a week-long nailing stage and tons of dowels. Everything, starting from estimating the size of the dowels themselves, wells for them and ending with the process of riveting, blackening and seating was done in a day and a half. The nails themselves were made with the help of a small device. It had been in storage for a long time and I was sad that there was no reason to use it. So when I decided that this sculpture would feature nails, I was very happy to finally use this device.

- 450 replies
-
- 11
-

-

-
Thank you all so much for the kind words and appreciation. It's a pleasure.
-
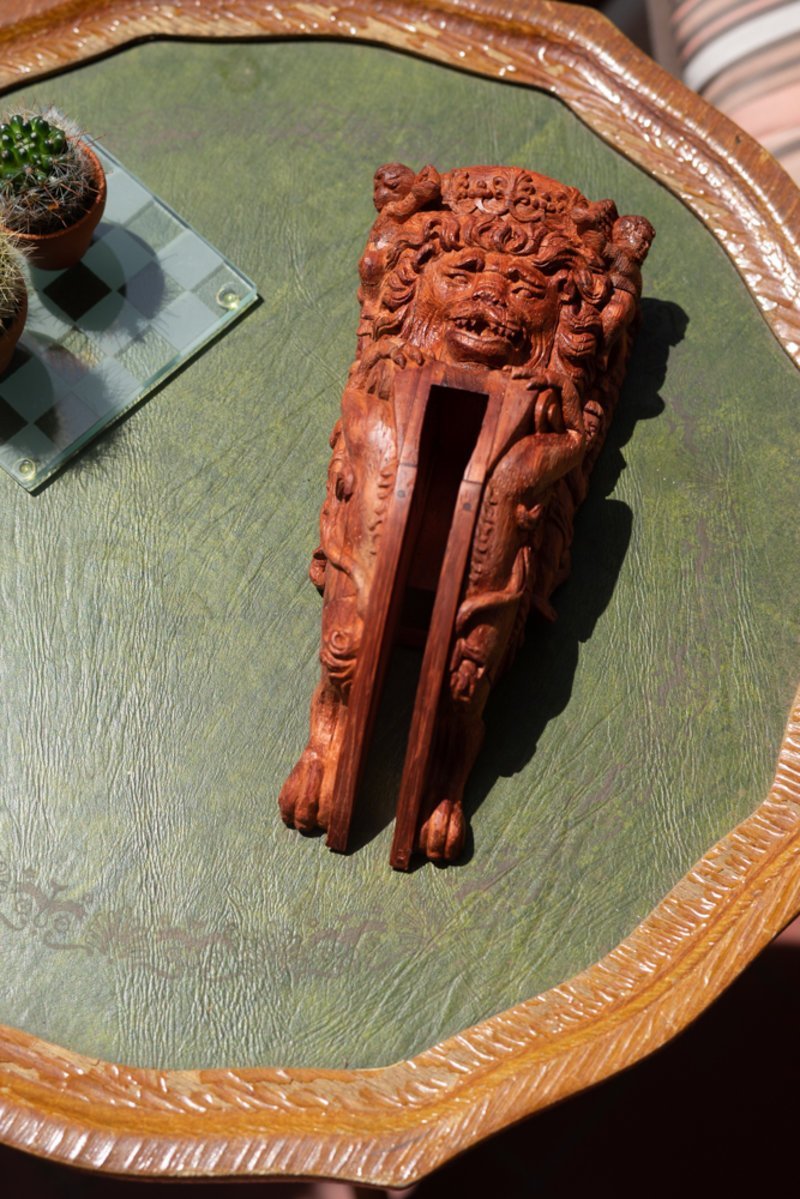
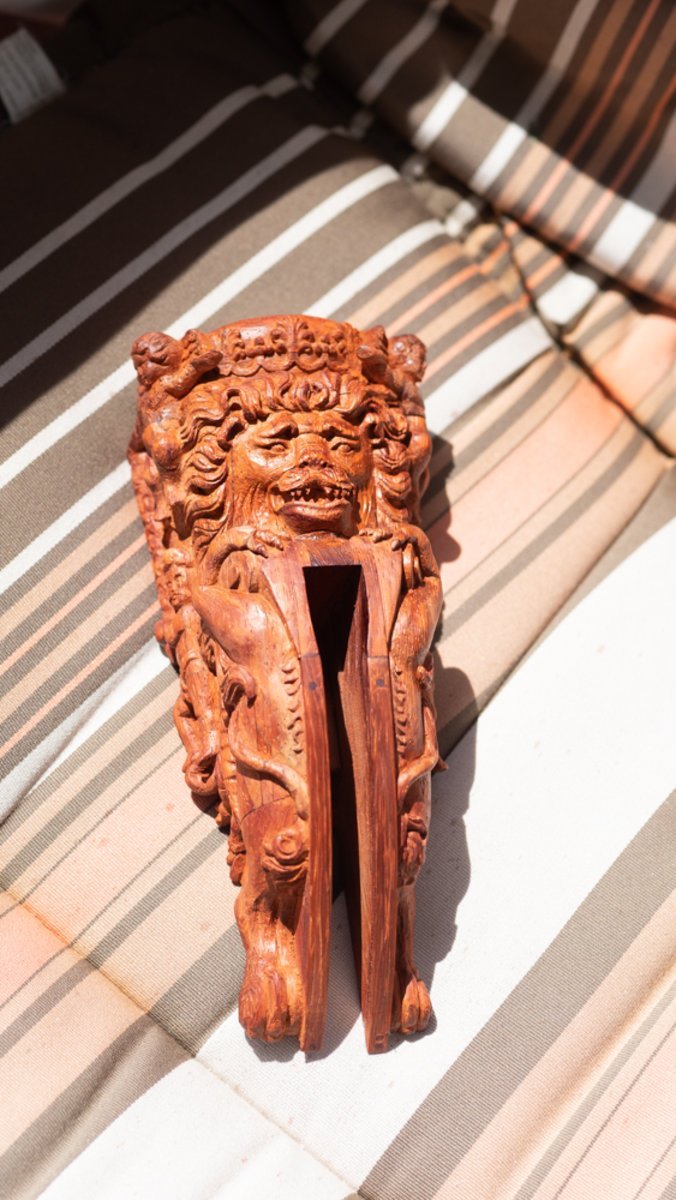
I have previously written many times about the peculiarities of paducah. The wood darkens very quickly. And that I was very interested in what causes this darkening. Does the wood get dirty so quickly from touch or is it a reaction to light or air? As long as I held the figurine in my hands, touched it, there was always a chance to say that the touching was the cause. In order to prove the effect of light or air, you have to let the sculpture lie in the light and have nothing and no one touch it. This is the only way to compare and see the difference. And so the moment came when I decided to do a little experiment. A very dangerous one! Just kidding. It's really quite simple. I just decided to bring the lion into the light. and see if it changes. So I took my lion out on the balcony for a couple of days, and put him in such a way that the sunlight falls on him freely. The experiment lasted only two days. Just then the rains came and it was cloudy outside again. So I decided there was no point in continuing. So what can we say? What were the results of this very dangerous experiment? There were changes. During this time, the tree began to darken and became a deeper brown color. Which answers and confirms the theory that the wood is changing. Maybe it's oxidation, like an apple. I don't know the exact name of this process. Of course, the answers to such questions can probably be found on the internet. But I wanted to see for myself exactly how the changes happen. I was sure they would happen. I vividly remember what the board I bought looked like before treatment. And that it even had different sides. Most likely it was from the fact that in the stacks in the warehouse one side was in the shade and the other side was a little more lighted. So I was expecting a change. And would have been much more surprised if I hadn't seen them. The other thing is that I didn't know how quickly the changes would start to appear? And that was something I was very interested to see. After this experiment and the experience of working with a tree that is new to me, I can say that the tree also changes by touching it. It polishes very easily and acquires a kind of greasy sheen. It absorbs any dirt from your hands. And at the same time it changes very actively from simple light. So if you have the task of preserving the bright color of this wood, then this is bad news. Most likely, the wood will have to be covered with varnish or some other composition. And you will need to look for information, whether some kind of coating will help to preserve the brightness, is it even possible? In my case I don't mind the lion getting darker and darker. On the contrary, a darker tone will look more like the old wood of an ancient sculpture. A bright color is not necessary for me. So I'm happy with what I've seen in this little experiment. Of course, one could go on and complicate the experiment. For example, to check whether the paduk is affected by temperature, heating? For example, putting the wood in an oven. But I didn't do anything like that. Of course, I would never dare to bake a finished sculpture like a pie. For one thing, my sculpture is made up of glued segments, and heating it would destroy the entire bond between the segments. And secondly... perhaps the first is enough. I didn't stick the rest of the scraps in the oven either. Maybe I missed some unexpected discoveries. But I'll be honest, I wasn't that interested anymore to see if there would be any changes or not. Let at least some mysteries remain undiscovered. Maybe next time. But not now. Way and posterity will have room for their own experiments and discoveries. Or else we will know everything and they will have nothing left 🙂. Well, that's it. A little later I will describe the final conclusions again. And there is nothing more to tell within the scope of this post. ...to be continued...


-
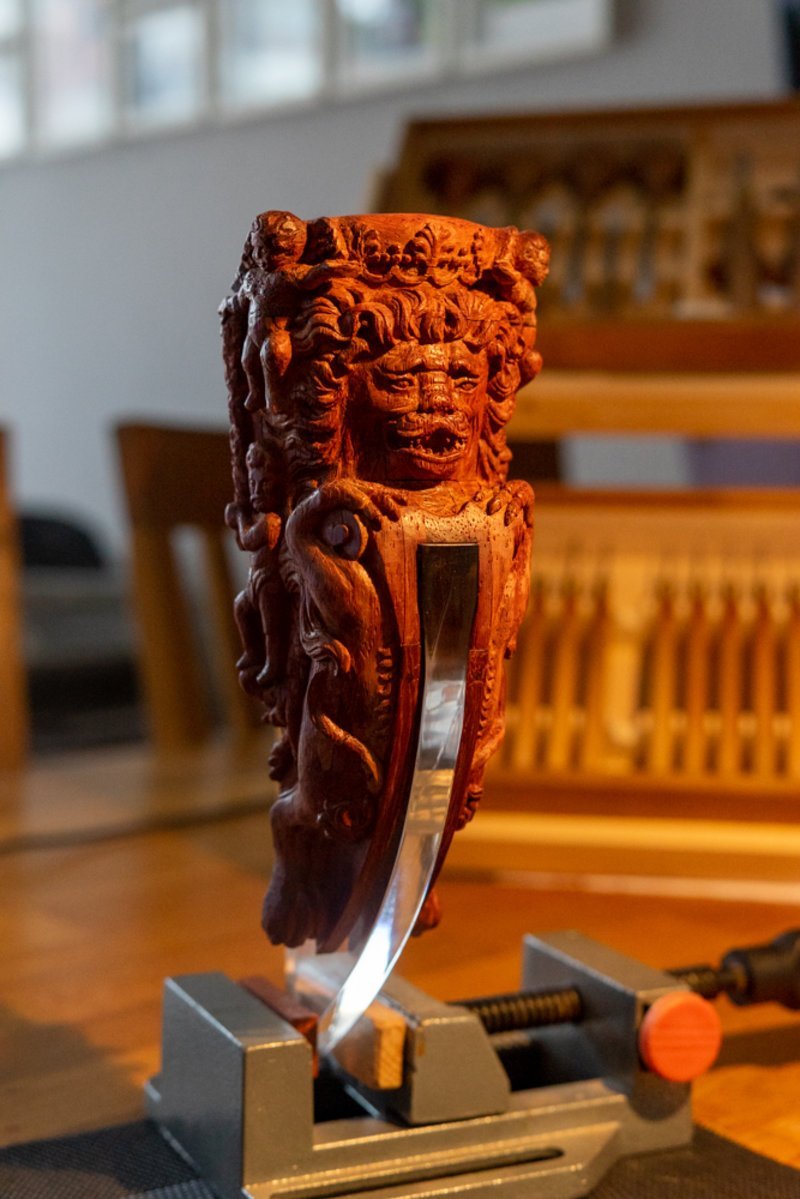
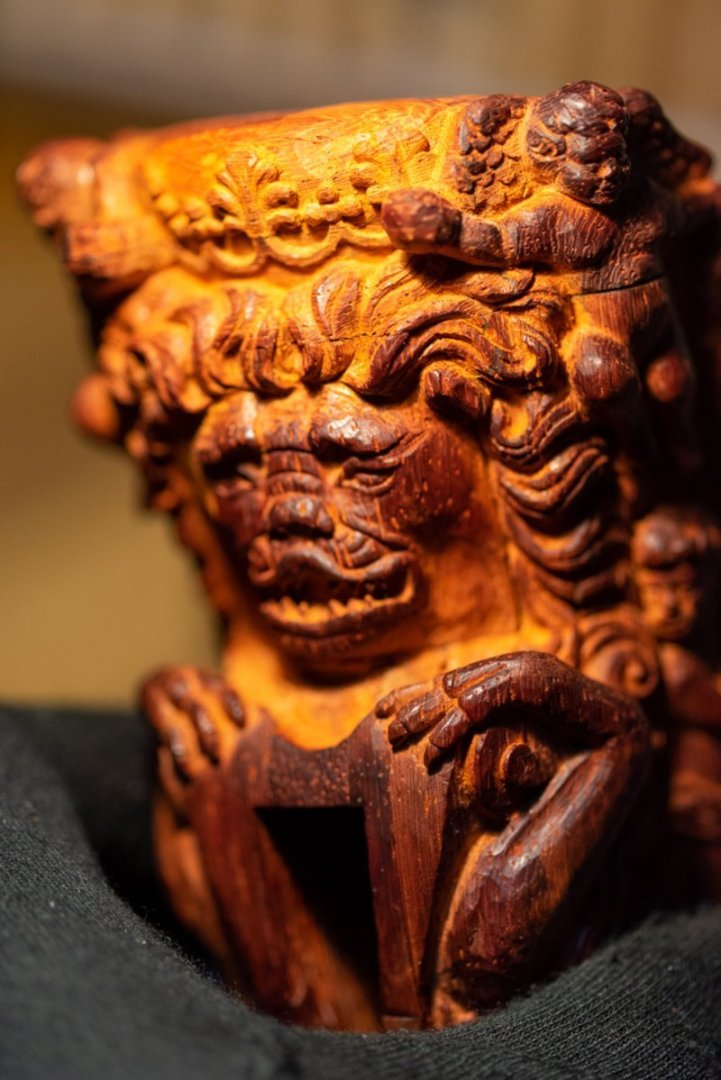
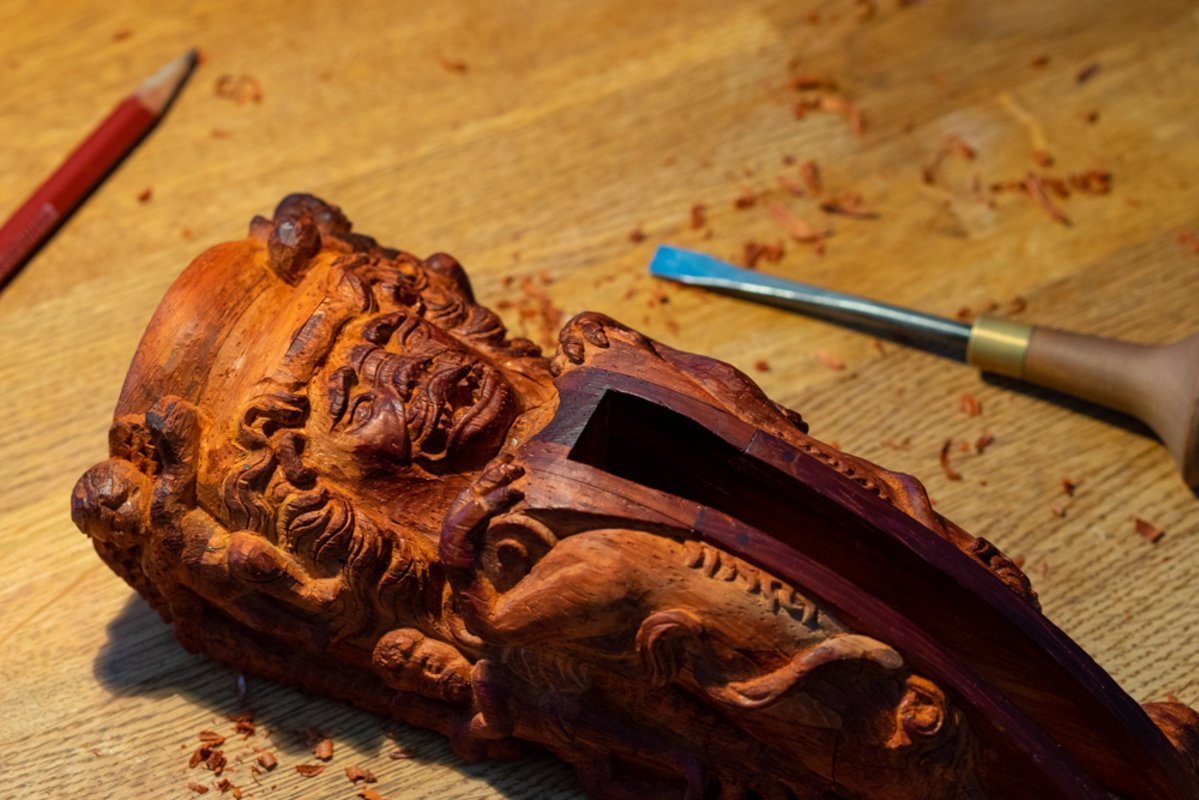
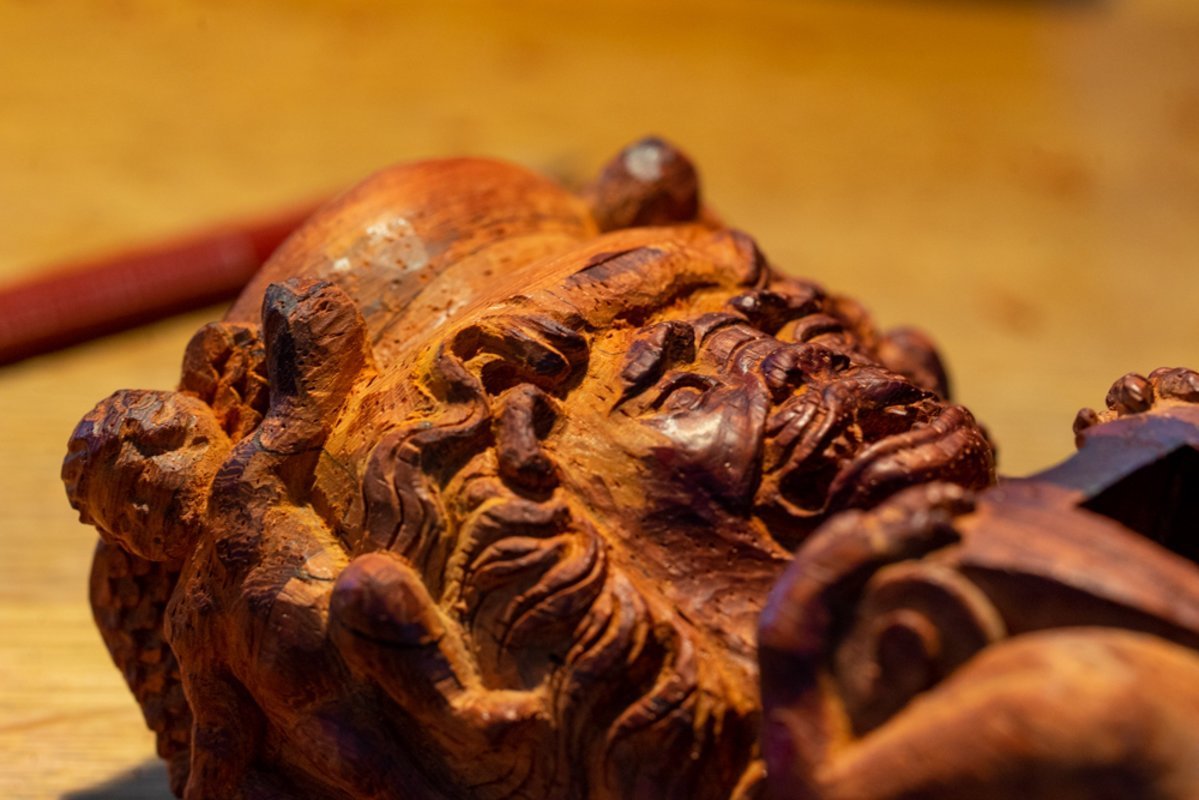
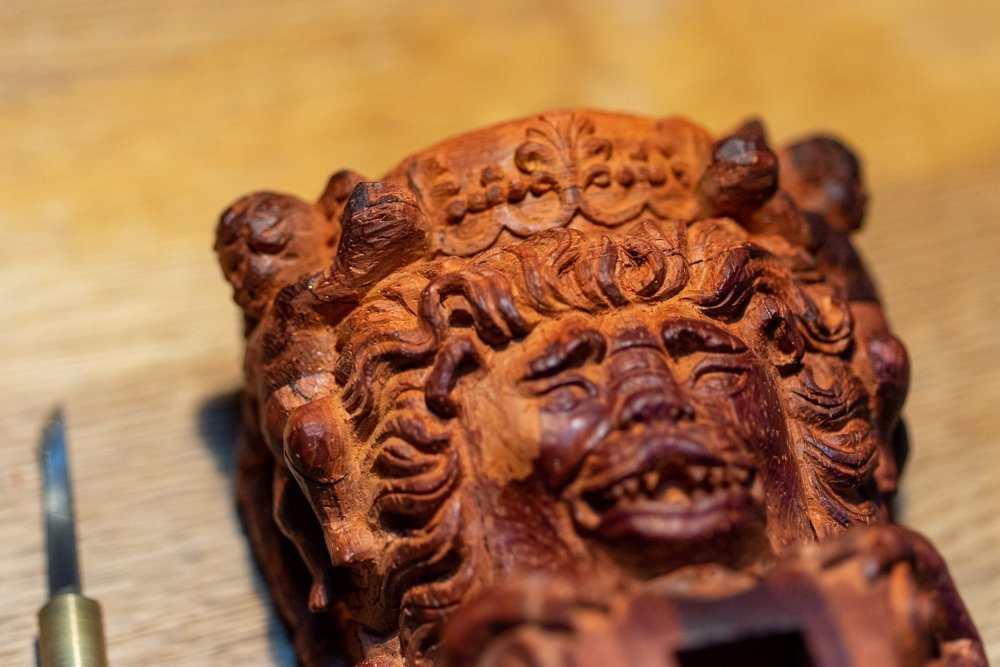
After working on the top of the head there were some minor refinements and modifications. The largest of the interventions concerned the face of my Chewbacca. The carving of the face as a separate segment on the table, detached from the rest of the sculpture required correction. Not everything could be seen, and there was a fear of cutting off too much. And in the end the face turned out a bit flat. I wanted to add more gradients. Just a little bit. I left that question out on purpose. I was waiting until I could examine the whole figure. And now I waited for that moment. I didn't take many intermediate photos. I took only the starting one, and then woke up when everything was already finished. It all happened so fast. And there's a paradox. You can't tell the difference from the finished photos. It's as if I hadn't redone anything. But there is a difference. I "sunk" deeper lower eyelids, thus changing the vertical slope of the eyes, similar actions touched the cheekbones. And the rest of the small touches. It seems that in total the changes are not noticeable, but now my soul finally got what it wanted. What's more noticeable is that now I've cleaned up the whole figure. And the fresh color looks completely different. You can also see in the last photos that the sculpture has become shiny, as if I polished it or rubbed it with oil. In this case I didn't even add a drop of oil. Since the work is not finished yet, oil can do some damage. The lion is assembled from segments that are held together with glue. And there were already moments when we had to take the sculpture apart and glue it back together again. What if I have to take it apart again? Then the oiled wood could already be in trouble. So I didn't use oil. And I wasn't going to polish it to a high gloss on purpose. That's another difference with this kind of wood. It gets shiny very easily. This effect has been seen before, and then simple contact with a glove polished the surface in the same way. Now you can see the same effect, but without the darkening.
-
Thank you for such high praise. I'm very glad you liked it.
-
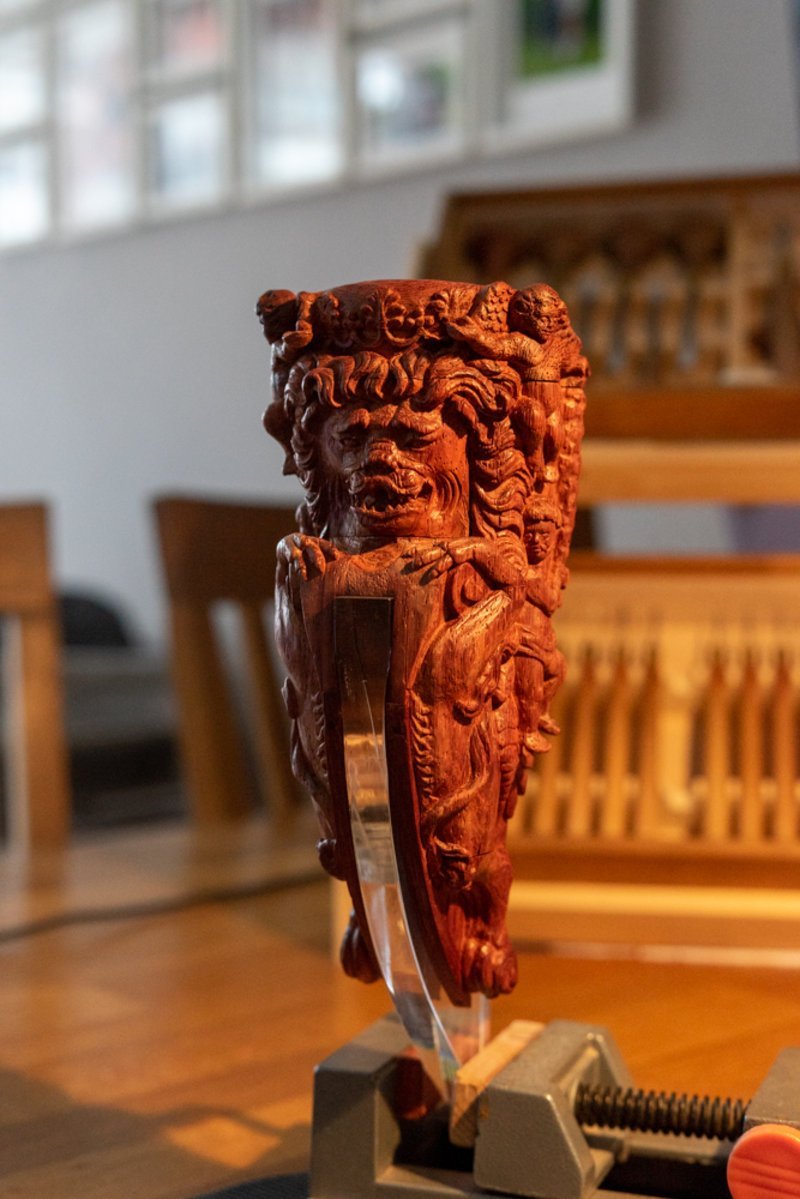
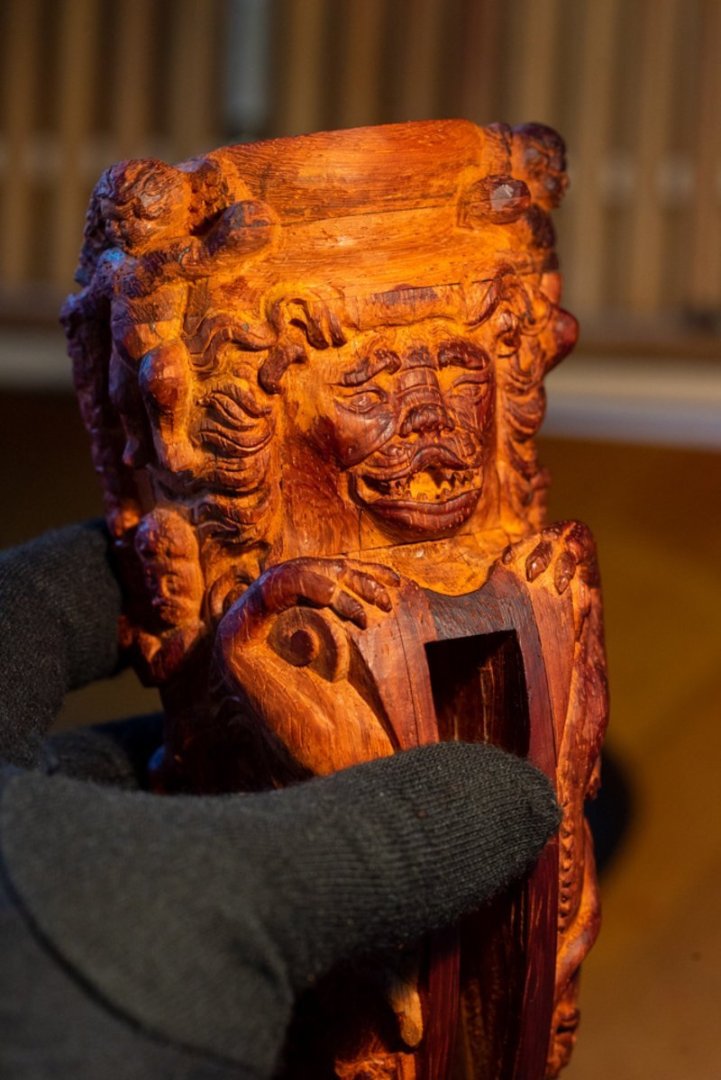
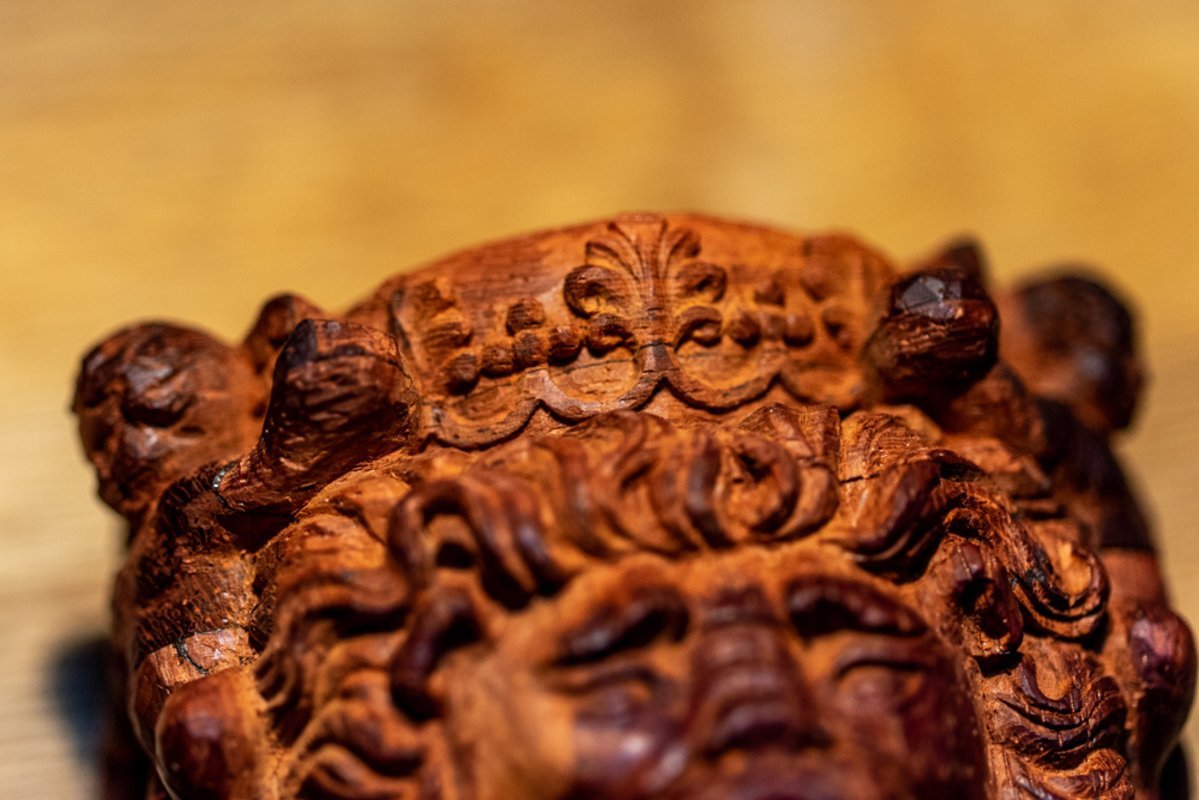
It's time for the head. The curls on the forehead were worked on, as well as the crown. I was worried at this point, as the crown is primarily a wreath pattern. And it is quite small details. If the wood crumbles somewhere on the hair, it can be easily corrected. Change the locks of hair a little and in five minutes you forget that it should not have been quite like this. And with a clear ornament this will not be the case. If the small details on the crown are cracked, the problem will be immediately noticeable. But everything went without much trouble. Maybe it is the hands have already started to get used to this capricious material. Maybe there were quality pieces in the right places that would not break off. Or maybe I was just lucky. In the end, I liked what I got in the end. Well, once again you can see how well the places where the knives removed the darkened wood are visible. And the "fresh" areas are quite different in color and tone. By this point I was no longer worried about the lion figure looking like a burn victimized fireman. Unlike humans, over time the light areas of the wood will even out in color. Oh, and I'll clean the whole figure at the very end. But I've already written about that.
- 450 replies
-
- 12
-
-
-
The subject of asymmetry in sculpture is a broad one. And each individual case may have different causes. For example, if we consider the sculptures on the Vasa ship, the difference could also be as an initial curvature. Or maybe it is the traces of time and destructive influence of the environment. In some other sculptures it may be evidence that the sculpture was cut first from one side and then from the other. In general, they tried to make symmetrical parts, but it did not turn out to be 100% coincidental. If we consider this particular lion figurine from the museum, then there are completely different conclusions. It is not a full-size sculpture. The master calmly held the sculpture in one hand, could easily rotate it and try to compare the details with each other. Here you cannot say for sure that several carvers could have worked. So the asymmetry in this small sculpture shows other conclusions. I can look at myself and already see the answers. When I try to make the same elements, I have to try very seriously. I have to constantly make marks, measure lines because the eye without rulers or molds just doesn't notice the mismatch. I am sure that each of us can remember such stories. So here most likely the reason was because the master or had not yet reached a high level of skill. Or that at that period of time people didn't even think about the fact that it was necessary. Well there's a slight difference. So what? It's not that big of a difference. What difference does it make that the characters on the two sides of the sculpture have differences? After all, I, as a viewer, only saw these differences when I looked closely and compared them. It wouldn't have occurred to me to compare whether all the curls were the same. It's a paradox. People used to try to make their work look like exact copies, as if it were made by a machine. And it took effort to achieve that effect. And now, when CNC, computers, 3D printers and other technologies become more and more common, it is just that perfect symmetry is much easier to achieve. Just make a mirror copy in the computer and that's it. Do each zone by hand without copying? No, I wouldn't, it would take too long. Although this is a separate topic. We can talk about the influence of new technologies on our shipboard creativity for a long time. Maybe even fight over different opinions.
-
I've been having these exact same questions. I even did some experiments to see what effect light and air have on the paduk. I will tell you about that too. Good advice. Thank you. I never thought of using chemistry. I'll have to give it a try.
-
Strange, the site loads some of the photos with a twist. And no matter how many times I tried to rotate them, it never works. That's too bad. I'll have to twist and tilt my head sideways. Or rotate the computer screen. Let it be like neck and head exercises. Against osteochondrosis. 🙃
-
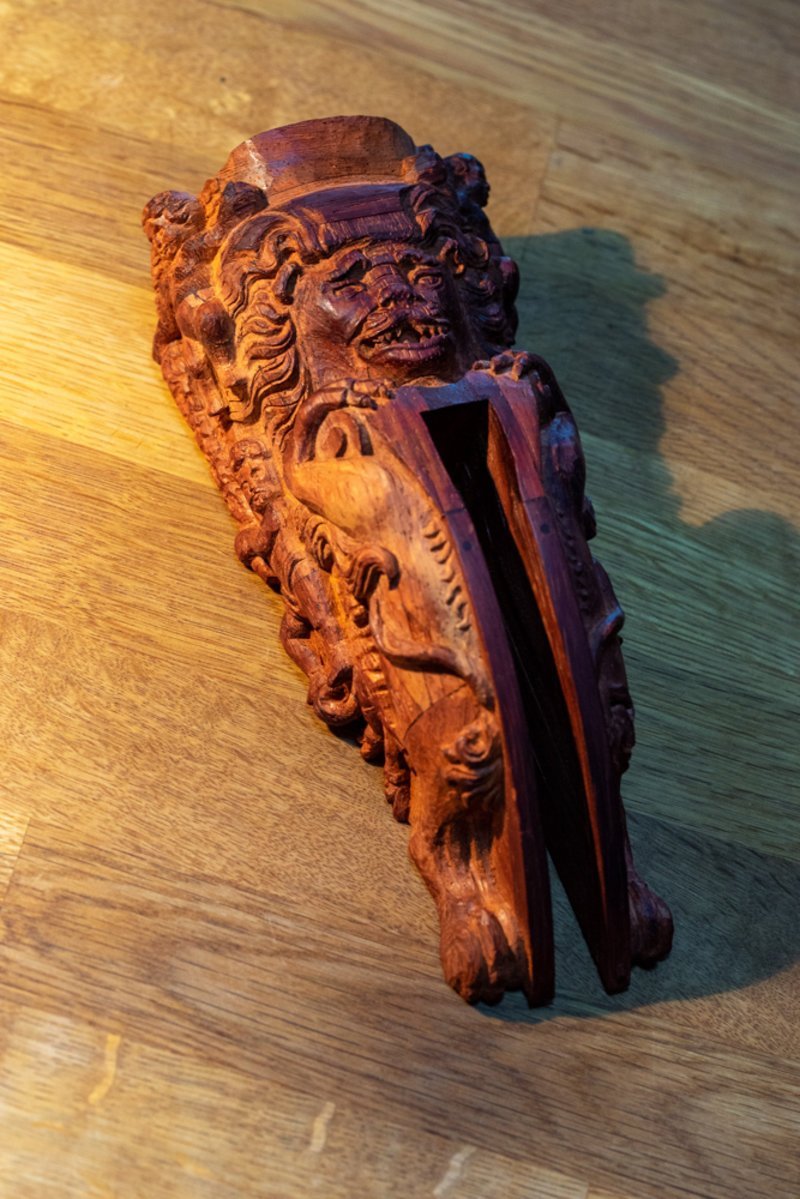
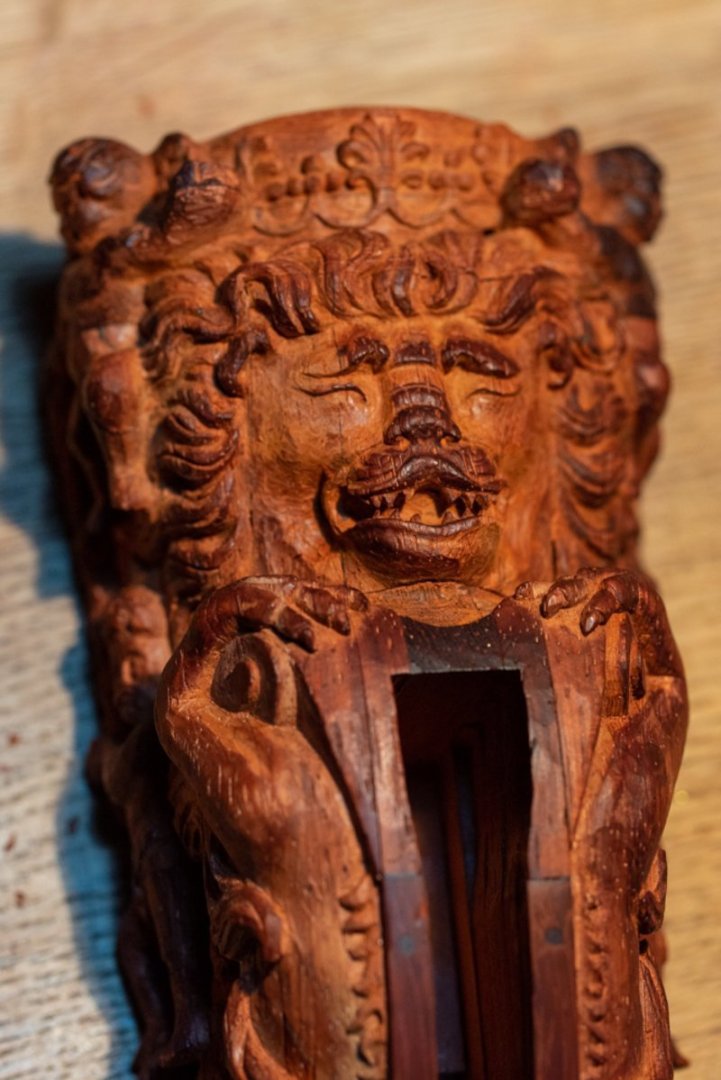
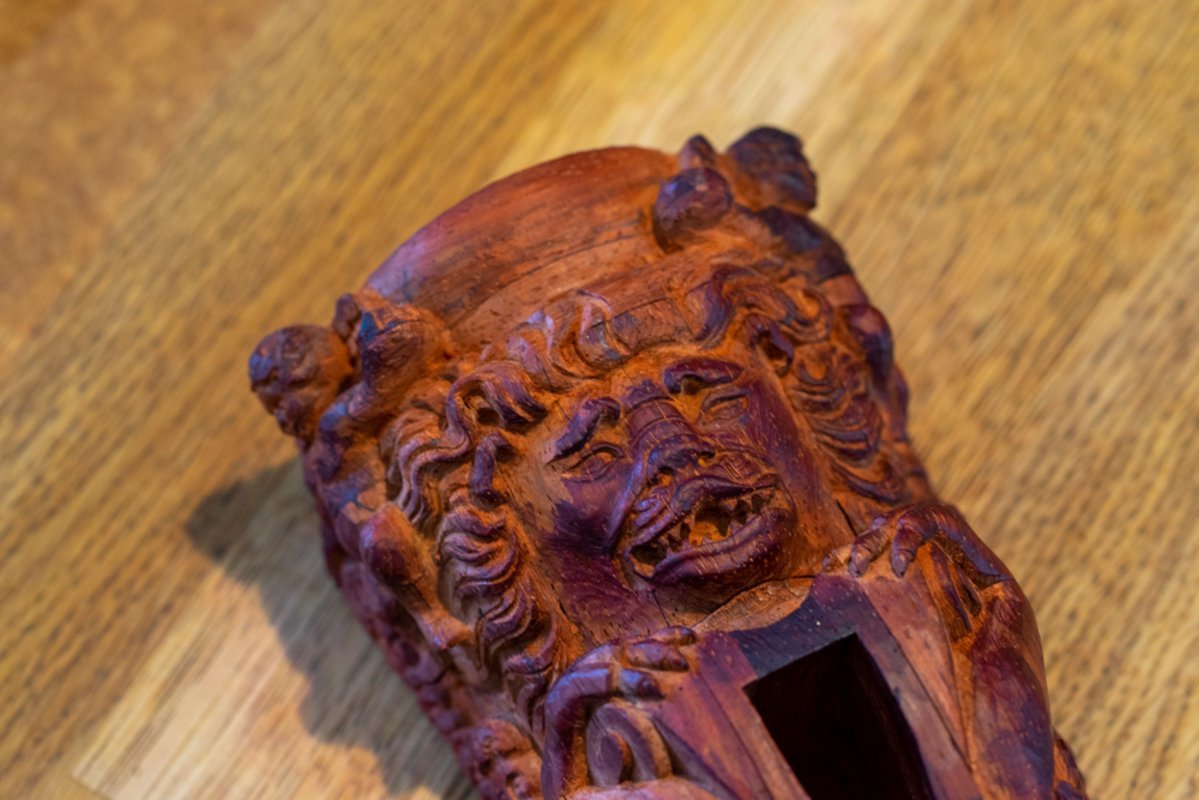
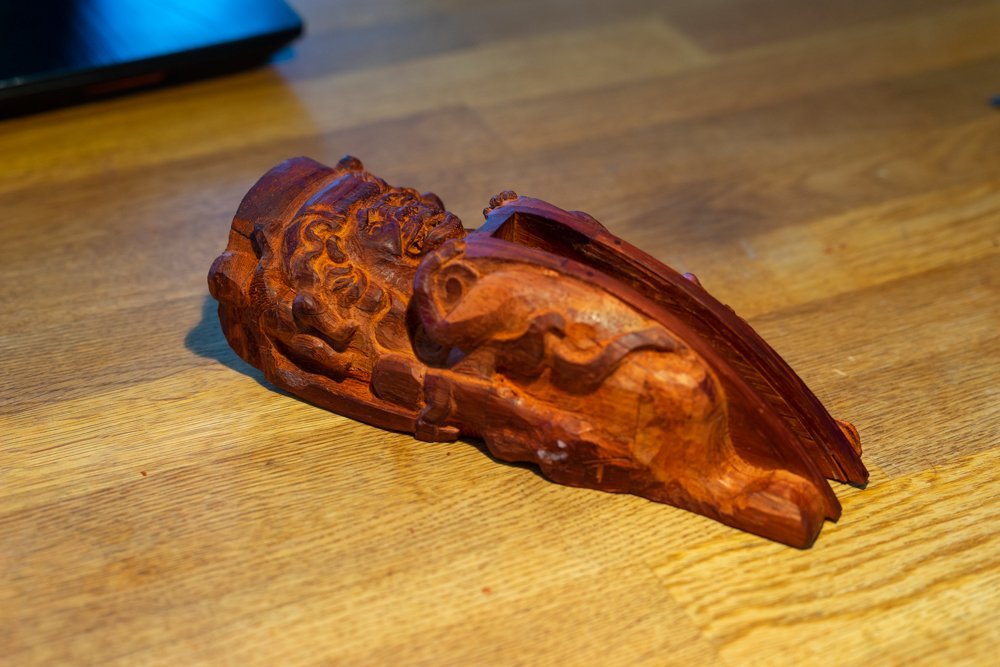
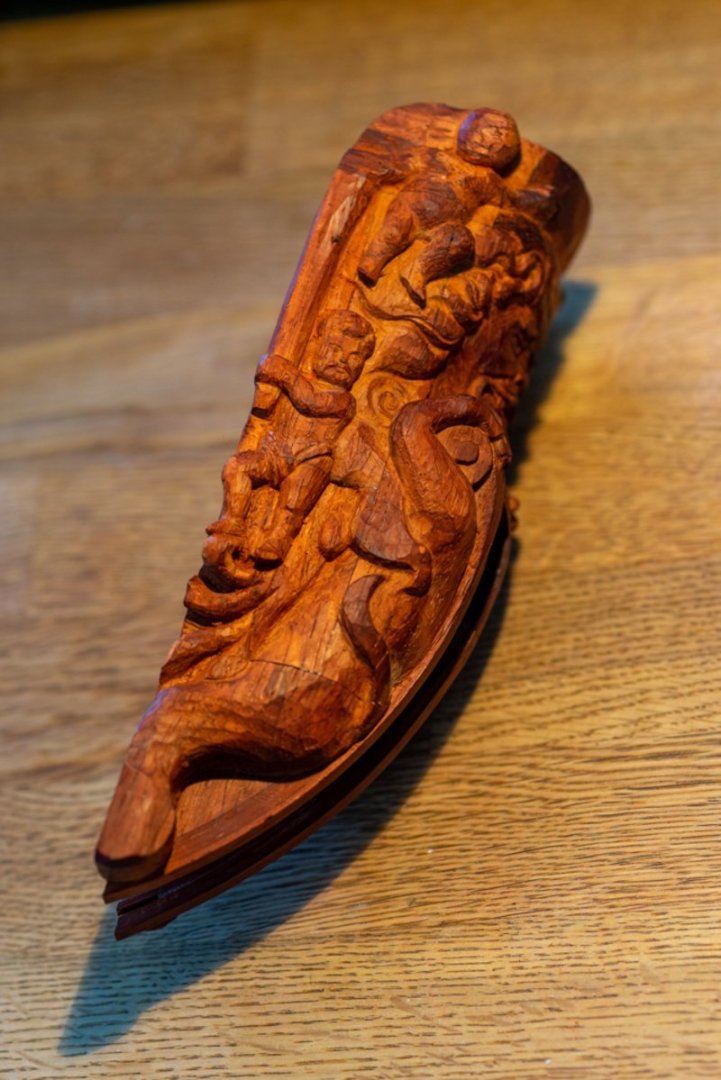
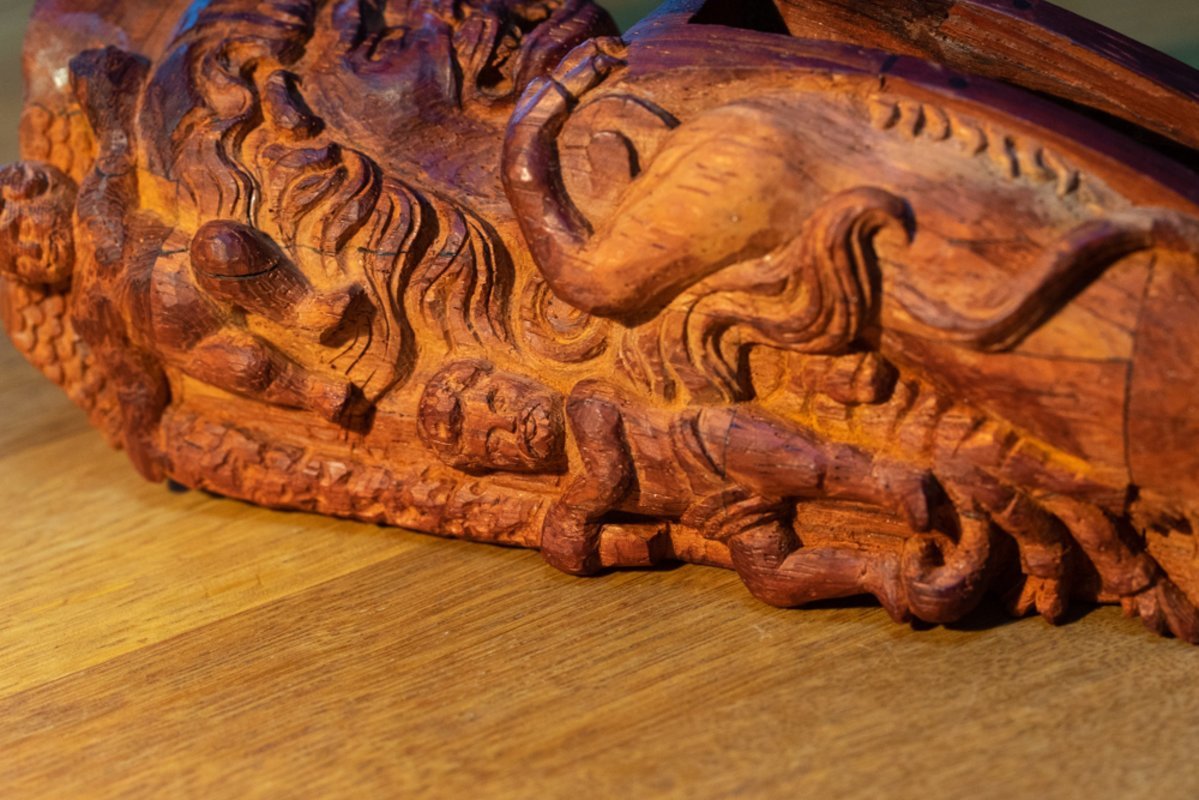
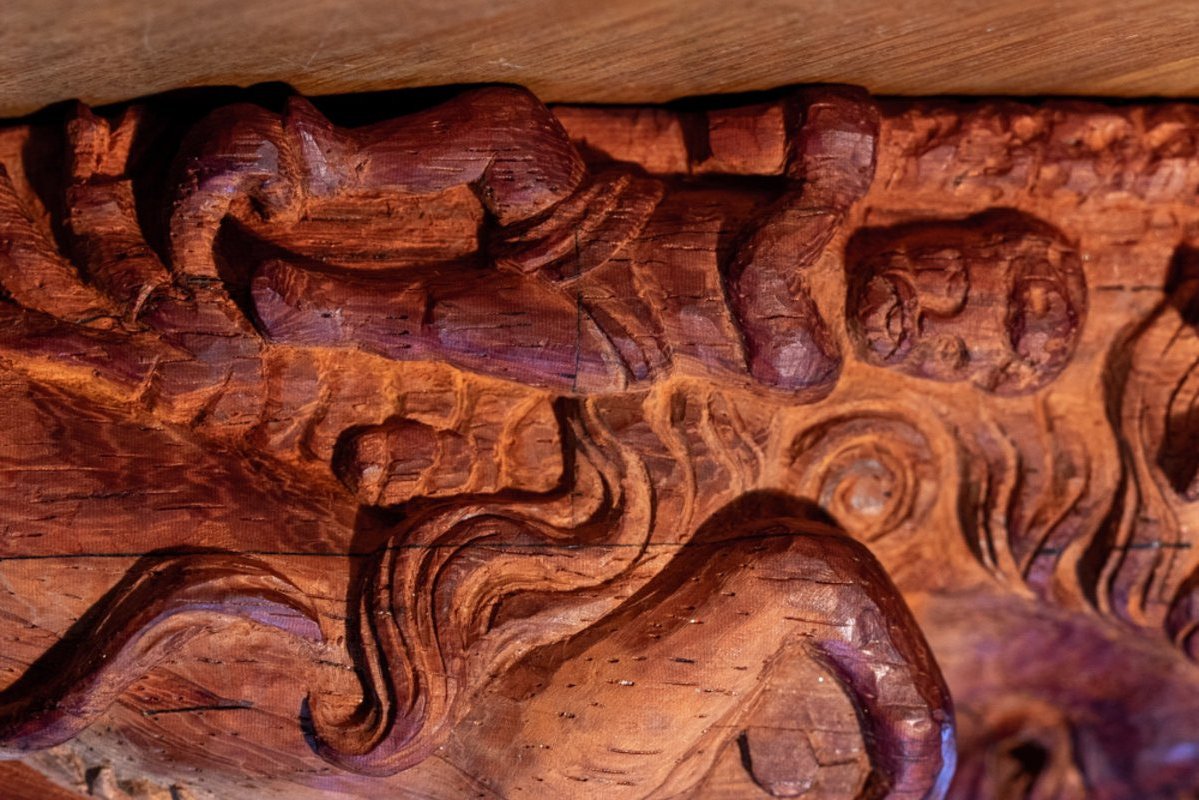
The second side of the lion figure. Often the right and left sides are processed simultaneously. To follow the symmetry and more accurately show the mirror elements of the figure. However, this time doing the carving parallel on both sides was not as necessary. In this again you can see the difference between the way modern people look at the work and the way our ancestors did it. When I talked about the lion from Vasa's ship I already mentioned that the original figure has many asymmetrical features. In this lion, the same trend has been maintained. On the museum original you can see that the two sides have slightly different nuances. Which means that both sides can be done one at a time. What I found interesting to consider was that the two sides had their own features. For example, the defeated Hydra lay on both sides of the sculpture slightly differently. The necks of these predators were different. One side had more curves than the other. The tattered holes of the wounds looked different too. The Heracles were different too. For example, they looked in different directions. I'd also like to point out another feature that was a revelation to me. Paduk gets very dirty. And I can't call it dirt. When working, you always have to make sure that the wood doesn't get dirty. This applies to any wood. This is especially true for light-colored woods. I have a very negative attitude towards sanding. In my opinion, sanding sandpaper "kills" the carving. I don't like it when a sculpture looks too smooth. So the issue with the appearance of dirt on the figure is always very important to me. It took me a long time to get used to gloves while working. I don't like them, my hands don't feel objects well. Now I can get used to the option of having my left hand gloved and my right hand with the tool without protection. At least this way I can reduce the degree of dirt on the sculpture. However, there was nothing to help me while working from this sculpture. Even with a glove on, the workpiece became covered with a dark patina very quickly. The surface also became shiny, as if I had rubbed a piece of lard or sausage on the workpiece. But you can't call it dirt. It was something else. Padouk, perhaps, oxidized or burned out in the sunlight. And the darkening process happens very quickly. It was particularly interesting to watch the dark areas form first on the most convex areas. Just like with ordinary dirt. But over time, the darkened areas become wider and wider. And they even go into the hollows. The light-colored areas turn into thin hollows in the very depths of the depressions. You can't get your hand in there, so it's clear that this process of discoloration is not just dirt. In these photos, you can see the darker areas. And you can also clearly see that where the knife has just cut away new layers of wood, the sculpture has a lighter color. In some ways, the paduk resembled an apple, where the bite or cut site becomes darker over time due to iron oxidation. In the following parts, the feature with dark areas on the wood will be seen even more. Such is the peculiarity of this type of wood. At this stage, there is no point in cleaning or renewing the darkened areas. After the carving is finished I will go over the entire surface at one time so as not to traumatize the sculpture unnecessarily. This wood is very finicky and it is very easy to ruin the work that has been done. Well, there is nothing more to tell in this issue.

-
Thank you for the high praise. I tried my best and for me the project with this Wookiee is a new challenge and a test of myself. There's still a long way to go, we'll see what happens in the end.
-
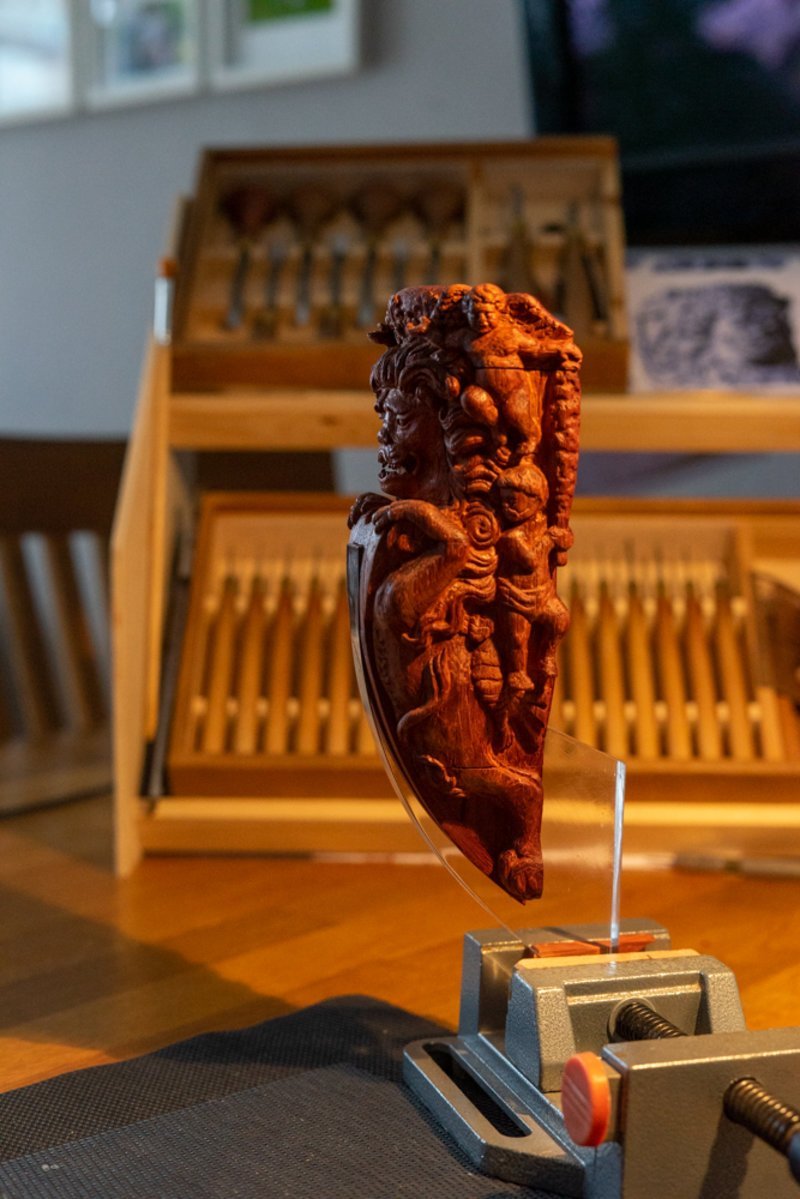
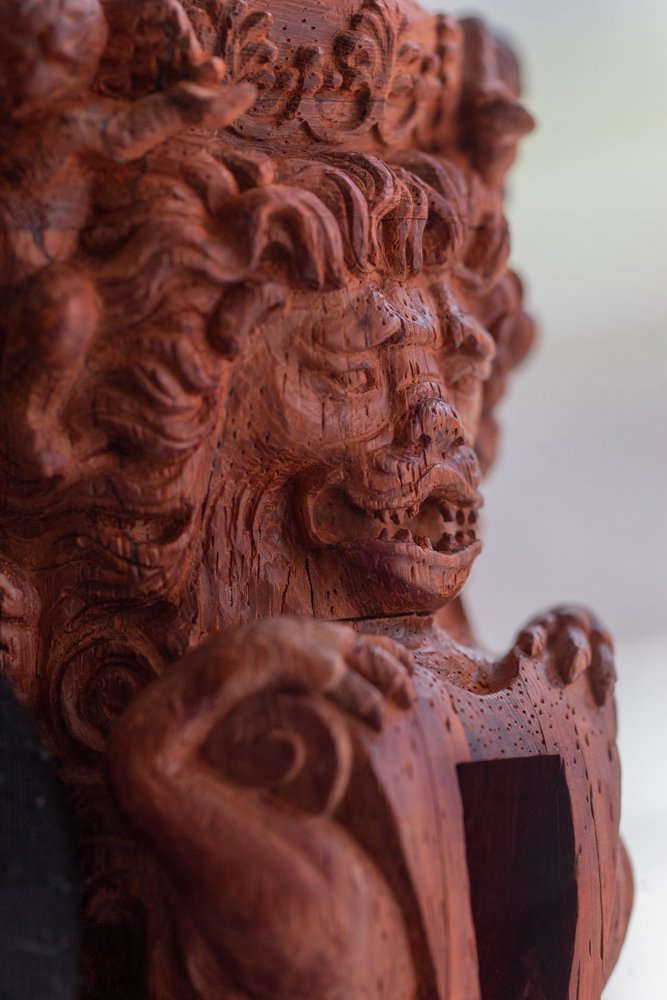
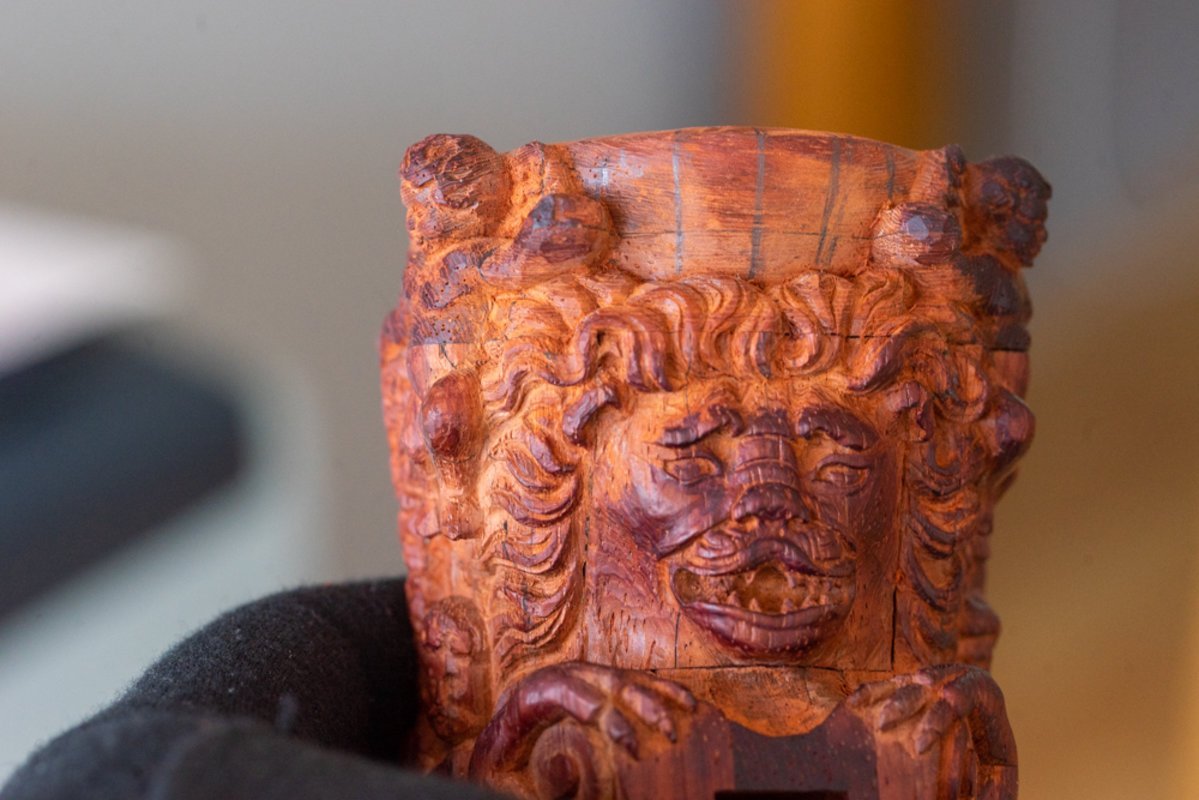
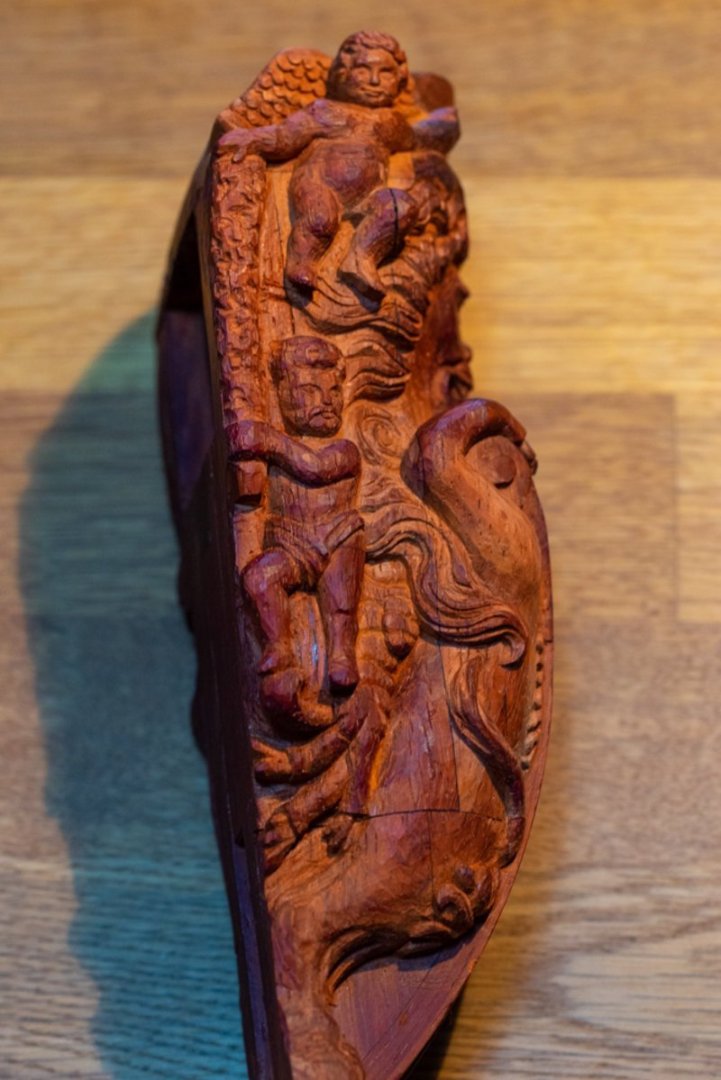
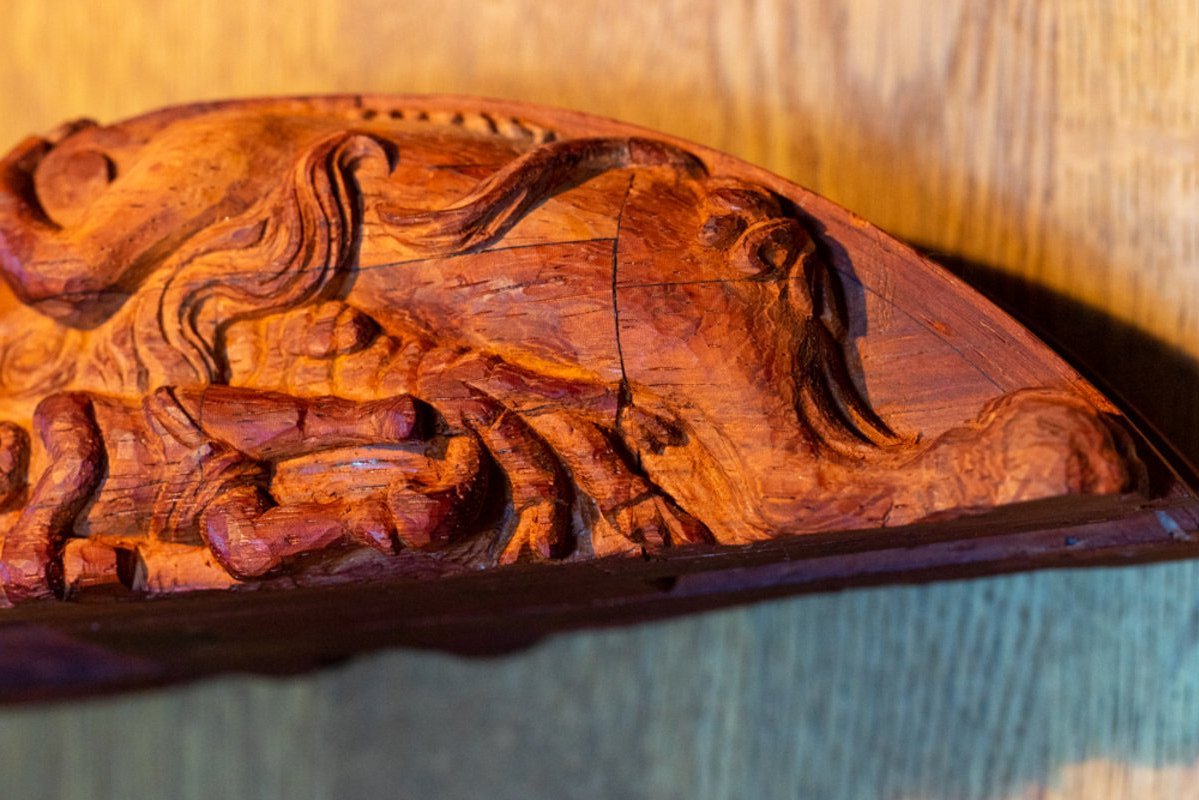
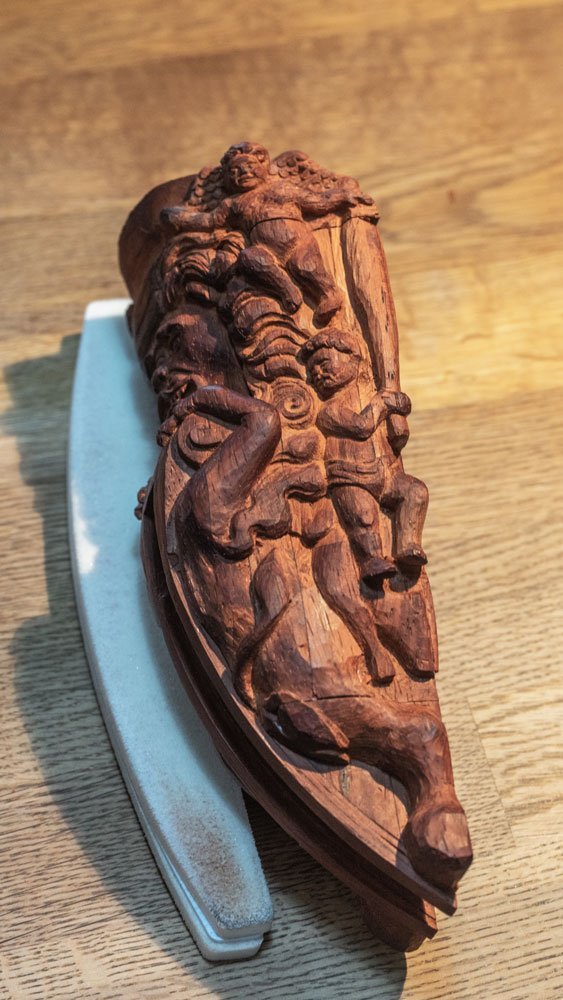
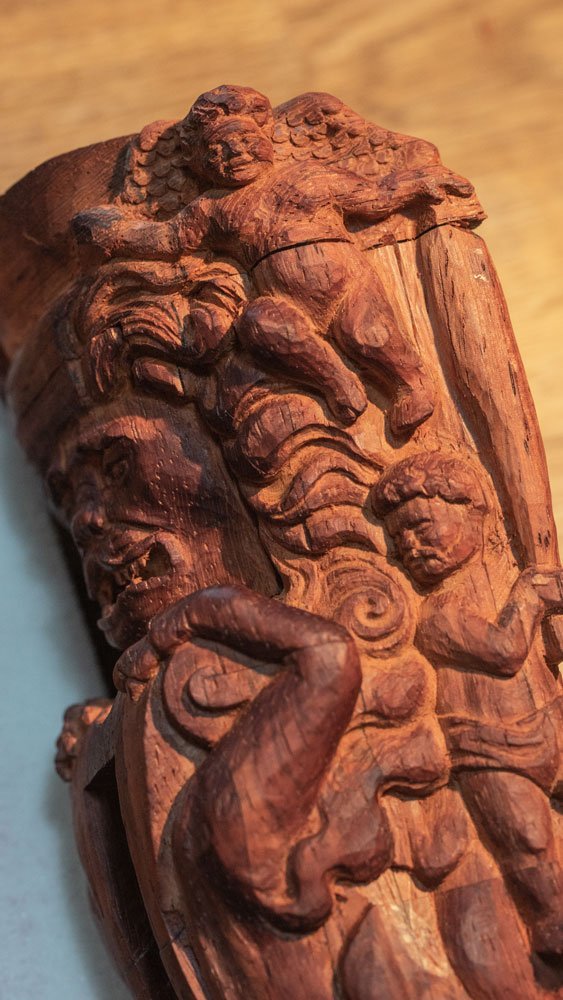
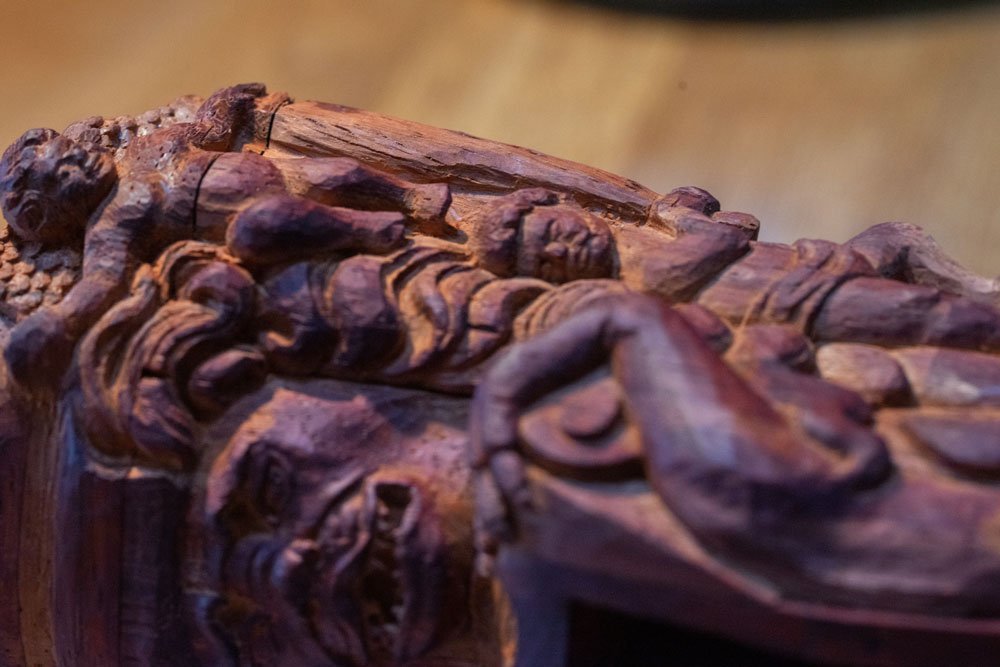
I was taking close-ups for myself, temporary photos, so to speak? For technical tests. My eyesight isn't what it used to be. I wanted to see the fine details through the optics. It always looks wrong with my eyes. The eye is more forgiving, you don't notice any mistakes. Now I realized that in macro photos there will be disadvantages in the form of roughness or tool marks. I photographed to see these disadvantages. But to my surprise everything turned out the other way around. And it's not that there are no flaws. They are. But these are the minuses that I just like. And the roughness of the wood, and polygonal traces of cuts, and notches left from the point. It's all there. And exactly where it should be. Where it should be. Or to be more correct: in sum, I really liked the fact that it was all there. Exactly where it should be in the end result. So I'm posting these shots as an excuse to share. I realize everyone has their own fetishes and understanding of how carving should look like, with what degree of accuracy and meticulousness. But as they say: all felt-tip pens are different for taste and color! I share the vision that I have. So, in my opinion, the figure looks authentic. There is a feeling that it is two hundred years old, not two days from birth. It's not the final state yet. Work on this side is ongoing. There is also something to be said about new discoveries with the work on the paduk. But I'll save that for future issues. Translated with DeepL.com (free version)
.jpg.40f5ae3c5306da301e79b5156c3c7f81.jpg)
-
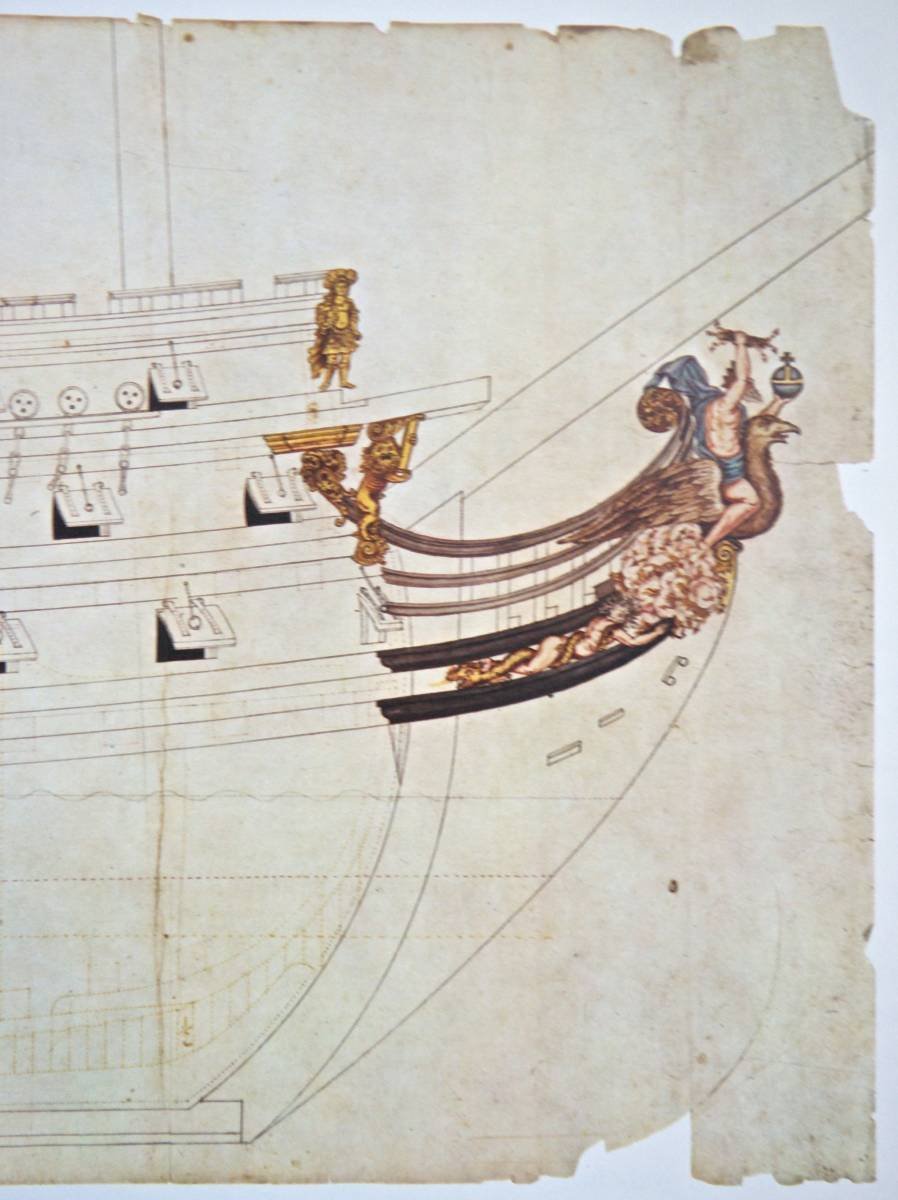
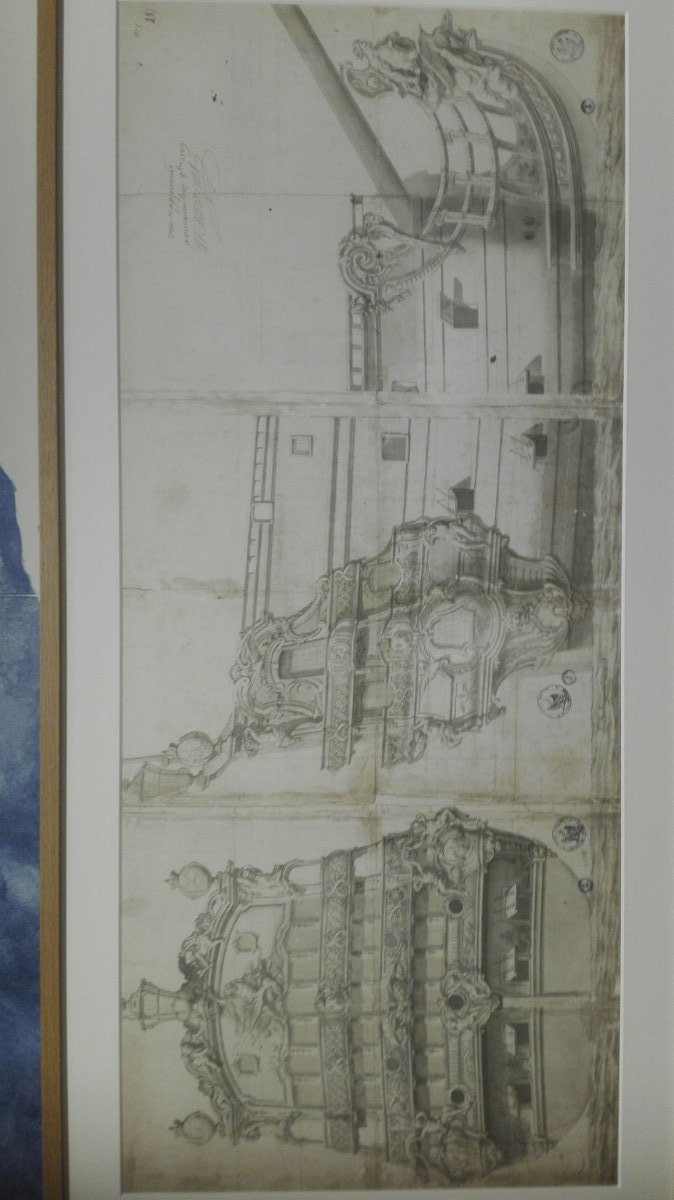
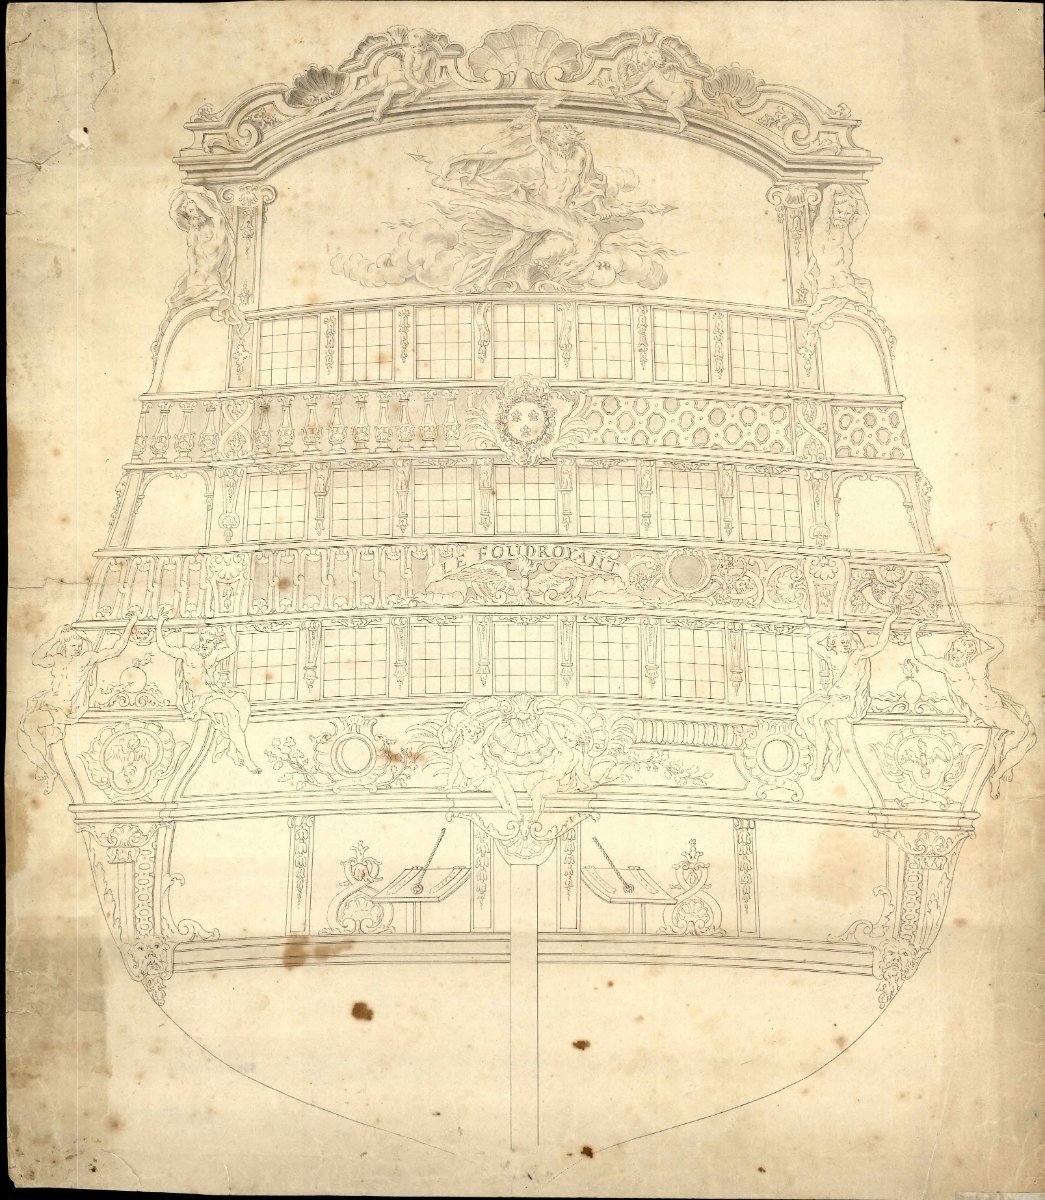
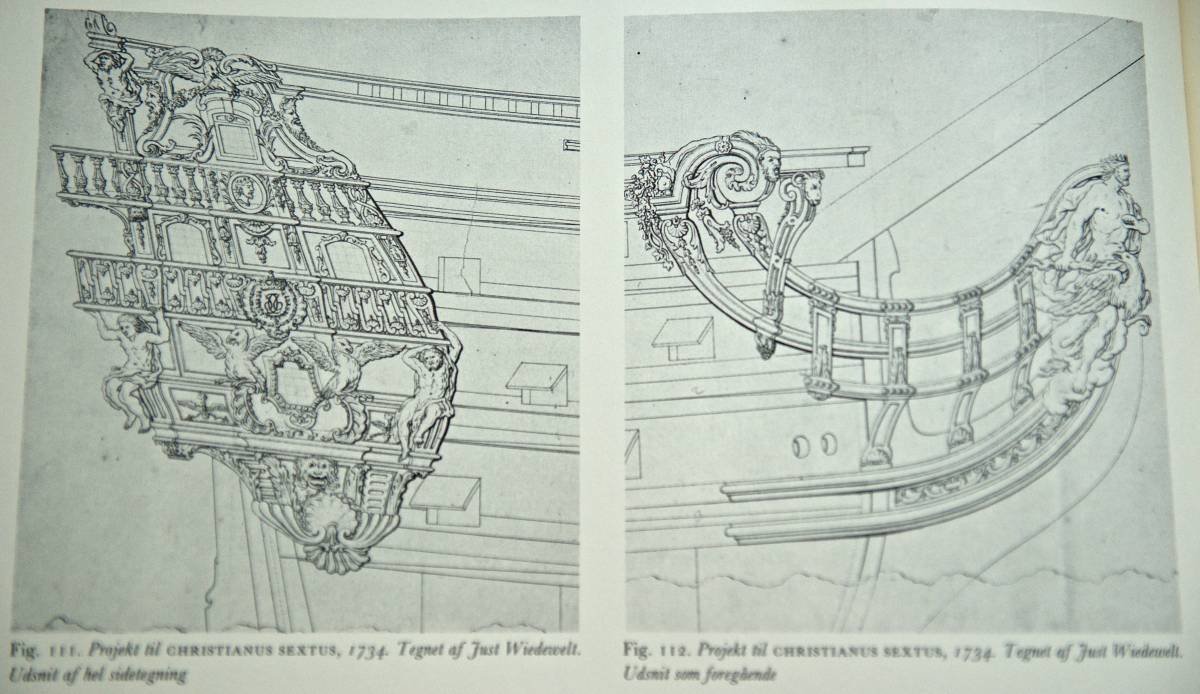
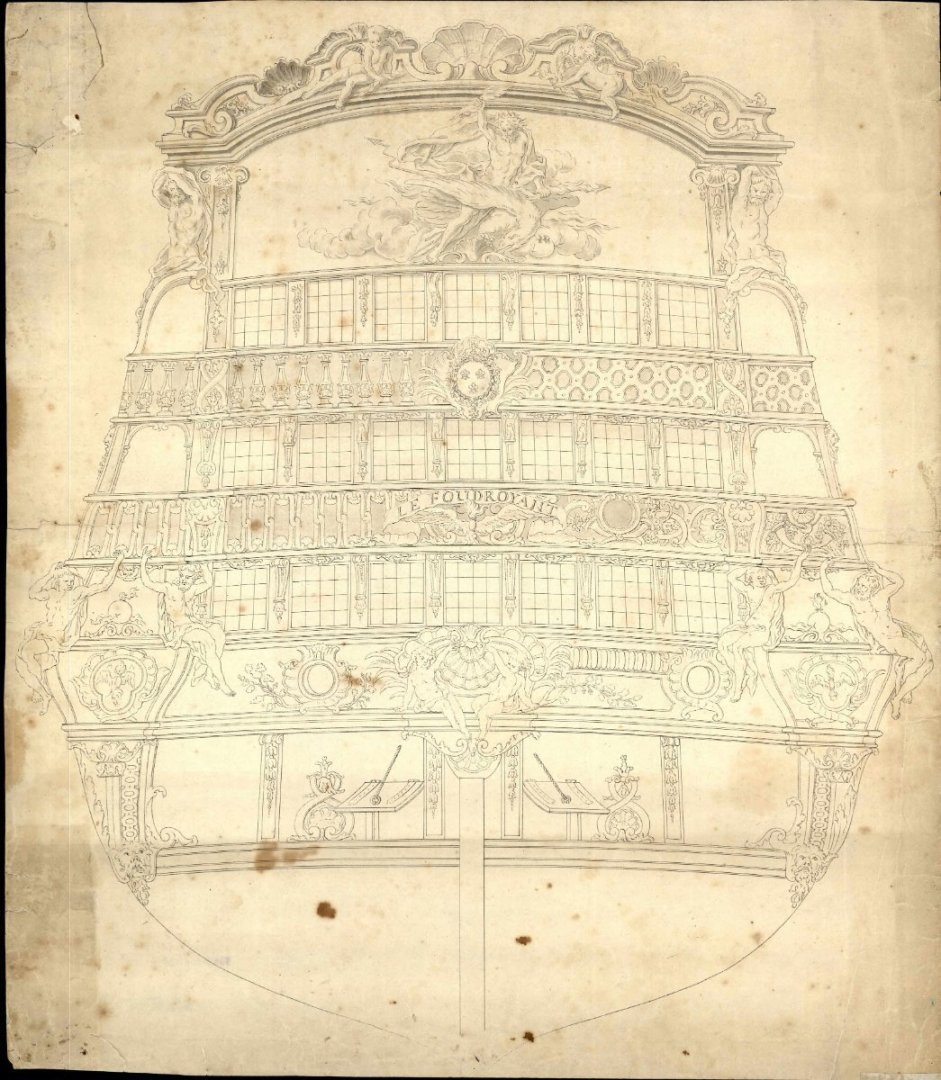
Your saying that the French adopted the experience of the Danes and copied their ships really surprised me. I even specifically started looking for sources that once served as a basis for my memory. And I found some of them. For example, here: The beginning of a long dynasty of truly talented sculptors who officially held the position of chief ship sculptor at the Holmen shipyard was started in 1729 by Johann Heimbrod, a sculptor from Saxony who had previously, in 1722, already participated in the design of ornaments for the ship "Drinning Anna Sophia". On the structural side, French and English styles dominated Danish shipbuilding, just as they did for the ship's decoration. Naturally, the chief sculptor was directly subordinate to the chief shipwright, and was given limited freedom of creativity. Heimbrod used both English and French styles in the decoration of Danish ships. The main difference between the two styles was that in England the lion was often used as a bow figure, a feature that was never used in France. Far more important was the fact that on English ships the galleries were not in the form of a balcony, but were closed, forming what was known as a loggia. The design of English ships in general represented a more compact and architecturally structured composition. French ships were not characterized by a carved hackabort, nor were the carved statues of large size that marked the transition from the stern to the quarterdeck galleries. Heimbrod, being an extremely talented craftsman, completed a large number of commissions for the design of elements of ship decoration, serving only four years. He died in 1733 and was succeeded by Just Wiedewelt, a Danish-born sculptor who was chief sculptor at Holmen from 1733 to 1757. Many of the bow compositions of the period, known from models and drawings, reveal influences from the French palace style, which Wiedewelt discovered during his extended stay in Paris from 1698 to 1715. In creating the decorations of Danish ships, he often used copies of original French drawings, sketches from life, etc., which were modified to a greater or lesser extent to conform to local realities..... Of course, all maritime countries tried to adopt the experience and design innovations of their neighbors. But still there were conditional "trendsetters", and there were those who tried to apply innovations found by others. And if we talk about copying not just individual elements of the design, but the whole hull, I still tend to believe that it was the Danes who could create "Chinese clones" of the French, and not vice versa. But that doesn't really affect the crux of the matter. The more important thing is that I found errors in myself. And you correctly pointed them out. I made a mistake in my drawings. This image belongs (as you correctly wrote) to the Danish ship HDMS Fridericus Quartus, (1699). And this image belongs to the HDMS Christianus Sixtus (1733(1734)). And it is exactly a repeat of the French Foudrant 1724. I have not found any data about Frederick that he is also copied from the French counterpart. So to claim that he is also a clone is not correct. I've sorted that out. However, I still have one question. There were two ships named Foudrant. One was in 1724. But there was also a ship of that name in the late 17th century. And there may be some confusion with the story of juggling names from one ship to another. When the ships Hubac and Pangalo switched names Soleil Royal and Foudrant . At what stage of readiness did the swap take place. Did they already have sculptures on them? And what ended up on the Foudrant breakwater? Going off of your findings that there were no images of Jupiter before the Fulminant, what stood then? P.S. It's good that these dialogs are not seen by my customer. The case is simple. There are ready sketches. And I make a model based on them. All questions about the fact that on the breakwater should stand exactly Jupiter were removed from the agenda of discussions a long time ago. And found (oh wonder!) unknown sketches of Beren confirmed the guesses about Jupiter. I'm still interested in digging into the theory.

-
Thank you. This answer can be called a point in the question of common lore and symbolism in ships. If there is ever any evidence that we don't know everything yet, this version can be brought back. And even exclaim: Wow, I thought of that ten years ago. But until then, you can let go of this conspiracy theory with a clean heart and recognize it as dead. She died before she was even born. Amen.
-
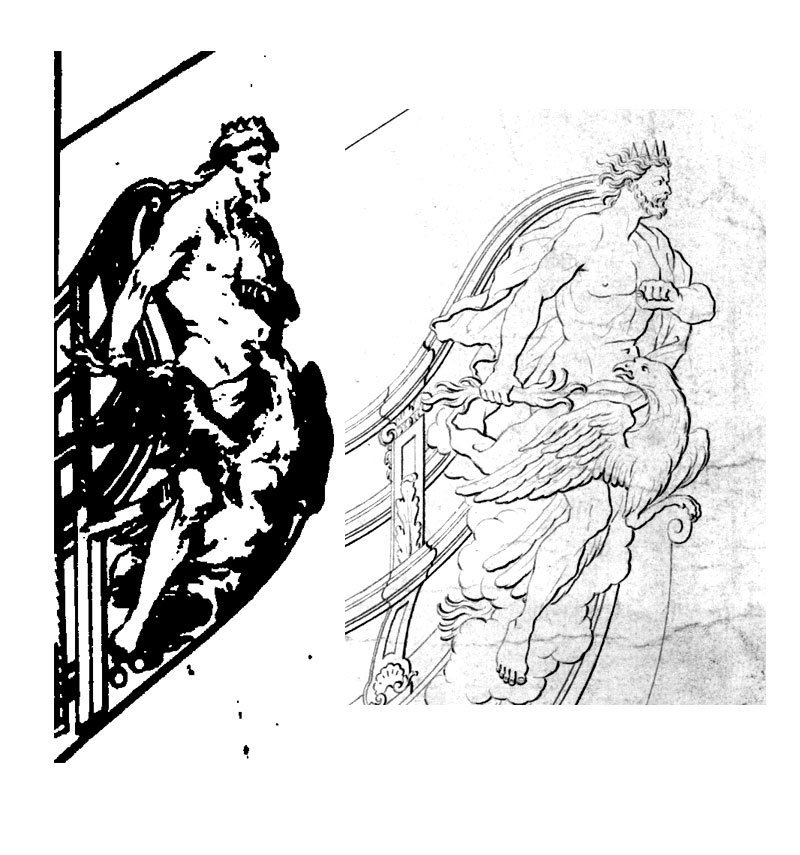
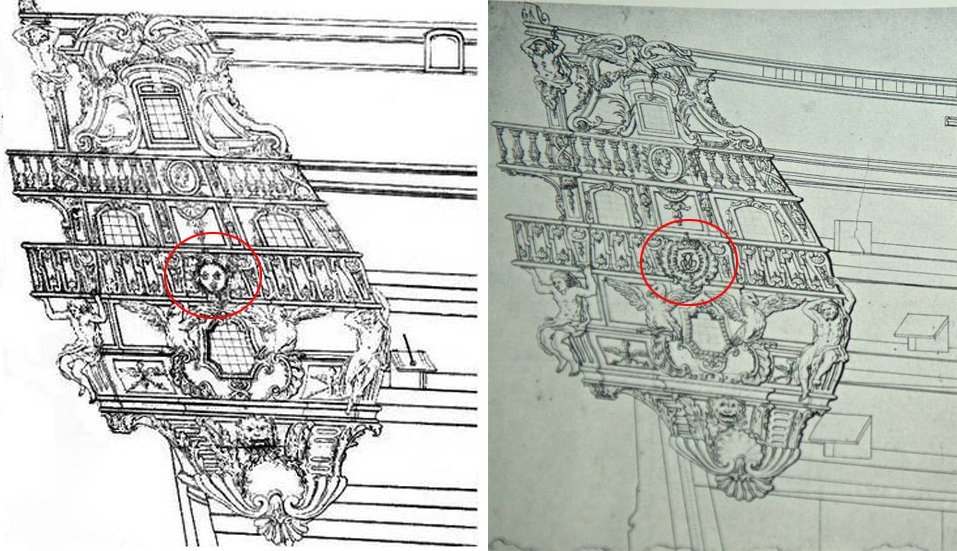
I was interested in these lines. You say that Jupiter was not seen as a major figure until the Fulminant. However, I certainly have memories of seeing such figures. I tried to find similar examples, but of the French ships I quickly remembered only _le_Foudroyant_. I still have in my folder of this ship photographs from a ship built in 1724, that is, later than the _le_Foudroyant_. But I remember that there was a ship of the same name, but of earlier construction. В 1693. In a separate section where I keep the decals, there are images with Jupiter figures, but I have kept them without specifying exactly from which ships they are taken. Therefore, I cannot say with one hundred percent certainty that these images accurately depict a figure from a ship built in 1693. This picture was shown in this post, here too le_Foudroyant is depicted. The figure looks very much like a ship built in 1724. So I don't know for sure, either it is the same ship. Or the decoration is repeated from an earlier version of the ship in the early 18th century. My library also has drawings of Danish ships. It would seem to be a bit of a mismatch because these are not French ships. However, the interesting point is that Danish ships are clones of their French counterparts, and the Danes were very meticulous in copying what they saw from the French. I even have images where the originals and the copies are side by side. And you can see how the Danes removed the royal lilies. You can see how diligent they were in redrawing the sketch. That is, their copies also show that France had ships with Jupiter figures. On the one hand you show me the conclusions, which are based on the work of people who are engaged in researches not the first day. And on the other hand I have images that have a different point of view. Foudran 1724 shows that there were definitely images after Fulminant. This ship built at the end of the 17th century I see only the transom. And purely from an artistic point of view I can say that making images of Jupiter on both stern and bow is not really logical. If I were decorating this ship, I would do it differently. And if there is already one Jupiter on the stern, I would show something different on the breakwater. I'm having trouble coming up with my own version. Most likely I would put a Jupiter on the breakwater and something different on the transom. And this is where I need your comment. What do you say? Is my data and memories wrong?


-
I'm confused. Reread several times about policy decisions and moves, but I can't find an answer, how does this answer the question about decorating ships with decor? Responding to the post about the La Superb, and L’Orgieullieux: You cite data that they are two "relatives". I guess I'm not articulating my thoughts very well after all, or the translator isn't quite translating me correctly after all. I was interested not just in the mere possibility of the existence of several ships that are built according to the same design. This fact does not require confirmation. Such ships were built in many countries. And there's no sensationalism here. I'm interested in whether there were ships with a common semantic idea. La Superb, and L’Orgieullieux do not, as far as I know, carry any common meaning. If I am wrong and in fact they do not, that would be a great discovery for me. My logic is simple. If there were no other examples in practice that ships had instances where there were "relatives in idea, history", then there is no reason to look for parallels in Fulminant and Ambitious. But if EVER it turns out that such a practice existed, and there are other examples with a common idea, then in this case it already makes sense to look for connections between our ships.