HAIIAPHNK
-
Posts
351 -
Joined
-
Last visited
Content Type
Profiles
Forums
Gallery
Events
Everything posted by HAIIAPHNK
-
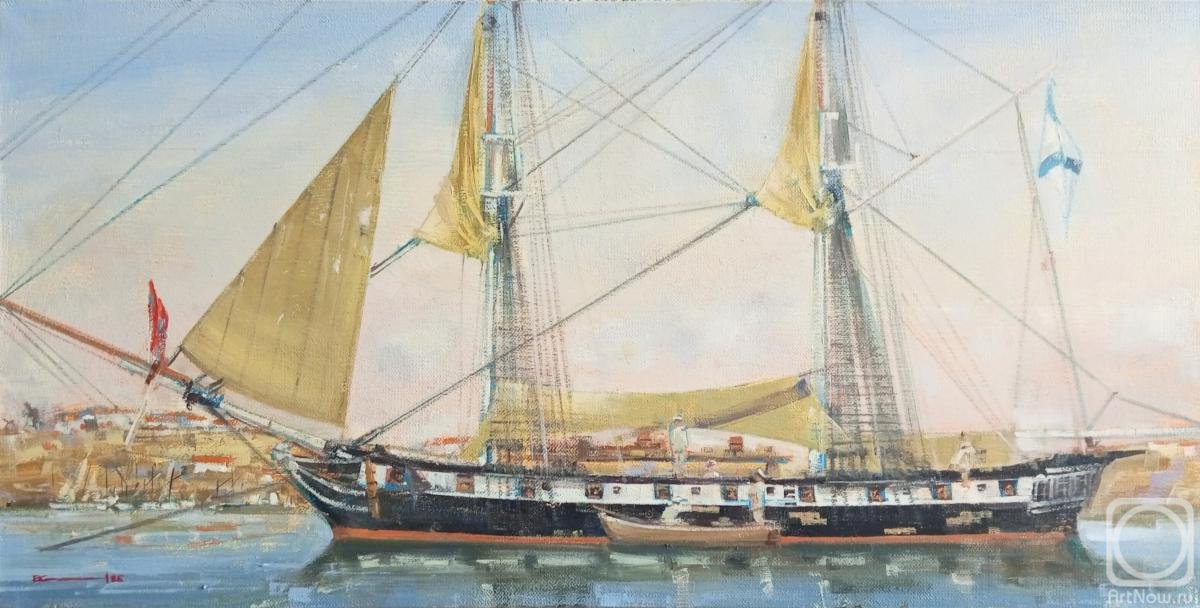
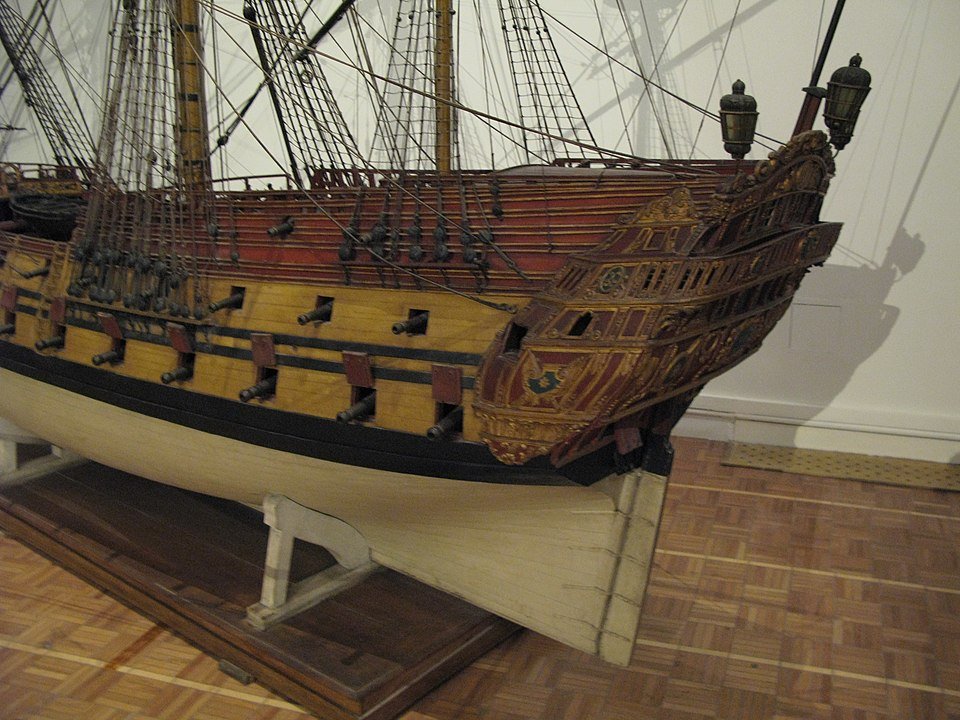
 Reflections on Mercury, like dominoes in a falling chain, touched on another subject. But before I talk about it, I need to shower you with a bit of historical background. The thing is that the brig Mercury is a landmark ship in the Russian-speaking ship-modeling community. No, that is not quite right. This ship occupies a completely special place in the history of the Russian Navy. It is one of only two ships in the entire history of the Russian fleet that were awarded the highest and most honorable distinction for combat merit. This was a special award. It was not bestowed upon a specific person—not a talented captain, and not the crew—but upon the ship itself. The honor consisted in the ship being granted the right to fly the St. George’s ensign at the stern. No other vessel was permitted to hoist the same flag. I will briefly recount the feat of Mercury. The events took place during the Russo–Turkish War of 1828–1829. On May 26 (14), 1829, the 18-gun brig, while on patrol cruising duty, emerged in the morning fog directly in front of a Turkish squadron, at first mistaking it for friendly ships. When it became clear that the squadron was hostile, the brig turned onto a reverse course. The situation looked hopeless: opposing an entire squadron was simply impossible. The Turks, for their part, decided that the outcome was already sealed. Two large ships were sent in pursuit of the Russian brig: the 110-gun ship of the line Selimiye, carrying the admiral of the Turkish fleet, and the 74-gun Real-Bey. Their aim was to squeeze the brig from both sides and force her to surrender. However, Mercury had no intention of capitulating. The crew firmly resolved to fight. And already the first stages of the chase and the exchange of fire showed that the situation was far from as clear-cut as it had seemed at first. The Turkish ships began to suffer numerous damages, and soon the flagship ship of the line abandoned the pursuit, followed later by Real-Bey. There were several reasons for this. First and foremost, the bold conduct of the crew and competent tactics. The brig maneuvered skillfully, using both sails and oars. A small, low-sided ship alongside the large enemy ships of the line unexpectedly found itself in an advantageous position. Mercury’s hull lay below the level of the Turkish ships’ gun ports. In some sources I have read that the brig tried to keep as close as possible to one of the enemy ships. This almost completely deprived that ship of the ability to depress its guns and deliver effective fire against the hull. The second Turkish ship, running on a parallel course, formally had a more favorable position, but it too was constrained: immediately behind the brig rose the side of its own consort. Mercury, meanwhile, adhered to a clear and deliberate tactic—she directed her fire at the enemy’s rigging. As a result, the masts of both Turkish ships were badly damaged, and yards with sails were shot away. Selimiye suffered especially heavy damage: during the fight, one of the forward stays holding the mast was almost completely shot through. This created a real threat to the stability of the standing rigging and, if events had continued, to the loss of masts altogether—making any further pursuit extremely dangerous. Yet it was precisely the loss of speed that proved far more painful for the larger ships. Mercury, as I have already mentioned, actively used oars, whereas ships of the line had no such option. In the diary of Mercury’s captain, Alexander Kazarsky, it is recorded that the Turks attempted one last argument to intimidate the Russians: from the flagship they threatened to board if the brig did not surrender. The reply sent from Mercury was that if the Turks attempted boarding, the crew would blow up the powder magazine. Everyone would perish. Of course, it would be foolish to claim that Mercury emerged from the battle unscathed. The Turks inflicted plenty of damage as well. However, the overwhelming majority of hits struck the sails and rigging—148 hits in total—and only 23 hit the hull. On the one hand, this indicates that it was genuinely difficult for the enemy to conduct accurate fire against the hull of such a small vessel. On the other hand, it may also point to a desire not to sink the brig, but to capture her. Accordingly, the main effort was focused on immobilizing the ship. In the end, the Turks abandoned the pursuit, and the brig successfully returned to Sevastopol. This feat was marked in a special way and entered history forever. I have described everything very briefly, without details, leaving much outside the frame. Why did I tell this story at all? There are several reasons. First, I plan to work further on the figure of Mercury, and my actions will be directly connected with this narrative. Understanding my intentions will be much easier if one already knows what kind of sculpture it is, which ship it is associated with, and what place that ship occupies in history. Second, another thought arises. If I intend to place the figure of Mercury in the display case alongside other sculptures, a certain dissonance appears. Mercury will be painted, whereas the other figures are executed in a classic, purely wooden style. This means that the single painted sculpture requires some visual support. It is logical to make at least one more figure with some kind of colored finish. And if next to Mercury—a ship that received special honors—there appears a second sculpture, then it is more than logical for it to represent the other ship that had the right to fly the St. George’s ensign. The solution presented itself naturally: I urgently need to find information and create a second figure to pair with Mercury. Now I have finally finished this long introduction and made clear what kind of project it is that has excited me so much. Next, I will talk about the long road toward creating a sculpture from the Russian ship of the line Azov. This ship is another vessel of special importance in the history of the Russian fleet. Moreover, Azov was the first ship to be granted such an honor. Mercury was the second.
-
Hello, Matthias. Thank you for your high praise of my work. I completely agree with you about the display case. I also believe that the case should be as inconspicuous as possible and not distract attention from what is on display inside it.
-
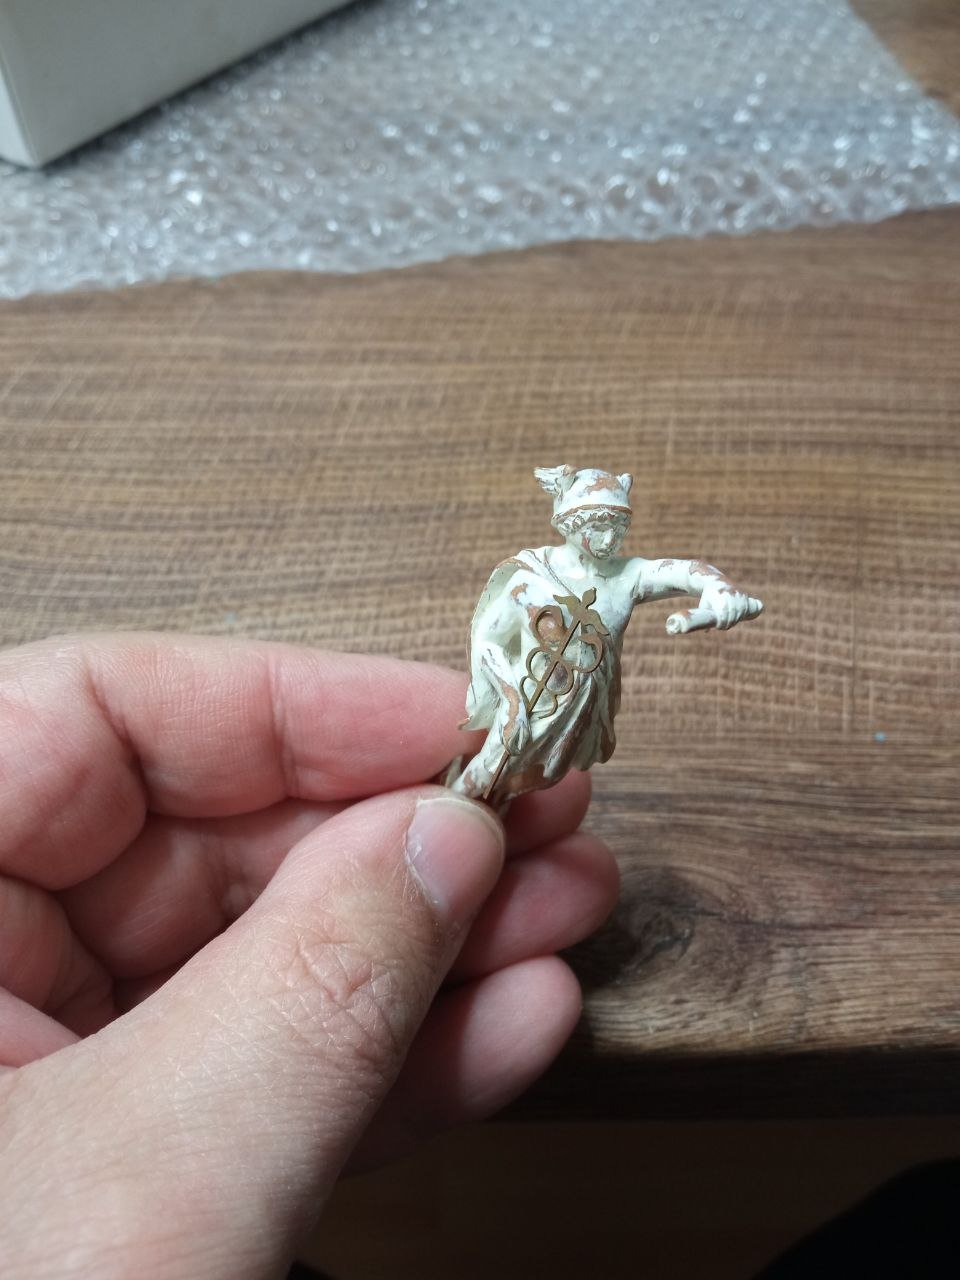
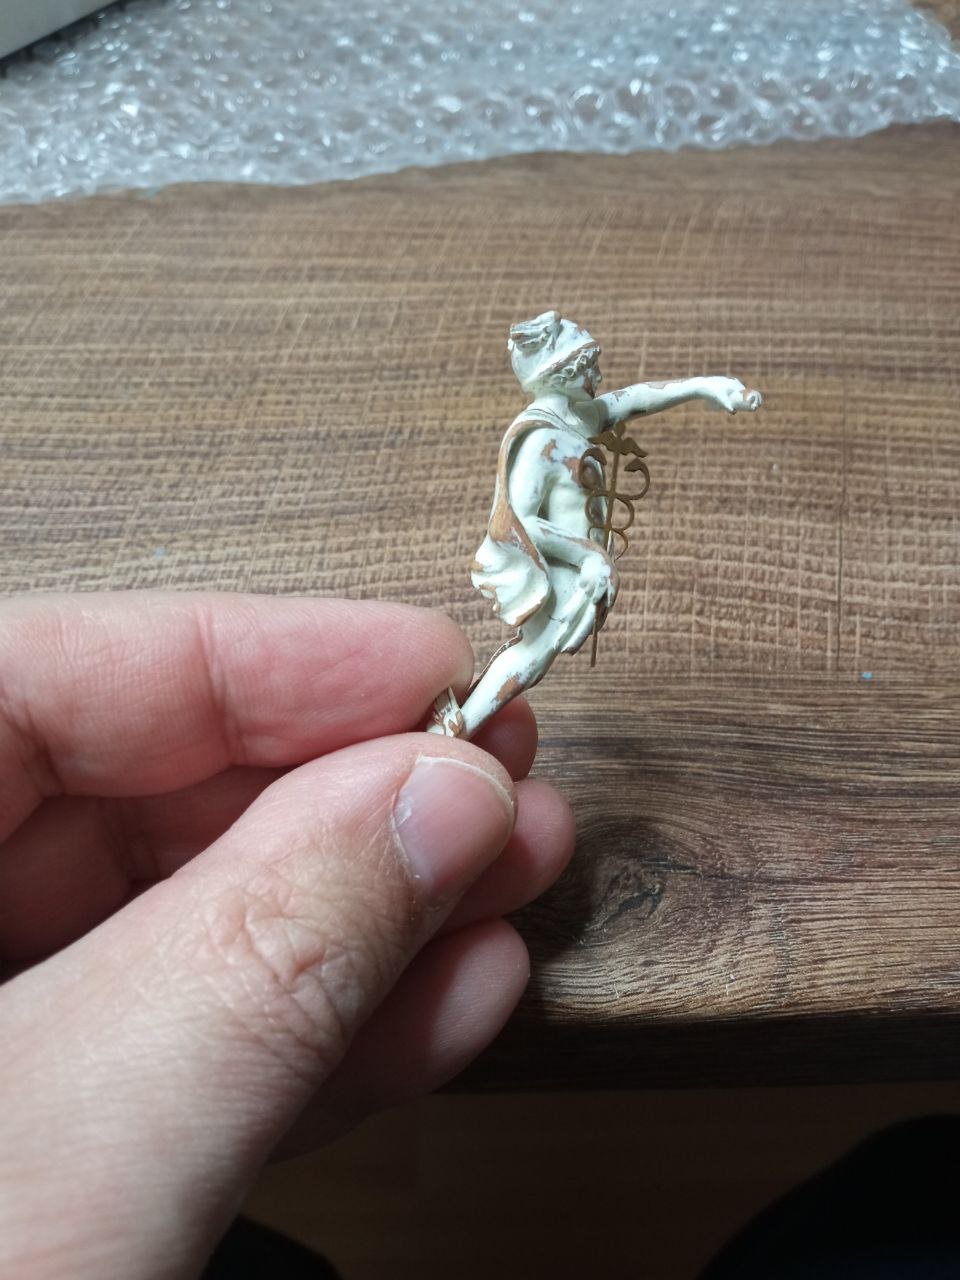
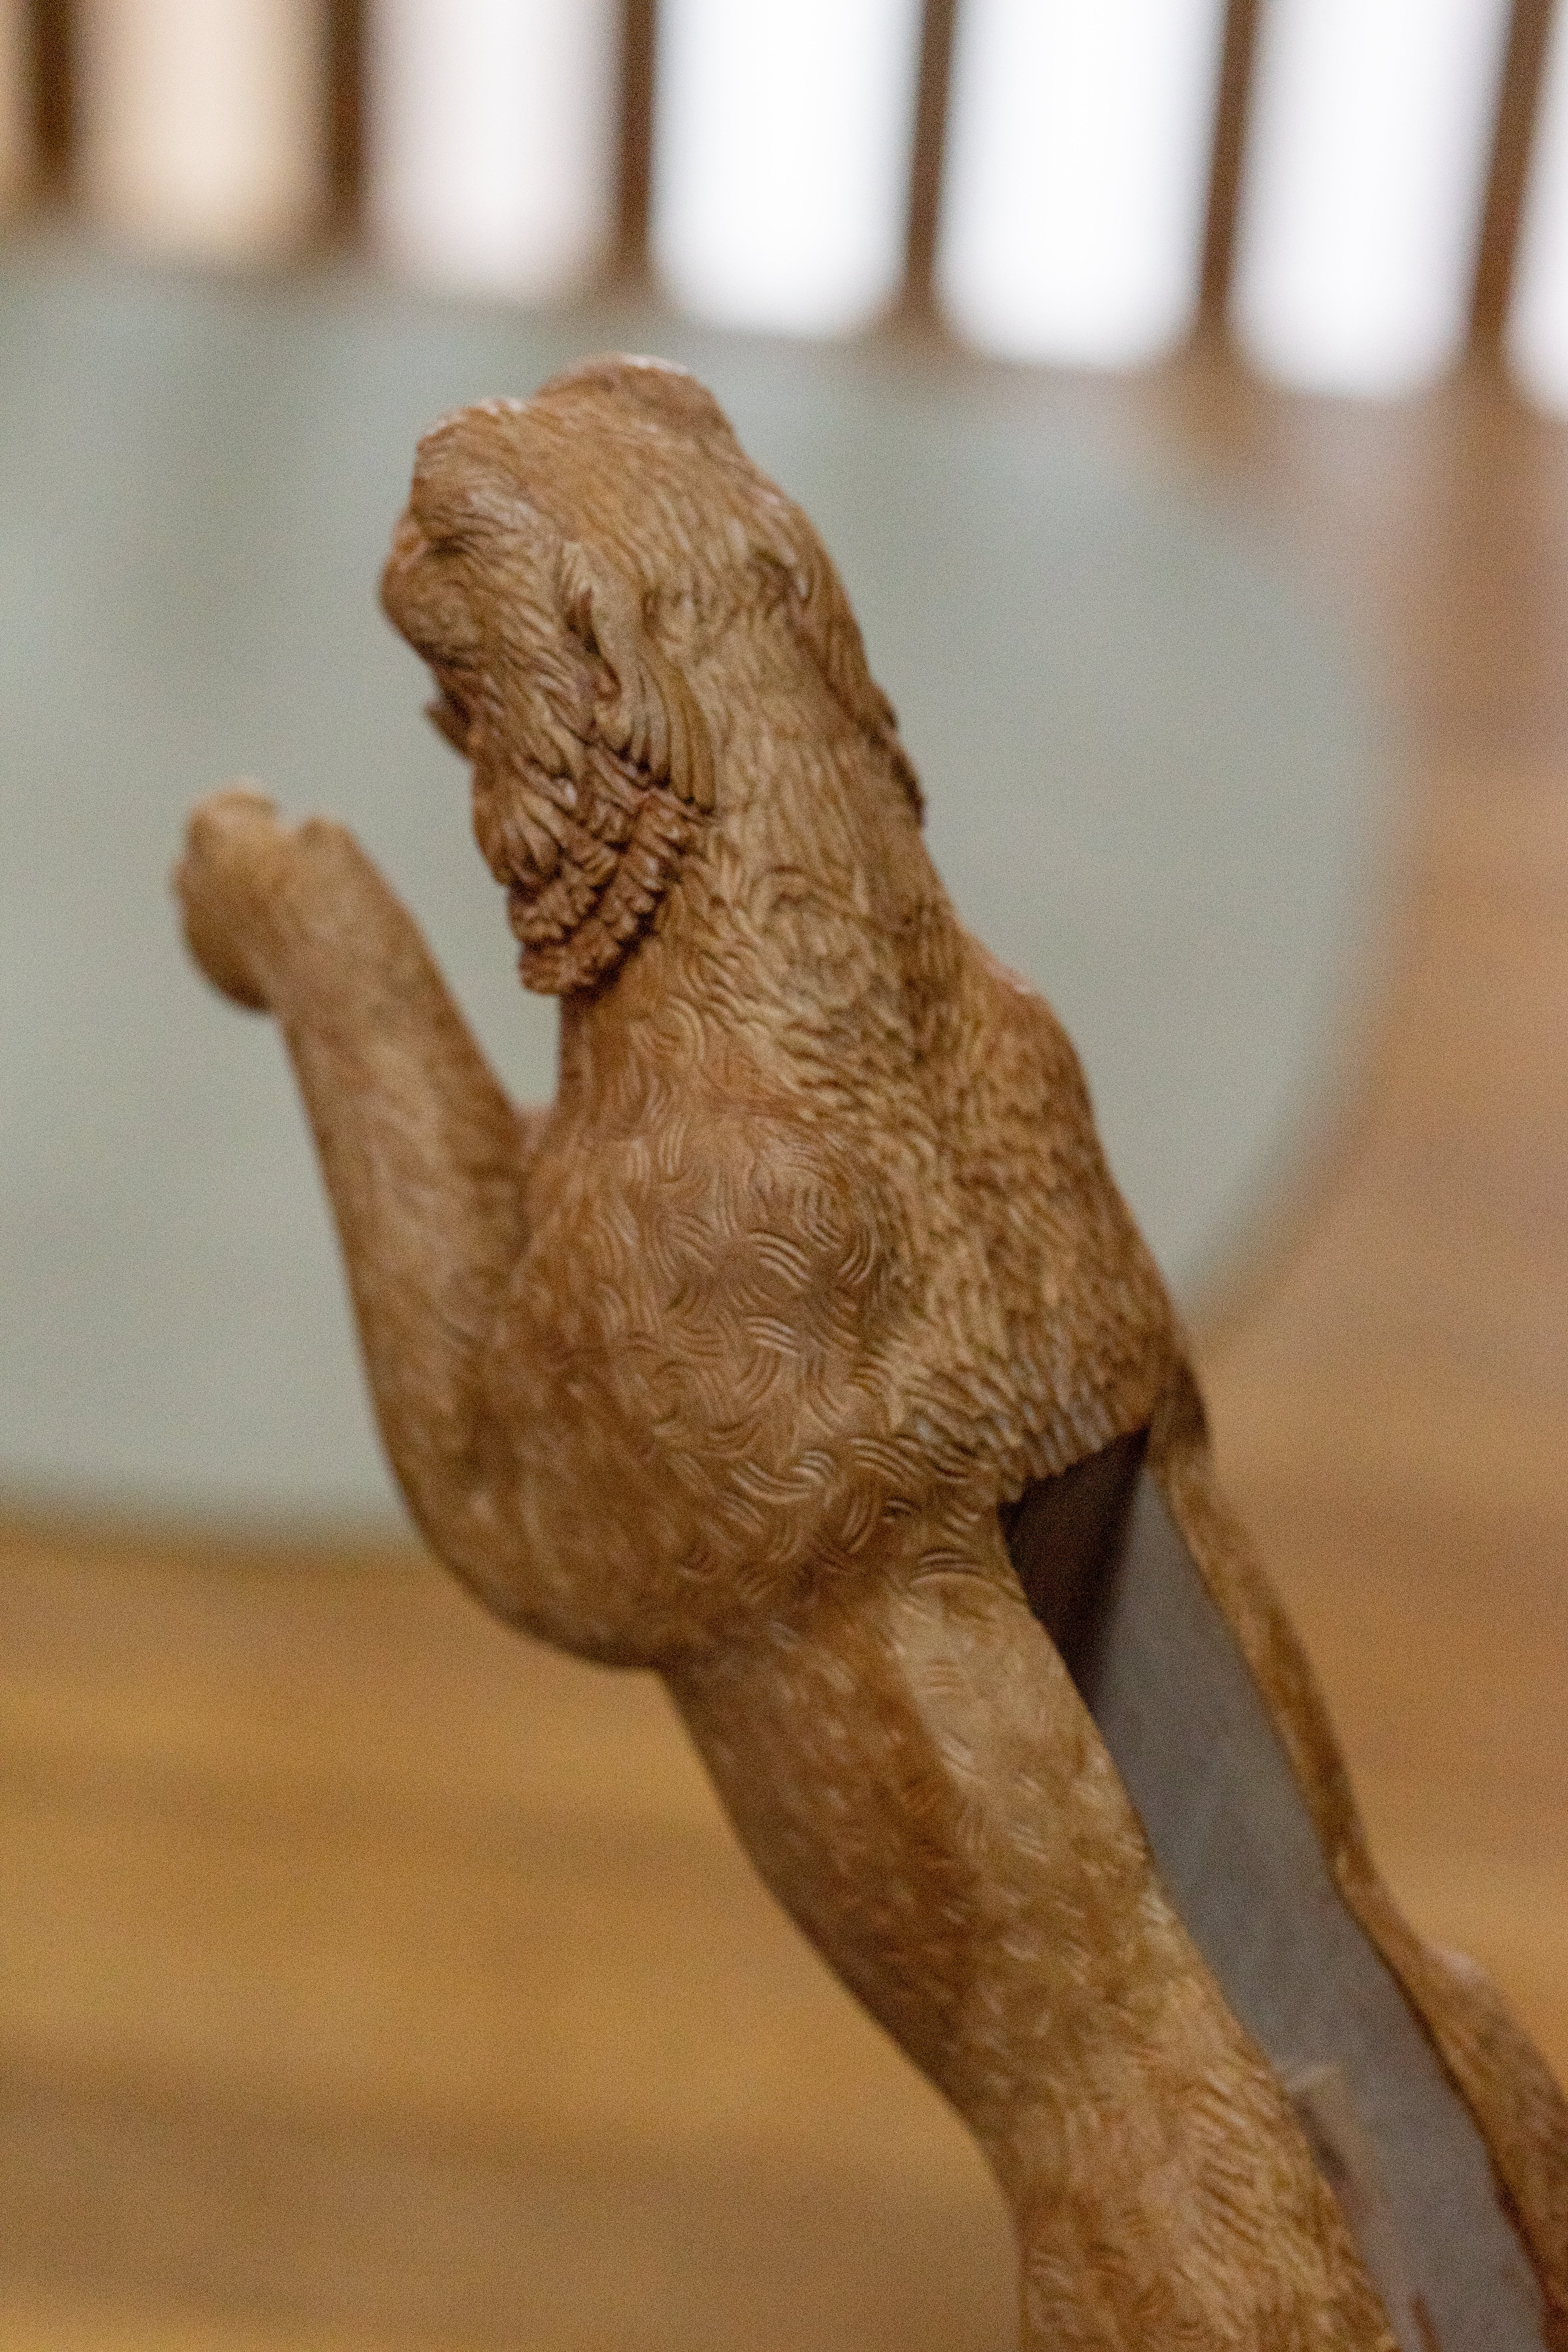
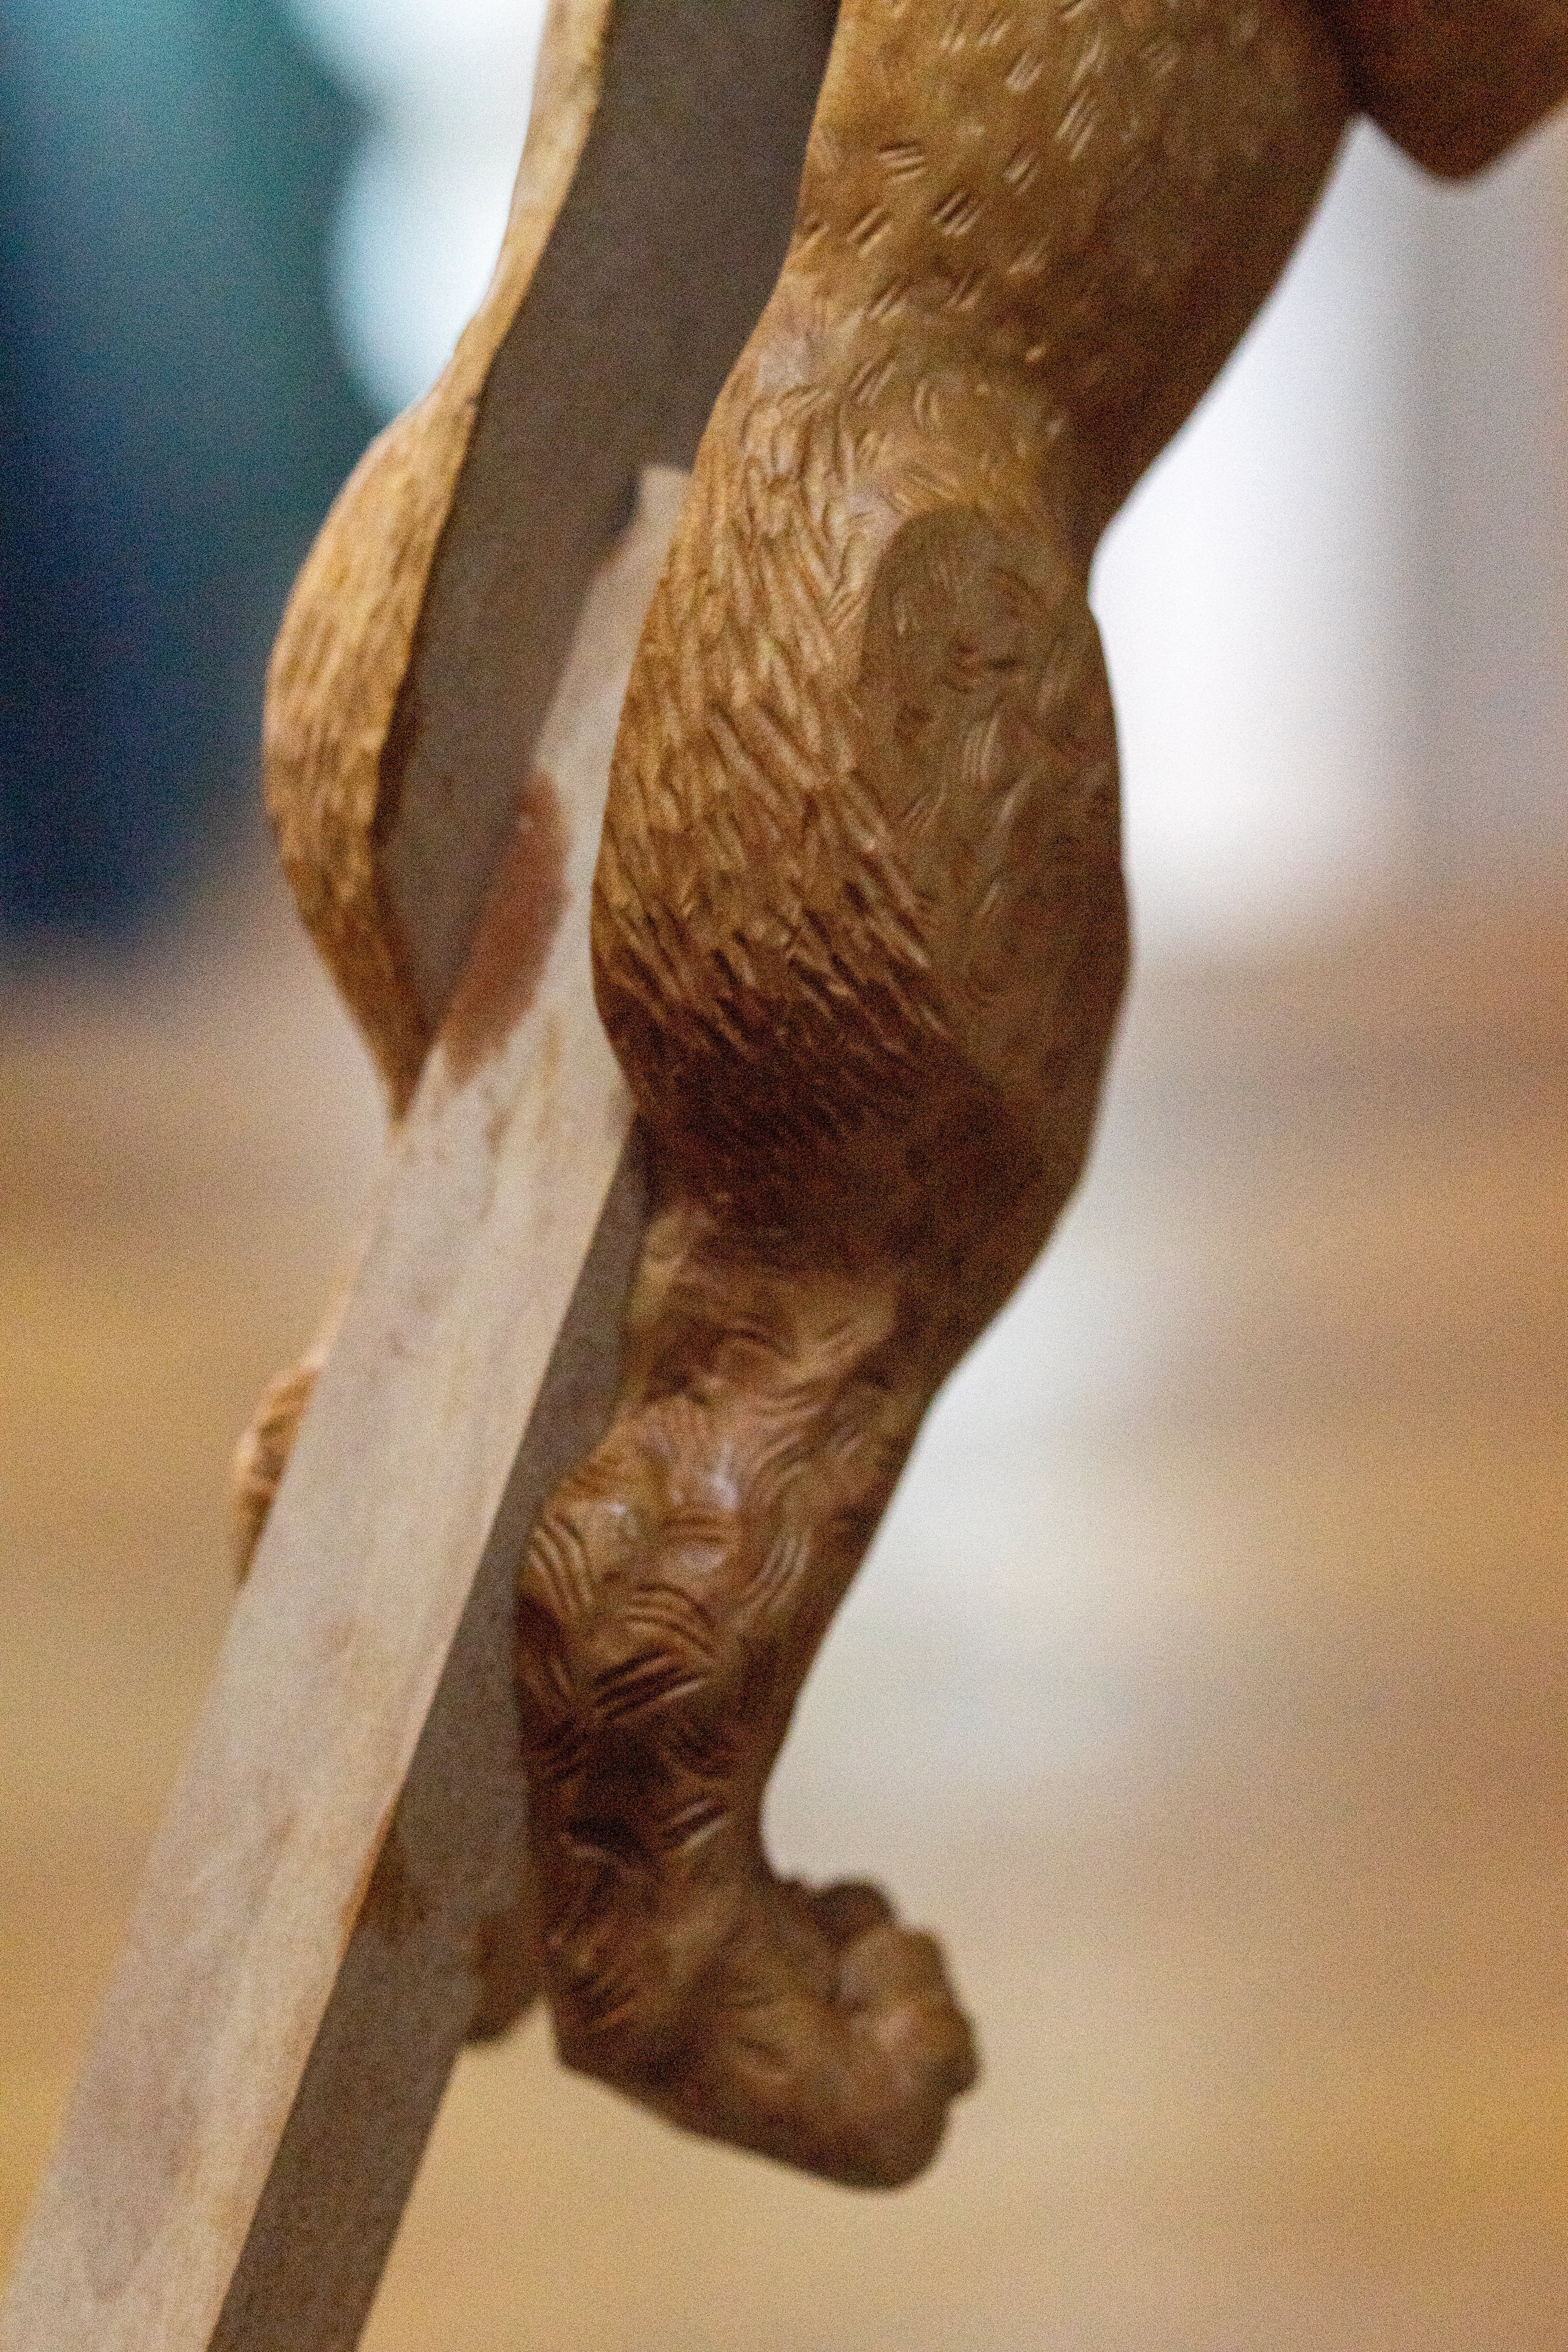
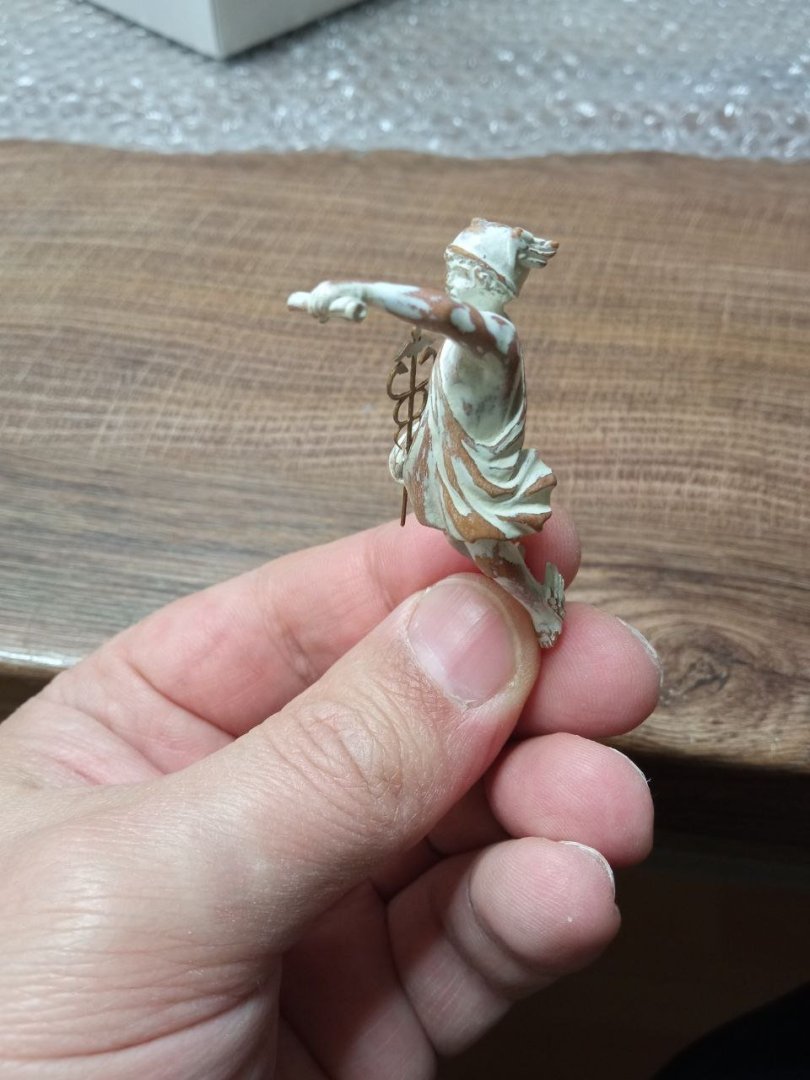
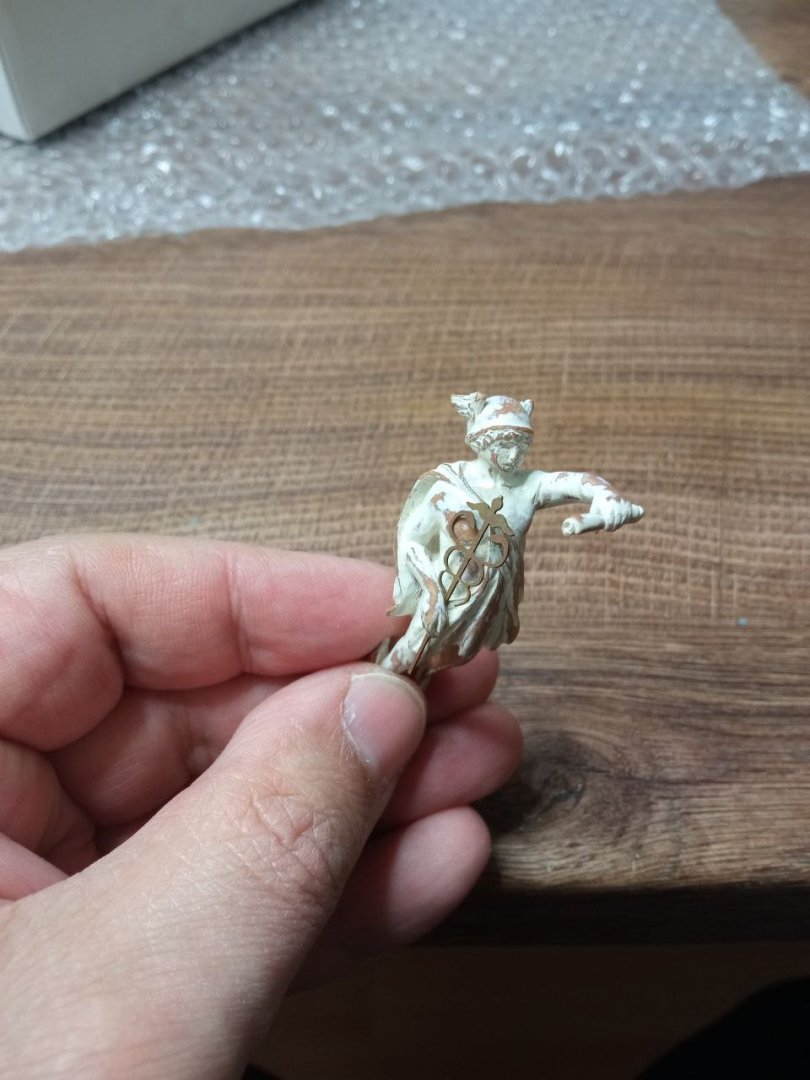
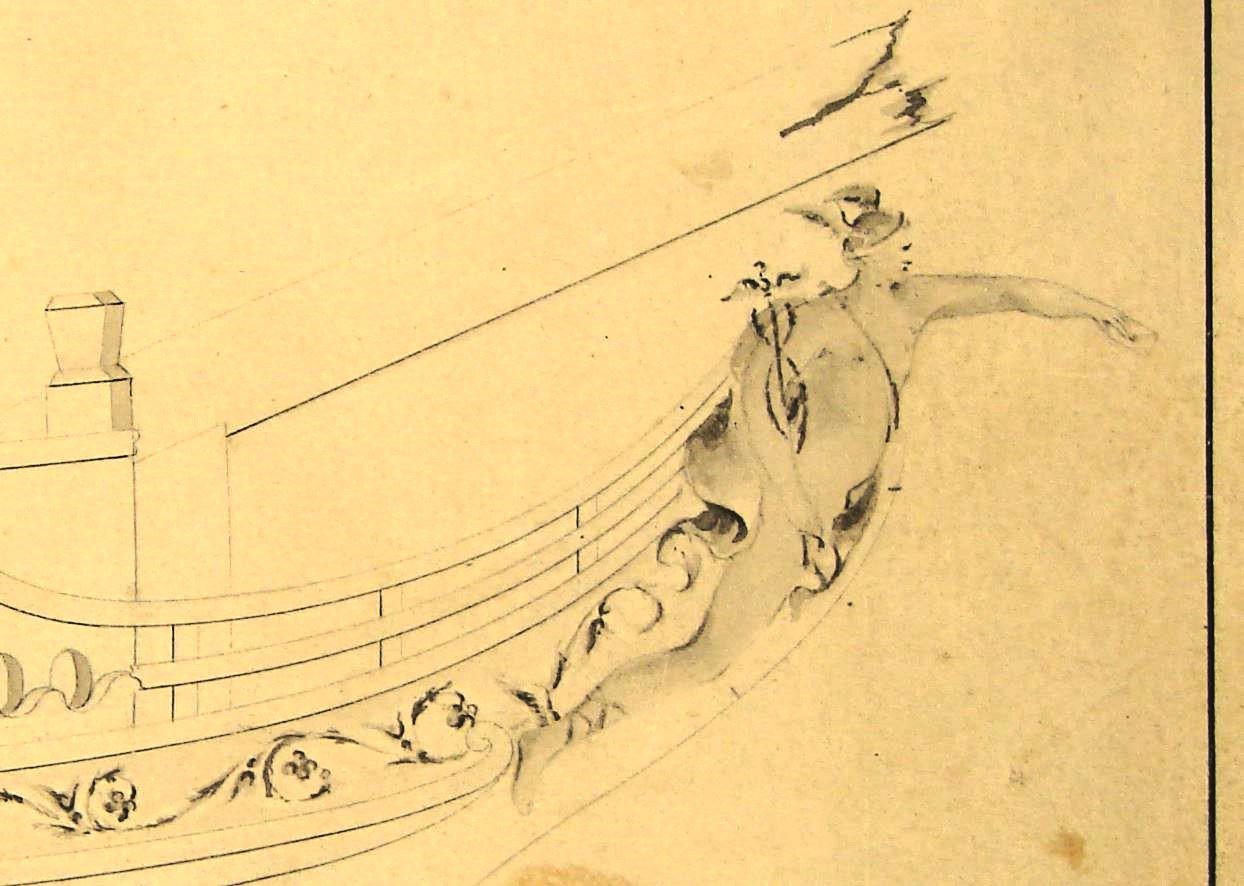
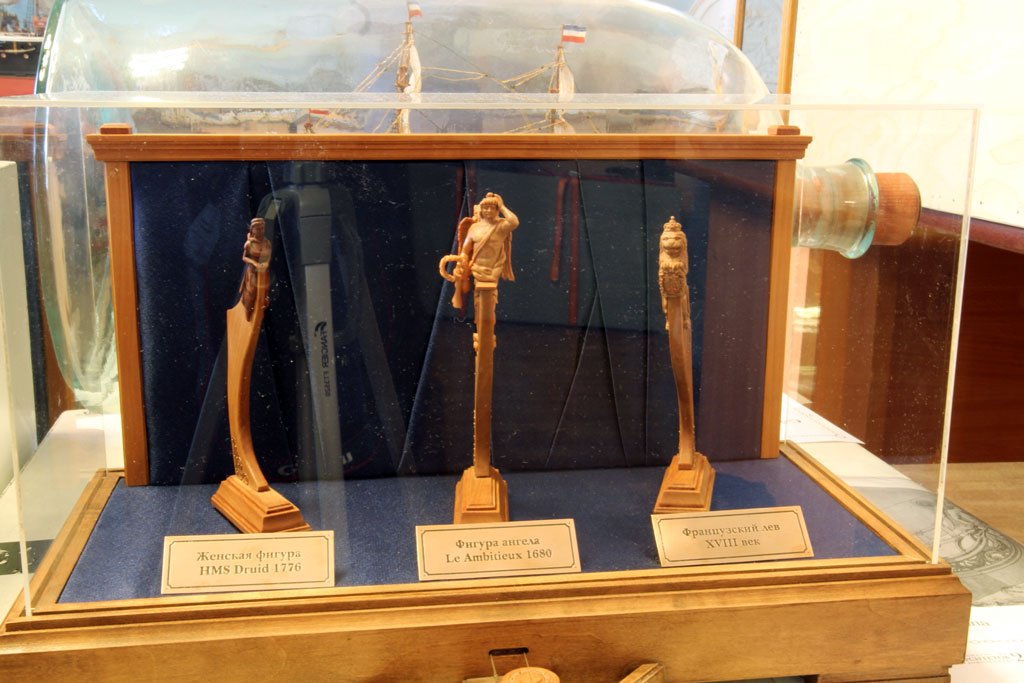
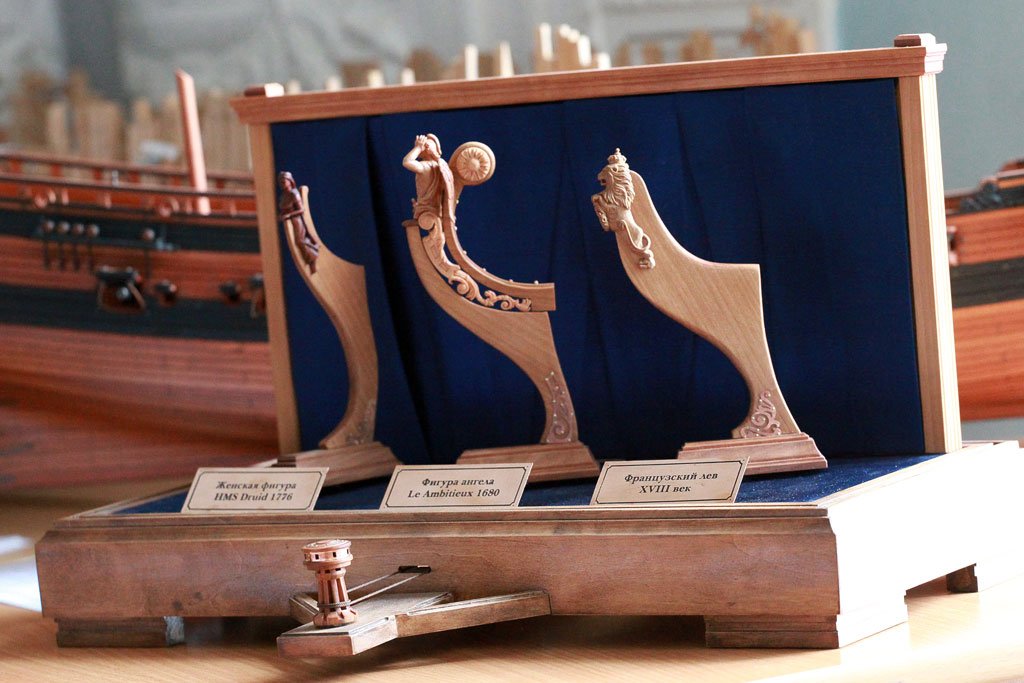
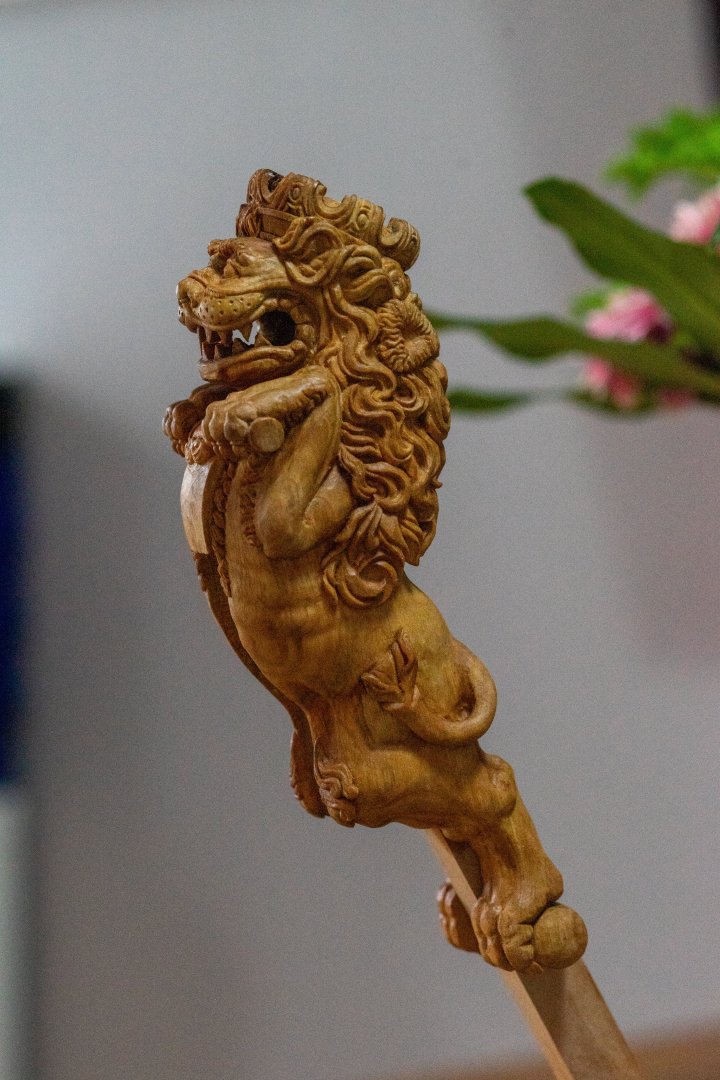
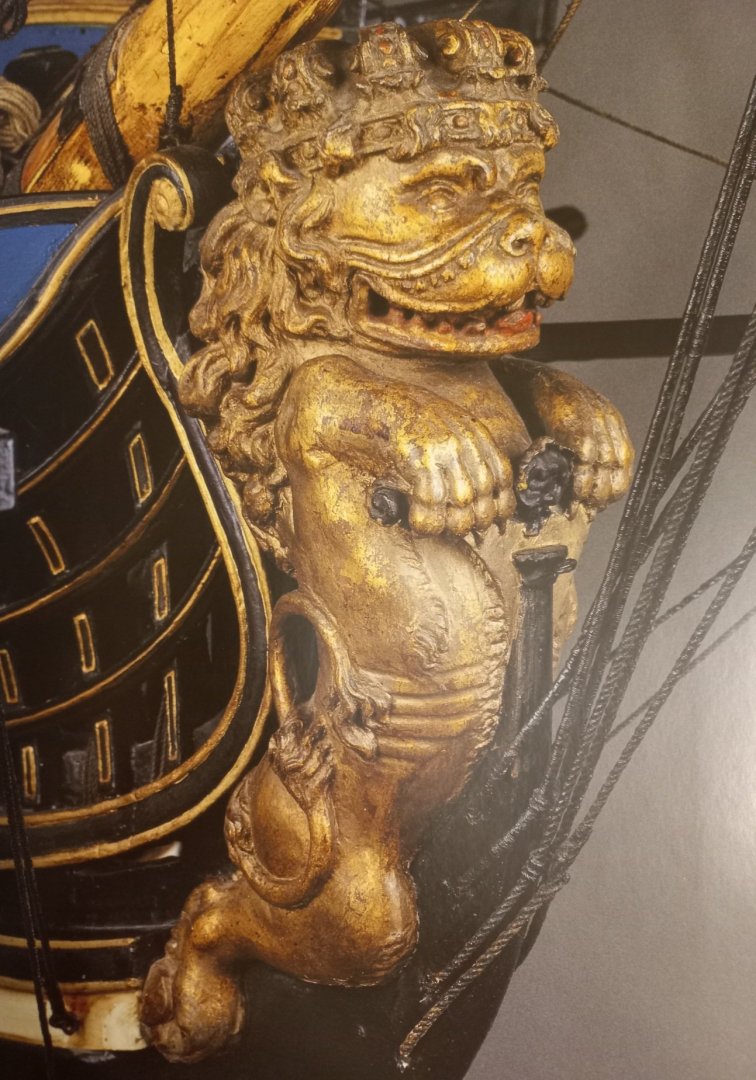
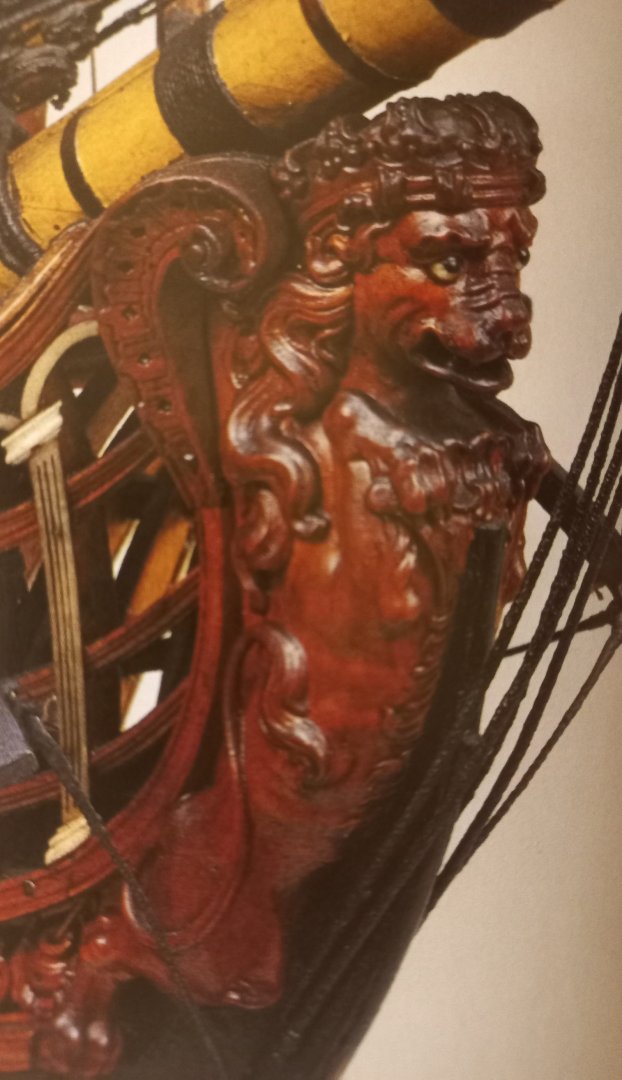
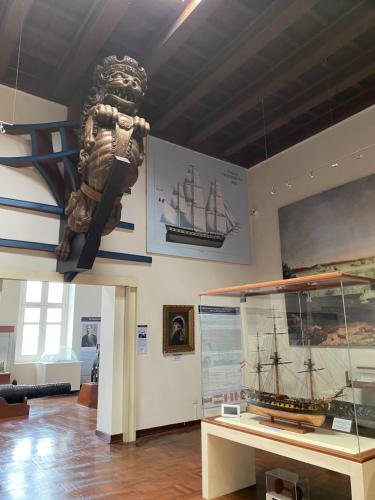
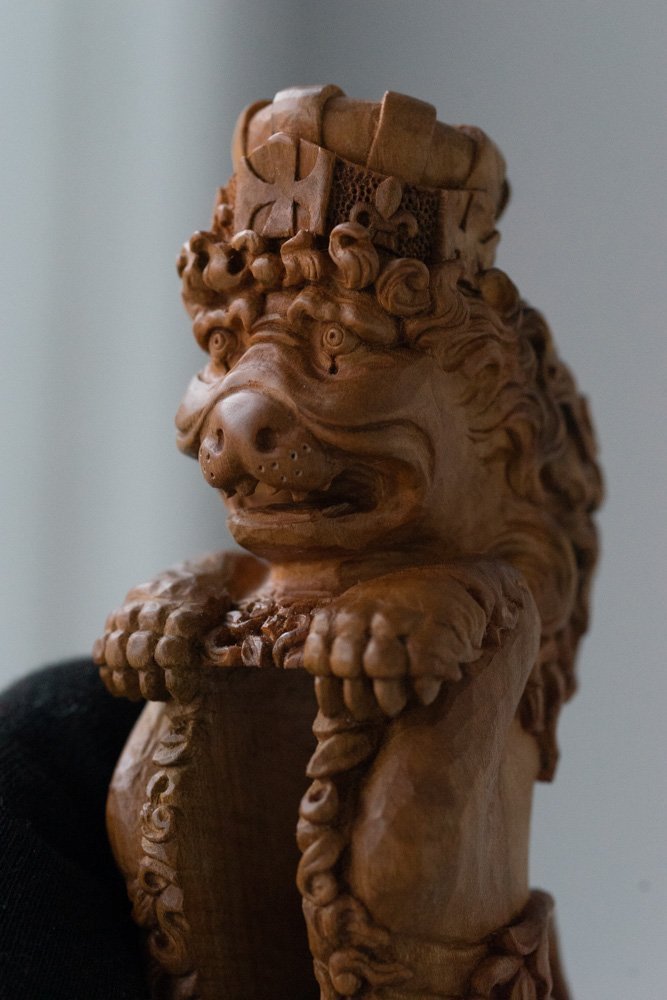
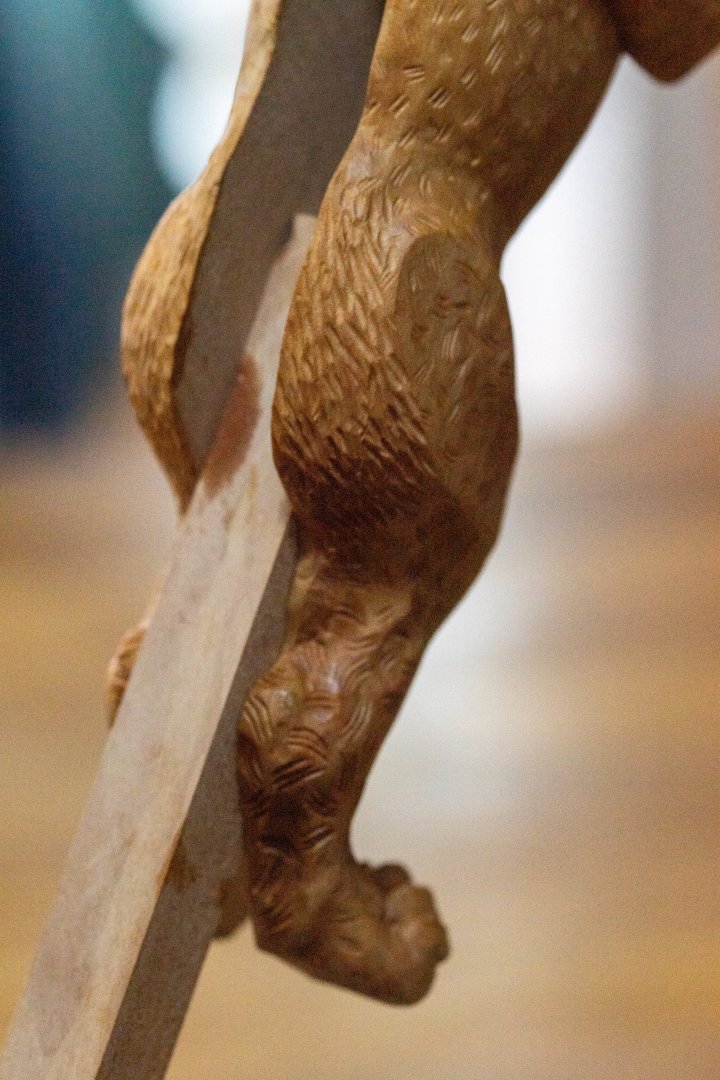
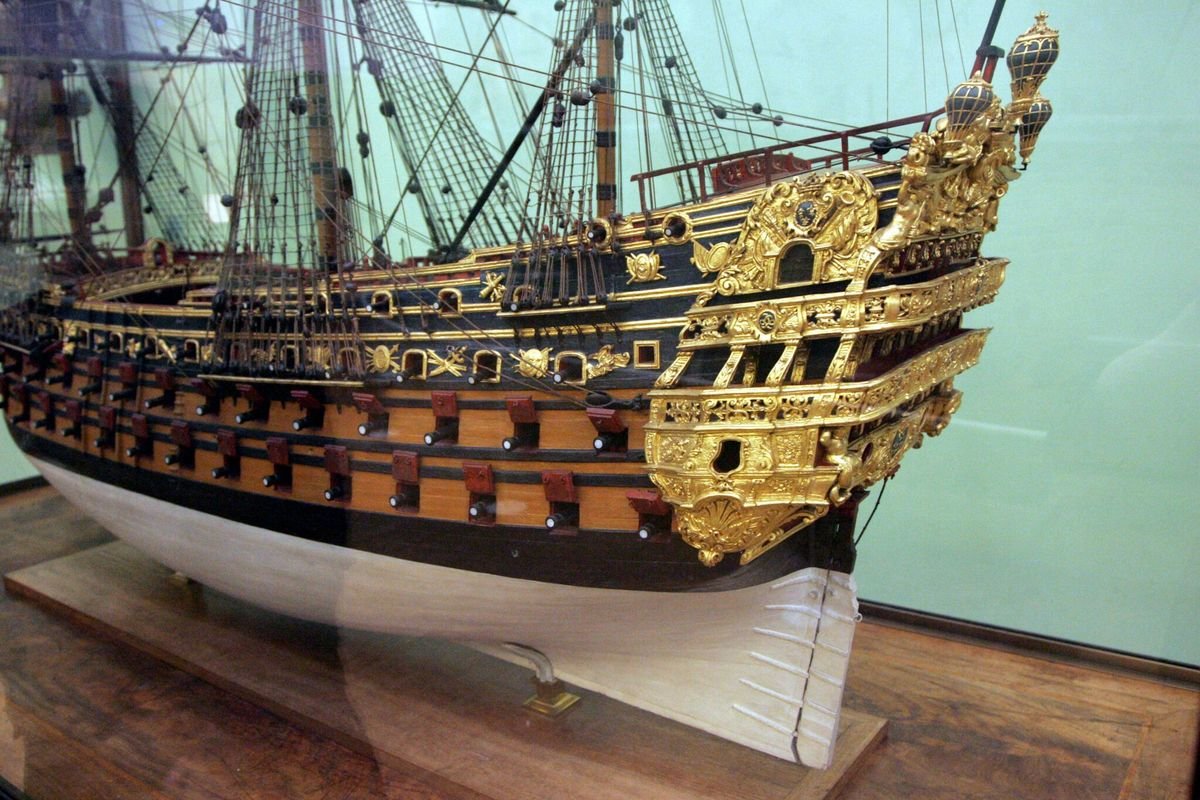
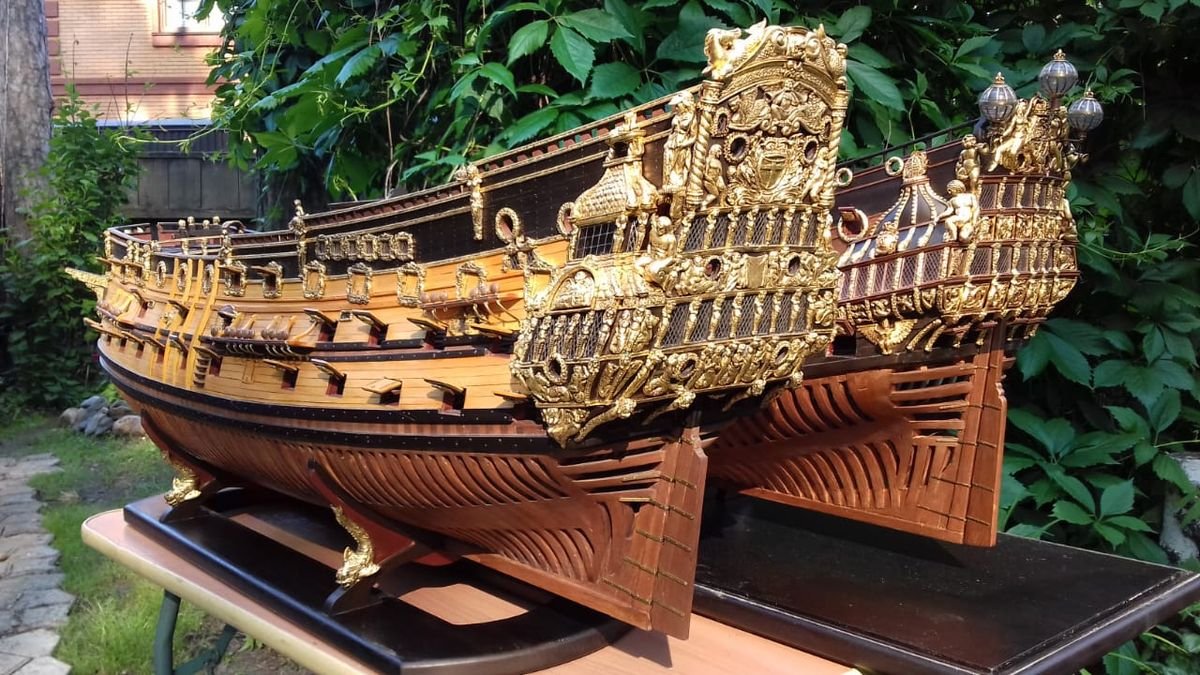
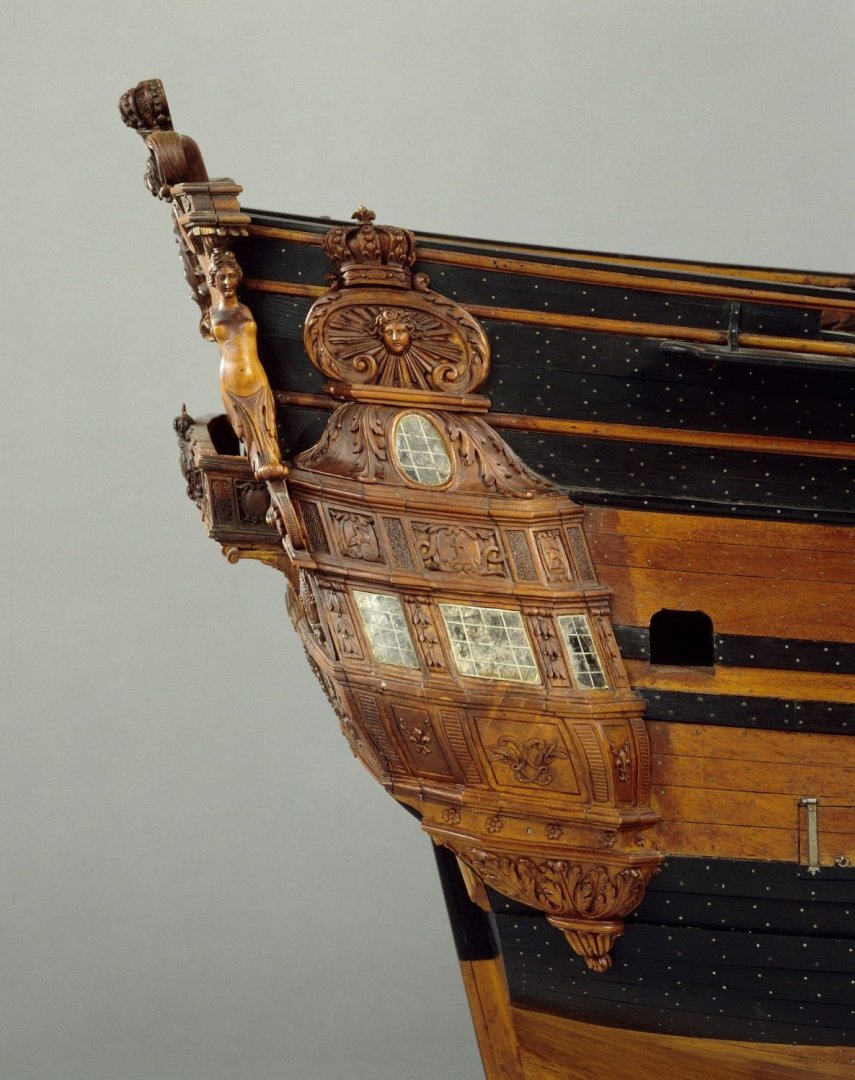
When I look through all my figures, I inevitably stop each time at this one. It differs quite noticeably from the rest. It is white. And today I will take your attention to tell the story of this particular work of mine. This sculpture of Mercury ended up in my collection unintentionally. At one time, it was a commissioned piece. It was a figurehead for the Russian brig Mercury. A little later, I will pay more detailed attention to this ship, as it will be useful for the flow and understanding of the entire story of the current project. For now, I will mention only what relates directly to this figure. Why and how did a commissioned work end up staying with me? In the original drawings that formed the basis of the work, the figure was supposed to be mounted on the beakhead so that its upper edges were roughly at the level of Mercury’s chest. Approximately like this: And I carved the figure exactly according to these plans. But in the end, the deep cutout looked very unattractive. The eye was drawn to it first and foremost. So it was decided to make changes. To do it in such a way that there would be no cutouts visible from the front of the sculpture, and the figure would be mounted using a slot on the back. At first, I tried to make an insert or plug for the sculpture to close the hole in the chest. But this insert was still noticeable. In the end, I began carving a new sculpture. And the original Mercury figure remained with me. When the commission was completed and the second attempt was sent to the client, I began thinking about what to do with the defective sculpture. Its entire defect consisted only of the visible insert. In all other respects, I personally liked it. And I did not throw it away. I decided to try something new for myself. The original sculpture on that brig was certainly not bare wood. That is, it was not left uncoated, like wood. Like all other sculptures, it was painted. So why not paint it as well? The paint would hide the plug. And what more was needed? And that is exactly what I did. However, the result did not satisfy me. The white figure began to resemble a plastic toy soldier. There was a complete feeling that it was not hand carving, but a stamped mass-produced item. So I began experimenting with wear and abrasions, to give it a more weathered appearance, and, most importantly, to allow the wood to show through in the worn areas. I will not go deeper here into descriptions of what was going on in my head, or what ideas I had. I did not bring them to completion. And this topic will also be described separately. But not now. For now, I will simply say that I tried repainting it several times, but I was never satisfied with the result. Finally, I simply set the figure aside, without finishing it. And now, when I started thinking about the display case, I returned to Mercury once again. It needs to be brought to its final state, and only after that will it be clear whether this little sculpture will take its place among the others in the display case or not. And here another turn in my story will take place. But that will be in the next post.

- 546 replies
-
- 10
-

-

-
I decided to publish another story related to carving. I like it when it is not just a description of a process, but a story. That makes it more interesting for me both to read and to write. The longer you work in one particular field, the more standardized it becomes. The first time, there are still searches, mistakes, first impressions. But with each new project, there are fewer and fewer such discoveries. You do what you have already done before, you know in advance what the result will be. And describing something like that is not so interesting. In this sense, a first experience is much more vivid material for publication. And now I have once again gone through this most interesting stage. I am again doing something for the first time. Again the emotions are sharper. And again I want to share something that is, for me personally, a premiere. So what follows will be a long story about another one of my projects. It is hard to pinpoint the beginning of this story. A very long time ago, I decided to take part in the University Cup. This is an exhibition-competition held in Russia, in Saint Petersburg. It is one of the events in the country where modelers gather and display their work. And in 2014, I decided to go to this championship and bring my works there. At that time, I had already been engaged in ship model carving for some time. I carved some pieces for my own pleasure, and made others to order for fellow modelers. At that moment, I did not have many finished sculptures on hand. Each new piece was shipped to its customer immediately after completion. But even the few sculptures that I planned to bring to the competition needed to be displayed somehow. The figures were small and fragile. It was necessary to ensure both good visibility and their safety. So I made a small display case for them. It turned out to be an interesting project. I still remember with pleasure both working on the case, inventing its design, and later seeing it standing on a shelf at home. Using a small handle, which I made in the form of a spire, it was possible to manually rotate the figures inside the display case and examine them from any angle. And then my move to another country happened. A great deal of my belongings remained back home. I was unable to transport my tools, my ship models, or my library to the new place. The only things I took with me were my sculptures and my carving chisels. Naturally, I simply removed the sculptures from the display case and carefully packed them into a small box. By the time of the move, several more figures had been added to those that had participated in the University Cup. The move itself took place in 2017. And then one day—quite recently, I think it was this autumn—some acquaintances came to visit me. The conversation at the table turned to ship models and my carving, and I went into the room, took out that very box, and began showing my figures. I took them out one by one, arranging them on the table. The guests looked at them, picked them up, asked questions, or shared their opinions. And at that moment I suddenly thought about the fact that I have been living in this new place for almost 10 years now. And all this time my works have been lying in the same box in which they traveled here. Nothing has changed during this time. There were many thoughts. That I myself would like to periodically see my works just by walking through the room, rather than only taking them out of their packaging on some special occasions. I thought about how I worry every time I hold small details in my hands, or when someone else turns them over while examining them. I am afraid that a figure might fall and be damaged. And there are already places that have suffered during the time spent in the box. There are already broken fragments. Yes! I urgently need to think about a new display case. And finally place my figures where I would like to see them. In a place of honor, in a new display case. But this thought immediately led to another. Today, a different display case is needed. There is no point in repeating the old one. Now I need to accommodate more sculptures. And I want to come up with something new, rather than simply repeating what I have already done. This is how the ideas began to transform. But what does the topic of a display case have to do with a story about carving? After all, these are different subjects. Yes, that is correct. All of this is merely a long preface. The real beginning is still ahead.

- 546 replies
-
- 10
-
-
-
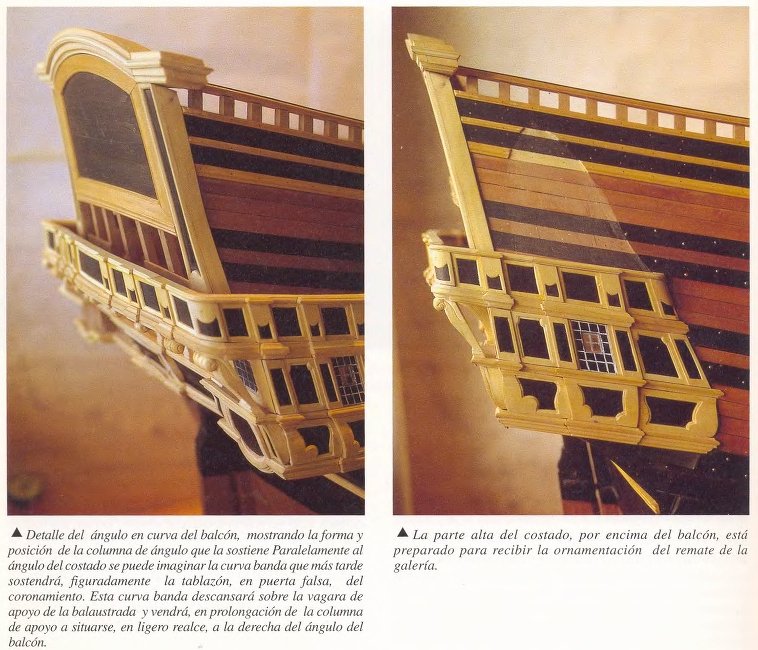
P.S. Allow me to offer a little advice. You wrote that you are upset by the mismatch of angles and slopes. This results in parts that do not fit together properly during assembly. At the same time, you are making each screen separately from the others. It will be easier for you if you make a template with the general shape of the balustrade. And if you make the screens with a margin at the top and bottom, you will be able to assemble all the screens on the template. Only then should you cut or sand the top and bottom of the entire set. Then all the angles and slopes should match perfectly.
- 2,699 replies
-
- 4
-
-

-
- heller
- soleil royal
- (and 9 more)
-
Mark, hello. You are not alone in thinking this way. It is very familiar to many of us. When I do my job, I also worry that I am not able to do it perfectly. And sometimes, I do it and I like what I see as a result. But as soon as I take a photo of the product, my hair stands on end with horror. Everything is crooked. There are some rough, broken edges, joints, and debris. Just a moment ago, none of this was there, and my eyes didn't see any flaws. But micro photography changes everything. And it ruins my mood. In reality, it's not so bad. We live in a world of machines and computers. We are used to machines making perfectly accurate parts and printers making copies. That is why we demand the same from ourselves. However, this is not always possible. Yes, there are people who have a steady hand and a keen eye, who are capable of doing things so precisely that even under a microscope it is impossible to find fault with their accuracy. But that does not mean that other people should not engage in creativity until they achieve the same level of skill. First and foremost, we create things that should evoke emotions. If this happens, then the task has been successfully accomplished. When I looked at the museum models, I couldn't help but notice that there were quite a few “crooked” details. But that doesn't prevent me from admiring the model. When I was reproducing the carvings from the Vasa ship, I saw that there were also many asymmetrical and crooked elements there. What's so difficult about that? Well, no, one eye is higher, the other is lower. The head of the sculpture looks as if it was made by different people from different sides, who didn't pay any attention to what their neighbors were doing. But we still admire it and enjoy looking at it. I hope this will reassure you at least a little. You are following in the footsteps of the builders who once built the ships we admire today.
- 2,699 replies
-
- 4
-
-
-
- heller
- soleil royal
- (and 9 more)
-
Hello, David. You're right, we are indeed the first in line to criticize our own work. And that's normal, as long as it doesn't turn into complexes. The truth is, we also have an enthusiastic fan of our own creations inside us, who craves recognition from others. So there's almost always a battle going on inside between the critic and the fan. Sometimes their arguments even keep us awake at night.
-
I hadn't thought about it. But now I can't look at him without that image in my mind. He really is riding somewhere on an electric scooter. Or roller skates. 😄

-
Thank you for your assessment of my work.
-
Now it's time to show the photos. I didn't take any photos along the way. Only the final ones. This story turned out to be emotional. Even tearful. Was there any point in writing about it? Maybe I should have just shown the photos and left it at that. But there are practical lessons to be learned from this story. I heard this phrase: Sometimes you need to stop and think, am I doing something stupid? I don't remember where I heard it. It sounds like something psychological. It could have been said somewhere in a movie or a motivational speech. This saying also applies to this case. Maybe it's worth stopping and starting all over again. That's what I should have done. -------- I was already thinking of stopping there. But just before publishing the article, I decided to add a few more words. There have been many moments in my life when I failed at something. And then my mood would also be ruined. For example, I'm terrible at ironing clothes. I hate doing it, no matter how hard I try, after I iron them, they look even worse. I am completely unable to plaster walls. When I was building my house, this stage drove me crazy. What could be so difficult about it? Just take the plaster and smear it on the walls. But no matter how hard I tried, I couldn't get the walls to be nice and smooth. There are many other similar examples. And many times I abandoned other “chewed-up moles.” I put them aside and thought that later I would return to this task and do everything right. But that was the end of it. I didn't start over. I didn't redo it. There are many such abandoned, unfinished projects. From this point of view, the Spanish lion can be seen as a victory. One way or another, this project has been brought to completion. And that's what matters! There are moments in life when a problematic story no longer seems tragic after some time has passed. And you can tell jokes about how you crashed your car, lost your wallet, or fell into a puddle. So be it. And then I will point to my lions and say: I called this one Gustav, and that one Peter. And this one, with a sly smile, is Chewed Mole. And then they will surely ask me why a mole, and a chewed one at that? And then I will say: It's too long to explain. Believe me, he is the real Chewed Mole. No other nickname would suit him...


- 546 replies
-
- 18
-
-
-
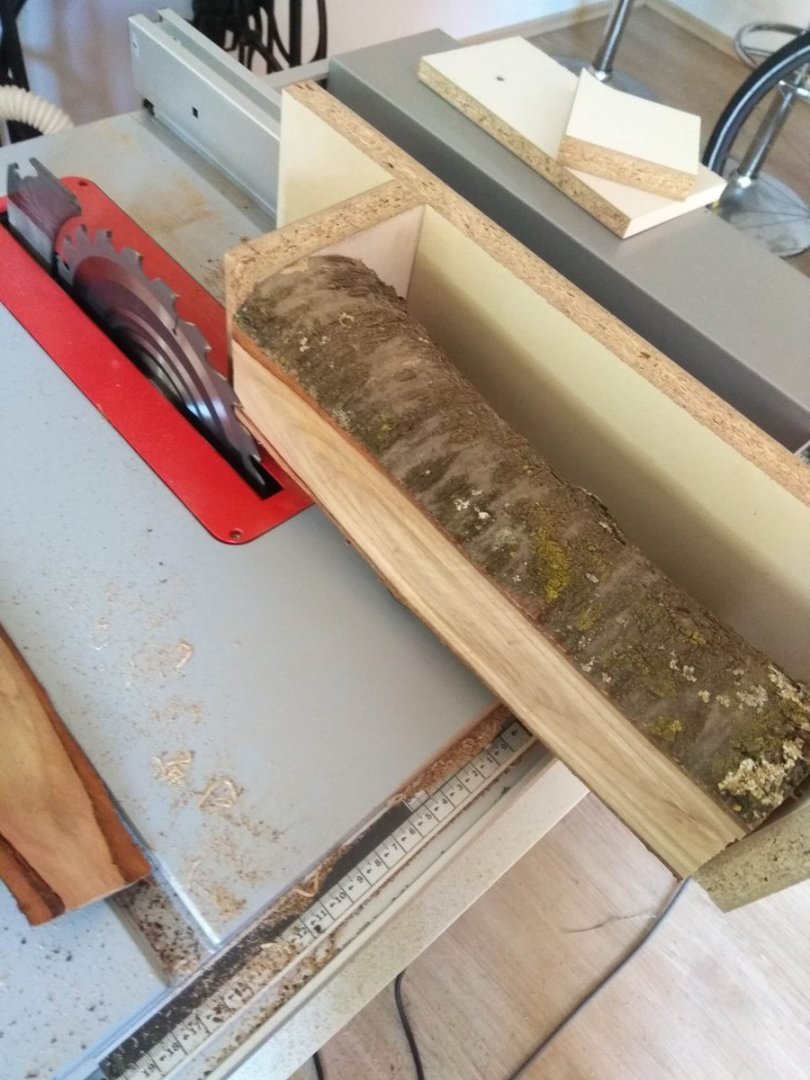
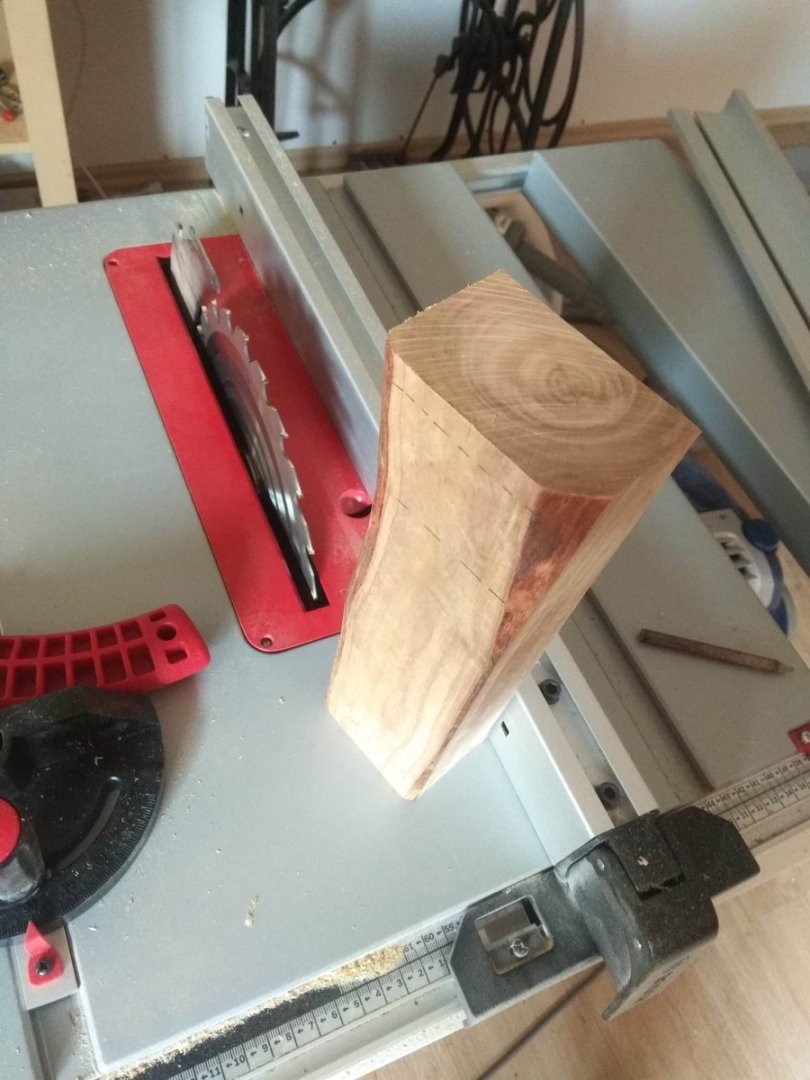
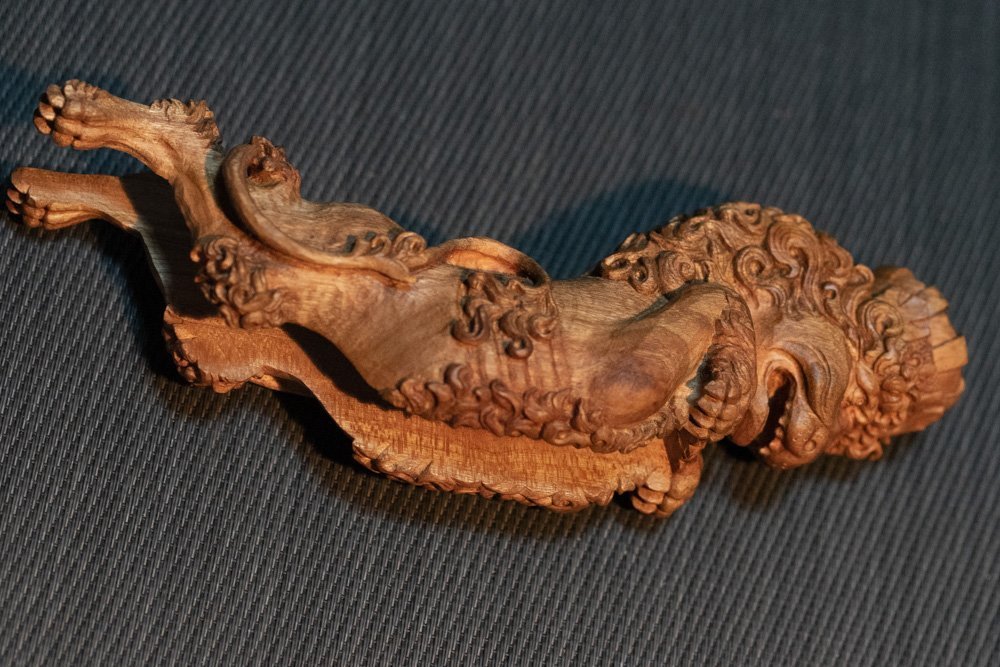
Chewed mole. There is such an expression in Russian. I don't know where it came from, and I don't know its true meaning 100 percent. I've never thought about it, and I can't say that I use it often in my speech. I just know it from somewhere, that's all. Most likely, this strange combination of words appeared as a substitute. There is a swear word that sounds like this very mole that someone chewed. That is, in order not to say the swear word, for example, if there are ladies or children nearby, someone came up with a strange but legal phrase. Those who are familiar with the swear word will understand what is actually being said here. But innocent children will only hear a funny combination of words. But this is just my guess, I don't know the exact explanation. This phrase is usually uttered when something breaks, gets damaged, or doesn't work out. It's an outburst of pent-up emotions. I'm sure there's something similar in every language. People are the same, and when something doesn't go as planned, they just want to swear. But why did I start this story with a mole? It's simple: I often remembered this phrase while working on my next lion. But first things first. This story is about a Spanish lion. As usual, I first had to find a suitable reference. That wasn't a problem. There are plenty of lions from Spain. I spent more time thinking about which one to choose. And just before I started working, I suddenly saw this photo by chance. It immediately caught my attention. I started looking for information about where this photo was taken. In which museum? Soon I had other photos with this lion. I realized that I wanted to make this one. And so the work began. And then that same chewed-up mole started to appear somewhere nearby. I decided to make this lion from a small apple tree log. I had worked with this log before. I used part of it to make the “Brit.” And then everything was fine. But now the wood was tormenting me. It was very difficult to cut and process. In some places, the material was loose, and in others, the cut turned out as if I were not working with a sharp knife, but tearing with my teeth. While I was doing the rough work, I didn't pay attention to it. Movements during this stage of work do not have to be very precise. You just need to cut away a lot of excess material. Untidy marks are quite normal here. But when it came to more precise movements, the wood began to surprise me. I can cut the wood and everything cuts perfectly, but after a couple of centimeters, everything starts to change dramatically. Then you can only cut in one direction, then in the opposite direction. The material crumples, then tears. And then everything becomes quite acceptable again and cuts perfectly. And every time I huffed and puffed, called the lion a mole, and wondered whether I should continue carving. Maybe I should throw away this damn piece of wood, take another blank, and start all over again. And every time I came to the same decision. No, I'll give this blank another chance. I've already wasted a lot of nerves and time on it. But now I've managed to make the difficult part look less like someone actually chewed on it and spit it out. I've achieved a result that doesn't look too awful anymore. After all, I've already carved another lion from this piece of wood. And everything was fine. I hope my torment will end here and everything will be easier from now on. And guess what happened next? Next, I remembered the mole again, got angry and tormented myself. And again I thought that maybe it wasn't too late to start all over again. And every time I thought about it, I found more and more reasons to convince myself to continue tormenting myself. Look, you've already done the head, it was difficult, but now you like it... Come on, you've already done the head and the mane. Don't you feel sorry for the time you've spent? Look, you've already done more than half the work, you didn't just suffer, you also showed tremendous patience. Come on, gather your strength, this nasty piece of wood must not win, it must not break you. So I kept working. In the end, the Spanish lion wasn't abandoned. I showed patience. Or maybe stubbornness. Or maybe it wasn't patience at all, but laziness. Laziness to start all the work over again. All of this is equally true. In the end, I would describe the path I decided to follow as negative rather than positive. Yes, I can call myself persistent. I can think about the fact that I was able to complete the work with capricious material. Can this be called a victory? Yes, it can. But in reality, no. Because of my attitude, I spent a lot of time on this sculpture. The work progressed slowly. I often put everything aside. Perhaps if I had taken a higher quality blank, I could have made not one figure, but two or three in the same amount of time. Every time I returned to work, I was not driven by a sense of pleasure. Not by sweet thoughts that I would be doing what I love. But by the fact that it would spoil my mood again. And I would do it only to get it over with as soon as possible. Yes, I was able to smooth out the difficult spots, and if I hadn't talked about my adventures, no one would have known about it. And no one would have found those spots. But still, I only did it so that the rough and poor-quality areas wouldn't be noticeable. I couldn't do everything the way I wanted to. I wanted to get a different mane. On my lion, it's not the same as on the original. And that's the downside of my decision, my laziness. Most likely, I will continue to tremble with excitement for a long time when I look at this sculpture. For me, it will remain Zhevanny Krot. I remember other sculptures. What I achieved with them. And now there will be an outcast.

-
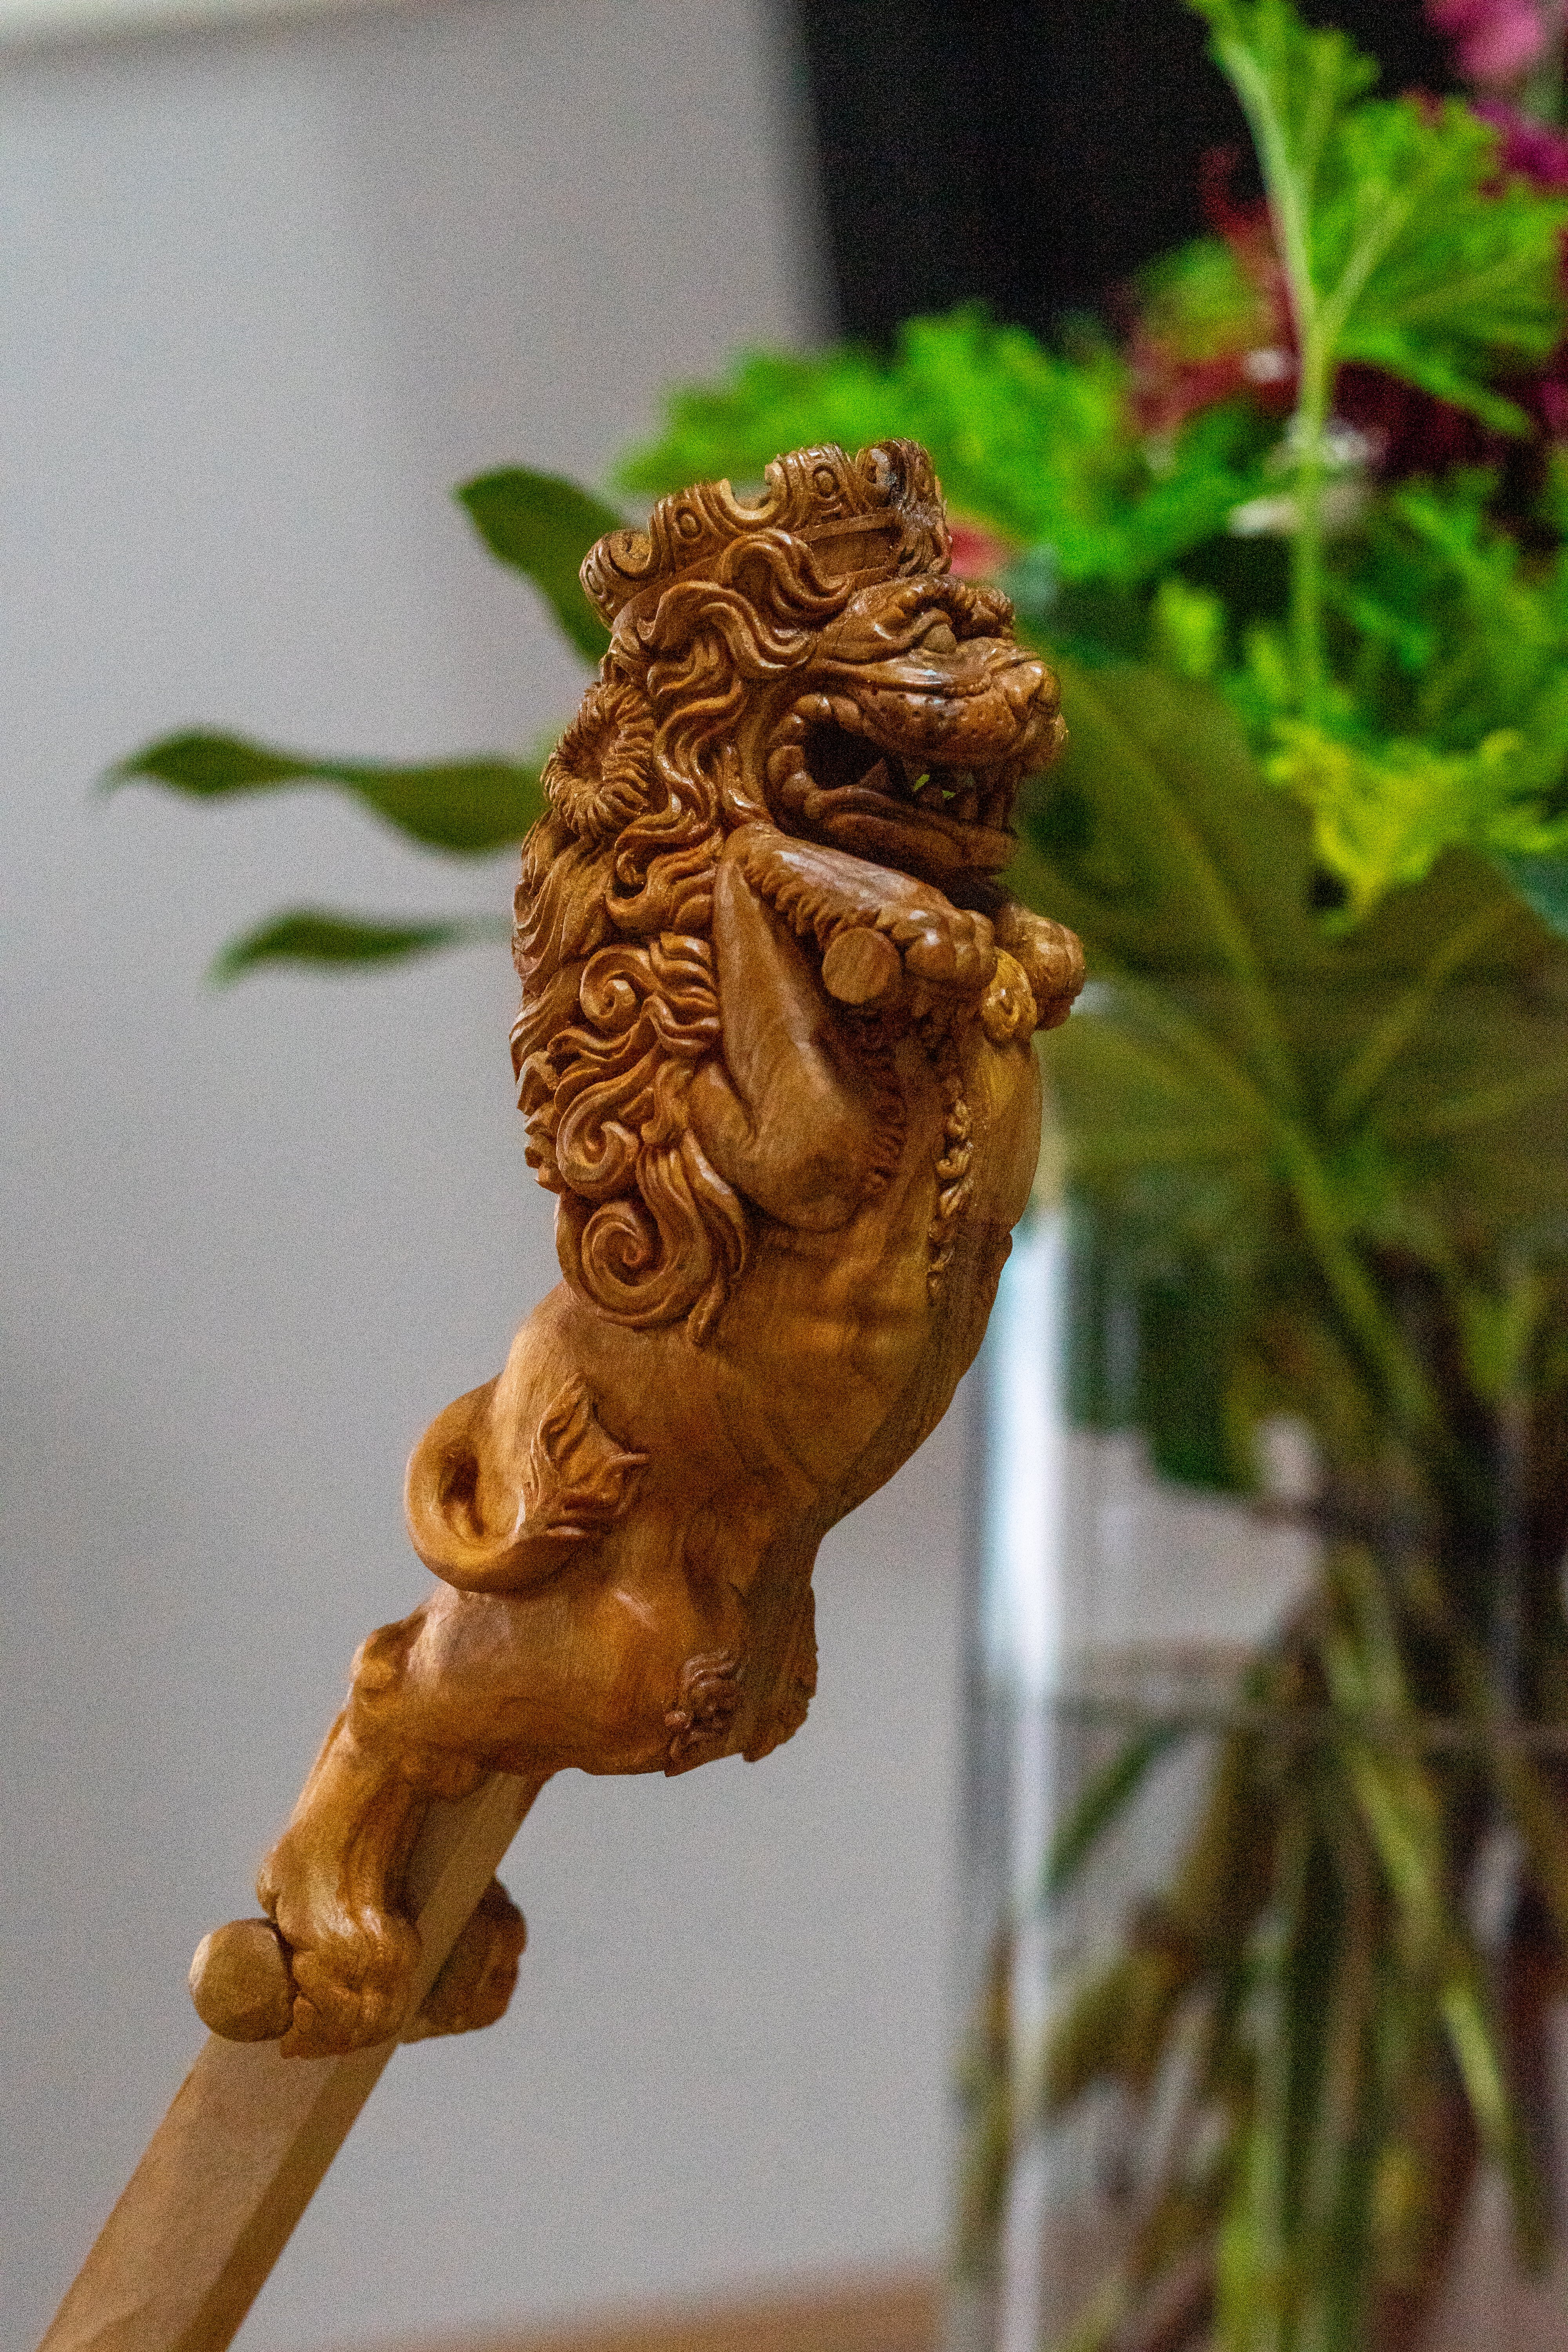
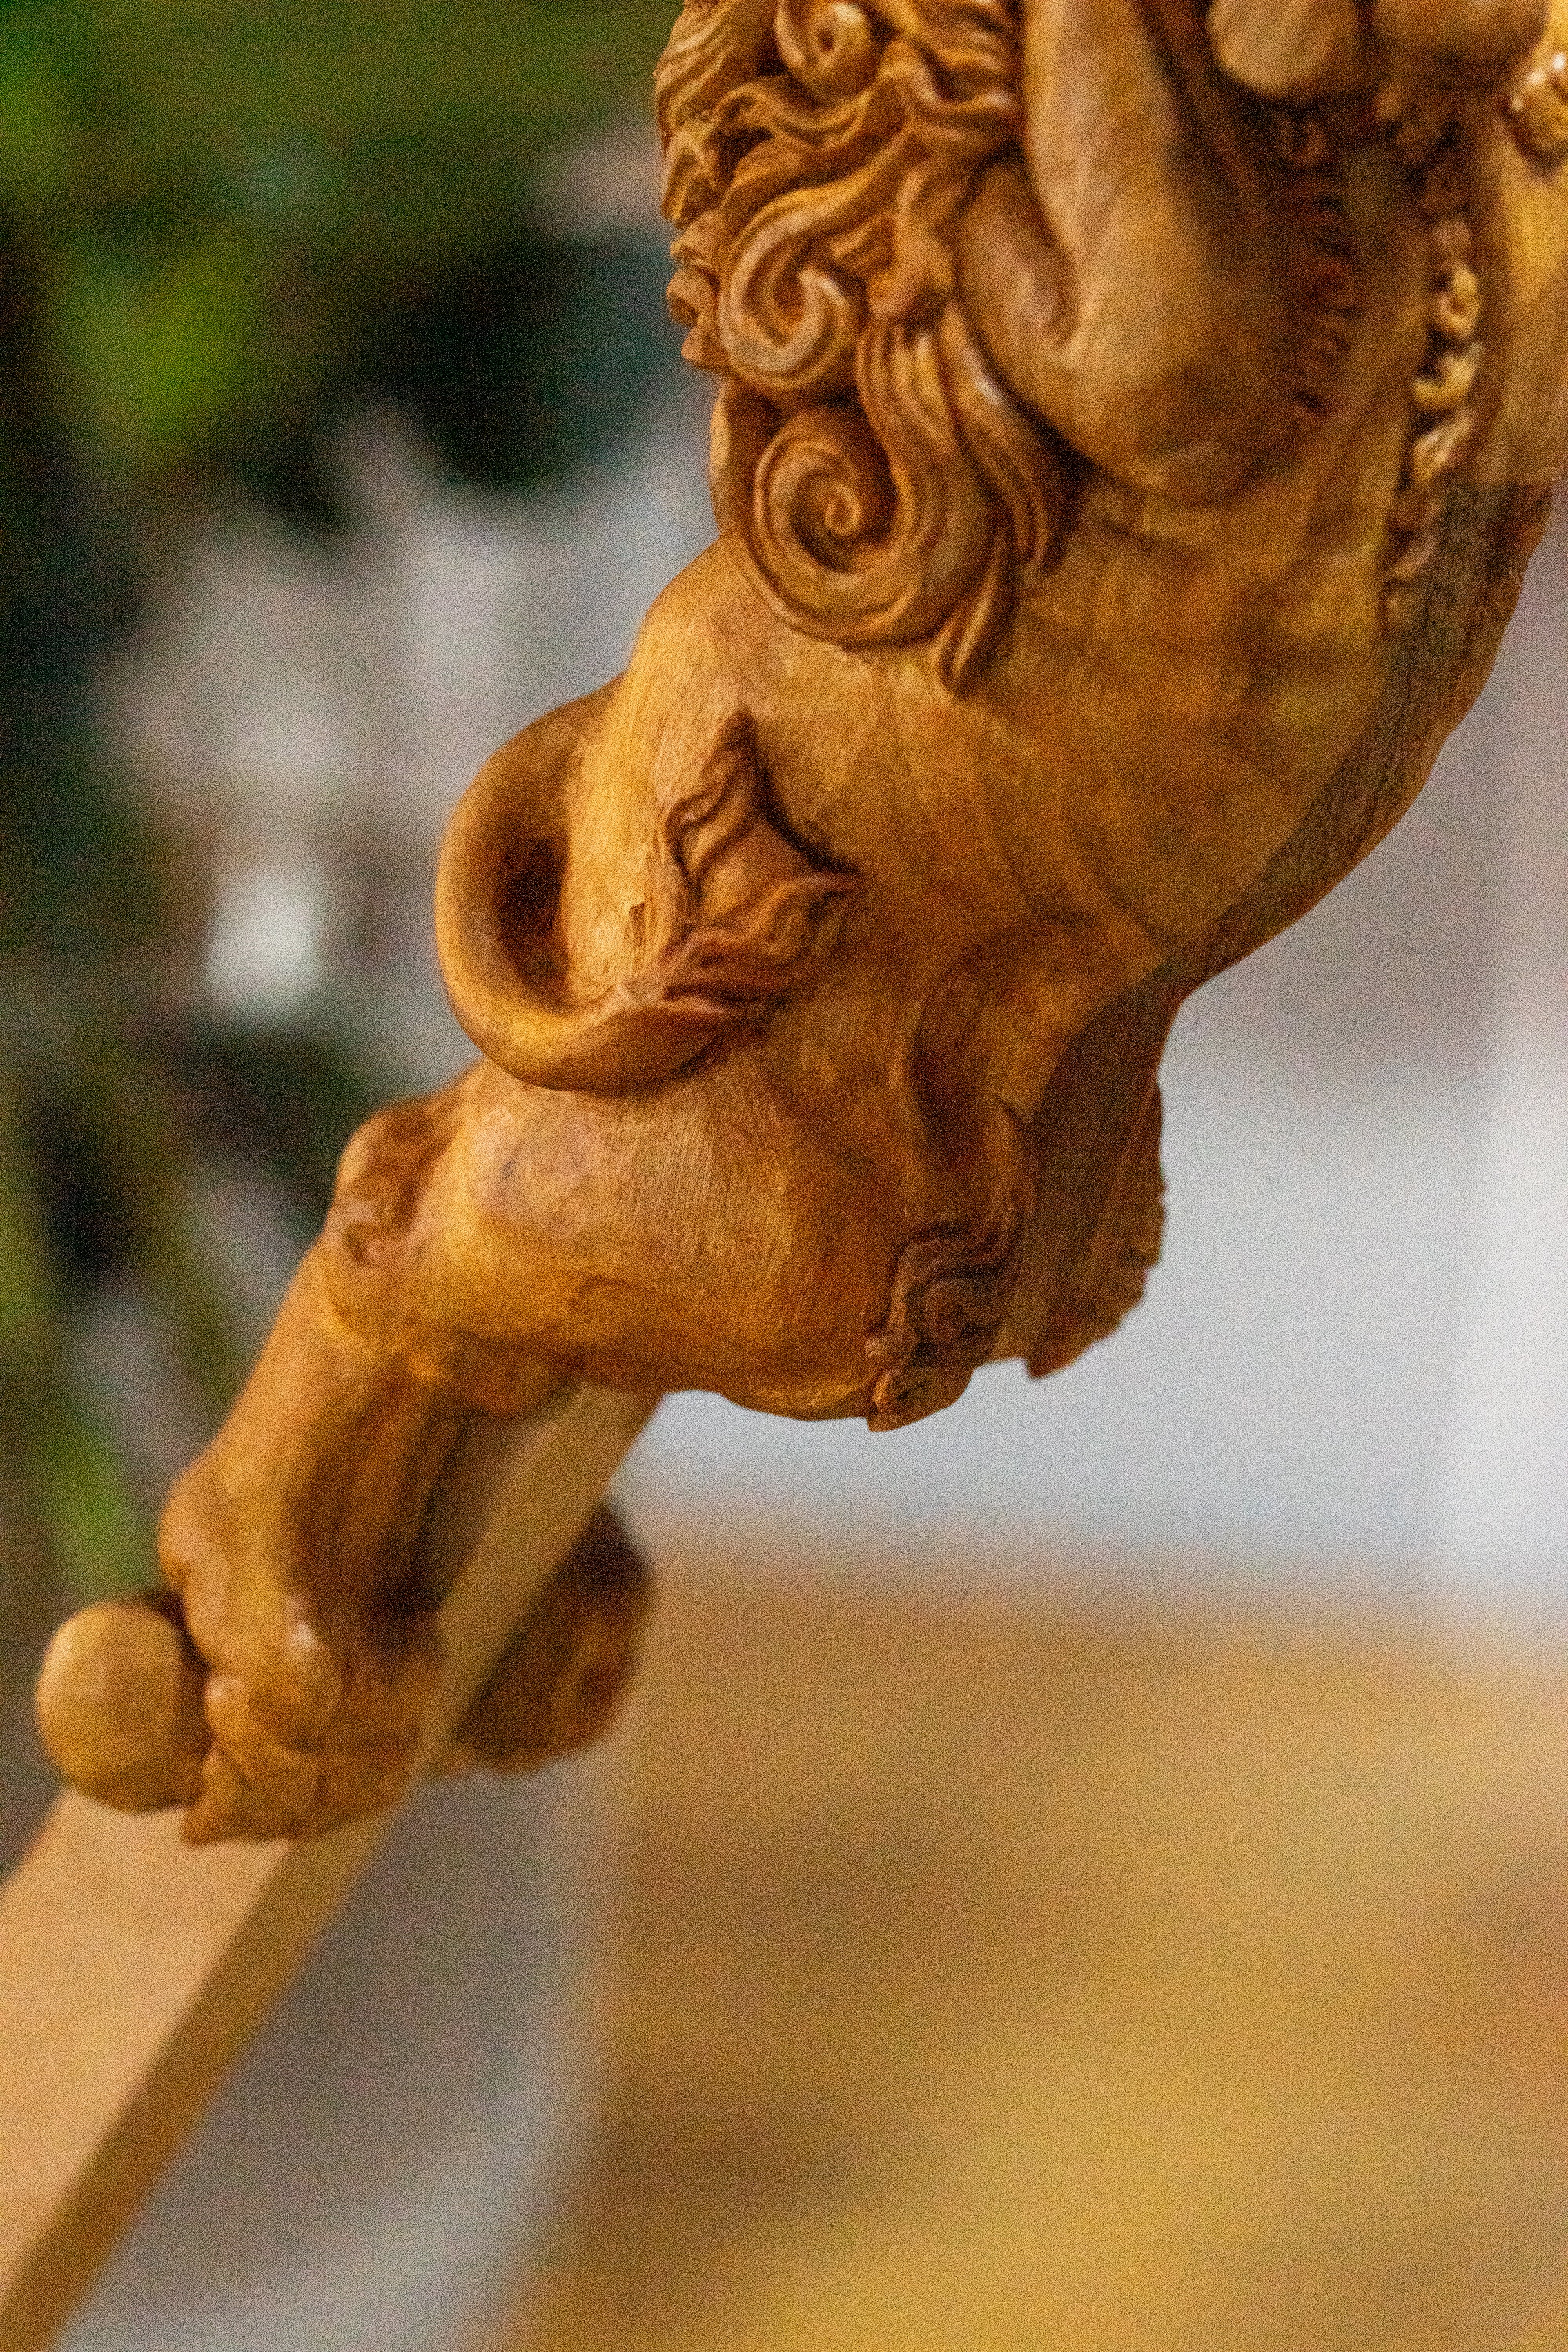
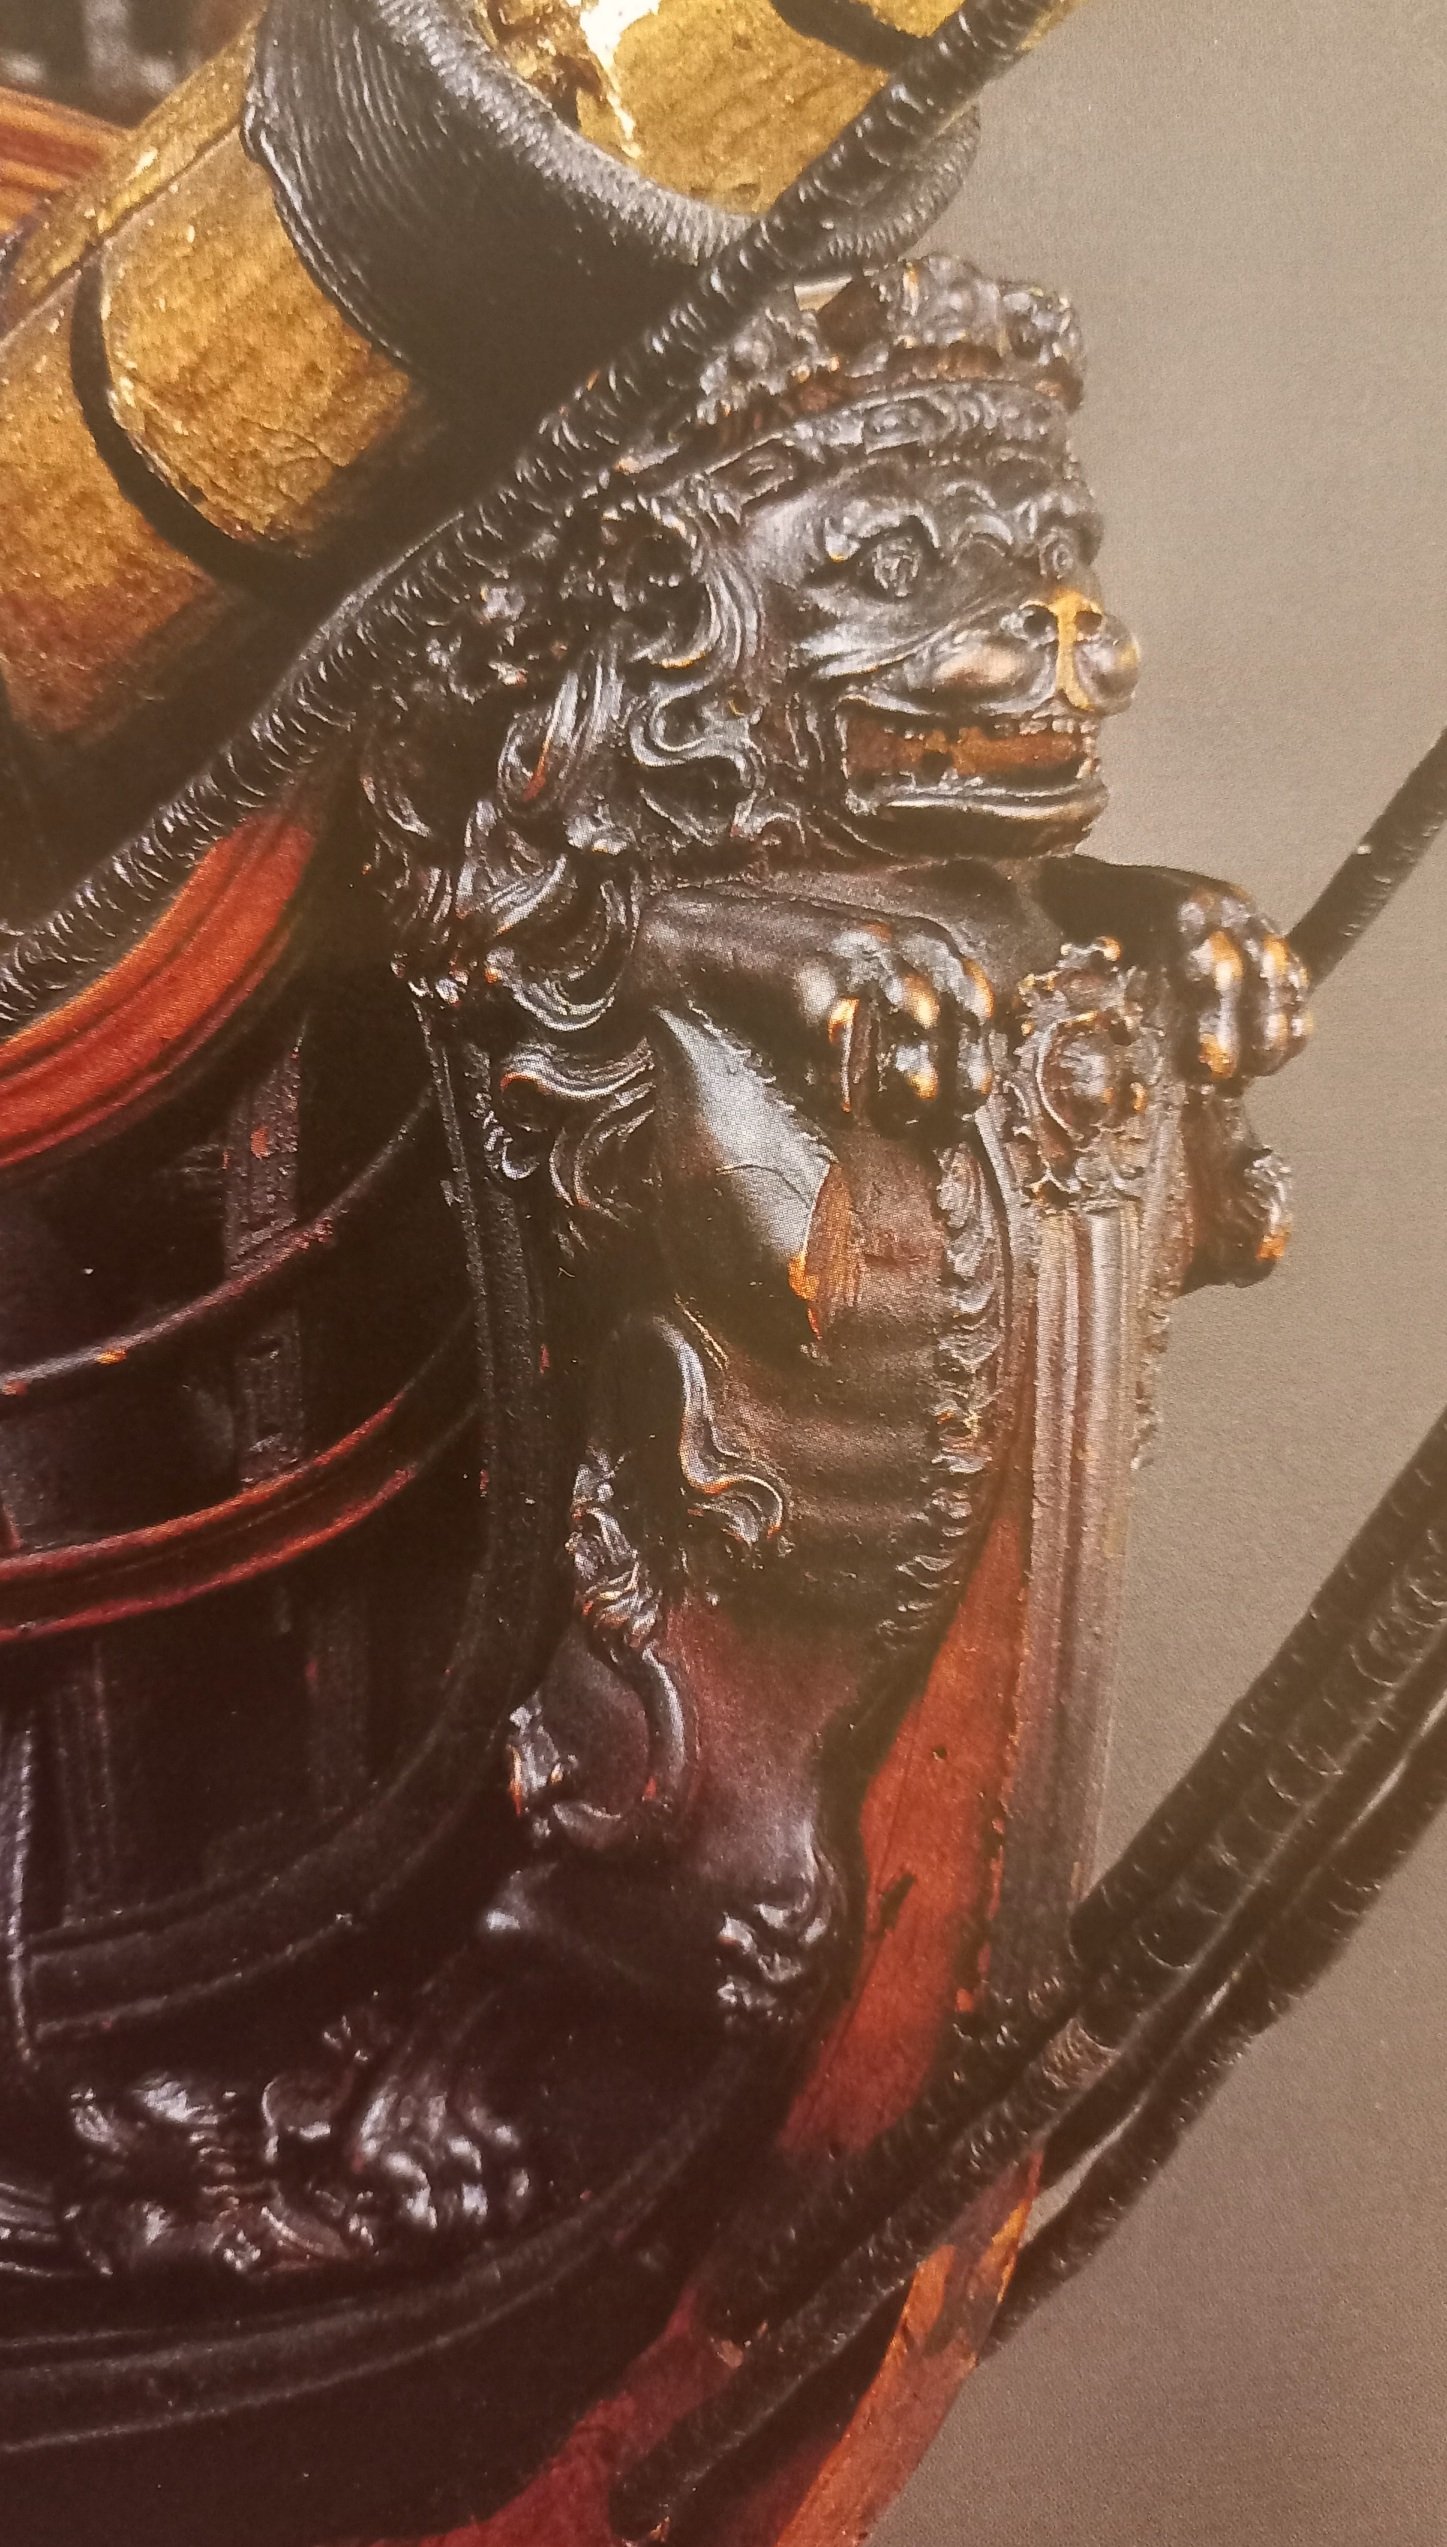
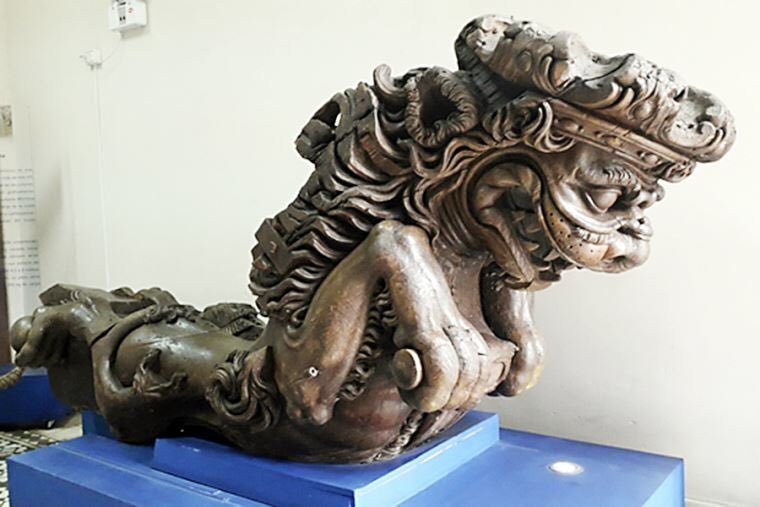
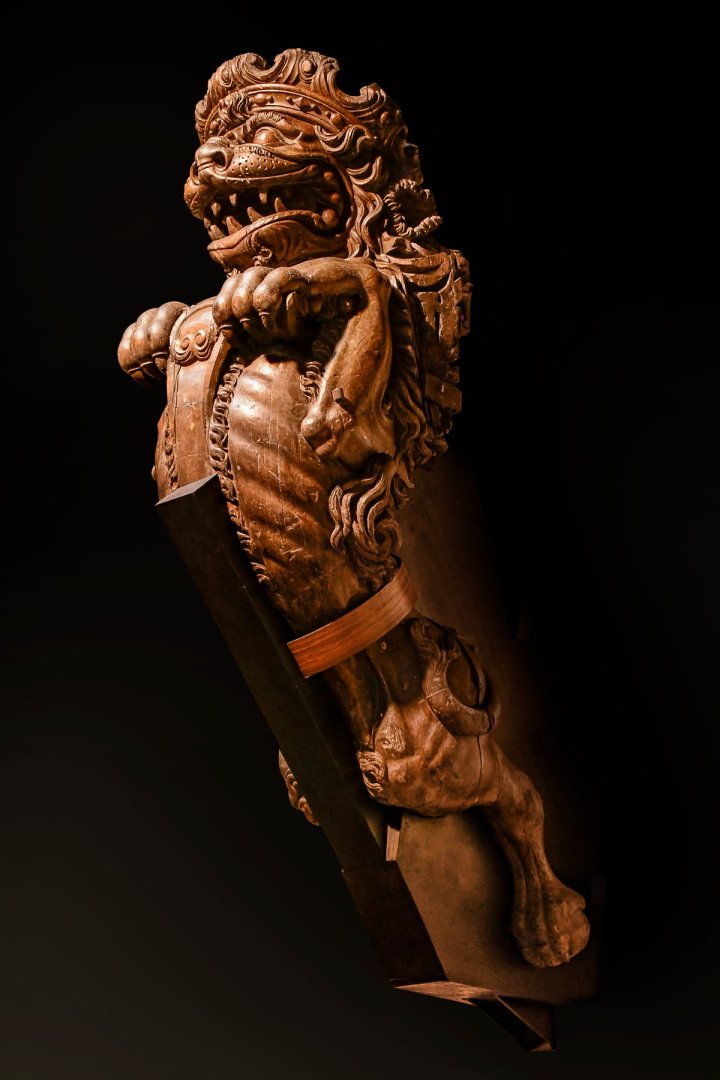
Well, now I can show you what I've come up with. This is what my Turkish lion figure looks like. I haven't yet decided whether this will be the final look or if I will work on it some more. You can see that the museum reference has gilding. Maybe I will do the same with my sculpture. But I'm not sure. I don't know if it's worth doing. I will come back to this question later, when the whole company is assembled. I will lay out all the lions and think about how they will stand on their exhibition pedestals. Should I leave them all wooden, or should I add paint, gilding, or something else to some of them? For now, at this stage, I consider the work on the Turkish lion to be complete.


- 546 replies
-
- 10
-
-
-
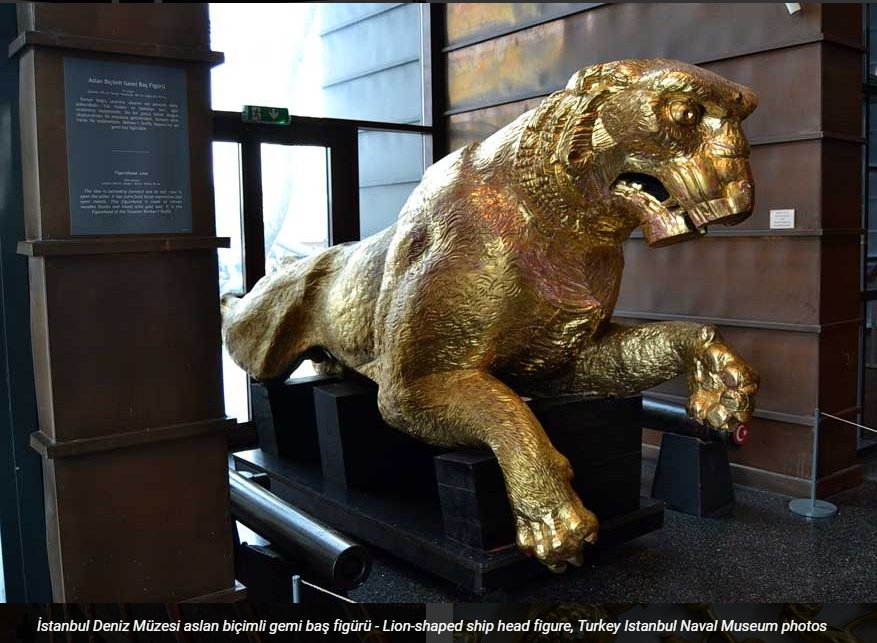
After work on Fulminant was discontinued, I had more time. And I returned to my lion project. During this time, I managed to finish two lion figures. And first, I will show you the Turkish lion. In fact, it took a very long time to complete. I started it more than two years ago. And work on it was put on hold. Only now has it been completed. I finished everything I wanted to do. Well, not everything; there are still some issues left. But more on that later. I didn't take any photos while I was working on it. There's nothing new here, and I don't see the point in photographing something I've already shown many times. So, there will only be photos of the finished sculpture. I am very happy that I was able to make a Turkish lion for the lion collection. Very often you can see different styles. The vast majority are either European or American ships. But I don't know any Asian ones at all. Although Turkey is a country with a long maritime tradition. But I don't know much about it. The only memories I have are childhood impressions from Sabatini's books. In one of them, the main character was enslaved on a Turkish galley. But, of course, as befits the main character, he managed to escape and embark on adventures. I also remember descriptions of some battles from the Russo-Turkish wars. But that's all about events. I had no idea what Turkish ships actually looked like. That means I had never encountered Turkish decor. I know that religious laws prohibit painting or sculpting people, and the main method of decoration is patterns, intertwining geometric or plant elements. So, getting to know the ships of this country was a revelation for me. As it turned out, the maritime museum in Istanbul is very diverse and rich. There was a lion figure there that I couldn't pass by. What was especially valuable was that it wasn't just a small figure on a model ship or a drawing, it was a life-size sculpture. So there was a lot for me to look at there. The plasticity of the body, the style. How exactly the carver depicted the mane and fur. You can see for yourself how different this lion is from the other European lions in my collection. Compared to Swedish, British, or Russian lions, the Turkish lion is closer to a real predator. In other countries, lions were depicted as strange monsters. Here, with the exception of a few minor details, the body structure is very accurate. The explanation for this is quite simple. Most likely, lions were not exotic animals in Turkey. They were probably brought from Africa and kept in private menageries by local rulers or wealthy nobles. In Europe, it was much more complicated. People there simply did not know what a real Simba looked like. Keeping one was not easy. More often than not, lions could be seen as skins on the wall or stuffed animals. That is why there is such a big difference in how artists imagined the king of beasts. Well, the second reason why the Turkish lion looks more like a real one than the others is that the Turkish lion represents a different era. It was created much later than its northern counterparts in the collection. That's the whole reason. Ideally, I would have liked to find a more ancient reference for the Turkish lion. But I simply couldn't find one.


-
Now about what you said about the working space between the guns. You are right, it is extremely important that they are mounted at a sufficient distance from each other. I absolutely agree with you. And that's why there was a discussion on these same pages a few months ago about where exactly to put an additional cannon. Putting the cannon in the outermost segment is the most convenient option and in terms of the issue you have raised. A cannon placed in the outermost section of the Bottle will not interfere with the “neighbors” in any way. However, I cannot agree with you on the most important point. There is a very big difference in exactly where you can put a cannon in a side gallery, and where you can't. And if the outermost segment is too close to the outermost cannon on the deck, I would never put a cannon in the middle of the side gallery. I've written quite a bit on this topic before. And believe there is no point in repeating myself. About the fact that there are mentions with cannons, I tried to be objective and point out that side too. But I can't call these examples worthy of serious attention. All images can be divided into two groups. These are drawings. Simple pencil drawings. Let's be frank - these are in no way suitable for a serious document. I just imagine that a few centuries later someone will find my childhood sketchbooks where I drew cars, airplanes or ships and will claim that this is exactly how it looked in the distant 21st century. Here's the proof. We will repeat exactly. Parsing what in the old drawings was actually correctly depicted, and where the artist's imagination or lack of knowledge is a separate topic altogether. I think you'll agree with that. We often argue about nuances not only when looking at fuzzy handwriting, but also drawings made as an exhibition project for a king. And even here we can debate what Beren meant by making the floor lines not parallel to each other? And here it should be a volumetric construction or a flat bas-relief? And we end up with models where there's no exact replication. Created after personal research work, private representations of a particular author. And you can either agree with it or not. Please, make your own version. The modeling world will only get better. And let our descendants go crazy, compare different variants and think why they are different? Which one is right and which one is wrong? The second group is models in museums. And this is a much more serious argument. But what do we actually see on these models? I have already mentioned that some of these models are ships that were not built and do not reflect accurate data. But now let's put that argument aside. --- Let's take another close look. You can see the standard cannon positions right next to it. And that's where the cannon barrels are. If the windows in the side locks are also cannon windows, then why did not they put cannons here? What prevented it? Or maybe it's just a window? And there shouldn't be a cannon in it? I willingly agree that from these windows it is possible to fire muskets, arquebuses or other kinds of hand-held light weapons. But not a cannon. And this is an example that I myself was interested in, and am now already using strictly in counter-evidence. The small size of the porthole already speaks volumes. Now look at this porthole. You can see perfectly well that it is much higher than the cannon windows next to it. There's no way this porthole could have been a gun emplacement. It's just an open little window for ventilation, that's all. The only thing that could have been fired from here was something portable. I tried to find some documentary information and couldn't find any evidence to support the theory that a cannon could have been placed here. I looked at every book I could find. Spent a lot of time searching the internet. I couldn't find anything. I also managed to get in touch with Michael Bezverkhny. He's one of the masters who built Ambitionary. And his opinion deserves attention. Especially since he is also a man who is well acquainted with ship history and engineering. I asked him questions about Ambitious and about the possibility of placing artillery in side locks in general. And he too confirmed that it was technically impossible. By the way, if you can find such information, I'd love to continue the discussion. I've become so interested in this that I'd even like to see some actual Legend Breakers style experiments. So that replicas of ship rooms could be built, in which cannons would be set up and demonstration shots would be fired. How can I finish what I'm saying? This model can accommodate an additional pair of cannons on its side (one on each side) so that these cannons are positioned in the side castle area. But ONLY in one place! In the outermost section. In this case, there will be no conflicts with the standard distance to neighboring cannons, nor with the impossibility of anchoring and firing. And this is the ONLY possible option on this ship.


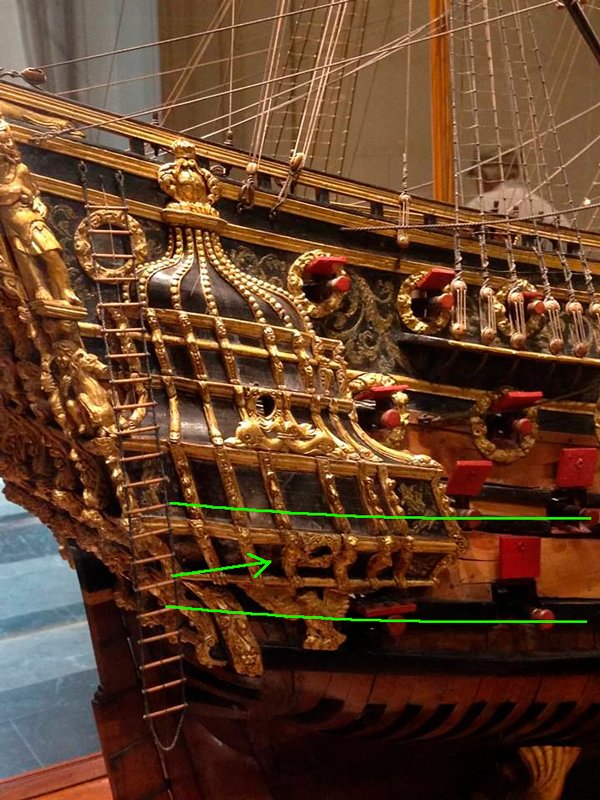
-
Hello, Empathy. Your questions are interesting. However, I will try to answer them. I cannot answer for Mr. Frohlich and comment on what and why he did in his model. I think he was merely sticking to the blueprints he had. I'm talking about the Budrio monograph. And it's worth redirecting questions to the book here. In part, Budrio himself, in the pages of his work, has answered that question. His version of the Ambitious is a certain collective image, not a strict recreation of a particular ship. And the title is rather symbolic, Budrio chose this one out of the whole cohort of ships studied simply because it illustrates the colossal idea that the author planned to realize. It can be debated at length whether he was right to make such a choice. After all, mentioning a particular ship sets certain queries. You, for example, would like more scrupulous adherence to the data. How would you decide? If you set a goal to make some kind of generalized picture, combining all ships within a class, what name would you give? Would it be a title completely unrelated to the actual story, or would you take the name of one of the ships? And would you make a generalized but fantasy model at all, or would you reconstruct exactly a specific ship? With all its data and features? There's no wrong answer. There are just different ones. Budrio decided this.
-
Hello, Mark. Thank you for your participation in the discussion. I have filed your opinion in my notebook. You have given me food for thought in other topics beyond this issue. I will try to revisit your examples a little later. In the meantime, I'll take a moment to reflect on the situation. Plus, it's the right thing to do for my customer. Let him see other opinions without me interfering with them. Thanks for the advice about the mailbox. I'll try to start another one and post from the new one. Unfortunately, I don't know if that will help. One of the last emails I got was about my customer having problems with other people too. From this I conclude that the problem is not with me after all, but with him. It's so frustrating when something you're used to stops working. It doesn't matter what exactly it's about. When the car breaks down, when the light, water or electricity in the house goes out, or when the TV remote control is lost.
-
Chapter 21 In which the author is already tired of writing, but still continues... Now I’ll move on to the window on the second floor. I believe, unlike the issue with the cannons, this won't take as much time. However, I can't completely set this topic aside—after all, this is where one of the most significant disagreements between my opinion and the client's arose. Let me remind you: the client believes that this window should be glazed. As an argument, he refers to Frölich's model, which serves as an important reference for him. He also mentioned that in the British Museum, all models have mica windows—regardless of whether they are in actual openings or merely false panels imitating glass. These arguments puzzled me. I can't agree with the idea that all models must necessarily have glass windows. I didn't set out to track and classify every window. Moreover, it seems to me that in museum models, there are at least as many blind windows—even in places where they were glazed in the original. Perhaps, during the creation of models, this detail wasn't considered important. It's possible the craftsman didn't have suitable mica, or he was dissatisfied with how it delaminated and became cloudy. I won't judge why windows were often made blind, but there are quite a few such models. And this isn't a "mistake," but simply one of the acceptable approaches. Even if there is a consistent tendency in the British Museum to insert mica everywhere, it's unclear to me why this particular museum should be the standard. Why not French museums? Or German, Russian, Spanish, American ones? Why specifically England? I didn't understand the logic of this choice. Let's try to look at the issue from another angle: how was it arranged on real ships? Of course, on real vessels, cabins had actual windows—to let in light, provide a view of the sea, and create comfort for the inhabitants. But ships also had false windows. They were made for symmetry and beauty, creating the illusion for the observer that there was also a room inside. Such false windows could simply be painted, depicting glass with blue paint, and over it—drawing dark or yellow lines of the frame. And if the ship was particularly luxurious, such "windows" were decorated with mirrors or polished metal so that from the outside they sparkled and looked like real ones. Based on this, it's quite logical that the same principle can be applied to the model. If even false windows were tried to be made as close to real ones as possible, then perhaps in models they were intentionally glazed. One can imagine that a monarch issued a decree: all models presented to him must have "real" windows—with mica. Or conversely: craftsmen, knowing their client's love for everything shiny, inserted mica into every window so that he would be pleased and approve the projects. That is, let's assume that some models indeed have a reason to be fully glazed. But here it's important to emphasize: if glazing is to be done—then in every window. It doesn't matter whether it's a real window or a fake one—within the chosen approach, glass should be everywhere. This is an interesting thought, and it's quite logical. If a viewer on the shore is supposed to see glass and not suspect that some windows are merely illusions, then why not reproduce the same concept on the model? But here I notice a contradiction in the client's logic. If he truly wants to adhere to such a principle, then all windows on the model should be glazed. And if some windows are made with mica, and others—from ivory, then the idea falls apart. We immediately show: "Here is a real window, and here is a fake one." And in this case, the placement and design of each window become fundamentally important. Do you understand what I'm saying? Now about the client's next argument: he claims that the starting point for his decision was the model L’Ambitieux, made by Frölich. Allegedly, in the upper part of the castle, there's a window with glass—so we need to do the same. But, looking at the photo, I don't find confirmation of this. Moreover, the photographs sent by the client quite clearly show: there's no glass at all. It's an absolutely black background. Most likely—a plate of ebony or similar material. But definitely not transparent glass. Look more closely—you might have confused something. Furthermore, the final model of L’Ambitieux gives an unambiguous answer: on the second tier of the side castle, there can't be a real window. Look at the reverse side—Frölich made half of the hull in the admiralty style, and it's clearly visible: there are no cutouts in the frames. It's a solid structural hull, with a decorative panel overlaid, imitating a window. In our case, when we're building not L’Ambitieux, but Le Fulminant based on it, cutting a window at this level would fall right at the junction between decks. And that would look extremely strange. The only way to install mica there is to follow the already described path. Adhere to the logic that can conditionally be called "a hook for the English king": insert mica into all windows without exception. How will this affect the visual perception of the model? Will the hull be visible through the mica? I don't know. But you can simply try: carefully insert mica from the back instead of the ivory plate—without cutting holes in the hull. See how it looks. If the result isn't satisfactory—you can always revert everything back. It's not difficult. On this note, I will probably conclude my descriptions. Earlier, I had already sent letters with similar reflections, but I'm not sure if you received them. Therefore, this is my last attempt to find a way out of the current situation. I had sent letters with similar descriptions before, but I'm not sure if you saw them. So this is the last attempt to find a way out of the current situation. I really hope that sooner or later you will see this series of posts and read all of this. Then you will have the opportunity to make decisions, and I will be sure that I have expressed everything I could. For me, Le Fulminant has become a very interesting project. And I try to invest everything I can into it. And I do care about what the result will be. I also hope that after this series of posts, hints and advice from other forum participants will appear. This series turned out a bit different from what I planned. And can such a thing be planned at all? But I always tried to engage in dialogue with all of you in not quite standard ways. I live, and building this model is also part of my life. I tried to share my thoughts, experiences, life events. This project is more than just a description of construction. I really hope that in the end, by deciding to voice the problems that have arisen, I haven't crossed the line. Therefore, I apologize to the client. I really hope he won't be offended when he reads that I decided to have some dialogue with him outside of personal correspondence. And I also hope that in the end, new responses will appear. At this point, I’m typing with my toes — my fingers didn’t survive the previous chapter. Time to give my feet a rest too.


-
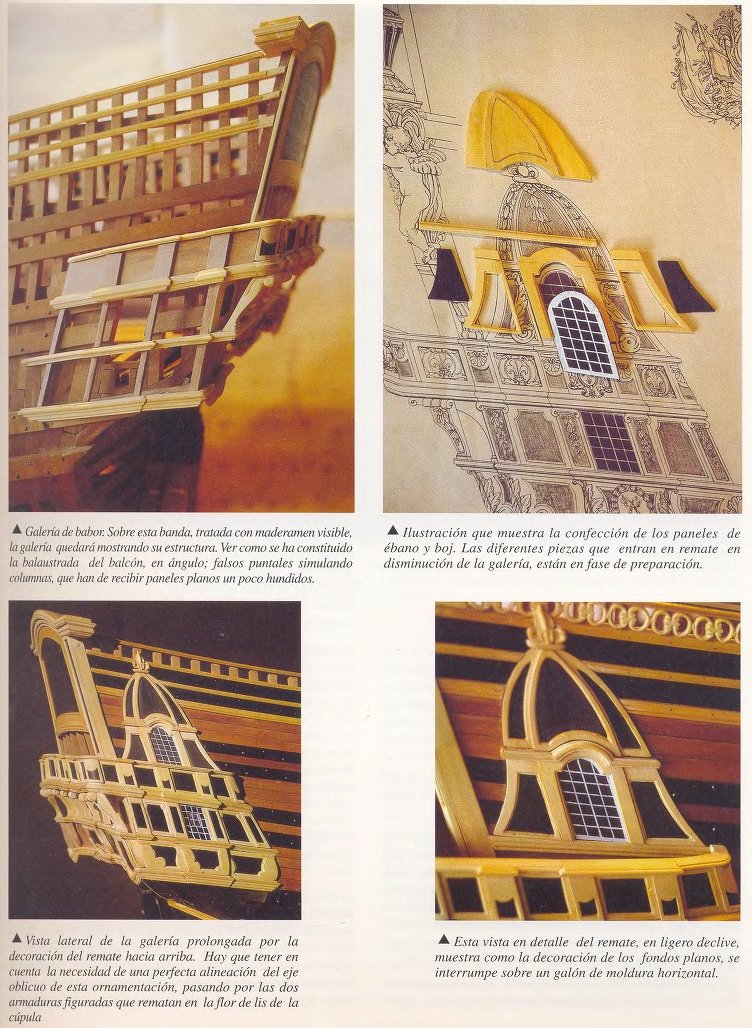
Chapter 20 In which the author still won’t let it go and once again examines the balcony cannons — but from a different angle. To present my final argument as to why I cannot agree with the client, I must return to the very beginning of this particular model’s story. It all began with a completely different nameplate — the ship was originally being built as L’Ambitieux, strictly following the drawings from the corresponding monograph. Only at one stage, when the hull had already been completed, the client decided to make some changes. He discovered a previously unnoticed drawing showing the ship's stern decoration. And that’s when the idea was born to completely rework the project and turn L’Ambitieux into Le Fulminant. These ships are very closely related, so in theory, there shouldn’t have been any serious problems. But structurally, we have a hull based on L’Ambitieux. Which means that the gallery exit has already been built according to its layout. Now, however, I’m working with a completely different stern structure. If we recall previous discussions, I had posted a comparative analysis of the two sterns on the forum. Back then, the topic was that the stern of Le Fulminant was wider than in Boudriot’s book. The decision was made to preserve the appearance shown in Bérain’s drawing as closely as possible. As a result, we ended up with a combination of two different designs. In Boudriot’s version, the toilet exit was precisely centered and aligned with the central section of the stern. But in the wider version of Le Fulminant, this centering is lost — the exit no longer ends up in the same place. If this is simply a toilet exit — then there’s no problem. But if the plan is to place a cannon in this opening, as the client wants, then the gun won’t be in the center. And that — is my final argument. So what now? There are several possible options in this situation. The first is to place the cannon in the outer segment. In that case, I think many concerns would be resolved. But we shouldn’t start there. First, it’s important to clarify something else. Last time, the discussion ended with the client writing that he didn’t plan to cut openings in the hull. The general consensus was that the entire lower row consisted of false windows without glass. That means I can safely proceed with the stern’s construction. In the final version, the shutters will be closed, no cannons will be visible, and there’s simply no reason to make cutouts in the hull. So the main question to the client is: does this concept remain unchanged? If so — does it even matter where exactly a cannon could be placed? And is there any point in continuing this debate? Last time, I myself raised the question: how was the situation resolved historically when a gun was hidden behind a false window? If it was a removable panel, then how was it removed? After all, the shield isn’t small and most likely heavy. How quickly could it be taken down to ready the cannon for firing? That’s when one of the forum participants suggested an interesting idea: the shield didn’t necessarily have to be a solid panel. If it was built as shutters opening outward, the whole process becomes simple and realistic. I really liked this idea. I even made a note to myself — be sure to return to this solution and make one of the false windows double-leafed. This way, I could elegantly show that something is hidden behind it — without revealing the cannon or making unnecessary holes in the hull. It could be presented as a subtle hint, without overt display. At the time, I didn’t share this idea — I figured that after such a hint, everyone would come to the same conclusion naturally. Especially since practical work was still a long way off, and small details could wait. But now I’m returning to this idea and suggesting it as a solution. Yes, I’ve already written a lot, and others have probably had to read quite a bit. You might throw your hands up and shout at the screen: “Couldn't you have just said that from the start?! You could’ve spared us all the long stories, the ‘museum tours,’ the knights and musketeers! Don’t you have anything better to do? You could’ve just made one window different — and that’s it!” And yes, you’d be right. I really could’ve shortened it all. But I really want to understand — what was the correct solution? How was it done in reality? I could just build closed shutters, I could place a “hint” wherever I want. But that doesn’t bring me any closer to answering the main question: did this have any technical sense? Could there really have been a cannon placed there? That’s the state of things. I really want to figure it out. To do it right. To be sure I’m not mistaken. If the client’s concept remains unchanged, and nothing has to be redone — I’ll build closed shields. And I’ll make one of the segments double-leafed. I’m ready to compromise and let the client choose where exactly he wants to hide a cannon. Even if that decision goes against my own opinion — I won’t argue. I’ve said everything I wanted. That means now the client can either accept my arguments or stick with his own decision. Of course, other modelers’ opinions may emerge later, and the picture might become clearer. Perhaps I’ll be the first to line up and openly admit I was wrong. With that, I consider the hidden cannon topic closed. I’ve tried to give it all due attention, laid out my arguments and doubts. I have nothing more to add — now it’s just a matter of waiting for the client’s response and that of the others. But that doesn’t mean I’ve finished telling stories. There’s still one more question — about the window on the second tier. We’ll talk about that in the next part.
-
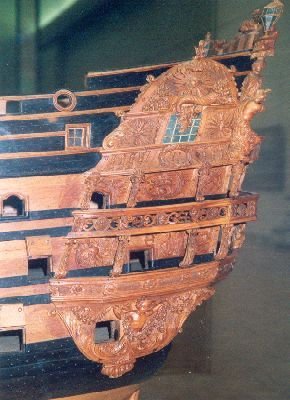
Chapter 19 When we open our eyes, we let in a vast world. But beware: it may destroy your own. Sounds like a quote from a bearded old man in a strange book. Now I will turn my reflections 180 degrees. And even if I don’t entirely destroy my own logic, I will at least do it serious damage. Just take a look at the huge number of ship models. Alongside examples where I found confirmation of my theory, there are just as many that confuse me. In those, everything is arranged the other way around: the cannons are located precisely in the central sections of the side galleries. Here it’s important to pause for a moment. Side galleries were built in different ways. There are examples of ships where the lower parts of the stern galleries are open — without glazing or solid walls. There are also closed versions. It’s logical to assume that in the case of open balconies, nothing would obstruct cannon fire from the officer’s cabin. So such cases aren’t even worth considering — they do not contradict my theory. I’m putting all those ships aside and will not take them into account. But the closed galleries deserve a closer look. They have a lot in common with our Fulminant, and at the same time, the cannons in the central section of the sterncastle are clearly visible on them. Below I will provide a few examples of such ships. Let’s start with this model — it’s fairly well known. You can clearly see what I’m referring to. So how can this be explained? When I first saw this example, my initial thought was: this is a presentation model of a project that was never implemented. A real ship with such features never existed. That already provides some sort of explanation to satisfy my inner researcher. Moreover, the same can be said of many models currently displayed in museums and serving as sources of knowledge. Many of them were created as presentations, made by artists rather than engineers. Their goal — understandably — was to impress, to attract attention, to encourage investment in the construction. In other words — marketing. In this particular case, something went wrong, and the ship was never built. This raises a valid question: should we trust museum models? Do they reflect actual design solutions, or are they more the fantasy of the model-maker, later adapted at the shipyard? The question remains rhetorical. There’s no definitive answer — each case must be examined individually. This is a task comparable in scale to the work of the ANCRE team. A quote from the book on L’Ambitieux is relevant here: the very idea of the book was an attempt to systematize the available data and create a generalized image of the ship — a sort of calling card for an entire class. But, as Boudriot himself admits, the task turned out to be unachievable. The ships he studied were too different from one another. It’s the same in our case with the cannons on the balconies: each vessel requires individual analysis. Only by delving into its structural features can we attempt to answer the question — is this an artist’s fantasy or a feasible engineering solution? And if it is feasible, then my theory doesn’t hold. With this approach in mind, I began to study other examples. For instance, an English ship. Here we’re not talking about a particular school of shipbuilding, but about the very principle — and therefore, there’s no reason to ignore models from other countries. I specifically chose photographs from different angles. At first, I thought the side sterncastle was just a flat decorative structure applied to the hull. In that case, it wouldn’t obstruct cannon fire. But the photos show that the “bottles” have real volume — this is not an imitation. You can also see that the gunport is just a small window. The barrel of the cannon would have to pass through it. Which means the cannon truly stood inside the projection. But how was that structurally realized? Are there any drawings that show how the cannon’s mounting was reinforced? Logic suggests that the hull frames in that area might have had a different construction — the structural part of the hull could have extended beyond the balcony. But that seems unlikely. An alternative would be strong beams inside the extension, on either side of the window, to which the cannon was mounted. But I’ve never encountered either of these solutions before. I don’t have a single source describing such an implementation. All I can do is shrug. Maybe in such cases they used cannons with elongated barrels? But then how were they loaded? That creates additional complications. In the end, I arrive at this: I can find images showing cannons positioned inside side sterncastles, and this applies not only to cases where the gallery is just a flat façade. How exactly this was implemented — I do not know. Which means I cannot state with certainty that such a solution was entirely impossible on the Fulminant. But that’s not the end. I’ve traveled the path from confidence in my theory to doubt. And we haven’t covered everything yet. Now I will return to the construction of the Fulminant itself and offer one more argument — this time specific to this version of the ship.


-
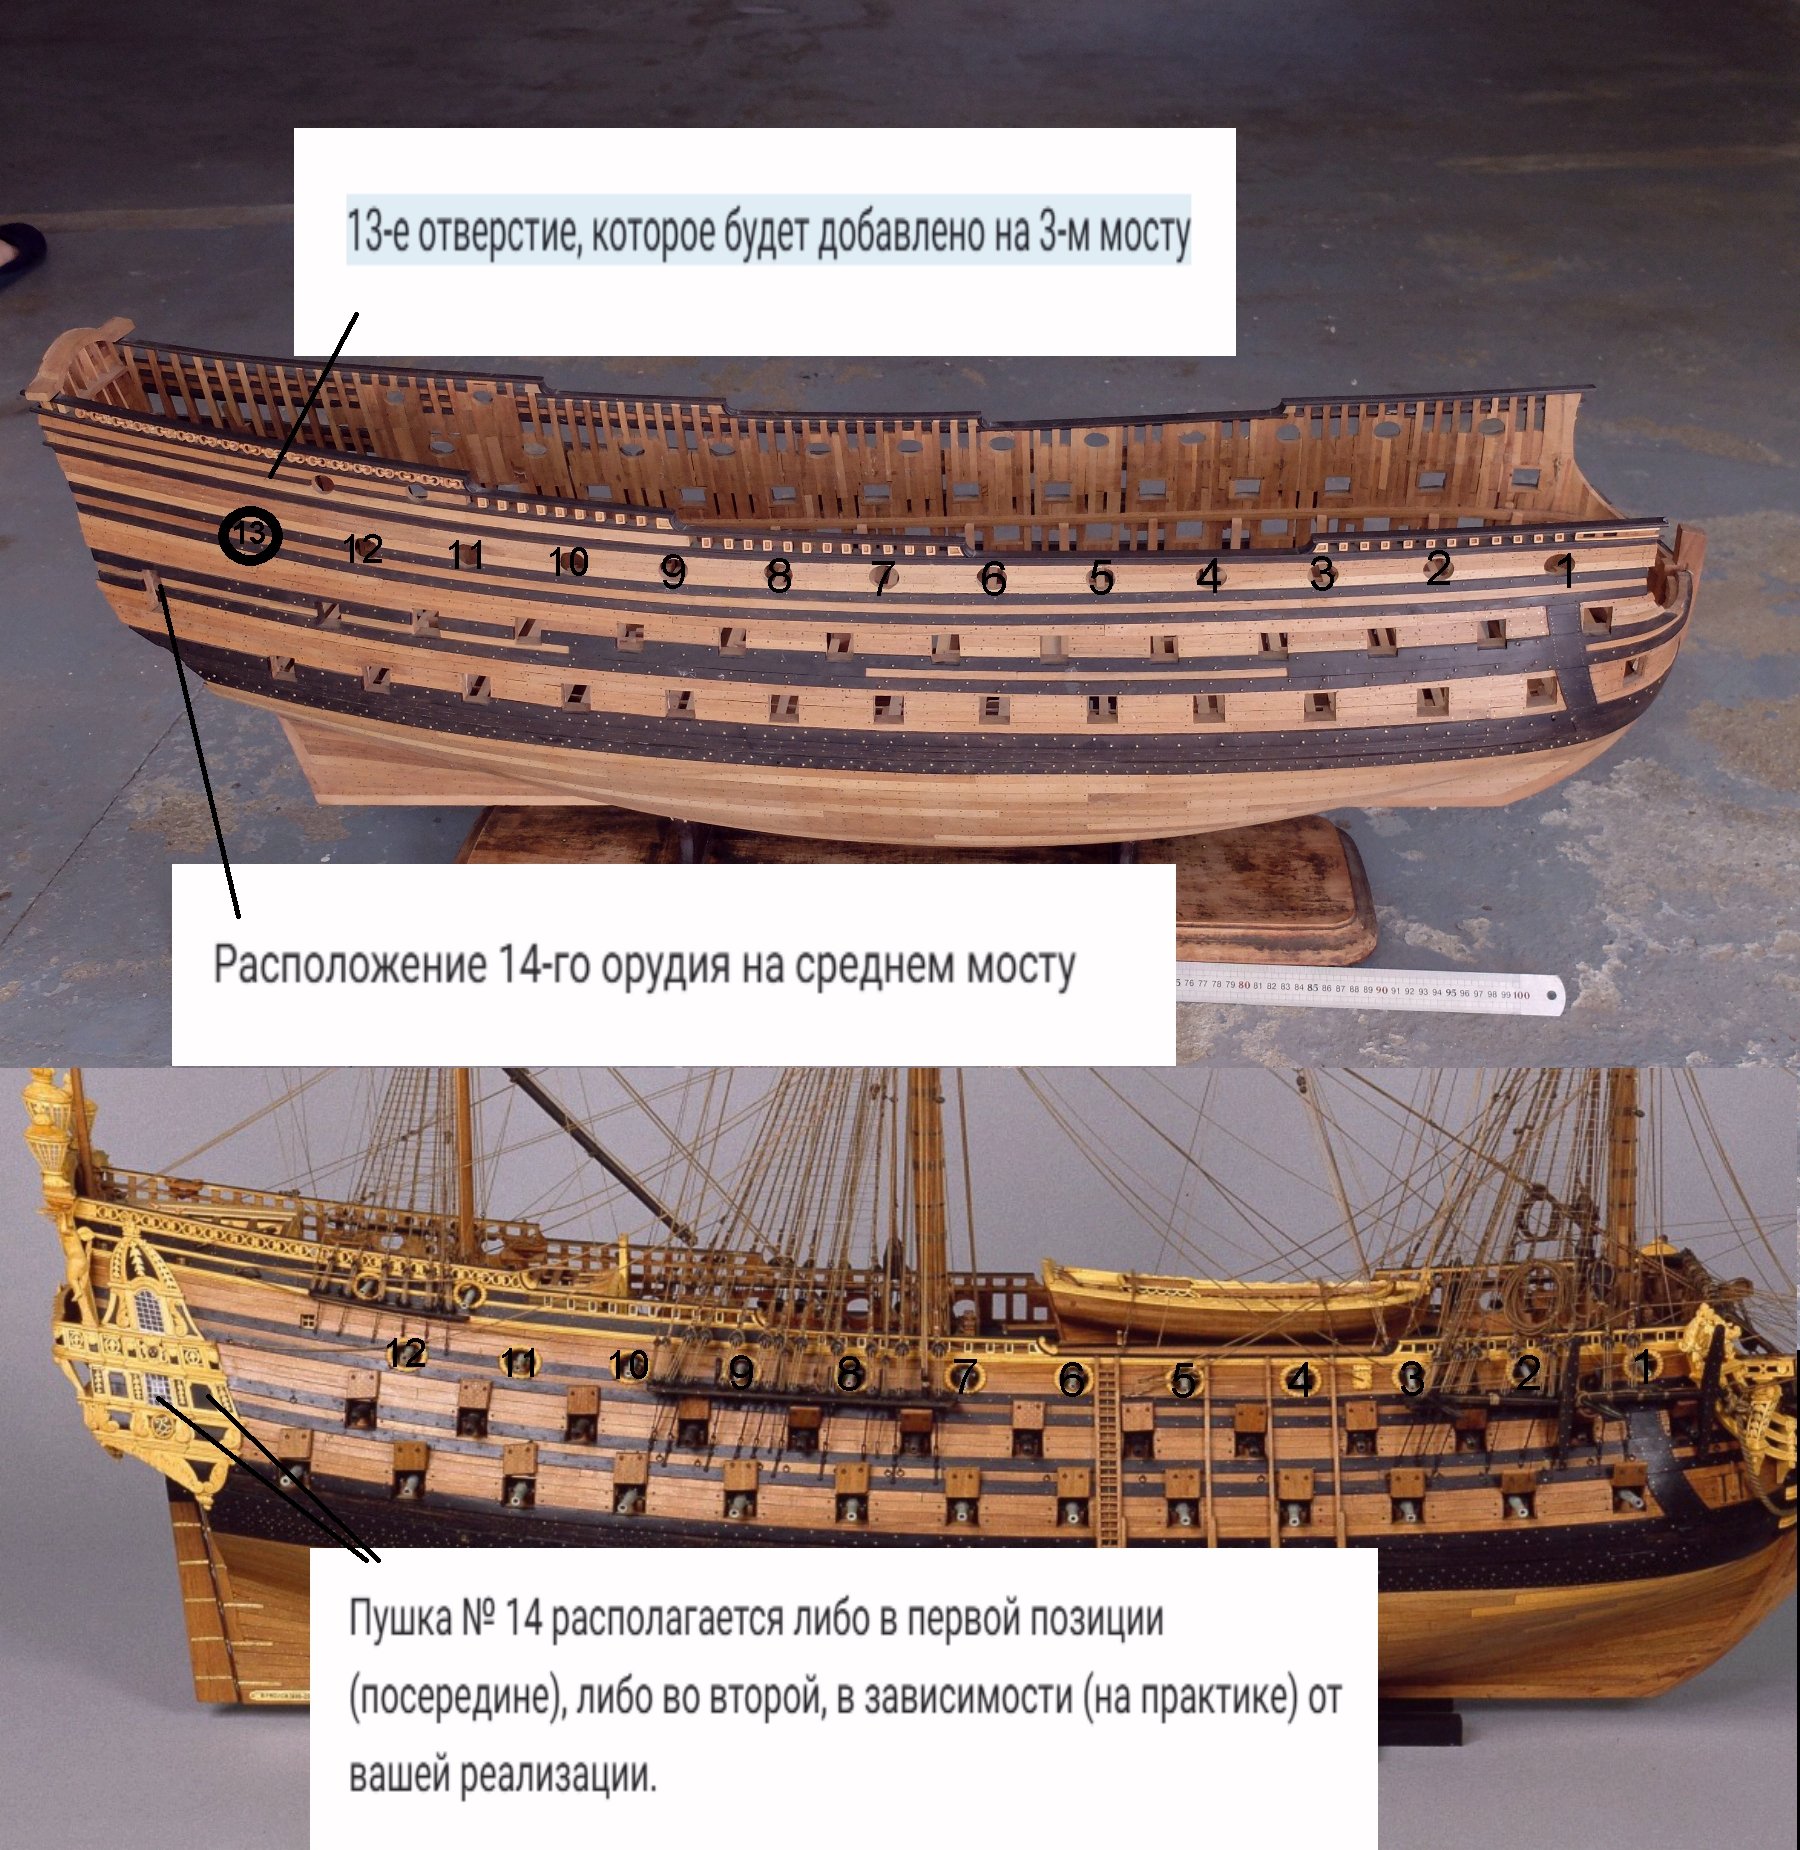
Chapter 18 In this chapter, the author will start cooking porridge out of cannons and watching the process from the windows. Does that sound unclear? That’s because the author himself doesn’t understand anything. So, the question about real and fake windows is complicated and individual from the very beginning. If we are to look for any analogues, then it would be, of course, L’Ambitieux... We will look at it, compare, take it into account, reject or rely on this example. And it’s also time to voice the second component of the mystery with windows and gunport dummies. Somewhere in the area of the side castle, it is necessary to place an additional cannon. This question was also widely and thoroughly discussed last time. And I thought that a solution was found in the end. But now the client is raising this question again and suggesting his own version. And what exactly is this version? I will try not only to paraphrase it, but to bring it here directly from the letters: "...Hello, Sasha; If AMBITIEUX became famous (among ship modelers), it is because (a) in the first stage, Boudriot developed a monograph for AMBITIEUX. In the second stage, Frölich received a commission from the Naval Museum to build AMBITIEUX (based on Boudriot’s plans), and that commission was used to create a book for modelers (about the fleet of Louis XIV), which was translated into more than 5 languages. Sasha, if I ask you to emulate (as much as possible) what Frölich did (for AMBITIOUS), it is because all modelers (looking at our FULMINANT) will immediately compare it with AMBITIOUS. Let’s assume (for simplicity) that FULMINANT has a few more guns than AMBITIOUS... at least, as they were presented in Frölich’s model... Therefore, we will follow Frölich’s design (for the stern castle), i.e., with a window drilled for gun No. 14)... and that way, we will not attract criticism (justified or not, it doesn’t matter) and controversy from all modelers who will ask us why we didn’t follow what everyone else follows, and why we tried to change something in Frölich’s well-known standard. So it is reasonable (and wise) to make the middle window as Frölich did, and to make the upper window “real,” like in the English Naval Museum..." ---------- "...I’m going to show you my way of reasoning (which is adaptive), and don’t think it’s anything special... I reason this way because that’s how my brain is wired (or trained). I’m going to talk about the middle window, where gun No. 14 is located. I base this on the fact that my modeling experience and historical knowledge (I’m a modest person) probably fall far short of Mr. Frölich’s, who was commissioned to build the model of L’Ambitieux (and, I presume, paid a considerable sum) by the Paris Musée de la Marine. I saw this model of L’Ambitieux with my own eyes, and its photographs have gone around the world, it became the subject of technical books, and I assume Mr. Frölich had to meet with all the experts in France and around the world to justify and explain how he made his windows. There must have been more than a dozen discussions (with arguments and counterarguments)... which eventually led to a certain outcome. My pragmatism tells me to do what Frölich did..." ---------- "...Hello, Sasha; I will explain the number of cannons in more detail, it’s not that complicated. (a) For the lower deck everything is fine, and nothing needs to be added. (b) For the middle deck, the 14th cannon must be added. This cannon goes through an already drilled hole (a door), but since I don’t have the model in front of me, I assume that this already drilled hole corresponds to the center of the three lower windows. Is that correct? If so, then we will proceed as planned: all 3 windows (on the lower level) will be fake windows (i.e., with window frames installed on top of an ivory plate). I will send you an example. (c) Frölich made the upper window real (with mica), and the British Naval Museum also makes real windows, so I recommend making the upper window real. (d) For the upper deck, the additional hatch openings we will make won’t interfere with the side bottles, so we’ll talk about that later. Let me know if that’s clear, or if you need further explanation? To sum up: the 3 lower windows are fake (thus covered with ivory), and the middle one must let a cannon pass through (see Frölich); the upper window is real (covered with mica), as done by Frölich and the British Naval Museum. PS: model shipbuilders can make their own windows; in the British Naval Museum, all windows are real..." this is an example from the British maritime museum I have included several letters at once. All of them complement each other in meaning and form a single overall picture. To combine them into one answer, I will once again summarize the client’s wishes: There should be a glass observation window on the upper deck. On the lower deck, the windows should be false, and a cannon should be placed in the middle, which must come out through the toilet exit. In this case, there is no point in cutting an additional window in the hull next to it. The letters also clearly show that the client has a special reverence for Froelich’s model and sees this particular model as an example. And therefore, it is also set as an example for me. I must rely on it. Now I must try to respond to these words, since I am not sure whether my letters are reaching the recipient and whether the client is able to read them. So where should I start? On the one hand, the client’s wishes seem logical. And what difference does it make to me? Is it really so hard for me to meet these wishes? After all, the client’s opinion is not very different from my own thoughts. The only significant difference in our approaches lies in the window on the second floor. The client wants it to be transparent. But I firmly believe that it cannot be an observation window and must be a false one. And below — both in my version and in the client’s — all windows should be false. So what’s the problem, then? That’s how it looks at first glance. But let’s go step by step. What is it that troubles me so much? First, I want to address separately the issue of placing cannons inside officers’ quarters. Is there a certain order or rule about where a cannon could be placed and where it most likely could not? For me, this is now a question that goes beyond just the Fulminant. It is a topic for a more precise understanding of naval engineering and architecture. Something that will help me grow personally and will also be useful in the future. I want to understand correctly how I should think in similar cases. Are there any clear rules? Any prohibitions or taboos? Things that absolutely must not be done? And from that point of view, let’s consider the question: can a cannon actually be placed in a doorway? It seems so logical and natural. The opening already exists. Just roll the cannon into the doorway, open the window, and let it fire! So simple. But no. I see major problems here. What can we observe on L’Ambitieux? What disturbed me? How exactly do we want to position the cannon? There are two options here. In the first one, the cannon is rolled out through the toilet entrance and fires from there. In the second, it remains inside the cabin, and the firing is done from within. And now I will describe my doubts. Let me begin with the fact that the construction of the officer’s toilet here involves a sharp floor drop. The officer, rushing to relieve himself, must not only go out the door, but also descend about half a meter lower. The toilet floor is lower. And this plays a significant role when it comes to firing. The difference in floor levels between the two rooms would not allow the cannon to be rolled out into the side balcony structure. A platform would have to be built. Or better yet, the entire toilet structure should be redesigned. The blueprints of L’Ambitieux give no indication that there was even a theoretical intention to move a cannon toward the toilet window. The second problem lies in the doorway itself. It is not wide enough to accommodate a gun carriage. If we want to place a cannon in the toilet, then the doorway must be enlarged. And finally, I would like to mention one more issue. The side balcony construction is not sturdy. It is more like a light shed that leans against a solid house. The planks and frame of this extension simply cannot support the weight of a cannon. The very first shot would rip its fastenings out along with the boards. So, in my imagination, rolling the cannon into the toilet itself makes no sense at all. Then maybe we can use the second option. No need to move the cannon right up to the window. Let it fire from the cabin. In this case, a narrow doorway is even more convenient. It would prevent the cannon from rolling into the toilet. In this setup, all the fastenings would be attached to the strong inner walls of the ship, which is another huge advantage. But even in this option, my imagination draws some unpleasant scenarios. Let’s imagine you are an artilleryman and for some reason you dragged your cannon into a house and want to fire from there. But you didn’t place it near the window — you left it in the middle of the room. There are a few meters to the window, certainly more than a meter and a half. The essence of the problem becomes clear. When firing, some of the gunpowder gases will not exit through the window. They will scorch both the room and you. There might be even bigger problems if you're firing canister shot. It’s no coincidence that ship cannons are always rolled out into the gun port before firing, so that the muzzle is as far from the ship as possible. As a result, I see a problem in the idea of placing a cannon in the middle section of the side balcony. It would be much simpler to place the cannon so that the barrel lines up with the extreme section of the side balcony — the one closer to the bow of the ship. And there are plenty of examples of this configuration. Unlike the situations I’ve described above, this part of the side balcony is essentially false and leans against the ship’s hull. And a cannon placed inside the officer’s cabin has practically the same characteristics as any other standard cannon. This is how I reason and the option that I currently have. I believe that if a cannon is to be placed in the area of the side balcony, it should only be in the outermost section. Last time, the exact same decision was made. However, back then, neither I nor the others participating in the discussion spent time describing the situation in such detail. Now, I just want the client to have the opportunity to read everything — as wide and full an answer as possible. And at the same time, this won’t be just my opinion. Maybe others will add some thoughts to my words. Or perhaps, on the contrary, strong counterarguments will appear, and I will end up changing my opinion. The question of counterarguments is also very important. And I myself have been looking for them. Because as I said earlier, I am very interested in understanding this question for myself. It fascinates me. I truly want to know how things were arranged on the ship. That’s why, along with my logical reasoning, I also have questions. One could say that these questions undermine my own logical line of thought. How? And what kind of questions are these? I will write about that in the next post.


-
Chapter 17 In which the author remembers Porthos’s baldric and talks a lot (what a surprise) Let me begin the topic of the side gallery from afar. Ornamentation in the military has an ancient history. Since time immemorial, men with weapons have sought to emphasize their status and impressiveness. Some painted their shields and armor, others covered their bodies with war paint and decorated themselves with feathers, some enlarged cockades and aiguillettes, embroidered patterns on lapels and sleeves. The desire to show one’s importance has always been present. How are we any worse than gorillas and baboons, showing off their silver backs and bright rear ends to rivals? It's a good time to remember Porthos from Dumas — with his famous baldric, rich but fake. And now, let us imagine not mere soldiers, but high-born officers (yes, I know Porthos was also an aristocrat, but that’s not the point here). Ships became the pinnacle of this drive for outward grandeur. A captain’s or admiral’s cabin turned into a splendid palace with carvings, sculptures, and luxury. But let’s step back from this general pomp to a narrower subject — windows. The 18th century had already moved away from the medieval reality where castles served not just as homes but as fortresses. Back then, windows were narrow, adapted for defense. Later, castles became palaces — and the windows grew larger, adorned with stained glass and graceful frames. This trend spread to ships as well. Although a ship is not quite a palace but a war machine meant to fight in battle. However, the practice of forming a line of battle allowed the stern to remain relatively safe. Which meant that large and beautiful windows could appear there. Naturally, there was a desire to show status not just from the rear, but from the sides as well. And thus, side galleries — "bottles" or "castles" — came into being, which were decorated just as lavishly. This leads to a problem: stern windows, though vulnerable, are at least somewhat protected. But from the side, a beautiful glass window could easily be hit by a cannonball. So what could be done? First, a real window could be placed high — in a spot where it’s hard to hit. Gets broken? No big deal, the crew will fix it. The captain himself won’t be playing glazier. Restoration after battle is a whole separate story — whether one window more or less... As for the officer’s safety — he wouldn’t be sitting in his cabin during a battle anyway, wondering whether a cannonball will come through the glass. He’d be on deck. And the risks there are quite different. Second, one could simply create an imitation. From a distance — it looks like a window, but up close — it’s a solid wall. Another Porthos’s baldric. And so different options emerged: some had real side windows, some had false ones, and some had both. Each case had its own story. Even ships that looked similar on the outside could have variations. One shipyard decided one way, another — differently. Maybe they ran out of glass. Maybe a master wanted to try something new. Now imagine us — 21st-century viewers. We walk into a museum and see several models of the same ship. All different. And we clutch our heads — what was it really like? We’re used to standards, technical specs, clarity. You buy a spare part — and it’s supposed to fit. A different mindset. But in the 18th century, things were different. And we won’t find a universal answer. As a teenager, this kind of ambiguity used to bother me. One day, I noticed different depictions of Nelson’s death in paintings — and on each canvas, his uniform was different. Sometimes a tricorne lies beside him, sometimes a bicorne. How could that be? Why is there no accurate report? This was an important event, surely someone documented it. But — alas. And this is both frustrating and delightful. For a historical modeler, it’s a kind of freedom. The main thing is that my choices are well-argued. The viewer has their own criteria. They may disagree. But if, after seeing my work, someone says: “I’ll go build my own version!” — I’ll be only glad. One more ship modeler in the world. A celebration! But what happens when I have one opinion and my client has another? On the one hand, this question has a logical answer from the start. I’m building the model for the client. Which means their opinion takes precedence. And that could be the end of the conversation. And I’m okay with that too. Except for one nuance. I sincerely believed that I was building with an eye toward what had previously been agreed upon. And that the current state of the structure and what I did completely matches our mutually accepted decision. Which brings up a much more significant issue: what happens next? What if such questions arise at later stages too? Where is the guarantee that makes the next steps clear? And how can I be sure I understood everything correctly? That I’m not going down the wrong path, one I “painted” in my imagination? And what if tomorrow the client comes up with a new idea and takes things in a completely different direction? Or the opposite — we agreed, the client expects one thing, and along the way I made some adjustments or forgot something, and now the result and the expectations have diverged. Then I’ll once again face the question: how do I redo it? When you have ready-made blueprints or a schematic in front of you, they serve as that very guarantee. Either of us can point to the plans and check whether we stuck to them. But when you’re working based on a concept, with a degree of creative freedom, that freedom can become a problem. Simply because each person might have their own vision of what the final result should look like. A difficult situation. That’s why, at some point in history, people decided they needed specialists to write laws and standard contract templates. There is another option. As I’ve already mentioned, it’s to try discussing our views. It’s very possible that I went down an overly complicated path, delved too deeply into history, and brought in far too much extra information. Why bring up basics and vague examples about Porthos and Nelson? I know perfectly well that my client already knows all this without me. And could probably describe all this unnecessary fluff much better than I did. I also know that this post turned out to be a waste of time for many who have been following this topic step by step. But I decided to start the discussion from scratch. The previous conversation took place a long time ago. And if I were a third-party reader, I wouldn’t find it convenient to flip back through pages to figure out when that discussion happened and what was said. I might not even be sure what exactly was expressed back then. So I decided to construct the topic now in such a way that regardless of whether you remember what happened many months ago, whether you were reading the topic back then or not, from this moment you’ll be able to understand everything, recall everything, and see the heart of the issue — starting from the very basics. So I apologize in advance to anyone who is surprised and wondering why they wasted their time. Now I can take the next step and begin describing my client’s opinion.
.jpg.335d9e06e012182fd0c628d351563fe6.jpg)
-
Chapter 16 In which the author feels like a character in a TV show, a sci-fi novel, or the movie “The Lake House,” and thus occasionally behaves like Keanu Reeves… although, perhaps, also like Sandra Bullock. This will be a long chapter — in fact, more like an entire series of posts. And in it, it’s important for me to try to find a way out of a rather strange situation. I’m warning about the length right away. Where should I start? Perhaps with the fact that the latest discussions on this forum have given my project an unexpected twist — almost a detective one. My client reads this forum, and we often discuss in private correspondence what participants write here. And recently, someone brought up the topic of windows and cannons in the side gallery. Seeing this, the client immediately picked up the idea and began sending me emails with questions — where do I plan to place the cannons, where will the glass windows go, and where will there be shields with imitations. He even proposed some options himself, and at that point, I felt confused. The thing is, we already raised this question here on the forum — and discussed it exactly when we needed to: before starting work on the side gallery. I did the theoretical groundwork, found solutions, and started working based on them. By now, part of the structure has already been installed on the model — strictly according to the approved plan. But the client’s new version contradicts the previous agreements. So now what? Tear everything down and redo it? To reach the hull, cut new gunports, carve out openings for regular windows? That’s an enormous amount of work and, essentially, a step backward. It wouldn’t be such a problem if the new idea really made the Fulminant more accurate or beautiful. But unfortunately, I see neither logic nor benefit in it — only compromises and questionable decisions. And now, at this stage, another factor comes into play — a technical one. And it is precisely this that became the reason for this chapter’s appearance. It’s a problem with Google Mail. From the very beginning of our correspondence, the client and I have occasionally encountered issues with email delivery. Sometimes he would write to me, wondering why I wasn’t replying and whether everything was okay, while I hadn’t even received the messages. Sometimes it was the other way around — my emails wouldn’t reach him. It used to happen rarely, but lately the problem has worsened. I send an email — and hours or even days later, I get a notification: the email wasn’t delivered. Either postponed, or blocked. And the system doesn’t specify which email was affected. Perhaps all of them. Or half. It’s no longer just annoying. At a time when we need to actively discuss important technical details, such failures become critical. Those who’ve read my posts already know that brevity is not my strong suit. Yes, in Sparta, I would’ve been thrown off a cliff long ago. And now imagine the length of my emails — comparable to a volume of War and Peace. Especially when I’m trying to explain my position in detail. I began searching for the cause. Is the problem on my end? Or on the client’s? Are the messages too large? Or does Google “stumble” because I attach the original Russian text? I often include it — so that if there’s any doubt in the translation, the client can refer to the original and do his own. It’s logical when discussing fine nuances. But maybe this format seems suspicious to the mail system? I tried everything. Broke the text into parts and sent it in fragments. Sent emails with screenshots instead of text. Changed the format, removed Russian, changed fonts, shortened the volume... And still: messages don’t get through, and the notifications keep coming. Sometimes — several at once, delayed by several days. I get responses from him — but only to fragments. What about the rest? Did he get the first part? The last? Or only the middle? How does he perceive it? What is he thinking about me? That Sasha has lost his mind? I’m at a loss. I wrote to him that we have problems with the correspondence. I suggested switching to messengers. But did those messages reach him? Who knows. The only option I have left is carrier pigeons. Or a bottle in the ocean. This post is not just another of my traditional digressions from modeling. This is a last attempt to make contact. If the client reads this forum (and I’m almost certain that all the current confusion began right here), perhaps he’ll see this message too. And maybe we’ll be able to reestablish communication. Of course, turning the forum into something like the magical mailbox from The Lake House is a strange idea. Although it does sound amusing. He writes to me by email, and I reply here, on the forum. A ready-made script for a romantic comedy! But that’s a movie. In real life, it’s not funny, not romantic, and — alas — unethical. The forum is not the place for this kind of correspondence. So why am I writing all this? What’s the goal? If my client truly follows the forum, and if the reason for the misunderstanding lies in something he read and interpreted his own way, then maybe my analysis will bring the conversation back to a constructive direction. If the topic resurfaced again, it means it needs to be discussed. And so, I invite all participants to once again walk through the theoretical, technical, and aesthetic aspects of this part of the project. In the next post, I’ll describe the initial situation — lay out the client’s opinion and my own point of view. And in conclusion, I want to touch on a very important point. To begin the actual discussion, I first need to outline which option my client prefers. As I already mentioned, my viewpoint is different, and I’ll try to explain in what way. But even the very format of presentation creates a somewhat unfair situation: I’m the one speaking, while my client, not having the opportunity to respond immediately, finds himself in a less favorable position. Often, an outside reader may have an unconscious urge to support the one who’s speaking — that is, me. And, accordingly, to question the position of “the other side.” Therefore, I want to stress from the start: my goal is not to question the dignity or opinion of my client. I deeply respect and value this person. It’s important to understand: I don’t consider myself automatically right. I fully admit that I might be mistaken. So I ask you to treat my viewpoint calmly and thoughtfully. If I’m wrong somewhere or in need of correction — please say so directly. My task is not to sway the client to my opinion using public support. No. What matters to me is arriving at the most reasonable, fair, and well-founded decision. That is why I consider it important to state this introduction before the main discussion begins. And one more — truly final — clarification. I’ve already spoken about the influence of translation and interpretation. Two people may speak about the same thing, be like-minded — but translation or personal perception can introduce distortions. And as a result, the meaning at “the other end” turns out completely different. What am I trying to say? I will describe my client’s position — but it will not be a literal transmission of his words, rather my understanding of his viewpoint. And I’m well aware that this may not be the same thing. It’s quite possible that he’ll read my words and say: “What nonsense? That’s not what I meant at all!” So I apologize in advance if I turn out to be that very “distorting prism” through which the meaning gets twisted. I will describe what I understood from what was said—but I do not claim absolute accuracy in conveying someone else's position. What am I hoping to achieve with this post? I hope that my client will be able to read everything I’m trying to convey. I also hope that the technical issues with email will be resolved. If necessary, I’m ready to switch to any other communication channels—for me, direct dialogue is extremely important. And of course, with the support of other modelers, I sincerely hope that together we will find a logical and, ideally, historically documented solution. With that, I conclude this post.
-
Ouch! I've already heard that the labeling of emotions differs from country to country. And in America they don't understand the way Russians draw emoticons. So I'll explain, I wanted to depict unrestrained laughter. This does not mean that I read chat and cut my nails ). I hope the meaning of the joke is clear and I didn't make my posts even weirder. (emoticon that is embarrassed)
-
Oh, yes, you're right! A thousand times right! I'd give a lot if I could go back to that time for one minute and see the ships with my own eyes. The only thing that reassures me is that science fiction is not on my side. And as soon as I get my hands on a time machine, I'm going to regret it. ))))).
-
Mark, thank you for sharing your explorations and conclusions. In a way, I have encountered a very similar situation. However, while you decided to reduce the number of windows to achieve a more harmonious composition, I am considering increasing the number of windows from three to four. And the fact that my solution is turning out to be rather unsuccessful is precisely what is causing my confusion. I don’t like the original three-window version by Beren, mainly because of the very long second window. But the alternative of splitting it into two doesn’t satisfy me either. I realize that over time, the concept of aesthetic taste has changed significantly, and what was not an issue for Beren now causes discomfort for me. But how do I determine where to stop and say, "This is the ideal solution"? For example, I used to perceive some of his other decisions differently. But now the time has come to examine them more closely. Previously, when I looked at the eagles beneath the windows, I somehow thought that Beren was illustrating different levels of protrusions and that the oddly halved eagle was actually the figure placed in the central segment of the stern, where the wreath with the ship’s name is located. From the side, it is partially visible, and I believed this was what the artist intended to depict. But now I see that it is something else entirely. It is actually positioned on the side castle. L'Ambitieux uses the same approach, but instead of a bird, there is an ornamental scroll. Budriot depicted it in the same manner, as if it were an accidental misalignment. To me, it looks like a clear mistake or a flaw. I cannot call such a composition a successful design. However, neither Beren nor Budriot seemed to have any issue with it. And if that was considered acceptable, how should I perceive my own discomfort with the elongated window? There are many conflicting elements here that raise questions for me. If we compare the design of the transom and the side castle, we can notice discrepancies. For example, the upper frieze below the windows, where the lion heads are depicted, maintains roughly the same visual rhythm. From both the transom and the side projection, this line is executed in a fairly consistent manner. However, at the lower level, where the eagles are located, the situation is completely different. The space between the eagles on the transom is filled with ornamental decoration. But as soon as this same strip transitions onto the ship’s side, everything changes. There is no decorative embellishment between the eagles—just emptiness. Why? I could continue further, but that would take our discussion too far. I am trying to determine the best way to resolve these emerging questions, but so far, I have not found an answer that satisfies me.