HAIIAPHNK
-
Posts
351 -
Joined
-
Last visited
Content Type
Profiles
Forums
Gallery
Events
Everything posted by HAIIAPHNK
-
 Work on the ship is moving slowly. More often it is one step forward and then two steps back. But it is good that it is like that, rather than standing still. And there's one problem I've encountered. After several attempts I decided to voice my problem in the chat, maybe someone knows how to solve this problem. The essence of the issue is as follows. I need to make a molding. And the molding should be in the form of an arc. But unlike previous cases, this arc is not part of the radius. It is an ellipse, moreover, the axes of this figure have “slipped”. I have attached a picture to make it clearer what I am talking about. The most obvious solution, in my opinion, is milling with a shaped cutter. You can make a blank in the form of an arc of the desired shape, and then cut out the profile of the molding with a router. But the problem is that I don't have a milling machine. Previous moldings I made with a shaped scraper. This method allows you to make even radius moldings without machines. But now this option is not suitable. I also could not bend the finished molding, the size of the ellipse is too small. The part crumples and breaks. Maybe someone has already faced such a task and can tell me how to make such a part?
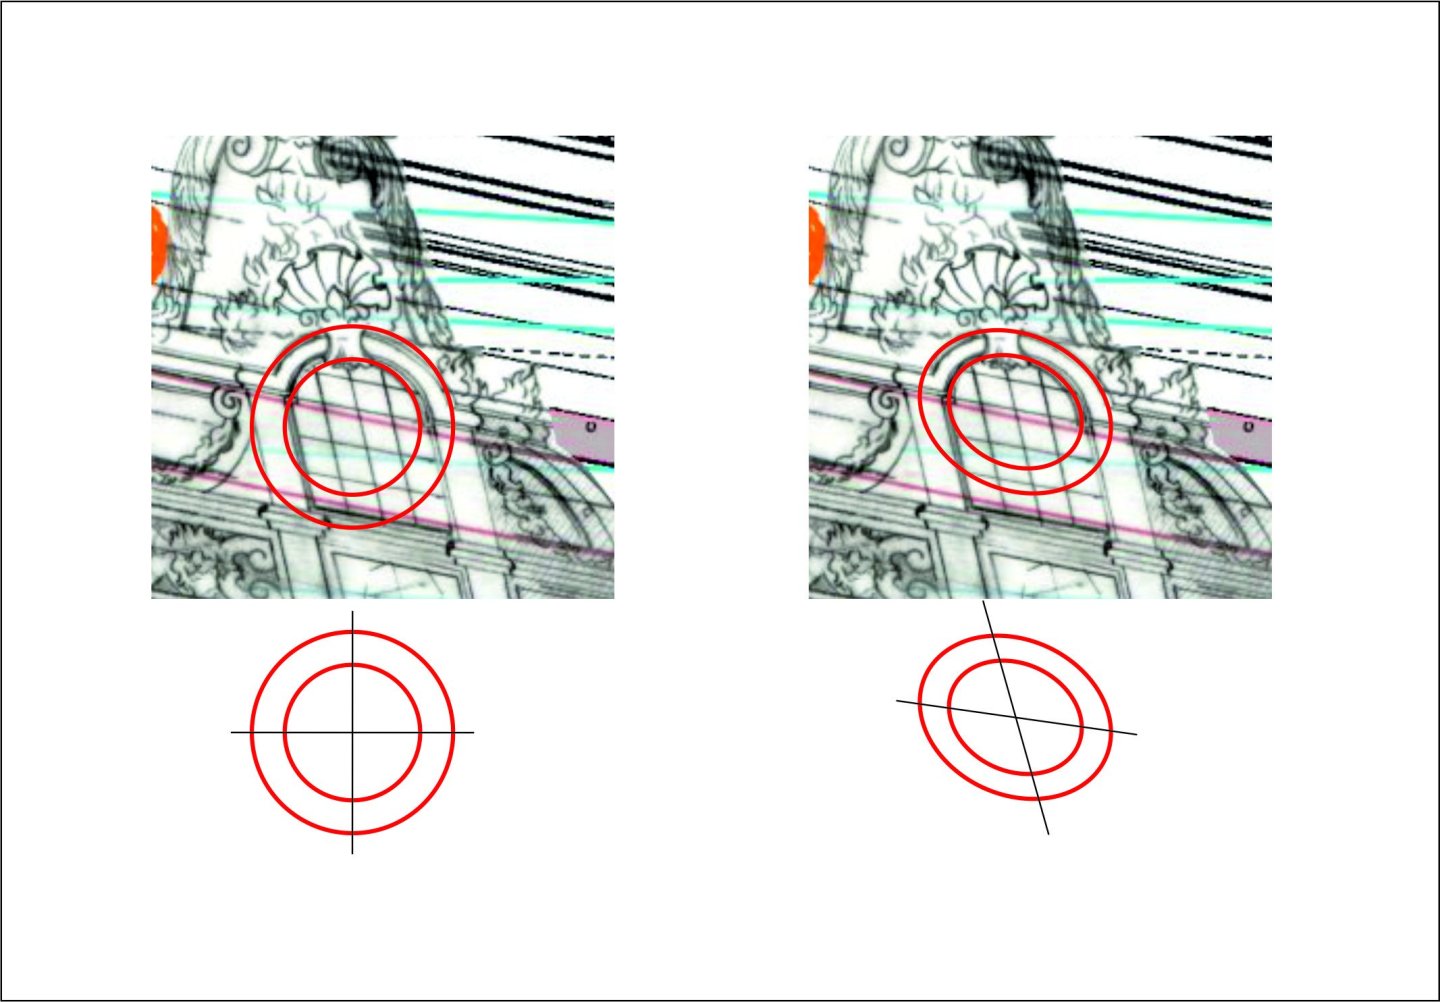
-
Oh! We are now very close to a difficult place. I would not like disputes to arise between opponents and supporters of the use of bone. There can be many different opinions here. And each side will be right.
-
Thanks for the very interesting link. I've bookmarked it. In the spring there are plans to go to Nuremberg to visit friends. It would be a lie to say that we’ll make a detour along the way and stop at the museum. This trip is hard for me. And I know for sure that during my trip to Nuremberg, if I even suggest making a stop, my family will not understand me. And they will rightly say that even if they agree, I will be the first to break. And you can only carry me around the museum. Or drag it. I don't mind, but other people definitely won't understand. But after Nuremberg it will be possible to check how much such a trip will cost me and make plans. There is a maritime museum in Hamburg. And he's just great. 9 floors! And everything is in the ships! This is a fairytale. I was even able to convince my family to go there twice. For the first time we went specifically to this museum. And after the long journey it was enough for me to get to half of the museum. And I begged for two years to go there again. And already from the second time I was able to examine it completely. It was a good trip. Highly recommend. And if you go with your family, I can add advertising for them too. You can say that after the museum you will take your family to a musical. There are different performances, but the best is The Lion King. Believe me, not only will your children be delighted, but you will have a great time too. Well, I made an advertisement for the Hamburg Maritime Museum. I'll go ask them for a free ticket for advertising.
-
Thank you for your kind words. They mean a lot to me. I really wanted to share not only the result of my work, but also the emotions that I had during the entire working process. And this is directly related to those discoveries and solutions to technical issues. And with historical stories. I tried to make the post interesting to read and watch. It is very important to know that this approach is actually interesting to someone, and not just me doing it for myself.
-
I'm late, but still noticed the corrections and additional information in your post. And wanted to respond to these thoughts. Maybe this will be helpful. Give a big hello to your dentist. For some reason I pictured him carving miniature sculptures directly into the patient's mouth. Why? Right out of a tooth or dental modeling compound. I imagined the patient coming home, opening his mouth, and there..... Now, on a more serious note. Try telling your friend to look for a tagua nut. Very interesting stuff. Especially if you need to make very tiny pieces. And even if you have to glue a common blank from different parts, it is very easy to do with ordinary second glue. Unlike bone, this glue is quite sufficient for a very secure connection. In appearance, the color is very similar to ivory. Very easy to work with both hand tools and electric hand routers. There is no unpleasant odor at all like bone. Which is just a huge plus. Maybe this is just the thing to help your dentist friend make his carvings even more interesting. I have a project in the works right now with the French ship Fulminant. I'm posting this thread right here: There's just so much to do with bone carving. At least one day I will get to that stage of the work as well. So in this thread is what I had time to learn and try. If you are interested, you can have a look, suddenly you will find something useful for yourself or on the contrary, you will see some questions in which you can enrich me with your hints and advice. In both cases I will be only glad.
-
I too have come to the conclusion that research is the only way to prove accurately. Even then, there are likely to be problems. For example, they may demand not just a certificate of origin, but that the certificate was made here and not there. They will say that they trust this laboratory, but not this one. A receipt from the purchase may help. It might not. There will always be nuances. For example, what prevents you from buying one thing and making it out of a different material? Or, for example, I have an old piano, which I got from my grandmother, or grandfather's billiard set. If I didn't buy it, but received it as a gift, I can't prove anything. In this case, pictures that show step by step that I took exactly the bones from the grocery store, boiled them, sawed them apart and cut them out would be more valid than just a receipt. In theory. There's a lot of nuance and human error involved. For some people, one piece of evidence will be enough, and for others, no evidence at all will be enough. Plus, as mentioned, laws change very quickly. I wouldn't be surprised if tomorrow there are new clauses that outlaw cow bones too. If killing elephants is a crime, why not outlaw any other killing of animals as well. Today it still seems absurd and impossible. But what will happen tomorrow?
-
Yes, the question about elephant ivory or mammoth bone is a very difficult one. I'm definitely not going to look for that material. If only because of its expensive cost. I am aware of the fact that one can find legal ways to acquire it. For example, in the form of strips of bone from musical instruments. Or old billiard balls. Maybe there are some other sources where you can get this material and without getting involved in smuggling or something else illegal. An artificial substitute would suffice for me. Or a natural substitute that superficially resembles bone, such as tagua nut. I wonder how exactly you can defend yourself against the charges. Let's say I use ordinary cow bone in my work. How can I prove that it is cow bone? And not elephant ivory or walrus tusk? For example, if I post my work process on the forums and the photos show exactly what material I am using, will that be a sufficient argument that I have not done anything illegal?
-
Thank you for your appreciation of my work. I'm very glad you liked it. I completely agree with you. In shipbuilding, the choice of wood depends on a very large number of nuances. And not every wood is suitable for small figures. Fortunately, this particular lion project gives me more room for experimentation and choice. The size of the lions is much larger than the usual ship sculptures I've done before. Which just gives me the opportunity to use types of wood with more active fiber patterns or nostril pores in the material. I still have time to think about which types of wood to choose for the other lions. Perhaps some of them will be wenge or another similar wood with a dark chocolate color. So far this is a question that has not found a definite answer. Virtually 100% among the lions will also be a lion made of bone. This is another puzzle that has yet to be solved. It is very desirable to make a French lion out of this material. It seems to me that a French lion just has to be made of that material. And it's either going to be cow bones, like the French captive modelers did. But then I would have to decide how to make a large figure from small fragments of bone. For obvious reasons, cow bones will not make it possible to find a solid piece of material. So it would have to be a prefabricated structure. And that's going to be a challenge. All hope is that the current work on the Fulminant ship will help to find suitable thoughts on how to accomplish this. And the skill of working with bone, of course. Or there is an option to take artificial substitutes for elephant bone for this lion. But again, I've gotten sidetracked. I just wanted to show that the choice of material for a complete lion pride collection is a separate topic. Interesting and not easy. I want the material and the image of a particular lion to complement each other. In the case of the French lion, this connection is semantic. And in the case of wenge, this wood can give the right parallels with specific historical prototypes. For example, with Spanish lions. Several of the lions of this shipbuilding school are dark. And it would be appropriate to emphasize this very point. At least, that's what I think.

.jpg.16fdf471af1c5a1d4b00dc97453f6922.jpg)

-
What happens next? Most likely the next lion in this project will be the Turkish Lion. But this, the next story will be completely different. If only because I did not take photos of the work process. Yes, at the moment the work is about 70 percent done. But when I'll get through the remaining 30 I don't know. I don't think I'll finish this lion anytime soon. I'll probably only post the finished photos. Turkish ship sculpture is completely unknown to me. I know almost nothing about this school. Except that I know that there, as well as in other Muslim countries, they did not use images of people. That's why all sculptures on ships are either animals and birds. Or ornaments of some kind. The lion I chose for reference is practically the only feline predator I could find on the Internet. I am glad that it is very different in style from Russian, English or other European lions. Which is already a great thing. And to my great regret with such a strong peculiarity of appearance I am not at all aware of how sculpture developed in Turkey. Who knows, maybe in time I will find something interesting to share. But only time will tell.
-
This concludes the story of the Russian Lion. It turned out to be very long. I thought for a long time whether it was worth publishing such long posts. After all, I could have limited myself to photos. Thank you to everyone who participated in the discussions and showed their interest in my work. Without this reaction it would have been much more difficult. So I want to thank everyone who supported me with their interest.


-
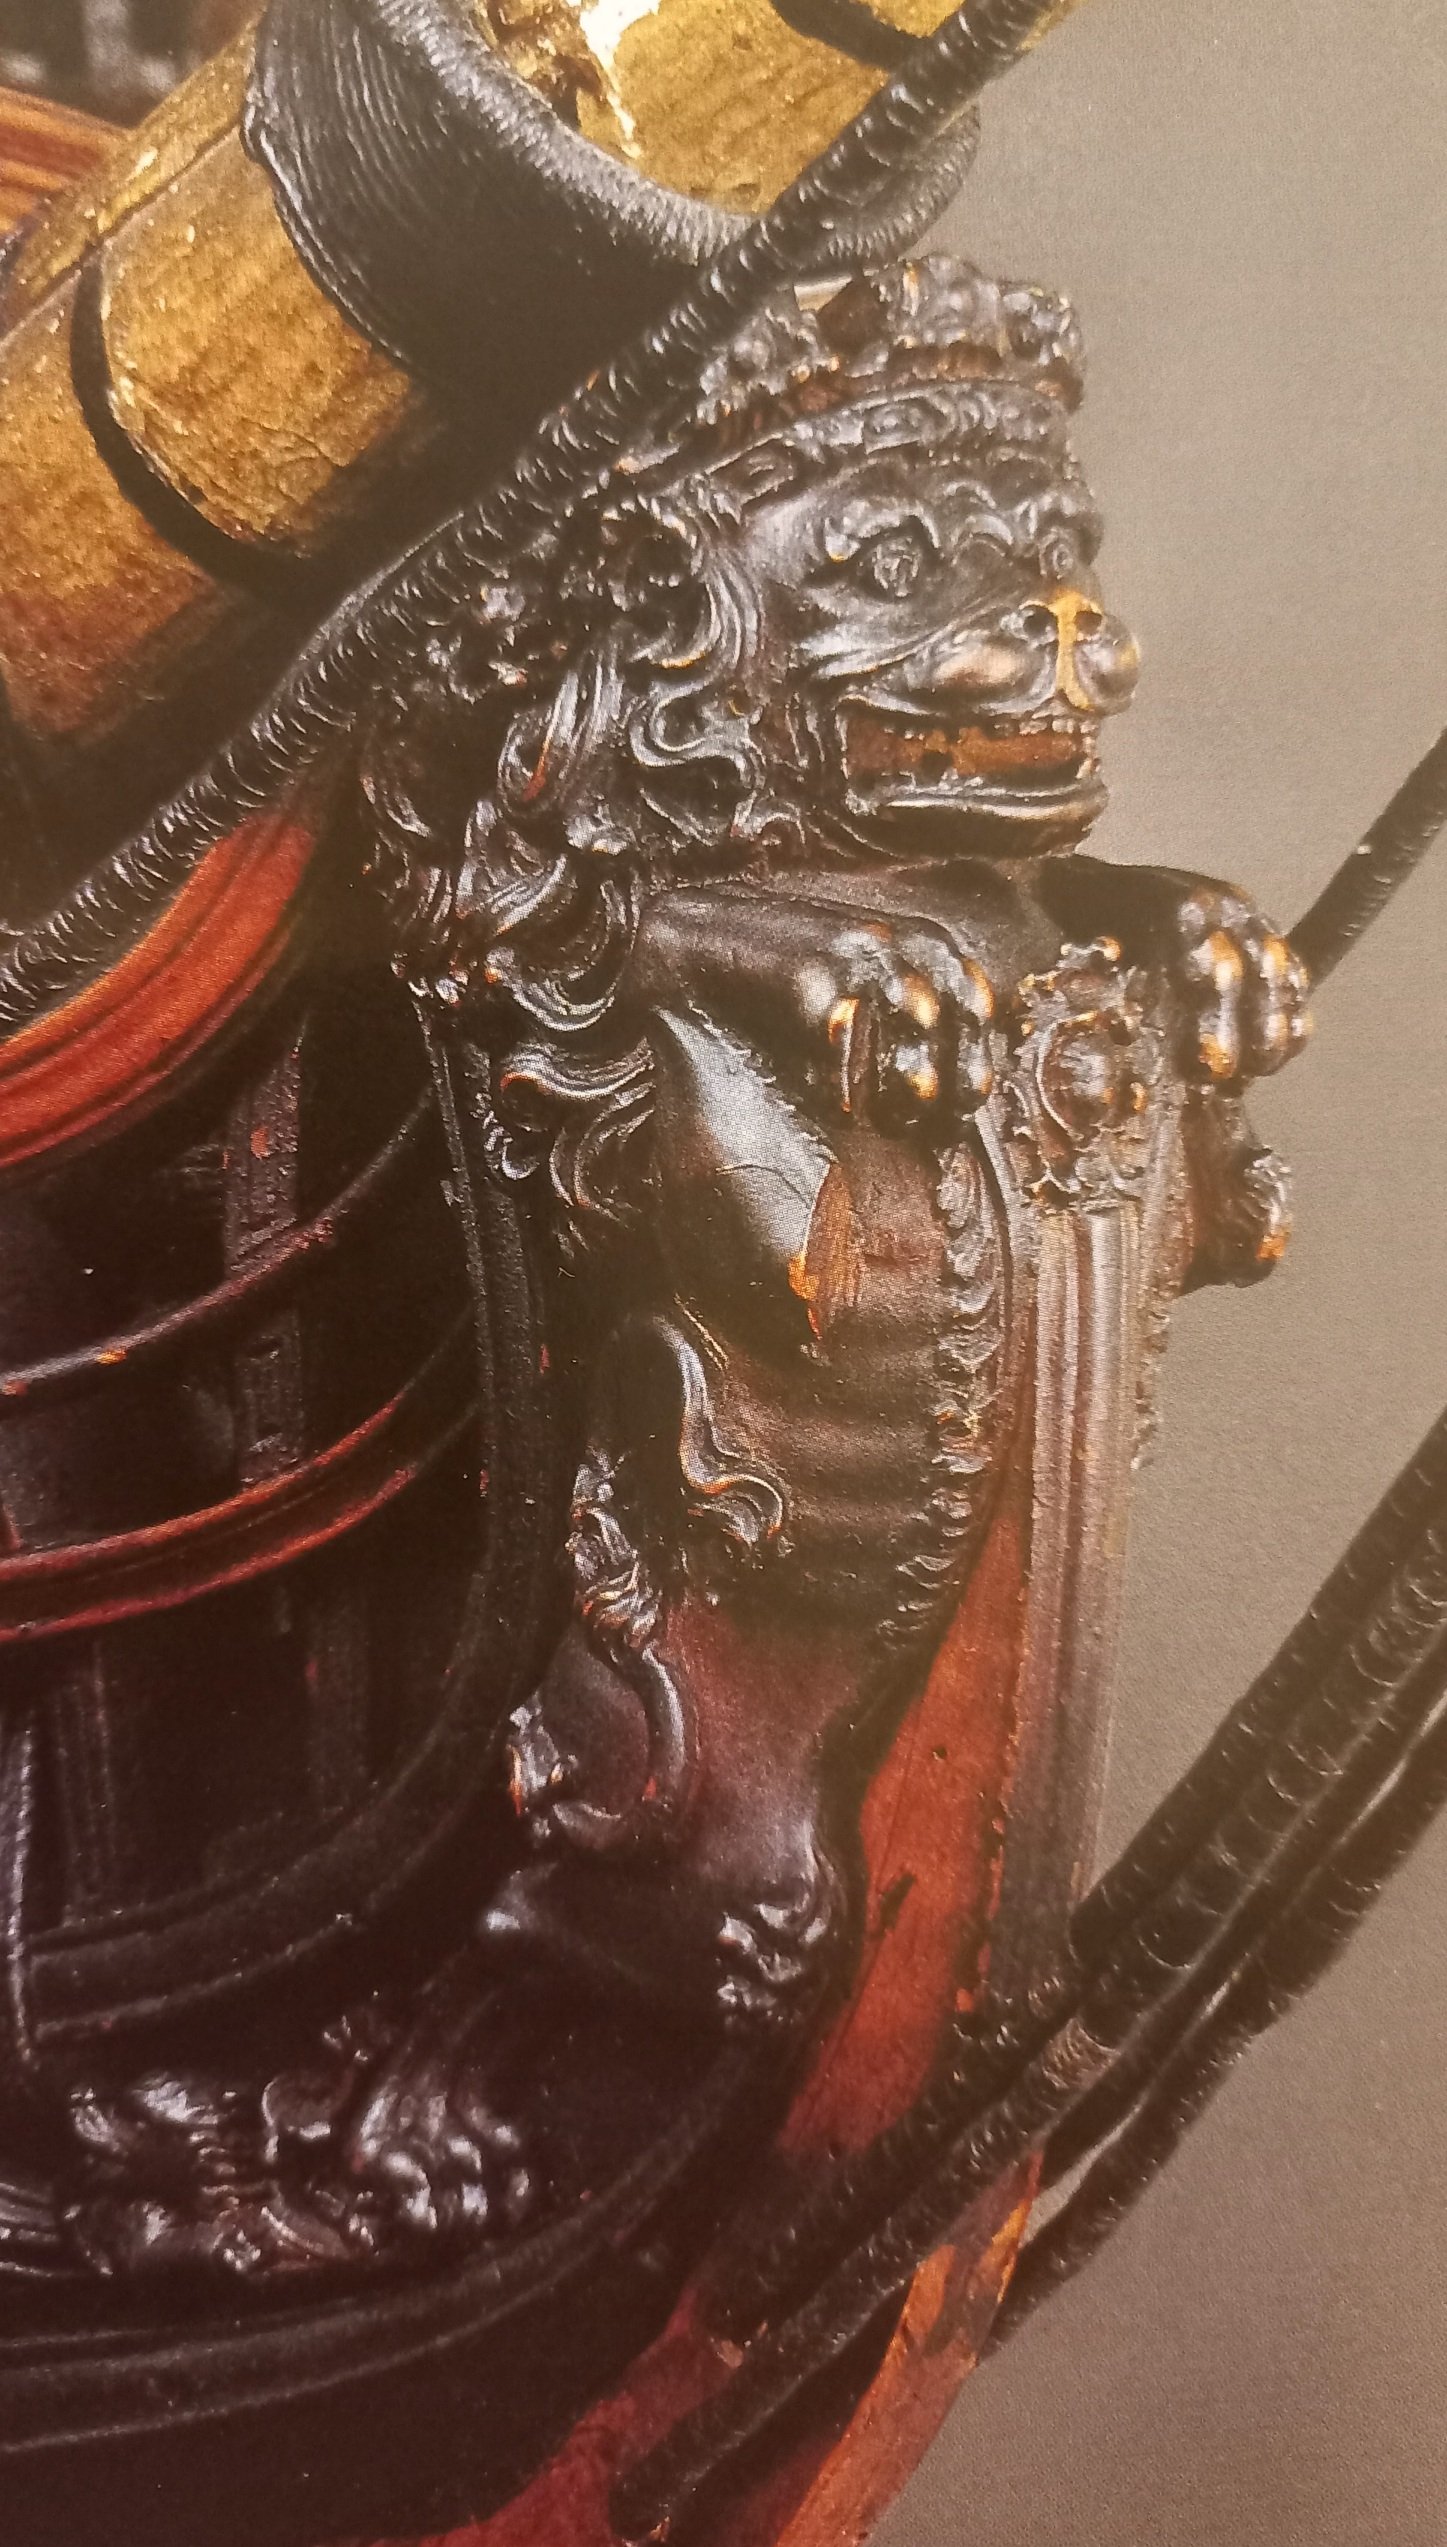
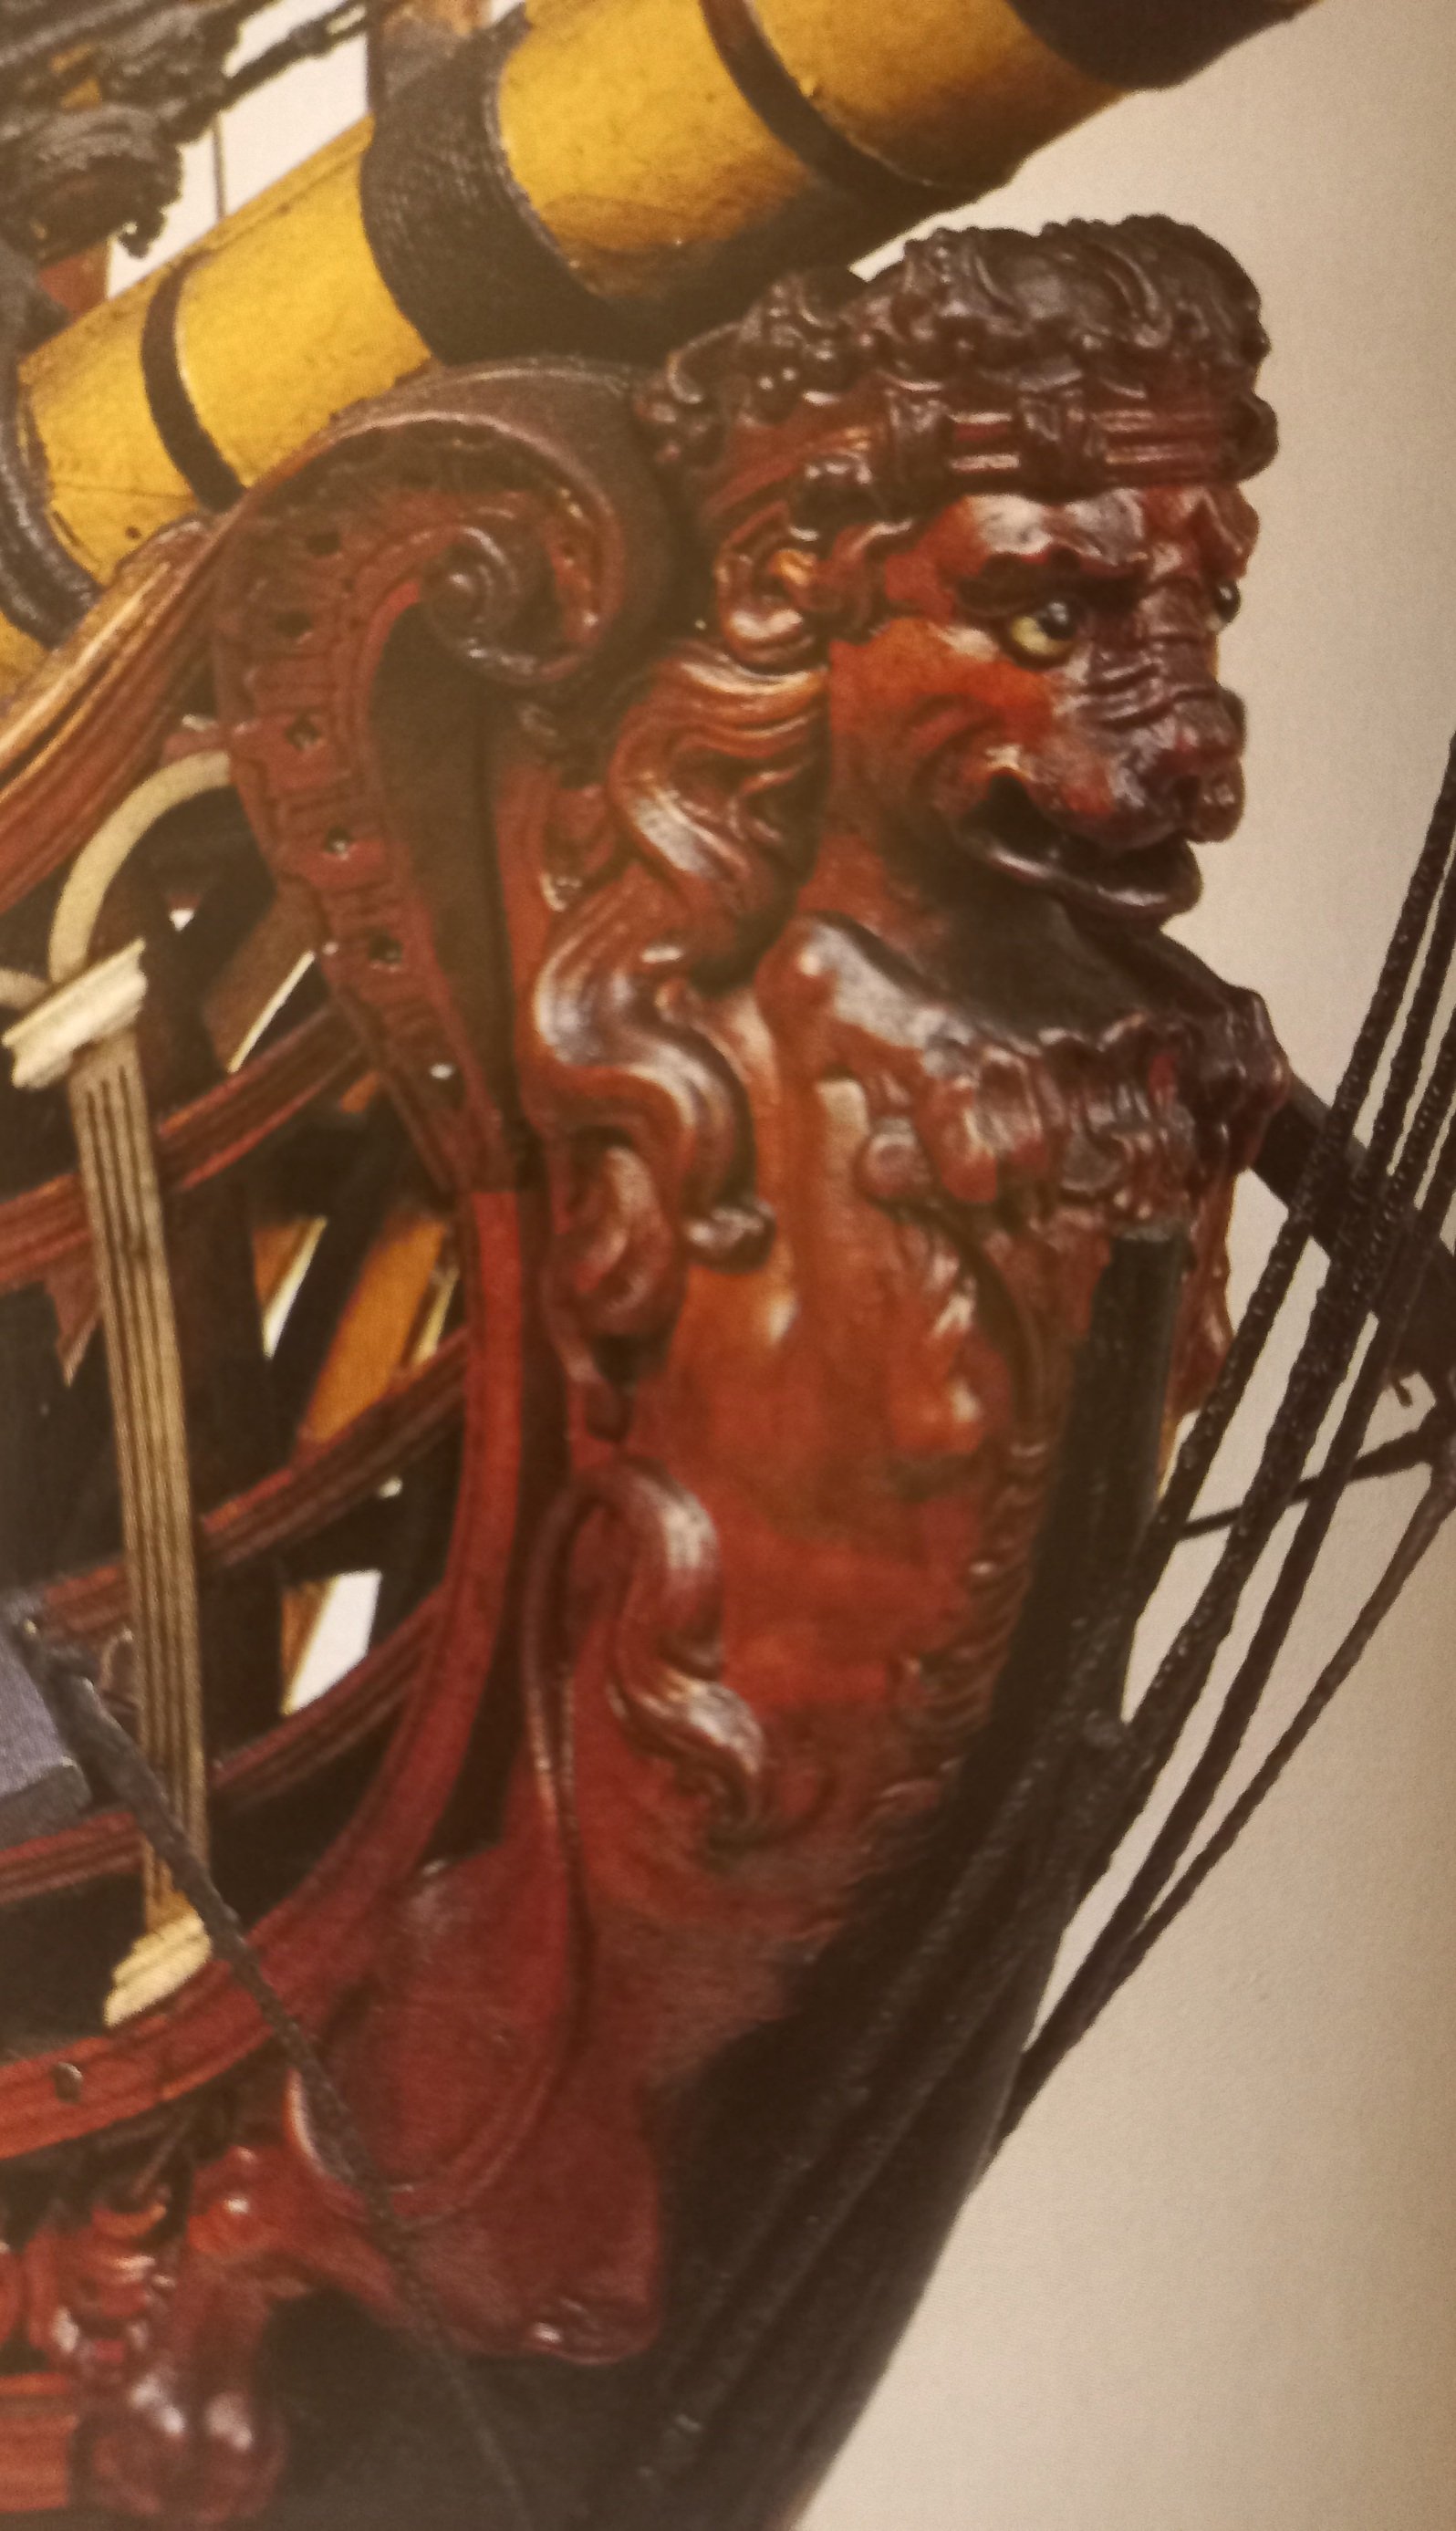
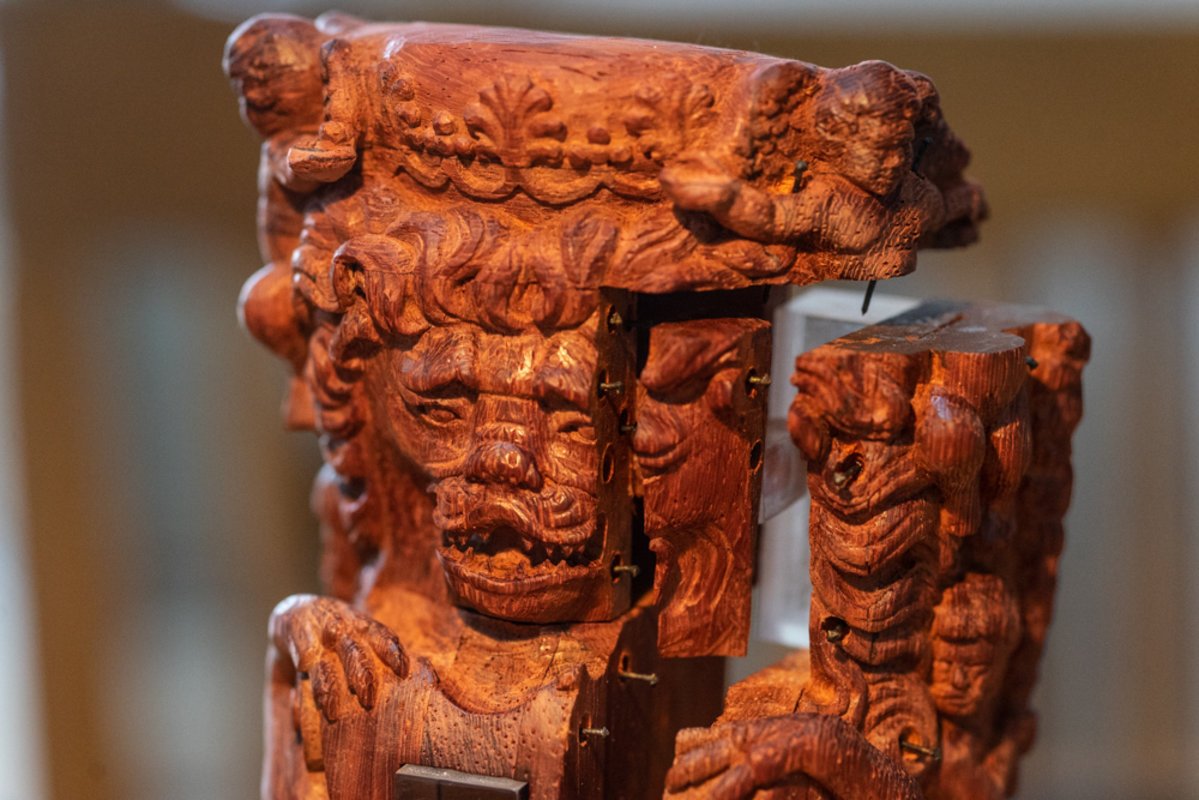
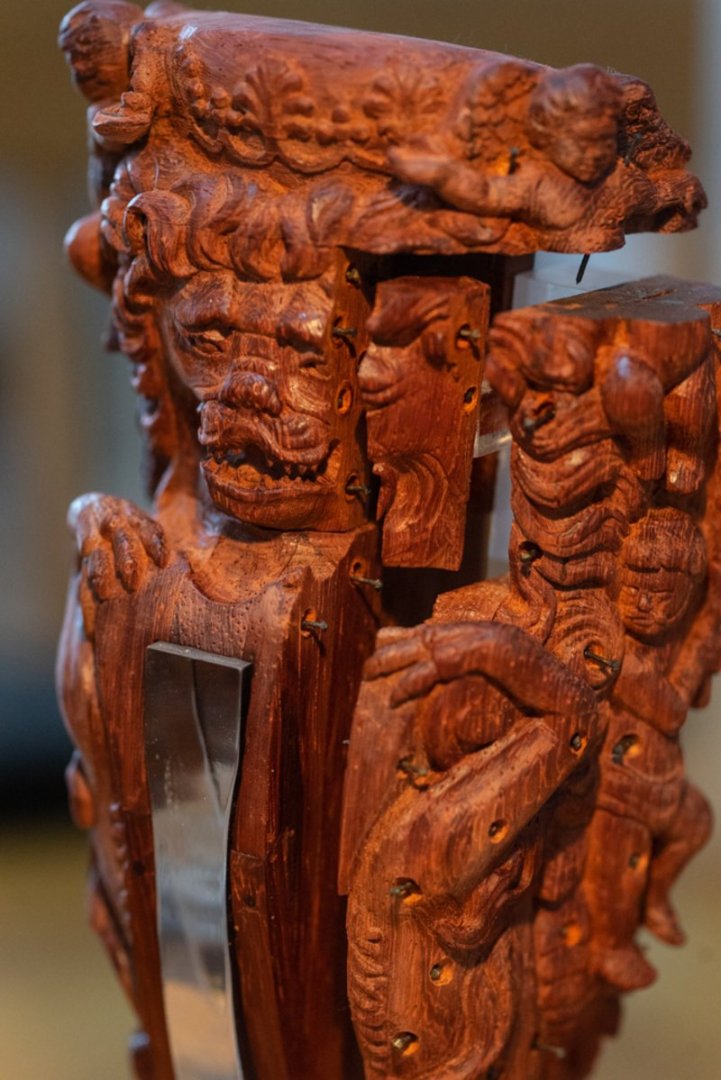
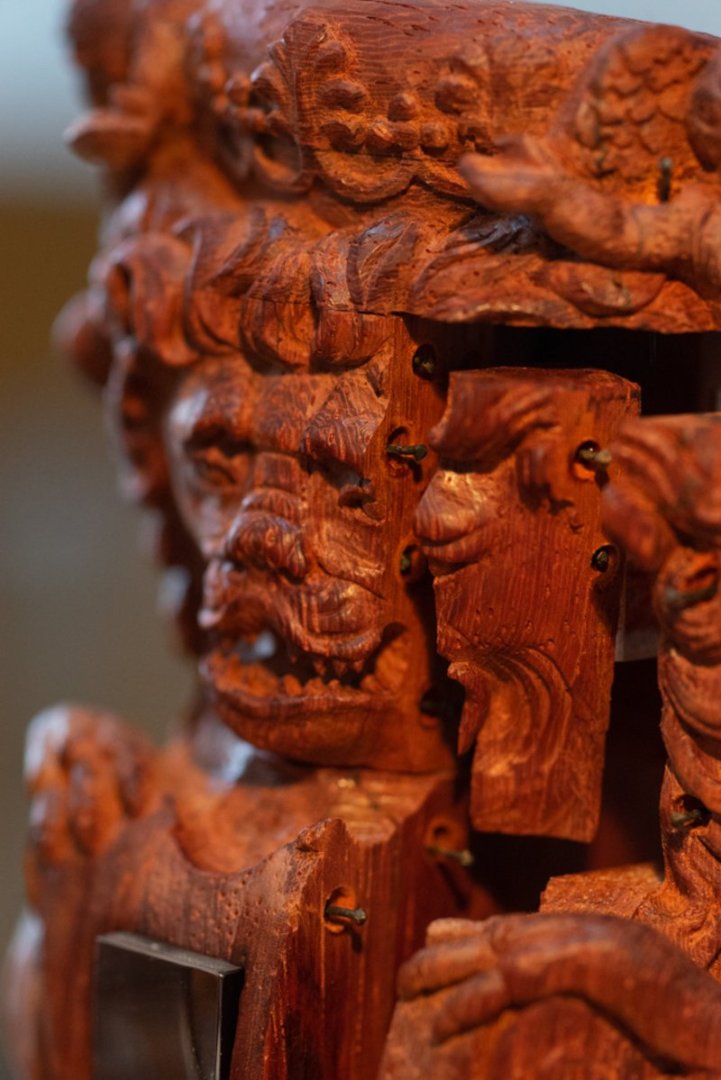
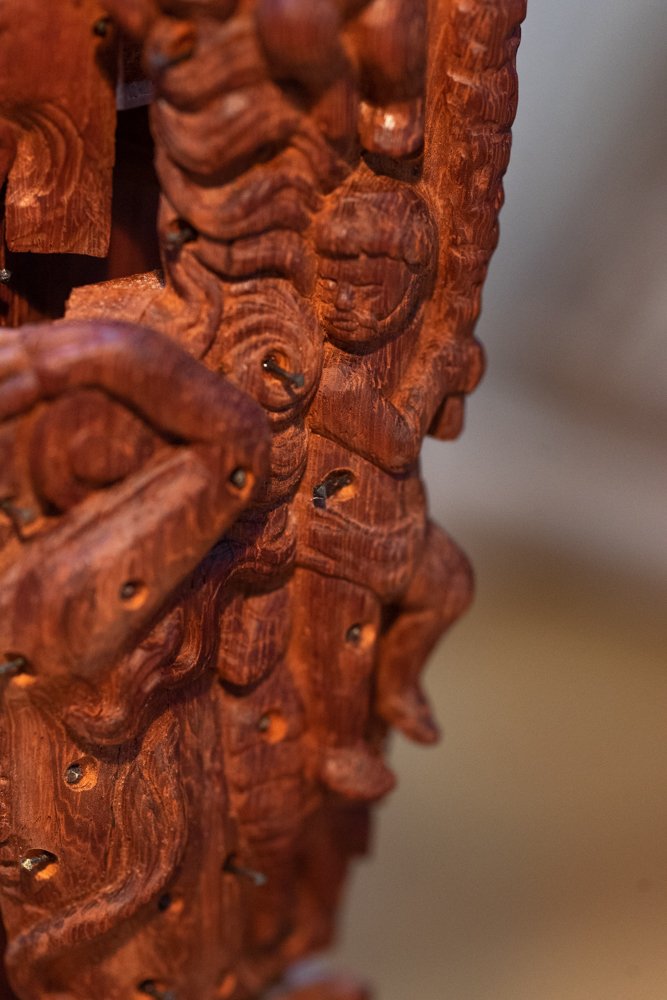
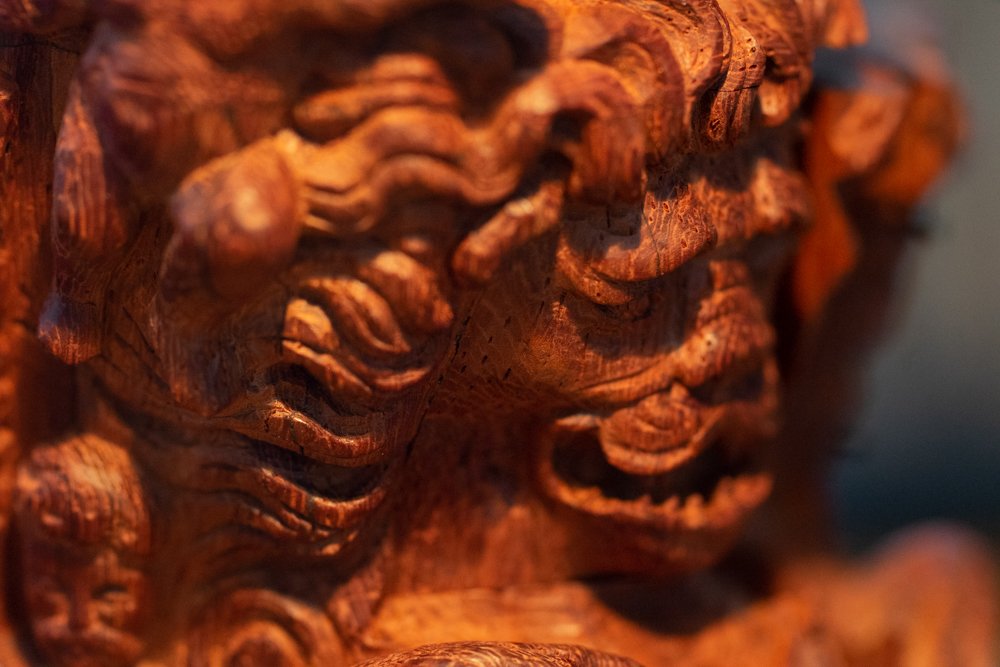
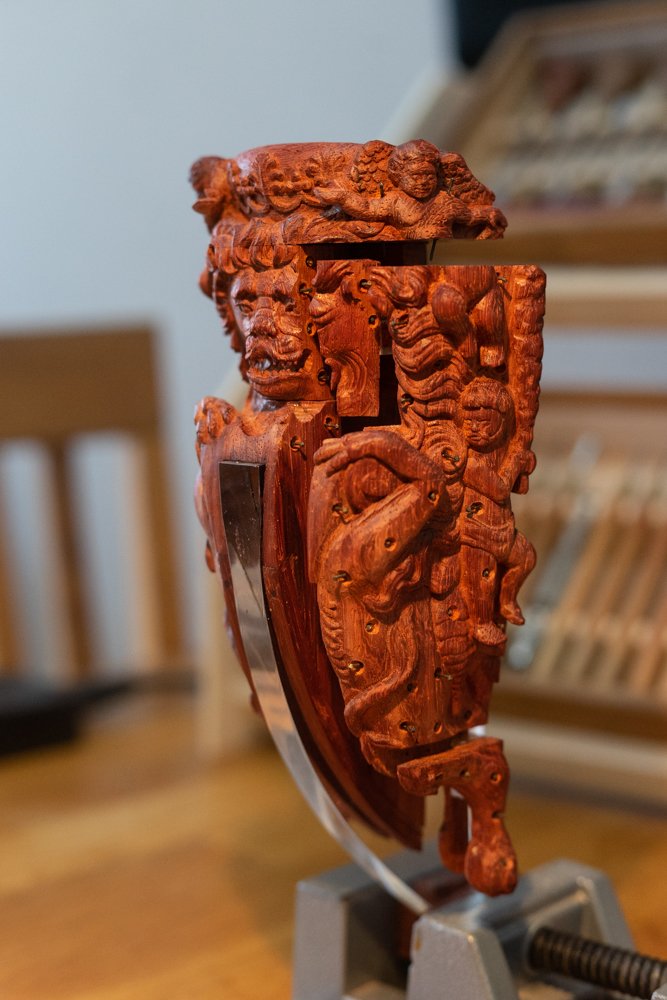
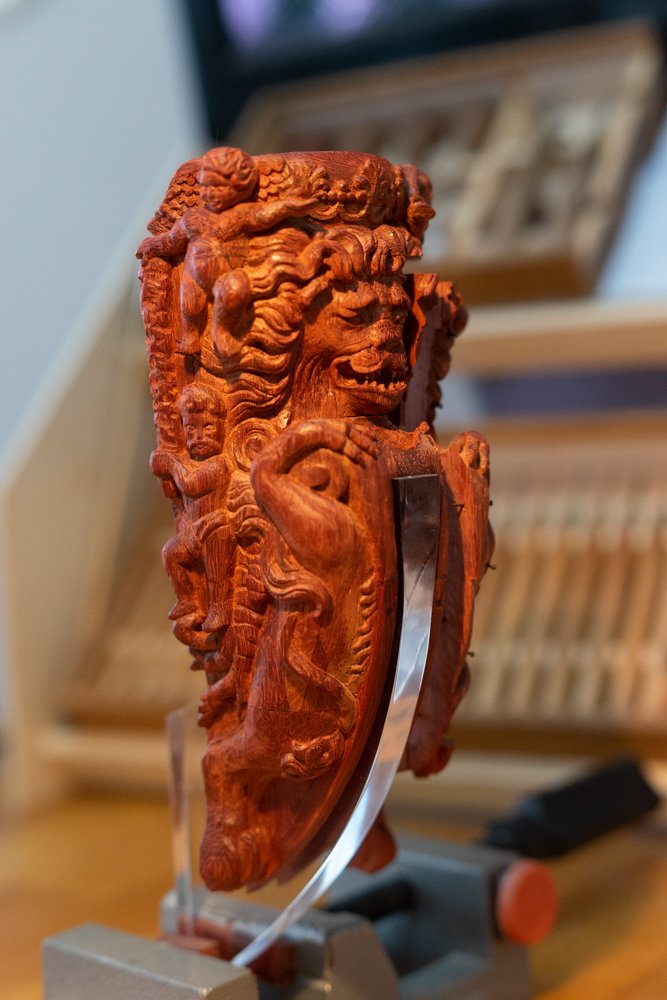
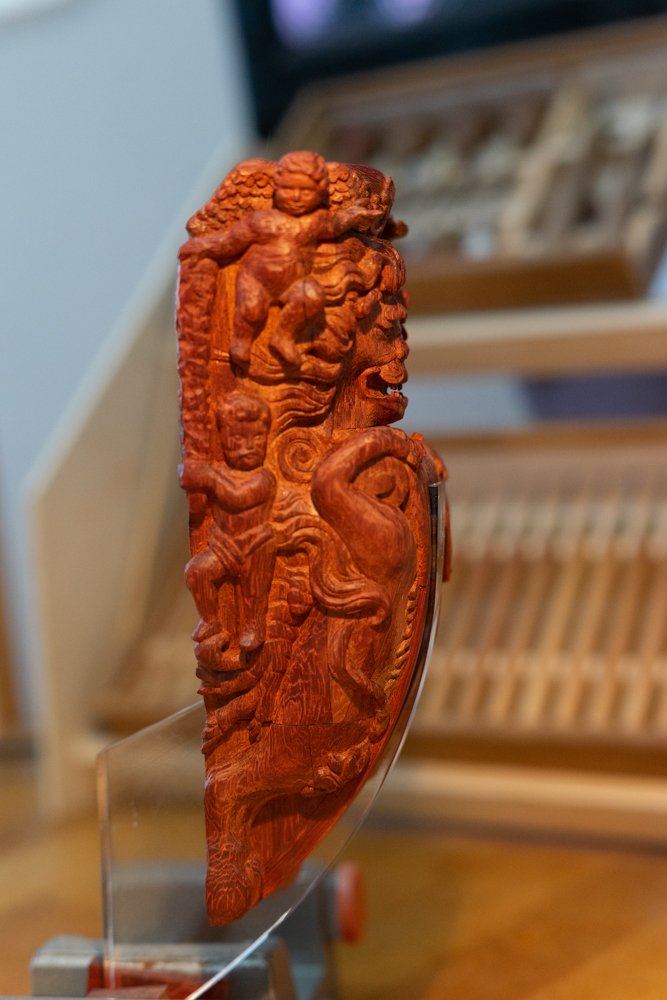
Well, here are the final shots of Chewbacca. This is the end of all planned works. This project was an unusual one. A lot of things were done for the first time. It was the first time I made a Russian lion. It was the first time I got acquainted with paduk. Very unconventional wood. It showed a lot of surprises and was not easy to work with. But I am glad that I did not stop and did not abandon this idea and brought it to the end. For smaller jobs this wood is probably not suitable. Unless there are some special designs where the fibrousness and frequent pores in the wood will be justified. In its classic form it is not the best material for ship models. But in my case it is the case when the disadvantages of wood did not affect the final result. Even on the contrary, it emphasized the desired effects. The final sculpture at the same time looks like a rustic, rough work. And at the same time, the color of the wood gives a completely opposite effect - something expensive and regal. And at the same time, even a fresh figure looks very old, as if it were found in the basement of some old castle. And I am sure that with time paduk will become darker, which will further enhance this effect. I'm happy that I was able to work with plastic for the first time. And as a stand it looks both neutral and at the same time the smooth polished edges, the cold shine of the glass "dialogues" with the uneven tool marks on the sculpture itself. When I was still working with plastic, I heard doubts from some modelers. Why did you use plastic? Better get a tree, they told me. Like wenge. It'll look very organic. But in the end I was happy with the way the plastic looked. First of all, it immediately reminds me of some kind of museum piece. In the future, there will be other lions in this Pride parade. Perhaps some of them will be made of dark wood, wenge or hornbeam. I haven't made up my mind yet. But I am already sure that whatever the future lions will be in terms of color and tone, the plastic will not "argue" with any of them. It is the most neutral to any color of wood. And having seen how the Russian lion looks on a plastic pedestal I was only convinced of this. And of course, this project was a premiere for me in the style of presentation. The variant with admiralty division into sectors, the nails shown were an unexpected solution for me. For someone this look may look controversial, but I'm glad I decided to do this experiment and I like the way this lion looks exactly. I hope that when the whole collection comes together it will be interesting to look at. And each of the lions will tell its own story.


- 546 replies
-
- 10
-

-

-
Life changes. I used to be able to run like a deer and jump like a kangaroo. Not anymore. What I could afford yesterday is not so easy today. It took me a long time to save up to buy these kits even then. And not just those. I had my own workshop. Today it's a little corner in the basement or a dining room table. But sadder than that is another thought. Now I'm thinking about what could happen tomorrow. I wonder if I'll spend it on something I won't be able to use tomorrow. But I'm not complaining. On the contrary, I have the strength and desire to pursue my favorite hobby. My arms and legs are moving and my head is working. And many people do not have such riches as I have. You just need to make sensible decisions. There is a great desire to have all possible machines and tools. But sometimes you can think of something that can replace expensive solutions. Or maybe time will pass and I'll save up for such a contraption. And I'll be happy again.
-
Yes, those are the exact machines in question. I looked at them, then I looked at my carriage. Then I looked at the price of the machines and I went to cry. I even thought they would be more expensive, but I was still impressed with the price. Found a Chinese analog on Ali Express, costs half the price, but.... Many different But... Tomorrow I'll try how I can grind at least one test groove in the sharpening stone. Without a router. Already scared...
-
I'm not very good with computers. I didn't immediately realize how to find information. The name Dekel in the search showed different covers. It was only after some time that I realized to look at the picture. And I found some information about similar machines. It's a wonderful piece of machinery. It has, of course, some peculiarities. On the one hand, I saw that they have a set of collets of different diameters, which is a plus. But at the same time there are still some limitations, if we consider them in the matter of sharpening these chisels. I'm not sure if the pear-shaped handles will fit in the mount. Or even more correctly, it is almost certain that most likely this will not be realistic. Long handles, too. Still, there will be a lot more advantages. If access to such a machine became available, I would definitely consider the question of making removable handles. My very first carving kit had just such a removable handle. There was only one. It was in the shape of a pear, and all the blades had to be changed. It worked for me as a first set. Ah, back in my college days, how long ago that was. I'll make a note of it, maybe one day I'll come across such a machine somewhere. I haven't found an ad for something like this yet.
-
Yes, a professional machine. I daresay it's for cutting corners on gemstones? Although there would be a mandatory fluid feed and most likely the disk would be horizontal. But there's probably a lot of variations. If I had the blades separate from the handles, it would be the most ideal. As it is, the tool mount would need to be further modernized. Ni or tear the blades out of the handles and give the tool new ones so that the blades can be easily removed. Having something like that would be a dream come true. Tell me, and similar machines are found somewhere in the sale. Just wondering what the cost might be? I will see the price, roll my eyes and once again realize that it will remain just a dream. I just want to cry...
-
Yeah, that's pretty much how I operate, too. This is what my cart looks like. Straight blades are sharpened with the fastener fully clamped. When sharpening semicircular ones, I loosen the nuts slightly so that the tool barrel can rotate. I roll the cart forward with one hand and rotate the tool in the slot with the other hand. The overall result is good. And you can cut. But as I said it all depends on how many sharpening cycles have passed. Little minuses gradually accumulate. This can not be avoided with this method of sharpening. I'm looking for a more precise option than this.


-
The 2nd option is much more complicated. It is based on a different principle. If the first is purely mechanical sharpening by hand with the help of devices, the second option can be called machine sharpening. And this principle can also be divided into several variants. The basis is a general principle. You need a rotating abrasive. And you need a bed in which the tool is loaded. This bed also rotates. And as a result, the sharpening will take place with a precise radius. Then the options for achieving this can vary. For example, there is an option where the tool is loaded into a cart. But it does not hold the chisel rigidly, but can rotate around the axis. At the same time, the wheels on which this cart rides transmit the rotation to the tool mount. Which will add up to a proper radius sharpening. This method can be transformed into different shapes. For example, small motors can be used. One will rotate the disk with abrasive, and the second will rotate the chisel. Such a variant is even easier to make than an overly complicated rotating cart. There are too many different connections, and each element has to match perfectly with the others. Because any backlash will lead to poor quality work. And such a mechanism can only be made with precise equipment, which I don't have. Even two motors would be easier to connect. I looked at different spare parts on amazon and theoretically such a device can even be tried and built. However, I already know that in the process there are bound to be problems that I don't even know about now. And in the end, probably, it will be cheaper for me to buy a real machine than to build something from separate elements on my knees. I remember very well how I recently made a homemade sanding planer and what problems and questions arose in the process. I don't know, maybe I wasted my time for such an overly detailed description. I am not good at expressing my thoughts in a short form. But maybe this will make sense. Someone will suddenly suggest something useful. That would be great.
-
1 way let's call conditionally simple method. It requires 2 components. 1 is a cart, which will firmly hold the tool and give the desired angle of the blade. 2 component - a shaped bar with abrasive. This is a fairly common method of sharpening such tools and usually such bars can be easily made from a block of wood. Then abrasive paper is placed in a groove on this bar. That's it. But with such a small tool, this method will not work. The groove is so small that no paper can be placed in it. I thought that instead of paper, I could use sanding stones. If you can make a ball mill of the right size in it, you can get the grooves you need. You could make a small bed into which the slats with the stones would be inserted. Each diameter has its own grinding bar. You can take several variants of stones with different grits, which will allow you to more accurately make sharpening or polishing. In theory, such a method should work quite acceptably. However, I have a few buts. In order to do this I need at least a small milling machine, for example from Proxon. I even tried to buy one of these on private sale. But I fell for scammers and my money went into a dishonest pocket, I was not careful enough. So for now I can't realize this idea myself. Also, there are questions as to how much grinding stone grinding is even possible. They vary in hardness. I don't know how the cutters will behave, there is a possibility that they will wear themselves off against the abrasive and end up with nothing. In any case, the answers to such questions can only be solved by practical method. Try and see. Otherwise, nothing will work out.
-
Yes, I was talking specifically about Mikhail Kirsanov's instruments. I have 3 sets of his tools at the moment. One with thin handles, that's what I use. There is also a set with almost "adult" sizes. And this set has pear-shaped handles, sometimes they are also jokingly called enemas. It was once an experimental set, and Mikhail gave it to me as a gift. I have not met such a set on sale, although I may be wrong and he also makes such sets for sale. Not everyone shows their tools or publishes their hobby at all. I have one more set lying around as a spare. It has short and thick handles. And because of this, the chisels require more space in the box. That's why I have this set in two separate packages. I once ordered this set as a gift for my father. But he died and never got to use it once. So the set came back to me. And I keep it as a memory. So I have a rich experience with tools from this master. The question of sharpening is quite complicated. First, it is important to realize that everyone uses such tools with different frequency. Someone takes it out occasionally and makes a couple of cuts where no other tool can get through. I, on the other hand, use chisels a lot when I'm working on carving. They literally get hot from the intensity of the work. Accordingly, everyone's need for sharpening is different. There are also different sharpening needs. Ideally, it's a little straightening, and a couple of strokes make the tool sharp again. But even a couple light touches of the most delicate abrasive gradually imposes small inaccuracies. I've made a little cart for myself that helps with sharpening, but it doesn't produce perfect results either. There are complications. Straight chisels are easier to sharpen, but there are problems with them too. When the width of the tool is very small, the slightest misalignment causes the angle of the grind to go wrong. At first I was frustrated, everything seemed to be correctly pressed and measured, so how could the curvature appear? And I tried to correct it. But then I realized that every next attempt to correct erases the metal. It's easier to leave the sharp blade alone and work with it, and tolerate the fact that the edge is not at 90 degrees, but with a small slope. It will be more expensive to correct this disadvantage. With round chisels it is much more complicated. Any theory of sharpening can be described by the following formula. For an ideal edge, the entire length of the blade must be in contact with the abrasive for the same amount of time and experience the same pressure force on any part of the blade. As soon as either of these two parameters are violated, the blade will be defective. Semi-circular chisels need to be run across the sharpening stone and rotated at the same time. It ends up being a lot of fun. Like I said, sharpening errors can accumulate, and in the initial stages you can't see them. But the further along you get, the more they affect you. At one point, the inevitable finale will come - the tool needs to be resharpened, not just corrected. The beauty and power of Michael's instruments is precisely that they are made with jewel-like precision. On precise equipment. And of course the man himself has a steady hand. You can't get such perfection by hand. If someone has experience in sharpening and can share methods, I will gladly accept any advice. Now I am trying to make a different kind of sharpening device. And I see two possible ways to go about it. Since the more complicated issue is with the semi-circular tool, I will describe these methods with this particular type of chisel in mind.
-
Speaking of which, I'm just now trying to solve a difficult problem. I'm doing my carving with mini chisels. They're unique. Chisel sizes start from 0.5mm up to 3 or 4mm. The smallest one I have is a 0.3mm semi-circular chisel. I once had them made to order by a craftsman from Moscow. A very handy and high quality tool. However, it has its own peculiarities. Such a small tool is very difficult to sharpen. The slightest misalignment and the sharpening will be uneven. And now imagine, if the total size of the blade is 0.3 - 0.5 mm, what is the thickness of the metal? The tool is very thin and every rework of a wrong sharpening will wear the metal very quickly. Can you imagine what a challenge this is. This is where you need devices that will make the sharpening movements error free. In terms of precision, these are almost jewel-like tolerances and backlashes. And I am now in a state where, after repeated sharpenings on my hands, the tool has accumulated so many errors that it will soon be possible to correct everything only with serious equipment. And I am trying to find a person who could help in this task. There are two options here. The first option is to make the device itself, so that I could sharpen my chisels with its help. Or the second option is to sharpen the tool on someone else's equipment, if the master works as a jeweler. Now I am asking everyone who theoretically can be useful. But so far without results. It's a complicated subject.
-
Of course, people who know how to work with machine tools, make unique tools or make some individual elements for ship models exist. The only problem is that it is sometimes not so easy to find them. I know several specialists in Russia or Ukraine who cooperate or used to cooperate with other modelers. And sent orders to different countries of the world. But now many connections have broken down. And even if the person himself is still engaged in production, it is almost impossible or very problematic to send parcels. Finding contacts used to be easy. On forums, on special sections there were announcements where masters offered their services. You could buy or sell your tools if you didn't use them. Or books. But I find it difficult to navigate in the current environment. I don't know if other sites or forums have similar sections? And in general, are there people who want to collaborate with others and make something to order?
-
Thanks for the review. I am very glad that you liked the idea of showing the sculpture in a not quite standard way.
-
It's impossible to buy such a set nowadays. The master has long since stopped producing them. At least I haven't seen any mention of them on the internet for a long time. I bought this set about ten years ago from a master from Sevastopol.
-
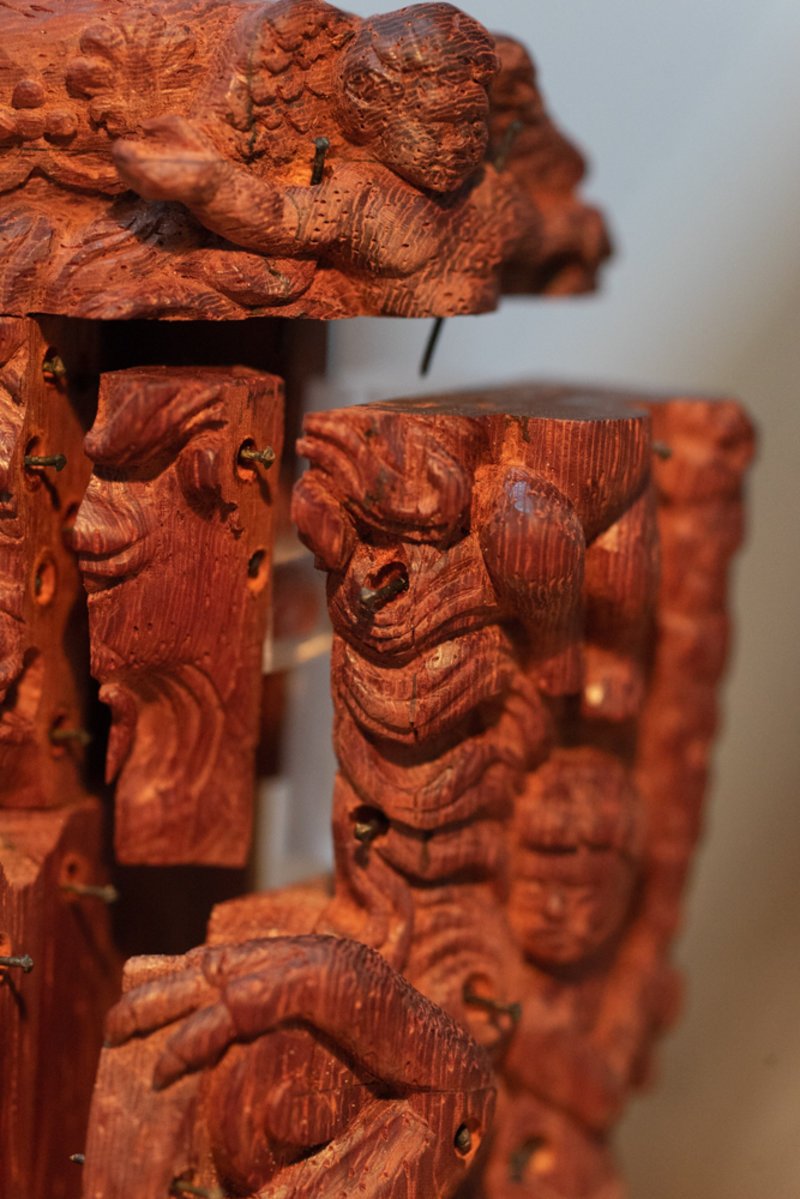
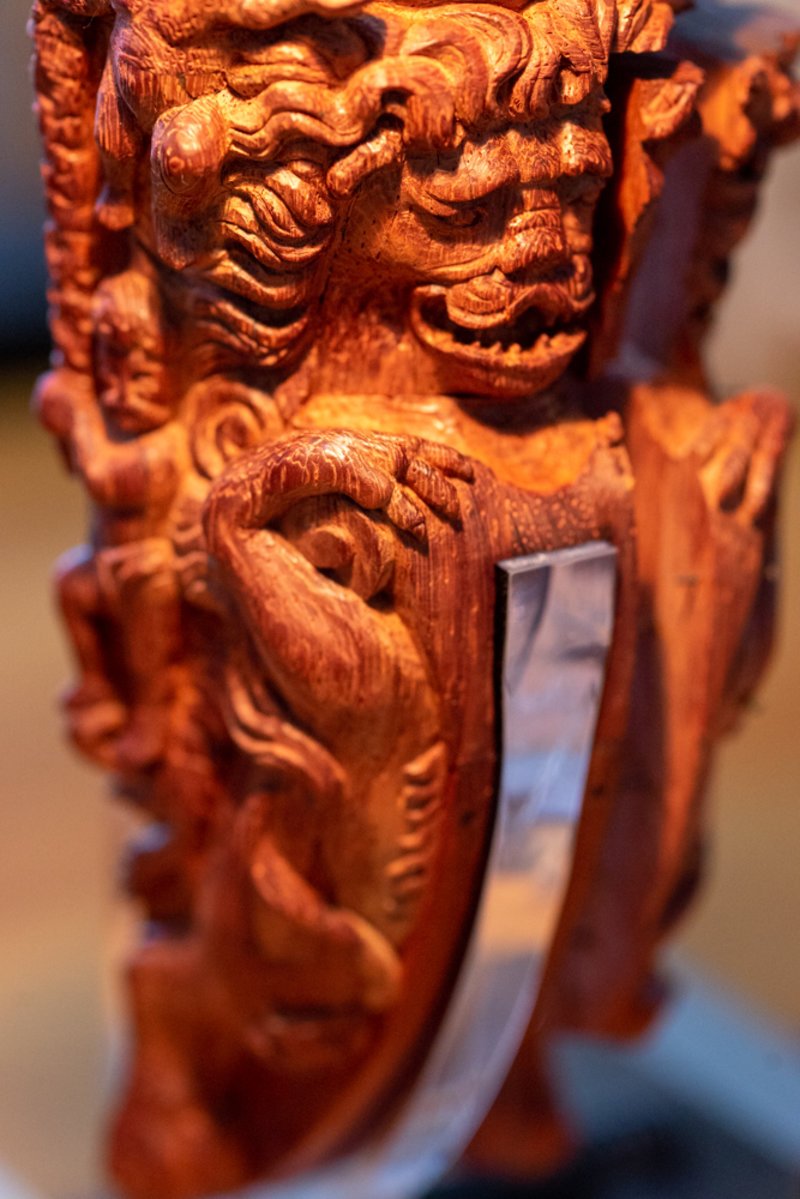
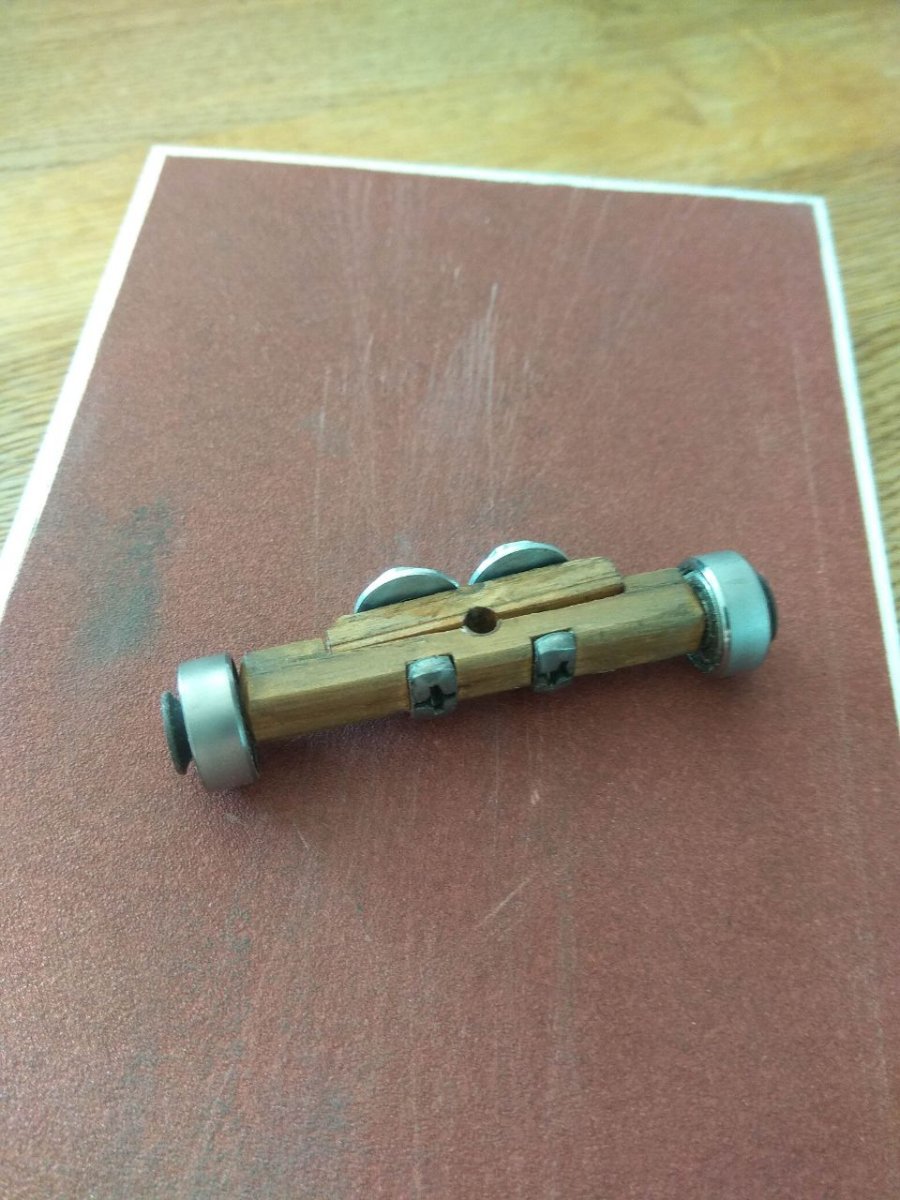
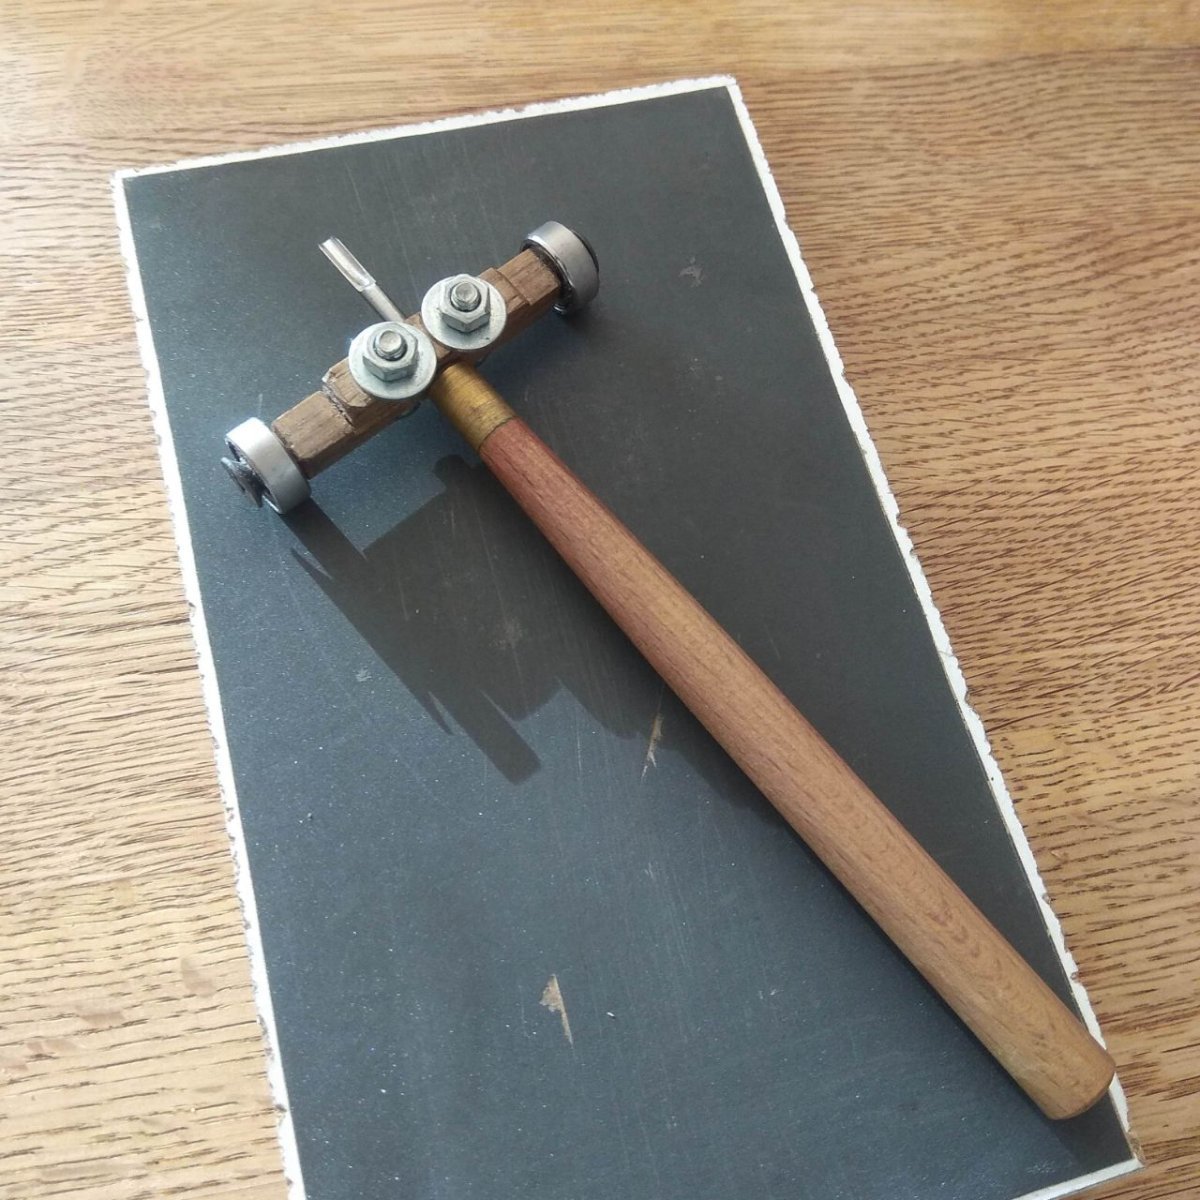
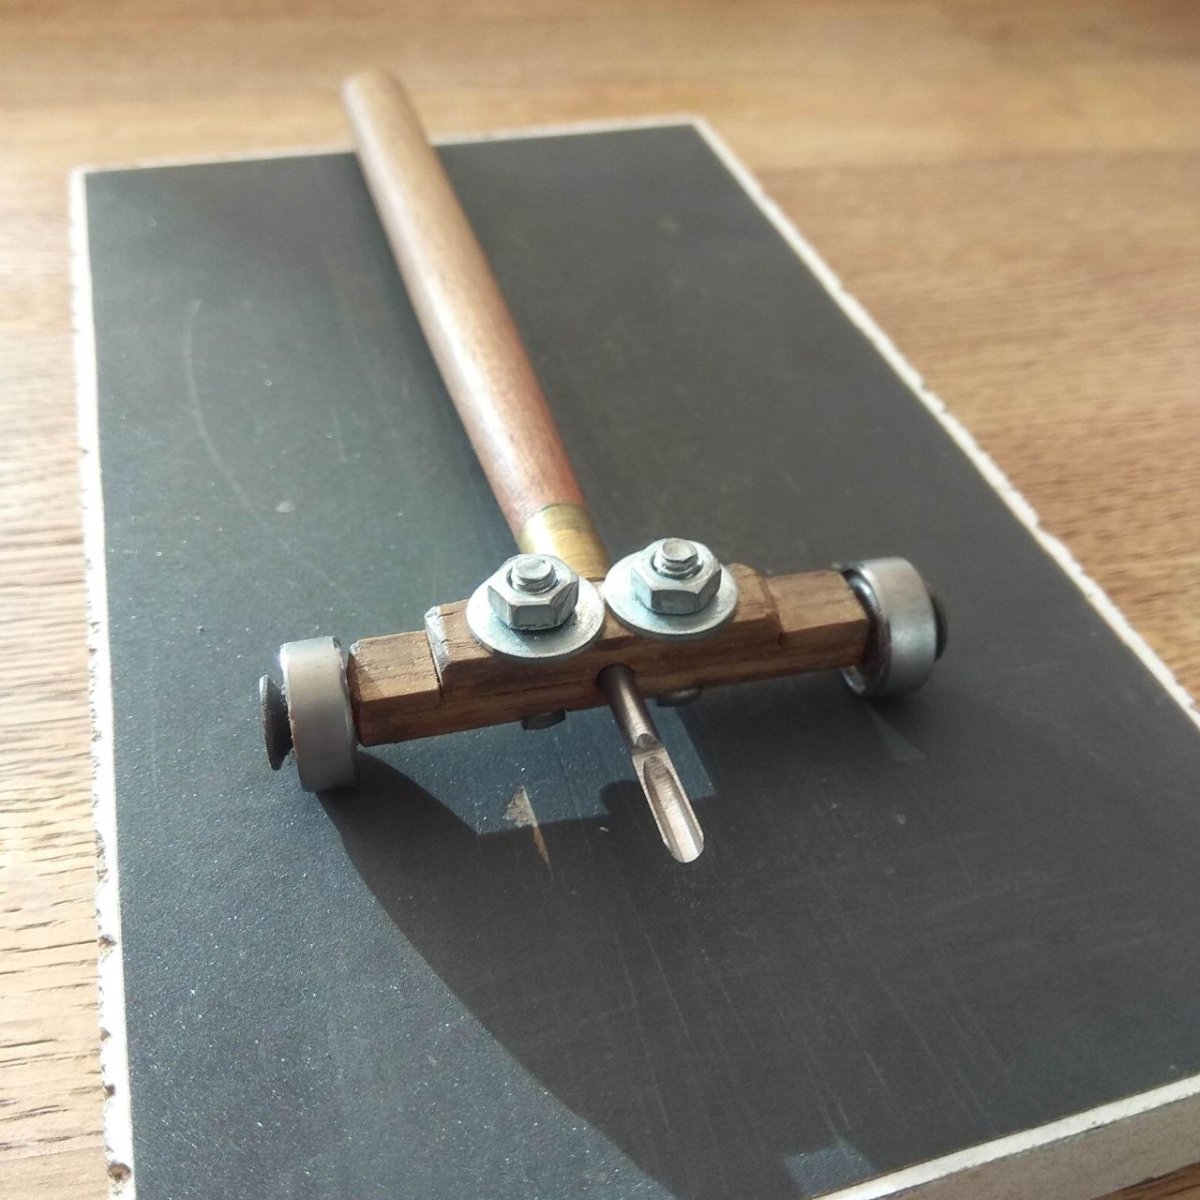
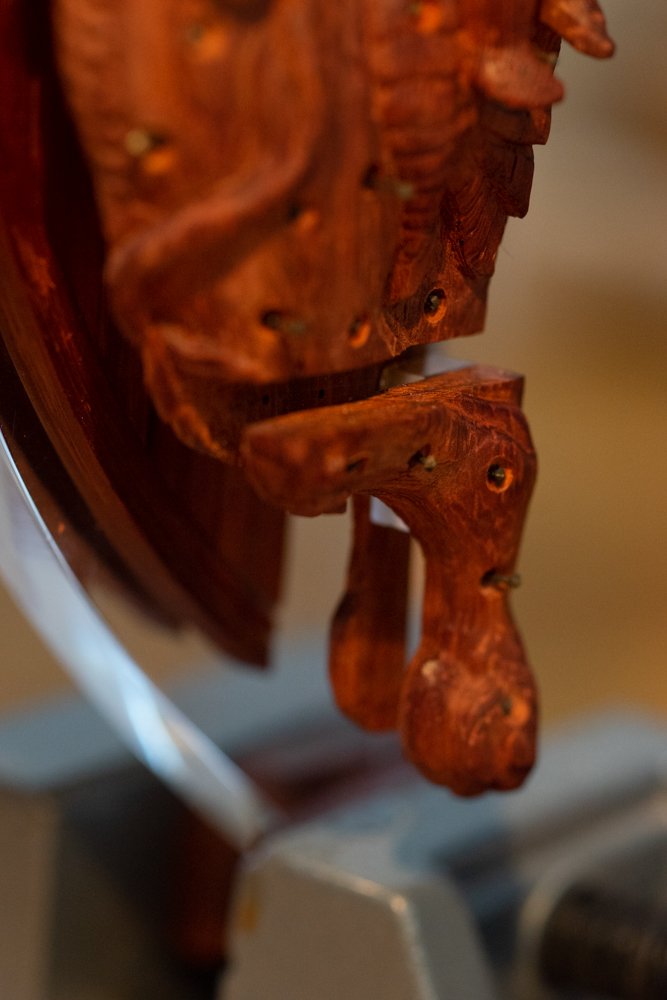
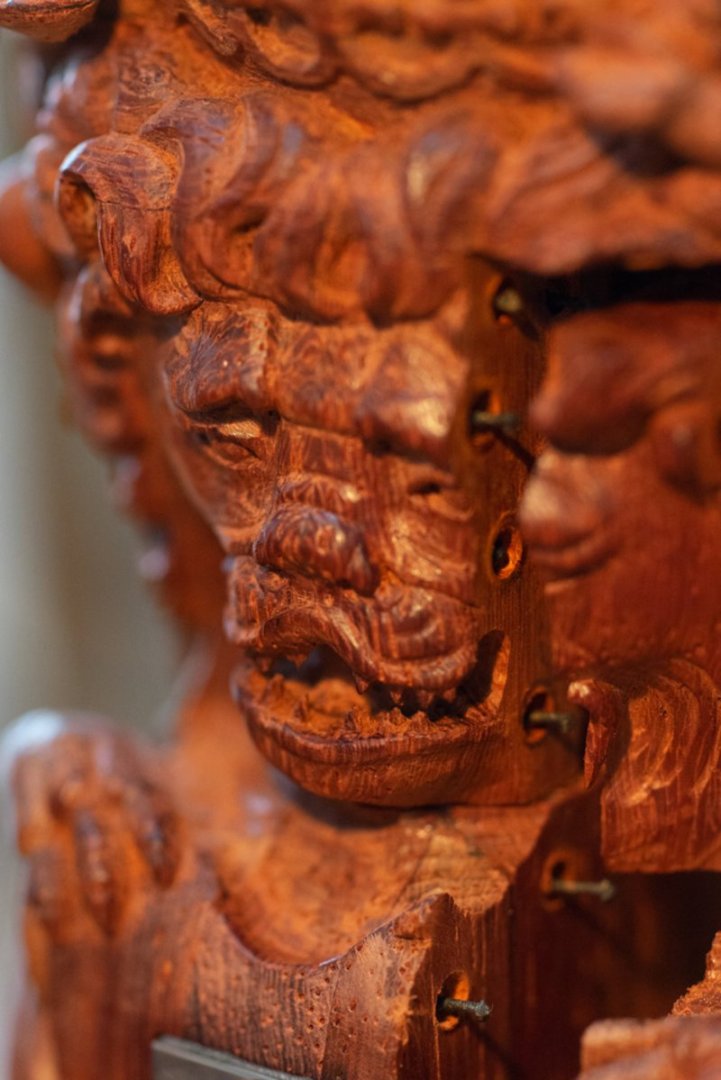
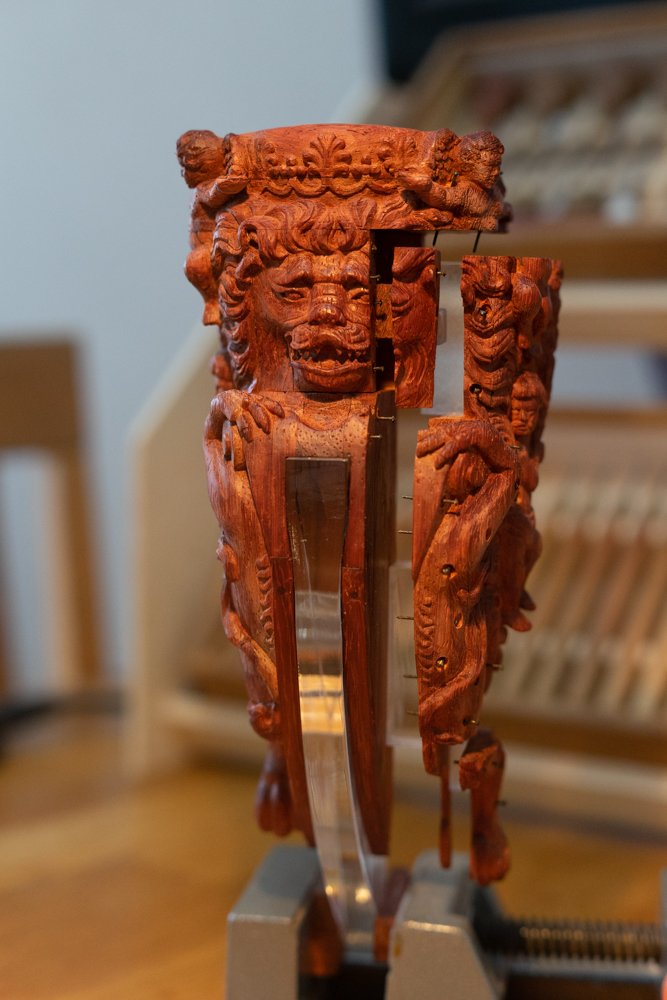
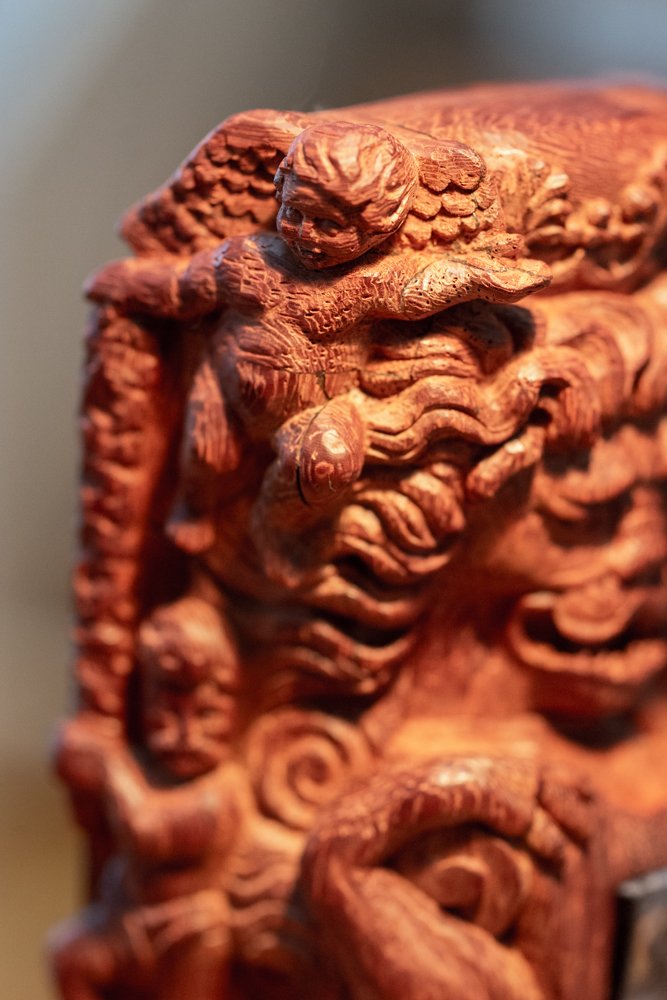
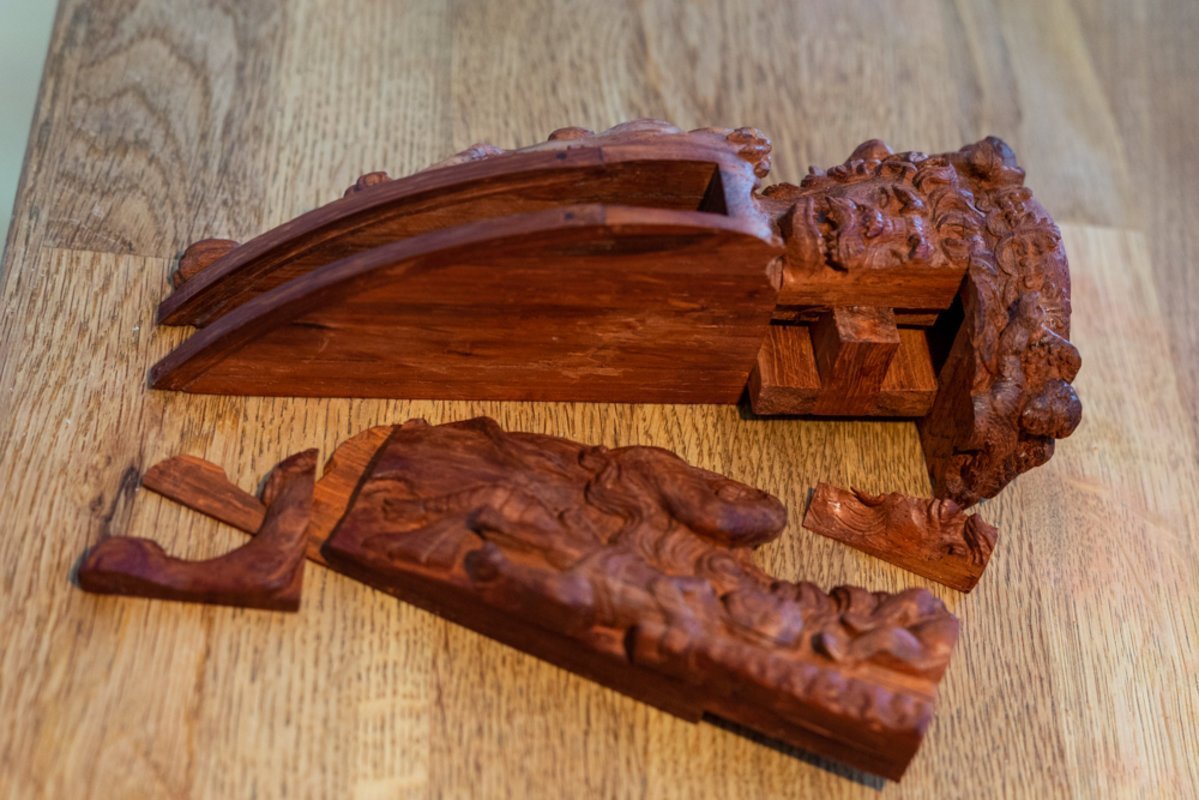
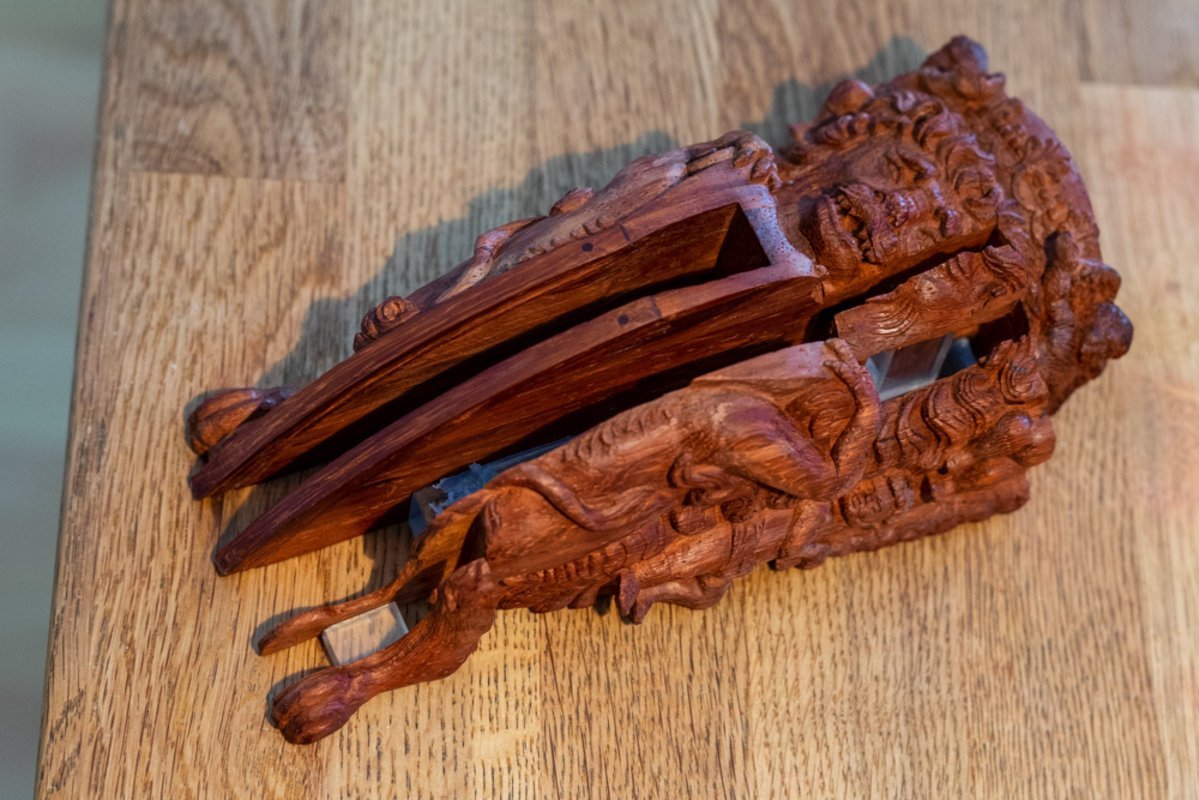
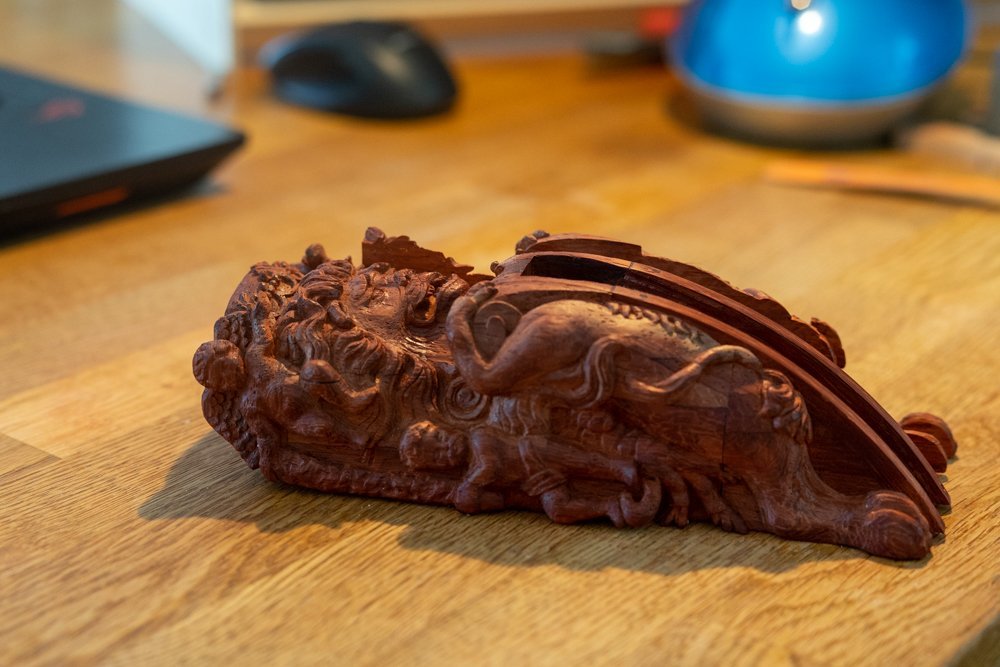
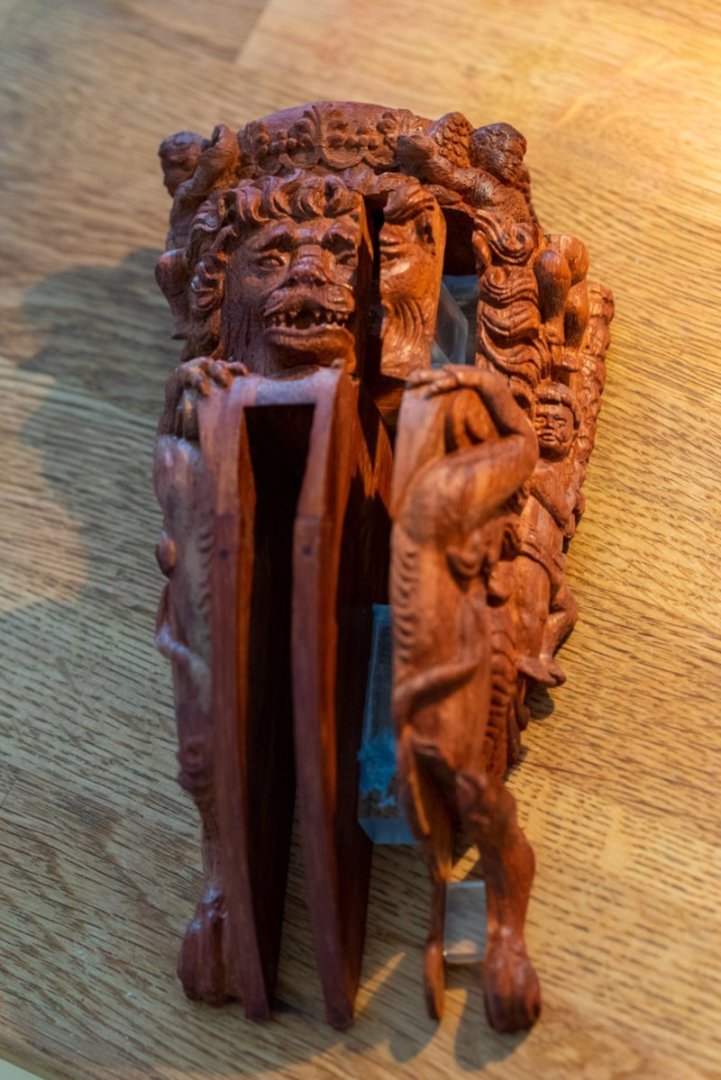
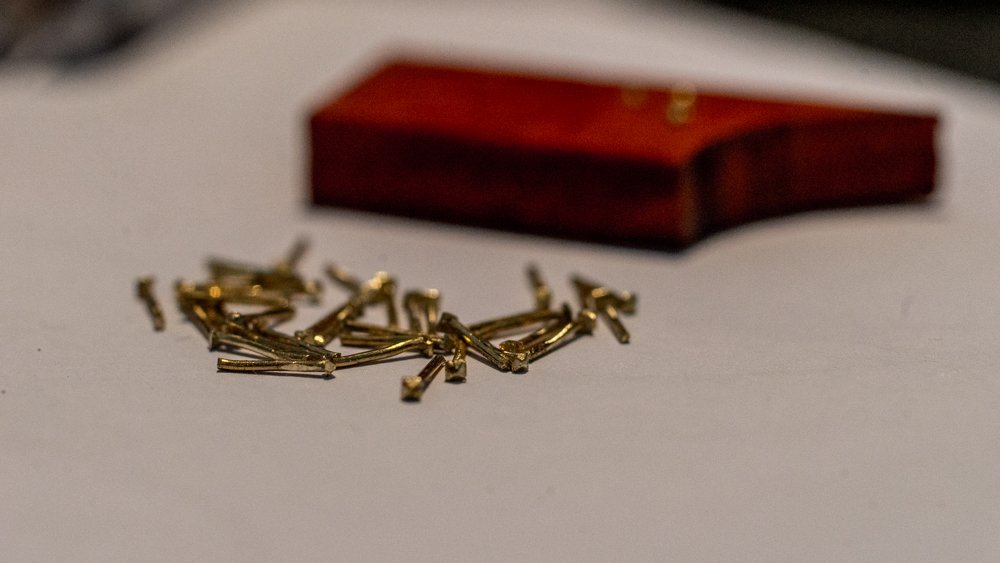
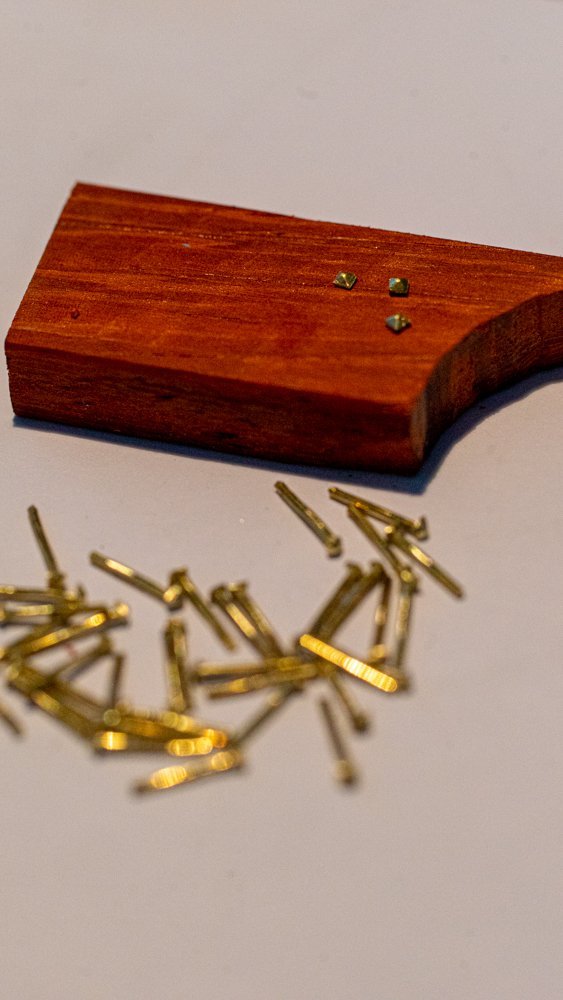
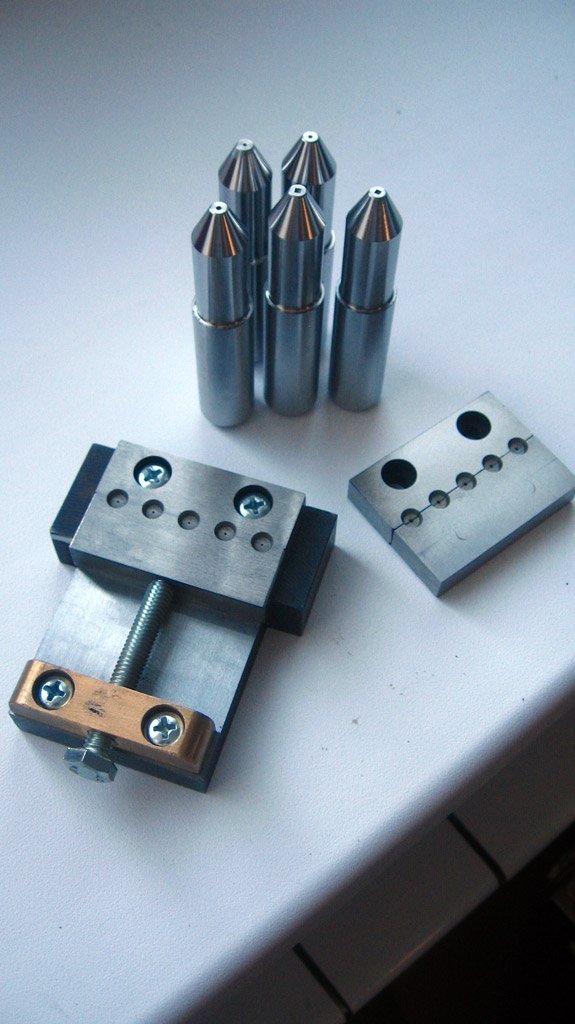
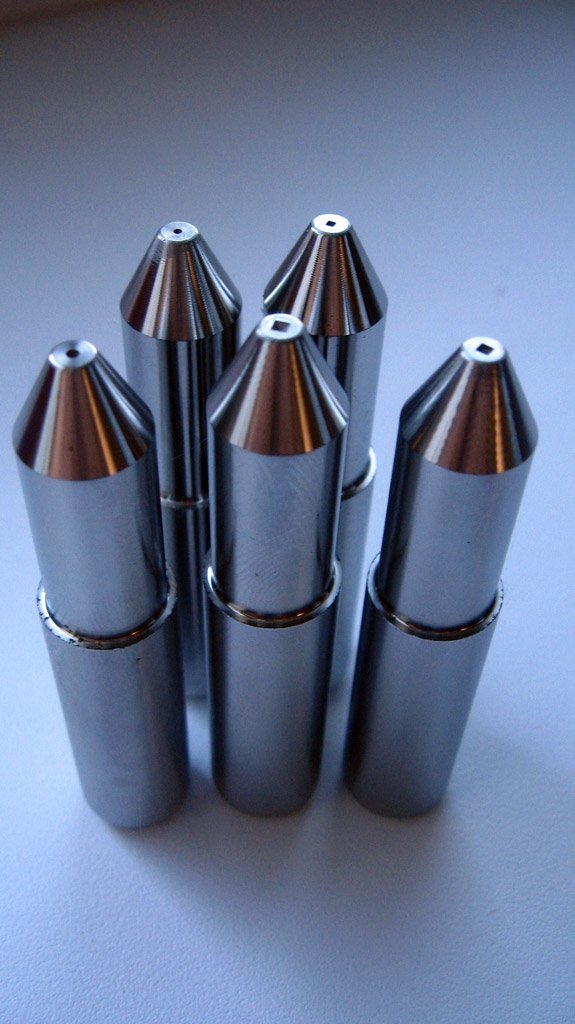
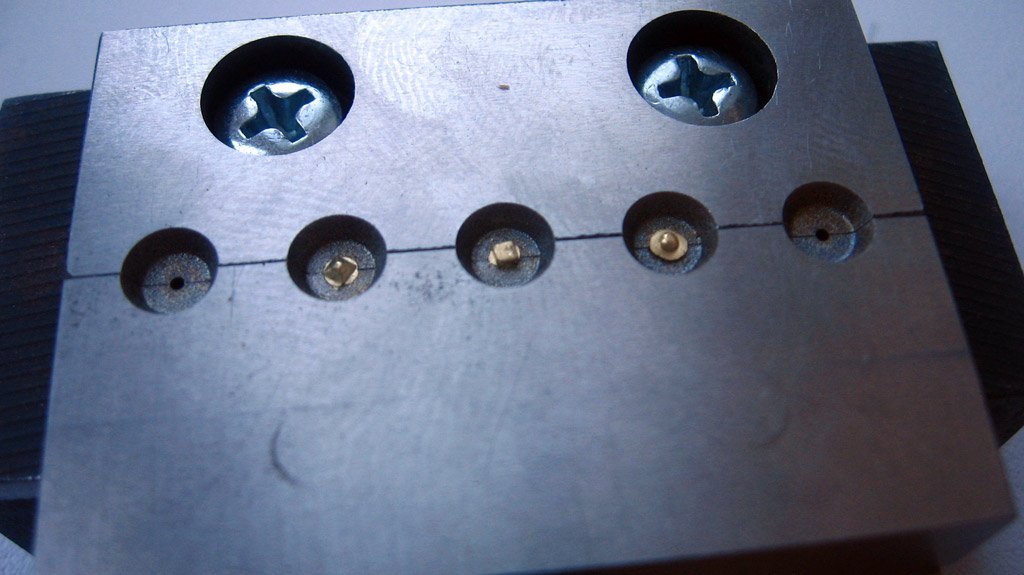
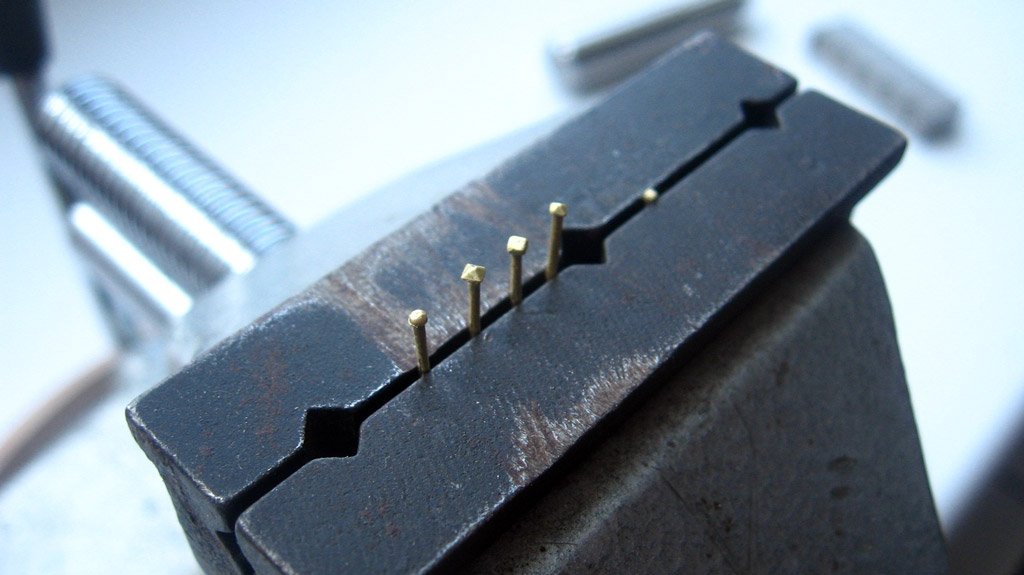
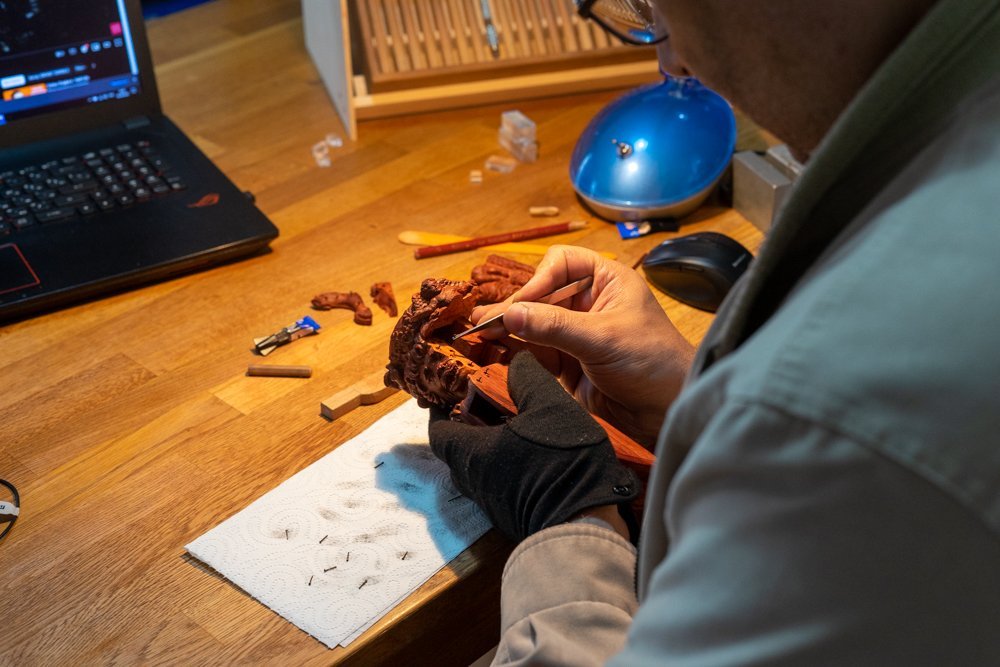
... But that's not to say the work is over. There's more to do. Good stories have unexpected twists, plot changes. Just when you were looking at a story with the same mood, suddenly everything changes. Something minor suddenly becomes major or vice versa. And since we're writing this epic with a Star Wars tinge, it's a good time for: "Luke, I'm your father!" - "Noooooo!" Agreed, a good twist in a narrative is then especially good when it didn't just fall out, but when there were some hints before. But at one time they were not noticed or given any importance. And only when the twist is realized, you suddenly realize that all this time the true state of affairs was under your nose all along. That's when it's not just a primitive Luke-I'm your father, that's when it's something more thoughtful, meaningful and interesting. I don't know what analogy to pin it on, but I hope for your imagination, choose the twist that tastes better to you. Some people are closer to the fact that the killer is a gardener, some people are closer to the fact that Jon Snow is a Targaryen or that DiCaprio is not a detective on the Island of the Damned (sorry for spoilers). I won't say that my stories claim to be recognized as geniuses. But hobby stories could use a little twist, too. Now it's time to get back to where it all began. The rubik's cube. After all, a lot of people have asked why did I bother so much? Why did I have to do so much? Just take a block and work. But for me, that was the whole point! And in those moments, when I told how I cut out the face, that I repeatedly disassembled the blank, pulled out the segments from the very middle, I inadvertently opened the veil of the future twist. Now is a good time to remember these episodes. To ask the question, and indeed, how is it that the glued billet was so easily disassembled? Why? Doesn't that say something? Yeah, yeah, I know no one thought so. Who needs to remember that? But as the author of the twist, I just have to blow the fog. "This is the way" and all that. Anyway, all of the above led to this particular stage in the work. If the lion from Vassa was as close as possible to the state at the time of lifting from the bottom, a copy of his museum original, then Chewie I wanted to represent the sculpture at the time of installation on the bow. The actual dimensions of the sculpture piqued my interest at this particular stage. How was such a huge structure built? How was the blank prepared? How was it installed? In my opinion, this way the overall collection will be more multifaceted and interesting. When different figures will show different things, and not just a line of lions. I haven't decided yet what will happen with the next lions, but now we're talking about Cheubaka, so we'll come back to him. I decided that just drawing the figure on the seams would not be enough. It is necessary to open some joints and show these divisions. In fact, this figure can be called an admiralty figure. To be able to see some technical elements that are usually hidden from the eye. And if I'm showing the "insides", how can I leave out the carnations? I have to show them too. I decided right away that there will not be any "hedgehog" - when every single nail is present according to the staff schedules and places. Once in a while will be enough. More of a hint that they were. So I didn't have a week-long nailing stage and tons of dowels. Everything, starting from estimating the size of the dowels themselves, wells for them and ending with the process of riveting, blackening and seating was done in a day and a half. The nails themselves were made with the help of a small device. It had been in storage for a long time and I was sad that there was no reason to use it. So when I decided that this sculpture would feature nails, I was very happy to finally use this device.

- 546 replies
-
- 11
-
-
-
Thank you all so much for the kind words and appreciation. It's a pleasure.