
SighingDutchman
-
Posts
45 -
Joined
-
Last visited
Content Type
Profiles
Forums
Gallery
Events
Everything posted by SighingDutchman
-
 I am about to start this kit in a few weeks time. Did you ever finish it? I thought you were doing a good job, by the way, especially for a first build. Seb
 -
Thanks, Craig, for your answer to my question. Lots of options to choose from, then.
- 33 replies
-
- 2
-

-
- Bounty Jolly Boat
- Artesania Latina
- (and 1 more)
-
Thanks, Keith and Allan, this is very useful. Will have a think about this over the holidays and decide on what option to go for, as I appear to have some room for choice. And I will save my Barbie and Ken figurines for a less historically accurate future project.
-
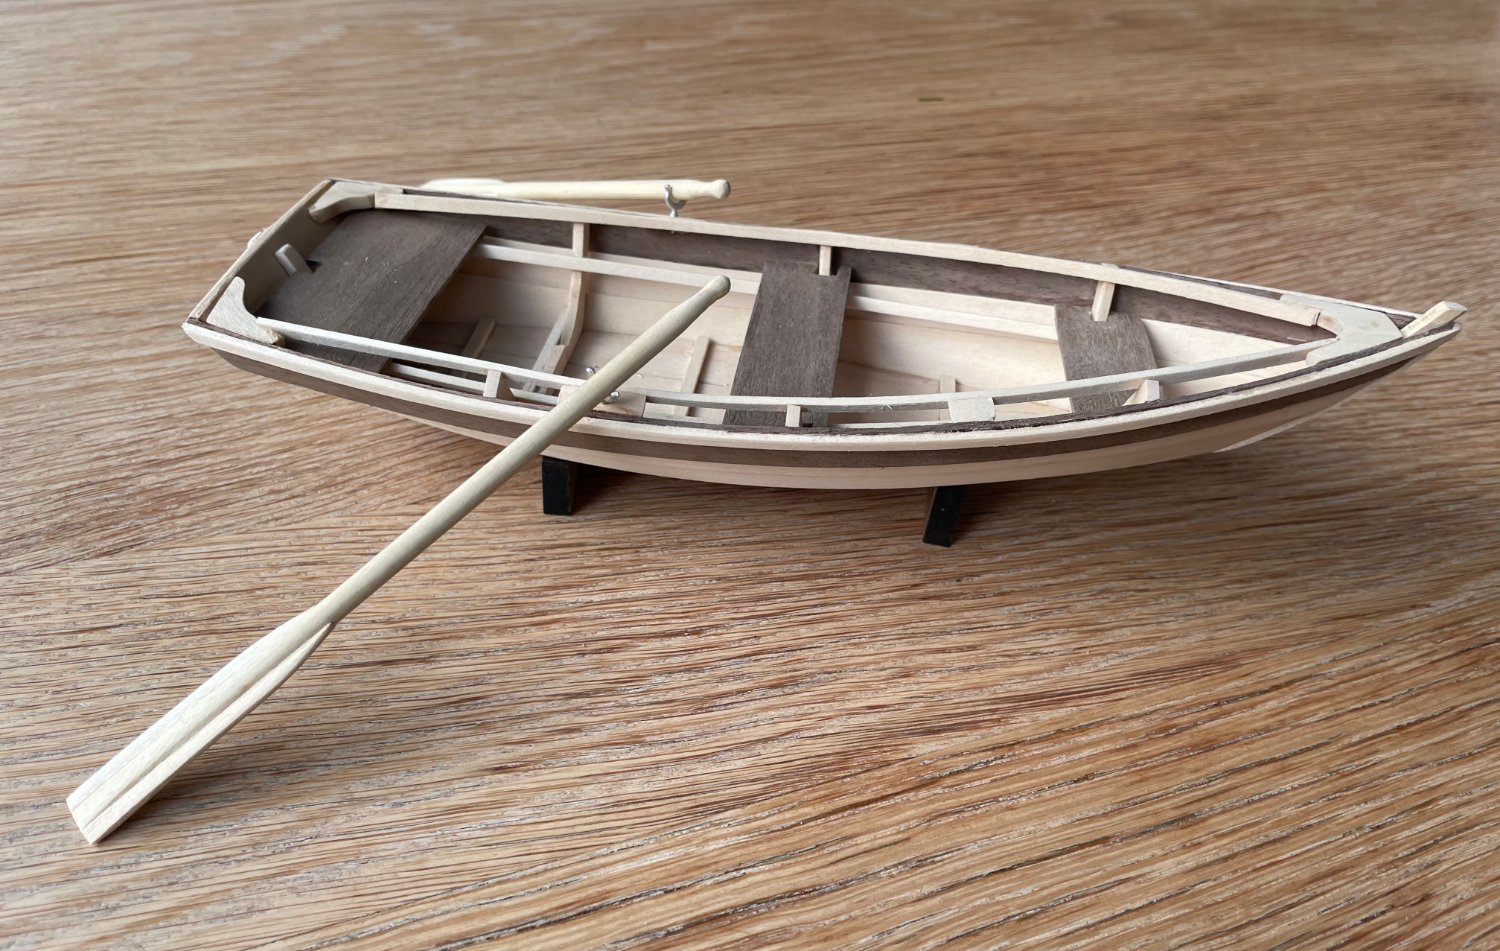
Finished painting the hull and installed the rudder. Changed the design of the rudder to something that, to me, appeared more natural and historical than the kit instructions (=a bent copper rod with a small wooden ball at its end). For anyone reading this who knows their ships' boats (Craig and Allen are real experts, of course), I have a question about the oar locks. I have seen that in ships' boats, these are usually fairly large, square cut-outs in the upper strake. The kit suggests very shallow half-round cut-outs, just as deep and wide as the oar diameter. These are easy to create, but not realistic. However, I worry about making large cutouts in the upper strake, for fear of ruining/breaking things. I am currently watching the 2017 Channel 4 reality show ('Mutiny'), in which the nine participants are making Bligh's journey in a replica of the launch, and in that boat, the square oar locks exist, but there appear to be removable wooden inserts, that can close off the oar locks when the oars are not being used, thus preventing surface water from entering the boat through the oar locks. When these inserts are in place, from the outside, the oar locks are more or less hidden. My question is: are such inserts historical? If the answer is yes, I might be able to get away with somehow indicating the outines of the inserts onto the boat, without having to actually fully cut the strake, thus minimising the risk of ruining my build. If anyone knows the answer to this question, your help would be greatly appreciated!
- 33 replies
-
- 1
-
-
- Bounty Jolly Boat
- Artesania Latina
- (and 1 more)
-
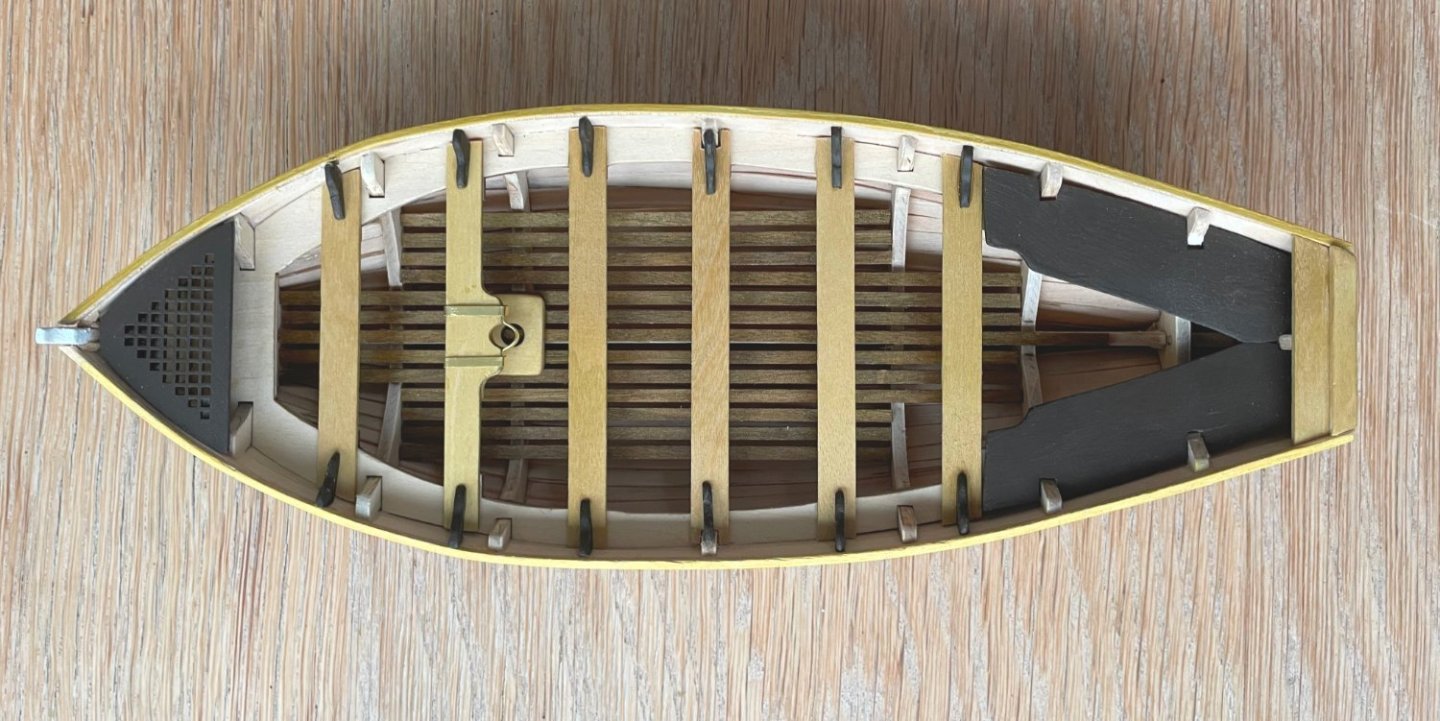
Because there was a lot of 'downtime' in the planking phase, when waiting for the wooden strips and/or glue to dry, I was able to work ahead on a lot of the elements that go into the inside of the boat, in terms of cutting/sizing/sanding/staining/painting/etcetera. So, they were all lying there, waiting to be installed once the hull was fully planked. This morning, I glued them all into place, completing that part of the build. The result can be seen below. As Keith already predicted, a lot of the planking imperfections are now hidden or, at least, no longer so blatantly visible, so that's good. Meanwhile I am painting the hull in the 'Cornwall Bounty launch replica' colour scheme. Will post a picture once finished.
- 33 replies
-
- 3
-
-

-
- Bounty Jolly Boat
- Artesania Latina
- (and 1 more)
-
Thanks for the tips, Keith. And for the encouragement. Just had a look at your album of the Bounty and drakar. You may be dismissive of your talents, but I would be very happy (and proud) if I could, eventually, achieve builds of that quality. Your Bounty especially is a real beaut!
-
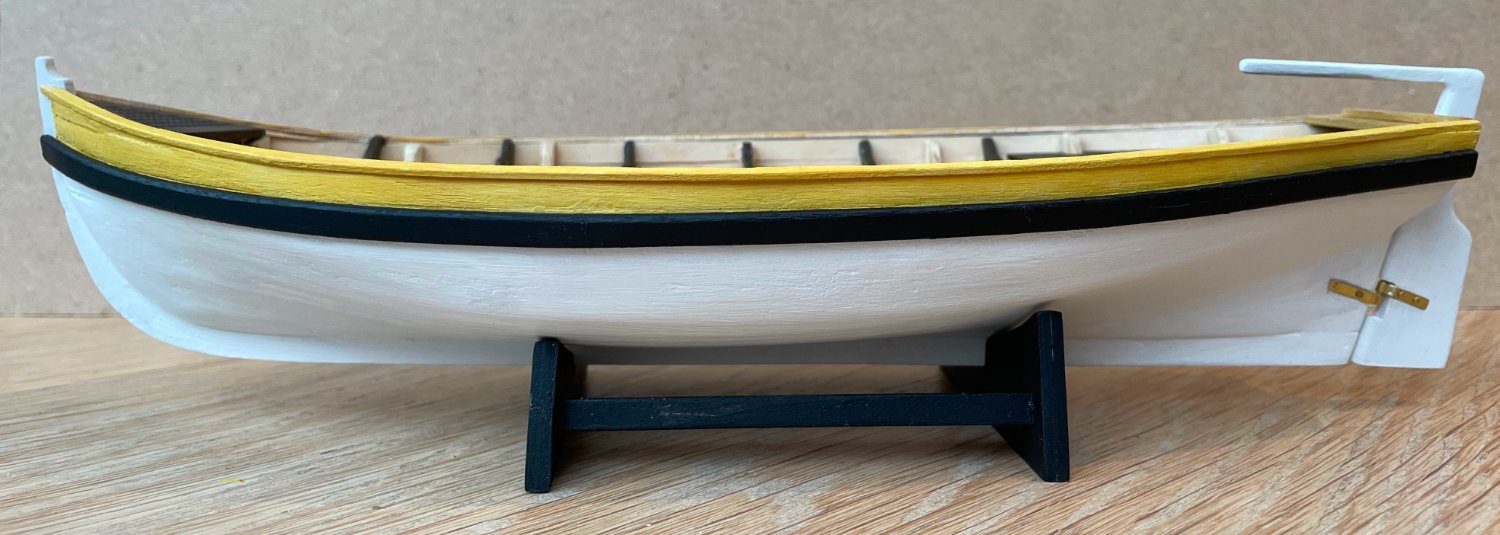
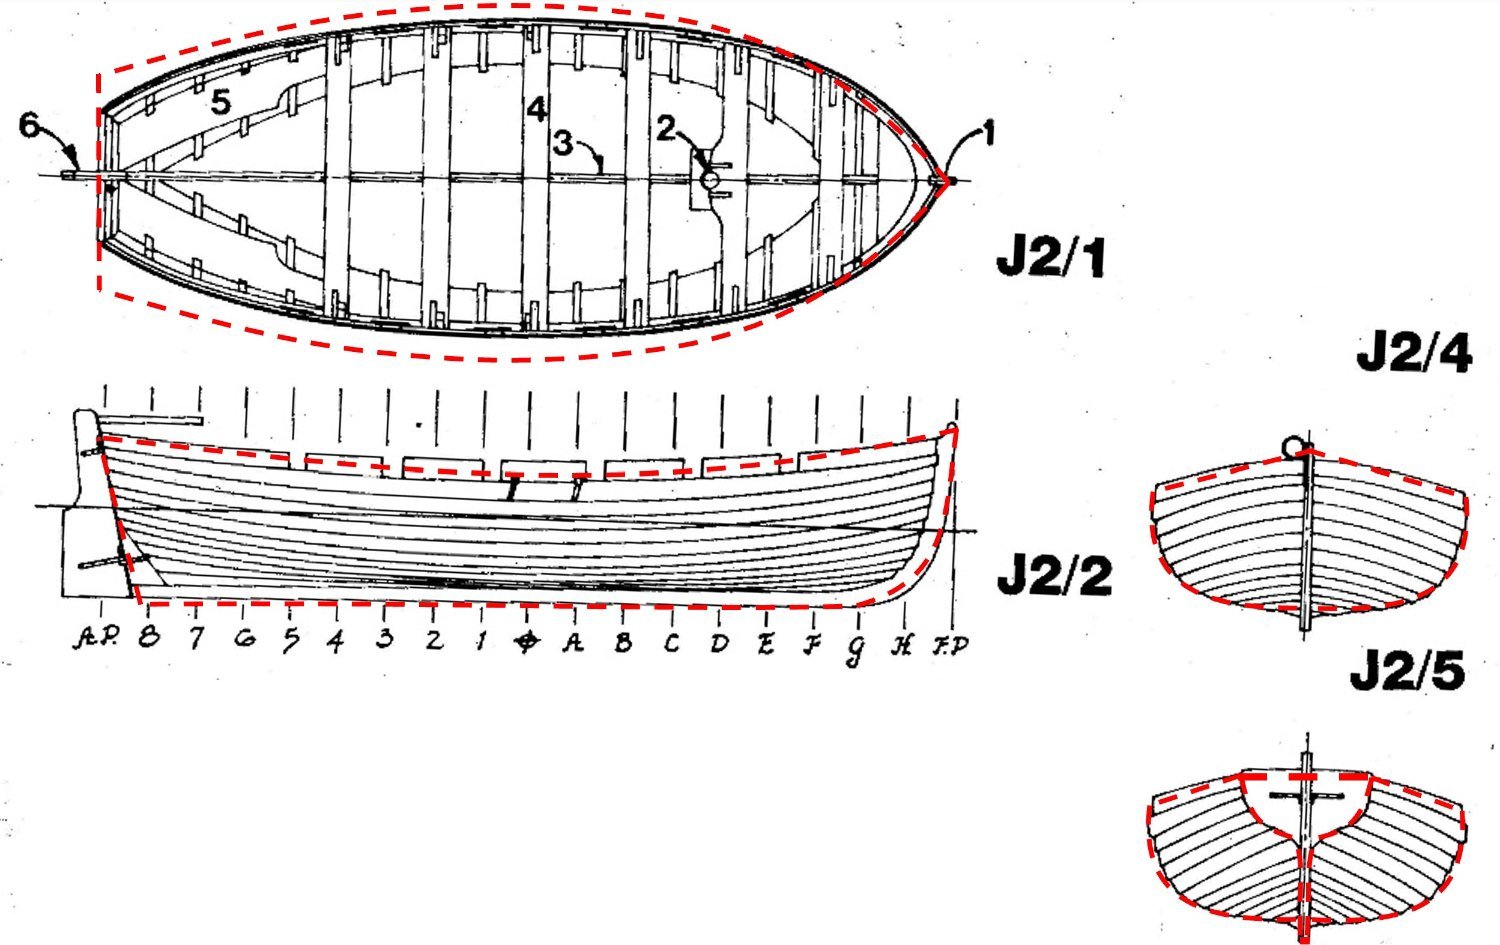
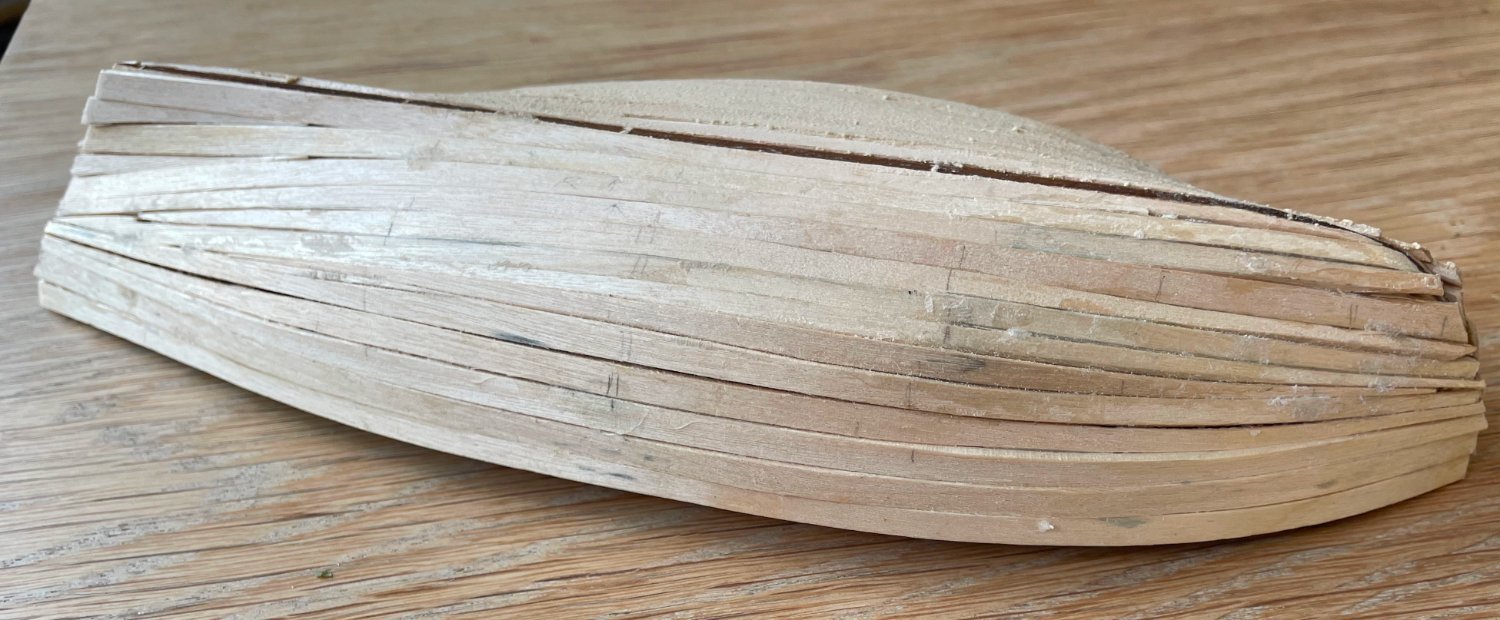
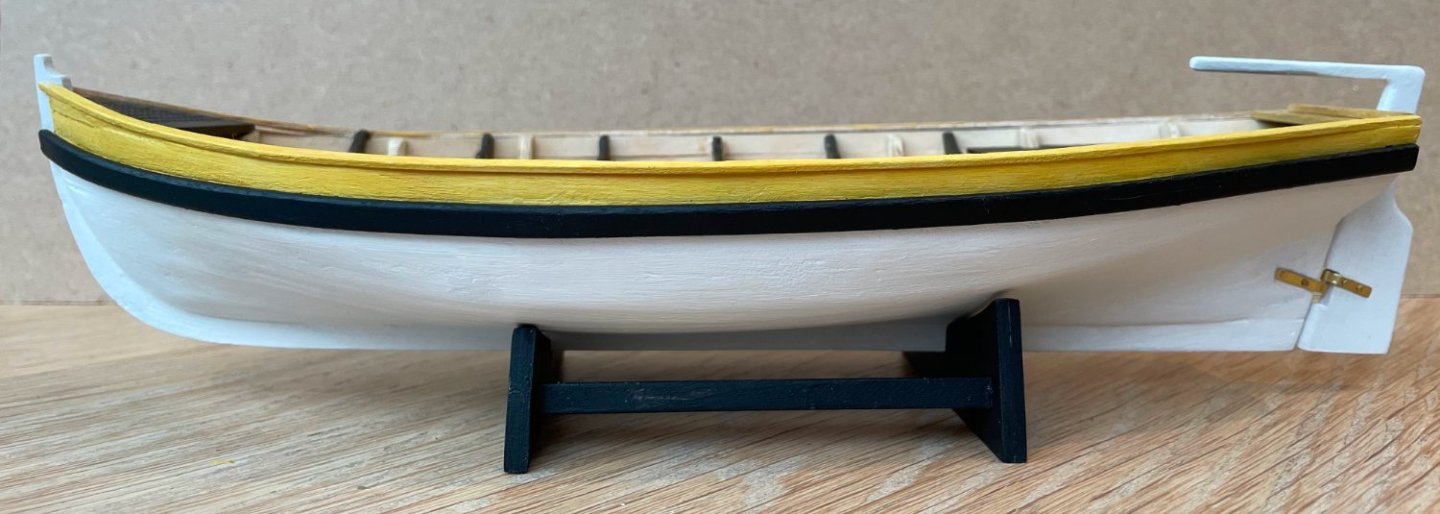
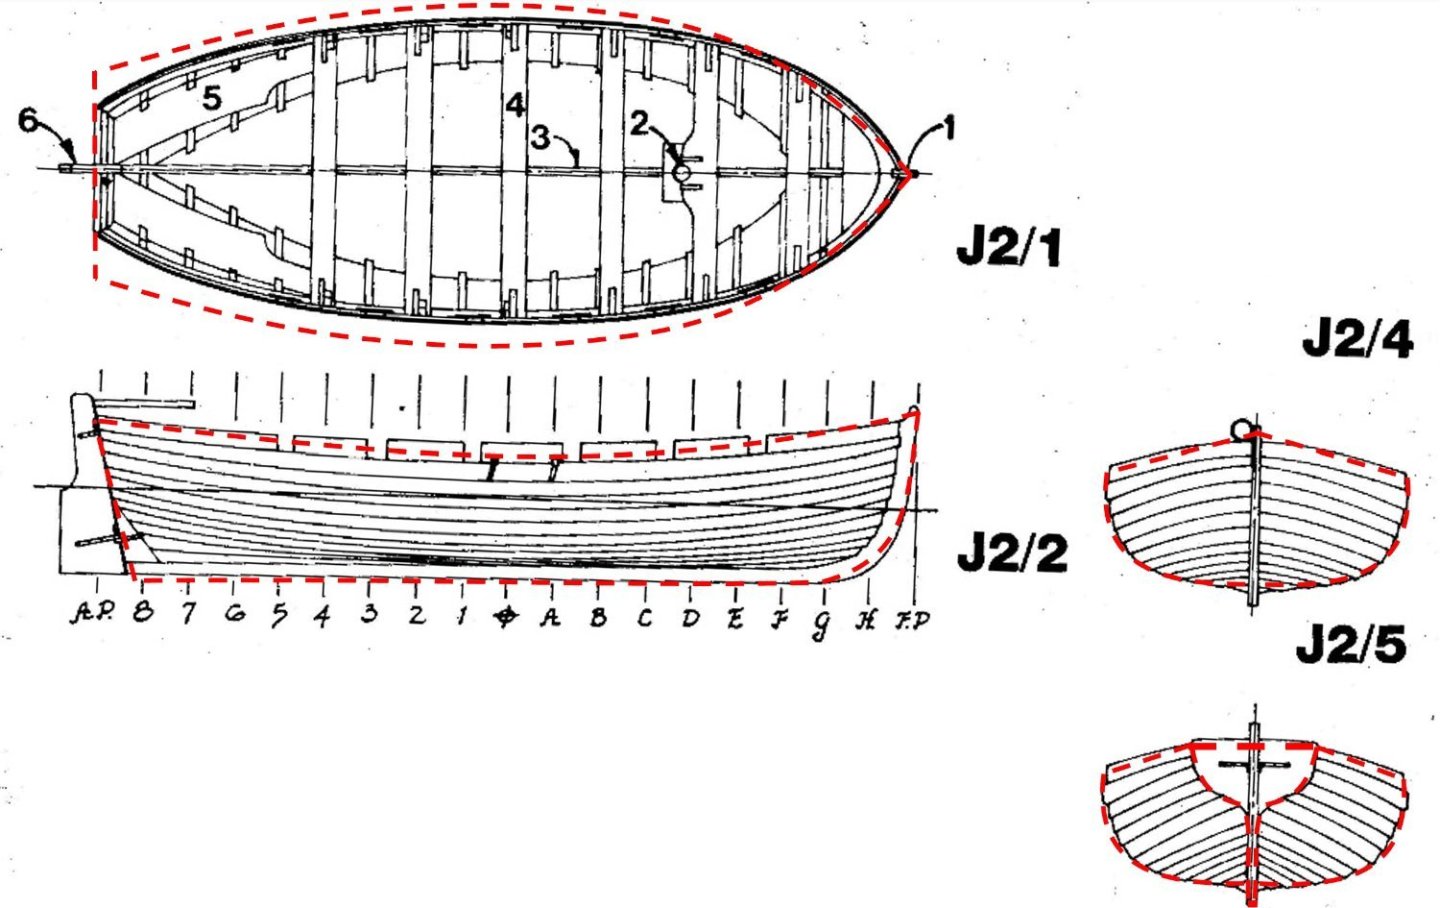
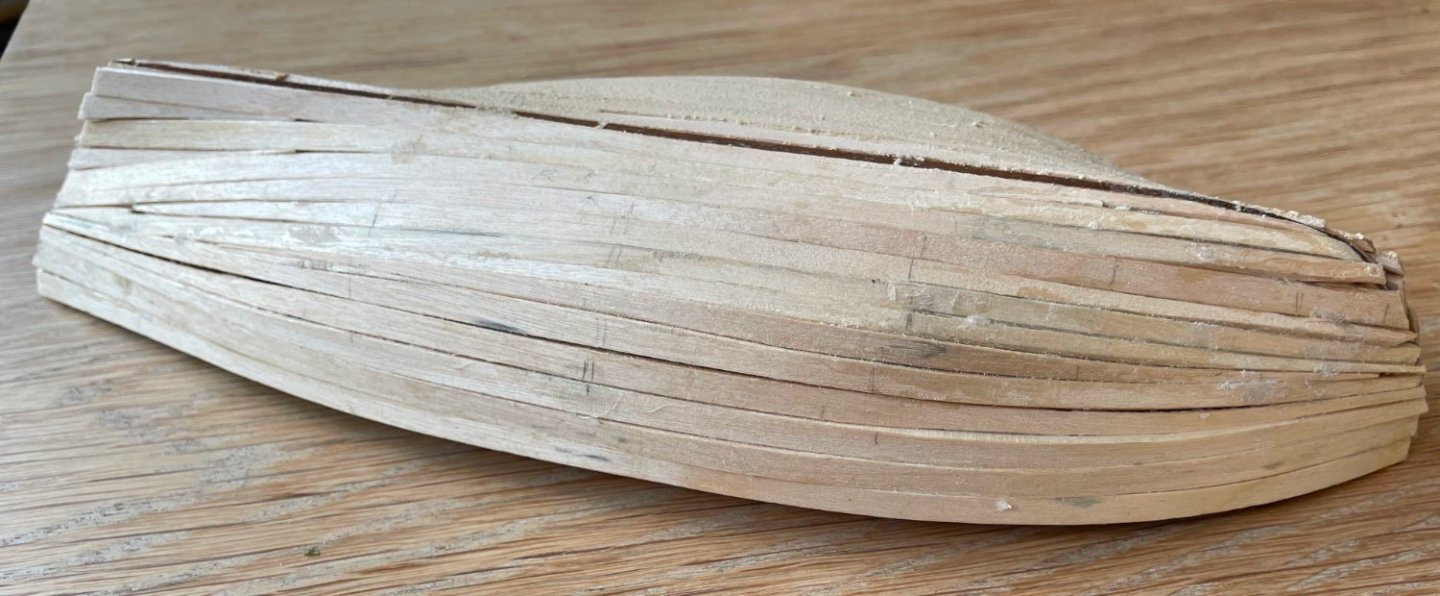
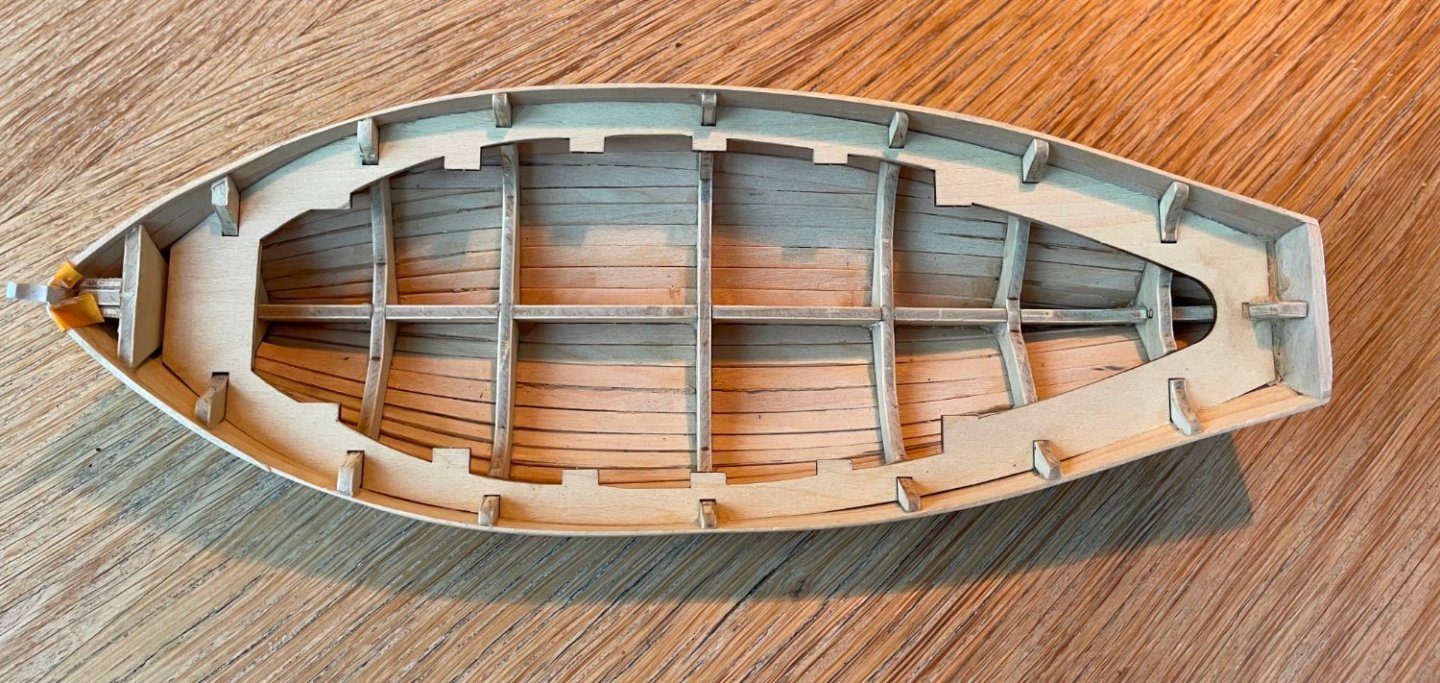
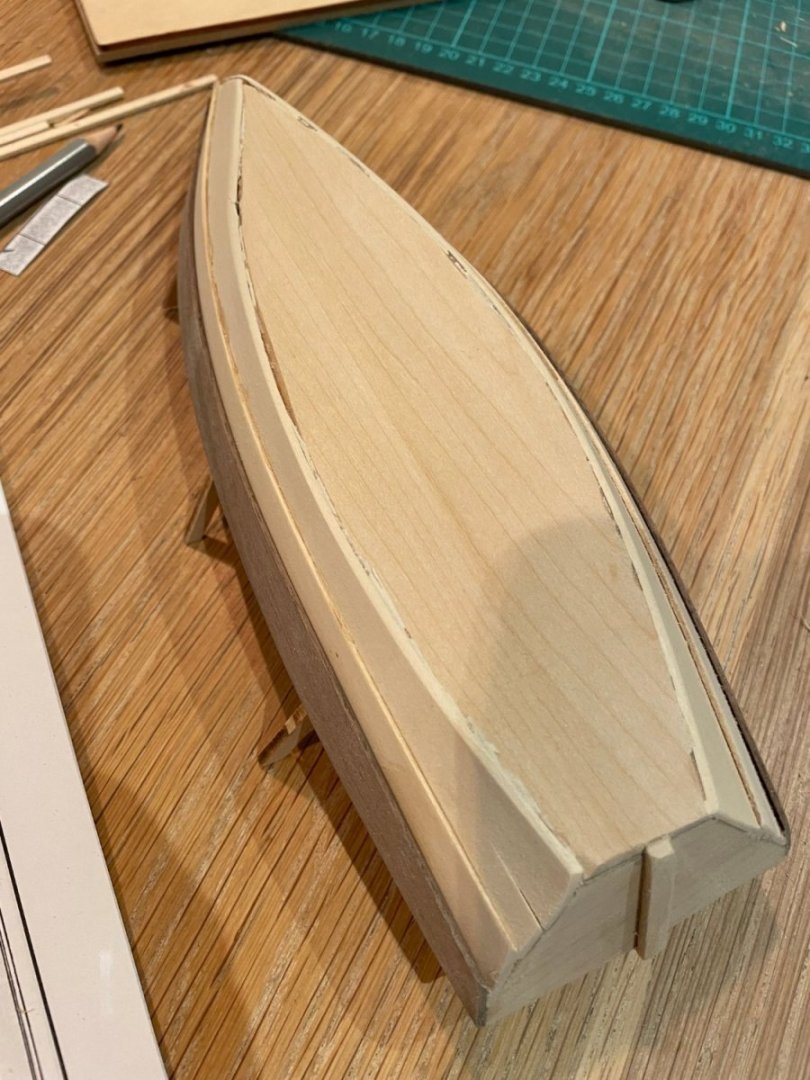
As discussed above, and despite Artesania Latina’s claims, the model I am building is clearly not representative of Bligh’s 23ft launch. Despite its name, it is not representative of the Bounty’s jolly boat either as it is too big, corresponding to a 20ft vessel whereas the jolly boat was significantly shorter – Craig’s wonderful scratch build for it on this forum (see: https://modelshipworld.com/topic/33083-16ft-cutter-by-imustbecrazy-finished-small-116-bountys-small-cutter-jolly-boat/) is based on a length of 16ft. So, as Craig suggested in the discussions above, it is probably best to simply consider it as a model of a generic eighteenth-century longboat. But perhaps it can, more specifically, serve as a model, albeit an imperfect and accidental one, of the Bounty’s third boat, a twenty-foot cutter. For one, the model scales to the correct length of that boat. Comparing it to plans of contemporary cutters, found in W.E.May’s ‘The boats of men of war’ (1999, p.33-4, 41), it also seems to have roughly the right general shape, breadth and depth for a boat of that size. In the image below, I have overlain the contours of the model (in red) onto a plan for the Bounty’s cutter published in John McKay’s ‘The armed transport bounty – anatomy of the ship’ (1989, p.120), and the correspondence is reasonable, although certainly not perfect. It is also virtually identically rigged to what McKay proposes for the bounty’s large cutter. To underscore that tenuous connection to the Bounty in the model (in a desperate attempt to maintain a level of historical interest for it, other than just as a generic 18th century longboat), I decided on using the same colour scheme for my build as that of the reconstruction of Bligh’s launch in the National Maritime Museum in Cornwall. This was built there for the 2017 exhibition ‘Captain Bligh: Myth, Man and Mutiny’. I did not visit this exhibition but based on pictures online, I gather that the boat builders decided to paint the outside hull white up to the whales, which were themselves painted black, with the (single) strake above it painted a light ochre. Keel, rudder and stern were also painted white. So that is what I will do as well. Back to the actual build. Despite this being my first real plank-on-frame build and, therefore, not expecting much in terms of the quality of my planking, I was still disappointed with the dog’s dinner I made of it. I found it really hard to get the strips to lay flat against the frames. As a result, as shown in the picture below, the finished hull has a heavily, unintended clinker appearance. I will chalk it up as a learning experience. The NRG half hull planking kit is going to be my next project, when I finish this one; with its help, I hope to do a much better job in the future. But, I think the hull is still salvageable. The image below shows it after sanding. It is going to be painted anyway, so hopefully my mess will be largely hidden. Unfortunately, since it is an open boat, it will be impossible to fully hide it, as the image below of the boat’s inside shows. So, to save myself from continued disappointment, I will have to remember to mostly view the boat strictly from the side ;-). Artesania Latina markets the kit as ideal for first-time modellers but perhaps, in hindsight, I would have found a double-planked hull closed off with a deck easier. It would have allowed me to use fasteners to better align the first layer of planks with the frames, and enabled me to hide mistakes below the second, thin layer of strips and the deck. But, I am still thoroughly enjoying this build, which is the main thing.
- 33 replies
-
- 4
-
-
- Bounty Jolly Boat
- Artesania Latina
- (and 1 more)
-
Hi Allan, I did watch that, but I messed up nevertheless by trying to find some kind of midway house between the Artesania Latina instructions and Chuck’s method. But I have also received the NRG half hull planking kit now, which I will do after this kit, and which will hopefully much improve the planking on my next build.
- 33 replies
-
- 3
-
-
- Bounty Jolly Boat
- Artesania Latina
- (and 1 more)
-
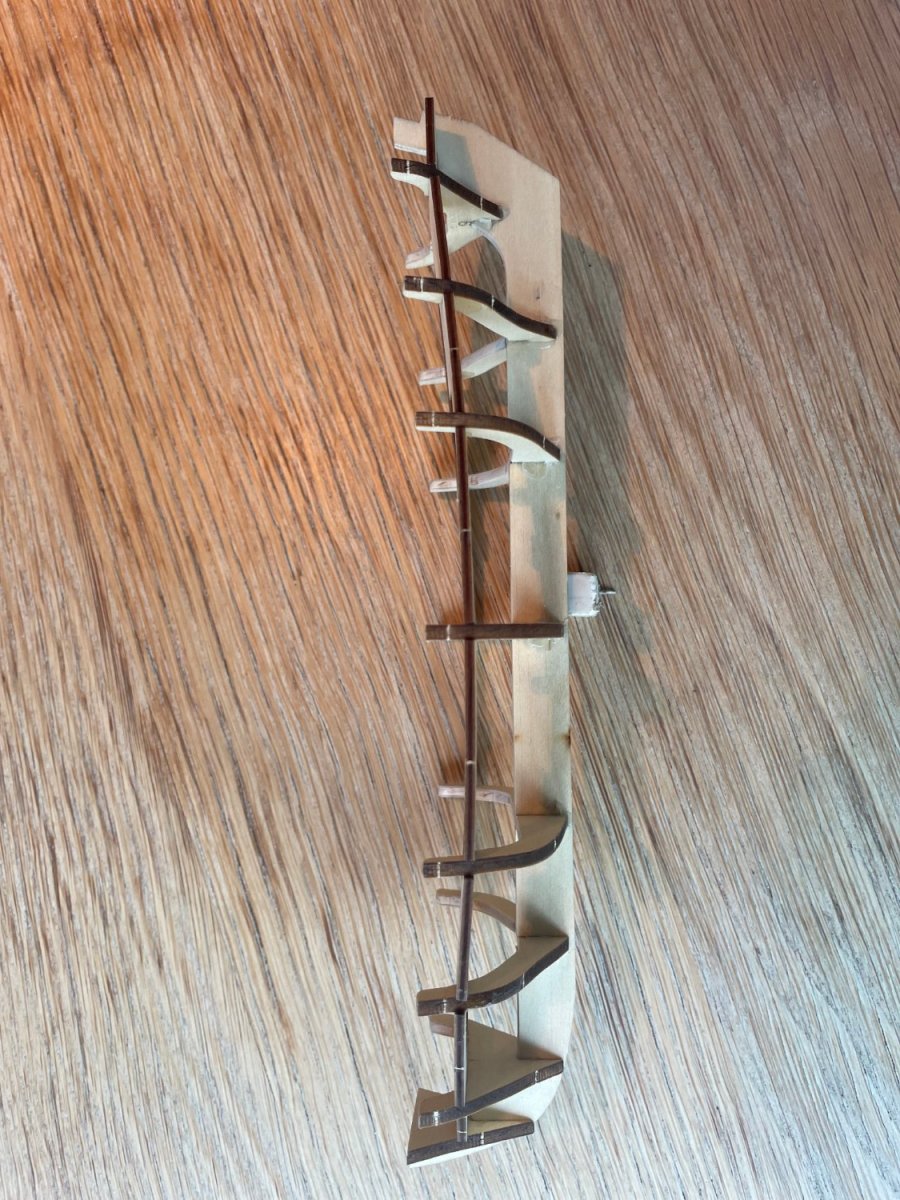
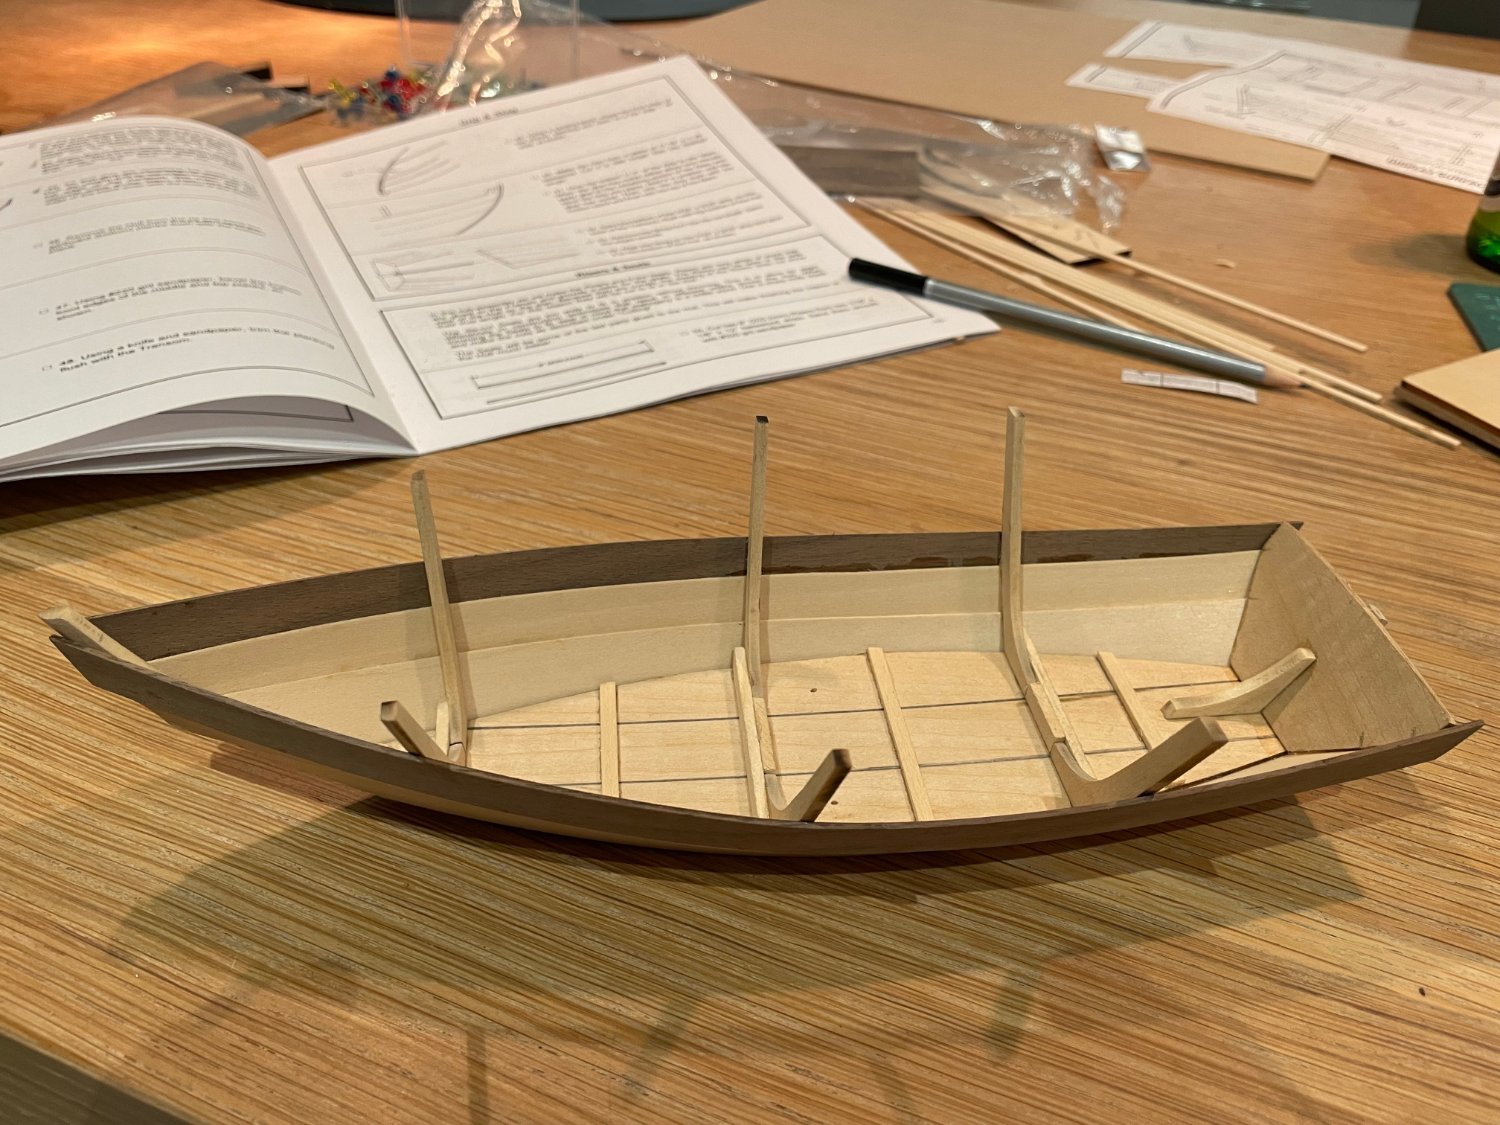
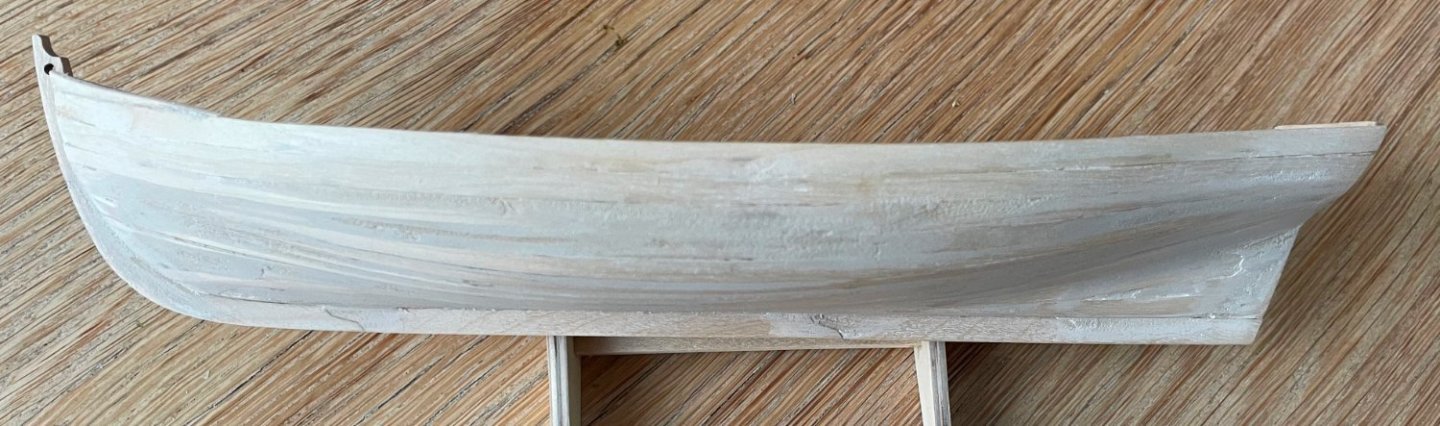
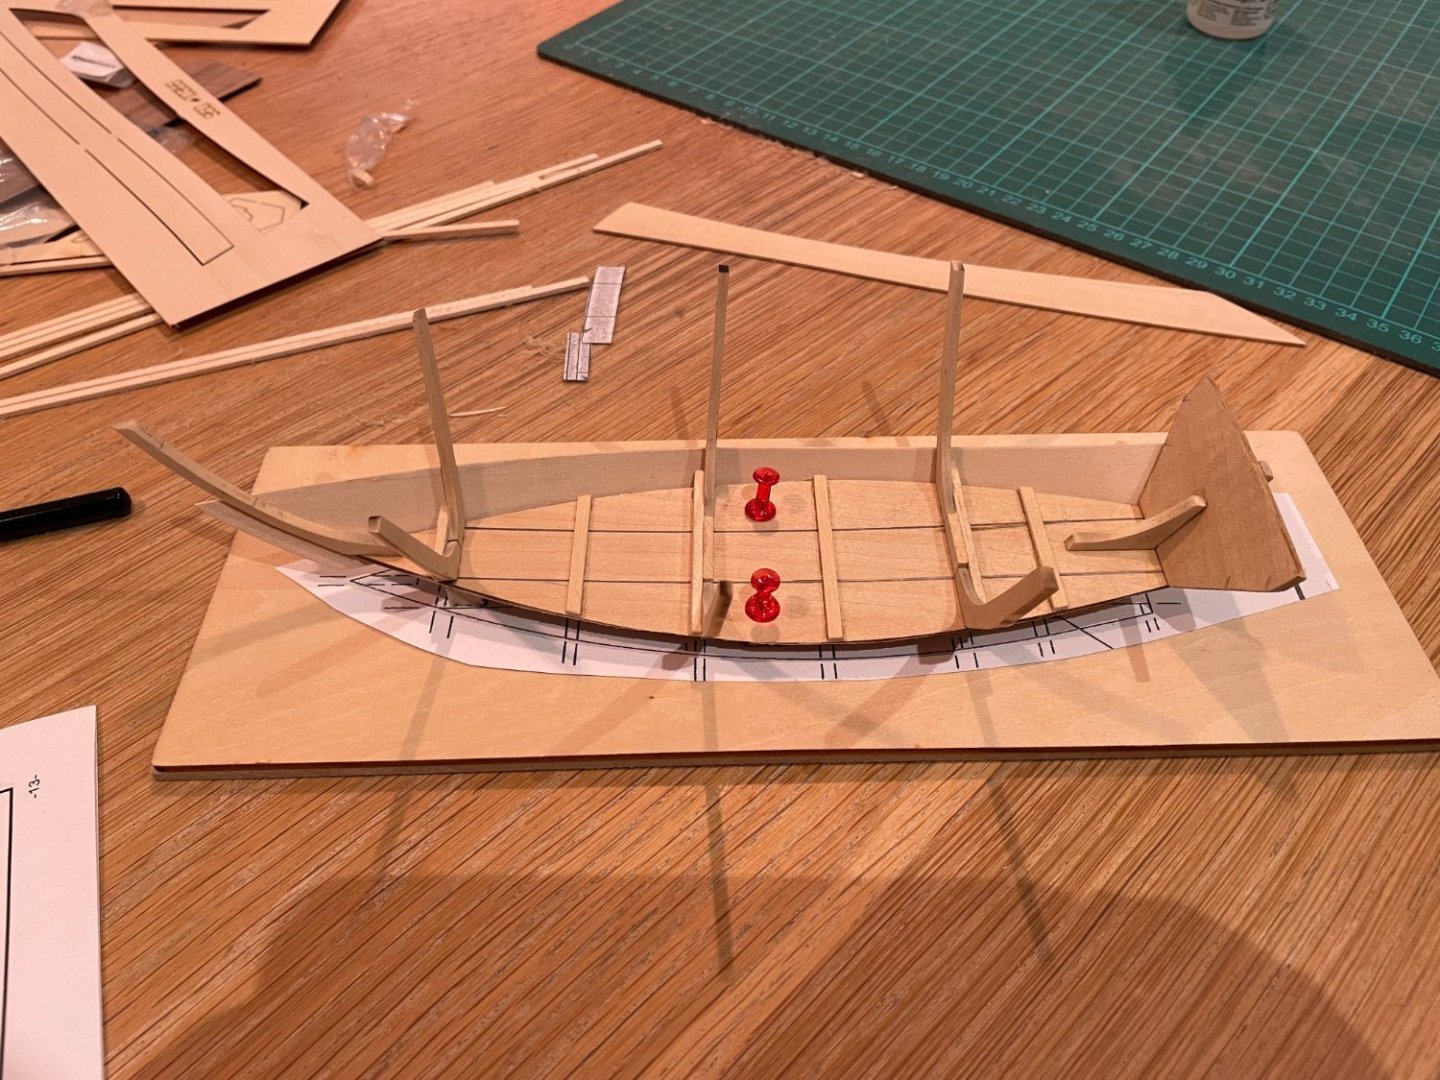
Based on the welcome input from Allan and Craig, above, I have been doing some online research regarding the (supposed) historical significance of this boat. Am awaiting some relevant books (second hand, so affordable) and will report back on conclusions reached soon. Of course, it was already clear that the Artesiana Latina Jolly Boat is not the boat Bligh used, and that the launch which he did use looked quite different from the model I am building. But it is still interesting to see if the model I am building at least shows similarity to one of the other Bounty boats and, more generally, how credible it is as a model of contemporary longboat. In the meantime, I have made some progress with the build. I attached the transom and some filler pieces at the bow and installed the internal 'surround' (don't know what its name is) which the thwarts will lay on. I noticed too late that the third bulkhead from the bow and, to a lesser degree, the second bukhead from the stern, were a bit too tall, leading to a slight wave shape of the internal 'surround' (see photo below). I hope this won't be really visible in the finished model, but for others building this model, it is worth checking this, because the fit of the bulkheads is not perfect. I removed 1.5 mm from the top of the third bulkhead from the front, to prevent it from sticking out over the gunwale (apologies if I am using the wrong terms; as a newbie, there is a lot of nomenclature to get my head around). I also lowered the transom with 1.5 mm, for the same reason. Have faired the bulkheads, false keel, transom etcetera, and have started planking. This being my first real plank-on-frame model means I am finding this quite hard, but will report back on how it all went shortly.

- 33 replies
-
- 3
-
-
- Bounty Jolly Boat
- Artesania Latina
- (and 1 more)
-
This is very helpful, Allan. Thank you very much!
- 33 replies
-
- 1
-
-
- Bounty Jolly Boat
- Artesania Latina
- (and 1 more)
-
Thanks for you input Allan. And I agree. I will merely be using the AL JollyBoat as an example of a generic longboat and as a learning experience, and will not claim anything else. I need to develop my building skills and experience before I am able to make major adaptions to kit plans, let alone scratch build. That is certainly my ambition though. And I annoy afraid of research, on the contrary. In that light: do you have a link to the plans on Wikimedia common? Would love to check them out.
-
Many thanks, Craig, this is great info! I’m afraid Artesania Latina is still claiming this to be ‘the boat’. I only found out that this claim was false somewhere on this forum, but can’t remember where exactly.
- 33 replies
-
- 1
-
-
- Bounty Jolly Boat
- Artesania Latina
- (and 1 more)
-
Thank you, Paul, for your encouragement. And thank you, Allan, for your suggestion. I will have a look at the website of the Royal Maritime Museum. But the only model I built before this one was a Midwest rowing dinghy, so I am too inexperienced to adapt the current kit to a more historically correct one. I know that the Jolly Boat was not actually used, and that Bligh used the launch instead. Had I known that when I bought the kit (in a black Friday sale, at half price), I might have picked the one from Model Shipways, which is (or at least, is supposed to be) the actual launch. Even without the historical interest, the jolly boat is still and attractive project for me though. I have a question for you, since you clearly know your stuff. Looking at old paintings that feature these kinds of smallish boats, the hulls appear to be either bare, fully painted, or painted up to the wales. I have not found one with the 'water line' look displayed on the Artisania Latina box, which I therefore suspect to be ahistorical. What is your opinion on this? Only answer this question if you have time, and feel like doing so, of course. No pressure!
- 33 replies
-
- 2
-
-
- Bounty Jolly Boat
- Artesania Latina
- (and 1 more)
-
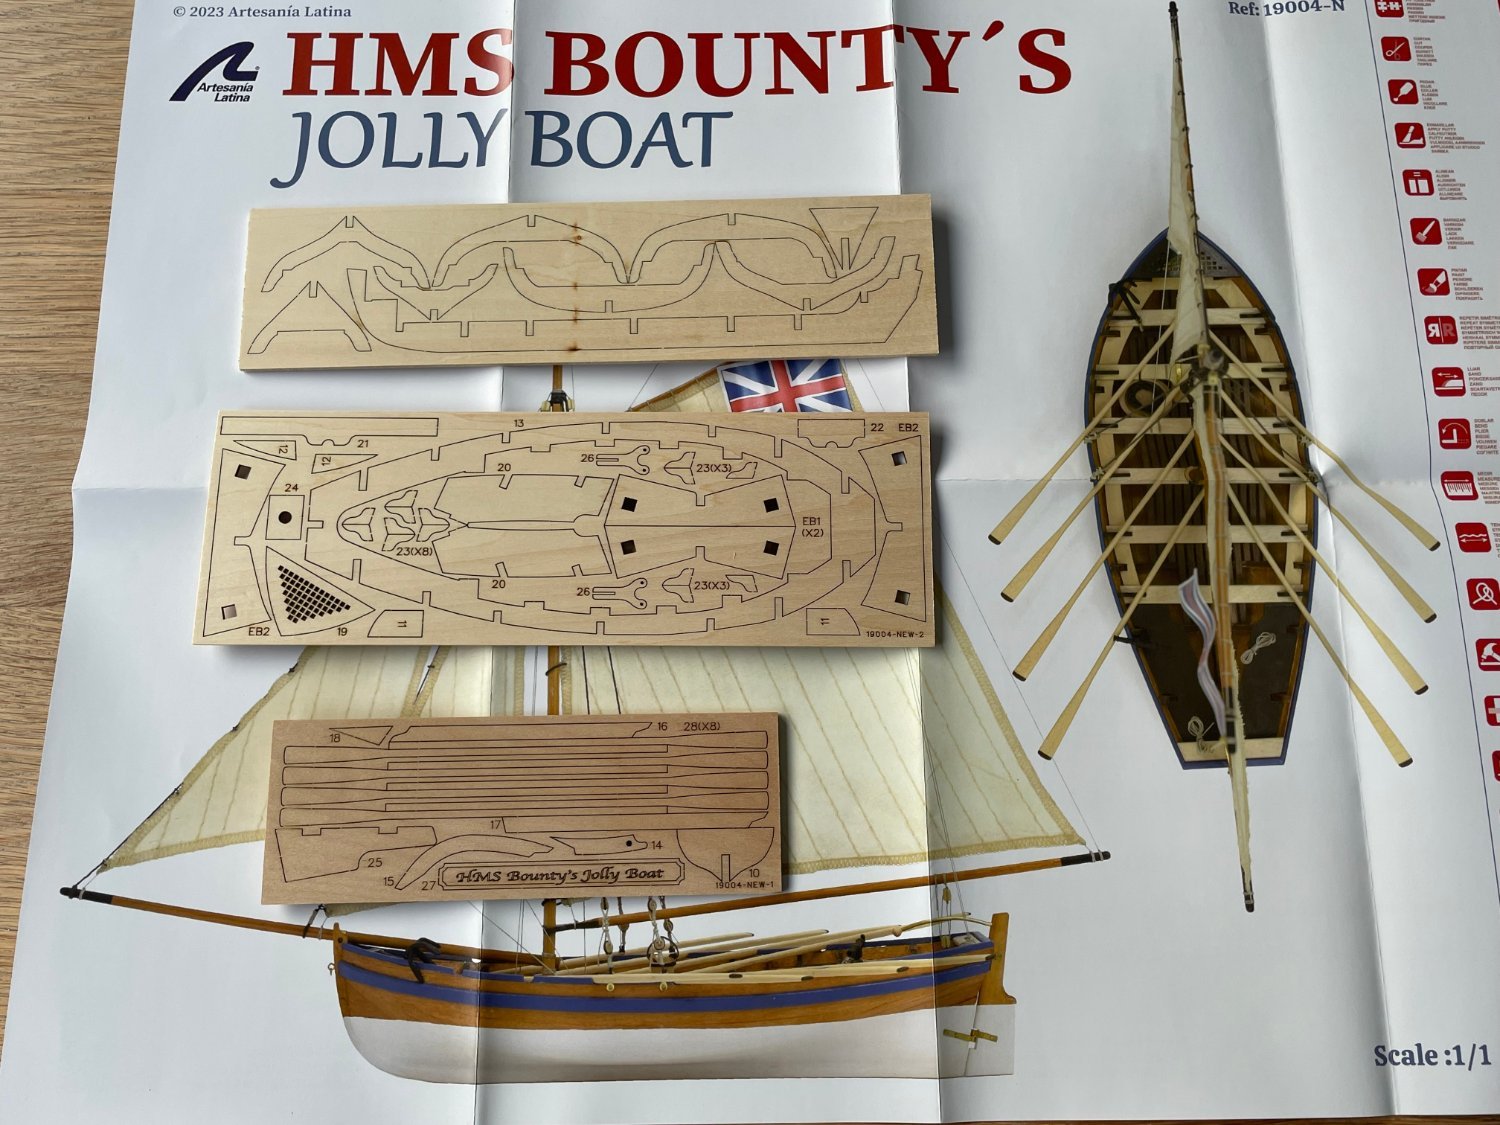
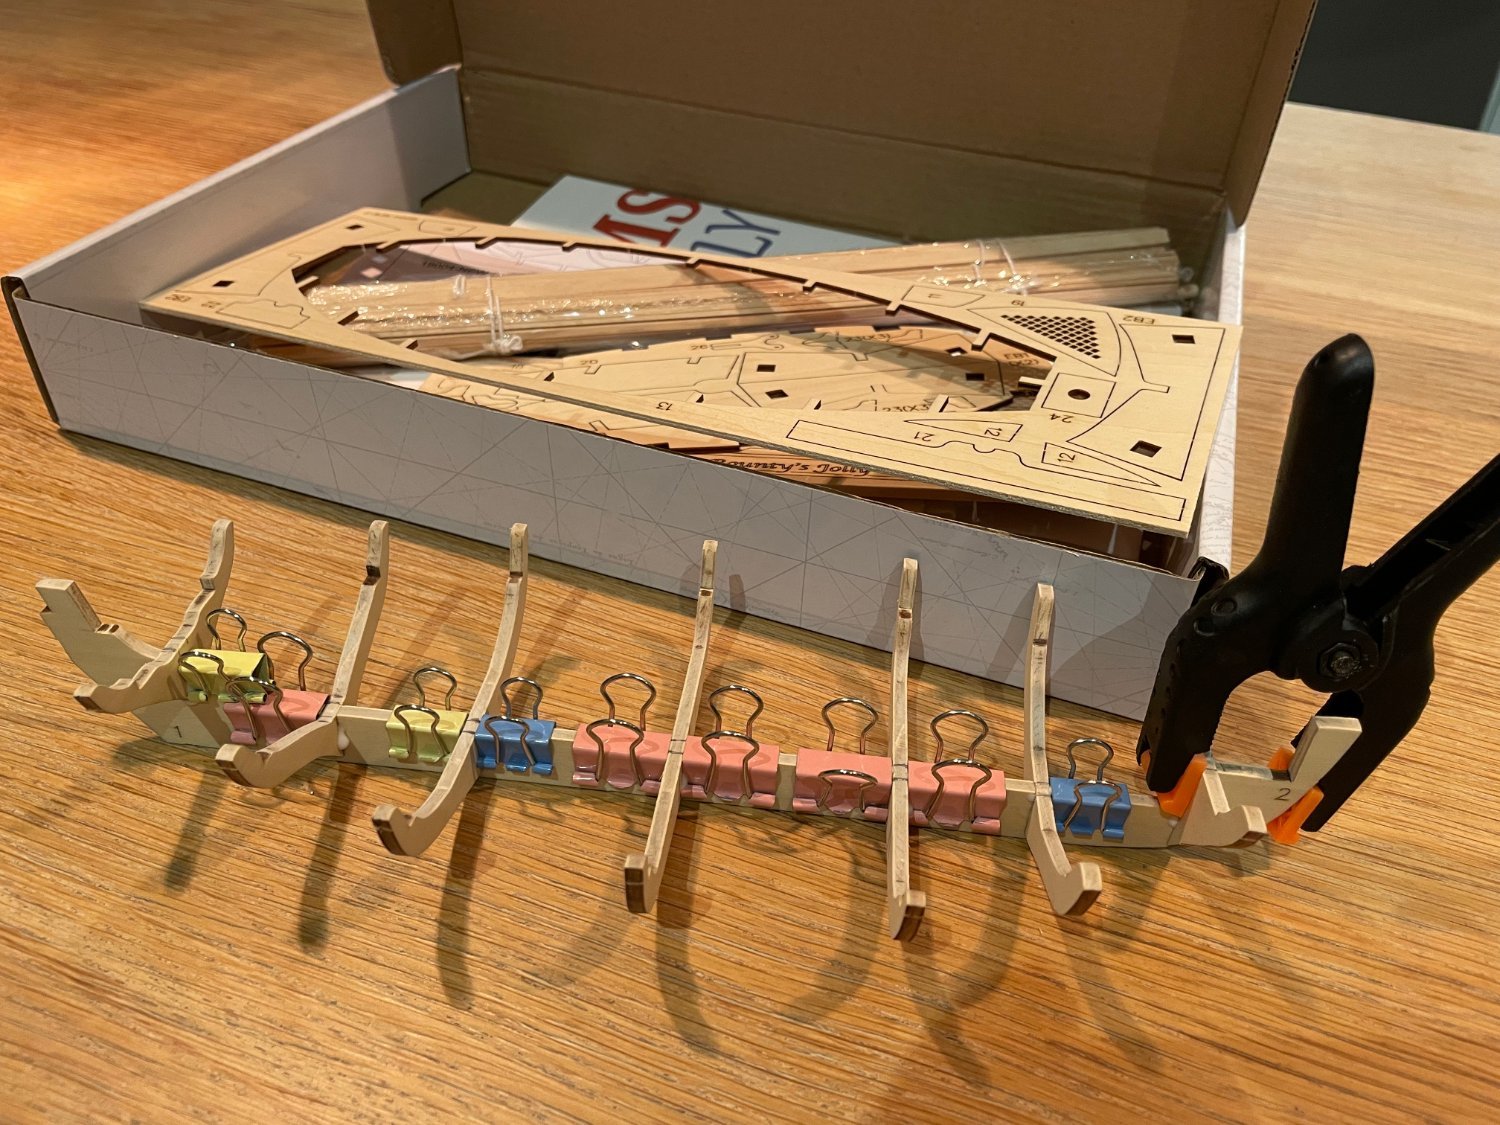
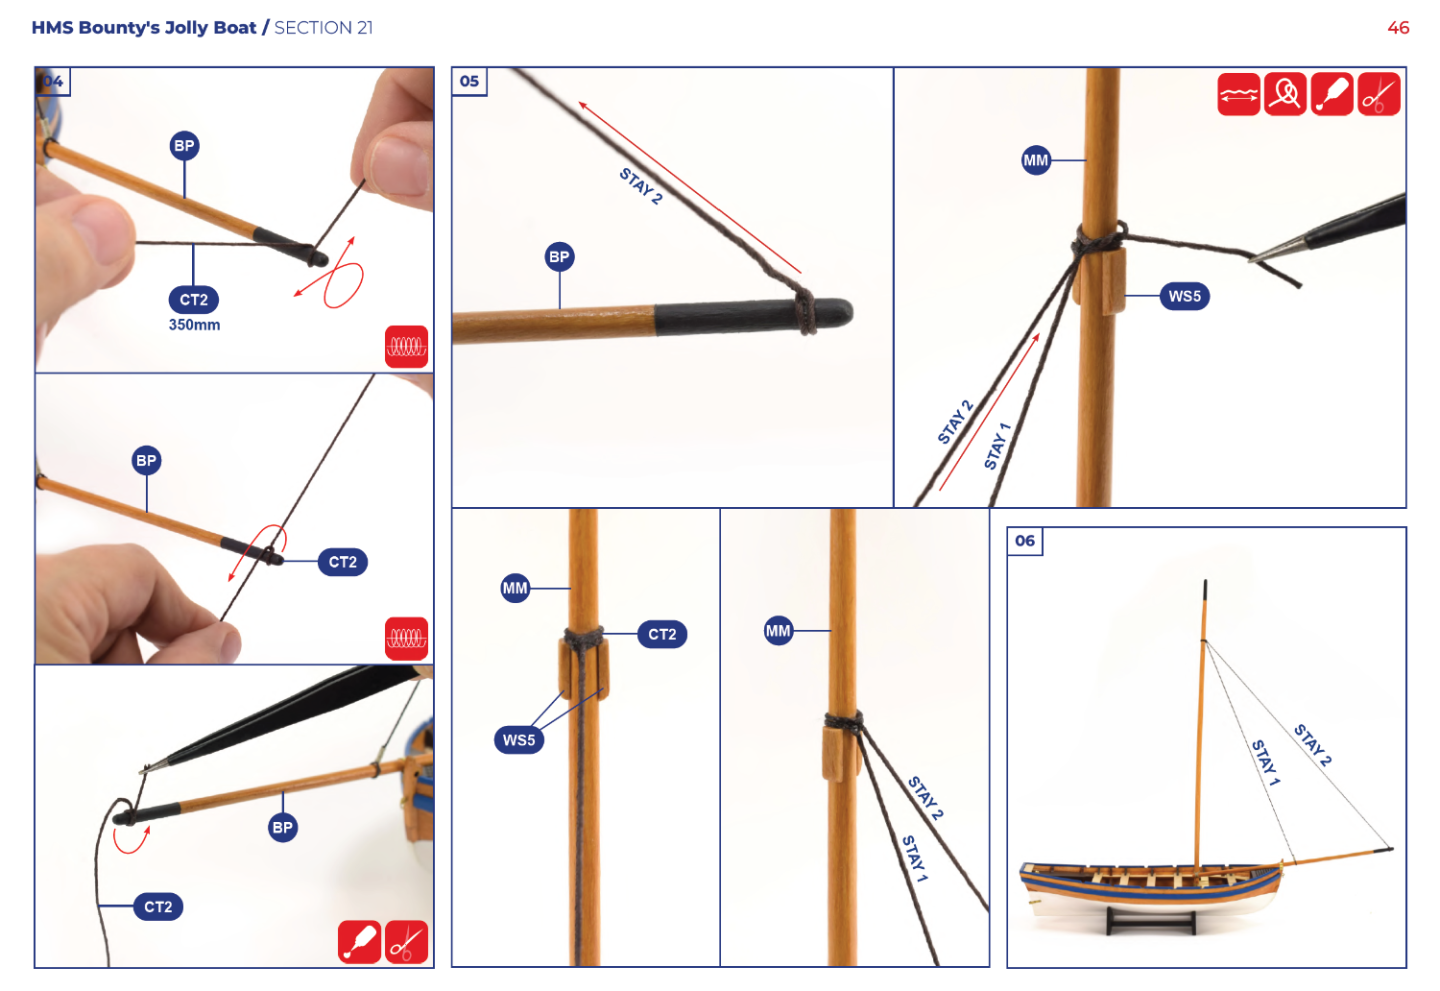
Having just finished a very simple rowing boat model as my first build, Midwest’s Dinghy, this model will undoubtedly be more challenging. It is single lay plank-on-frame hull, so I am painfully aware that I have little scope for correcting mistakes if the planking goes wrong, unless I decide to fully paint the hull (which I may do, have not decided yet). The Bounty Jolly Boat kit by Artesania Latina has been around for a while, and there are plenty of build logs on this forum, which I have read with great interest and will undoubtedly be very helpful in my own build. However, Artesania Latina has renewed the kit this year, and there is a number of differences to the old kit. This appears to be the first build log for the new kit. A first change in the renewed kit is the box (see image below). The older kit is still available for sale from some retailers, so if you want to make certain you are getting the newer kit, make sure you get the kit with number 19004-N, not the one with number 19004. I have found the instructions for the older kit online, allowing me to compare the old and new kit. The new kit is very similar to the old one but there are some differences. An oft mentioned problem with the old kit was that some of the sails where much larger than on the plans. That problem appears to have been remedied. The new stand, now being of the ‘cradle’ type, is different from the old one. The new kit includes a grapple, which appears not have been included in the older version. The inside front of the boat is now covered by a grid, which is also new. The plywood that the false keel and bulkheads are made of is of a different style than in the past, looking more like solid wood with a thin veneer on it than ‘traditional’ plywood. This makes it less visibly ‘fake’ when seen from the side, which makes for a cleaner build where the plywood sides are visible. The oars are now in one piece, requiring rounding of the shaft; in the old kit, blades and shaft were separate. I am sure there are more differences, but these are the ones I noticed so far. One significant difference is in the instructions: an instruction booklet is no longer provided. Instead, the instructions are provided digitally. This means you either have to print the instruction booklet yourself, or to use the digital document directly. Since the instruction booklet is quite thick, I opted for the latter, meaning I have to make sure to have a charged tablet or laptop near my model shipyard (=my kitchen table). This sounds less convenient than the older, printed, colour instruction booklet and, in some ways, it is. However, the new instructions are truely excellent. They are super detailed and much more extensive than the old ones. Virtually every little step is giving its own photographic explanation, leading to an instruction booklet of eighty A4-sized pages, with on average six photographs per page (see image below for a sample page). It leaves very little to the imagination, which is excellent for a kit aimed squarely at beginners. I was very impressed. No one-to-one scale plan drawings are provided, only a one-to-one scale photograph of the completed model, but that should not be a problem given the excellent instruction booklet. This print, plus all the contents of the kit, can be seen on the photo below. The front of the box mentions multi-media instructions, that is, an online build video. Such online videos do indeed exist for some of the other renewed beginner kits, but not for the Jolly Boat, at least not yet. Maybe Artesiana Latina is in the process of creating it? A six-colour paint set is available as an extra purchase. I started the build today, by removing the false keel and bulkheads from their sheets. All the parts were straight and came out easily. I sanded the laser burn from the edges that would be visible, for aesthetic reasons, but not on invisible edges because I have read elsewhere on this forum that the laser burn does not affect the strength of the glue bond – hope I have understood that correctly. The bulk heads fit easily into the false keel, perhaps even too easily. There is a degree of wiggle room up, down, and sideways. To ensure that the bulkheads were perpendicular to the keel in all relevant directions, I used foldback clips (as shown in the photo below). Will leave the white carpenter’s glue to set overnight and continue with the hull tomorrow.


- 33 replies
-
- 6
-
-
- Bounty Jolly Boat
- Artesania Latina
- (and 1 more)
-
Thanks / bedankt!
-
Thank you Paul. The kit is arriving by courier today. Looking forward to starting it too. But I think I will do the NRG hull planking tutorial kit first, to maximise my ‘planking skills’ before tackling the jolly boat.
- 8 replies
-
- 1
-
-
- Dinghy
- Midwest Products
- (and 1 more)
-
Thank you, Chris.
-
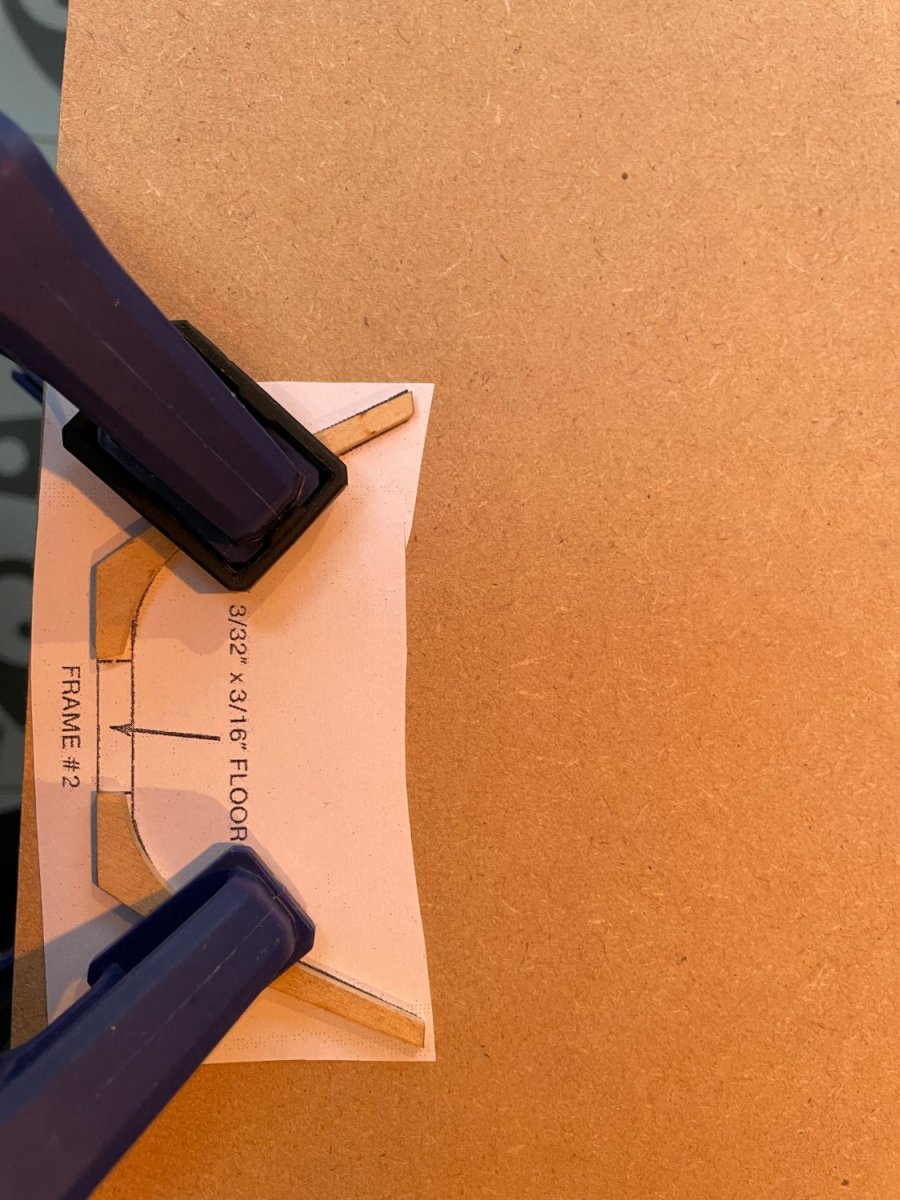
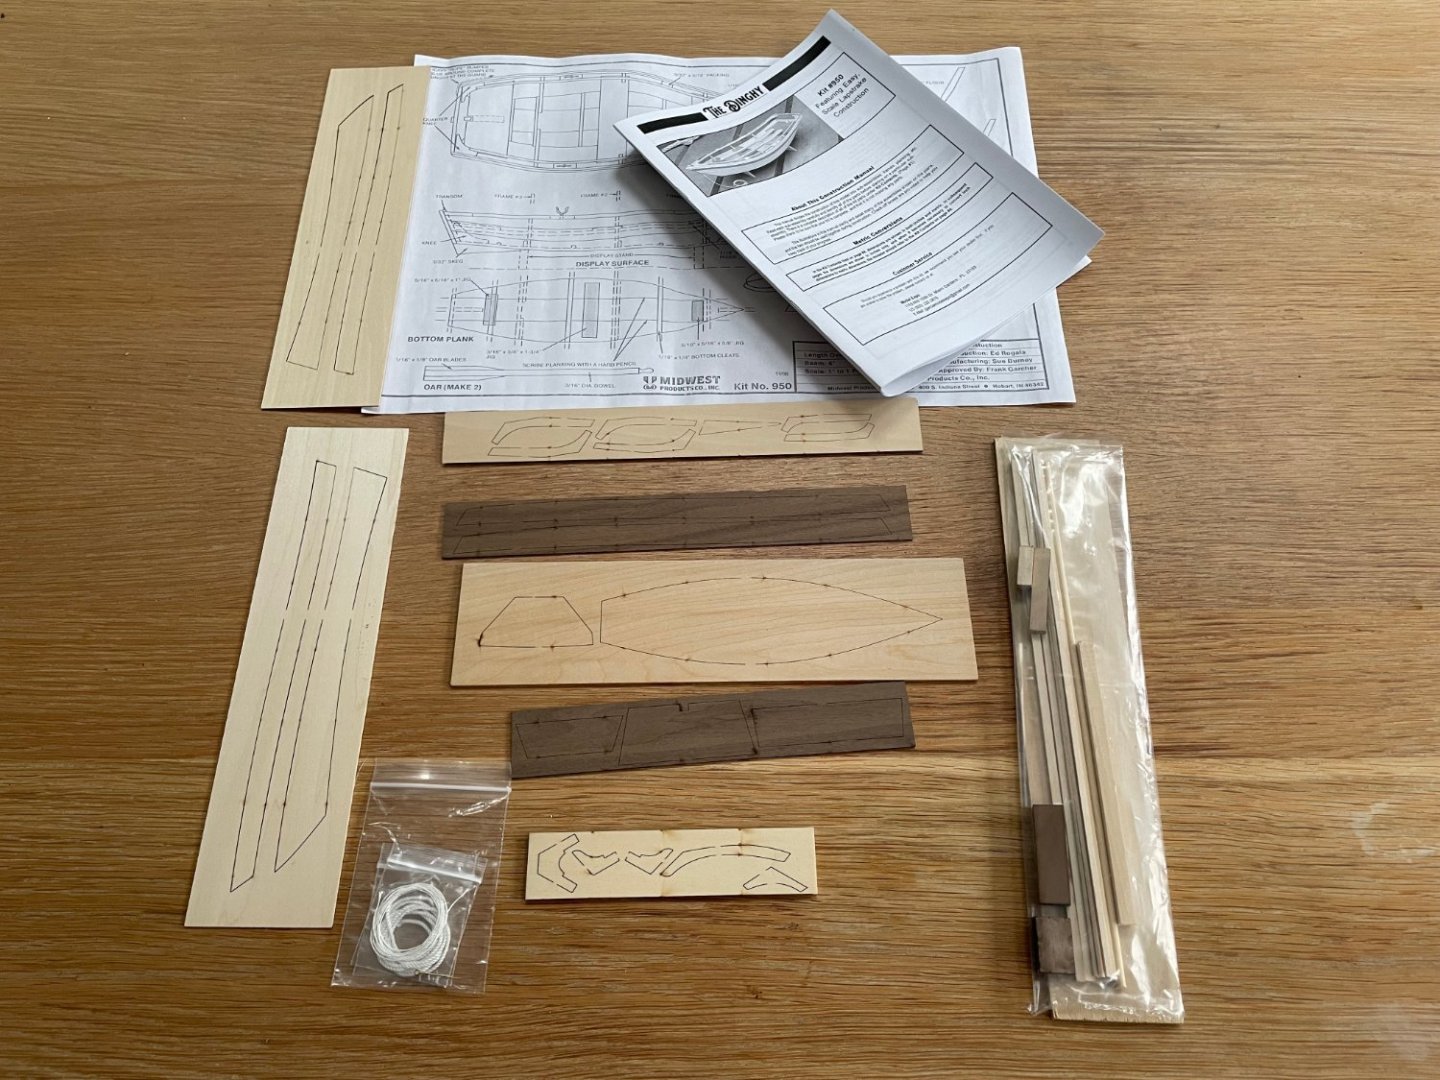
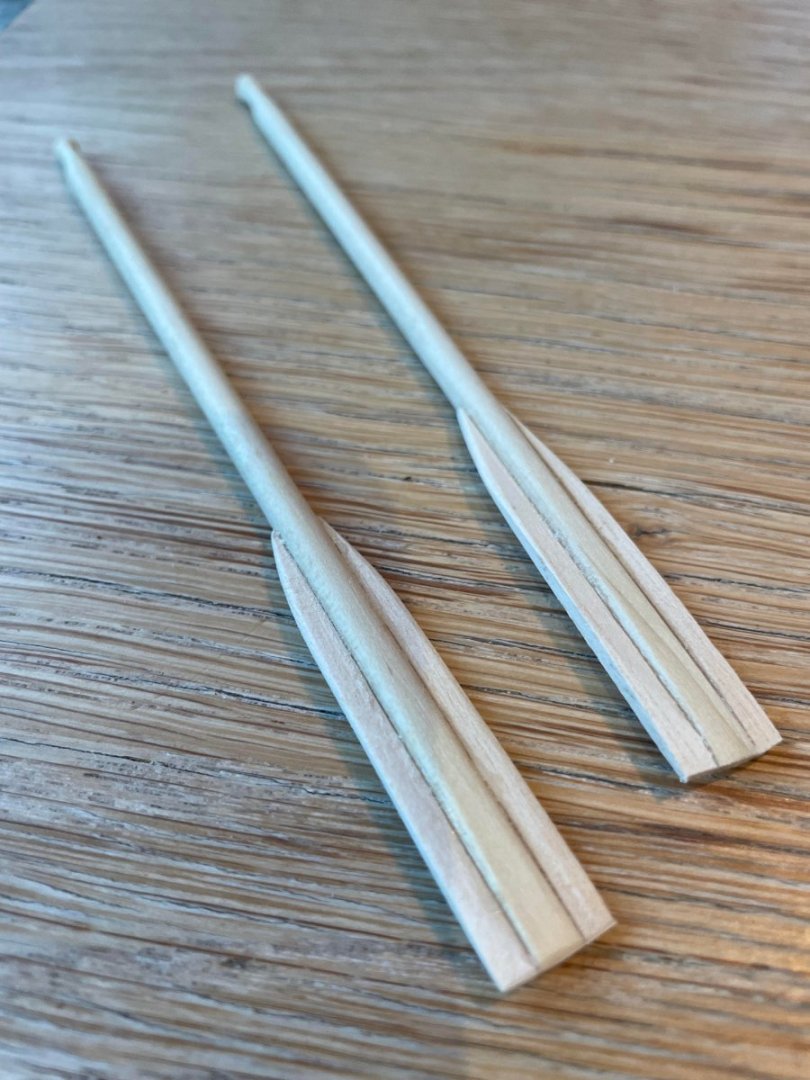
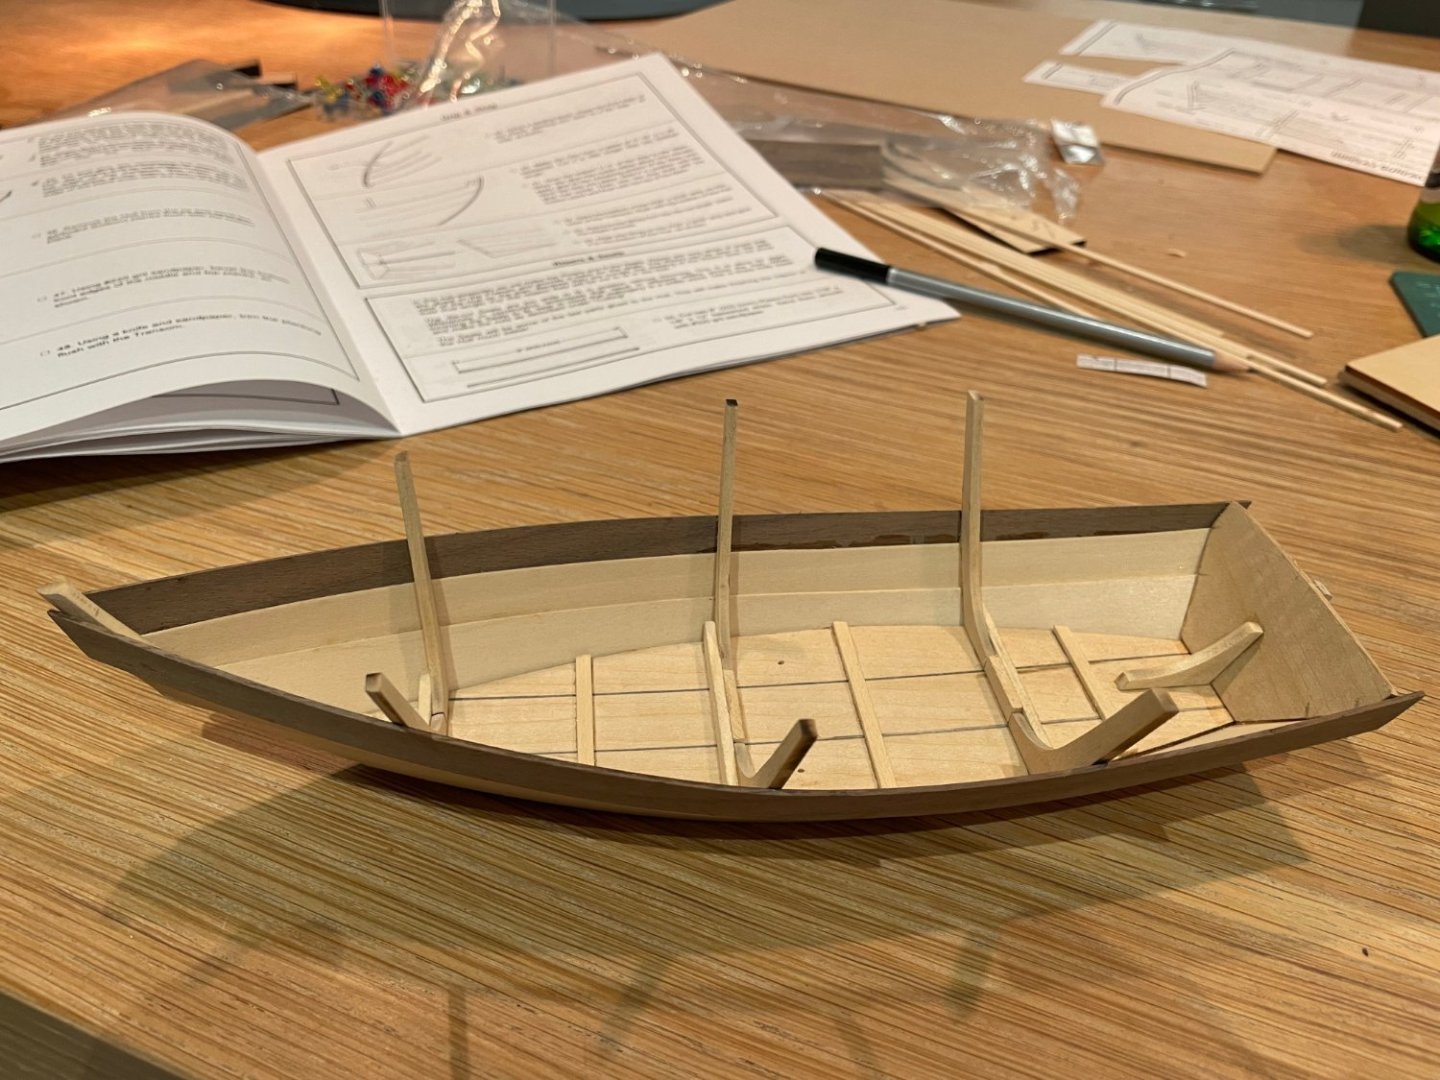
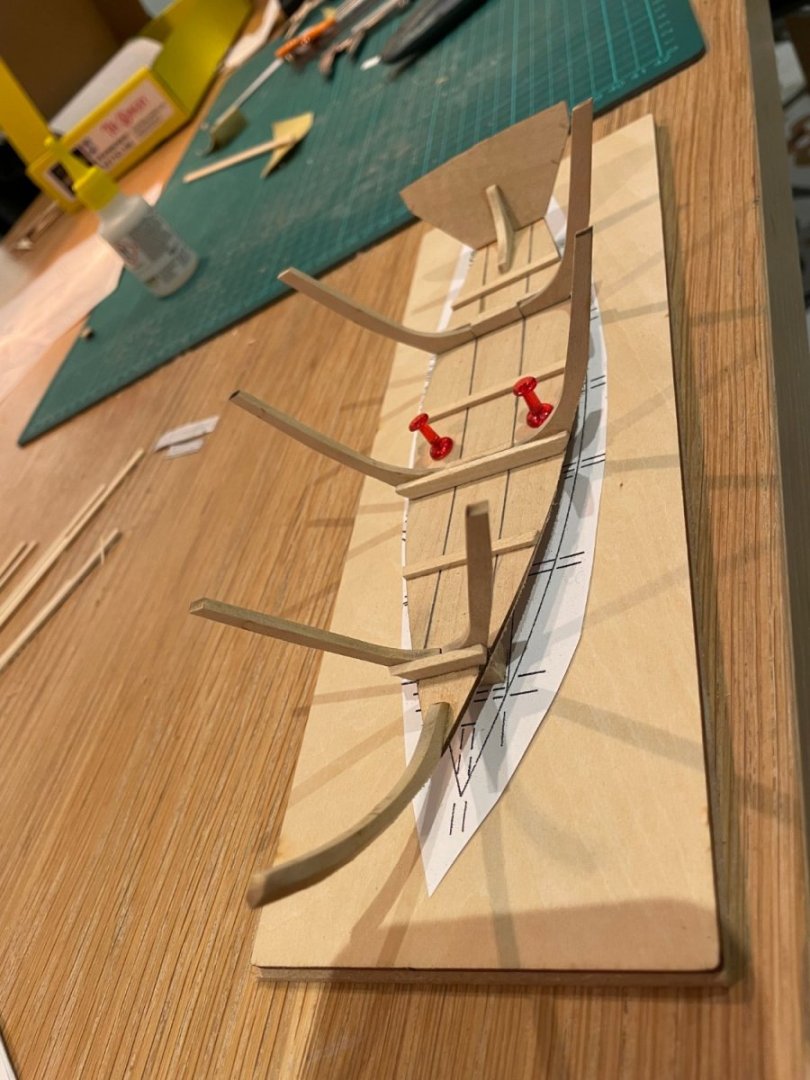
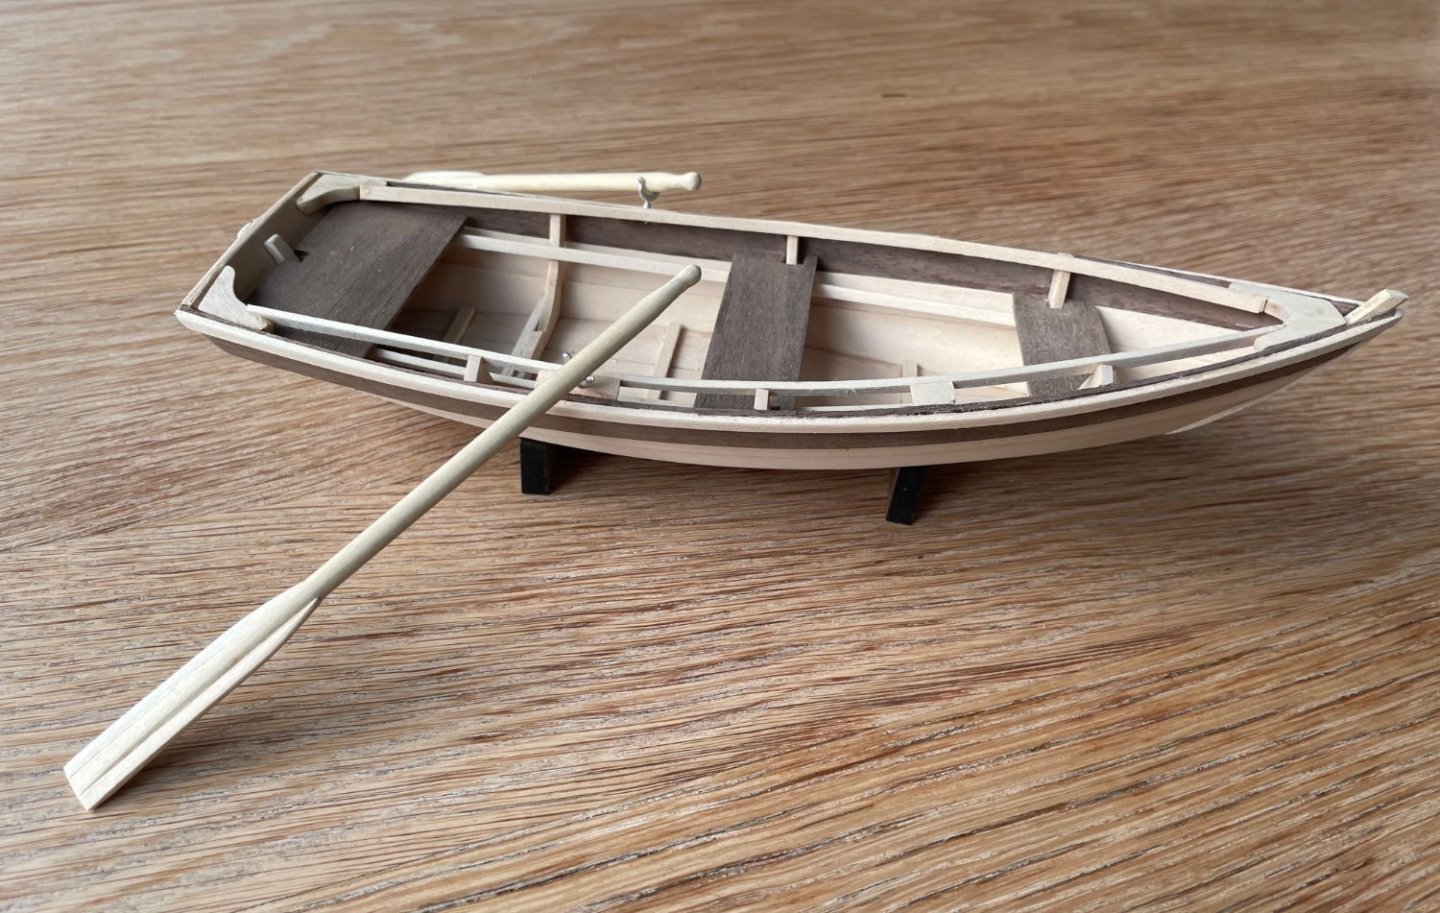
As a new member and a newbie to wooden model ship building, I thought this very short build log of a very simple model, Midwest’s Dinghy, could also serve as a means to introduce myself to the community. And, who knows, the build log itself might be useful for another newbie planning this same model. As my username suggest, I am Dutch but I actually live in the UK, in London to be more precise. When I say I am a newbie to wooden models I am lying, albeit it very slightly. I did actually build one wooden model before, when I was a kid, and started another one, which I never finished, in my twenties. Both builds are many decades ago now though, and I hardly remember anything about them, so I definitely feel like a complete novice. I do remember that the model I built as a kid was a solid-hull model of the Bounty, and that I very, very, severely simplified the rigging because I lacked the patience to do it right at that age. The model I built in my twenties was a plank on frame model, but I don’t remember the ship or the kit manufacturer. I did complete the double-planked hull on it, and it actually looked okay, but I was working 60-70 hour weeks at the time, and never got round to the rigging. I moved home many times since, and somewhere along the way, the incomplete model got lost. So, not a great start to this hobby… However, I have much more spare time now, and I have decided to give it another go. To nullify the chance of failing at the rigging stage once more, I chose a beginner model that does not have any rigging – a rowing boat. Smart, is it not? Or simply cowardly, that is for you to decide… The model I chose is a classic: Midwest’s Product Dinghy, now produced and sold by Model Shipways. It is a very simple little boat, but it does have a plank on frame construction, so it does provide a first opportunity to get acquainted with this daunting-for-a-beginner aspect of model ship building. I completed the model in a ten-hour day, so this is not a proper build log, as the actual build was completed before I could even start the log. Still, as I wrote above, perhaps it can be of use to another beginner contemplating the same model, who knows. I myself read several build logs of this model on this forum, and they were very helpful. Thank you, Voyageur, Duanelaker, MaryO, and burgoofj for your clear and instructive building logs! These are the contents of the box (photo below). The planks for the hull are pre-formed, which was one of the reasons I selected this kit, since I am interested in the ‘plank spilling technique’ that I have seen discussed on this forum. In this case, the spilling has already been done for me, making things easy. The instructions consist of text and black-and-white drawings, and they were very clear and easy to follow. They did not mention that one should remove the black burns on the sides of the laser-cut parts though, to ensure that glue/dyes/lacquer can get proper purchase on them, but I had read about that in other builds on this forum, so I knew that I needed to do that. All of the parts were straight, and could be used as is. I have nothing to compare the kit to, but I was quite happy with its quality. For some parts of the build, the instructions ask you to pin the wooden parts to cut-out parts of the plans. I wanted to keep the plans intact for future reference, so copied them beforehand, and used those copies instead. This photo (below) gives an example, in which two halves of a bulkhead are supposed to be affixed to the plans, and subsequently connected with a small wooden section; rather than the suggested pushpins, I used clamps. The instructions tell you to use a pencil to draw two parallel lines on the dinghy bottom, to suggest it consisting of three planks. I did not find the result very convincing, and near the end of the build, decided to largely rub out the pencil mark and replace them by a straight scratch/scribe in the wood. The dinghy bottom is curved, which is achieved by putting it on top of three blocks of different heights, and then affixing it to middle one with pushpins. The manual says you should soften the underside with alcohol first, but I did not do that, and it turned out fine. The two pushpins do leave two holes in the bottom which, despite ending up below a seat, are visible from certain angles in the completed build, so in hindsight I would probably rather have clamped the bottom rather than pin it. But the holes are not very conspicuous. In this photo (below), I have put on the first planks. Since they are pre-spilled, they go on effortlessly. As the manual recommended, I used CA glue (super glue) throughout this build, so I did not require any clamps to keep the planks in place. I used a high-viscosity CA glue, with a set time of 30 seconds, as I have seen recommended on this forum. This worked well, but despite the glue not being at all runny, I did manage to leave some visible traces on the inside of the boat, mainly where I had to move planks up and down during the fitting process. I was largely able to remove these later, by simply sanding them off, but careful inspection would still show up some glue blemishes in the completed model. In hindsight, I should perhaps simply have used PVA instead. The CA did make for a quick build, but even the high viscosity, relatively slow-setting variant I used clearly introduces the risk of staining the wood. A lesson learnt. In the photo below all planks are on (yes, I know, ‘all’ is only three on each side, but I had to start somewhere), and the pushpins have been taken out. The dinghy bottom kept its form nicely. When removing the side-plank overhang from the dinghy bottom, I used a knife, as suggested by the instructions. That was a mistake, as the knife ripped some to the planks, even though it was sharp, resulting in some gaps between side planks and bottom. I filled these with a mixture of wood glue and saw dust, and they are not problematic because they are at the bottom of the boat and not visible, but in hindsight I should have just sanded rather than cut the side planks down. These are the oars I made. I found the instructions unclear about how to ensure that the decorative (?) rounded ends were similar, and the oars ended up a bit uneven as a result, but the bottom of the oars, the bit with the blades, looked alright, so I am focusing on that in this photo. And, finally, this is the completed dinghy (photo below). I made the mistake of installing the inwales to high at the back, and could not move them down because I had used CA glue (again, will switch to PVA in next build), so the back seat is positioned too high. But overall, I am quite happy with the result. I can recommend this boat to other novices. It is simple, looks quite nice, and can be finished in a single day, if pushed, so you get a quick return on time invested. I know that that is not particularly important, since this a hobby, not a job, but it is much better than biting off too much, getting frustrated along the way, and never finishing a build, which is what happened to me in my more youthful exploits in model shipbuilding. I really enjoyed building this little boat, and it has given me the confidence to take a slightly more ambitious model for my next build. I am awaiting delivery of the NRG half hull planking tutorial kit, and have also already purchased a kit on which I want to apply the lessons that I will undoubtedly learn in that tutorial, namely Artisania Latina’s Bounty Jolly Boat. Will start new build logs for these two projects once I have started them. Thank you for reading and greetings from London, Seb.

- 8 replies
-
- 5
-
-
-
- Dinghy
- Midwest Products
- (and 1 more)