middle-Watch
-
Posts
9 -
Joined
-
Last visited
-
 Mr Whippy reacted to a post in a topic:
HMB Endeavour by middle-Watch - Artesania Latina
Mr Whippy reacted to a post in a topic:
HMB Endeavour by middle-Watch - Artesania Latina
-
Mr Whippy reacted to a post in a topic:
HMB Endeavour by middle-Watch - Artesania Latina
-
Mr Whippy reacted to a post in a topic:
HMB Endeavour by middle-Watch - Artesania Latina
-
Mr Whippy reacted to a post in a topic:
HMB Endeavour by middle-Watch - Artesania Latina
-
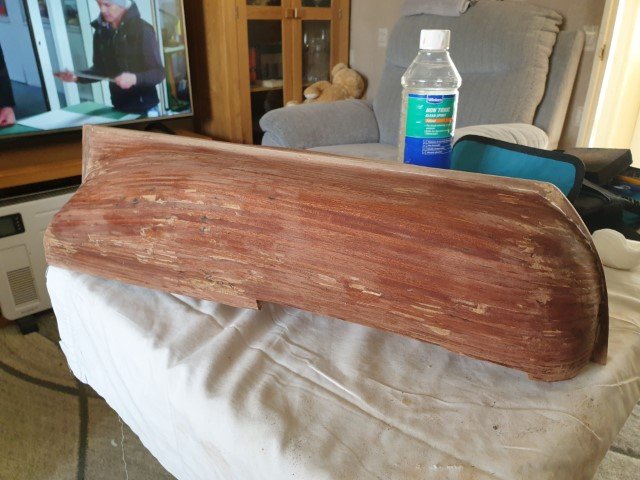
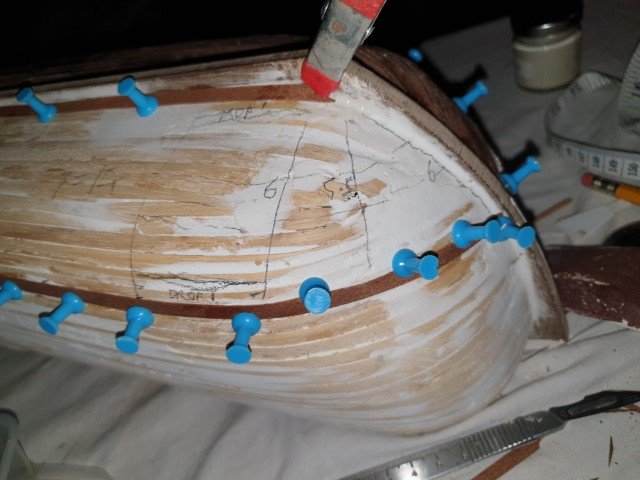
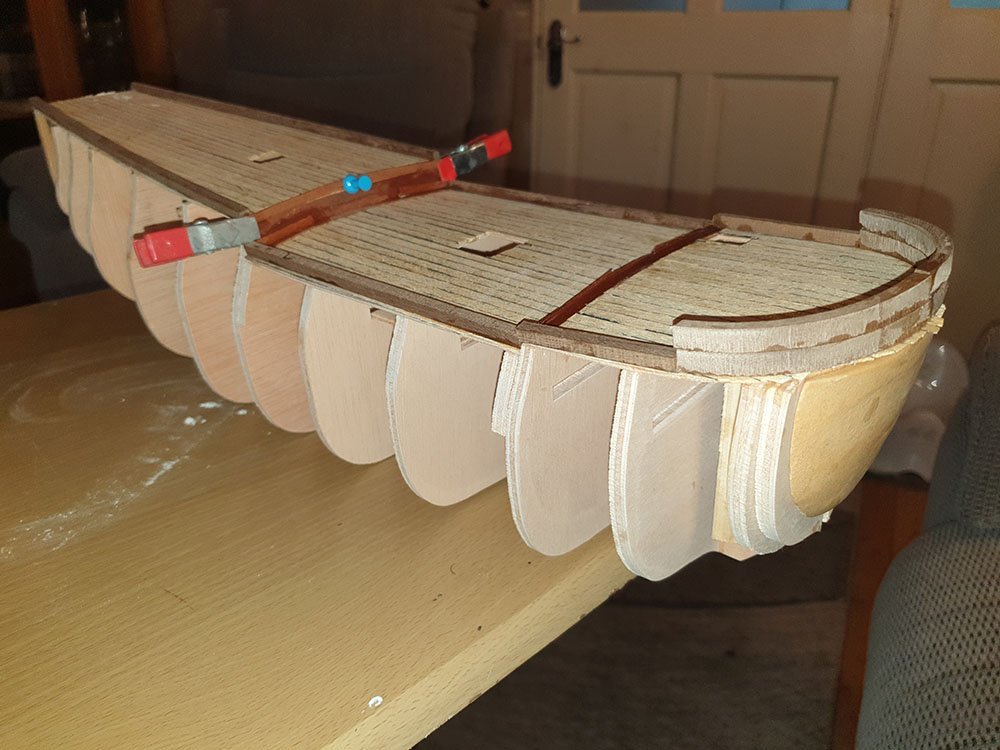
The stern, one of those places where there is virtually no instruction and just a finished shot to clue me in. I have added the whale planks but they are not easy to pick out at the moment. Next step is to get a smooth line on the gun whales and cap them off and add hull furniture like the hawser holes and transom. Interestingly Endeavour has a Quarter Cabin, even though the warship constructed Beagle had hers removed for exploratory work, or rather the gallery windows removed and the cabin sub-divided.

-
Second layer done, the pale patches are oak wood filler, as the glue dried some of the gaps opened up, well a lot did actually, a very small tube of the goop was needed as the gaps were small and not deep, but I could not sand it back all the way as the veneer would not take much sanding without dissolving. I will try and sort that with some walnut stain, but that will have to wait until next pocket money day.
-
Okay, start of second layer of planking, hum... These are very thin walnut veneer strips, 0.5 x 5mm according to the parts list. Do not like being pinned anyway so I am using the edge of push pins. I carefully marked out where they were to go, and bogged them up! With hindsight I neglected to allow for the gap between the planks, might be small, but multiply by dozens and it gets big. Also the tutorials just do not seem to work for me, the ones I memorized said the plank has to lie naturally, not be twisted or pushed. Okay, but around that big Collier bow I could not trim a 5mm strip as instructed to lie flat, just not enough width of plank, I kept up ending chopping off planks short and then laying the broken off bit at a slight angle, just no way else I could get around the big bow without twisting. Obviously my screw up, will need more practise, but not on this model.
-
Pitan reacted to a post in a topic:
HMB Endeavour by middle-Watch - Artesania Latina
-
hof00 reacted to a post in a topic:
HMB Endeavour by middle-Watch - Artesania Latina
-
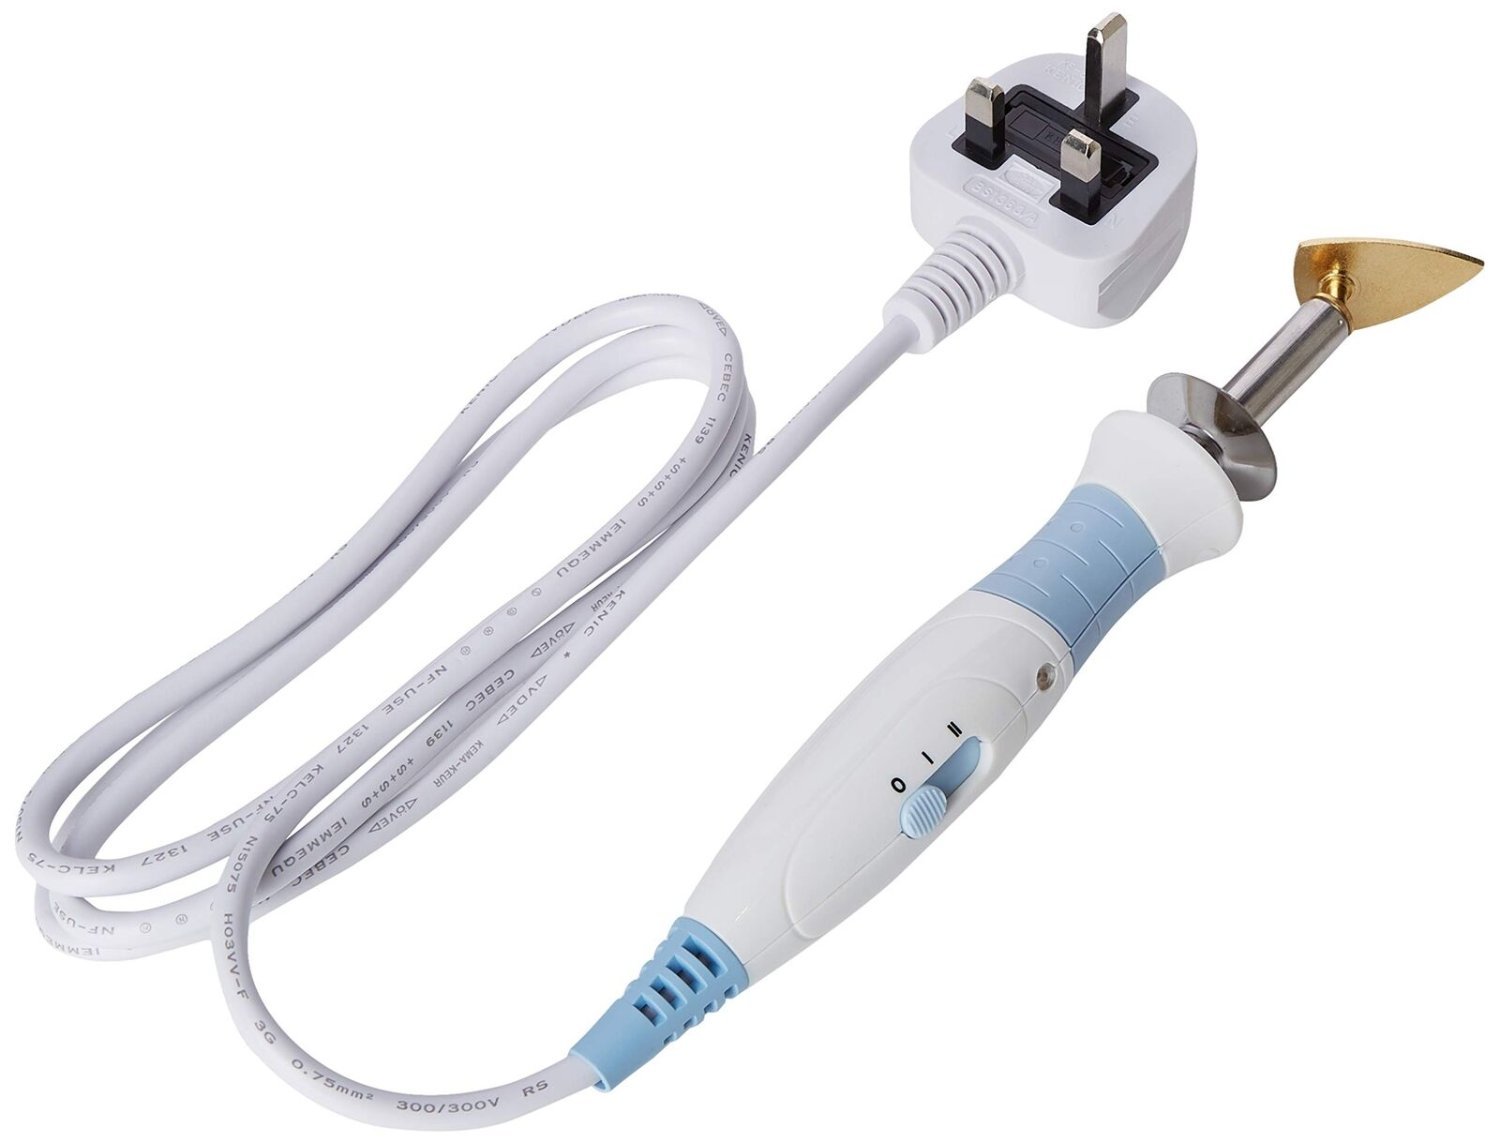
Okay, first layer of planking done, this is 1.5 x 5 x 1000 mm stock, looks like Basswood. I would be telling fibs if I said I got away without using some off-cuts to fill gaps that opened up, (******* great big lies actually!) With hindsight I should have blocked in the bow and stern gaps to give better foundations where things got really tight. I am putting it down to work experience I was panicking I would not have enough planks in the kit, and have been hunting for more on Amazon and E-Bay, but without much luck, as it happens I finished with over a dozen to spare, not sure how many the grandkids managed to snaffle and use as rapiers on each other! Next step is supposed to be fitting the second layer planks, walnut veneer things, but I have decided to fit the keel next and then do the beauty planking, hopefully making a neater job of this layer! I did decide soaking was not good enough to get the thicker plank curves, but the chomper thing I have was not doing the trick, it makes cuts into the plank to allow it to bend, but it also weakens them. I had my eye on a neat looking electric bender that is a modified soldering iron and a curved jig, but at £40 plus was out of my budget for now, what I did spot was my wife using a rather tasty device called a "Quilting Iron" which I have liberated, works like a charm, but sadly too late for the first layer! You just dampen the plank and run the tip along the edge you want bending. QED. The technical name for it is a Mini Iron Master, the wife uses it to spread corners and seams when sowing... ZZzzzzzzz!


-
Thank HOF, look forward to following your build.
-
hof00 reacted to a post in a topic:
HMB Endeavour by middle-Watch - Artesania Latina
-
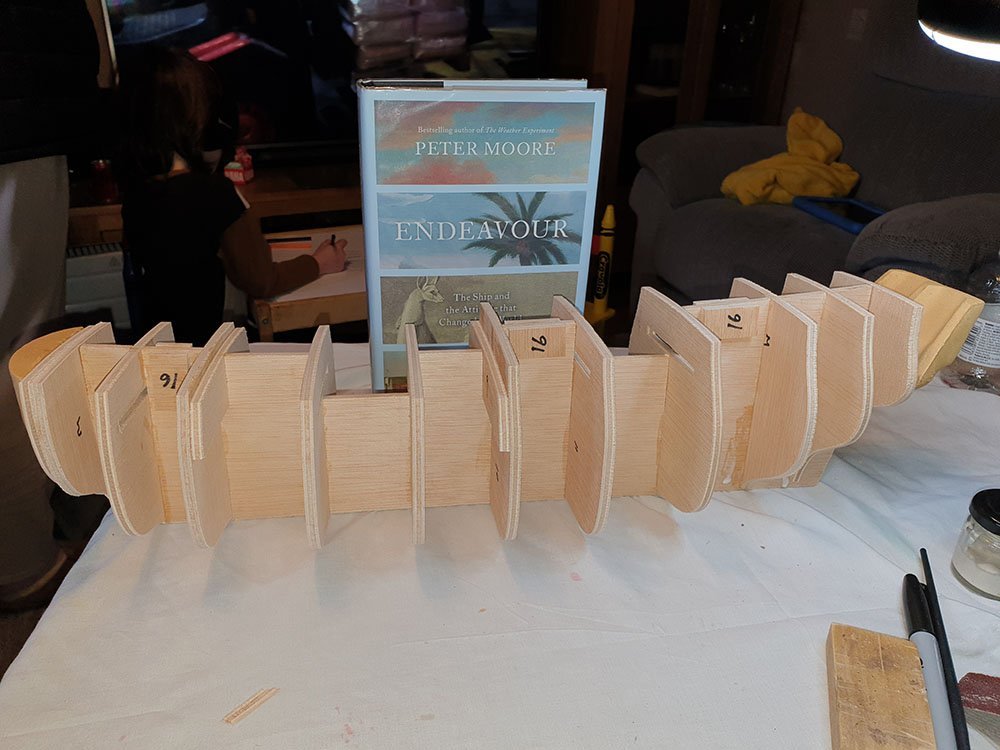
Thanks to the solid nature of the keel skeleton, I was able to use a power palm sander to blend the curves without it all falling to bits, a lot easier than hand sanding! The instructions cover positioning the first plank, at deck level, but after that you are pretty much left to your own devices, I have positioned the three key planks (x2) at the usual points, on the curve of the lower hull and at the Gar Plank position, the Gar had to be the easiest I have ever done, but it helps the wood stock is beautifully bendy and so far has not split at all, I give them a light soaking for the acute bends, clamp and pin in place, let dry then re-apply them with wood glue. I picked up a great tip from John Aliprantis on YouTube on modifying bulldog clips to lock planks to bulkhead sections while setting. The instructions advise laying planks parallel and filling any gaps with splinters and darts of wood, my survey says "Uh aaarh!" I don't think so, I will use drop planks and Stealers. Incidentally: so far, apart from the sanding, the work is being done on a hobby table in the living room, I have a dedicated modeling area in a spare room, but my wife gets sarcastic if I use it too much, thinks I am up to no good out of her sight! I will not be coppering the hull, cannot justify the expense, but if I make a reasonable job of this first build in a decade I may buy a smaller model next time and have a go at coppering.


-
Mr Whippy reacted to a post in a topic:
HMB Endeavour by middle-Watch - Artesania Latina
-
Bob Fraser reacted to a post in a topic:
HMB Endeavour by middle-Watch - Artesania Latina
-
Decks planked, tar effect created using a sharpie black felt on the edges, they will be lightly sanded and marked into plank lengths. I doubt I will put in the Trenails, I have done time on tall ships and I do not recall you can see them, they are usually set into the plank and plugged over, otherwise they would soon rust, and rip open bare feet and holy stones! The foundation of the bulwarks have been added, Walnut beading 5x5mm, they will be sanded to shape later and added to. The instructions say to use mahogany veneer to mark the steps in the deck, but the kit does not have any so I am using the dark veneer second layer planks. A bit of research shows the company: Artesania Latina, ceased trading a while back but restarted with re-engineered kits, so I likely have one of the old pattern models. Note there are no pre-drilled holes for masts on this version. Up to now I have only used Gorilla Wood Glue, I dislike CA, it does speed things up, but I find it has a habit of migrating where it is not wanted, and setting into a messy, brittle crystal-like blob when the surfaces do not mate closely. I like Gorilla as it is happy to be thinned with water when a thin application is needed, such as laying veneer, bridges well and sets strong and clear.
-
CiscoH reacted to a post in a topic:
HMB Endeavour by middle-Watch - Artesania Latina
-
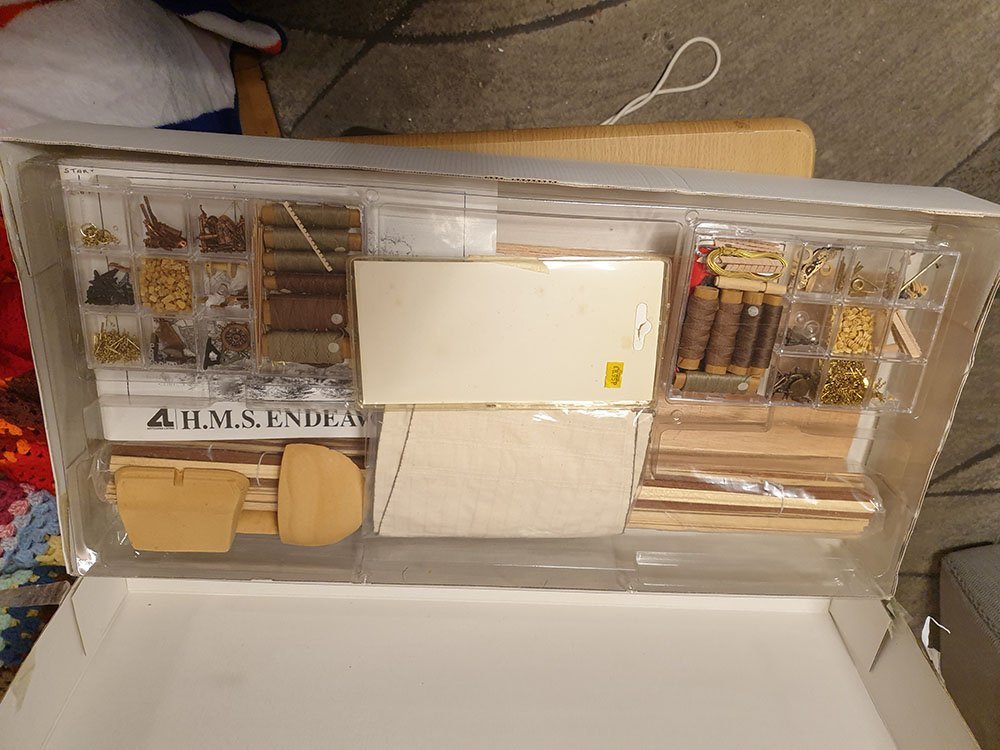
Took delivery and a bit of a surprise, while waiting for it I had read up some reviews and followed a highly detailed build on Youtube, but it seems my kit is substantially different. The box is larger, the wood lengths are a full metre, not cut down to about 30cm and the keel structure is solid false keel and bulkheads, not a patchwork of pieces that have to be assembled before constructing the hull. Also the bow and stern are some sort of solid material, not an array of ply pieces. I seem to have come out better anyway, the build I followed described the keel as fragile when built up, mine took a couple of solid blows with Janes Fighting Ships to settle a couple of the bulkheads into place with no damage, no cutting was needed, it slotted together into a very rigid construct in a matter of a few minutes. My plans though are inferior, no CDROM, the photos are grainy black and white and the build instructions brief and often cryptic in a separate book to the illustrations.
-
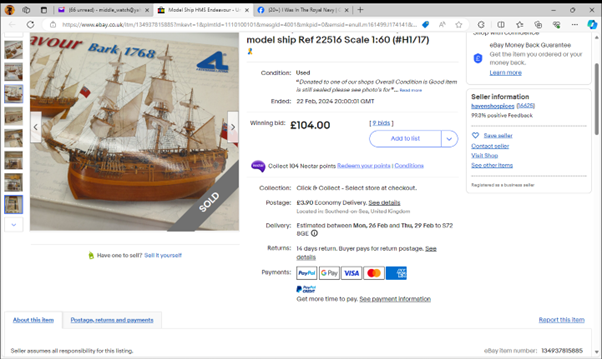
I need to buy a lottery ticket! After years of being unable to assemble even a basic plastic kit I have recovered enough to contemplate improving my motor and mental skills with a wood kit and spent a morning in the library, browsing the history of unusual RN ships that have captured my imagination over the years, I narrowed the list to three: Bounty, Beagle and Endeavour. From there I went to the internet (no model shops still open in my area, sadly) and was horrified at how prices had jumped. Spotting a likely subject I put a hail Mary bid on it, and to my amazement won. Endeavour, a Colier ship built in Whitby and commanded by a Whitby native when bought by the RN, and arguably one of the most famous ships of all time. Tainted by madness and producing the infamous Captain Bligh, I love it, I like to immerse myself in the history of any model I build, and this ship has history to spare. The main problem now is winner guilt, I feel I have robbed the charity shop I won it from, I suppose I should make a contribution rather than buy lottery tickets! I will record the build, with apologies from the start, it is ten years since I completed a model, and it has been a long road back.