


Bob Fraser
-
Posts
275 -
Joined
-
Last visited
1 Follower

Recent Profile Visitors
1,639 profile views


-
 Bob Fraser reacted to a post in a topic:
King of the Mississippi by Warnerade - Artesania Latina - 1:80
Bob Fraser reacted to a post in a topic:
King of the Mississippi by Warnerade - Artesania Latina - 1:80
-
Canute reacted to a post in a topic:
Use of “other power tools”
-
kgstakes reacted to a post in a topic:
Use of “other power tools”
-
mtaylor reacted to a post in a topic:
Use of “other power tools”
-
Gregory reacted to a post in a topic:
Use of “other power tools”
-
Use of “other power tools”
Bob Fraser replied to kgstakes's topic in Modeling tools and Workshop Equipment
We have a Cricut Explore 3 - the machine is tied to the software for conectivity because of proprietary drivers, and the Cricut Design Space software is tied to the internet either via PC and USB, or the app version which connects via bluetooth to the machine. You can design in other art / graphics software and then import. We also have another machine, the Sillhouette Curio. This is very similar to the Cricut in what it does with a couple of plusses. The Silhouette Studio software isn't tied to the internet, and the machine isn't tied to the software, there are several other softwares that can connect to it. They can both do things the other can't. Both can use a range of non-oem pens and cutters with adaptors. Cricut will import only SVG and DXF in it's free software, while Silhouette will import DXF, PNG, BMP, JPG, GIF, GSD and TIFF (SVG in a paid version). Both will do more filetypes in the paid versions. In both programs DXF will open with the lines of the design ready to be marked for operations, as will SVG, all other files will need to be traced with the software (needs clearly defined lines) but is relatively easy to do. The Curio will cut up to 2mm wood, as will the Explore, but both need several passes and higher pressure settings to do so. Corners and curves are well cut. We have both only because they were going being sold off cheap by people who no longer needed them, and they came with loads of materials and tools. My other half said "I need them for my makes, and you can use them too!" Having only had these a matter of a few weeks I tried both for some small cutting and drawing I found the Curio the easier of the two to use, but I've a long learning curve. If buying new neither machine comes with much in the way of tools, and Cricut oem are relatively expensive items. If you're looking to buy one, check out your needs and match them to a model in the available ranges that can do what you want. She also said a laser cutter / engraver would come in handy for her projects so now I've got that one to learn as well, with Lightburn being the software of choice - while building an enclosure and extraction duct for smoke and vapours. -
Bob Fraser reacted to a post in a topic:
Bregante by AmateurModelBuilder - Mini Mamoli
-
Bob Fraser reacted to a post in a topic:
Period Scale Model Masting and Rigging Tables
-
Bob Fraser reacted to a post in a topic:
Bregante by AmateurModelBuilder - Mini Mamoli
-
Bob Fraser reacted to a post in a topic:
Bregante by AmateurModelBuilder - Mini Mamoli
-
mtaylor reacted to a post in a topic:
Period Scale Model Masting and Rigging Tables
-
Bob Fraser reacted to a post in a topic:
Bregante by AmateurModelBuilder - Mini Mamoli
-
JpR62 reacted to a post in a topic:
Period Scale Model Masting and Rigging Tables
-
Got to say, they don't give the best of instructions. I have the Cutty Sark under way and had to use a lot of filler and shaping to get the lines looking anywhere near right. (Stopped for now as life got in the way but will continue soon I hope.) Use the photo of the ship on the box front to see what you may need to do. Looks like a lot of filling and shaping to get the lines in the photo.
-
Period Scale Model Masting and Rigging Tables
Bob Fraser replied to DaveBaxt's topic in Masting, rigging and sails
Dave asked earlier if the spreadsheet could be re-written to account for the foremast discrepancy. I've managed to get the spreadsheet so it's unprotected, made it so you can see the rows/columns and sheet tabs. Also frozen some headers so they don't get lost. The calculations can now be seen and followed, but they seem to go round in circles to me (probably just me not seeing it right). Would an Excel wizz like to have a go? Masting and Rigging - Danny Vadas - open.xlsm Forgot to mention you'll likely get some warnings about active code. These will need to be allowed to run it properly. -
Bob Fraser reacted to a post in a topic:
Period Scale Model Masting and Rigging Tables
-
mtaylor reacted to a post in a topic:
Period Scale Model Masting and Rigging Tables
-
 DaveBaxt reacted to a post in a topic:
Period Scale Model Masting and Rigging Tables
DaveBaxt reacted to a post in a topic:
Period Scale Model Masting and Rigging Tables
-
allanyed reacted to a post in a topic:
Period Scale Model Masting and Rigging Tables
-
AON reacted to a post in a topic:
Period Scale Model Masting and Rigging Tables
-
Period Scale Model Masting and Rigging Tables
Bob Fraser replied to DaveBaxt's topic in Masting, rigging and sails
Hi Dave. This is the DV spreadsheet on Windows view of the masting sizes for Diana as per the contract - available at the nmm here Artois Contract Using Extreme Breadth as 39' and length of lower deck as 146' Steel gives the same main mast length as the spreadsheet, 1745 Establishment as 88.92' There were amendments to the 1745 Establishment for larger ships in the intervening times. Using Lees the 1/64 diameter comes to 10.80mm Does the same for my little sloop, too! You'd need to do the math for the other given sizes of the fore to work out if there are any other differences. The spreadsheet is protected from editing, and I'm not a genius with spreadsheets.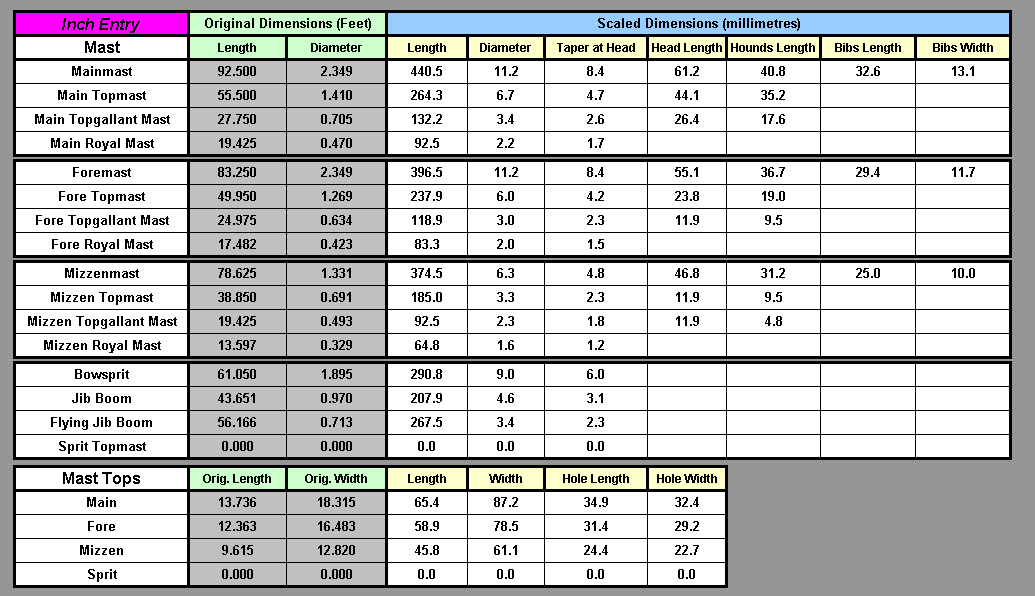
-
Period Scale Model Masting and Rigging Tables
Bob Fraser replied to DaveBaxt's topic in Masting, rigging and sails
Hi Allan, Dave. Allan - I'd seen that comment about the dates before, but couldn't remember it fully. Thanks for the reminder. As you say, a fantastic resource. I'm no expert or have extensive experience in these calculations, and my use has only been with this one ship. The ship I based my comment on was a RN sloop built 1756/57 and would most likely have been built to the 1745 Establishment, quick mast drawing measurements taken with a brass caliper. I would imagine that you are aware of all the different calculations over the 18th Century 🤣 I wasn't at all except for the 1745 Establishment, and was surprised by the variations 🤯 I was hospitalised last year for 10 days with covid and while I was there I did a little research on the sloop to give some working mast dimensions. but only from 1711 to 1794, and came up with the following table of authors. Purely for my own benefit! -------------------------- Dimensions for Bonetta 1756 as designed - Deck 85’10”, Breadth 24’ 4”, Depth in Hold 10’ 10”, Keel 78’ (as per Ollivier)1, 220 40/94 tons (profile plan ZAZ4368 RMG) Dimensions for Bonetta as built - Deck 86ft 4in, Breadth 24’ 6”, Depth in Hold 10’ 10”, calculated Keel 78’5”, 22760/94 tons (Winfield, 2007) RD is Range of Lower Gun Deck or upper deck on a single deck, EB is Extreme Breadth, DIH is Depth in Hold, K is Keel length, BMF is Beam Multiplication Factor. Calculation Information Main Mast Length (Ft In) Beam Multiplication Factor Date Name Formula As Designed As Built As Designed As Built Reference Davis EB*BMF 2.66 ------------- (Marquardt, 1986) 1711 Establishment (RD + EB) / 2 (Lees, 1979) 1719 Establishment No Change to 1711 ------------- ------------- ------------- ------------- (Lees, 1979) 1723 Anderson EB*BMF 2.25 ------------- (Marquardt, 1986) 1726 William Sutherland** (((EB + DIH) * 3) / 5)*3 (Marquardt, 1986), (Sutherland, 1726) 1735 James Love ((K + EB) * 2) / 3 (Marquardt, 1986), (Love, 1705) 1737 Blaise Ollivier EB*BMF 2.33 ------------- (Ollivier, 1737) 1745 Establishment EB*BMF 55.479 55'7 3/4" 2.28 ------------- (Lees, 1979) 1752 Duhamel Monceau 1 EB*BMF 2.5 ------------- (Marquardt, 1986), (Monceau, 1752) 1752 Duhamel Monceau 2 (EB*2) + DIH (Marquardt, 1986), (Monceau, 1752) 1756 William Mountaine (K + EB) / 2 (Marquardt, 1986),(Mountaine, 1767) 1768 Chapman EB*BMF 2.43 ------------ (Marquardt, 1986) 1794 Steel (RD + EB) / 2 55.083 55'1" ------------- (Steel, 1794) ** EB+DIH in feet, multiply by 2 and then divide by 5 = length in yards. Multiply by 3 = feet and part. ------------------------ Hoping my calculations above are right, Dannys spreadsheet first entry for a sloop is 1794, and his calculations came out as 55' 7" to 3 decimal places, 55' 6" to 2 decimals for the inches part as input. Looks like the 1745 Establishment is used up to at least that date in the spreadsheet, as per Lees. Steels dimensions come out smaller. I have the Lees and Marquardt books, Love, Monceau, Mountaine, Sutherland are available as Google books. Dave - I think even an XP based laptop with Excel on it will run the spreadsheet. BTW, a distant cousin of mine captained Diana in 1799! -
Period Scale Model Masting and Rigging Tables
Bob Fraser replied to DaveBaxt's topic in Masting, rigging and sails
Hi Dave. This is because Dannys sheet uses active-x controls to do some of the calculations. Google sheets doesn't alow the use of active-x. I don't think it will run on a Chromebook, Office 365 on line also doesn't use active-x controls. You'll need you use Excel on a PC to open the spreadsheet to get it to work as it should. I just ran a quick check (Dannys) and measured the results against an NMM print I have which came out exact to the drawing. -
Bob Fraser reacted to a post in a topic:
HMB Endeavour by middle-Watch - Artesania Latina
-
Bob Fraser reacted to a post in a topic:
Decent small clamps
-
Instructions for rigging Cutty Sark
Bob Fraser replied to bill mckee's topic in Masting, rigging and sails
Billings boats direct - Cutty Sark topright of the blurb are links to instructions and riging manual -
ALs rigging diagram is a bit confusing, took a while using the big picture and the photo manual. I opted to be awkward and installed 2 of the things! 1 up and 1 lowered, the height can be a personal choice. whatever looks good to you.
- 128 replies
-
- 1
-
-
- King of the Mississippi
- Artesania Latina
- (and 1 more)
-
Bob Fraser reacted to a post in a topic:
King of the Mississippi by Cleat - FINISHED - Artesania Latina - 1:80
-
Coming together nicely. Neat job on the mast block!
-
Iron on transfer paper might work - use it with an ordinary inkjet. I've used this on t-shirts but not on silkspan. Sublimation printing works the same way but needs special inks in a dedicated printer on sublimation paper, can work with an iron, but usually a heat press.
-
That's what I used, except I made the glue 1/2 inch to 1 inch long to act as a needle to hold, rather than holding a flexible line when threading the block. Much easier when you've got fat fingers like me! 🤣 The needle threader doubled the line thickness and I couldn't pull it through most of the supplied blocks as the holes were too small. Even with the glue method some holes had to be widened with a micro drill just a little.
- 128 replies
-
- 1
-
-
- King of the Mississippi
- Artesania Latina
- (and 1 more)
-
Hi Cleat. I used wire to attach the blocks to the mast. My mistake, I'd advise against it as the wire snapped easily when tightening it up to the mast. Your photo shows the wire running through the hole. It, or the rope to attach the block to the mast, should run round the groove on the outside - the hole is for the rigging to run through. The blocks, - 1 hole is a single block, 2 holes is a double block. Have a look here - Working with small blocks has some tutorials on attaching blocks. Hope this helps.
- 128 replies
-
- 2
-
-
- King of the Mississippi
- Artesania Latina
- (and 1 more)
-
It's what I used too. Lay the wire along the length of it, fold the thing back into a triangle, squeeze it tight and pull the wire. First pull will work with thinner wire, thicker may require 2 or more. If there's still a curve to it do another pass with the curve pointing to the floor, but don't squeeze as tight.
- 128 replies
-
- 1
-
-
- King of the Mississippi
- Artesania Latina
- (and 1 more)
-
Nicely done! Noticed the pins in the bottom of the uprights - they helped me a lot in keeping stuff fixed in place 😃 Cheers,
-
Looking nice and neat!