
CiscoH
-
Posts
225 -
Joined
-
Last visited
2 Followers


Recent Profile Visitors
1,526 profile views


-
 CiscoH reacted to a post in a topic:
LE ROCHEFORT 1787 by Tobias - 1:36 - Harbor Yacht from ANCRE monograph
CiscoH reacted to a post in a topic:
LE ROCHEFORT 1787 by Tobias - 1:36 - Harbor Yacht from ANCRE monograph
-
CiscoH reacted to a post in a topic:
HM Armed Cutter Sherbourne by Pitan - Vanguard Models - 1:64
-
Canute reacted to a post in a topic:
SeaWatch Books is Open!
-
Canute reacted to a post in a topic:
TRE KRONER 1742 by Beckmann - 3"/8' scale - Transom-Model
-
CiscoH reacted to a post in a topic:
Chris Watton and Vanguard Models news and updates Volume 2
-
CiscoH reacted to a post in a topic:
Sloop Speedwell 1752 by Chuck - Ketch Rigged Sloop - POF - prototype build
-
CiscoH reacted to a post in a topic:
USS Constitution by mtbediz - 1:76
-
CiscoH reacted to a post in a topic:
The Hayling Hoy by jpalmer1970 - 1:48 scale - First POF build
-
CiscoH reacted to a post in a topic:
HMS Tiger 1747 by Siggi52 - 1:48 - 60 gun ship from NMM plans
-
CiscoH reacted to a post in a topic:
HM Cutter Alert by Thukydides - Vanguard Models - 1:64 - first build
-
 gorgeous work Matthias
 -
chris watton reacted to a post in a topic:
HMS Sphinx 1775 by mugje - Vanguard Models - 1:64
-
 RossR reacted to a post in a topic:
Frigate Diana by RossR - OcCre - 1:85
RossR reacted to a post in a topic:
Frigate Diana by RossR - OcCre - 1:85
-
Frigate Diana by RossR - OcCre - 1:85
CiscoH replied to RossR's topic in - Kit build logs for subjects built from 1751 - 1800
i really like your detailed descriptions! keep it up she looks better and better -
mtaylor reacted to a post in a topic:
SeaWatch Books is Open!
-
BLACK VIKING reacted to a post in a topic:
The Flying Dutchman by BLACK VIKING - first scratch build
-
SeaWatch Books reacted to a post in a topic:
SeaWatch Books is Open!
-
got mine today. its huge and packed to the gills with pics and info. well worth the wait
-
aliluke reacted to a post in a topic:
Armed Virginia Sloop by CiscoH - Model Shipways - 1:48
-
Dave_E reacted to a post in a topic:
Armed Virginia Sloop by CiscoH - Model Shipways - 1:48
-
Mr Whippy reacted to a post in a topic:
HMS Sphinx 1775 by mugje - Vanguard Models - 1:64
-
i planned out the planking on my ship (armed virginia sloop) exactly the same way Mugje- split the hull into symmetric bands with blue tape strips and sighted from the side and especially from behind and in front until the curves looked smooth. for me the hardest part to plank was the sternpost/counter junction area; all the planks went from wide amidships to skinny at the quarterdeck area into a wider trapezoidal shape at the stern. while at the same time curving upwards. lot harder than it looked before i started. i used mostly Chucks mini iron bending method. your planking is looking great
-
thats a nice paintjob
-
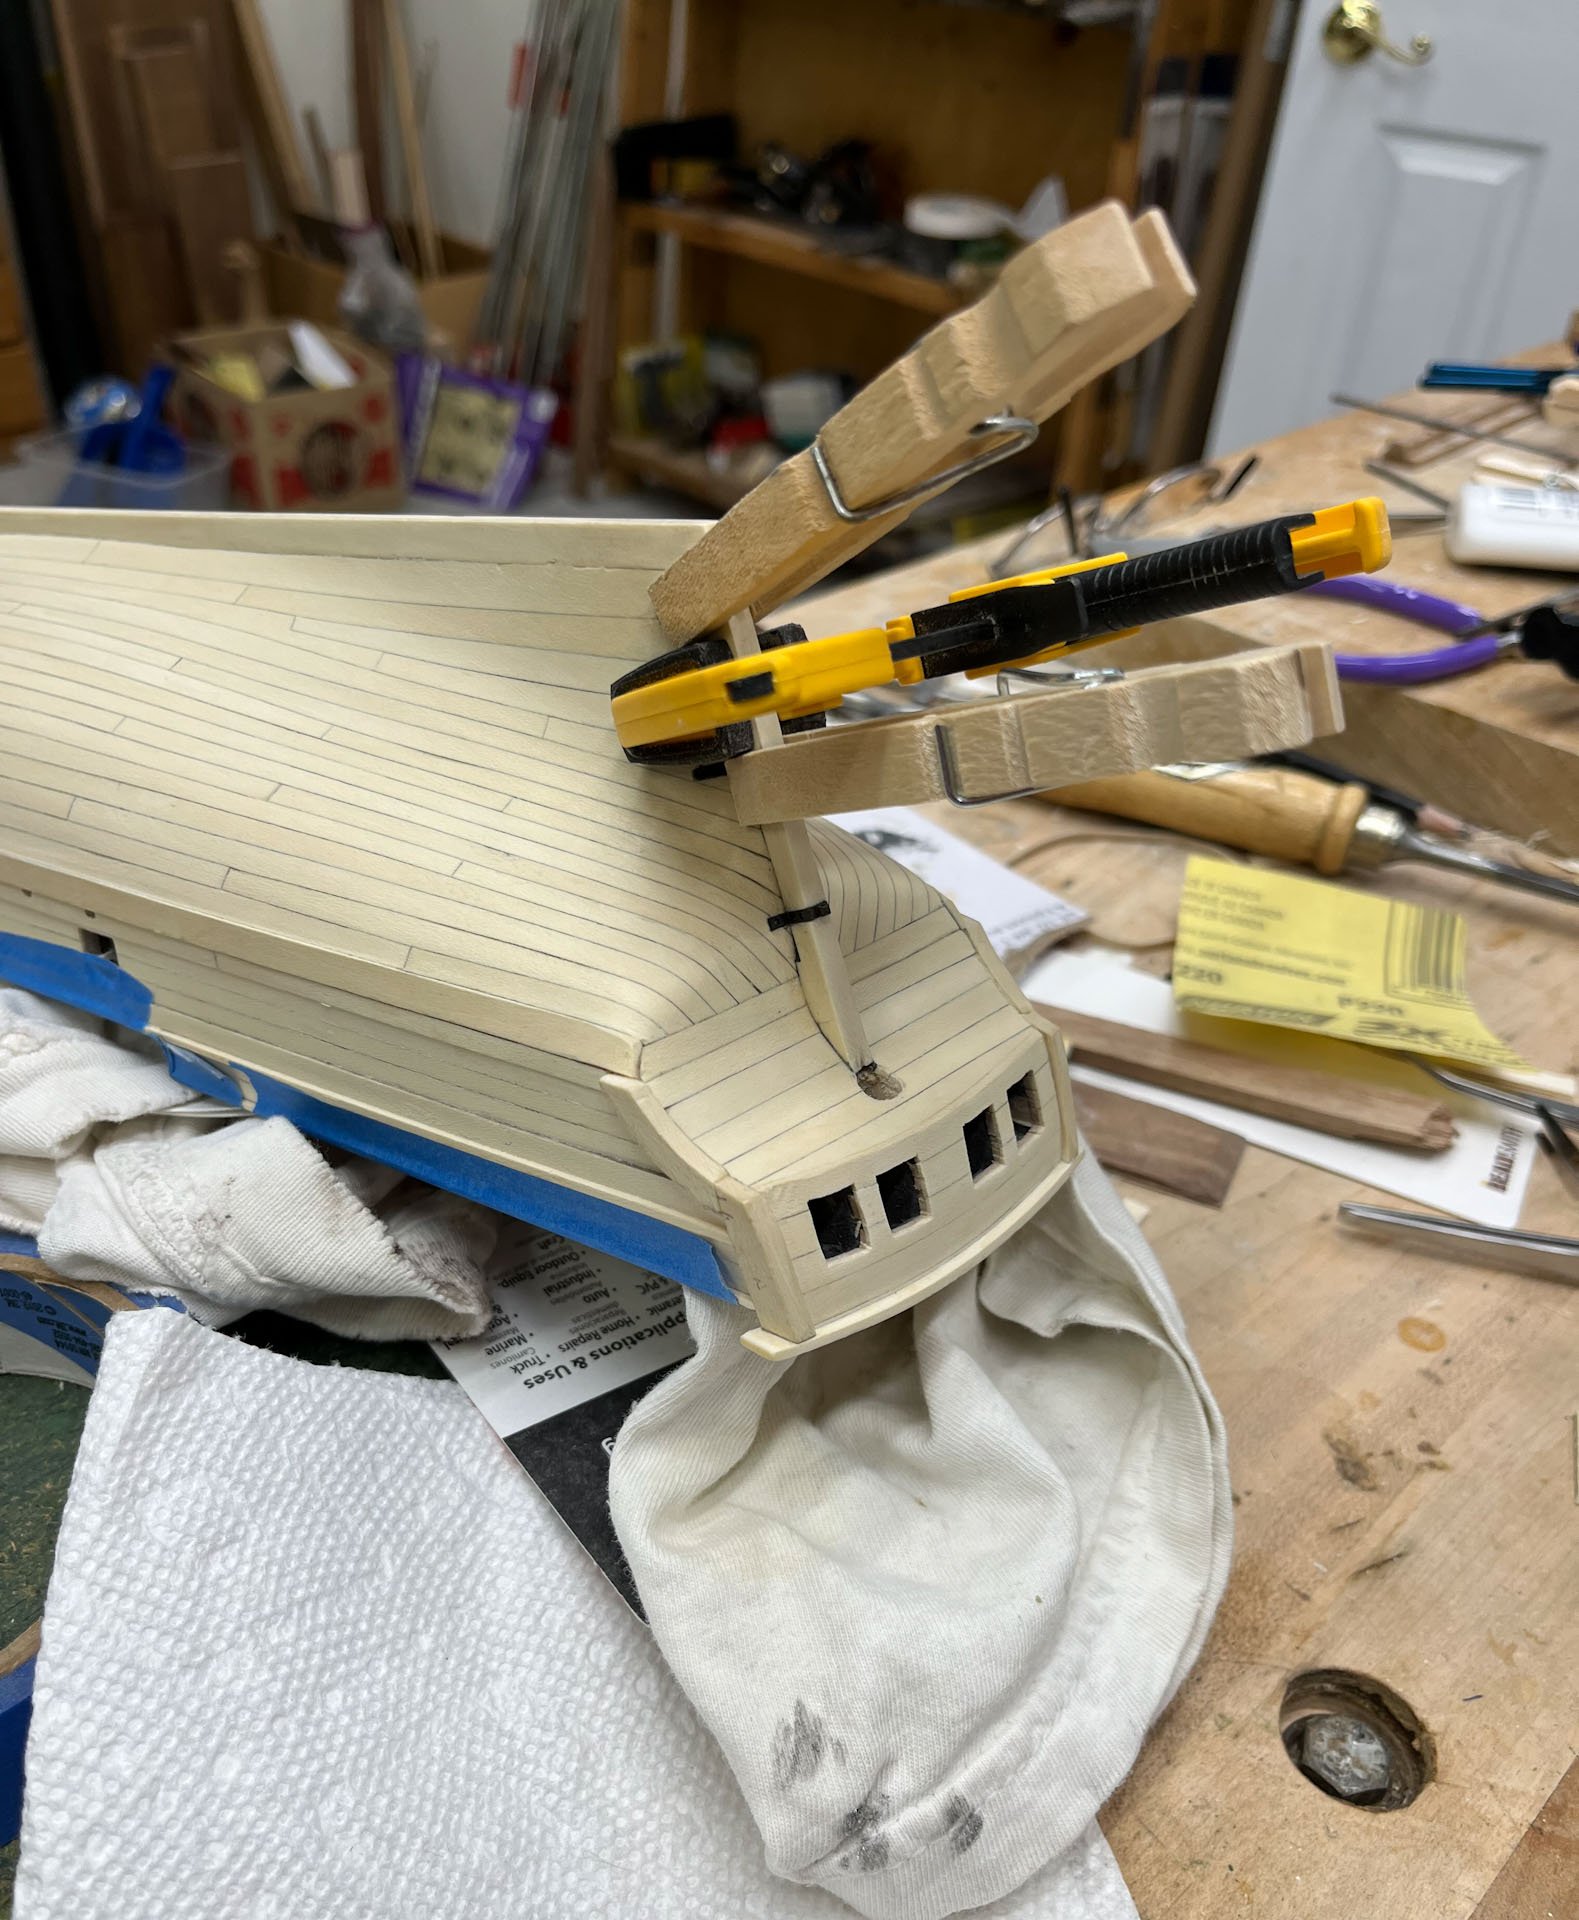
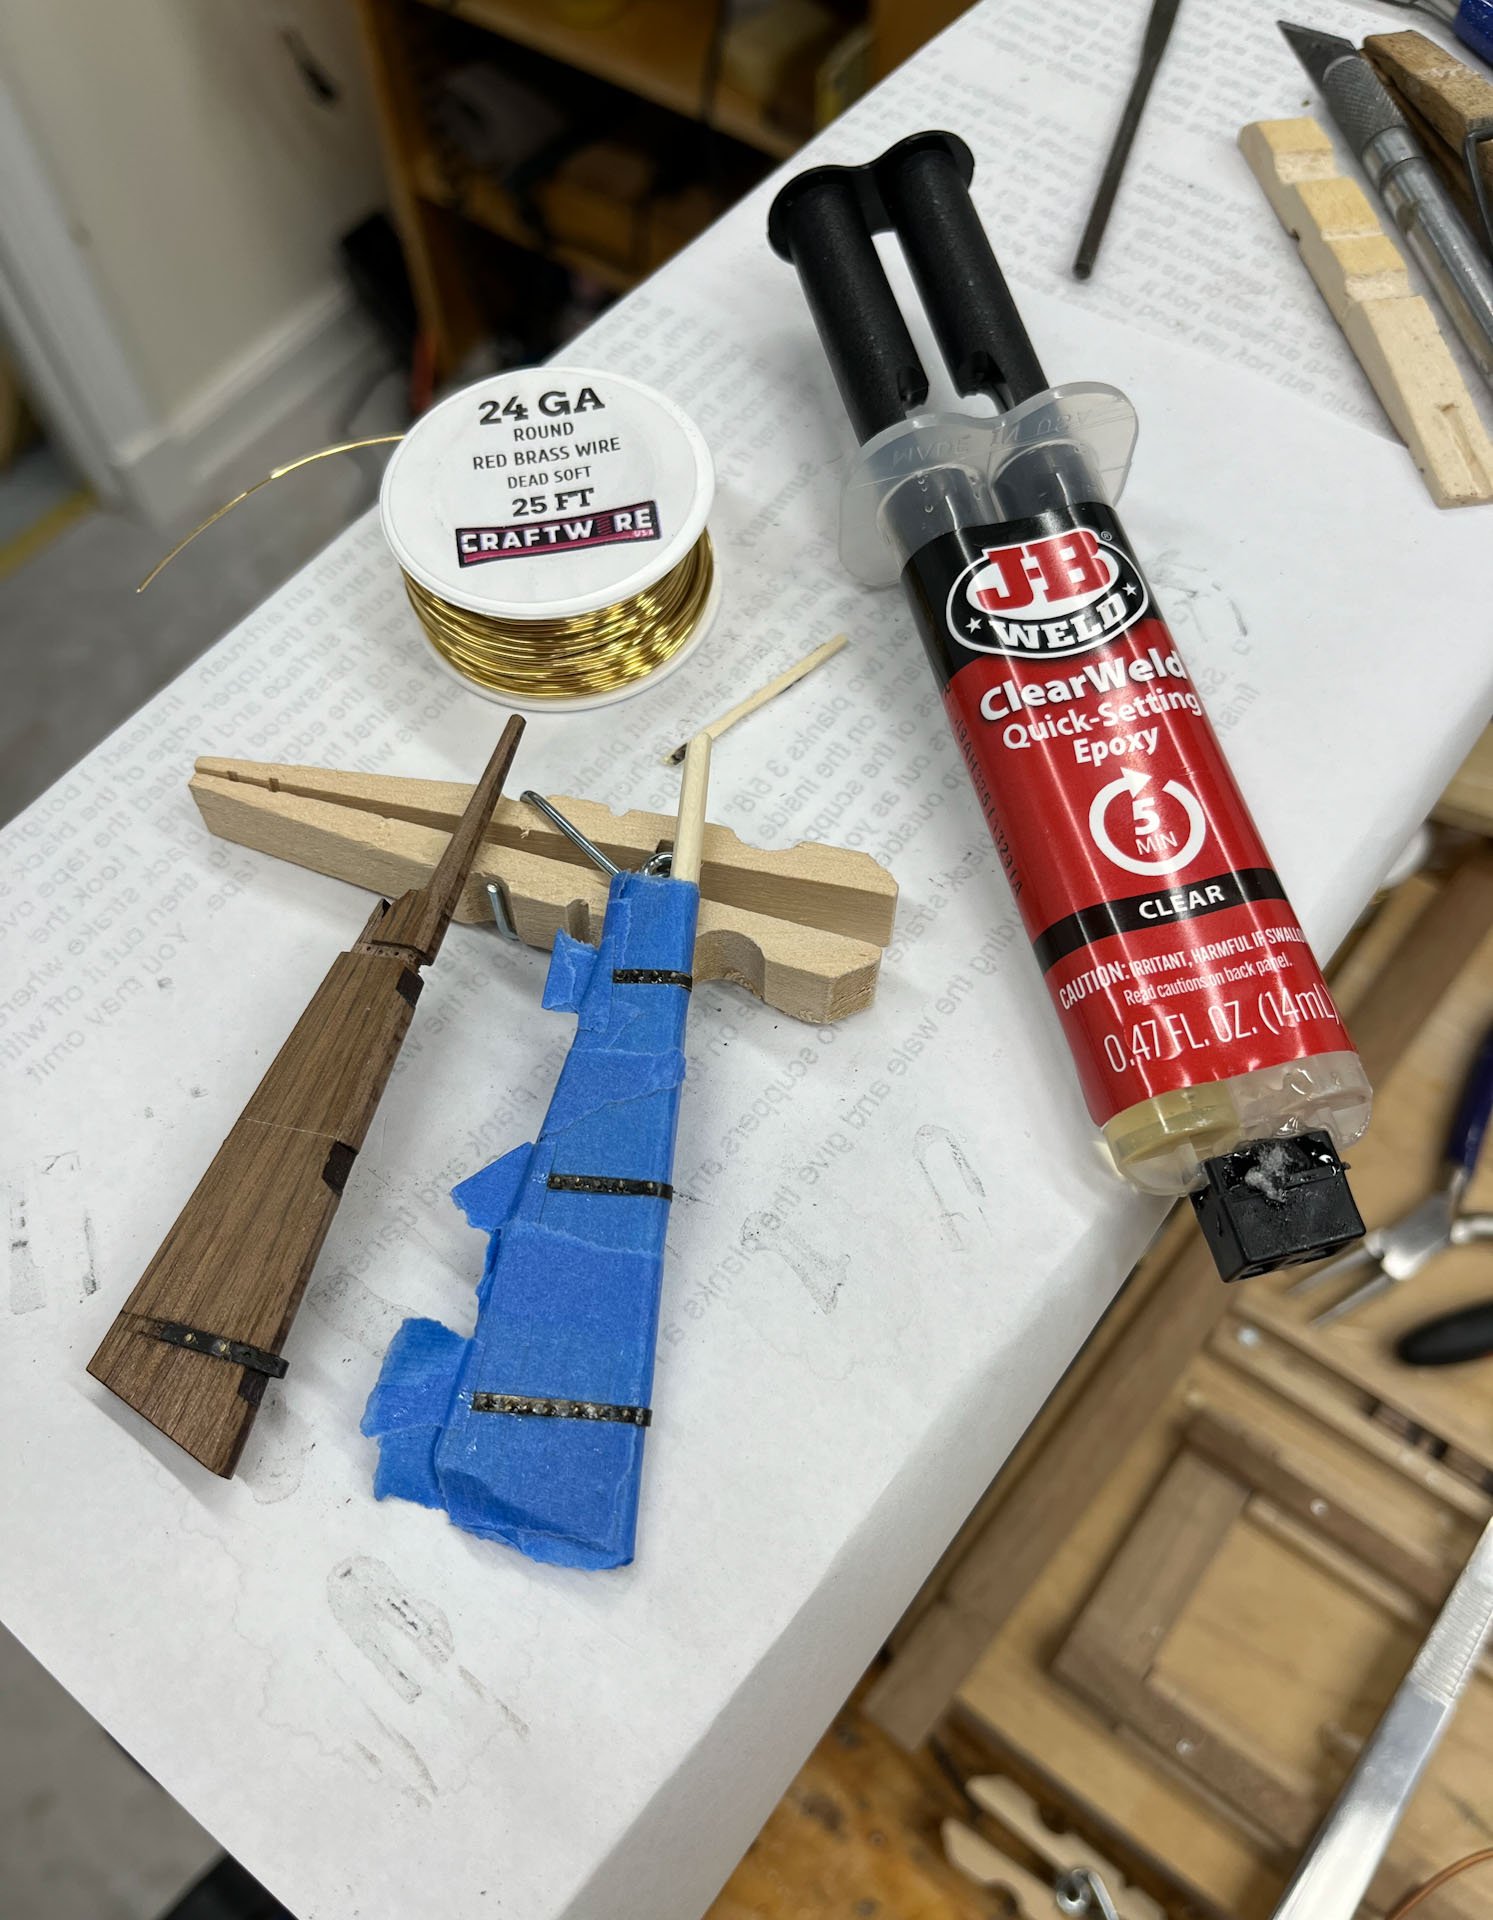
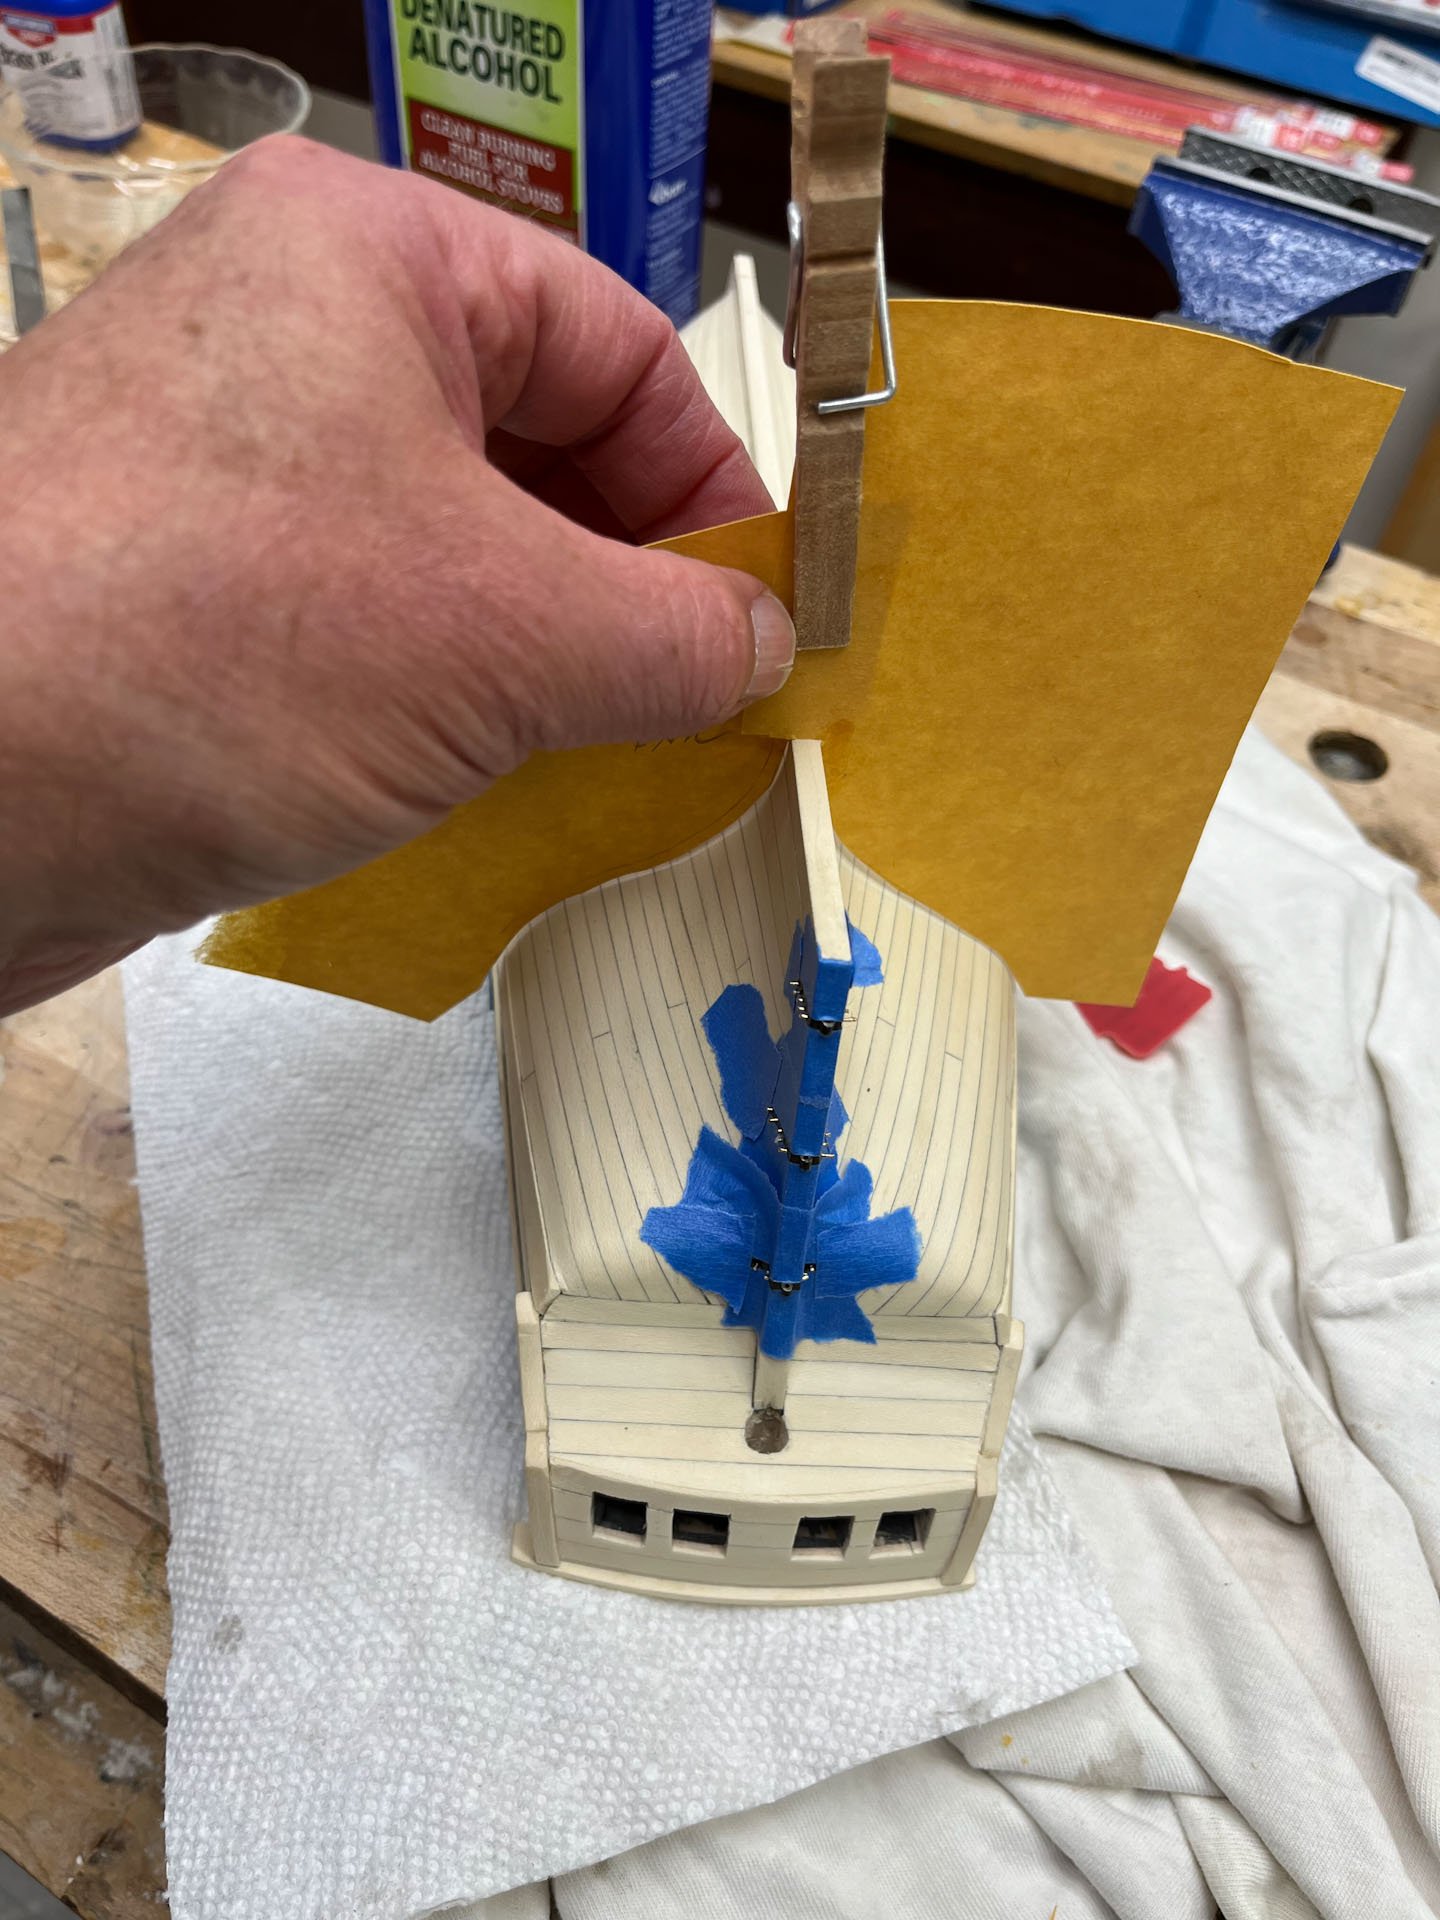
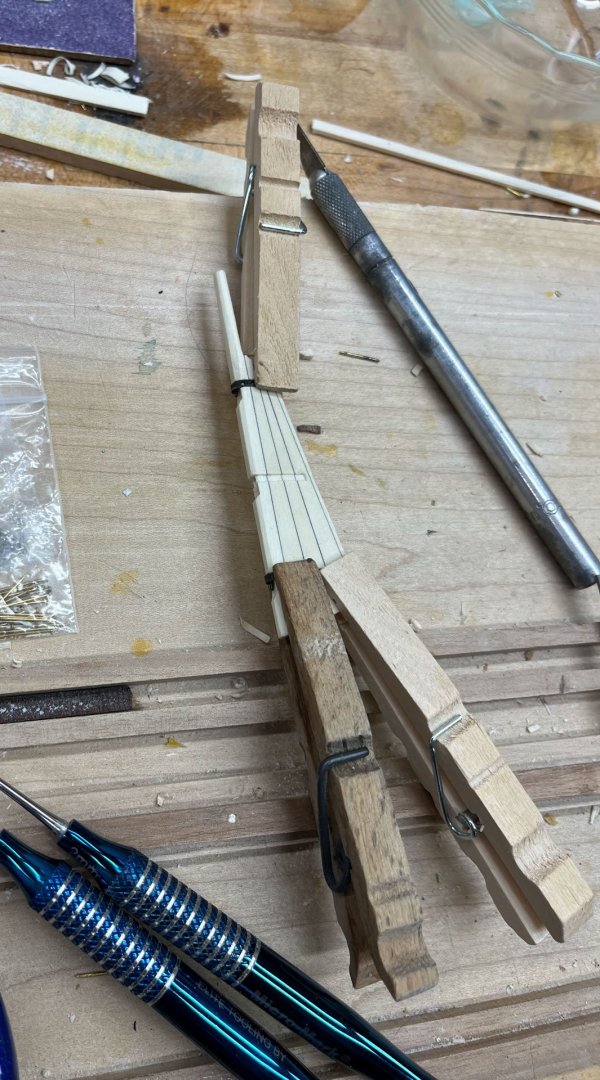
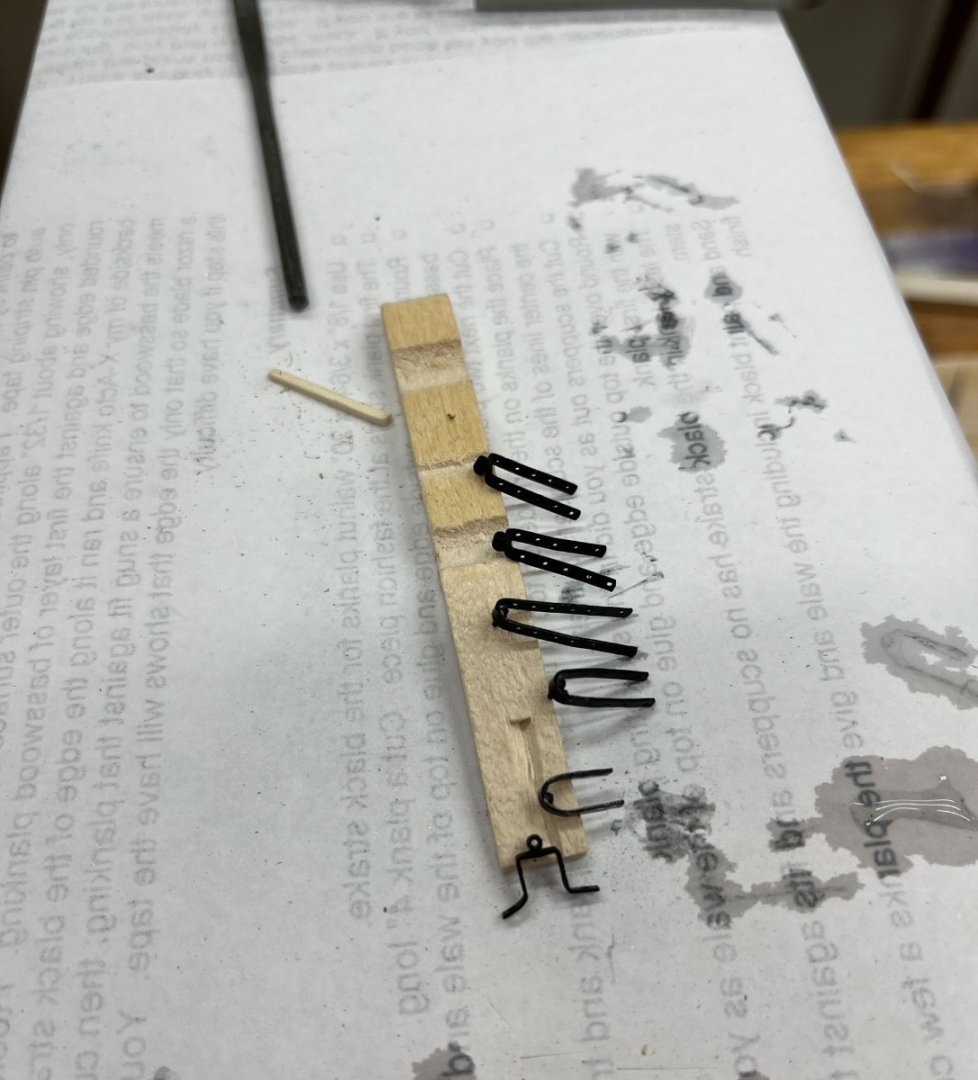
Good Wednesday evening everyone. Today's progress report is trying to finish the rudder. Still. Last report I had shaped and drilled holes in the pintles and gudgeons, then balckened them. Next step was attachment. I used 5 minute epoxy which it turns out is very messy. I should have lined my parts with tape; that stuff gets everywhere including your fingers. Below I am gluing on the rudder pintles. I did the top and bottom first to make fitting easier. Same for the hull; it is not easy getting the brass pre-shaped so it fits well but not too snug or it snowplows all the epoxy out of the rabbits. I had to do some gentle scraping of the surrounding hull after everything dried to get the shiny epoxy off areas it managed to migrate to. It was a Christmas Miracle! The rudder could be slid into place with only a little adjusting on the first try. I was honestly shocked. The top pintle has a small gap that we are going to live with. No way I am redoing the rudder at this point. My blackening was starting to wear off from all my handling. It too liked to get everywhere. see previous statement - I should have taped around my hinges. Next up was adding the nails/bolts/whatever you call them. I had given up trying to modify the brass nails I had from the kit and some smaller ones from my 18th Century Longboat kit. They were simply too big. So, once again using the hapless kit supplied walnut rudder, I tried the simpler method of inserting short lengths of 24g brass wire, dipped in epxoy, into each hole. Once dried they were very solid and amenable to filing them down. In the pic below the wire is drying in the holly rudder and I haven't filed it yet. And this time I used plenty of blue tape to mask the parts. The epoxy dried shiny but I plan to paint the boltheads and touch up any bare areas with black paint. And finally here is the sternpost with its epoxied porcupine-like bolts drying. And I have started making paper templates for my stands. thats it for tonight. Once the epoxy has dried, at least 24 hrs, I will flatten all the bolts down and paint. thanks for reading cisco


-
do you know if Mr Tarjack is still building model ships? if its the same person he hasnt updated his royal caroline bone ship in several years
-
USS Constitution by mtbediz - 1:76
CiscoH replied to mtbediz's topic in - Build logs for subjects built 1751 - 1800
thats a great pump Mustafa -
on my first ship i simply painted the brass black, which worked fine but felt like cheating. on my current build i spent a lot of time using various blackening chemicals which seem to wear off quickly with any manipulation. i think i may go back to paint. have you had a similar experience?
-
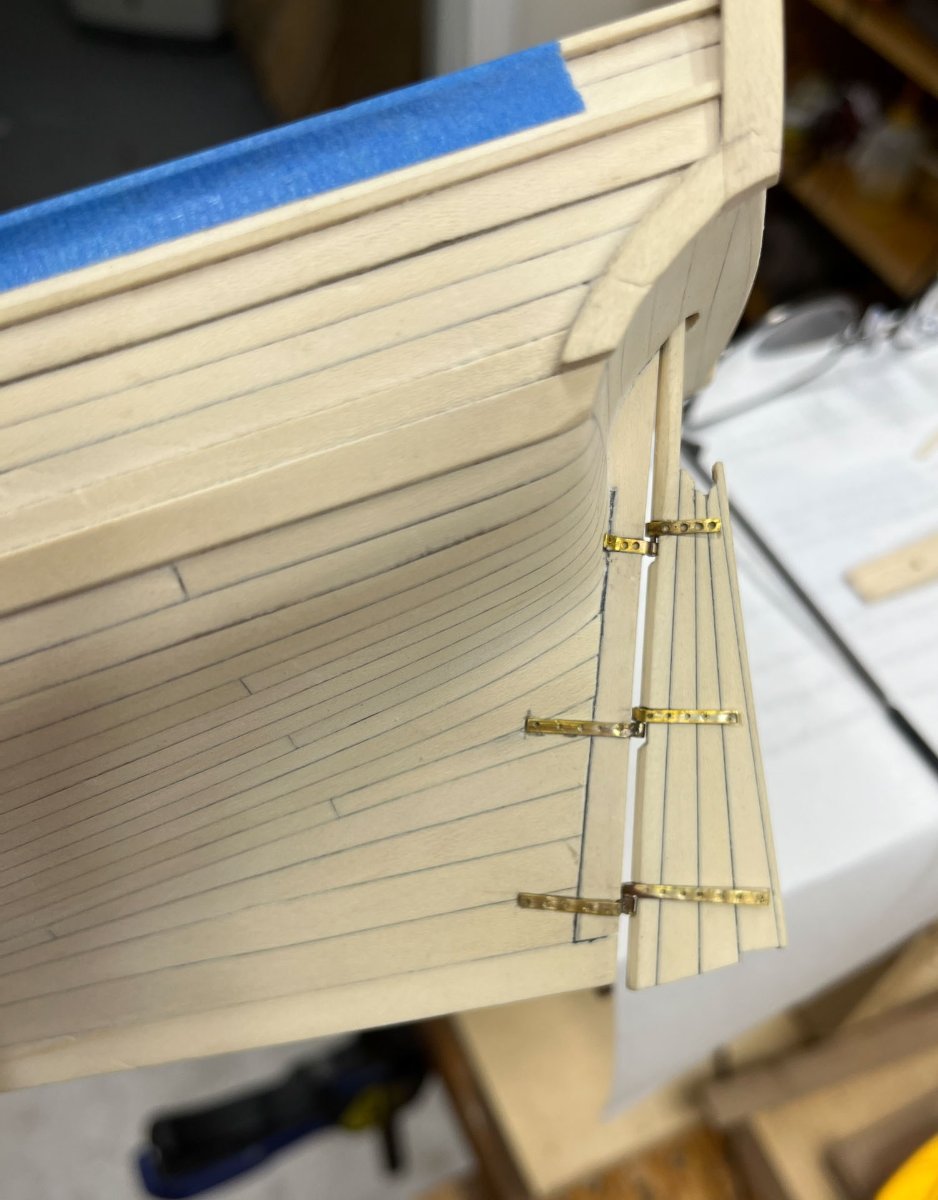
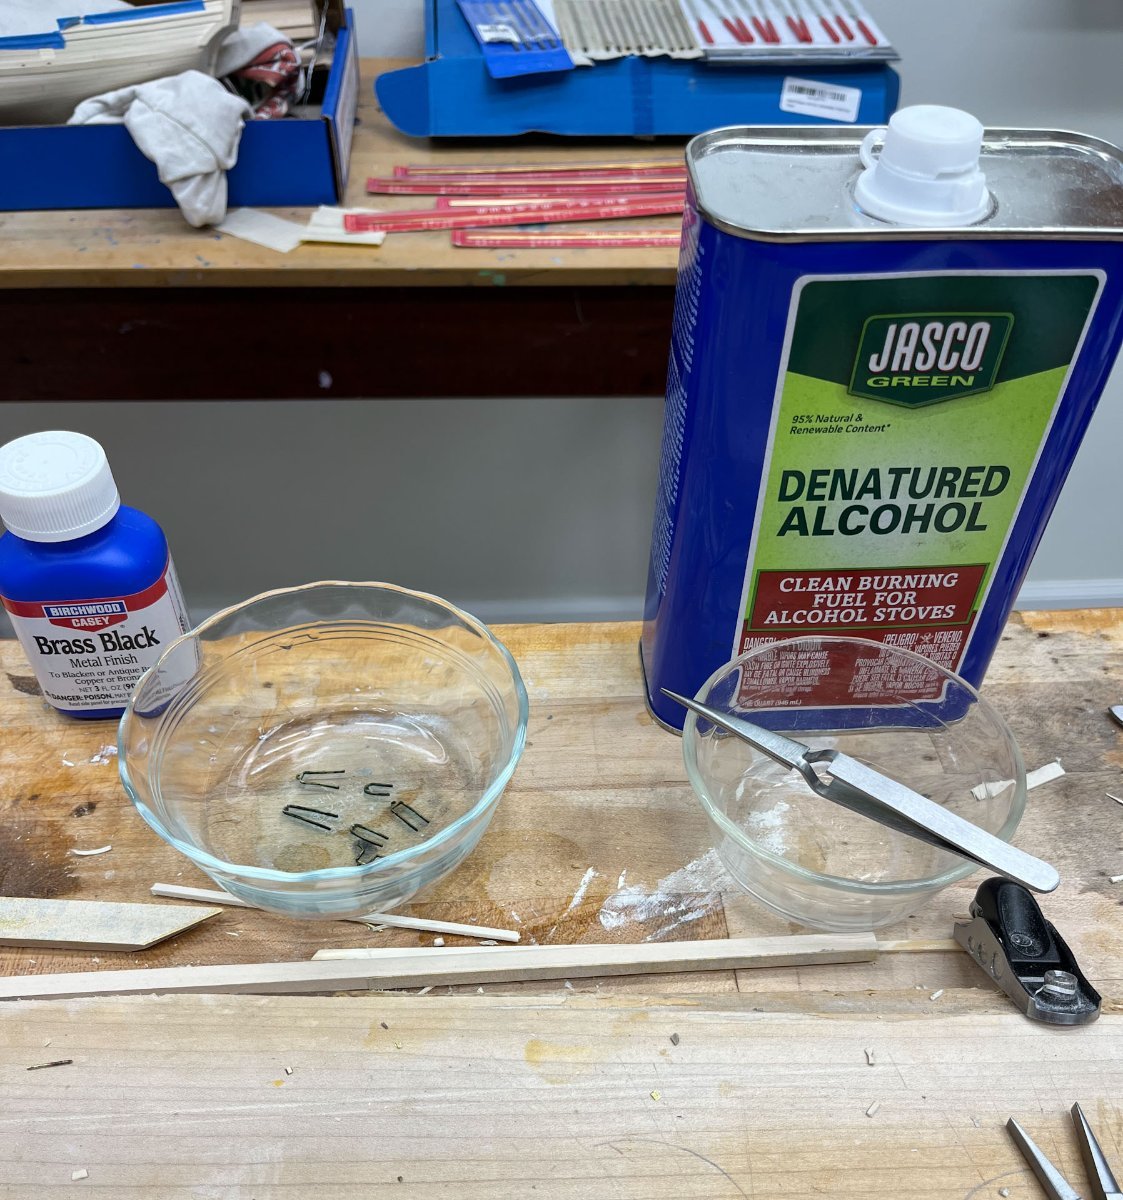
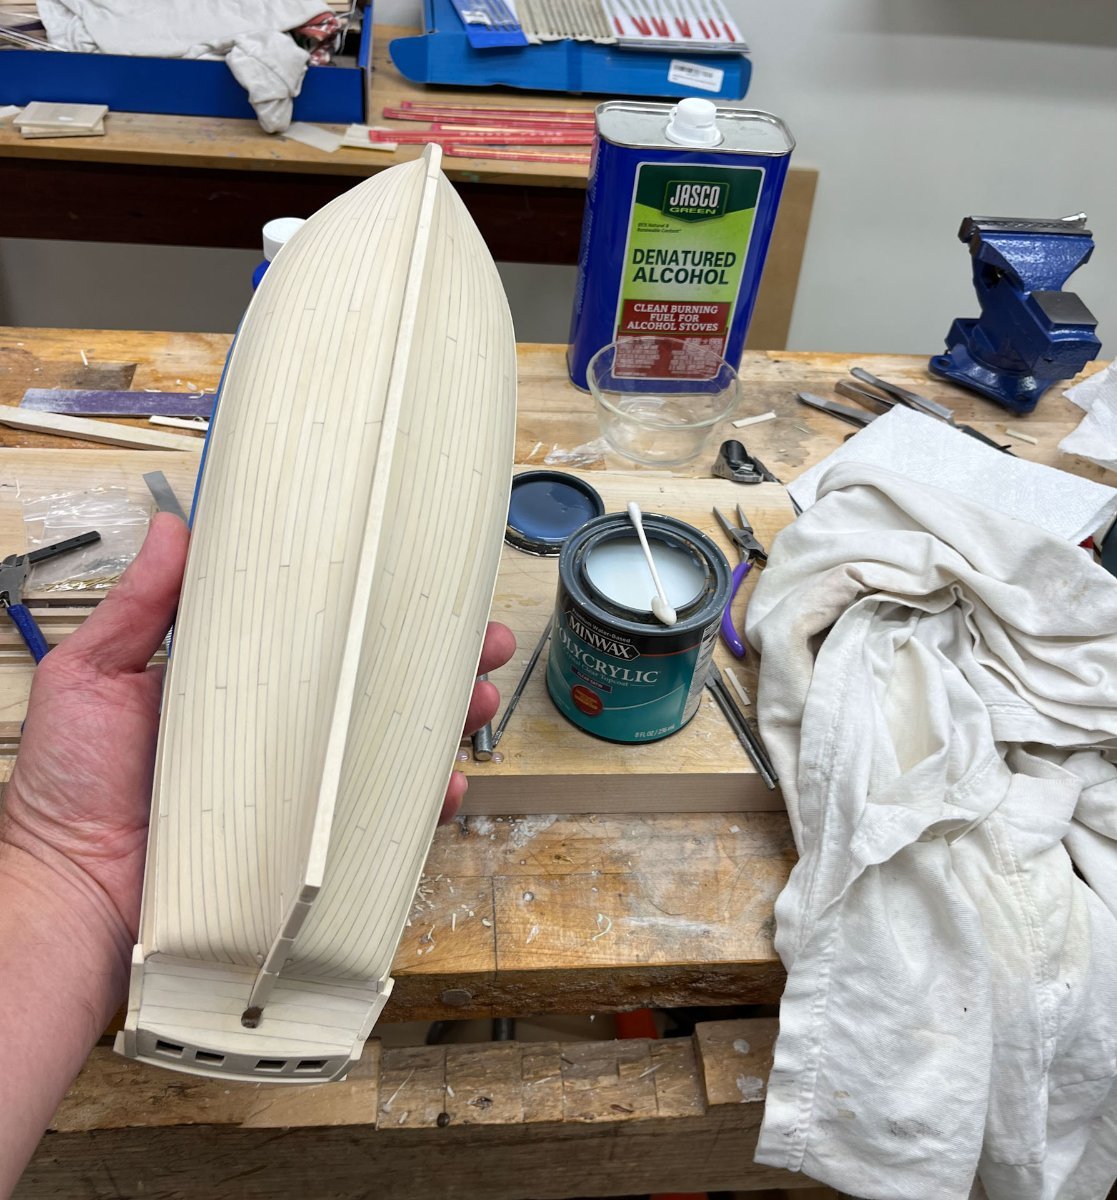
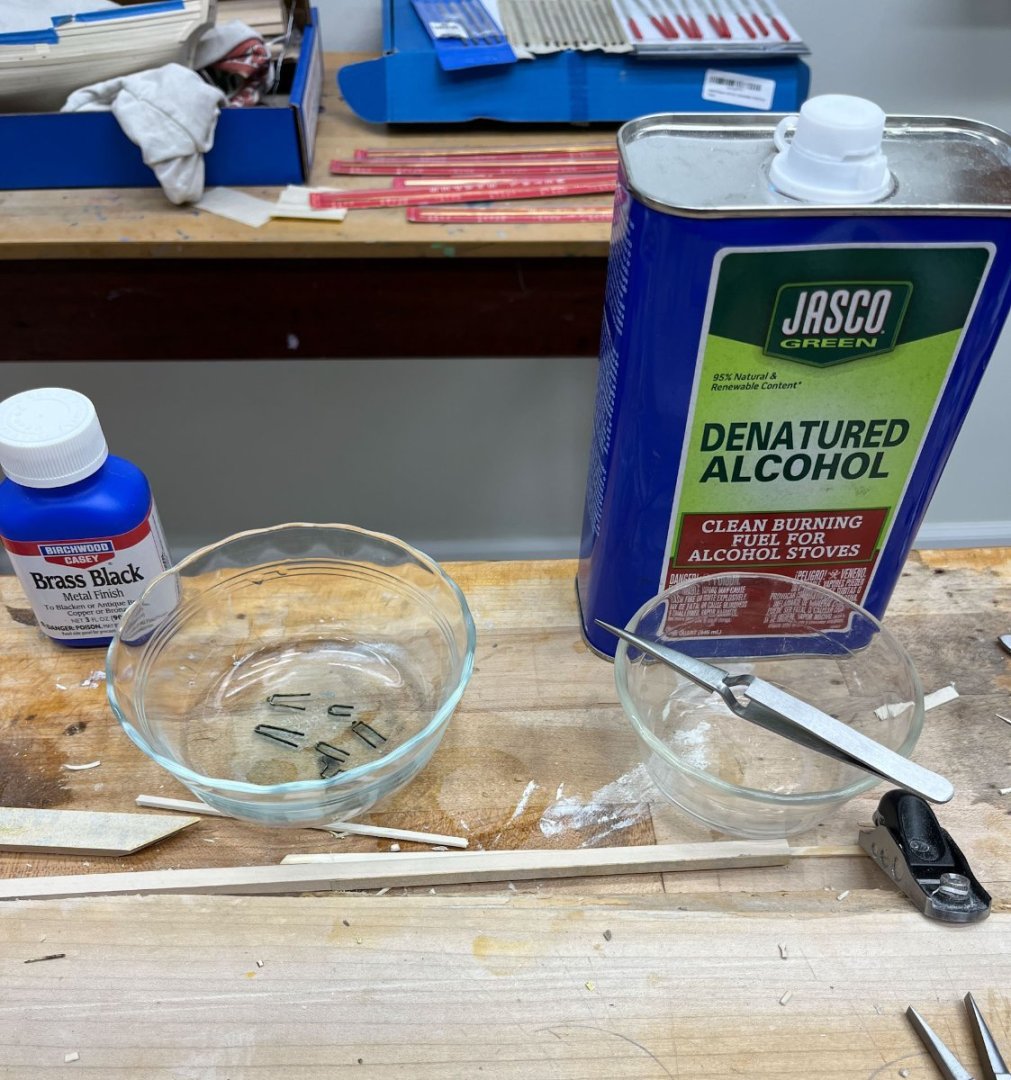
Thanks Thukydides. I am trying to get over this brasswork hump which I feel has slowed my enthusiasm and progress more than I'd like. Probably because the pintles and gudgeons have taken way more work than I planned. This weekend I spent a couple hours fine-tuning. All the pieces fit mostly, but lots of slightly lengthening or widening mortises, slightly shortening and rounding off the ends of the strapwork, and chiseling holes to allow the rudder to be seated with the smallest gap possible. Heres where I started; to me the gap was too wide and the top pintle a little too high. Not much I can do about the high pintle at this point but I can work on the gap. I also noticed all my handling and fitting of straps was getting the holly dirty. After this final futzing I washed the brass in isopropyl alcohol for 20 minutes, then moved them with stainless steel tweezers to a aprox 1:8 brass black to water for 15 minutes. Here they are drying, about 99% coverage. 1 spot on a gudgeon that will need paint. I haven't handled them yet to make sure the blackening sticks but I am optimistic. And finally I started with the hull's finish coat. After sanding off any marks on the sternpost from fitting the brasswork I applied the first coat of Polycrylic (water based polyurethane that doesn't yellow) with a qtip, the immediately wiped it down with a old cotton t-shirt. Most of the finish comes off so its a thin coat, but the tshirt smooths quite nicely. I'm guessing I'll do 3 or 4 coats. I have to test some of my discarded blackened brasswork to see if it looks ok covered with this finish; if not I'll put hinges in after finishing. Here's the hull after its first coat. It looks almost identical to before I finished it, which is the point. thats it for me. Monday is fast approaching and its off to mentally prepare with some hot chocolate and a book before bed. thanks for reading cisco


-
what/how did you make the pump strapping? each one looks like a perfectly formed octogon
-
i like the shape of the tombstone cutaways. very elegant