HOLIDAY DONATION DRIVE - SUPPORT MSW - DO YOUR PART TO KEEP THIS GREAT FORUM GOING! (89 donations so far out of 49,000 members - C'mon guys!)
×
MBerg
-
Posts
139 -
Joined
-
Last visited
1 Follower

About MBerg

- Birthday March 30
-
 MBerg reacted to a post in a topic:
HMS Surprise 1796 (prototype) by James H - Vanguard Models - 1:64
MBerg reacted to a post in a topic:
HMS Surprise 1796 (prototype) by James H - Vanguard Models - 1:64
-
MBerg reacted to a post in a topic:
HMS Indefatigable 1794 by Clark - Vanguard Models - 1:64 scale
-
MBerg reacted to a post in a topic:
2025 NRG PHOTOGRAPHIC SHIP MODEL CONTEST WINNERS ANNOUNCED
-
MBerg reacted to a post in a topic:
HMS Indefatigable 1794 by Clark - Vanguard Models - 1:64 scale
-
robert952 reacted to a post in a topic:
Norwegian sailing pram by Kenchington– FINISHED – Model Shipways – 1:12
-
MBerg reacted to a post in a topic:
Norwegian sailing pram by Kenchington– FINISHED – Model Shipways – 1:12
-
 Kenchington reacted to a post in a topic:
Norwegian sailing pram by Kenchington– FINISHED – Model Shipways – 1:12
Kenchington reacted to a post in a topic:
Norwegian sailing pram by Kenchington– FINISHED – Model Shipways – 1:12
-
MBerg reacted to a post in a topic:
HMS Indefatigable 1794 by Clark - Vanguard Models - 1:64 scale
-
MBerg reacted to a post in a topic:
HMS Surprise 1796 (prototype) by James H - Vanguard Models - 1:64
-
 Nice work! Equally glad to see you get back to your pram and sort that rigging out with something you're happy with.
- 167 replies
-
- 2
-
-
-
- Norwegian Sailing Pram
- Model Shipways
- (and 1 more)
-
MBerg reacted to a post in a topic:
Norwegian sailing pram by Kenchington– FINISHED – Model Shipways – 1:12
-
MBerg reacted to a post in a topic:
24- and 36-tooth carbide blades back in stock at Model Machines
-
Do you mean 09/12/2025 returning 09/29?
-
AJohnson reacted to a post in a topic:
HMS Erebus by clearway - OcCre - 1/75 scale - bashed
-
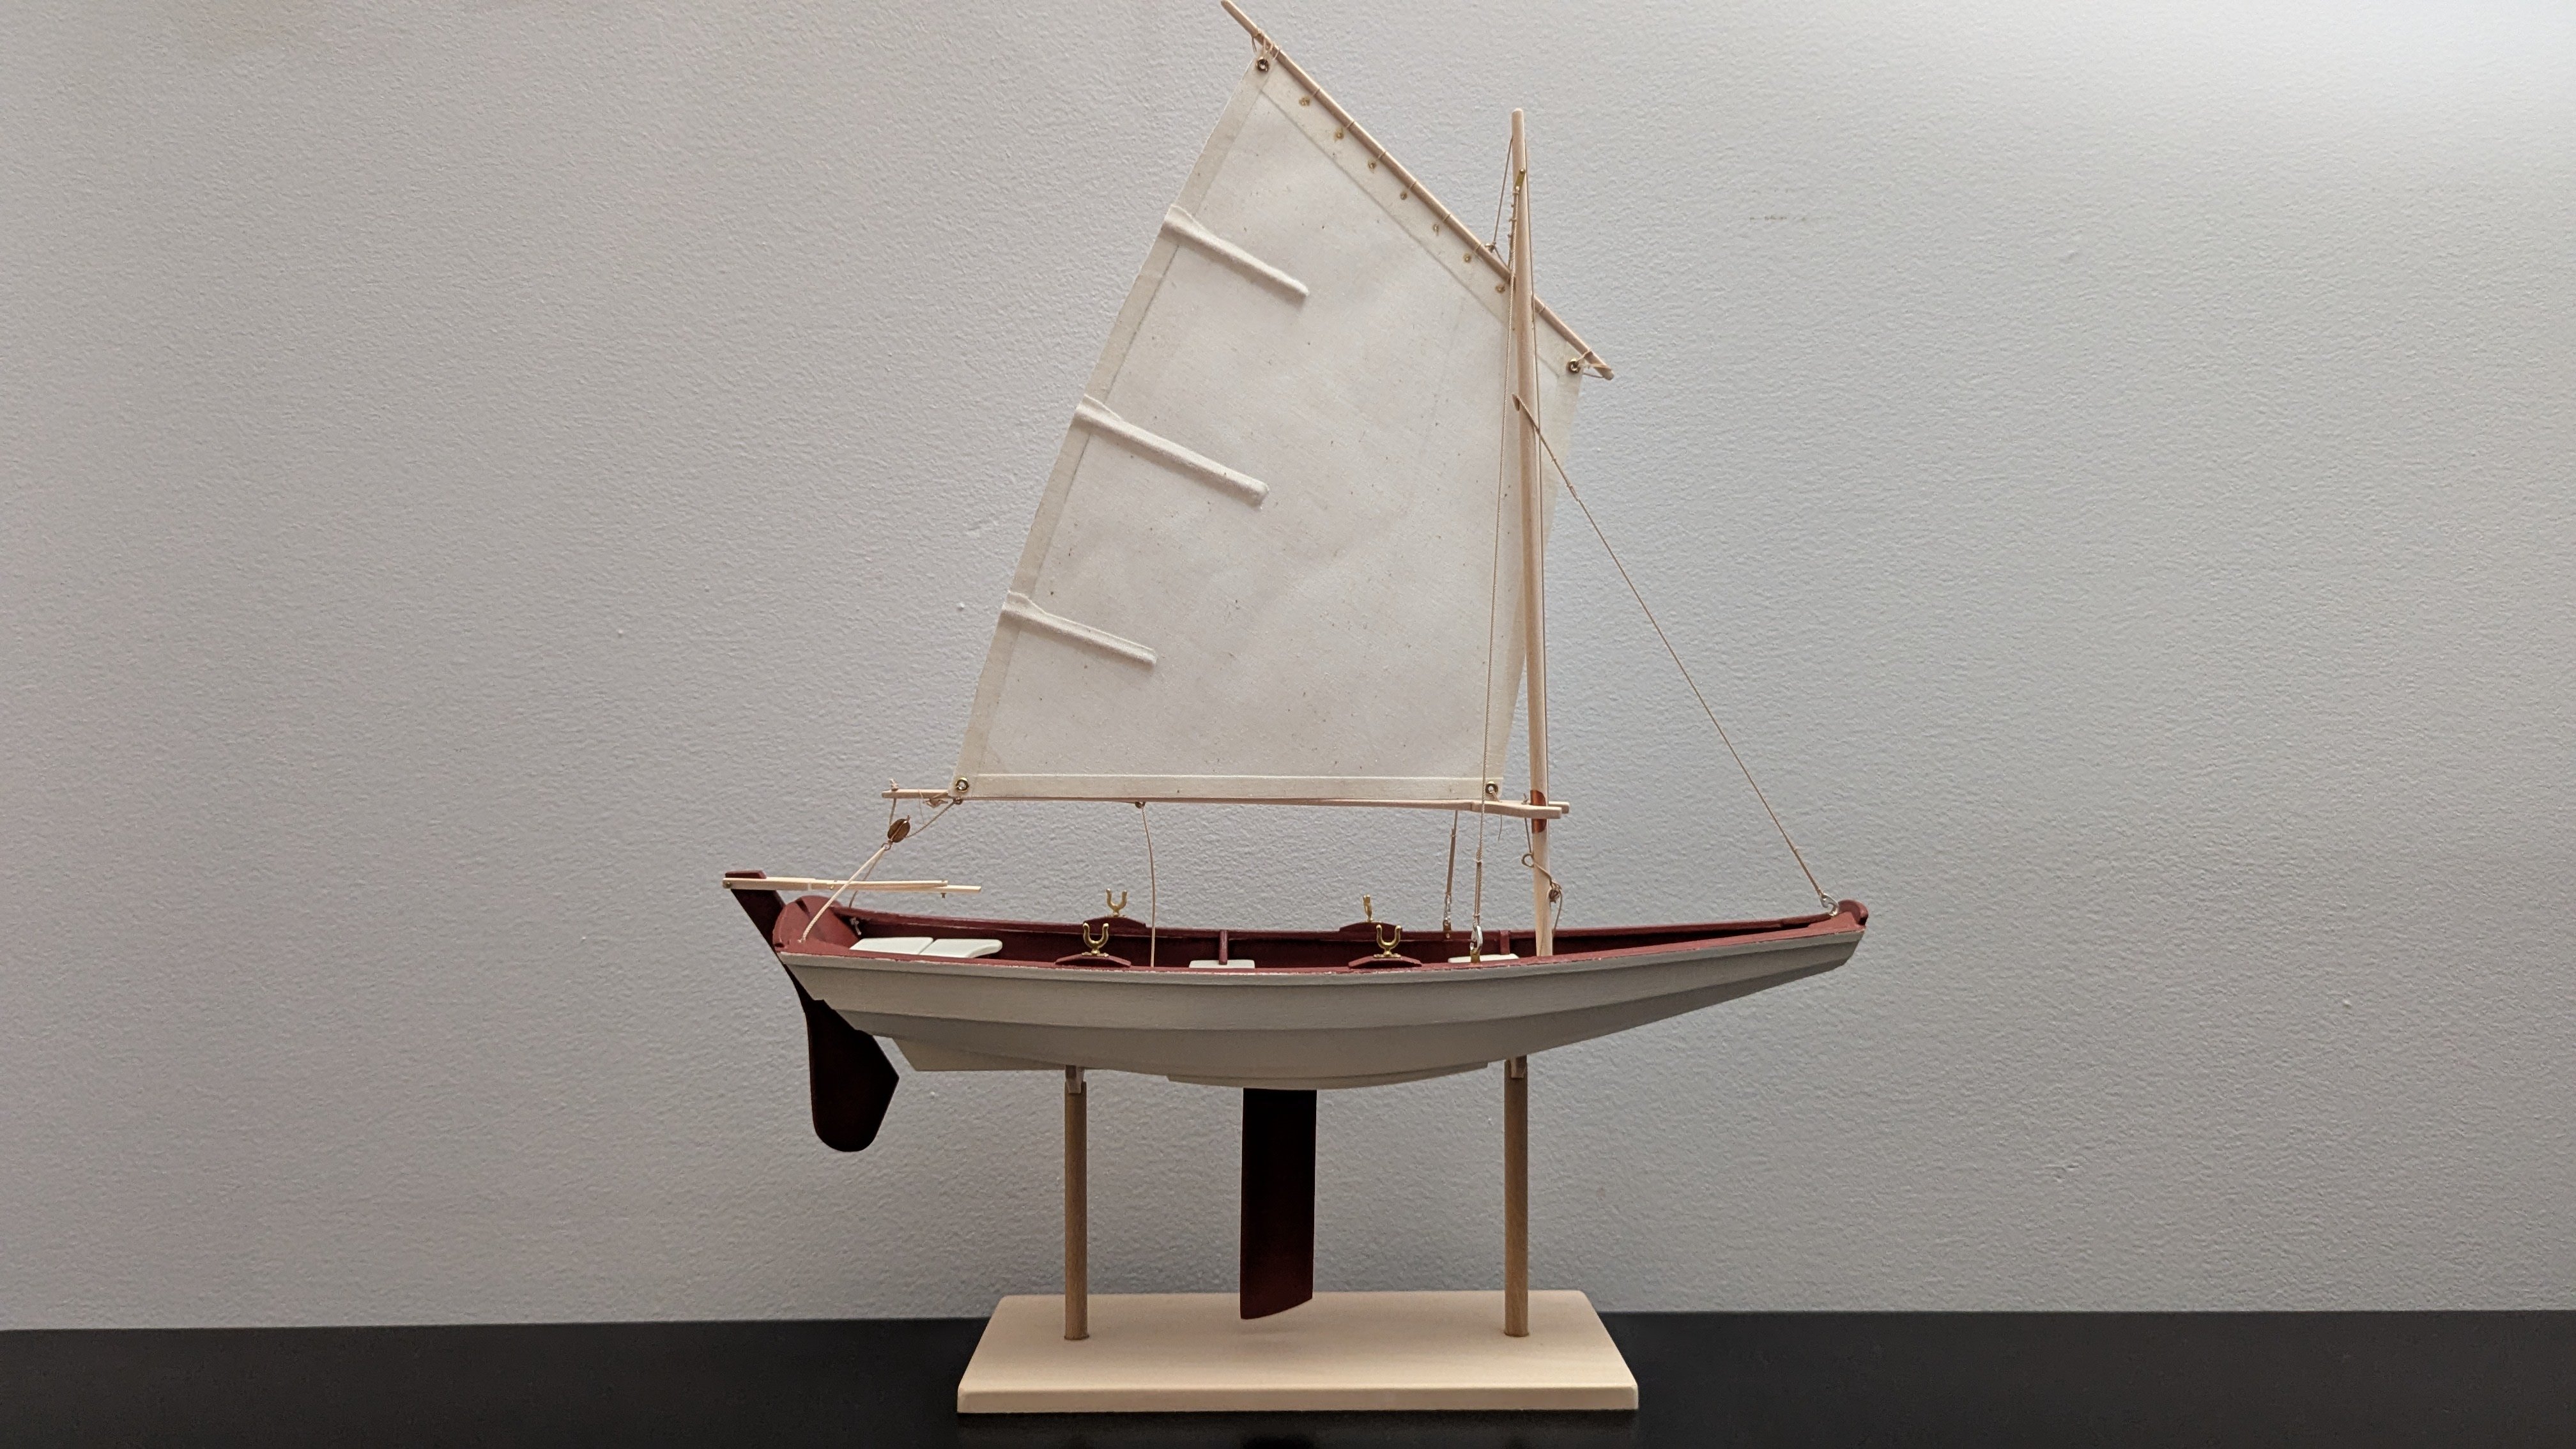
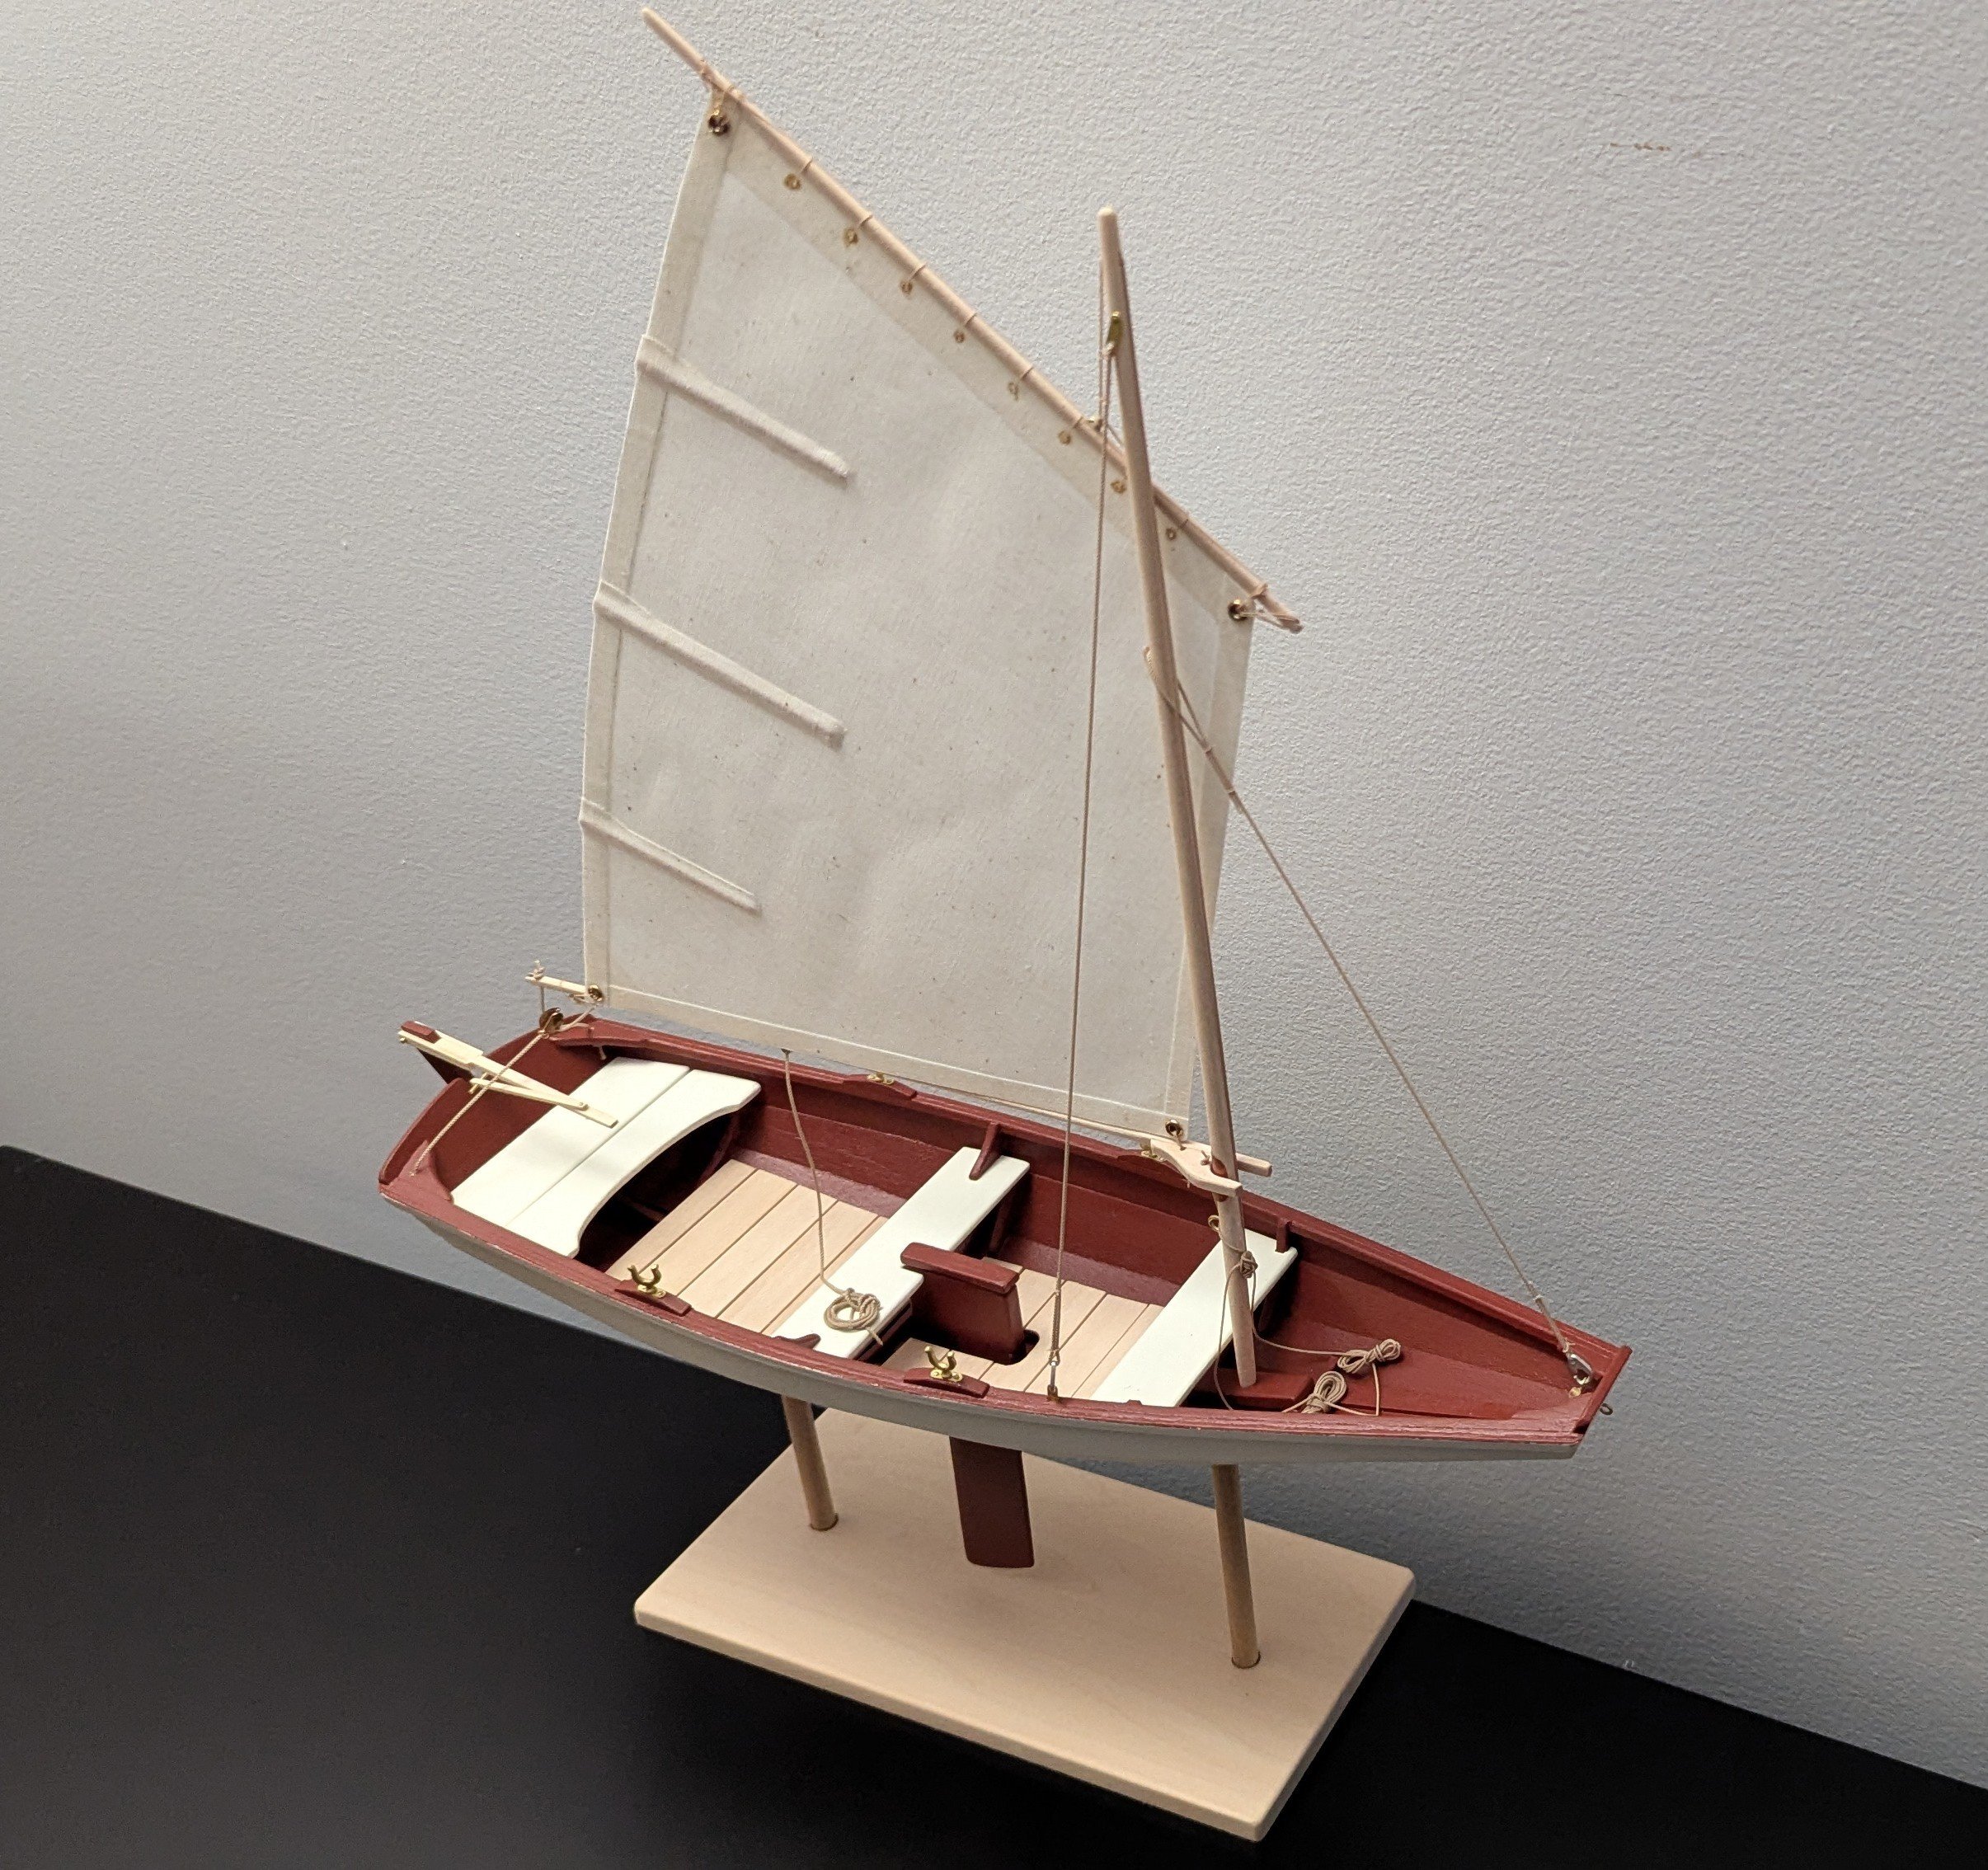
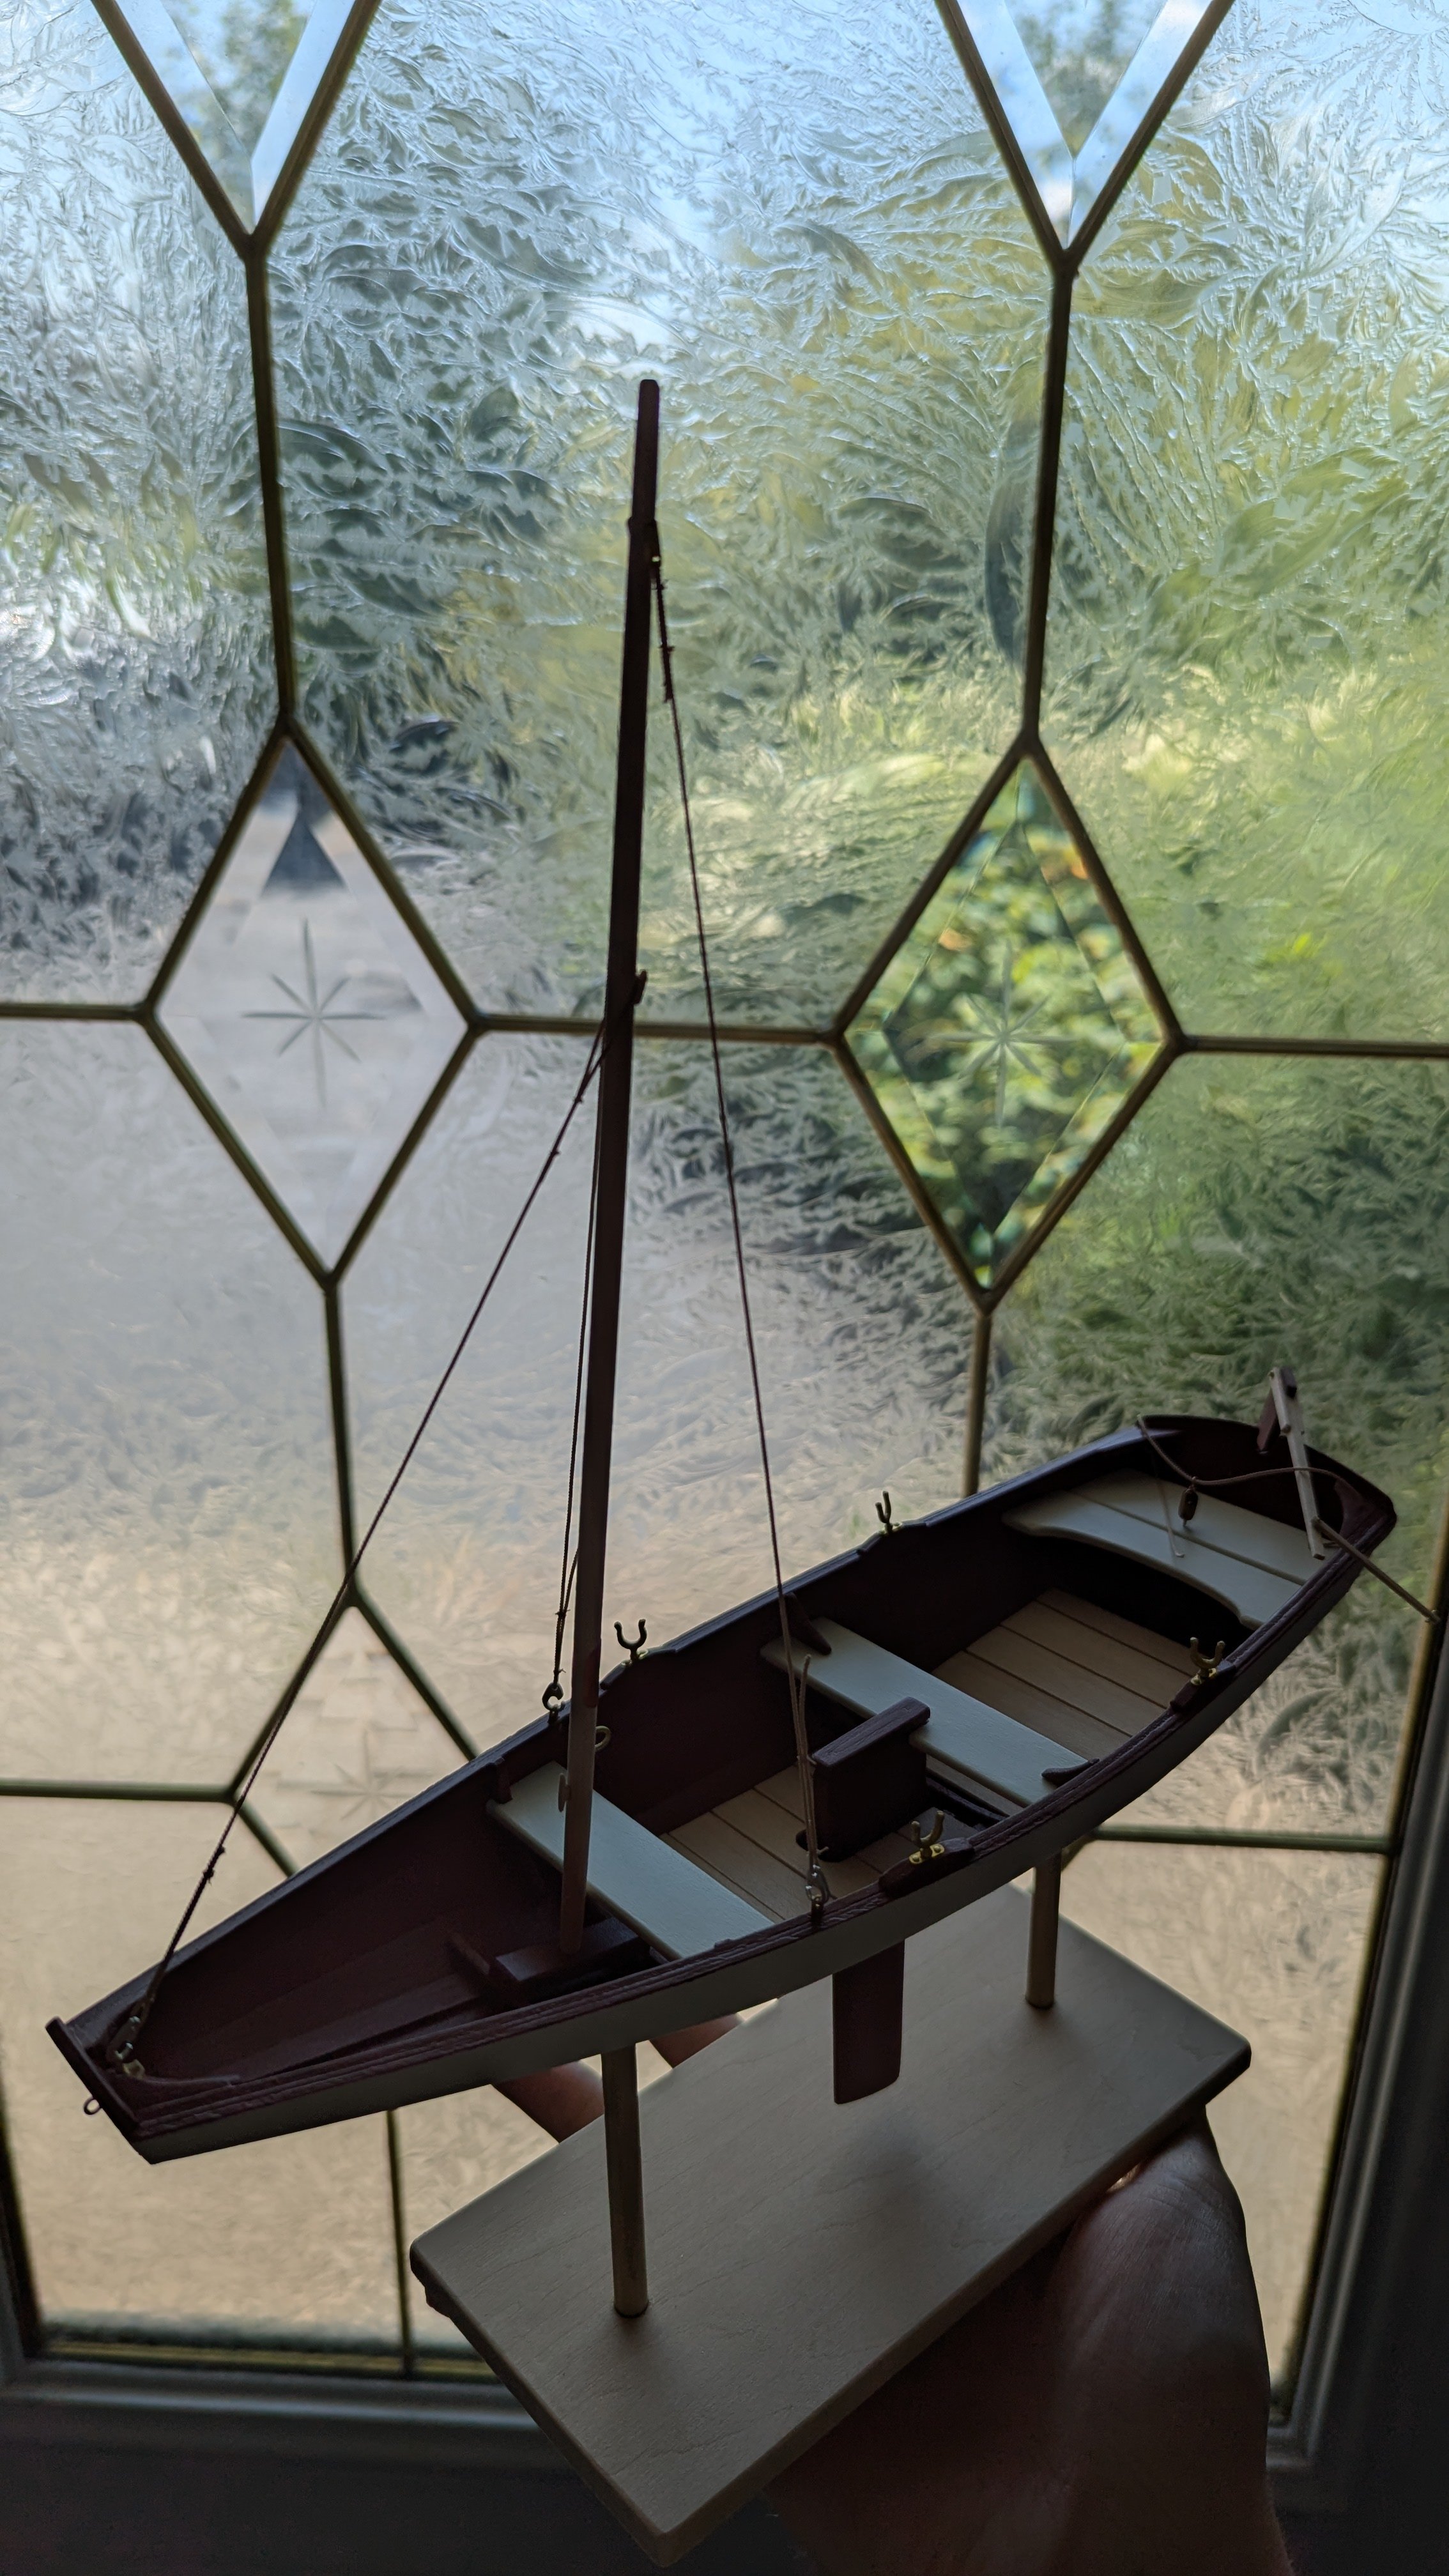
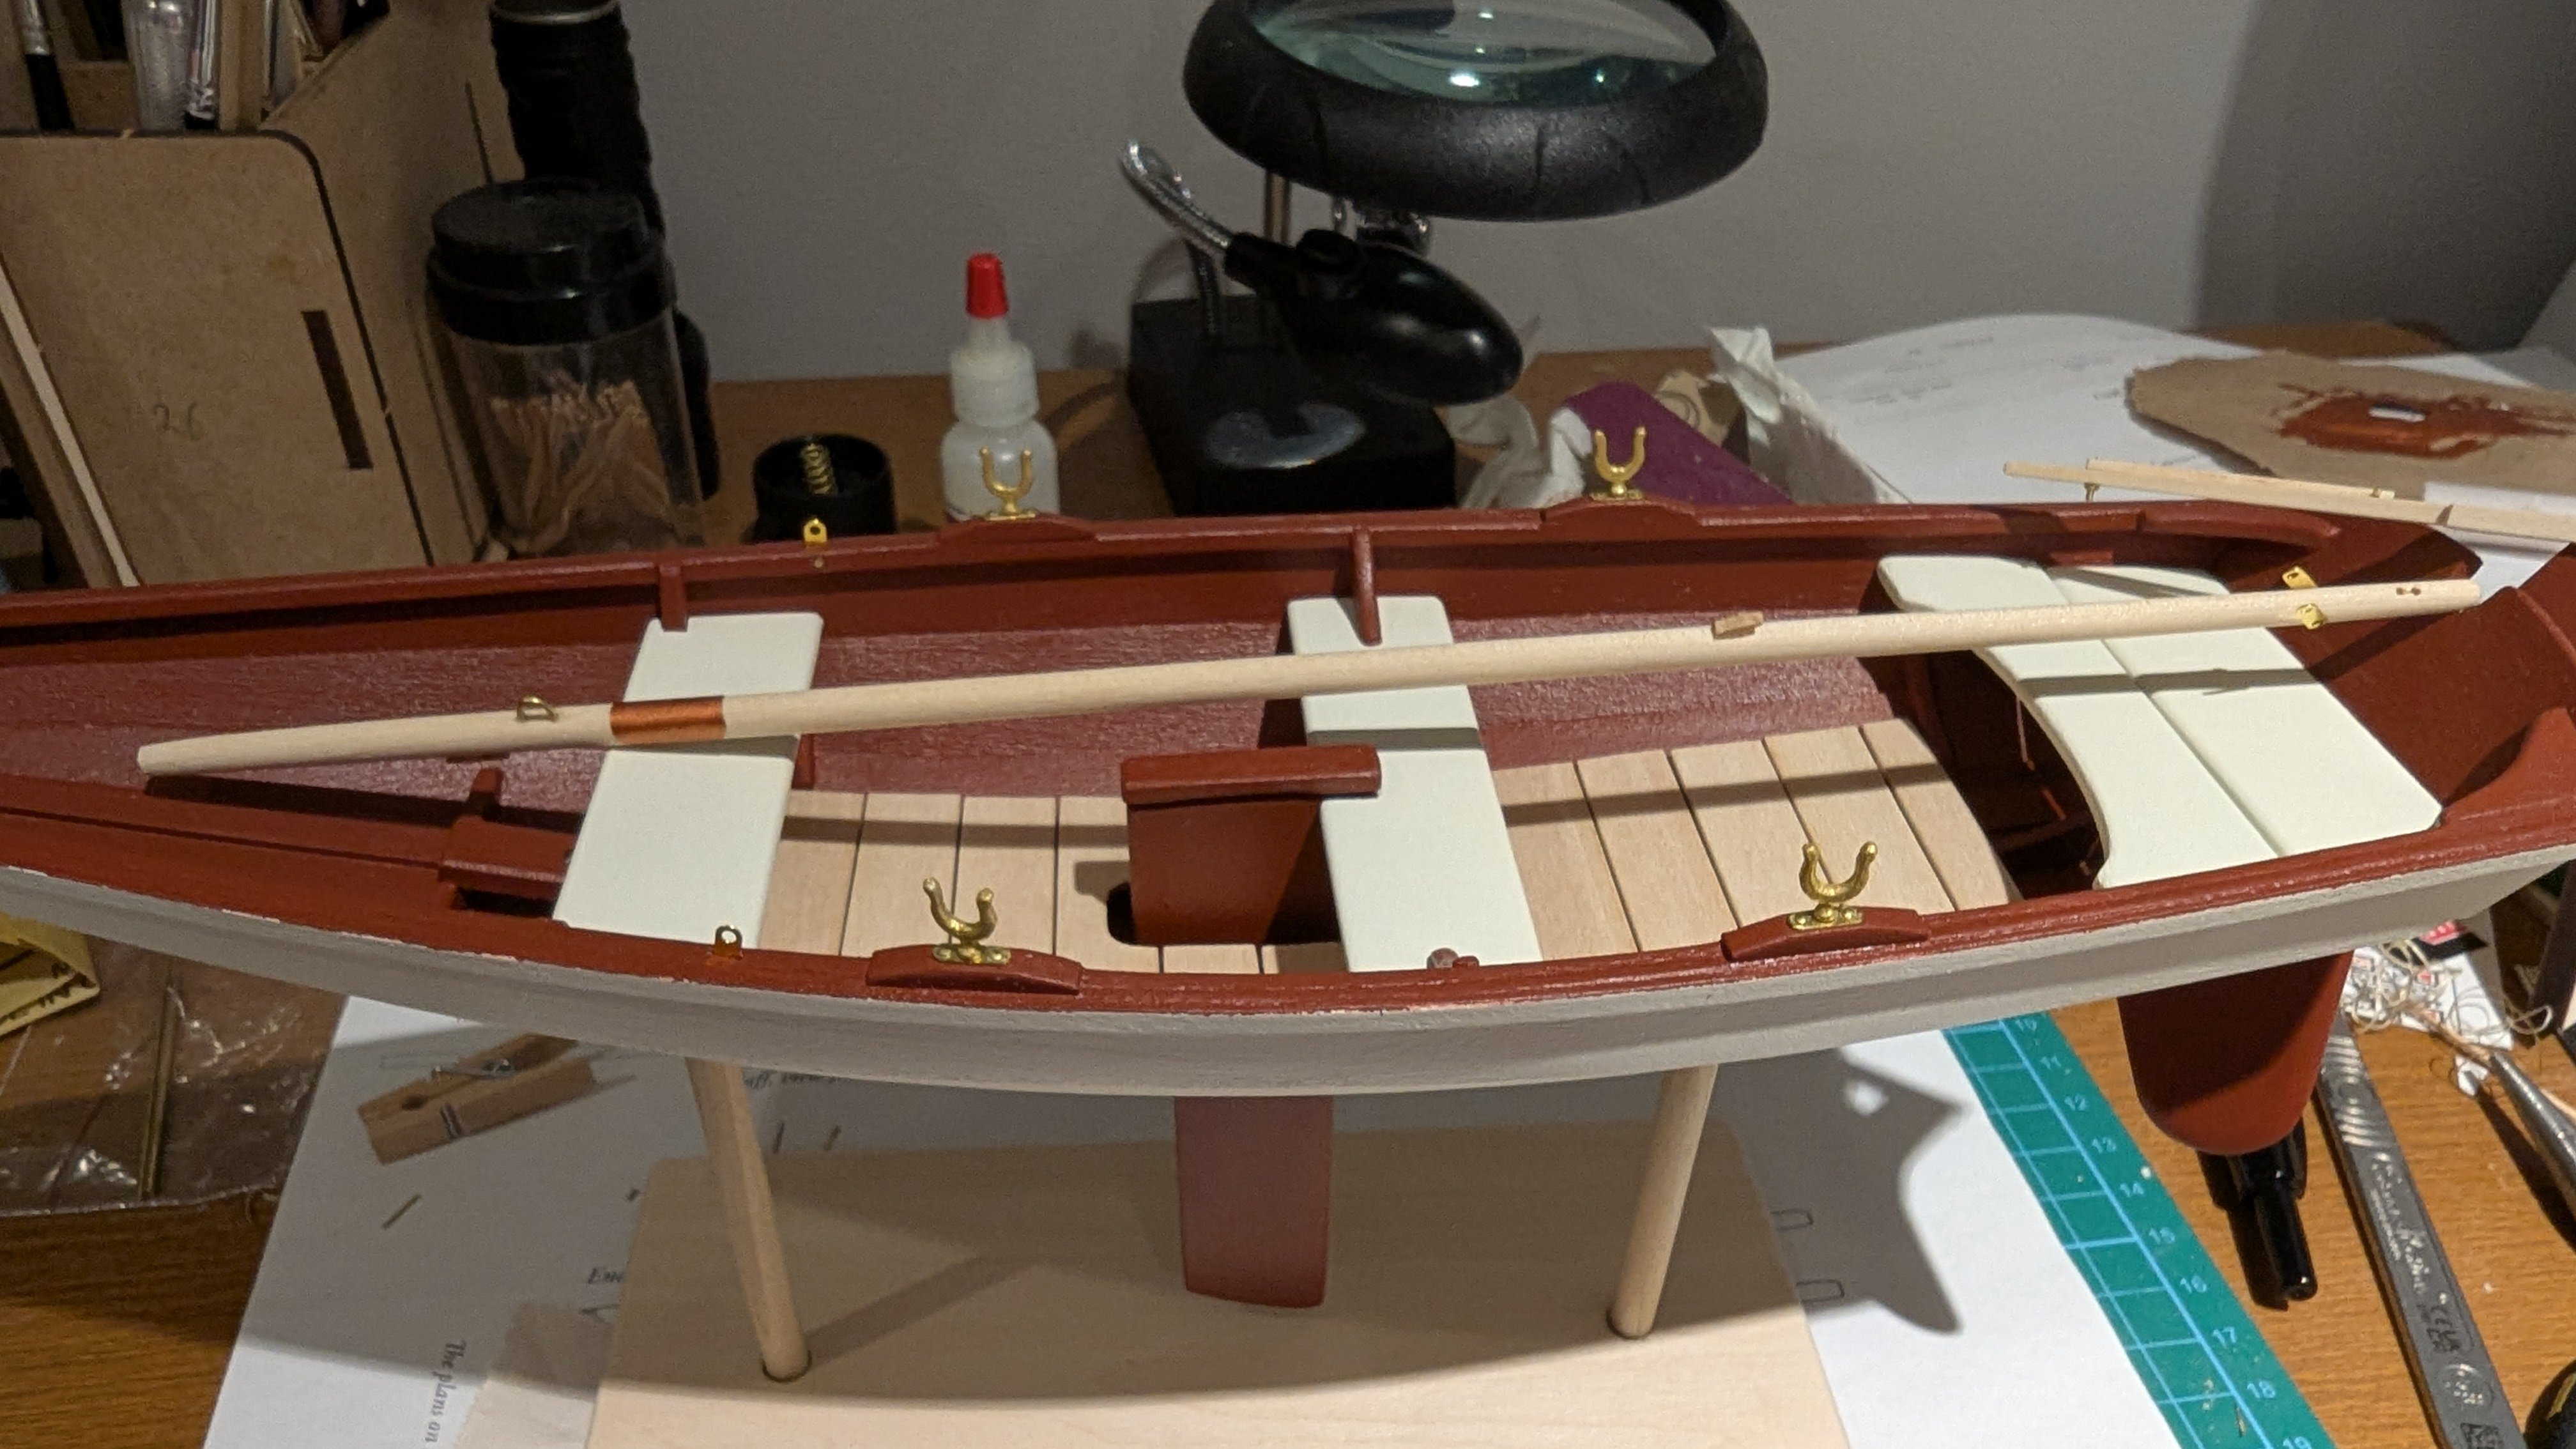
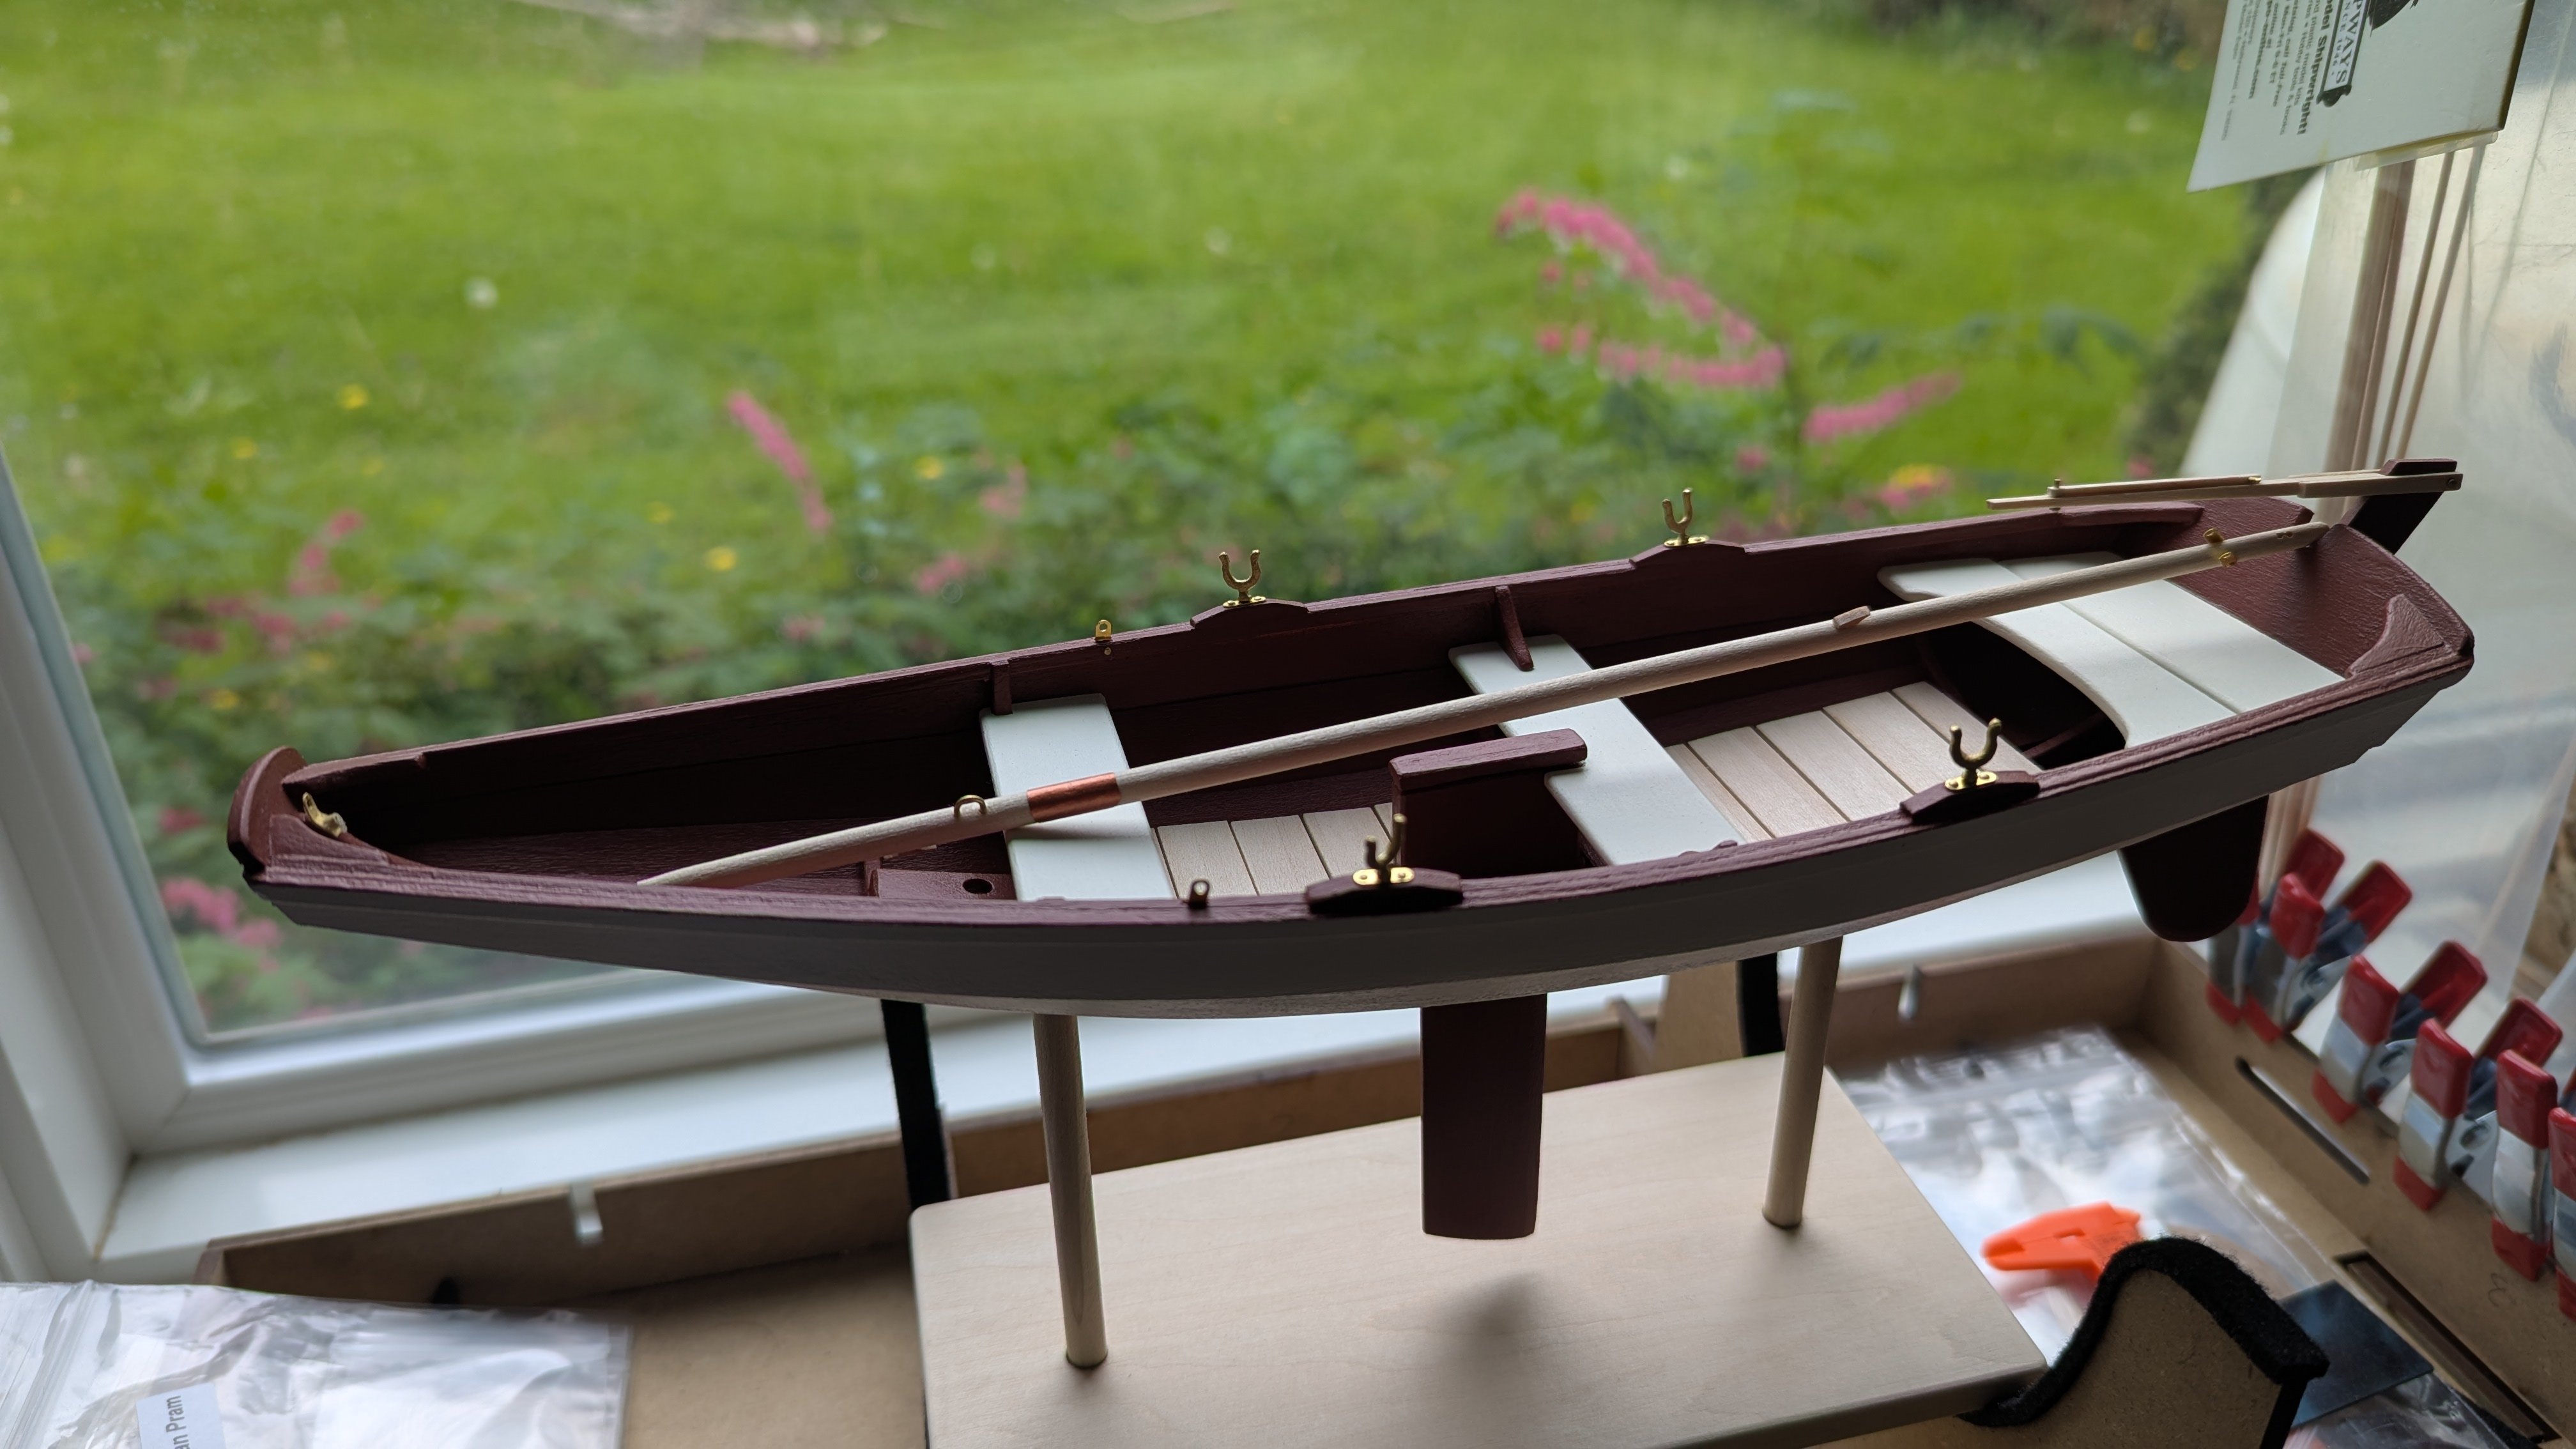
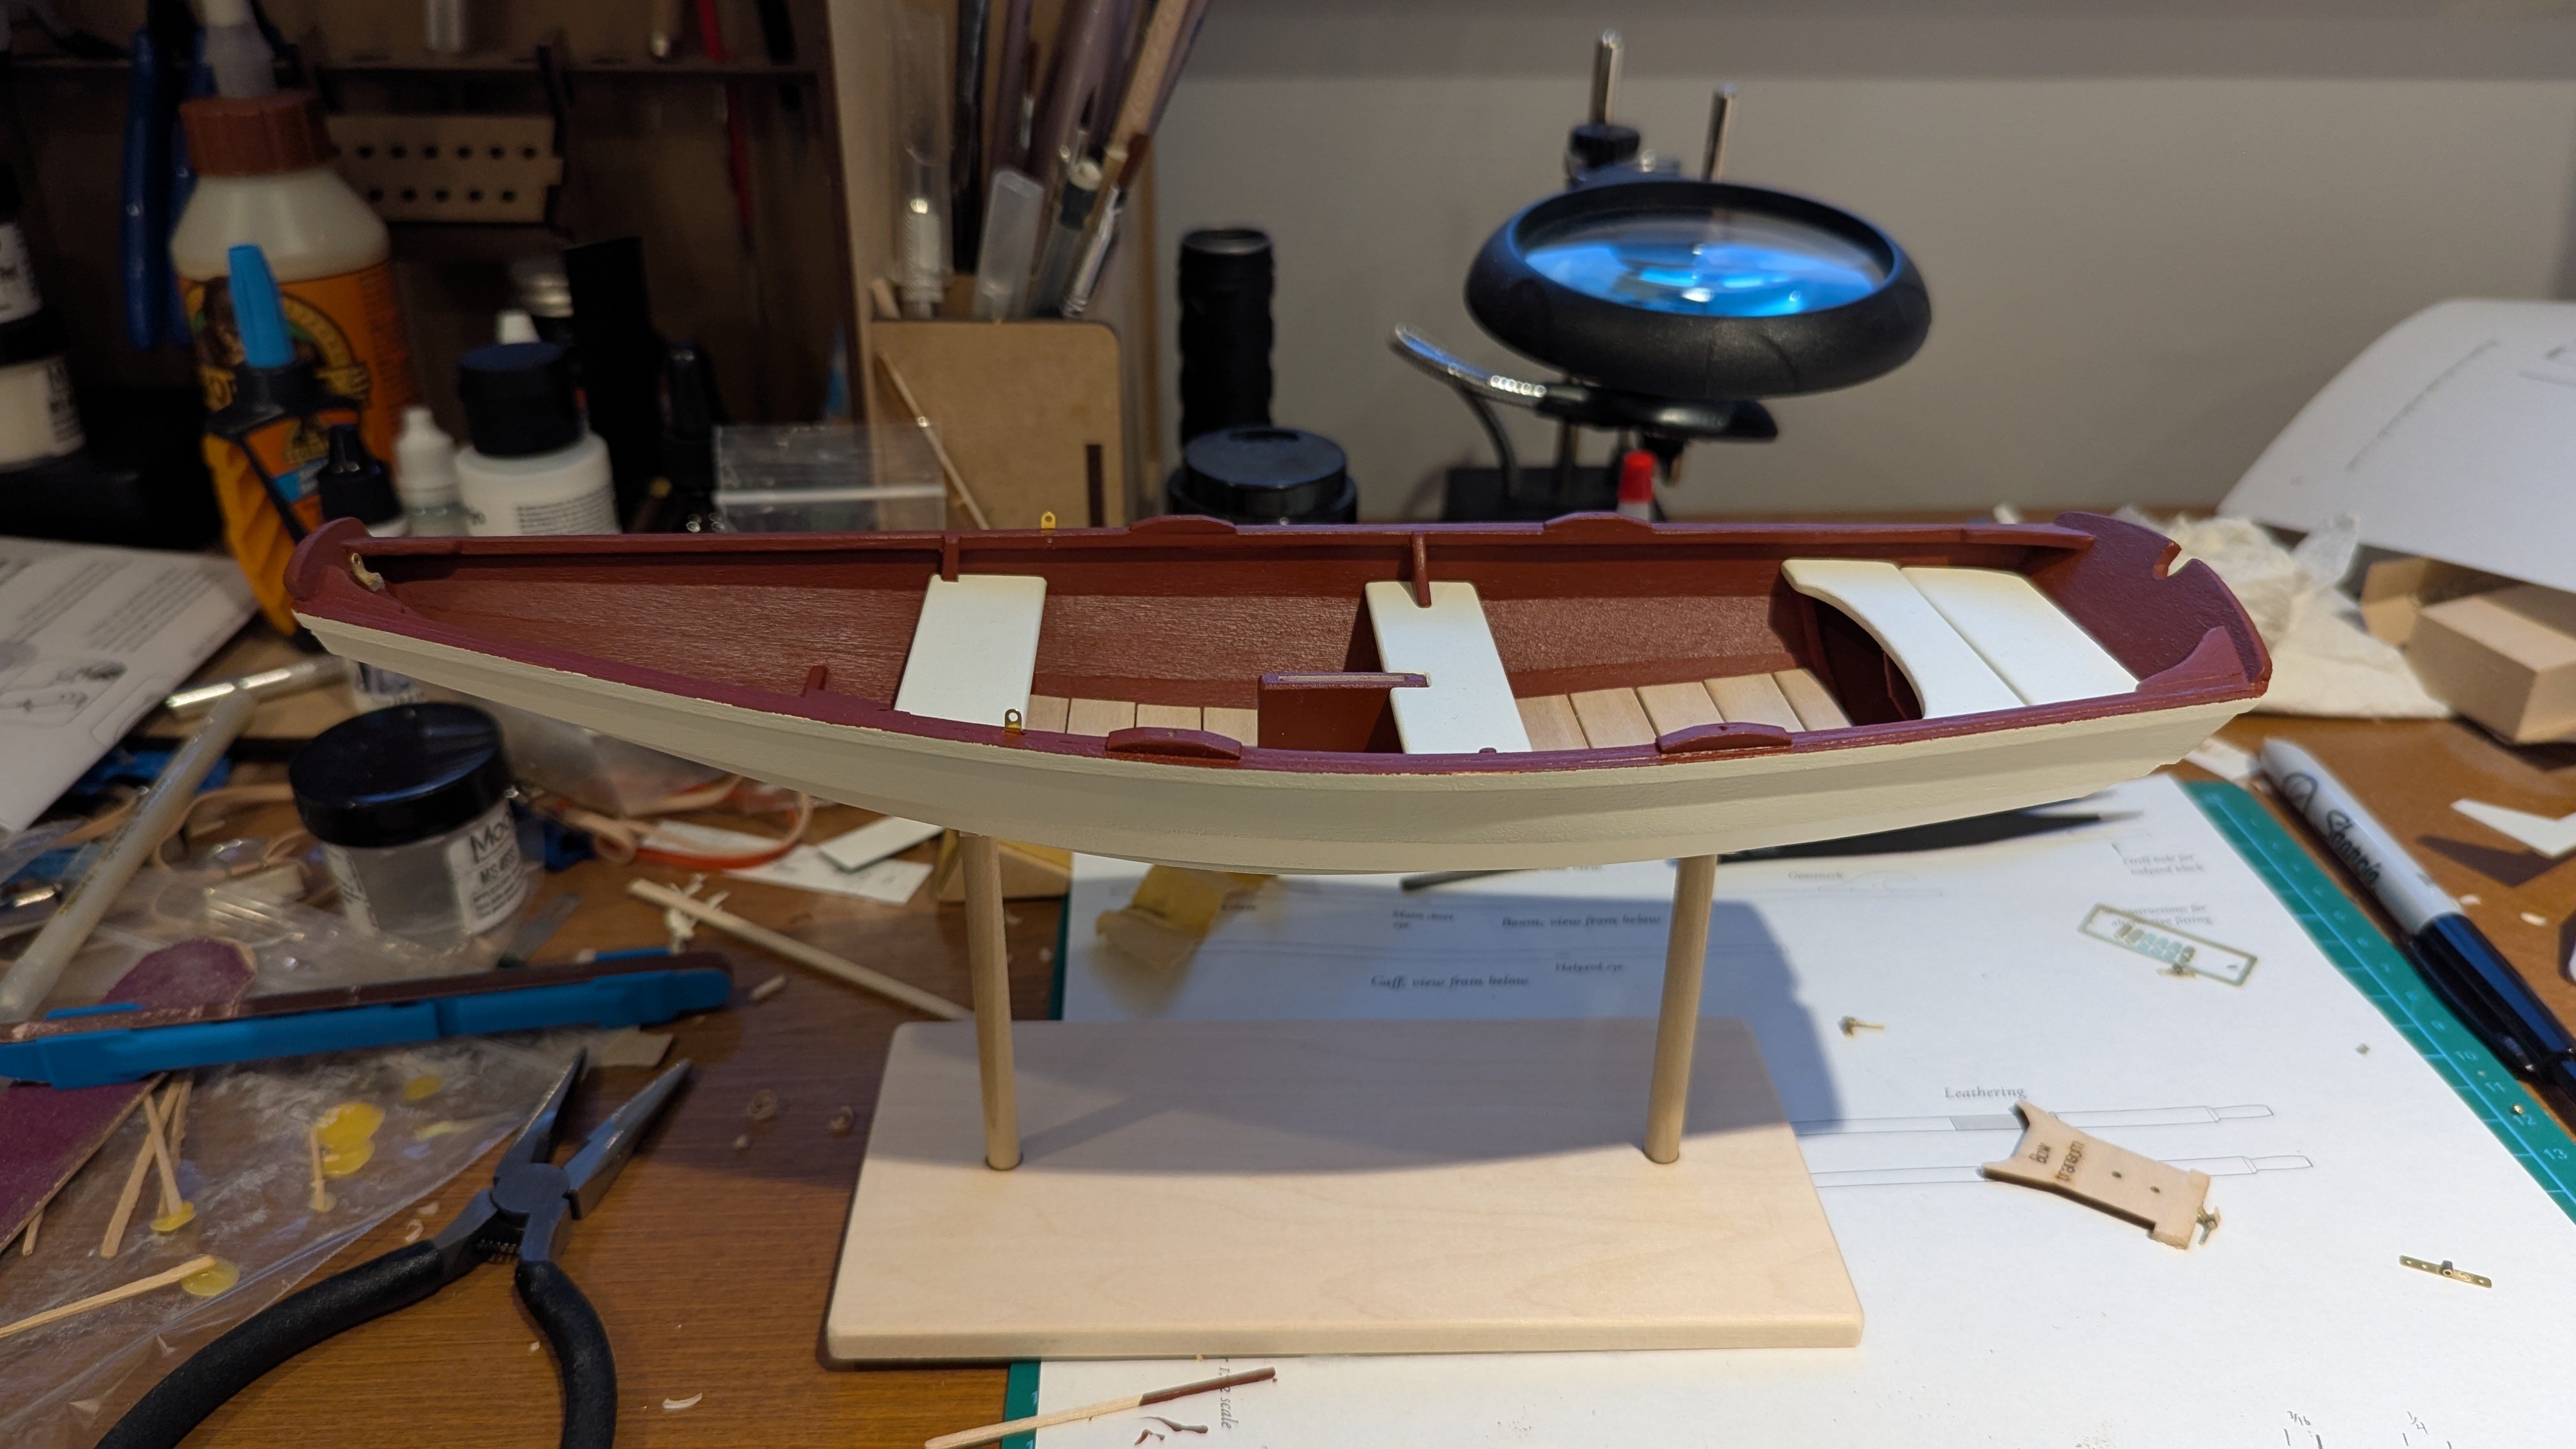
Thanks to everyone who followed along, commented, and liked throughout this build. I learned a lot working through this kit. When I first started, I didn’t expect it to take quite this long, but with a young kid and a demanding job, life has a way of happening… often. I’ve already noticed dust collecting on both the dory and the pram, so I’d like to put them in a cabinet or case. They’re not particularly special models, being that they're small beginner kits so I don’t think they warrant a custom case, but if anyone has suggestions for a cheap way to cover or display them, I’d really appreciate it. Originally, I wasn’t sure whether I’d start the Polaris from OcCre or the Lobster Smack next, but I’ve decided it’ll be the smack. I’d like to get it started soon, but first I really need to tackle the long overdue relocation to a more permanent, modeling friendly workspace. Something I've been putting off for about a year now, but it looks like I'll be continuing with this hobby! Before that, I still need to complete the oars for this one. I’ll likely return and post a photo or two once they’re finished, but for now, I’m calling this build complete. Thanks again, Matt


- 86 replies
-
- 14
-
-

-
- Model Shipways
- Norwegian Sailing Pram
- (and 3 more)
-
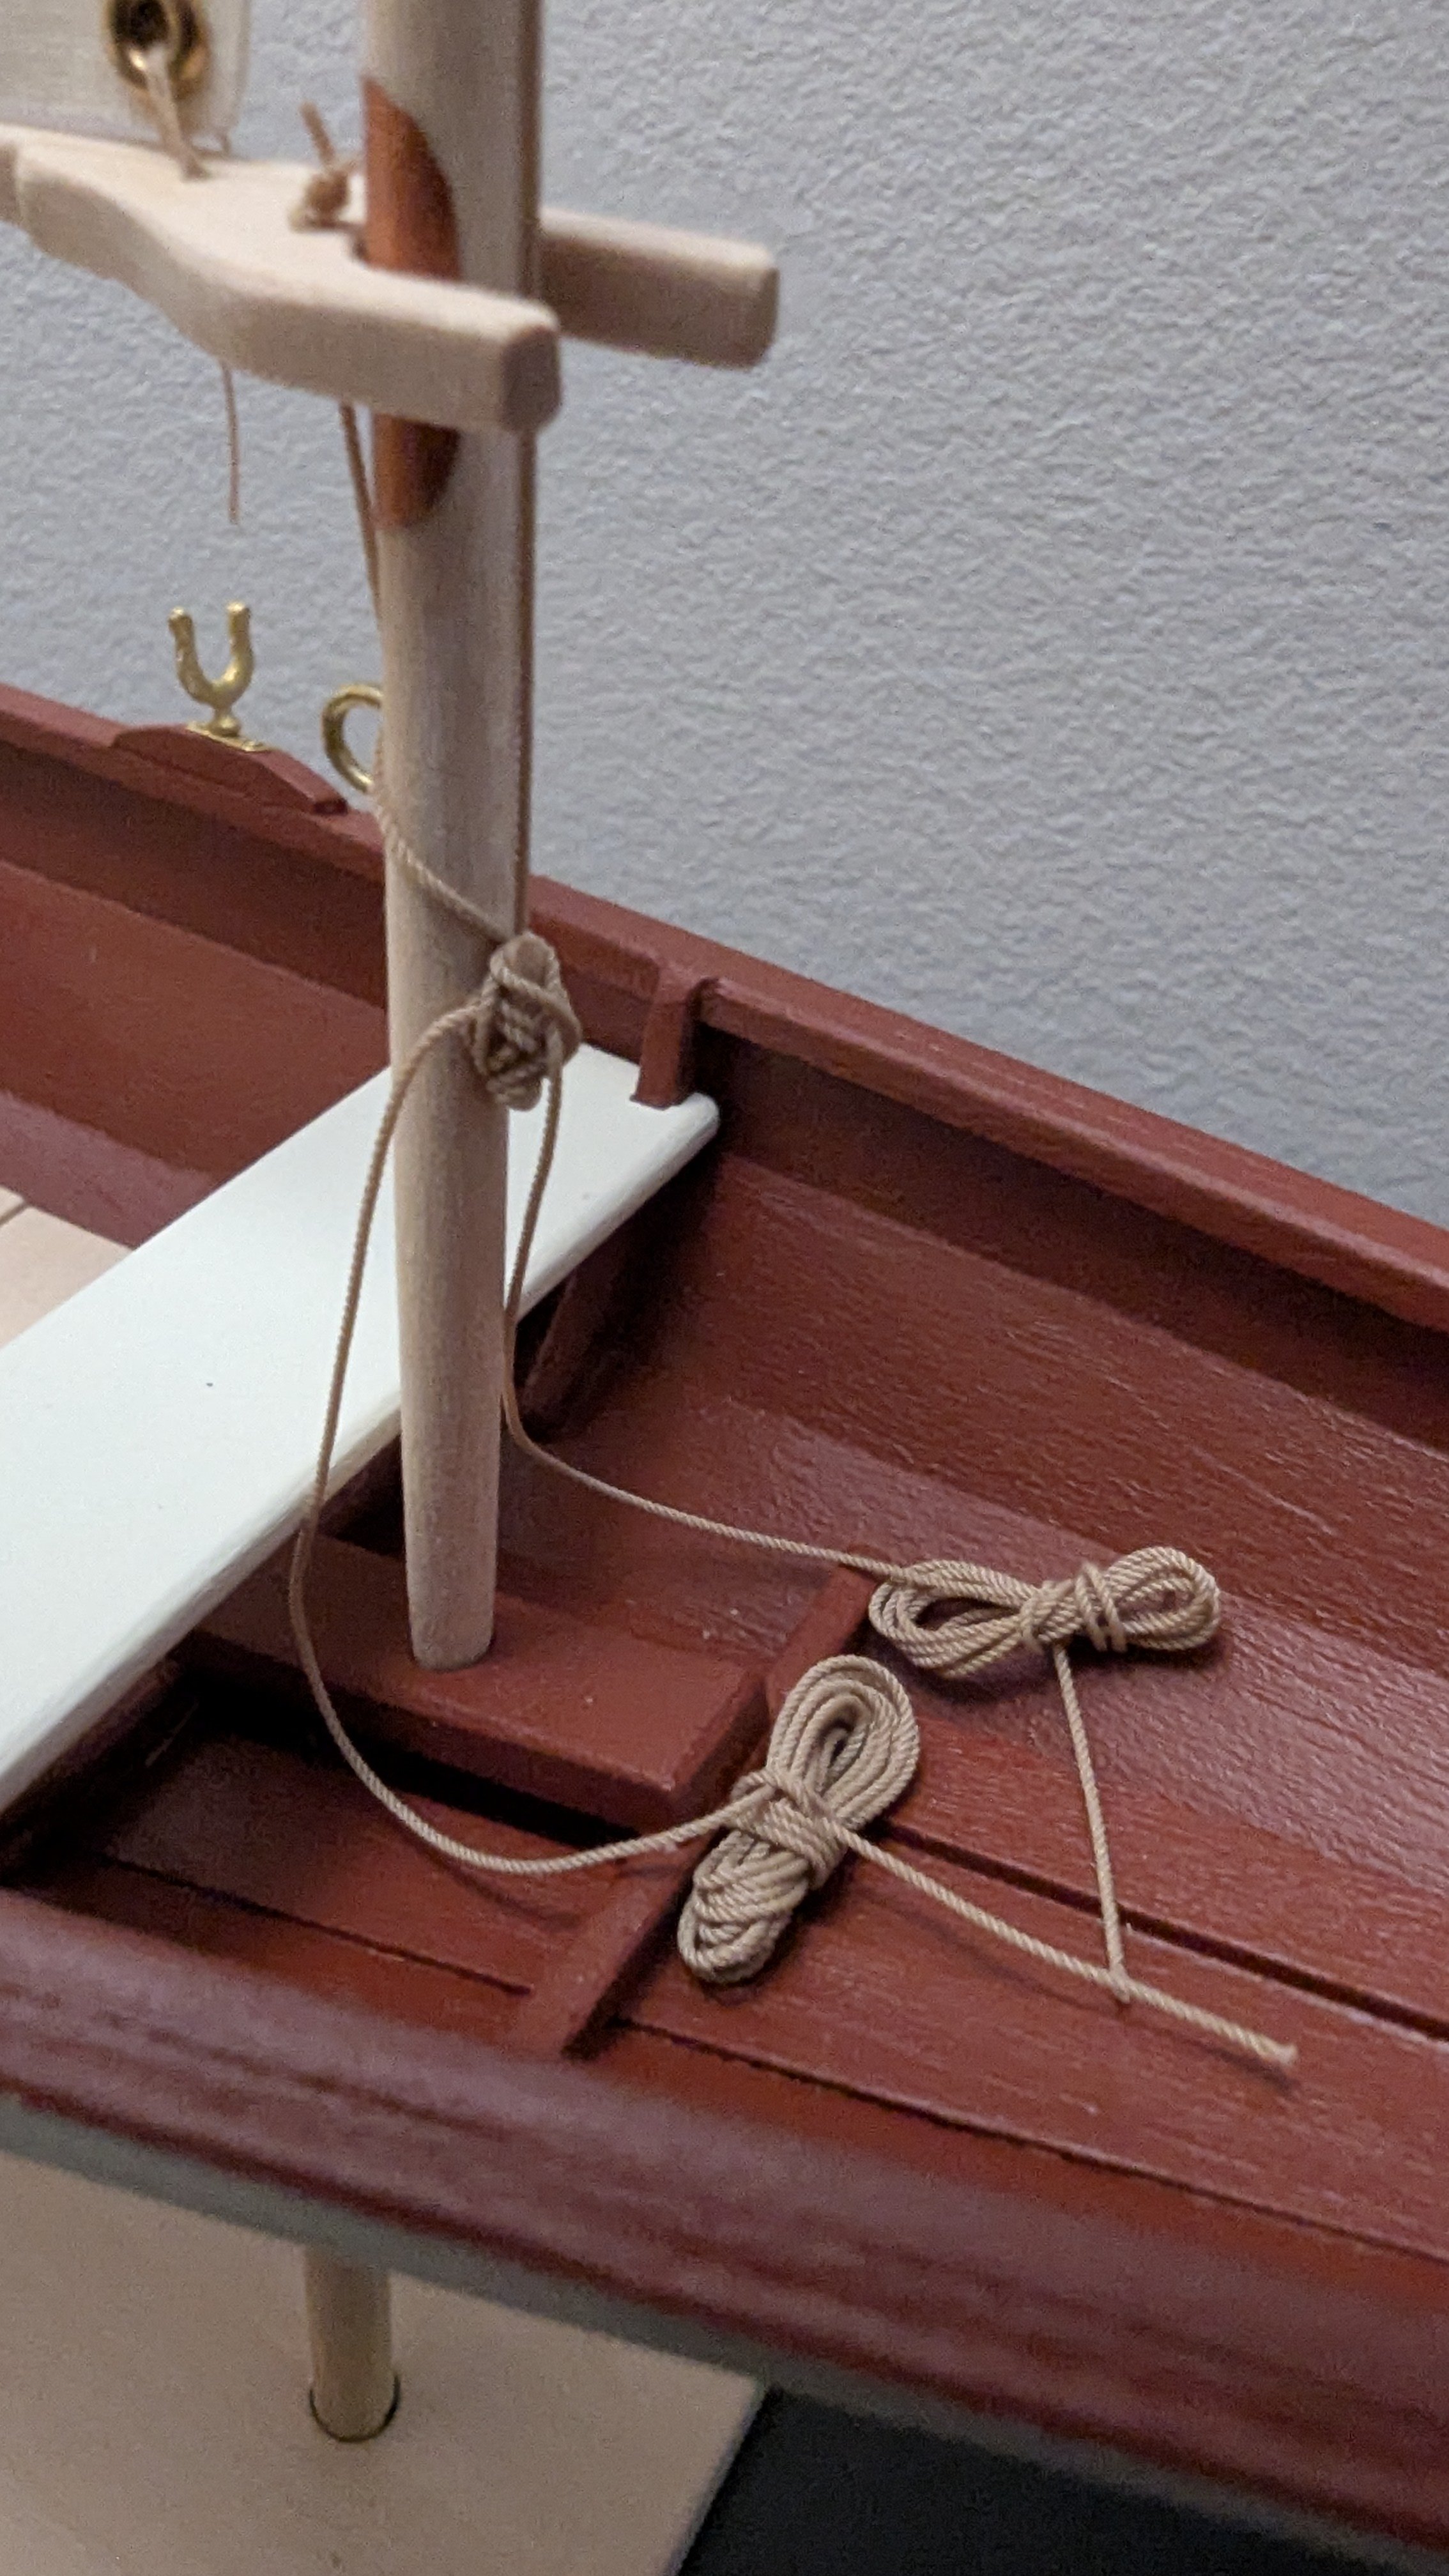
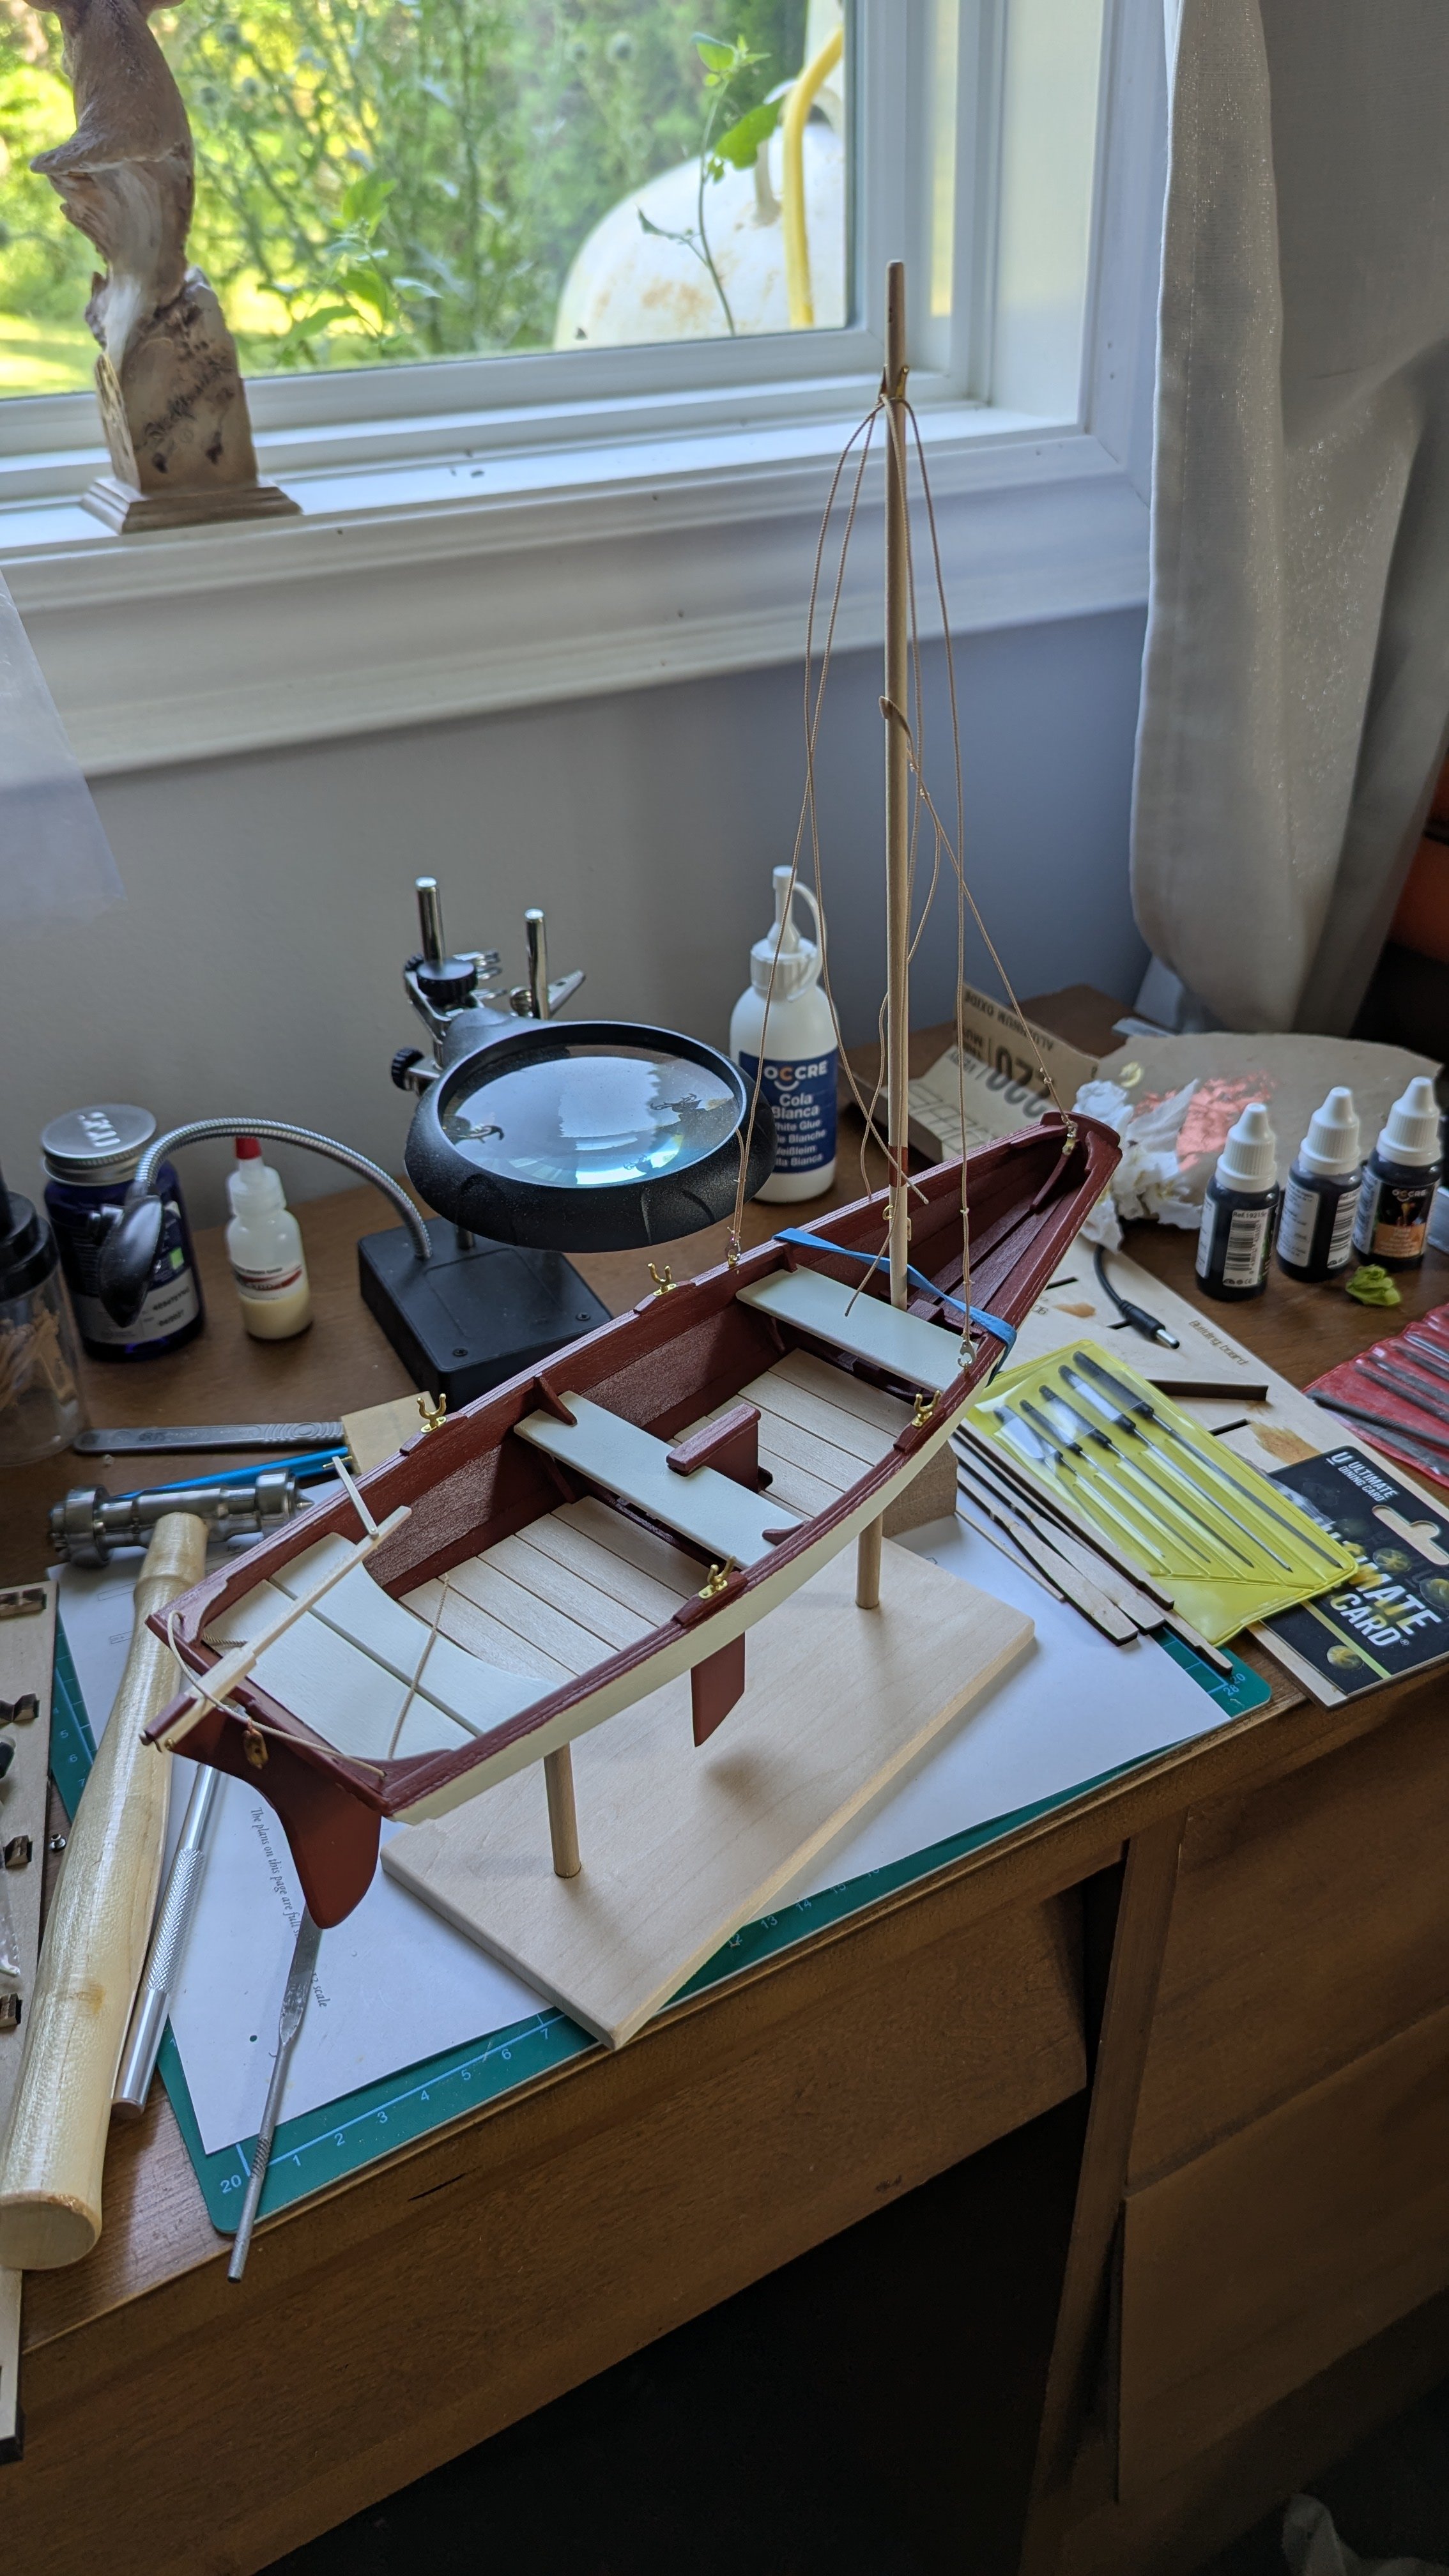
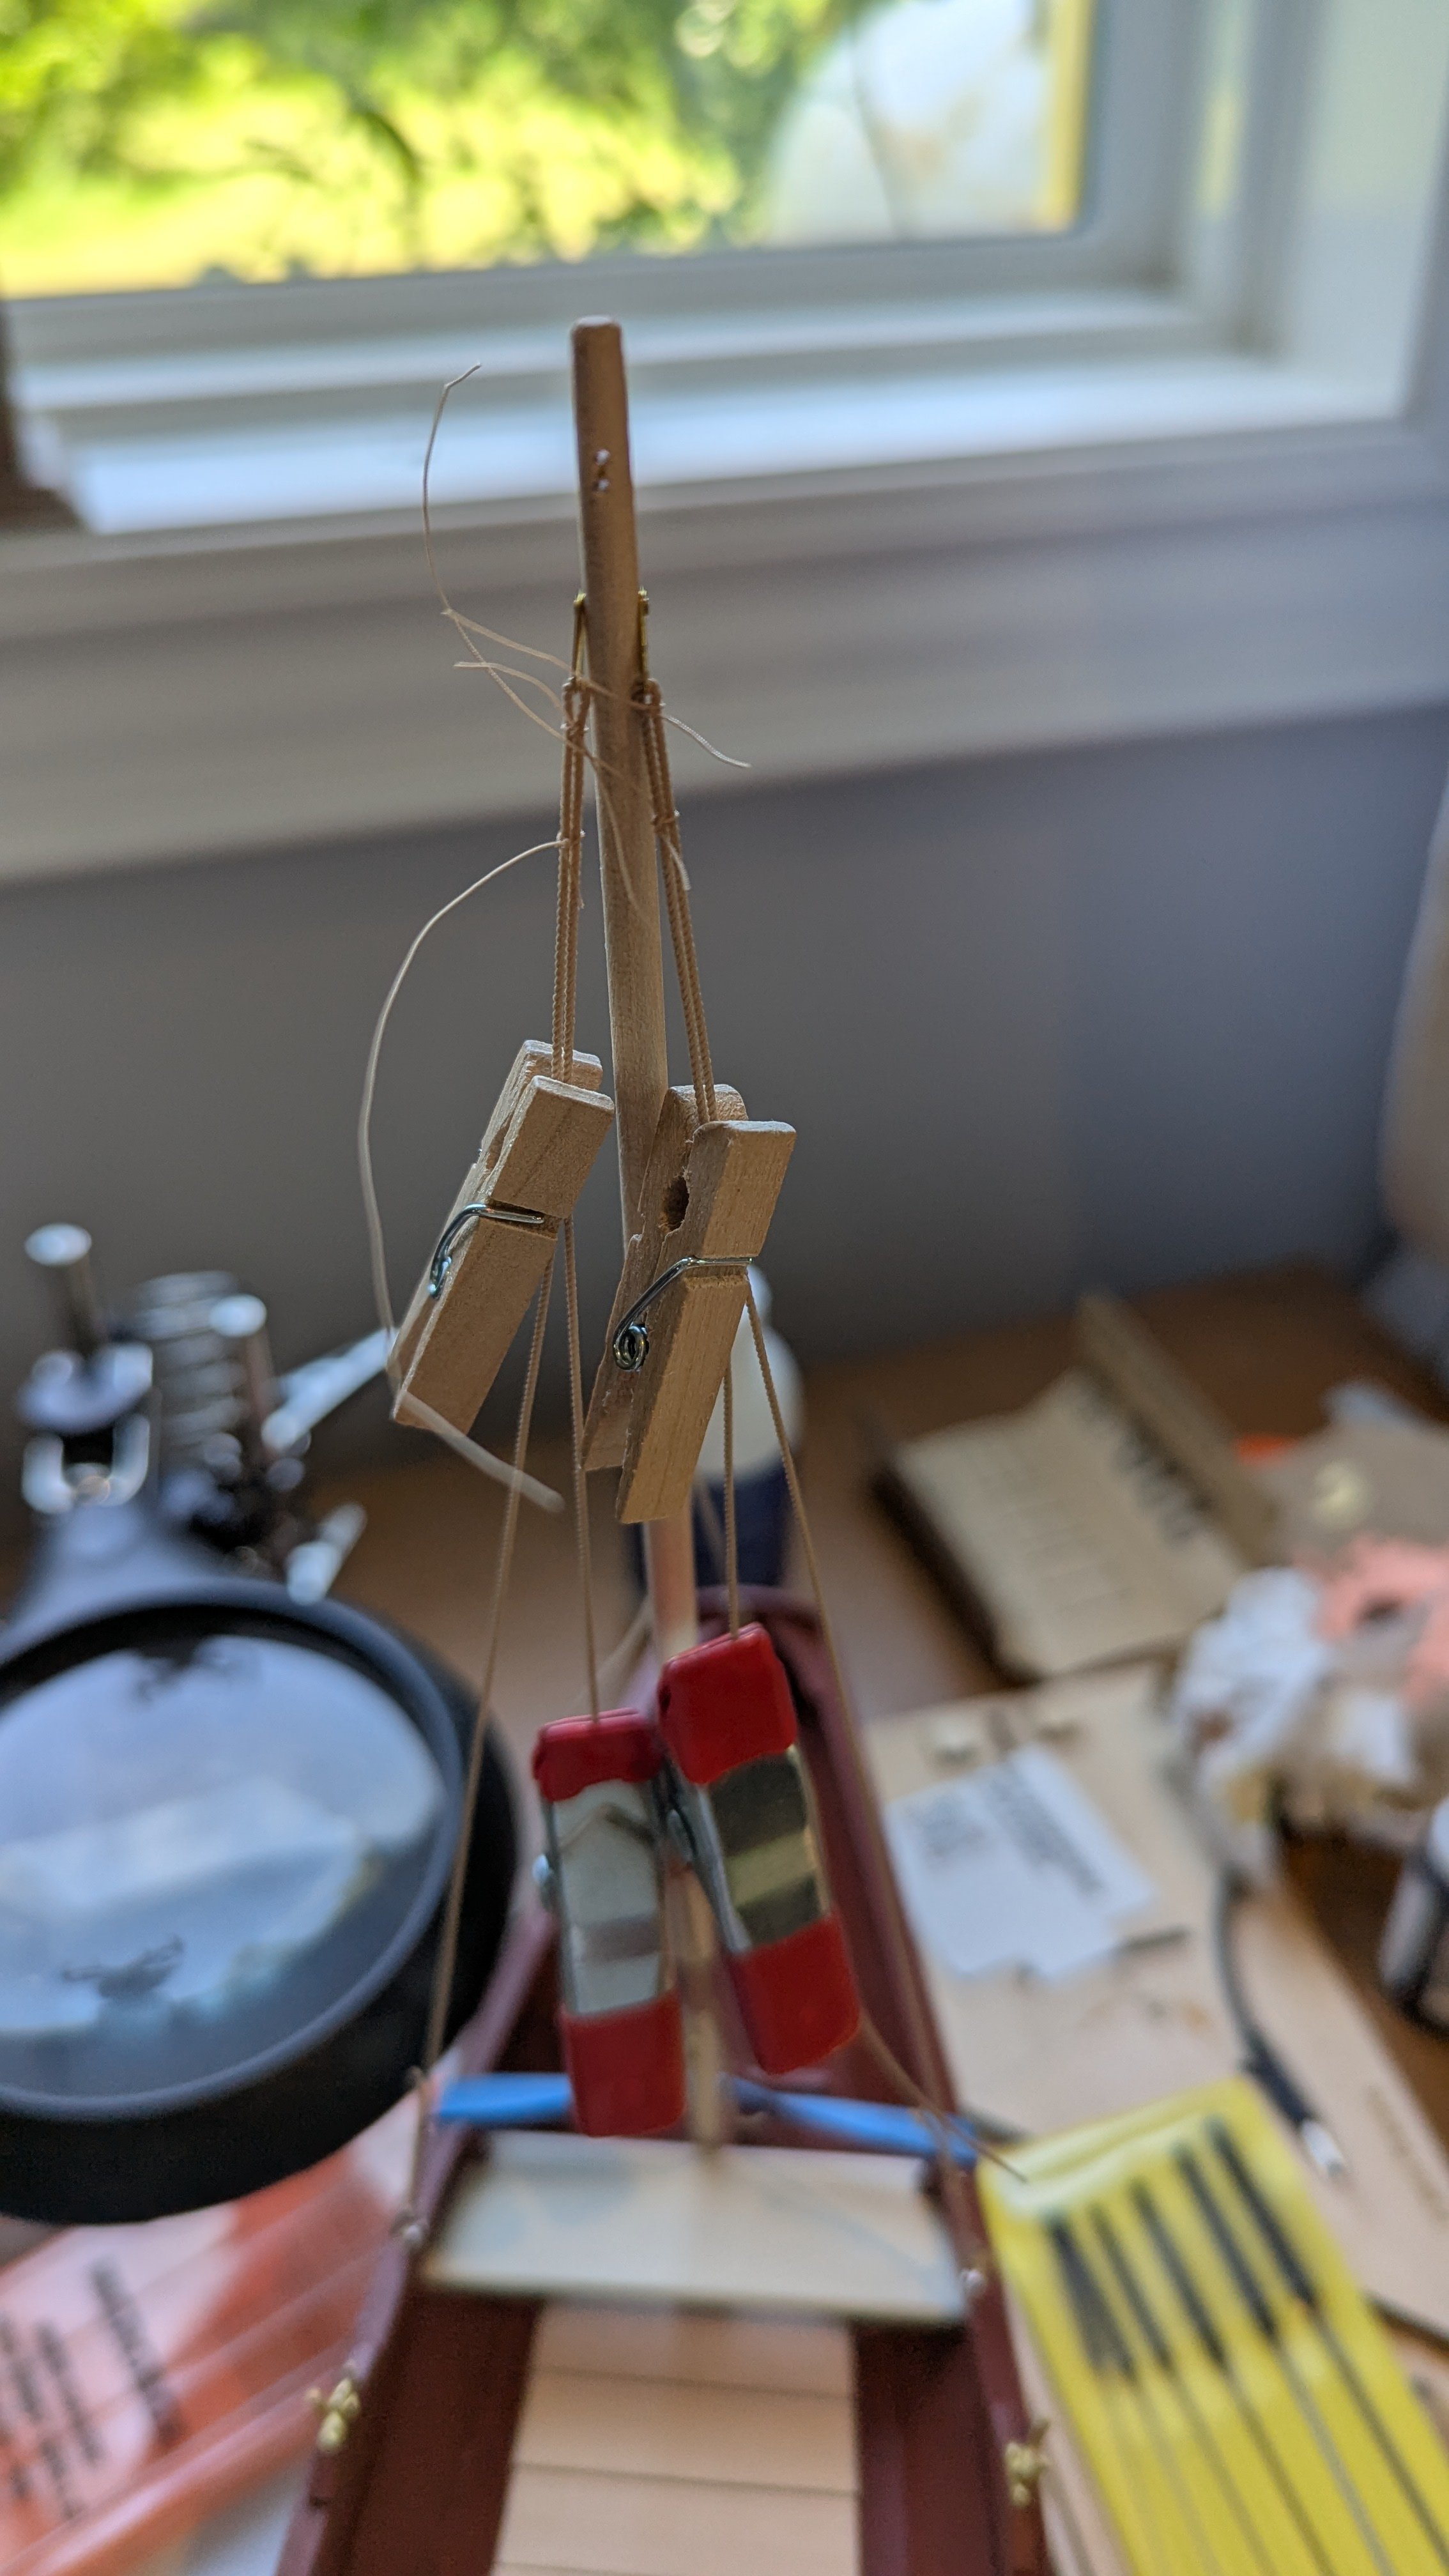
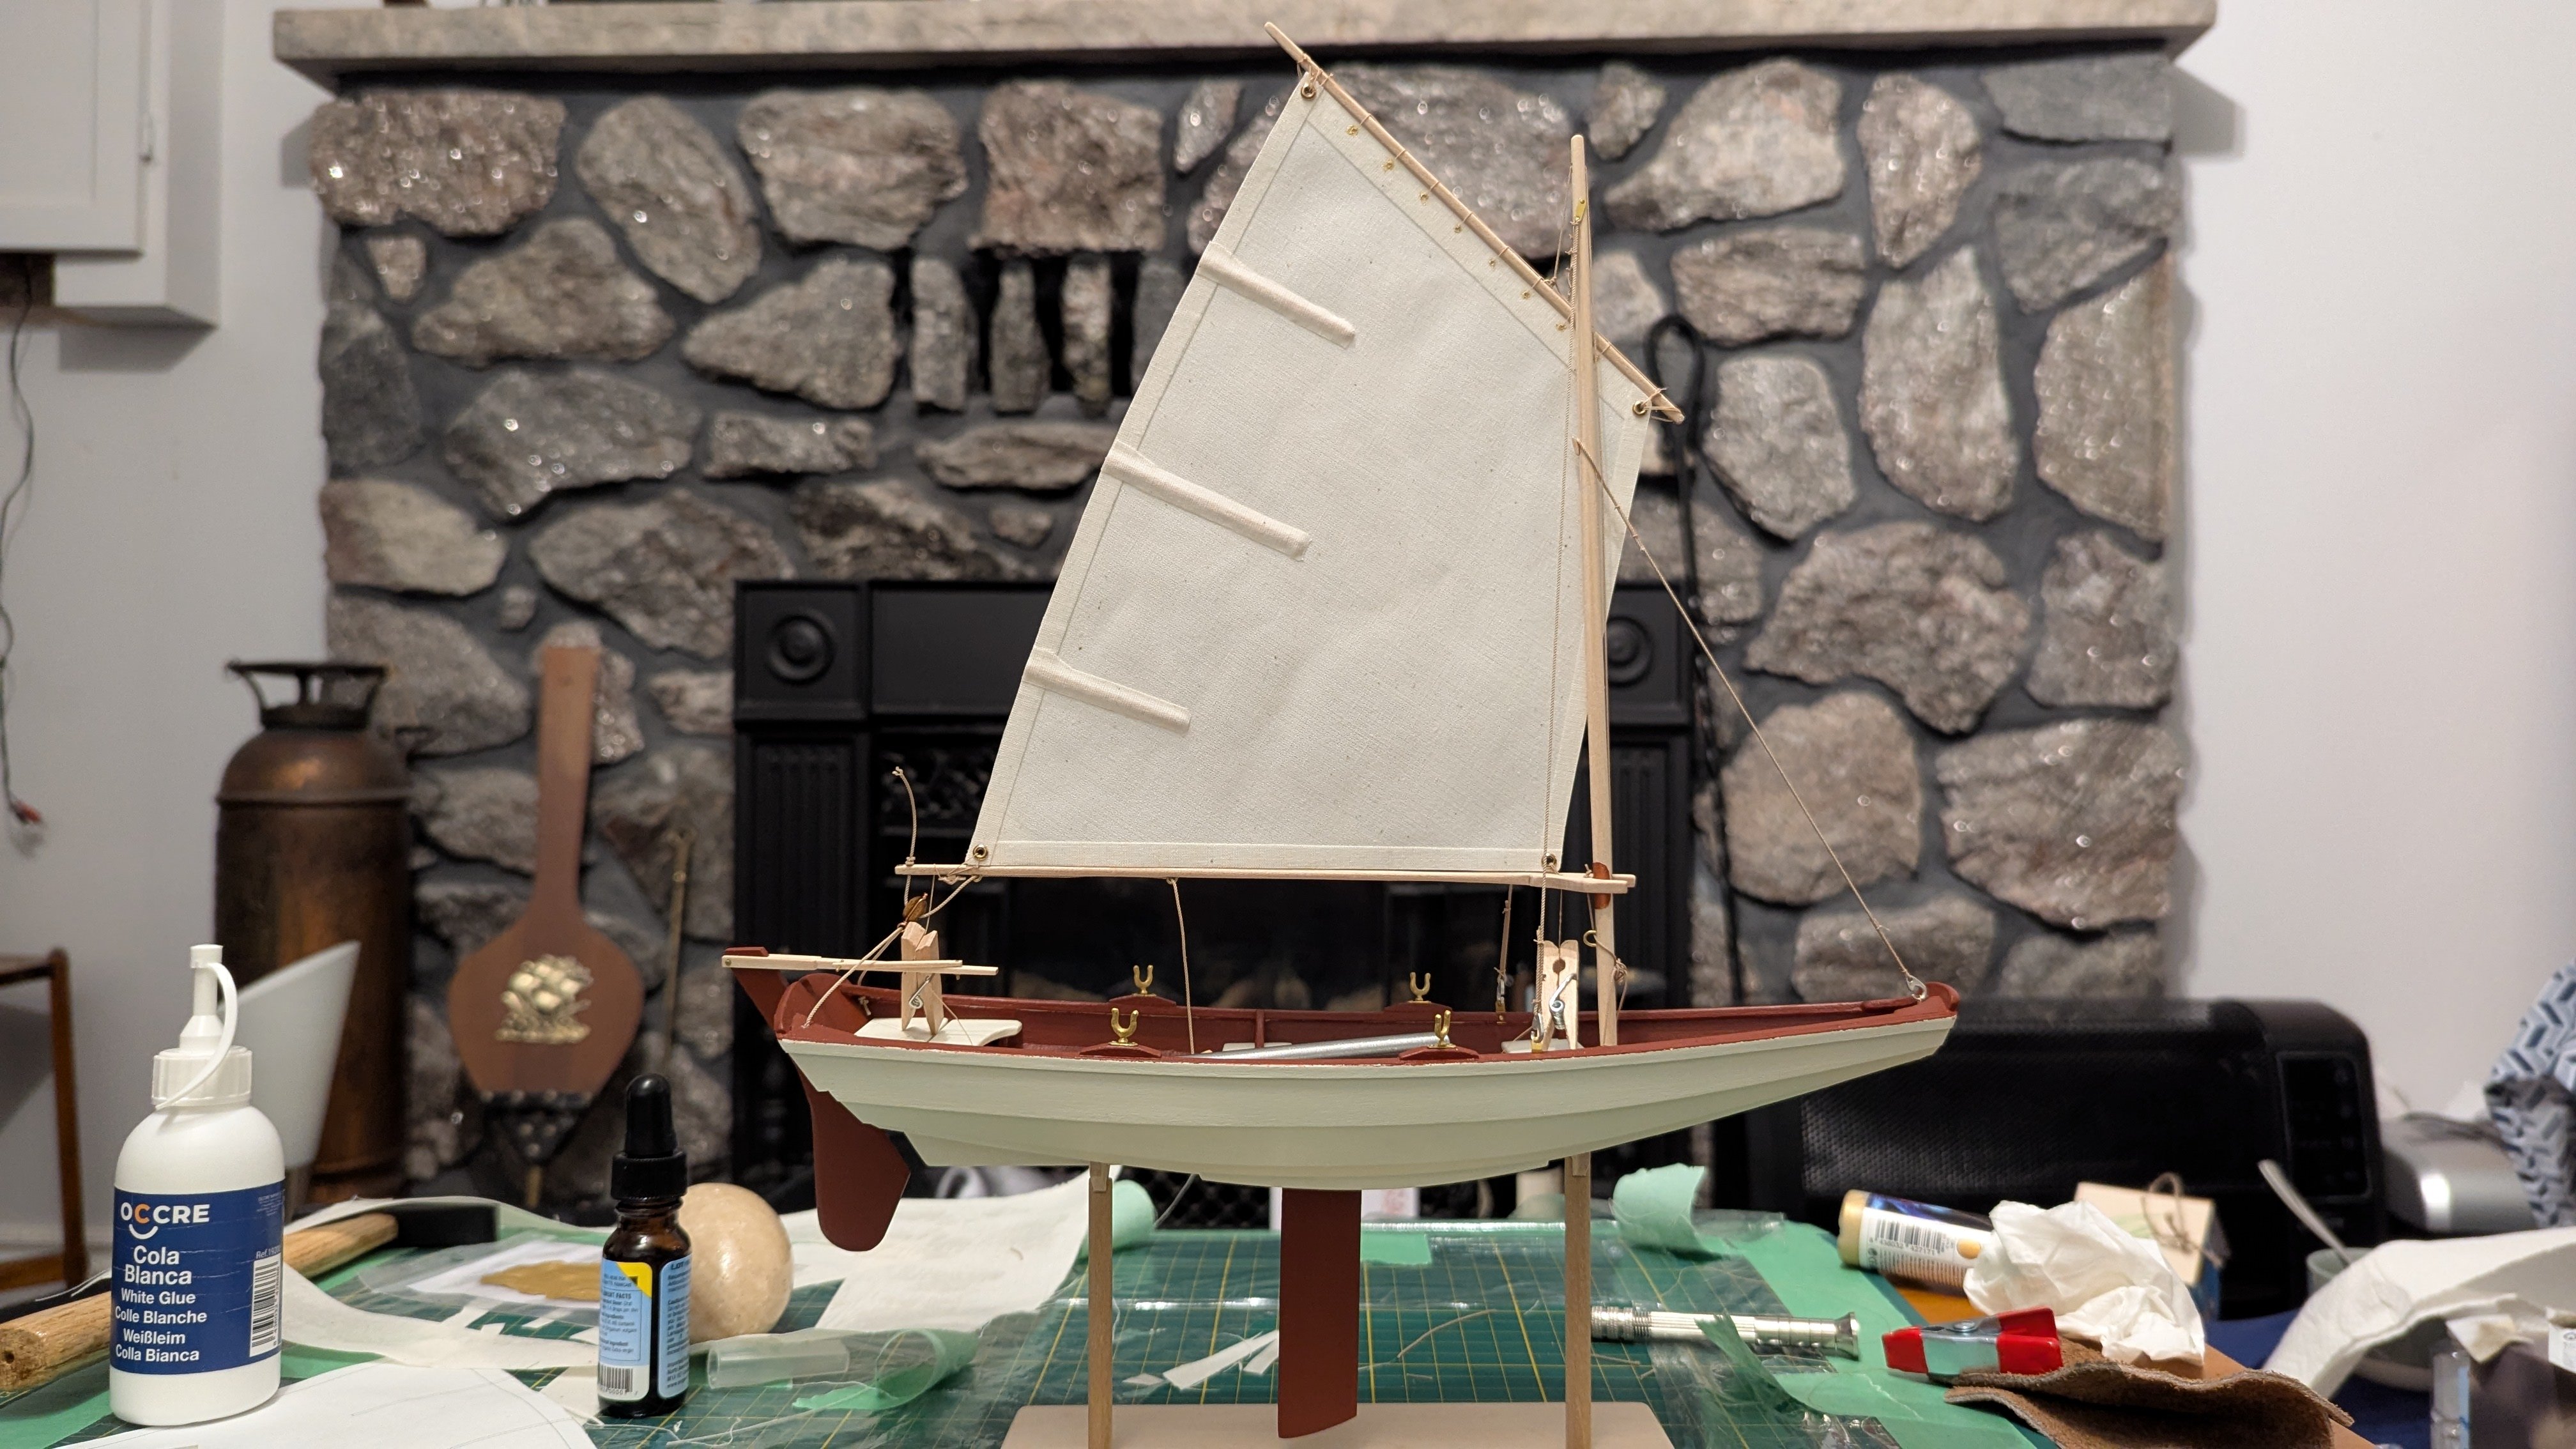
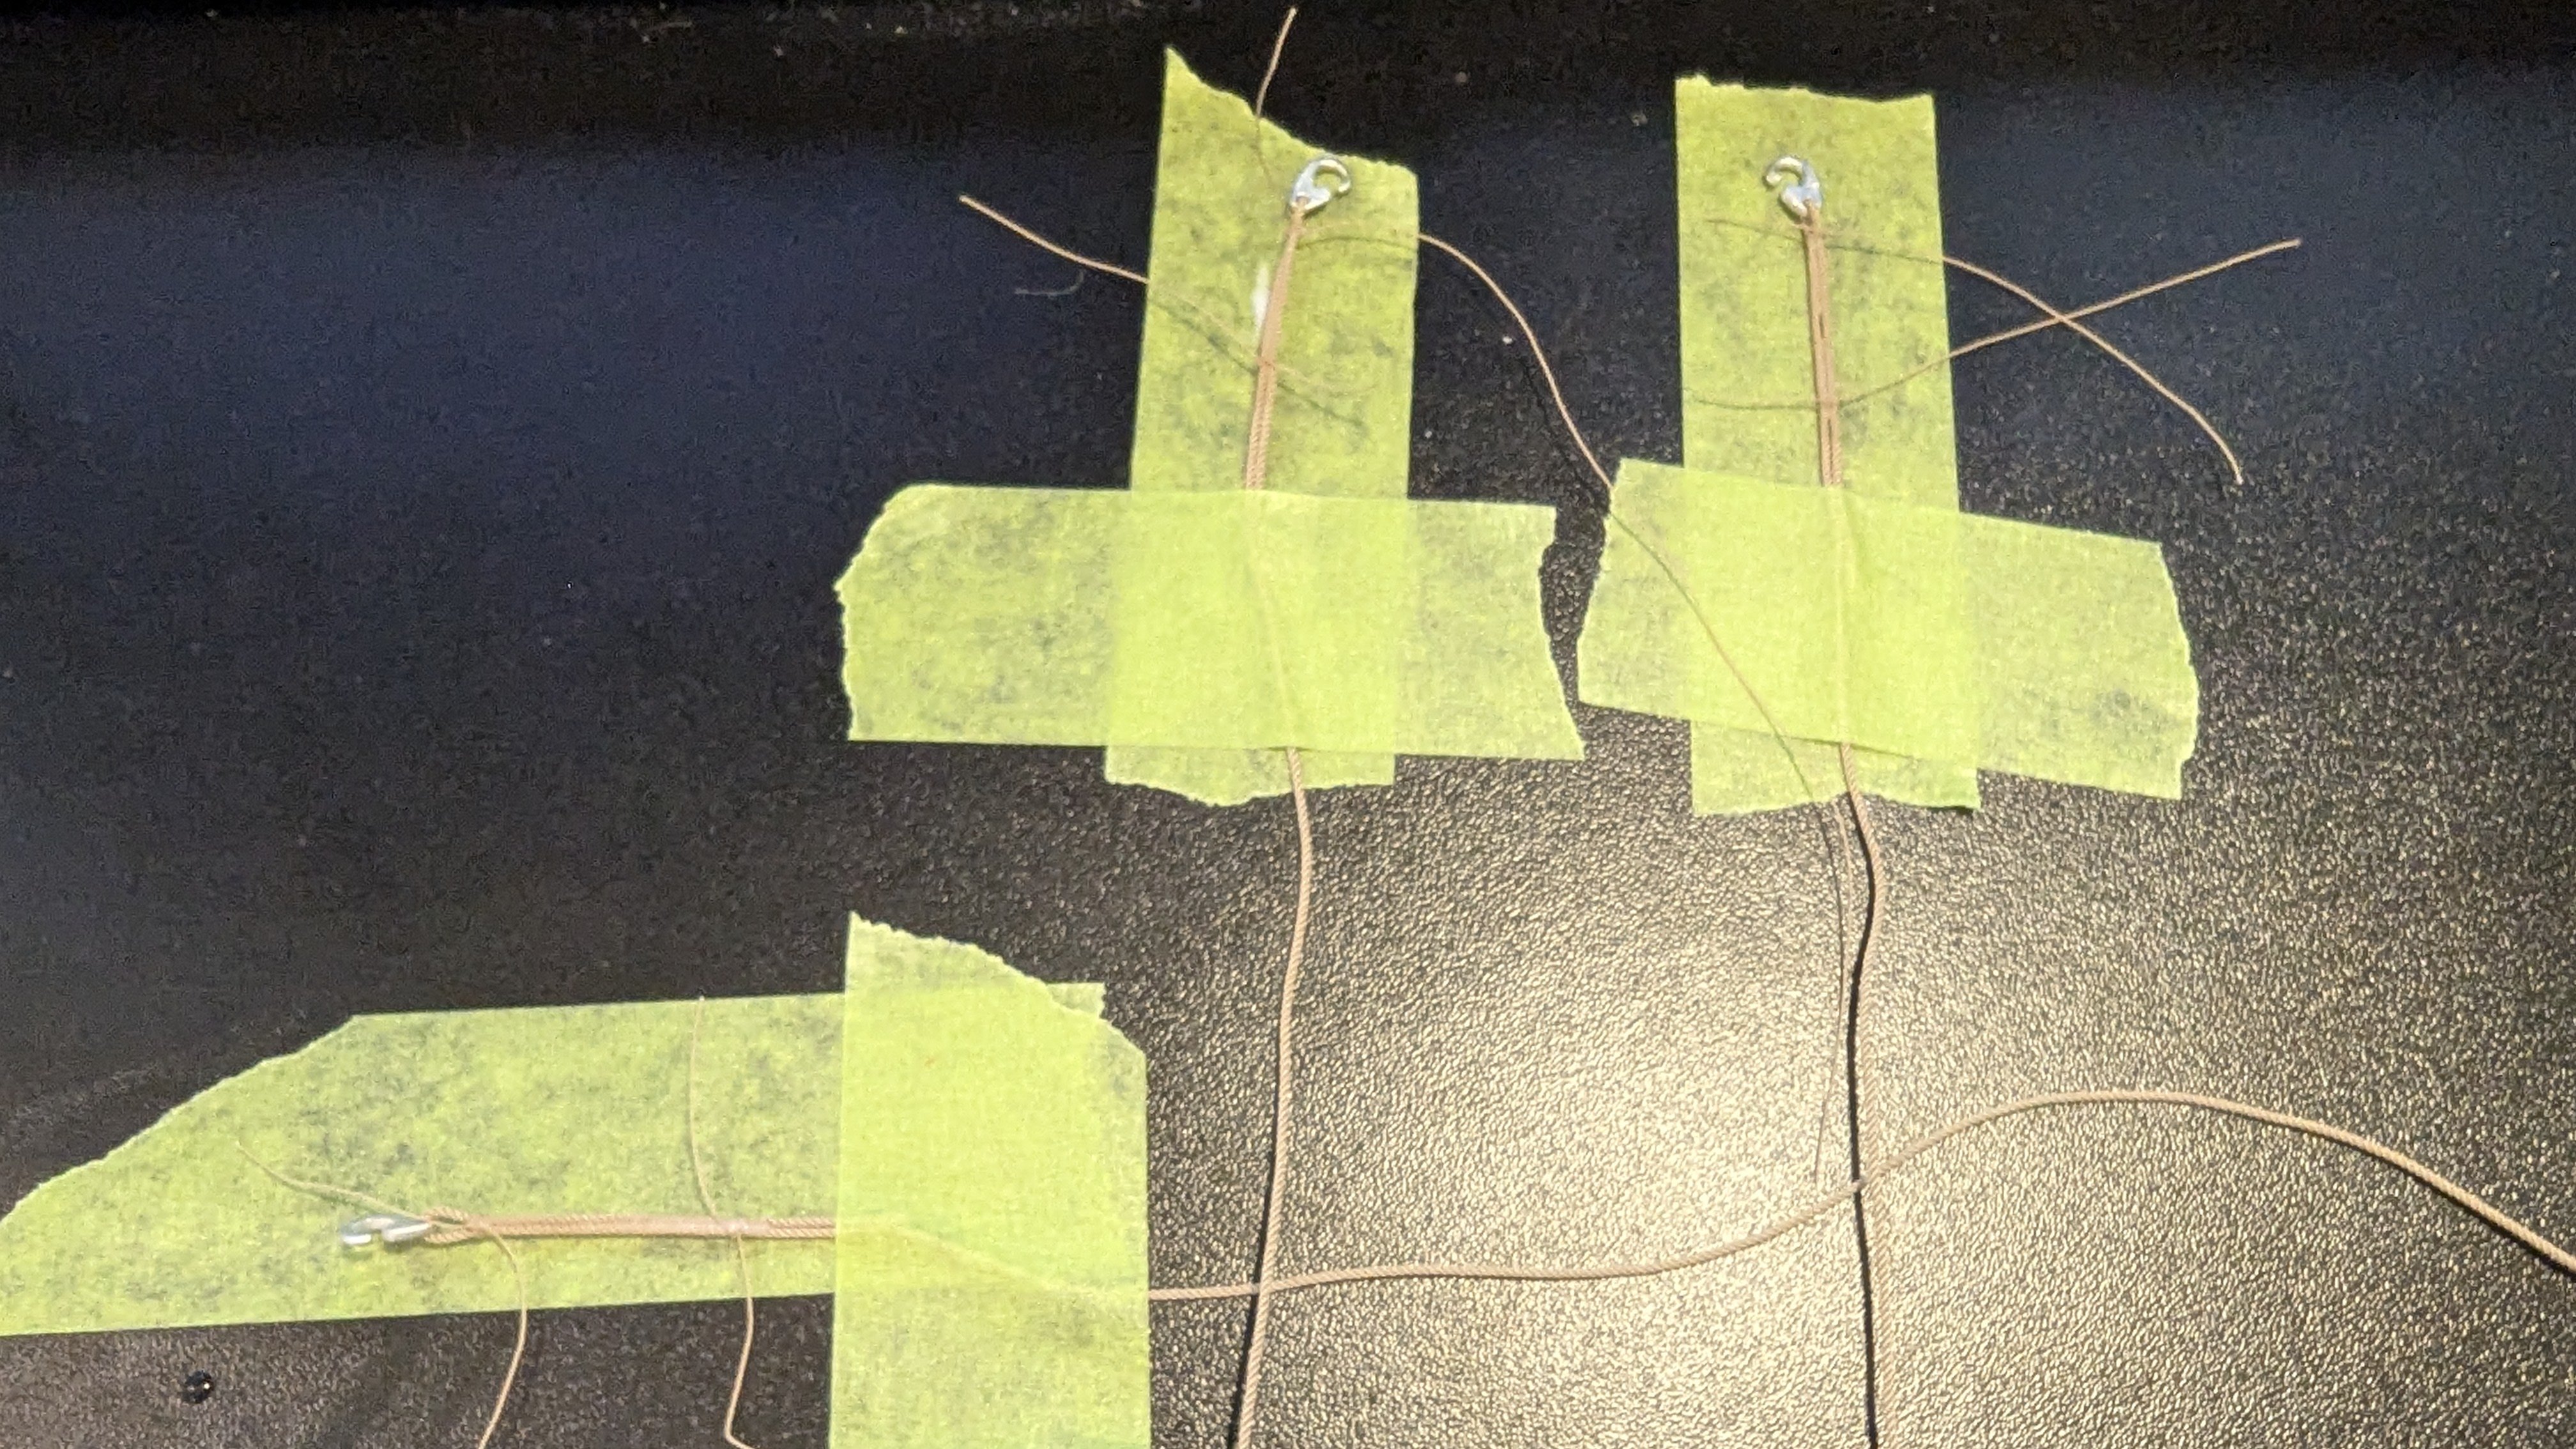
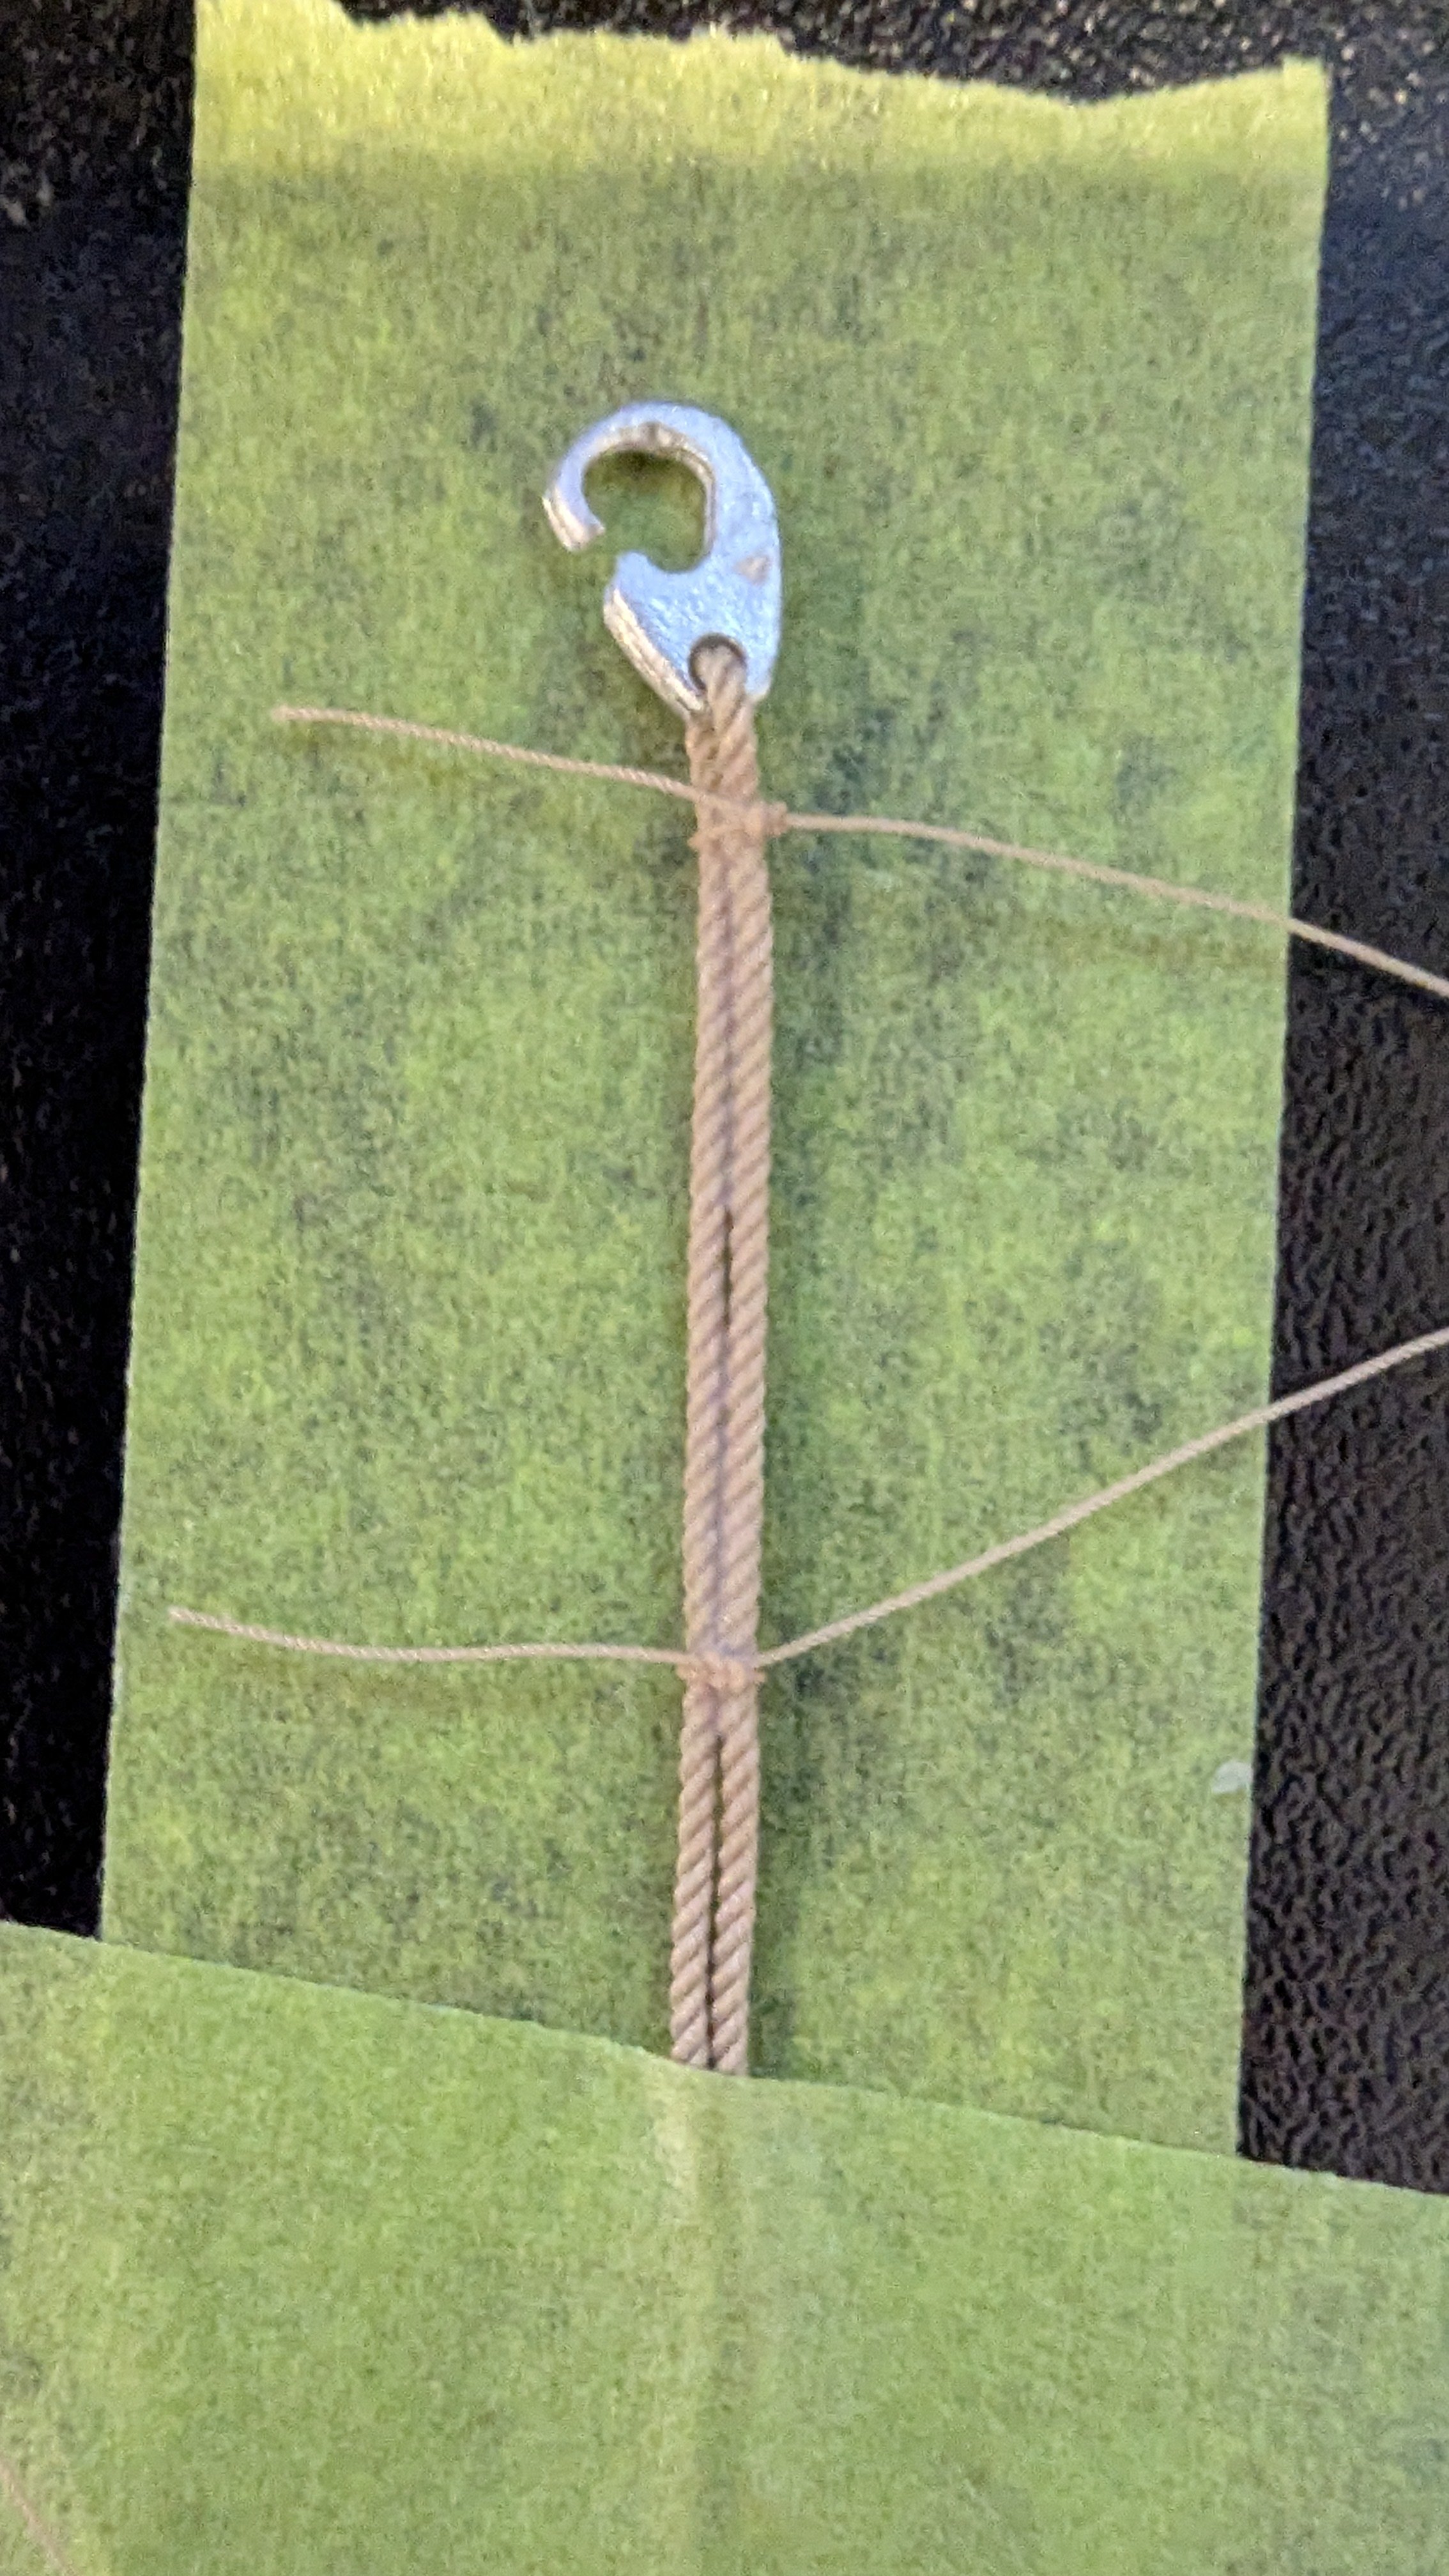
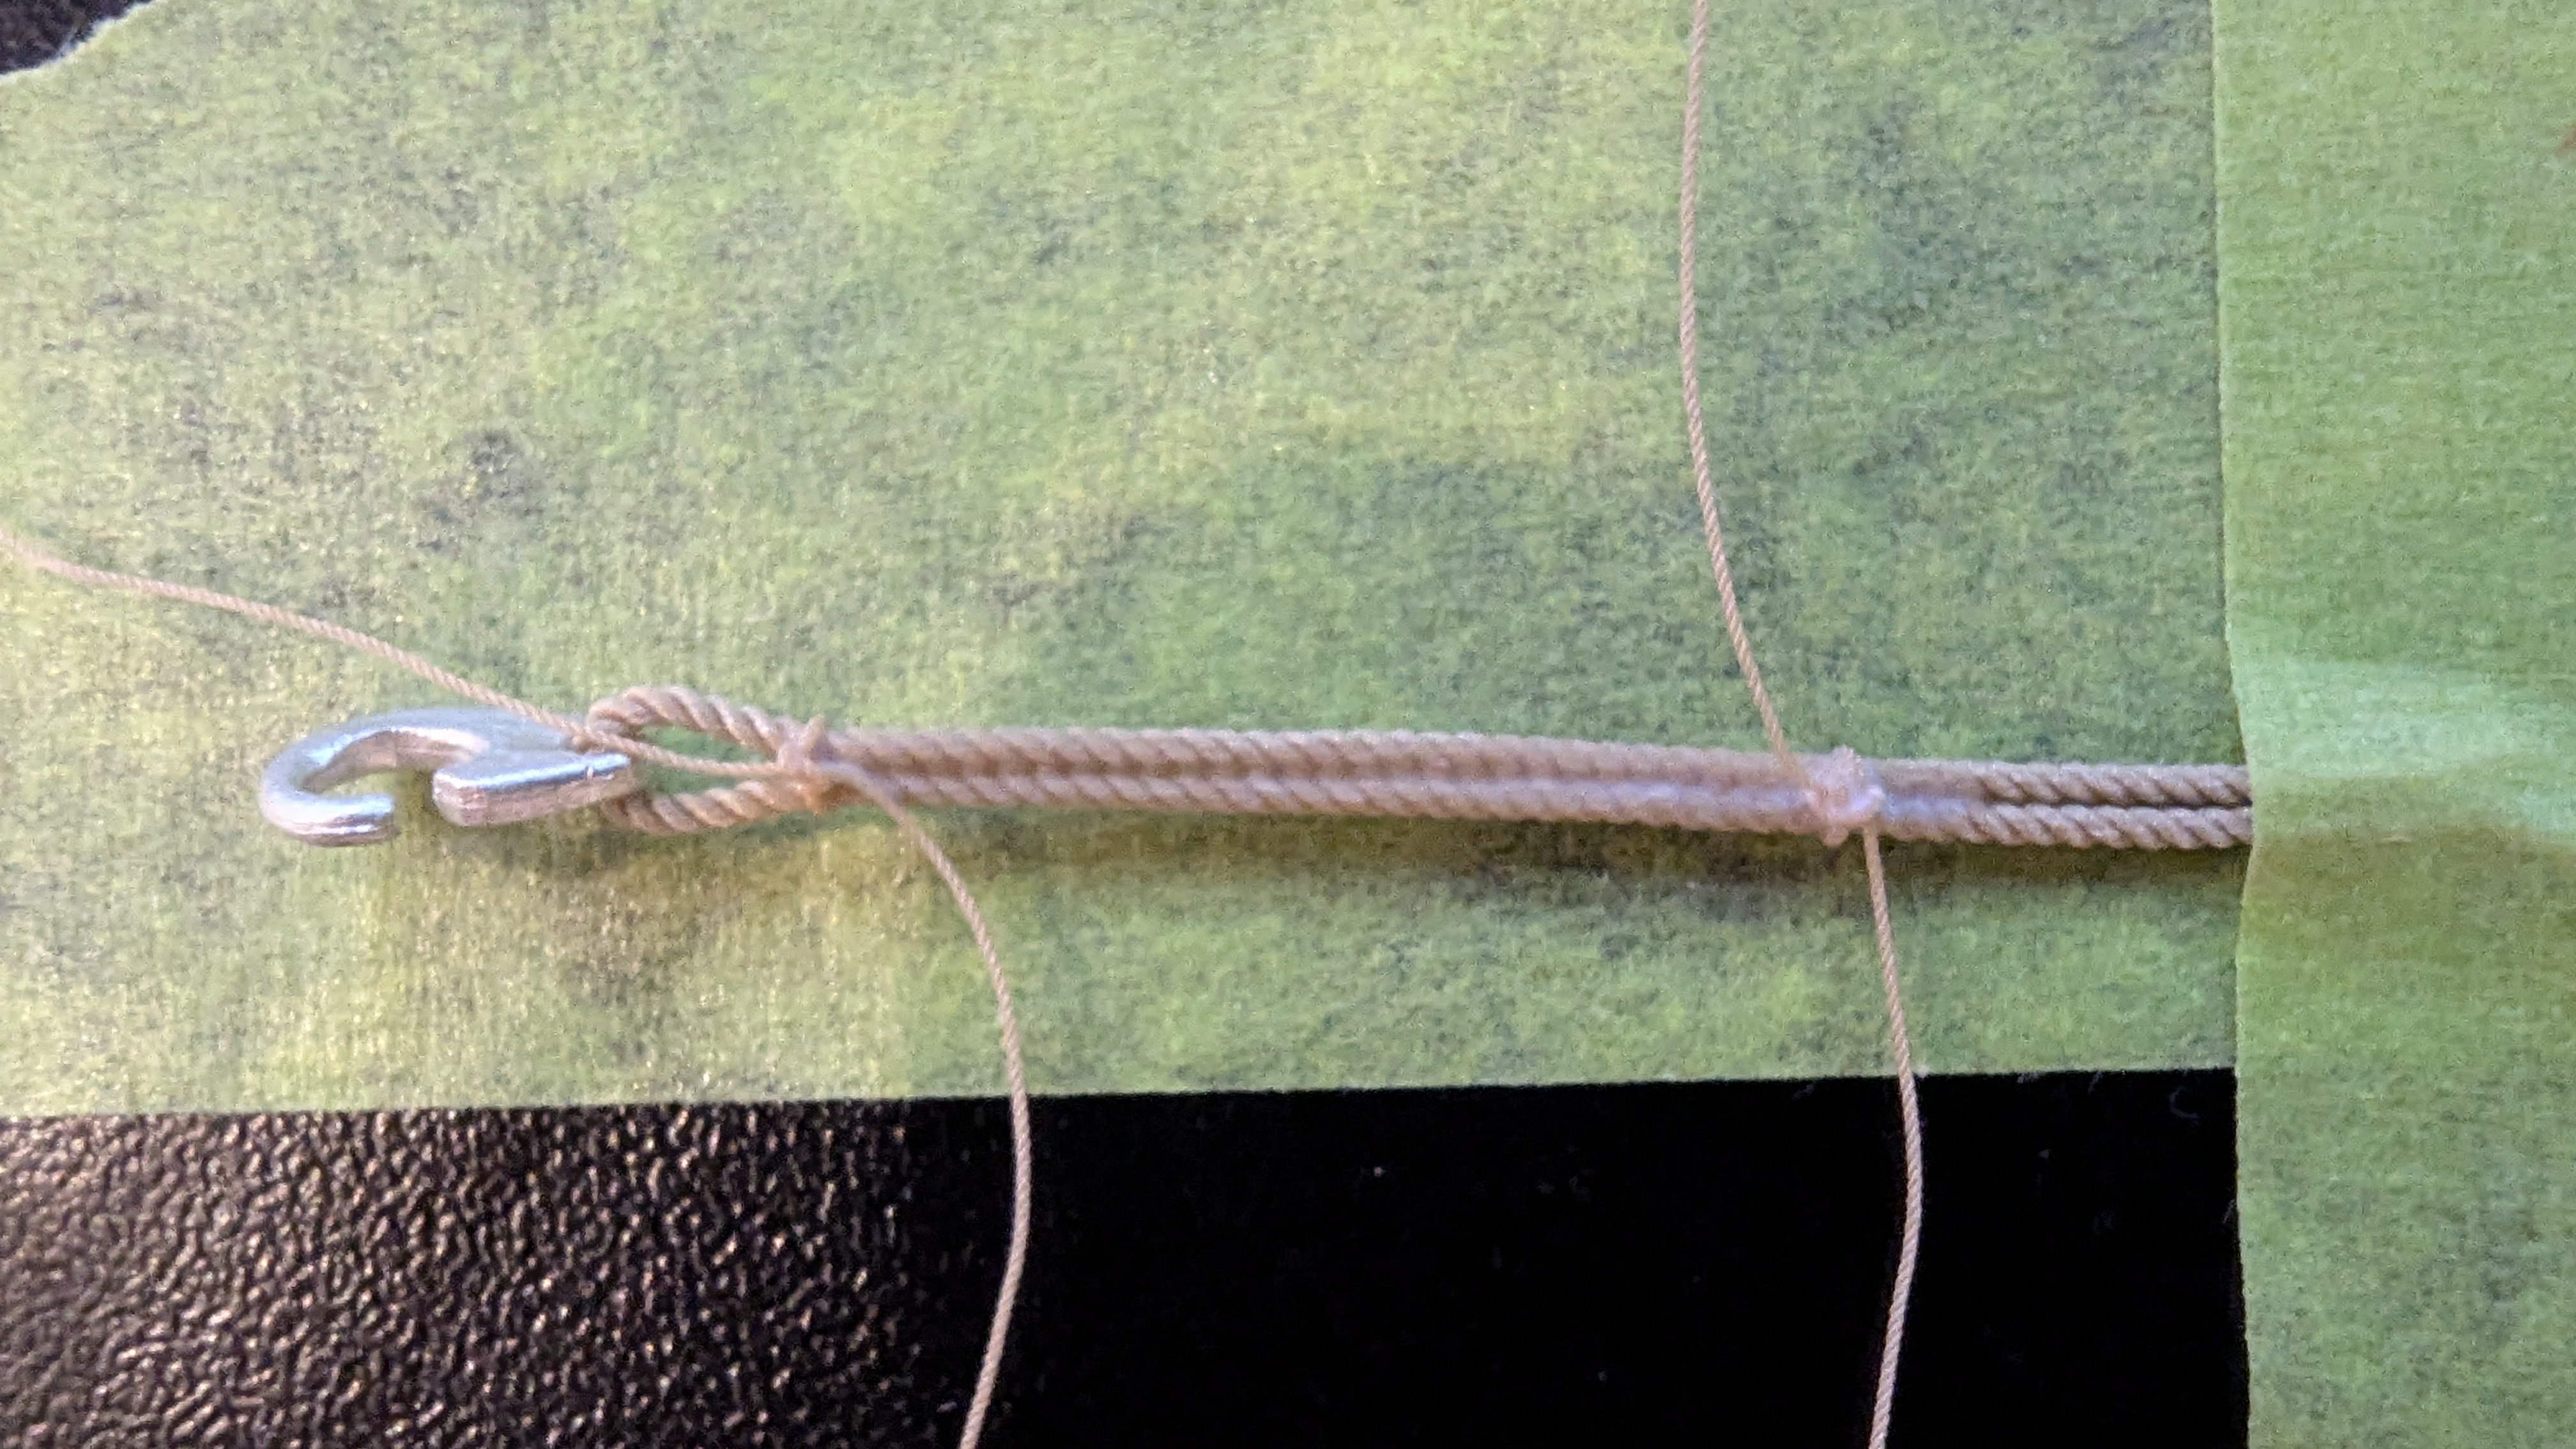
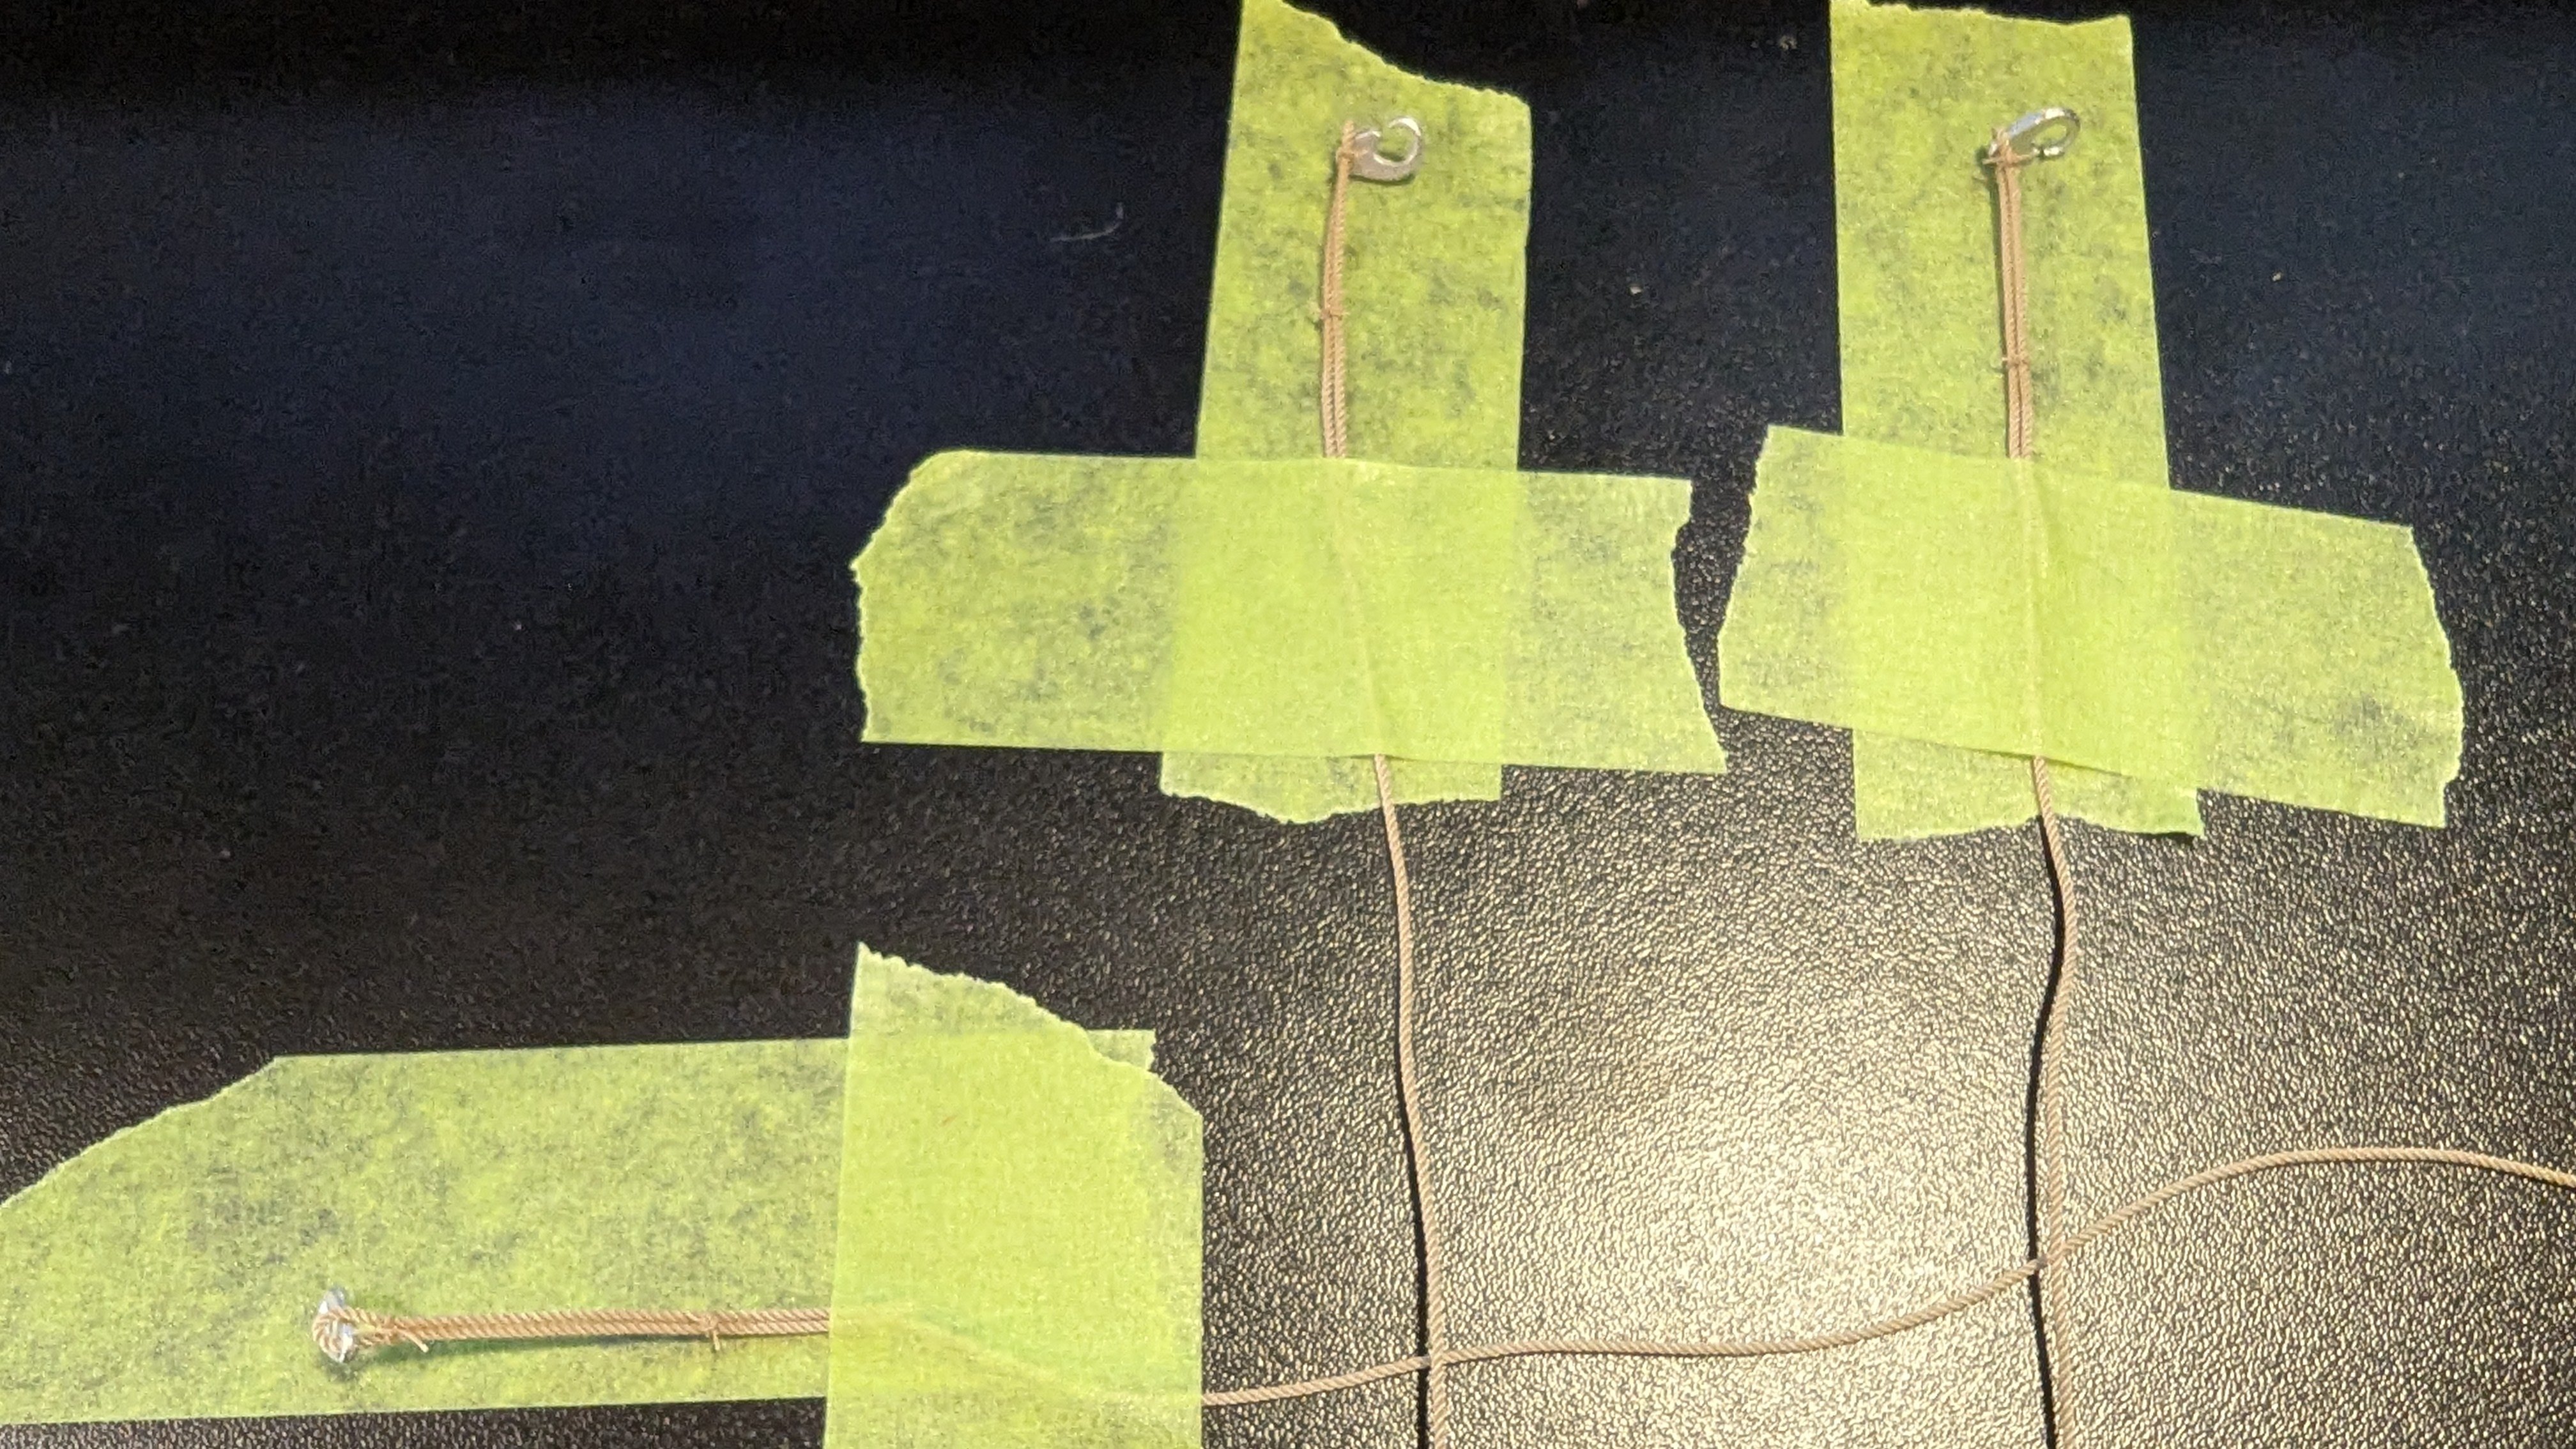
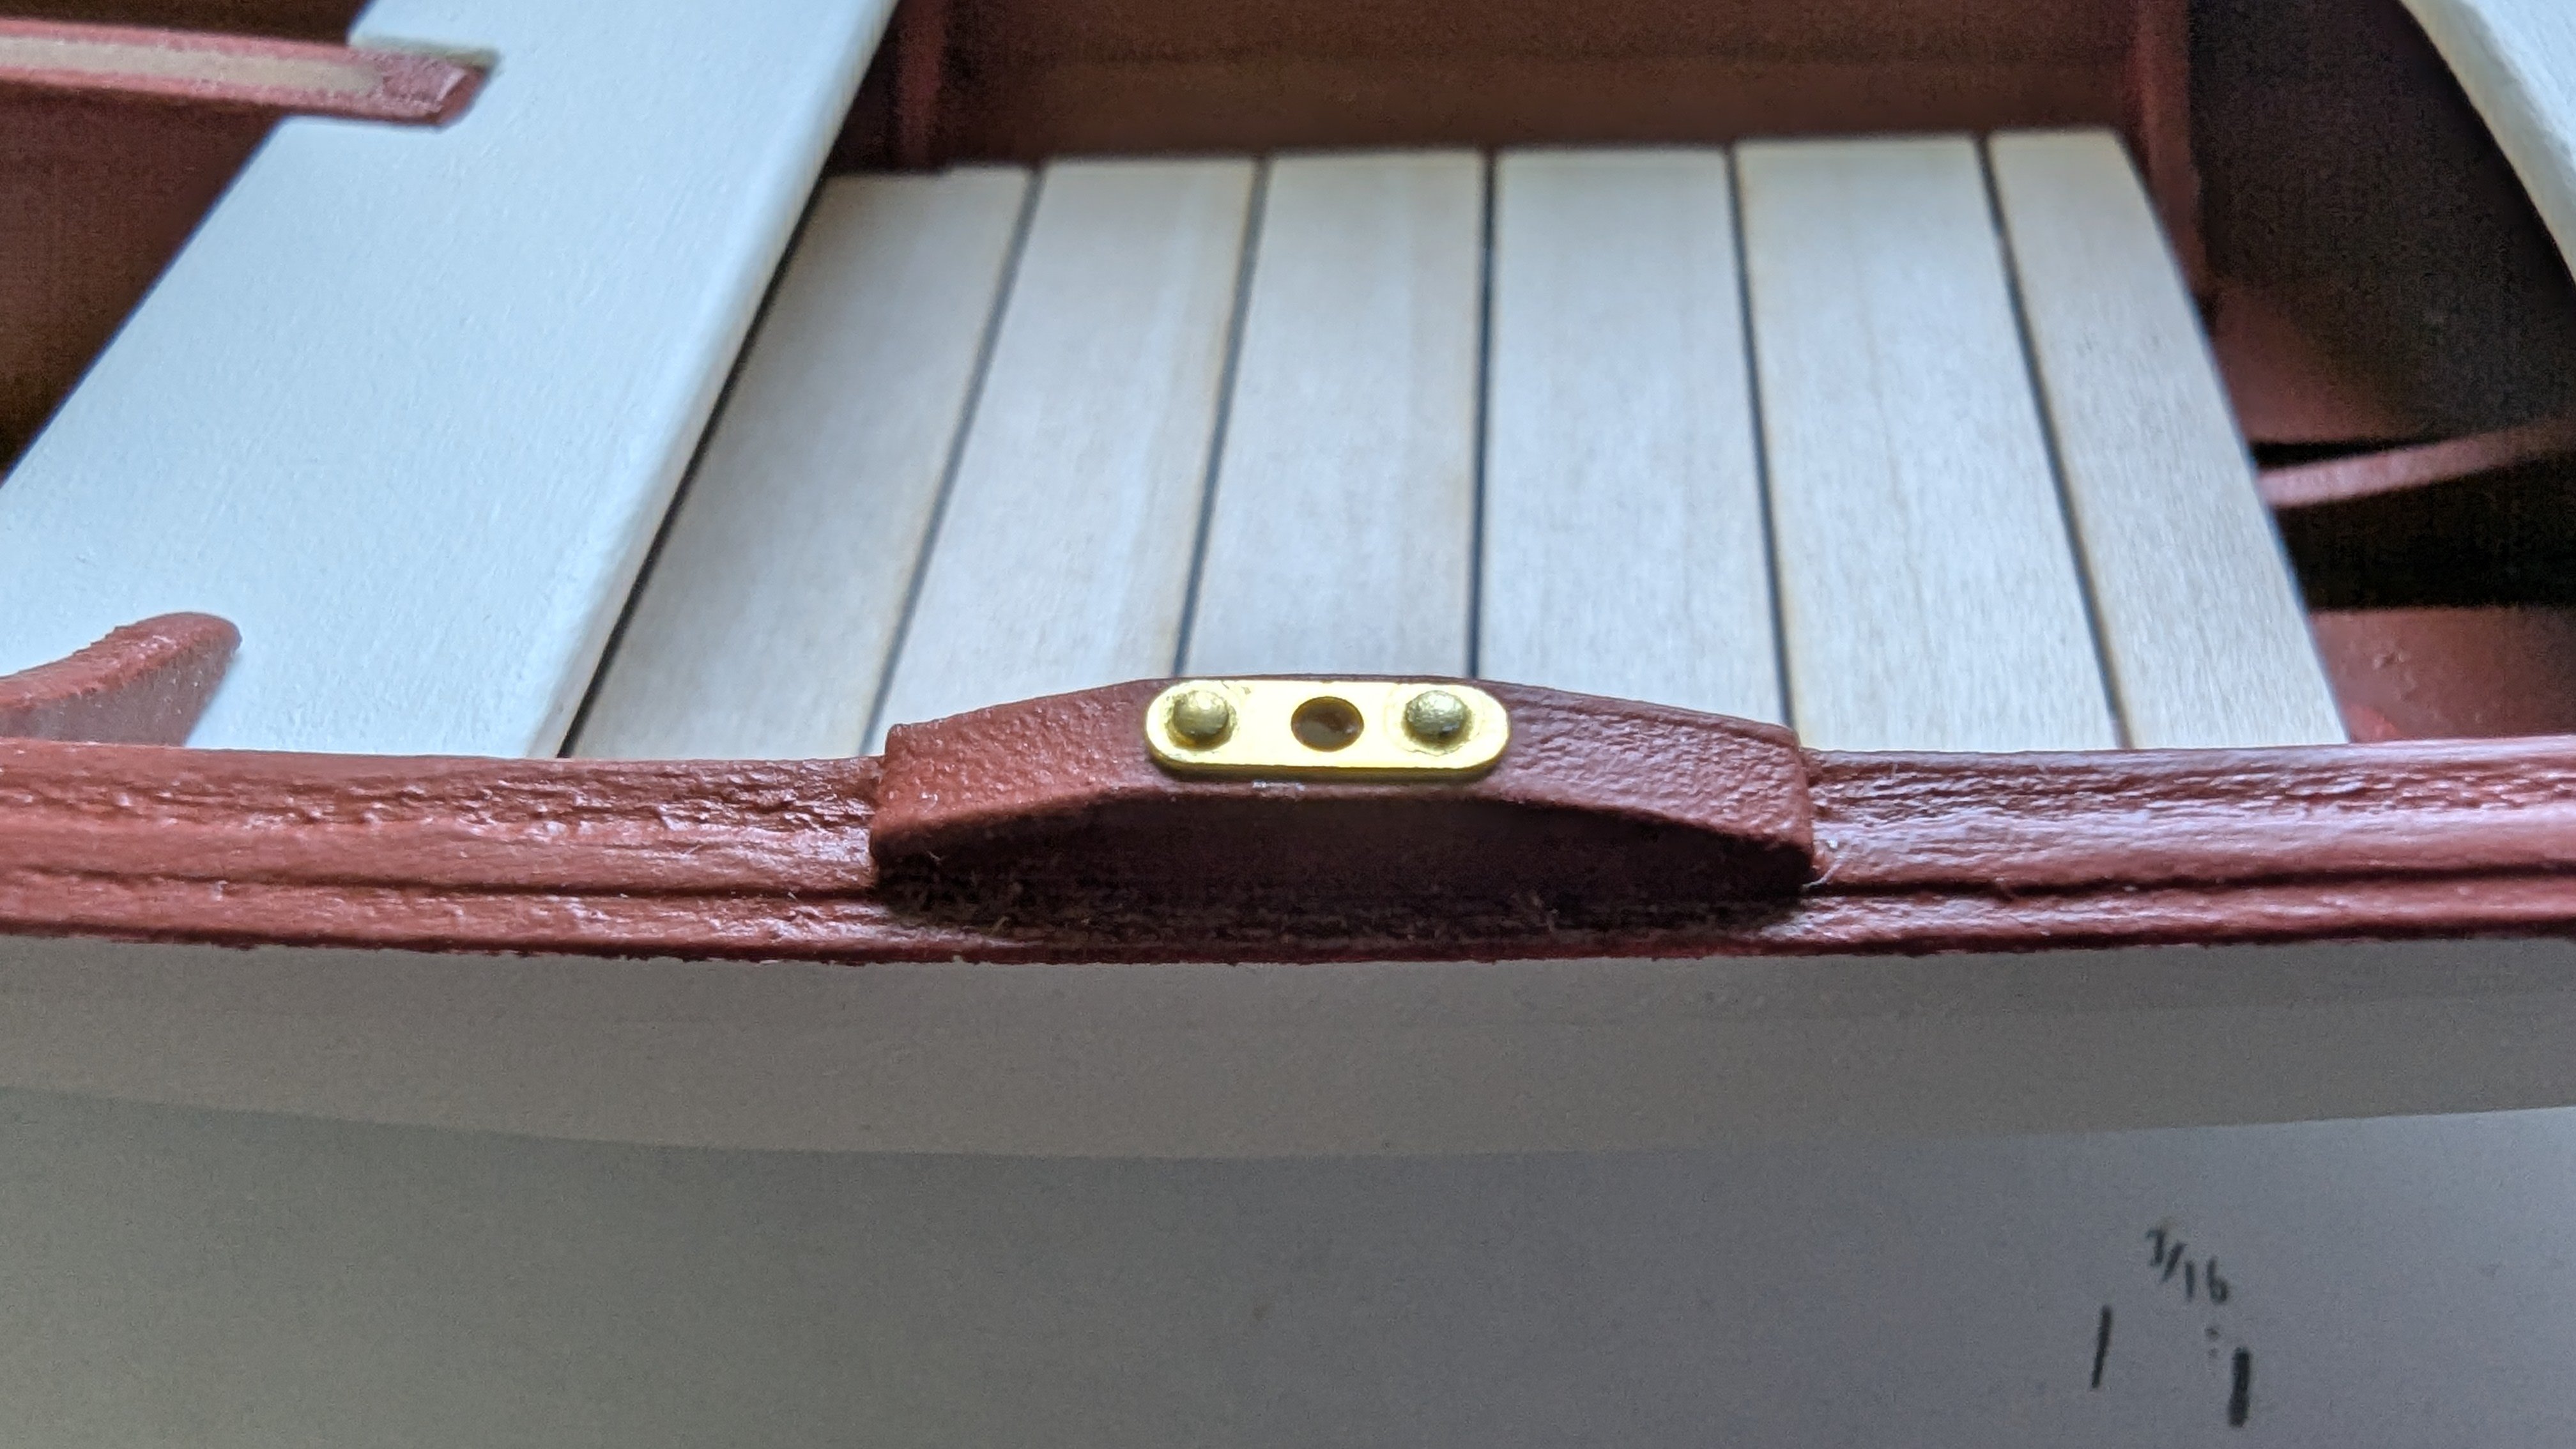
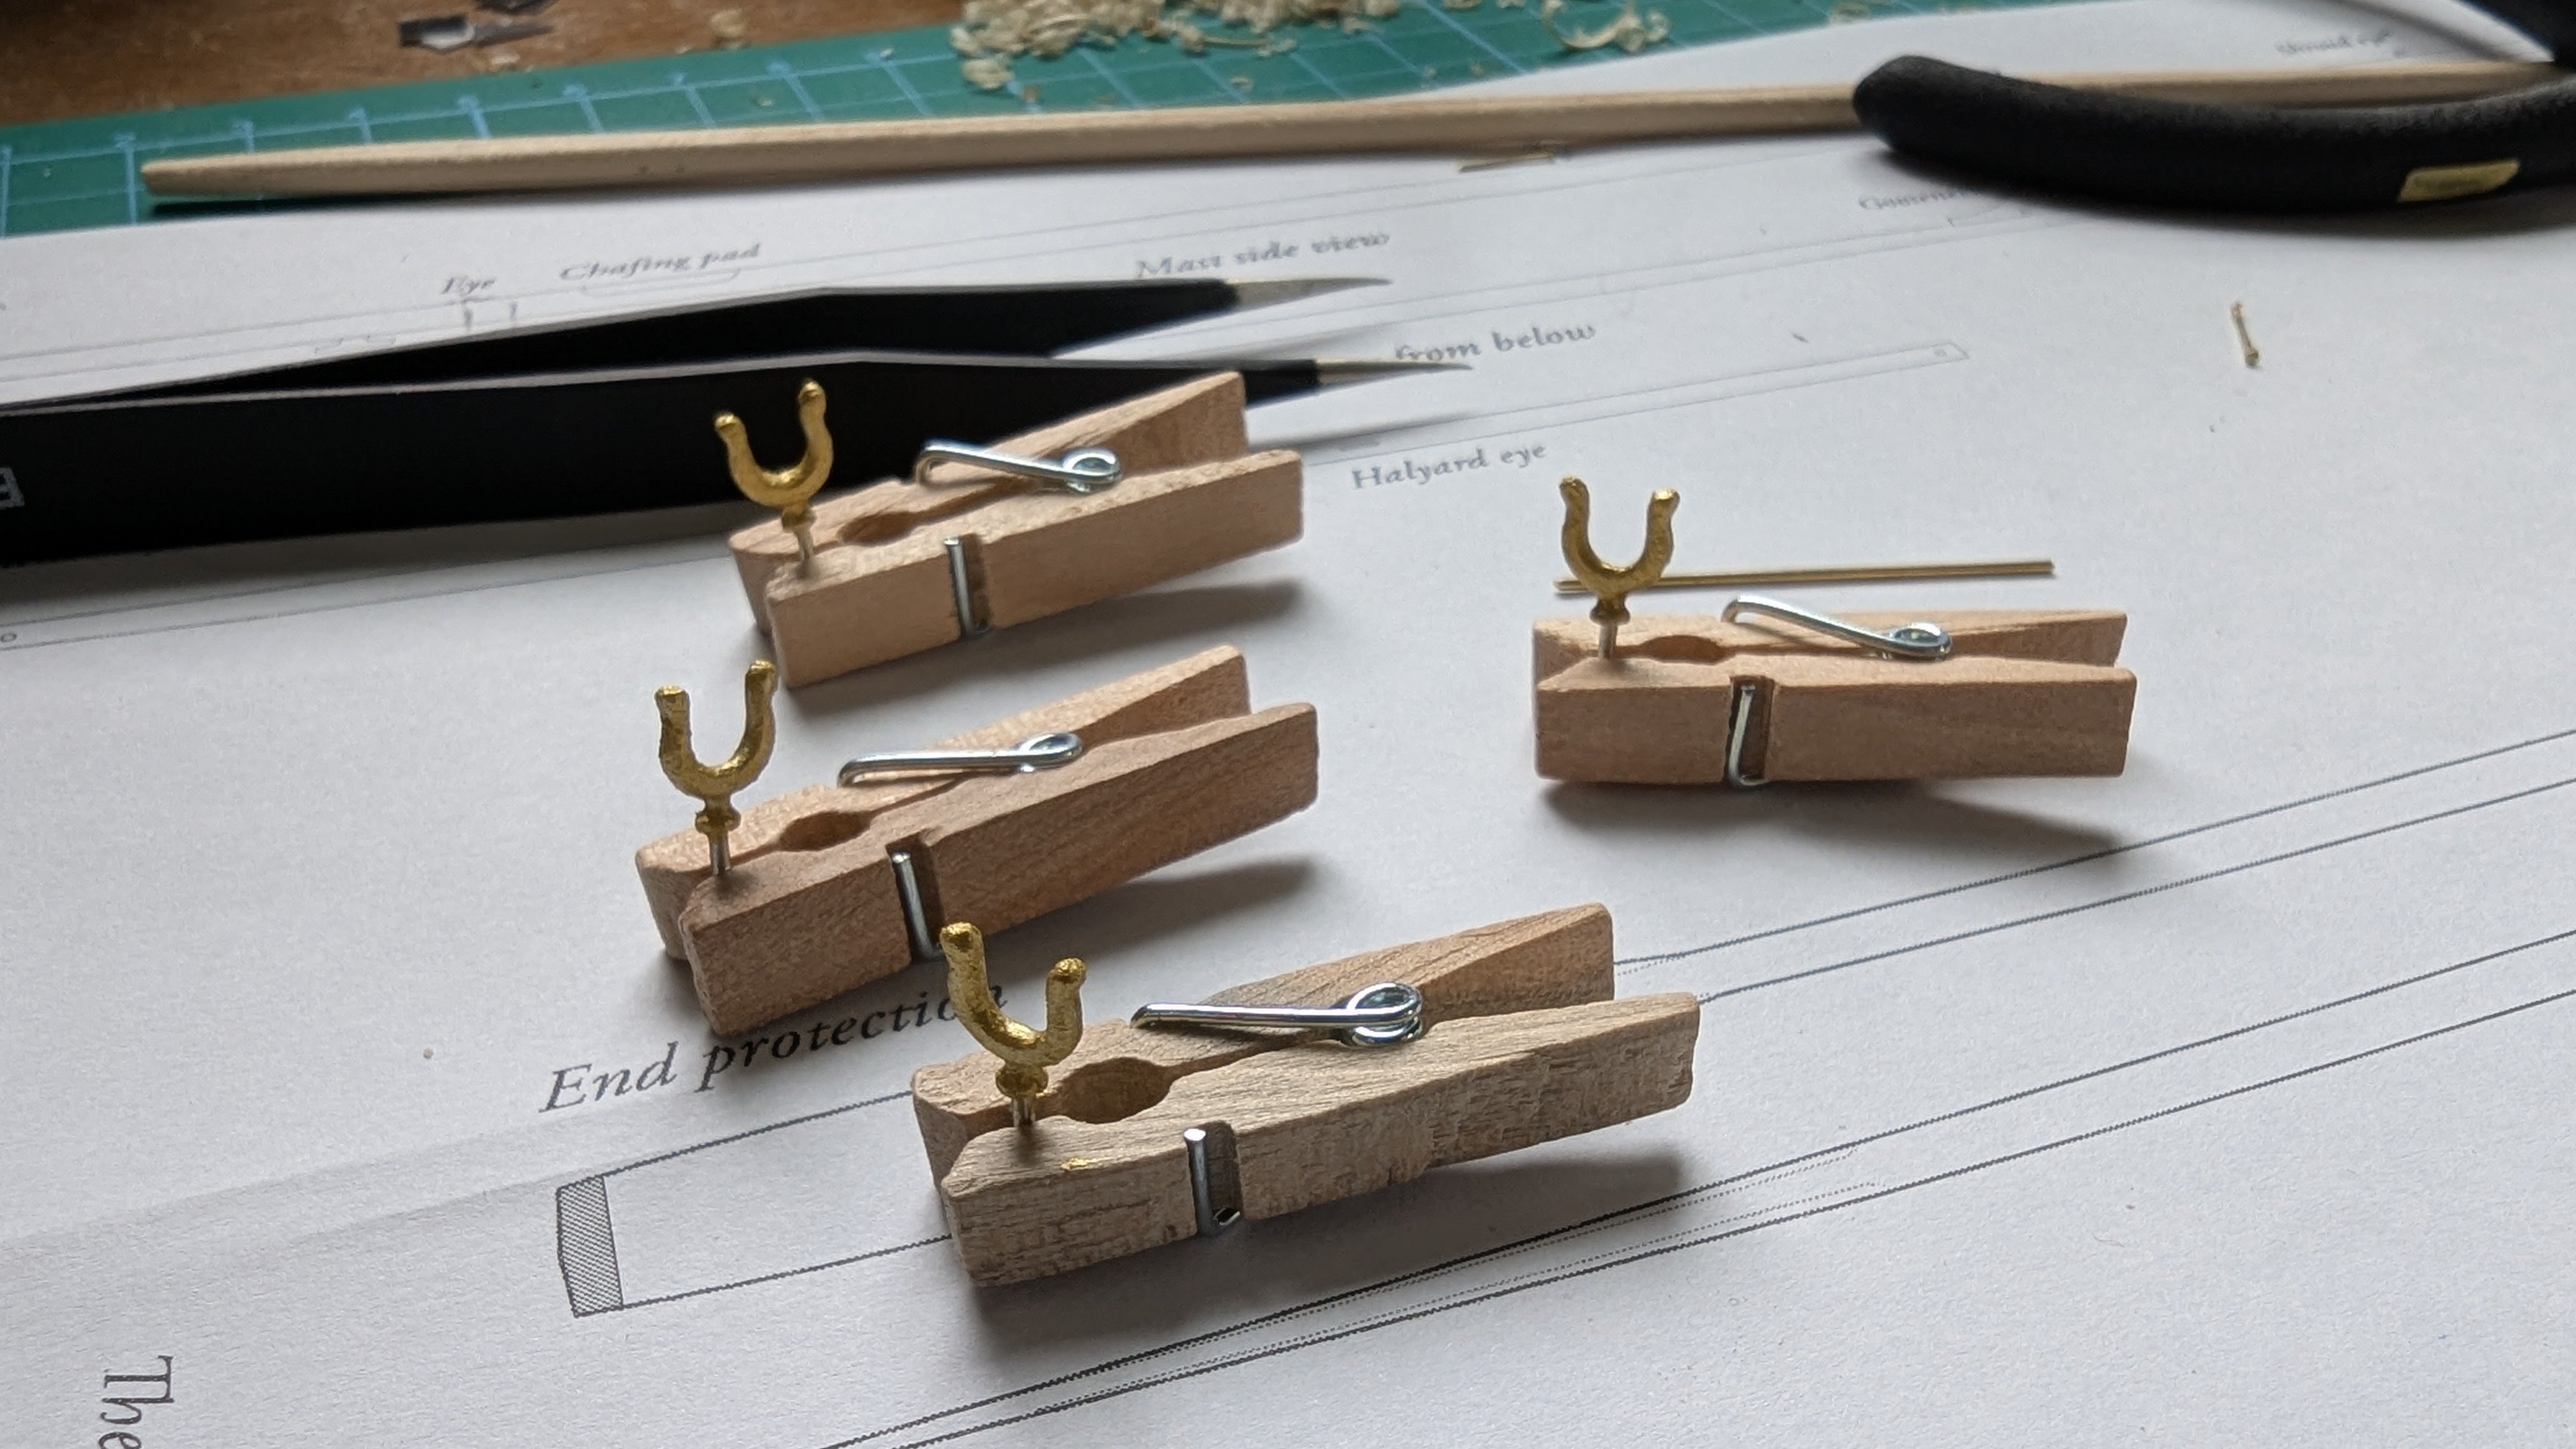
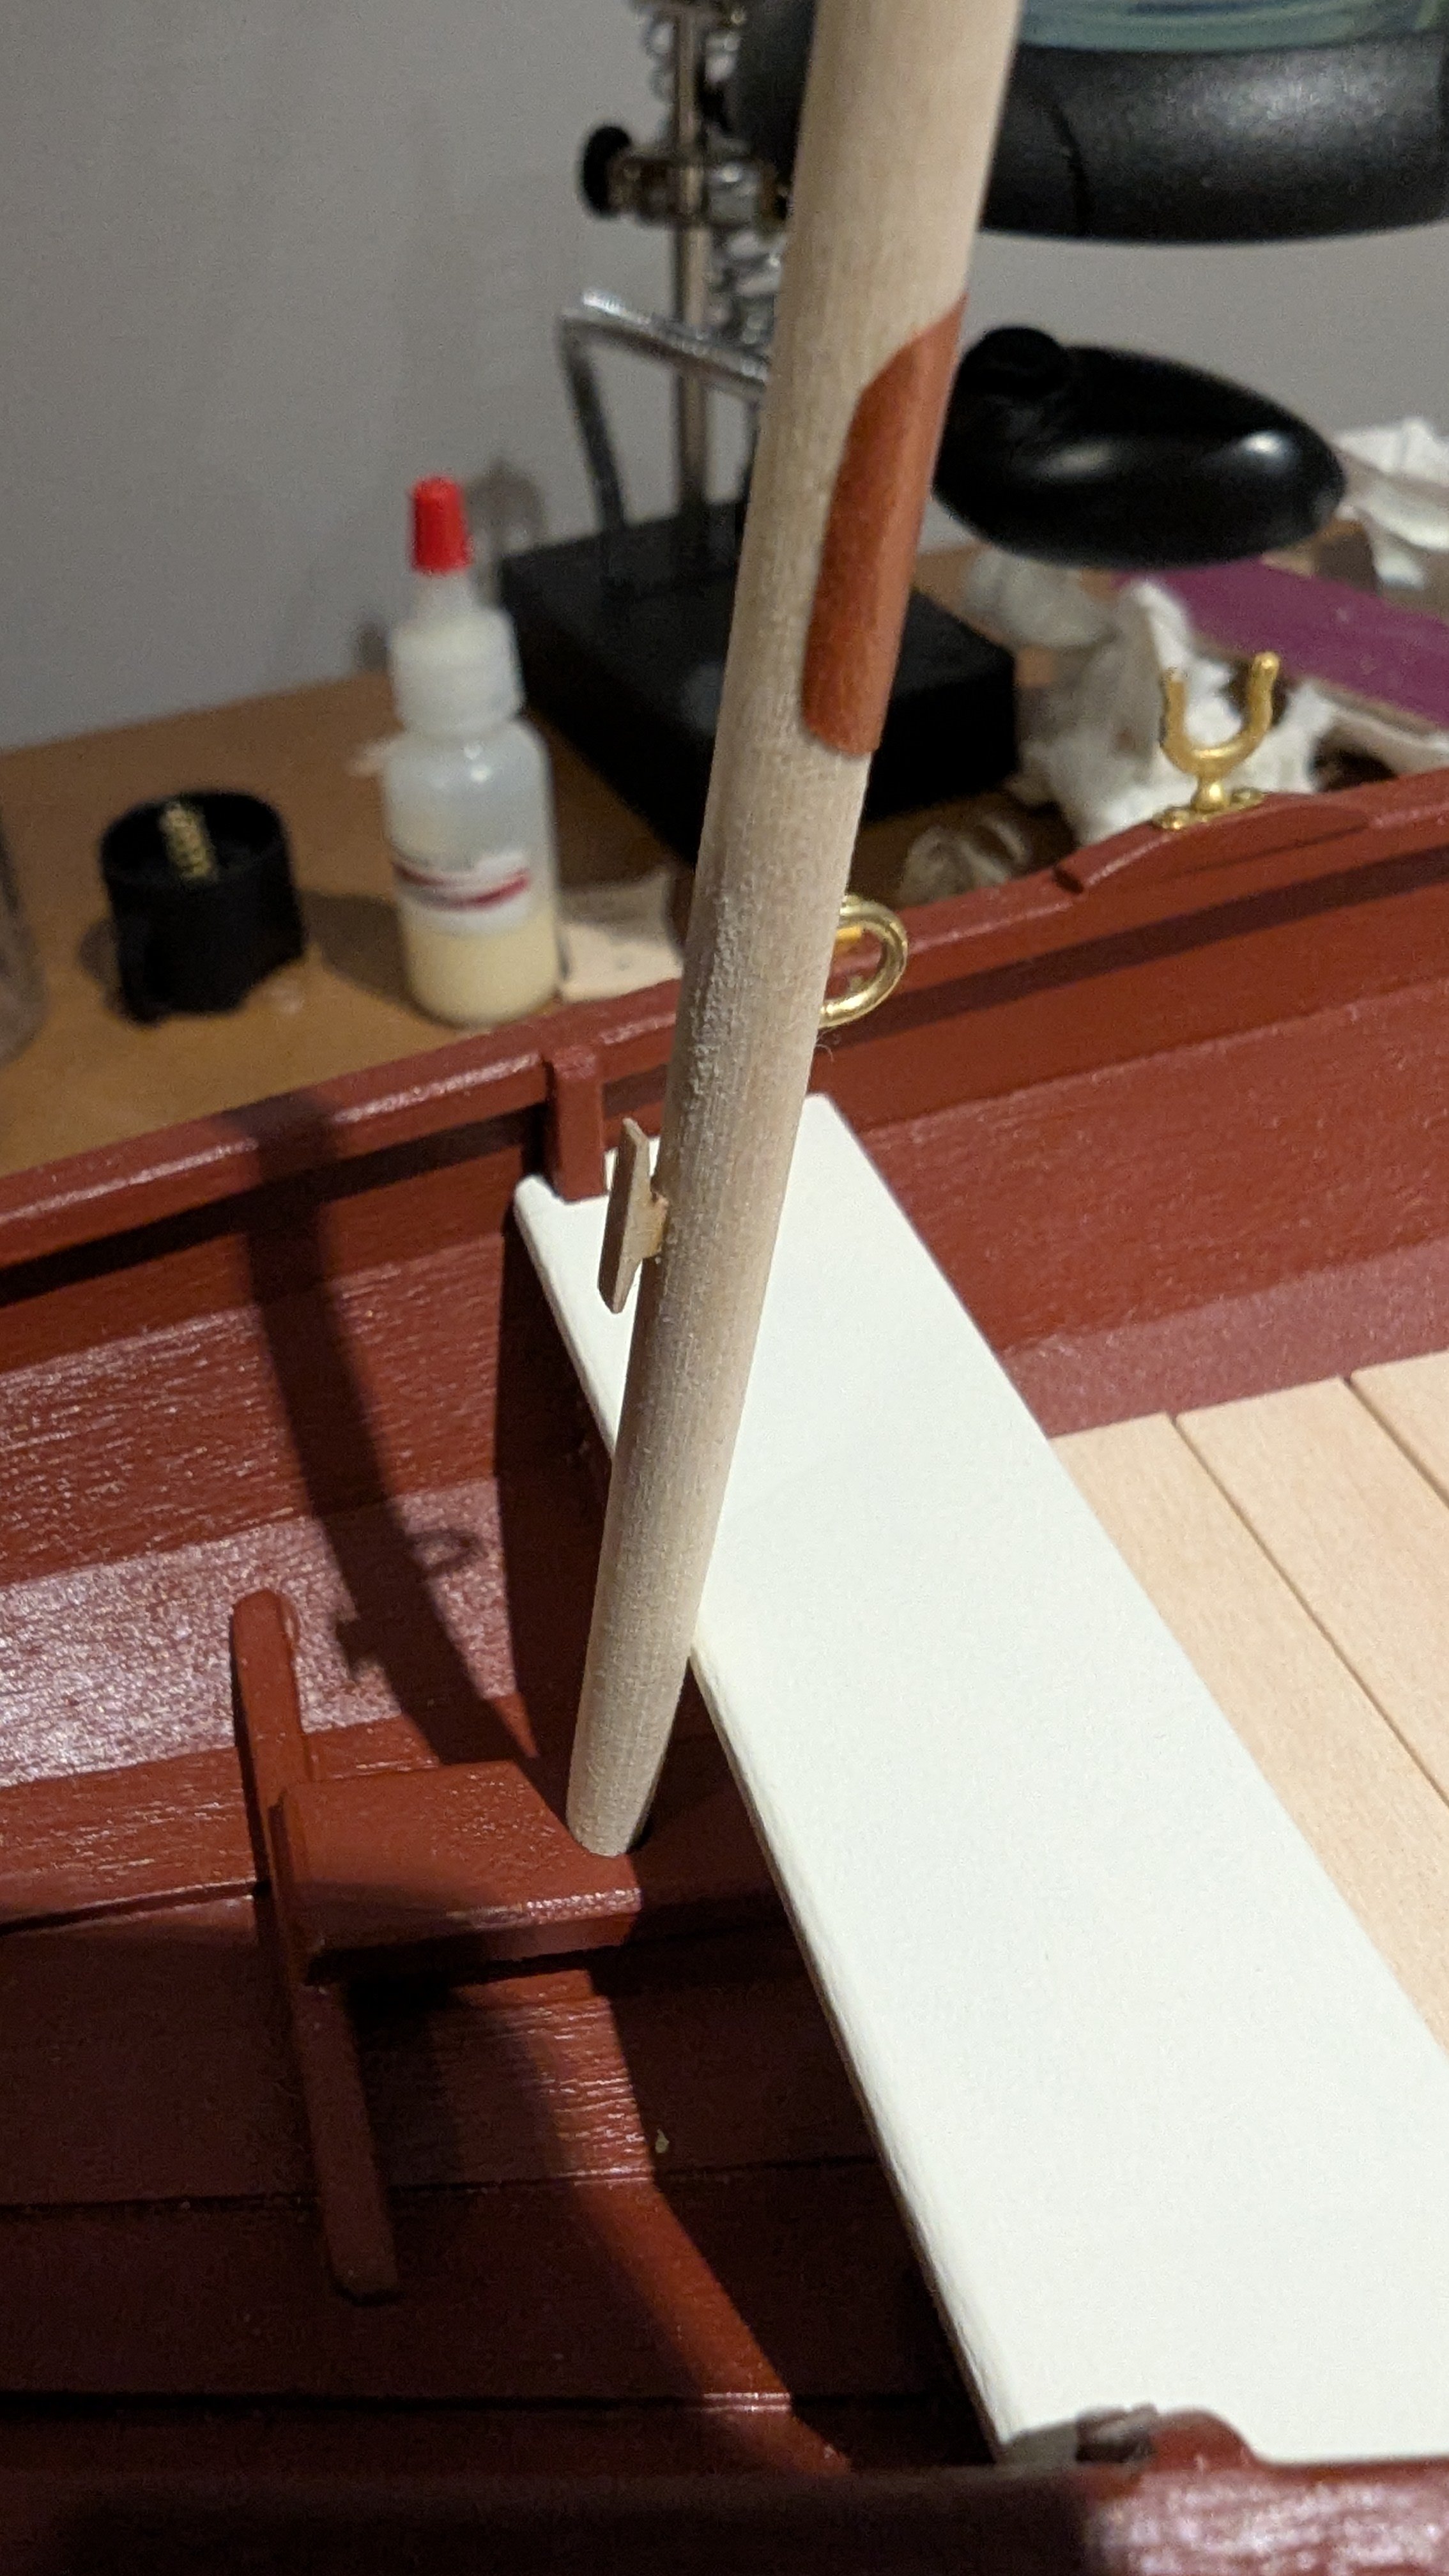
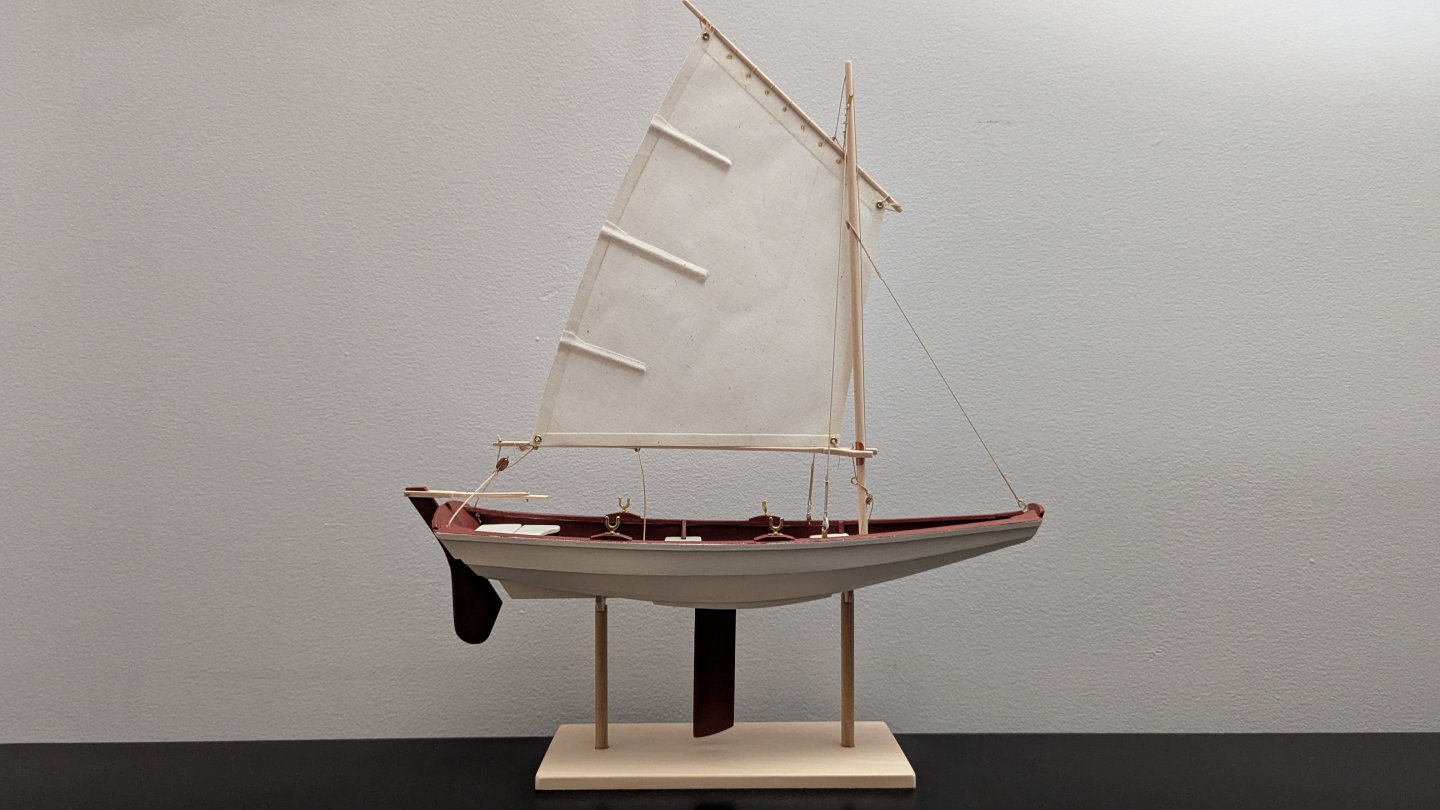
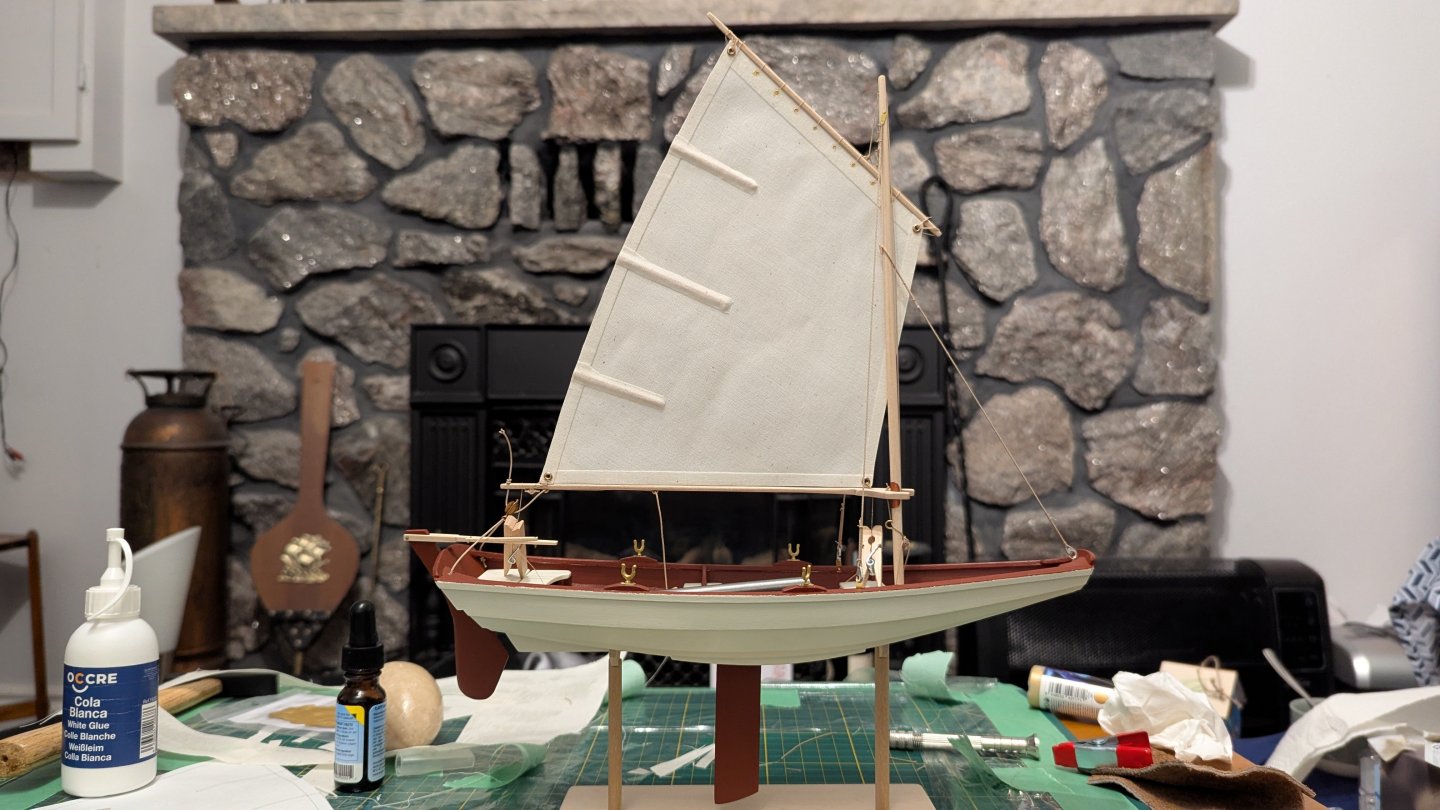
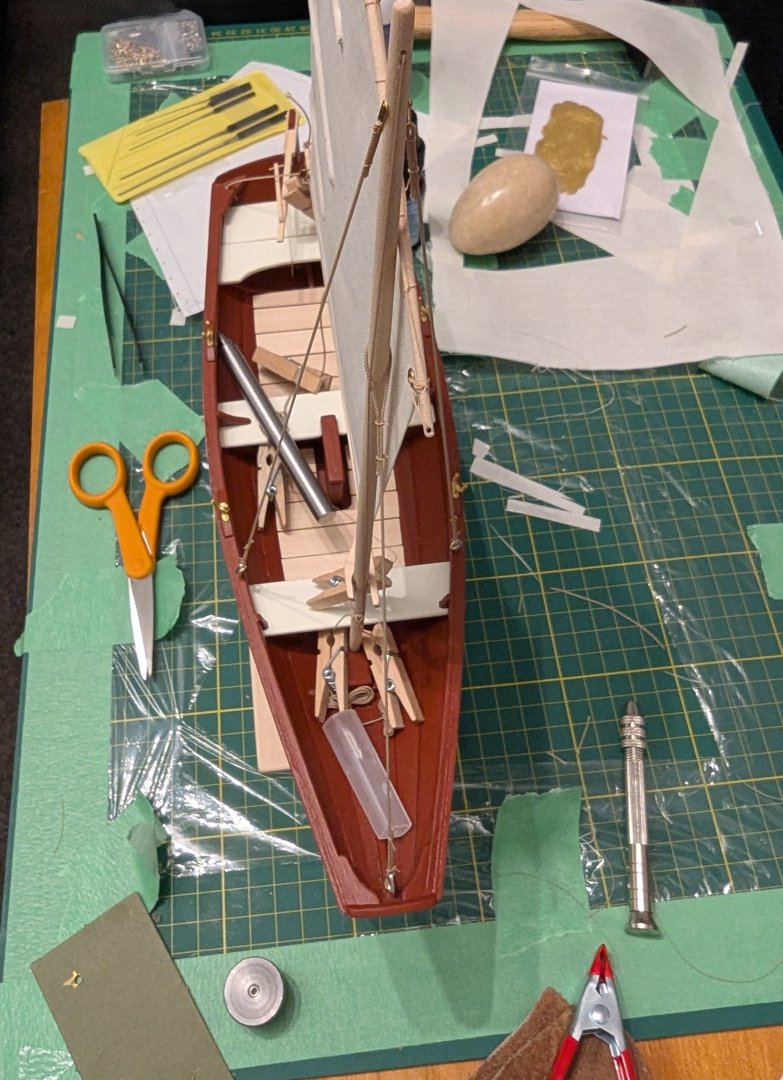
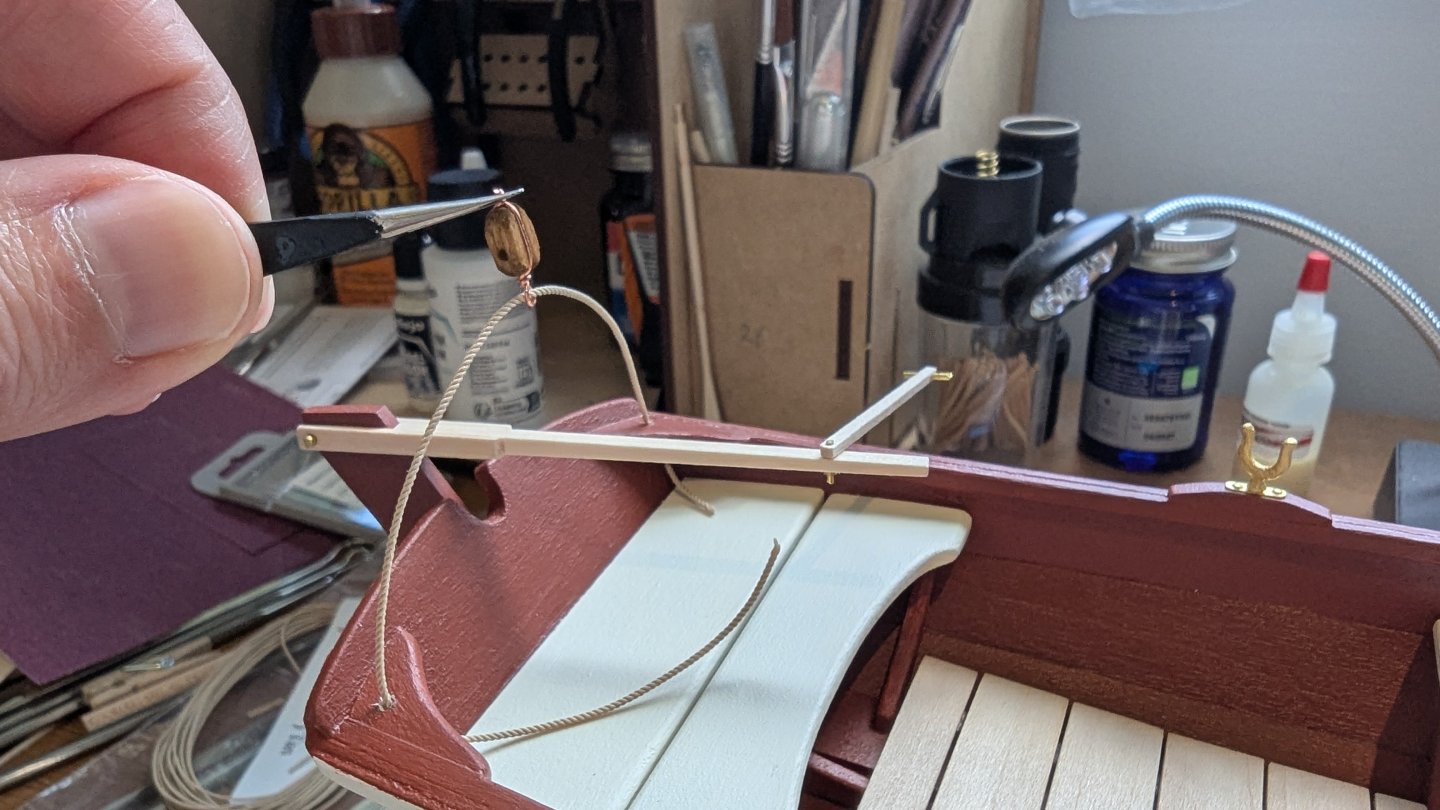
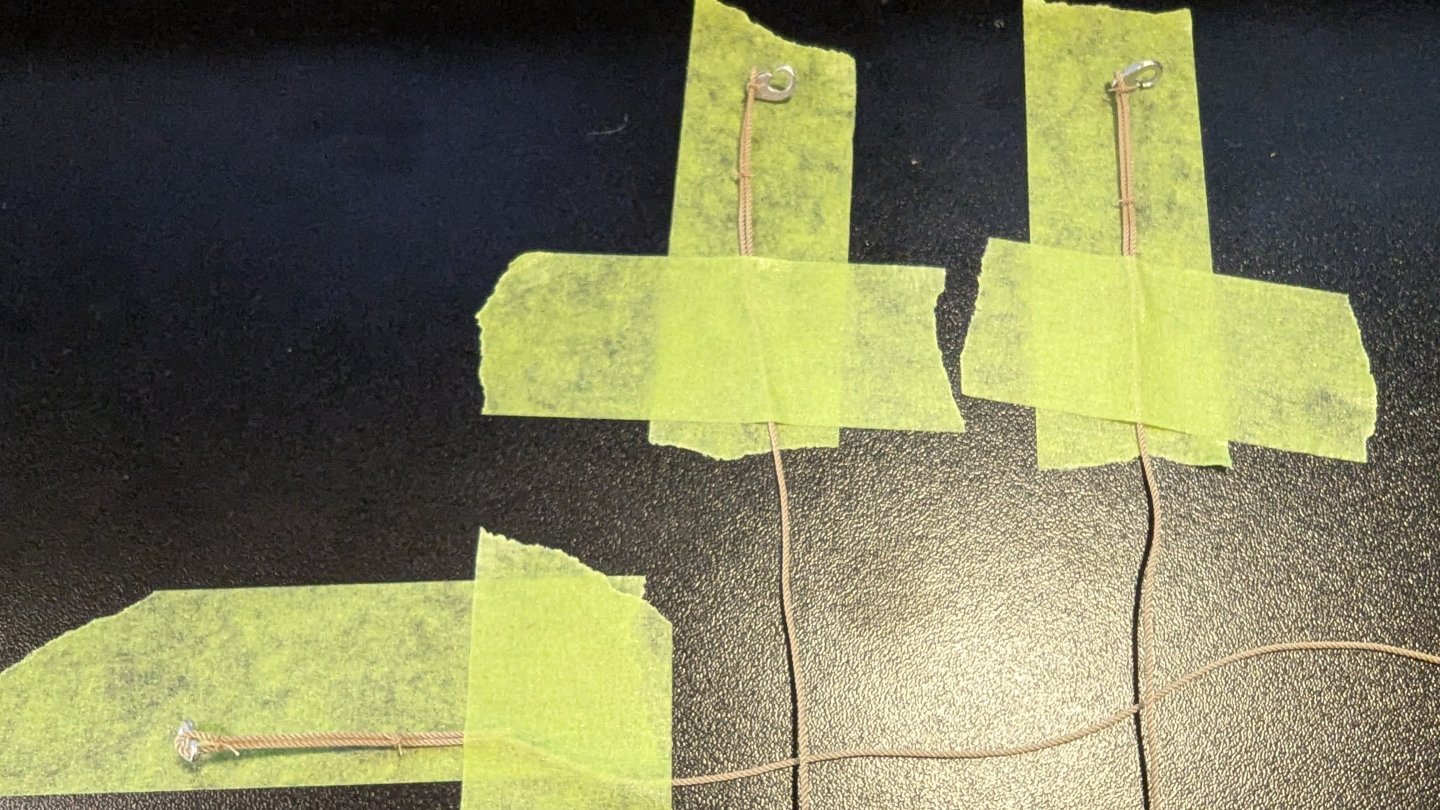
Log #18 - Finished I completed the pram last weekend with a bit of a nerve wracking finish. After I raised the sail, I noticed the aft end of the boom was hanging too low. I experimented a bit to see if I could adjust it enough and briefly considered finishing the mainsheet rigging and making it look as good as possible. But I knew I wouldn’t be perfectly happy with it unless it was improved. The only real solution was to redo the standing rigging, as the mast was leaning slightly aft. The backstays were fairly tight, but the forestay had ended up on the loose side. I decided to remove the sail and carefully cut off and separated the glue from the forestay clip. Once it was free, I pulled the mast forward, clamped the line, re-glued it, and re-tied the knots. It was a success! After that, I coiled up the loose lines and used various clothespins, a knife cap, and a metal punch to weigh down sections of the rigging while the glue dried simulating the natural weight and tension of working lines. Letting the glue dry after attaching the back stays Thinking the standing rigging was done And after pulling apart and reattaching the forestay I'll post a few more completed pics in a moment.


- 86 replies
-
- 7
-
-
-
- Model Shipways
- Norwegian Sailing Pram
- (and 3 more)
-
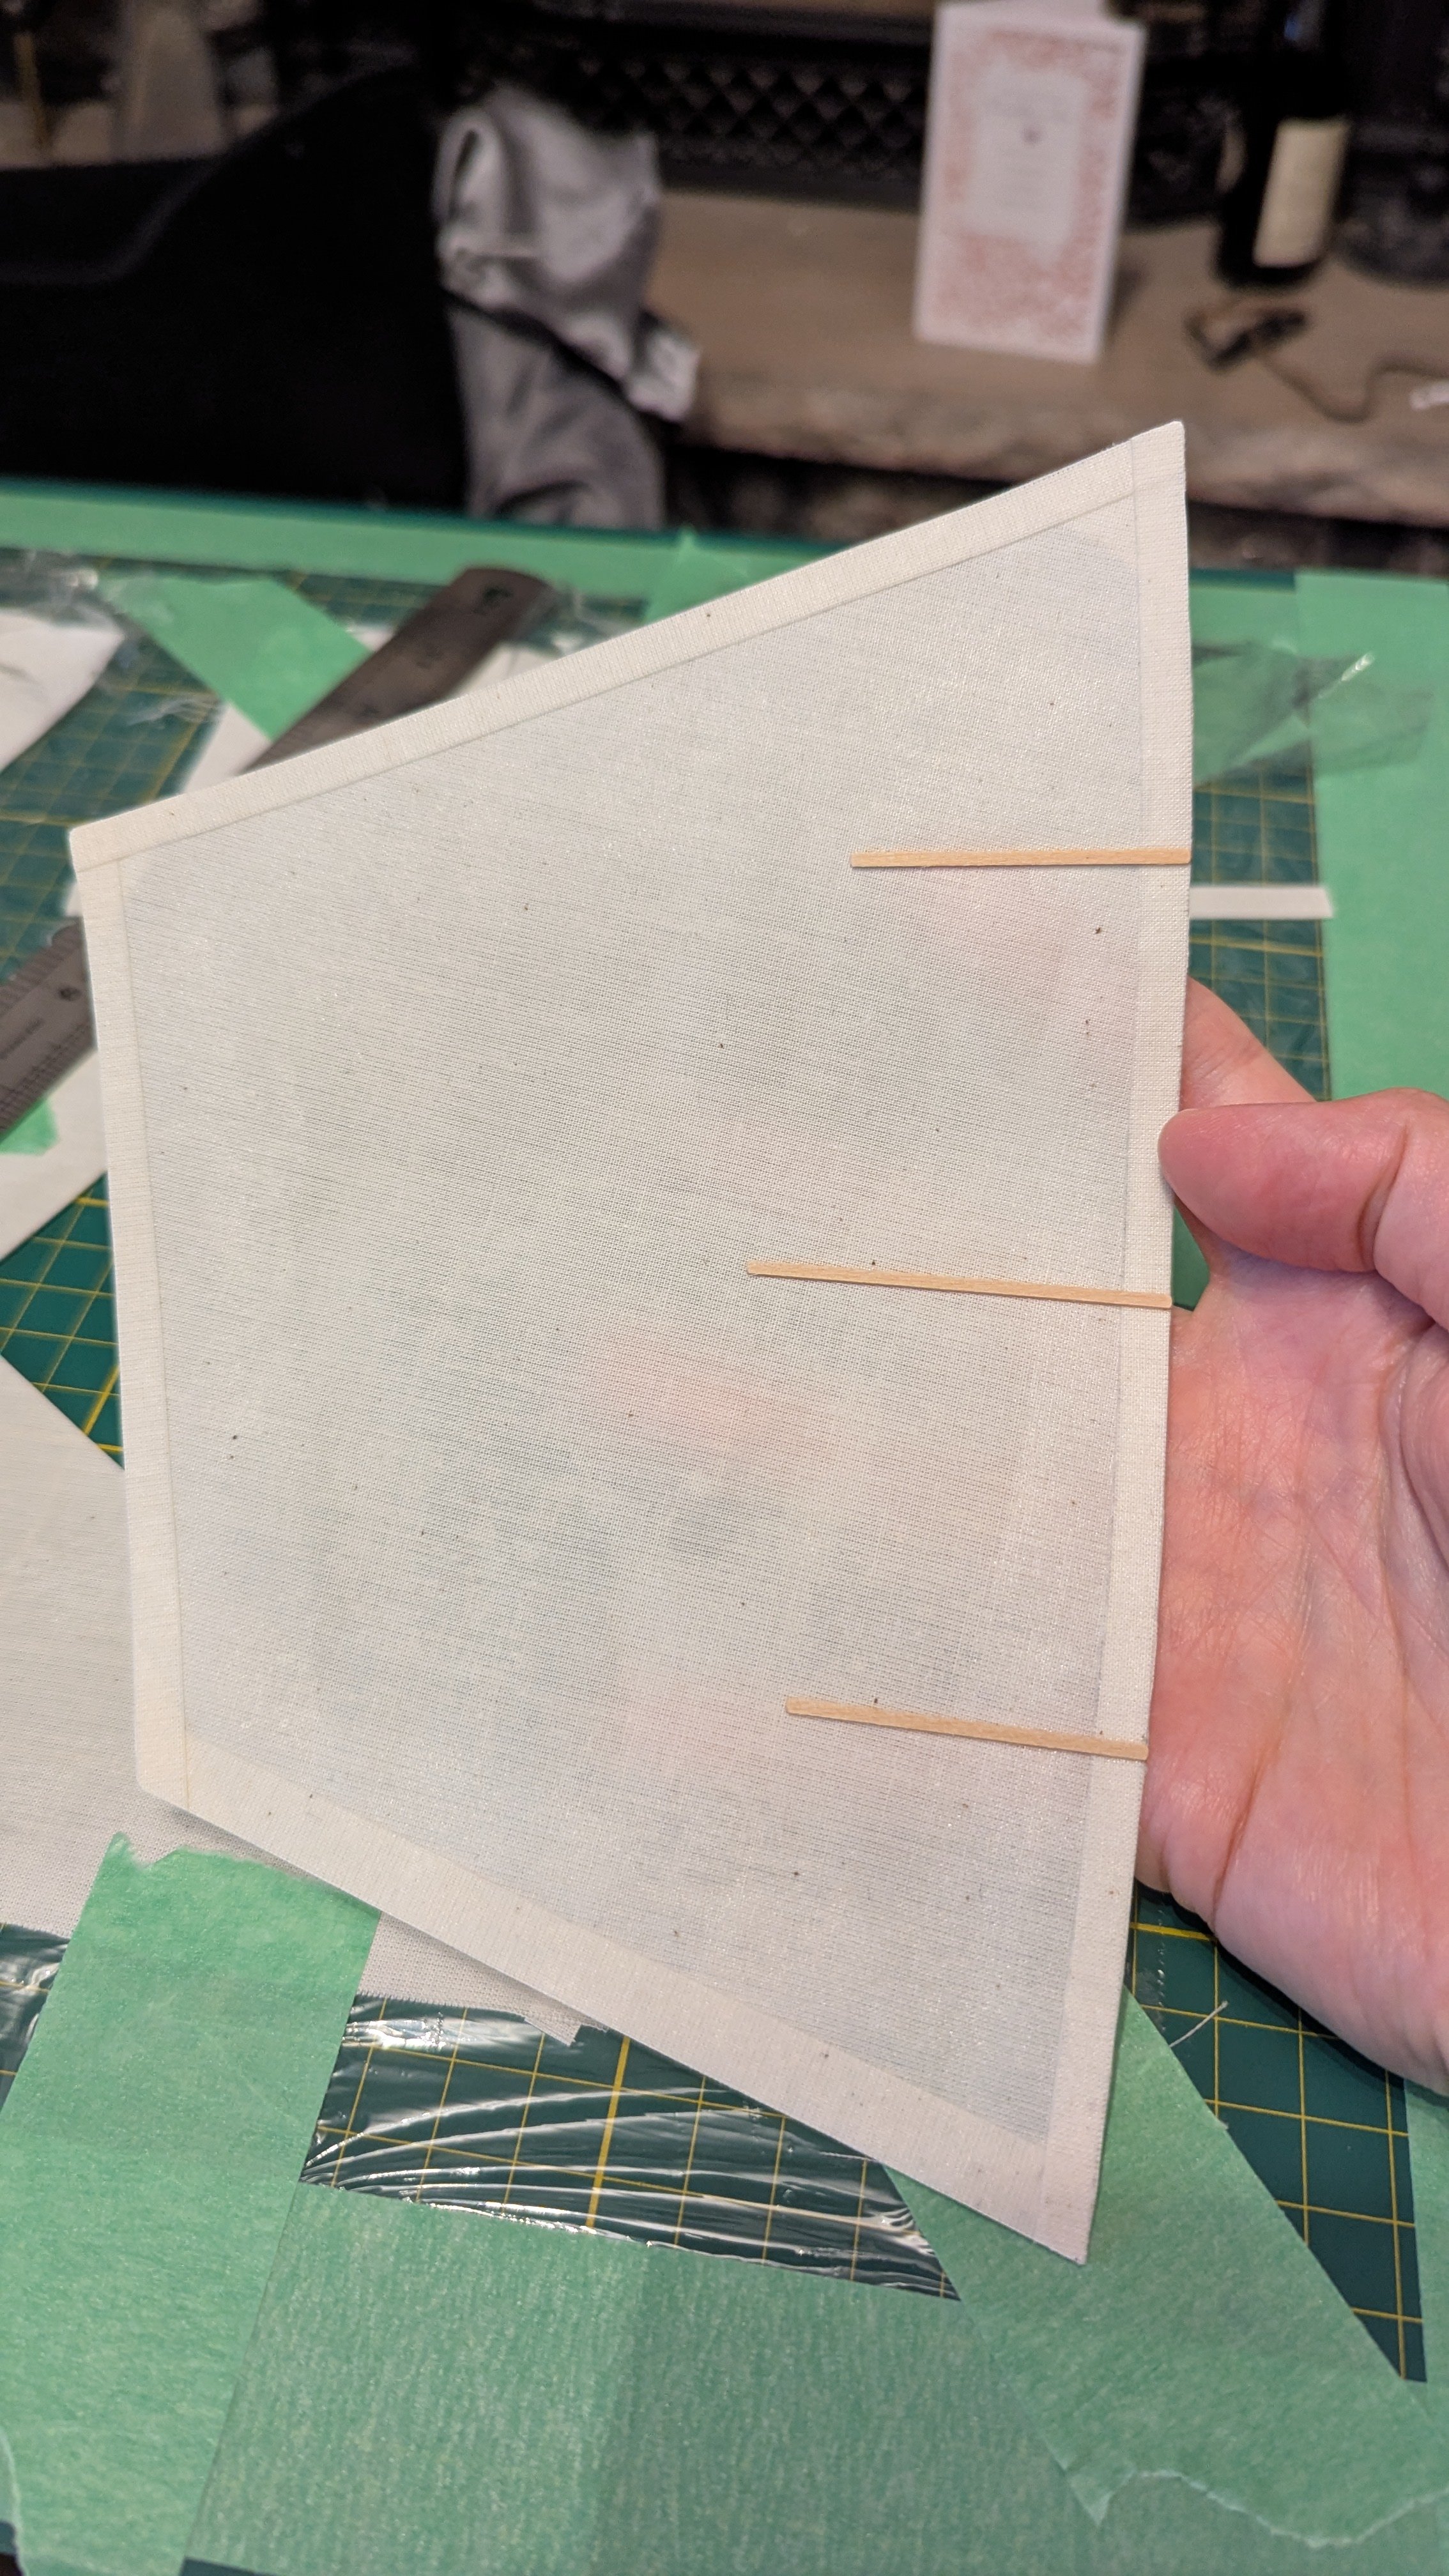
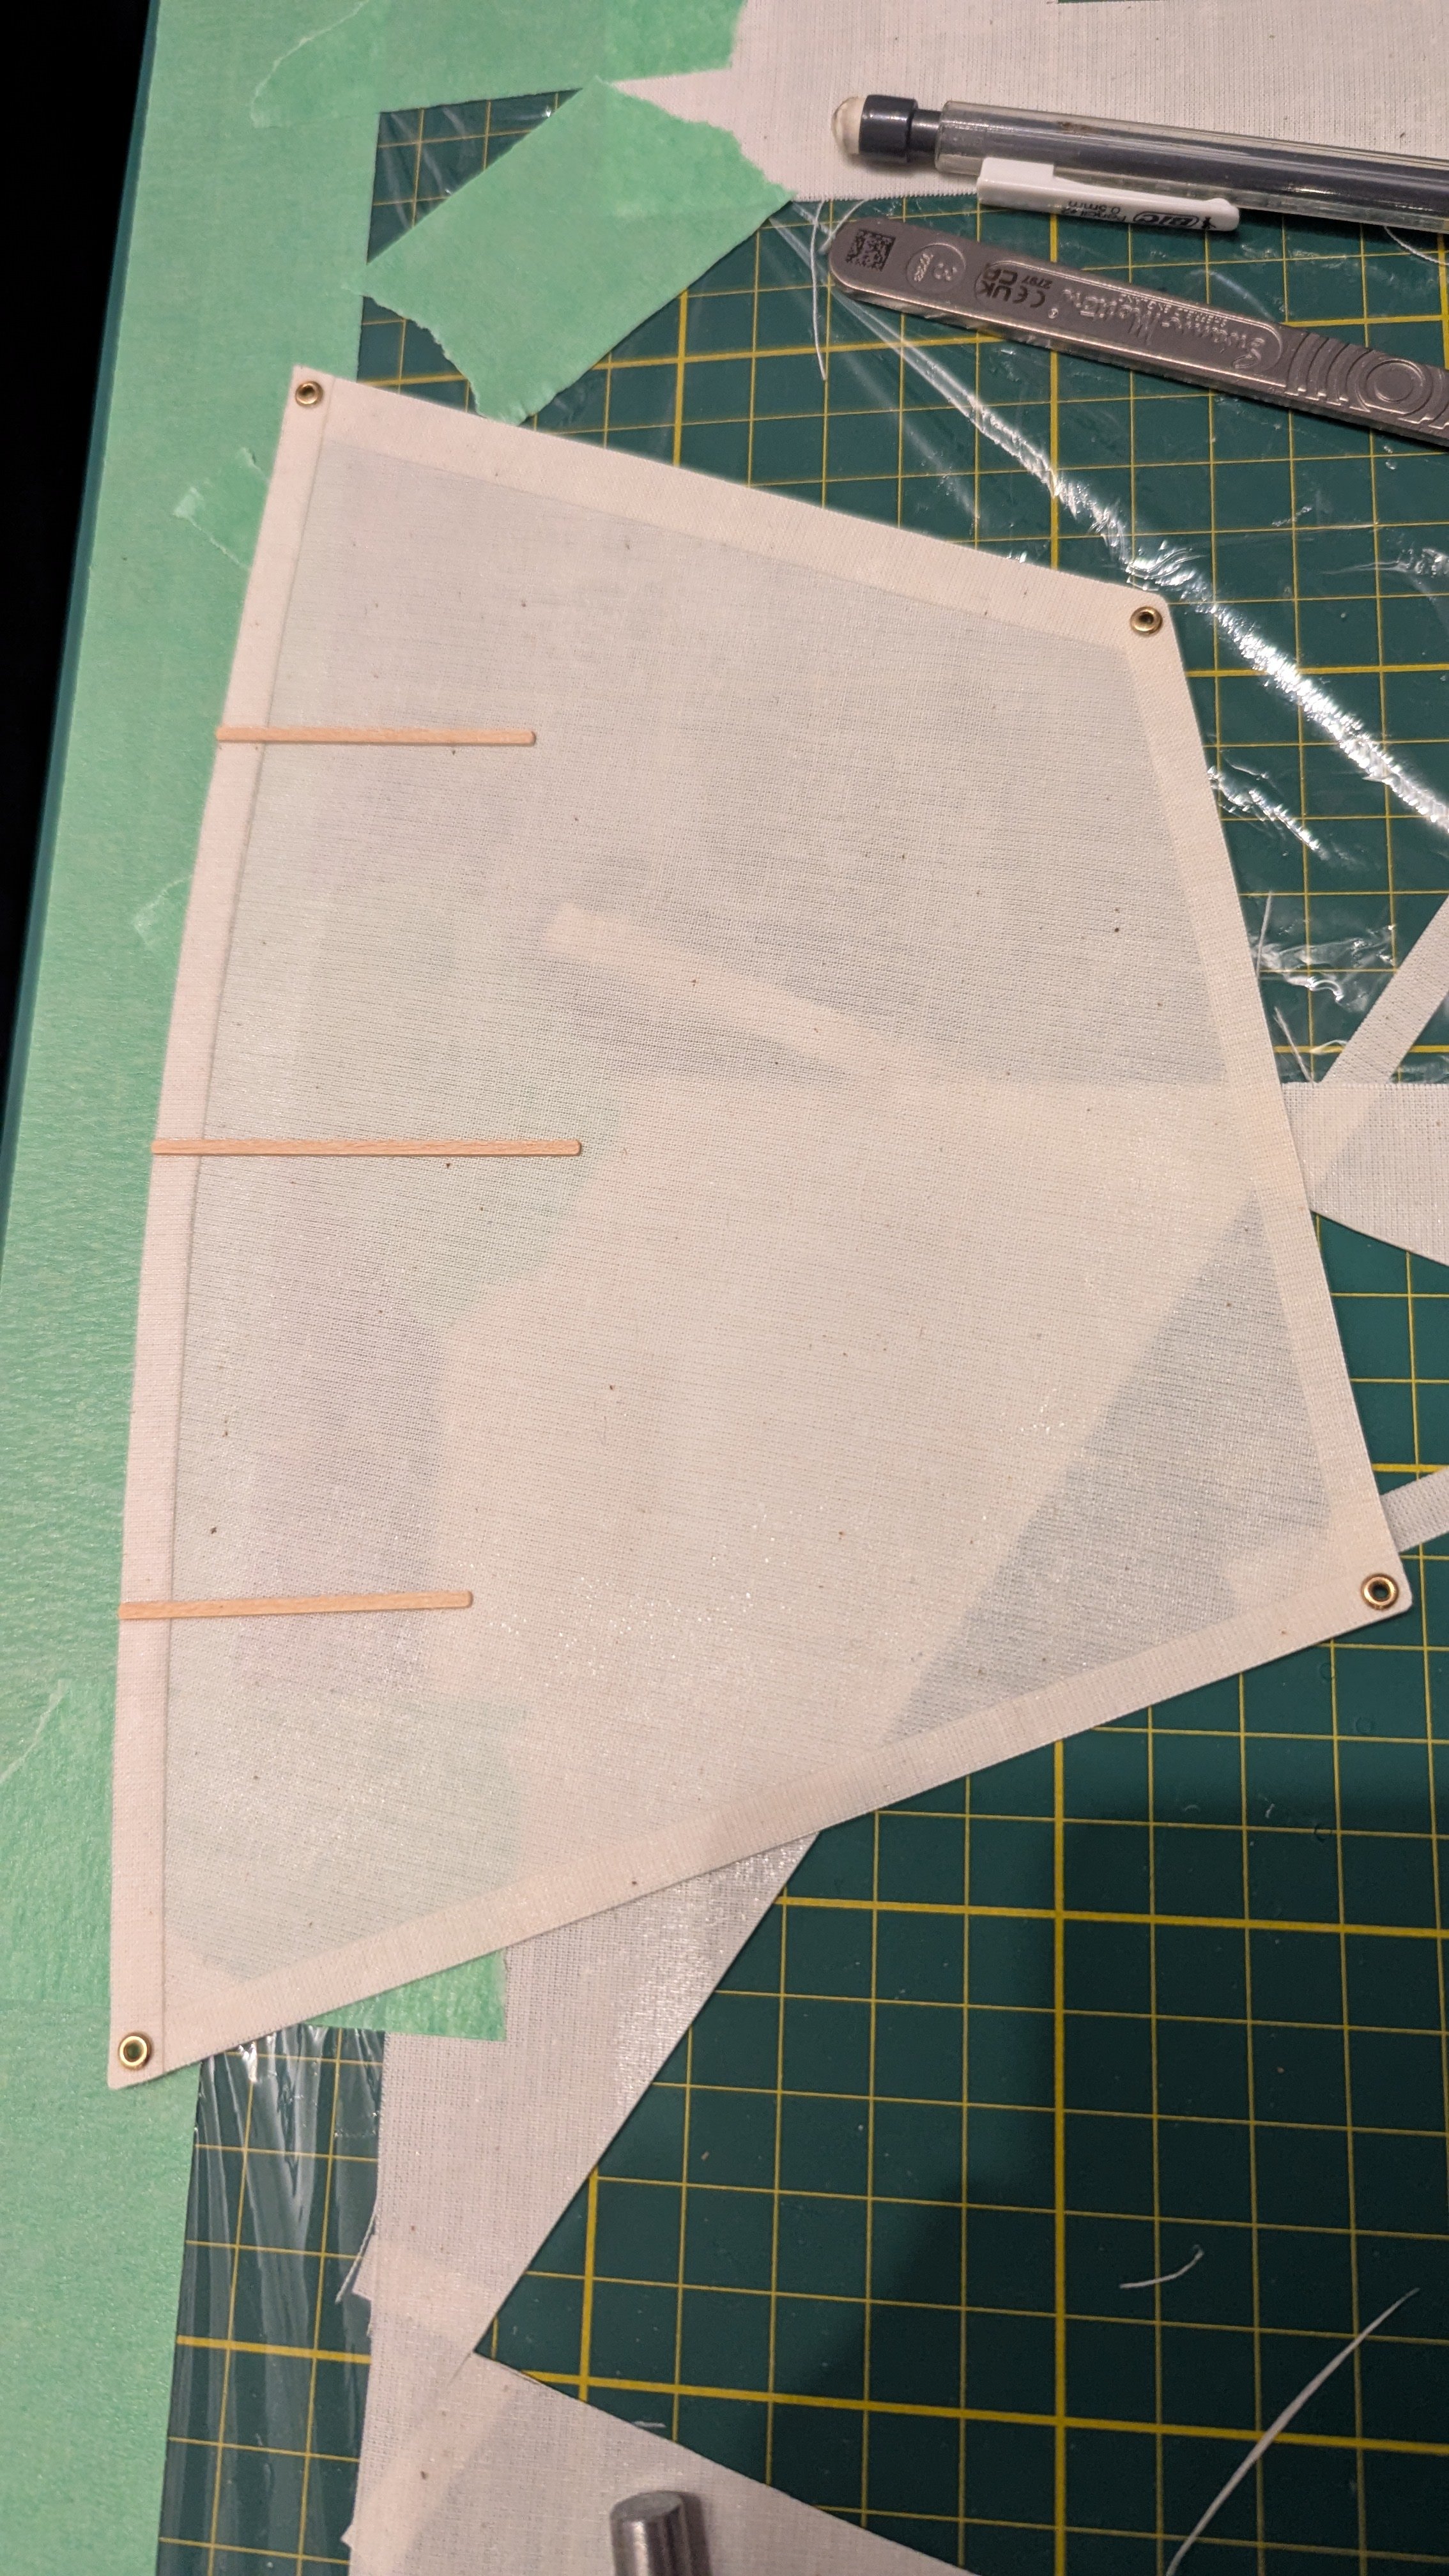
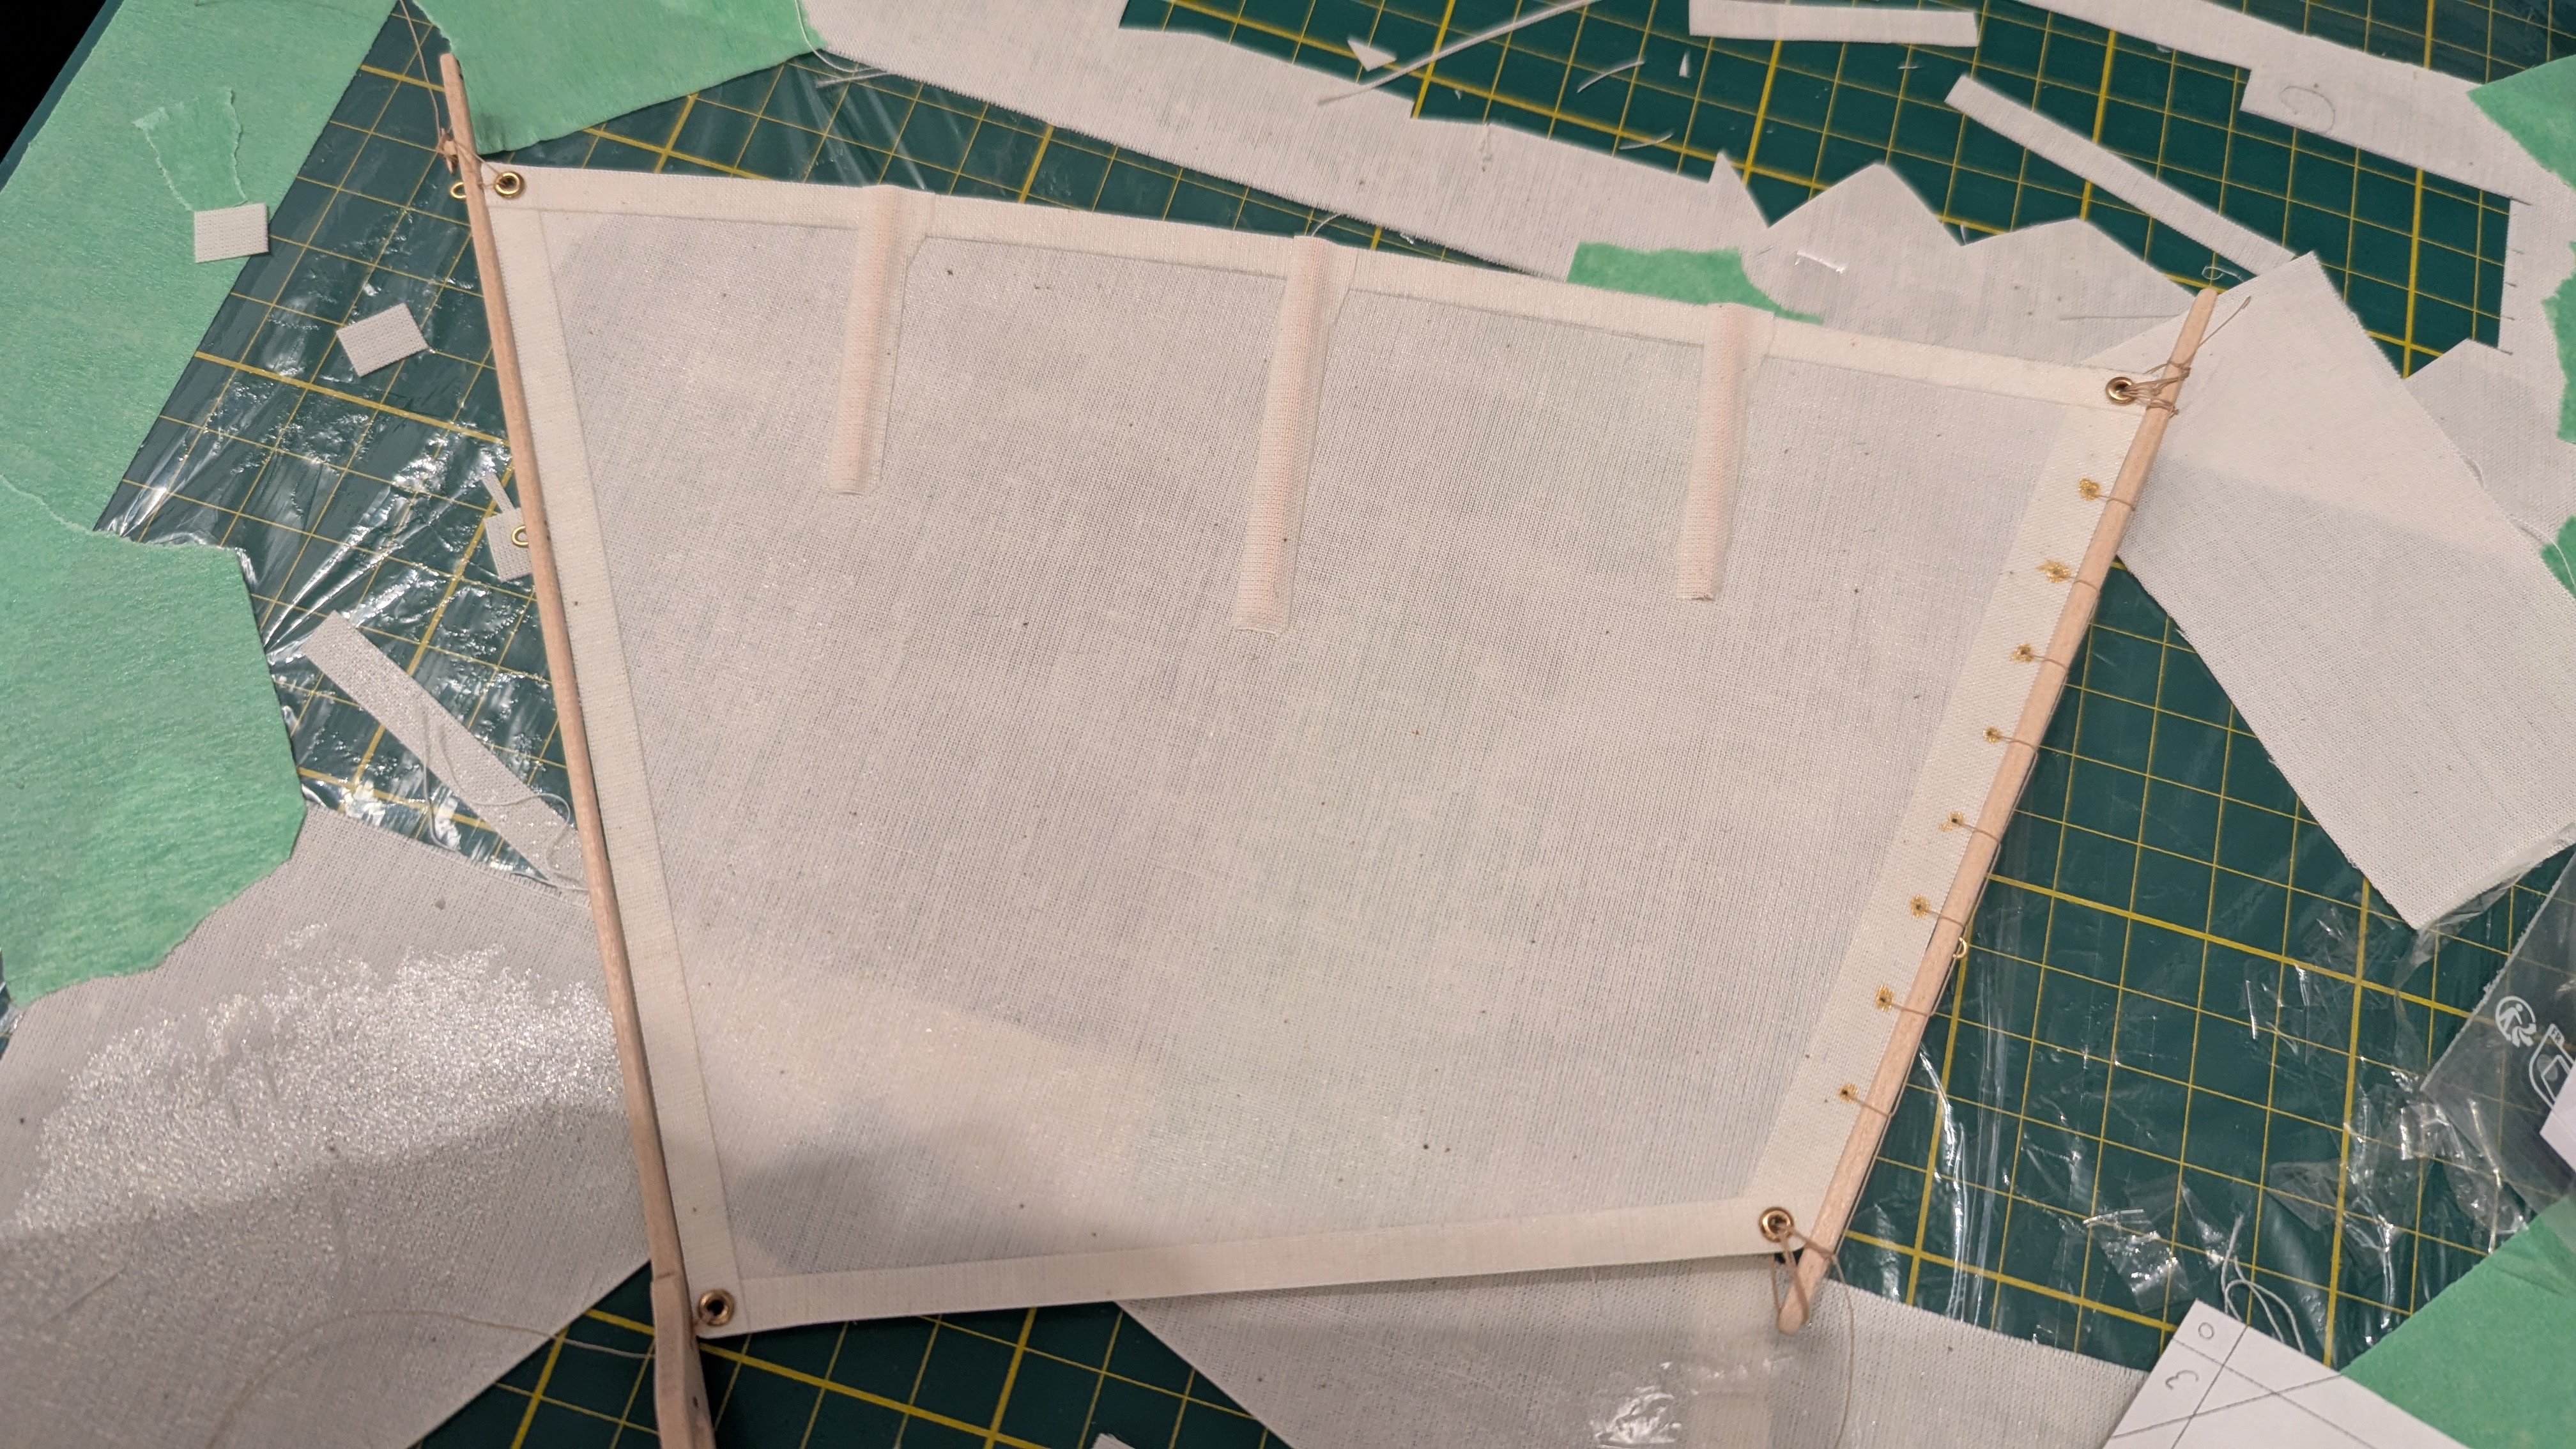
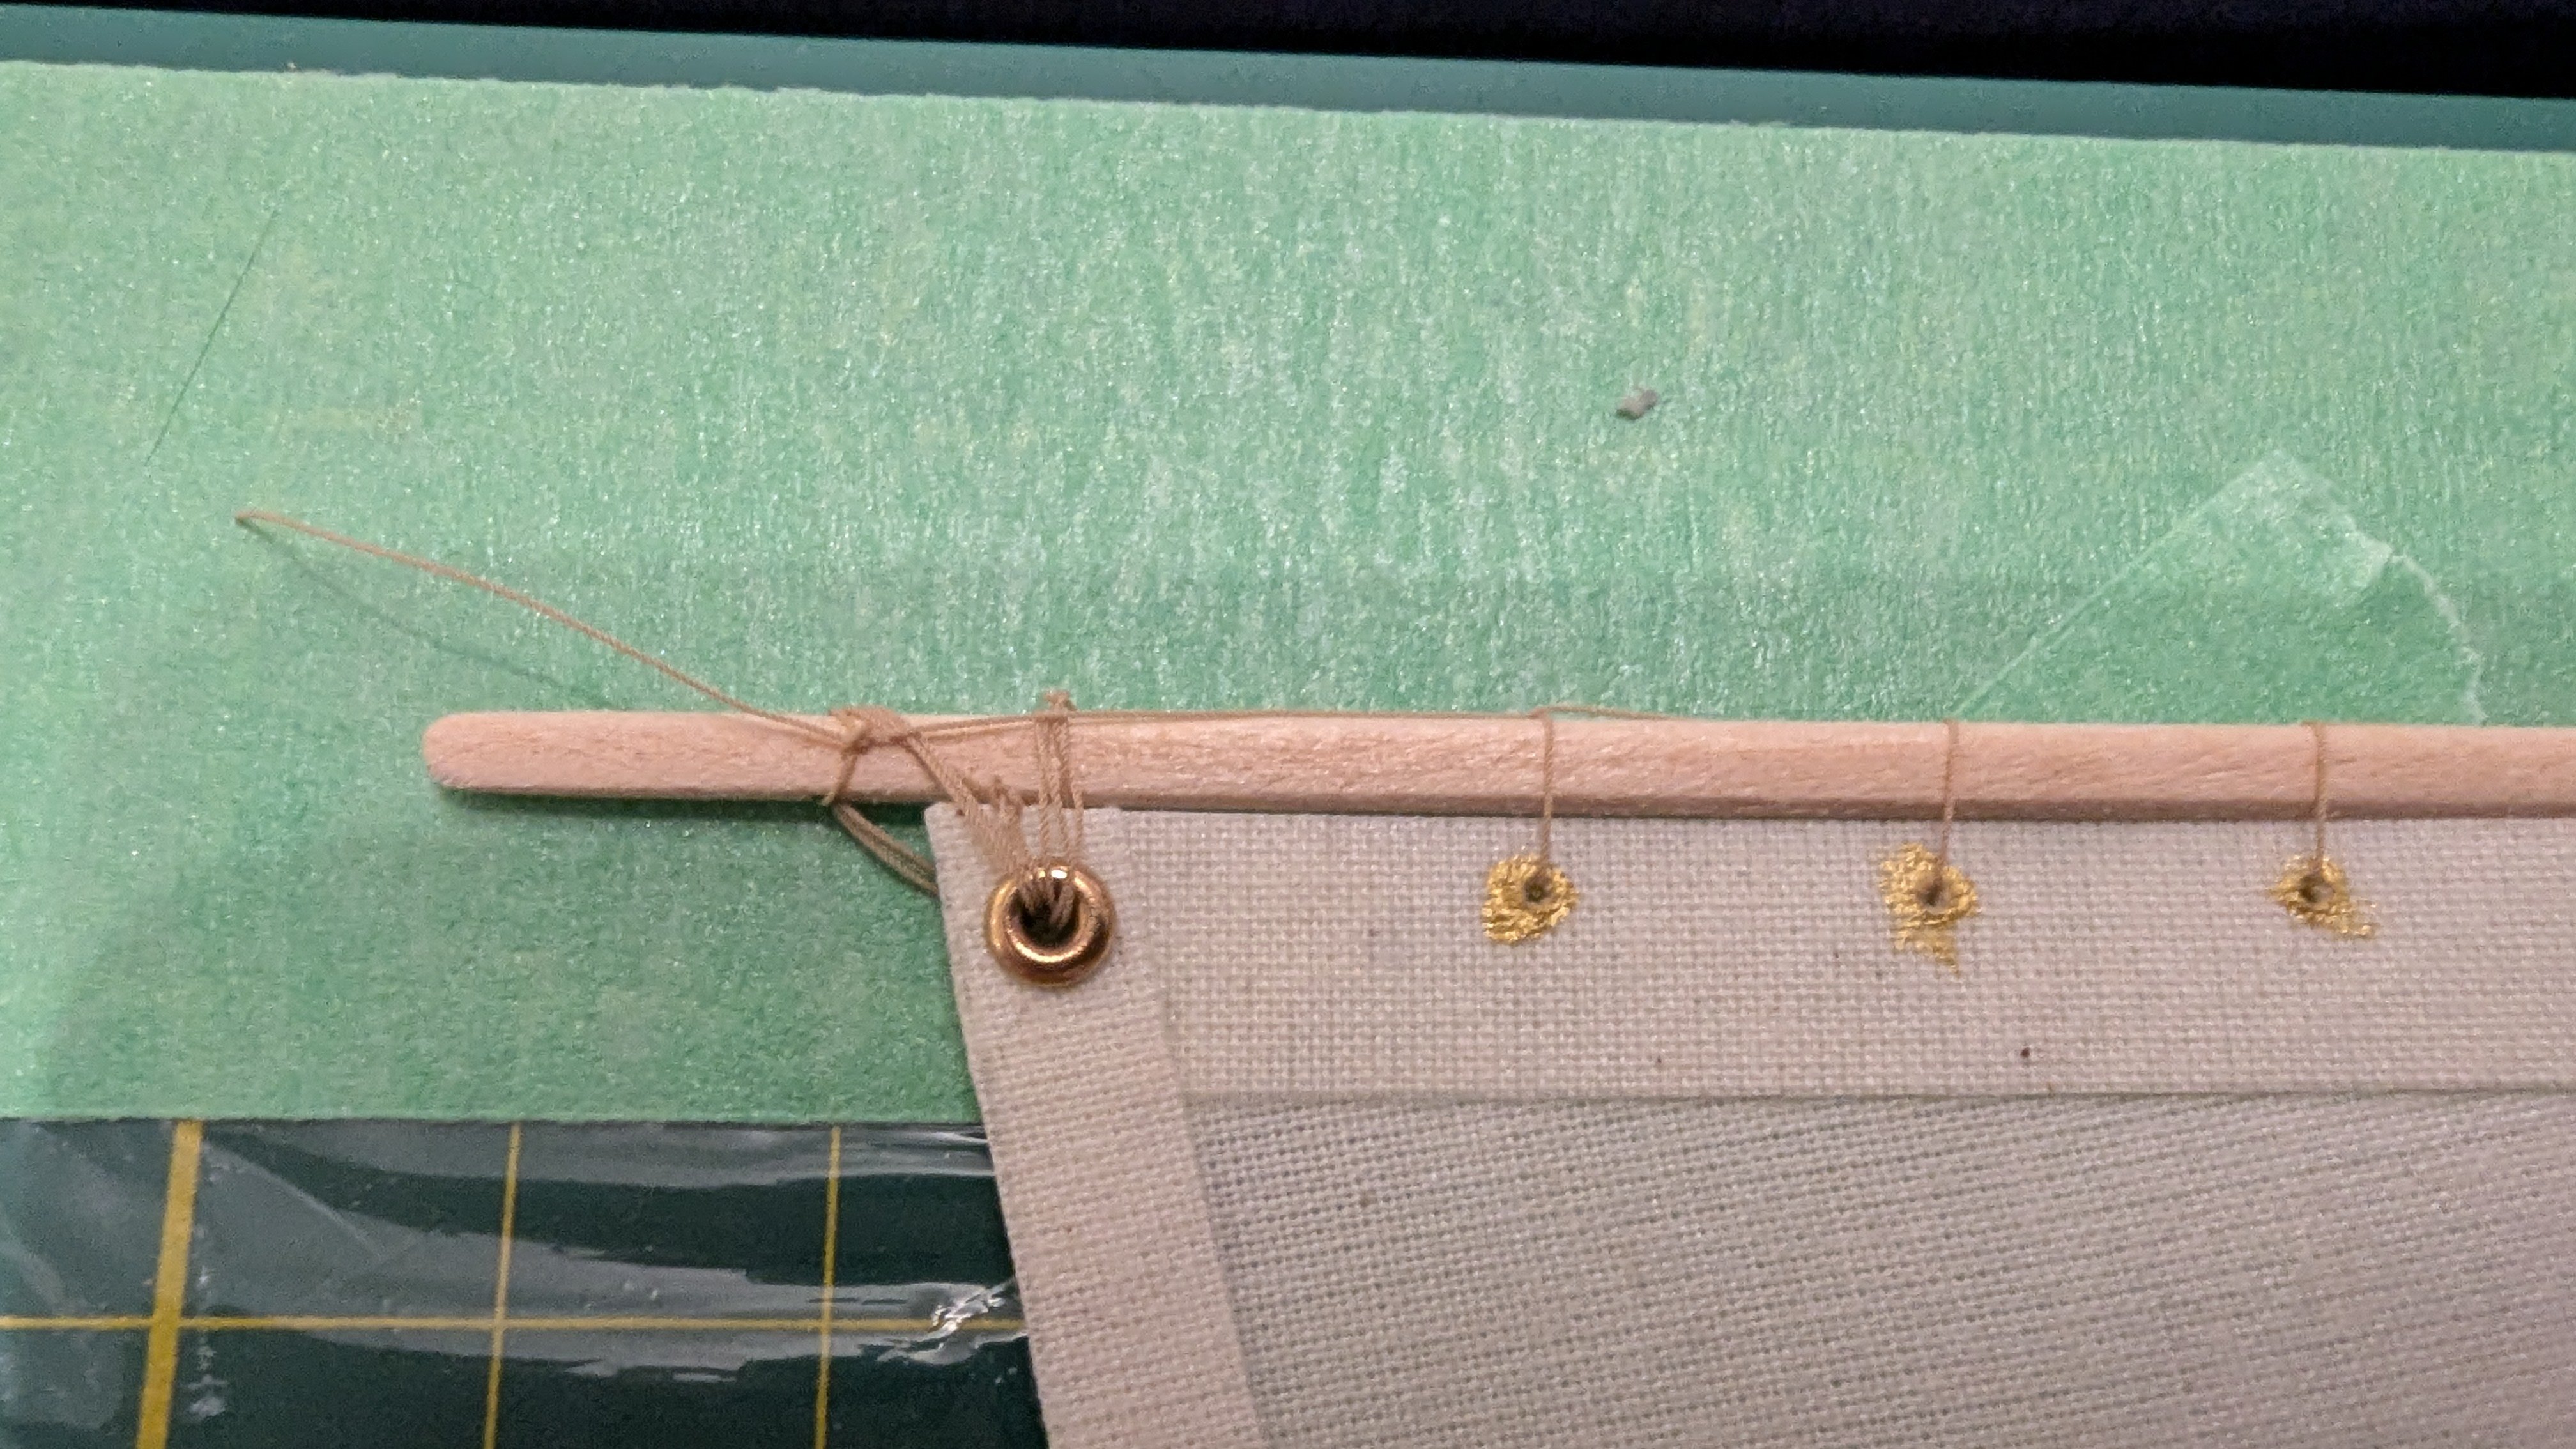
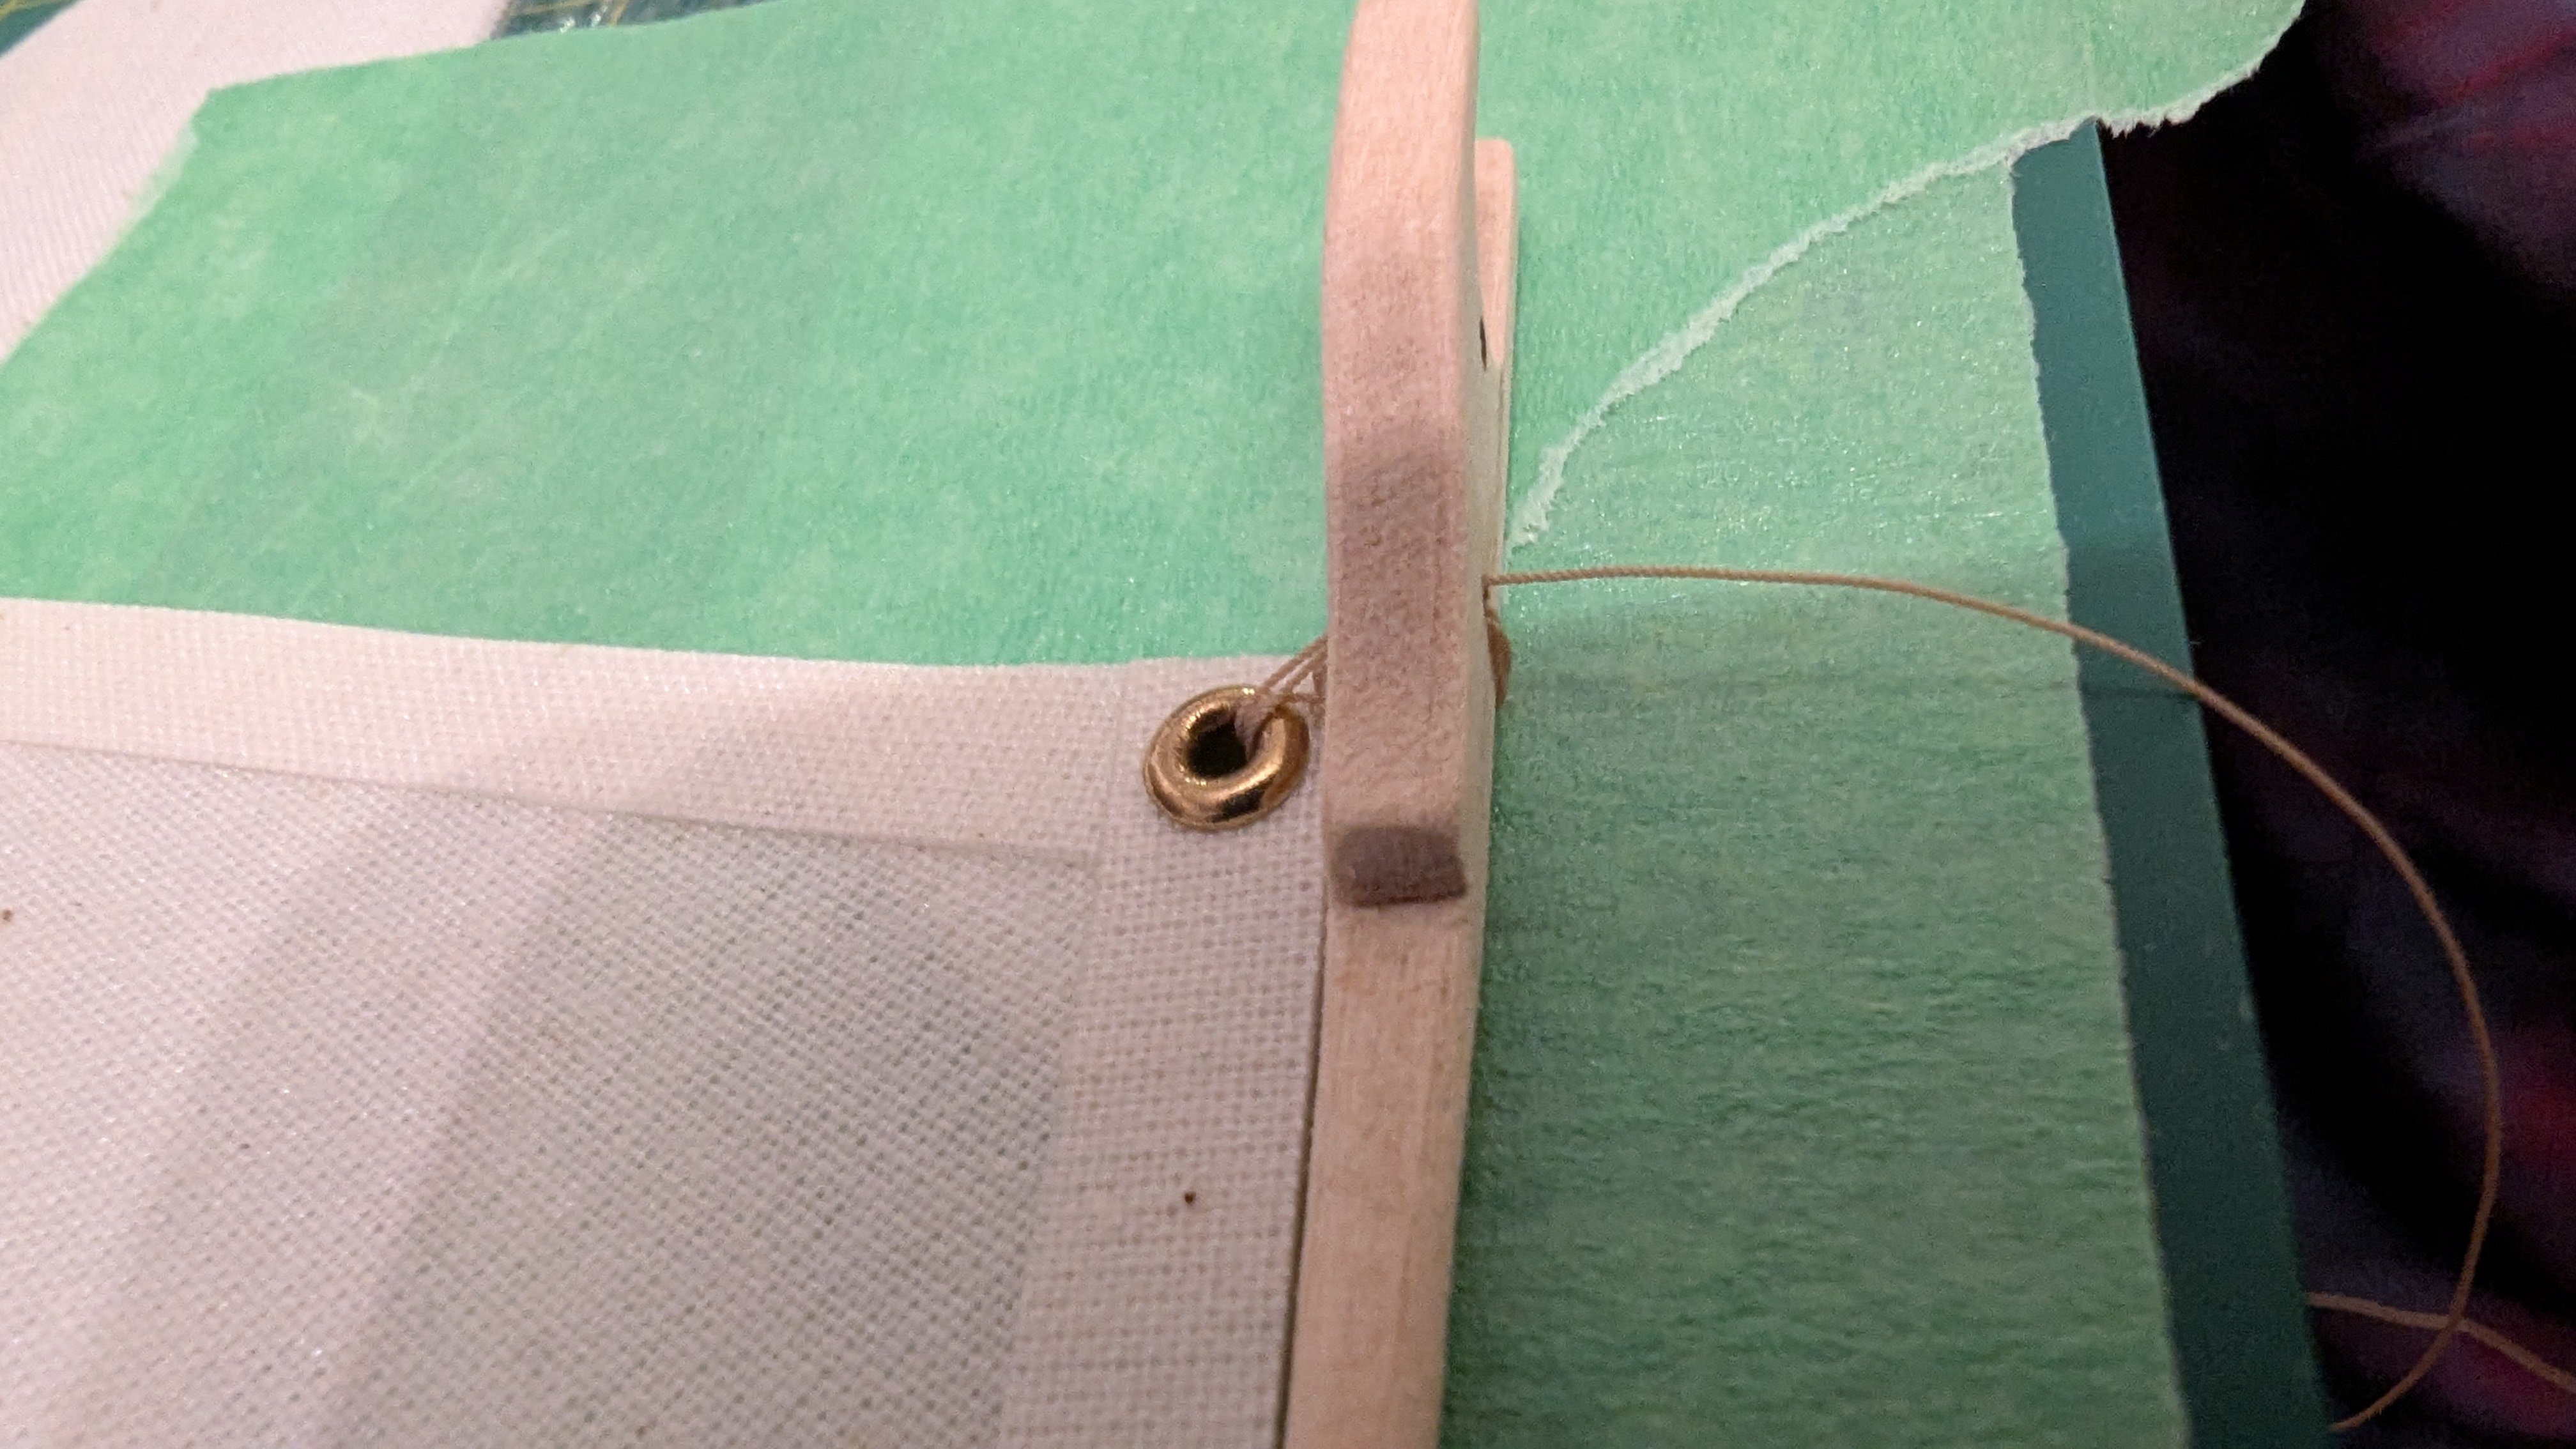
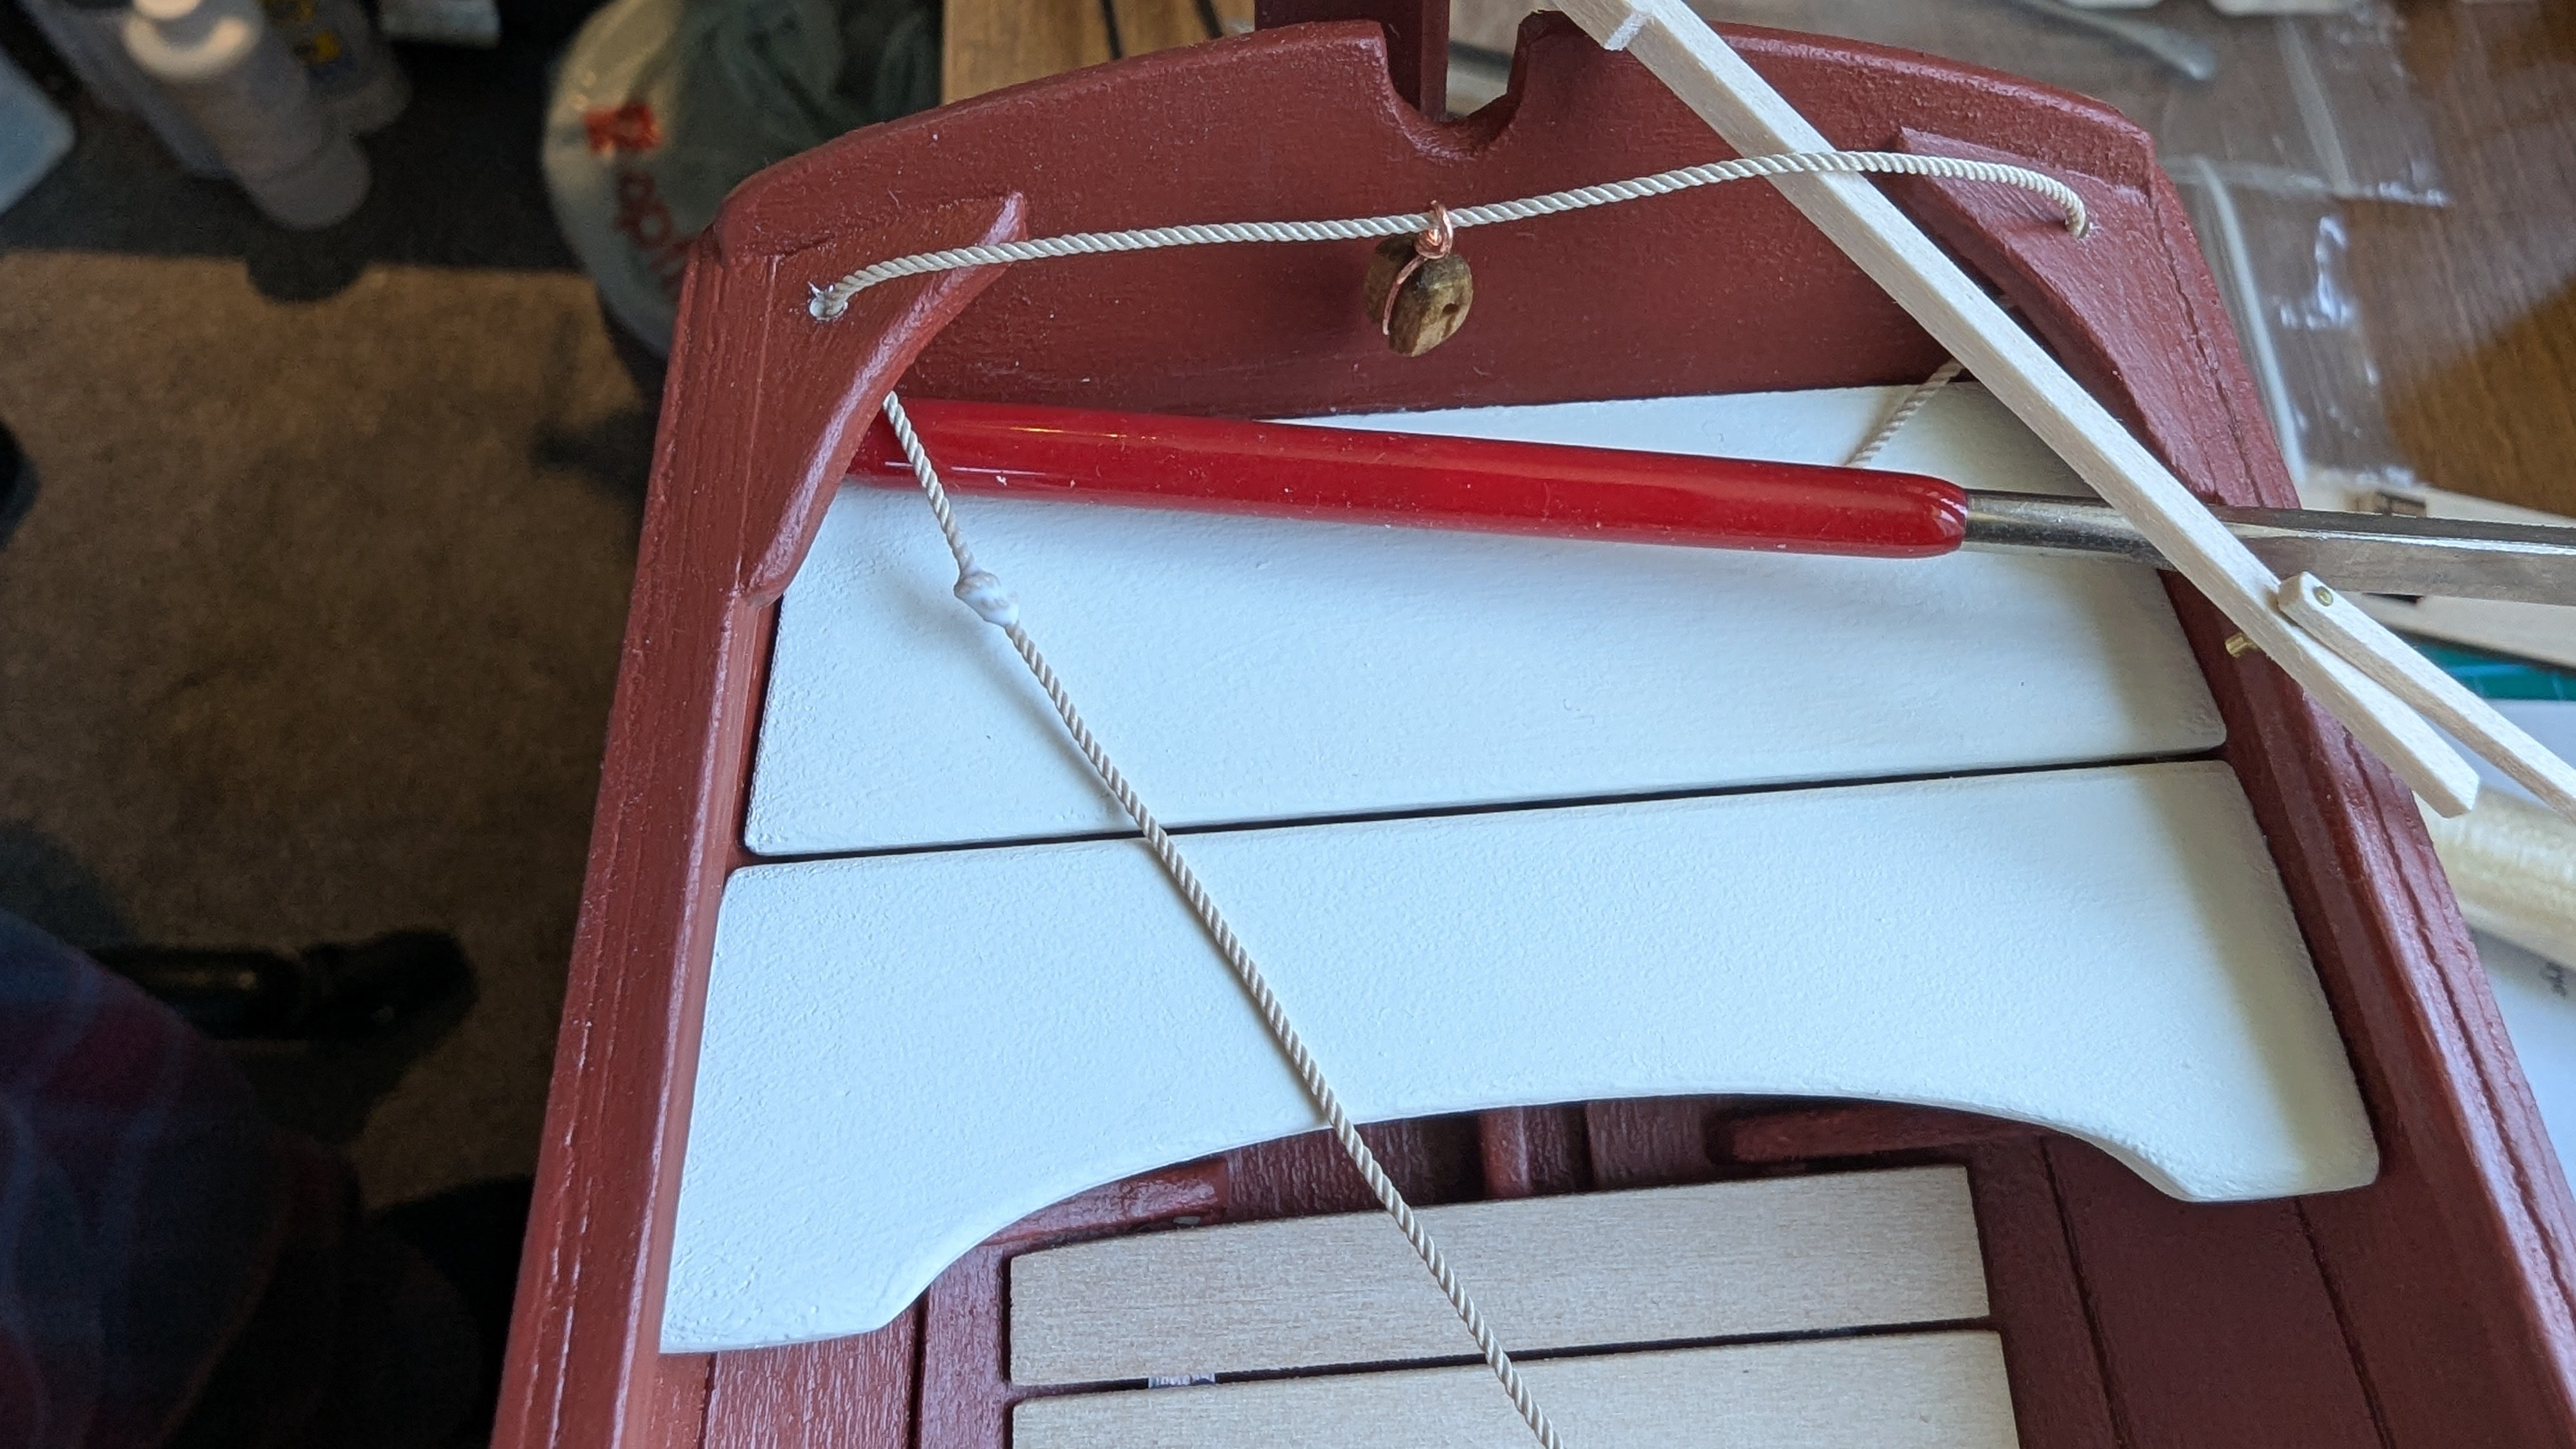
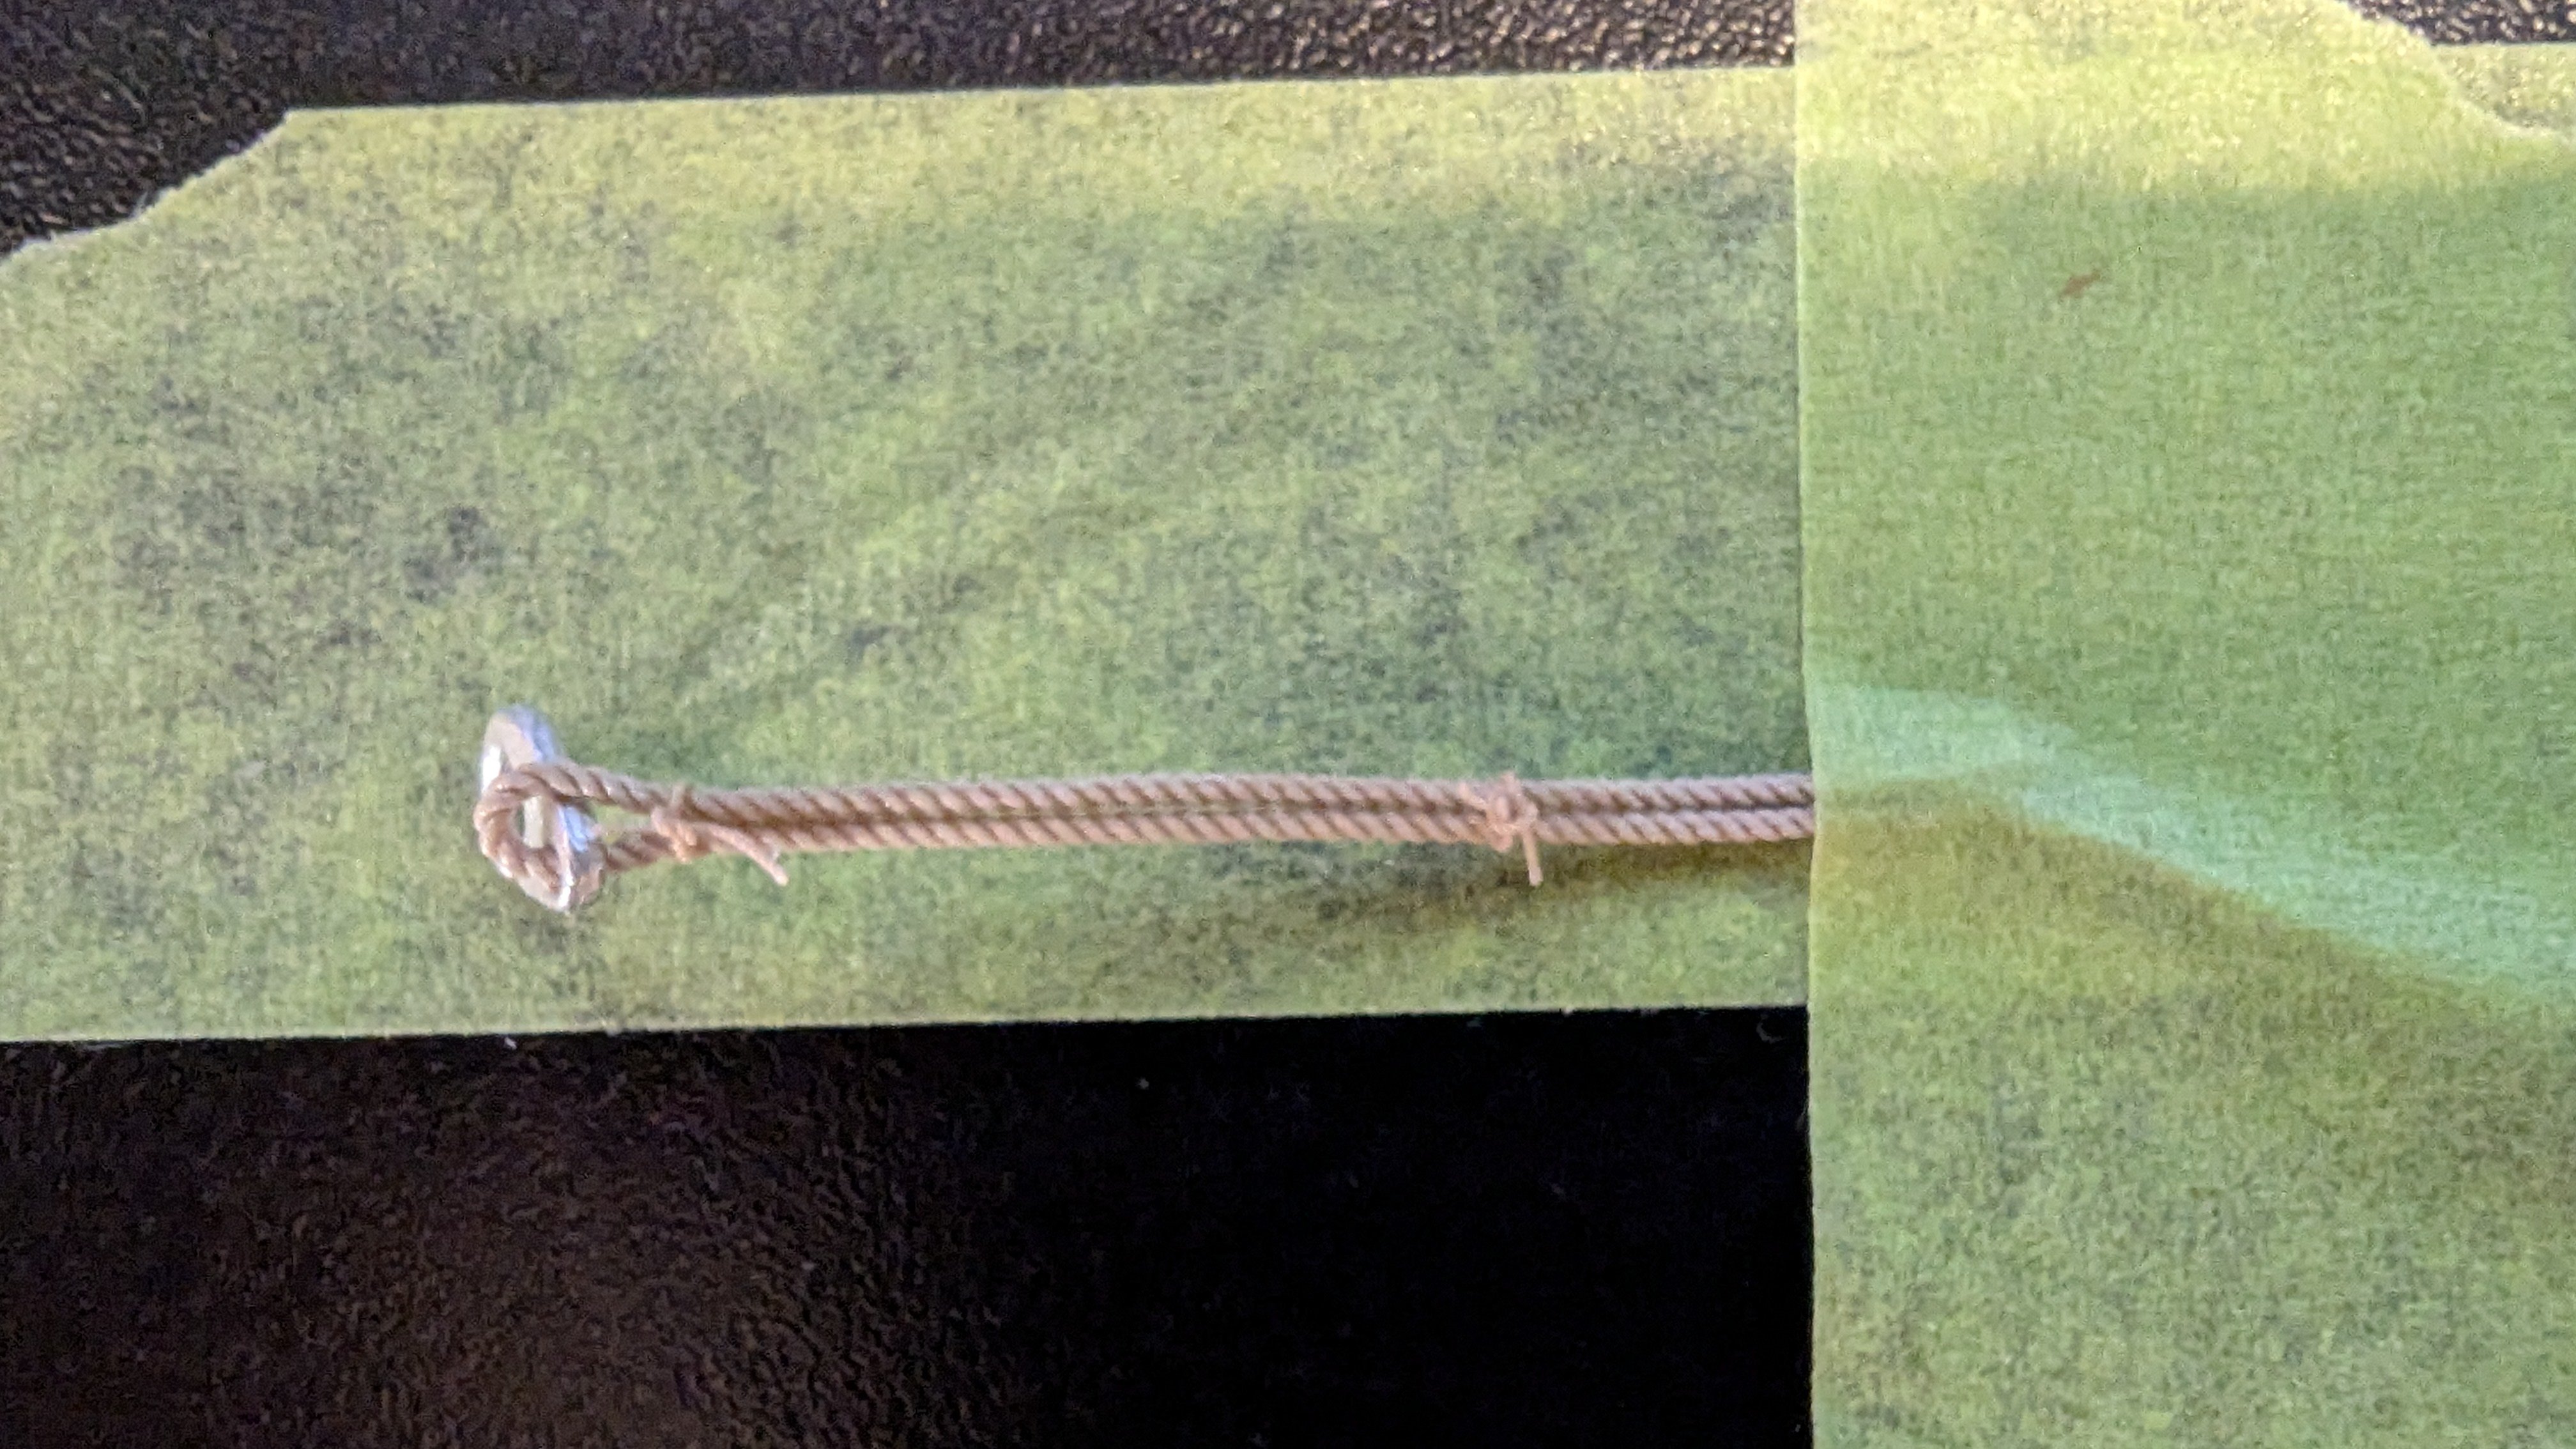
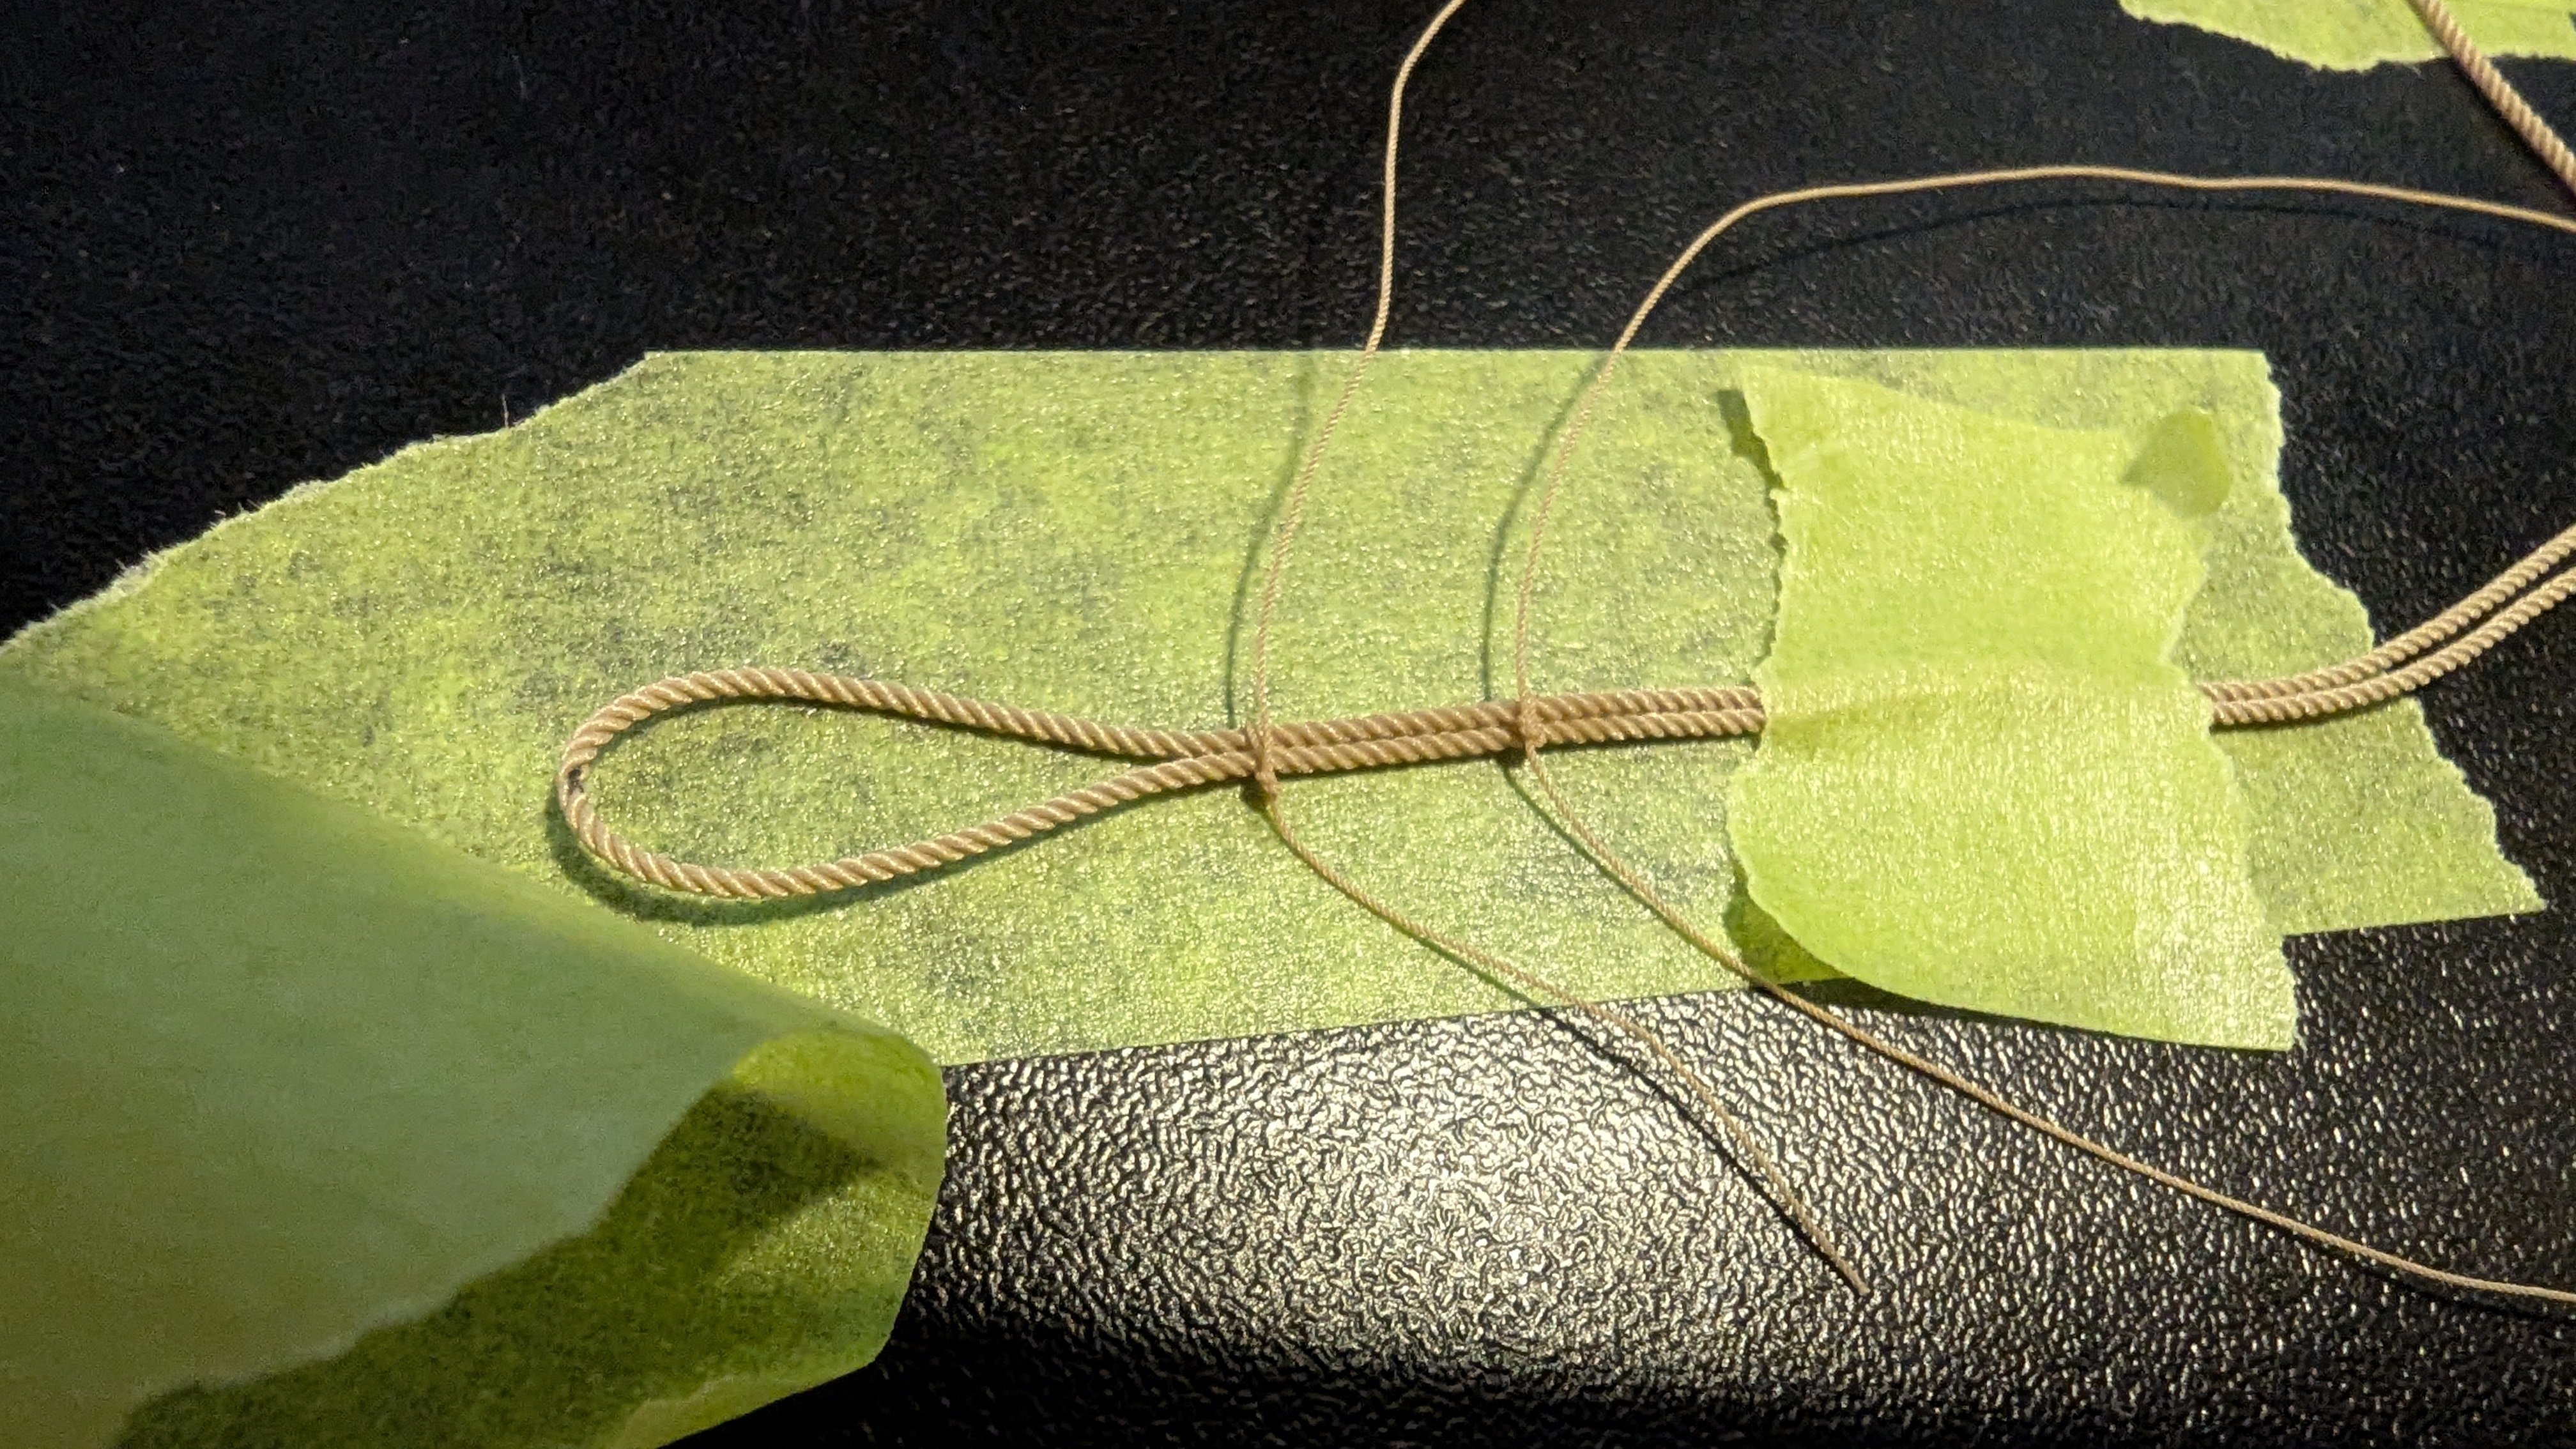
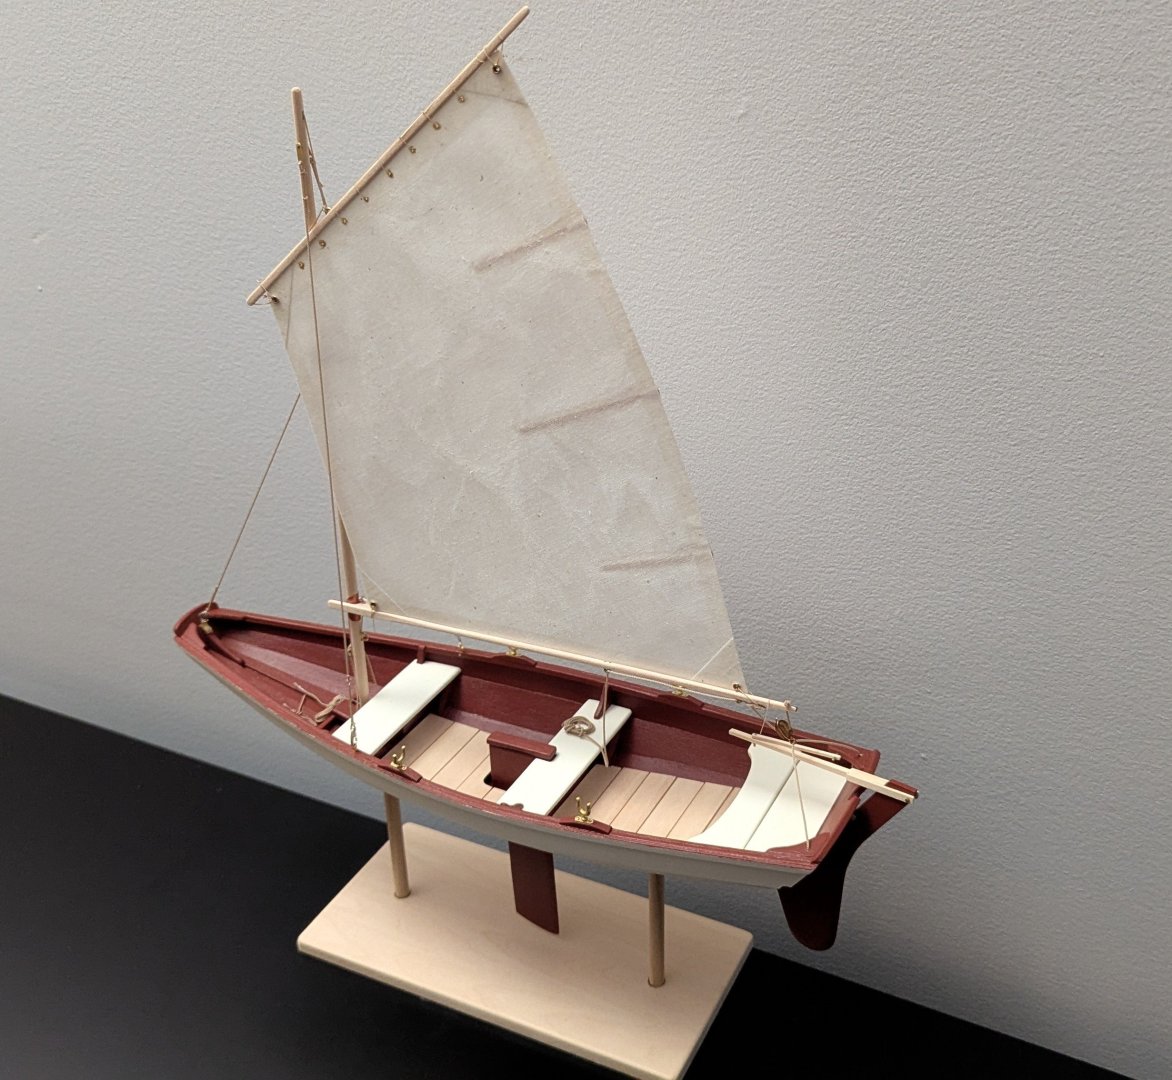
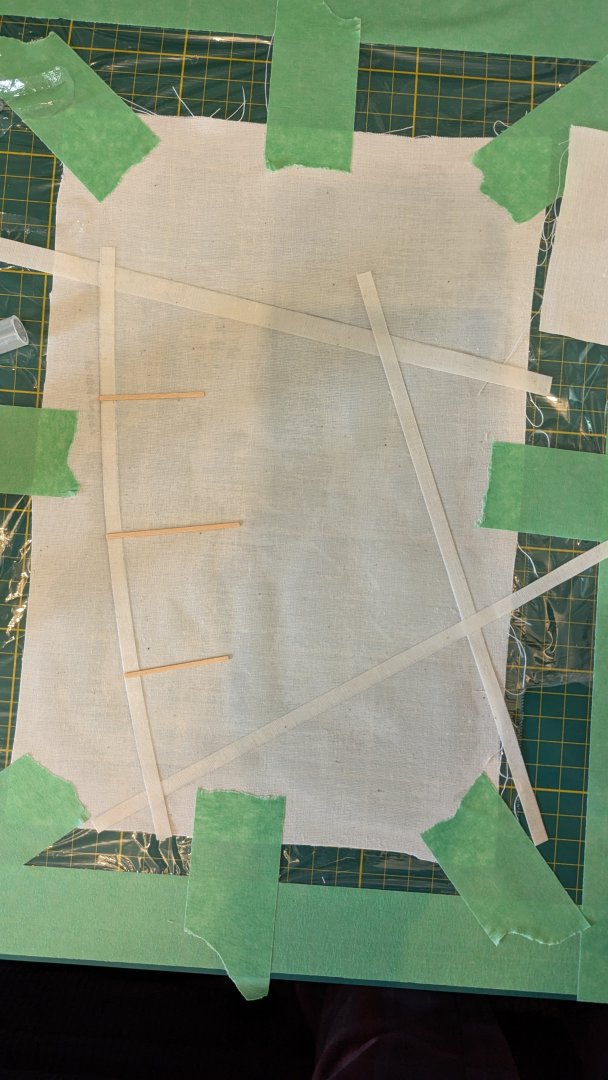
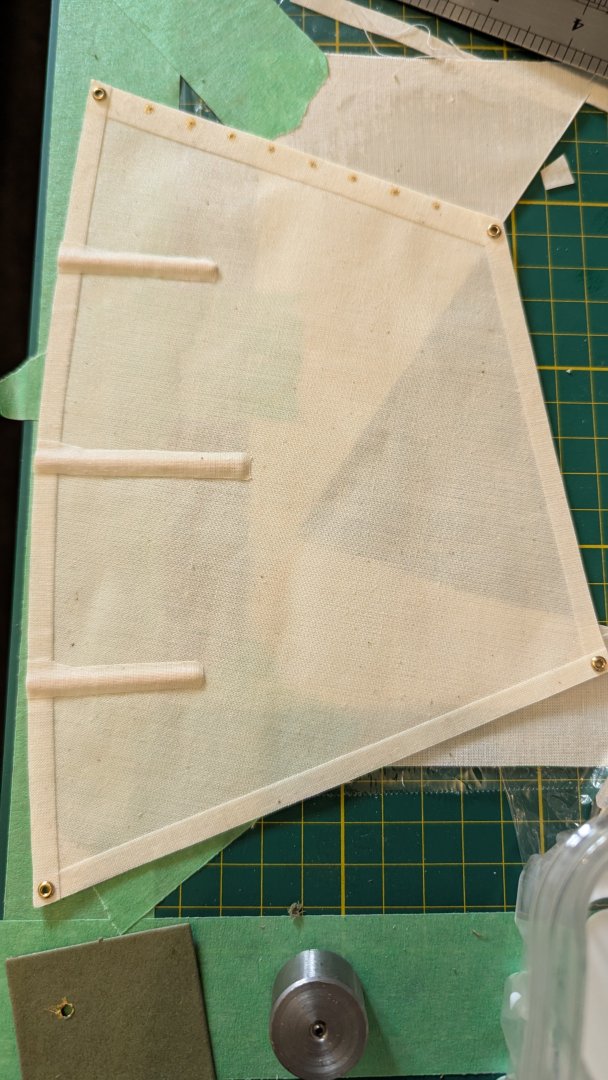
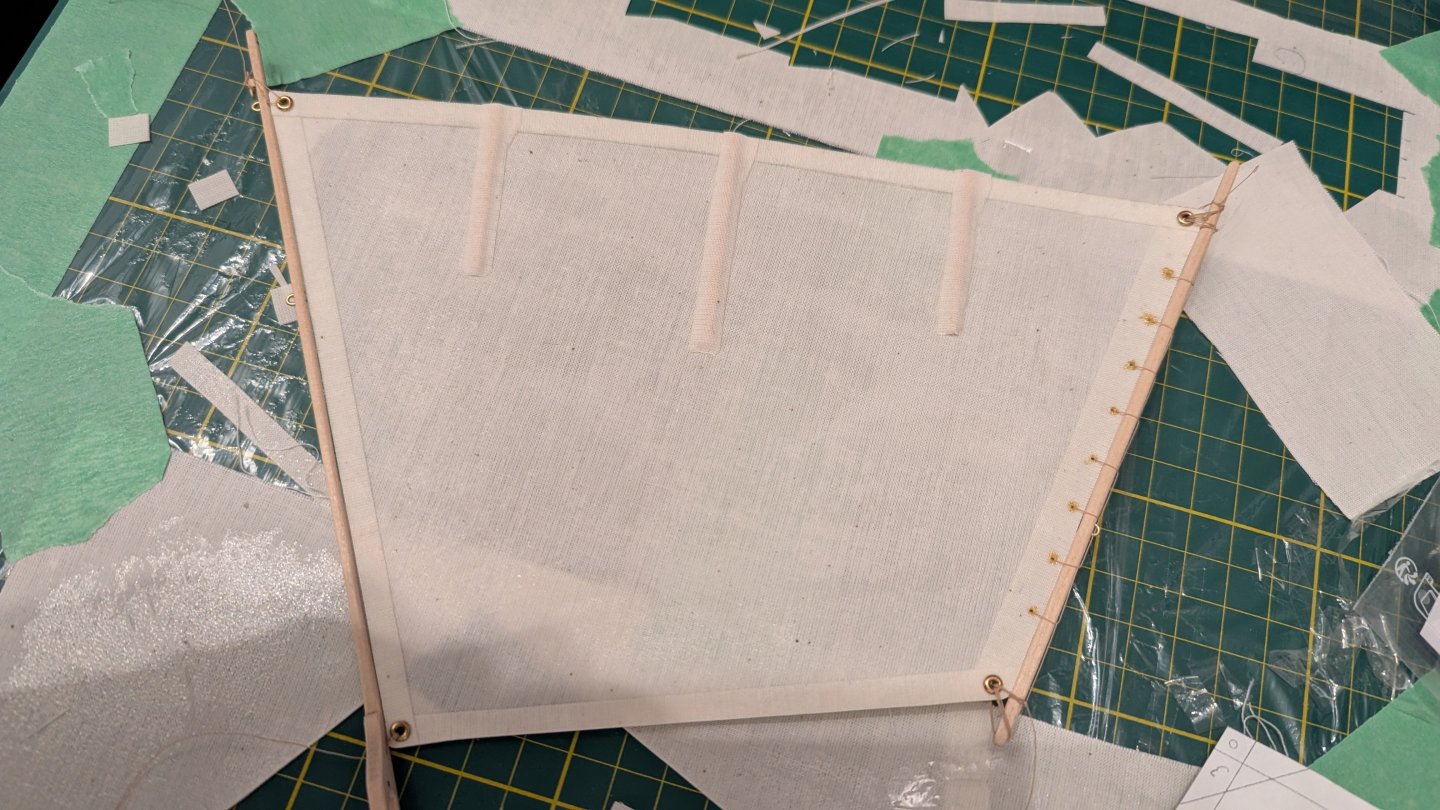
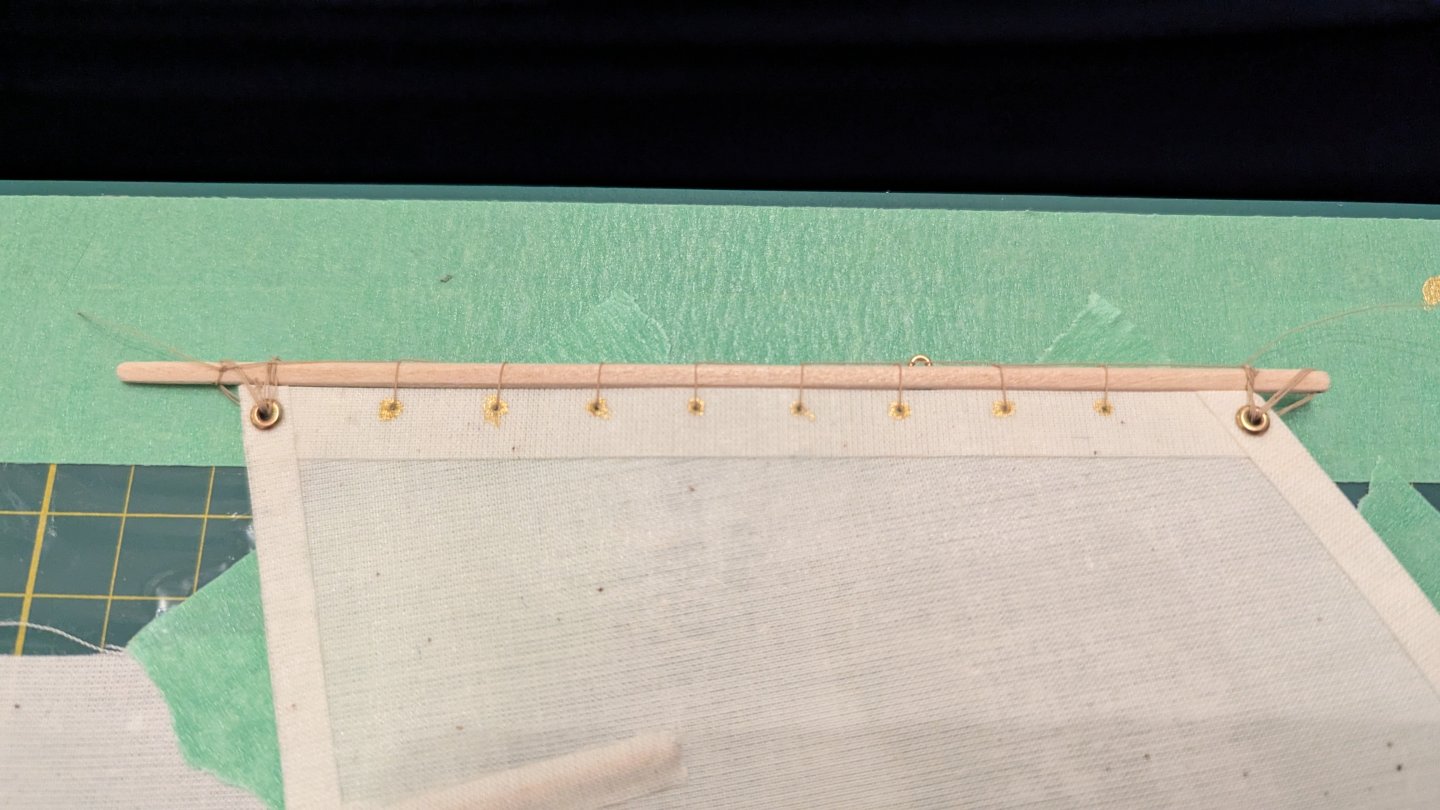
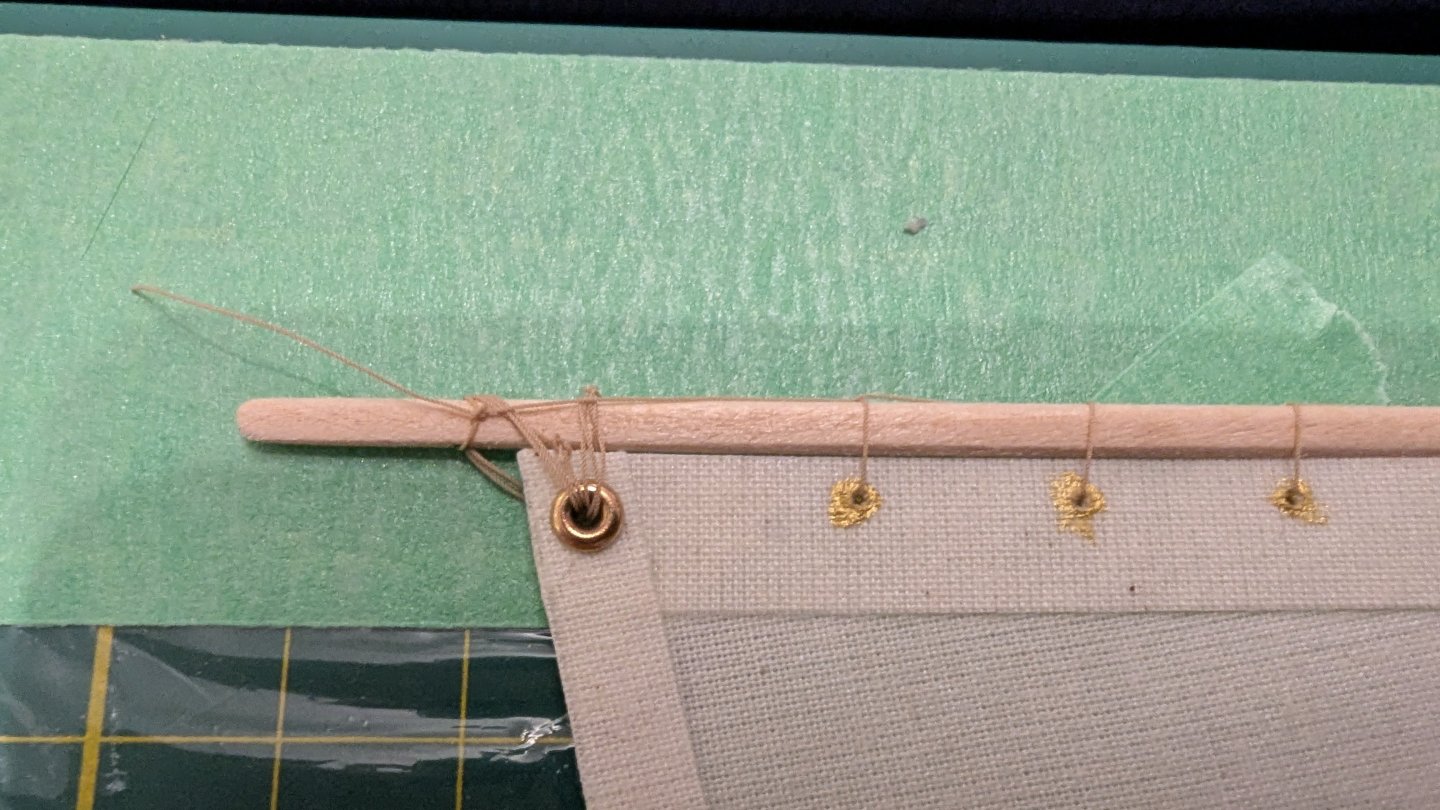
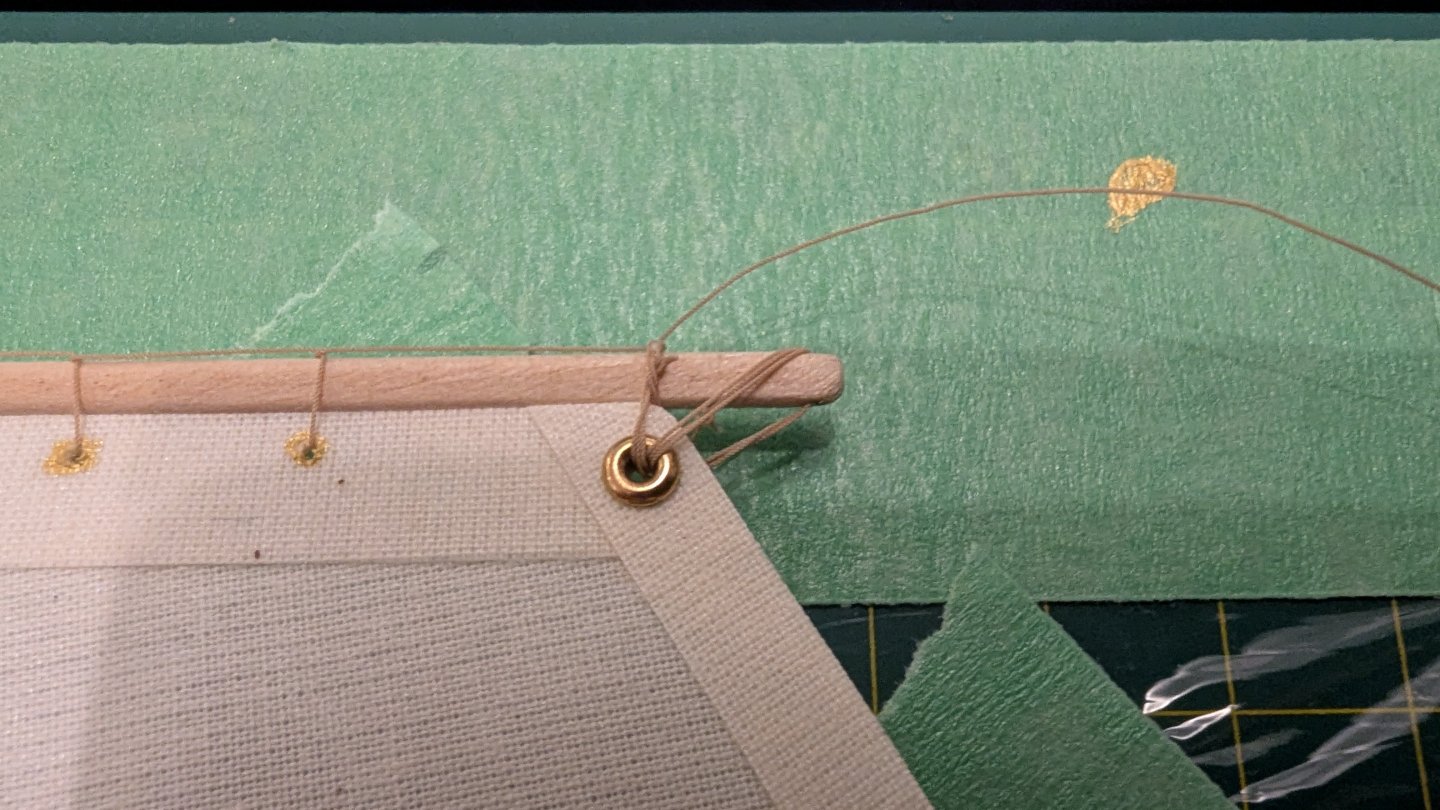
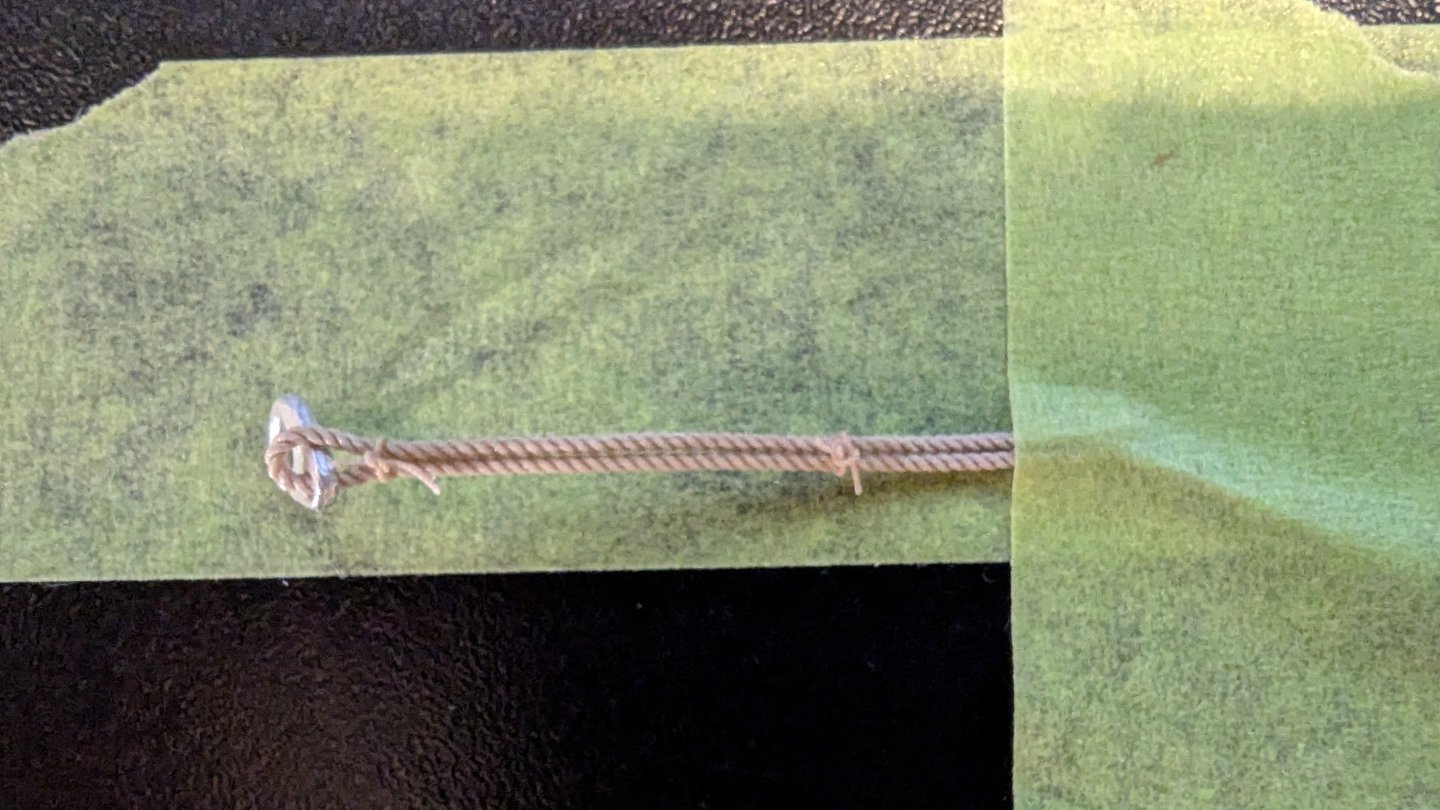
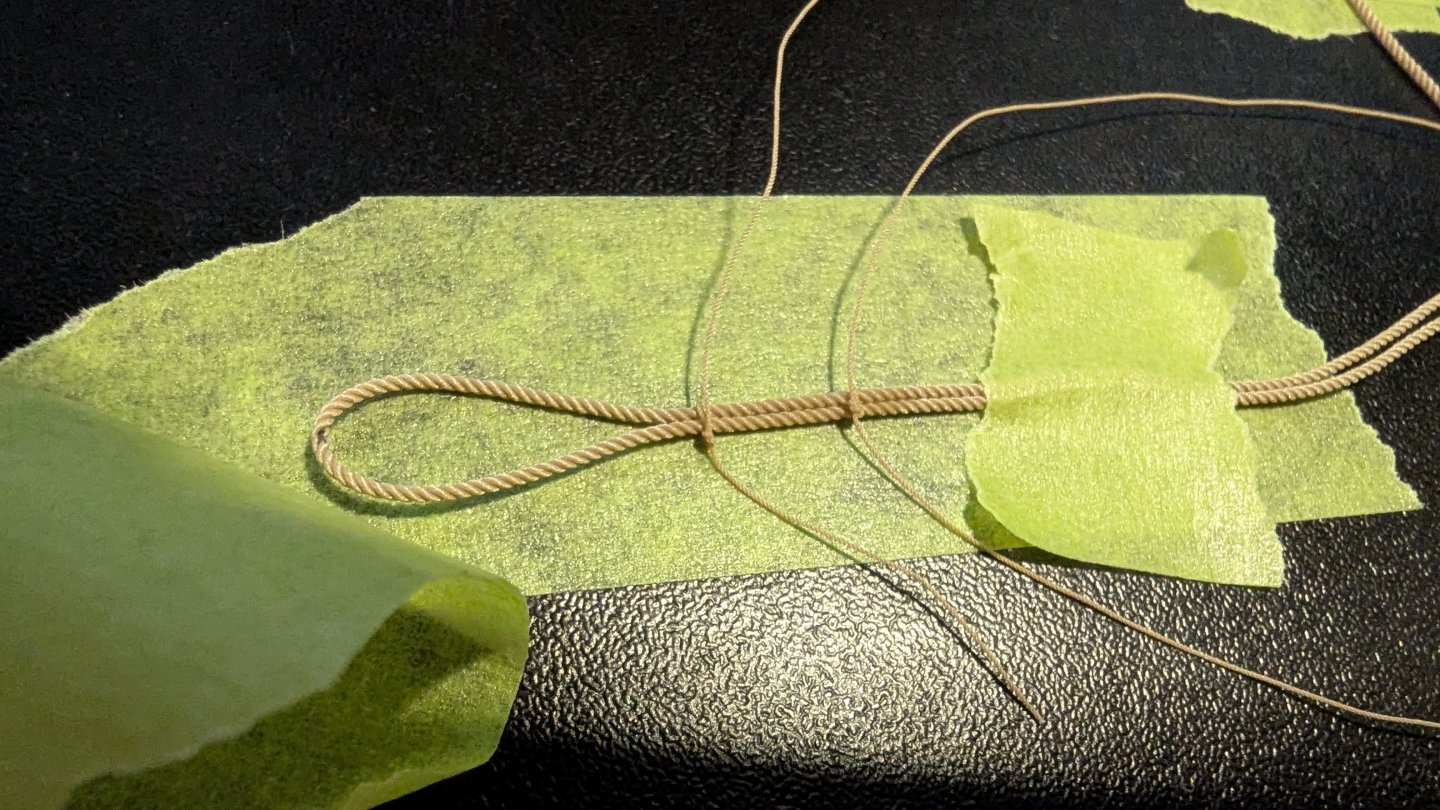
Log #17 - Sail & Rigging I figured the rigging on this little thing would be a quick breeze. I didn't anticipate the the number of tiny knots needed. Fiddling with that really small line takes some getting used to. Kudos to everyone that uses the kit supplied like, or as I call it - the devils line. That stuff is atrocious to work with, I placed an order with ropes of scale soon after the dory build. I'm either way too particular, not very good at rigging, doing something wrong or it's not apparent how much time it takes to apply all the lashings and rigging. I find most build logs have a post on the sails and then the next post is typically "all done!". I'm done the sail, it's 'bent to the spars' (is that the right term), most lines are in place and ready to go. I'm waiting for the glue to dry on the forestay knot so I figured I'd write up the last log before 'completion' (I'll still need to add the oars at a later date). Shroud lines are attached to their clips and ready to go as soon as the forestay is dry. Thank you to @Kenchington for the idea of pocketing the battens. I'm not entirely sure I would've thought of it myself, but my own sail is built that way, and I don't recall ever seeing a board with floating, exposed battens like that. A Chinese junk style sail is all I could picture, but those go right to the mast. Had I had enough forethought, I would've set the battens back a bit so I could close off the front of the pocket, but oh well. They may be a little out of scale, but I decided to use some small 1.5mm eyelets in lieu of paint for the grommets. I found some 1mm, but they were coming from China and won't arrive until next month. Although on the big side, I'm happy with how they turned out, they were nice to work with. For the smaller holes, I did use the paint idea which is very smart. I used the same 'gold' metallic paint I used on the oarlocks. I was back and forth on pocketing the battens, but I'm happy with the result. While waiting for the paint to dry, I decided to put in the optional extra effort to shape the block, and used a walnut stain. Bending the sail... I'm a visual learner and I must've read the lashing instructions 4-6 times before I decided to grab a piece of line and give it a shot. Once I started threading it through, it all started making way more sense and worked out well. Rigging up the block. The instructions aren't very particular about how much line to use or how high to set it so I made some adjustments until it 'felt' about right. I almost left one knot so I could tighten or loosen when the sail went on and I may end of regretting it, but I glued it up anyways. Letting the knots dry without touching anything. I used figure 8 knots for all the stopper lines here and elsewhere. Prepping the standing rigging It wasn't clear to me which knot to use for the forestay loop that goes around the mast. I thought of using a noose knot, but then figured it would be far to hard to get the length exact. I opted for the same style as above. It test fit well so hopefully nothing slipped before I tightened and glued the... serving? I'm not exactly sure what to call those two smaller line reinforcements. (The black mark in the middle of the loop is the center line for the mast, provided everything lines up well it should be covered by the mast and cleat) I cannot recommend Ropes of Scale enough. I'm sure any scale model rope makers, including home made is just as good. For those of you that haven't or won't start making your own, it's a worthwhile upgrade to any model expo owned kits. I swear, those guys must be masochists to give us that bouncy nylon trash. That's all I have for tonight, thanks for following along. I definitely wouldn't be this far, but the wife knows I'm trying to finish it up so was giving me lots of time today.


- 86 replies
-
- 10
-
-
- Model Shipways
- Norwegian Sailing Pram
- (and 3 more)
-
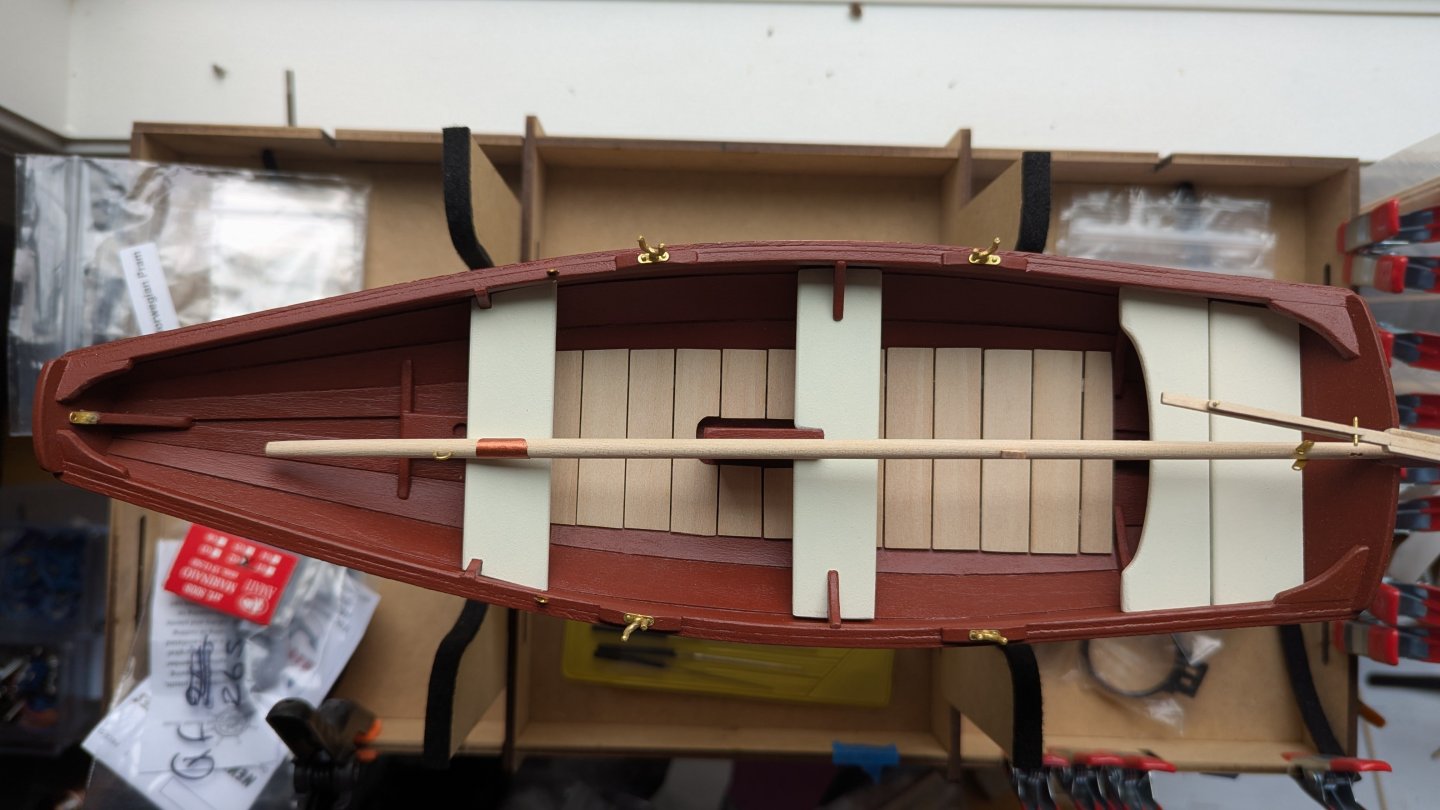
Agreed,that overhead shot is great. Nice work overall, my kits still collecting dust, but is about 2 builds away now.
-
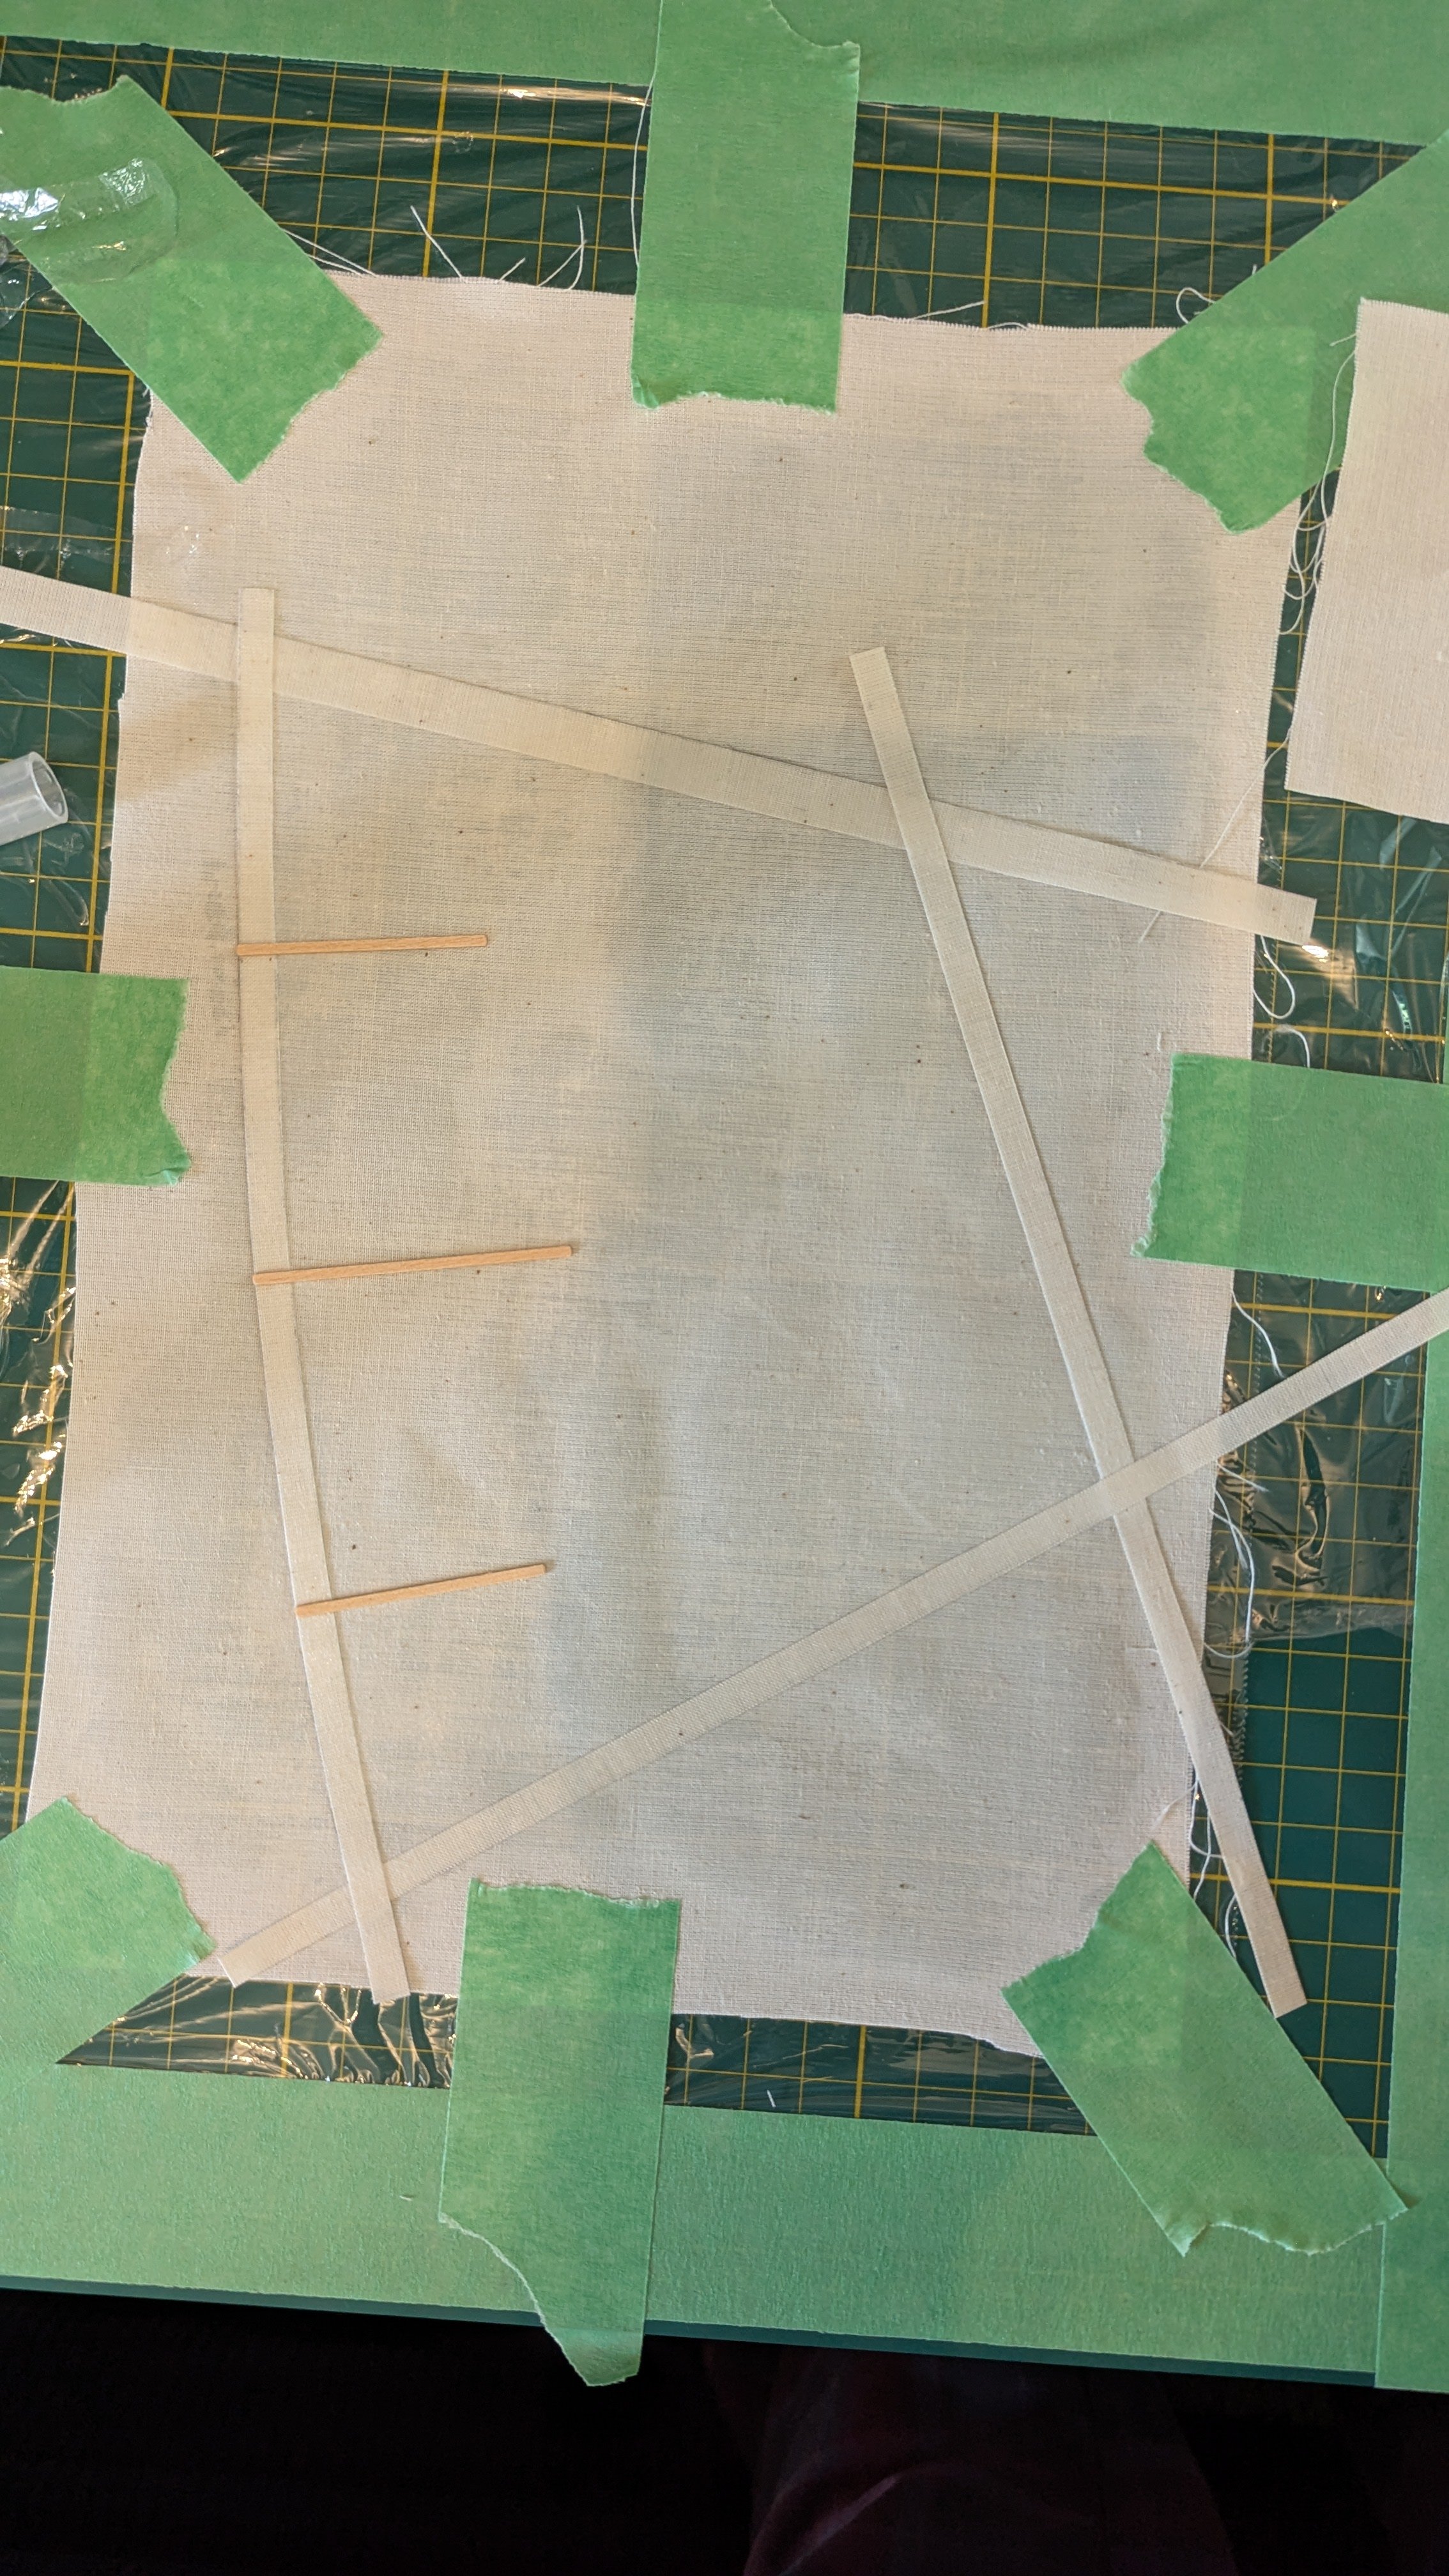
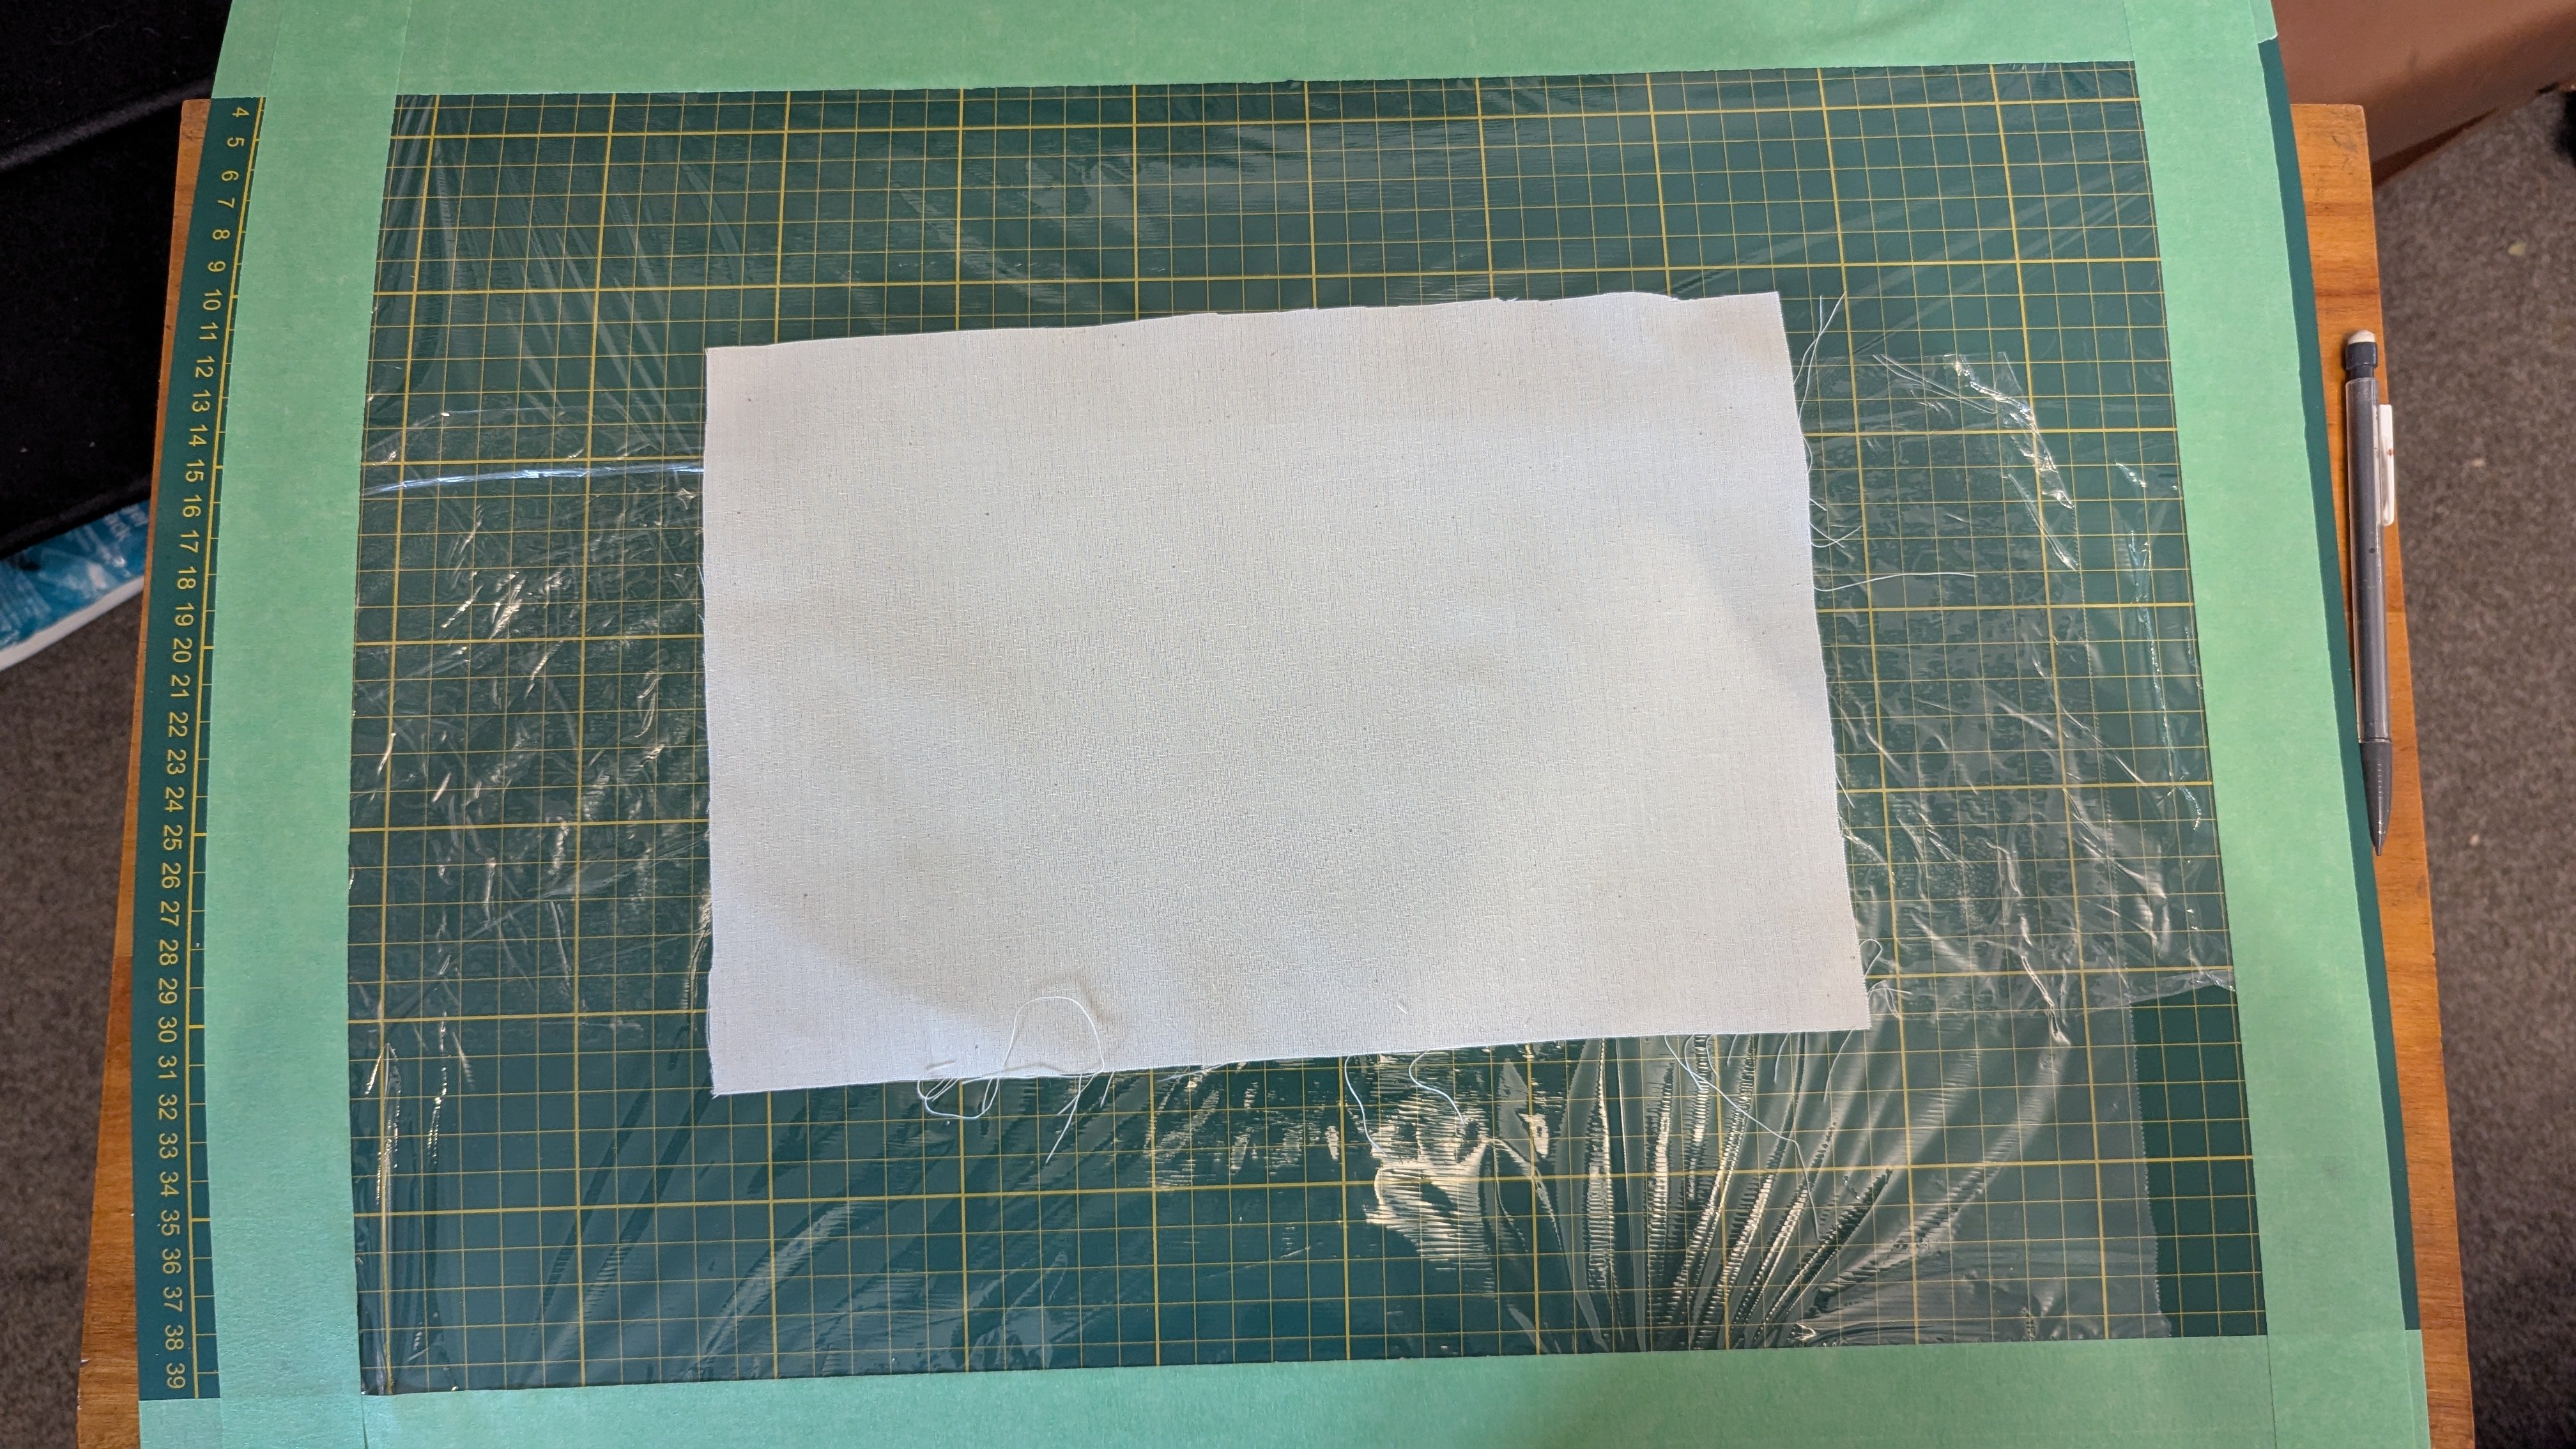
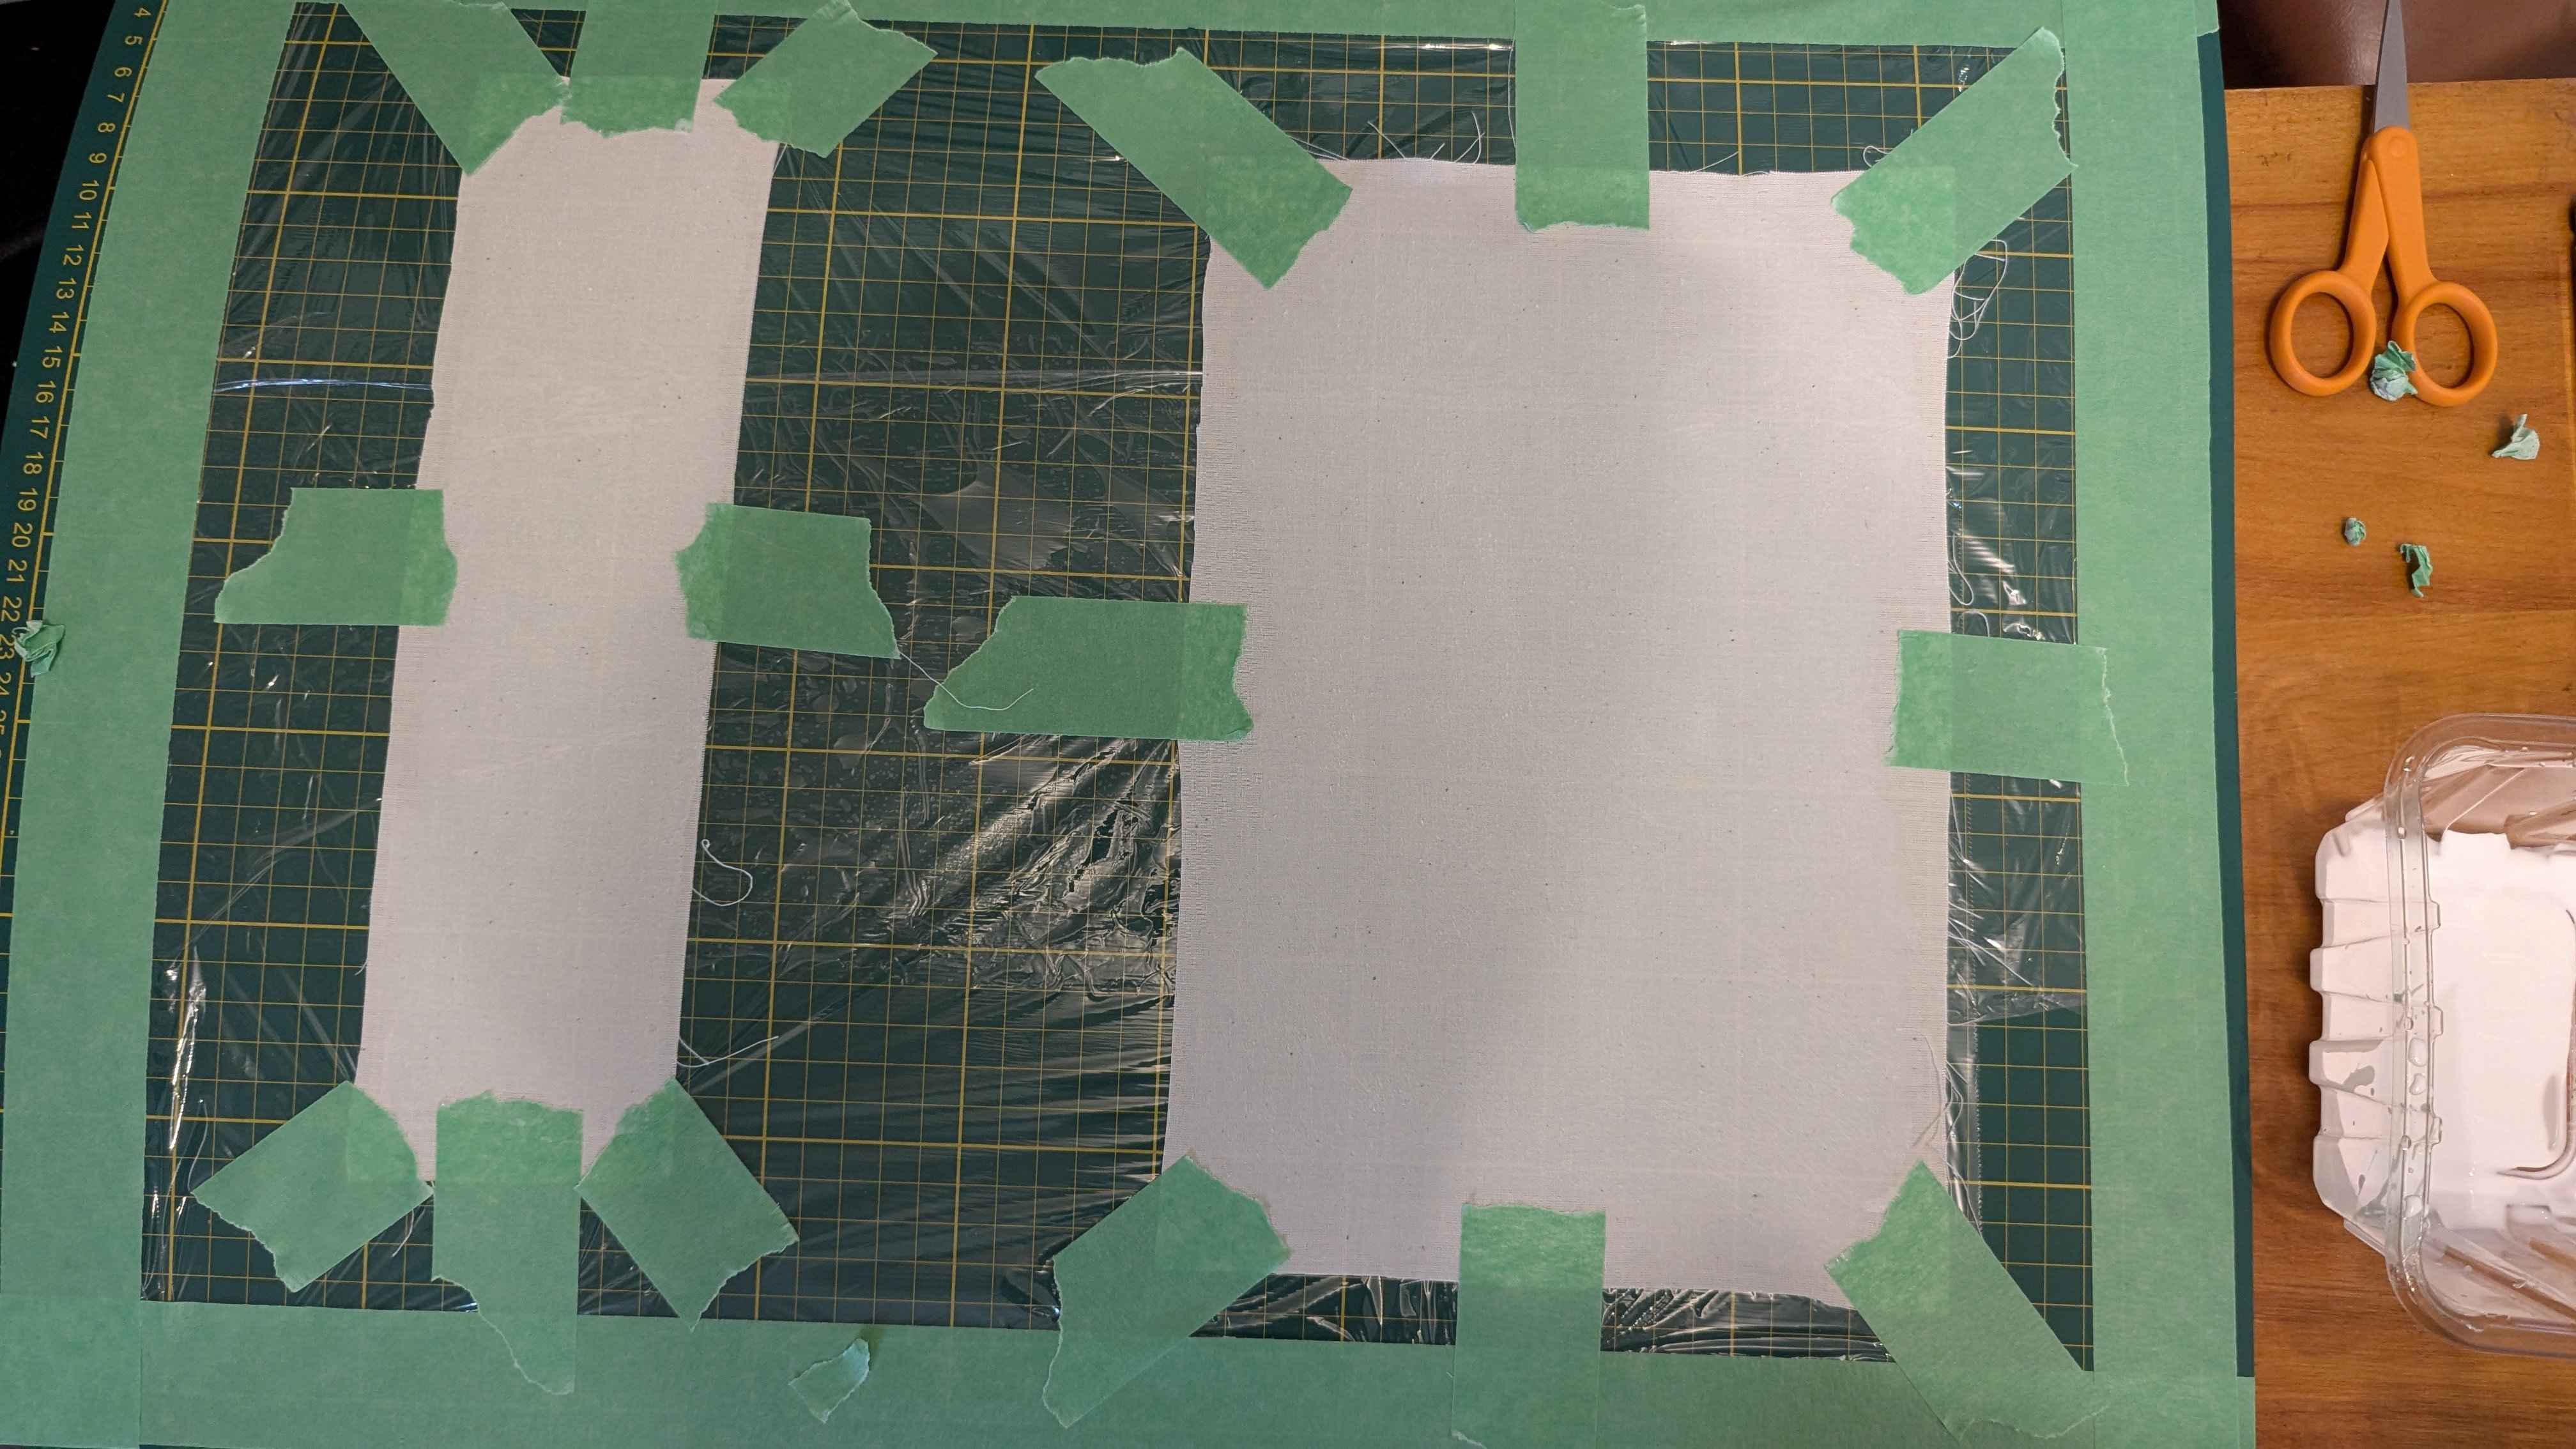
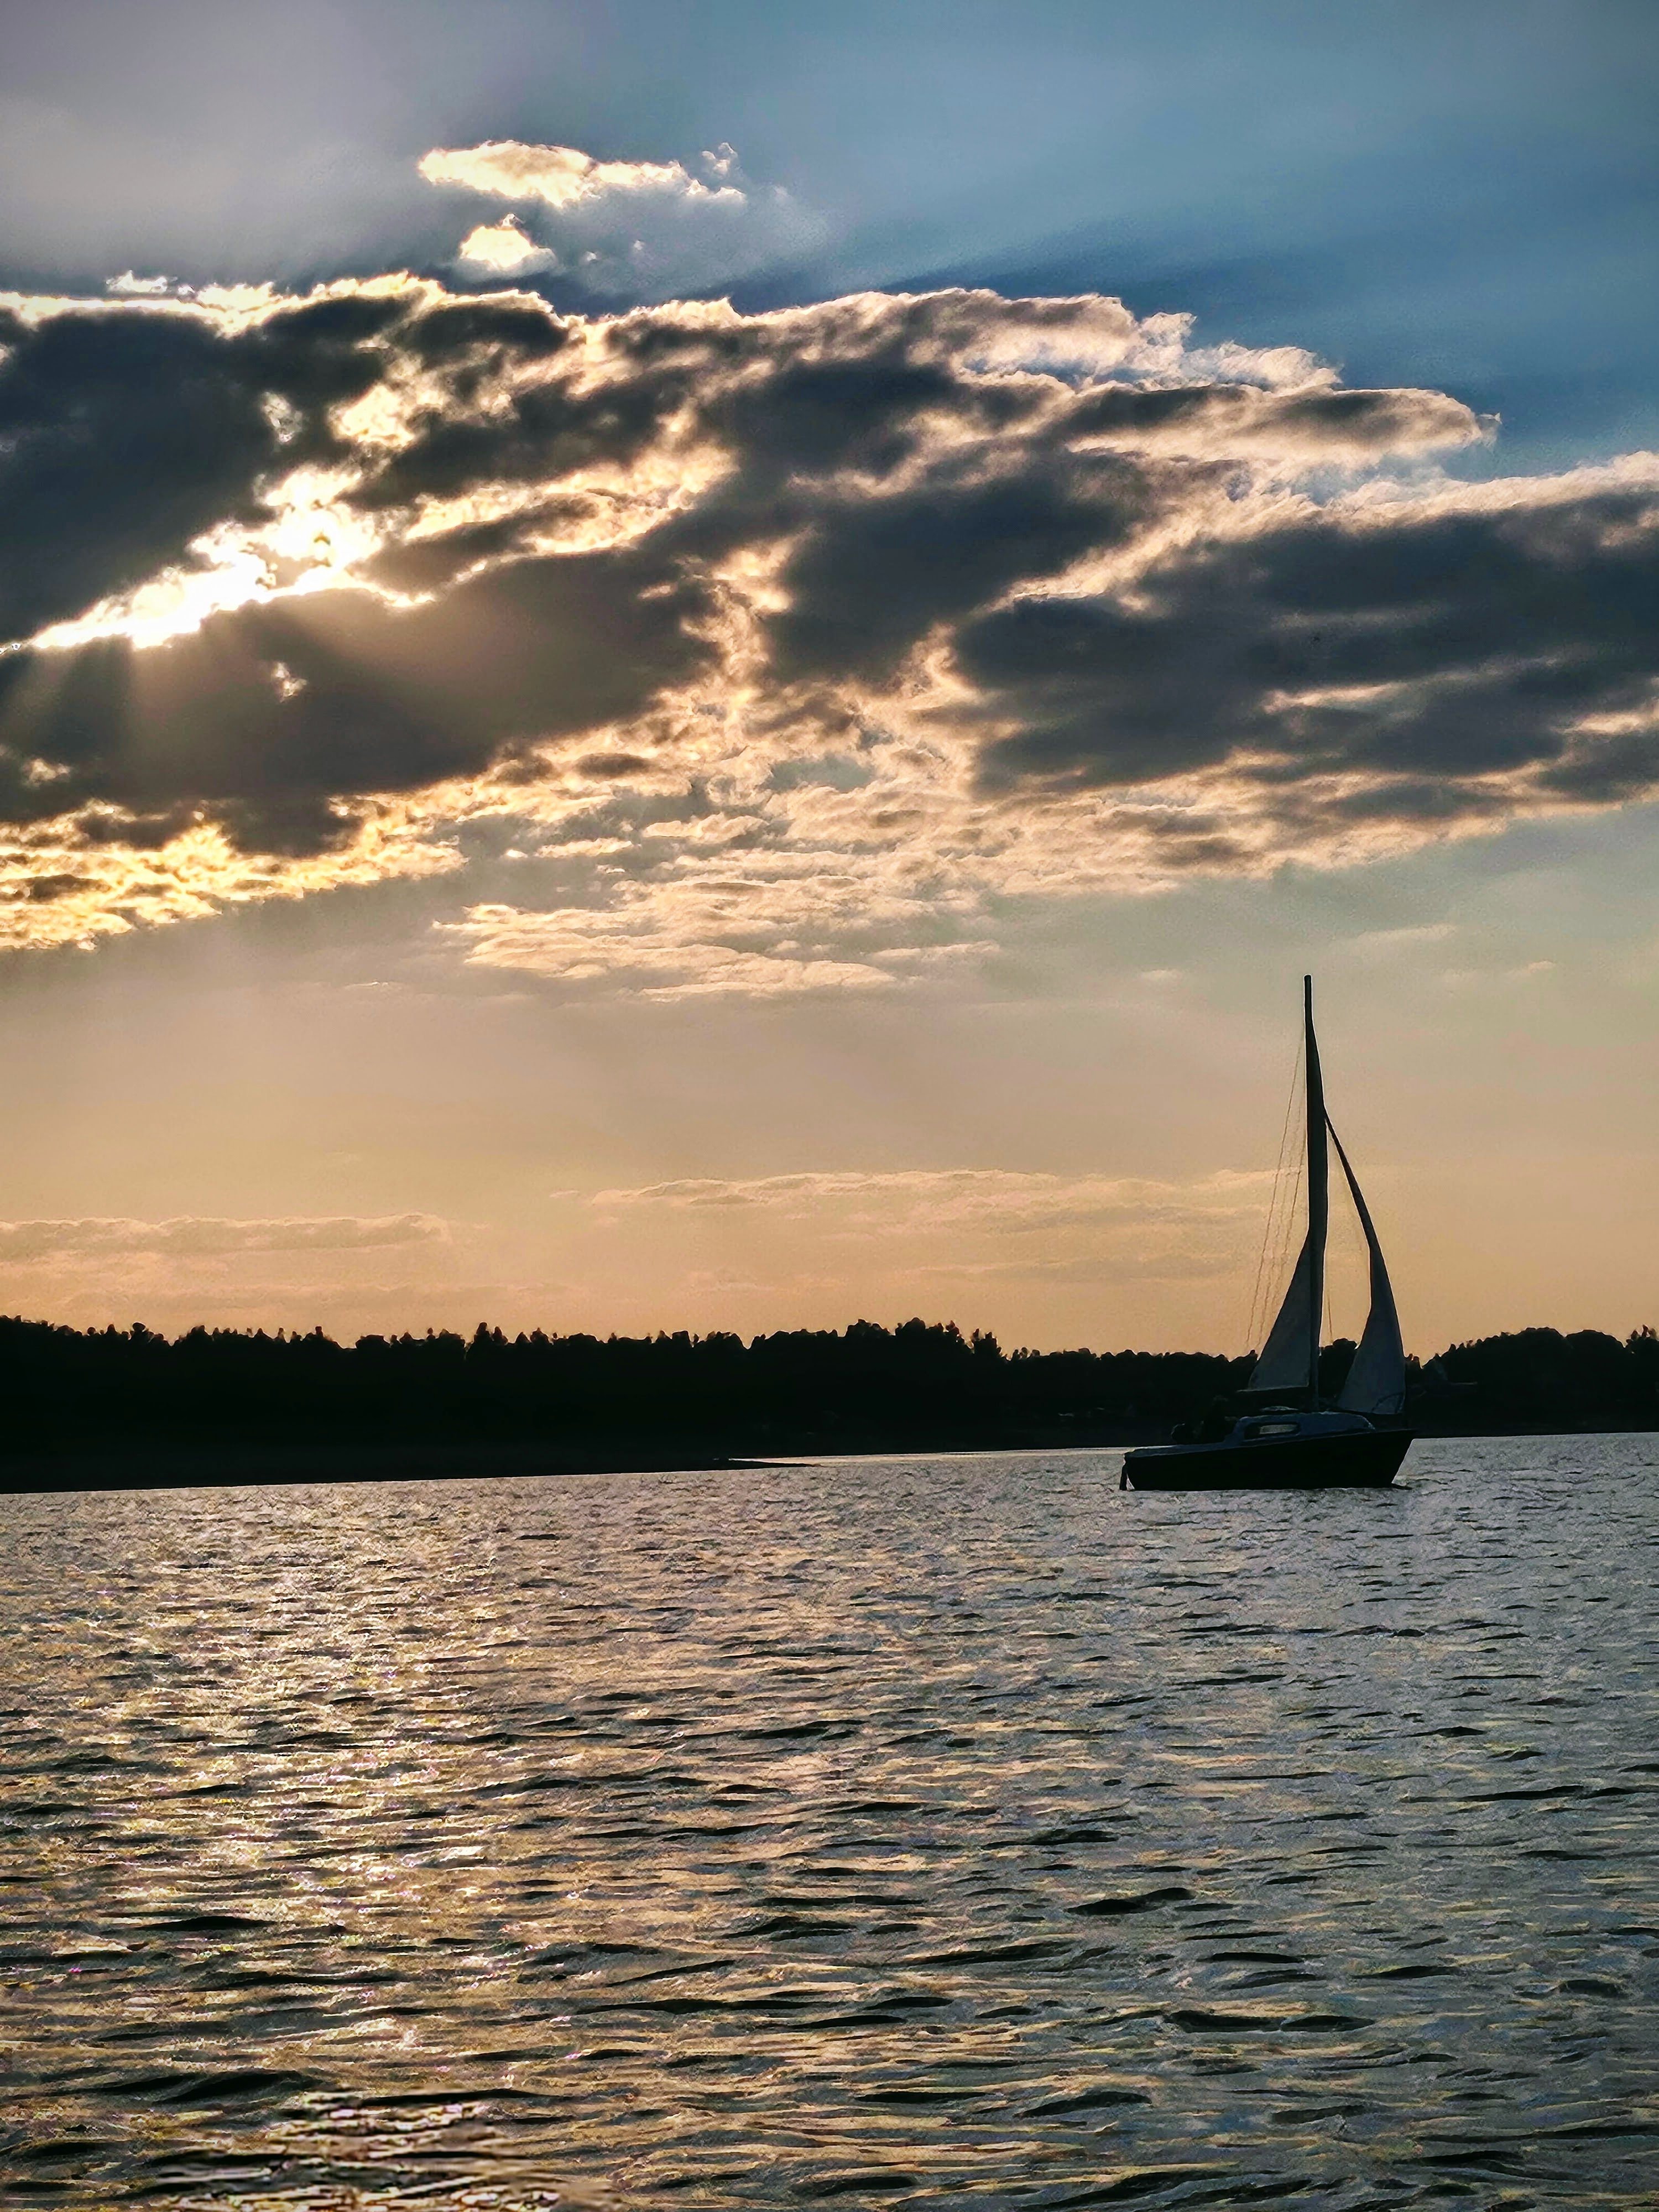
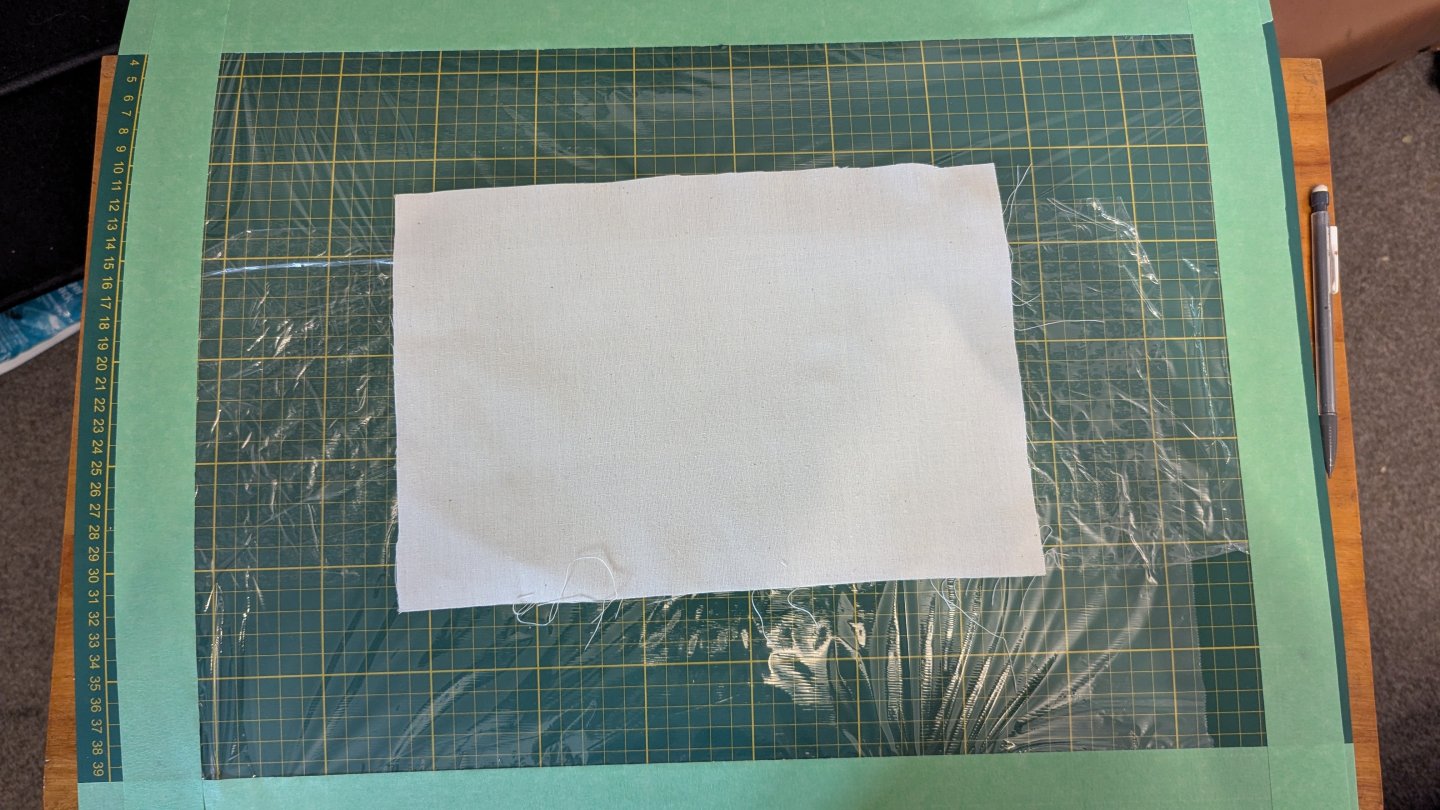
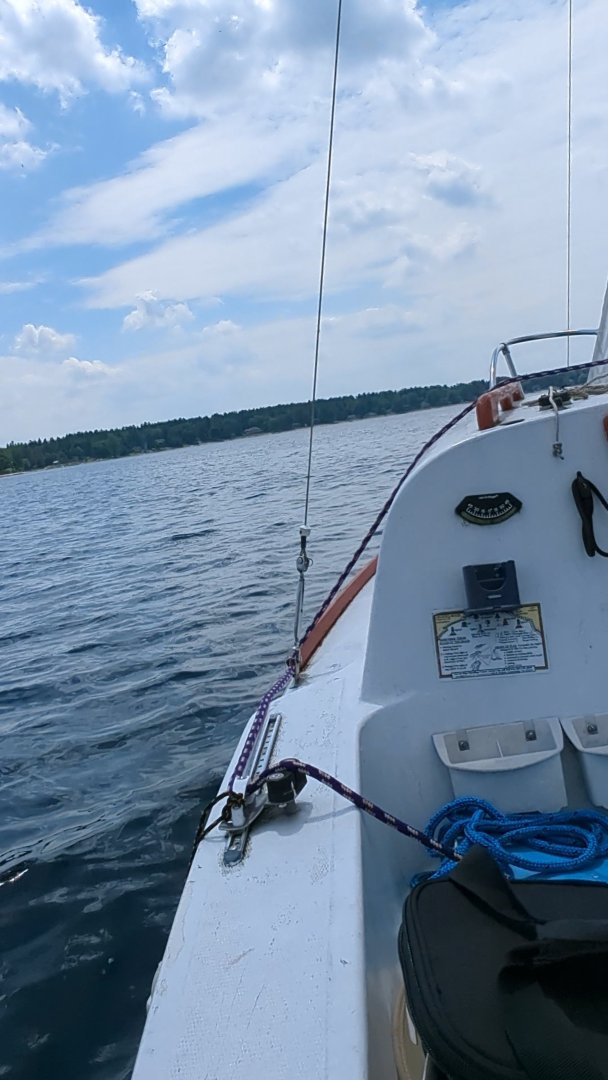
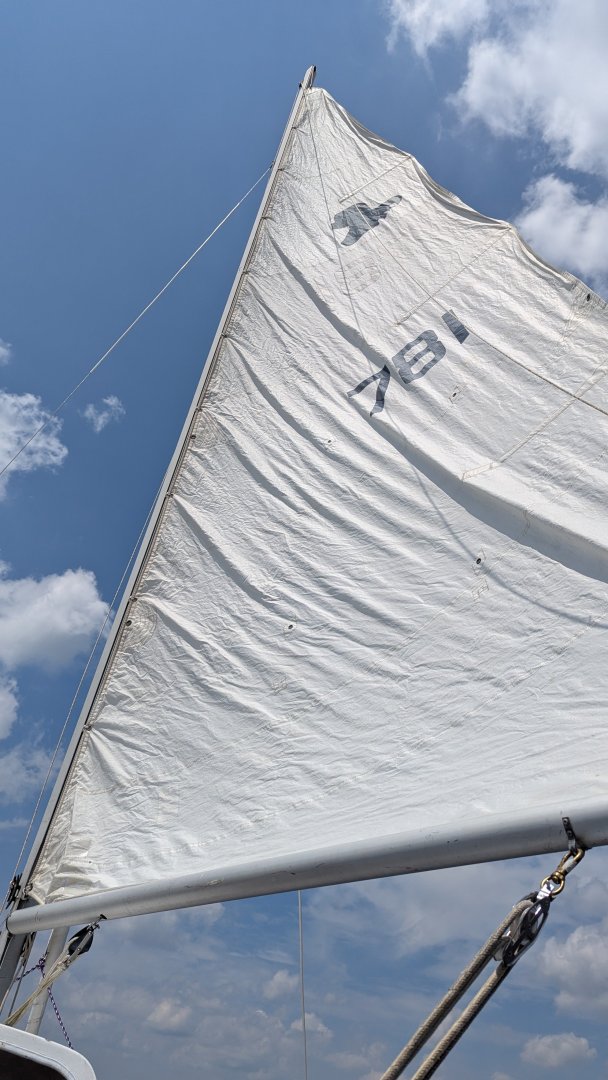
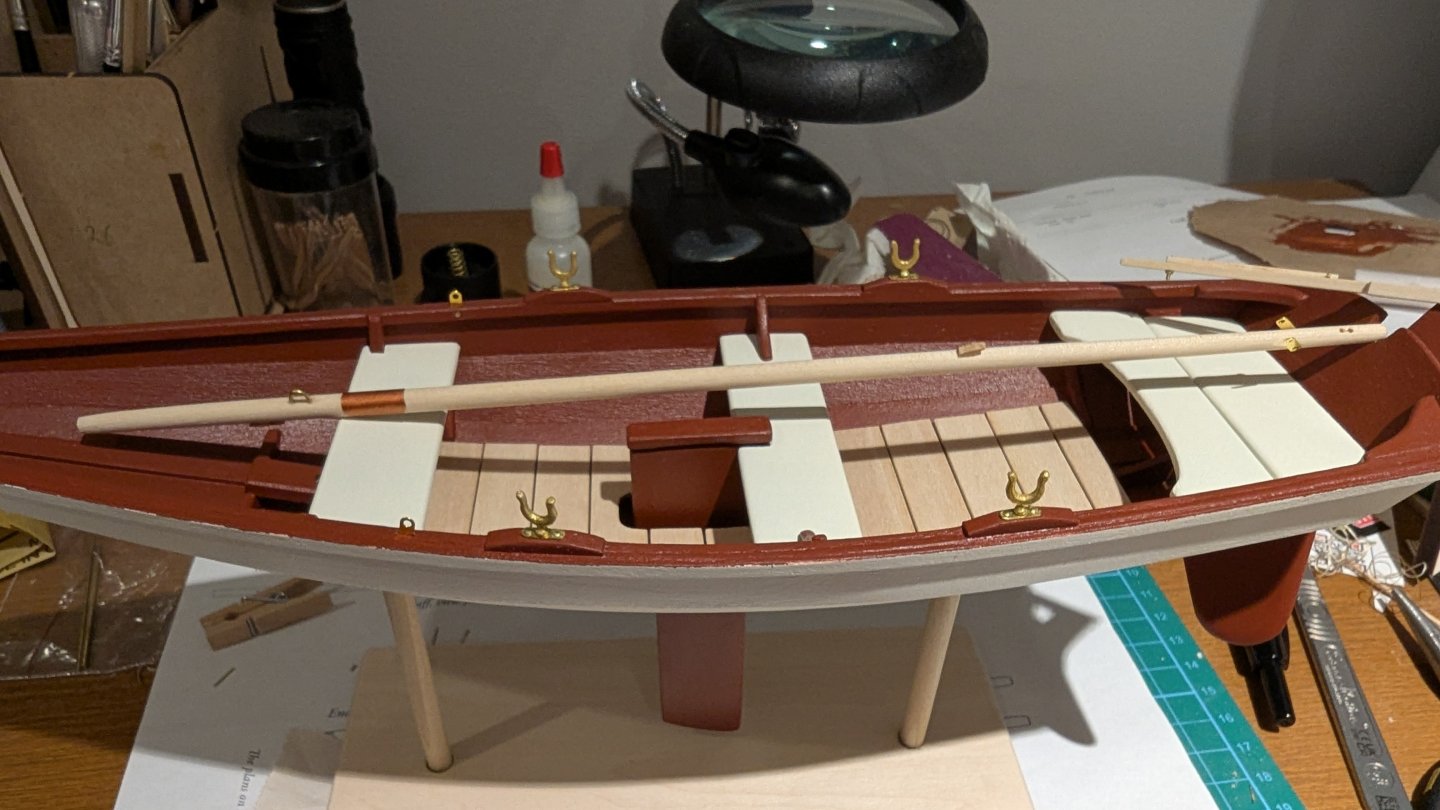
Alright, it's time to finish this up. It's been a busy summer, but I've also been procrastinating the oars due to the dust and the sail due to unknown territory. I needed a push and have been planning to join the NRG for a little while so I took advantage of the discounted offer and also joined the photo contest with the intent of submitting this pram. No, I don't intend to place anywhere on the board, but I figure it'll be a fun experience as well as a big motivation push because time is running out. The judges feedback may be helpful for the future as well. Log #16 - Finished the spars & started the sail I'm skipping the oars for now and going right to the sail as that'll be the bulk of what's needed for a completed model. The oars aren't really a necessity and even if they aren't done by the end of the month I can still submit the pram with sails. I finished the spars a while back, my only concern at the moment is how far I pushed the halyard eye in when gluing. The glue cured and stuck it, I tried pulling it back out a bit, but also had to be careful as I'd rather it be too deep than break the entire spar. If it ends up being too small, I'll just need to ream it out a little - not a huge deal. I've only just started on the sail. I laid some saran wrap down as others have. Glued up and drying The wife found those unopened scissors in a craft area. Fiskars and incredibly sharp, they did a great job cutting the fabric. That's it, but I should have more updates coming soon. 11 days to complete, photograph and submit. After thunderstorm delays, a flat tire on the trailer, and some other nonsense, I finally got the boat in the water for the first time. We had the odd breeze, but it was mainly calm. Second time being out on the boat, but my first time teaching myself to sail (had the wife and kid aboard, which added to the chaos of my not knowing what I'm doing). Thanks for the likes and comments. Matt

- 86 replies
-
- 7
-
-
- Model Shipways
- Norwegian Sailing Pram
- (and 3 more)
-
Interesting idea. Do you have any real images of these beside some models? The AI images are throwing me way off and it's impossible to get a real sense of scale and feel for these medallions.
-
There must be some hidden award for who can put their pram on hold for the longest. Pram looks great, and good idea with the dust collector. That's part of what's been keeping me since I'm in a carpeted rec room it makes such a mess!
-
NRG Photographic Ship Model Competition
MBerg replied to kurtvd19's topic in NAUTICAL RESEARCH GUILD - News & Information
Very interesting! I'd be interested in joining, but I'm not sure it makes sense at this stage in my career (especially seeing past' beginner' examples). Is it possible to take advantage of the special membership if unsure in joining the competition? -
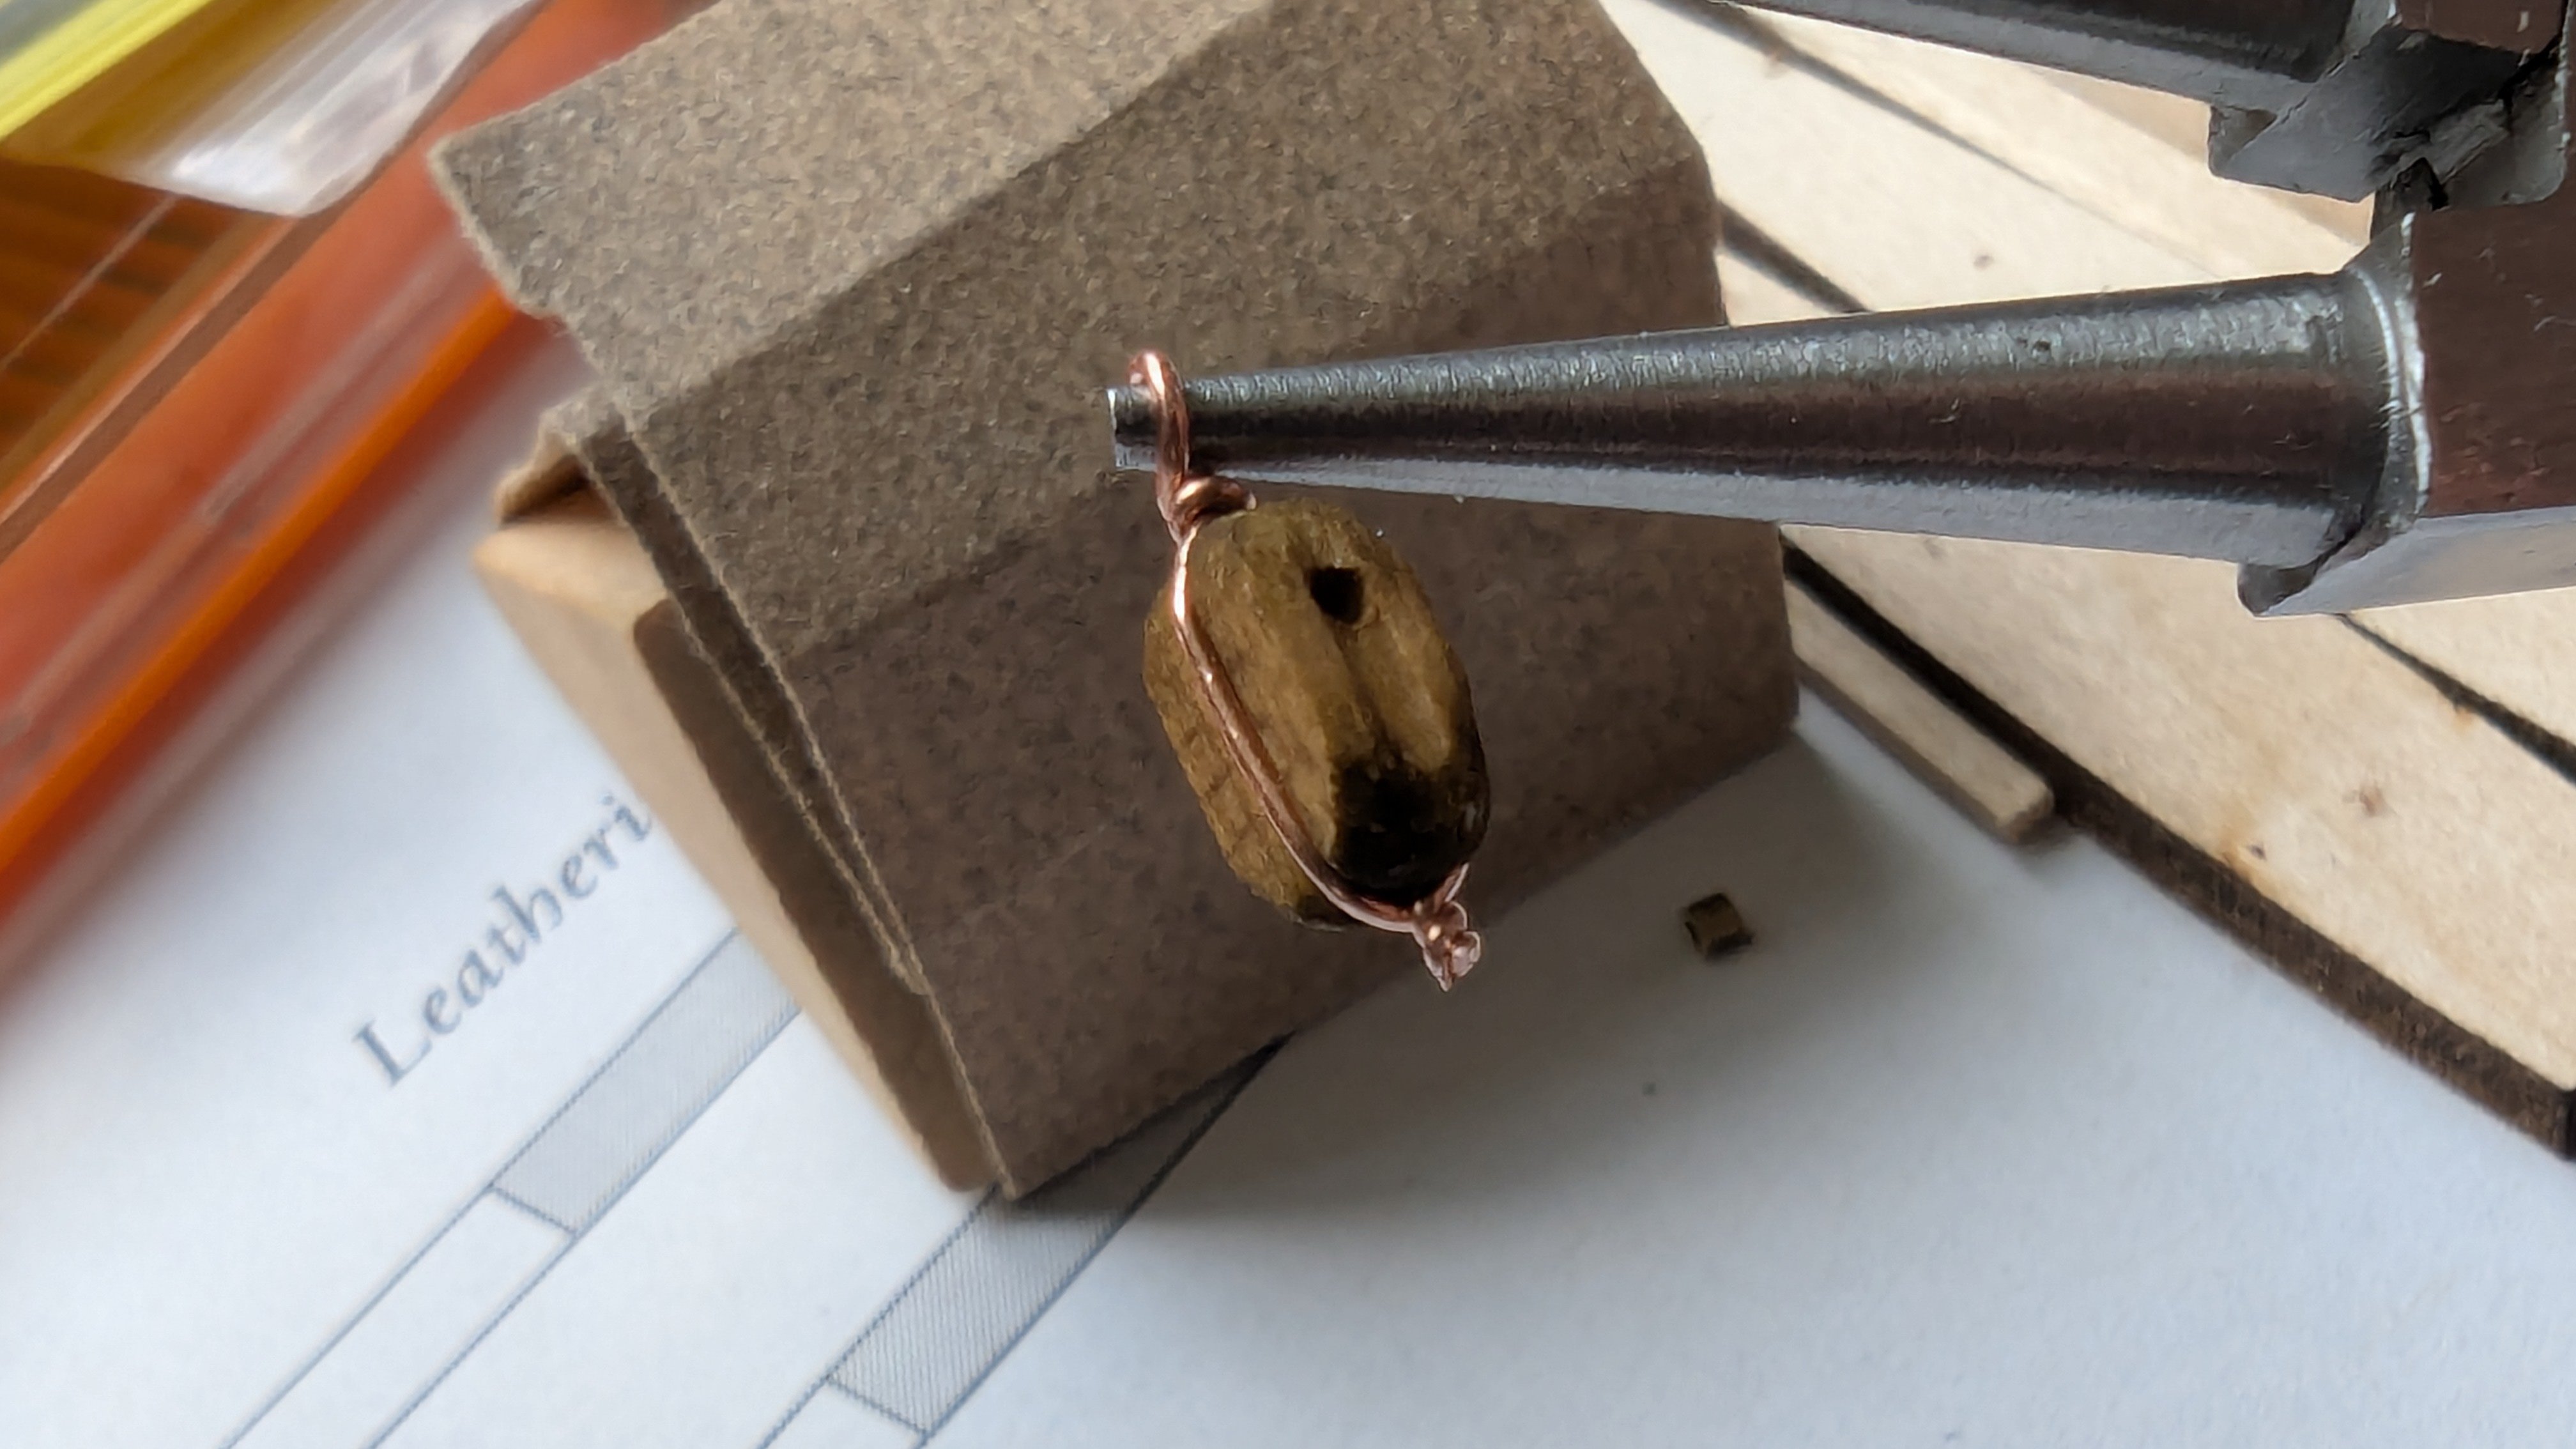
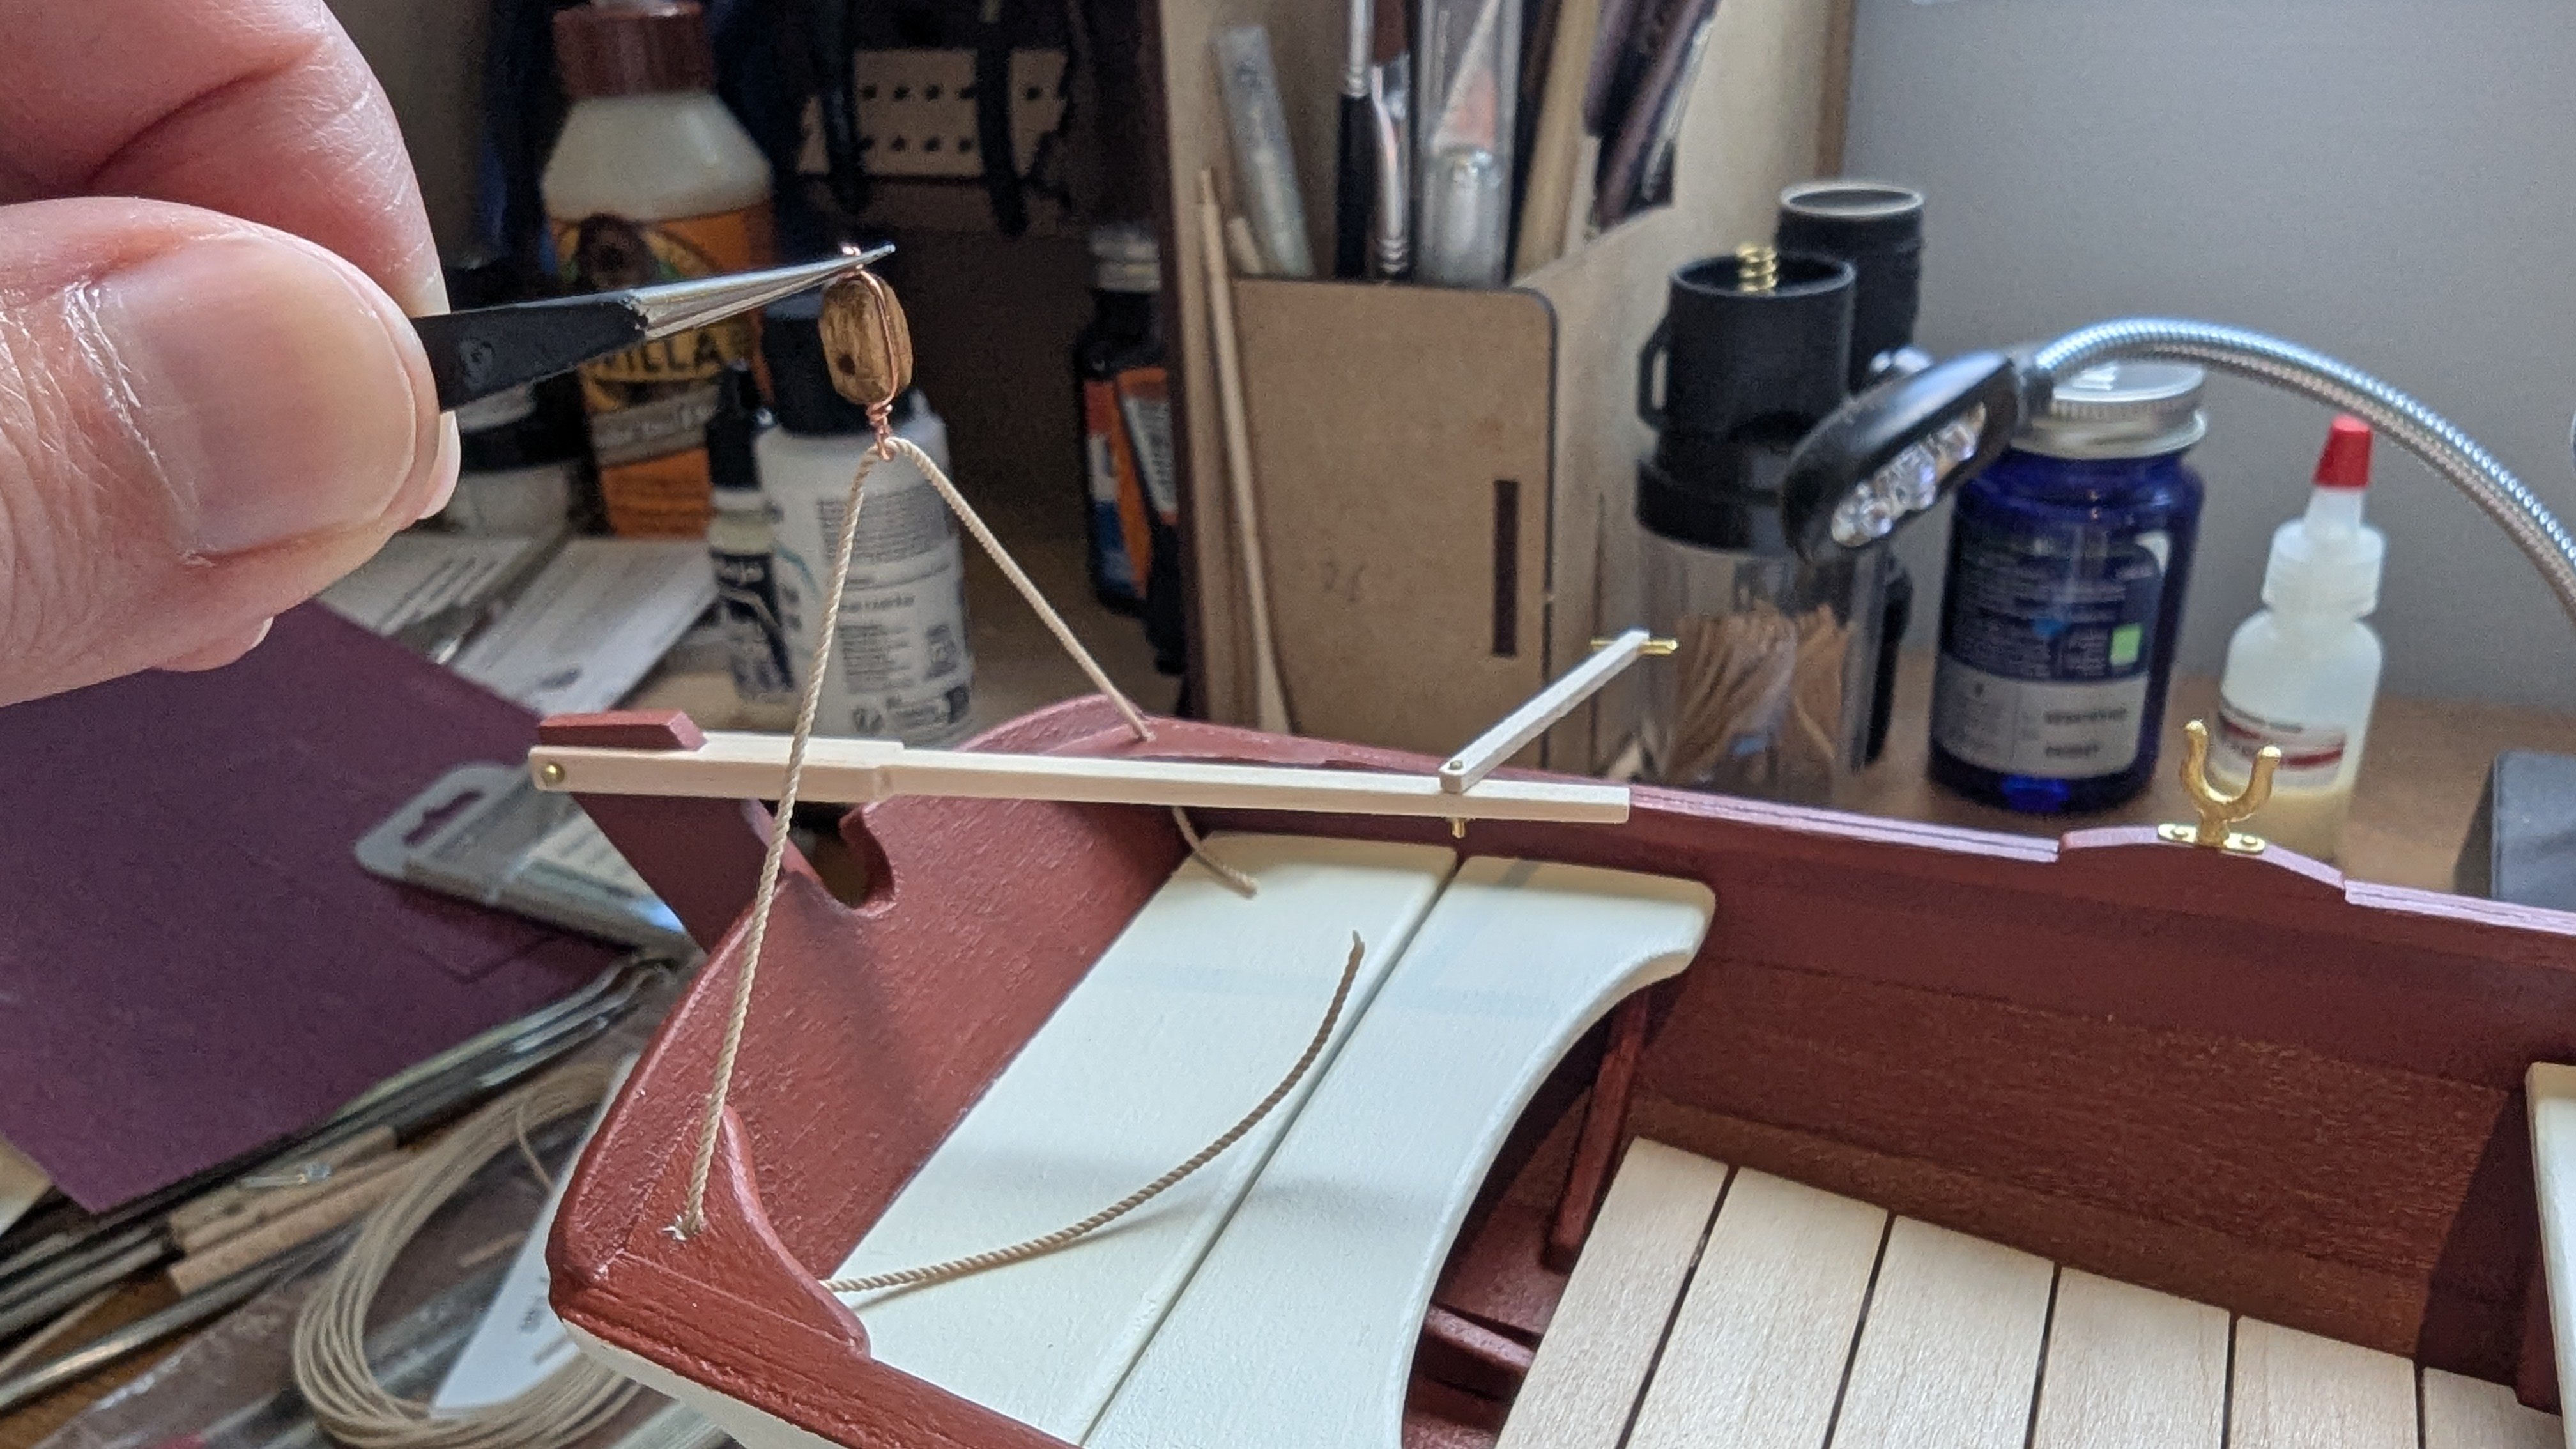
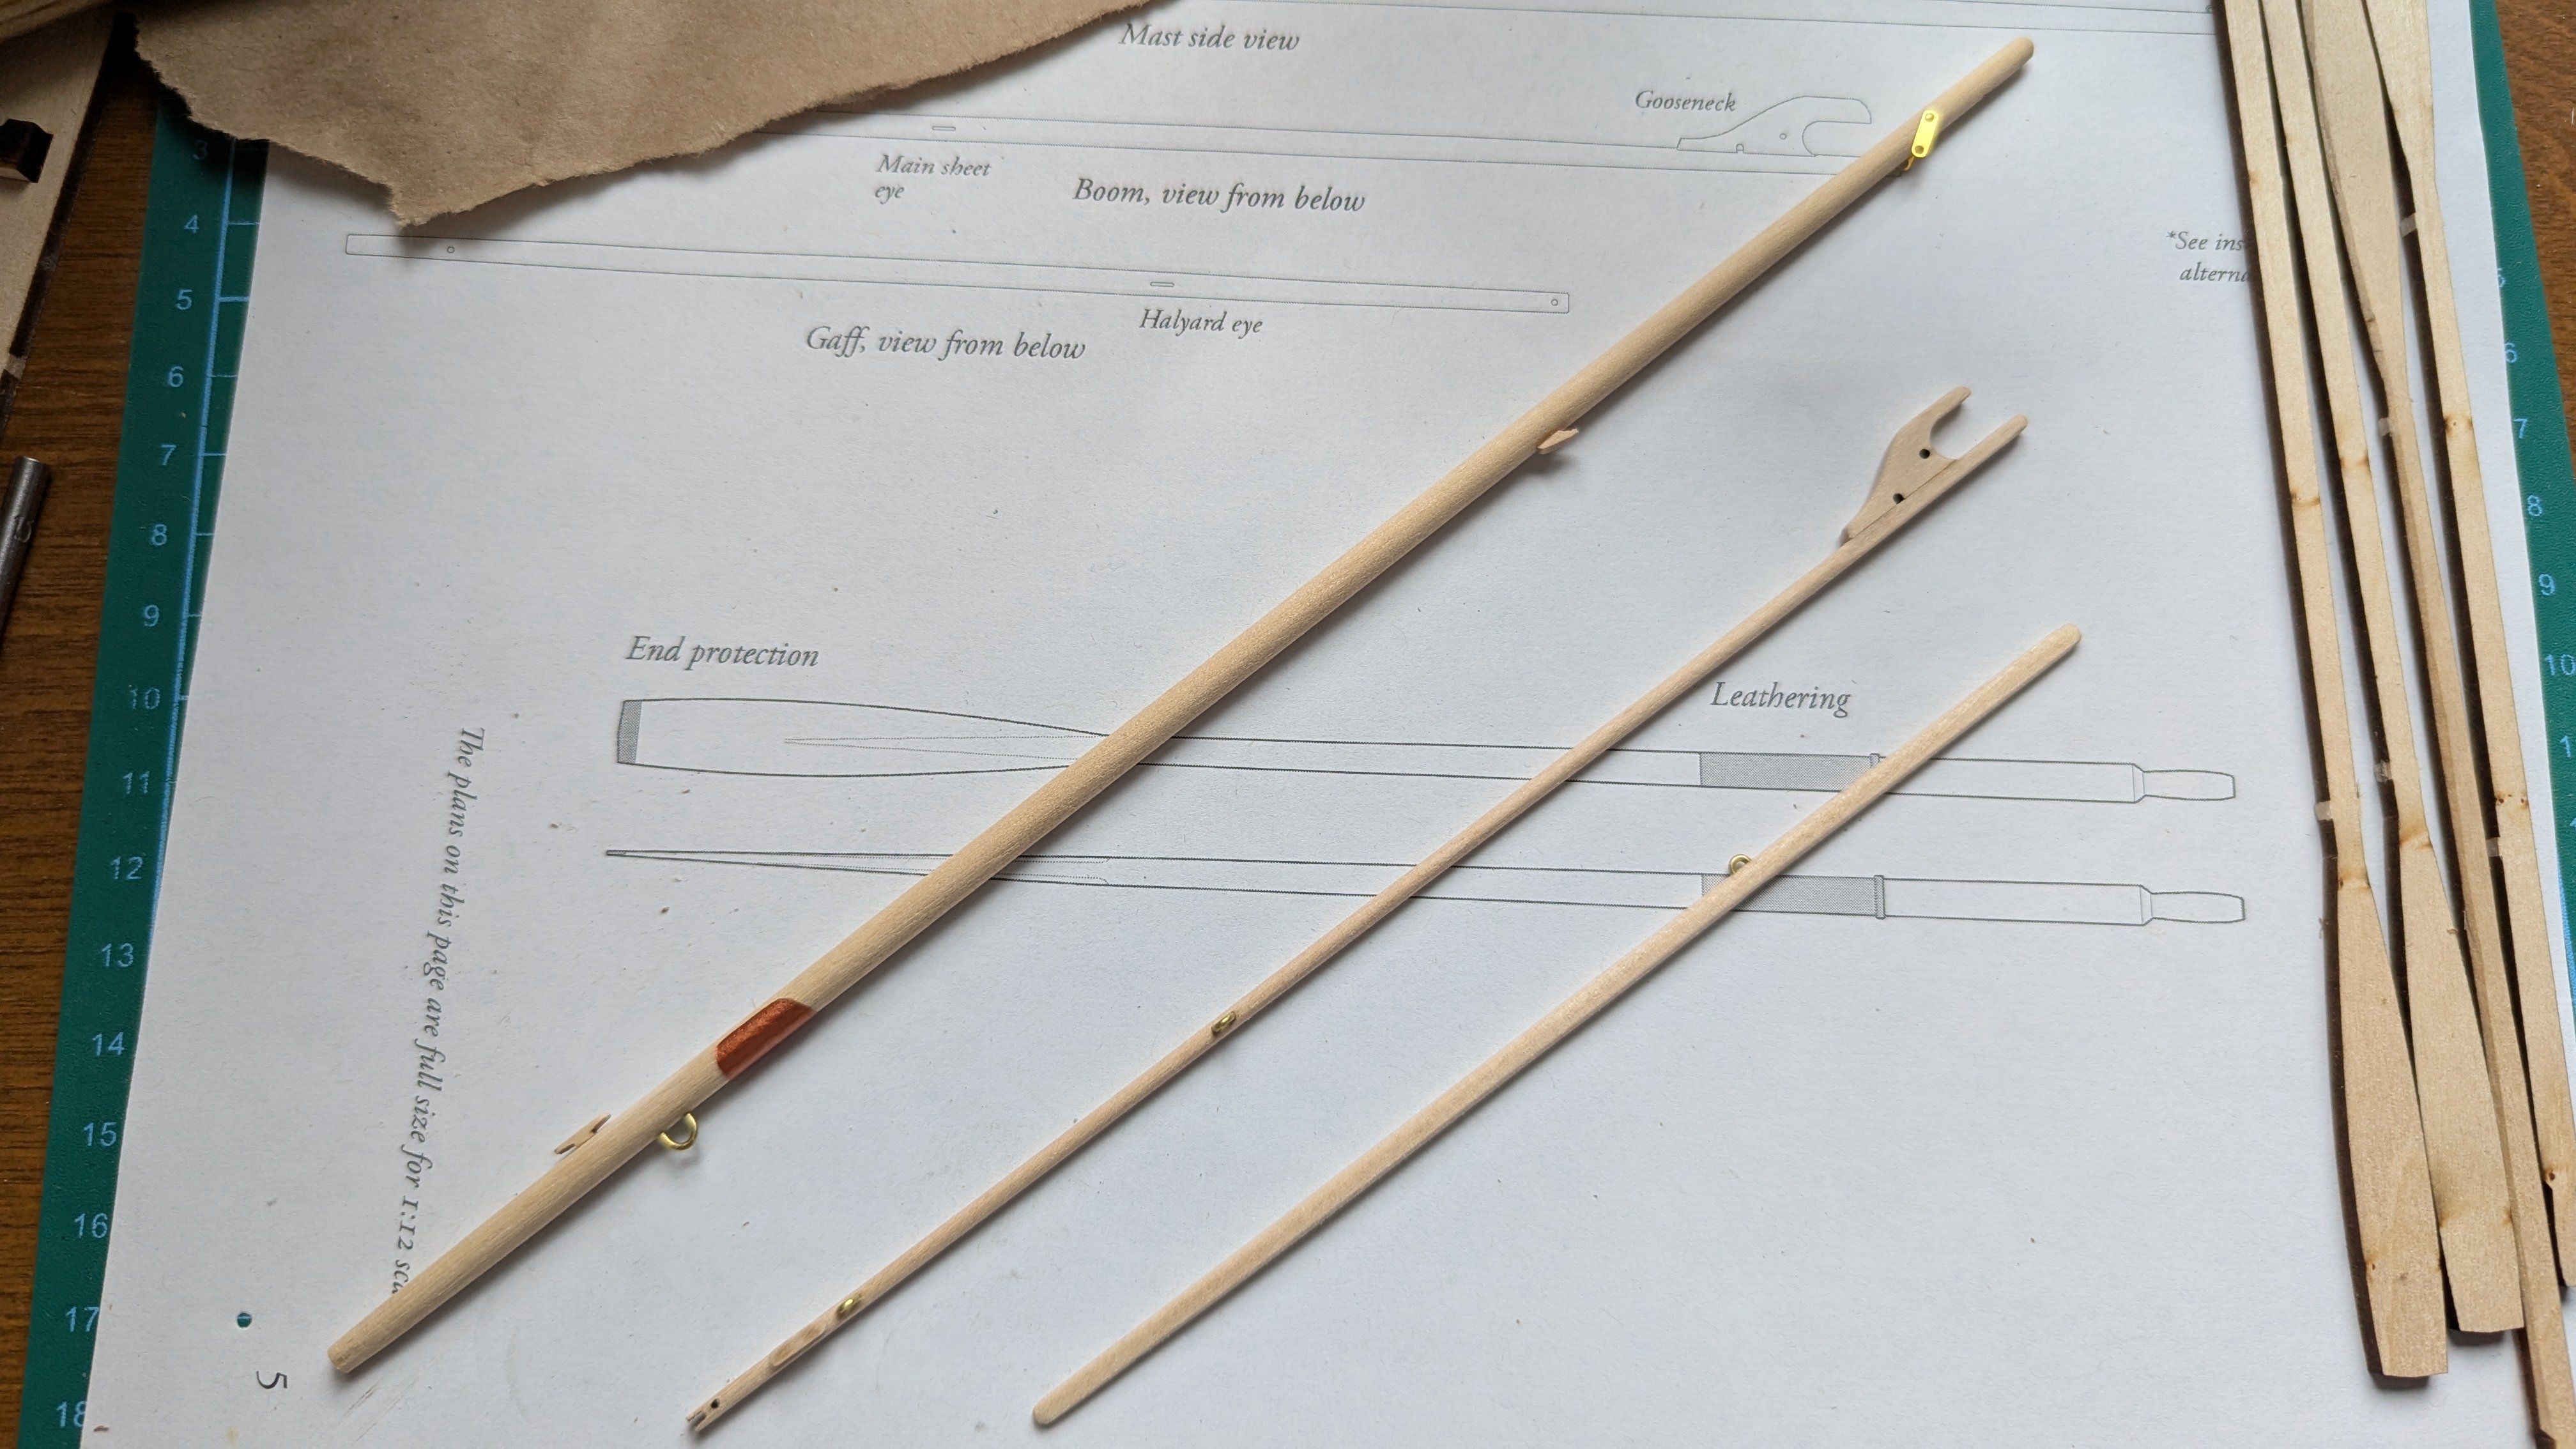
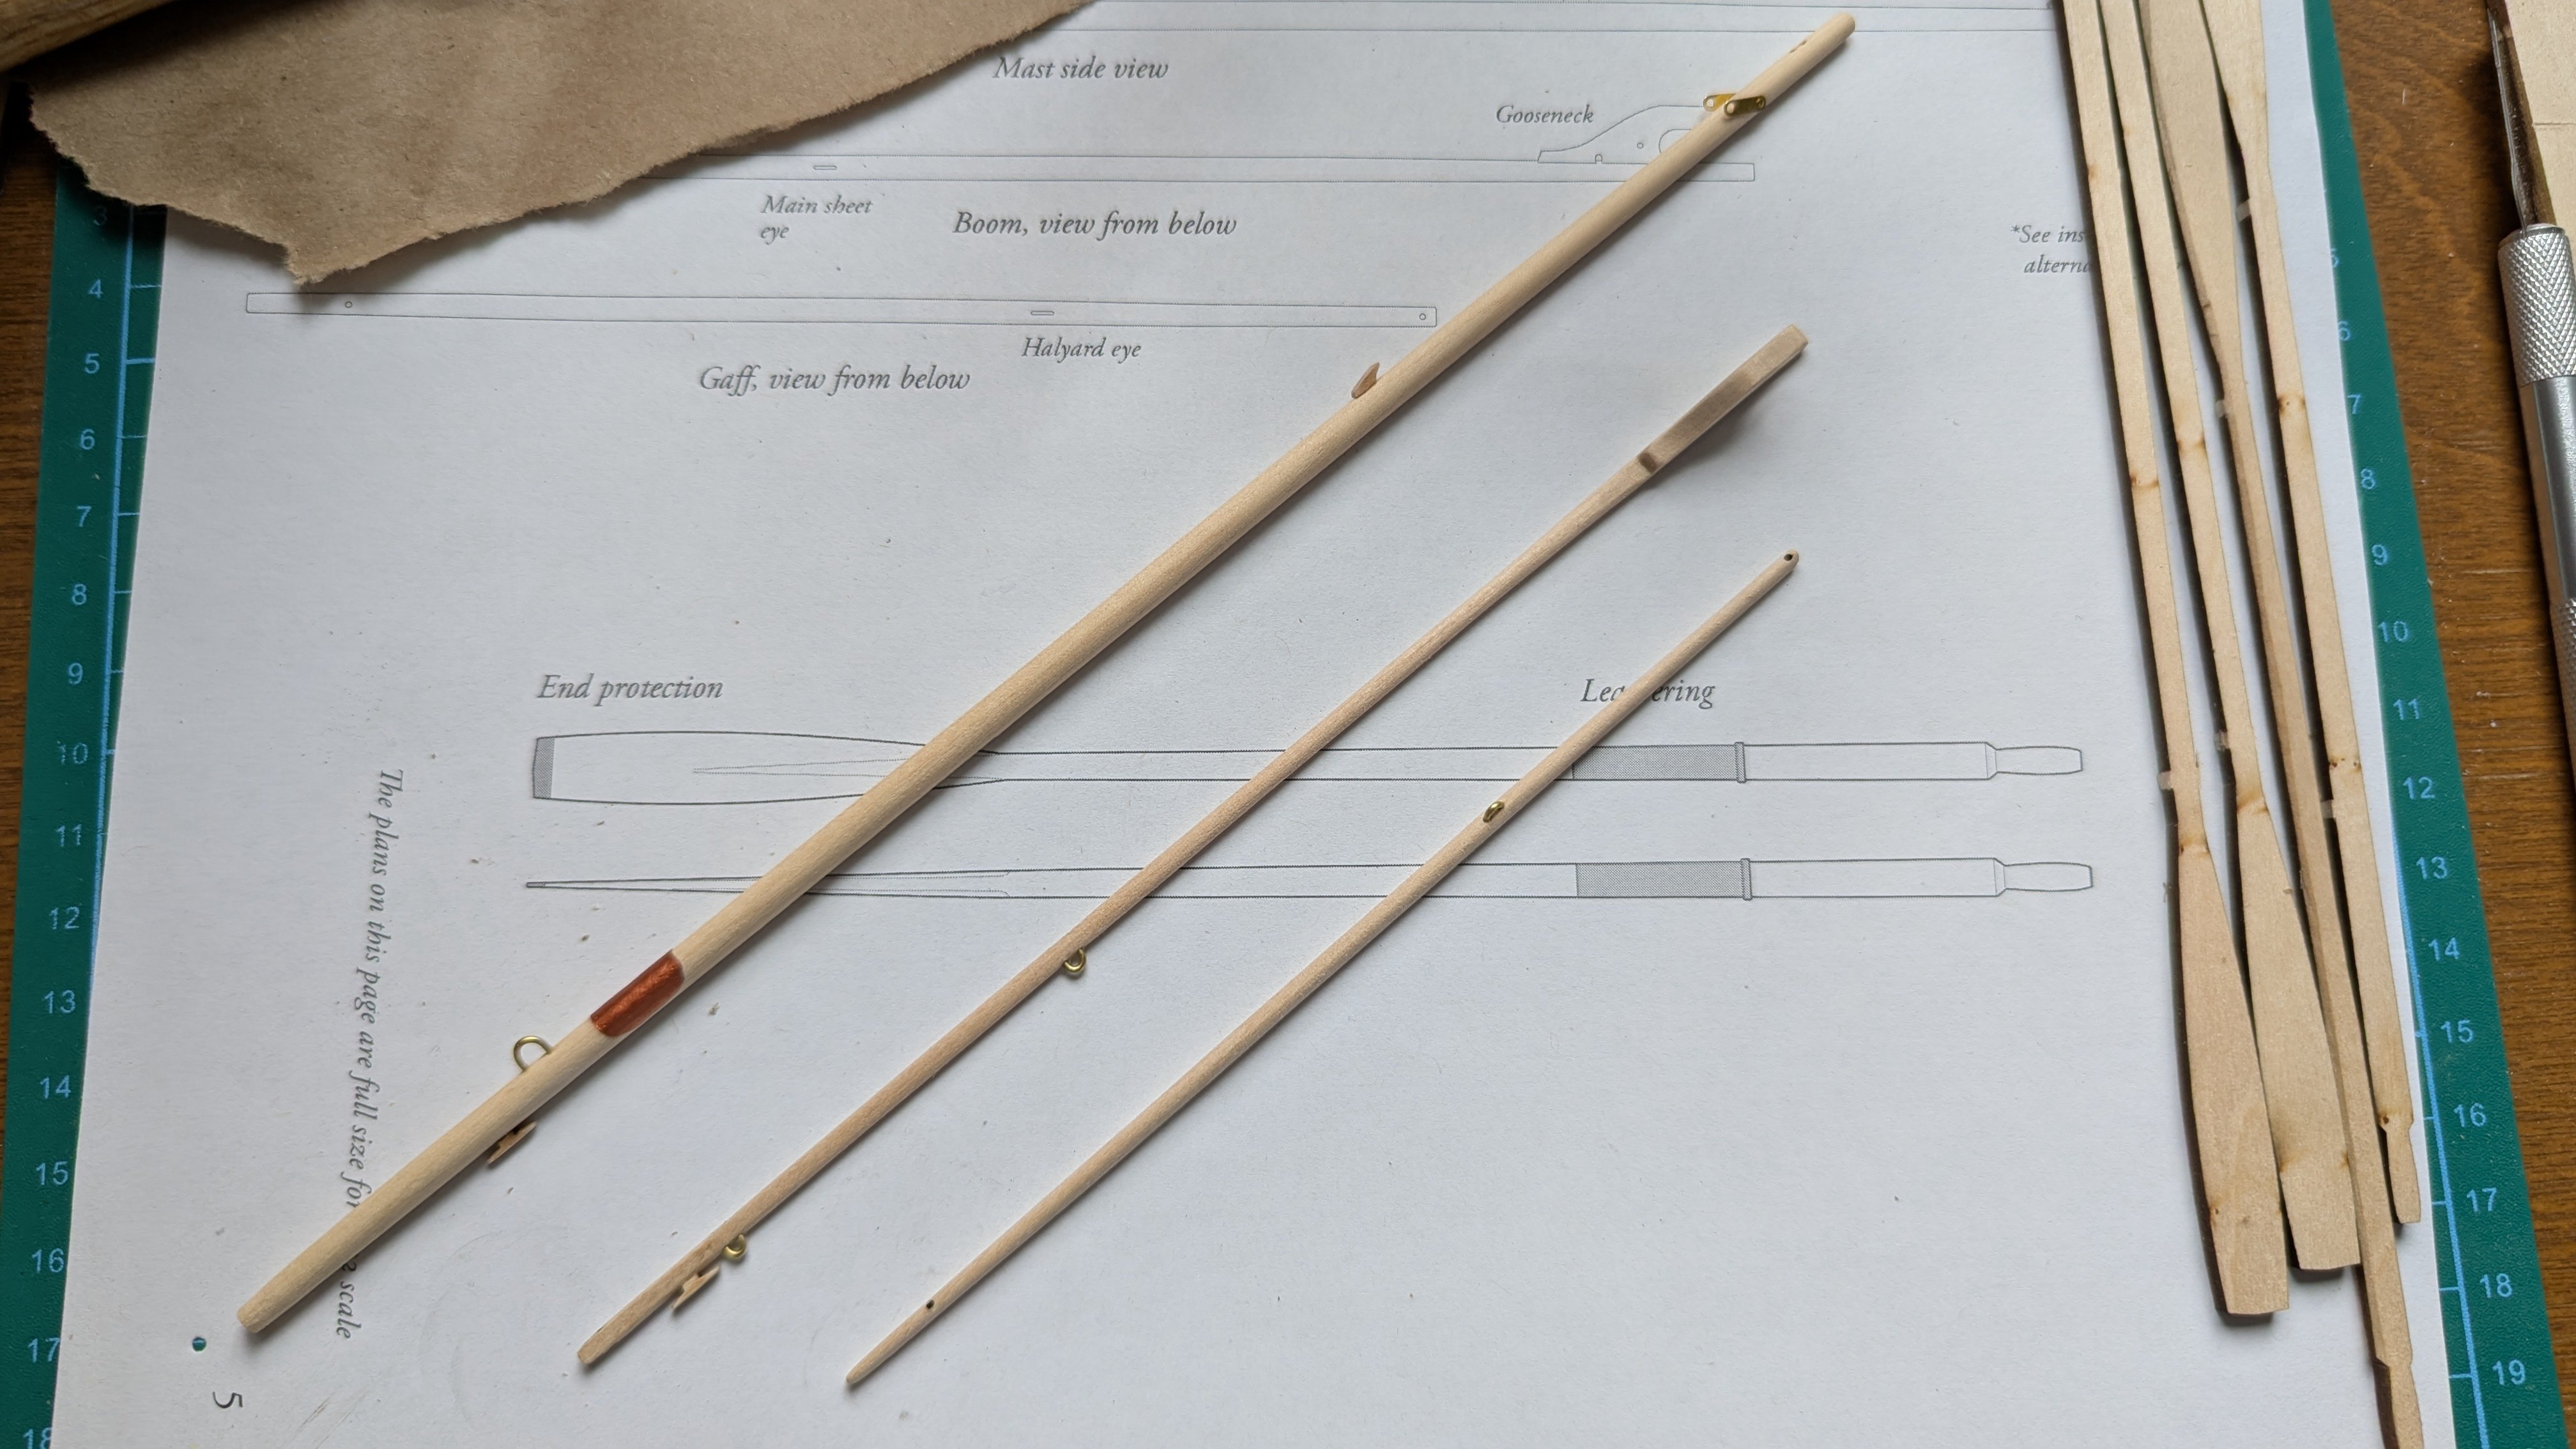
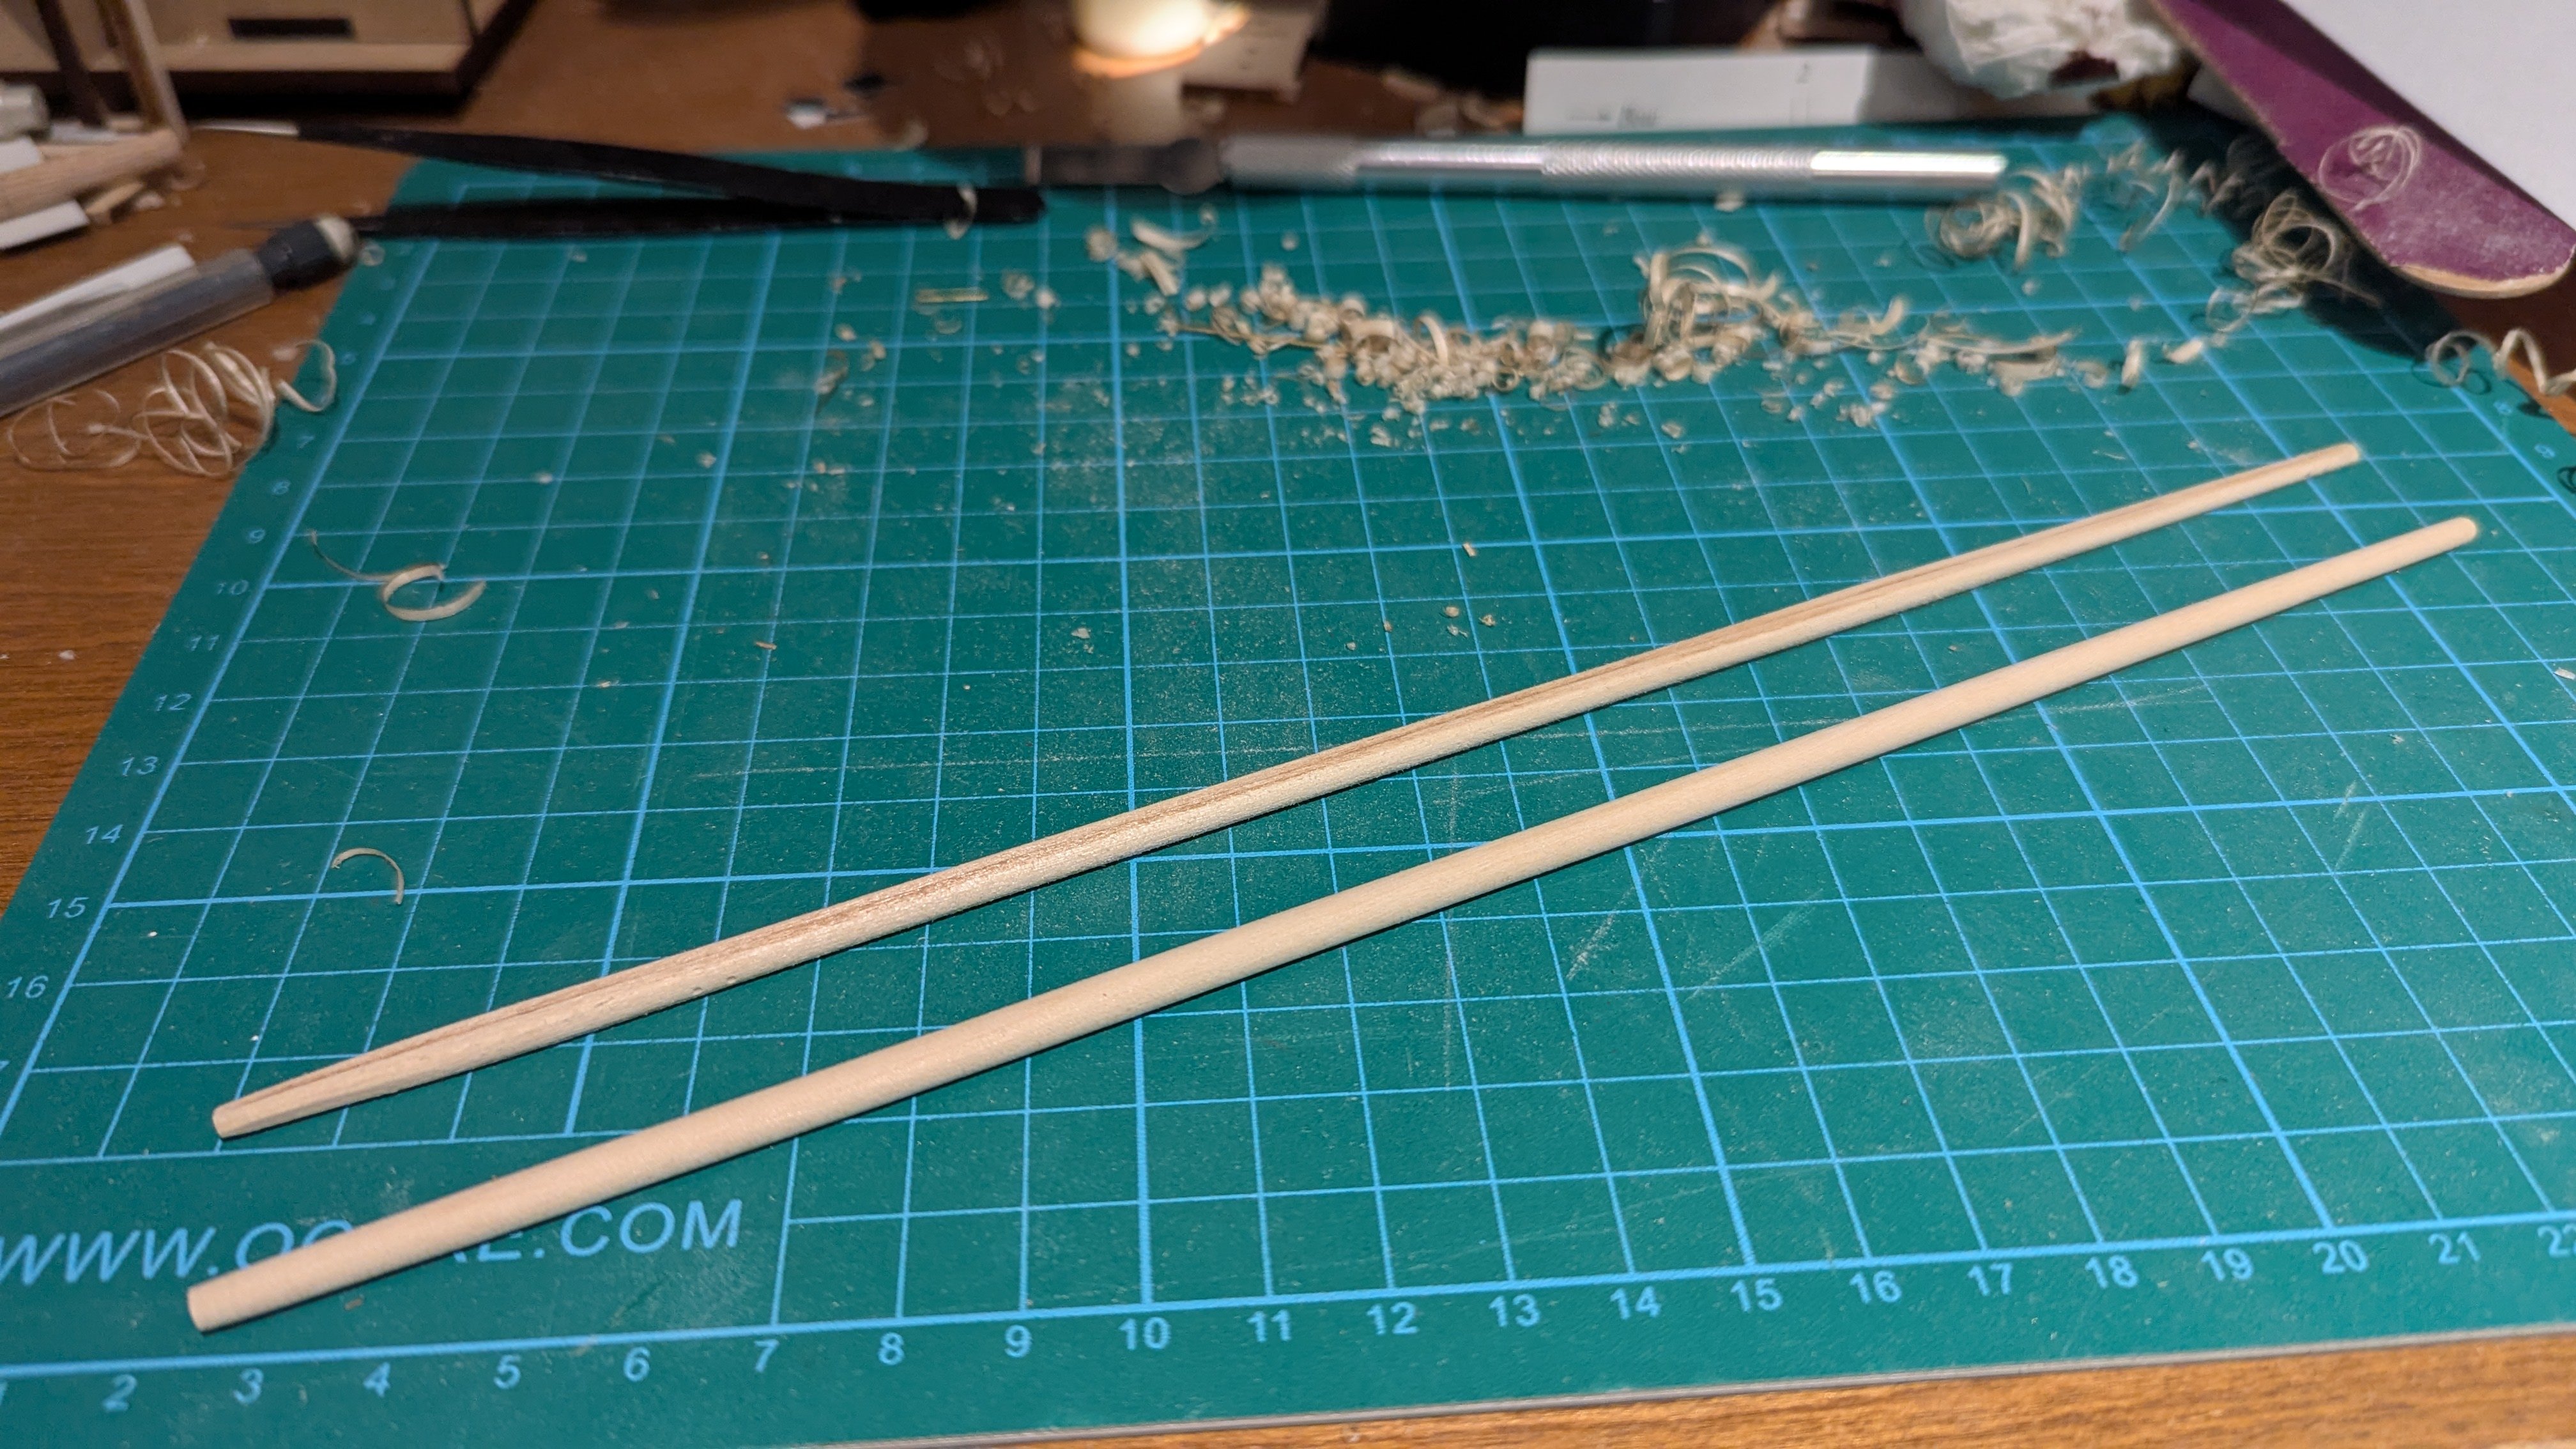
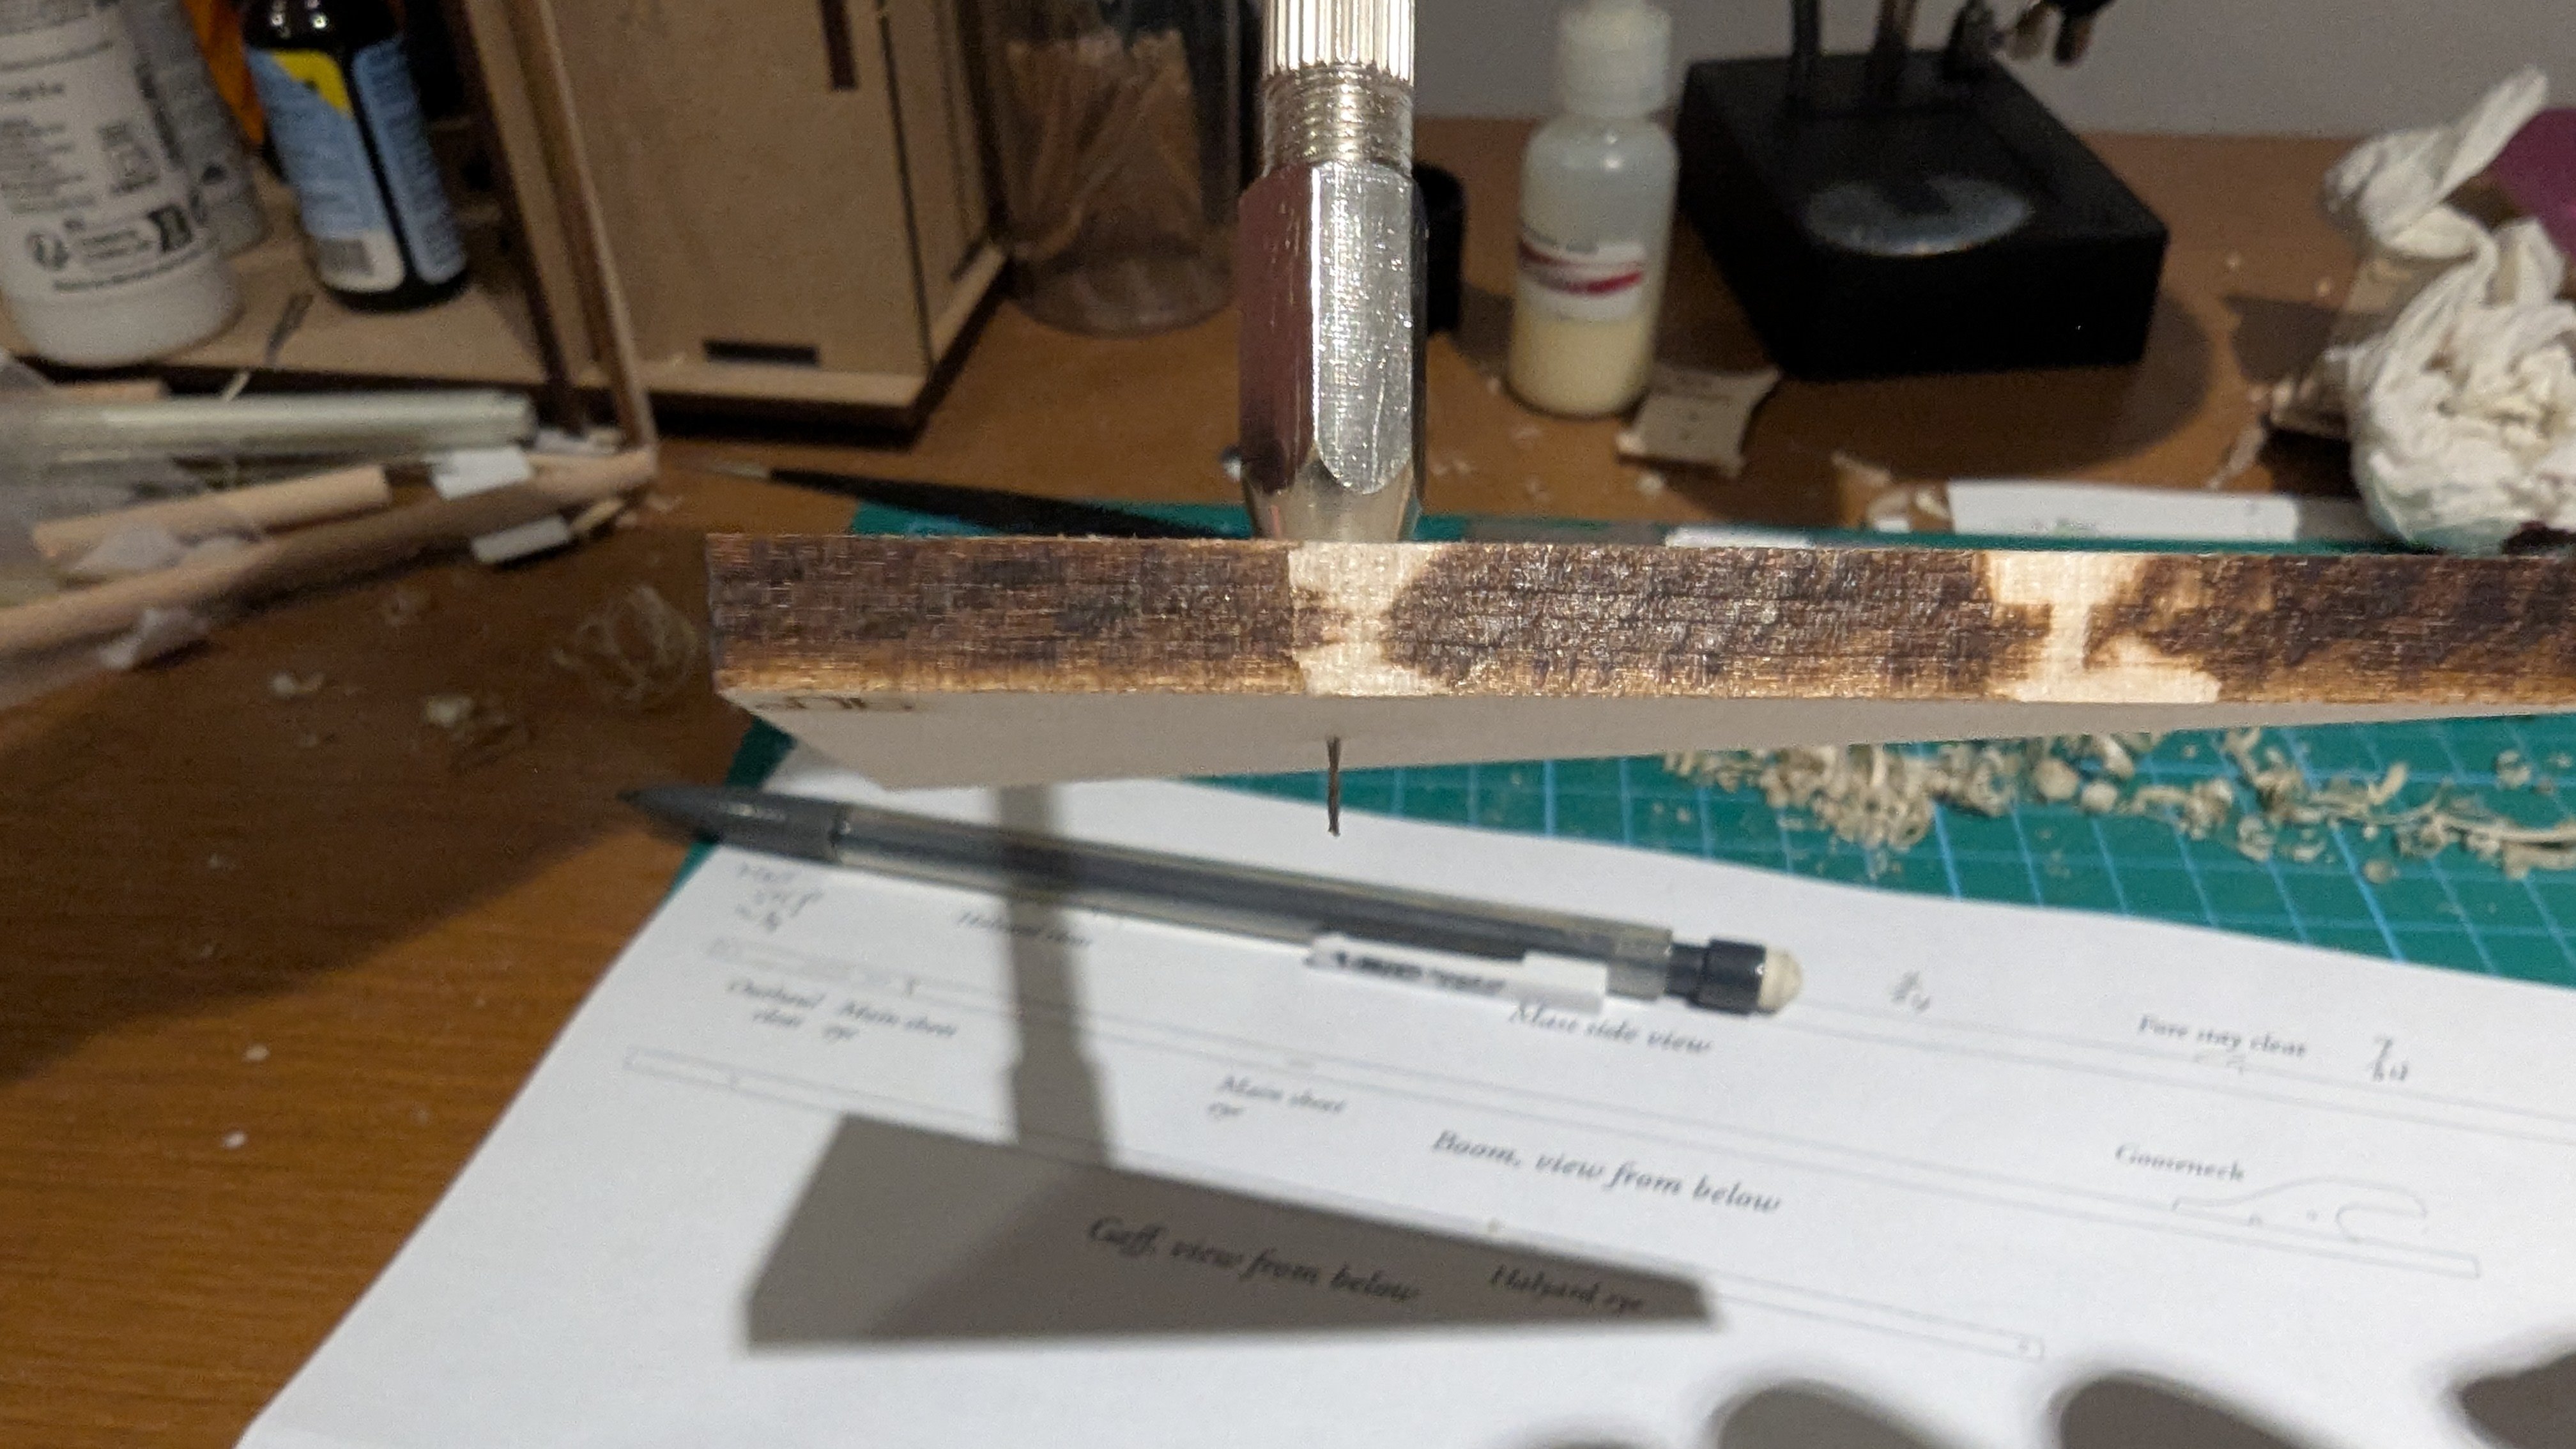
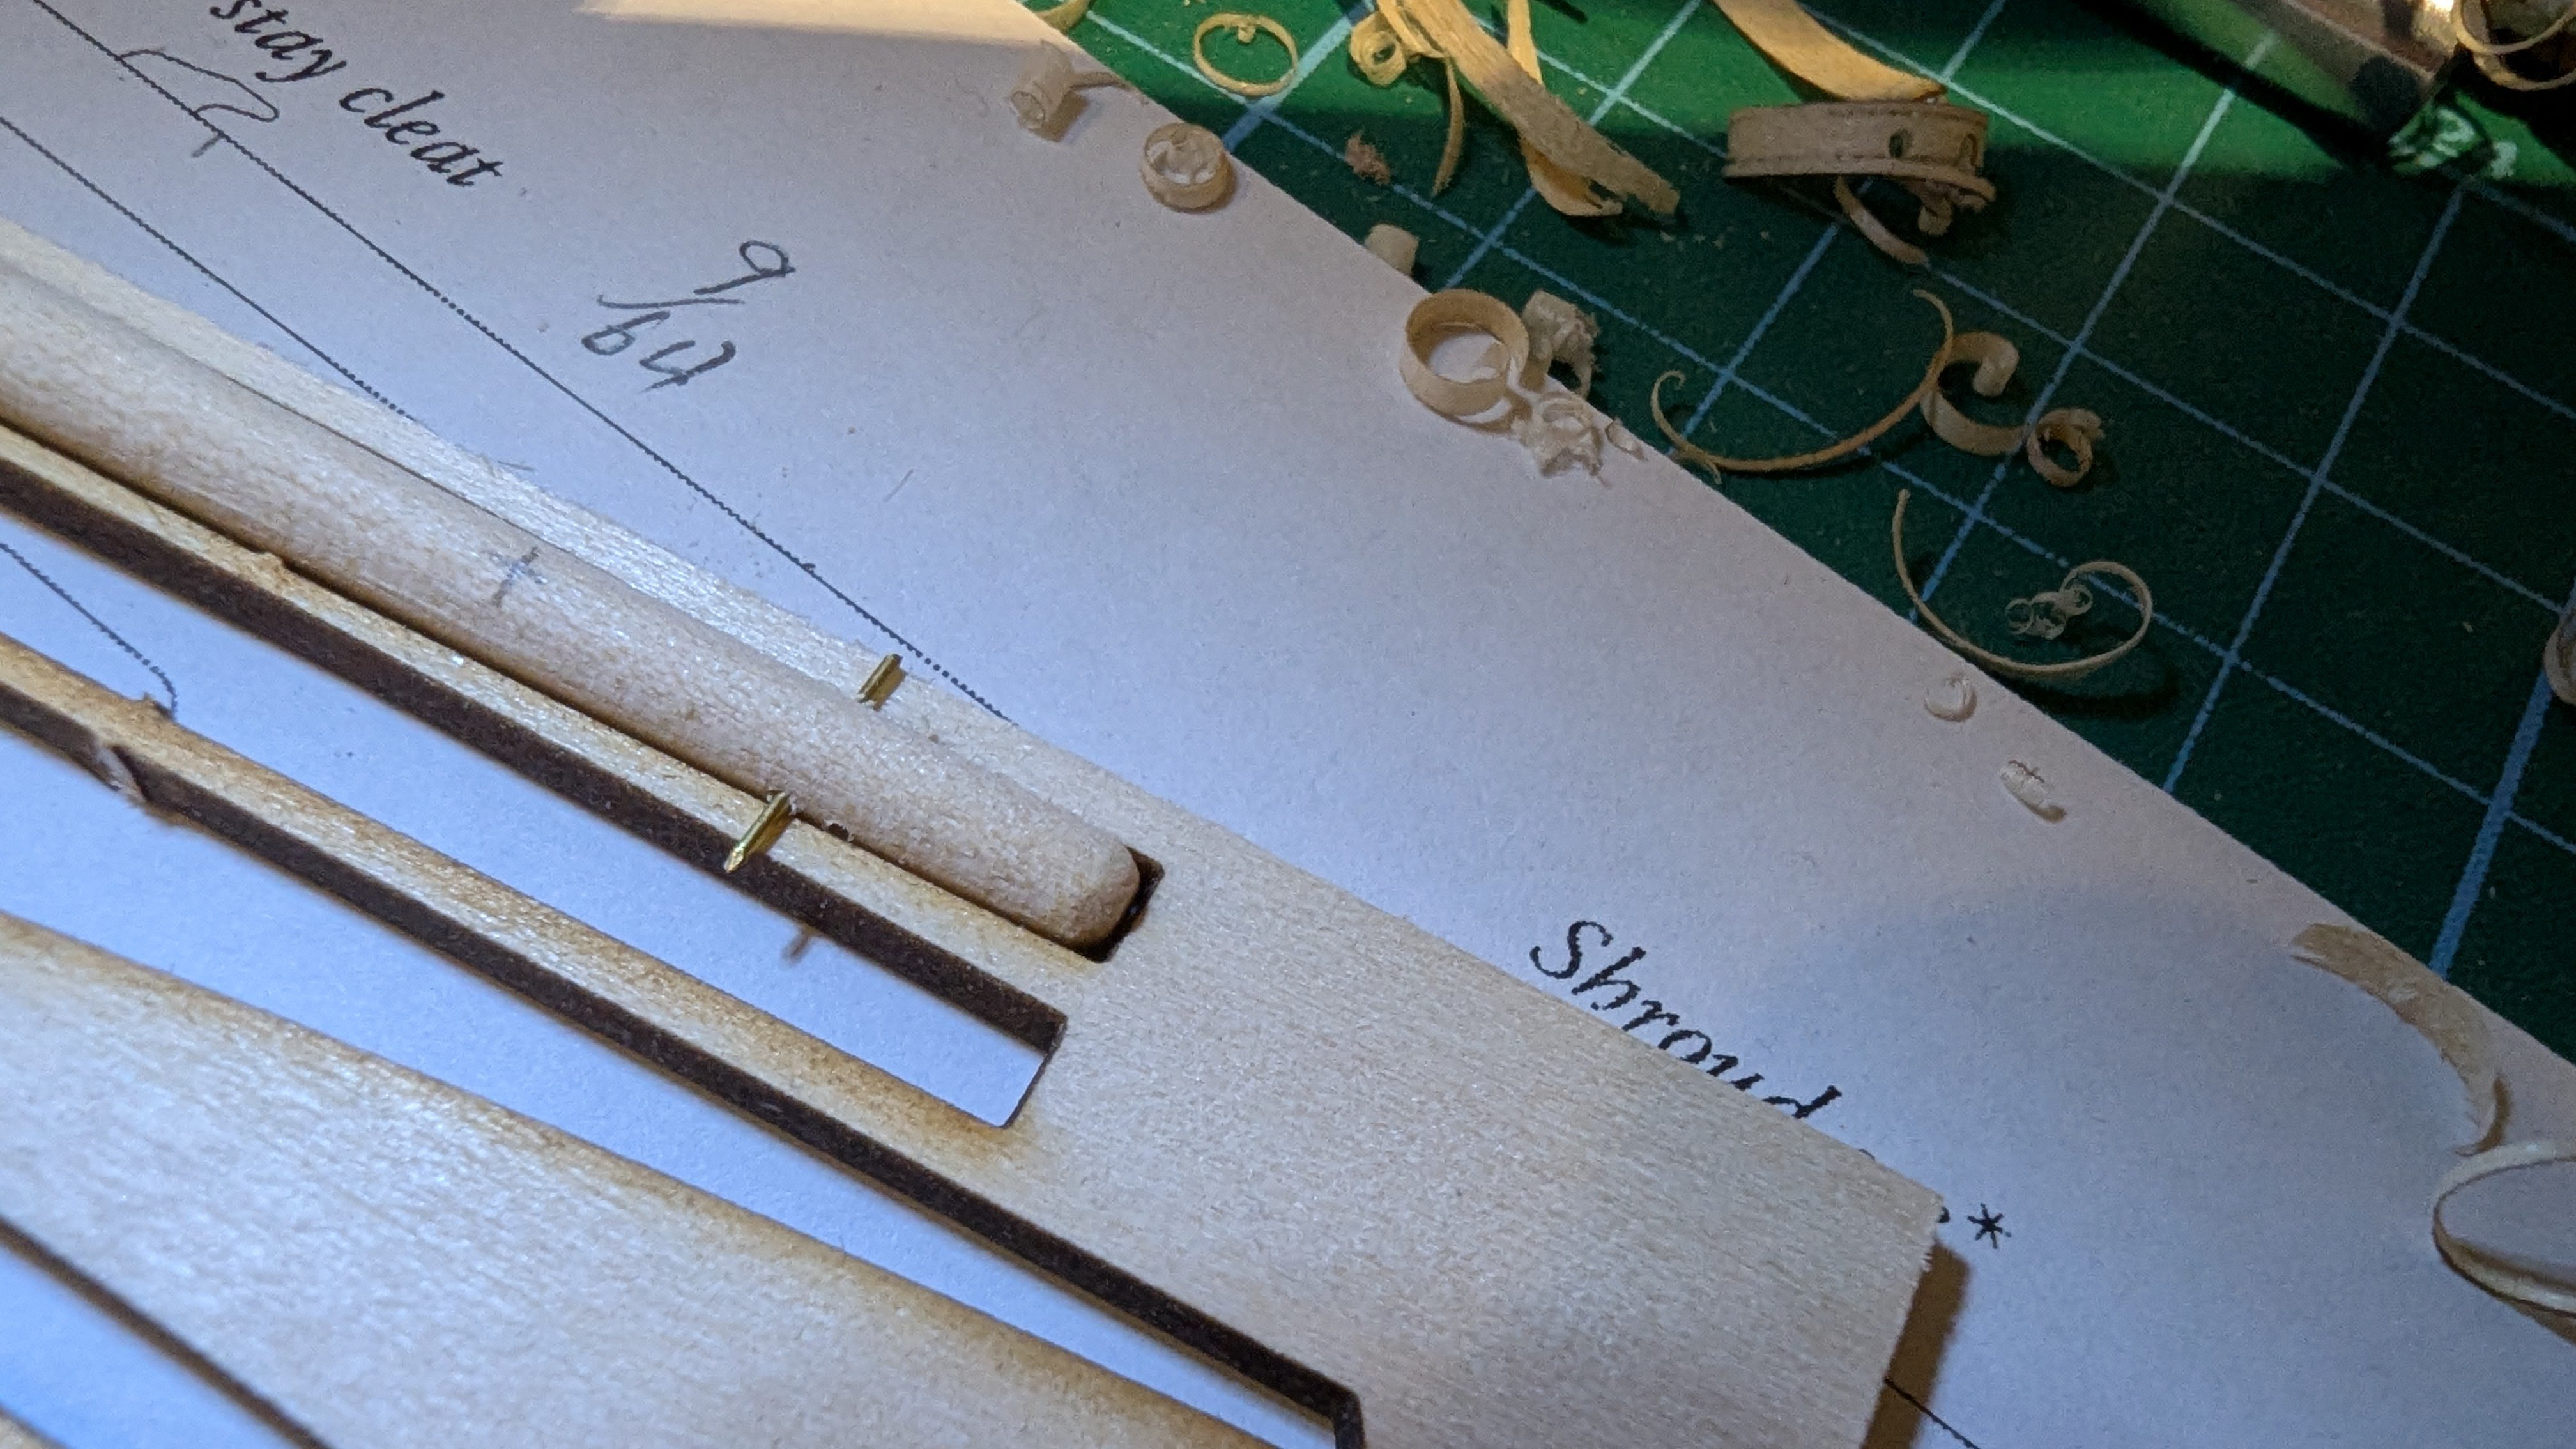
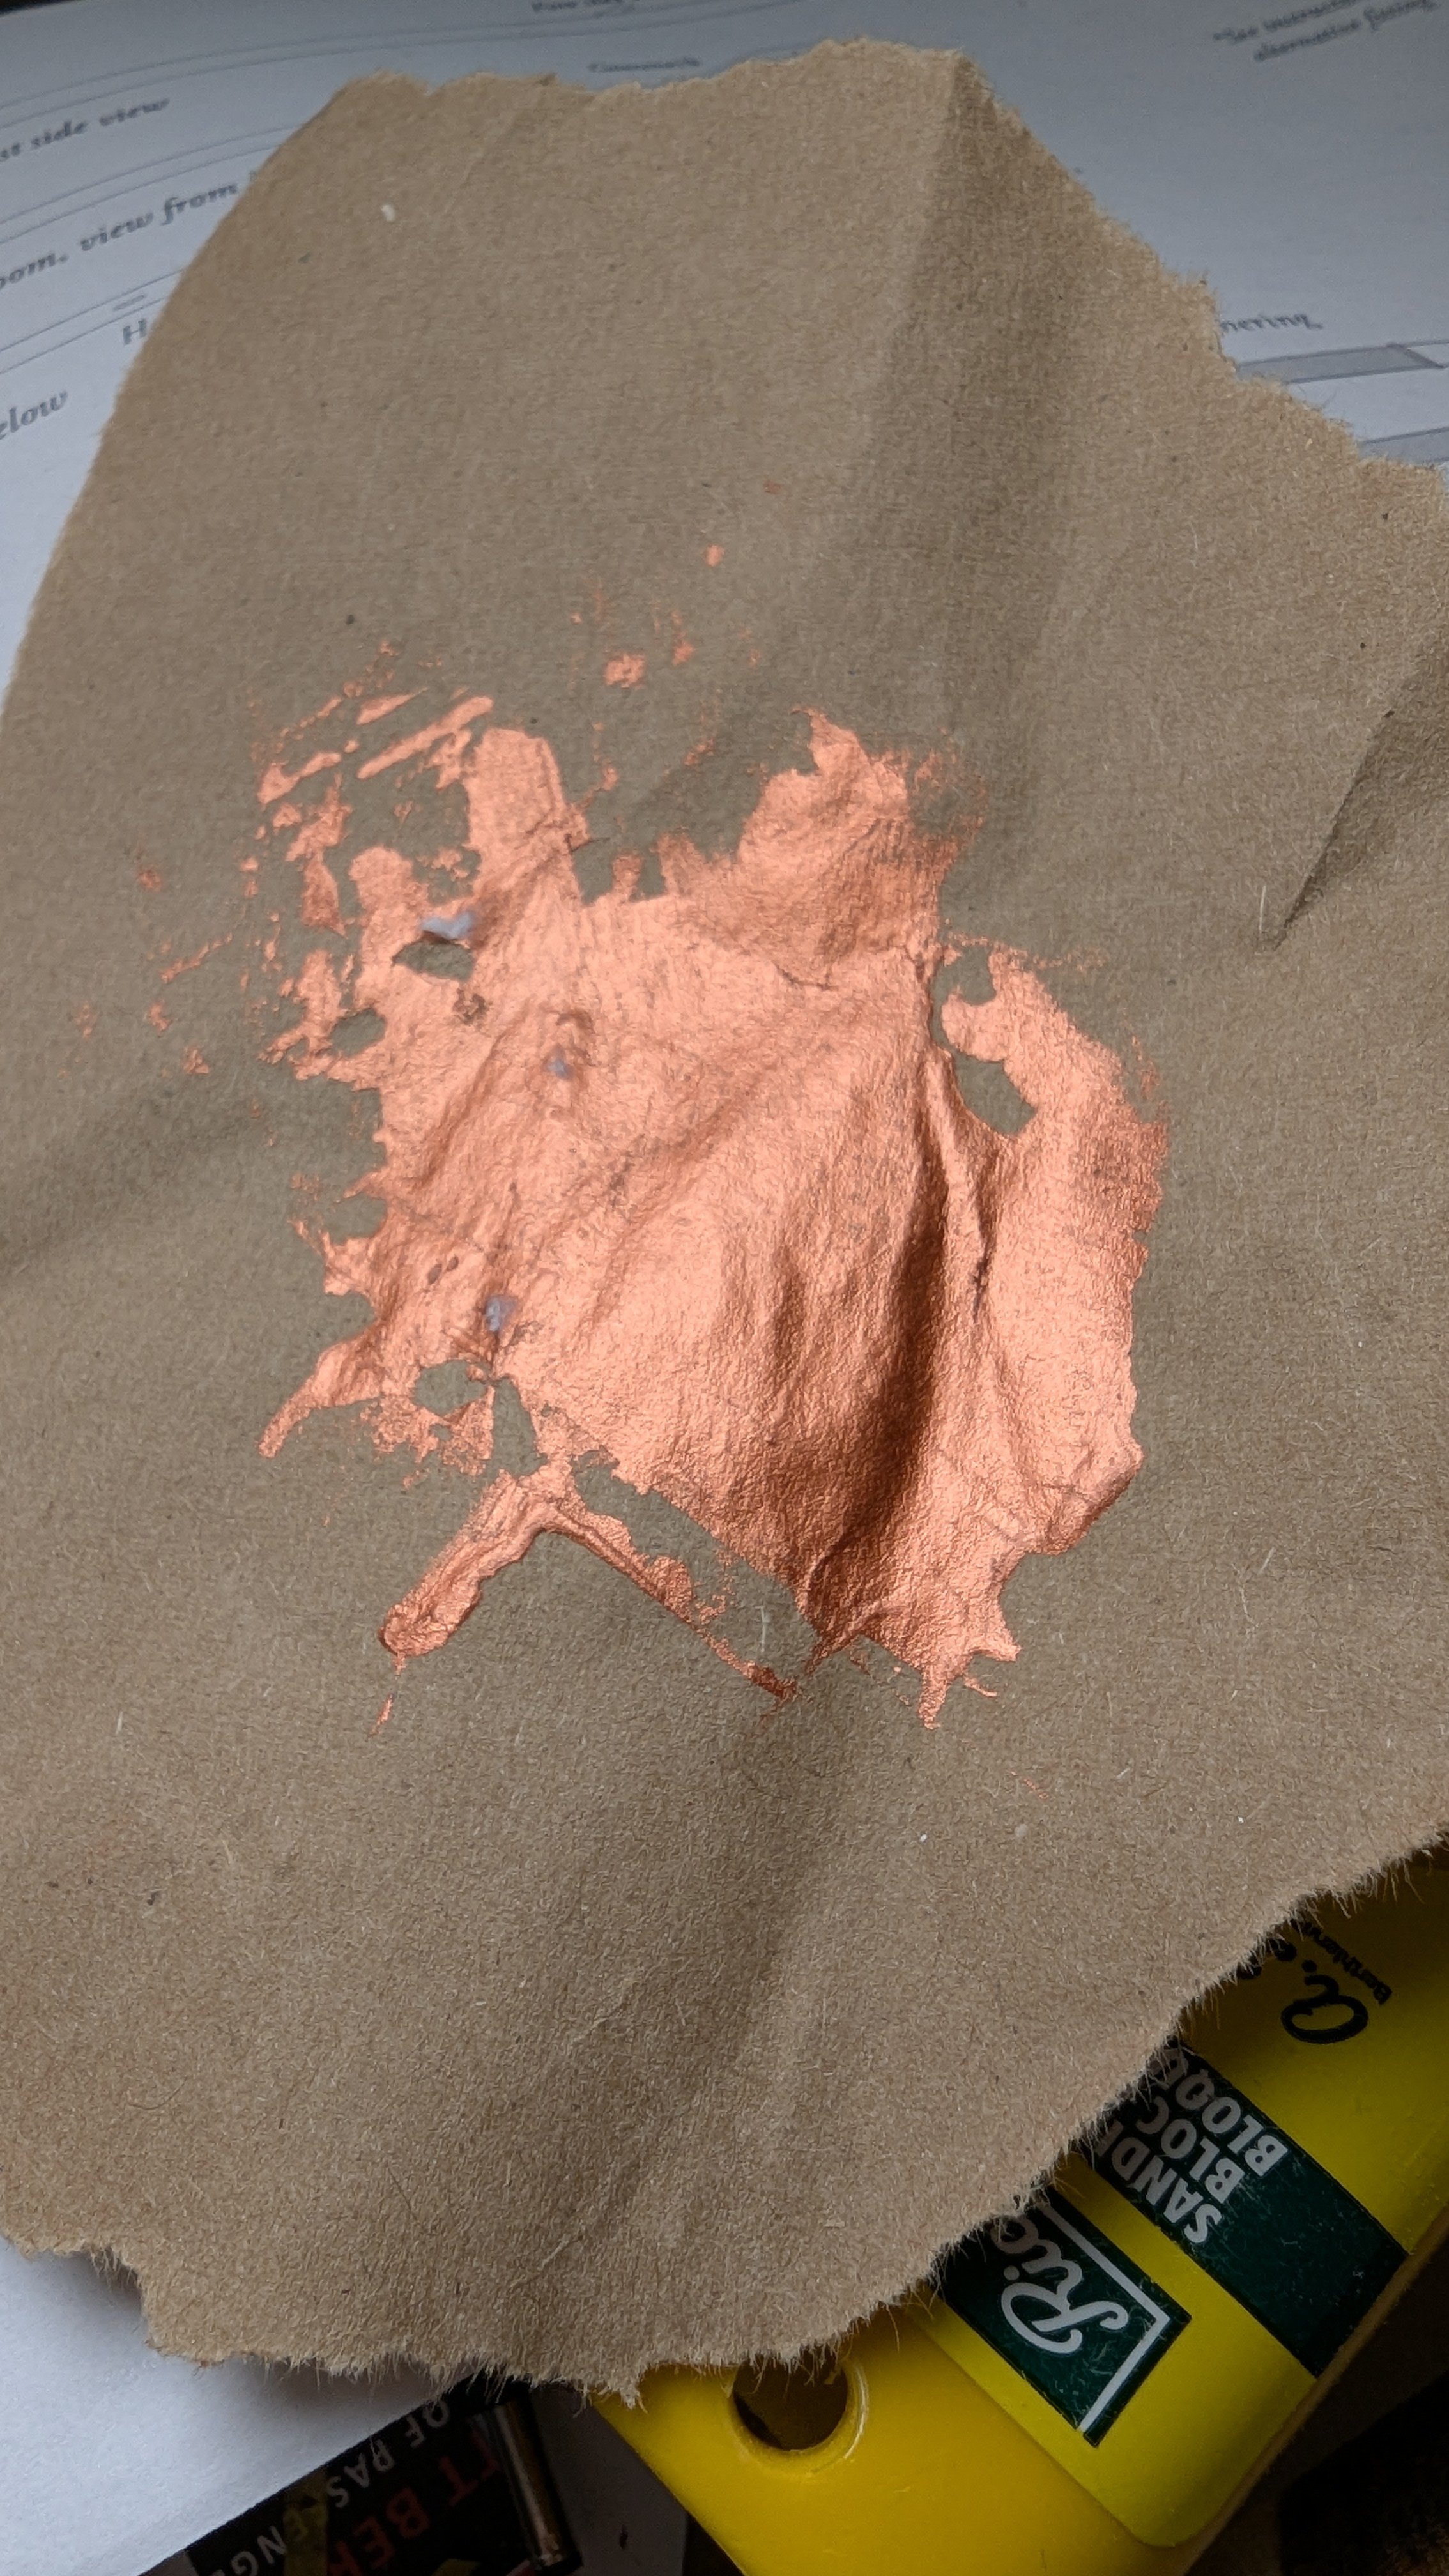
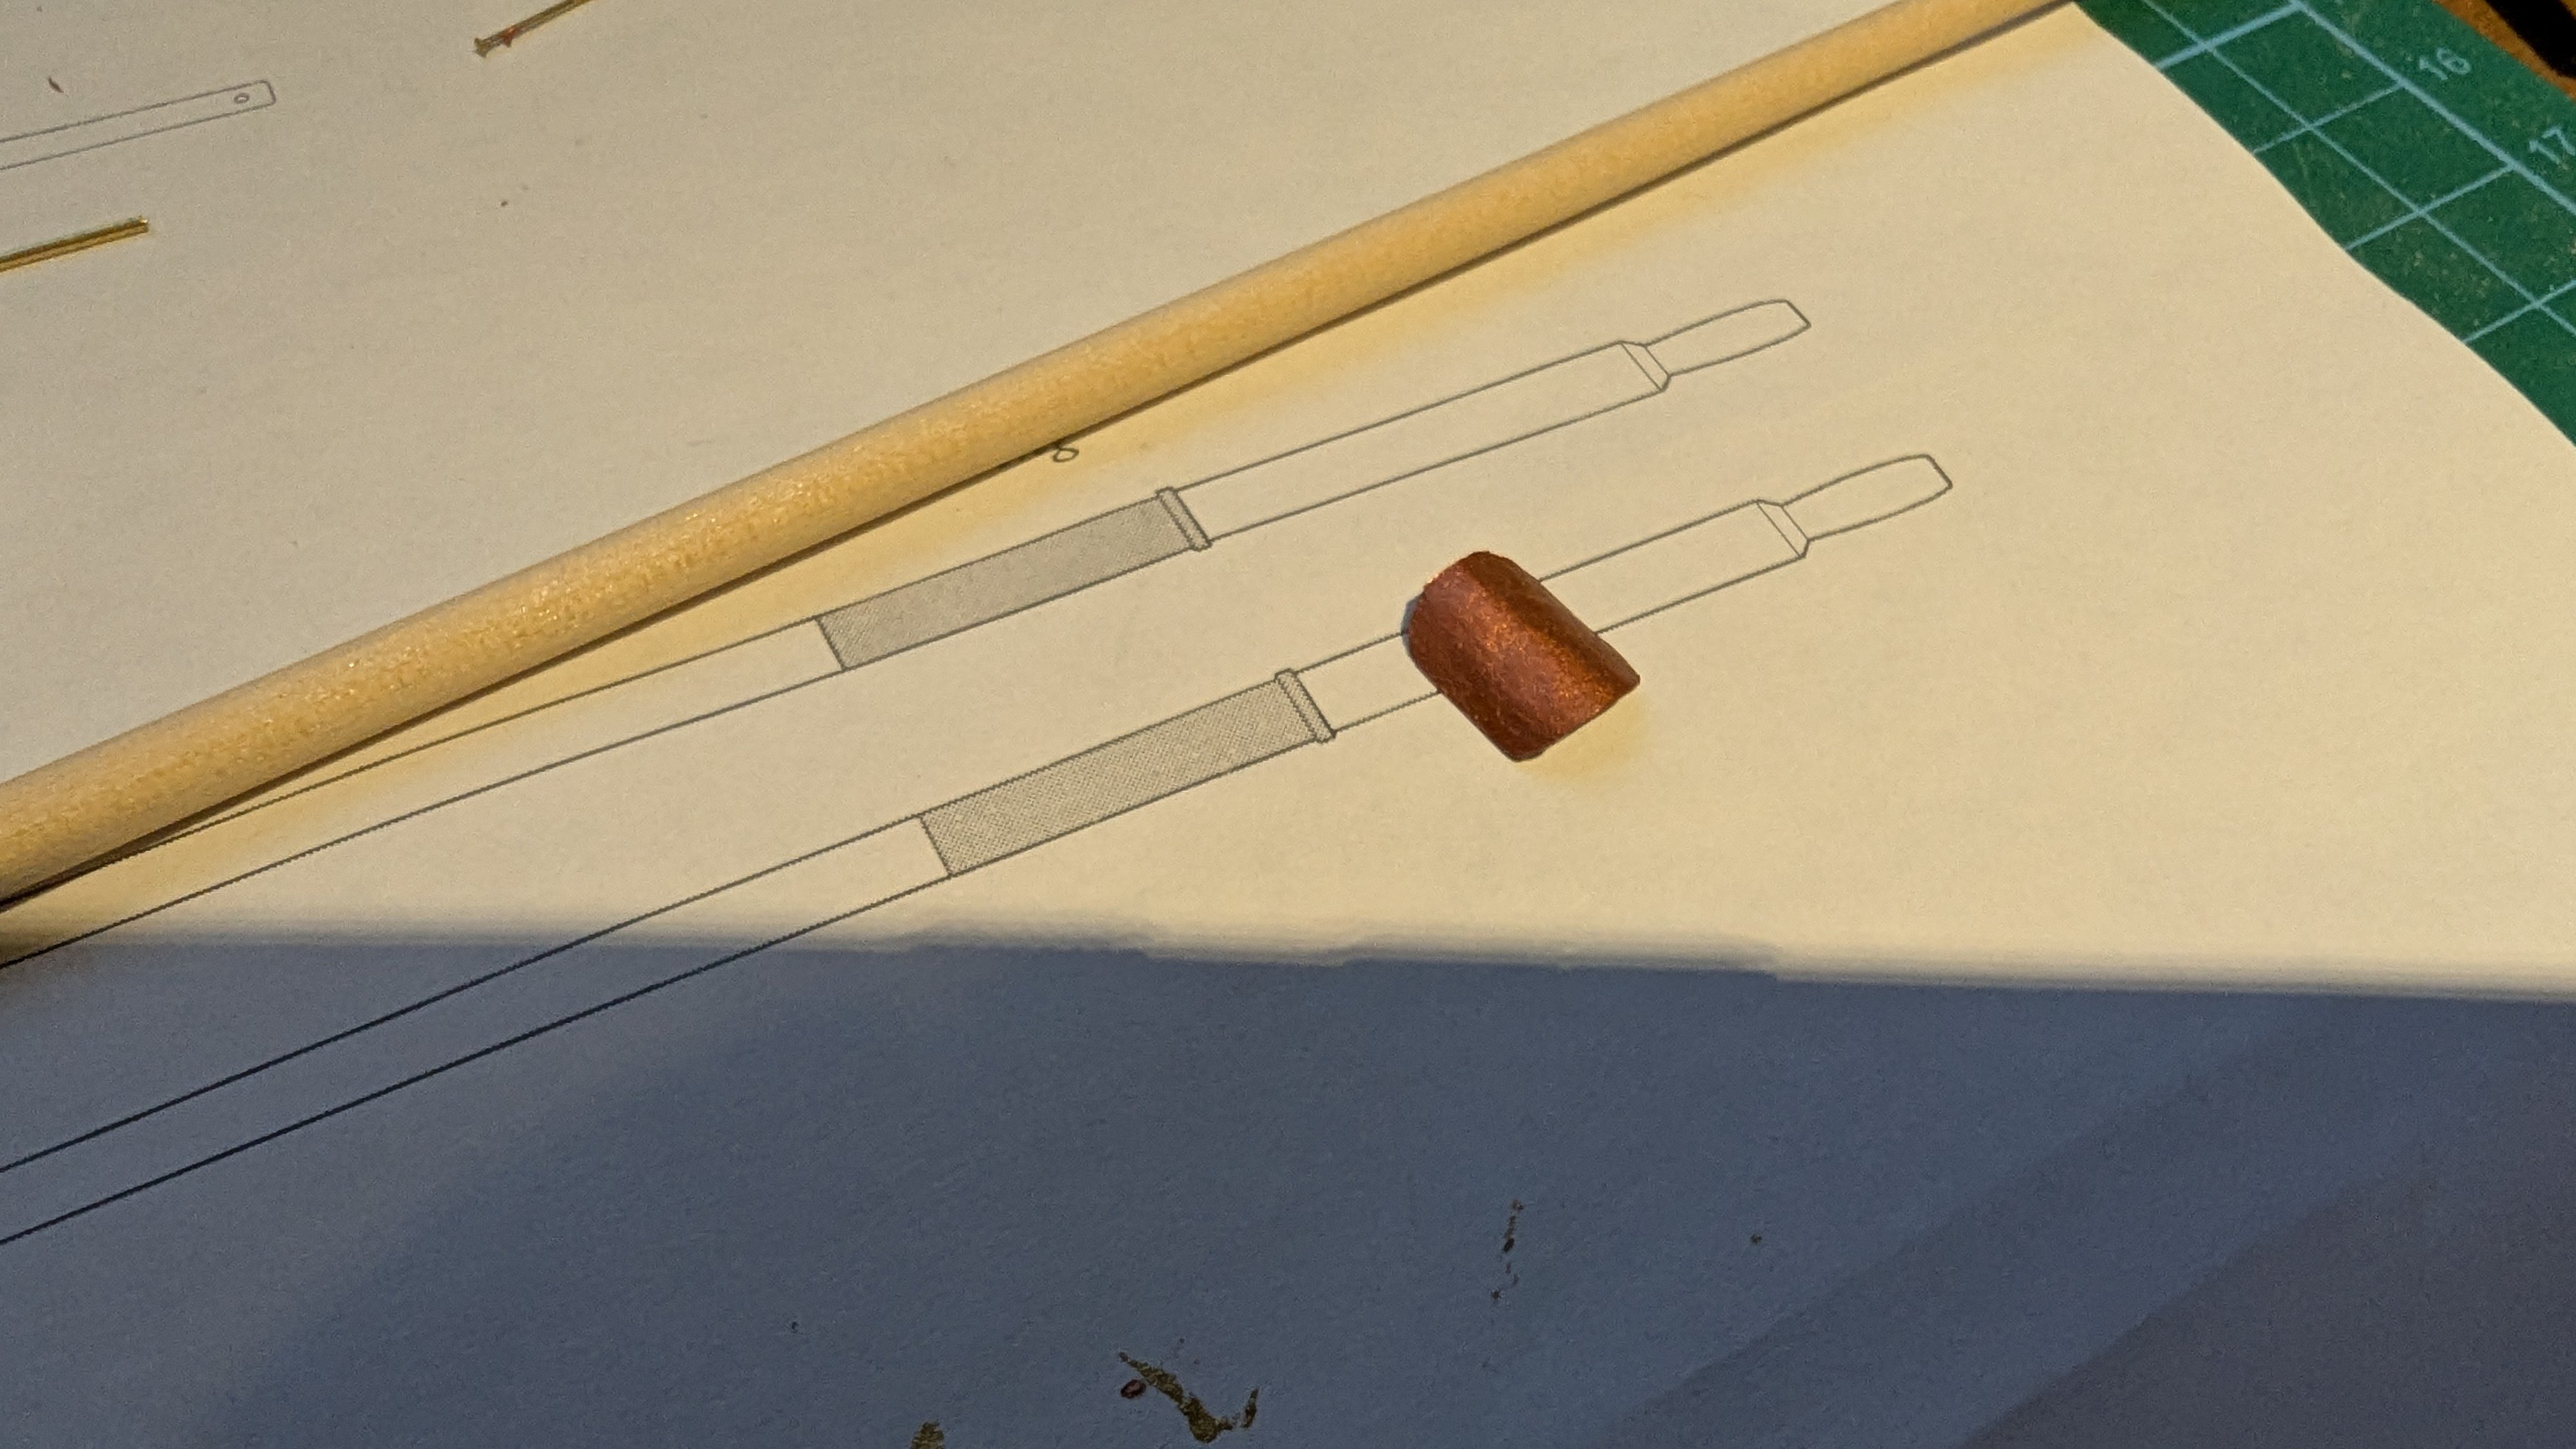
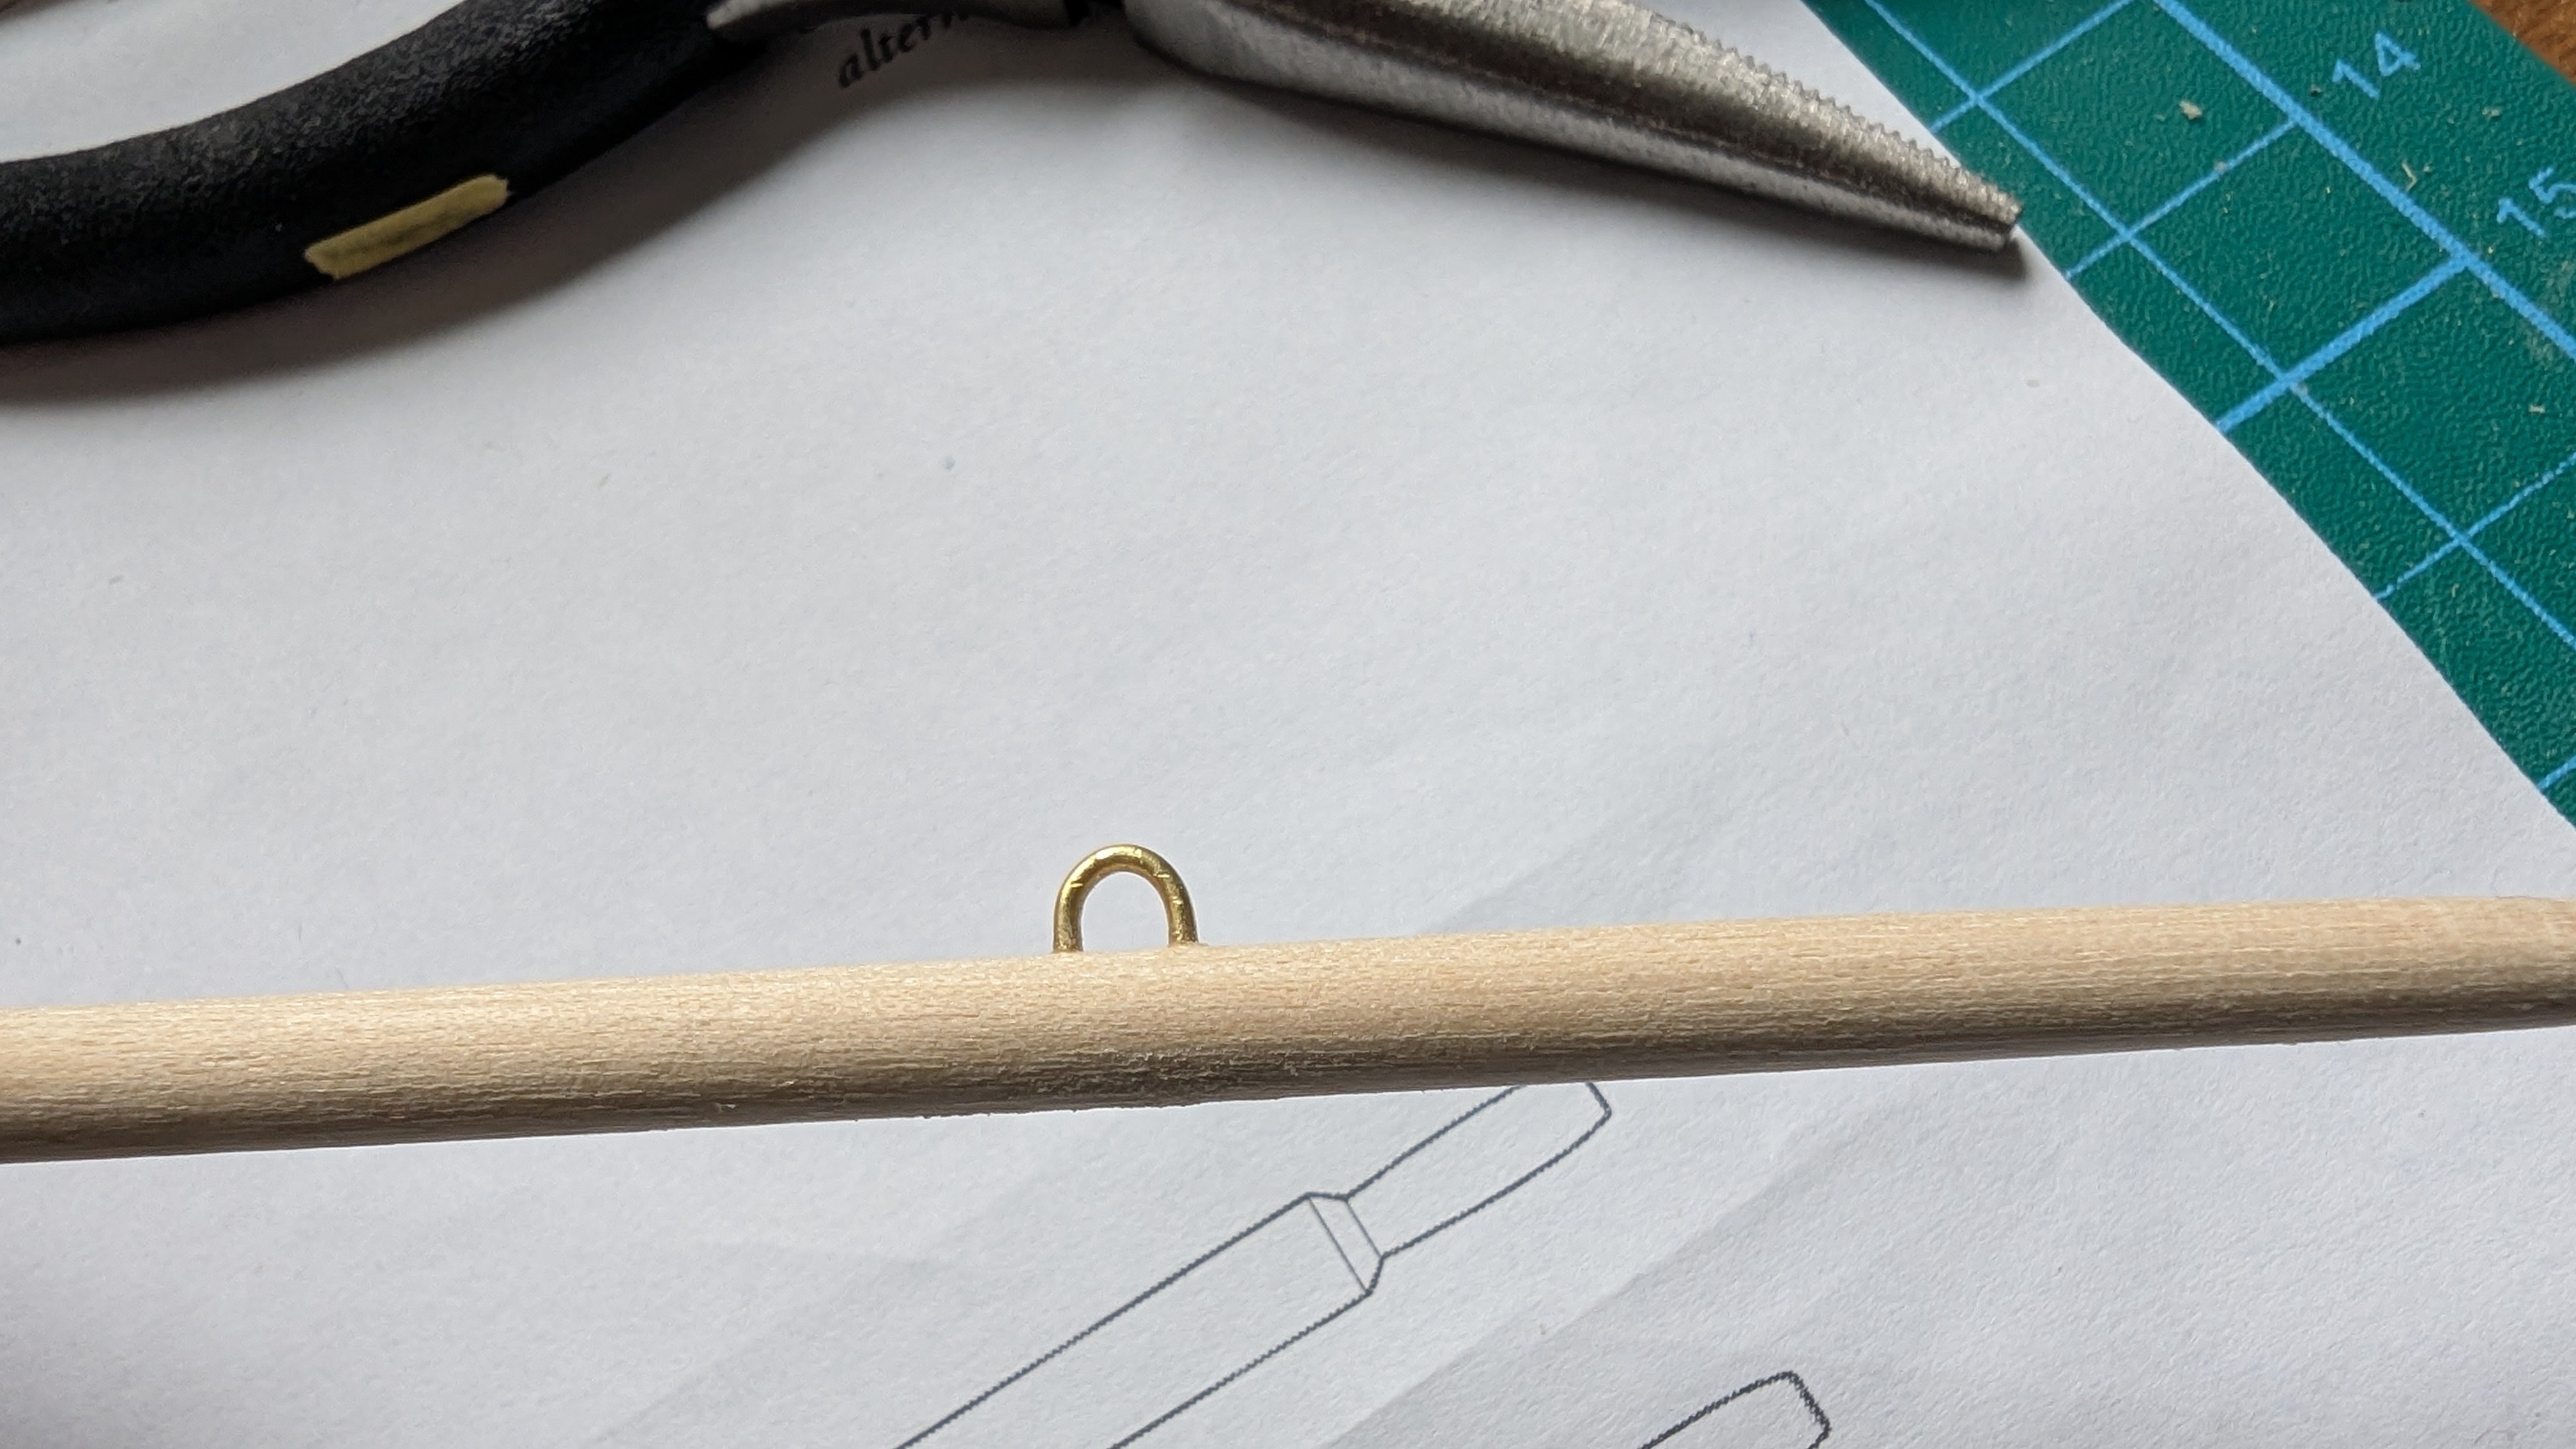
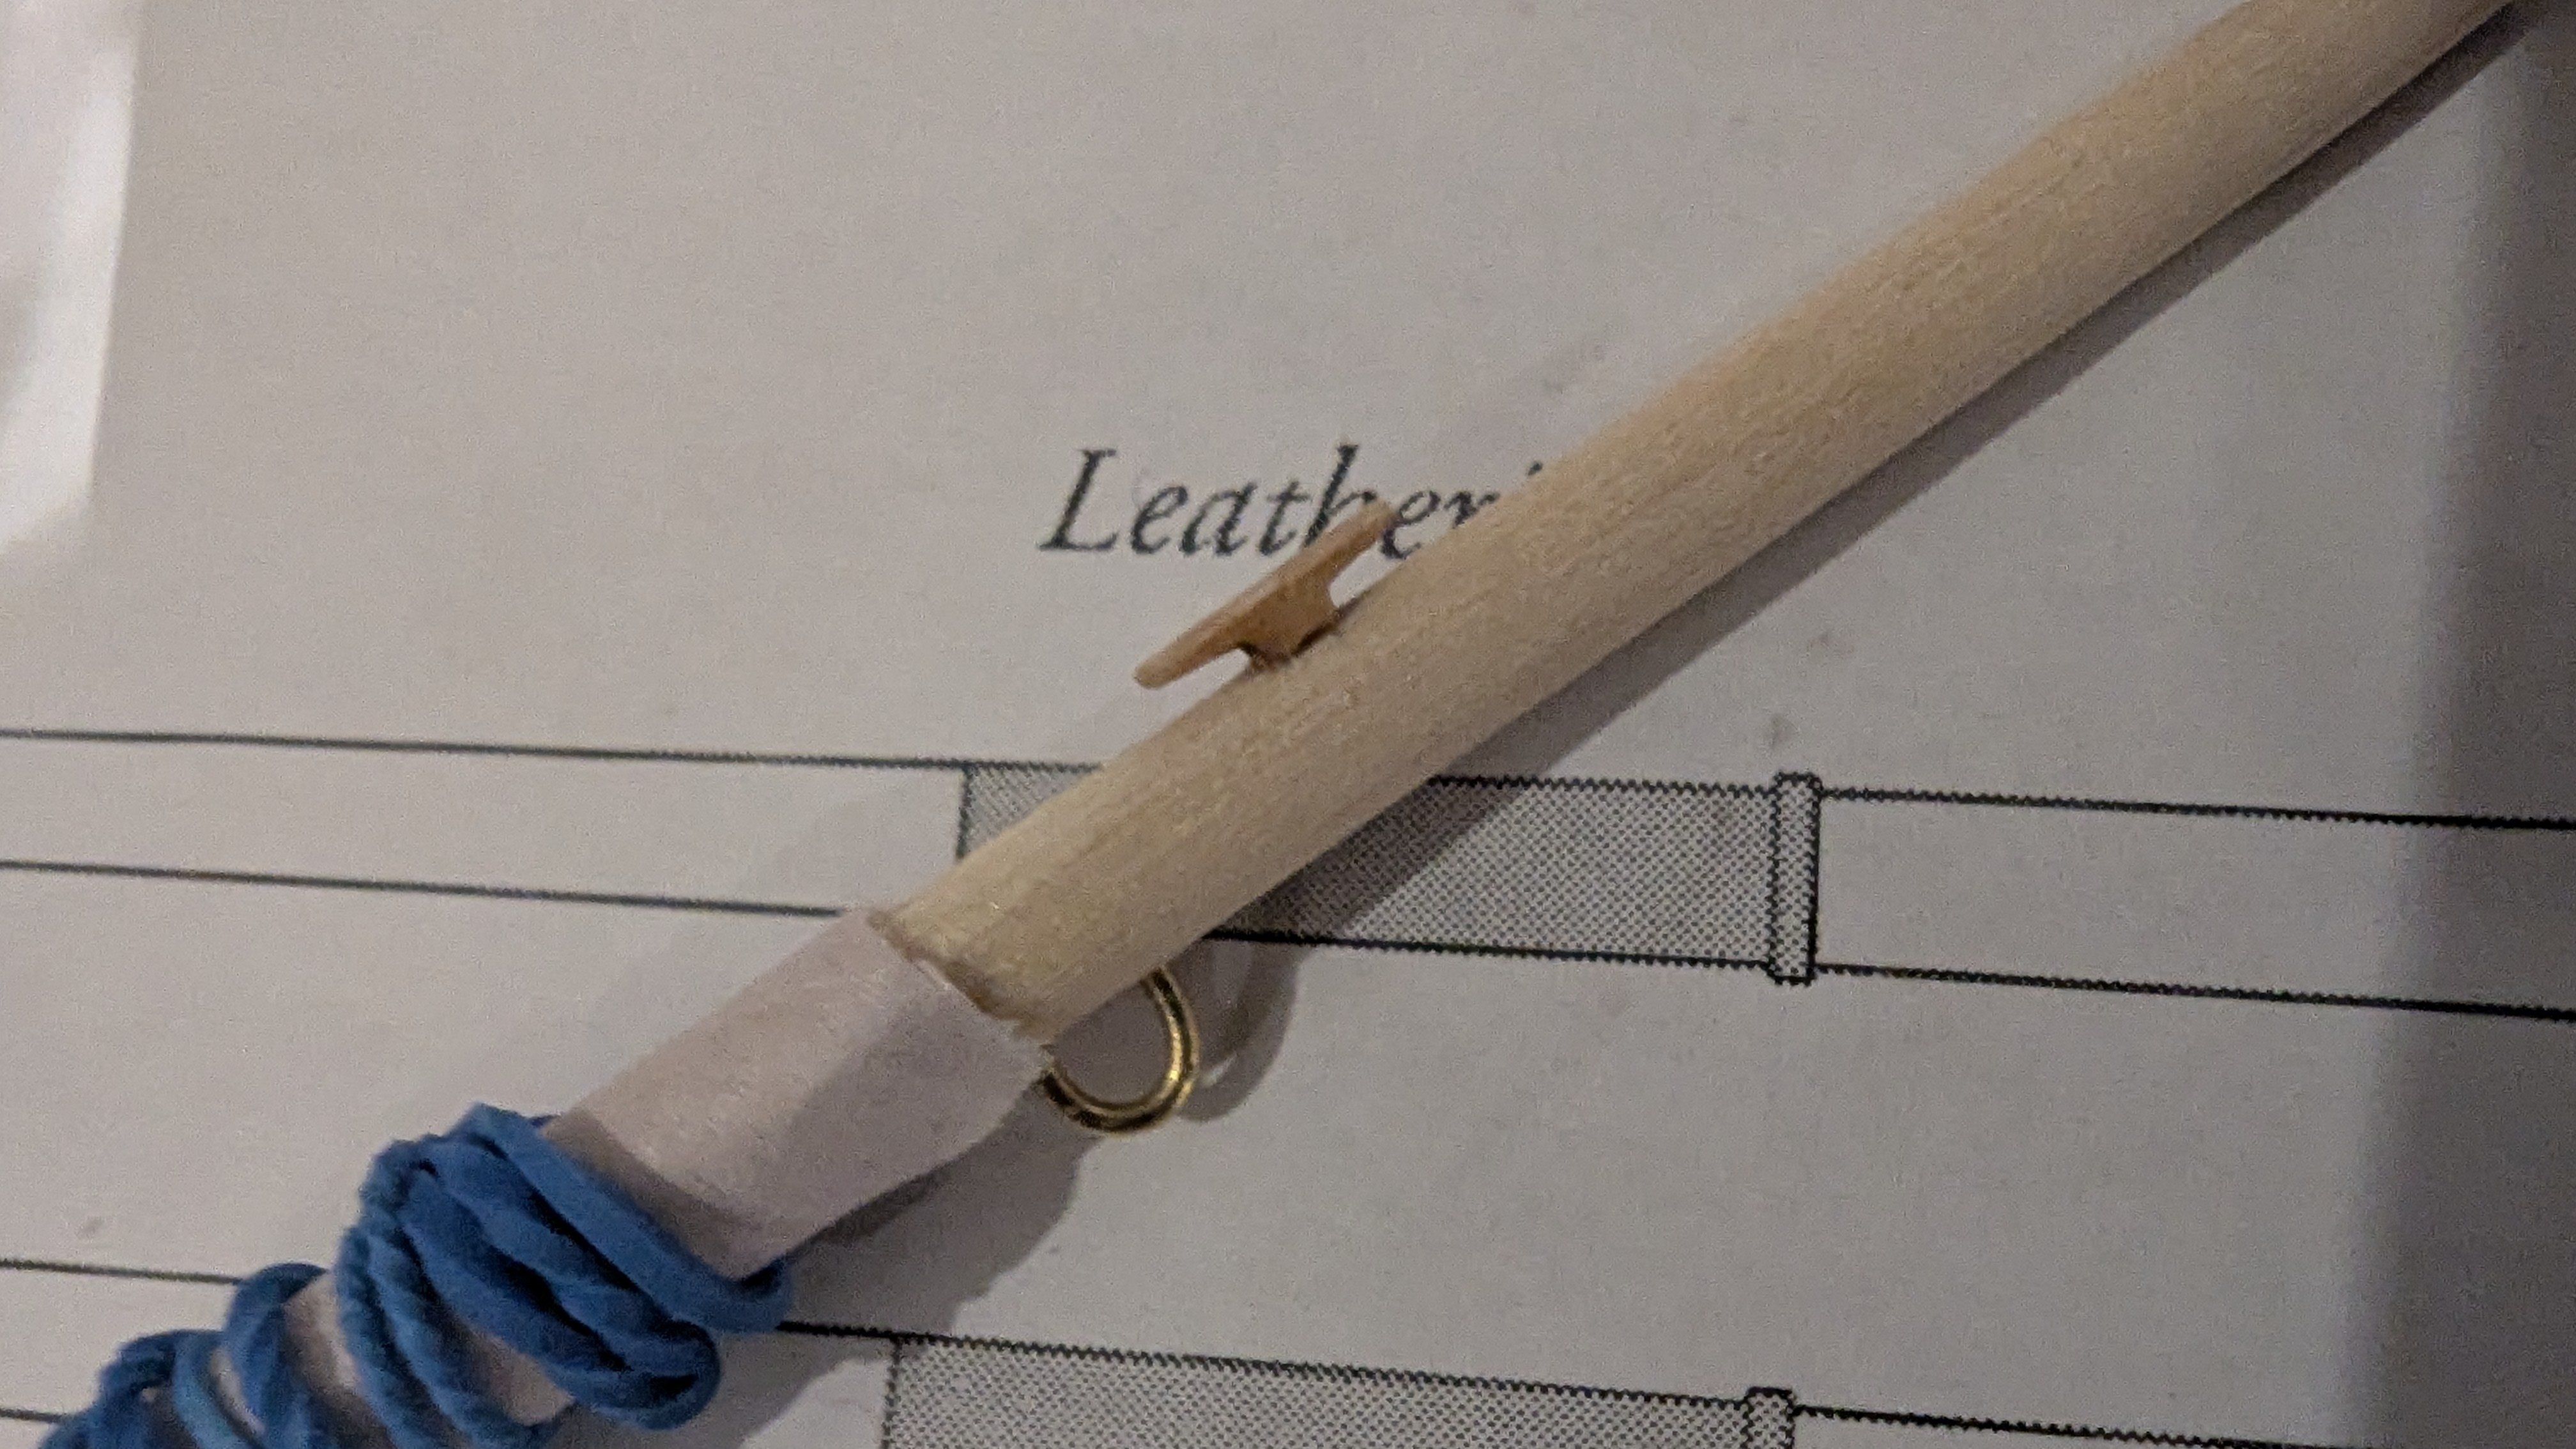
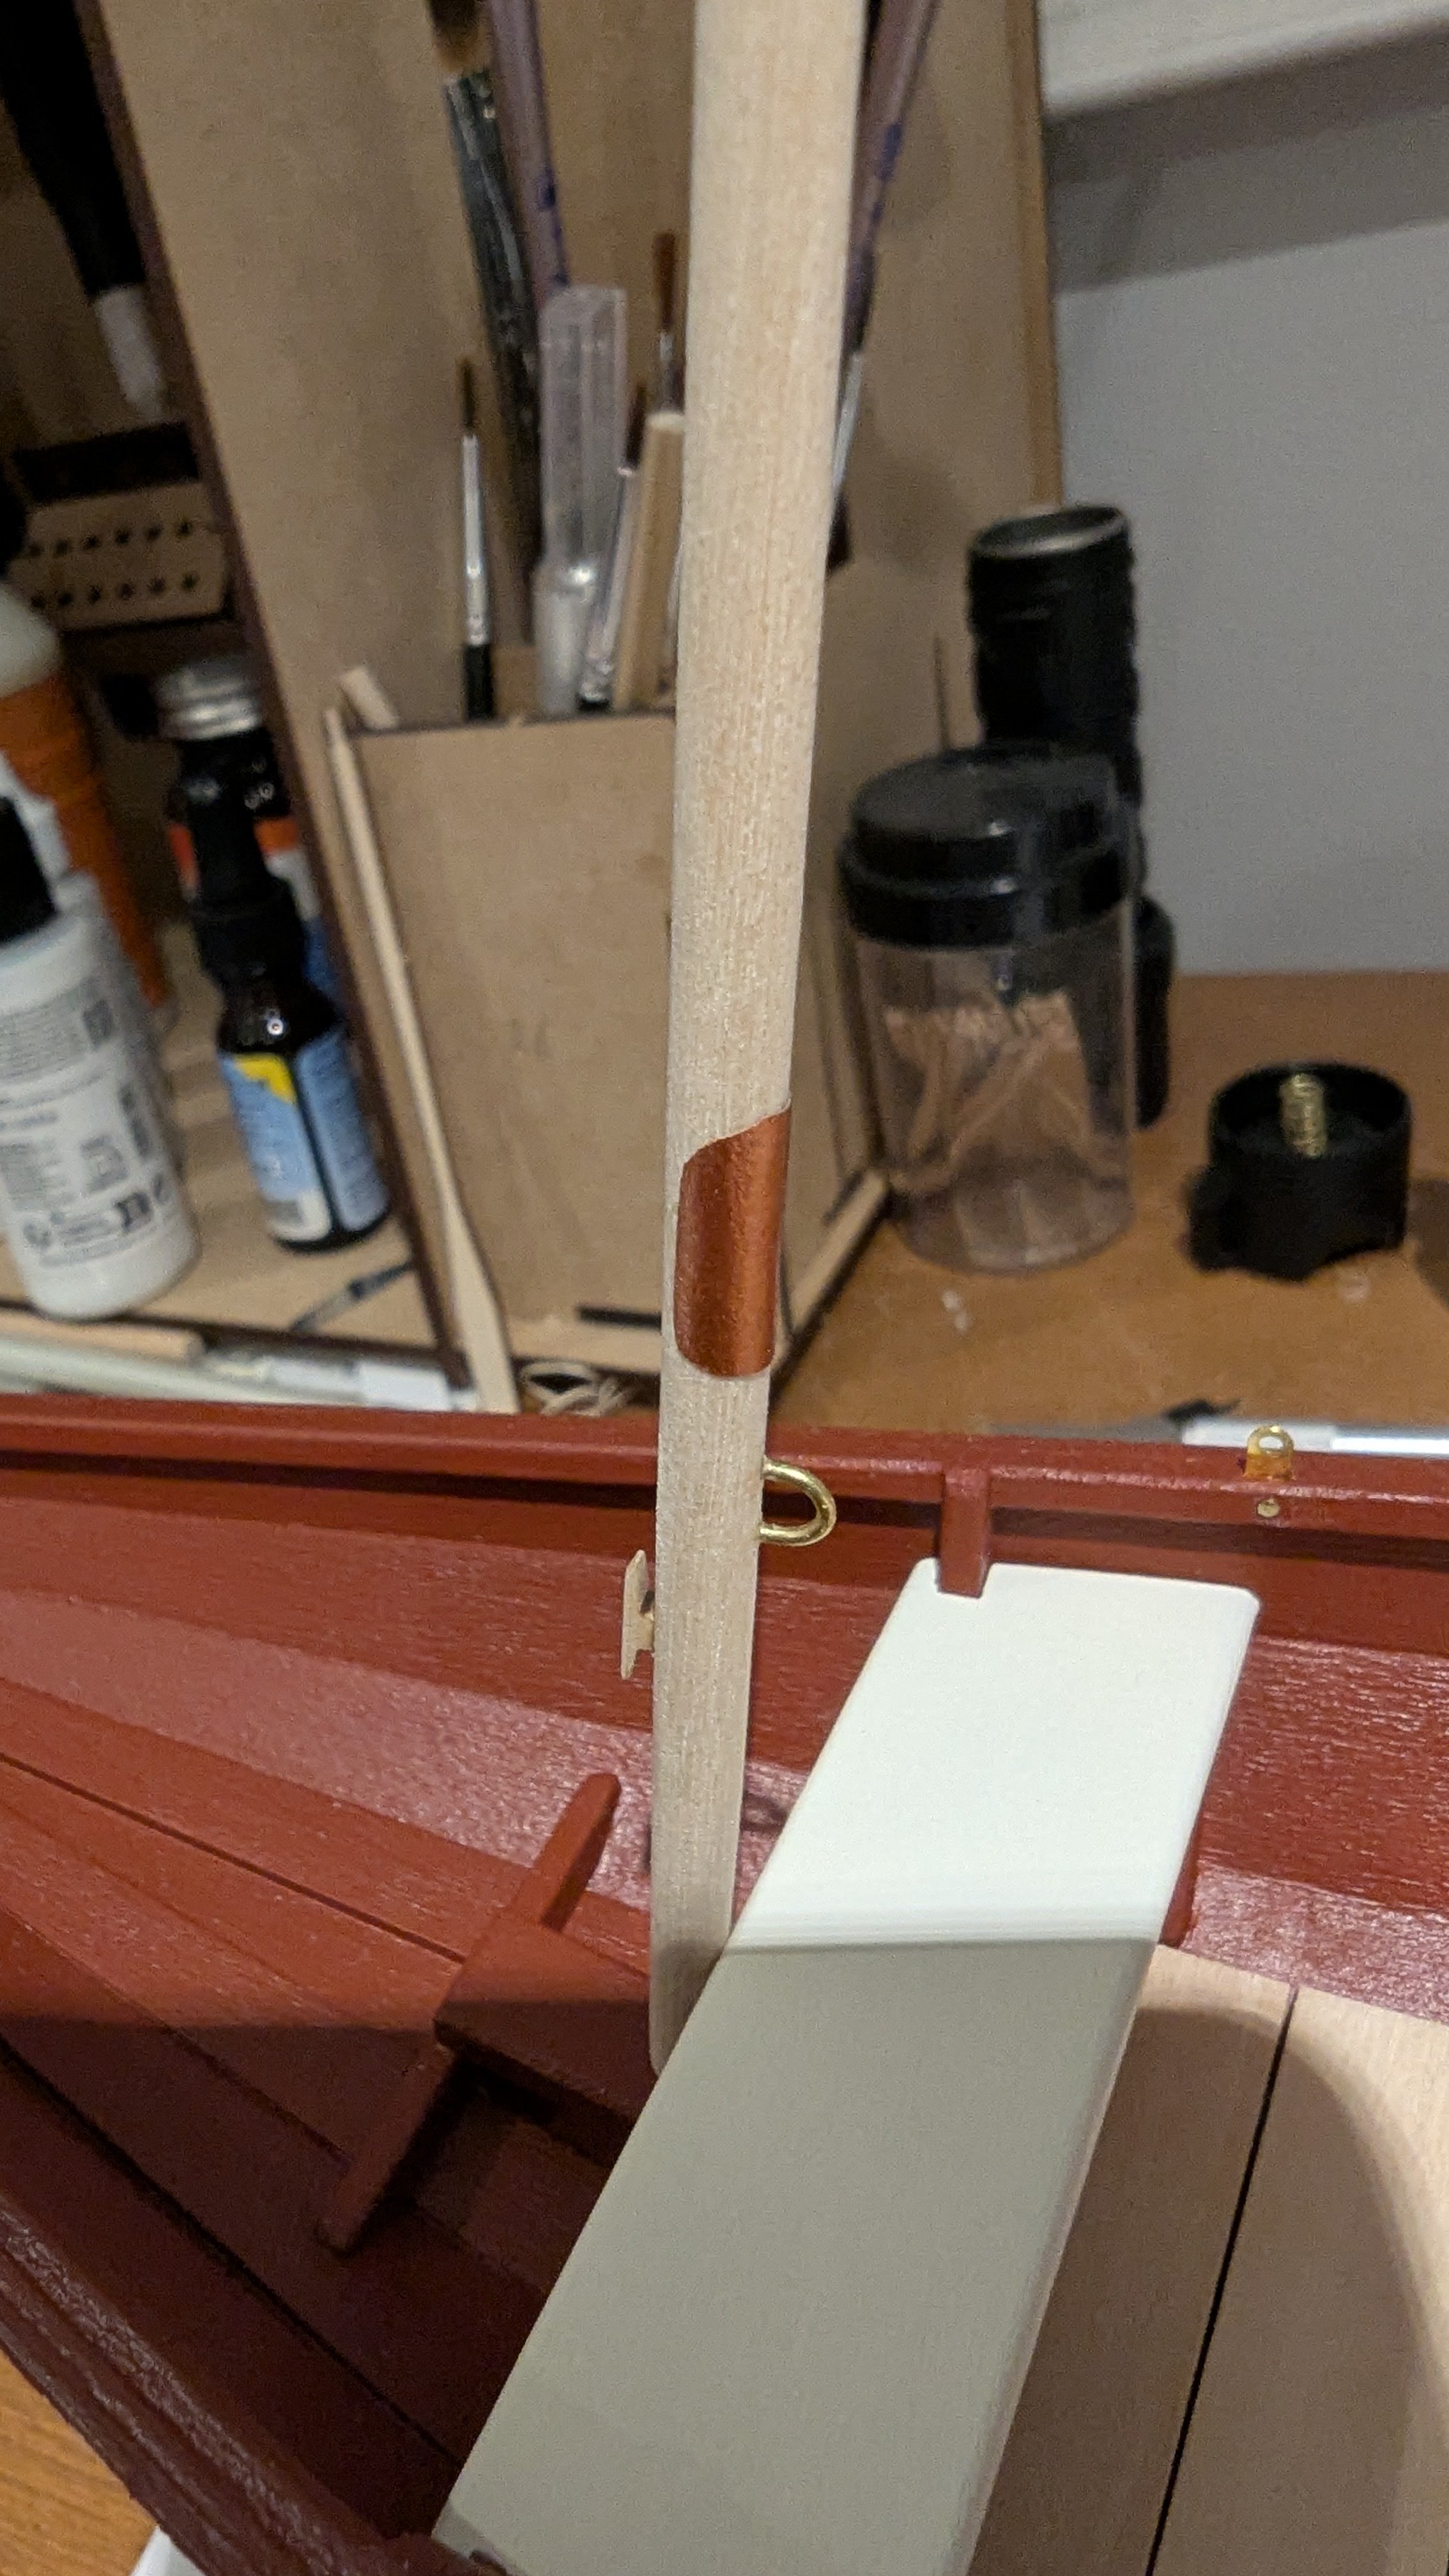
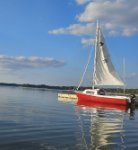
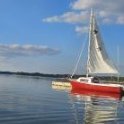
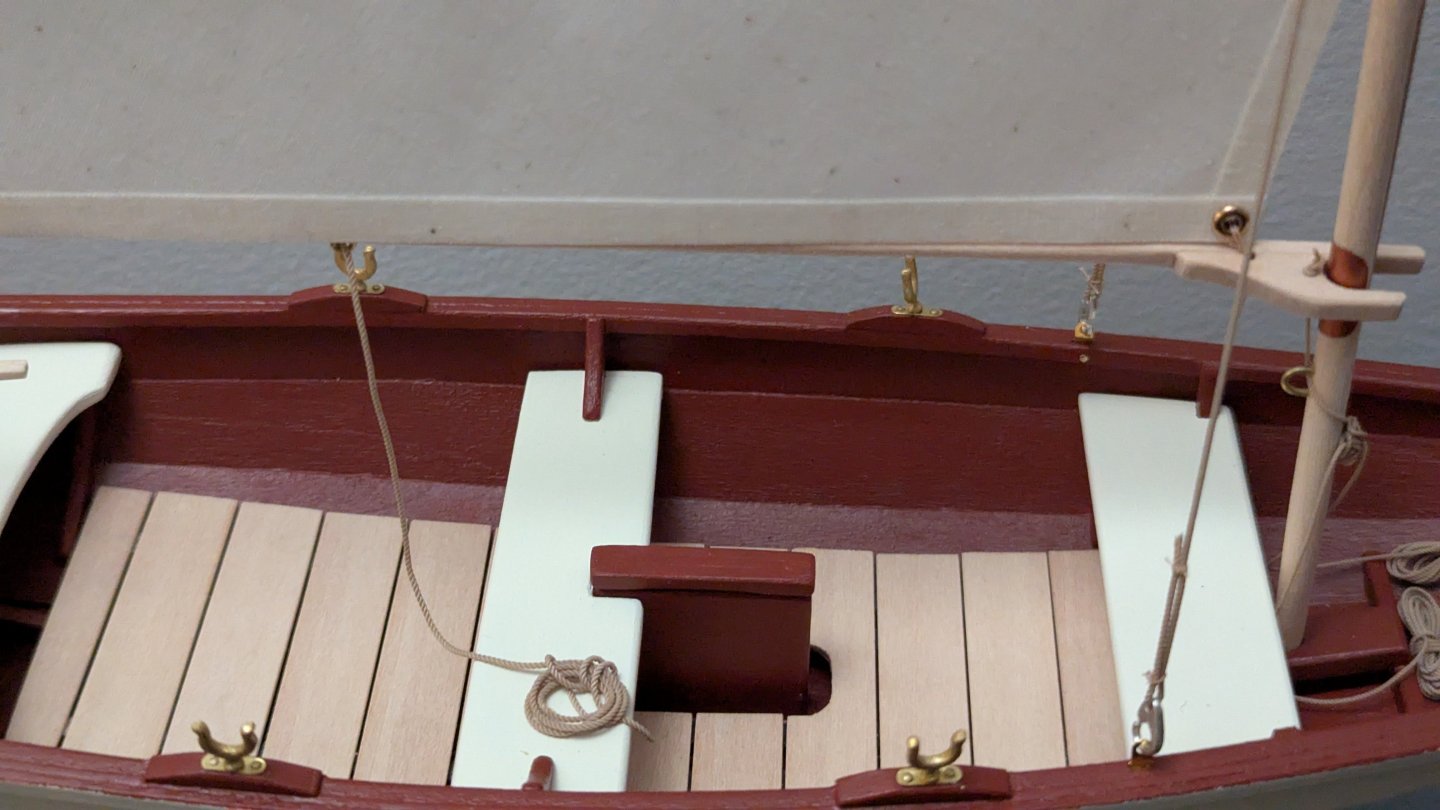
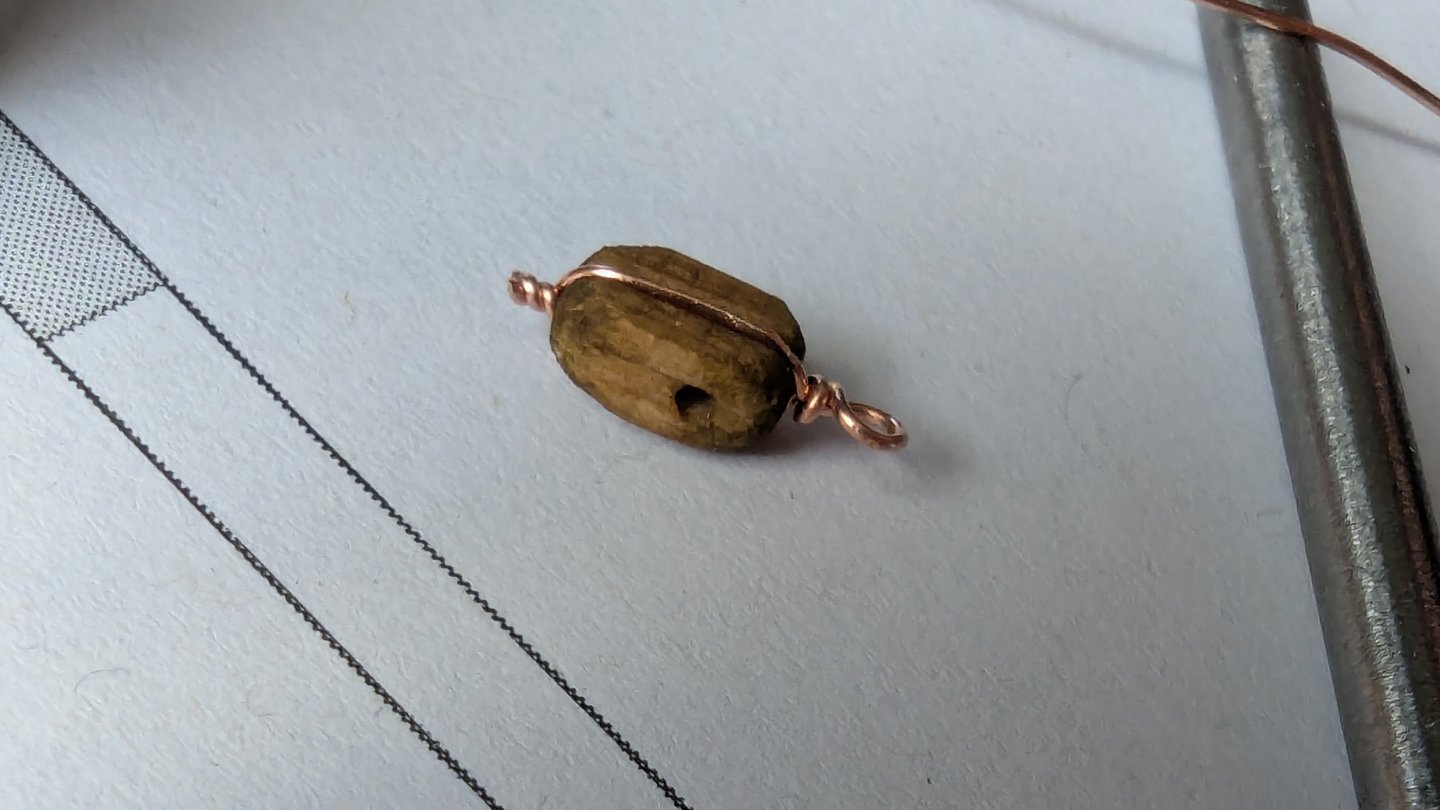
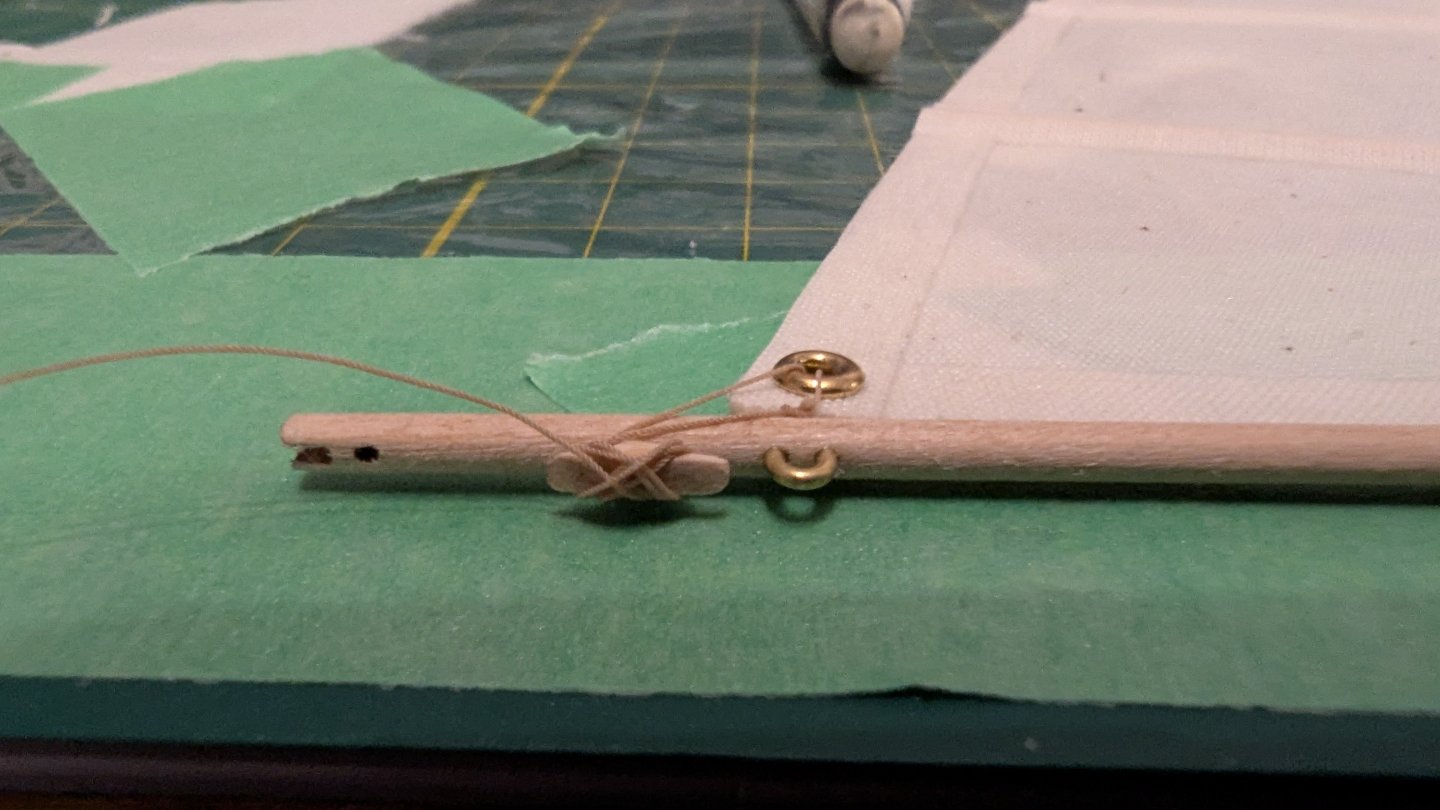
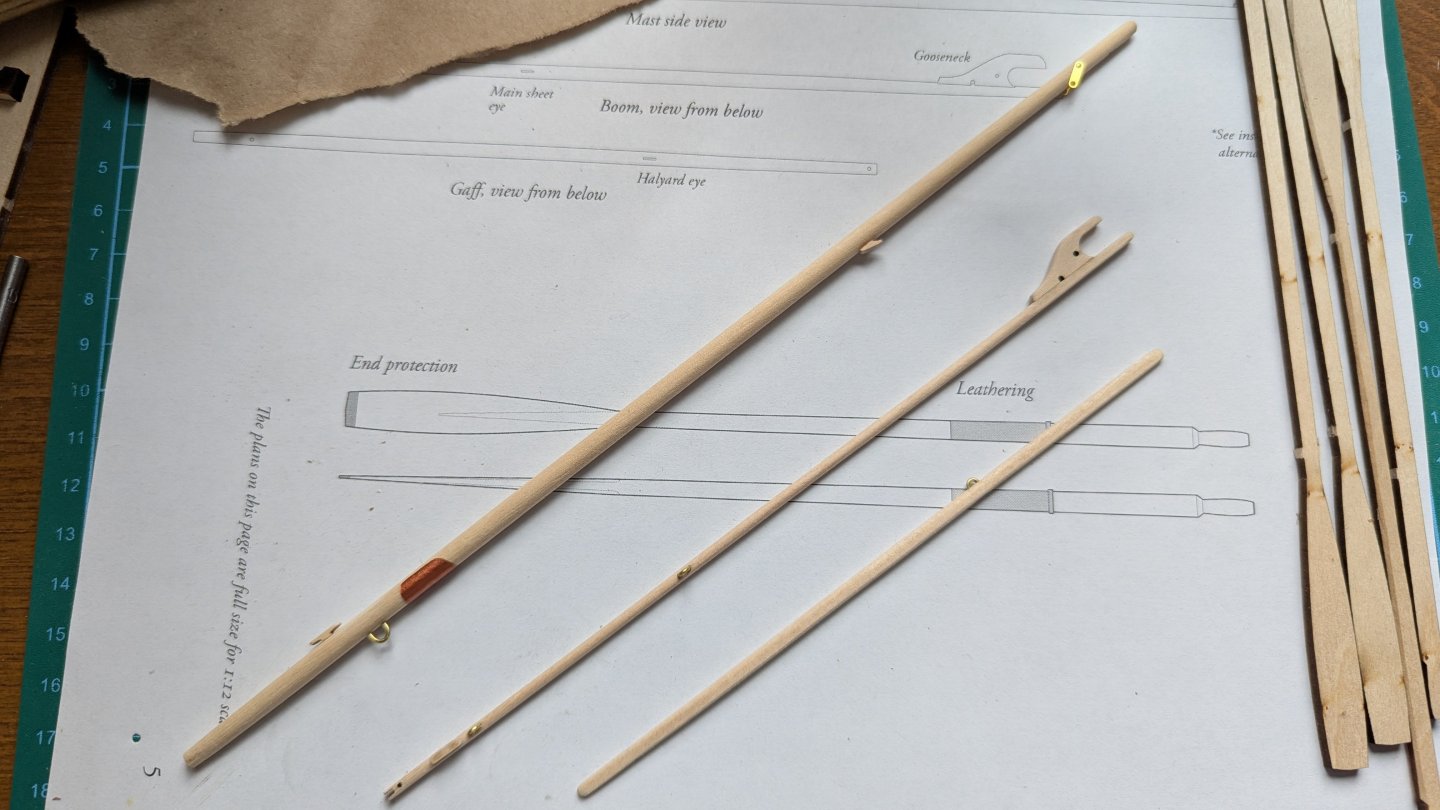
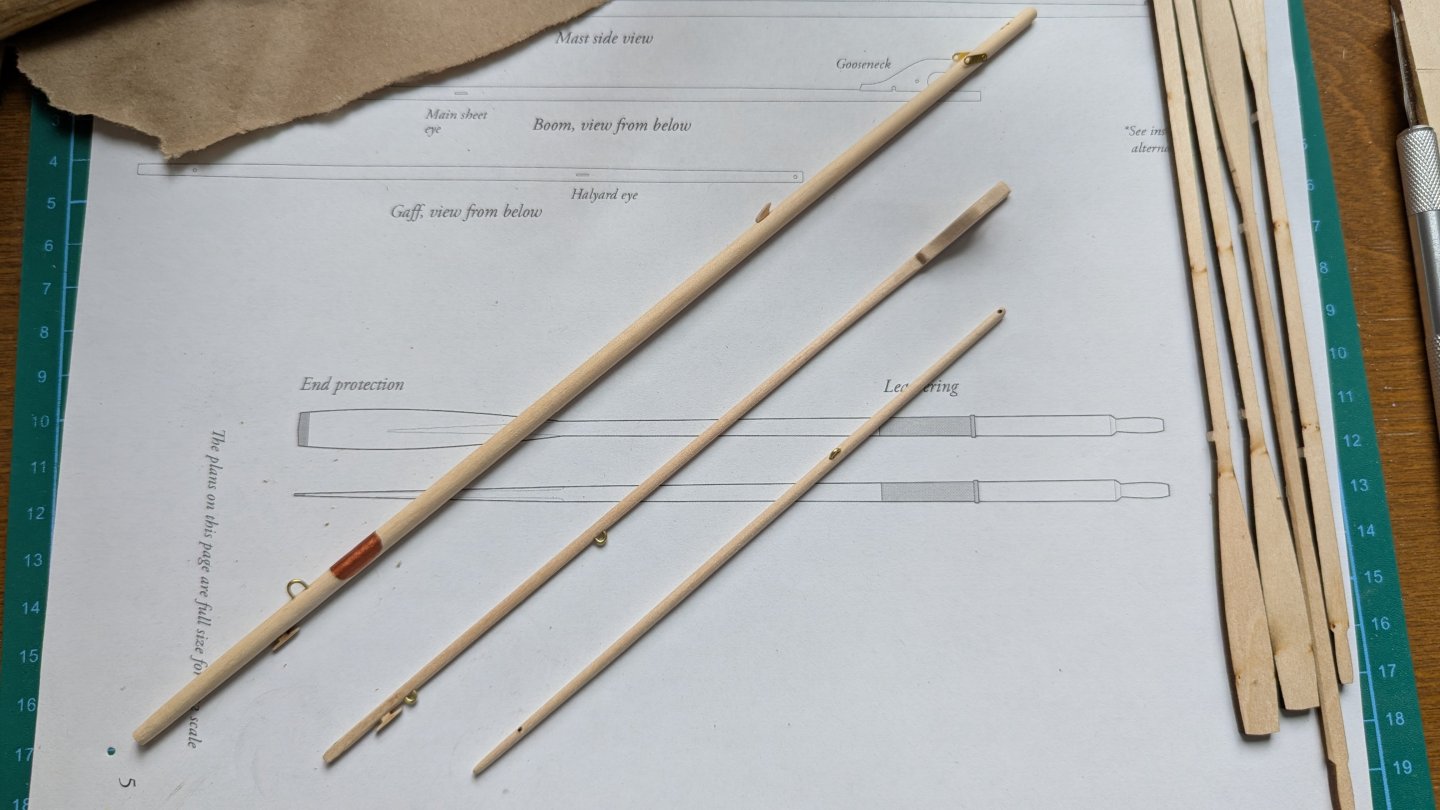
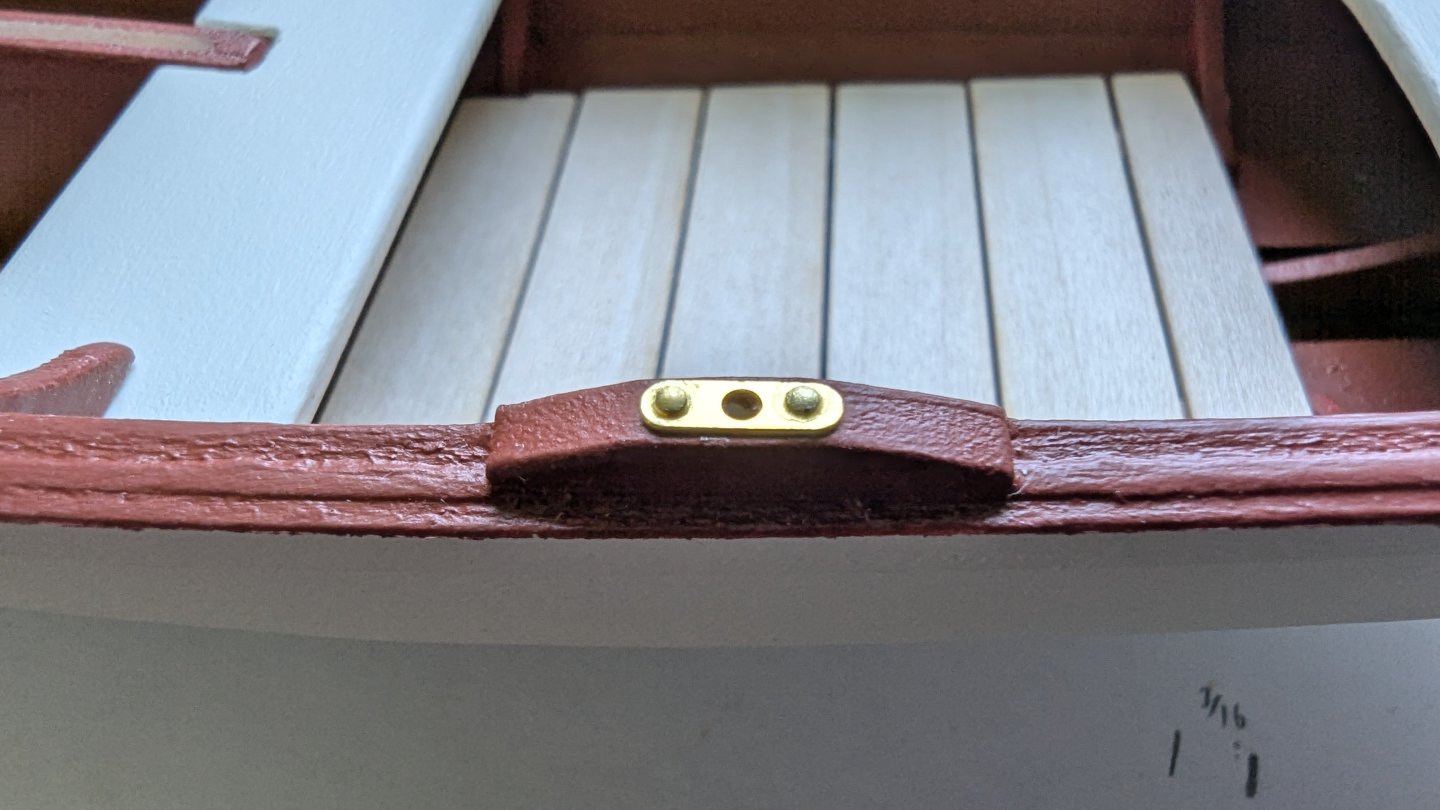
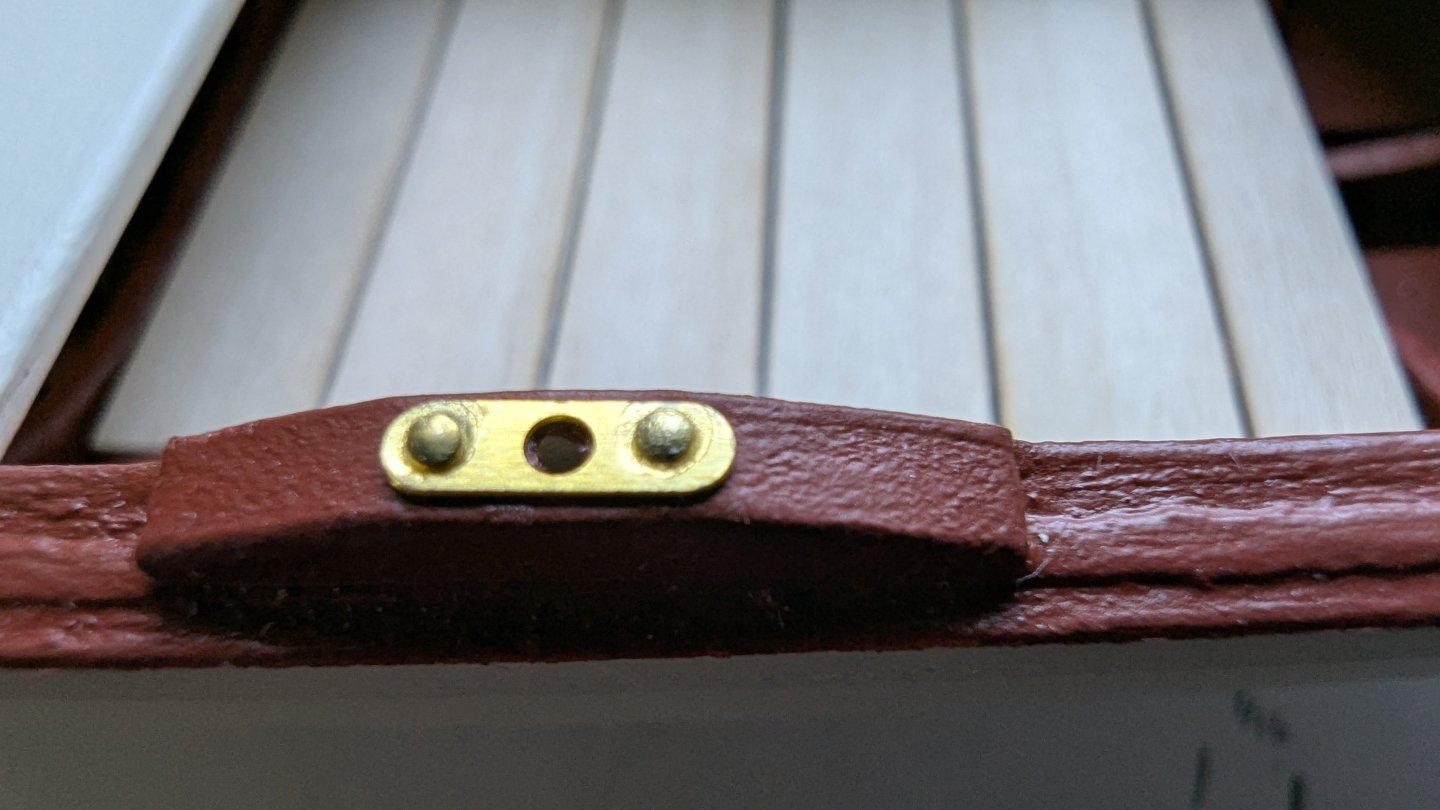
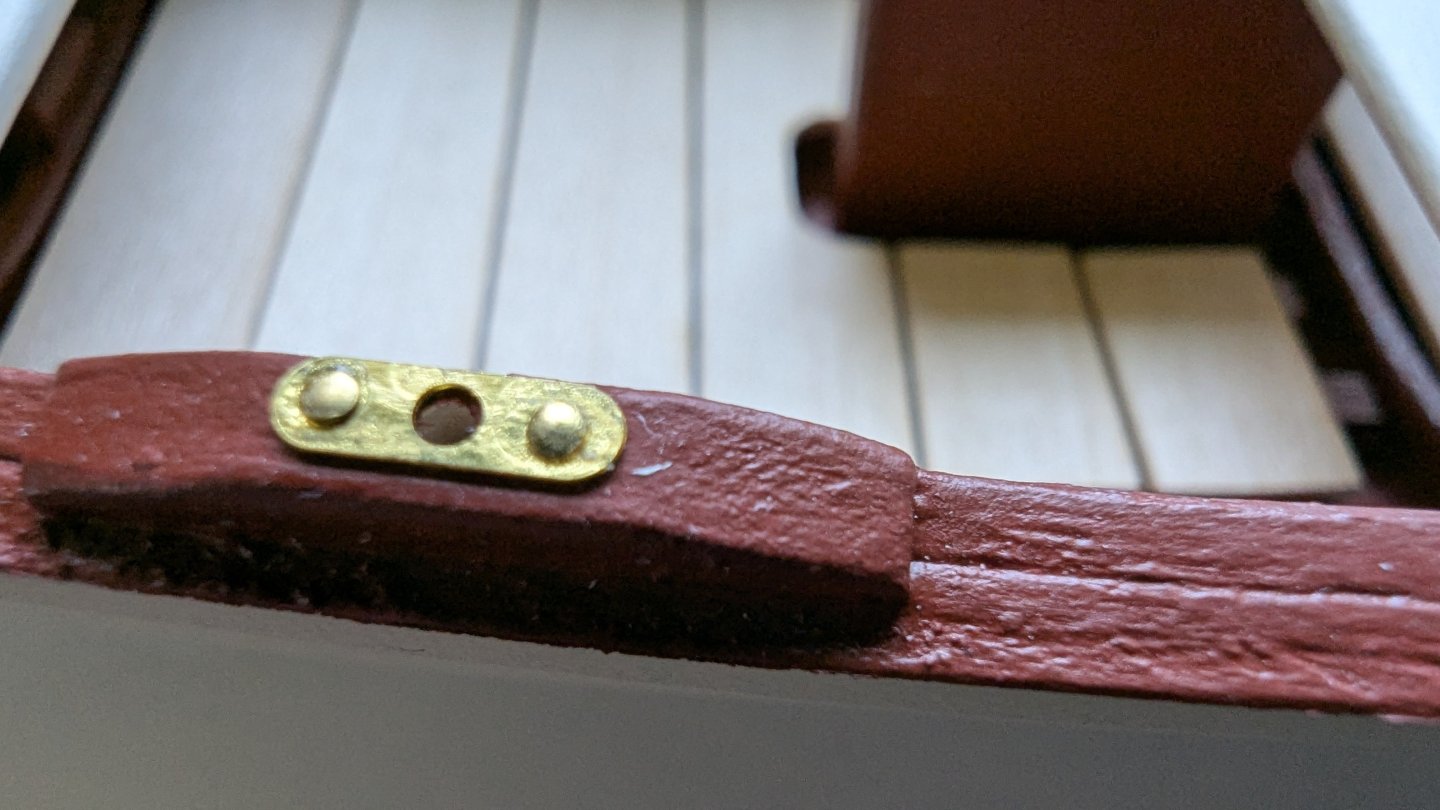
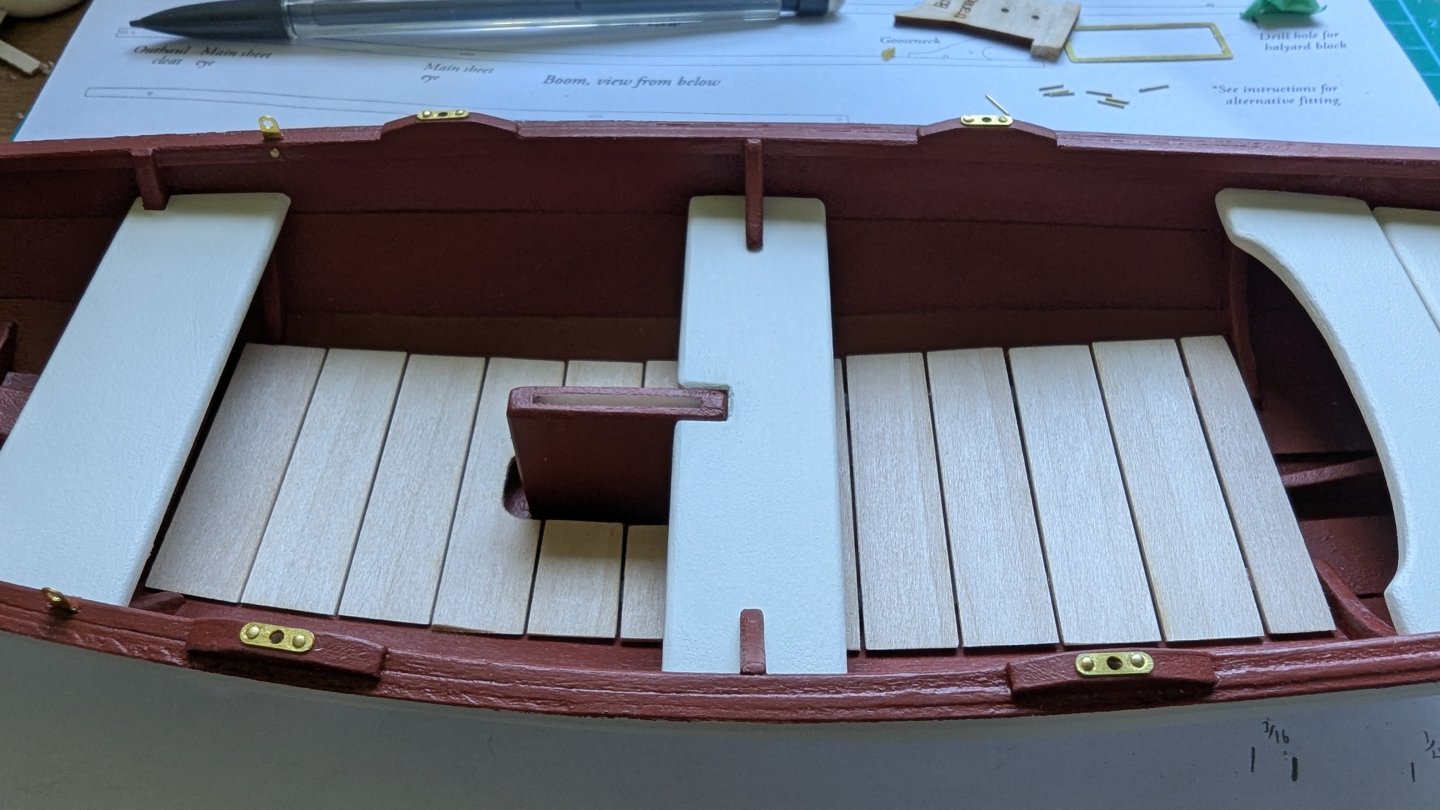
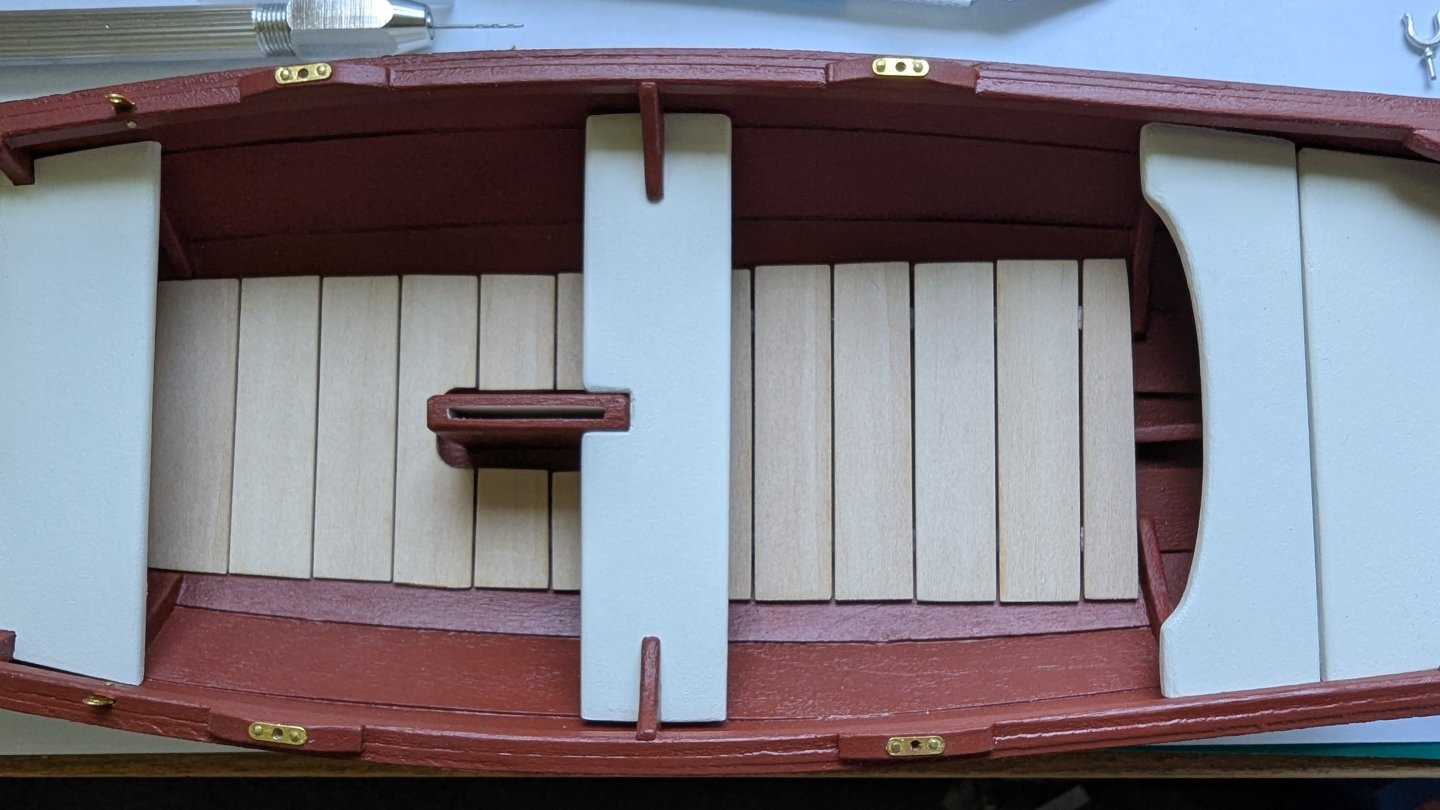
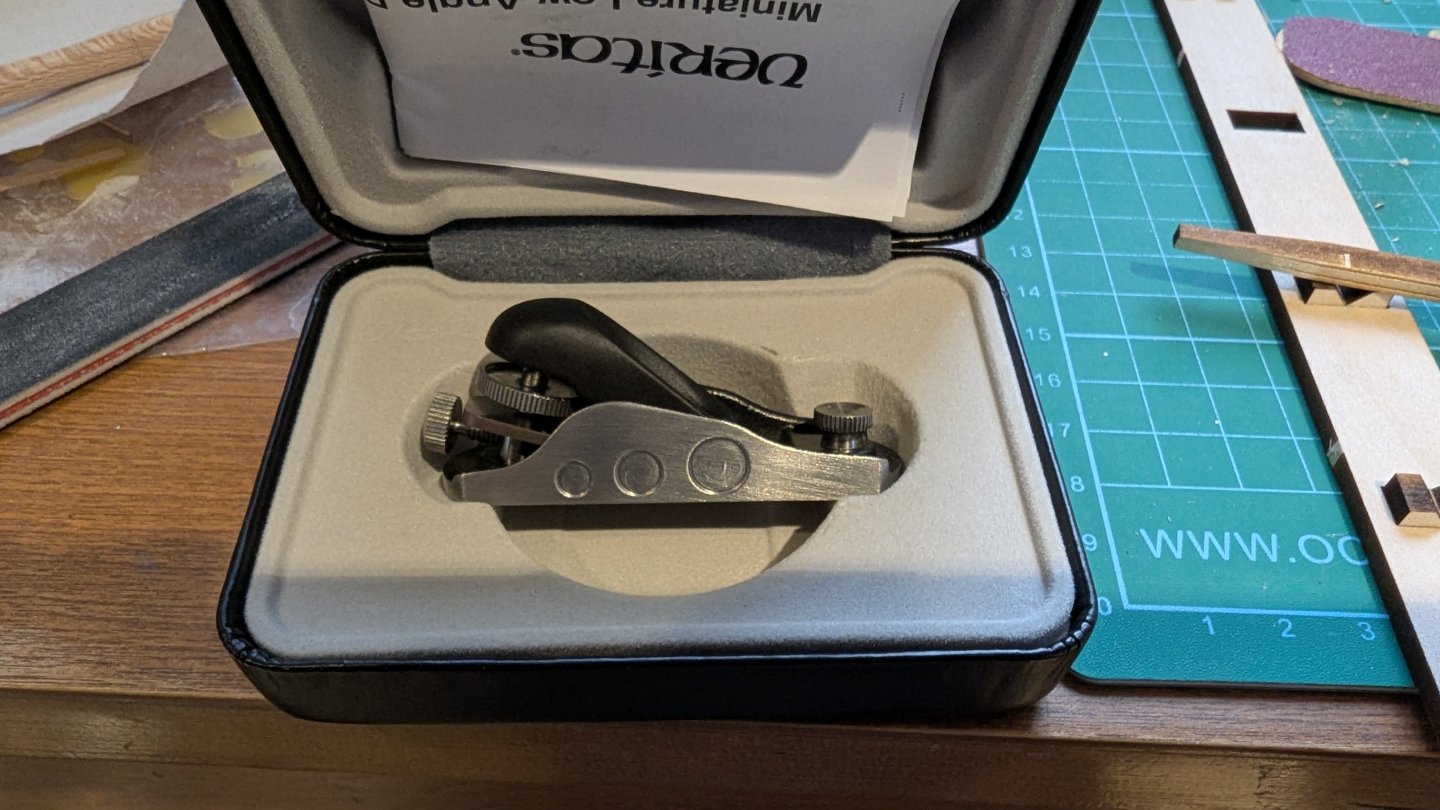
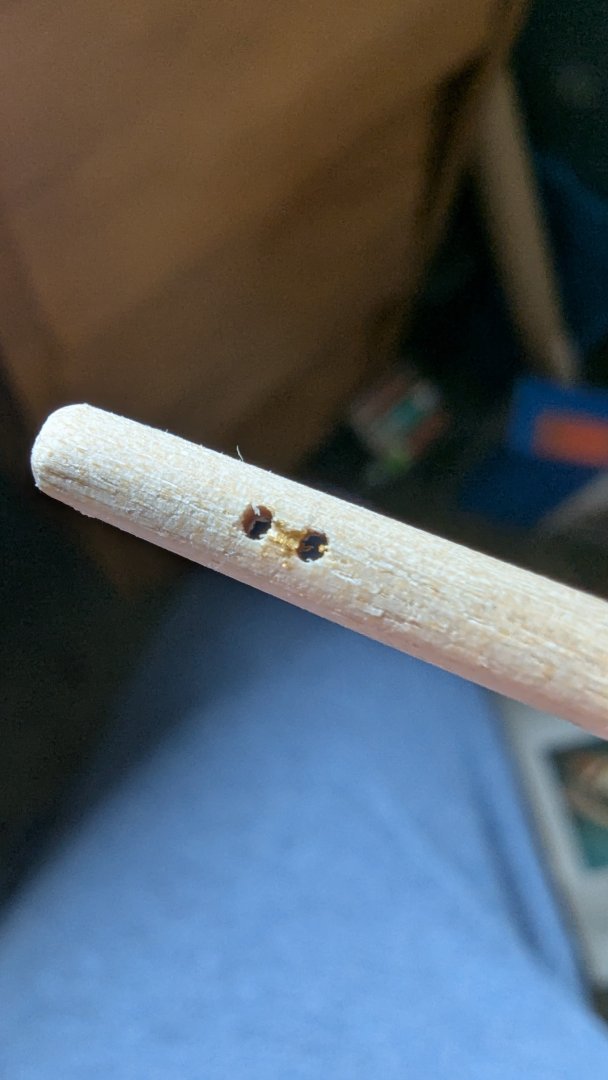
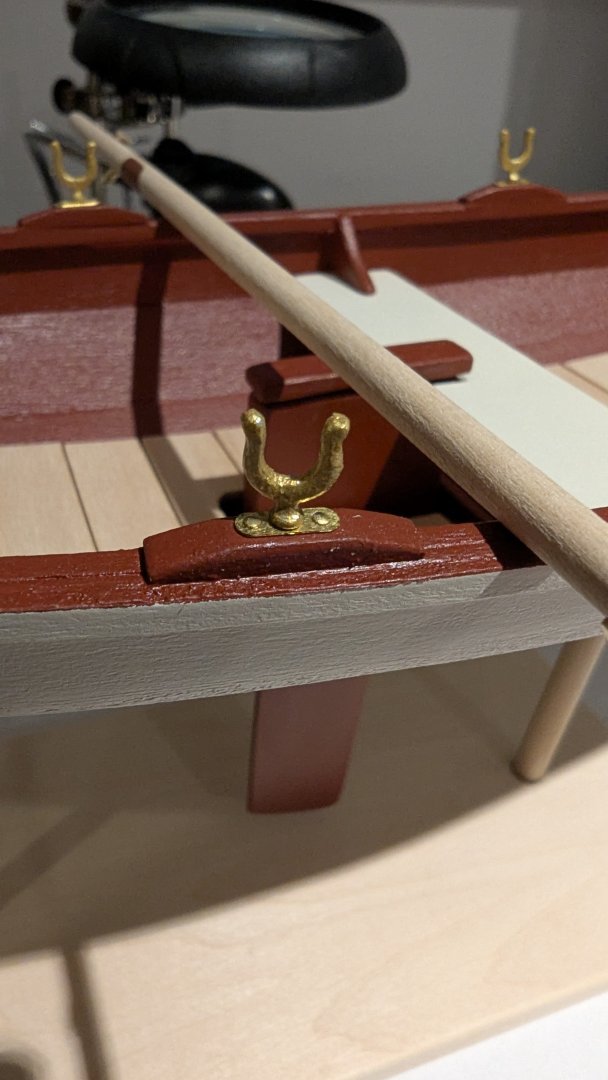
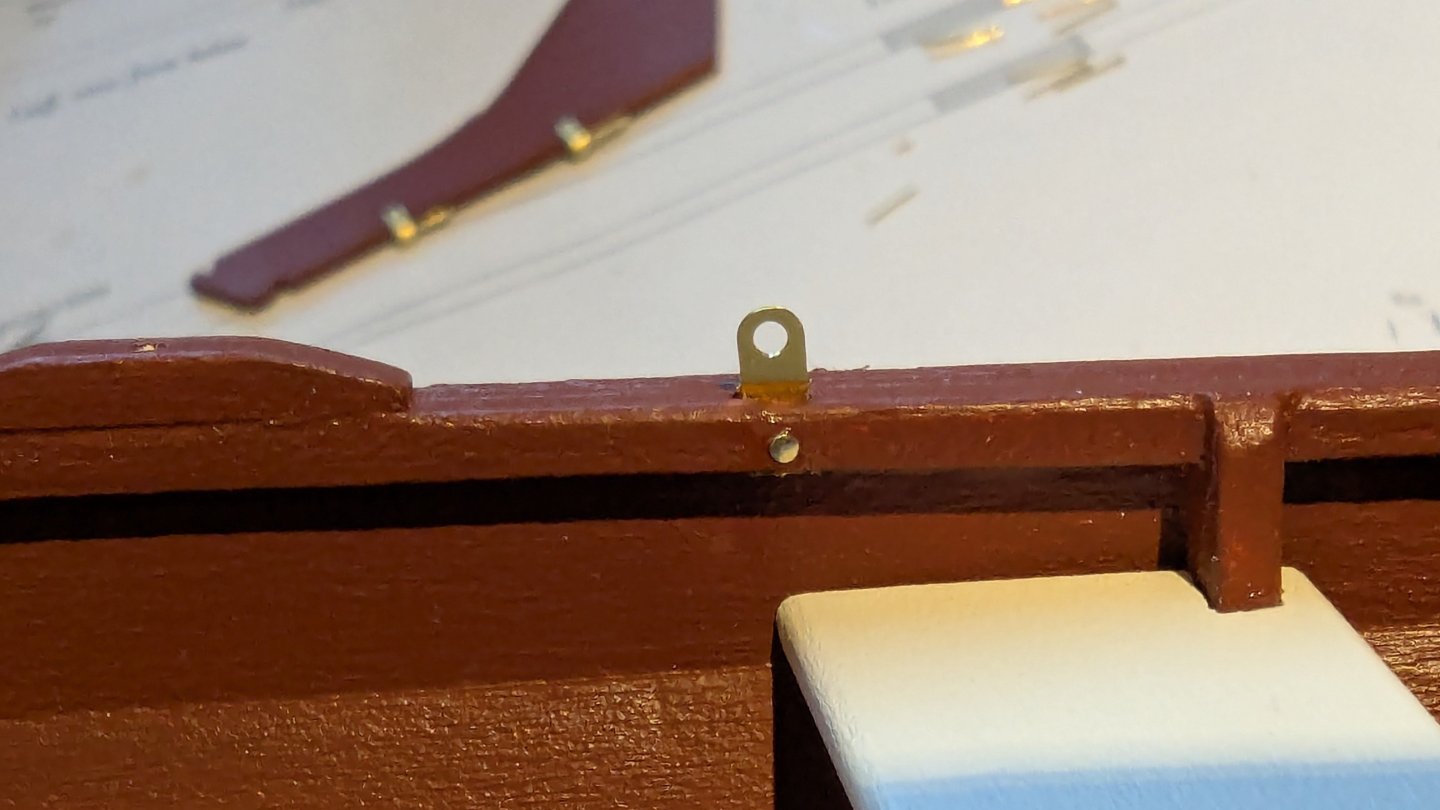
Thanks! I haven't gotten much done over the past week, but I've released all the wooden parts, and figured I'd force myself to organize my pictures up to the current point. This one feels a little picture heavy for the amount that was accomplished. Log #15 - Oar pads & locks, mast I picked up a few new tools, glue looper, Swann Morton scalpel, round nose pliers and some proper flush cutters (for wire/tube, I've been using the beginners kit ones from ME which I don't think are really appropriate for metal). First used was the glue looper which helped getting the oar lock pads in place. I applied each one differently, some techniques worked better than others. Using pins in the 'nail holes' to guide it into place with a small amount of CA on the pad help align it in the right spot. The looper helped apply just enough to make it stick, but not so much it spilled into the holes (there was so little glue, one or two of them actually came off). The loose pads were trickier to get nailed down, but I managed to drive the nails (applying a bit of CA to the tip to ensure they would do their job). I also had the nails slightly longer than the hole so they would bite into the wood and act as a nail should. 100% unnecessary, but I clearly have psychological problems. They all turned out quite well and fairly straight (and I just noticed a small amount of flaking CA on the paint in one of the pictures, now I'll have to go clean that up). I was debating for a while about what to do with the oar locks as I didn't really want them to be 'steel'. I ended up painting them with some gold OcCre paint I picked at the ME clear out sale. The Mast This took the majority of my time. I made both the laser cut glued pieces and the dowel versions. I ended up using the dowel because it's size and taper ended up near perfect. Although the process was interesting, I struggled with the glued pieces. Getting the char off reduced the size too much and discolored it. I found drilling such a small hole in the glue seem to be more awkward than drilling into the round dowel (I used some tricks for that). The bottom end that fits into the mast step ended up way too small and the overall profile was an ellipse - although I don't think that's an issue as many, if not most masts are oval. However, I finally got to use my Christmas present: Comparing both masts: I wish I could remember who, so I could properly thank them, but one of the build logs had used a cordless drill to shape the dowel. I did the same and although it was far too dusty and time consuming for my liking, it worked perfectly. The process really sped up when I stopped using the same piece of sandpaper, and cut 5 or 6 strips to rotate as soon as they got 'clogged'. (Now I might need to put a mini lathe on my wishlist) Drilling straight holes in the dowel took some ingenuity. With a press it would be much easier. I made a 'guide' out of a thicker piece of wood, placed the dowel in a vice and put the guide across the top to keep the drill straight. It would've worked even better had the top of my vice been perfectly level, but it worked well enough. Making the guide: Using the guide: Next, to make the perpendicular hole, I drove a pin through the current one and used that to rest it it on so it would sit perfectly level and I could drill perpendicular: The round nose pliers came in handy for the eyelets. The eyelet itself was a U shape with one tip being longer than the other. That way, I was able to glue in one tip and then line up the other tip to push it all the way in. Applying the cleats has it's own miniscule and shaky hand challenges, but straightforward. Finally, to simulate the chafe pad (I went the 'copper' route instead of leather), I used some copper OcCre paint I had got for dirt cheap from... you guessed it.... the ME clear out sale. First I simply used a toothpick to slather some paint on a piece of brown paper, wrapped the opposite side around a dowel to give it some memory while drying. Flipped it over, marked it out, cut with a brand new blade, PVA glue and voila. I sent this to the wife with no context and she asked if my fake nail broke off More gold paint, I cleaned it up after it dried, but didn't get a pic: The stay plates swivel since I managed to get them on with only the nails being glued into the mast. Handy if I need to readjust them when rigging The color matches nice enough; though I'm not sure how durable the gold paint will be. I've yet to glue them in. I was thinking of using a rubbery/flexible adhesive so they could be twisted slightly though the longevity of those adhesives probably don't make them the best choice. As of this week, I've shaped the boom; just need to finish gluing and drilling. Need to shape the top spar and oars, then onto making the sail and rigging. On a personal note, I found the time to get over to my boat for the first time this season. I stepped the mast and got the jib rigged up. I ran out of time and had to many questions to continue with the mainsail, boom, halyards, sheets, etc. I reviewed manuals, and reference pictures after I got home, and should be able to go back and finish it up when I have time for another visit. Maybe even get a little crazy and actually launch it! Thanks for the comments, and likes, Matt


- 86 replies
-
- 11
-
-
- Model Shipways
- Norwegian Sailing Pram
- (and 3 more)
-
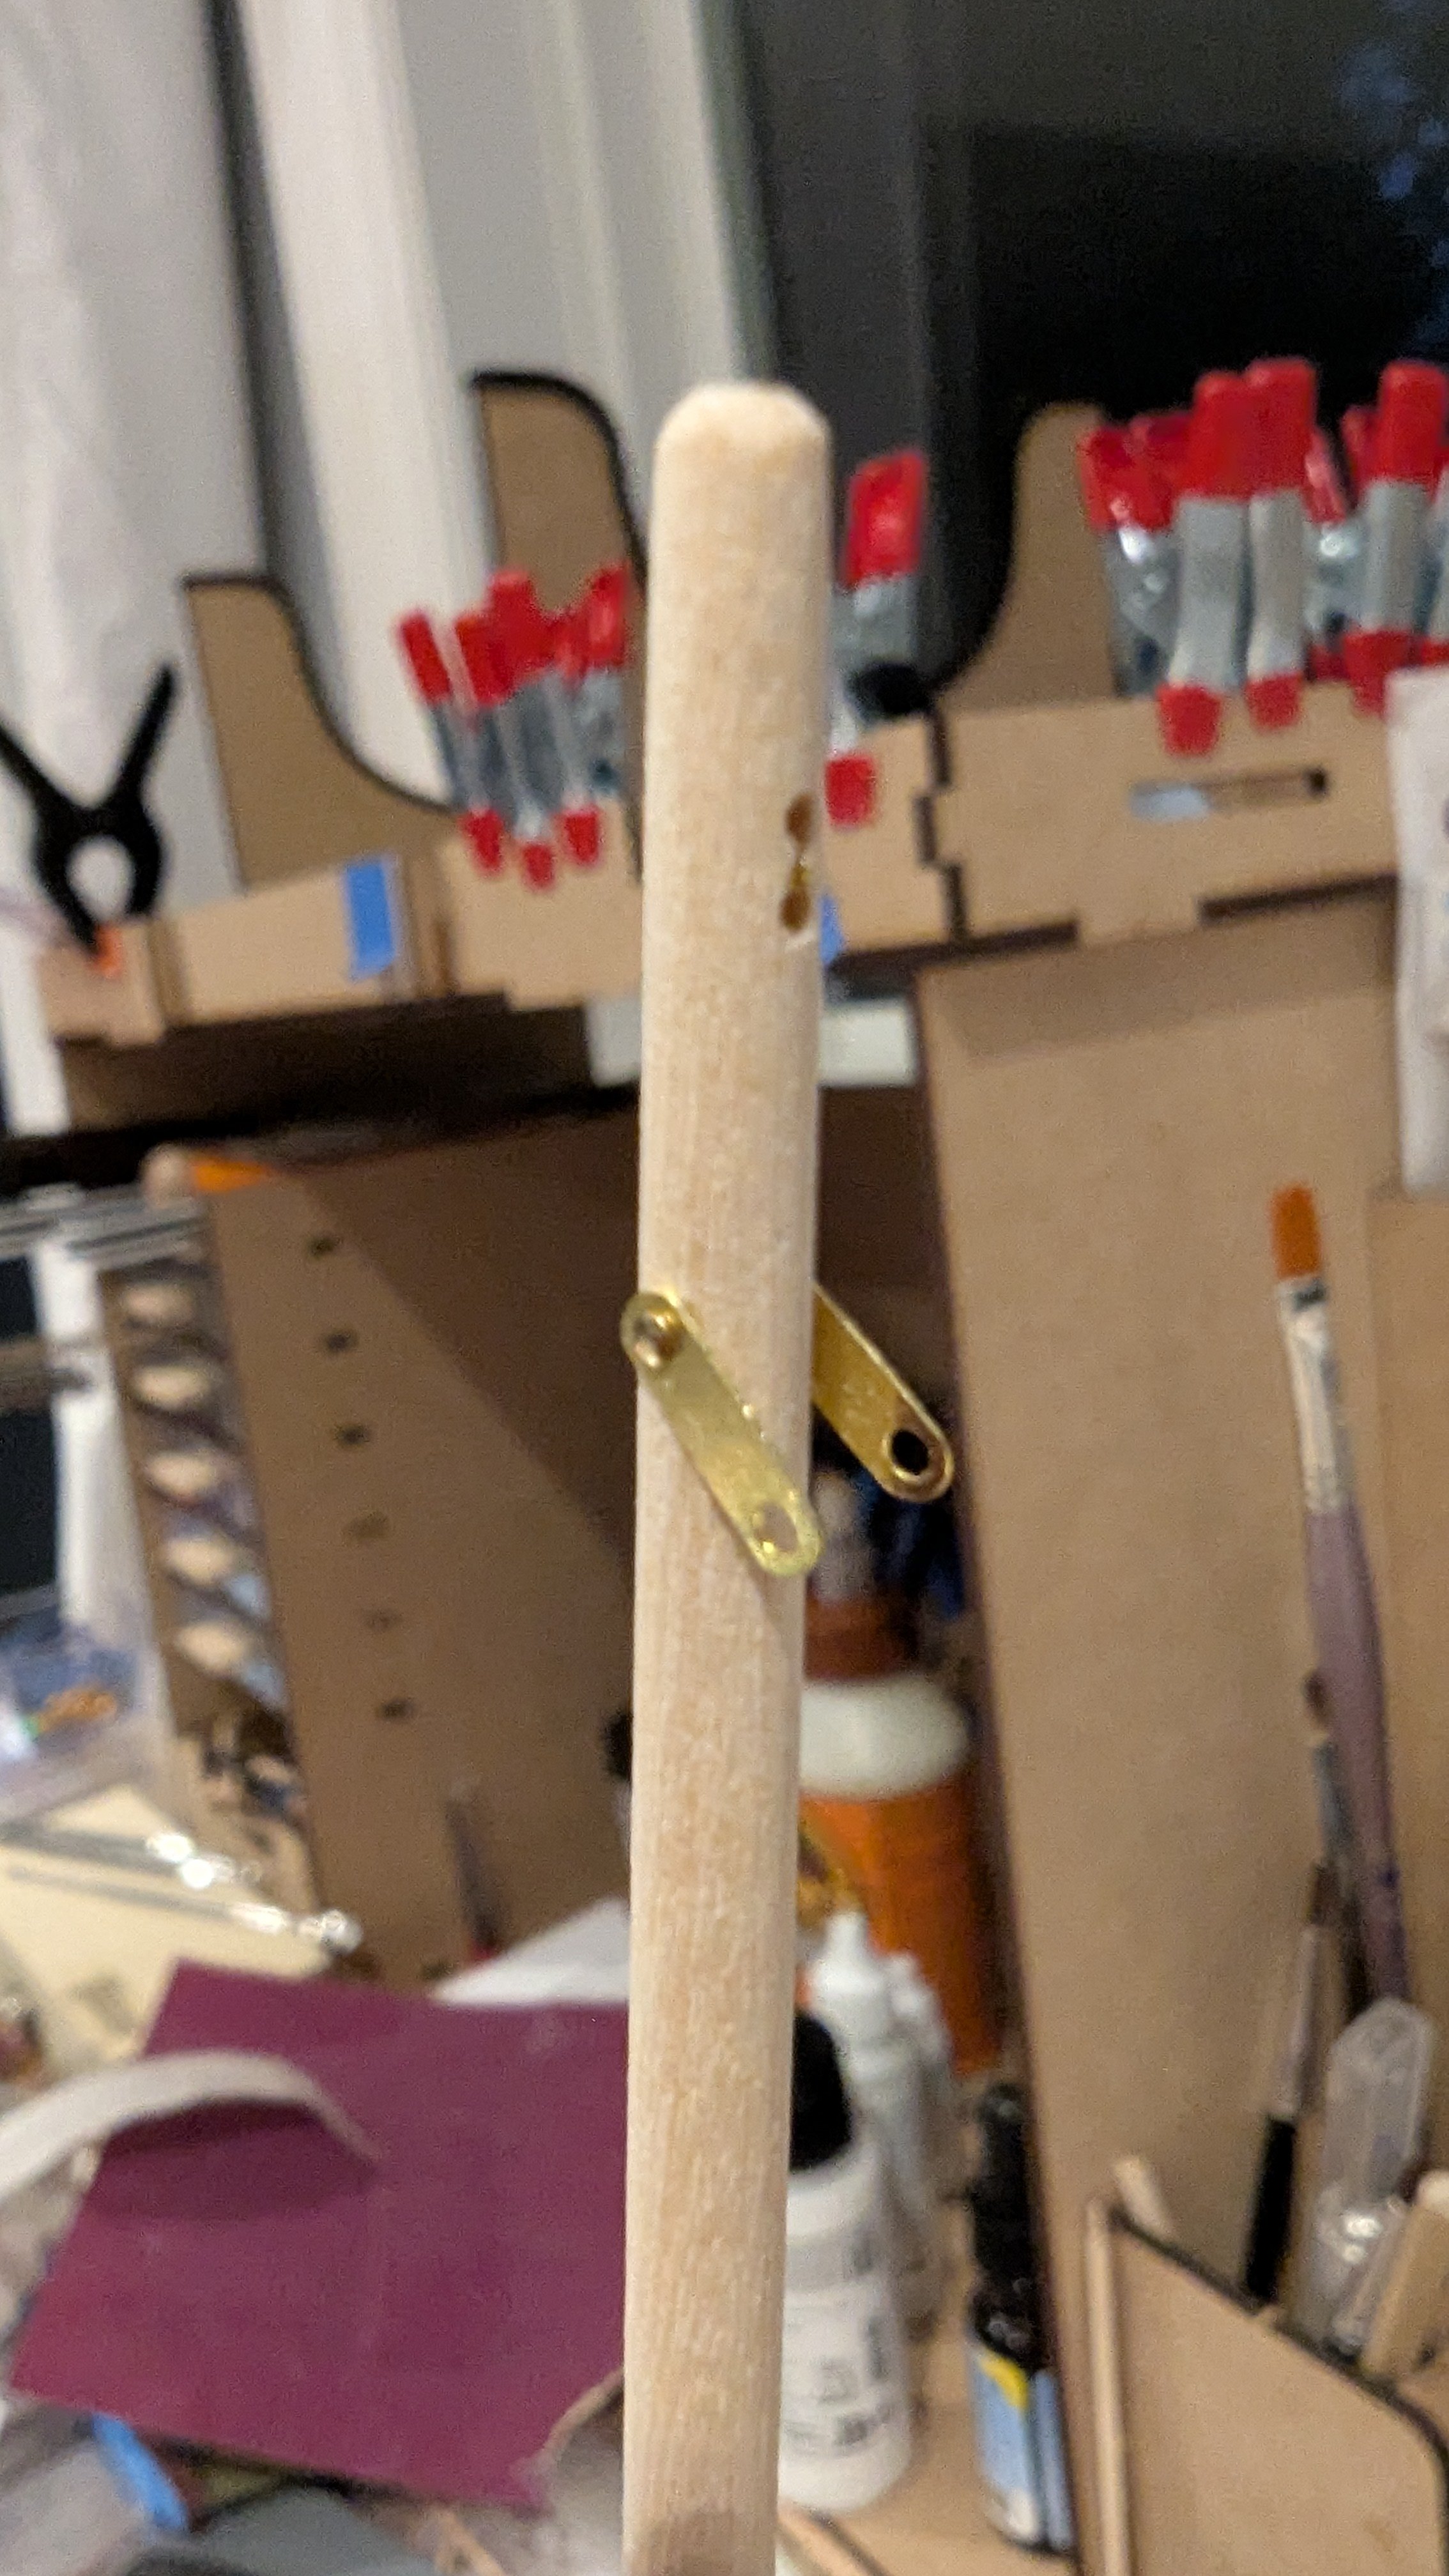
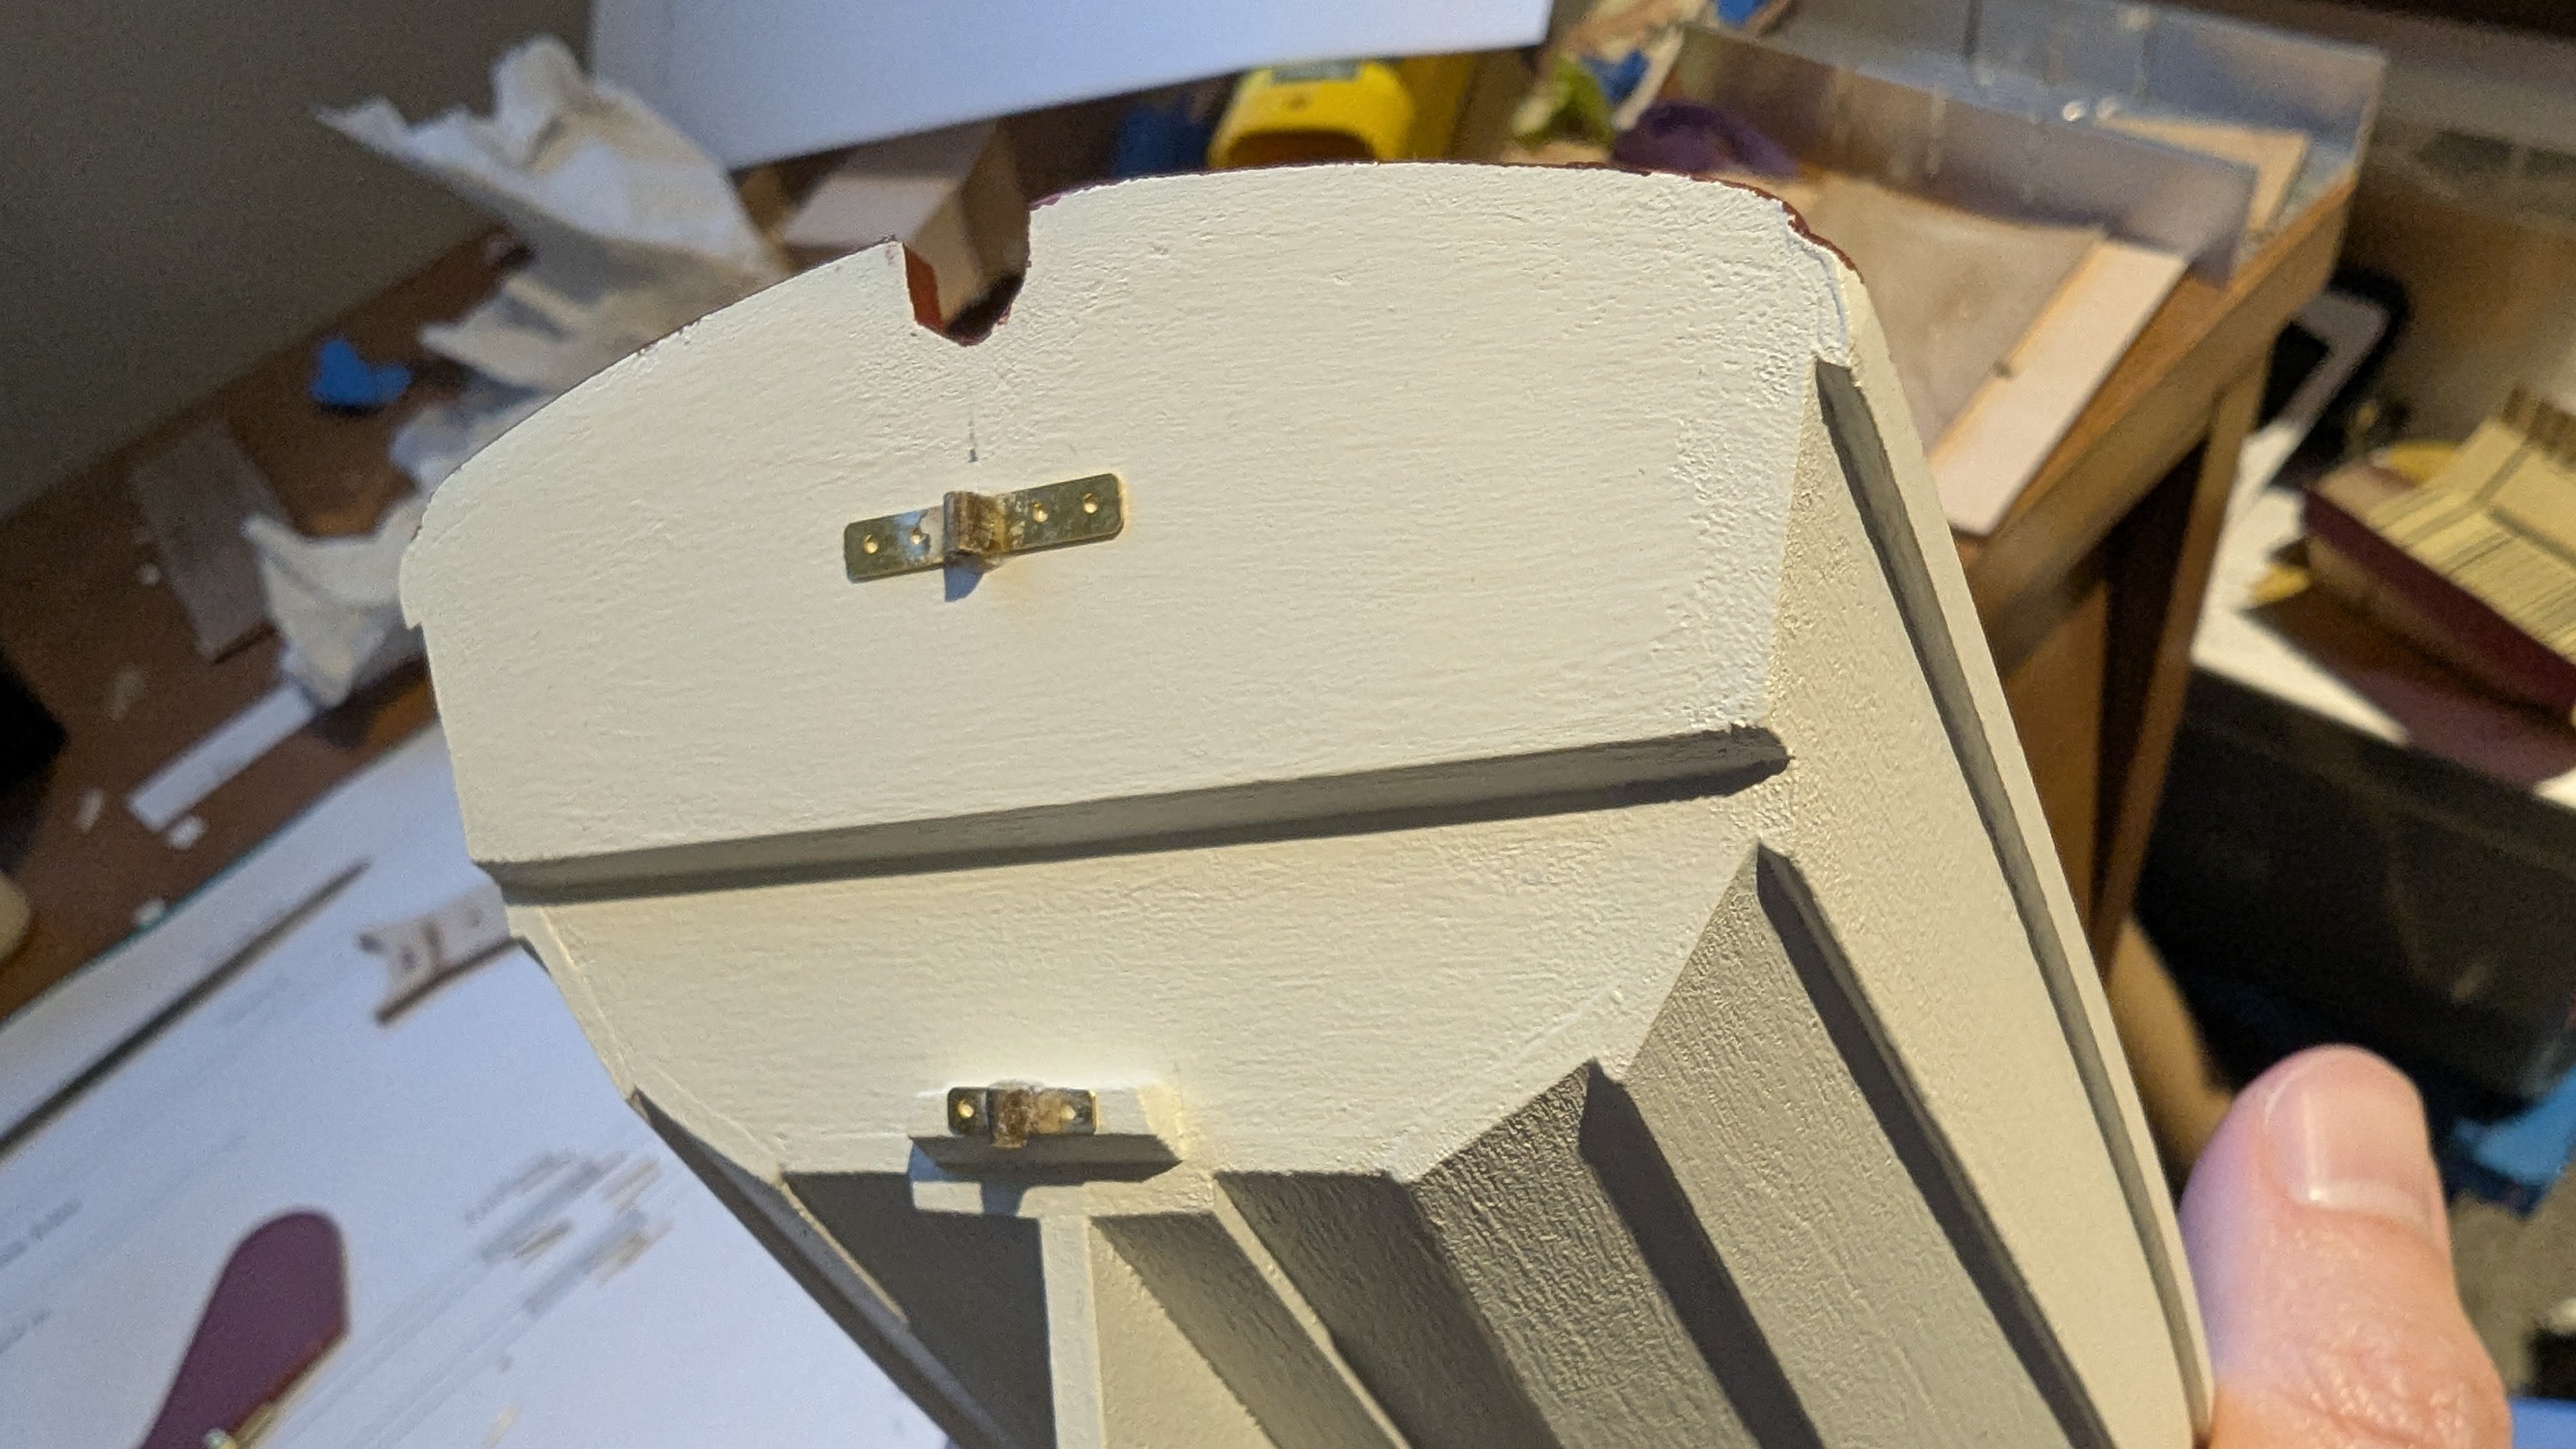
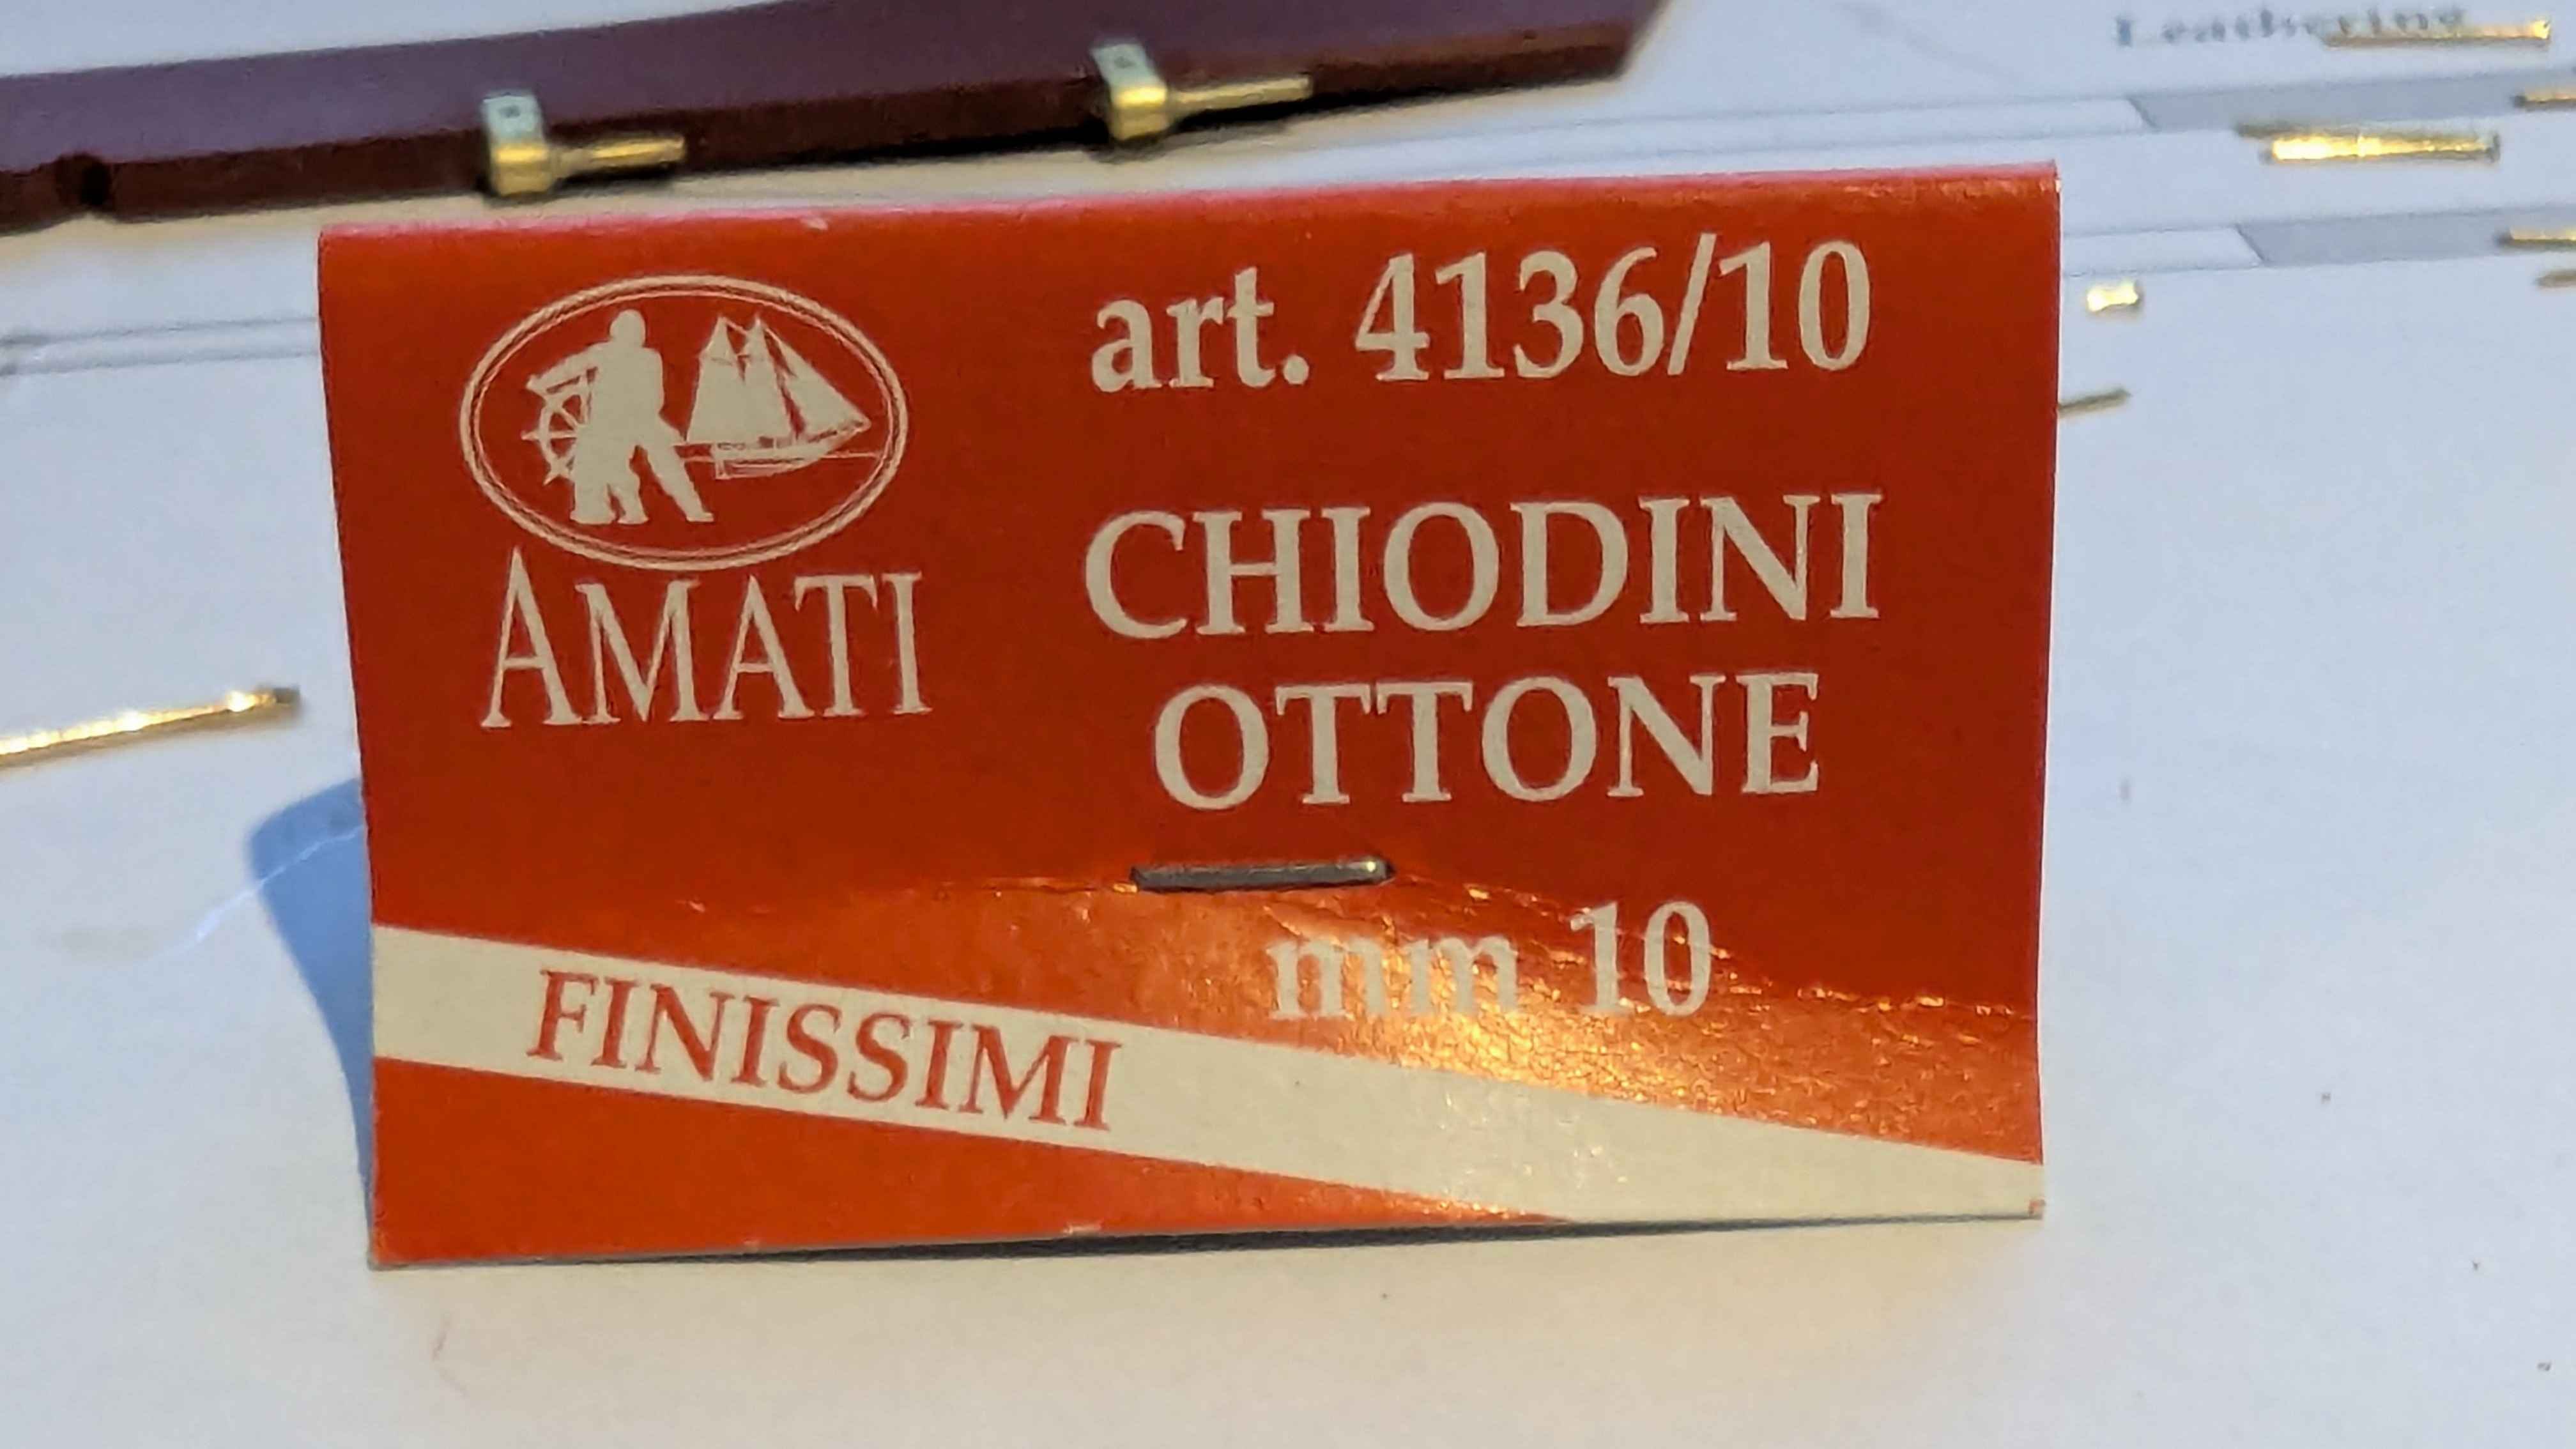
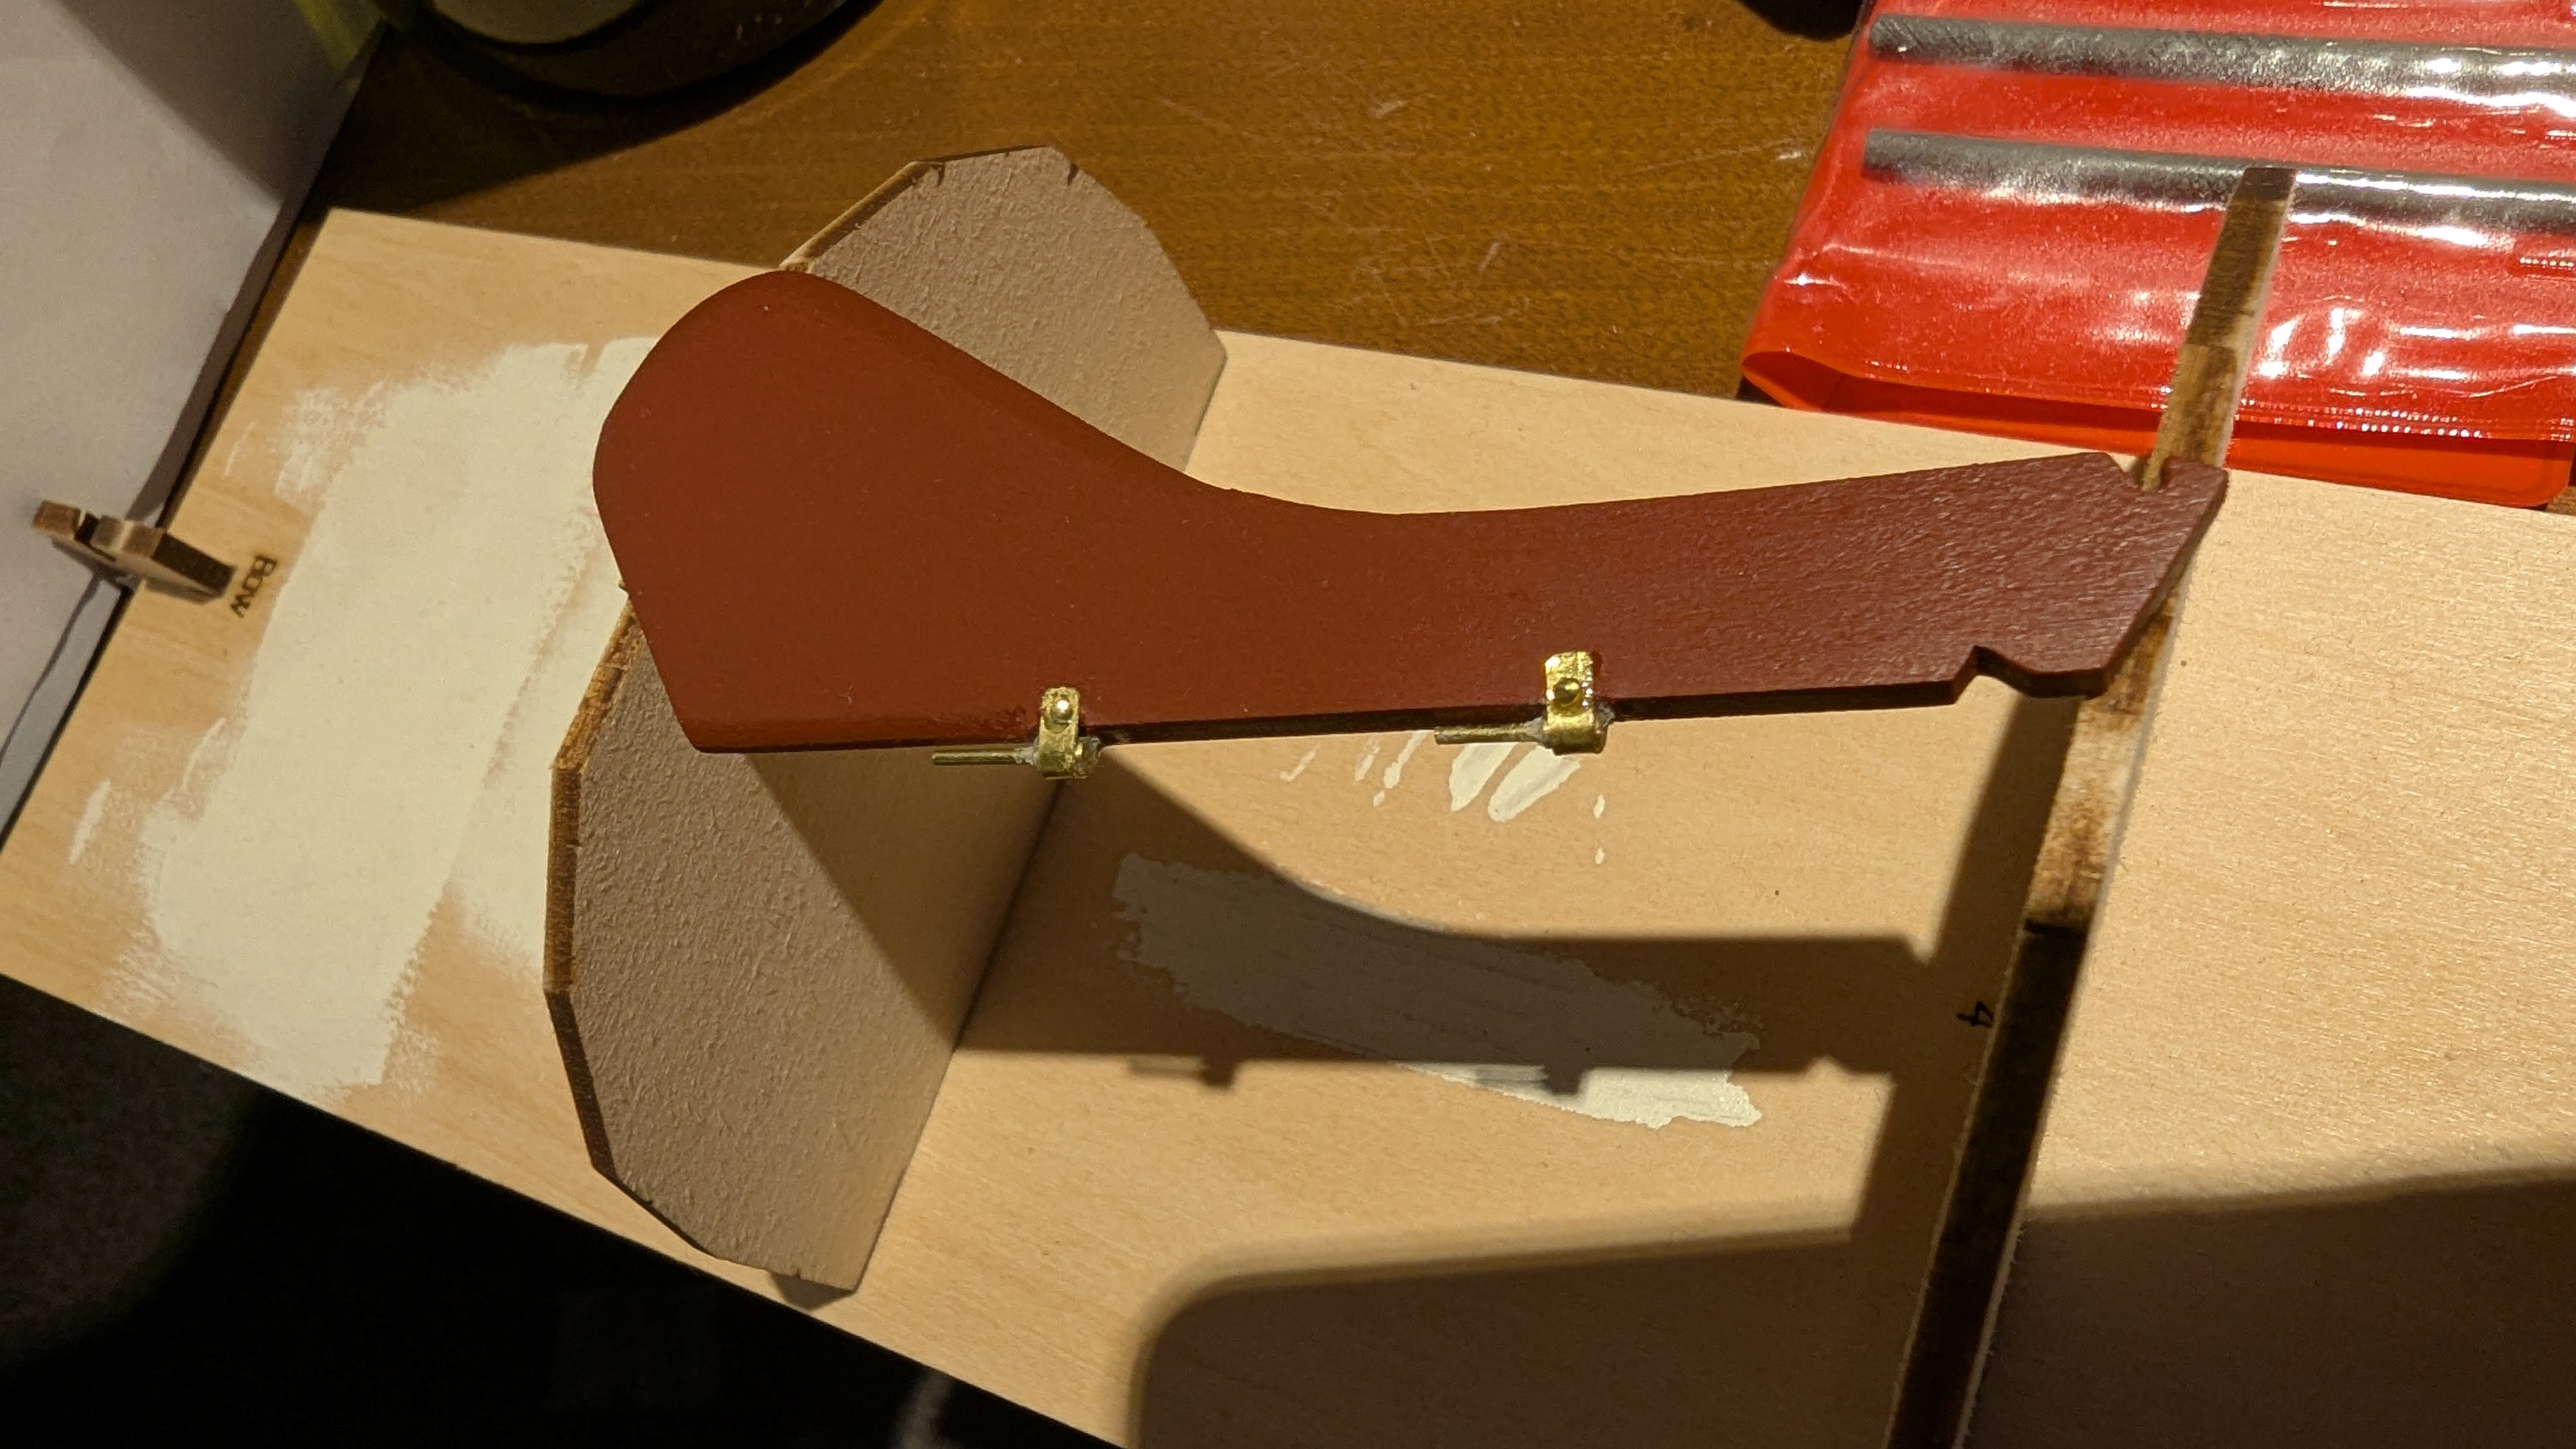
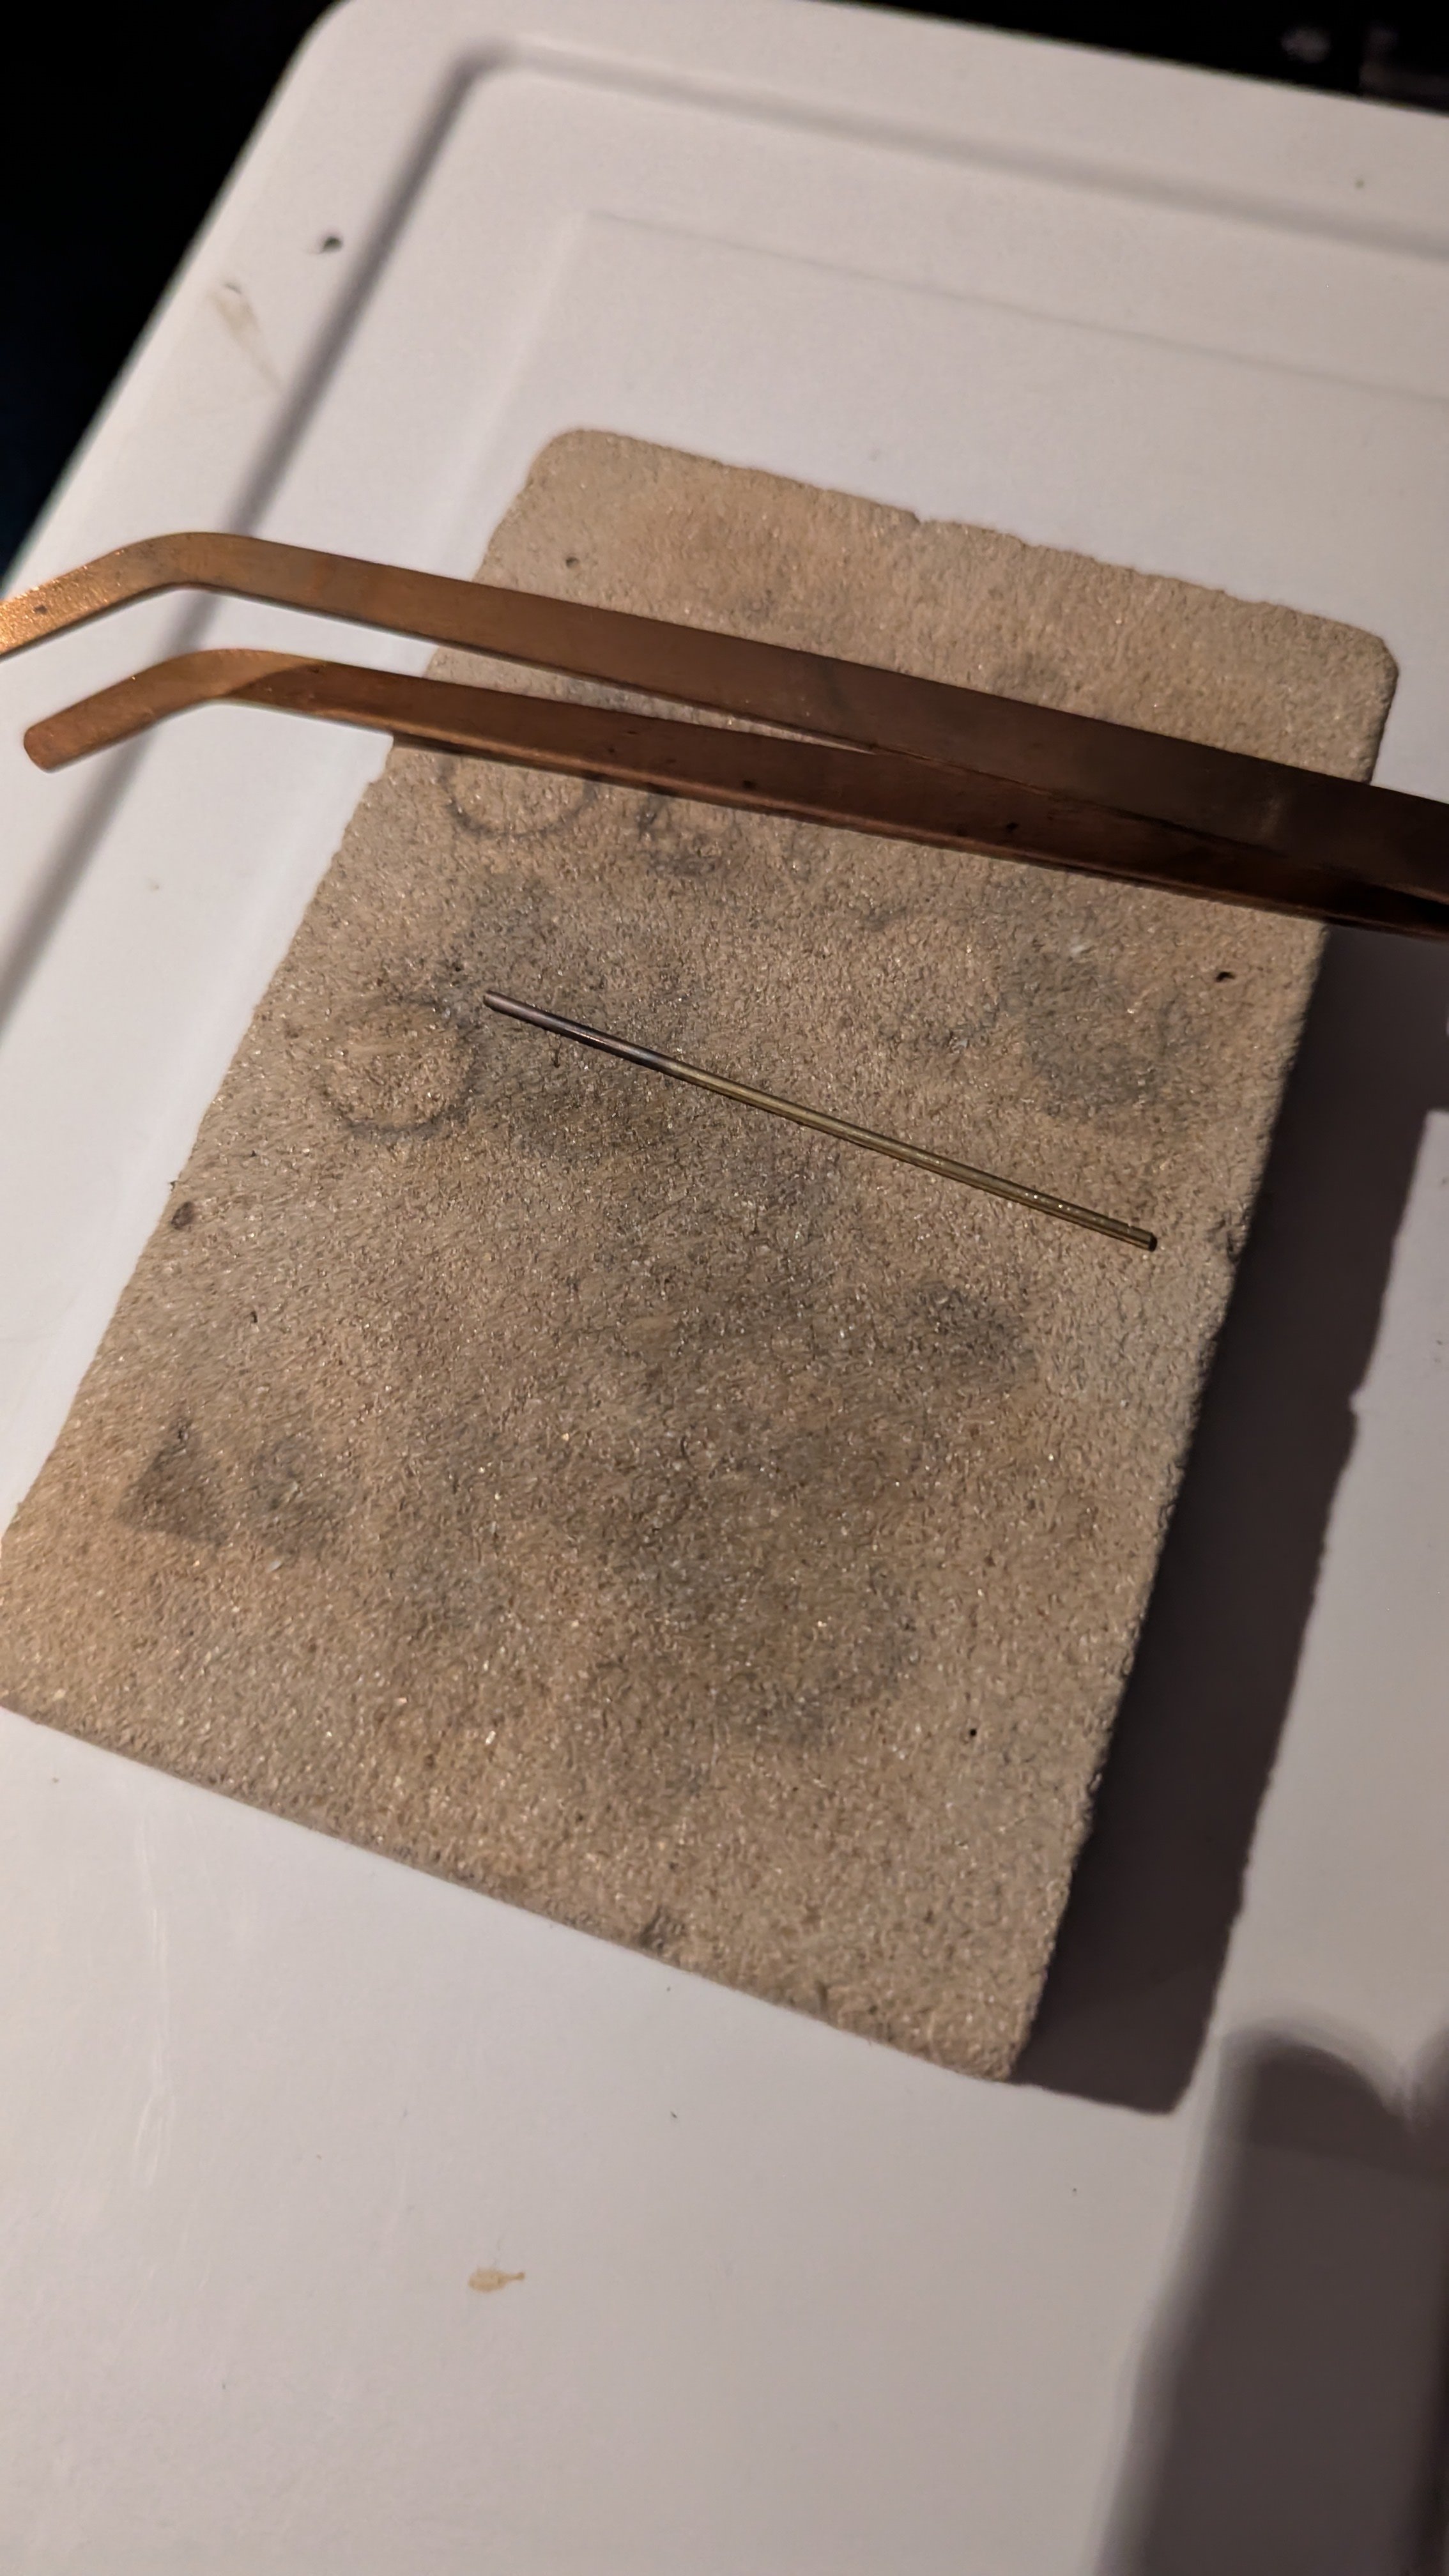
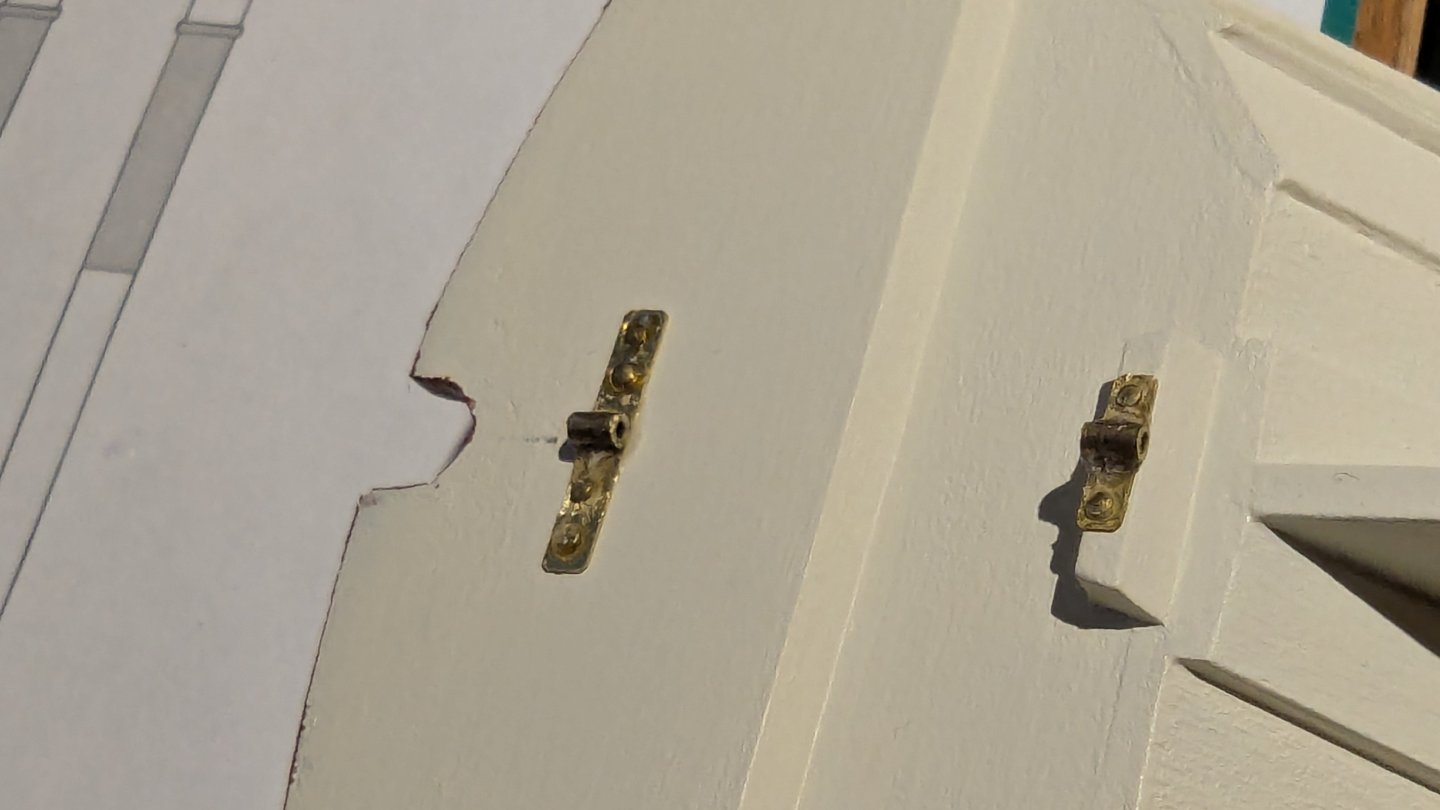
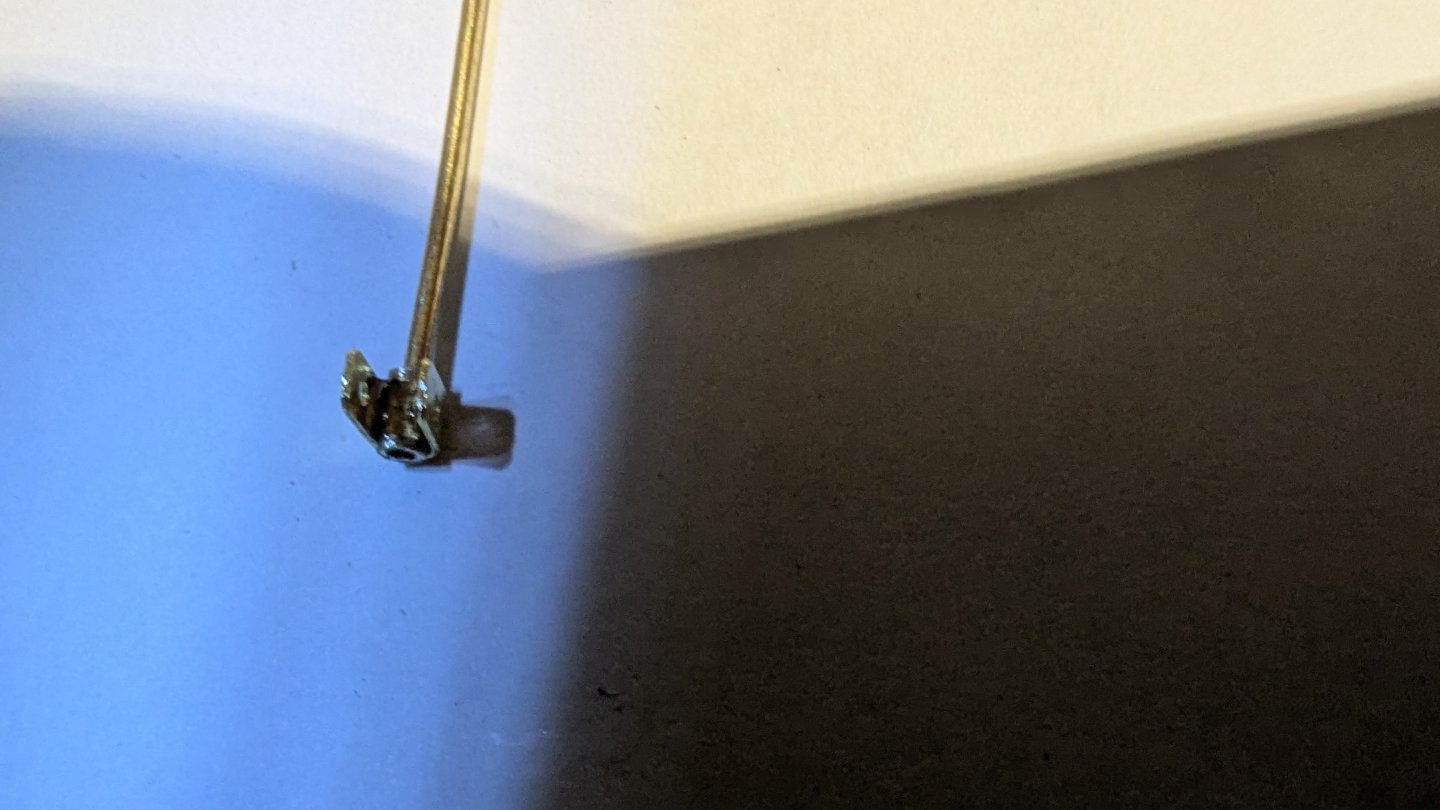
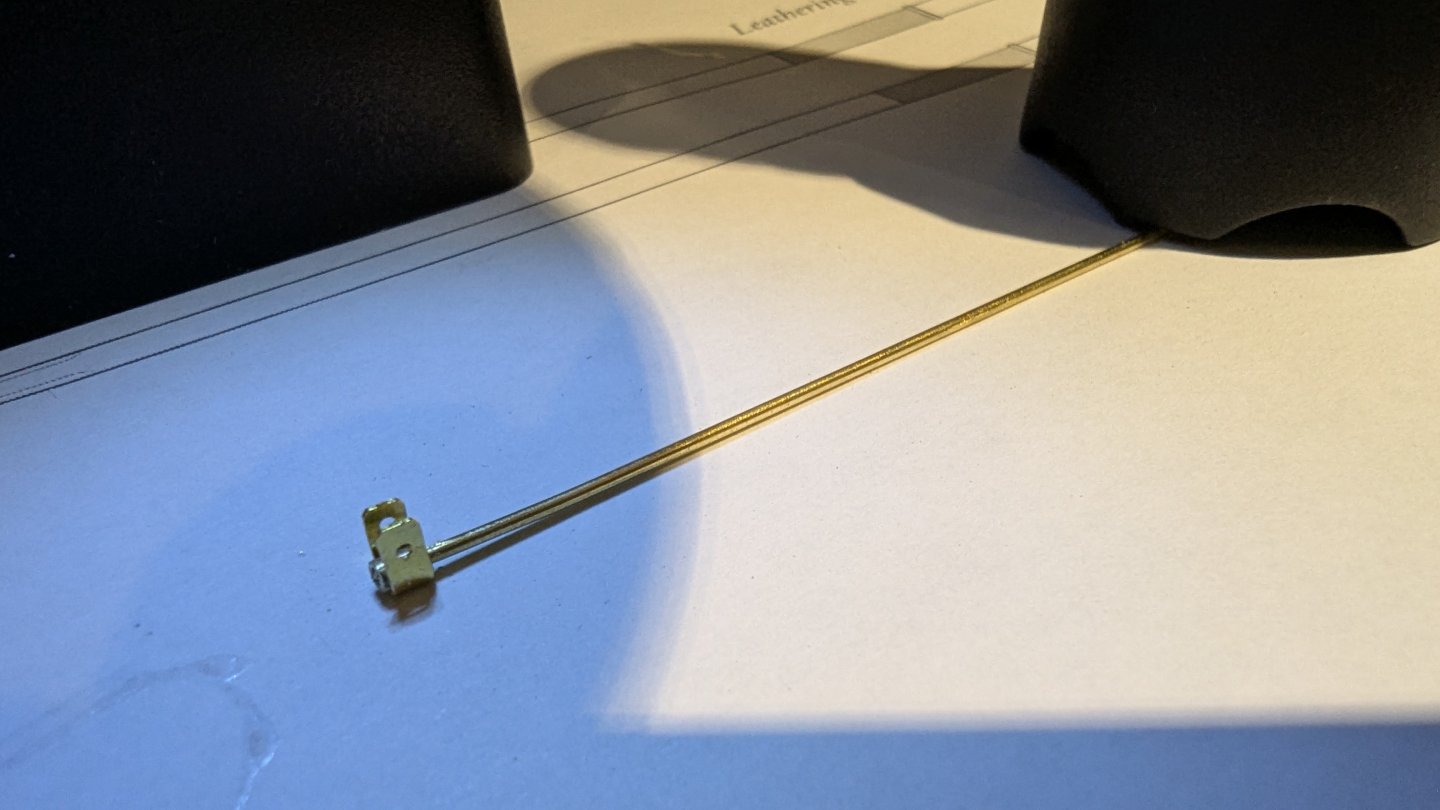
Thanks for linking that vid. I had completely forgot about that one. I have some good news. The pins I ordered from the UK worked. They're Amati, I'll post a pic of the package for any future victims of Model Expo. I got the nails installed on the stays; finished and installed the rudder. I was able to hold true to the prototype and instructions by completing the pintles as described. It was fun fitting the nails, but I can't say I had fun fiddling with the CA and getting it on my fingers every few seconds - the gobs that come out, even with my 'precision tip' are far too large. I'm thinking there are better options out there than the gorilla glue tips for such ultra fine detail. I found the idea of using pipettes, which I'll try. It also looks like BSI has some precision tips. Something to experiment with in the future - I'd love to hear comments from the wise ones here. Also, if there's a trick to keep away, reduce or clean up the white powder CA leaves behind. I'm very happy that I managed to keep the rudder as a working, and removeable part. I didn't bother marking out the transom for the gudgeons as instructed. I simply glued both on at the same time while hinged to the rudder. The bottom one ended up slightly crooked but it worked well enough and ensured the rudder was installed straight. Filed the rudder down a bit to seat the pintle closer. However I wouldn't advise doing this since there isn't a lot of room to work with and you could end up binding the hinges when fully assembled. Here are the nails I used: I haven't glued the base together yet, but it's shaped, and yes, my incredibly small workspace needs a cleaning up. Thanks for looking Matt


- 86 replies
-
- 8
-
-
- Model Shipways
- Norwegian Sailing Pram
- (and 3 more)
-
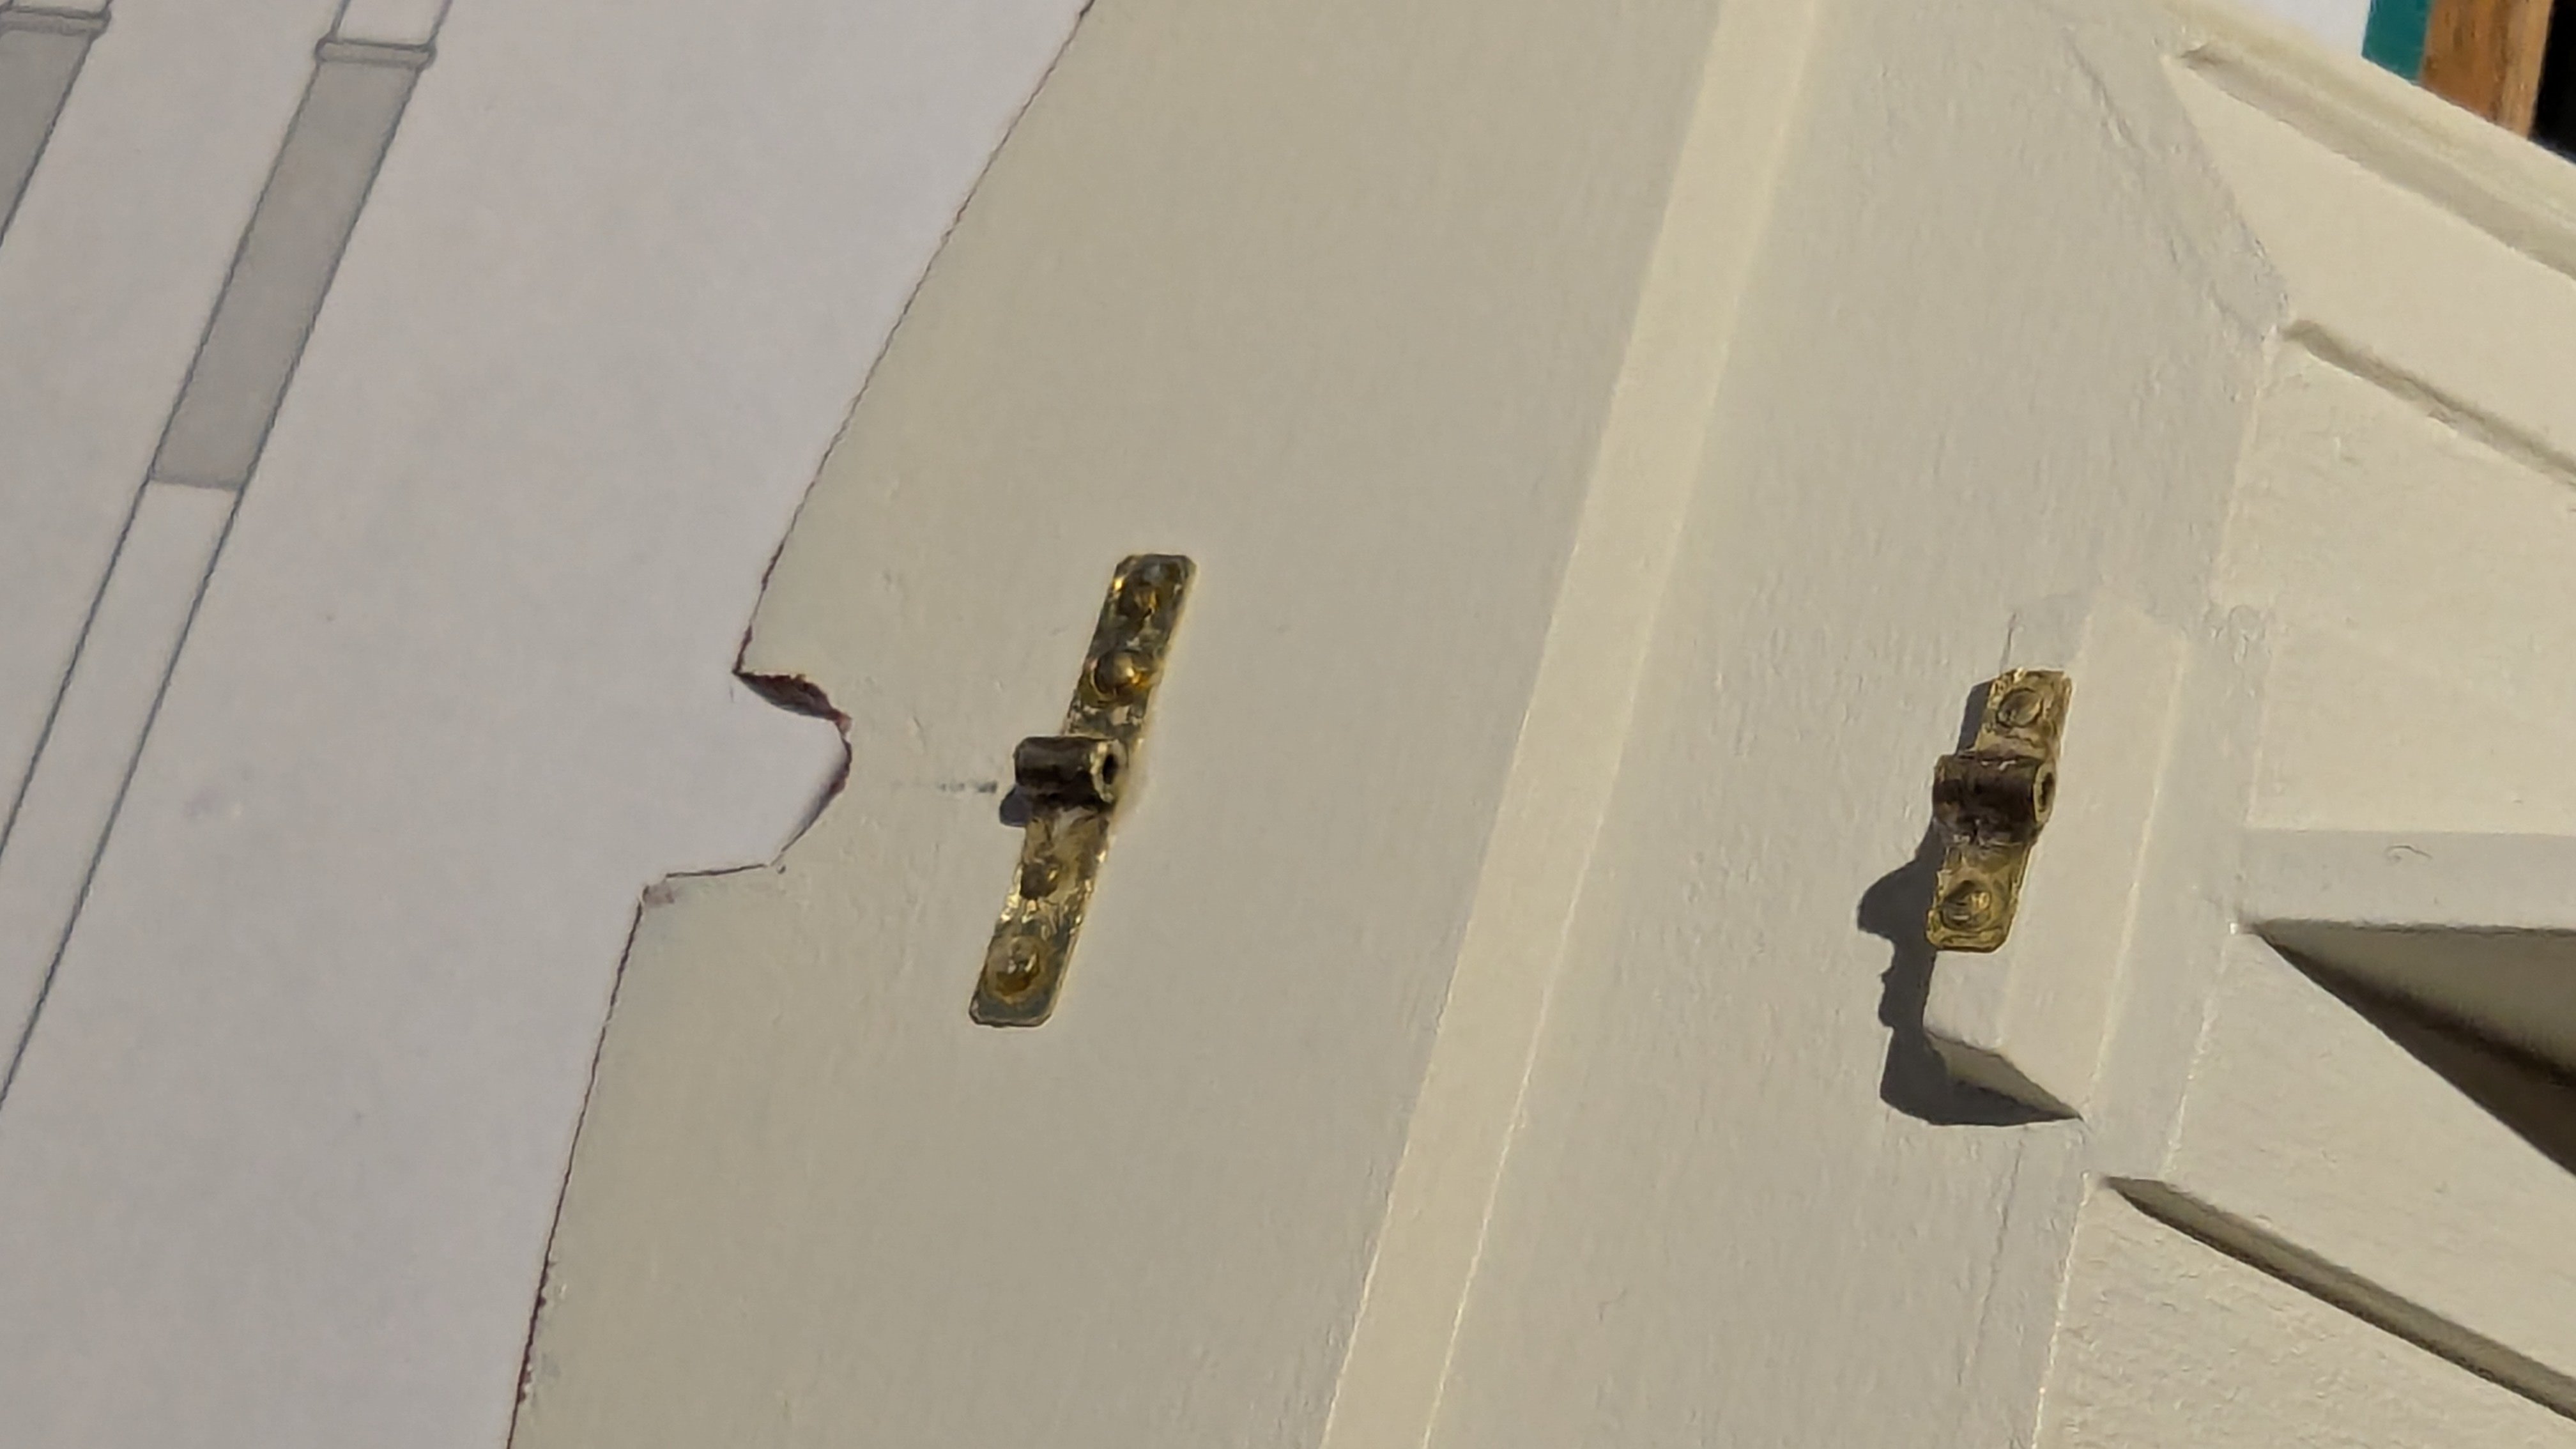
Woops! yeah, that's not a good look. Although they do also sell wood puzzles, maybe they're trying to mix the best of both worlds now. I feel vested in this now - I'll check out her channel to see what she does. Also good to know she made the lobster smack. I know the midwest is different than the model shipways, but it may still come in handy. For the rudder, I looked back at the instructions and the notches that are originally put in the rudder way back on step 28 do say they are for the pintles. So maybe they're supposed to be inset in the rudder a bit. This makes sense, however the etched lines were way to small to fir them. I'm thinking I'll back up a bit here and increase the size of those notches. Since I need to do a bit of touchup on the daggerboard anyways, I can touchup the rudder too. There's another issue where the rudder is 3/32" and the pintle is 1/16". So with the strap wrapped snuggly around the pintle, it's too tight of a slot to fit over the rudder. I was just messing with it and after widening the strap to fit around the rudder, the CA broke, the tube popped out of the strap. I may end up just fitting the pintle right on the rudder and then CA the strap over top of it. I'll fiddle around with this for a bit and see what I end up with... I am too particular for my own good sometimes. I hear good things about the fitment and quality of Vanguard, although I have some kit's ahead of me still, I'm really wanting to try them out. Will report back when I've made some good progress - convinced the wife to do a quick shopping trip for mothers day earlier, and I got some replacement dowels... We went there for her, of course.....
- 86 replies
-
- 3
-
-
- Model Shipways
- Norwegian Sailing Pram
- (and 3 more)
-
Haha. You know, that thought crosses my mind more and more as I continue through these kits. "You idiot, you fell for it again. When are you going to learn, the instructions are meant to trick you, not help you complete the build as best as possible!" I think a very likely scenario is that David (the maker of the prototype, kit and instructions) is not employed by model expo and they just kind of supply whatever is convenient and have no interest in fixing or improving the kits.
- 86 replies
-
- 2
-
-
- Model Shipways
- Norwegian Sailing Pram
- (and 3 more)
-
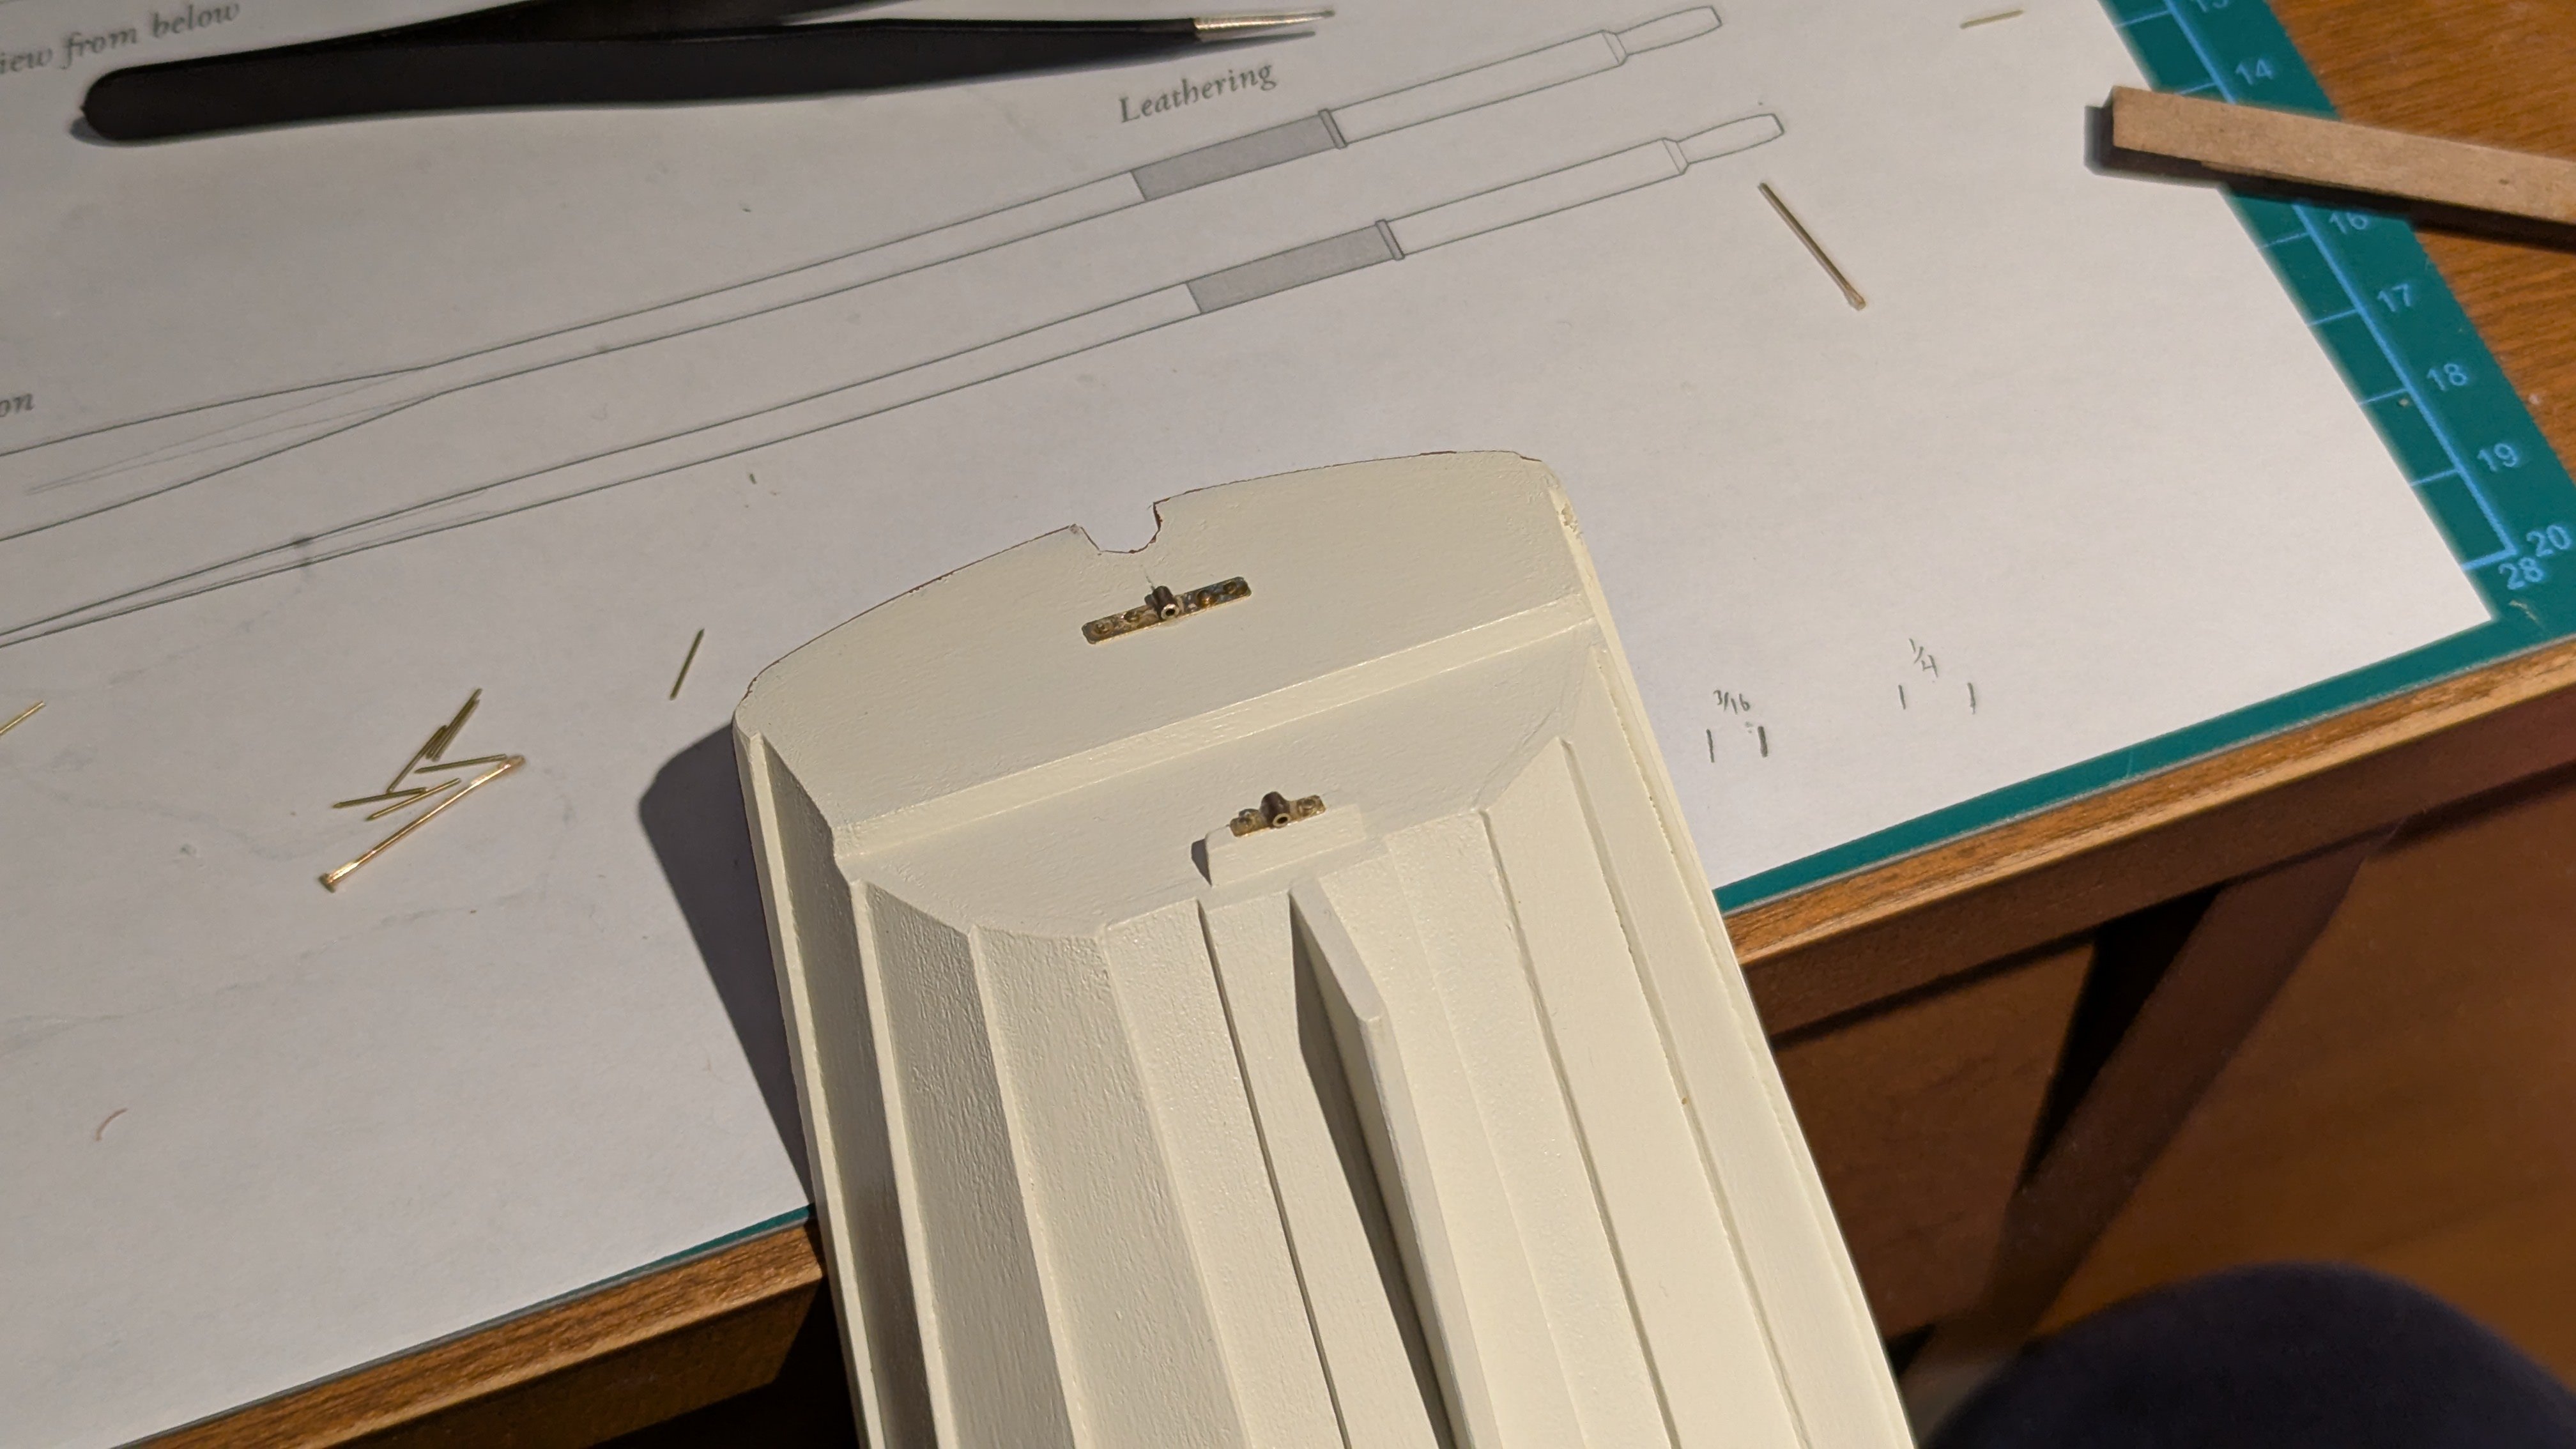
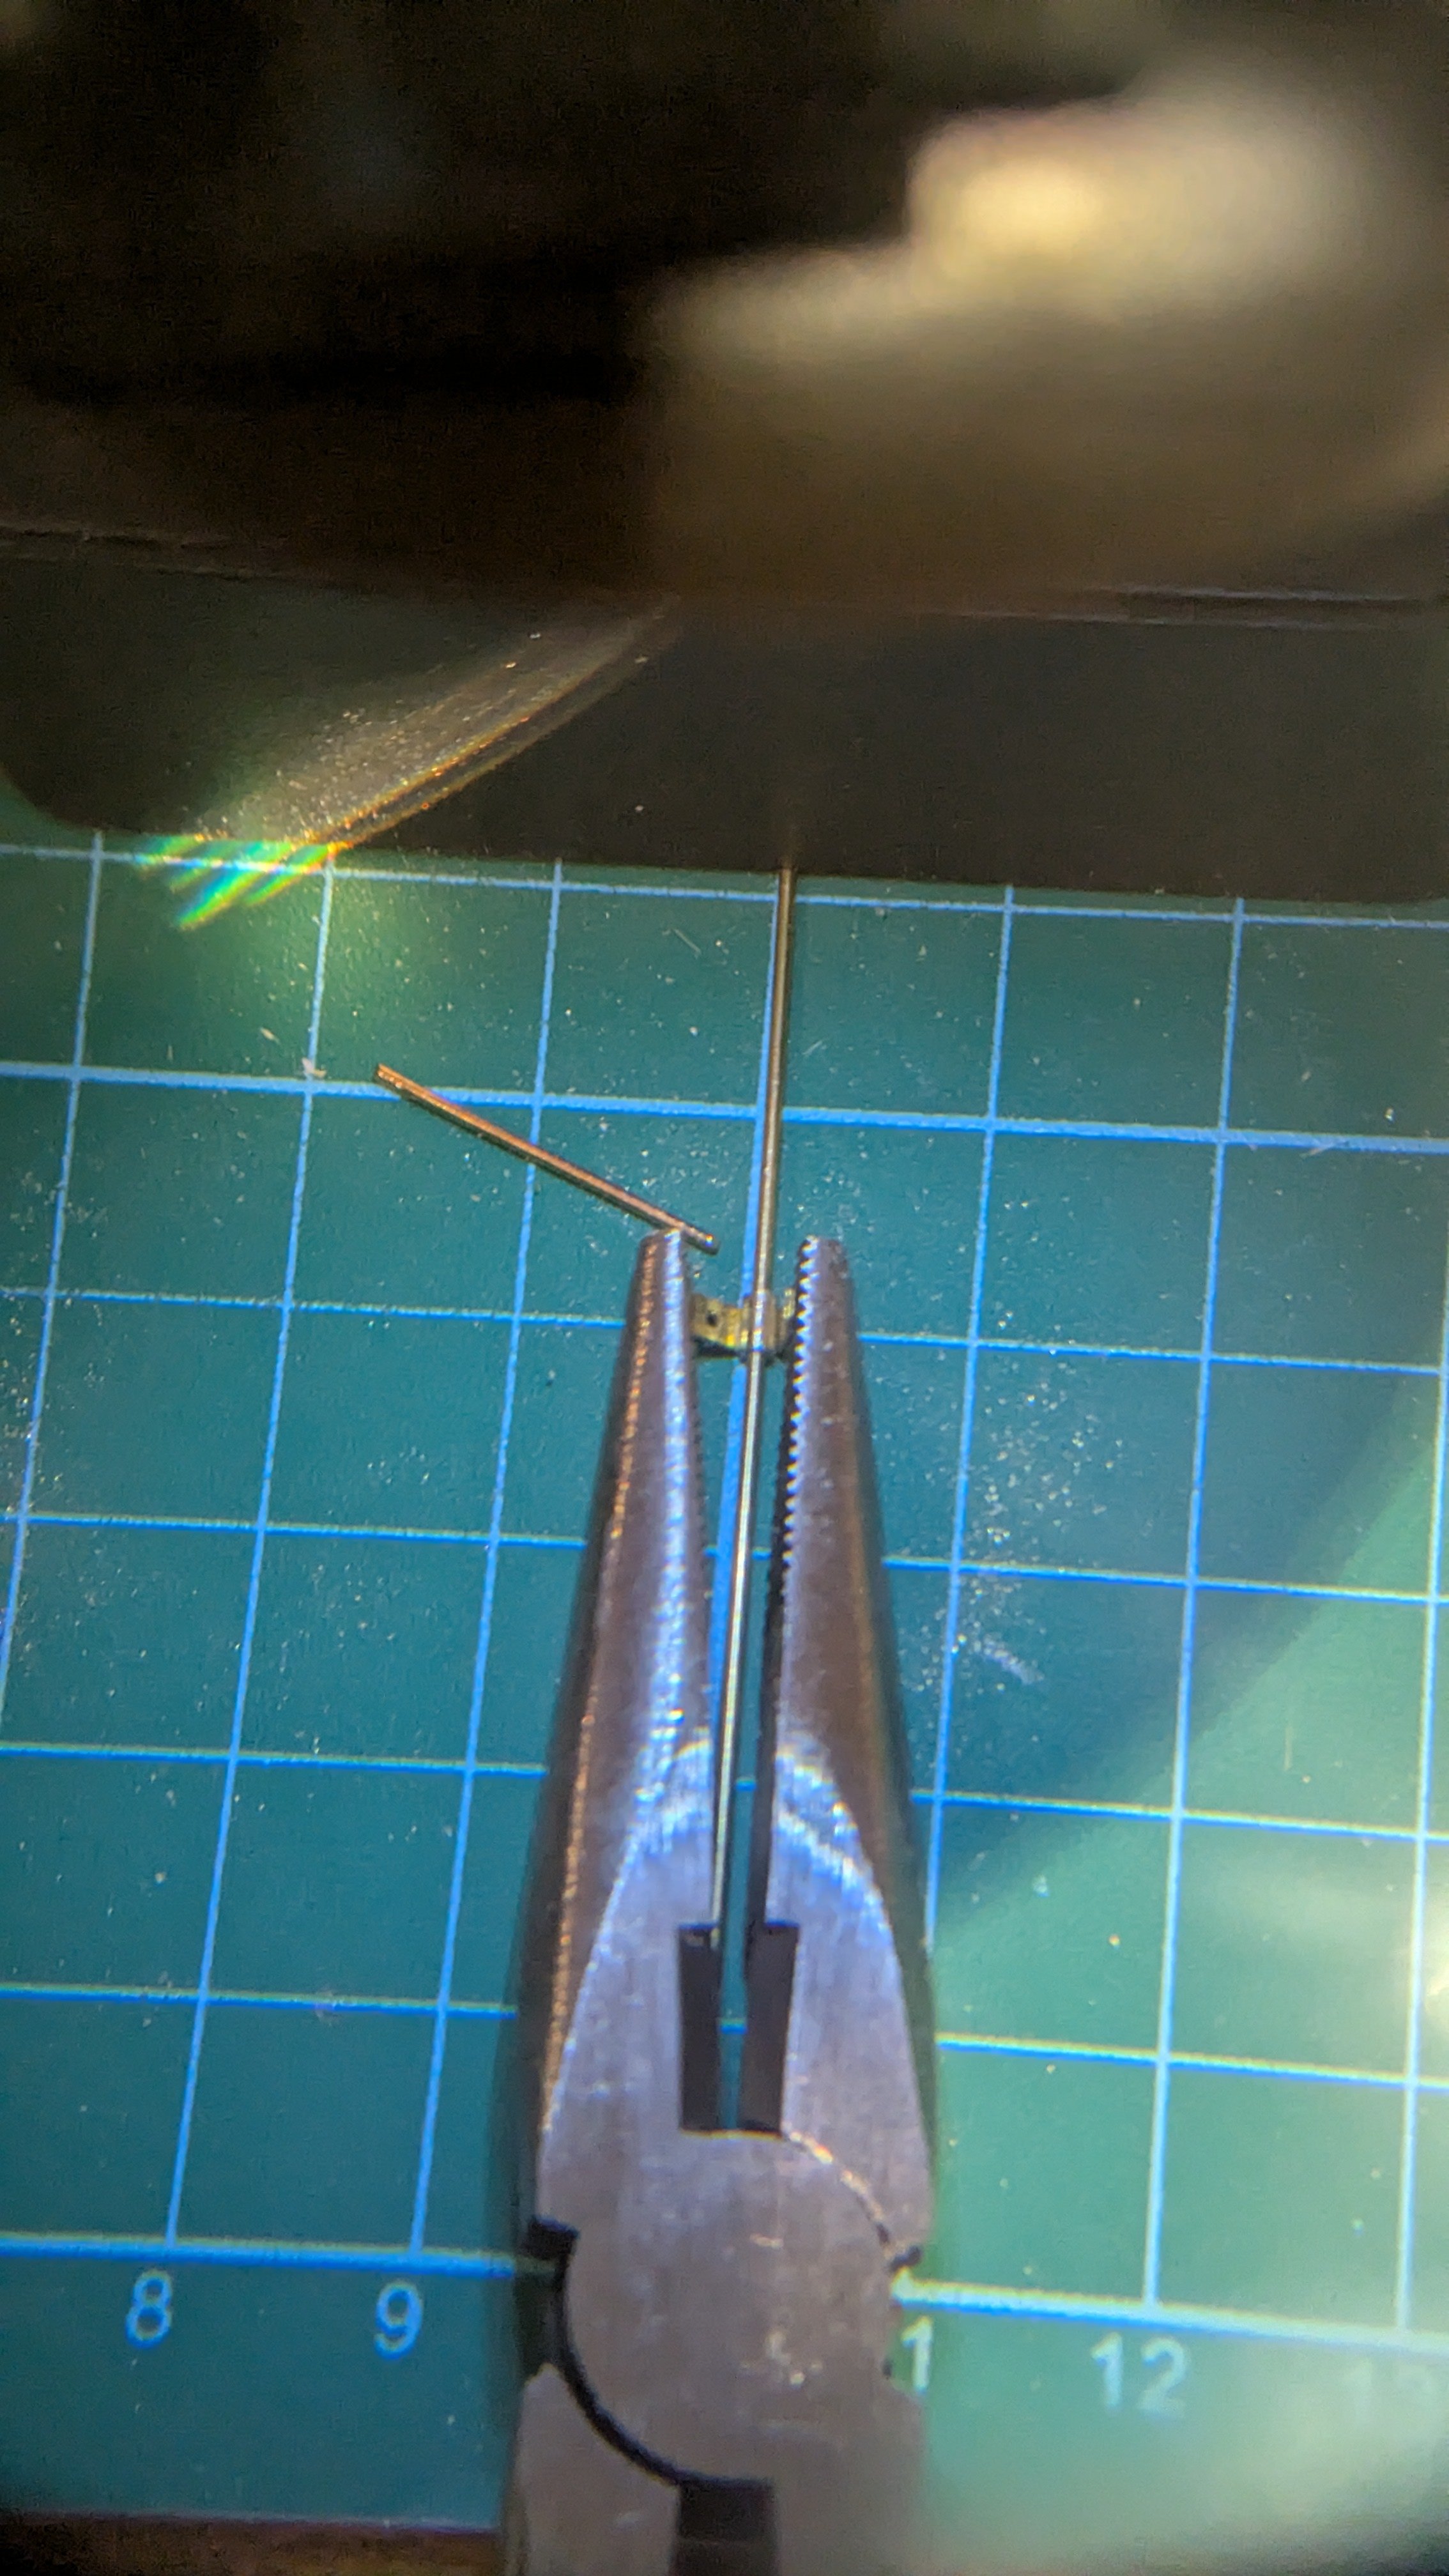
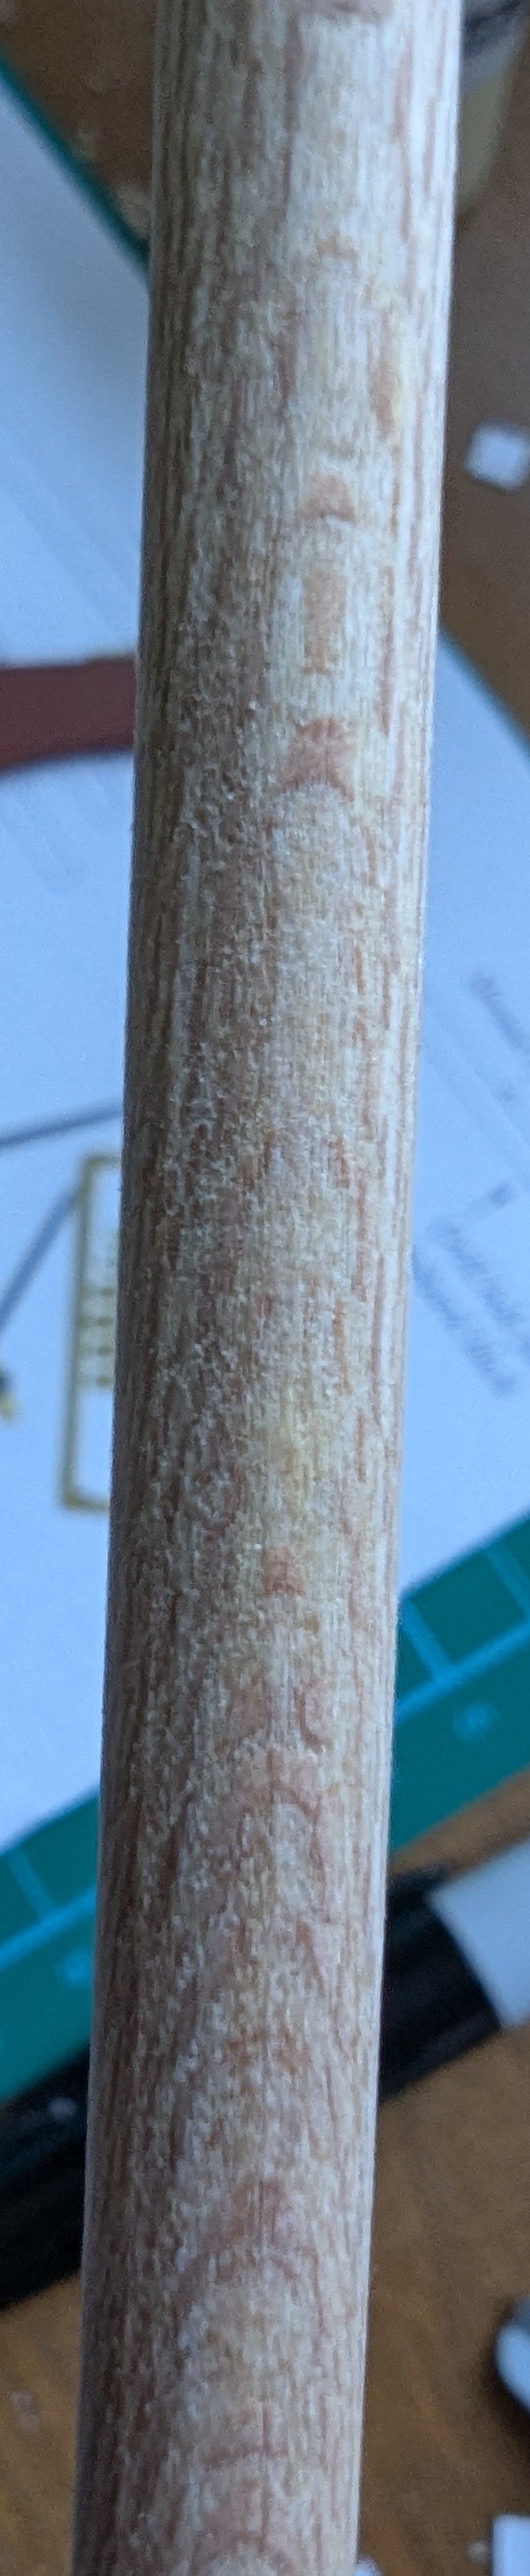
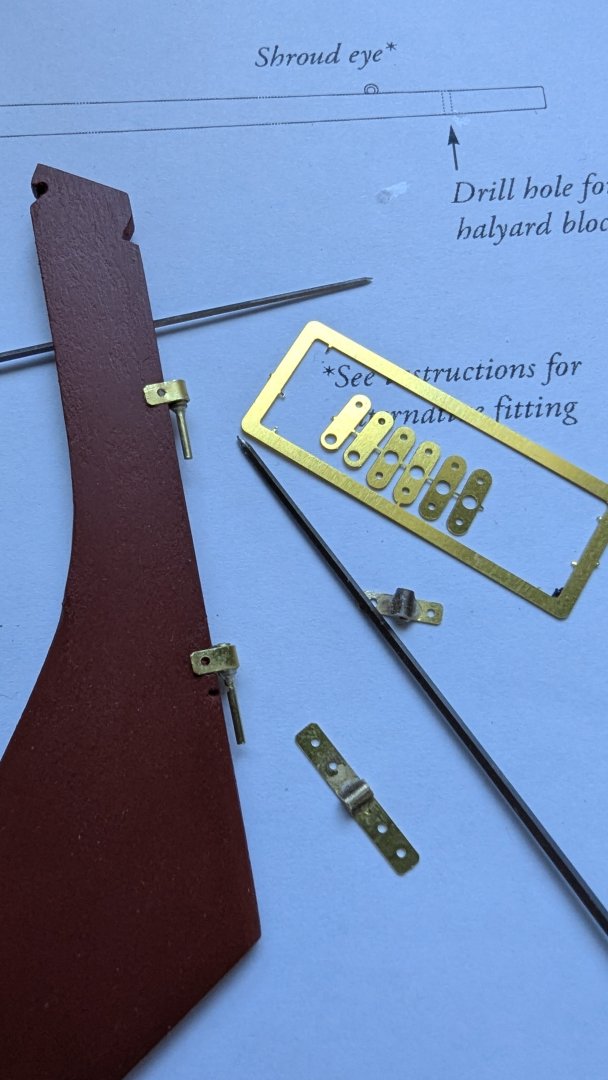
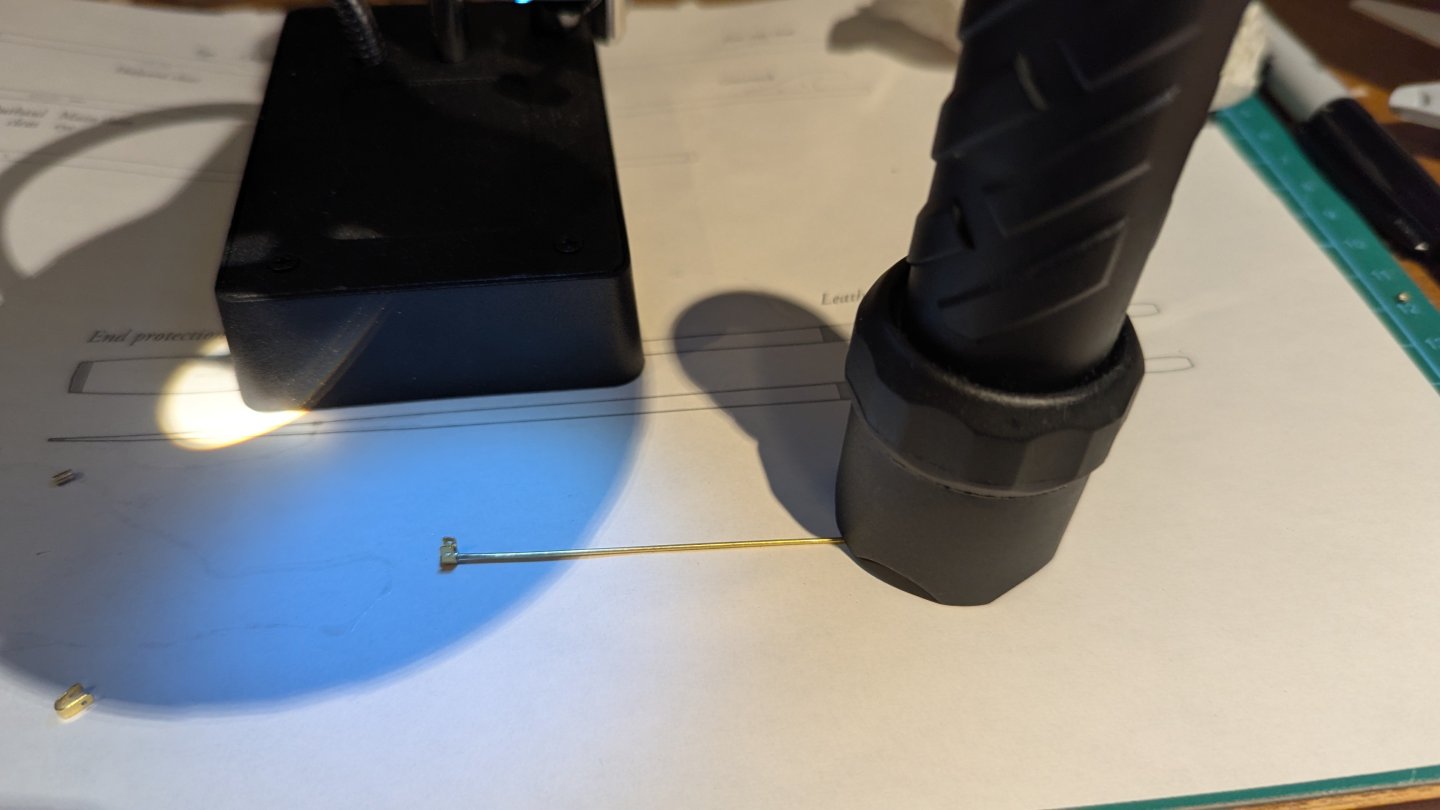
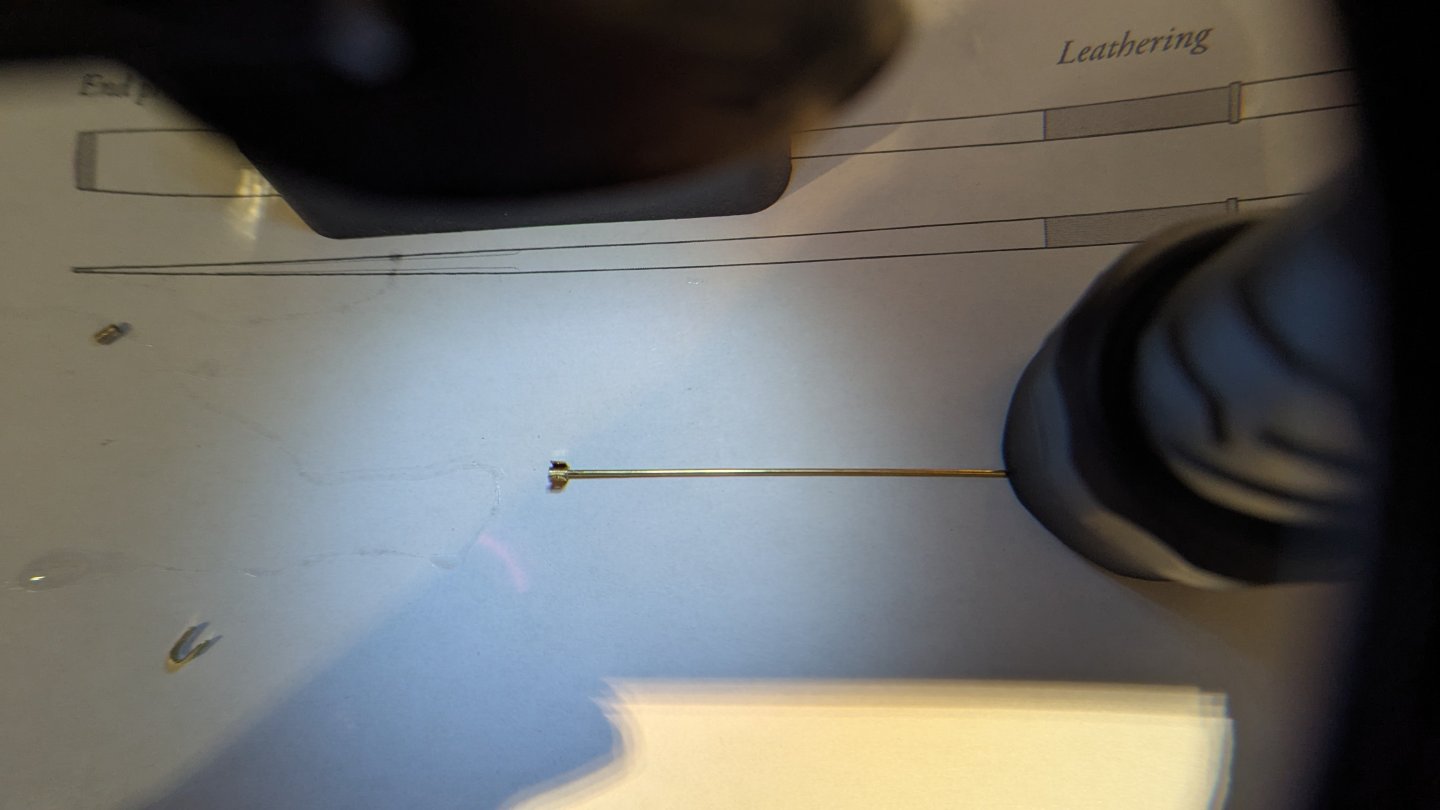
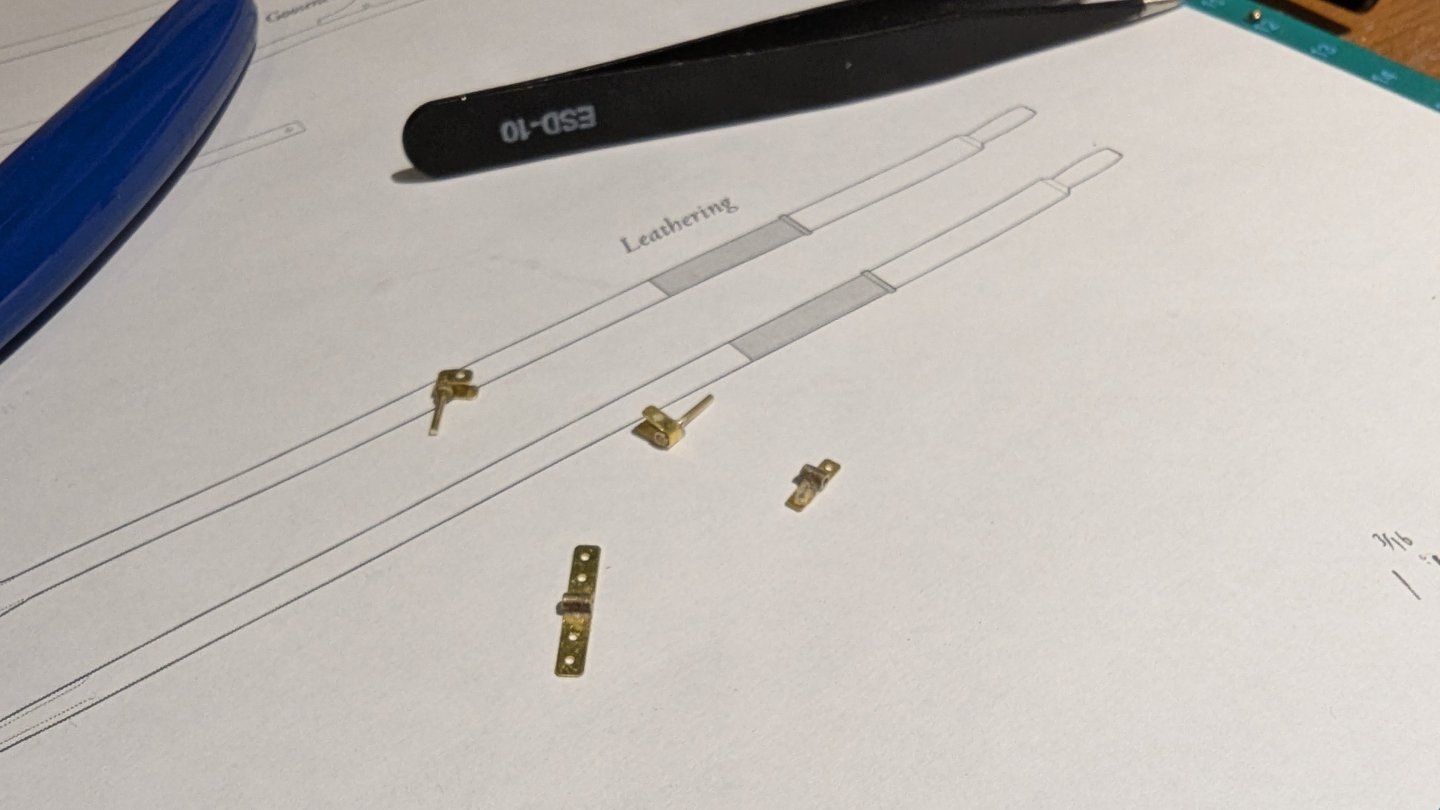
Thanks Trevor. I found some Amati pins/nails that based on the diameter in the desc. should do the trick. I've been jumping all over the place here, I get to the forestays, needs pins, get to the pintles, need a torch. So far I have the base and supports made up, a partly carved mast (which I just realized I cut an inch short at 9" instead of 10" ). I'm still waiting on pins, but the gudgeons and pintles are done now - or maybe not? Seems there's a bit of an issue, the 'straps' are too short. I double checked all the other brass pieces, and it seems these are the right ones. Anyone else have the same or have an idea of the issue? Funny, in the picture they look just long enough, but the top one is right on the edge. I feel like adding a nail will split the wood. Seems these should be far longer than they are, unless I've done something wrong. Making them was interesting - I'm not sure how I feel about the metal work. It's satisfying, but a pain at the same time. I liked gluing everything together, on the contrary, cutting the tiny brass tube was horrible. After I got a butane torch, I borrowed more of my wife's jewelry making supplies. I've also been getting some use out of the magnifying glass I bought a while back: Filing the tubes to length. Started with pliers to wrap the strap around the tube, ended up needed to adjust it and found that using my fingers worked the best. Used a flashlight to hold everything steady for gluing The mast dowel grain is pretty wild. It was going to look cool, but it was difficult trying to carve. The grain was one direction on one side and the other direction on the other side. Cross section like this: /// I'm not sure I would've been able to finish it without breaking it anyways, and looks like there's a couple methods to get the mast. I'll likely pick up another dowel just to try both methods just for the experience. Here's 3 pics, one of the 'front', 'side' and 'rear' of the dowel I had. Not sure if I'm explaining this right, but that's all edges of the grain. Having made bows before, I can tell about every couple millimeters of that dowel is a weak point. The centerboard needs a bit of touchup, the base supports need shaping and I'll get this mounted, hopefully the pins show up soon and are the right size. I'll need to sort out the rudder problem, and then I think that's it for the hull work. All that's left will be the mast, sails, oars - home stretch. Thanks for the help, comments, and following. Matt


- 86 replies
-
- 4
-
-
- Model Shipways
- Norwegian Sailing Pram
- (and 3 more)