HOLIDAY DONATION DRIVE - SUPPORT MSW - DO YOUR PART TO KEEP THIS GREAT FORUM GOING! (89 donations so far out of 49,000 members - C'mon guys!)
×


RollinOnTheRiver
-
Posts
8 -
Joined
-
Last visited
-
 RollinOnTheRiver reacted to a post in a topic:
Mississippi Riverboat by RollinOnTheRiver - FINISHED - Mini Mamoli - 1:206 – First Build
RollinOnTheRiver reacted to a post in a topic:
Mississippi Riverboat by RollinOnTheRiver - FINISHED - Mini Mamoli - 1:206 – First Build
-
 Haha I still appreciate the suggestion! My interests definitely skew towards the interior waterways, towards the paddle steamers or manpower driven craft of the 1700s/1800s, so a lake boat recommendation is plenty welcome.
 -
ccoyle reacted to a post in a topic:
Mississippi Riverboat by RollinOnTheRiver - FINISHED - Mini Mamoli - 1:206 – First Build
-
Cathead reacted to a post in a topic:
Mississippi Riverboat by RollinOnTheRiver - FINISHED - Mini Mamoli - 1:206 – First Build
-
Jsk reacted to a post in a topic:
Mississippi Riverboat by RollinOnTheRiver - FINISHED - Mini Mamoli - 1:206 – First Build
-
Jsk reacted to a post in a topic:
Mississippi Riverboat by RollinOnTheRiver - FINISHED - Mini Mamoli - 1:206 – First Build
-
yvesvidal reacted to a post in a topic:
Mississippi Riverboat by RollinOnTheRiver - FINISHED - Mini Mamoli - 1:206 – First Build
-
SiriusVoyager reacted to a post in a topic:
Mississippi Riverboat by RollinOnTheRiver - FINISHED - Mini Mamoli - 1:206 – First Build
-
RollinOnTheRiver reacted to a post in a topic:
Mississippi Riverboat by RollinOnTheRiver - FINISHED - Mini Mamoli - 1:206 – First Build
-
RollinOnTheRiver reacted to a post in a topic:
Mississippi Riverboat by RollinOnTheRiver - FINISHED - Mini Mamoli - 1:206 – First Build
-
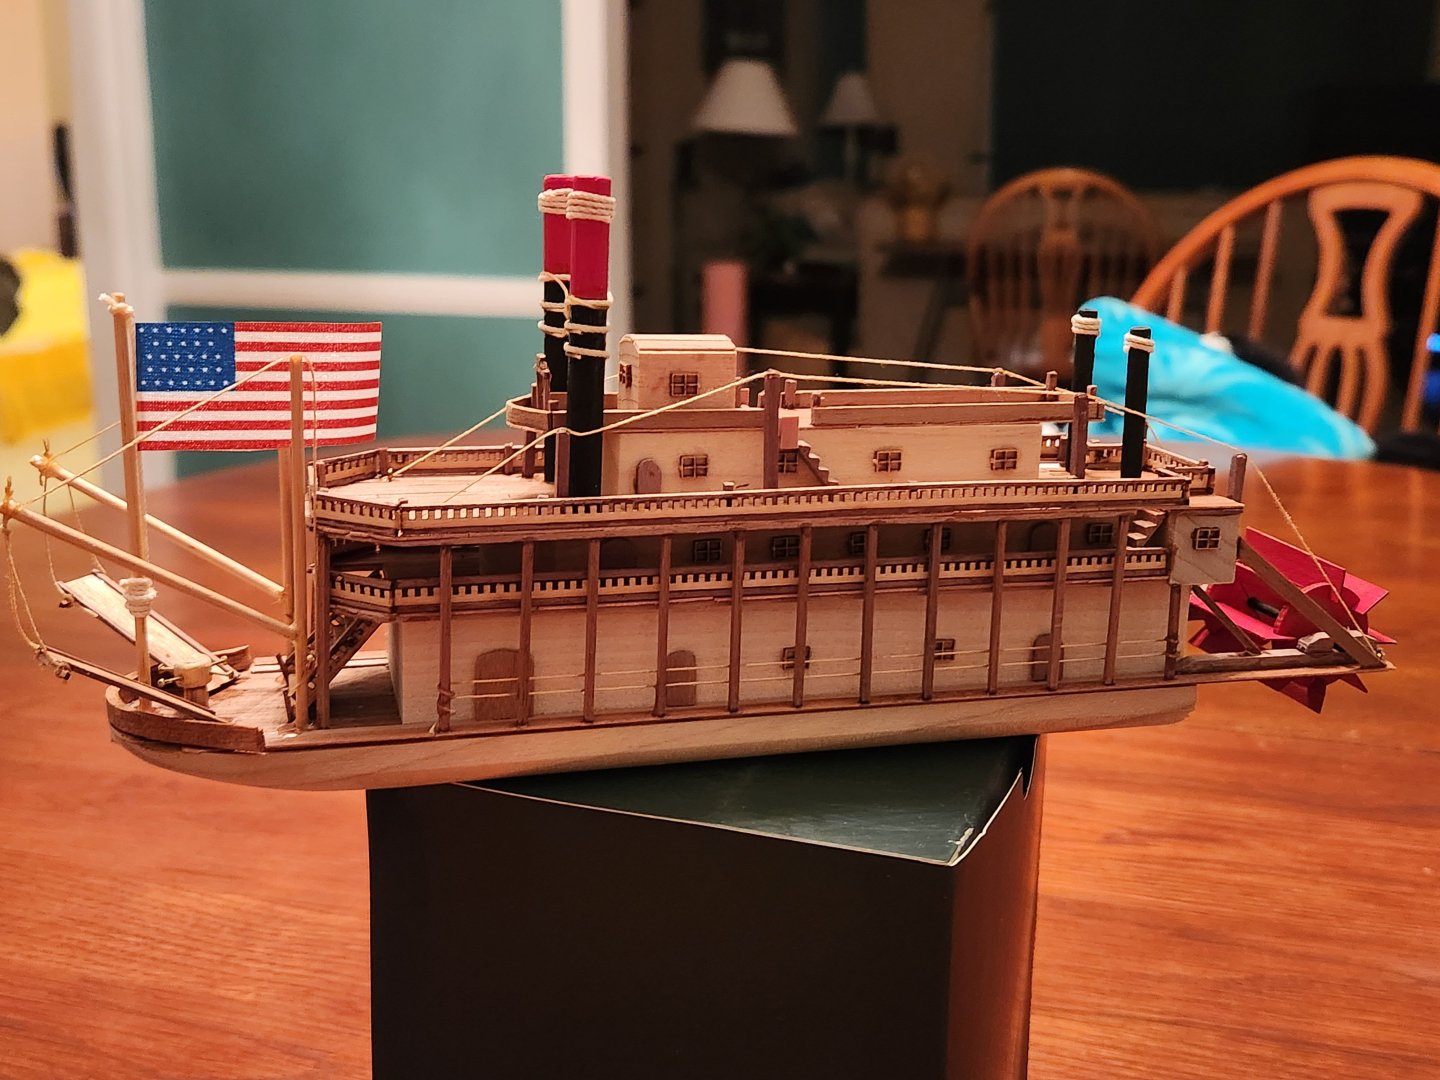
Thanks! I'd like to try my hand at a more "normal" sized scale model, because the mini nature of this one came with some serious headaches. I still enjoyed it as a a cheaper intro to the hobby, but I think there's a reason people generally don't use a scale of 1:206! Cathead above recommended the Model Shipway's Chaperon, which I'm leaning towards. Mamoli's instructions kind of scared me off that brand (once I got the hang of things, it wasn't unbearable, but I hated the haphazard afterthought way they'd order each step). I'd love to make a flatboat or keelboat from scratch some day, but I think another model kit would help me hone some skills before going that route.
- 19 replies
-
- 2
-
-
- mississippi riverboat
- Mini Mamoli
- (and 2 more)
-
SiriusVoyager reacted to a post in a topic:
Mississippi Riverboat by RollinOnTheRiver - FINISHED - Mini Mamoli - 1:206 – First Build
-
JacquesCousteau reacted to a post in a topic:
Mississippi Riverboat by RollinOnTheRiver - FINISHED - Mini Mamoli - 1:206 – First Build
-
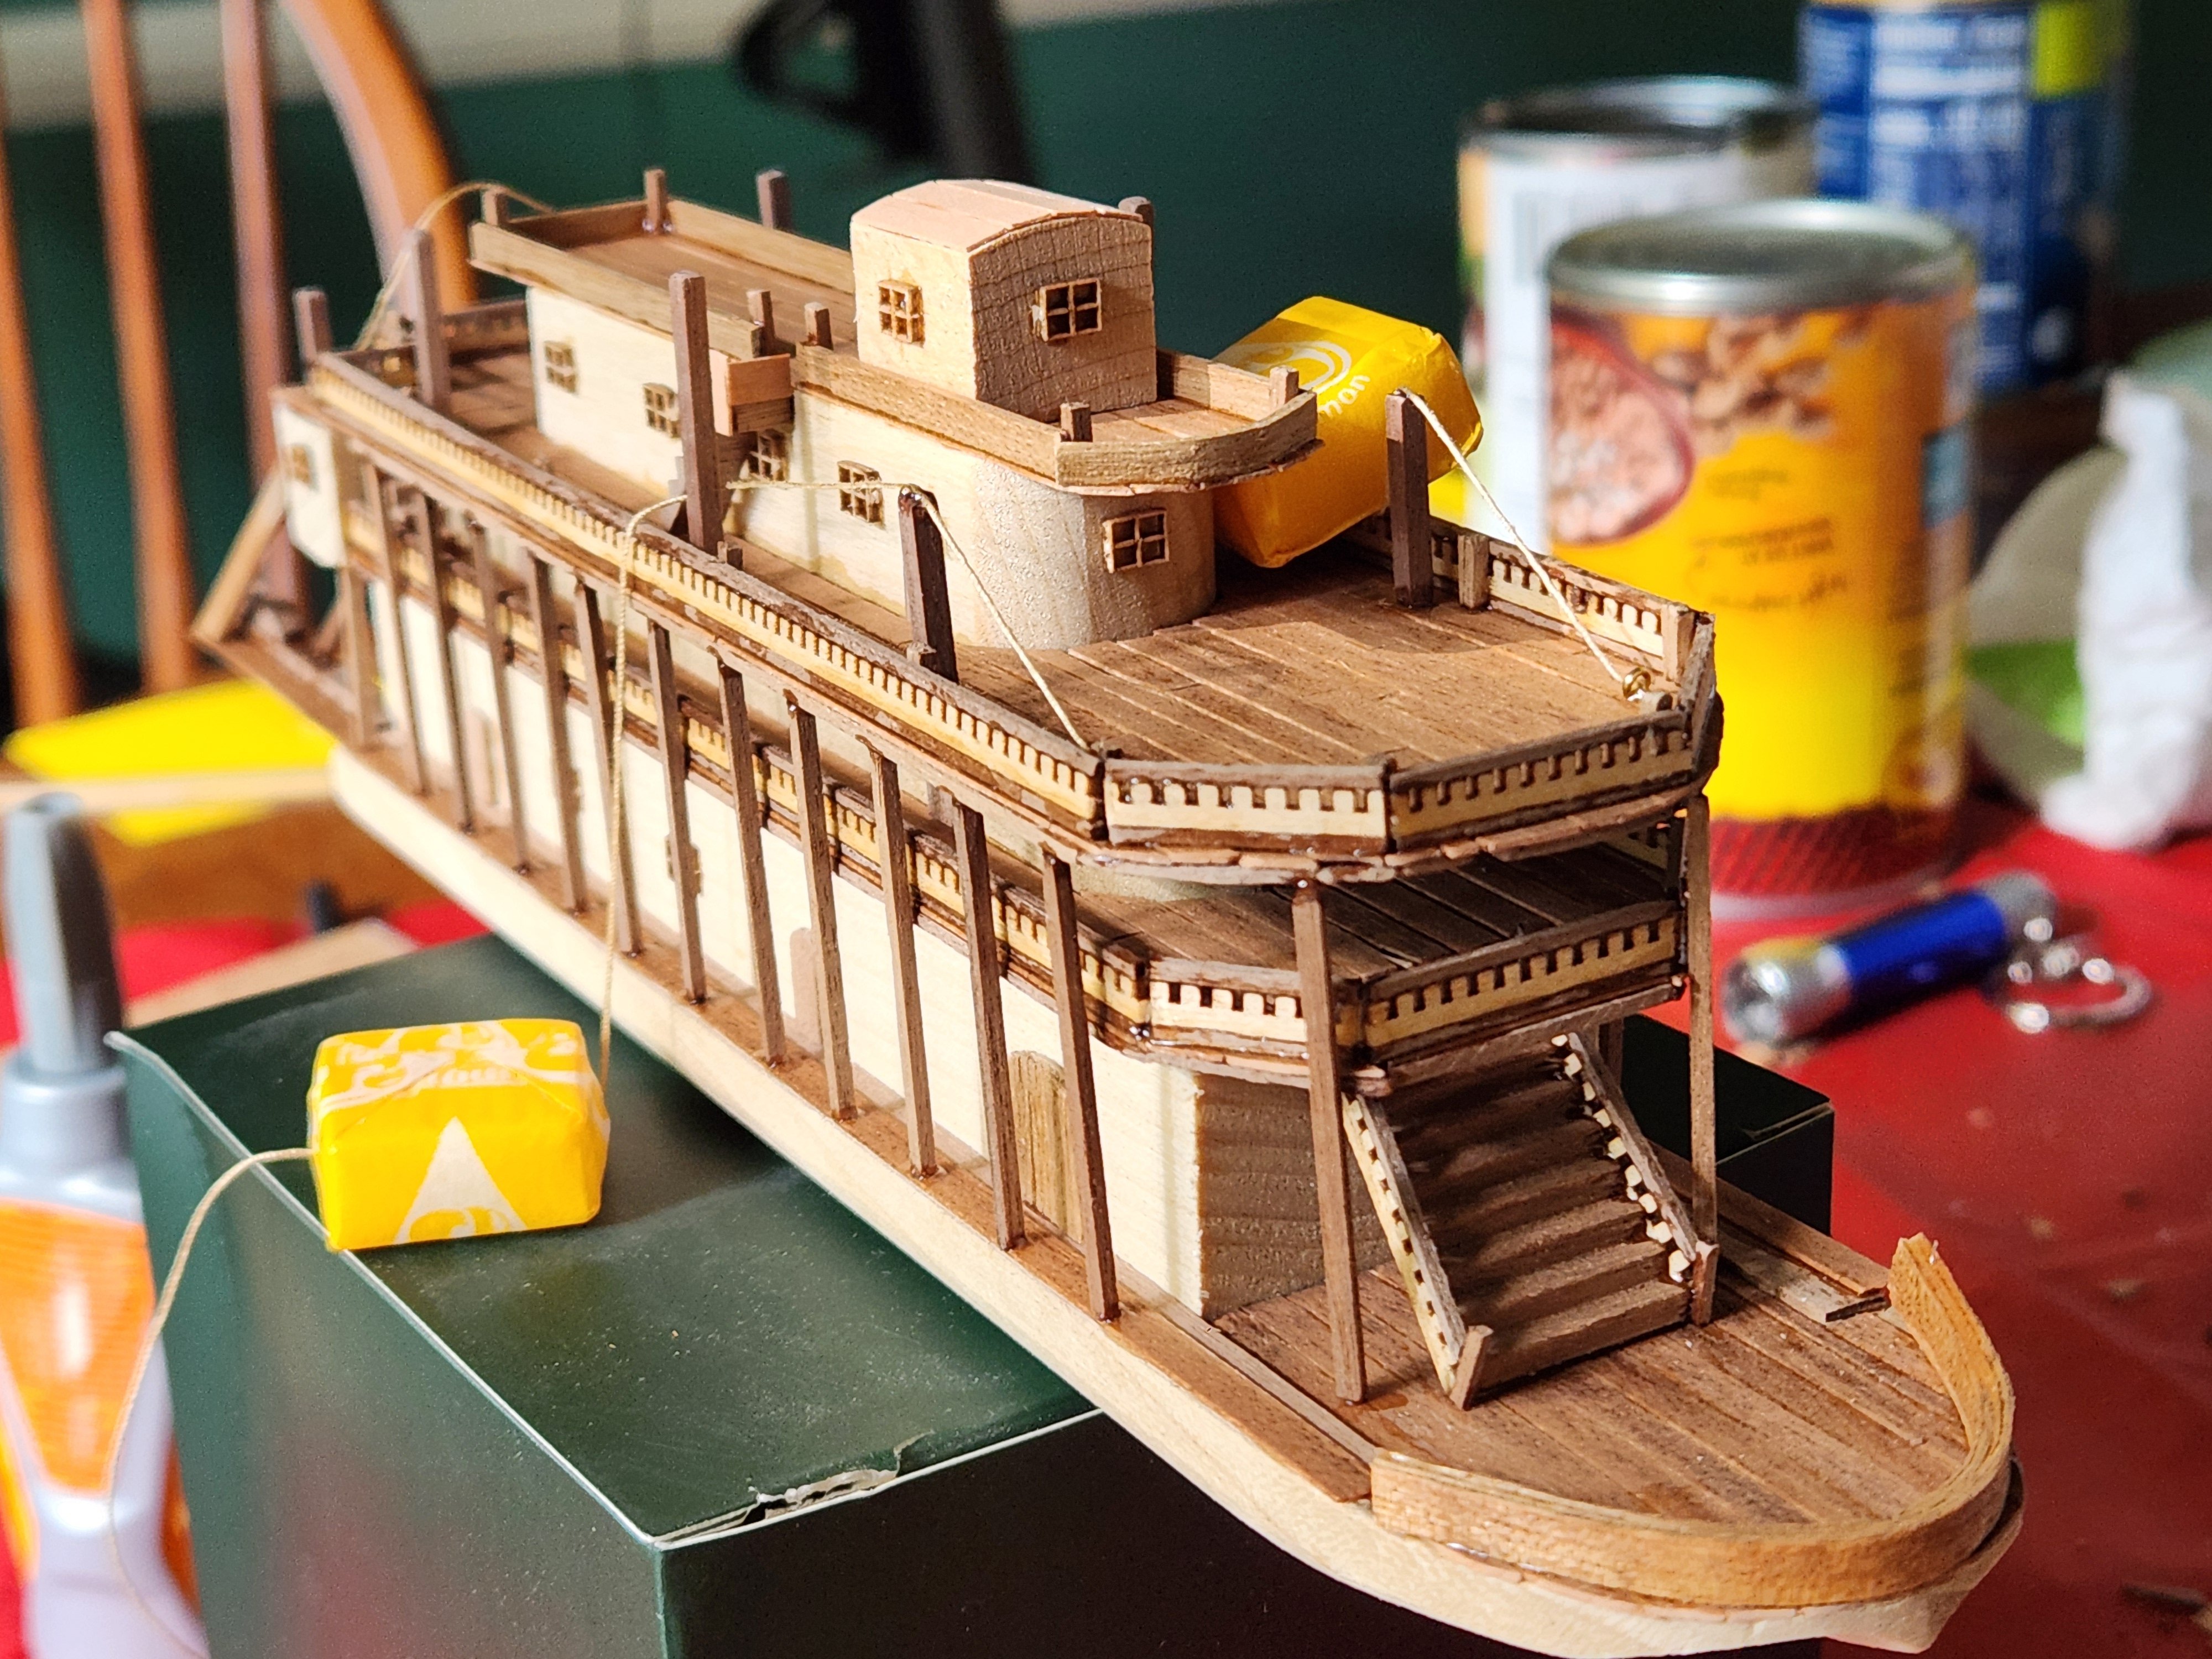
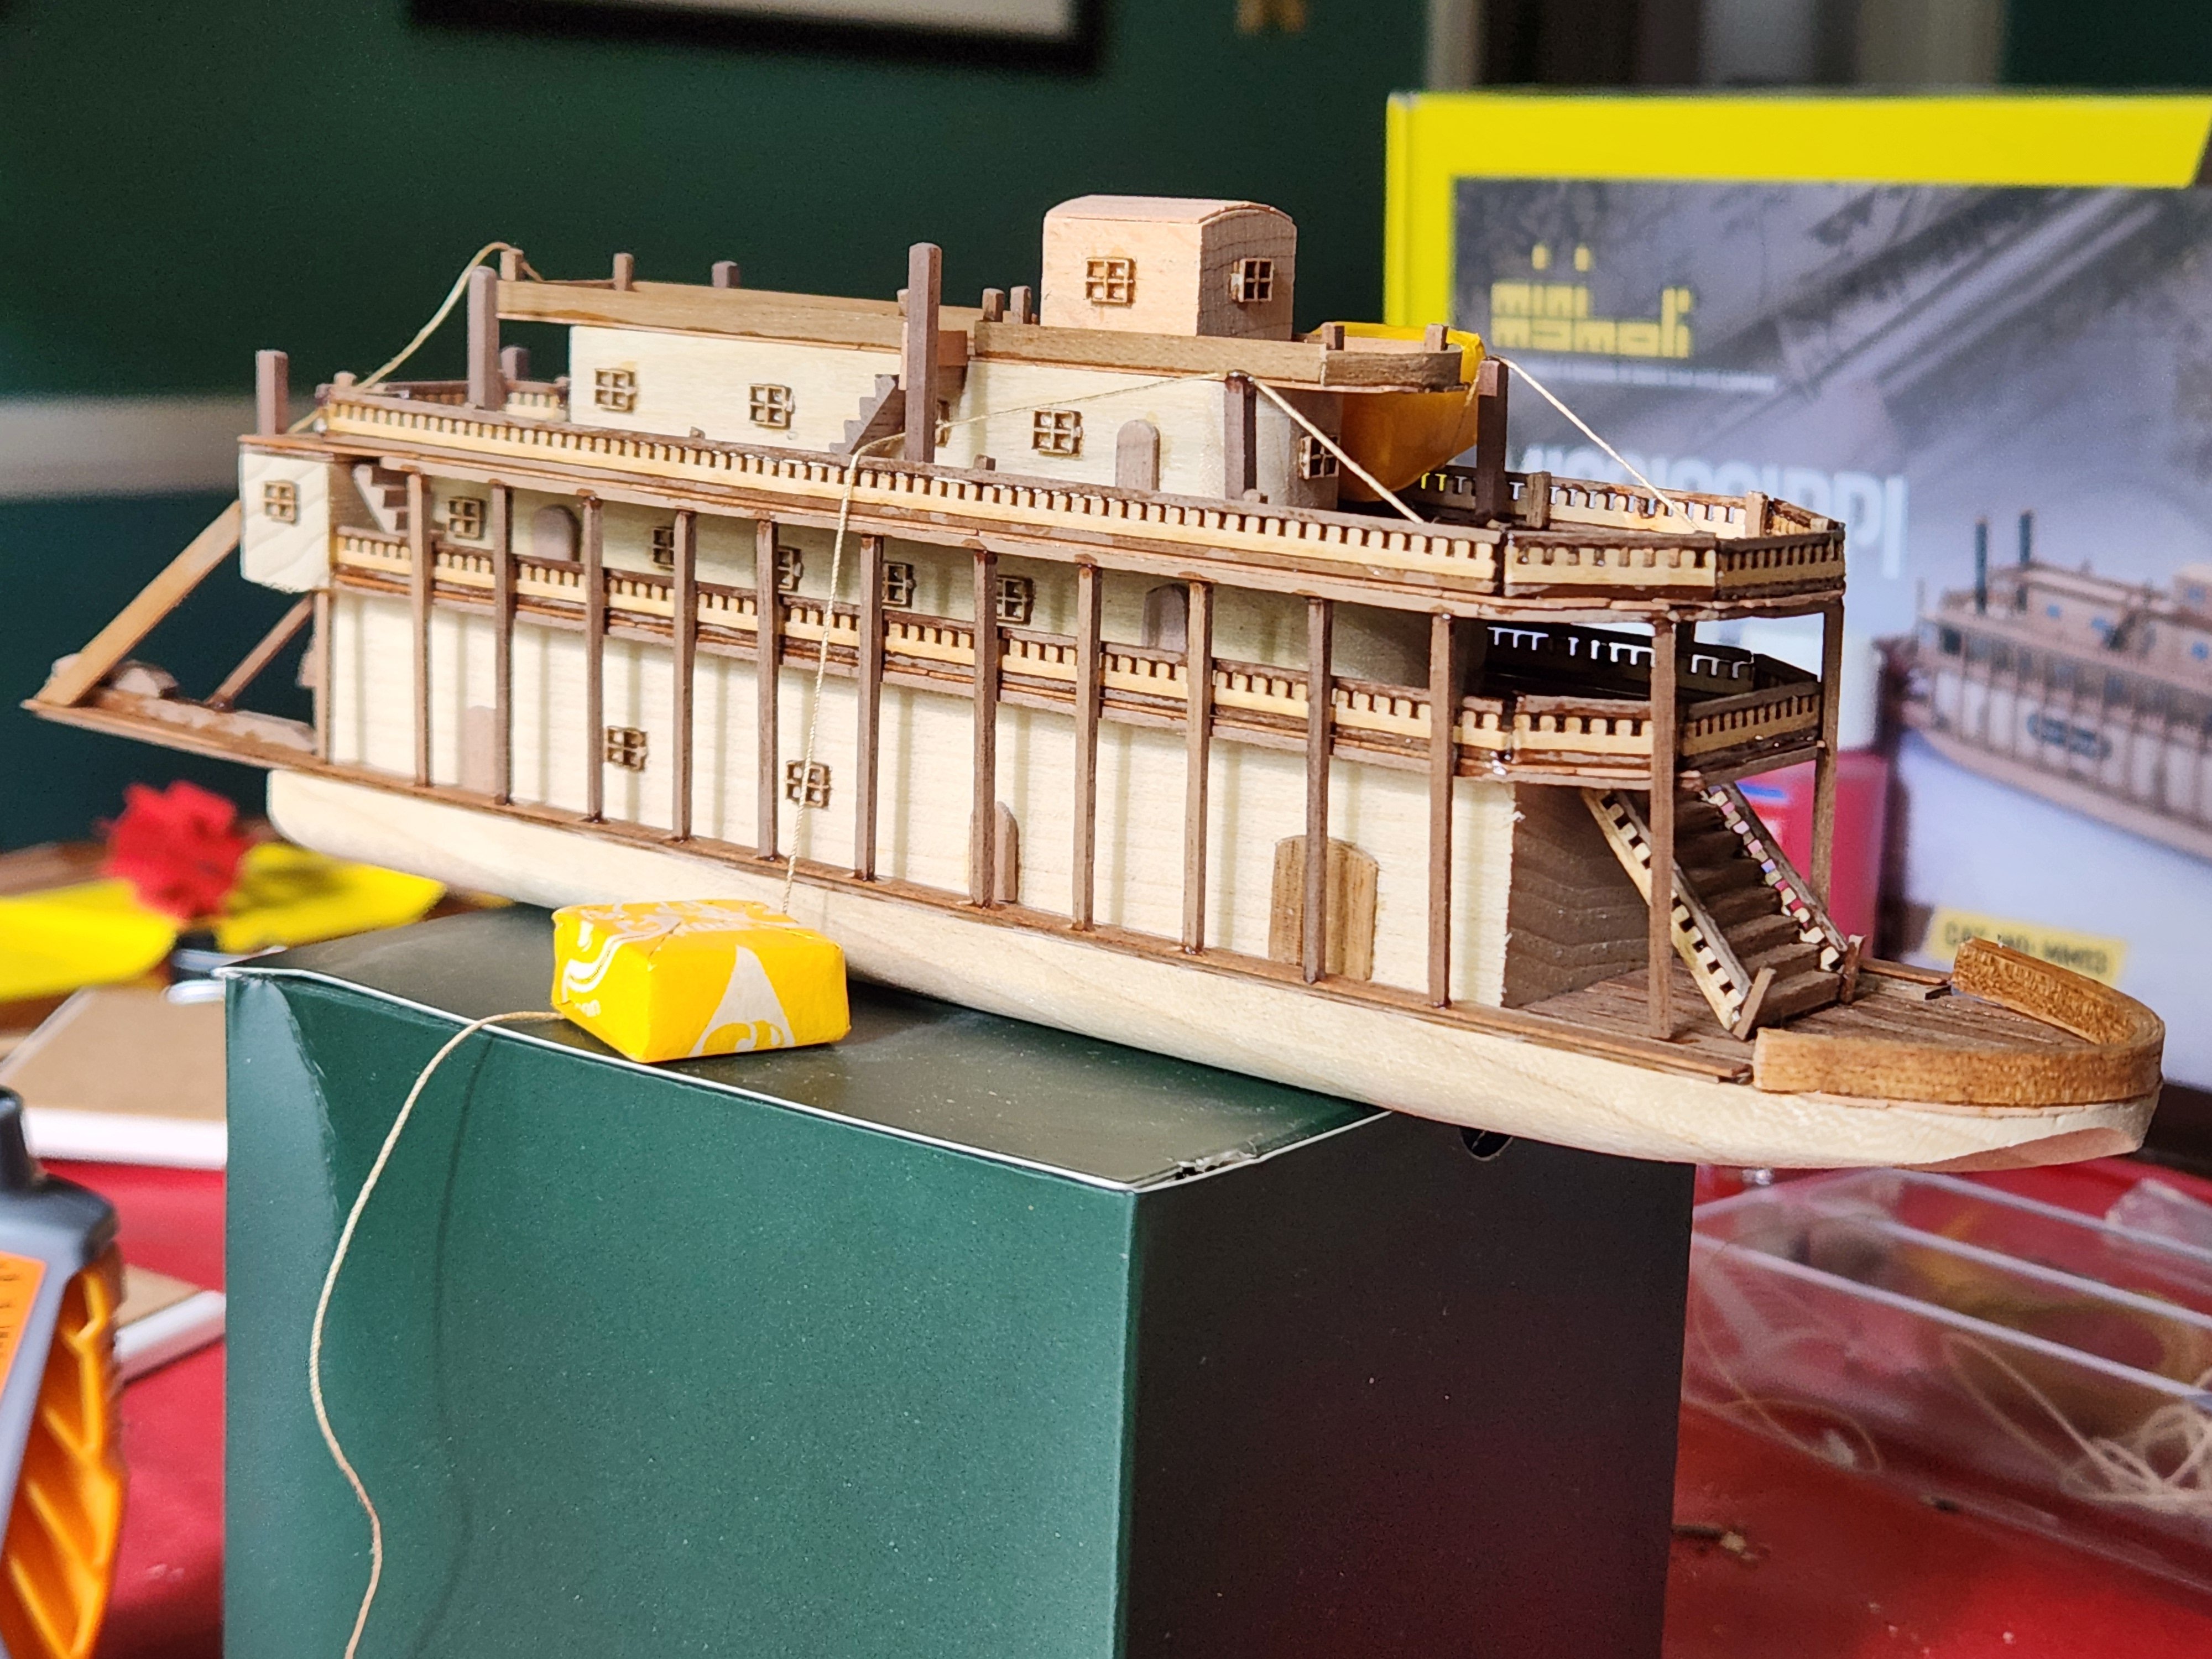
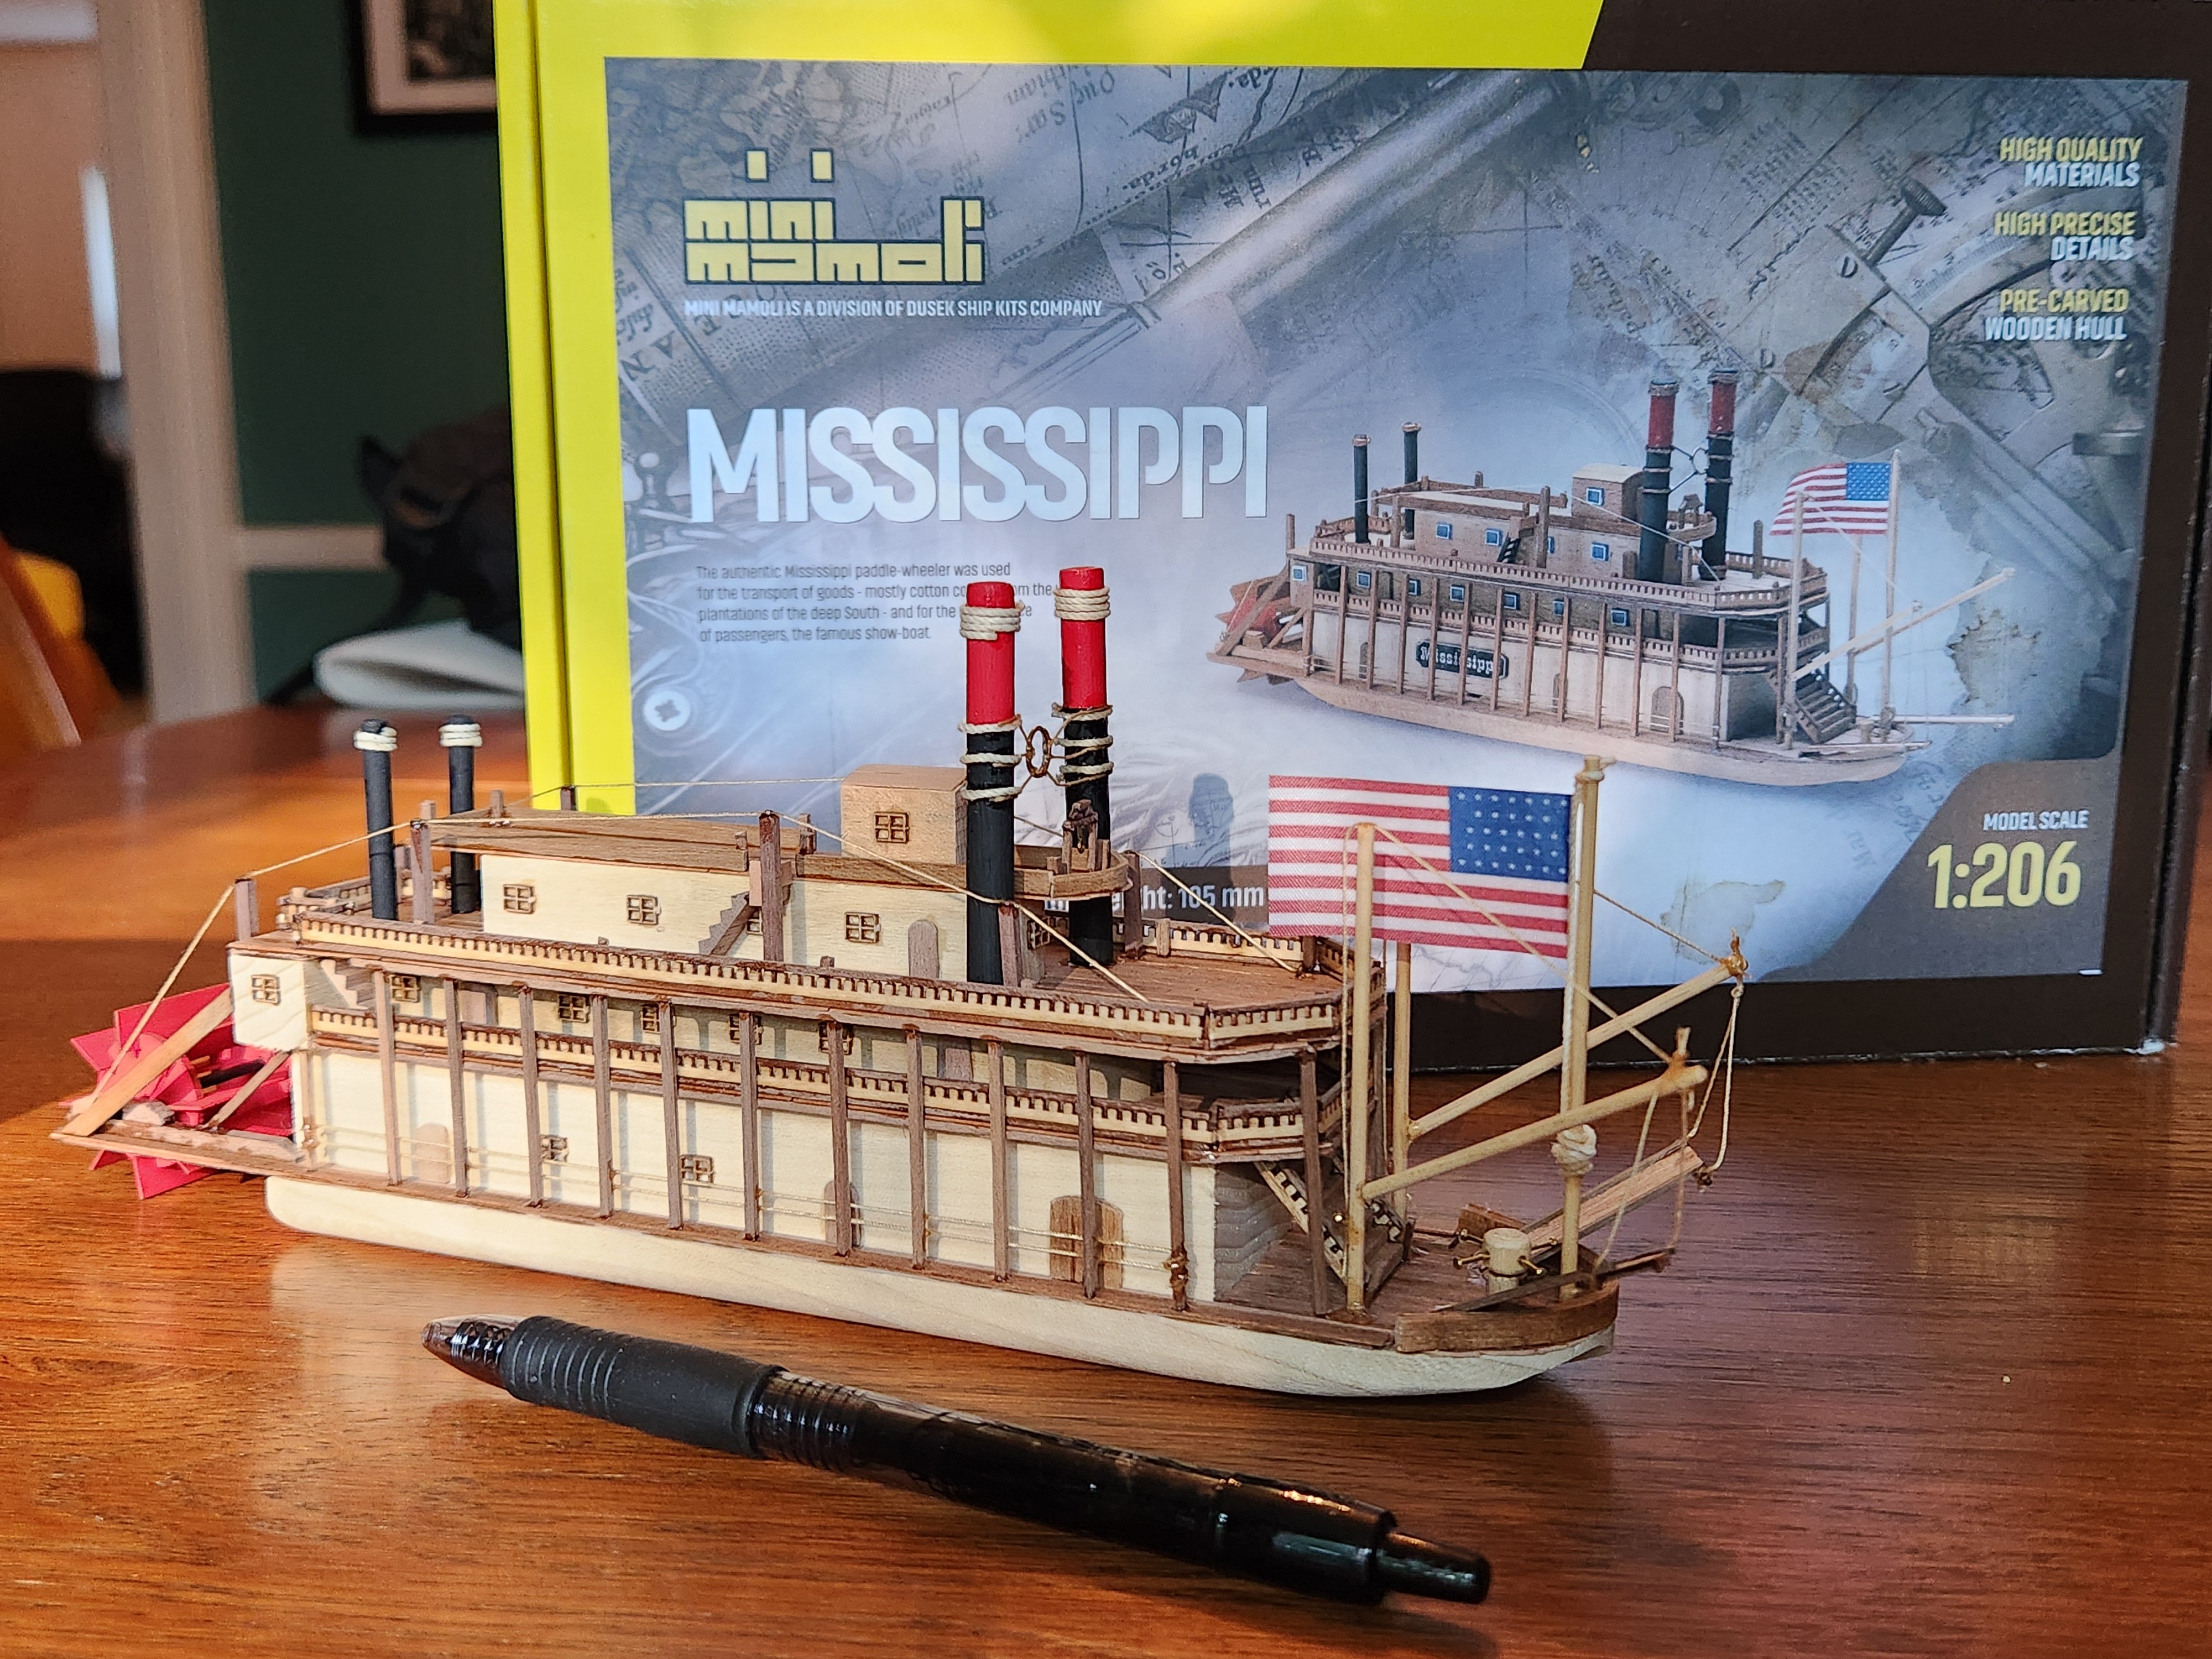
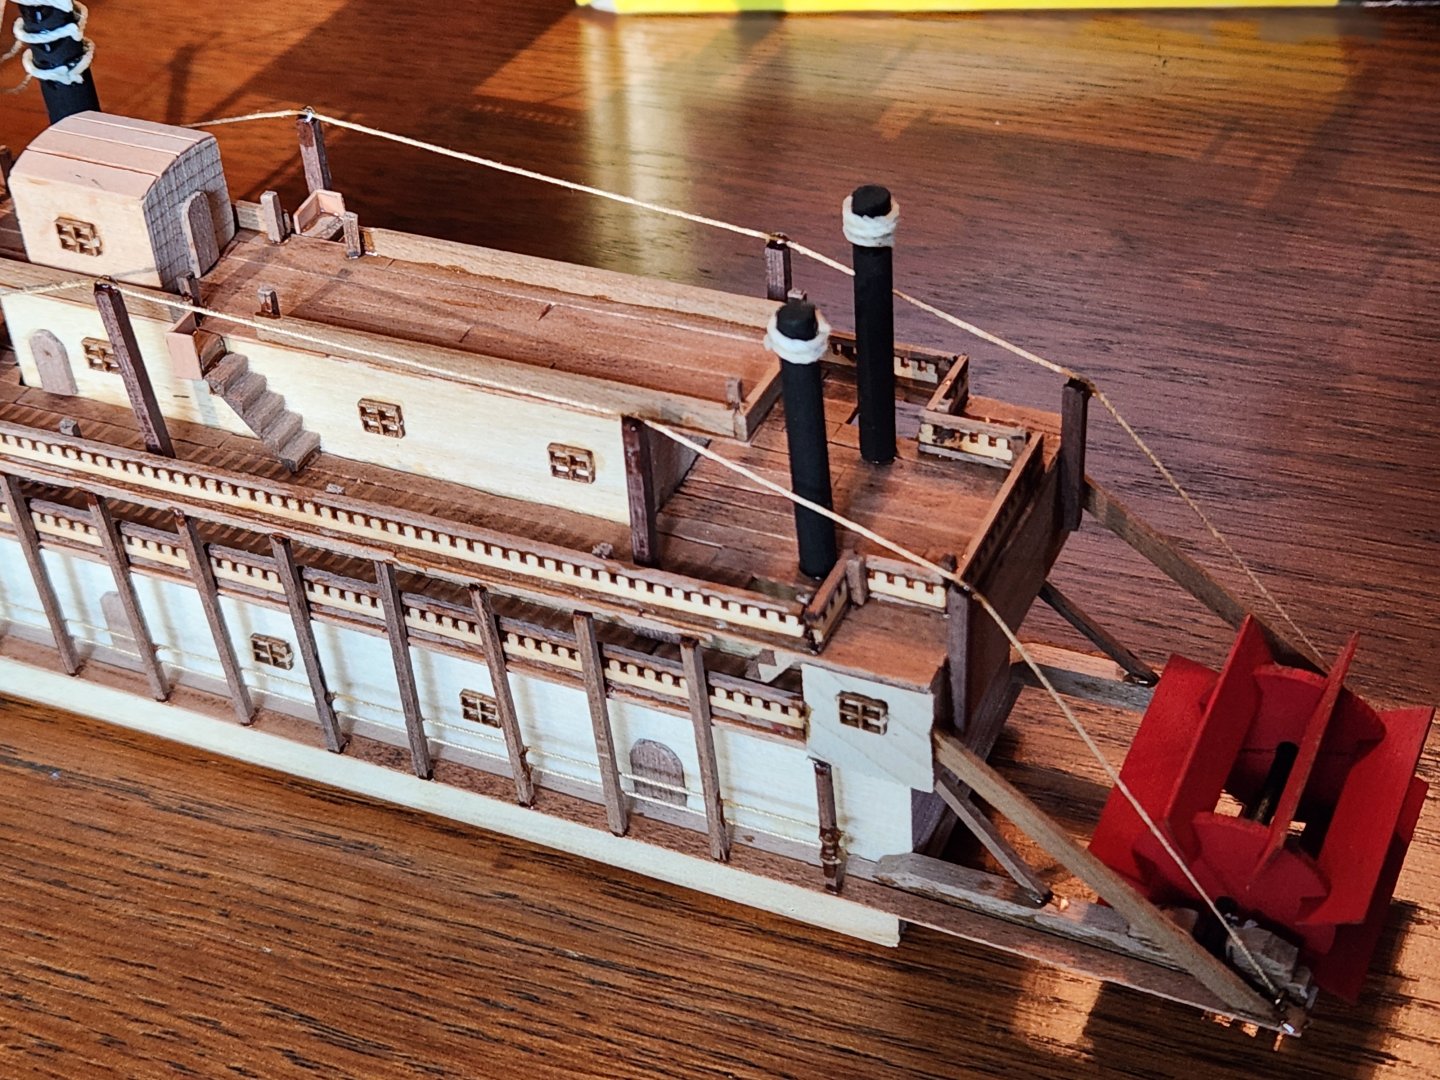
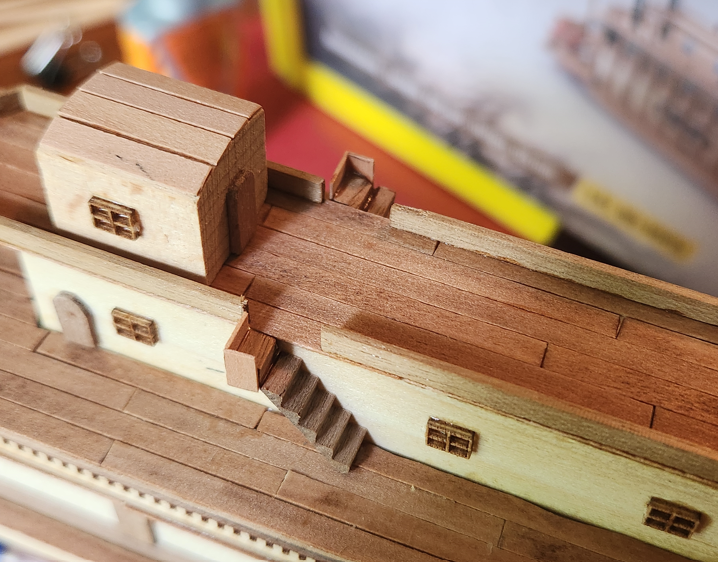
I completed my mini riverboat a few weeks ago, but was out of town and didn't have time to post pics before I left. I have to say, the final stages where the whole thing starts coming together are very rewarding. I finished making and applying the toothed strips that form the balconies. Then I fashioned the pillars, which were a fun challenge, since they had to be the exact right size or else they wouldn't fit in place or would be too short to glue on both the top and bottom of the pillar. I also ultimately decided to use extra windows to fill in space on the first level, rather than include a nameplate. I'd probably care more if this were a replica of an actual boat, but since it isn't, I decided it wasn't worth the effort. I'm happy with my choice. The paper sign in the kit would've looked horrid and I am nowhere near talented enough to freehand draw one on. Next up, the ropes! I tried to cut a little groove in the tops of the pillars to make the rope rest a little better, but still ended up having to glue the rope to each pillar one at a time to keep it taut. I was really rushing to finish the model before leaving for a trip, so I didn't take many photos of the final parts. Working with the thin rope around the smokestacks was harder than I expected. On any future models, I am absolutely buying some instant glue. Trying to secure coiled rope as glue dried was a massive pain. In my hurry towards the end, I wasn't happy with how the gangplanks turned out. I followed the instructions for the dimensions, but they still look a little too short for the boat. But my bigger issue was getting the ropes taut. The wood used for the gangplanks is VERY thin and has no weight or heft, so the rope is way looser than I wanted it to be. That being said, it's nice to reach the finish line!


- 19 replies
-
- 6
-
-
- mississippi riverboat
- Mini Mamoli
- (and 2 more)
-
Cathead reacted to a post in a topic:
Mississippi Riverboat by RollinOnTheRiver - FINISHED - Mini Mamoli - 1:206 – First Build
-
yvesvidal reacted to a post in a topic:
Mississippi Riverboat by RollinOnTheRiver - FINISHED - Mini Mamoli - 1:206 – First Build
-
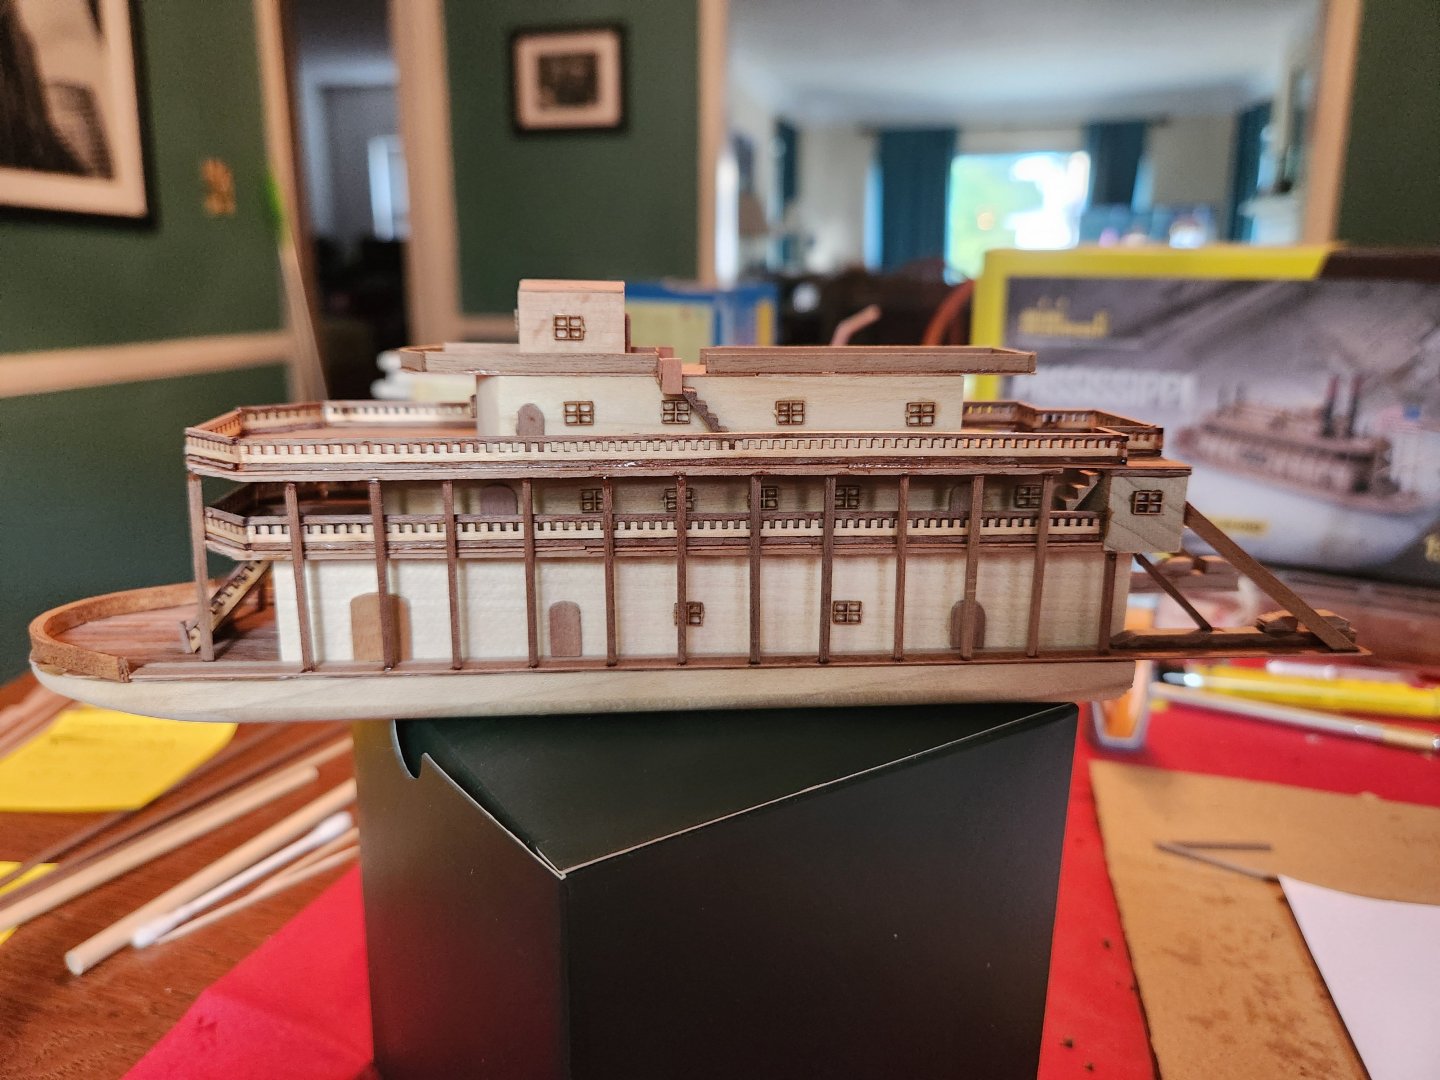
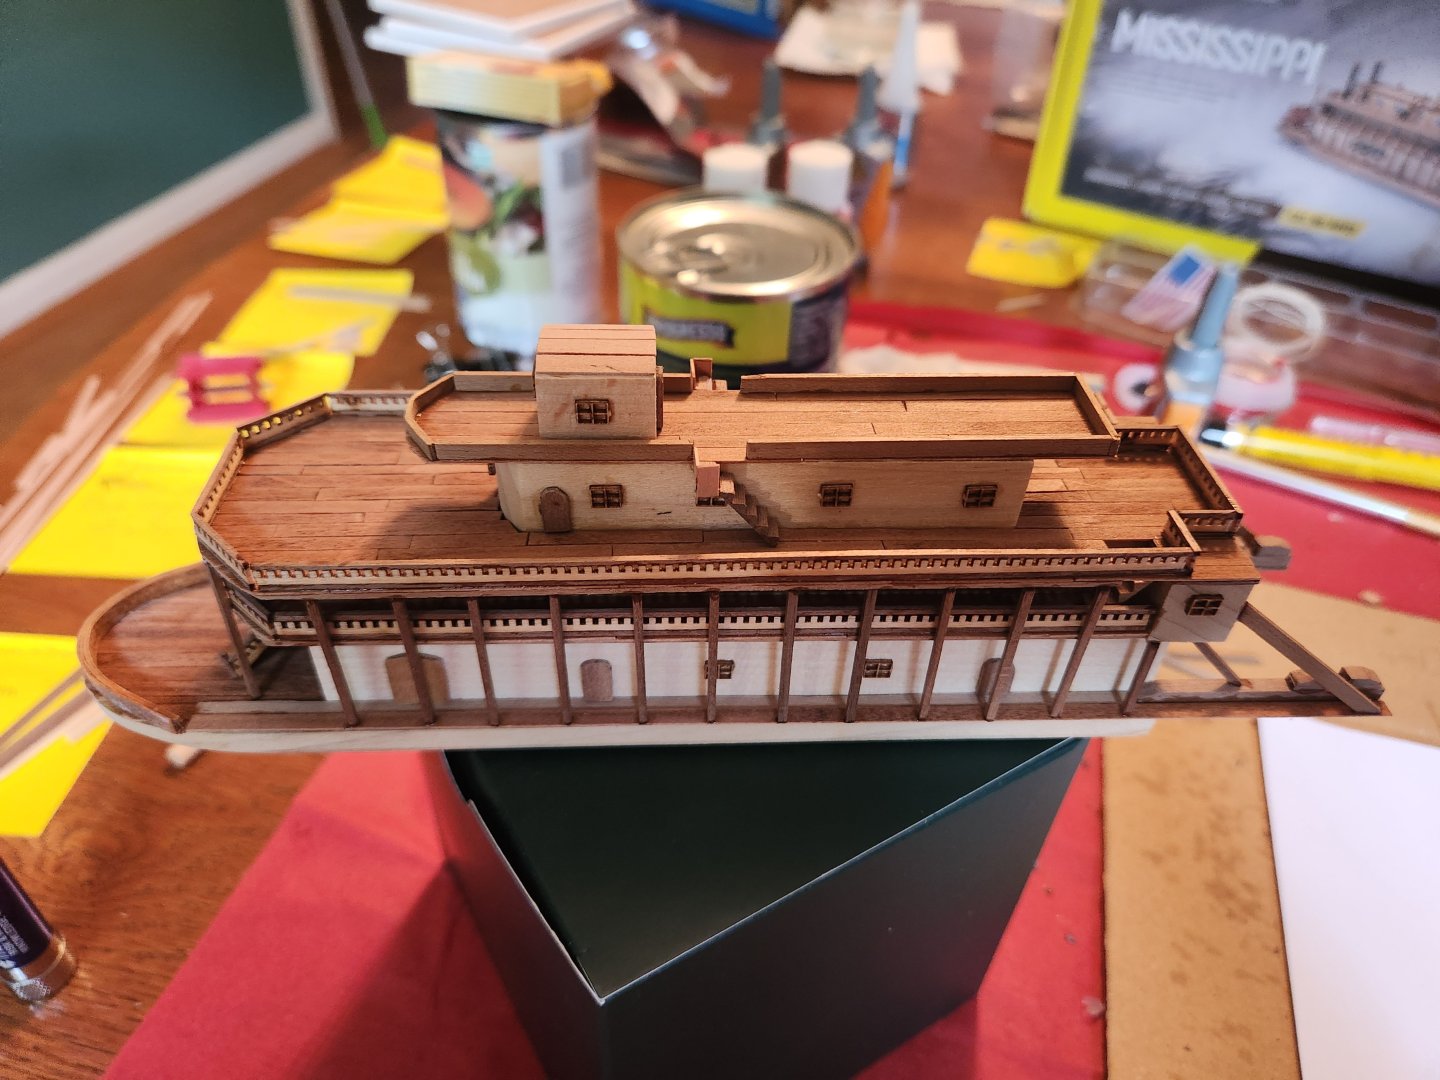
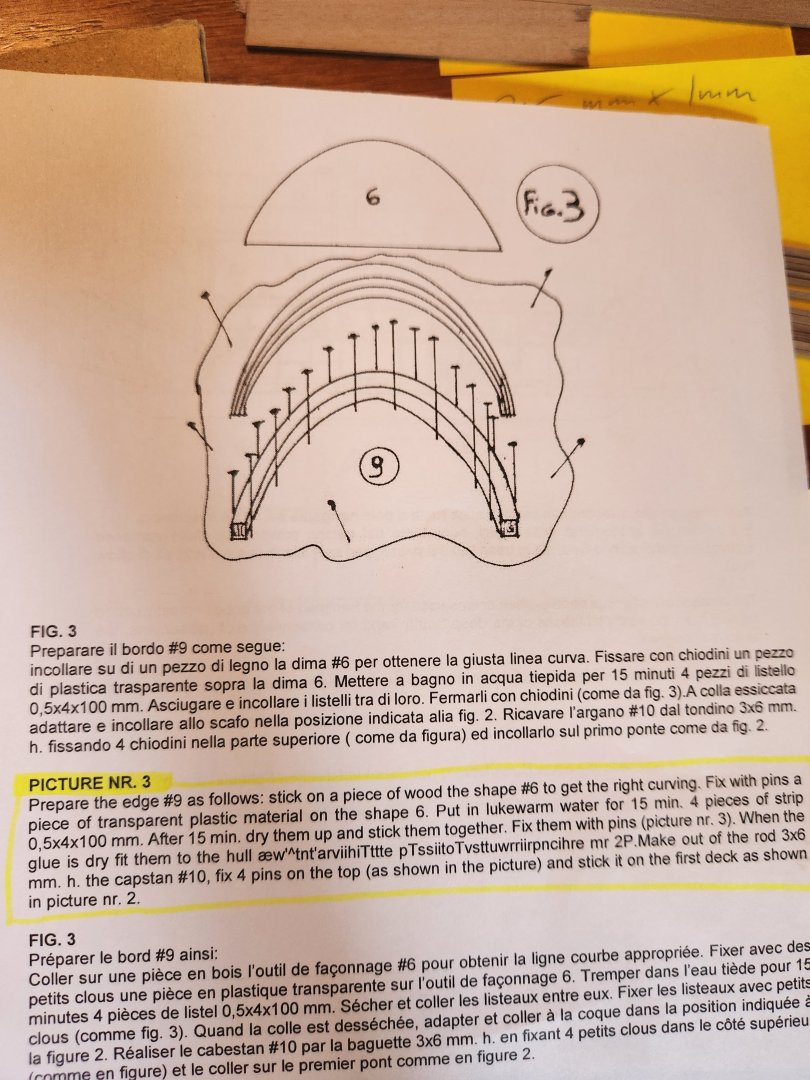
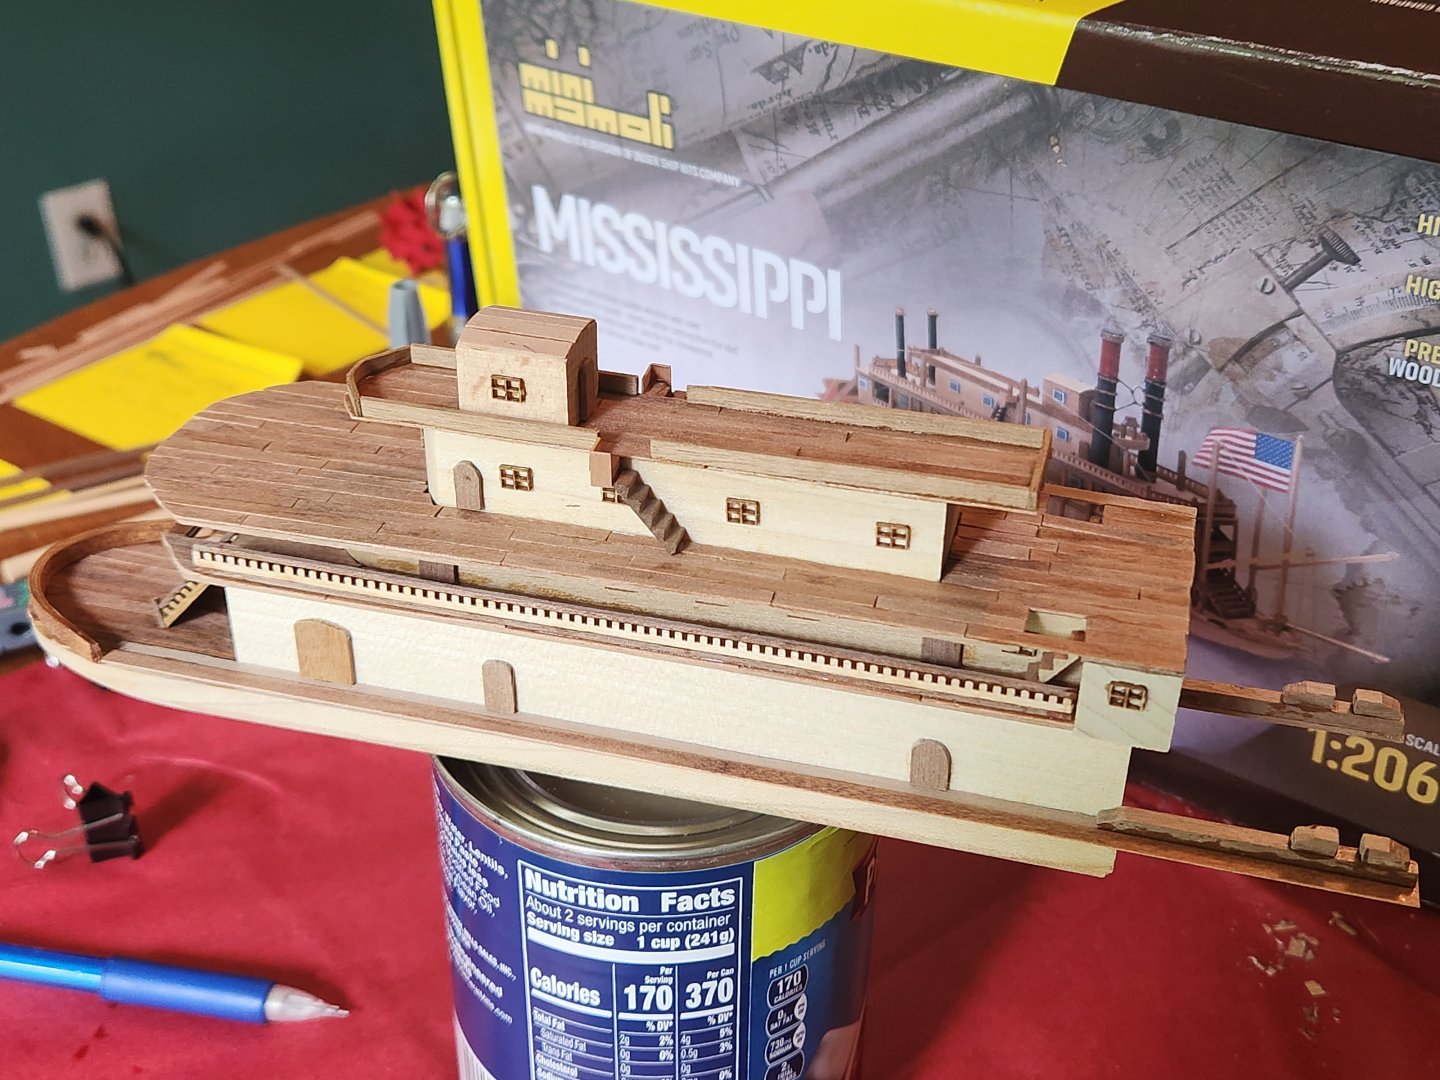
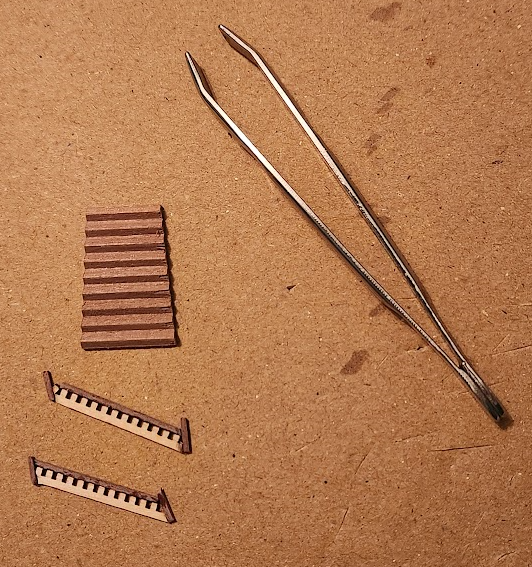
As I get to the "final step" (that's about 20 more tasks), I've gone back to some sections that I skipped at first, namely the raised edge of the bow. I didn't have pins, nor a "piece of transparent plastic material," although I probably could've repurposed something. But I ultimately traced the curve, transferred it to a thick piece of cardboard, and used toothpicks driven through the cardboard to hold the wood in the proper shape. It mostly sort of worked, although getting the exact right curve for the first deck and the fourth deck pieces proved to be more challenging than I expected. The top deck was particularly difficult because of the size and thickness of the piece I had to curve. No matter how long I soaked it or how hot I got it, I couldn't get a very neat curve. The first deck's piece was actually four thin pieces glued together, so they were much easier to bend. I built out the little tiny staircases leading to the top deck. I had to get a little creative again to hold some of these pieces in place, since there was no way for me to clamp certain pieces (with what I have on-hand. I have mostly been using office paper clamps, which have proven too tight or too big for some of the delicate sections of this build). With future projects, I may have to experiment with different glues as well. I like the slow-drying nature of the wood glue for the long time it gives you to get a piece into position, but there were times I would've preferred a faster adhesion. As I almost started in on adding the deck support pillars, I realized I hadn't applied any of the railings around decks two and three yet. I would definitely need to do that before adding the multiple pillars. I did a quick re-read through all the instructions and came to find out that at no point do the instructions tell you in words to make and apply the railings out of the toothed strip. They show up in two of the figure drawings, but you're never actually told to do it. I didn't think much of it at those earlier steps, since there were other items in the drawings that wouldn't be mentioned until steps later on, but they'd always be mentioned. Not so for the railings! So I have started in on those. The instructions definitely keep me on my toes.
- 19 replies
-
- 4
-
-
- mississippi riverboat
- Mini Mamoli
- (and 2 more)
-
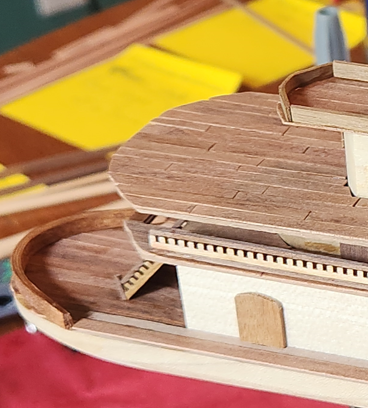
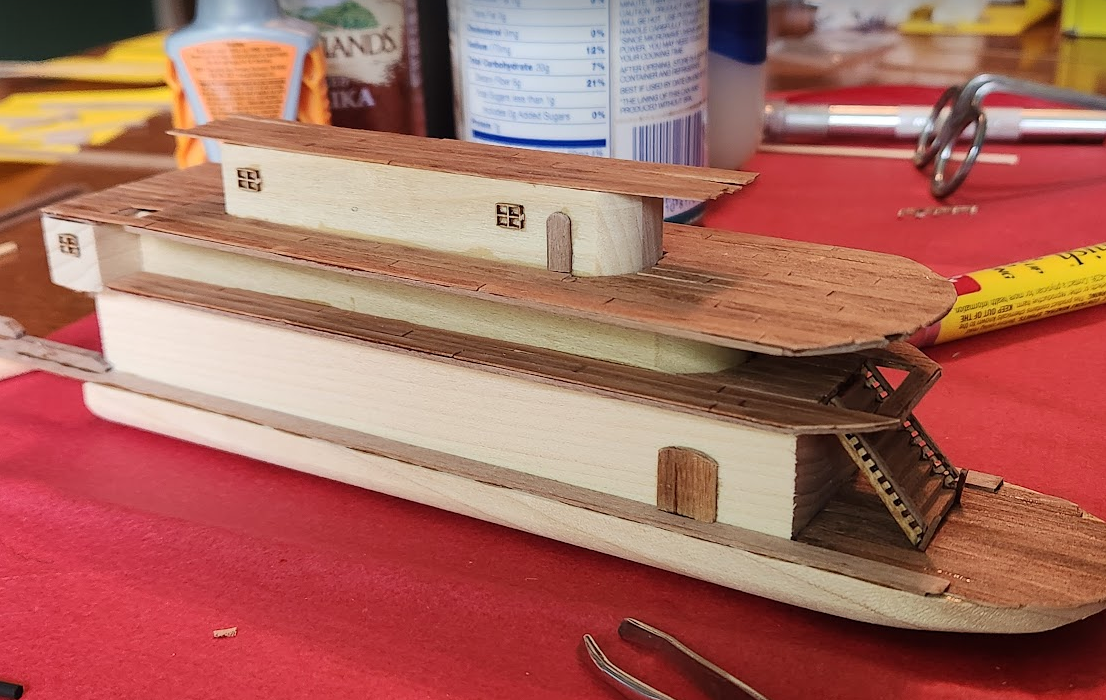
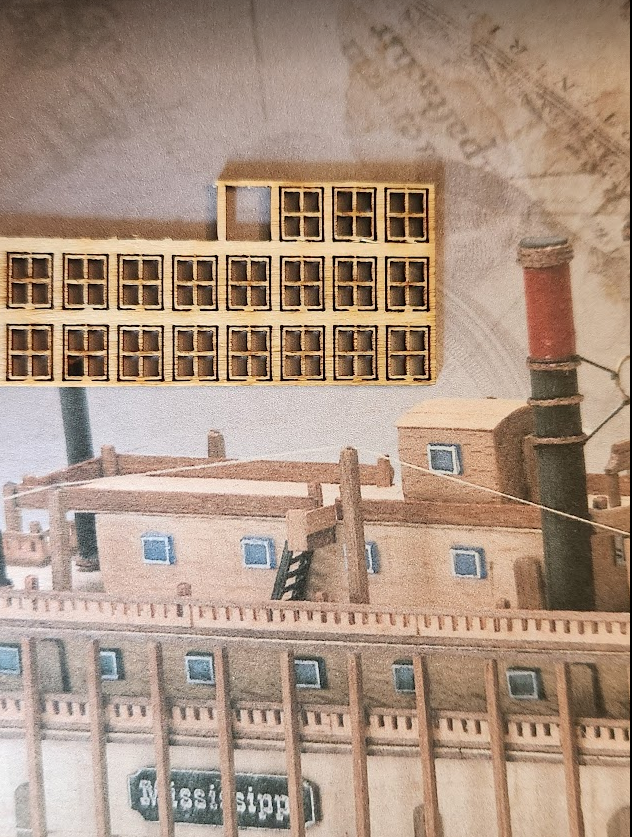
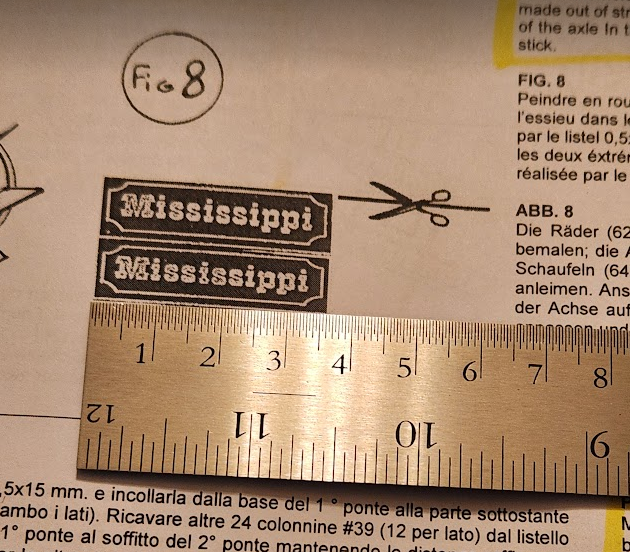
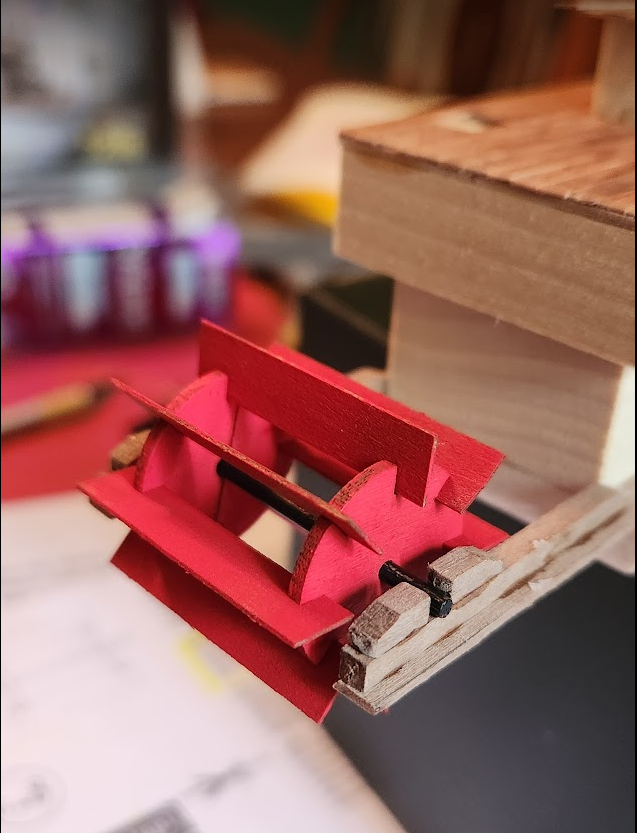
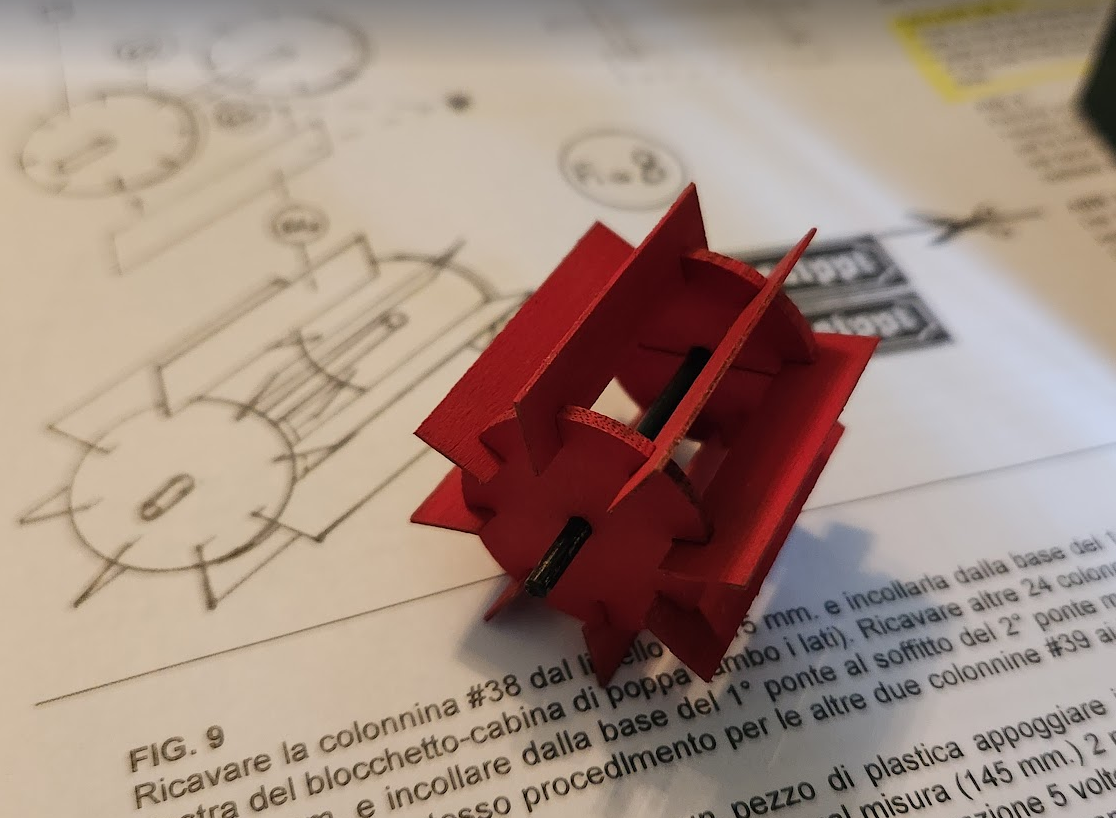
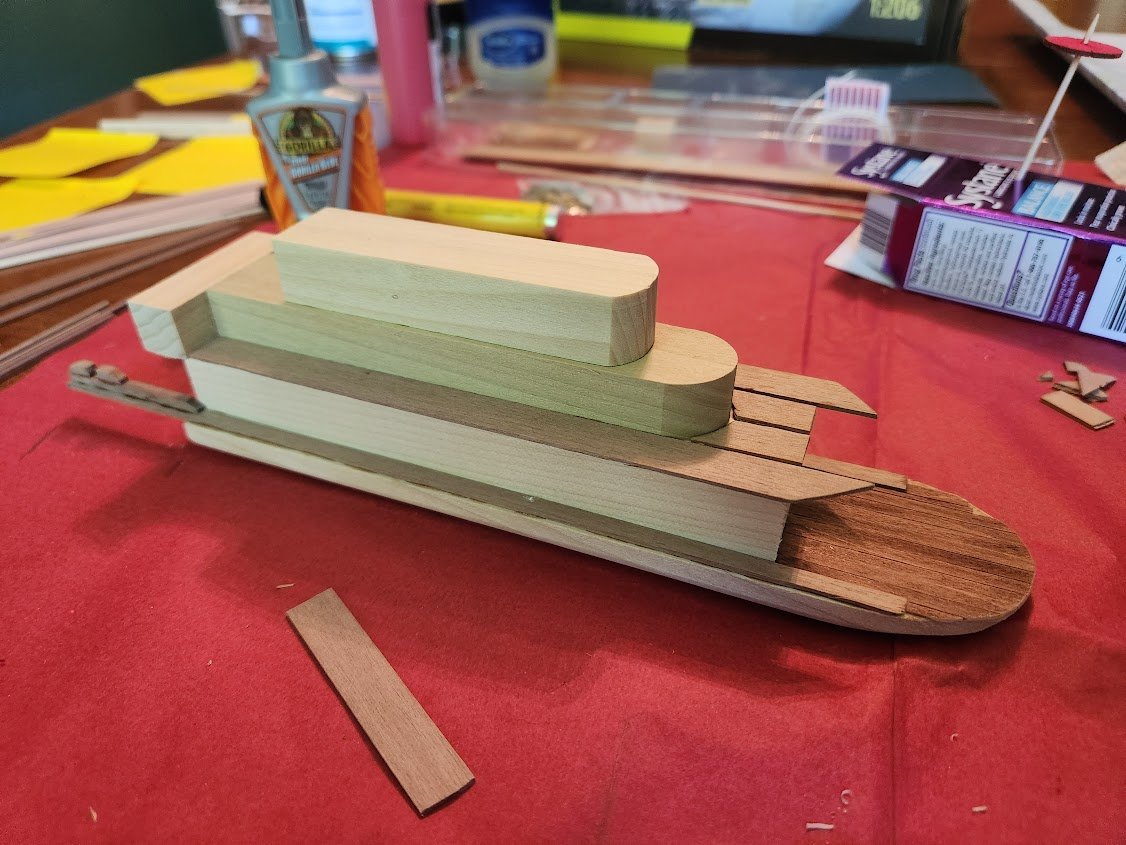
I've planked out the top deck and started in on some detail work, particularly the doors and windows. Mamoli originally included plastic windows, as can be seen in the box photo, and the instructions refer to the windows as plastic too. Instead, my kit included these wood windows, which I think I like better anyway. They are very delicate, though, and I snapped one or two window frames loosening them from the board. The kit also appears to instruct you make the name plate by cutting it out of the instructions. I briefly considered doing this and mounting it on some heavier card stock or something, but I think that would look pretty awful to be honest. If I have any leftover wood planks, I may fashion something myself, but I think sticking a paper name onto a fully wooden build would just make the whole thing look kinda cheap. I also put together the paddle wheel. The instructions and box photo don't have the paddles painted at all, but I think they look much nicer (and more accurate) in red. The paddle pieces were very thin and delicate and I was worried about these splitting on me, but I managed to get them into the grooves in one piece. What turned out to be the bigger challenge was easing the wheels onto the axle rod before I inserted the paddles. It was a very snug fit. Sometimes you need a little brute force. This was not one of those times. I snapped one of the darn wheels right in half trying to move it up that rod. Nothing a little glue couldn't fix, though. And once the paddles are in place, the whole structure holds together pretty well.
- 19 replies
-
- 4
-
-
- mississippi riverboat
- Mini Mamoli
- (and 2 more)
-
RollinOnTheRiver reacted to a post in a topic:
Mississippi Riverboat by RollinOnTheRiver - FINISHED - Mini Mamoli - 1:206 – First Build
-
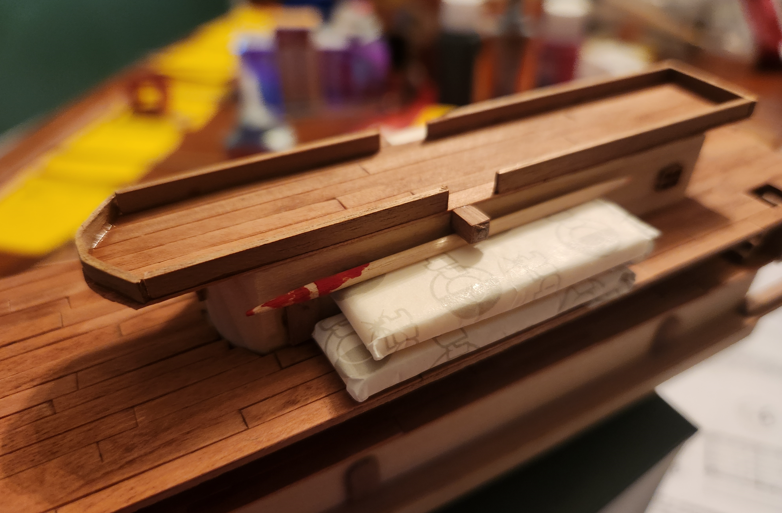
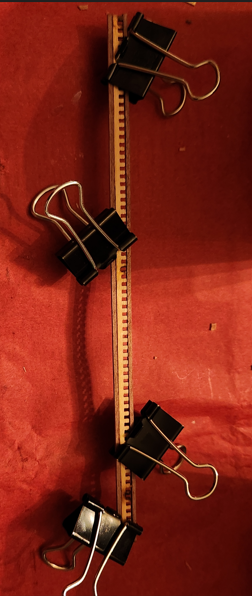
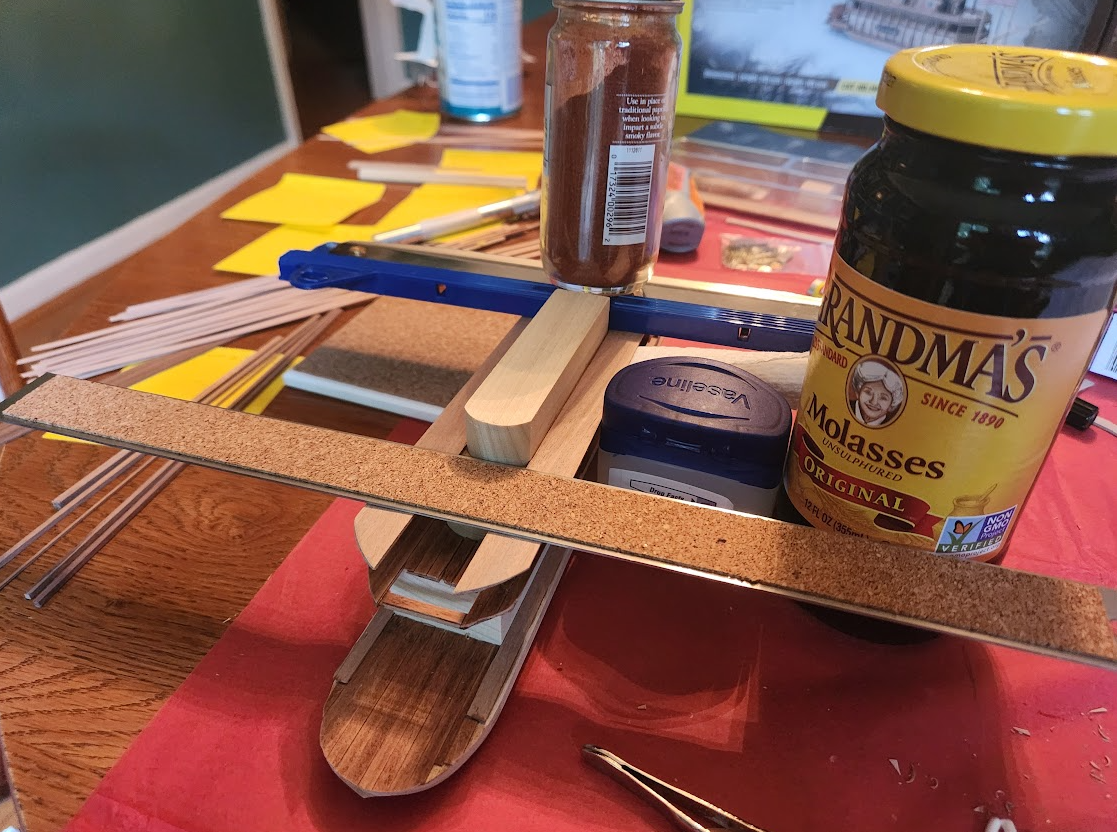
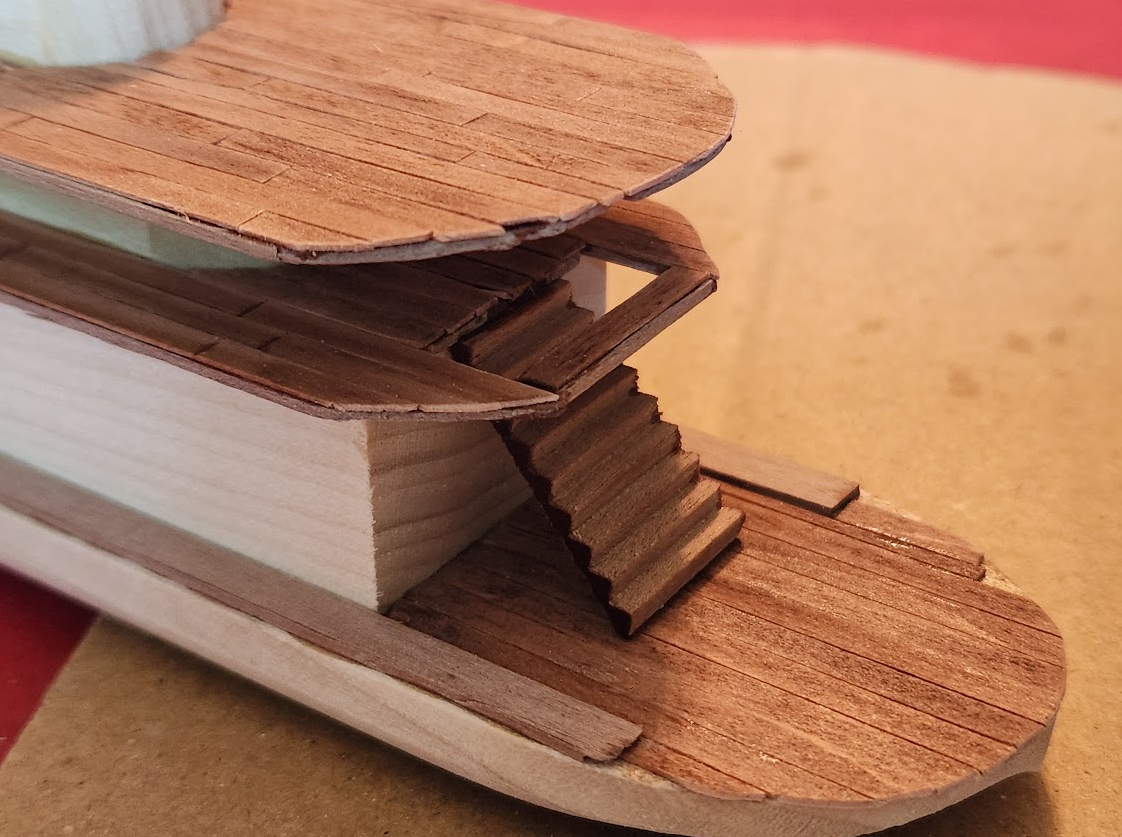
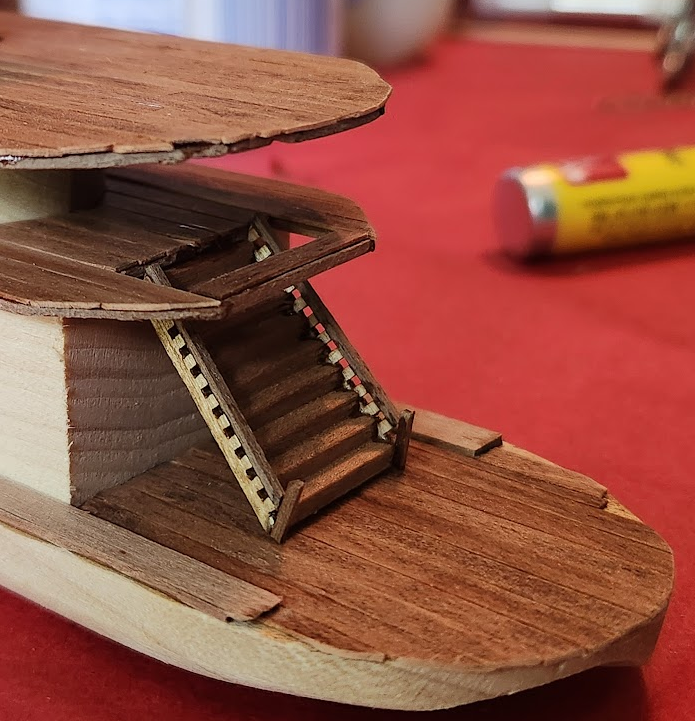
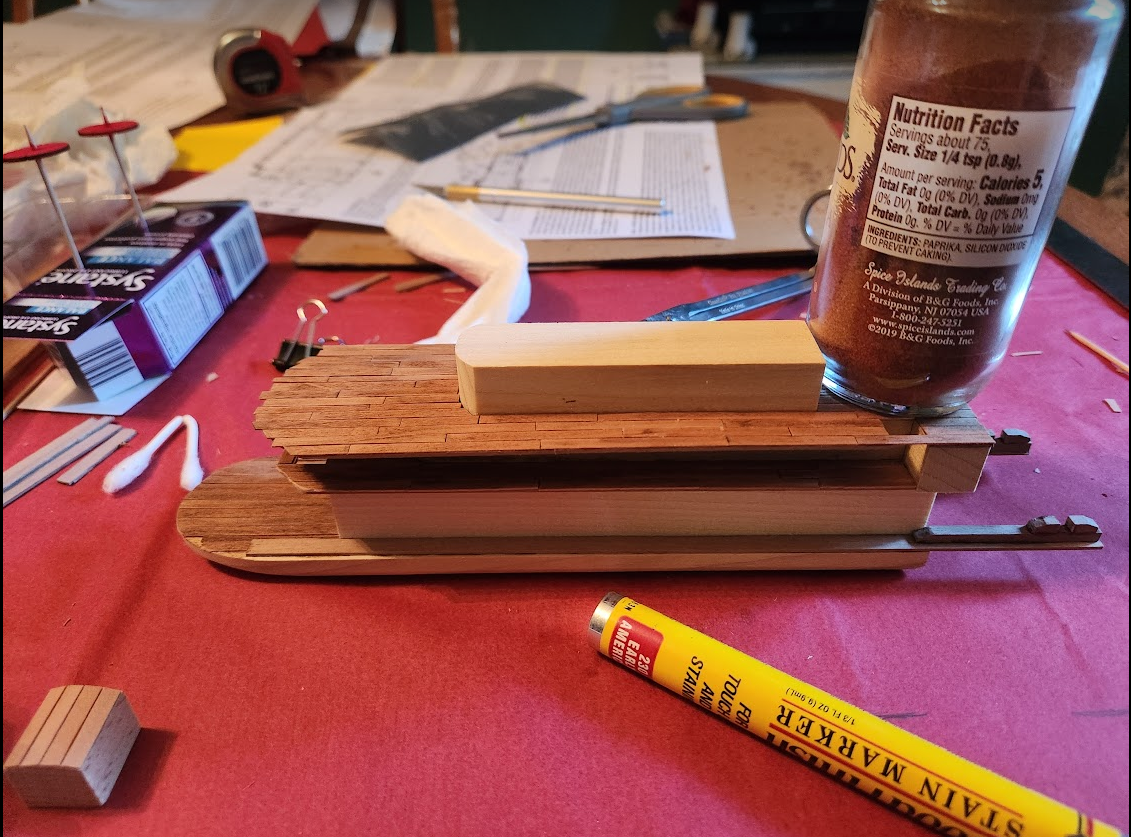
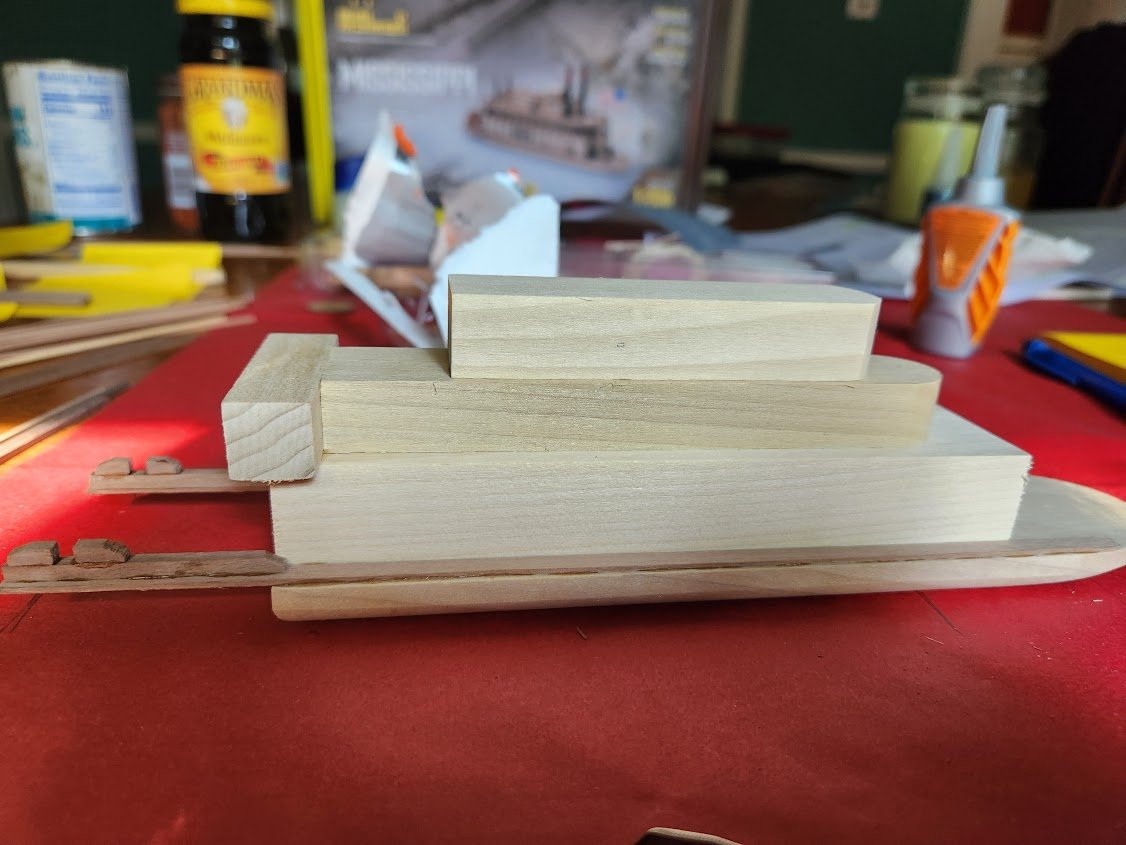
I finished building out and planking the second deck and moved onto the third, where I hit the same challenge a previous member here did. As you can see in my last photo, there is an extremely slim edge you're expected to attach the third deck to. There's a gap for a staircase, so the piece doesn't extend all the way to the rearmost block (which sure would've helped with stability!) I had to improvise to secure the pieces while the glue dried. The piece on the port side started to tilt downwards, so I folded a paper towel and wedged it underneath, then used the Vaseline container and molasses (the heaviest small item I had nearby) to keep the piece close against the wooden block. Luckily, my insane set-up seemed to work! Filling in the rest of the deck and adding the planking strips seemed to result in a relatively sturdy third deck. While I waited for this to dry, I started to prep the main staircase. The kit has you trim a toothed strip and add handrails. Getting the angle just so on the small toothed strip was a challenge. However, I found that I'd have to trim the handrails anyway. I had a small amount of overhang on the second deck that meets the top of the stairs that I chose not to trim back because it provided a larger surface to wedge in and affix the staircase to. This meant I had a nice excuse to cut off the wonky banisters. One side is still a little wonky, but I'm just gonna say it adds character 🙂 Lessons Learned So Far: I need to figure out my weights and clamps. I got a little shy about using the clamps after I practically glued one to the second deck and was afraid I'd rip off the planking strips getting it off (luckily, I got it unstuck without any damage). But trying to find items small enough, heavy enough, and flat-bottomed enough to apply pressure has been tough. If I let myself get hung up on perfection, I'll never take the first step. I'm okay with it looking amateurish, since I am an amateur. Perfect edges can come later, for now I'm having fun with it!
- 19 replies
-
- 5
-
-
- mississippi riverboat
- Mini Mamoli
- (and 2 more)
-
RollinOnTheRiver reacted to a post in a topic:
Mississippi Riverboat by RollinOnTheRiver - FINISHED - Mini Mamoli - 1:206 – First Build
-
Thanks for the recommendation! I've actually been reading through the instructions of the Chaperon, since they're available online and have advice and some interesting history on the boat. The color photo instructions seem so luxurious compared to the hand-drawn ones I'm working with! But it's all part of the fun to have a little bit of a challenge. I've actually been enjoying looking through your build history. I'd love to visit the Steamboat Arabia museum someday if I ever have an excuse to get out that way. I was also eyeing your Lewis & Clark project, since the idea of a scratch-built project is appealing to me, although I'd probably start with a much less ambitious flatboat while I'm still in the learning phase.
- 19 replies
-
- 1
-
-
- mississippi riverboat
- Mini Mamoli
- (and 2 more)
-
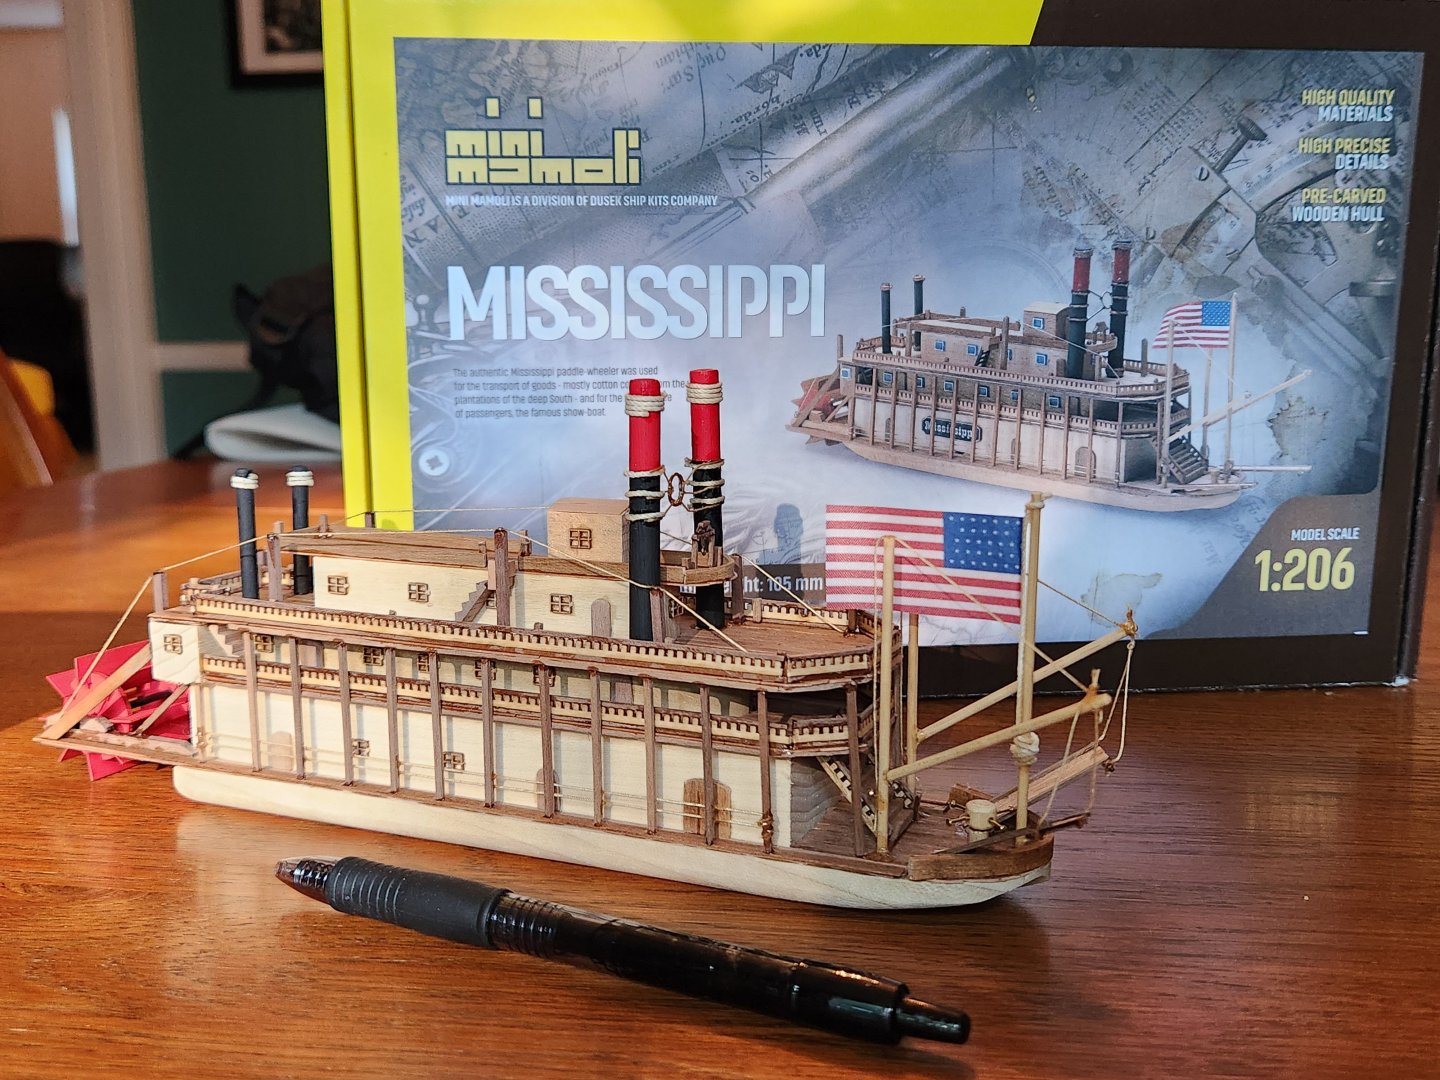
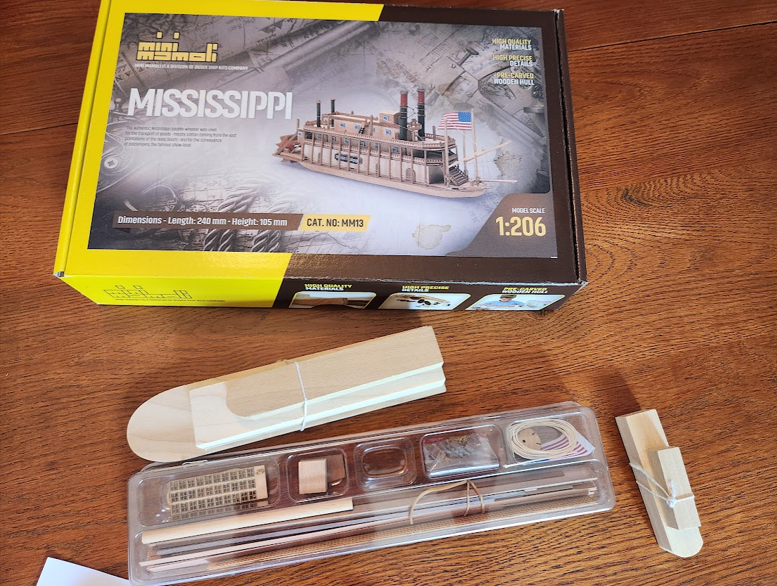
Hi All, I'm a total newbie to the hobby and wanted to start small with something I wouldn't be afraid to make mistakes with and learn as I go. I am much more interested in riverboats than sailing vessels, but most steamboat models I was coming across seemed a little too complicated (and expensive!) for a beginner looking to learn the basics. Mamoli's "Mississippi Riverboat" seemed perfect - a pre-cut, solid wood hull starts you off easy. My first introduction to model ship instructions has been a doozy. All the wooden strips and rods came in a bundle with nothing labeled. My first step was separating, measuring, and labeling everything. My next step was being utterly confused. Instructions beside Picture 2/Step 2 included "Make a sign with a pin in points #8 to be able later to stick pieces #52 and #60 (picture nr.9)." (This would be a fun recurring point of contention with the instructions, where the instructions for Picture 2 would include references to Picture 9 and so on). I decided to search online to see if I could find a youtube build log to reference (to no avail), but I did find one (incomplete) build log that led me to this site. Since I didn't have a lot of reference points to help me out, I decided to jump ahead (the instructions can, why can't I?) and come back when I had a better grip on the process. Lessons Learned So Far: I should've sanded the edges of the blocks before getting underway. They're not terrible, but these close-up photos sure highlight any frayed edge! Not over-gluing is a skill I'm still working on Instructions translated from Italian can be charming, with sentences essentially like "make this piece per the photo and stick it on," where the photo is a hand-drawn image with several steps overlapping to the point you can barely see what they're referring to I'm glad I went with a wood model instead of plastic. Cutting and shaping the pieces can be quite relaxing.
- 19 replies
-
- 5
-
-
- mississippi riverboat
- Mini Mamoli
- (and 2 more)