
Sjors
-
Posts
5,536 -
Joined
-
Last visited
Reputation Activity
-

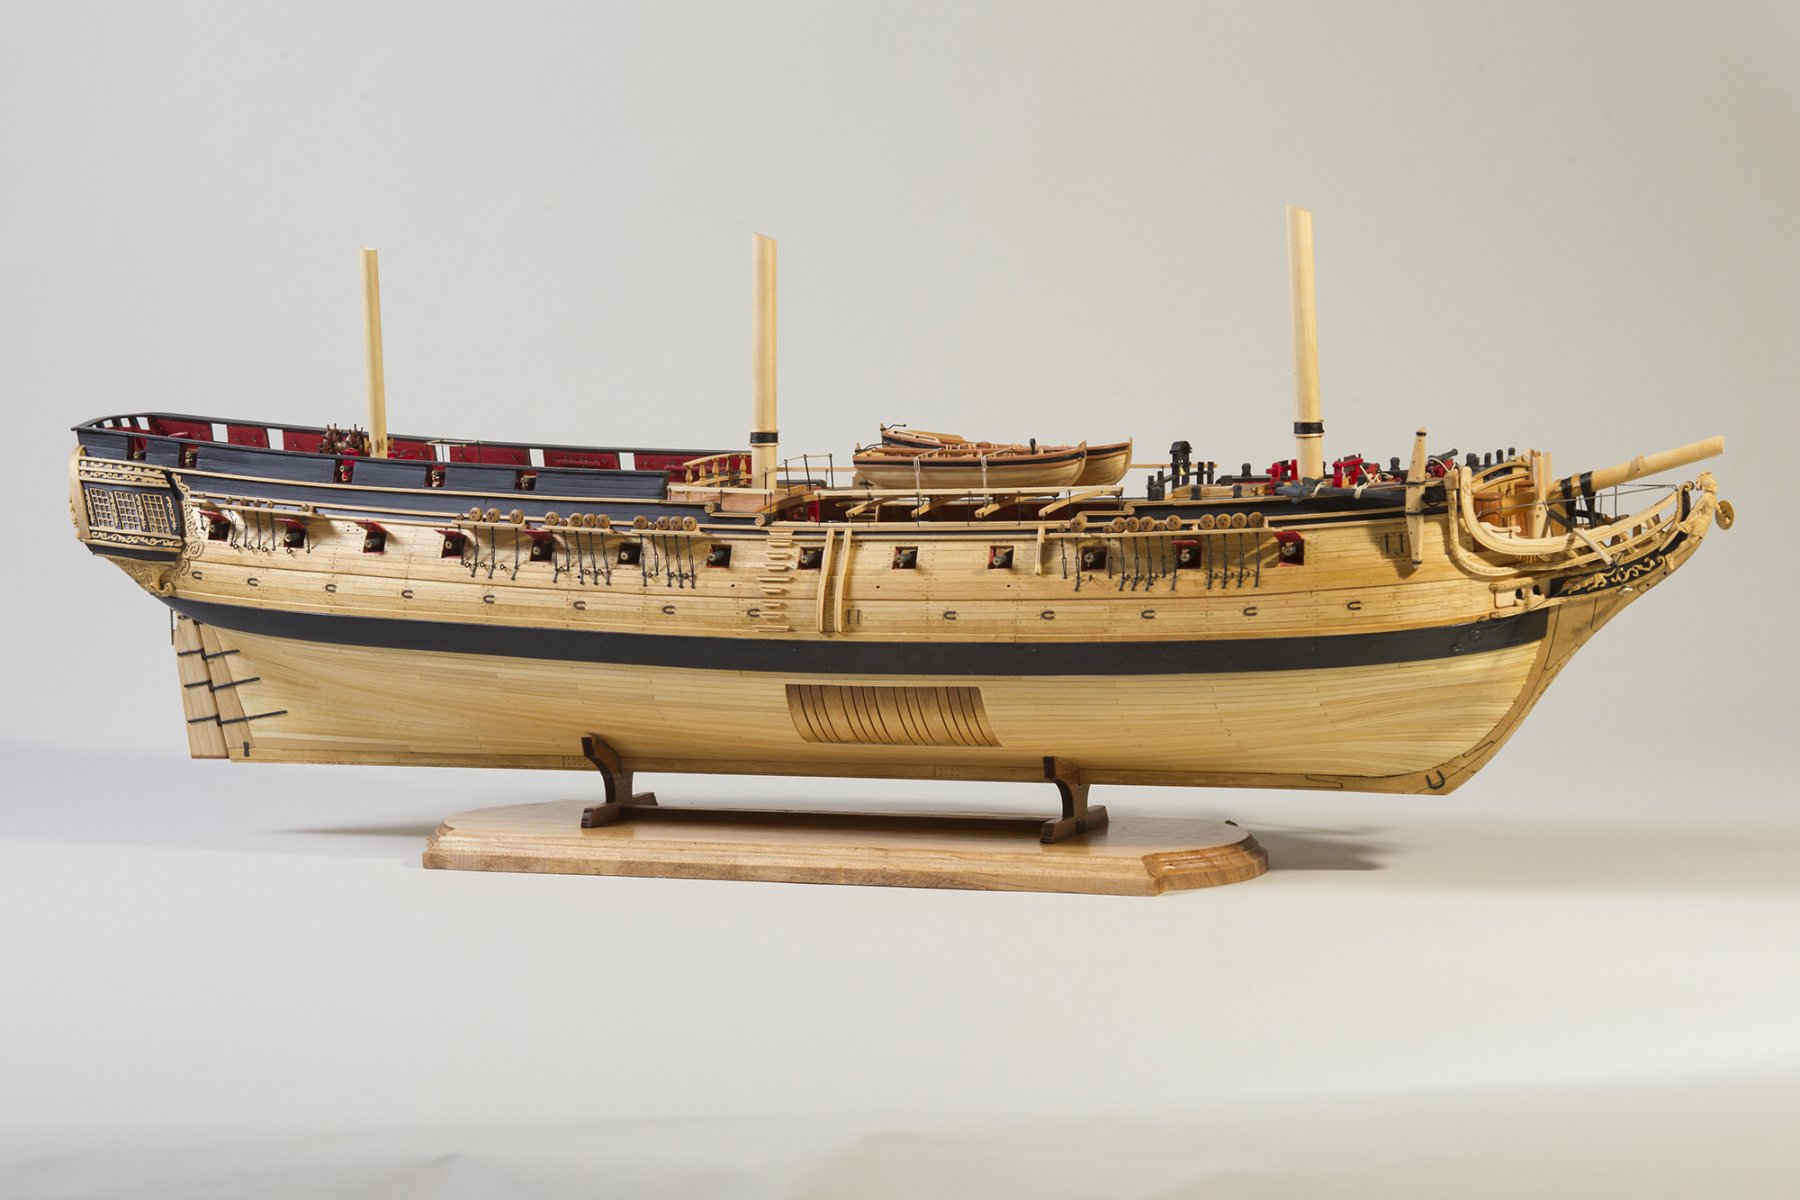
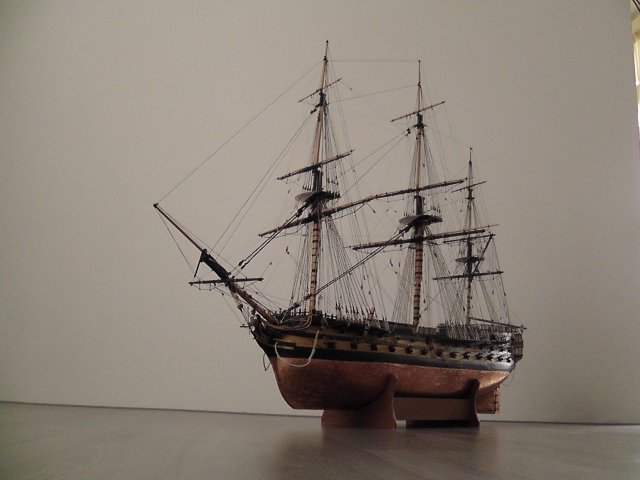
 Sjors got a reaction from JanV in Nuestra Señora del Pilar by Anja & Sjors - FINISHED - OcCre - Scale 1:46
Small update....
All the shrouds and ratlines at the lower fore,- , main,- , and mizzenmast are done.
All black so that was not so easy to see it all.
Next stop....the upper parts 🙂
Sjors
-
 Sjors got a reaction from PeterB010 in Nuestra Señora del Pilar by Anja & Sjors - FINISHED - OcCre - Scale 1:46
Small update....
All the shrouds and ratlines at the lower fore,- , main,- , and mizzenmast are done.
All black so that was not so easy to see it all.
Next stop....the upper parts 🙂
Sjors
-
 Sjors reacted to rafine in Duchess of Kingston 1778 by rafine - Vanguard Models - 1:64
Thanks so much Derek, Bob and the "likes".
I've now completed the main deck furniture and fittings. These included the hatch coamings and gratings; the galley chimney; the main bitts; the gallows; the windlass and belfry; the pumps; the bowsprit bitts and the guns. This work was quite straight forward, using the excellent laser cut and PE parts. The guns presented the only issue-- whether or not to rig them . After experimenting with the tackle, I chose to go with breech ropes only.
Now it's on to finish the remaining hull items, including the head, which I continue to put off.
Bob
-
Sjors reacted to Rustyj in Duchess of Kingston 1778 by Rustyj - FINISHED - Vanguard Models - 1:64 - Royal Yacht
Hi All.
Things have been a little chaotic at work the past three weeks as we've become a mass vaccination site.
Time in the shop and on MSW have been curtailed.
Anyways here's a bit more of where I'm at. I've painted the gun ports and I highly suggest you paint them prior to pinning the PE to the outboard side. Saves a bit of clean up if you are a sloppy painter like me.
Mast coats were added with the edges rounded just a bit. Just something I like the way it looks. The gallows, main mast bitts and staghorn cleat beams were assembled and placed along with the hatch combings.
I also assembled a cannon and rigged it with the breach rope. I attempted the tackle but even using 2mm blocks and the smallest hocks I could make there was no space between the blocks and I did not like the look. So I will just be adding the breach rope.
-
 Sjors got a reaction from BenD in HMS Snake by BenD - Caldercraft - 1:64
Hello Ben,
I have read your log and you have done a great job with your planking.
I have lay on both sides one plank.......
And now for the rest😃
I will watch you closely!
So i have 3 logs i can follow now 😄
cheers
Sjors
-
Sjors reacted to BenD in HMS Snake by BenD - Caldercraft - 1:64
I've been working on all the deck features. Nothing is glued in yet as there is a lot more work to be done. Next up is the fore and aft platforms.
-
Sjors reacted to BenD in HMS Snake by BenD - Caldercraft - 1:64
I just received some of Chris Wattons binnacles. They are really detailed for their size. I guess that's what you get when you buy a state of the art laser cuter.
Both sizes could work but I think I'll have room for the 1.64th one. Honestly an 18 gun sloop of war probably wouldn't have one of these but it's going on anyway!
-
Sjors reacted to BenD in HMS Snake by BenD - Caldercraft - 1:64
Carronades continued.
I made some .95mm rope for the guns and think I may move up to 1.10mm and see if that looks closer to scale. The length needs to be increased also as you can see it can't haul in very far. Fiddling with all these tiny parts makes me nervous about adding outhaul tackle.
Made the Ships wheel and capstan as a break from the guns. The wheel may be changed out in the future if I can find a reasonable replacement. The parts came off the sheet all hairy and chipped but they turned out okay regardless
-
Sjors reacted to BenD in HMS Snake by BenD - Caldercraft - 1:64
I was looking at the ship one morning and had a "OH God what have I done to her!" moment. The varnish on the copper was ugly and needed to be removed. 600 cotton swabs and a whole 500mL bottle of 99% Isopropyl alcohol did the job. Alcohol really does just melts acrylic varnish away.
After removal I used some more polish and shes bright and new. The batens need some paint touch up's but aside from that I think I have redeemed her.
-
Sjors reacted to BenD in HMS Snake by BenD - Caldercraft - 1:64
I've done something experimental and not sure how I feel about it. As you see in the picture below the tiles to the right are bright pink, that's what I was left with after cleaning. I couldn't bear to look at the ship in that state... I didn't even get a photo of it unfortunately. The tiles to the left are with a few coats of matt varnish with brown pigment to simulate slightly aged copper. It ended up looking like 5-10 year old penny without using chemicals plus it is sealed and will stay like this. Also it is protected from my profusely sweaty hands. what do you guys think?
-
Sjors reacted to BenD in HMS Snake by BenD - Caldercraft - 1:64
The Coppering is DONE! It was hard and I'm not completely happy with it but it just going to have to do. The humid summer weather has arrived and the finger smudges now stick out so it needs an application of polish. Brasso works well, but the question is do I varnish afterwards or not? I have a test strip of tiles I varnished 2 years ago and it holds up well and stays shiny. Or I could let it patina naturally.
-
Sjors reacted to BenD in HMS Snake by BenD - Caldercraft - 1:64
I decided to organize and upgrade the shipyard. I built a shelf with some cheap pine and organized my drawer. It really helps a workspace when there is some organization and everything has a place.
The coppering is turning out ok for the most part. Having some CA debonder is a must for this job, it doesn't mater how good you get with glue application some will leak out of the seams and cause a mess.
-
Sjors reacted to BenD in HMS Snake by BenD - Caldercraft - 1:64
Deck planking is in the works. I'm currently unemployed so I'll have some time to work on her over the holidays
I'm reasonably happy with how it's turning out, Little bit regretful of not adding margin planks. Next build perhaps I will delve deeper.
-
Sjors reacted to BenD in HMS Snake by BenD - Caldercraft - 1:64
The Bow decorations are finally done. The long parts #58 and #59 I ended up scratch building because the ply material was just not good and I had broken one. It was only four pieces but I think making my own parts is kind of fun. I think I should extend the red ochre out to the Hawse hole Bolster, what would be normal for painting that?
On to deck planking! This must be the 5th time I've gone over the deck pattern!?!. The beam positions are not really correct but it lines up with the hatches at least. My Beam positions range from 23mm-26mm which is not so far off from real ships I think. I'm doing a four butt shift pattern with 11-12 cm planks. With a scale converter that adds up to 25ft which is about correct for a ship of this period. I ended up buying more Tanganyika wood for deck planking because the stuff in the kit was jagged and awful. Turns out the extra I bought is in the same lousy shape. They are the same color at least.
-
Sjors reacted to BenD in HMS Snake by BenD - Caldercraft - 1:64
I've been working on the bow decorations for what feels like ages... The plans are kinda not helpful because they aren't consistent from picture to picture. So I'm kinda just sanding and fiddling around until everything seems to fit.
I've got the cheeks on and it turned out way better than I could ever hope. The rest of the head and decorations are going to be a hard few hours. The slots for the Gammoning didn't line up at all so I widened them on part #60 just like the folks from other builds. I'm still looking at everyone else's builds to see how they fared. I'll do my best, If it turns out bad I can always scrape it all off and scratch build some new decorations.
-
Sjors reacted to BenD in HMS Snake by BenD - Caldercraft - 1:64
The inner planking is done. Cutting the sweeps and ports out... It was quite the job to say the least. The 4x1mm planks were good quality but walnut is just not easy to work with.
The Red Ochre paint from Caldercraft is really nice to work with even with cheap pain brushes. My plan to have the planking show through the paint has worked out better than expected! I also put on the main wale. The 3x1mm planks were just awful wood and were slightly different sizes and colors, thank god they will be painted.
-
Sjors reacted to BenD in HMS Snake by BenD - Caldercraft - 1:64
Trimming the gun ports is really hard, the walnut just wants to crack at every opportunity. Now I just have to plank the inside and trim that too!
-
Sjors reacted to BenD in HMS Snake by BenD - Caldercraft - 1:64
Second Planking complete! I stopped spiling the planks a little past the water line, then it all sped up a lot. The last picture is with some sanding. Turned out ok. Going to work on trimming the gunports next before planking the inside.
-
Sjors reacted to BenD in HMS Snake by BenD - Caldercraft - 1:64
The planking continues... This planking method is taking a lot of time. It gives great results though. I'm probably not going to continue much past the water line because it will be coppered, I'll just just plank dirty style after that
-
Sjors reacted to BenD in HMS Snake by BenD - Caldercraft - 1:64
This setup right here is paying dividends! I set them up like this then use a blow dryer... 4 minutes later you have a laterally bent plank. this needs to be known by all. This is Chuck's method... Thank you man!
The three last planks I put on were laterally bent. They went on without the slightest of issue and I hope it continues this way. The stern needs some work
-
Sjors reacted to BenD in HMS Snake by BenD - Caldercraft - 1:64
I took a break in the planking to work on the Carronades to see if they could be turned into something acceptable. They seem ok but I wont really know until I paint them. It took 30-40 minutes per gun to get them to this stage so about 10 hours total. I would have liked to buy the Caldercraft 32-pounders but it would end up being over $200.
-
Sjors reacted to BenD in HMS Snake by BenD - Caldercraft - 1:64
The Second planking is coming along well enough. I've gone past the point where I can use clips to hold down the planks so its going to get harder. Also the lateral bending of the planks becomes a problem.
My test section turned out alright. I tried to keep it as clean and consistent as possible but it's just really hard. My hats off to all of you with clean edges and good paint jobs
I tried to make the planking and wood grain noticeable through the paint, lucky enough the Yellow Ochre was really thin. That's 6 coats!
-
Sjors reacted to BenD in HMS Snake by BenD - Caldercraft - 1:64
Second Planking
I've started the second planking and added planking to the stern facia Part 55. The instructions show it not to be planked which I found strange. I planked the inboard for strength though the inboard will not be seen with the stern platform. Yes it looks rough right now as it's just after rough cutting, sanding will commence shortly. I used 1x4mm strip for the planking and a 2x2mm strip for a boarder between the facia and stern counter.
-
Sjors reacted to BenD in HMS Snake by BenD - Caldercraft - 1:64
First planking complete
After the first 3 planks I gave up on shaping and spilling. There is another layer of planking so none of this going to be seen on the finished model. I'm going to put lots of effort into the second planking at least until the water line as the coppering will cover bellow that point. One thing to point out is that if I didn't put shims on bulkhead No9 and 12 it would have turned out really lumpy
the last picture is with a bit of sanding done. There is quite a lot more sanding to be done and I don't think I'll need very much filler. I have to say working with 1.5 mm lime wood was a bit difficult but it makes for a strong hull.
-
Sjors reacted to BenD in HMS Snake by BenD - Caldercraft - 1:64
The planking has begun. I think it will soon become a hot mess but for now it looks ok. It's only the first planking so it doesn't have to be pretty. I never seem to learn anything from the resources on this site .
I got a delivery from Cornwall model boats today! I received some sailors, Belaying pins, Rope, Blocks for the Carronades, And a Launch boat. The belaying pins look so much better, I can't believe Caldercraft didn't add them automatically given the price of the kit. The launch is going to be hard given the weak instructions, I'll give it another read I suppose.
The Sailors are very neat! The Captain and his Boatswain... I think