HOLIDAY DONATION DRIVE - SUPPORT MSW - DO YOUR PART TO KEEP THIS GREAT FORUM GOING! (Only 24 donations so far out of 49,000 members - C'mon guys!)
×

SaturnV
-
Posts
170 -
Joined
-
Last visited
Content Type
Profiles
Forums
Gallery
Events
Everything posted by SaturnV
-
 I have read that in the lower decks they would white wash the walls to help with lighting. I think it would also help the observer of the model see the details way down in the hull. What would one do to "white wash" the lower deck walls? Of course it would be made of wood down there if it makes a difference on what to use. Richard
 -
Thank you all for the encouragement and thanks for stopping by to see my build log. Way more than I get at home. Nothing really at this time to take pictures of. I used the oscilating spindle sander to sand down the inside and outside areas of the cant frames last night. That means the frames are squared off at the moment. Other than gluing them onto the keel and sanding in the curves I see no other way to get the curves correct. I'm thinking maybe I sand down the bottoms of them where they meet the deadwood prior to gluing because that transition point would be easy to screw up after they are glued in place. Again, I'm too afraid to do the upper curves off the model. Maybe I can temp pin them in place and brace them at the top???......... Richard
-
Daniel, your changes are well worth the hassel in my opinion. The look is very good. Your doing the part now that I can't wait to get to. The interior framing is my favorate part and thank you for sharing the PDF's. I will put them to good use when the time comes. So, does the cat meow with an accent? I've always wondered that about foriegn pets......
-
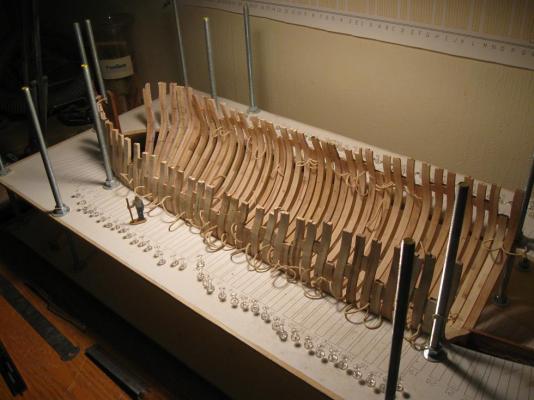
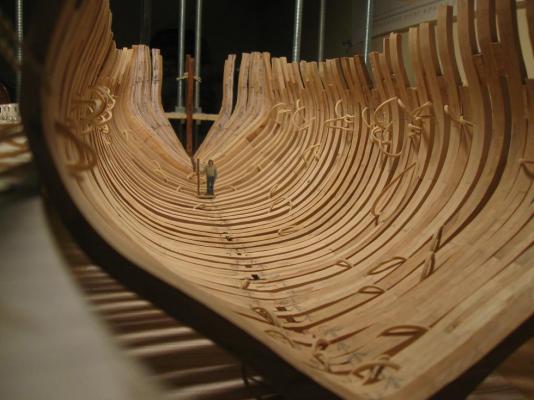
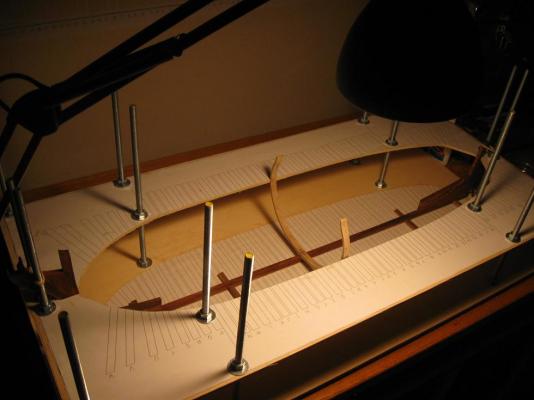
Hello all, I received my Swan book - what wealth of information that is! A good buy. Additionally, I have been installing frames from stem to stern and am now working on the bow cant frames. I feel I need to install these cant frames first so that I have a reference line for the bollard and the pieces that go before it. It should be an easier task to just fill in the gap rather than start with the bullard and then make frame W. So below is my progress so far. Mini-me has made a return to help with scale. I have glued the pieces together for the cant frames and have just placed them in their position to see how they look. I will begin fairing them soon to a point close to their final shape then I can start the filler pieces and the bollard. Please pardon all of the rubber bands. They are trapped on the frames but will be cut off when the cant frames are done at both ends. They are still needed to hold the model in place when I glue in the final frames. Richard
-
Joss, you are correct. I am looking for more detail on wall construction, pumps, and so on. And you and Mark are also right in regards to the addiction of getting the rest of them. A malady that I must conquer every day........ Funny you should mention the wood addiction too. My bedroom closet is half filled with wood slabs and boards for modeling. I'm afraid of getting termites! Richard
-
Thanks for stopping by Frank. I scratch build because it is cheaper than buying kits but also more rewarding because I cut up my own logs to make the wood for the project. For me it was a no brainer to go to scratch. Joss, I have looked at the NMM drawings before and it looks like those are the drawings that were used to make these Trton drawings - so not much help from them. To tell you the truth I don't know what I am going to get out the Swan book but everyone reccomends it so I ordered one. We'll see how it goes when it arrives next week. Richard
-
Boy, that quote would get me a punch in the face and a divorce! Ha ha! I drag the little lady off to look at my progress and her favorite line is "it looks just like it did the last time you made me look. When Are you going to learn that I really don't care about model ships. Don't you know we live in Colorado, not on the ocean?" Nope, not going to be dropping this project. I was told this book would help with the building of the Triton. Even if it does not, I will still enjoy reading it. You can't have too many model ship books. Richard
-
Well folks, I ordered The Fully Framed Model, HMN Swan Class Sloops 1767-1780. I had to tell someone and my family and freinds really don't care. I figured you guys would understand how this is an important thing. :-) I hope it is worth the money. Richard
-
Congrats Daniel on your recent work progress - she is looking quite good. I hope to catch up to you on this progress in the next month or two. I am taking vacation next week so maybe I can get a bunch of work done on these frames. So much fun, so little time...... Richard
-
I own the AOS Pandora book and looking at it I can see that WANG did all of his decks from that book. I do not know which would be more accurate for the Triton - Pandora or Diana or something else altoghter. The drawings for the decks supplied by this website do not show much detail, just the overall location of the rooms on that deck. I plan to use the Pandora drawings whenever there is a lack of information on the drawings supplied by this website. When the model is completed it will look good but may not be accurate. Richard
-
Hi Daniel! Yes, that step is a bit ambigous on the drawings. However, my montra is "perfection not required". I can easily add or subtract material as needed in that area without there being any visiable sign of a correction. The actual thin area of each of the deadwoods on my keel are sloppy but these areas will be covered by other parts so why take the time to make them perfect? They are merely areas to hold glue and can be adjusted without ill effect to the final product. The steps themselves are only marginally correct also, because final sanding needs to be done to smoothly transition between them and the cant frames. So, I wait for now to finish the deadwoods until I get the cant frames glued in place then I will make all of it flow nicely together. Trust me...... :-) 14 frames done so far - 0 through 7 and A through F. More to come. Richard
-
Thanks gentlemen for the encouragement. Still making frames - slow but steady. Richard
-
Made progress on frames this weekend. Frames are just placed in their reletive positions - not glued in place yet. Enjoying the work very much. Richard
-
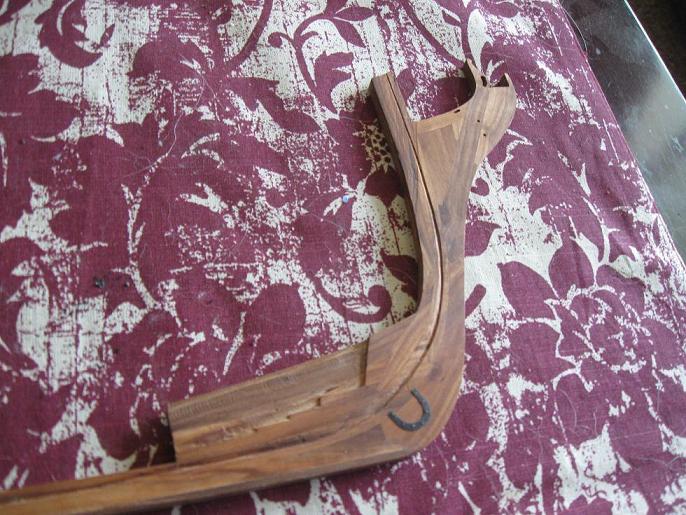
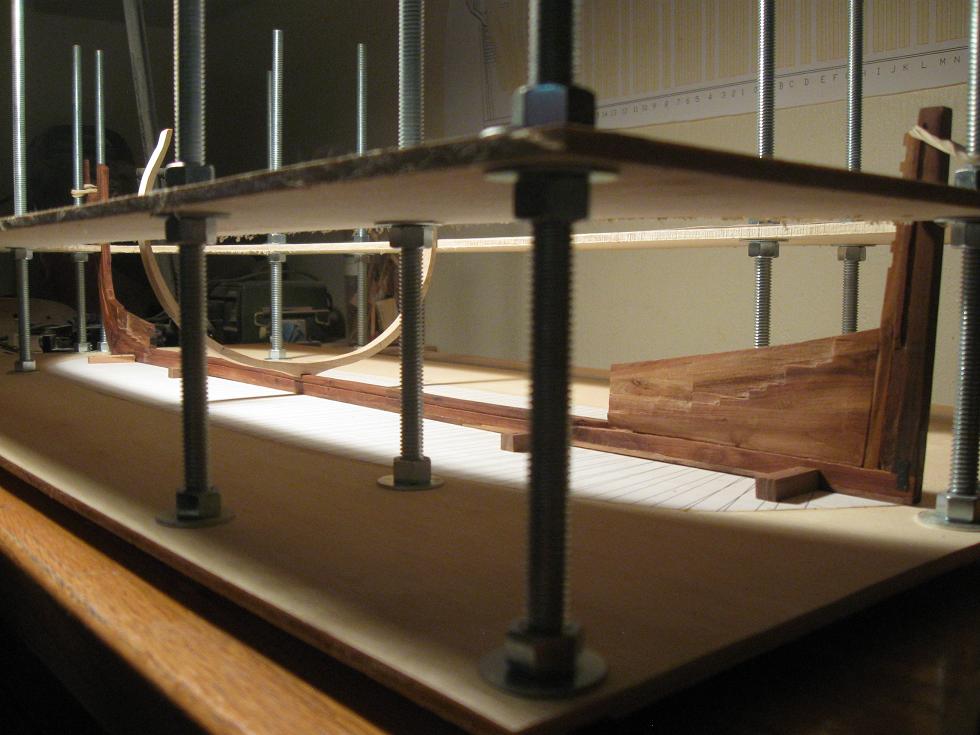
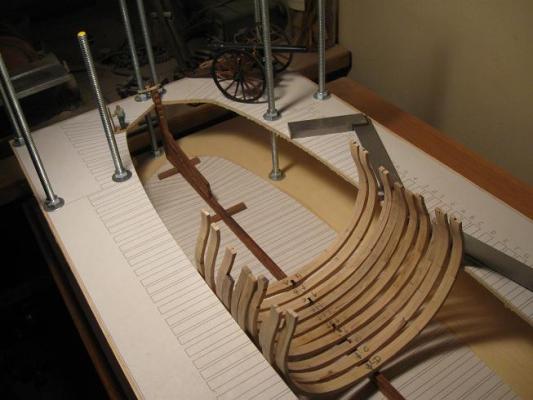
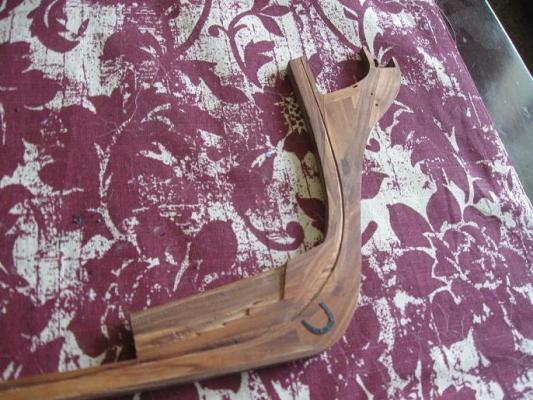
I finished my new keel and have mounted it securely in the jig. Ready to begin the frames. The keel parts are made mostly of the dark inner wood of crab apple. The false keel is walnut. All are locally harvested. The fish plate and horseshoe were tough because I had to do them freehand with no drawings with dimensions to assist me - they were both best guess based on an isometric view in an AOS book for the Pandora. I am satisfied though as these peices will not be seen much by the average person. They are mostly there because I wanted them there and also for a little accuracy - perfection not required.

-
Thank you for the angle gauges. I have printed them out and will use them at the appropriate time. As a side note, have you considered what you will be doing about the "buldge" on aft end of the hull? I am thinking that I will leave extra material on the inside of those last 3 frames and just sand out the buldge when I fair the hull.Then make the interior conform accordingly. Richard
-
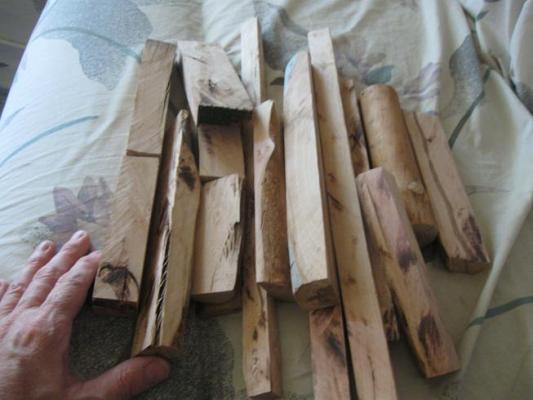
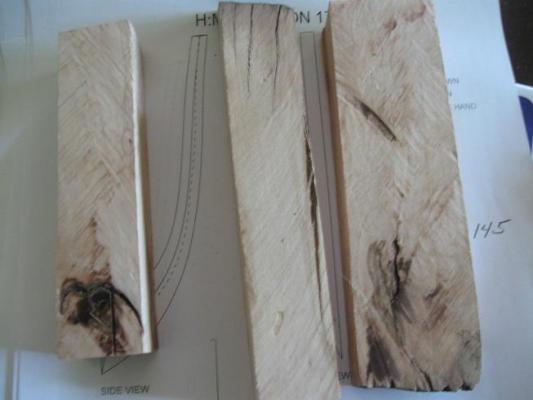
I have finished cutting out all of the frame pieces and have them all in their individual envelopes marked with the frame number/letter. I decided to make the keel again, this time with the dark section of crab apple wood. It is strong and has the color I like. The Russion Olive wood keel did not turn out to my liking so I made the switch. For the next week or so I will be finishing the keel for the second time. Once complete I will begin building the frames. Slow but sure progress. On a side note, when I got to the hawse timbers I had run out of my supply of apple wood. So I searched my closet for stock and came across a box of supreme apple wood that I had put aside for something special. It is strong, without grain, and is a nice pinkish-tan color. It is really nice stuff for carving but I needed it now so my bollard timbers and hawse timbers and the transom timbers will all be made of this wood. Here are some pictures of the wood. It is a limited supply that I have:
-
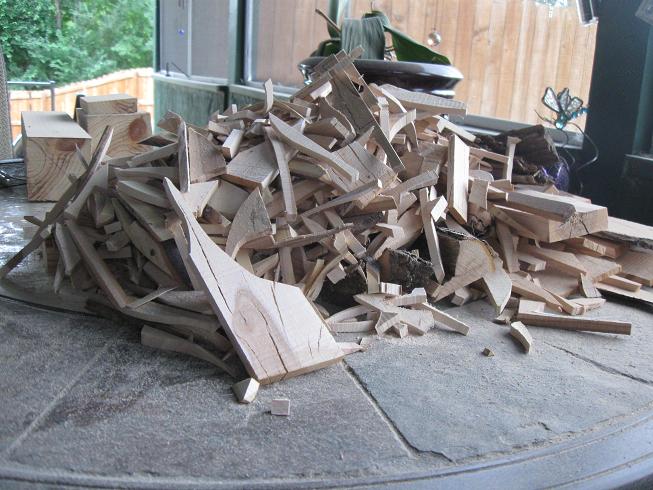
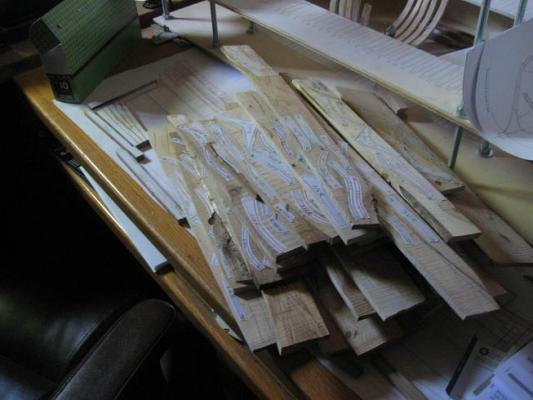
A couple of pictures to prove I am still working on this model. I been cutting up the frame pieces from the drawings and gluing them on apple wood (still 13 more to go). Then cutting them up on the bandsaw. After cutting up each wooden frame piece I put them in an envelope marked with the frame number or letter. Once all are cut up I will start in earnest in putting the frames together. It will probably take me all winter to get them done. Cutting up these frames makes for a lot of scrap that is too small to use for anything. The wife made me clean it all up for the holiday weekend. Something about her wanting to use the outdoor table for eating on. I thought it was there to catch my scrap wood.....

-
Mark, I think we will get by okay. I'll be leaving a goodly amount of material on the cant frames so that they can be faired after all frames are installed. For me, I just require someone every once in a while to say "Rich, you do/do not understand the drawings". =) Thanks again everyone for your opinions and help. Now onward to frame number 1 zillion.......... Richard
-
Hi Randall and welcome to the Triton build. Good to see others joining in. It has been a very satisfying project for me so far. A little test of my skills but not too much to make me want to give up. I'm sure you will do fine as your first parts look very good and you seem to have a grasp of what is required. Mahogany is a great wood for making ship models - I just can't seem to find any mahogany trees growing around here in Colorado or else I would be using it too! lol Richard
-
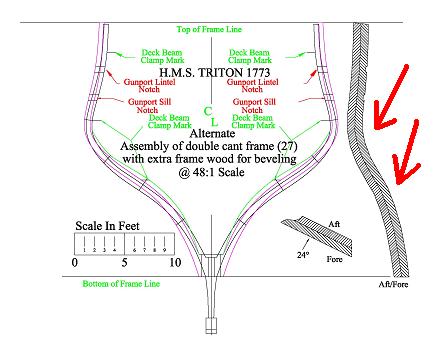
The Learner, your first picture is perfect and answers my question. I have been looking for a picture at that angle all over the forum but never found one. Thank you for posting. It is the edge view in the drawings of the individual frames that was throwing me off. I truely appreciate whoever made the drawings and is supplying them for free on this forum but that edge view is mis-leading. It shows the centerline between the aft and forward frames making me think that the frame is bent. I read technical drawings for a living so details are important to me - I take them at face value. It could be that the person drawing them was trying to make an isometric view but never said so on the drawing - it still says "aft/fore" under the view just like all of the other frames and still shows what appears to be the centerline. Maybe that centerline in this particular drawing is actually a corner line. The other tough part of these drawings is that hidden lines are shown as a solid line. In technical drawing a hidden line is shown as a dashed line. But I can get past all of that if I know what is intended and now I do! =) My last question is about the degree marks on some of the drawings (in this drawing it says 24 degrees). Is this the amount the cant frames are canted compared to the keel? It really is not clear in the drawing but that is my guess. As far as pre-beveling the frames, I will do that a little especially on the inside because that will be the most difficult area to sand. I'll get it close but still leave enough for sanding later. Thank you all for your help. It is much appreciated. Richard
-
I guess I'm not getting my question properly across to folks. So perhaps a picture is worth a thousand words as they say - I have drawn large red arrows in the attached picture to show the curve I am refering to in my question. There are the curves that make up the shape of the frame (the curve of the hull) and then there appears to be a second set of curves (forward to aft in the edge view) that are going to be difficult to make. I'm just trying to get folks opinion on how you would go about doing these second sets of curves. The problem is that if you cut out the frame pieces you no longer will have a flat surface to "glue" on a cut out of this second set of curves. The best I can come up with would be to sand a little, hold it up to the drawing, see where more needs to come off, sand some more, and repeat until you get the correct shape. Is that pretty much all I can do in this regard? Thanks ahead of time for any responses back to this problem.
-
So, I am getting to the point where I am cutting out frames "R" and above and frame "19" and above. These frames not only are made up of curved parts but are also curved from forward and aft. This is a quite complex set of curves to get correct. My plan is to cut out each piece the way they are shown on the individual parts pages (in a much thicker than normal piece of wood) and then sand or cut them down to the final shape - forward to aft - and then assemble the parts into a single frame. A difficult taks to say the least. Does anyone have a different technique that they have used, or plan to use, to make these very bent frame pieces? Just remember, the joint line down the center of the frame has to also be curved so just sticking two pieces of wood together and sanding down to the shape won't work. Any opinions would be appreciated. Richard
-
Frame faces
SaturnV replied to SaturnV's topic in Building, Framing, Planking and plating a ships hull and deck
Thank you Allen! That is a load off of my mind. I have been trying to figure out how to do those curves for several weeks but now it appears that I do not have to - just an illusion because of the drawing angle. So many frames, so little time, but loving every minute of it. :-) Richard -
Frame faces
SaturnV replied to SaturnV's topic in Building, Framing, Planking and plating a ships hull and deck
Thank you all for the replies. Follow-up question: For the cant frames, if you laid them down on a table they would lie flat from the top of the frame to the bottom of the frame where it attaches to the deadwood, correct? The side view drawings make these frames look curved and twisted but I think that is just an illusion because of the angle of the frame in the drawing. Richard -
For POF model hulls, the individual frames as they approach the stem (and stern for that matter) begin to twist to follow the final shape of the hull. For a POB, all bulkheads are at 90 degrees to the keel and when faired the faces of these bulkheads are all facing the same direction. Is this also true for POF? Would all of the faces of each frame be 90 degrees to the keel from stem to stern or would the faces twist with the rest of the frame? It is one thing to make a frame flat and then just fair it on the outside and inside edges but it is another if the face of the frame has to turn so that it remains 90 degrees to the inside and outside edges as they twist to follow the curve of the hull. That is a lot more difficult to do. What is the real life practice when building a ship? Any help with this question would be much appreciated. Richard