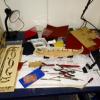
zimboinoz Posted June 17, 2015 #1 Posted June 17, 2015 Hi all, This is my second attempt at a model boat, as I needed something that I could work on in the evenings whilst working away from home. As such I needed something smaller (less masts/rigging) and less complex that would be relatively easy to move around with me. With hindsight possibly not the cleverest idea I have had but was willing to give it a go. Did get stopped once at the airport, as they were curious as to the contents of my luggage (my first trip bringing the majority of the 'tools' across) didnt even cross my mind till I was queried about it and had to explain myself. Anyway decided on a Viking long boat, as it is an era that interests me along with being relatively different to the tall ships (including being less complex and a fair bit smaller). So had a look online, as Perth doesnt have the greatest selection of hobby shops and a couple of days later I had the Amati kit in my hands. Kit looks pretty good, and relatively easy to get a move on. The precut planking is a breeze, and progress is relatively quick (yet have still been working on this for the last 6 months or so) along with a great sense of acheivement compared to the my last model with more traditional planking. As mentioned in the other build threads the laminted wood isnt the greatest quality unfortunately. Didnt realise the challenge of trying to complete this task whilst remaining relatively mobile, luckily I have managed to lock most of my tools and the model itself away in a locker between trips. And so far only had to do a couple of car trips with it all. One of my temporary build sites...... As mentioned this is a bit of a catch up post, and will get a few more photos of where I am up to now. And then it will slow back down again, but almost at the point of having to take this model on a plane trip across Australia. Now this could be interesting!! Canute, Griffon, Waitoa and 2 others 5
Keith_W Posted June 17, 2015 #2 Posted June 17, 2015 Hi Dirk, welcome to the club. Funnily enough, my Drakkar was built in Melbourne and ended up in WA. Albany, to be precise. Gave it to my friend as a gift, and he decided to put it in his holiday home! Canute 1 Regards, Keith 2007 (completed): HMS Bounty - Artesania Latina 2013 (completed): Viking Ship Drakkar - Amati 2014 (completed): HMS Bounty Launch - Model Shipways Current: HMS Royal William - Euromodel
zimboinoz Posted June 18, 2015 Author #3 Posted June 18, 2015 Thanks Keith, your thread is very helpful.
zimboinoz Posted June 21, 2015 Author #4 Posted June 21, 2015 Now there is no mention in the plans about staining/painting the model, yet the kit is supplied with a very light wood. To me this wasnt very 'viking' and so decided on staining (which would hopefully cover up the the laiminated wood). So off to the hardware store to try find some stain sample bottles. Ended up choosing what was called Japanese Brown, but on application realised that this was very dark and the wood supplied seems to slurp up the stain. Ended up only doing the keel and hull structure with this stain, until I could get back to the hardware store again. Did manage to spill most of the sample bottle over my plans aswell.......luckily they still readable (just). Back at the hardware store and after doing a bit of reading that these boats we often made out of oak, thats what I decided to go with. To me turned out perfectly. The stain tended to highlight any additional glue that had seeped between the planking. The stain being alcohol based tended to soften the glue luckily and it was relatively easy to scrape off. First application was also very blotchy (as you can see below), so went with numerous lighter coats with wiping off any excess stain. Guess this is the correct method anyway. Started to add the brass nails that was supplied with the kit, and initially thought that I might provide a nice highlight. But once I had done one side decided that they didnt suit at all, so the other side was completed using some black nails I had from model railroading. This came up a million times better. I like this pic showing the original look vs stained. Will still need to apply another couple of coats to the keen section as you can still see the laminates. GuntherMT 1
Jerry Posted July 4, 2015 #5 Posted July 4, 2015 Hello Dirk.. Just found your site and happy to see another Drakkar being built. Please let em know if I can ever be helpful to you as I finished mine about a month or so agao. Best luck to you and please keep posting. Best, Jerry Cutty Sark - Billings- Scale:1:64 HMS Victory - Caldercraft - Scale 1:72 https://modelshipworld.com/index.php?/topic/1951-hms-victory-by-jerry-finished-caldercraft-scale-172-1805-version-wood/ HMS Bounty - Amati - Scale 1:60 https://modelshipworld.com/index.php?/topic/10200-hms-bounty-by-jerrys-admiral-finished-amati-scale-160/&hl= hms bounty jerry#39;s admiral Viking Ship - Amati- Scale - 1:60 https://modelshipworld.com/index.php?/topic/10415-viking-ship-drakkar-by-jerry-finished-amati-scale-150/ Half Moon - Corel - Scale 1:50 https://modelshipworld.com/index.php?/topic/9065-half-moon-by-jerry-finished-corel-scale-150/&hl=%2Bhalf%2B%2Bmoon%2B%2Bcorel%2B%2Bjerry Bluenose- Model Shipways - Scale: 1:64 https://modelshipworld.com/index.php?/topic/13649-bluenose-by-jerry-model-shipways-scale-164/&hl=bluenose La Nina - Artesania Latina - Scale 1:65 COMPLETED...7-8-2017

Recommended Posts
Create an account or sign in to comment
You need to be a member in order to leave a comment
Create an account
Sign up for a new account in our community. It's easy!
Register a new accountSign in
Already have an account? Sign in here.
Sign In Now