stevenmh Posted March 7 #1 Posted March 7 (edited) Several years ago, at a Northeast Ship Model Conference, I had the chance to ask Chuck Passaro how he learned to do such amazing, and neat, hull planking. He came over and looked at the model I had brought to the conference (the Pride of Baltimore), replied with a "hmmmm" and said it had taken him a while to get it right, until he'd had his Ah-Ha moment (encouraging) and that I should keep working at it and I was sure to have my own ah-ha moment when it would all make sense and click into place (very encouraging). In the intervening years I have had several ah-ha moments, but none of them, I think, quite what Chuck had in mind. So I decided maybe this project would lead me closer to that moment. I decided to make a change to the kit, because as a novice I of course know better... but also because I wanted to get some practice with the kinds of wood I think I will be using as I move on to other models (and maybe one day my own scratch-build. So for the stem, keel, stern post and wales I decided to try using some cherry I have and will use Alaskan Yellow Ceder for the hull planking. I traced the stem and the forward end of the keel onto a piece of cherry, and cut it out and formed it using a scroll saw and sanding drums of various sizes that attach to my drill press. And just to enhance the learning curve I made a lap joint to connect the stem to the keel. The keel was an easy straight cut on the table saw - the kit keel has a curved section at one end to mate with the wider stem, I just included that in the stem I was making so the joint on my model will be slightly further aft that on the plan. As you can tell from the photos my stem needed some work to get both the width and the thickness correct. I finally glued the plan to a piece of foam core - some adhesive did bleed through the plan but the lines are not distorted so I think it is good to go. Once I'm sure the curves on my stem and keel mate properly with the provide keelson and stemson and I have cut out the rabbet my plan is with the rabbet. I did shave off about 1/8" from the aft end of the fore stemson to get the slots to line up with the plan. Edited March 7 by ccoyle corrected log title KARAVOKIRIS, palmerit, JacquesCousteau and 2 others 5 Current Build: Completed: USS Constitution Cross Section Pride of Baltimore 1:64 USS Cairo Blue Jacket Ships In the Yard: Half Moon Smoothbore Naval Deck Gun Brig Syren Medway Long Boat
JacquesCousteau Posted March 7 #2 Posted March 7 Nice start, the cherry looks great! mtaylor 1 Current Builds: Bateau de Lanveoc (1:32) [Scratch]; Muscongus Bay Lobster Smack (1:32) [Rescaled and modified from kit]; NRG Capstan (1:32) [Scratch] Completed Kit Builds: Model Shipways Dory (1:24); NRG Half-Hull (1:48); Midwest Peapod (1:14) Completed Scratch Builds: Xochimilco Trajinera (1:32); Juana y José Cross-Section (1:32); Chapala Canoa de Rancho (1:32); Lancha Chilota (1:32)
stevenmh Posted March 10 Author #3 Posted March 10 (edited) Thanks - I'm looking forward to seeing how the colors of these woods look together. One of the things that has not been clear to me is how deep the rabbet should be - is it just the hint of a slope into the keel and keelson, or does it extend well into the depth of the wood? I decided that it might be easier to deepen the notches in the keelson if I glued the keel and keelson to each other rather than onto the build board. This allowed me to use an x-acto knife, mini-chisel and files to extend the notches. They seem to need to go almost all the way through in order to get the bottom of the ribs to just above the rabbet, but now that the keelson is firmly glued to the keel it seems to work fine. I took a couple of frames out of the sheet and did some dry-fits into the keelson and the rabbet and they went together pretty well. I'll so this with all the frames before the glue comes out again. Edited March 10 by stevenmh JacquesCousteau, RossR, mtaylor and 2 others 5 Current Build: Completed: USS Constitution Cross Section Pride of Baltimore 1:64 USS Cairo Blue Jacket Ships In the Yard: Half Moon Smoothbore Naval Deck Gun Brig Syren Medway Long Boat
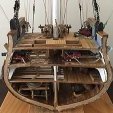
stevenmh Posted March 21 Author #4 Posted March 21 Thanks for visiting and the likes Only a little bit of progress, spending time to read the instructions and other logs. Got the backbone glued into place on the build board and dry-fitting the ribs. Then glued in the dead flat rib for real. Should have time this weekend to glue the rest of the ribs, then on to the deadwood bearding line... JacquesCousteau and KARAVOKIRIS 2 Current Build: Completed: USS Constitution Cross Section Pride of Baltimore 1:64 USS Cairo Blue Jacket Ships In the Yard: Half Moon Smoothbore Naval Deck Gun Brig Syren Medway Long Boat

Recommended Posts
Create an account or sign in to comment
You need to be a member in order to leave a comment
Create an account
Sign up for a new account in our community. It's easy!
Register a new accountSign in
Already have an account? Sign in here.
Sign In Now