Tiger65
-
Posts
28 -
Joined
-
Last visited
Content Type
Profiles
Forums
Gallery
Events
Everything posted by Tiger65
-
GrandpaPhil, that's the type of boat I'm thinking about. Maybe that Armed Virginia Sloop.
-
Thanks for all the positive comments. Paul, I am struggling with what's next. I really don't look forward to starting one of the big ships but I have done most of the smaller boats. Maybe some rum or grog will clarify things. Thanks again for the compliments.
-
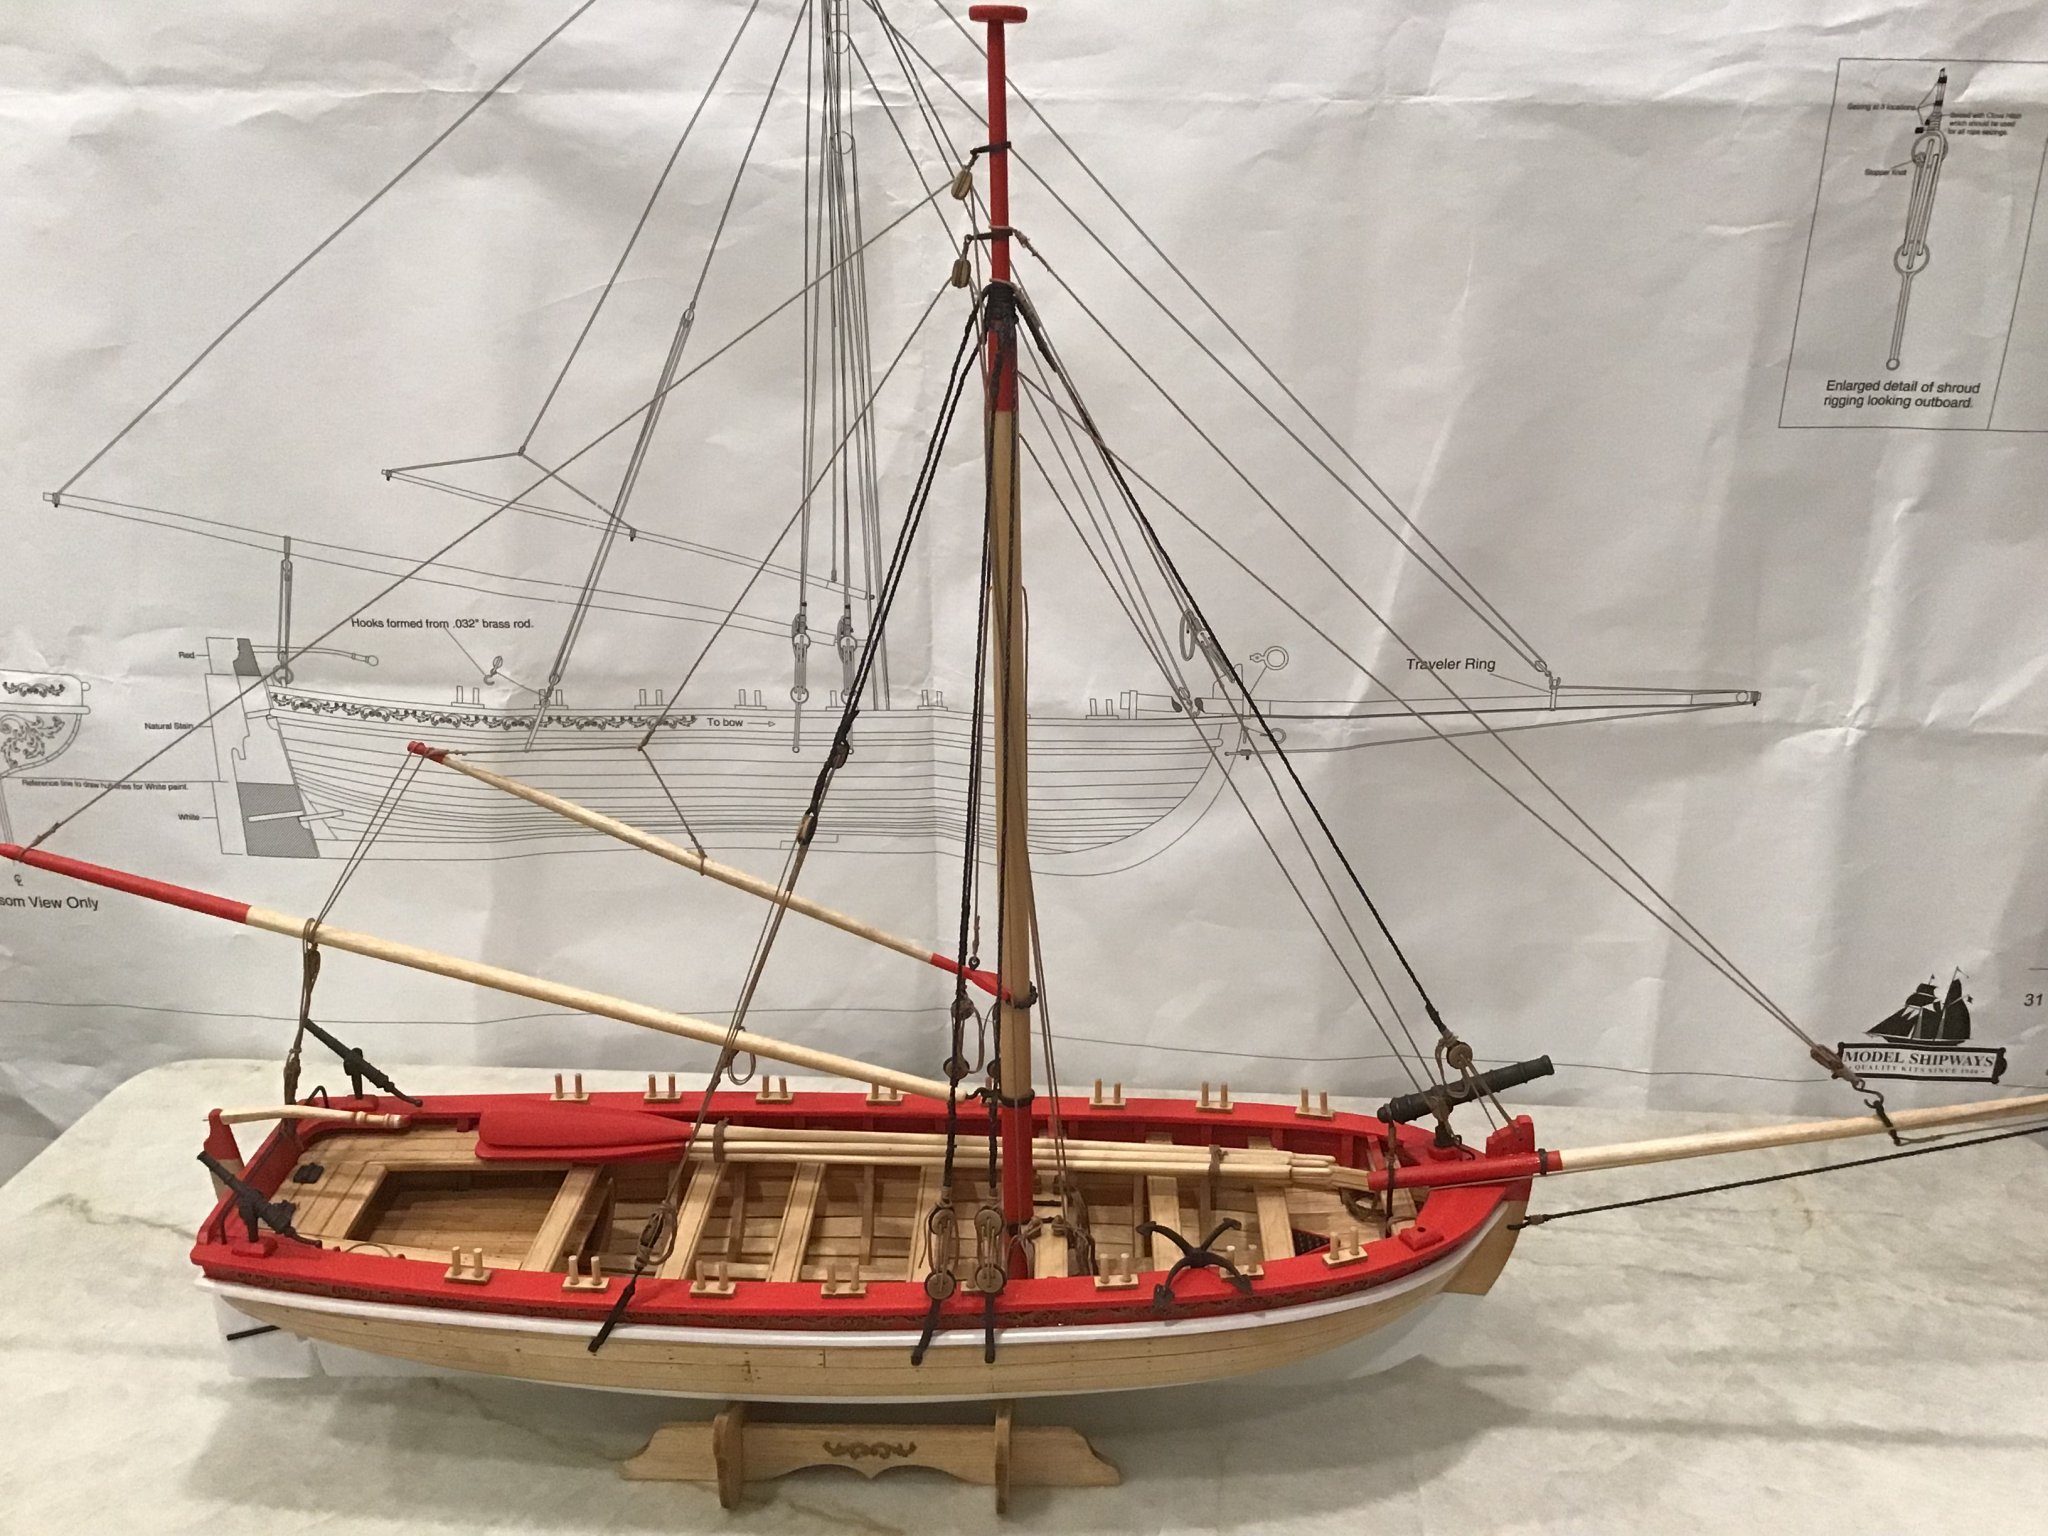
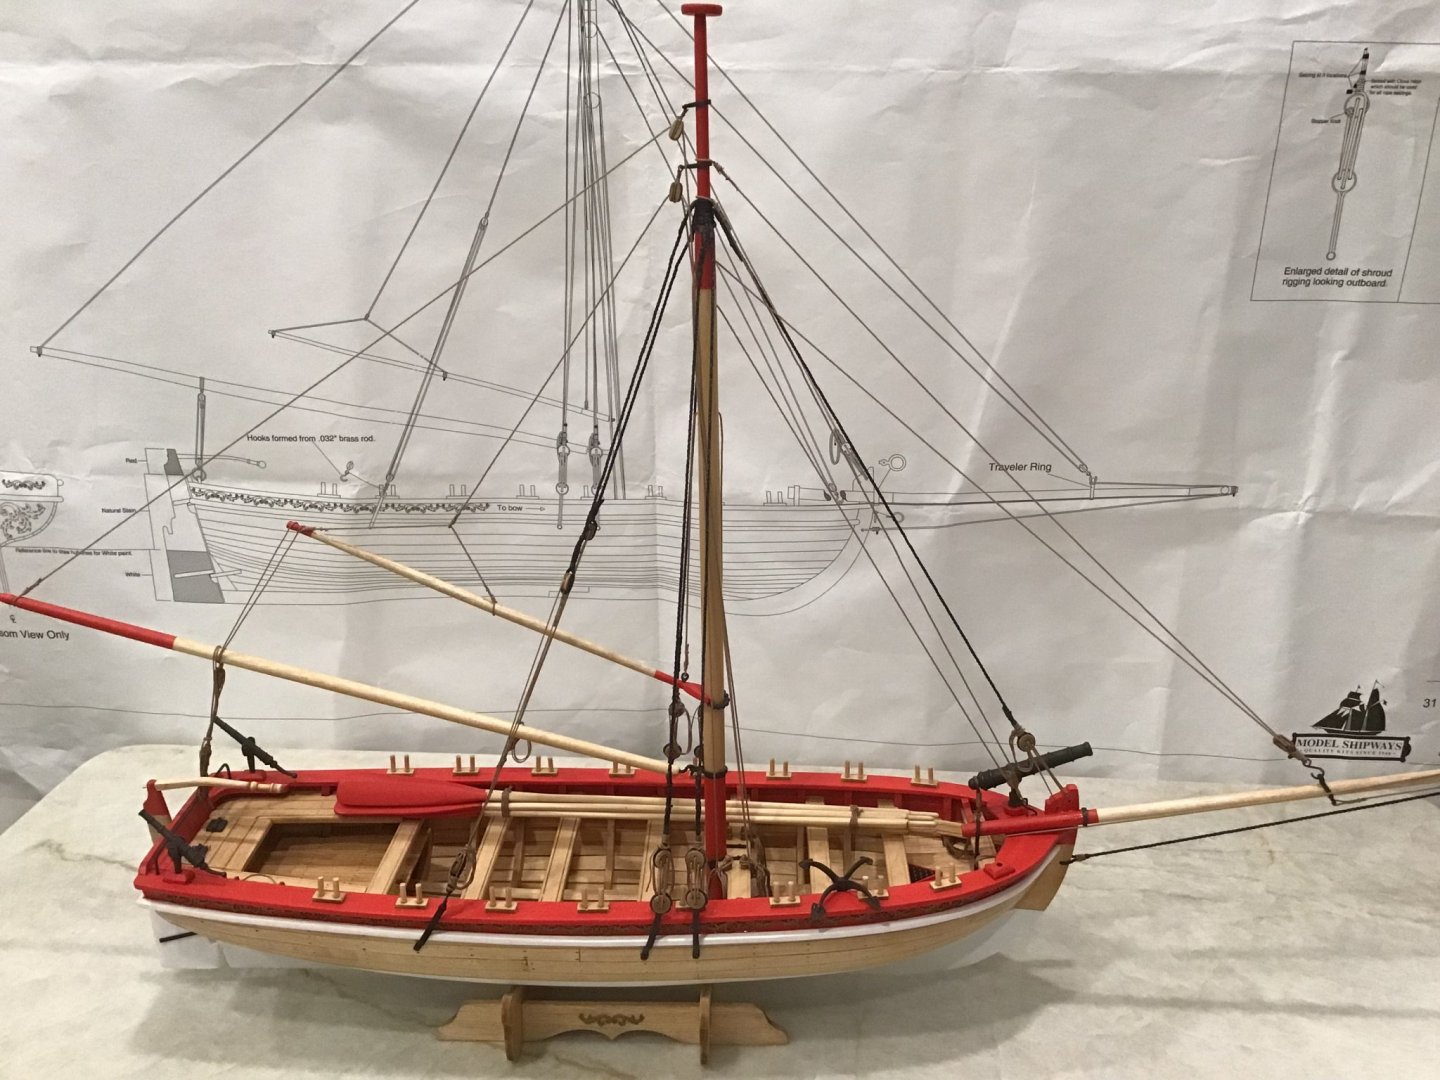
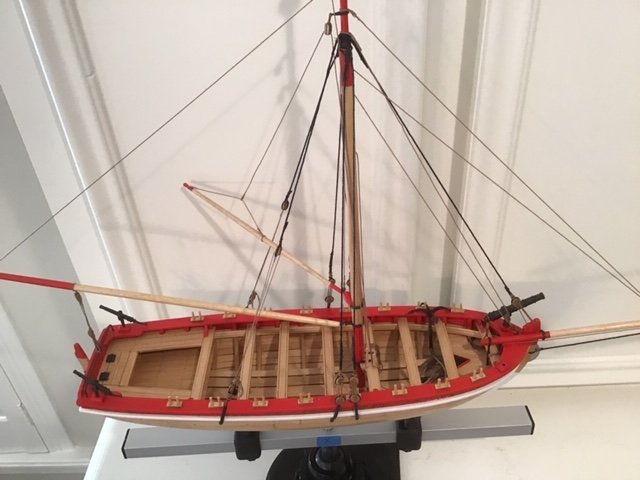
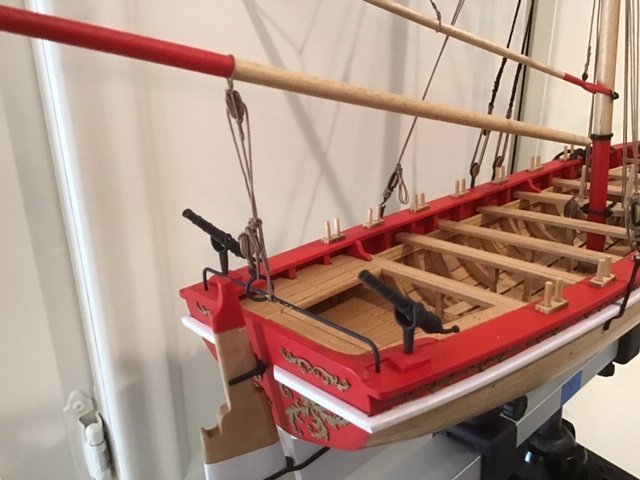
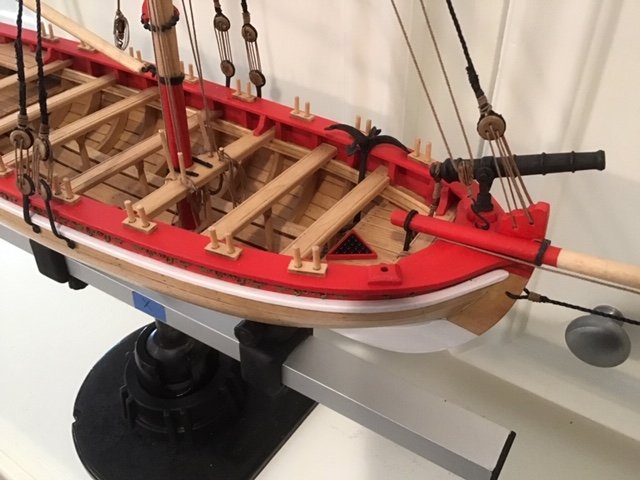
Ok, here's the finished product--or at least as finished as I can get it. Lots flaws but I won't point them out. Many thanks to Arthur Wayne and Dr. Ps. They were both ahead of me and I used much of their insight and copied many of their approaches. Thanks also to all who watched and commented.

- 43 replies
-
- 6
-

-

-
- 18th Century Armed Longboat
- Model Shipways
- (and 1 more)
-
Thanks Arthur but I have ordered the 14mm's, based on your earlier post. I am somewhat disappointed in the kit details on this boat. MS missed several items, some of which I remember as: mis-naming some of the metal work, wrong size mast or wrong size mast accessories and wrong size rope. I haven't noticed these issues on other MS kits.
-
Thanks to all for the compliments. I will post more photos after I clean up the last details.
-
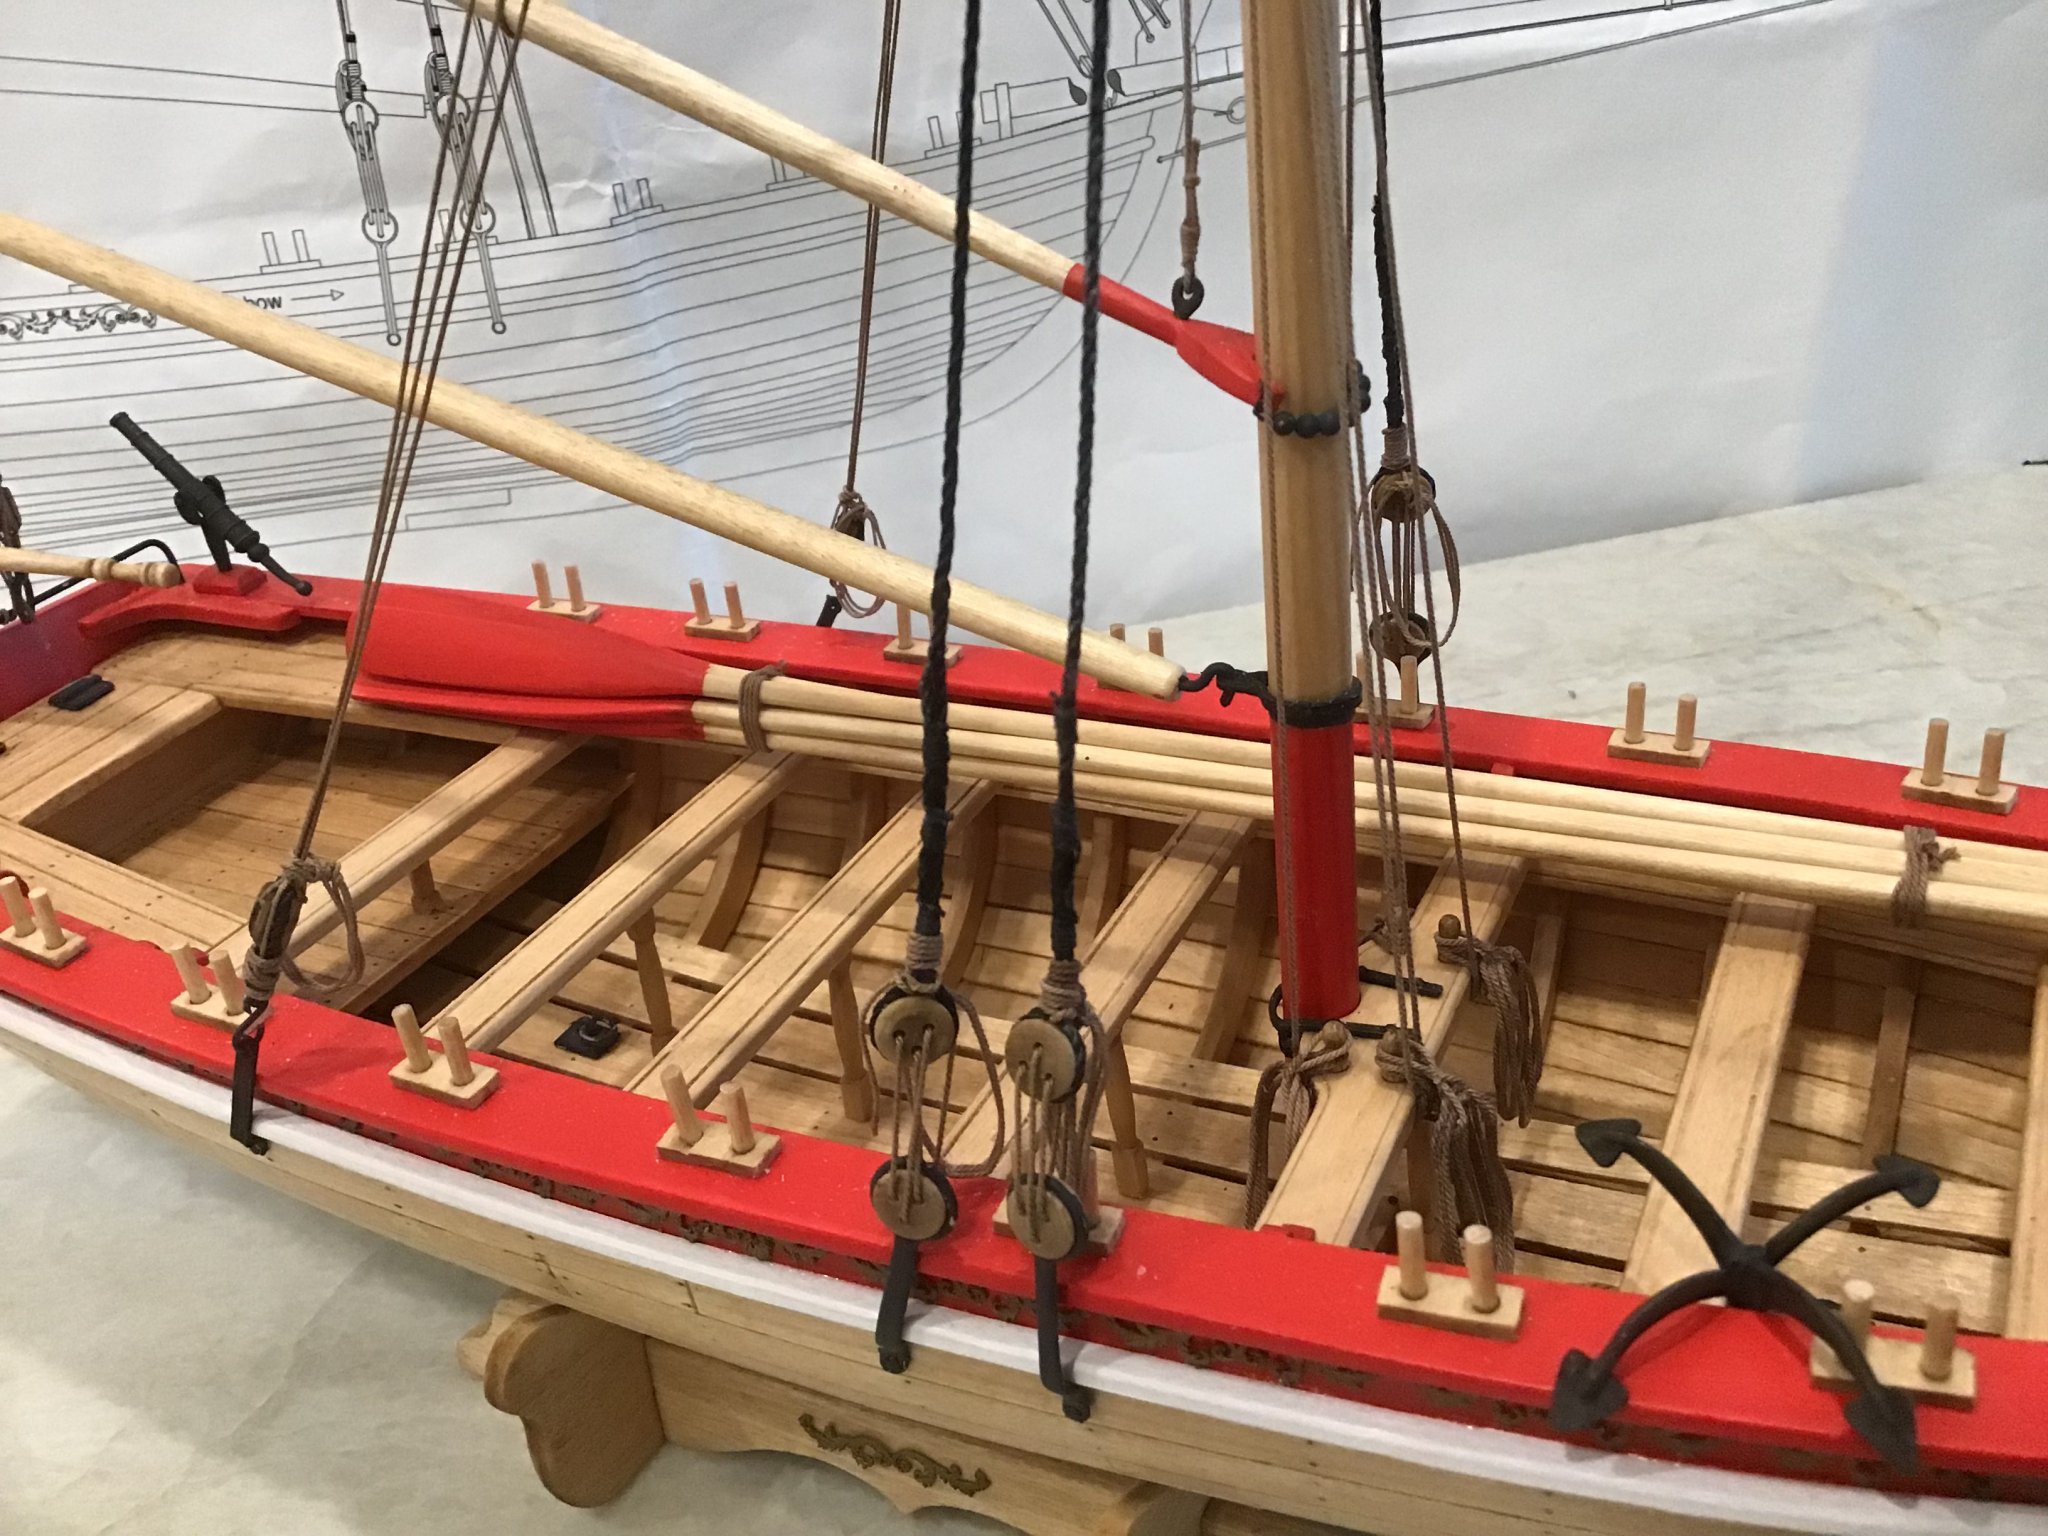
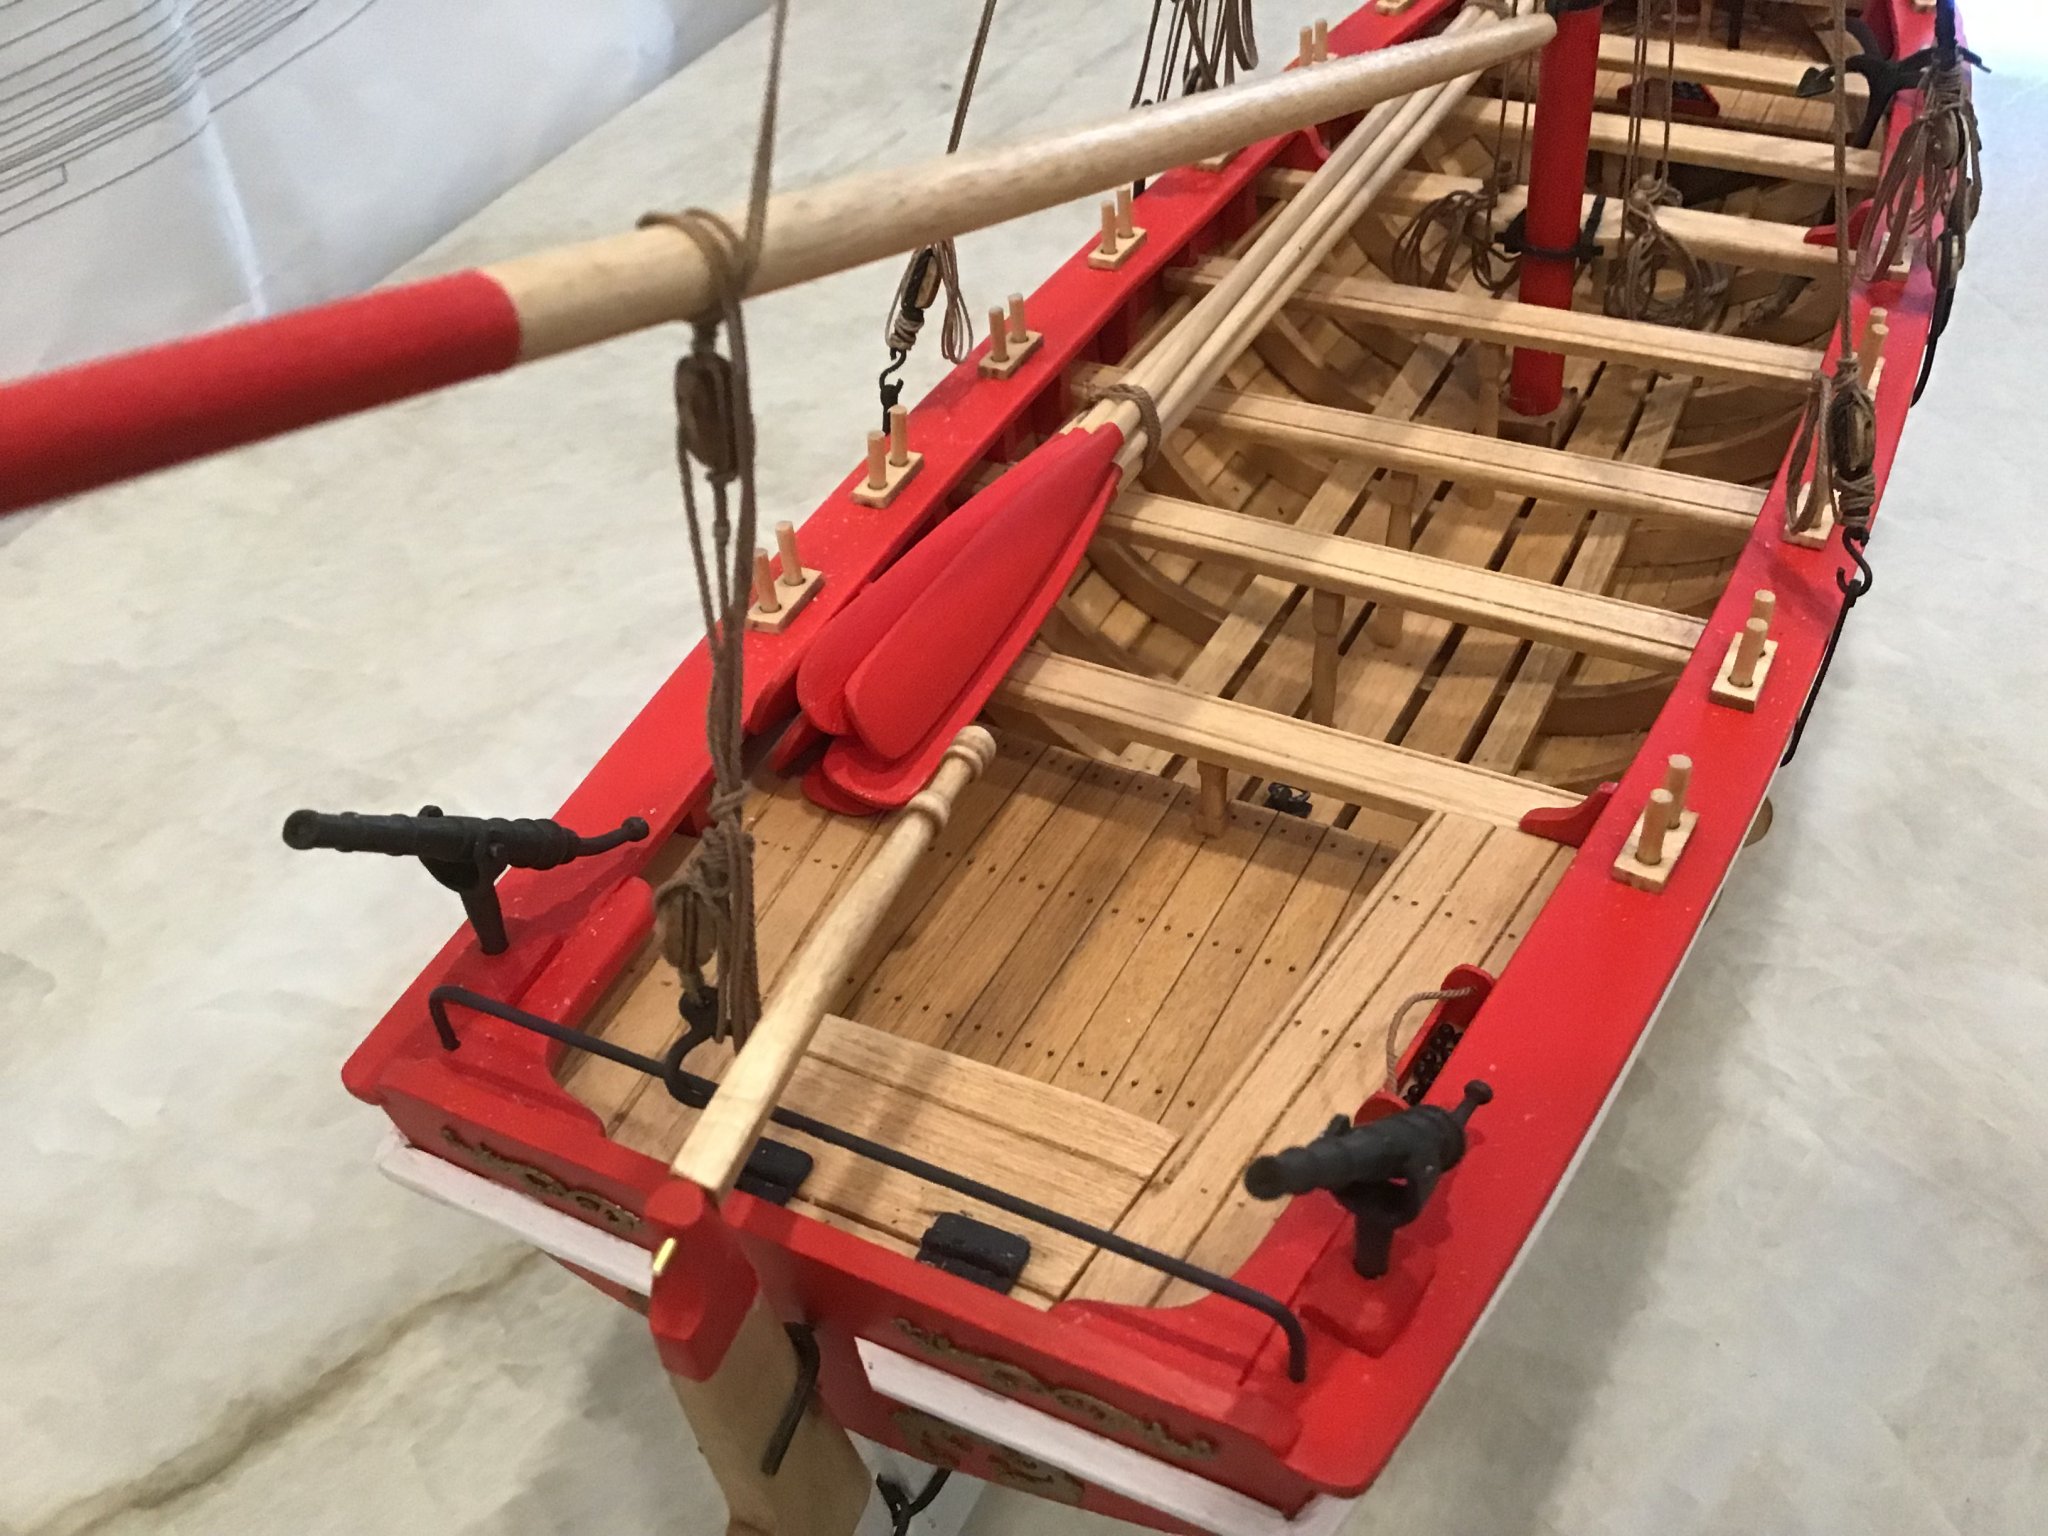
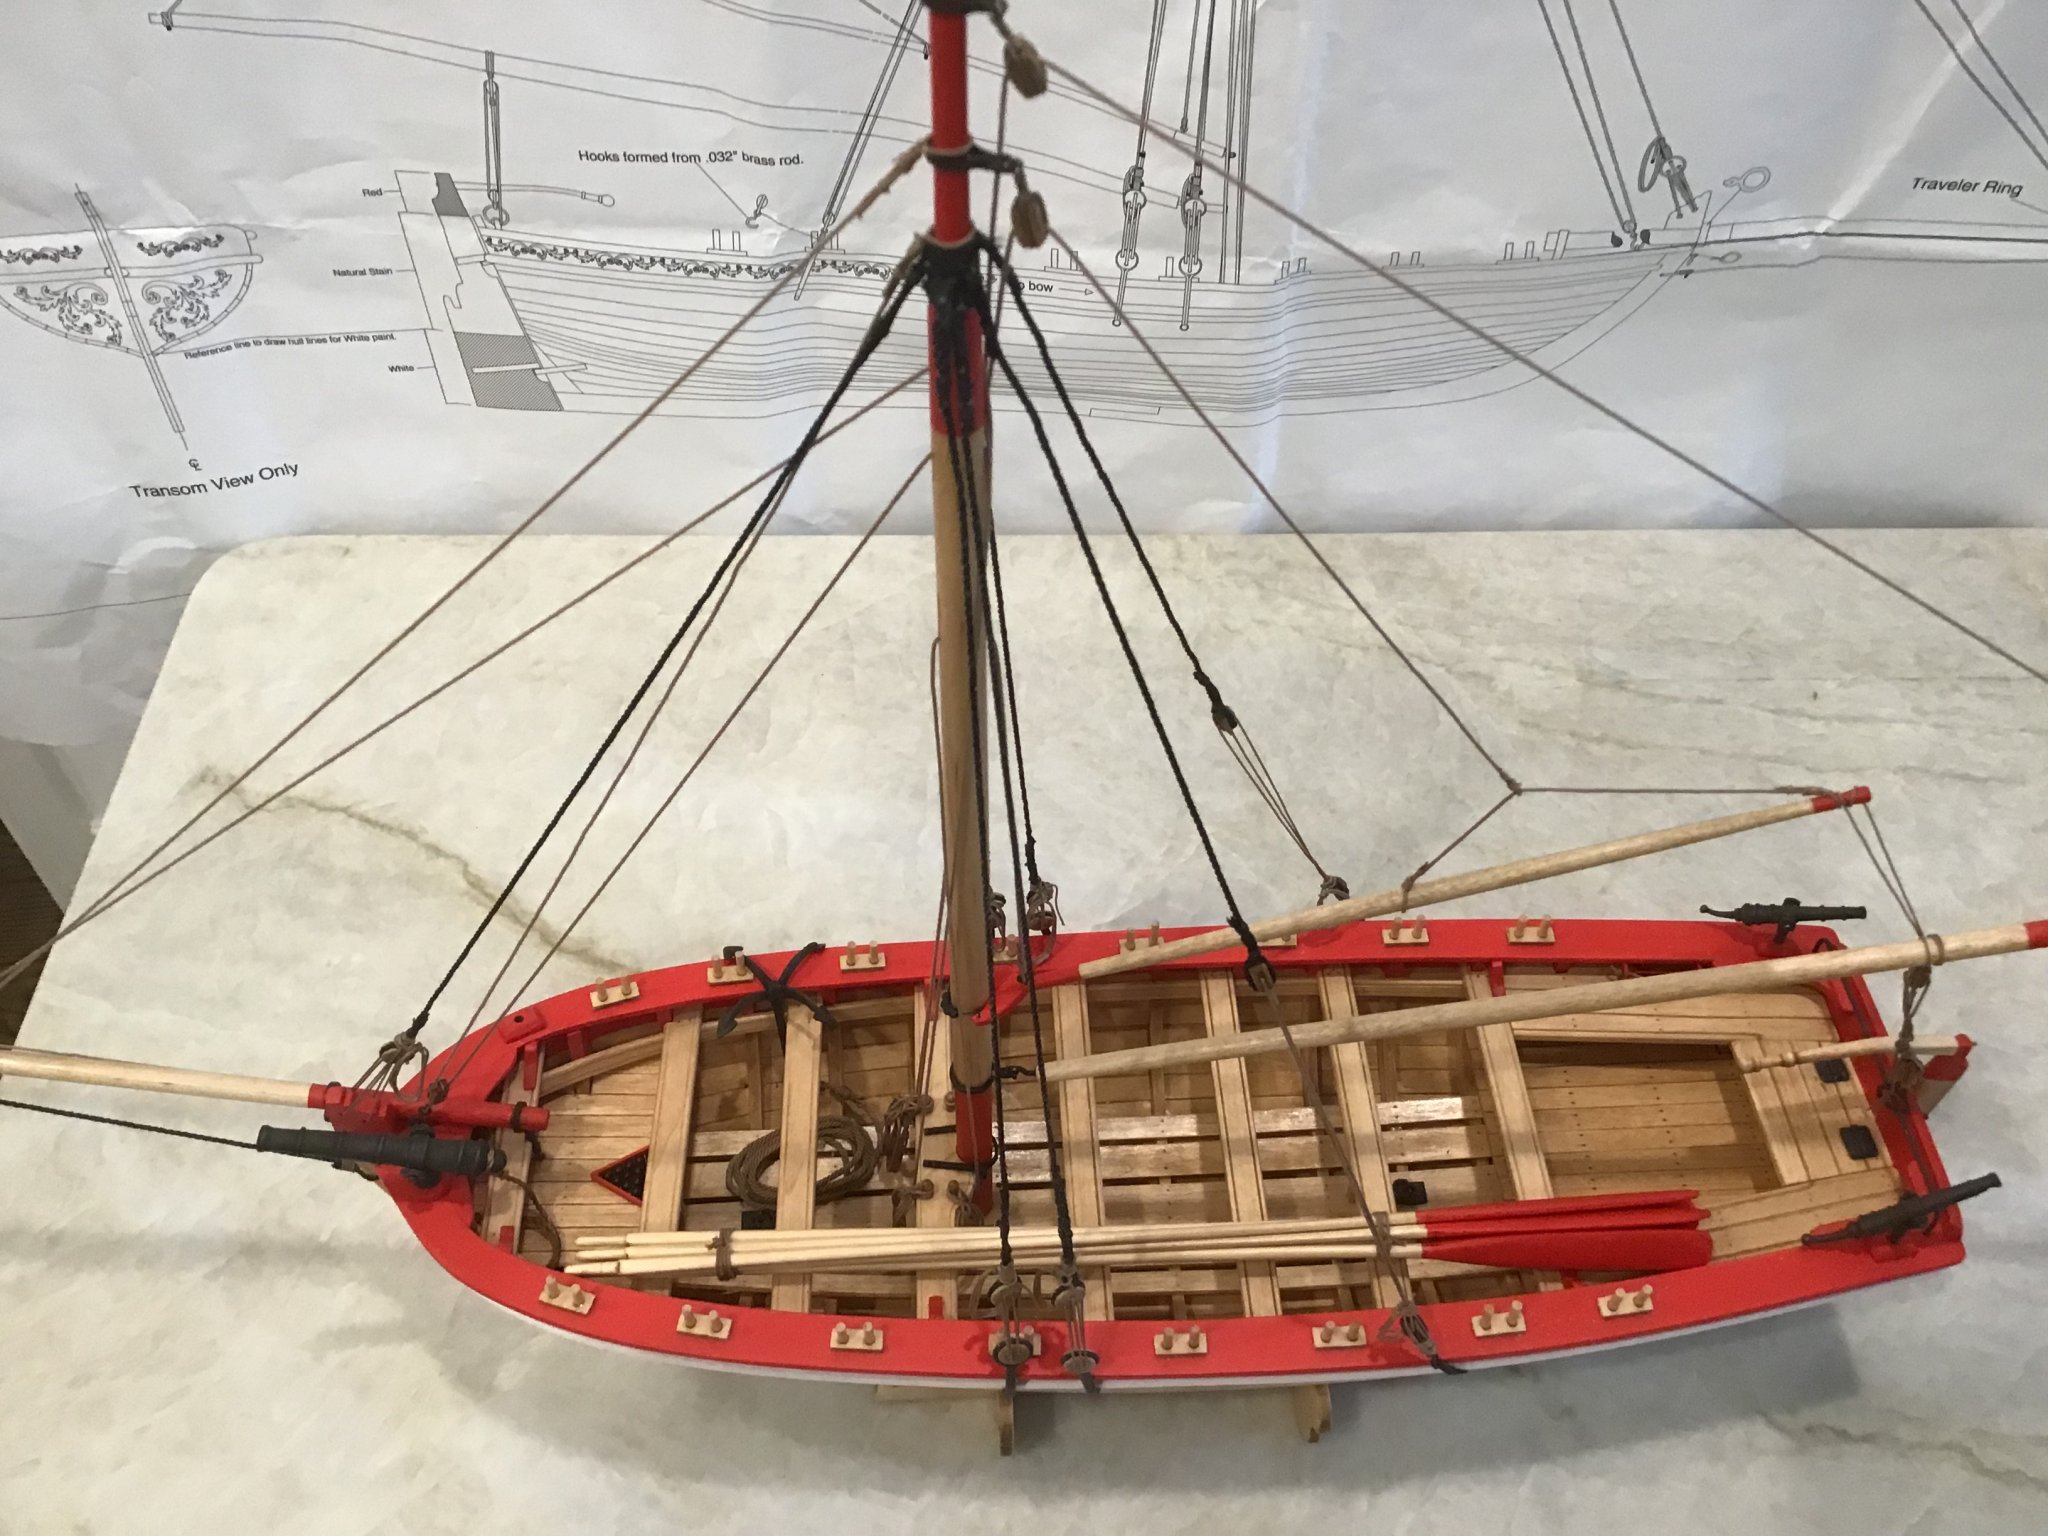
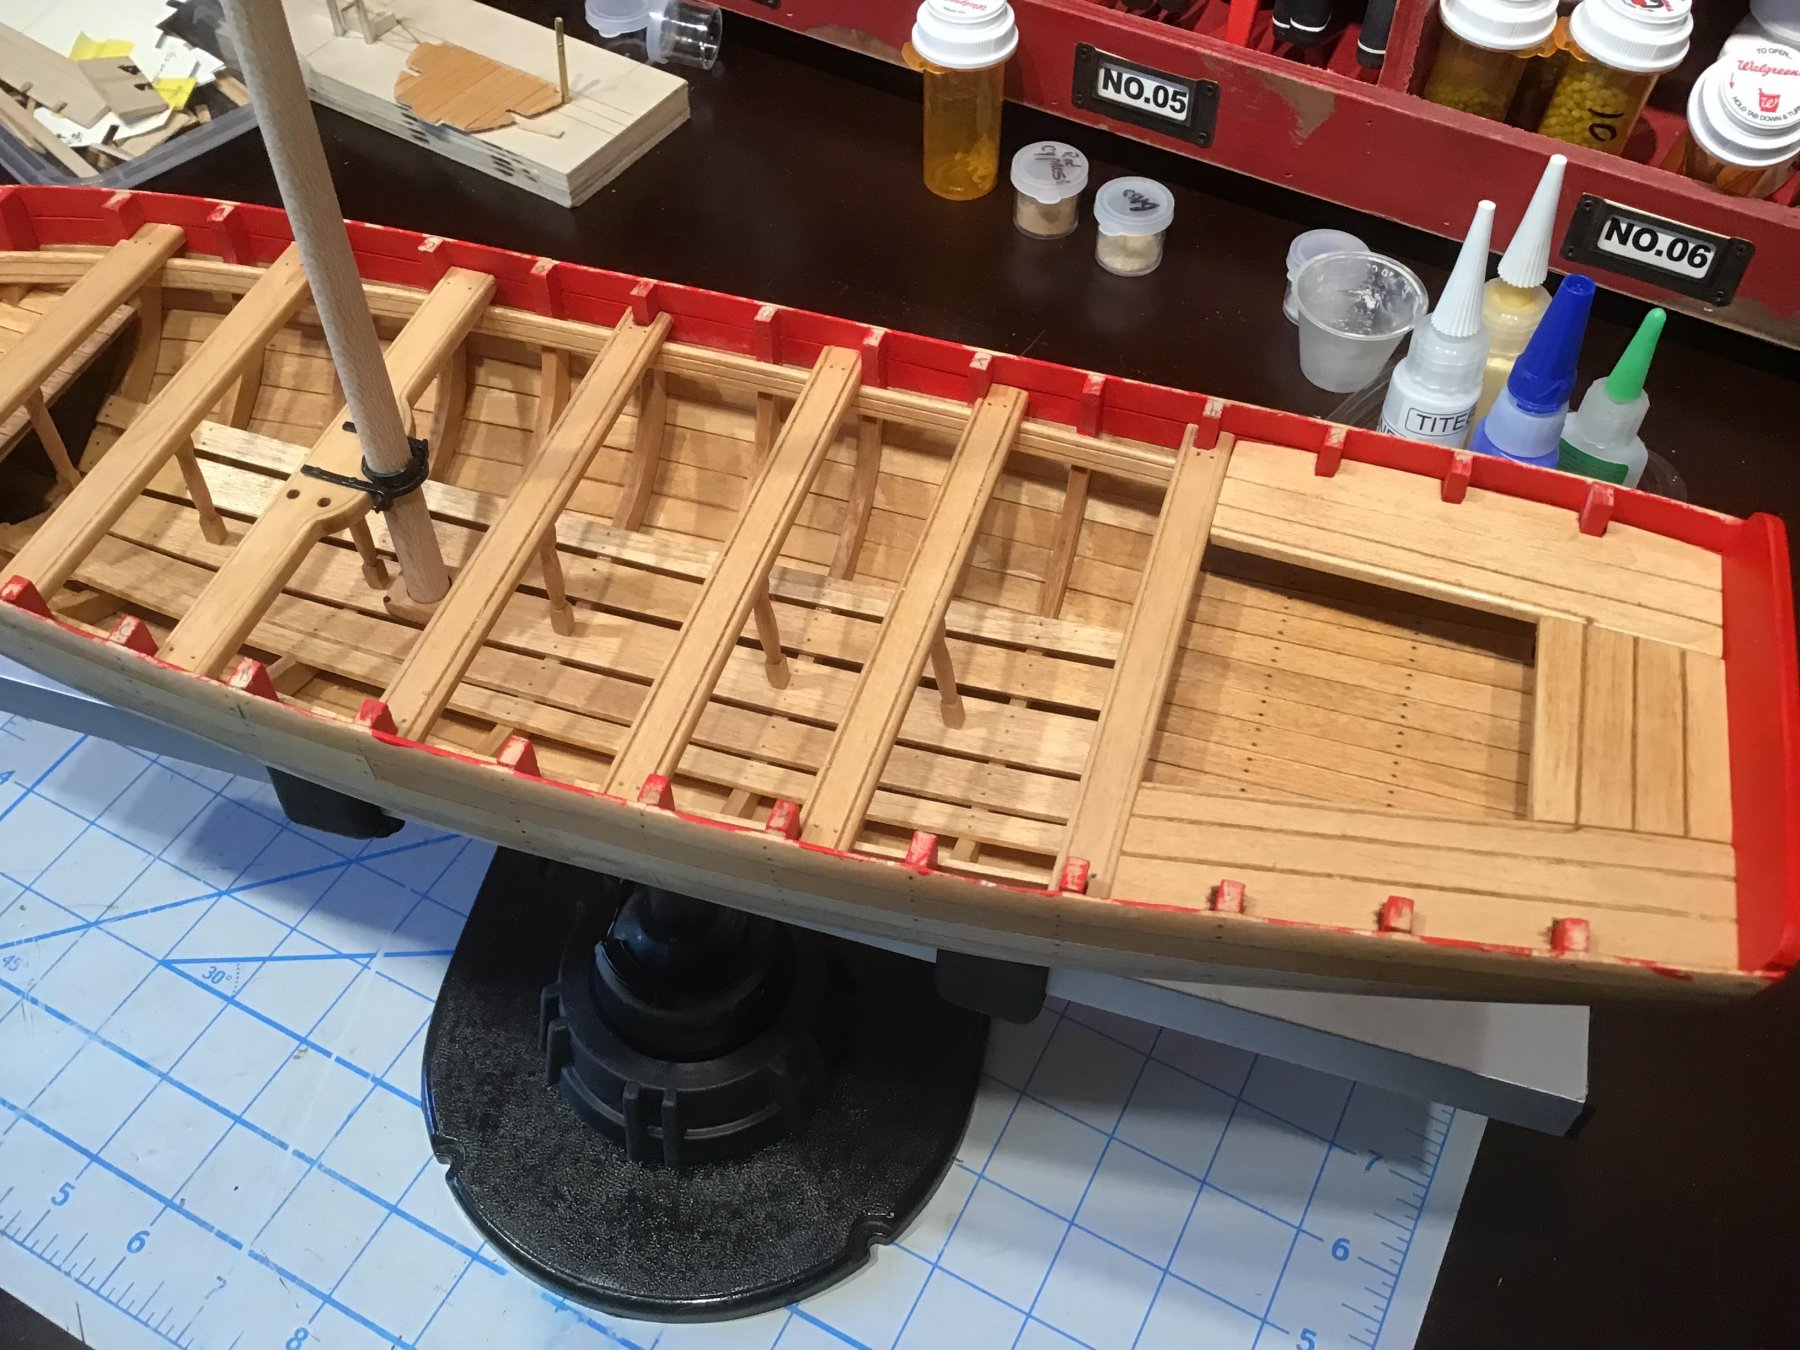
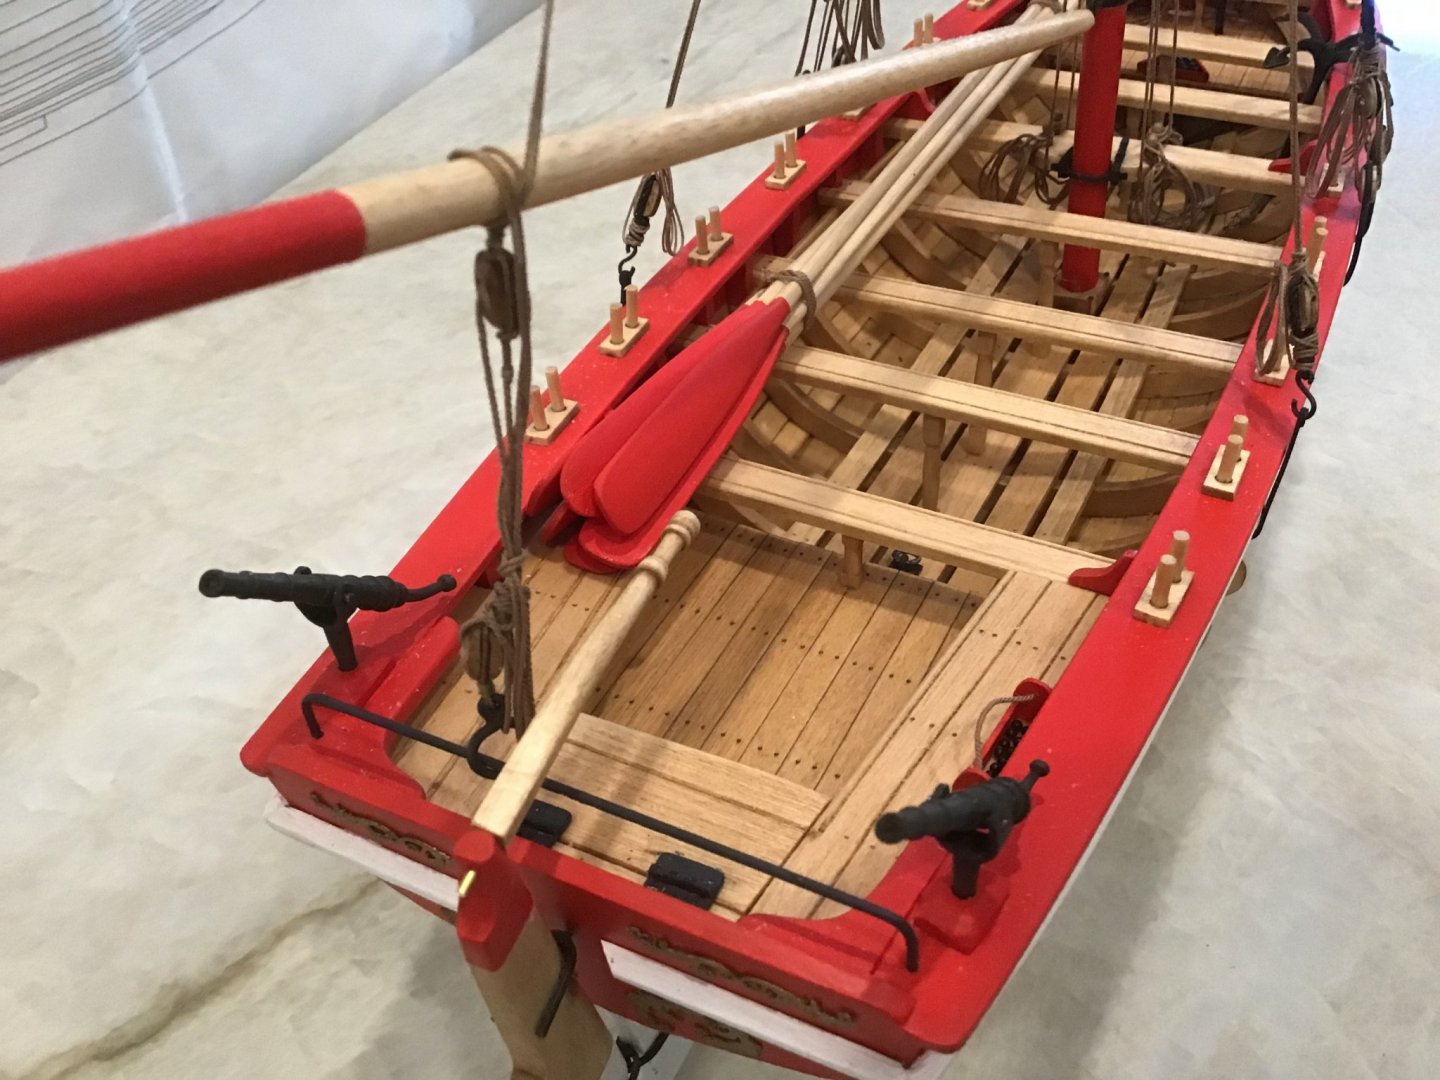
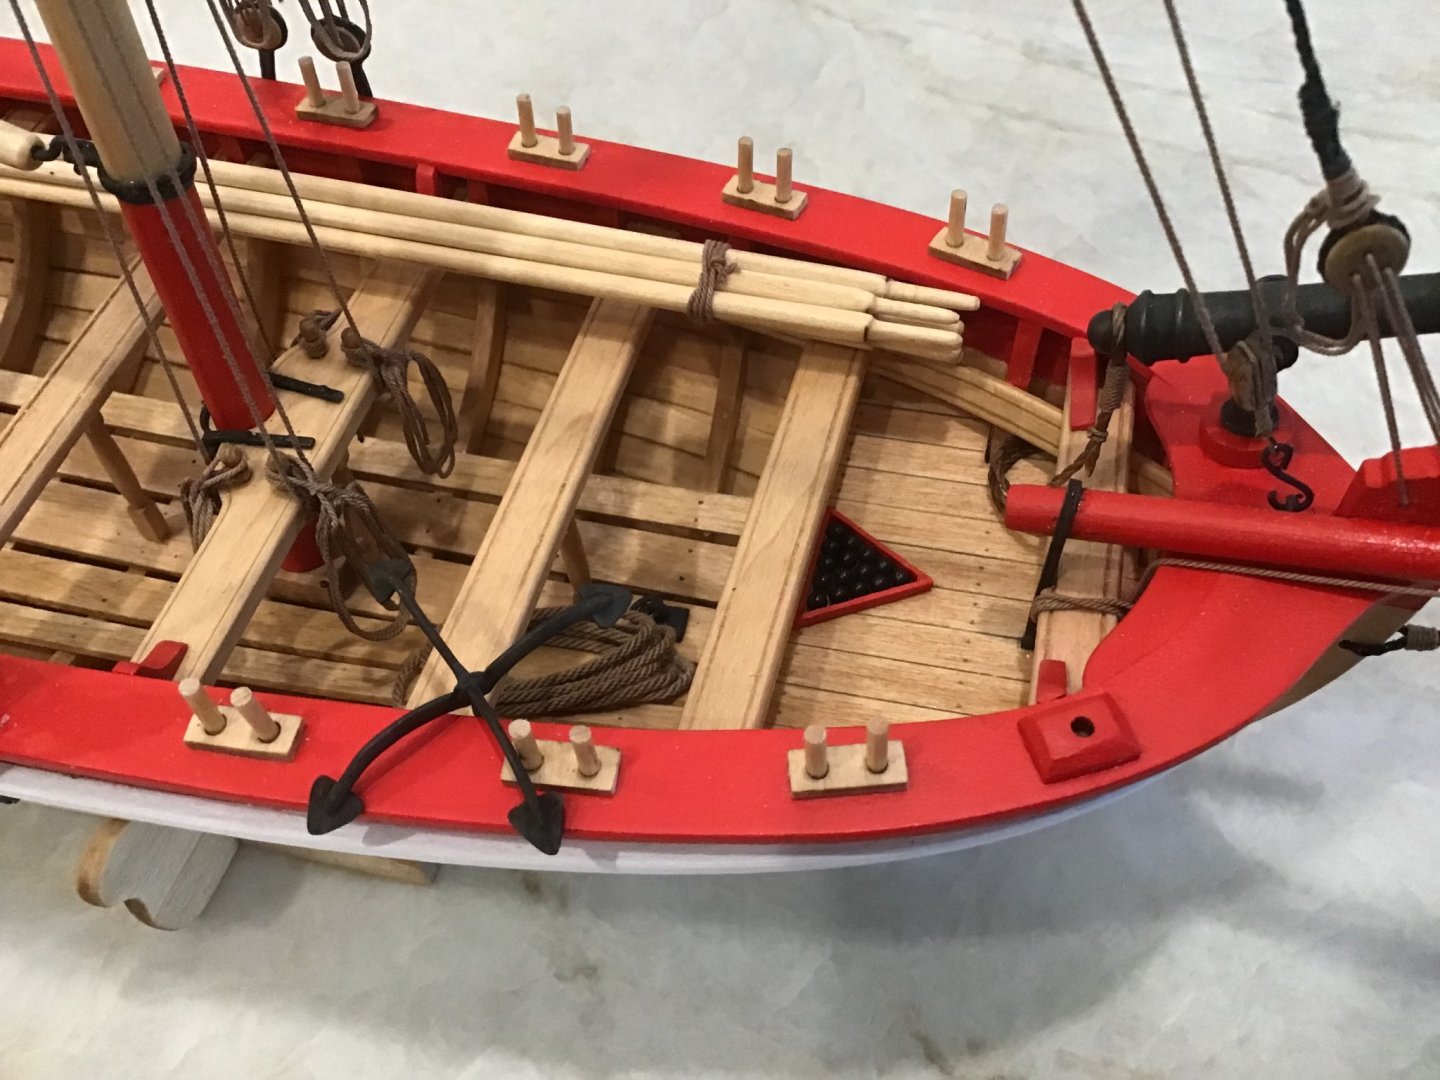
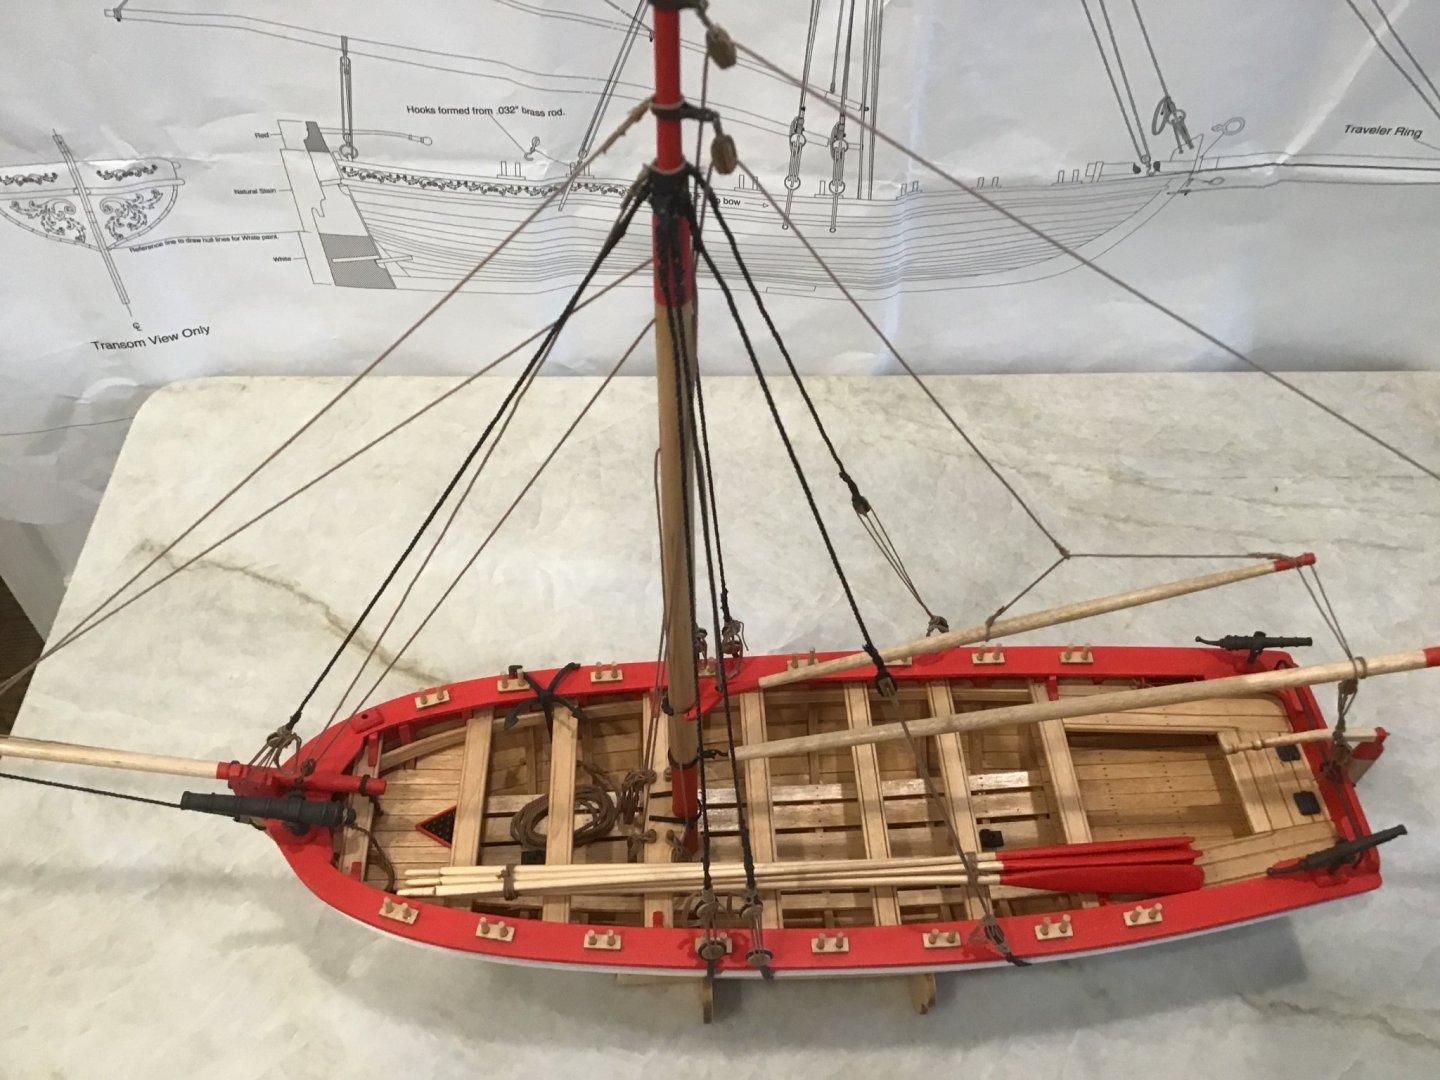
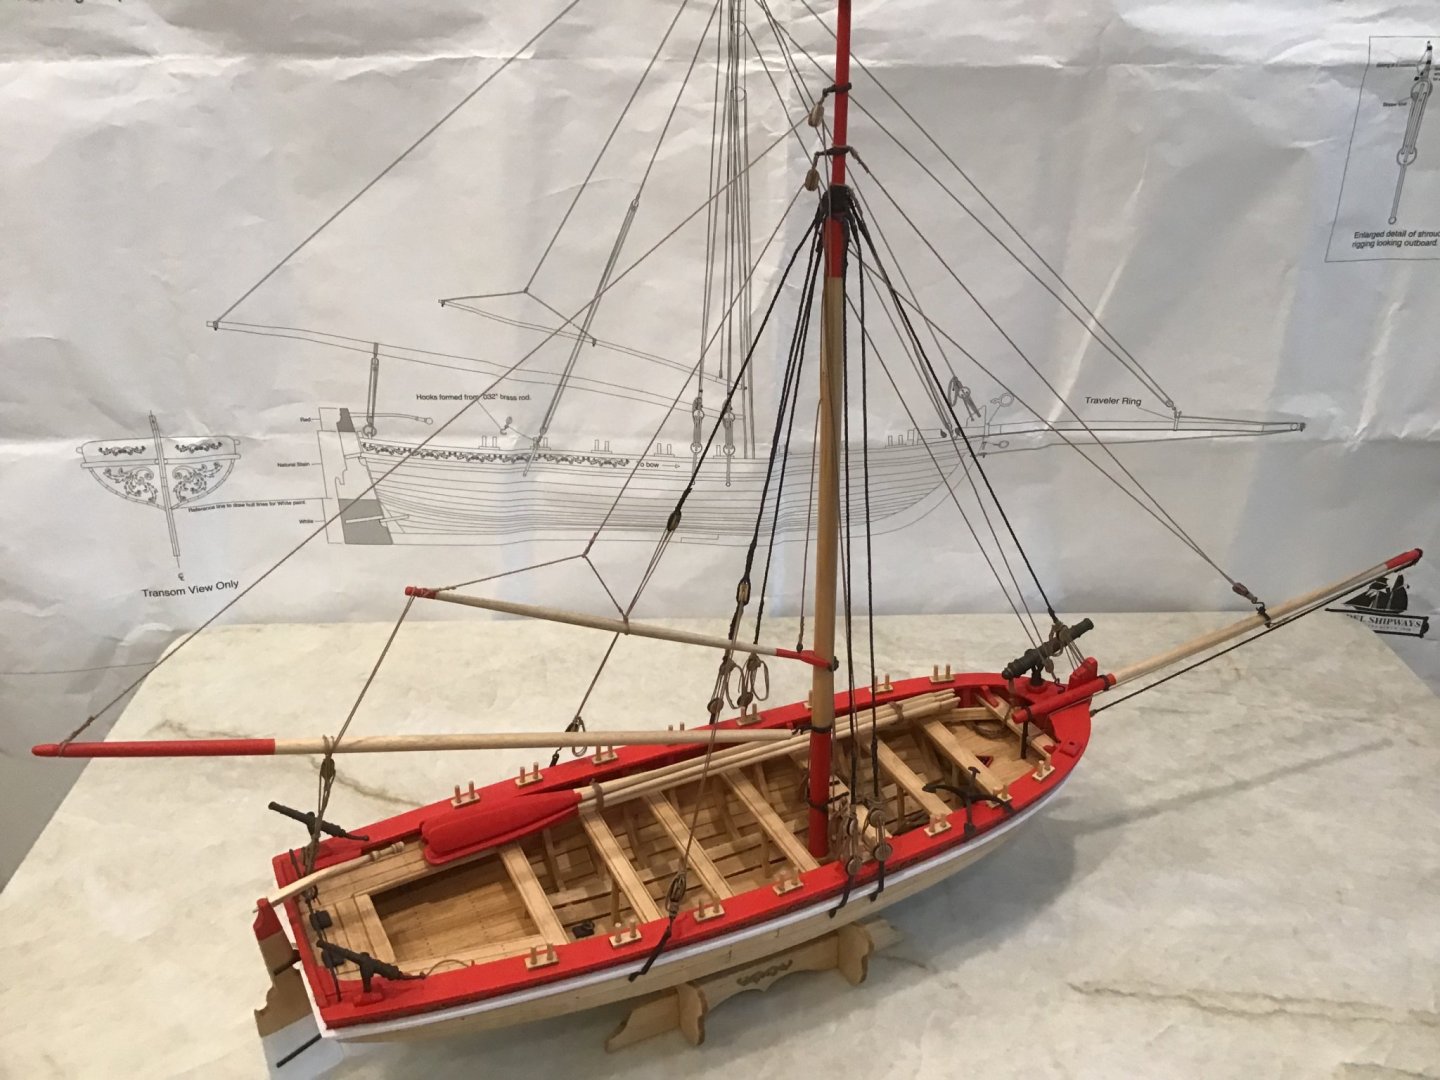
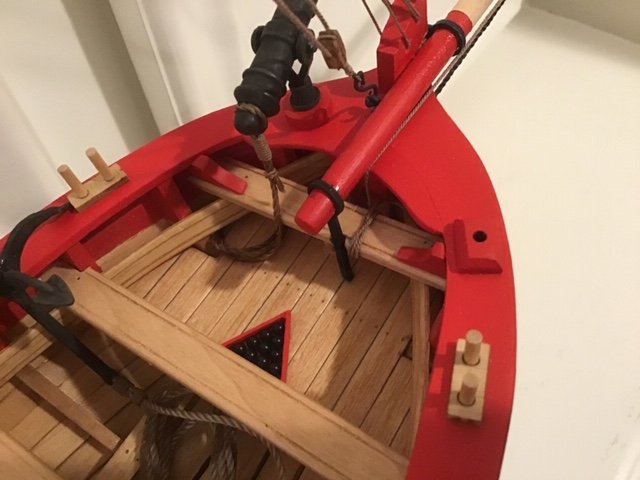
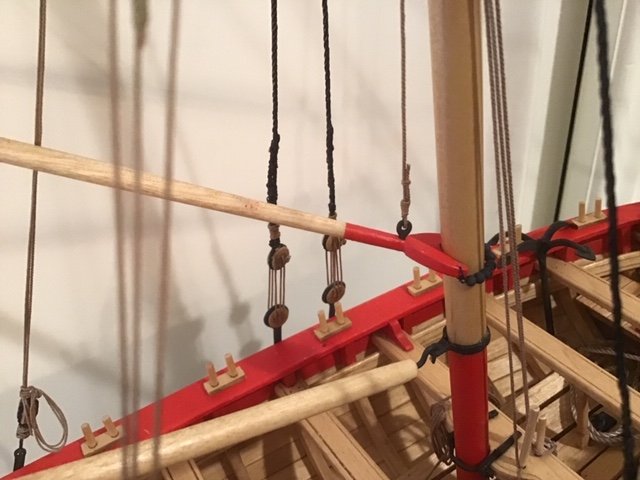
Ok, I’ve pretty much finished the rigging but ran into several issues. First, I elected to use a 3/8 dowel for the mast. That simplified some of the fitment issues on the thwart and the iron strap. That seemed to work fine and mounting of the mast was straight forward. I used the kit chain plates and deadeyes. I sanded the blocks and deadeyes but probably did not work them as completely as some of the other builders have. I used the kit supplied black rope for the shrouds and seized them with the black thread. The You-tube video by J. Brent on seizing was very instructive and I used his technique throughout. In many cases the kit instructions called for clove hitch knots to terminate lines but in most cases I seized those lines also. I don’t know what is period correct in all cases but I just like the look of the seizing. Like others have noted, none of the line in the kit would fit through the blocks and deadeyes so I used line from Syren. I used light brown .63mm for most of the rigging, .45mm for the deadeyes, and .20mm for seizing. However, if you look closely I varied from this formula occasionally. The shrouds, backstays and forestay went fairly well. I may have done too much seizing on these lines and they don’t lay as well on the mast head as I would like. Moving on to the Bowsprit I took a different approach to the “square hole in the deck” challenge. I measured the height of the post ring to the deck, clamped the bowsprit post legs together and filed them round, leaving a shoulder at the proper height. Then I notched the thwart and drilled a hole in the deck. With the post in the hole up to the shoulder it appears like a tight fitting square hole in the deck. That was one of my few victories. When I drilled the hole in the stem for the bowsprit brace I managed to split the edge stem at the hole. I could not come up with a good fix for this error so I had to resort to just gluing the bowsprit to the stem and the deck. This continued to give me fits because I knocked the bowsprit loose several times during the rigging process. I used the kit traveler ring for the boom. Others followed more exotic approaches but my creativity is waning. My next problem was the gaff. Because I used a 3/8” mast, the gaff jaws were too small. Of course I did not notice this until I was ready to mount the gaff. There did not seem to be a way to correct this problem so I remade the gaff and cut new jaws using the plans as a pattern. I rough cut the jaws on a jigsaw and sanded them into final shape. I actually succeeded on my first try, which surprised me. Drilling the holes for the parrel beads was another challenge. I had hoped to make bigger holes to allow for heavier line but could not do so. I ended up just using black thread on the beads. After the gaff fiasco the rest of the rigging went reasonably well. I followed Arthur Wayne’s idea on the decorative brass and put several coats of brass spray paint on the decorations before mounting them. I think this gives the scroll work more depth and realism. I have essentially finished the rigging and most of the model. I still have some rope coils to make. I’m trying to follow Tom Lauria’s You-tube instructions for making rope hanks but I’m having to work on my technique. Like others I find the belaying pins too small for the holes in the thwart. I have ordered some wooden pins from MS. For the cannon ball rack I found some thin, transparent double sided tape that my wife had for some project. That worked to hold the balls in the rack and also held the rack to the deck. I still have the paddles to make and the barrel to paint. I chose to leave out the windless. I couldn’t generate the enthusiasm to carve it out. More later.

- 43 replies
-
- 6
-
-
- 18th Century Armed Longboat
- Model Shipways
- (and 1 more)
-
Looks good Sea Hoss. I am about at the same stage but continue to make blunders that set me back a few days. I need to post again soon. I enjoy having someone just ahead of me. Always a learning experience.
-
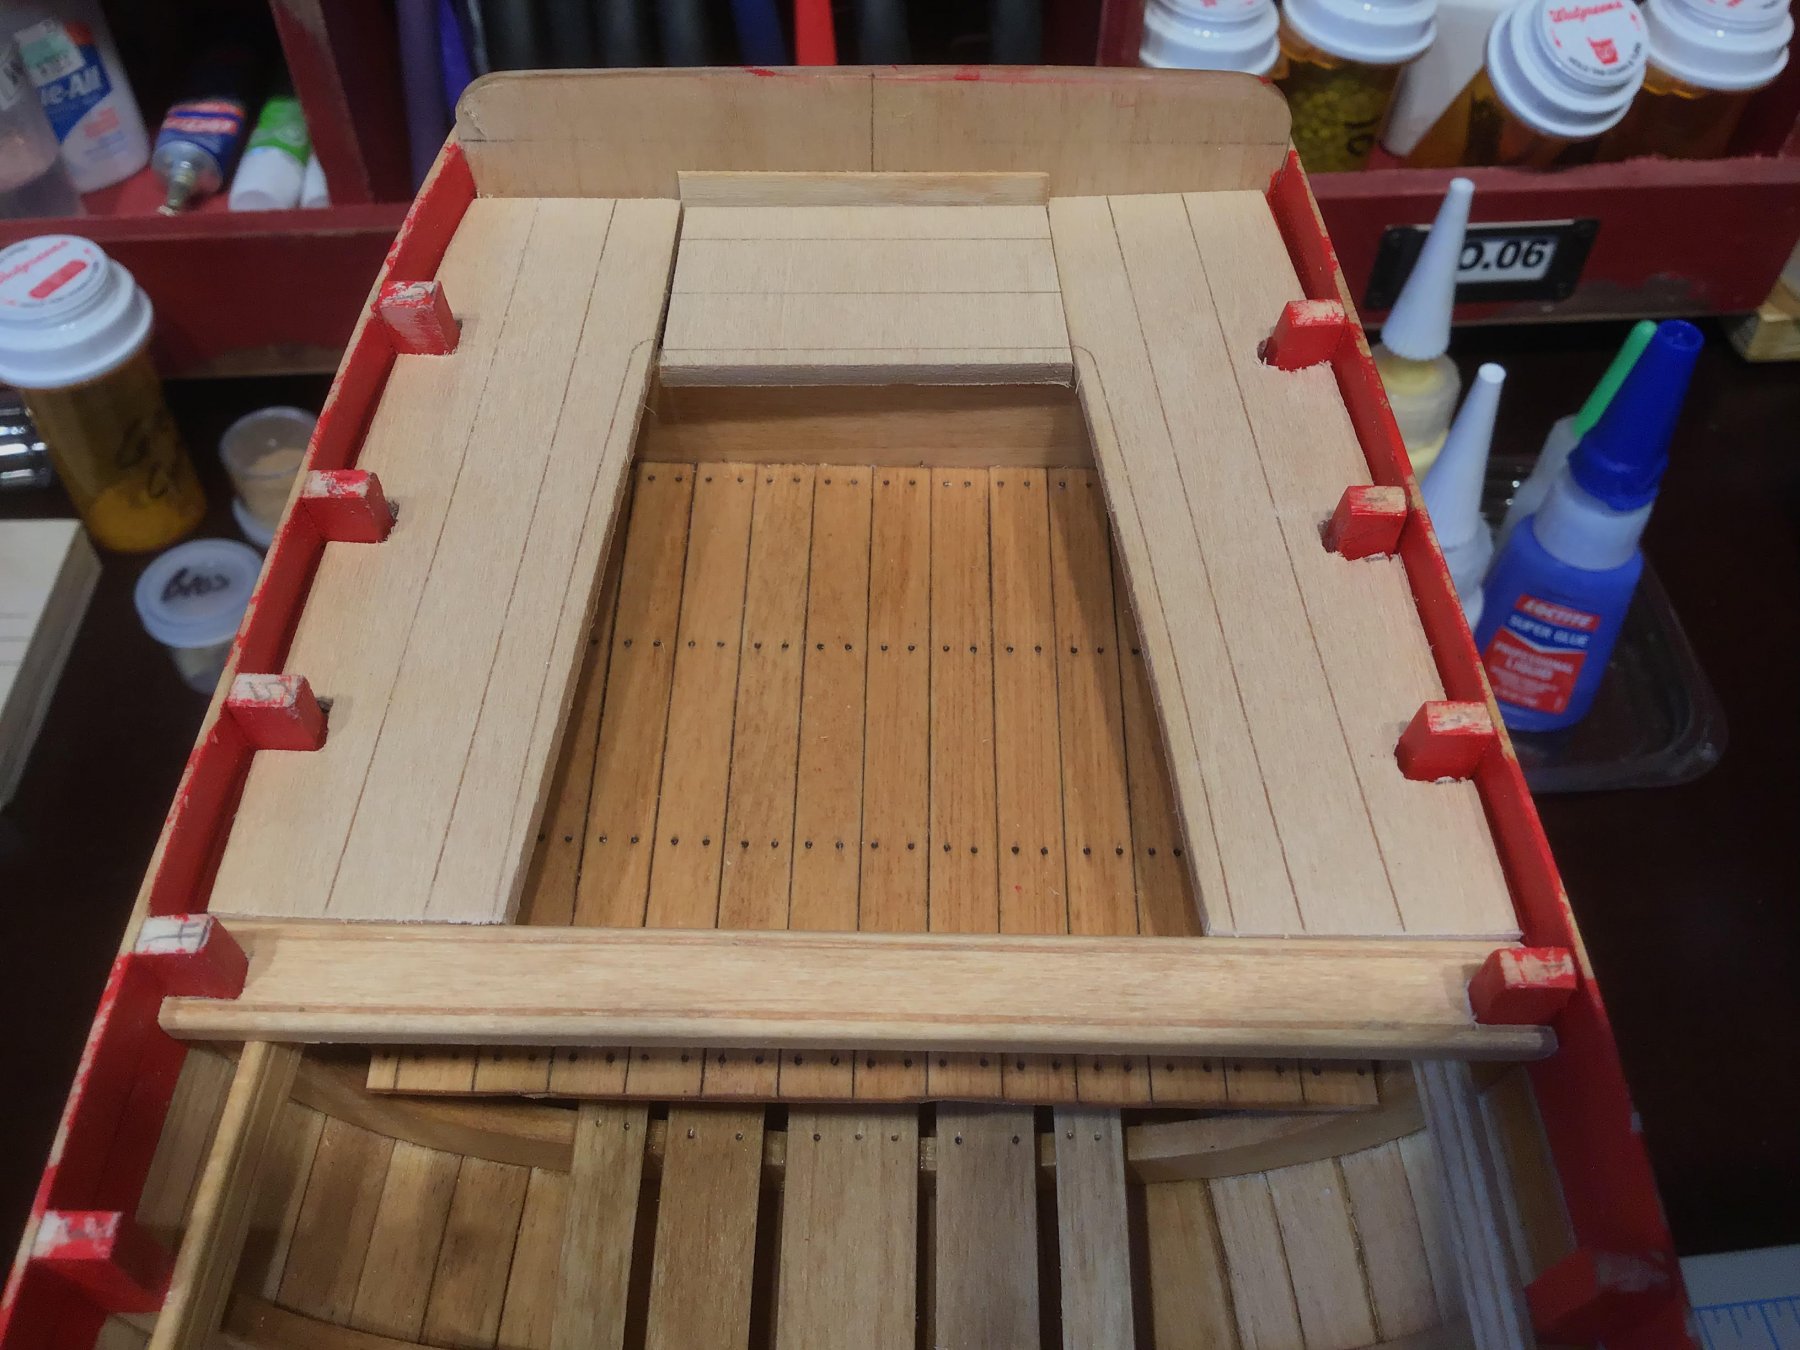
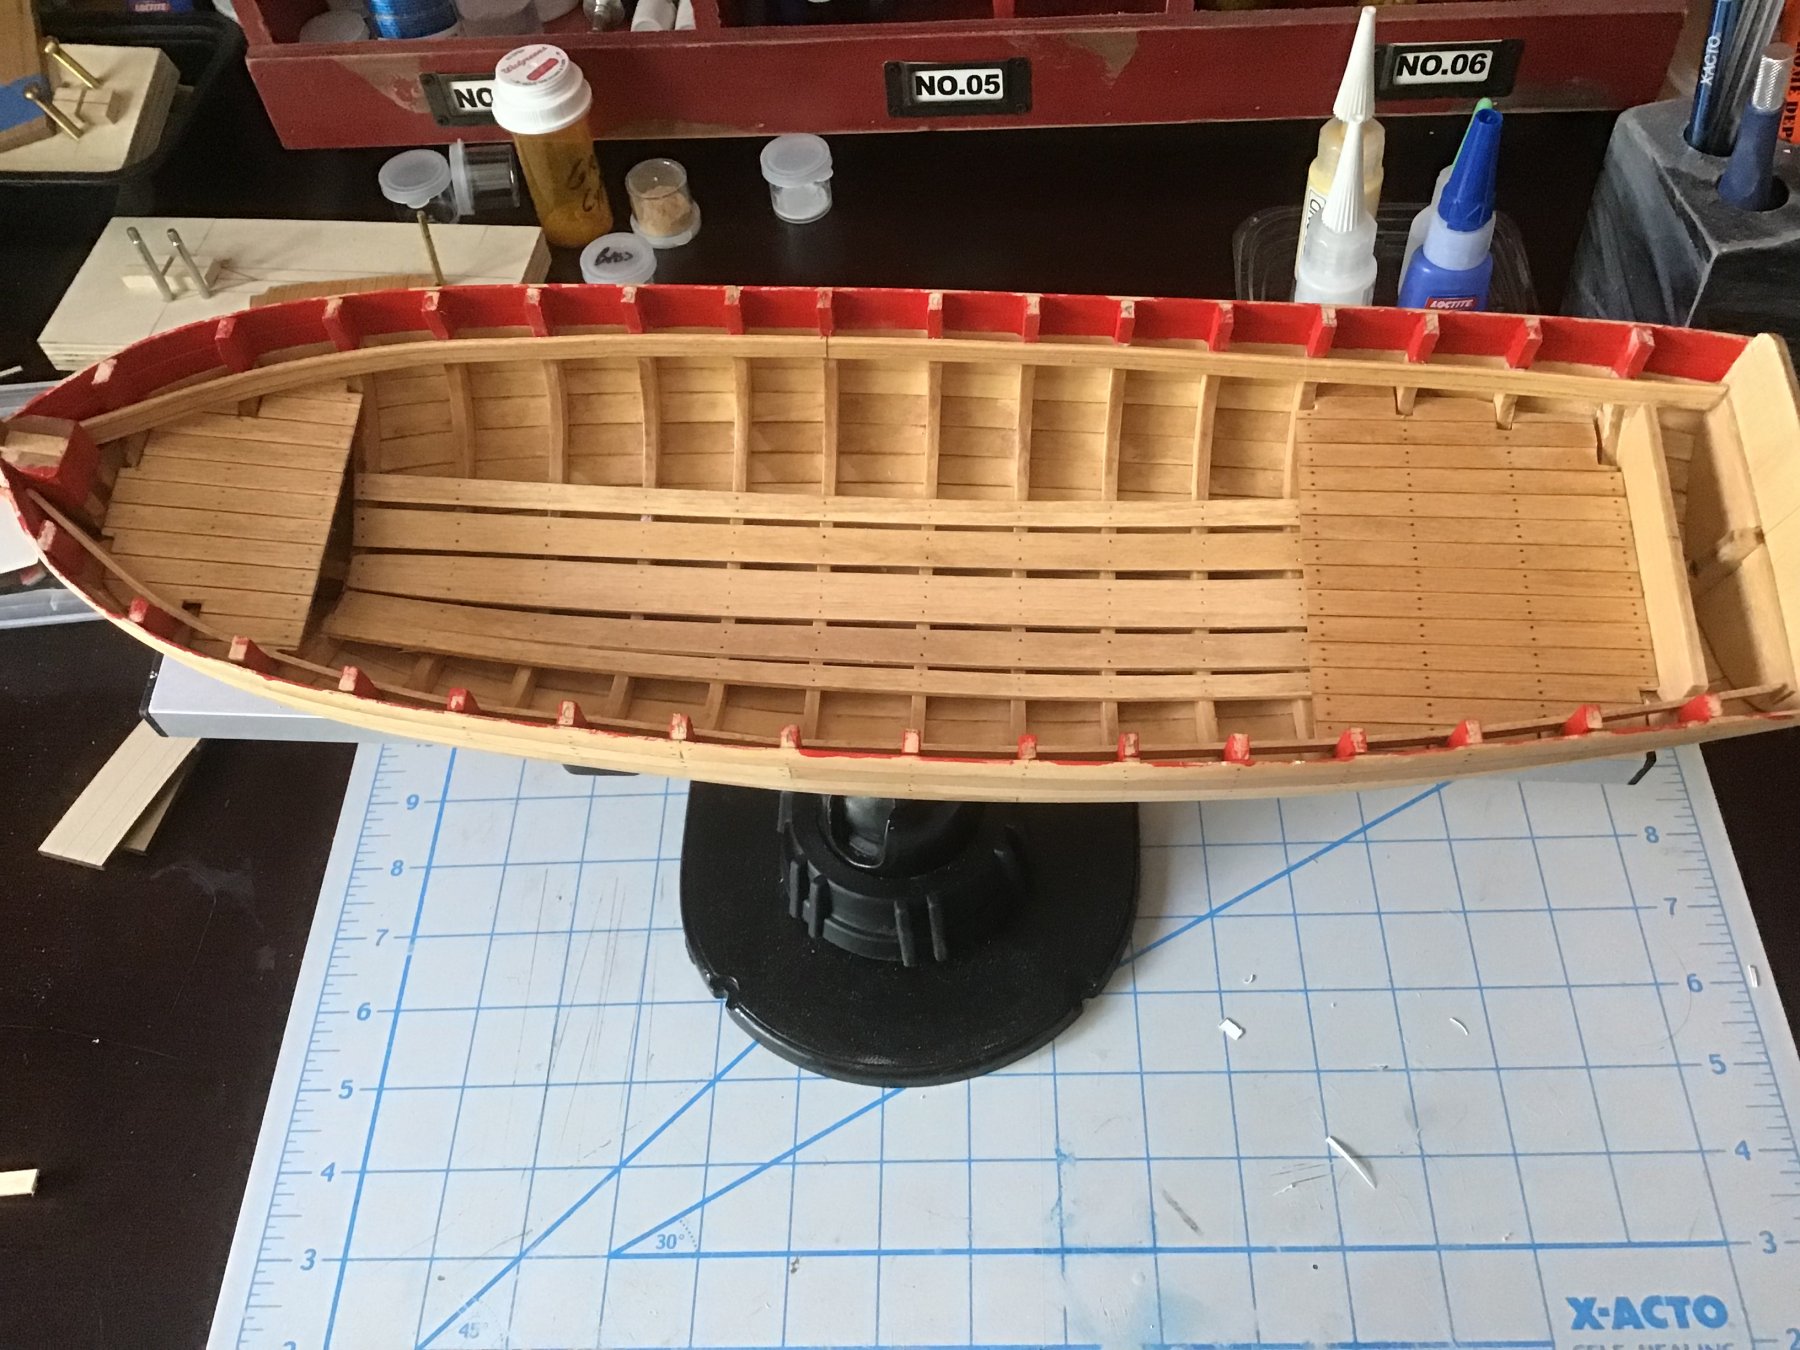
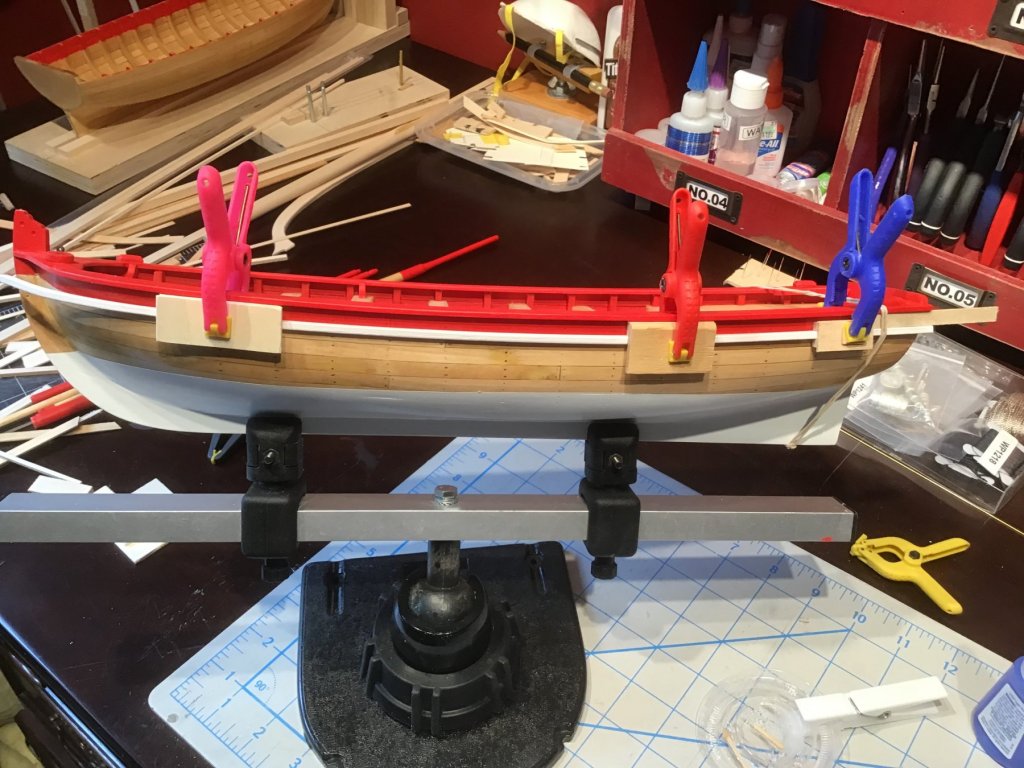
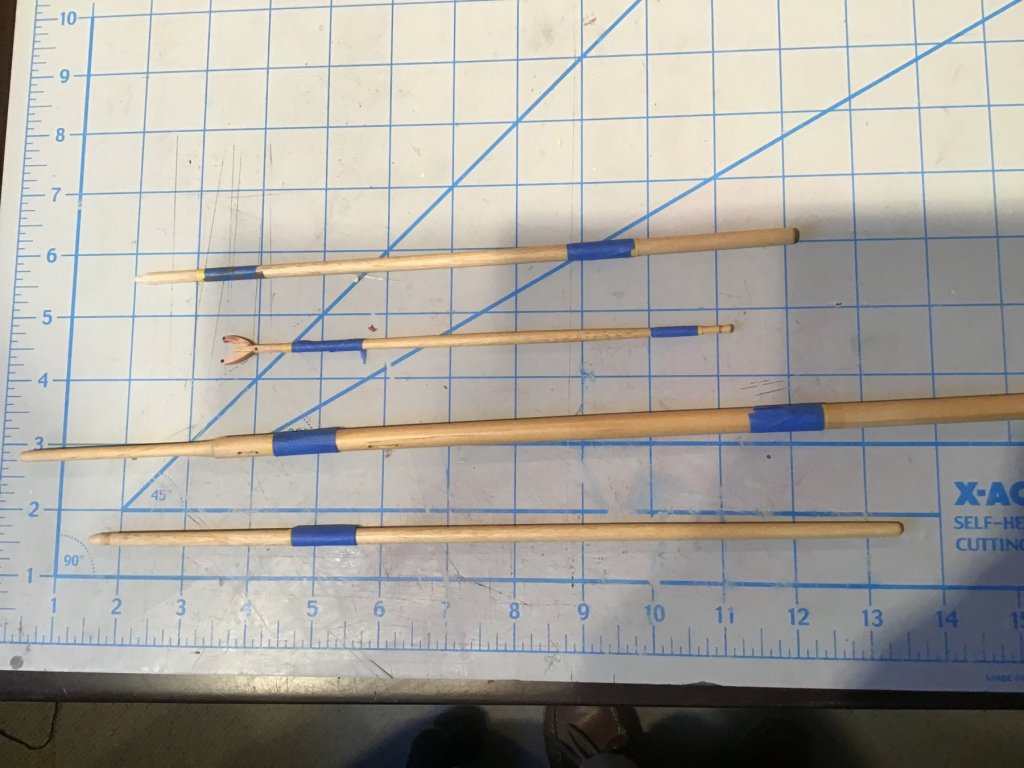
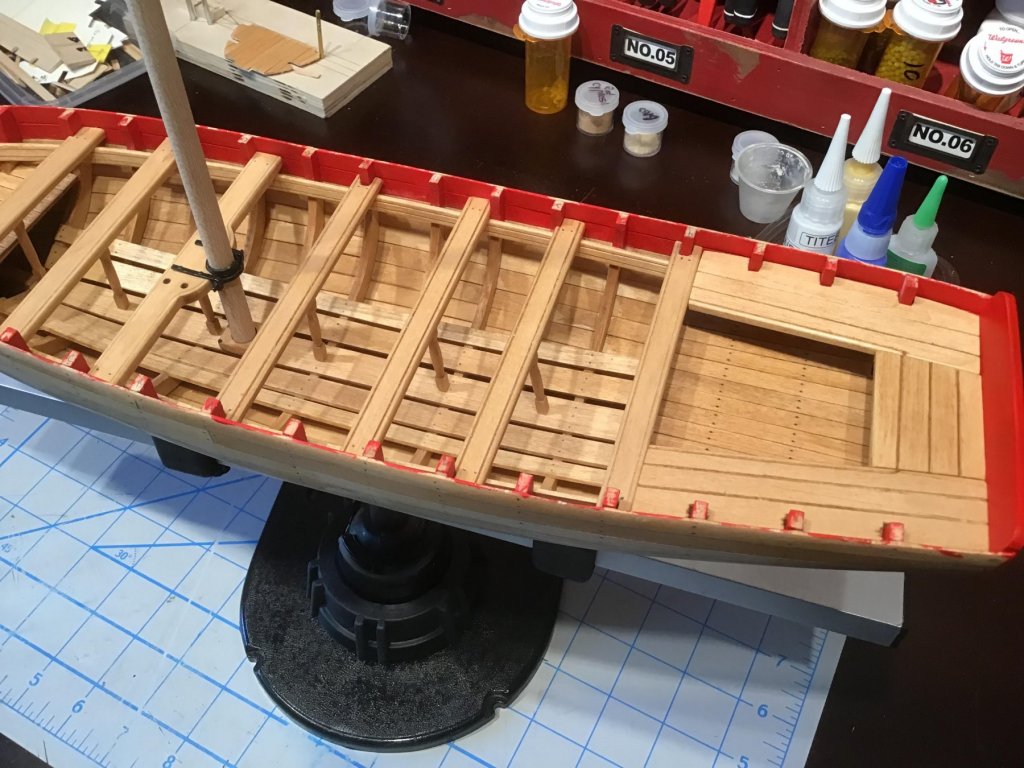
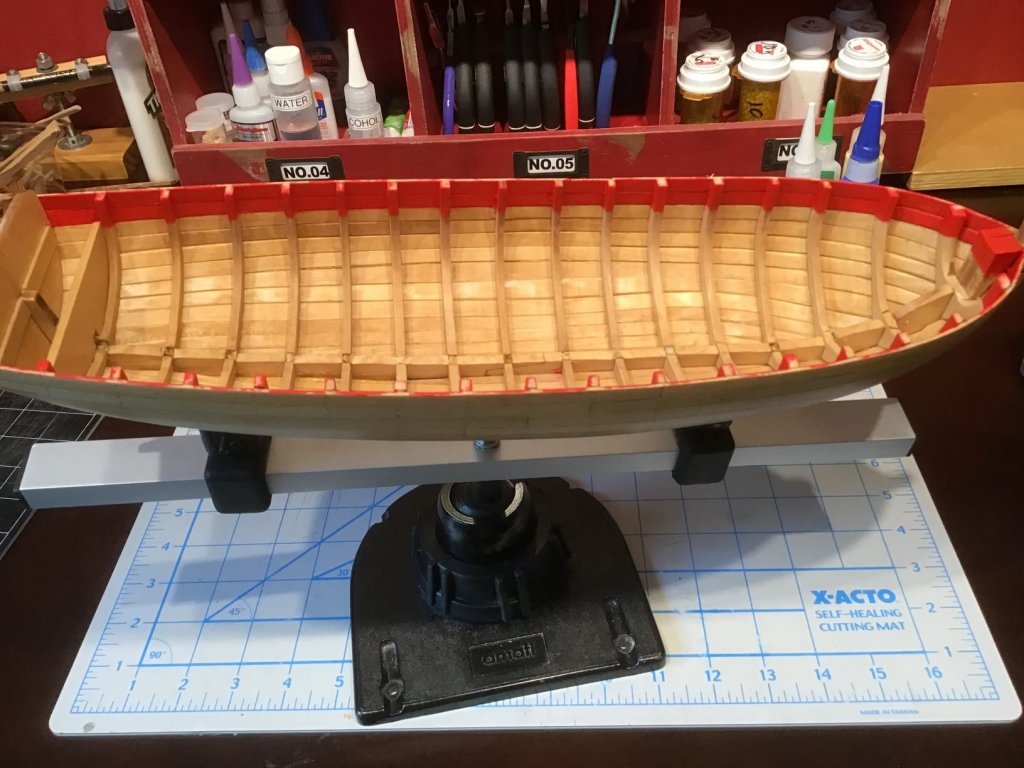
Ok, I have made some progress although I have not posted to the log lately. The first picture shows the cap rail in place. I followed the lead of some others and did the cap rail as a single piece on each side. I think it gives a better look because I am never satisfied with the joints I am able to make in strips such as this. I had to remake the rails only once. The first set did not fall correctly on both the inside and outside of the frames. The bow portion is wide like the kit shows, perhaps even wider. I saw in a later post that the real version had a much narrower overhang at the bow but I was too far along to consider this option. Also have the knees installed. The next photo shows the mast and booms turned and ready for paint. I created these using the drill press method, which seems to work better for me than the carving and hand sanding approach. I also changed my mind from my earlier post and decided to go with a 3/8 dowel for the mast. Since I was turning on the drill I just turned the bottom 1/8 down to 5/16 to fit the mast foot. The second pic shows the hull and the mast and booms painted. The final picture shows the rub rail being fitted for gluing. I made some simple positioning jigs to help with the positioning, clamping and gluing. It is not shown in this picture but I made the rub rail on the transom in two pieces instead of one piece with a subsequent cut out. I felt sure I would screw up the paint on both the rub rail and the transom if I tried a cut out. I am moving on to the rigging. I have not done in rigging in a year or so and I went back to several helpful videos on u-tube to remind of several good techniques. I am glad I did because it reminded me of some of the basics like boiling and stretching the line and the liberal use of bees wax. Of particular help was a video on Rigging Lanyards by Donnie Driskell. I am following his approach so we'll see how it goes.
- 43 replies
-
- 2
-
-
- 18th Century Armed Longboat
- Model Shipways
- (and 1 more)
-
Paul, great job! Following you and Arthur is a highly educational experience. I am not planning to make as many modifications as you made but your discussions of the basic build are most helpful. I continue to progress with my build and log. One step forward, one step back... However, you guys have certainly worked to reduce my number of necessary backward steps.
-
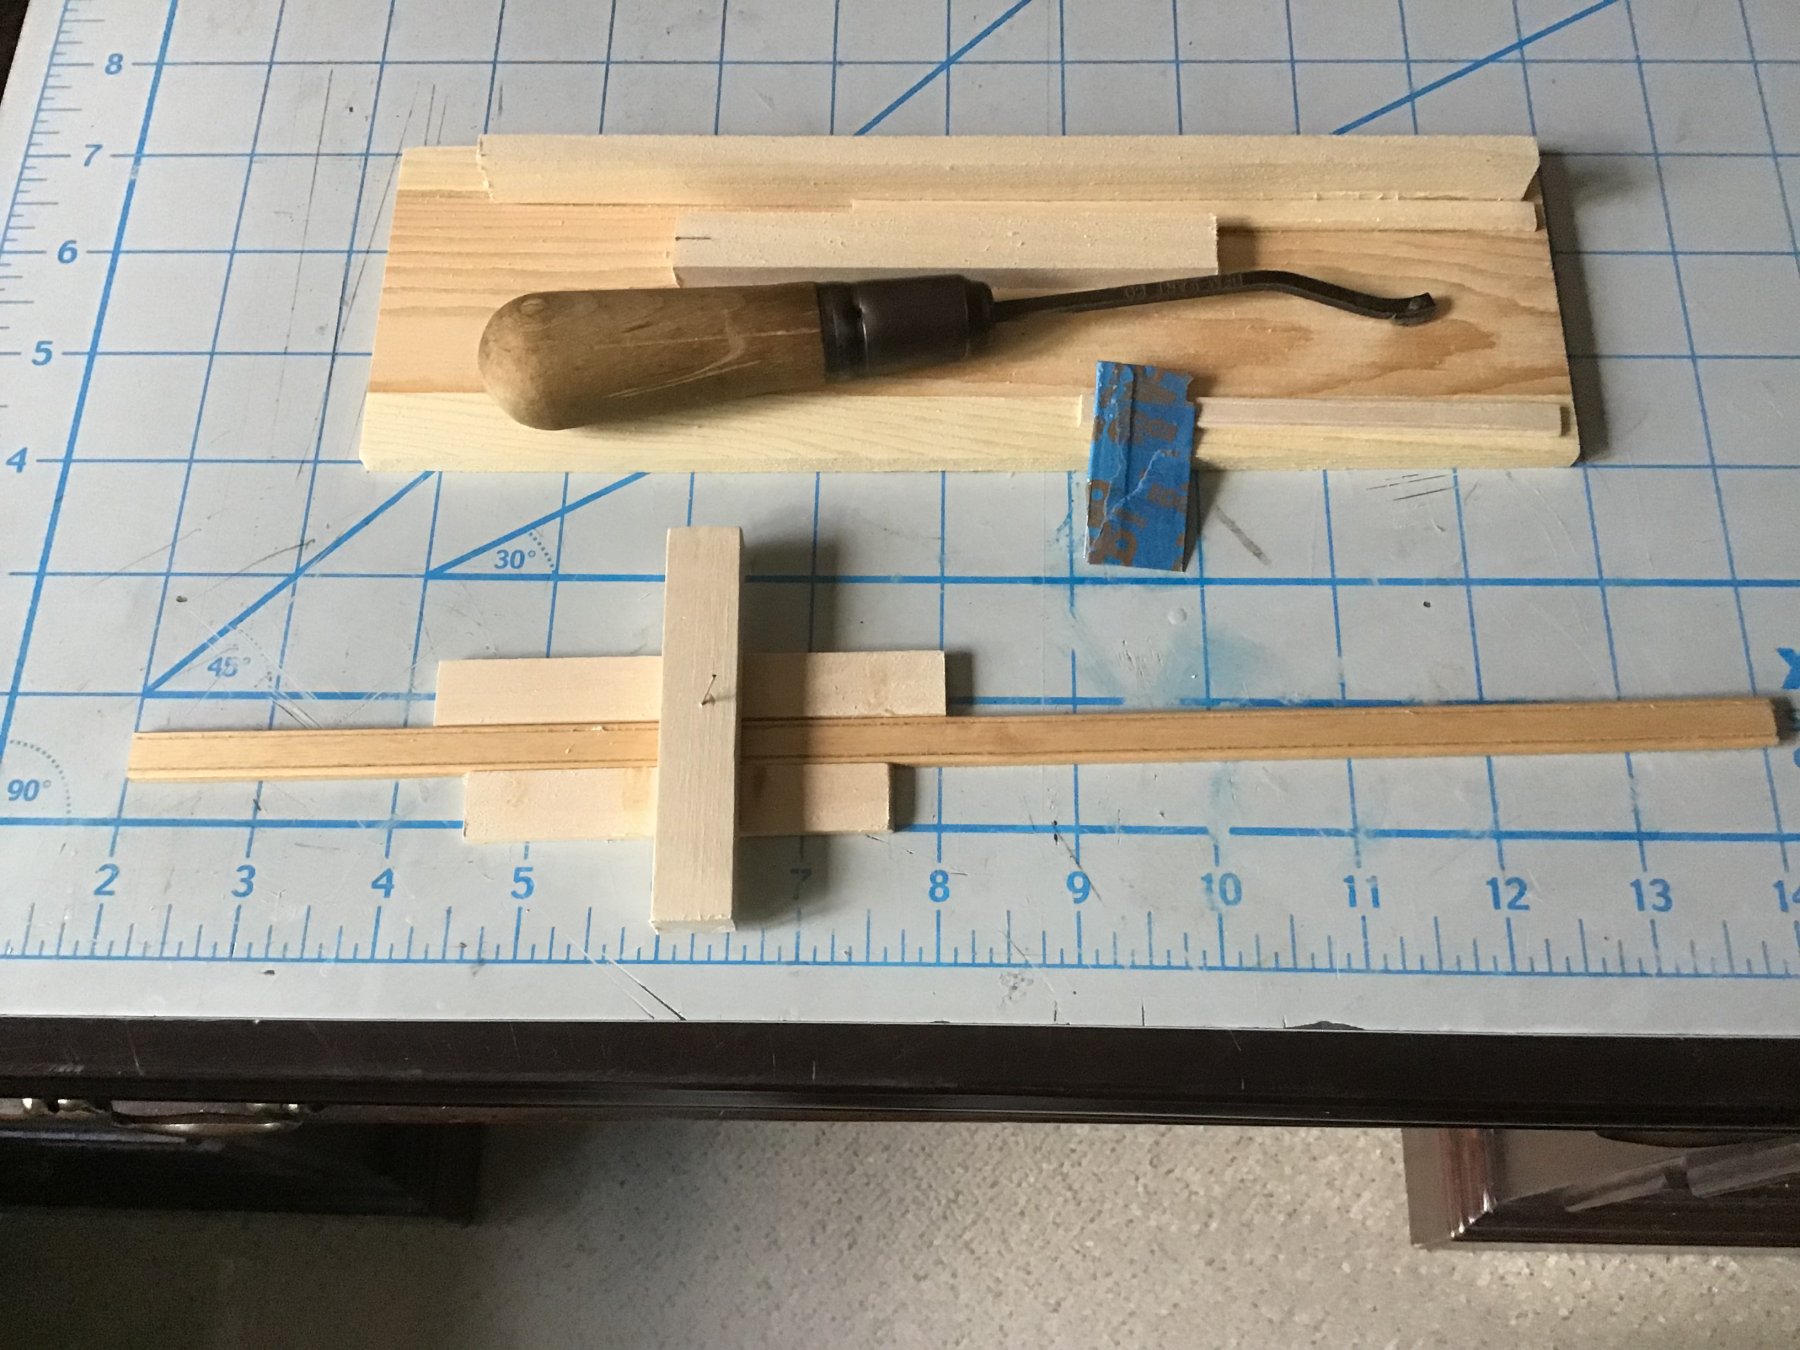
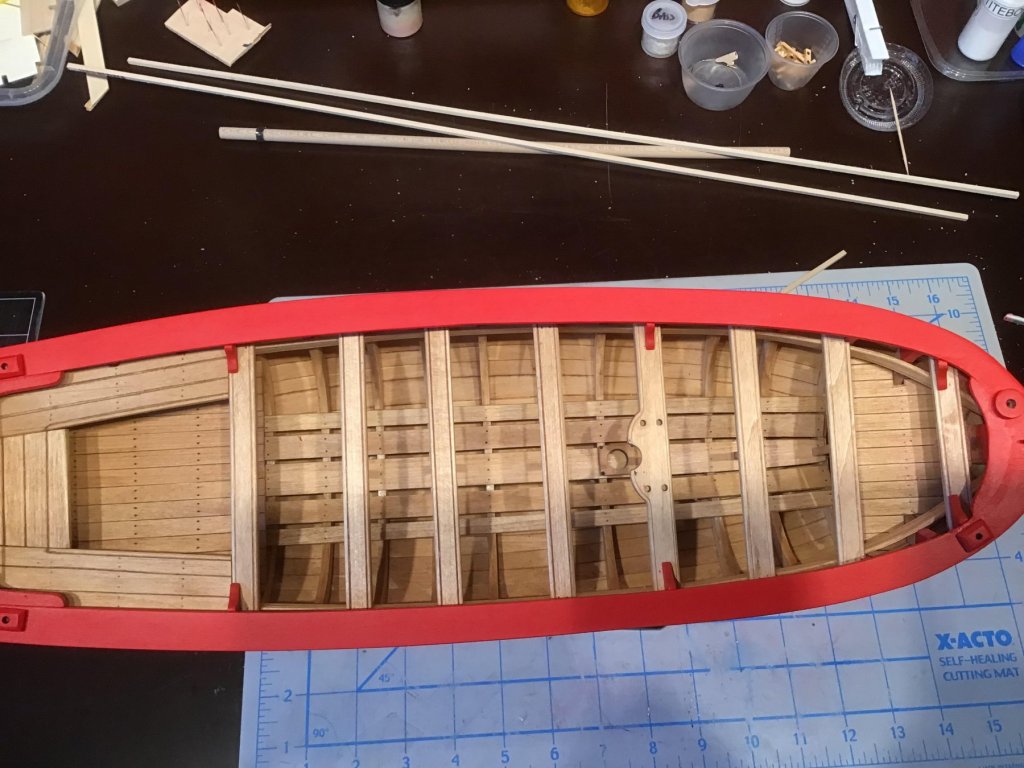
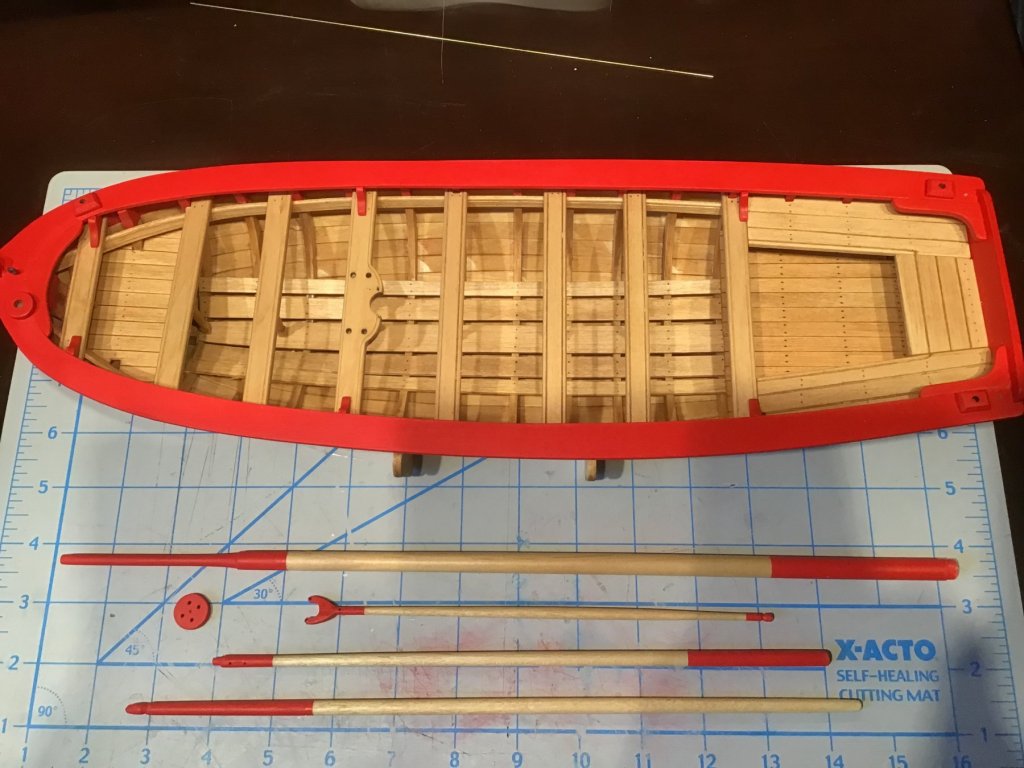
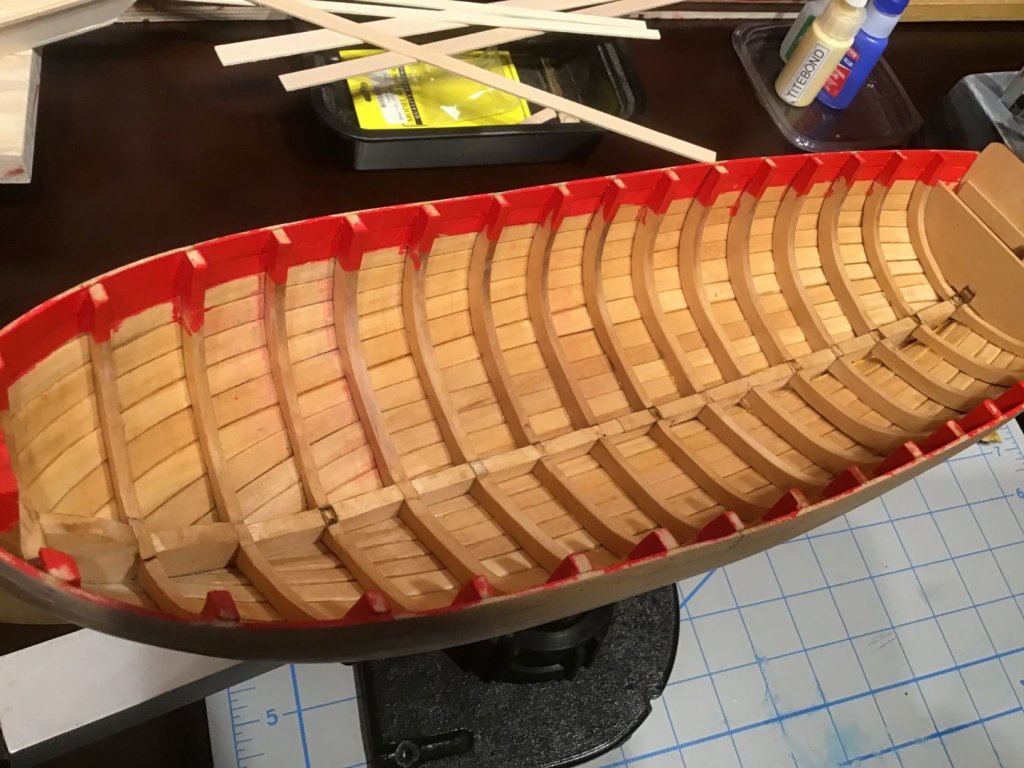
Here is a photo of the seats in place but not glued. I remade the far side seat and also the rear seat with the transom board wider. As you can see from the photo I have installed the thwarts and the supports under them. I took the easy way out and made the supports with the drill press as a lathe. I also discovered the situation of the mast thwart cut out being larger than the mast. I am trying a different way to solve the problem. I had a piece of brass bar stock so I made a collar for the mast. The collar fills the gap in the thwart and allows the mast support bracket to be tighter. Hopefully you can see it in the photo. The mast still has to be shaped and is not glued in. When the mast is complete I should be able to tighten up the remaining gaps that show up in the photo.
- 43 replies
-
- 6
-
-
- 18th Century Armed Longboat
- Model Shipways
- (and 1 more)
-
Paul, I did see your solution and I may do that. I am remaking one of the side seats to get rid of some of the gaps at the frames. If that goes well I may either remake the center seat or replace the board as you suggest.
-
Thanks for the kind words on the pirogues. I made several for friends and family. Once I got the lumber dimensioned and jigs made, the assembly was pretty straight forward. Lots of sanding to smooth everything out. Here is where I came out on the seats. I cut the thwart around the frame to fill the space to the shortest seat and adjusted the other seat accordingly. There is a small gap at the rear of the center seat where I have a trim piece in place now. Nothing is glued yet so I may put a trim piece across the entire rear of the seat area or I may leave the gap as a hinge area. Somewhat depends on if I decide to paint the seats instead of just staining them. I have some gaps around the frames that I would like to fill, so that may help make the decision. I'm moving forward on the rest of the thwarts. Is there any rhyme or reason the how the thwarts fit to the frames. I really can't see it. It doesn't make even spacing, so I'm not sure why its done this way. Mine is not to reason why....

- 43 replies
-
- 5
-
-
- 18th Century Armed Longboat
- Model Shipways
- (and 1 more)
-
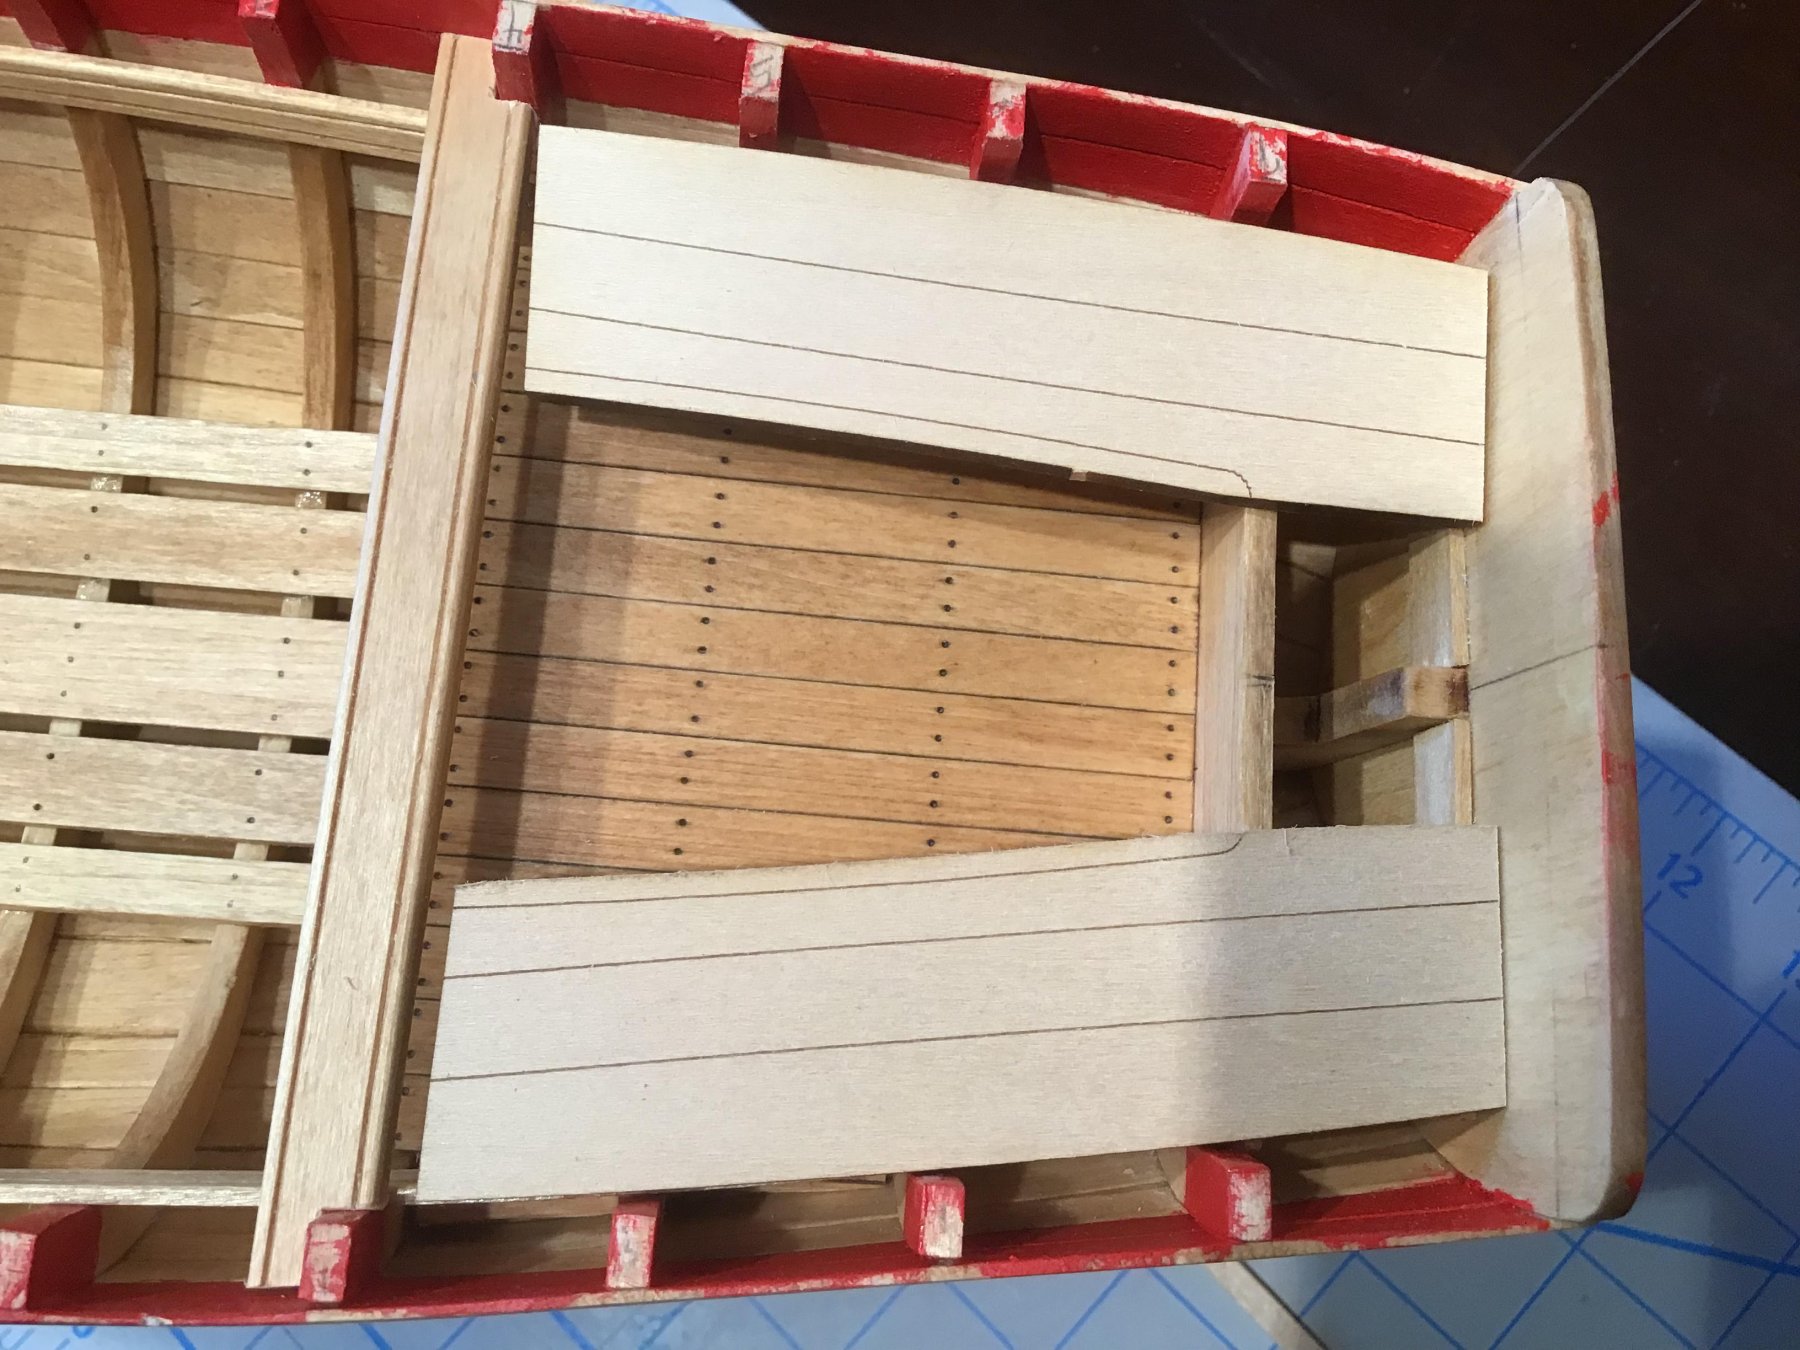
Okay, I have recovered from the rebuild of my hull. I must say, after watching Arthur Wayne and Paul Schulze I don’t know why I am continuing with a log. They have provided tremendous guidance for building this kit and I am glad I’m far enough behind that I can follow their advice for each step of the process. I didn’t spend all of these months on this hull rebuild. I got distracted scratch building some pirogues from cypress. Finding and having the wood cut to size was a major issue since I don’t have a table saw or thickness sander. Also I had to devise several jigs and procedures for the assembly. Just a few pieces of wood but tricky none the less. The hull planking was certainly no easier the second time around. I think it is marginally better than the first try but I still managed to make a couple of disastrous errors. Not the same errors as on the first build, but still egregious enough to be frustrating. I still plan to paint the outside of the hull because I used some filler in the areas that would normally be stained. I have installed the floorboards, platforms and risers. Arthur, I read your comment on the 3/8 planking for the platforms too late. I had already made them up and glued them in. The platforms gave me more trouble than I had anticipated since no one else mentioned any particular problems. The forward platform was especially difficult for me to get level and tight around the edges. I built the forward platform twice to get some semblance of fit. Again, Arthur shows us very high standards with the fit on the sides of his platforms. After much work and cussing I realized you can’t even see that fit on the rear platform on the finished model. When making the trim line on the risers I tried Arthur’s scraper idea, Paul’s scoring jig and also a gunstock checkering tool borrowed from a friend. Of the three Paul’s device was by far the easiest and most effective for me. I reconfigured the tool for the thwarts, which have a similar groove. My thanks to those two gentlemen for coming up with these ideas. I have begun to work on the seats. The seat pieces supplied in the kit seem to be almost the proper length. However, it points up a small frame alignment problem. Rather than remake the seats I think I will fit the seats as is and adjust the thwart to take up the gap, using the shortest seat as the operable seat length. Does anyone have a better idea? I have made a first template for the frame cutouts so I will confirm as I move along.


- 43 replies
-
- 6
-
-
- 18th Century Armed Longboat
- Model Shipways
- (and 1 more)
-
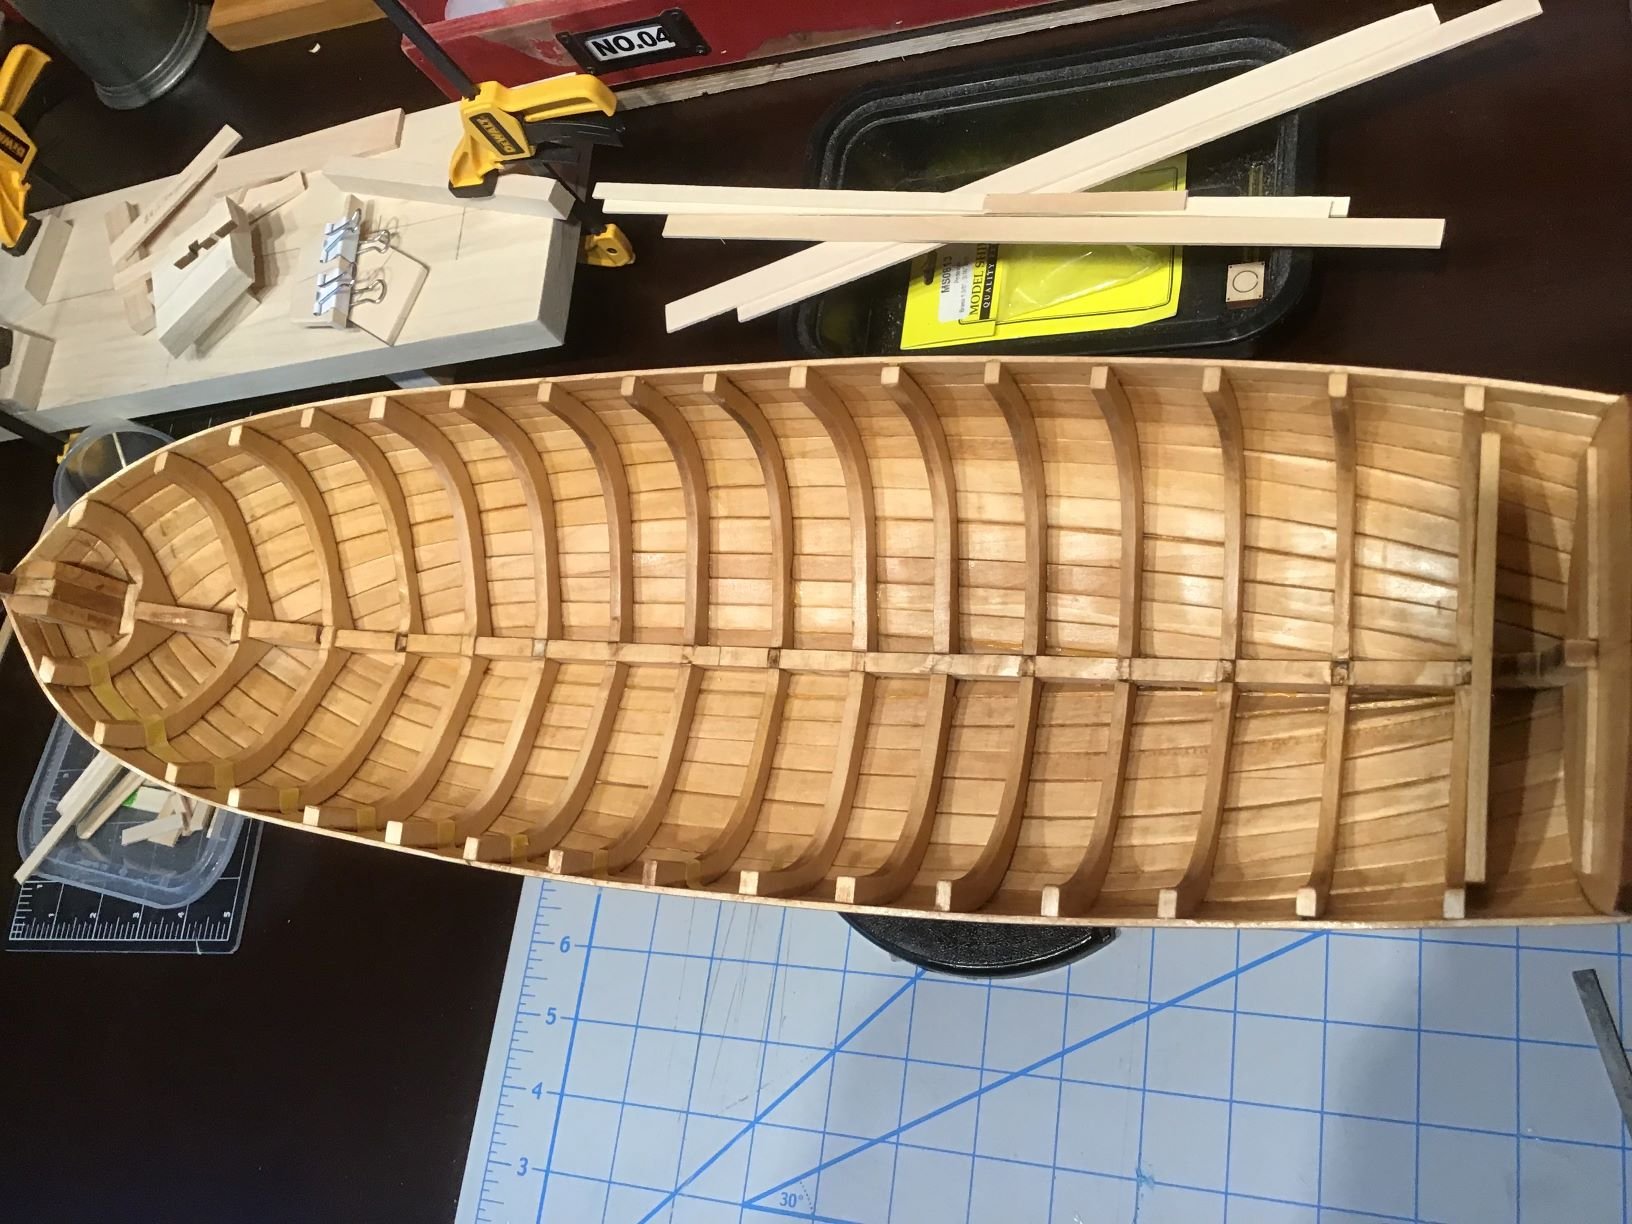
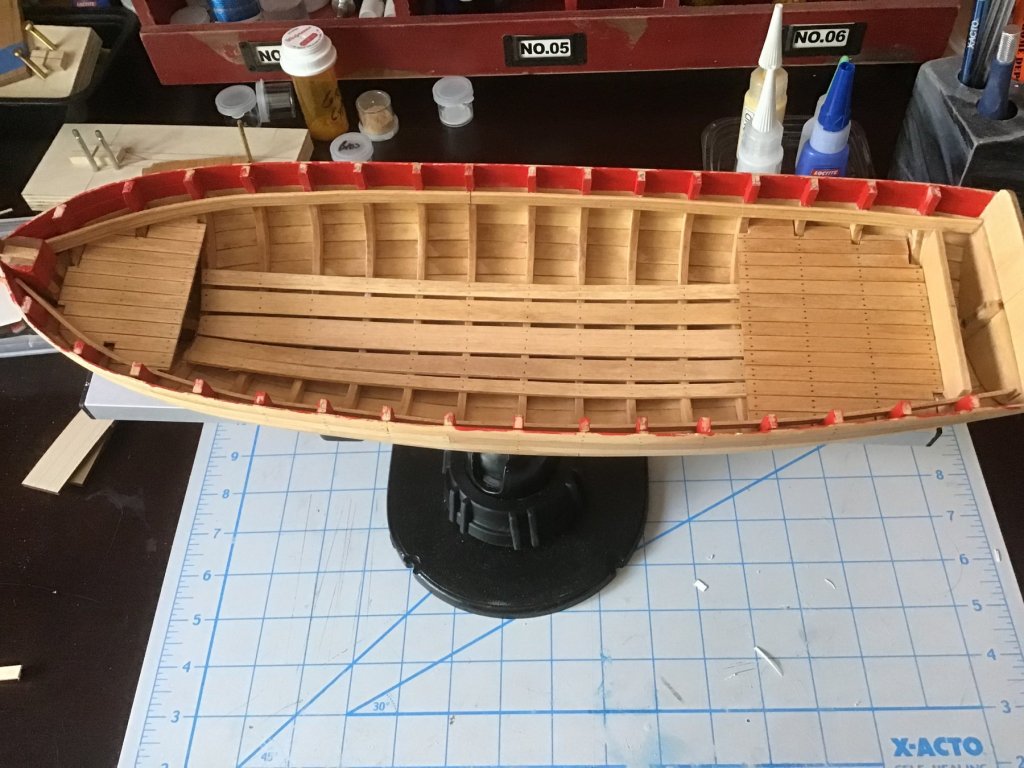
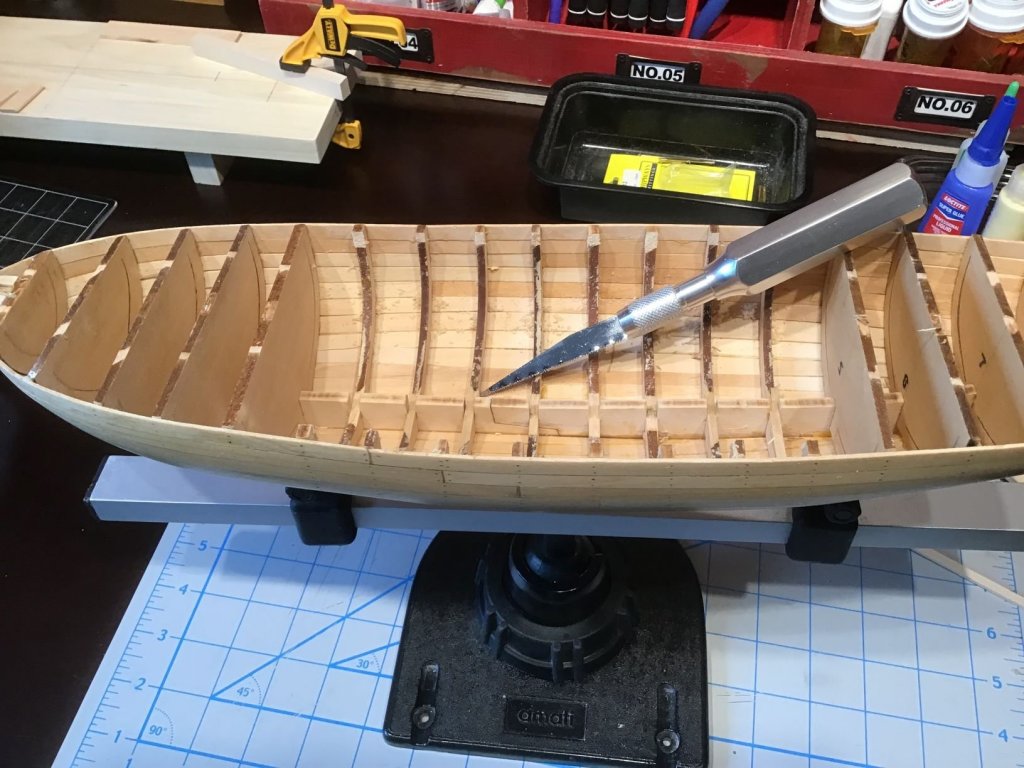
I finished the second side of the hull. The entire planking process is now complete and I have begun to add the tree nails using the pencil technique. I am using a tape guide since I did not do this a plank at a time. After much sanding and some filling I have used wipe-on poly on the exterior and moved to the interior. Cutting out the center of the frames has been quicker and easier than I had anticipated. I used the x-acto saw blade for the work. Now much more sanding is ahead. The interior sanded and poly applied. I taped the frames for painting---with fairly disastrous result. Since I was using acrylic paint over the poly service, I was able to repair the damage to a large extent. Here is the cleaned up interior. At this point I have decided I am not satisfied with my whole planking exercise. I have ordered and received a new set of the laser-cut sheets for the keel and frames from Model Shipways and I am going to start over on the framing and planking. This will take a couple of months but in the end I will have two versions of the work to choose from. A quick word in support of Model Shipways. I emailed them on a Monday morning—using the email address on their website--asking for the four replacement sheets and offering to pay for the sheets and the shipping. I received the sheets by mail on Thursday at no charge. I think this is exceptional customer service and has certainly made me believer in Model Shipways/Model Expo. I will choose them in the future for my modeling needs if they have the items I require. I will pick up this log after I get back to this point with my new version of the planked hull.

- 43 replies
-
- 8
-
-
- 18th Century Armed Longboat
- Model Shipways
- (and 1 more)
-
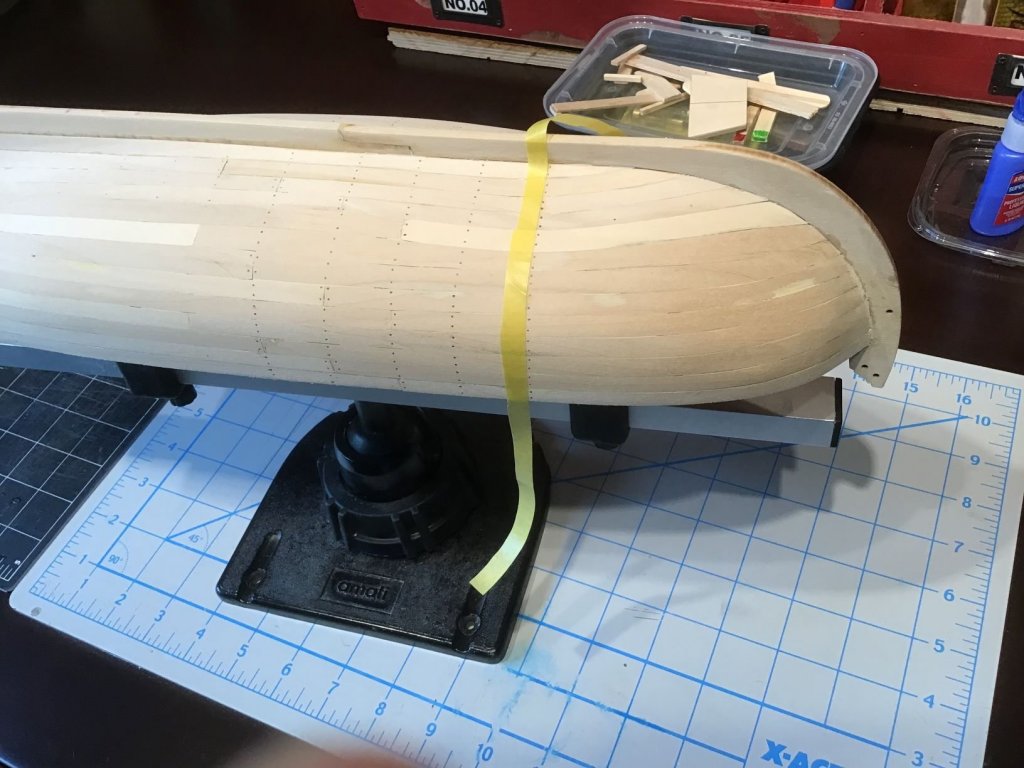
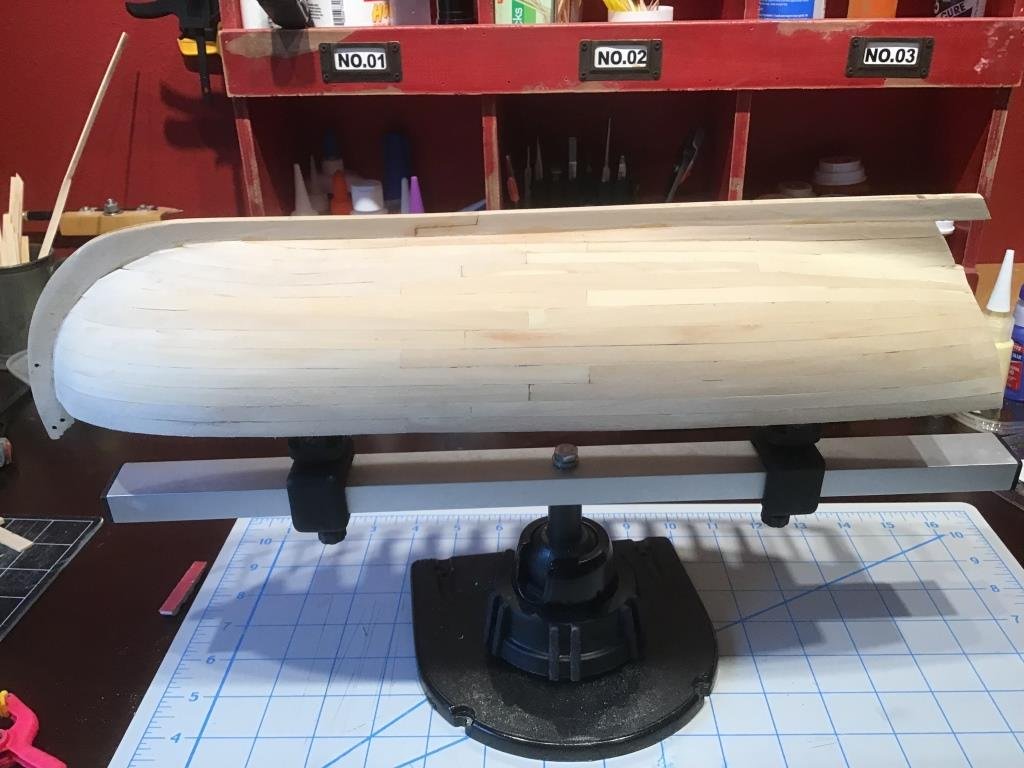
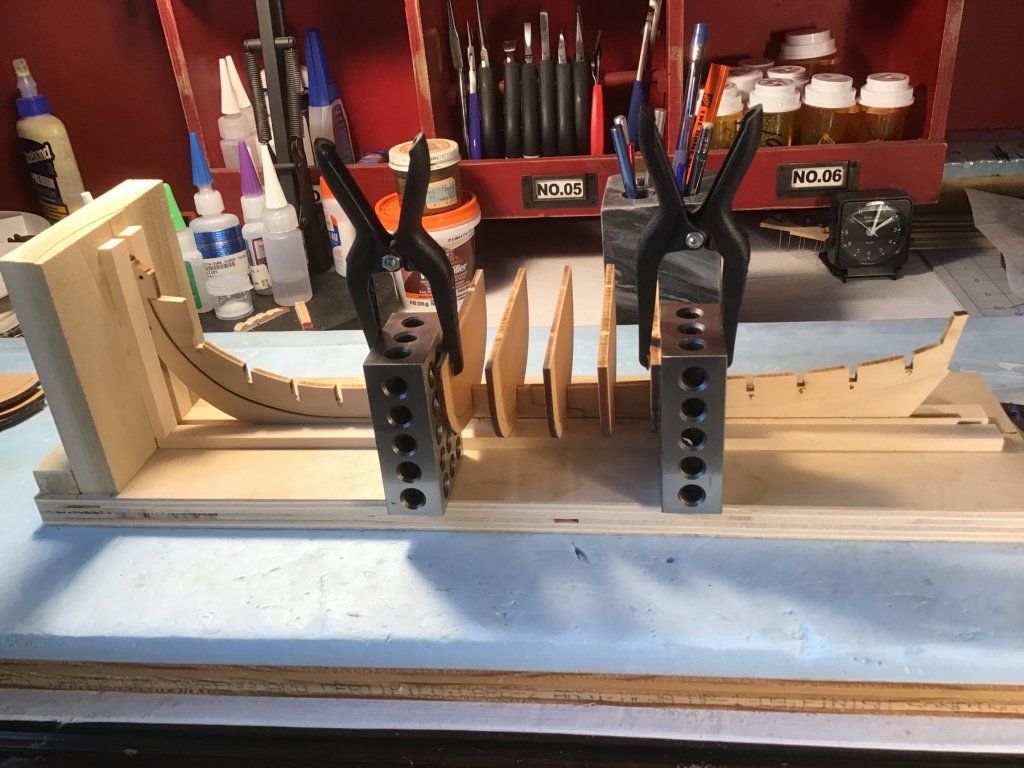
I spent much time and frustration trying different bending techniques for the hull planking. I also lost some time to getting a new desk and reorganizing my modeling work area. However, after looking at Arthur Wayne’s build log on this kit I decided to follow his approach to planking and cut the planks from sheet wood. I removed some of my old work and set to using the scotch tape patterning approach. I have been using one additional step, transferring the tape a heavy card stock and cutting the pattern on that. That has allowed me to check the pattern before cutting the wood. This is probably an unnecessary step but it has allowed me to remake pieces I wasn’t satisfied with. Also I continued to soak the planks to get the proper bend at the bow. I have finished one side and done some sanding on it. It turned out much better than my original approach using the strip wood as called for in the kit instructions. It still is not up to Arthur’s work, which appears to me to be the gold standard for planking this kit, especially if your name is not Chuck or Kurt. I have concluded that I will not stain the middle part of the hull as shown in the kit photos because I will still need filler in some of the joints and seams. I will look around for other longboat paint schemes. However, I have a long time to consider this issue. I am working on the second side of the hull and hope to pick up speed with practice. A couple of these joints in the replaced areas are not as good as I had hoped but fill and sanding will have to do.
- 43 replies
-
- 5
-
-
- 18th Century Armed Longboat
- Model Shipways
- (and 1 more)
-
I am so glad to see another log on this model. I have been completely stymied for several weeks trying to do an adequate job of planking using the 1/16x1/4 strips. I struggled though the lower planks and thought the uppers would be easier. The bow double curve was impossible for me to accomplish. I tried heat, water, ammonia and all combinations of them and could not get the bends to form properly. The instructions make this look so easy and completely ignore the problem of getting the planks to lay flat on the bulkheads. I have made one practice bow strip following your approach. It's not there yet but it shows that spiling is by far the best way to get a good result. I will be removing much of what I have already done in order to get a much better end product. Thanks for the detailed views and I look forward to following the rest of your build.
- 95 replies
-
- 2
-
-
- Model Shipways
- 18th Century Armed Longboat
- (and 1 more)
-
Ok, I removed the two strakes above the garboard and reworked them, Still not perfect but better. I tried Arthur's technique with CA glue but I didn't have good results. I use the Loctite Super Glue and held it in place for more than 30 seconds. Unfortunately when I moved to the next portion and put some pressure on the stake the first glue area separated. Probably my mistake but I went back to wood glue. It is more forgiving with set up time and removes easily with Alcohol. Anyway, I moving forward with the sheer.
- 43 replies
-
- 4
-
-
- 18th Century Armed Longboat
- Model Shipways
- (and 1 more)
-
Paul and Arthur, I appreciate your comments and you make good points. What frustrates me is that I did bevel and I did soak and form, even used some heat. I did not spile or make planks from sheet stock because the instructions clearly indicated that edge bending of the supplied materal was all that was necessary. Based on results I agree that they were wrong and you guys are correct. I always tell tell my friends that these models would be quick if I only had to build them once.
- 43 replies
-
- 1
-
-
- 18th Century Armed Longboat
- Model Shipways
- (and 1 more)
-
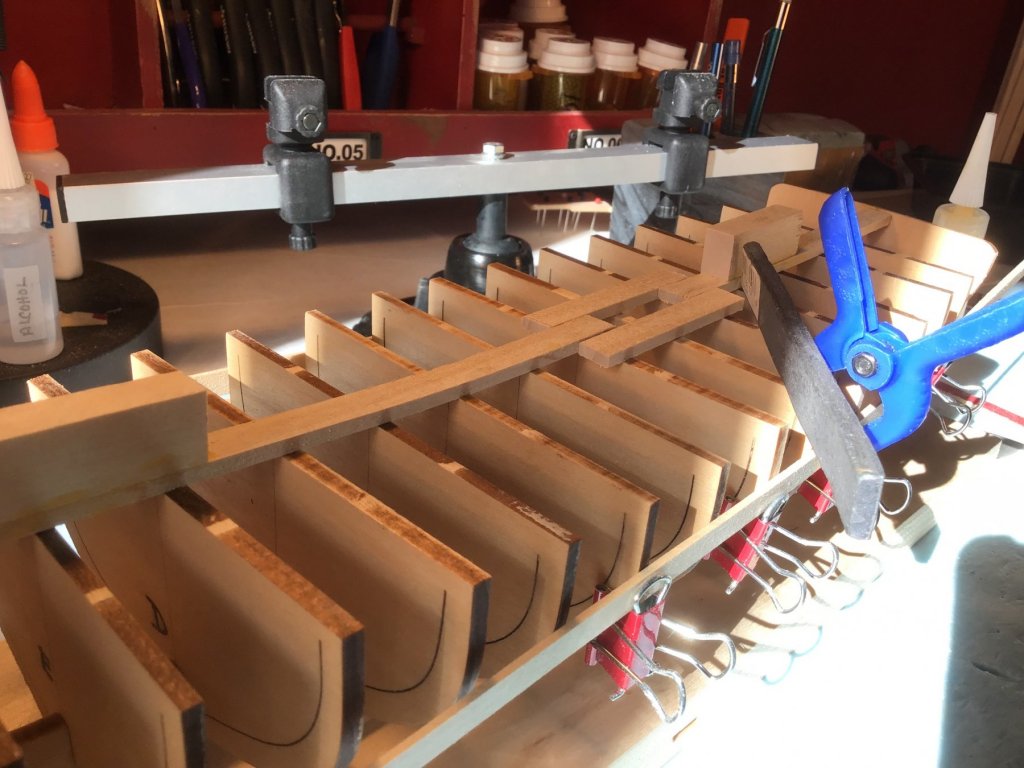
As usual my planking leaves a lot to be desired. The three following pictures show the first three sets of planks from the keel. I am not certain the curve on the bow end is correct and may lead to problems with the future planks. The most troubling area is at the stern end where the planks require a double curve to lay flat on the keel and begin the curve to the hull. I have not been able to get the planks to lay evenly against one another. One side is marginally better than the other but neither is perfect. I have removed and replaced these planks once and am reluctant to do again without a new approach. Unless someone has a better suggestion I plan to correct the area at where the lower plank is not tight against its neighbor but then just use sanding and filling to even out these planks.

- 43 replies
-
- 1
-
-
- 18th Century Armed Longboat
- Model Shipways
- (and 1 more)
-
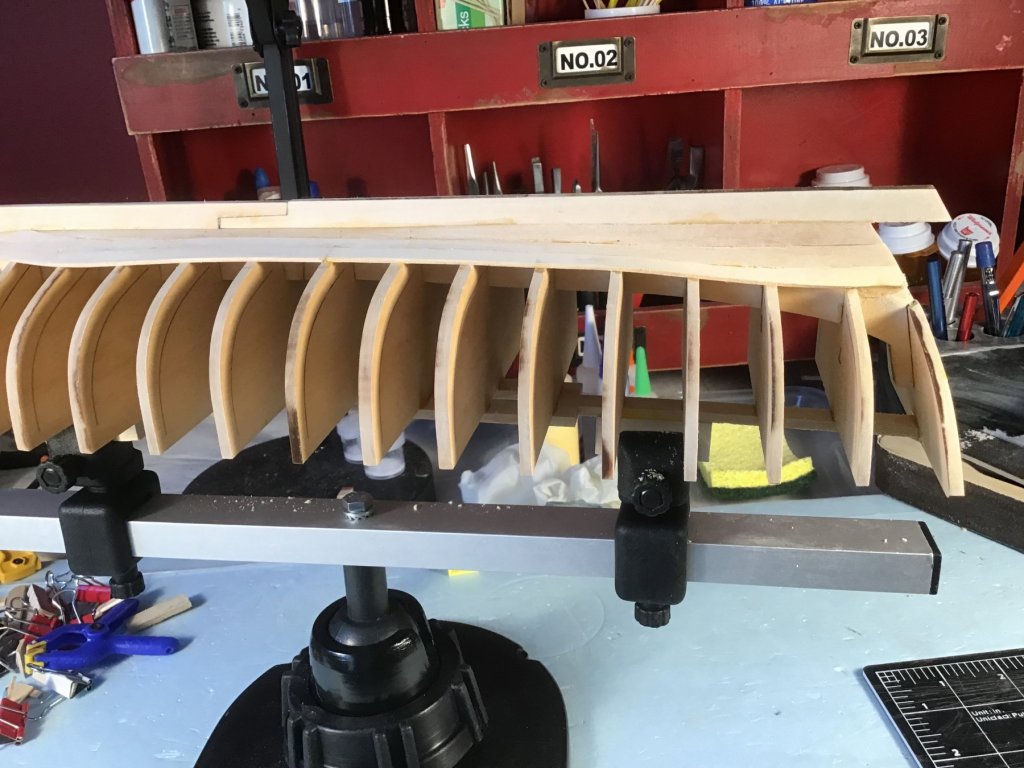
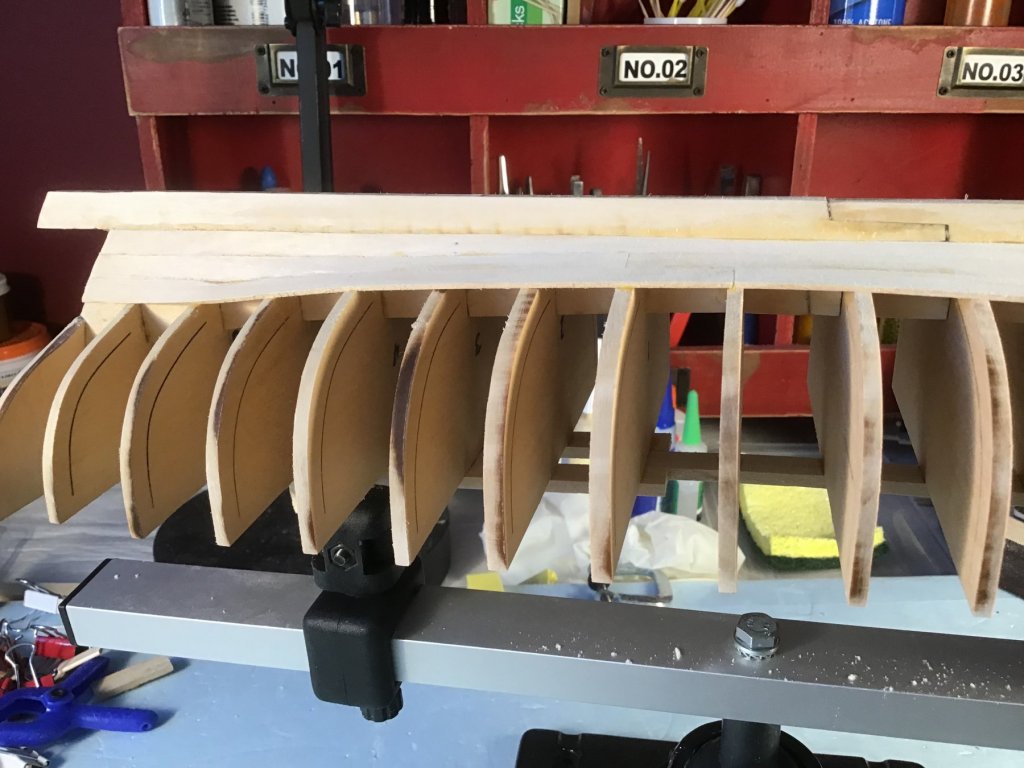
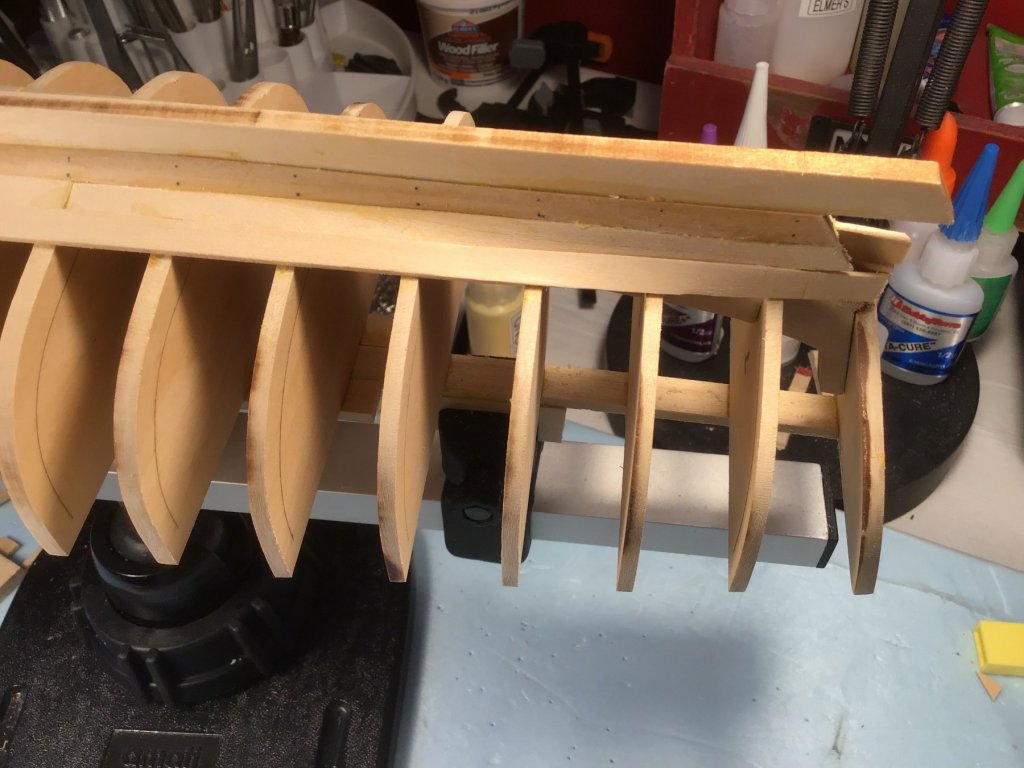
Bow fillers installed and first side faired (I think). I used the 1 1/8 inch emery board from the local cosmetic shop shown in the picture for the fairing. It spanned several frames at a time but was flexible enough to not put too much pressure on adjoining frame members. It was also easy enough to hold. The first apparent problem. While fairing the second side of the hull frames, one frame seemed too high and was not impacting the test plank at all. That frame had seemed ok on the first side but the other side was not where it should be. I decided to try to adjust it. That meant cutting the strongback and using alcohol on the glue. After removing it I worked on lowering it but also had to square it with the adjoin frames. After adjusting as best I could I re-glued and will hope for the best.
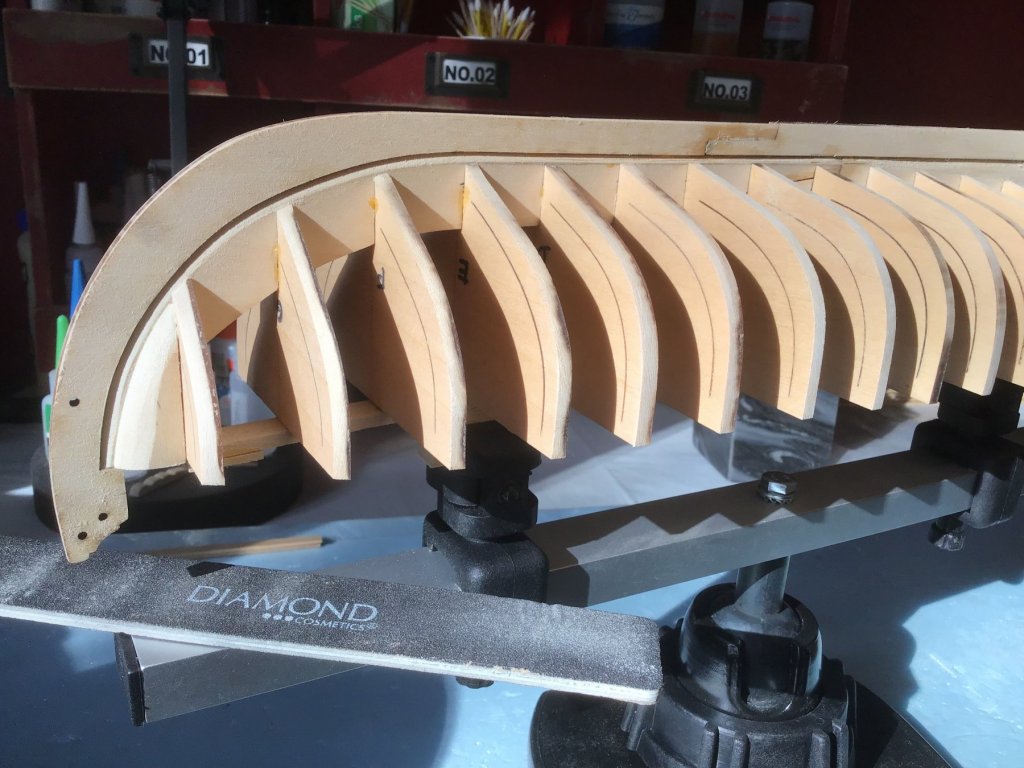
- 43 replies
-
- 5
-
-
- 18th Century Armed Longboat
- Model Shipways
- (and 1 more)
-
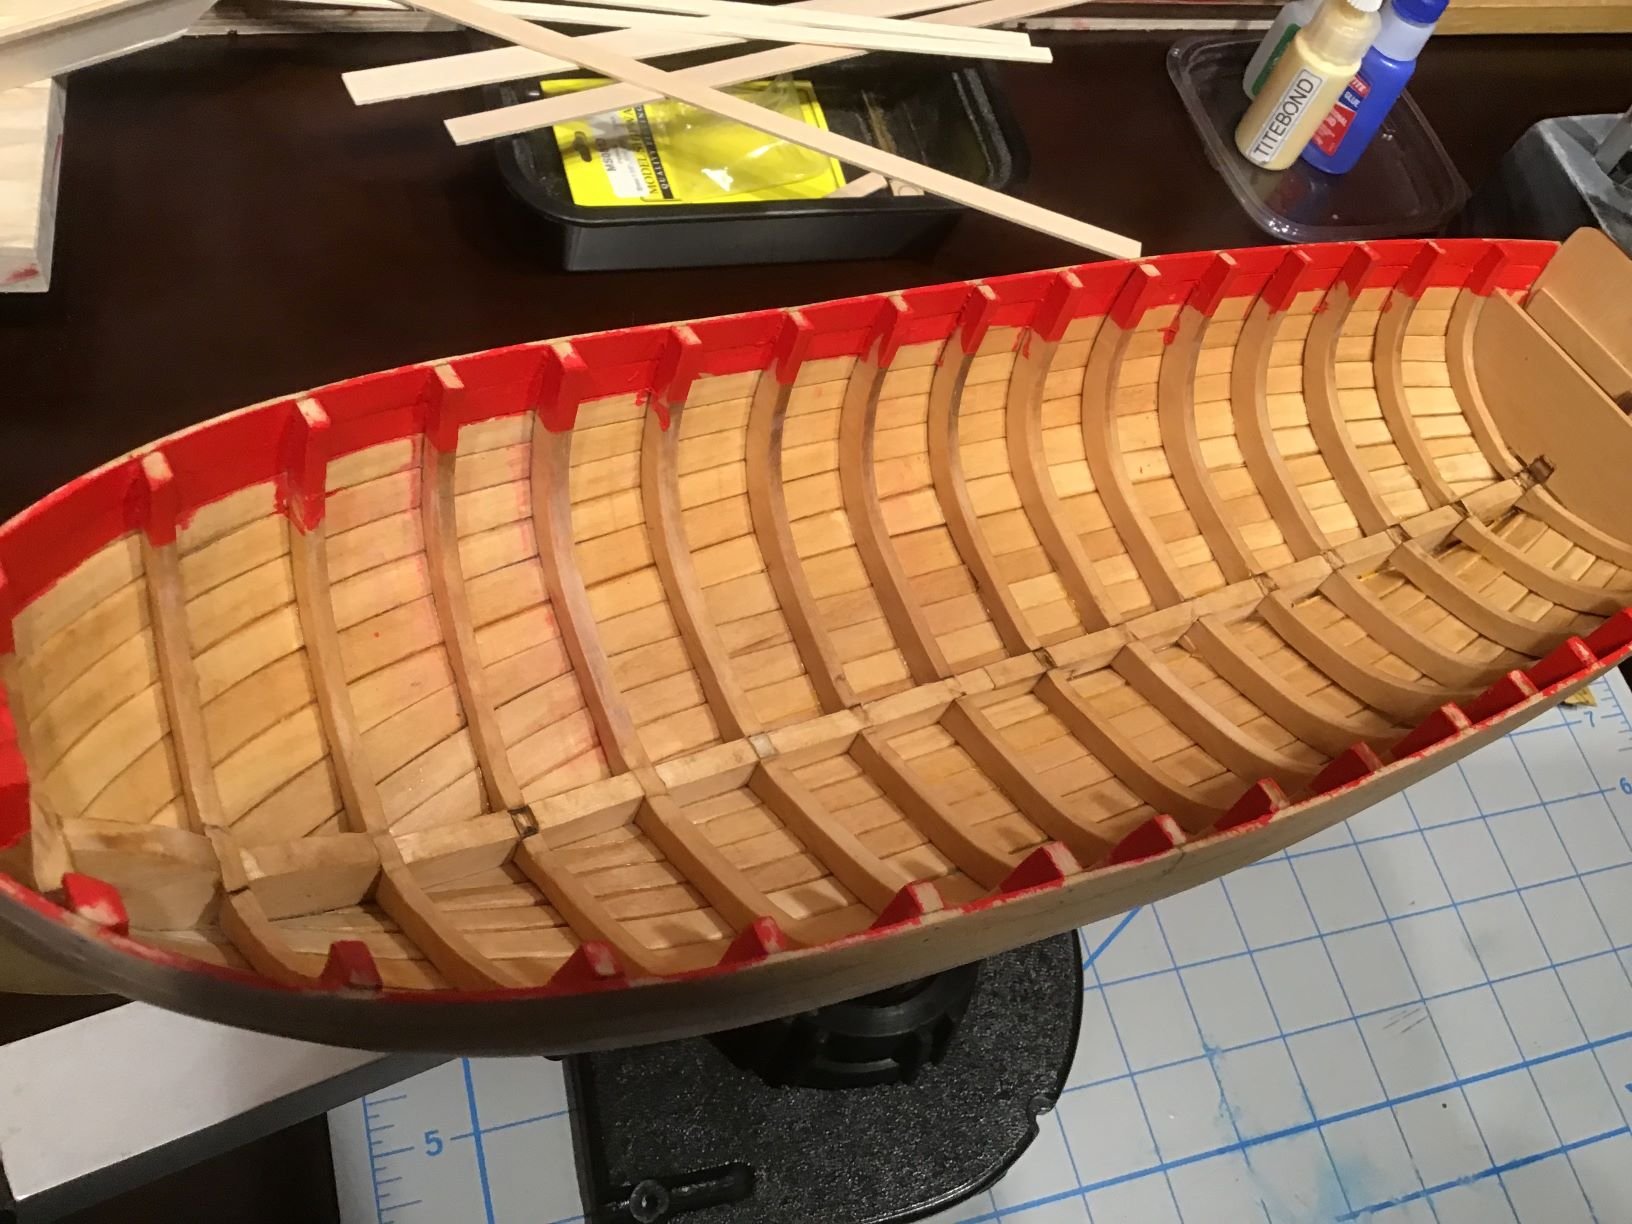
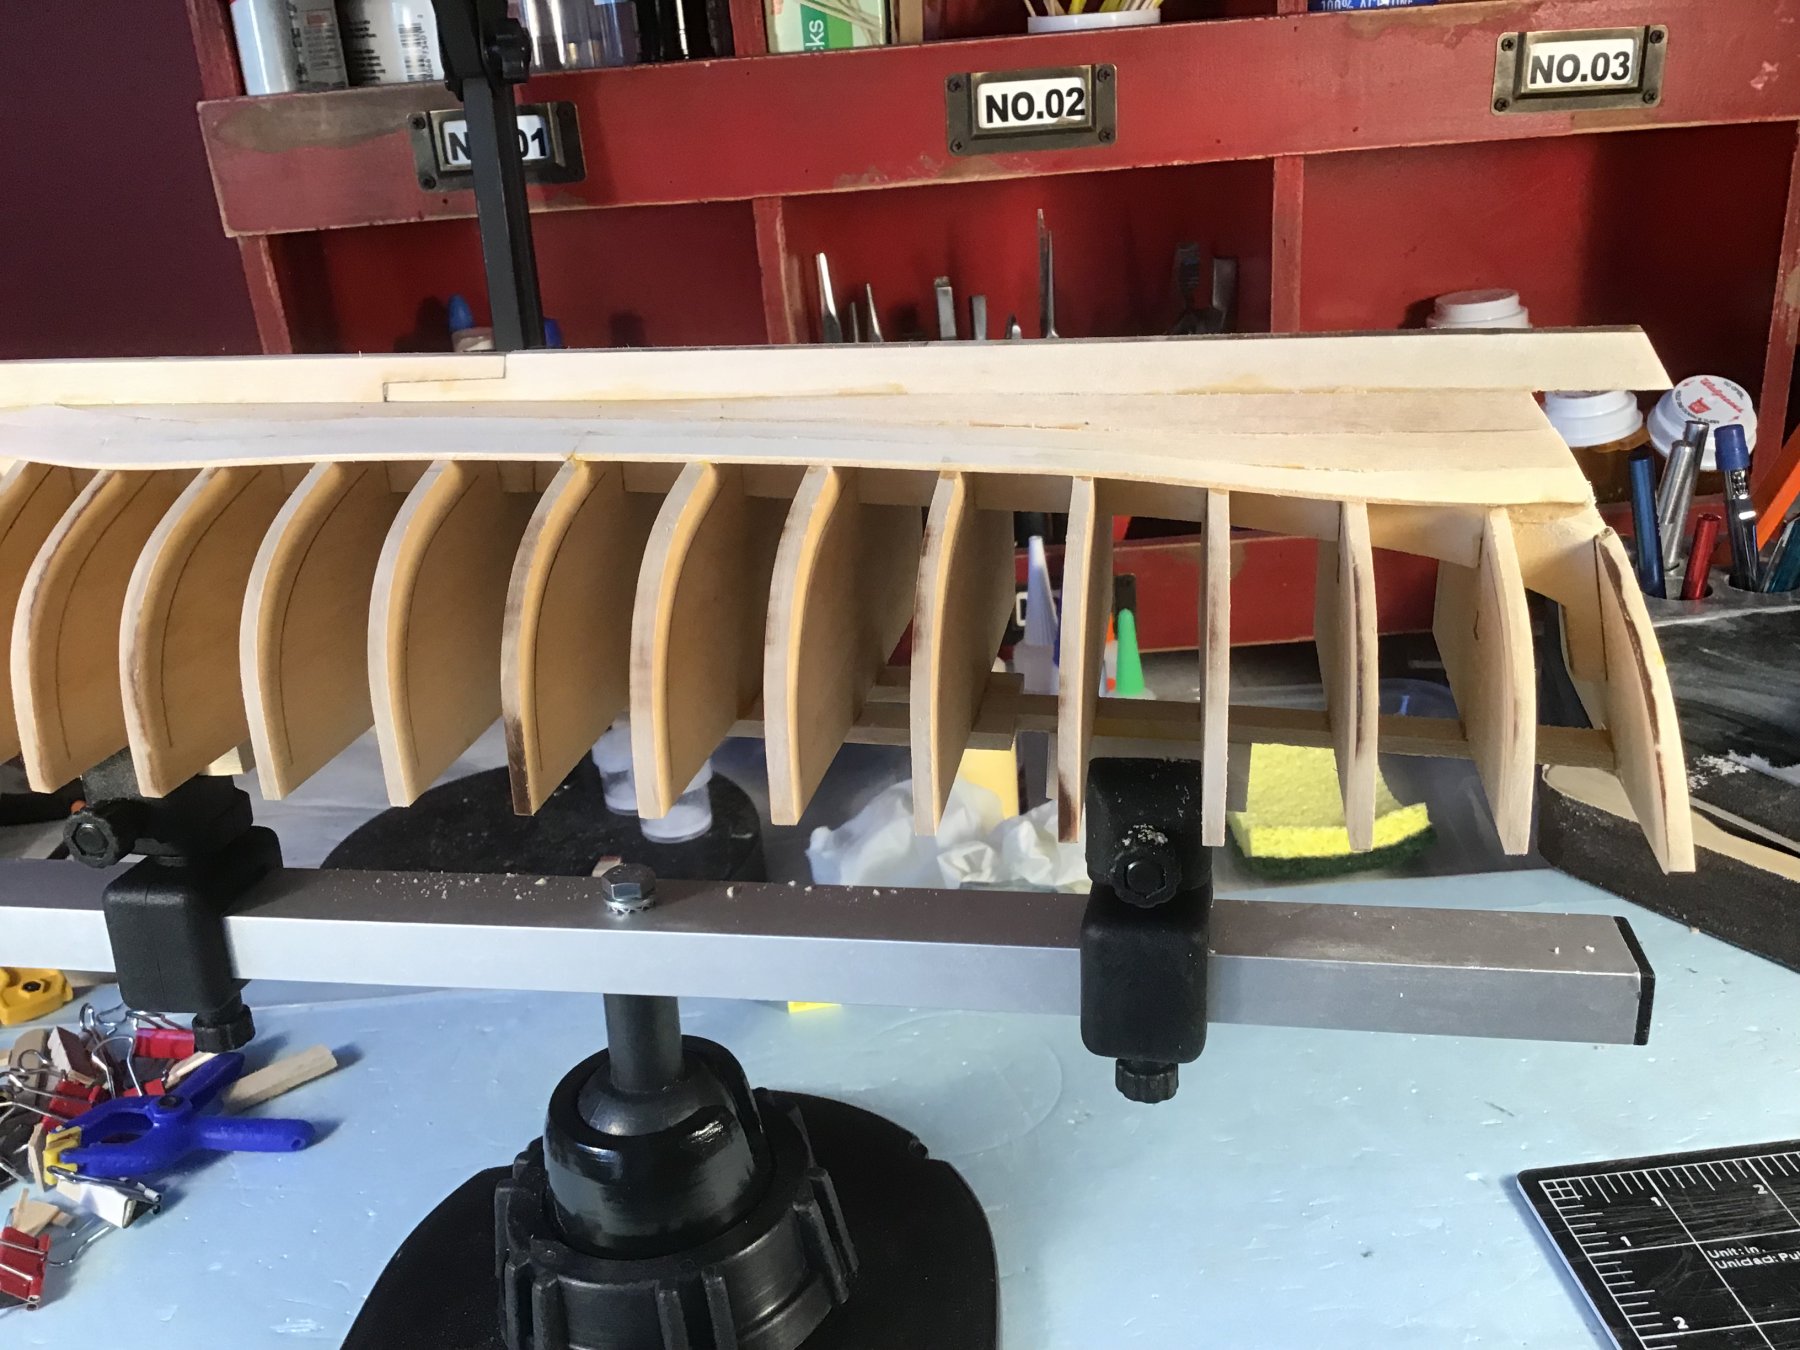
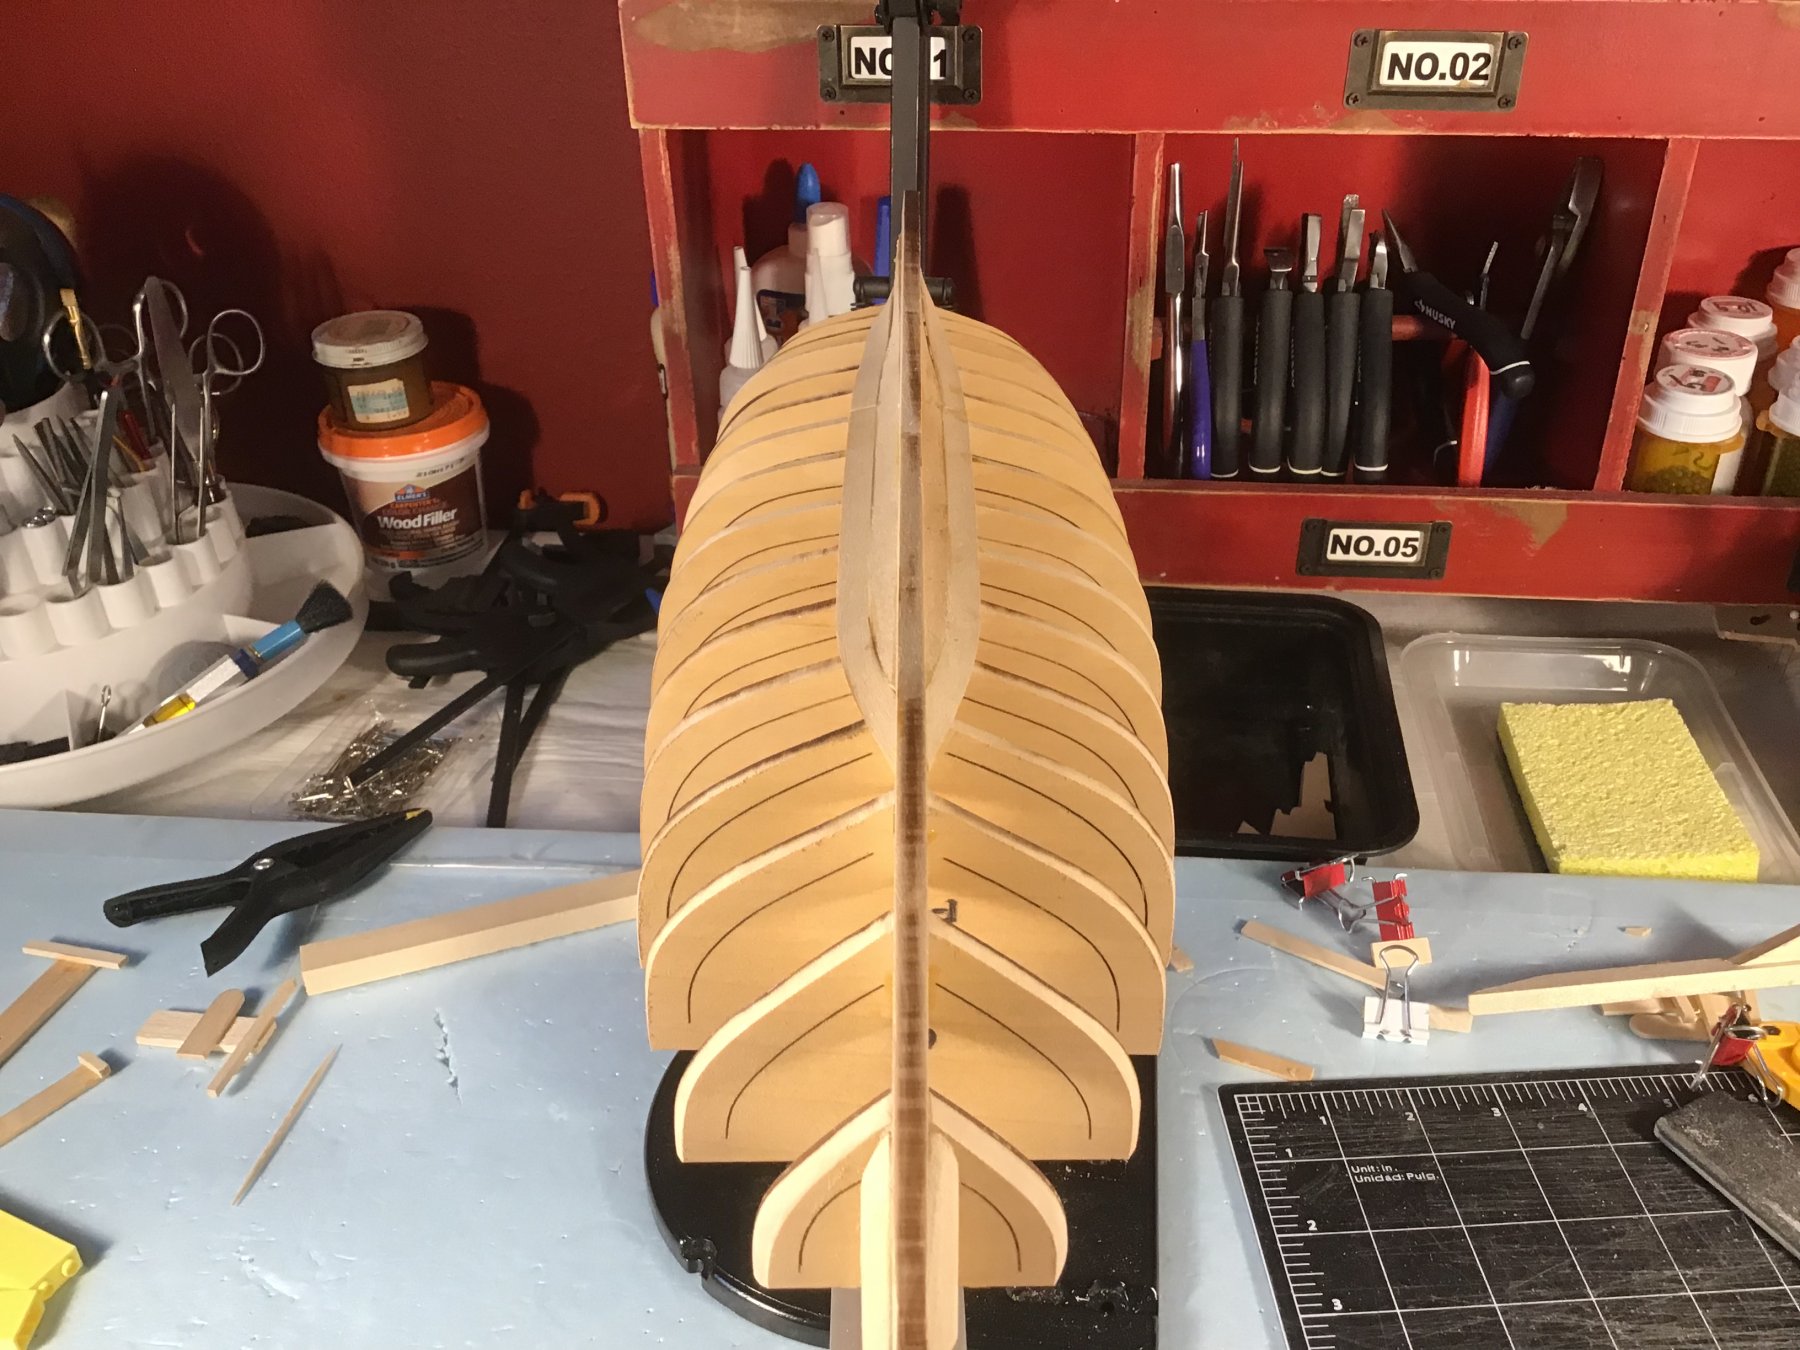
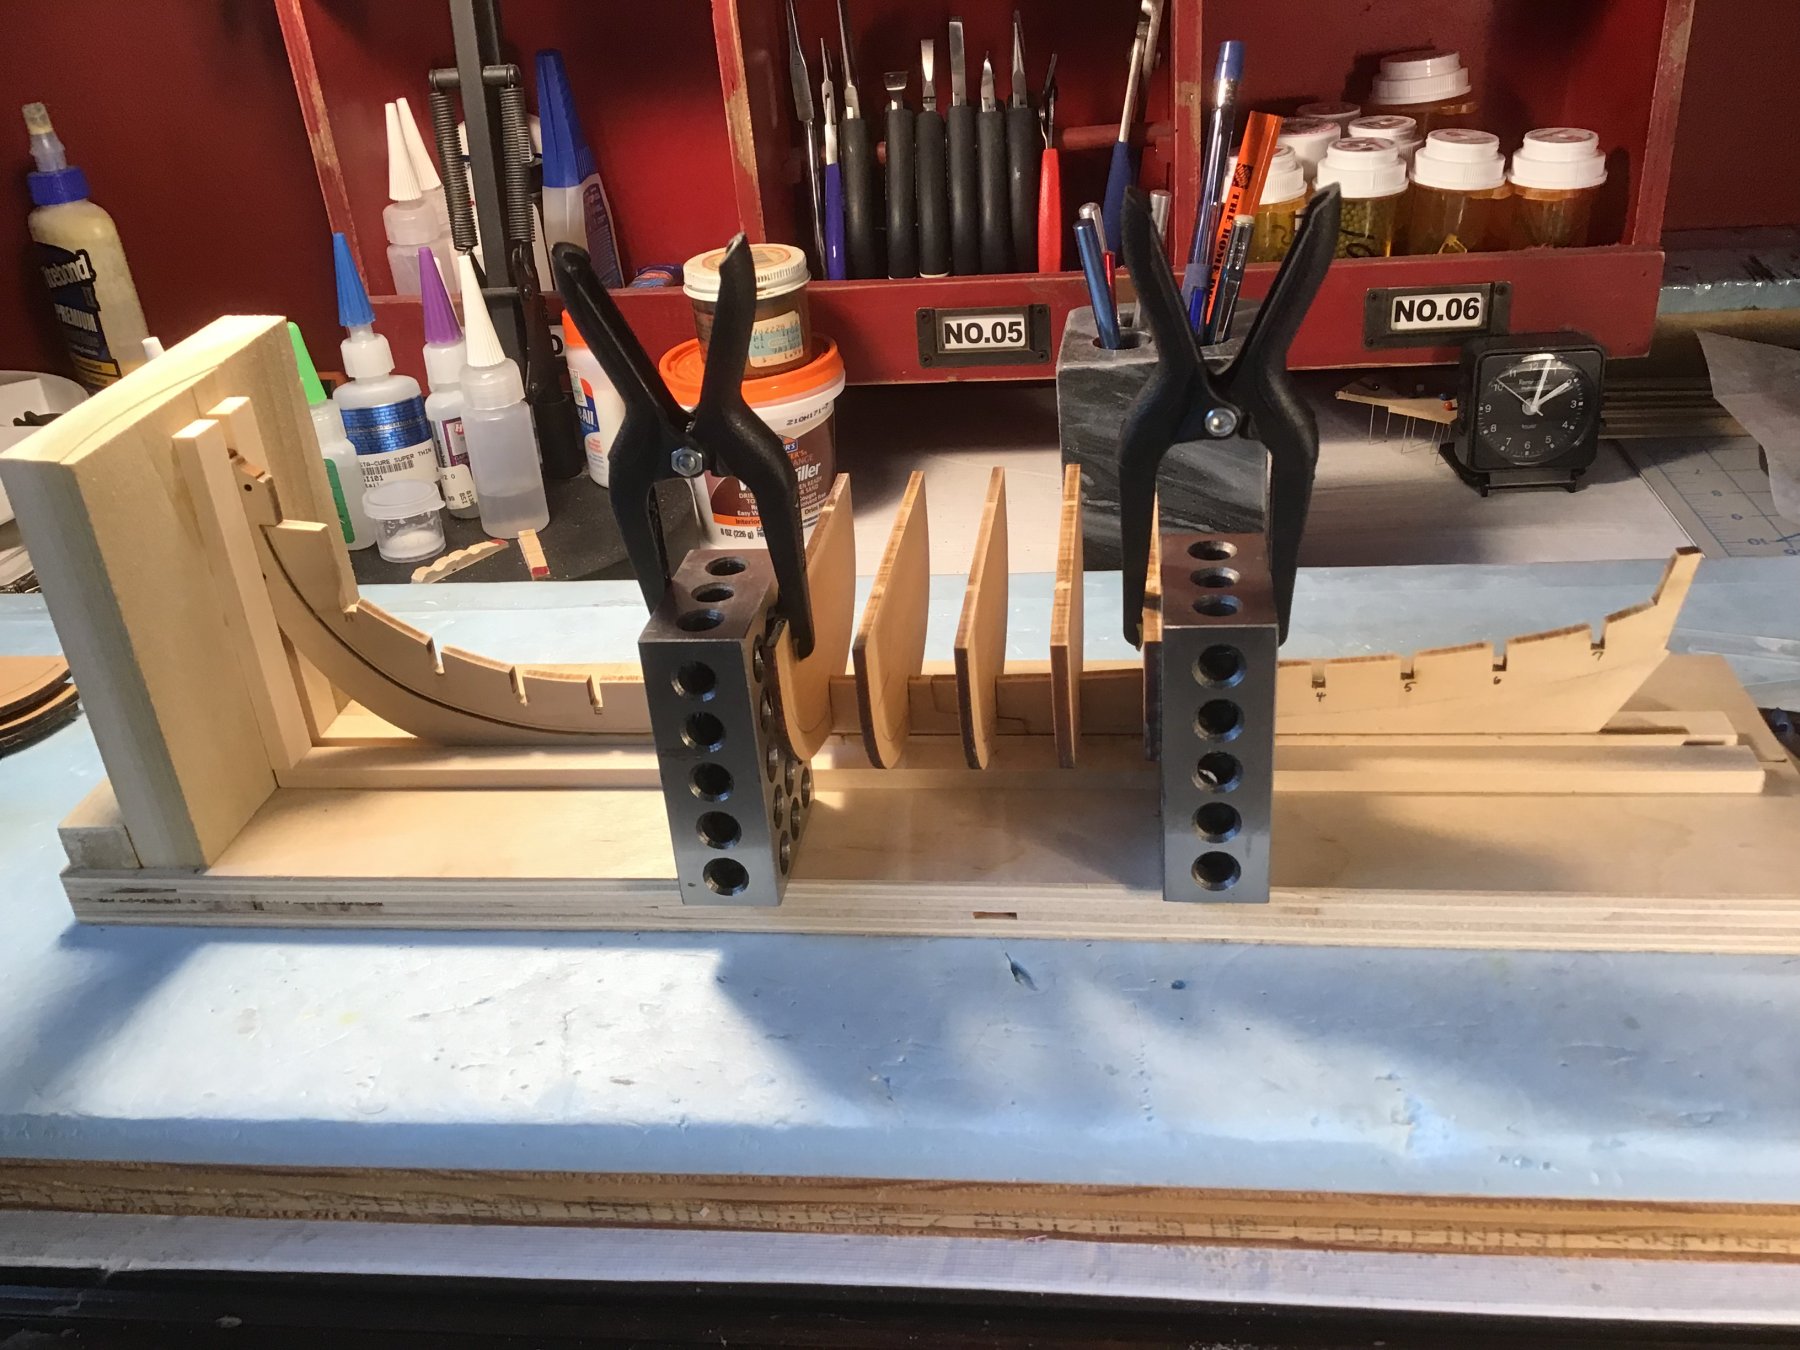
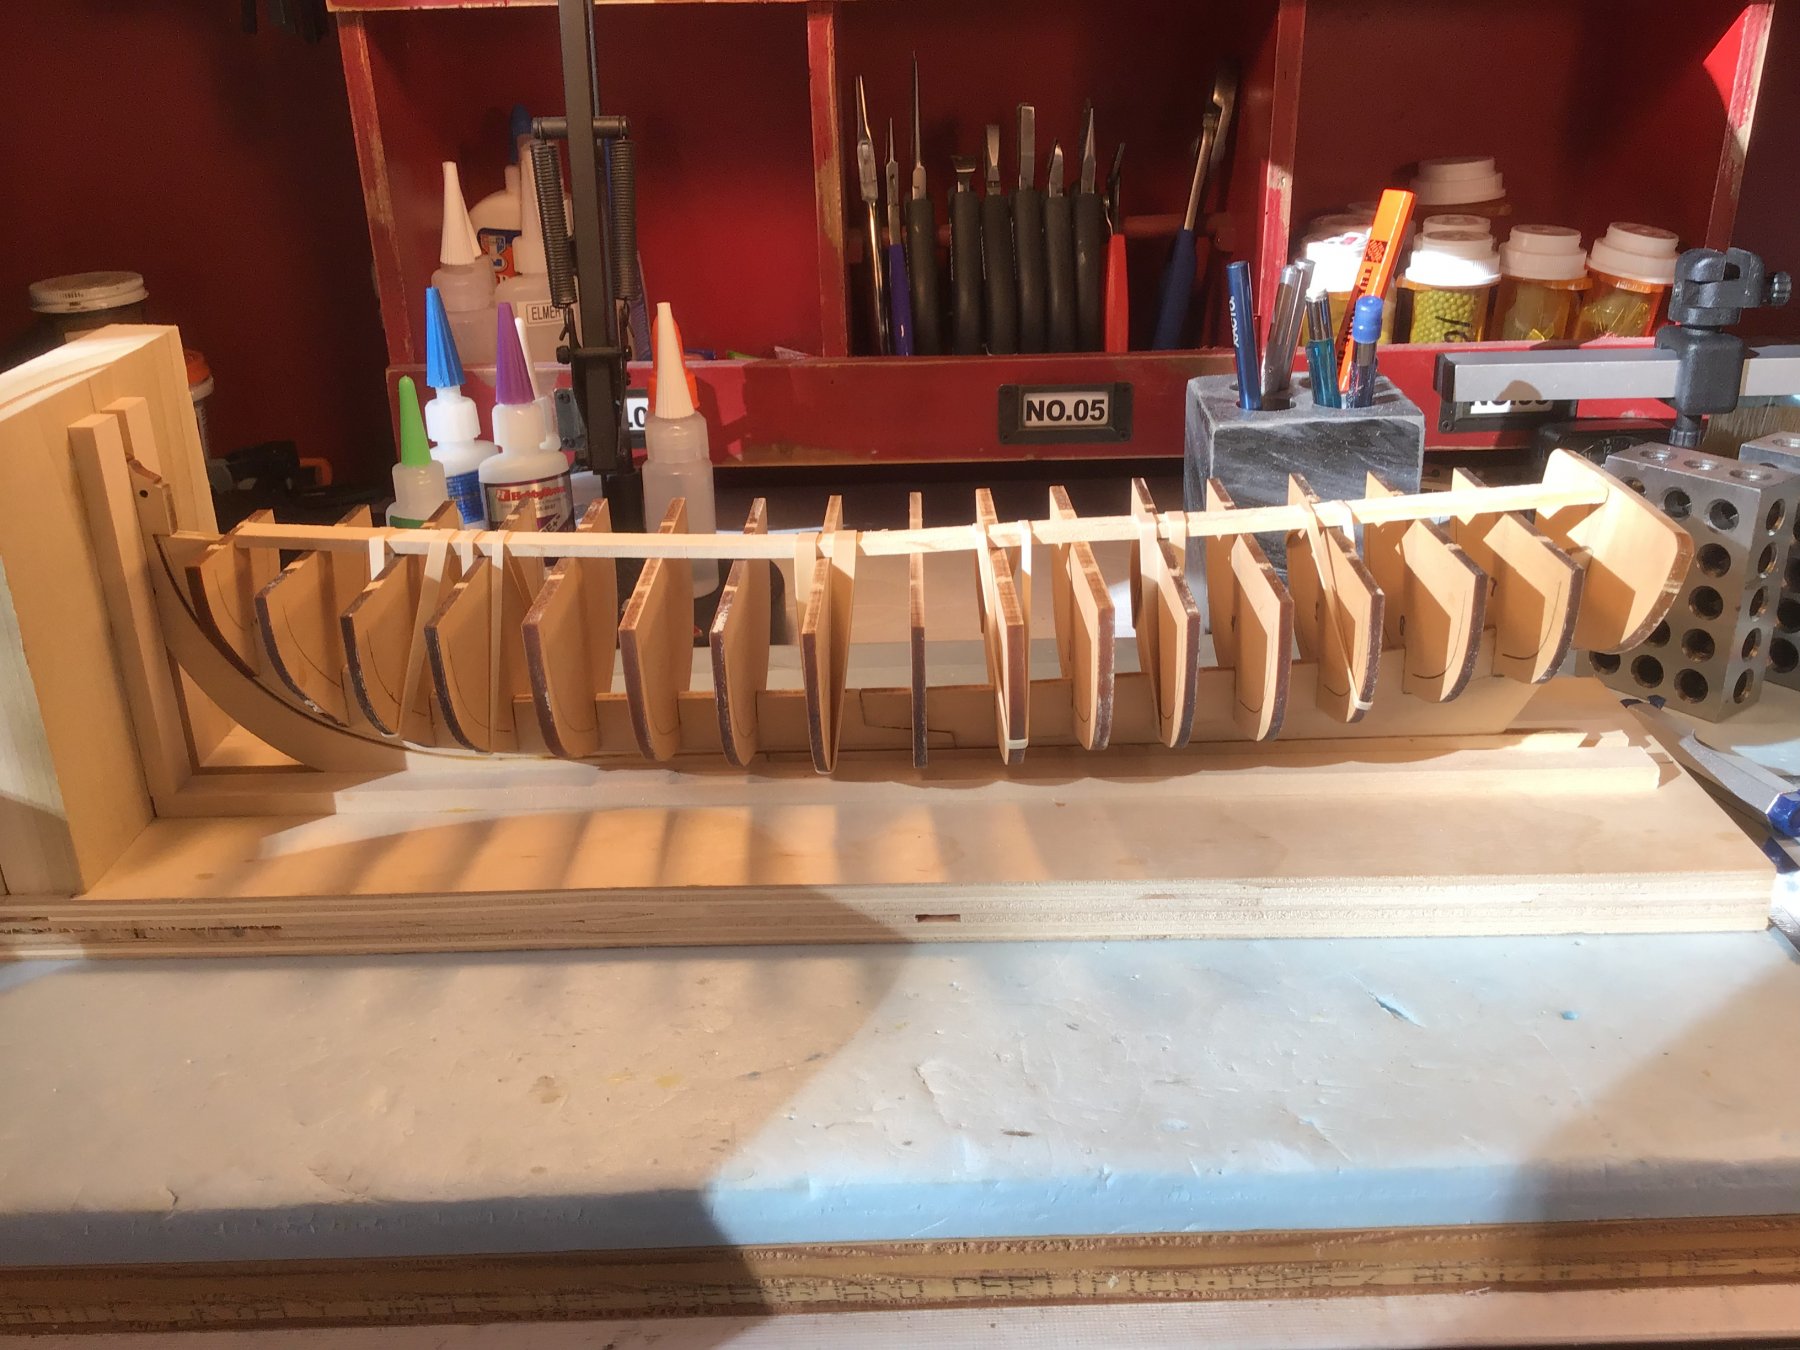
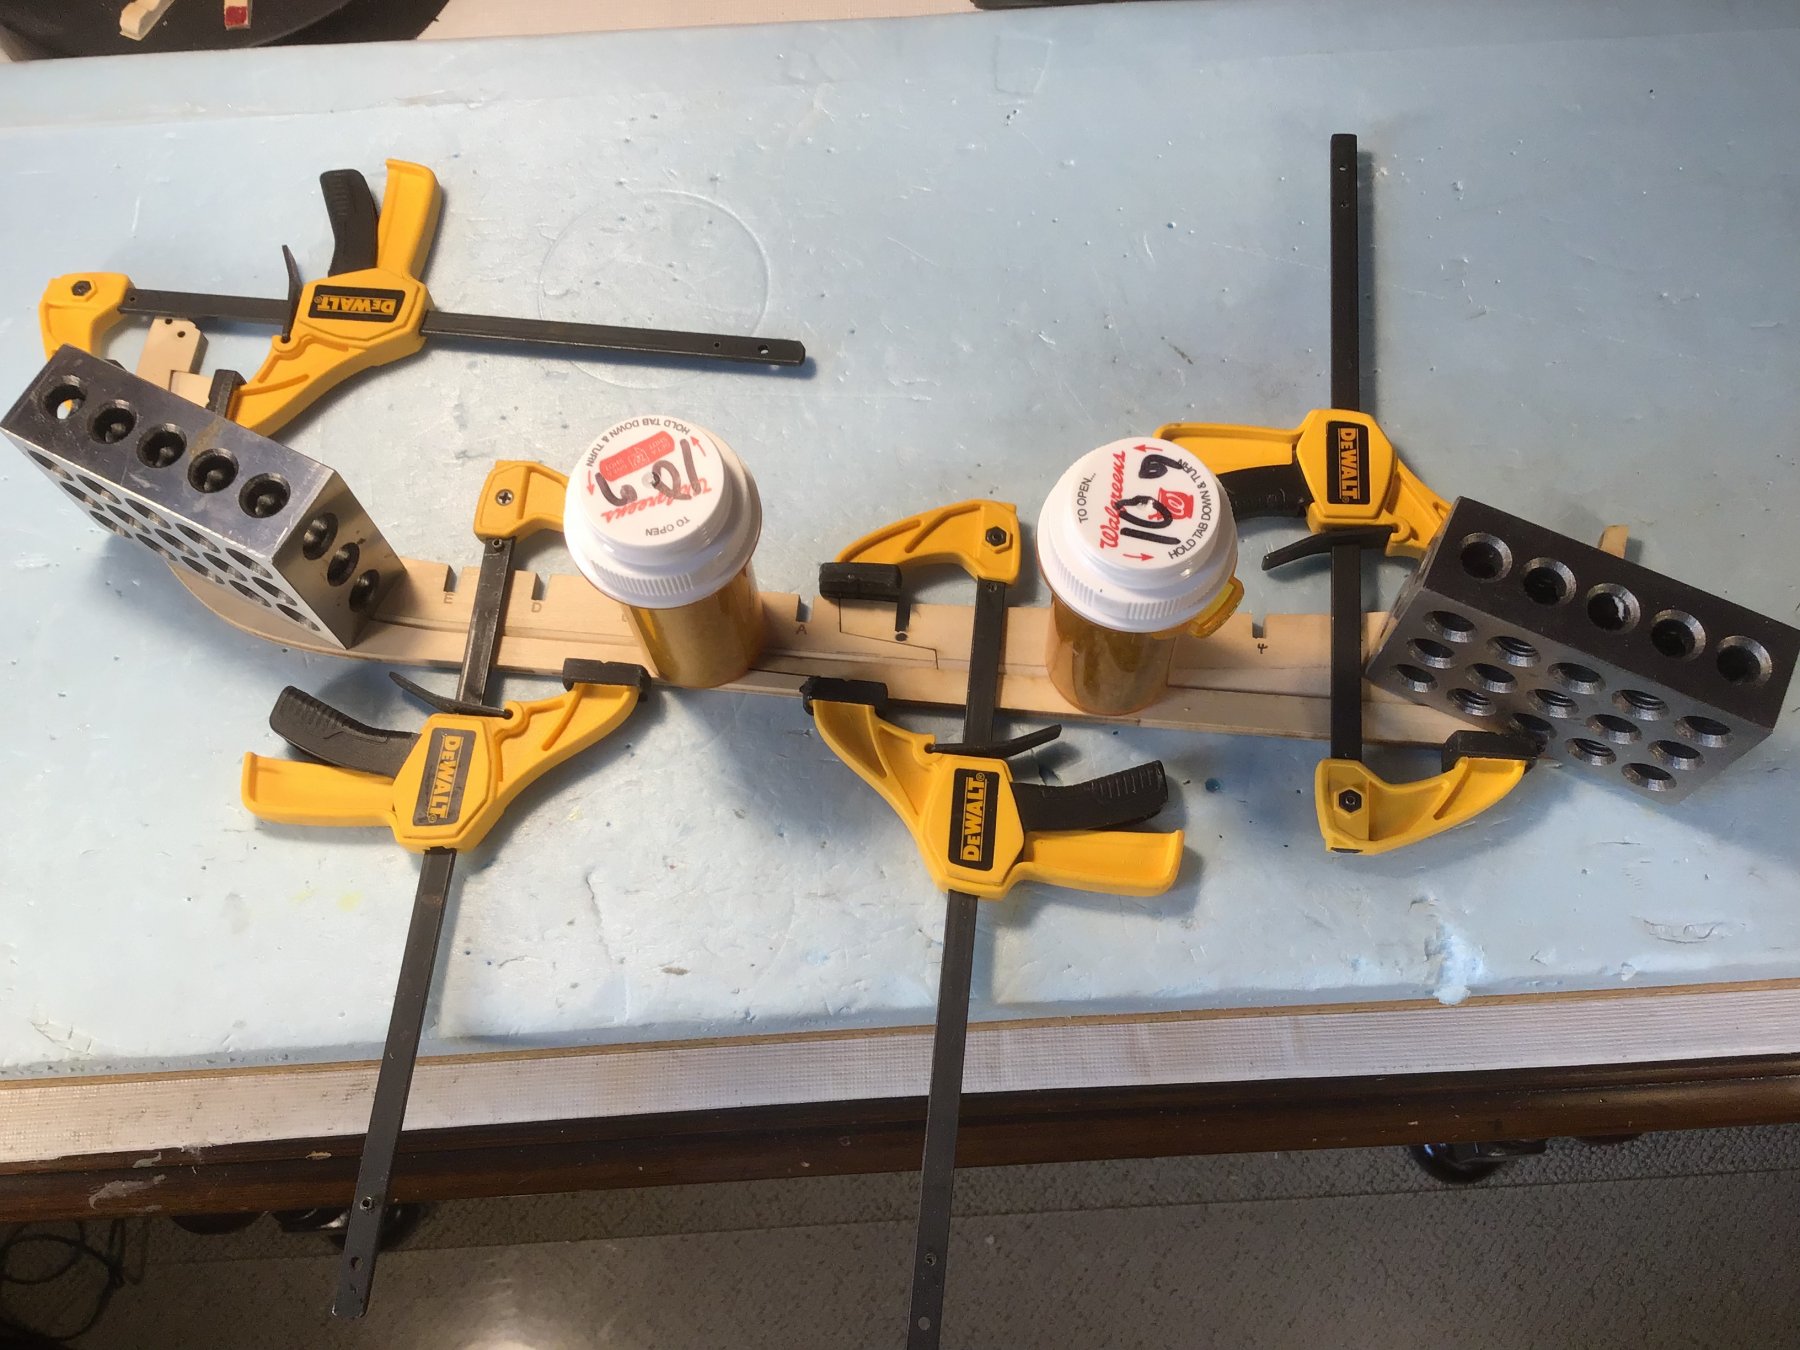
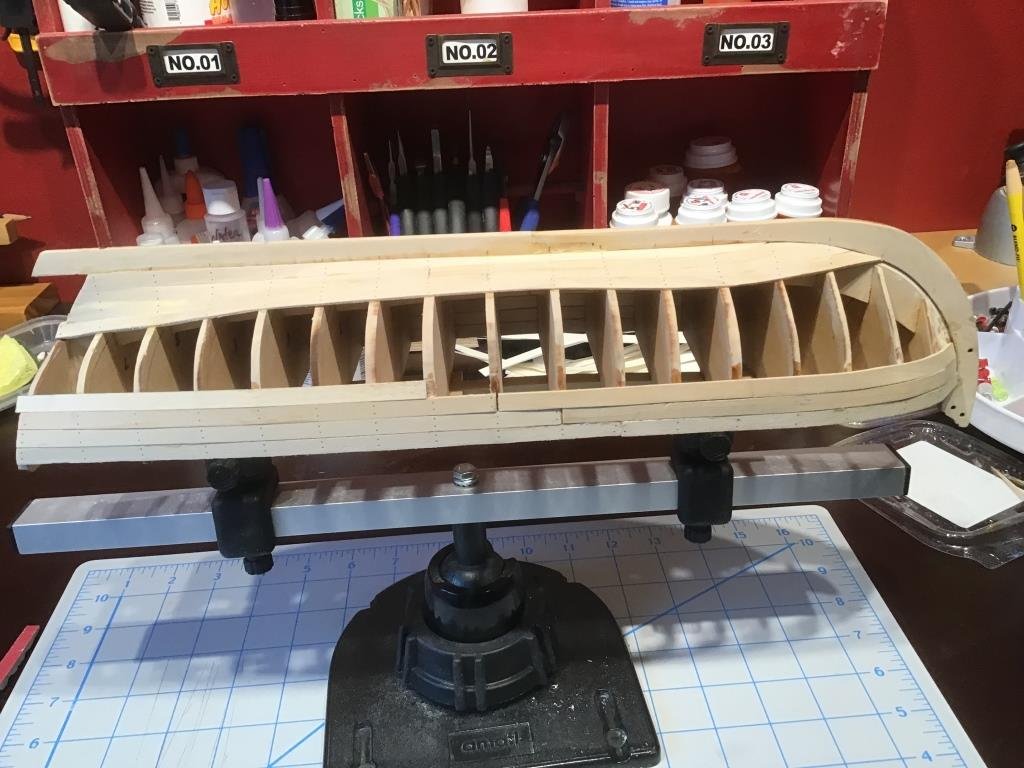
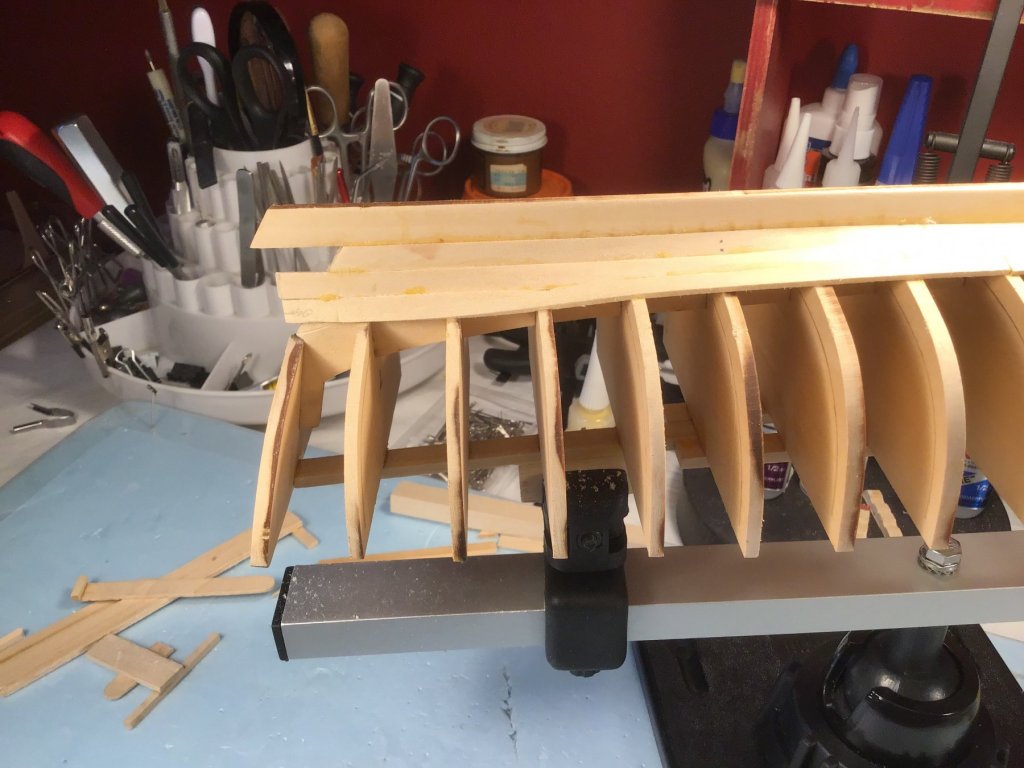
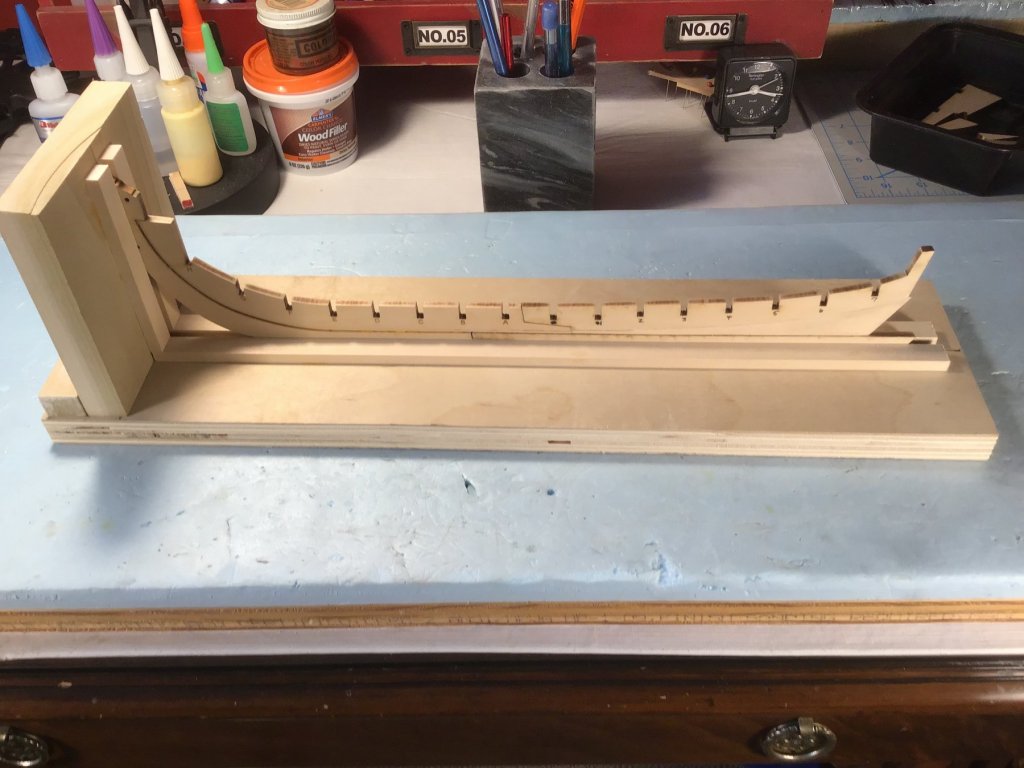
In the next photo I have begun gluing the bulkheads. I have tried to square and level them, then clamp to the metal blocks. This shows the completed bulkheads with the strongback in place for gluing. The instructions indicated two 1/8 x ¼ pieces glued together but I used a single scrap piece of 1/8 x 3/8 that I had. While the instructions called for using rubber bands to make the proper bend I soaked the strip first and then used the rubber bands for the bend and let it dry before gluing.

- 43 replies
-
- 7
-
-
- 18th Century Armed Longboat
- Model Shipways
- (and 1 more)
-
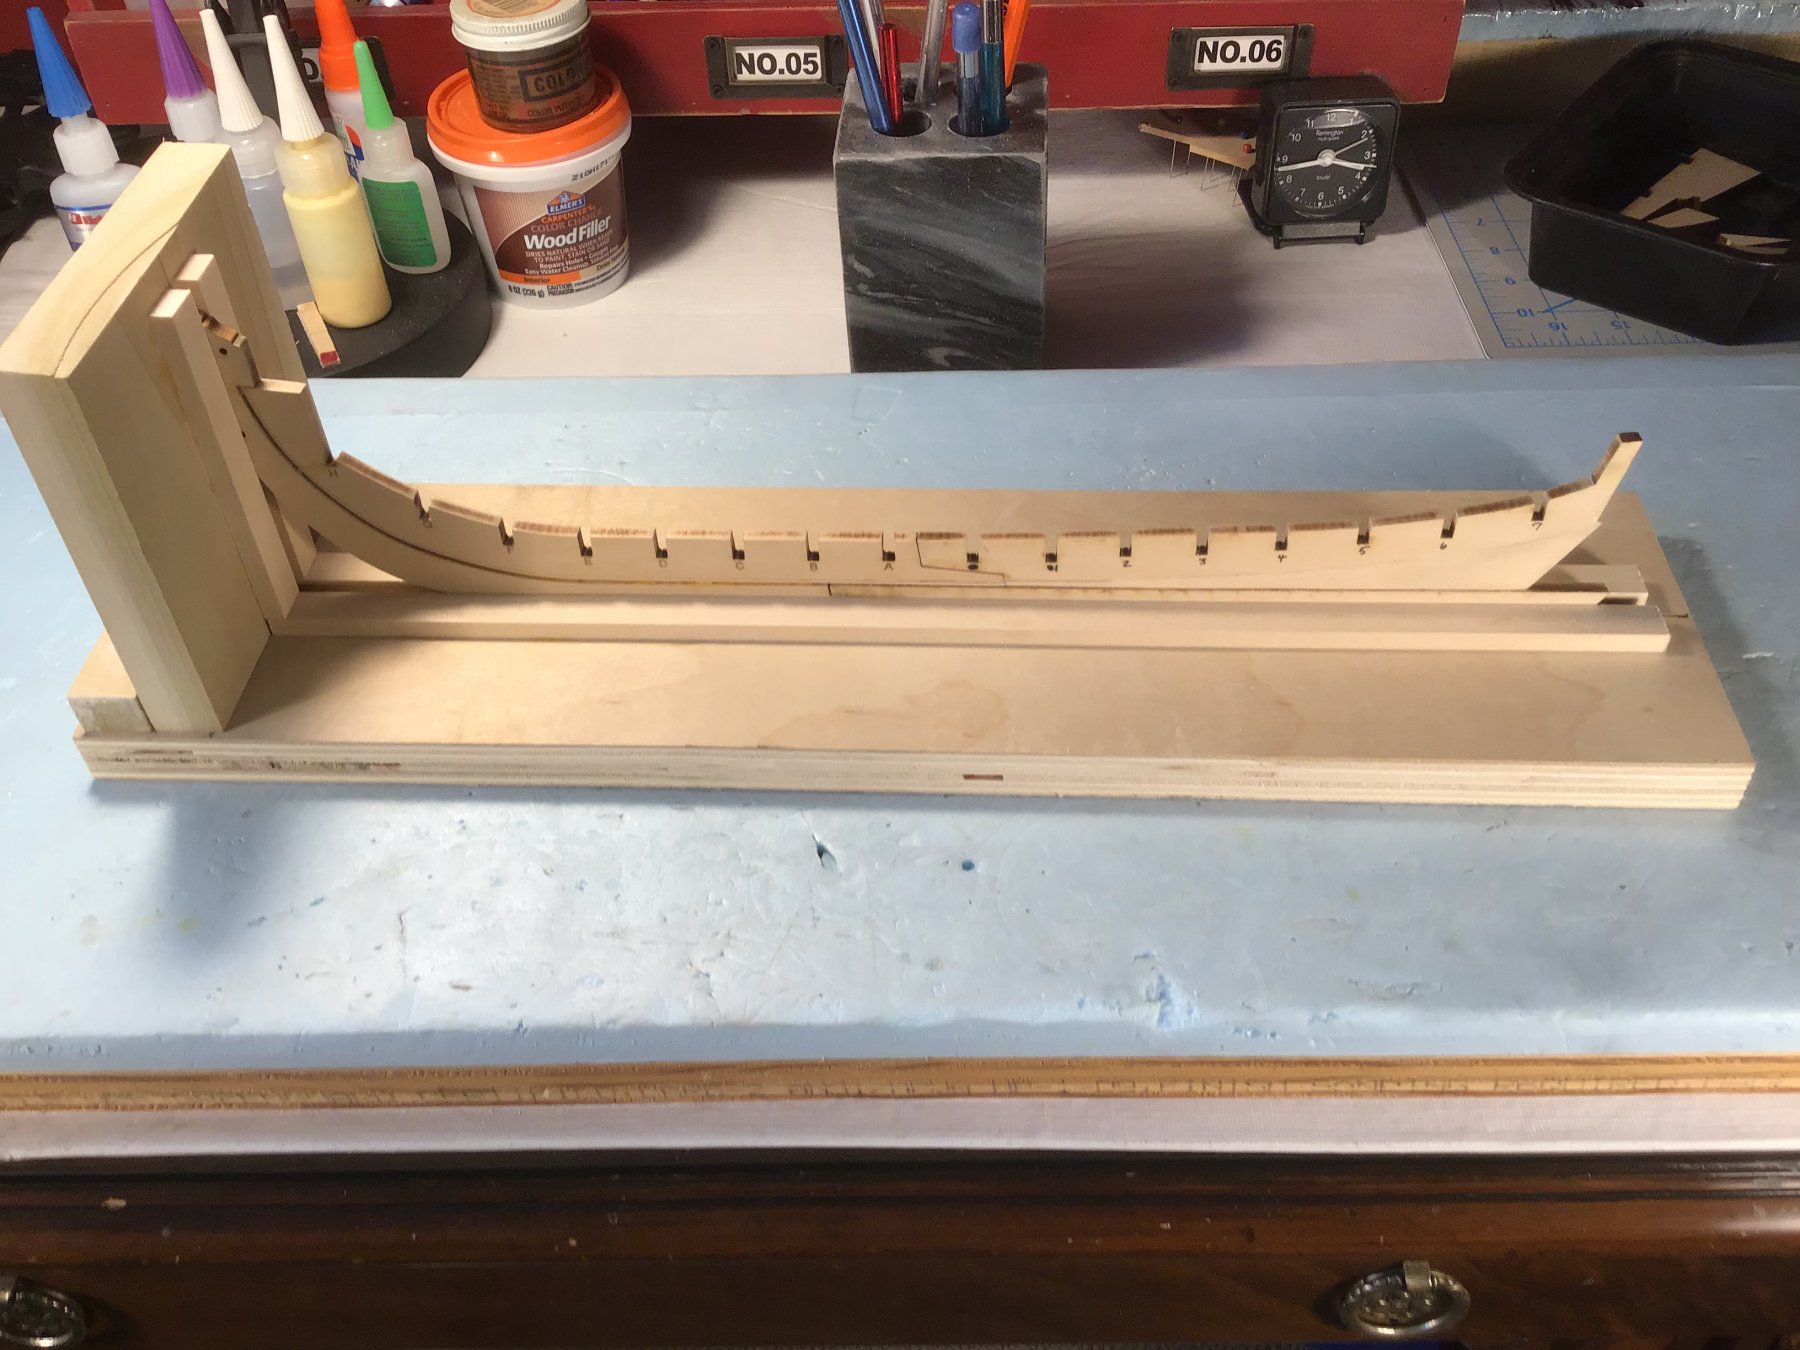
The first step is shaping the rabbit. Hopefully I have gotten close to the correct angle. The photo shows the keel and false keel being glued together. Most blogs have mentioned the weight for flatness but I found that, in addition, I needed clamps to hold the pieces tightly together. The pieces are placed on a glass desktop and weighted. Next photo shows the keel assembly in a simple building jig similar to many others in the various logs. Most of the builds I have seen have left the wood natural except for some wipe-on poly. I decided I wanted to try to add a little more depth without changing the whole look. I stained the frames and one side of the planking with Minwax Ipswich Pine. We’ll see how it turns out.


- 43 replies
-
- 5
-
-
- 18th Century Armed Longboat
- Model Shipways
- (and 1 more)
-
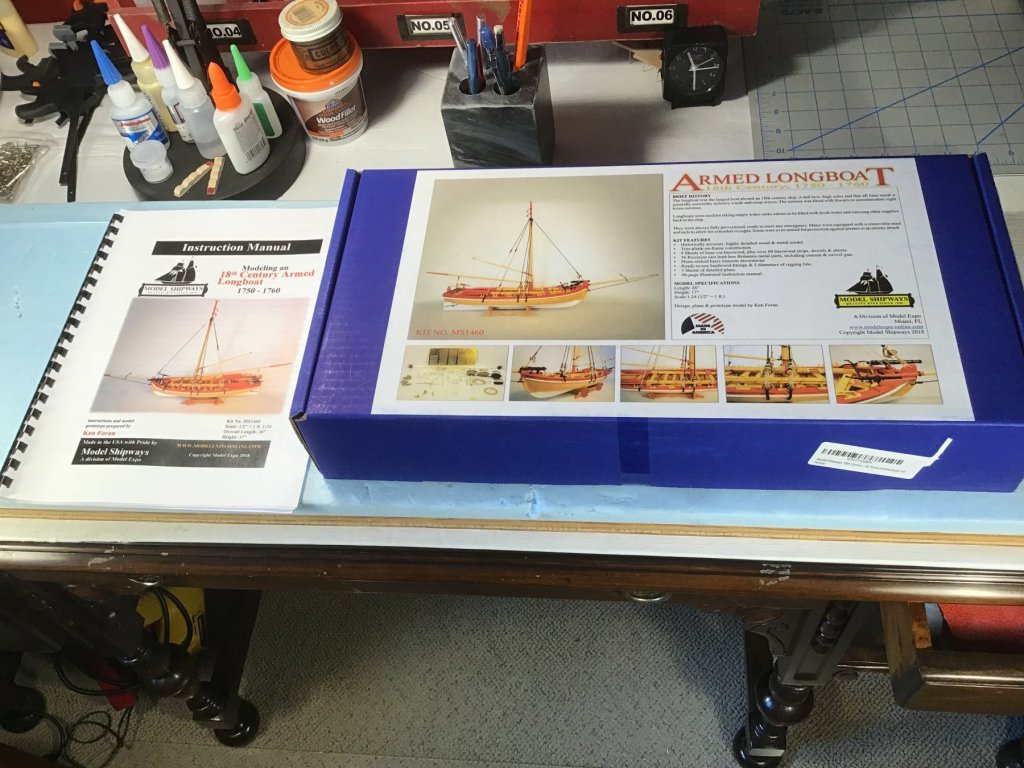
Hello all. This is my first build log although I have built a few models previously. I am in no way in the league of many of the craftsmen that I see in this forum, so any thoughts or suggestions will be most welcome. This project is the 18th Century Armed Longboat by Model Shipways in 1:24 scale. I assume this model is basically a scaled up version of the early Longboat designed by Chuck. There are not many build logs for the armed version but the smaller version seems to be one of the most popular builds on the site. Hopefully you can point out any differences and steer me away from any major faults. Below is the typical photo of the box showing the build to be undertaken. I’m using this photo primarily to check my ability to add photos properly.
- 43 replies
-
- 5
-
-
- 18th Century Armed Longboat
- Model Shipways
- (and 1 more)
-
Great idea. I will try this approach.
-
Kurt, thanks for the pics and ideas. Sorry for the late response. I was part of the large group whose homes were flooded here in Houston so my modeling has been hit or miss lately.