HOLIDAY DONATION DRIVE - SUPPORT MSW - DO YOUR PART TO KEEP THIS GREAT FORUM GOING! (Only 24 donations so far out of 49,000 members - C'mon guys!)
×


bucknbarney
-
Posts
62 -
Joined
-
Last visited
Content Type
Profiles
Forums
Gallery
Events
Everything posted by bucknbarney
-
 Ha! Things I did not think of Nenad! I think I'll avoid the dusting conversation until AFTER the ship is in her dry dock!
 -
Hey guys, the Admiral said yes to where I'd like to place the model! Of course, I don't think she has any idea how big this frigate is actually going to end up being, but it's a start! lol
-
I thought the same thing rpeteru, but I decided to keep them for now to use for reference and because for now, it I like how it looks. lol I look forward to seeing your build! It'd be nice to have another person building from the same plans to hash things out with!
-
Sorry about that. The ruler is 12" in length.
-
Thanks for the great compliments! Floyd, I want to have the prop in so my boy can use it when he wants to take my place as captain. Nenad, as far as placement in the home, I'm hoping (up to wife, of course!) to build a shelf for it to be placed right on the wall behind the dining room table! Wish me luck on that!
-
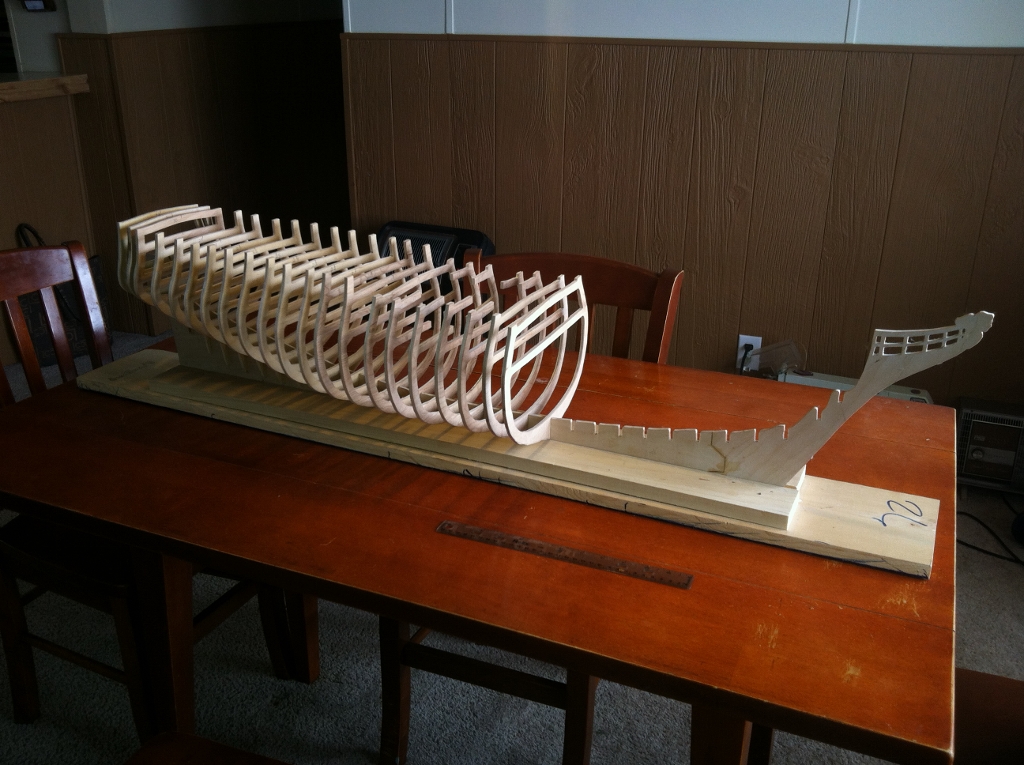
Forgot to say that I put a ruler in the pic next to the frame to help show size.
-
Thanks for that compliment. So far, it is 46" .
-
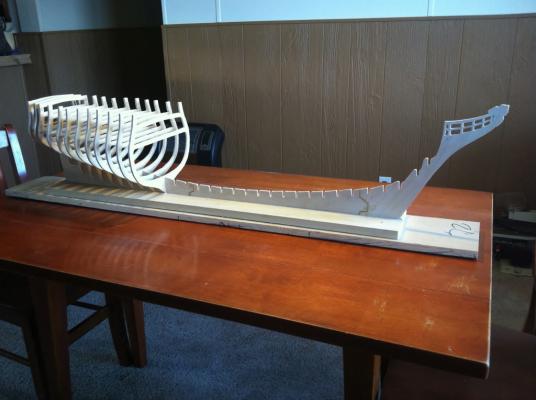
Here's my latest pic of my SLOW progress. Being a full time dad, full time husband and full time employee, I don't have a lot of time for my hobbies! lol Only 12 ribs to go! I have not glued any of the ribs down as I am also researching where I'm going to be putting my controls. Per some good advice given on this great site, I'd like to be able to work on the keel without the ribs attached when placing things like the prop and the detachable ballast plate.

-
Oh wow! I am super impressed at your skill with these tiny carvings! This whole model is just amazing.
-
While reading Nenad's posts on his build, he wrote about jewelry tools and supplies. It reminded me that my wife, who's from Colombia, used to hand make jewelry using native Colombian seeds (beautiful stuff). So, I dug out her equipment and supplies and found all kinds of stuff I'll be able to use (after asking of course!) in my build! So many good things on this forum! I also have to say how deeply impressed I am by all of you. I am used to working with rough, full sized building materials and you guys make things so much smaller look so much more beautiful and intricate than anything I have ever attempted. I am in awe of you all, and if I can make this build look even nearly as amazing as the models I have seen on this forum, I will be very happy!
-
Cutty Sark by NenadM
bucknbarney replied to NenadM's topic in - Build logs for subjects built 1851 - 1900
Nenad, My wife is from Colombia and she used to hand make native Colombian seed jewelry (very beautiful). I actually just re-discovered all her equipment today and I am blown away at all the goodies she used that will be useful to me (after asking, of course), from different wires, to threads and rope to small tools that will be perfect for working with all the rigging! You are so right my friend! Thanks for the great idea!- 4,152 replies
-
- 1
-

-
- cutty sark
- tehnodidakta
- (and 1 more)
-
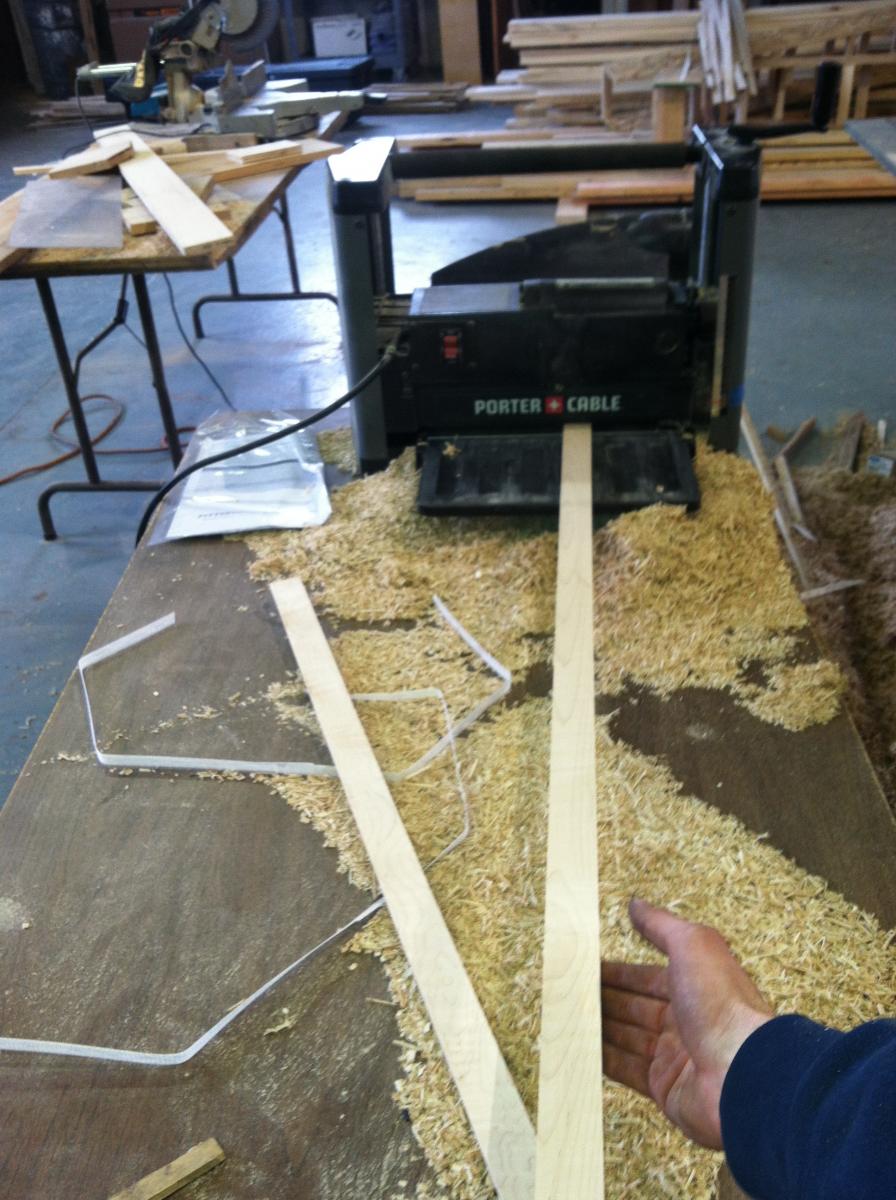
Either way... new toys for Mark!! My boss didn't even know how far down the planer could go. I had to clean out the planer perfectly to get it down that far, but it worked! It is actually closer to 2.5 mm. Still... I think it'll work great, and it was free, so I'm not complaining!
-
Found some scrap soft maple at the shop and used the smaller planer to plane down some strips for planking material. Got them down to about 2mm thick. With that, I'm thinking about going 5-7mm for width of the planks. It took a couple hours to plane them all down, but I like the price... FREE. On a side note: I purchased a metric ruler and decided to try it out. Now I have one question America..... WHY THE HECK AREN'T WE USING THIS?!?!?!?!?!?!?!? It is soooooooo much easier than standard!!!! OMG!!!

-
I am reading up on Revier's build now Mark. Thank you so much for the help. I'm grateful to you!
-
Thought I should show the pic of the plans I'm using. After a LOT of research, I'm finding that these just don't offer a ton of detail to assist me in accomplishing this build. The plans came with some PDFs that someone else had created and offered of the keel and ribs, which I am using to help get me through the framing of the main part of the hull. The rest.... must have flown out the porthole, along with a bit of my sanity, because I can find nothing else on this particular ship, which I don't even know the name of! I know I can have a little fun wit it, because this lack of info offers me the ability to explore a little artistic expression! still... just a little more info?.... lol As you'll see, it's bad enough that this is my first build, add a great lack of detail and having it be in a language I don't understand is just fun. I'm finding it a pleasurable challenge and have located some ships that were similar, like the Unicorn, that I have thought about taking ideas from. If there is anybody out there that knows what most of this plan says, or knows of similar frigates I can use for better reference, I am completely open to suggestions!

-
Thanks for the solid advice Cap'n'Bob. I have had that same thing on my mind for a bit now. After reading up on some of JerryTodd's builds, such as the Pride of Baltimore, I am actually now considering going at the hull in a similar fashion to his. Being that I am, in the end, vying for a workable R/C model, this seems to be the best route.
-
Thanks Bindy! Same to you on your build!
-
Thanks Nenad. I've been following your Cutty Sark build and it has been very inspirational to me.
-
No,it is thankfully not in a u-shape! You've got a LOT of experience Jerry so if you say still use it...I'm using it! I've been considering the Hahn method as well. I have been thinking about how I'd ensure that the frames where plumb and level when I glued them and was thinking about using spacer blocks, 90 degree angle braces and clamps. Still, it appears to be a little easier, after the building base has been made, to use the Hahn method.
-
Well!! first of what I'm sure will be MANY wonderful pitfalls in this build of mine.... Noticed this morning that the keel is bowing. Being that it is 1/4 ply, I can't steam it or go any of the other routes using heat to straighten it as I will delaminate. So... This morning I attempted a fix by just moistening the outer plies on each side and placing the keel on a flat surface with weights to keep it flat while it dried during my work day. Came home and checked at it is straighter! But... alas, it is not perfect. I'm going to attempt it again tonight with the hopes that it will straighten out even more over night. Anyone have any suggestions? I even asked several of my co-workers (I'm a carpenter) and they couldn't think of anything better besides just scrapping the keel and cutting and filing another. I don't want to have to do that!!! But, I will if it comes down to it. Well, like most projects, there's always something else to do while you wait. So, back to tracing, cutting, and filing more ribs!
-
Cutty Sark by NenadM
bucknbarney replied to NenadM's topic in - Build logs for subjects built 1851 - 1900
OMG! Nenad, this is beautiful man! I am so stoked to get where you are now! Many kudos to you! -
Thanks to all for your awesome help and encouragement! I am planning on keeping this log up as much as possible. Thought I should throw out there that I am hoping to have this model floating by summer and all the masts, yards, sails, rigging and R/C components finished by fall. This may be a bit ambitious, but that is how I am! Lol
-
Thanks Yambo! I am thinking about fabbing up a detachable steal keel to help in that arena.
-
Thanks for the heads up Floyd. I'm new to all this and I want this build to sail well, so I must ask if you think I should start with something near the Breadth x 2.4 dimensions discussed in an earlier post? Thanks again.
-
Here is a pic of what I have accomplished thus far. 12 ribs down, 20 to go!