HOLIDAY DONATION DRIVE - SUPPORT MSW - DO YOUR PART TO KEEP THIS GREAT FORUM GOING! (89 donations so far out of 49,000 members - C'mon guys!)
×

owend
-
Posts
51 -
Joined
-
Last visited


-
 GrandpaPhil reacted to a post in a topic:
HMS Mercury by owend - Shipyard - 1:96 - CARD
GrandpaPhil reacted to a post in a topic:
HMS Mercury by owend - Shipyard - 1:96 - CARD
-
GrandpaPhil reacted to a post in a topic:
HMS Mercury by owend - Shipyard - 1:96 - CARD
-
GrandpaPhil reacted to a post in a topic:
HMS Mercury by owend - Shipyard - 1:96 - CARD
-
GrandpaPhil reacted to a post in a topic:
HMS Mercury by owend - Shipyard - 1:96 - CARD
-
Nikiforos reacted to a post in a topic:
Louise by owend - FINISHED - Constructo - 1:26 scale
-
Nikiforos reacted to a post in a topic:
Louise by owend - FINISHED - Constructo - 1:26 scale
-
Nikiforos reacted to a post in a topic:
Louise by owend - FINISHED - Constructo - 1:26 scale
-
Nikiforos reacted to a post in a topic:
Louise by owend - FINISHED - Constructo - 1:26 scale
-
GrandpaPhil reacted to a post in a topic:
HM Schooner Ballahoo by owend - FINISHED - half hull
-
GrandpaPhil reacted to a post in a topic:
Louise by owend - FINISHED - Constructo - 1:26 scale
-
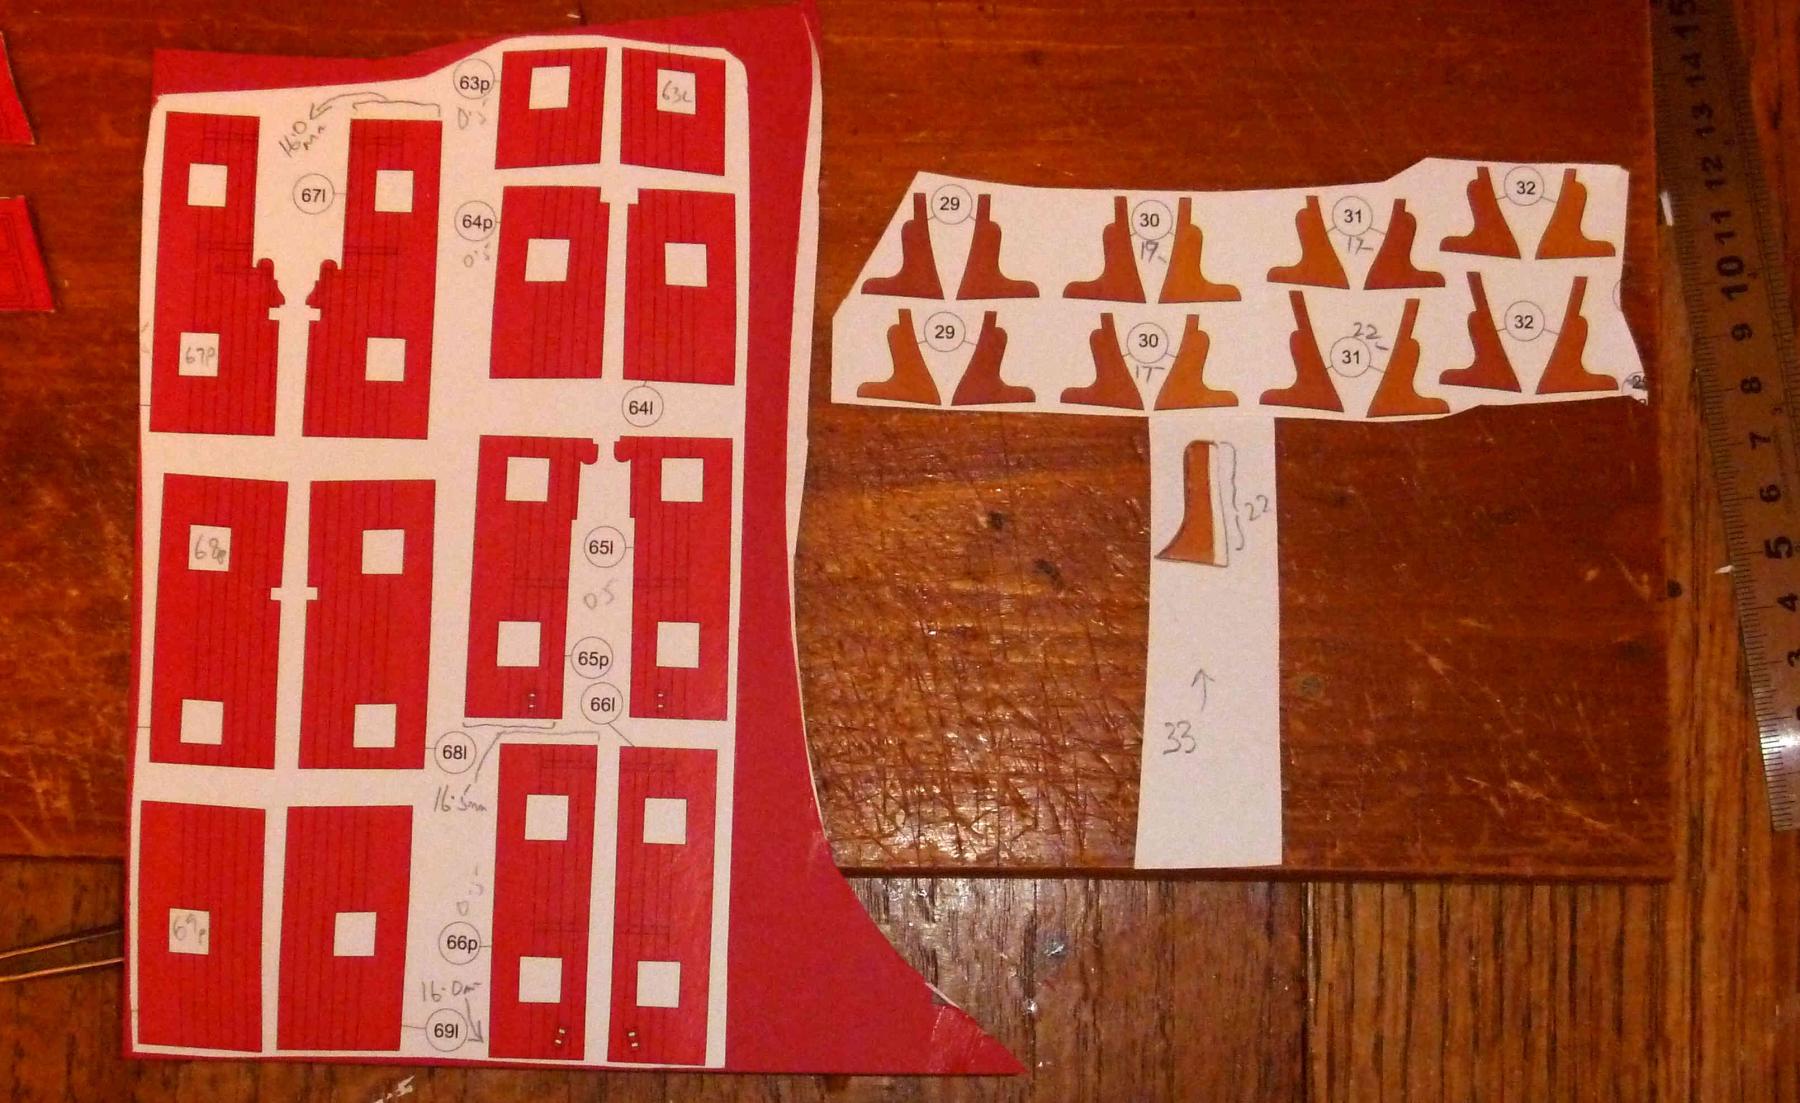
 A bit more done, and the first quality problem arises. As Clare (catopower) has noted on his buildlog, the knees (bulkhead extensions? bulwark supporters?) seem to be different sizes for port and starboard. They are also strange sizes - for instance part 31 is either 17mm or 22mm, whereas the height of the inner bulwark parts 65 and 66 which should be supported by knee 31 is 16.5mm. As the knees are all about the same shape and will be partially obscured under the spar deck, and the bulwarks are 16-16.5mm, I'm going to scratch some at 16mm high, but using at least the outboard profile of each pair as they are slightly different. I'll try the shorter of the two options of the printed profiles, they LOOK more accurate. I would guess that in the typesetting, someone copied one set on knees and pasted for the second pair, and somewhere the image was stretched. PeteW, as Captain Slog says, the laser-cut hull skeleton is worth paying extra for, which comes with Mercury. I think for Enterprise the price is lower but without laser-cut parts; the laser-cut extra pack will nearly double the price and it's otherwise the same, as far as I know. Owen
-
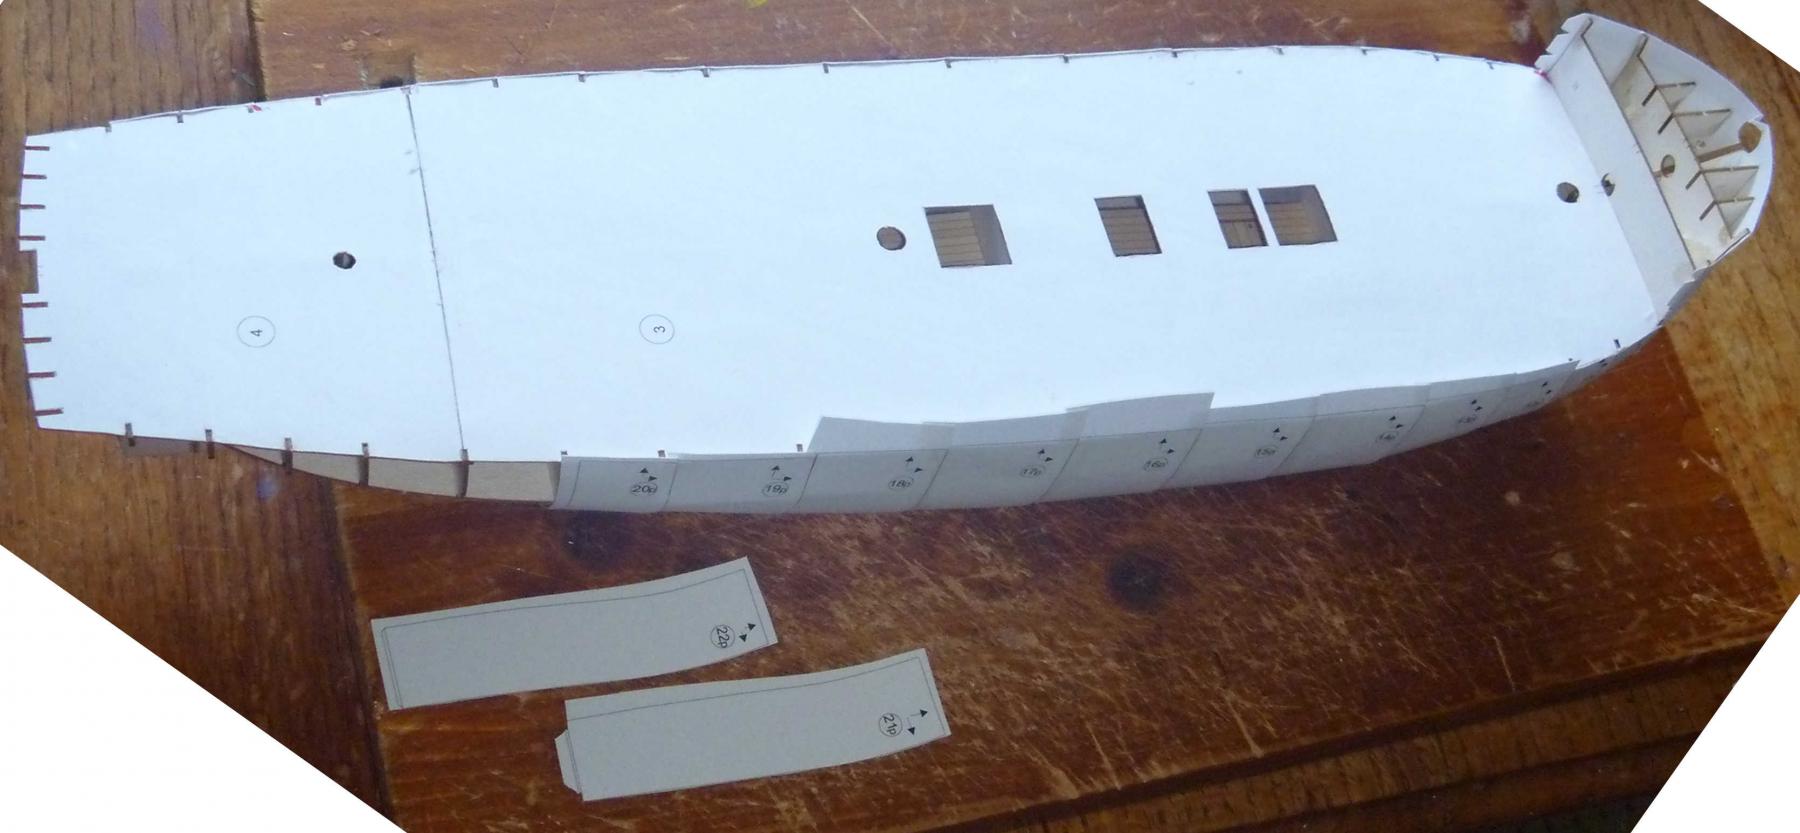
I also went out of sequence to add the "plating" to the upper part of the bows, so that the horns were again protected. Also in the interests of safeguarding delicate bits I haven't attached the transom yet, it'll go on after the plating/planking is on. I have done the plating slightly off-instruction, by leaving a tab on one side of each plate so that they are in effect vertically clinker-built, and not cutting to precisely deck level until after attachment. When the glue has fully set I'll knife and sand the joins smooth and remove the above-deck pieces. A bit labour-intensive but easier for me as my card skills are less than perfect. The instructions suggest using "putty" after the "longitudinal planking" is on - I'm not sure if this is the second, decorative, layer or this white underlayer (more likely), which suggests they expect some unevenness. We'll see!

-
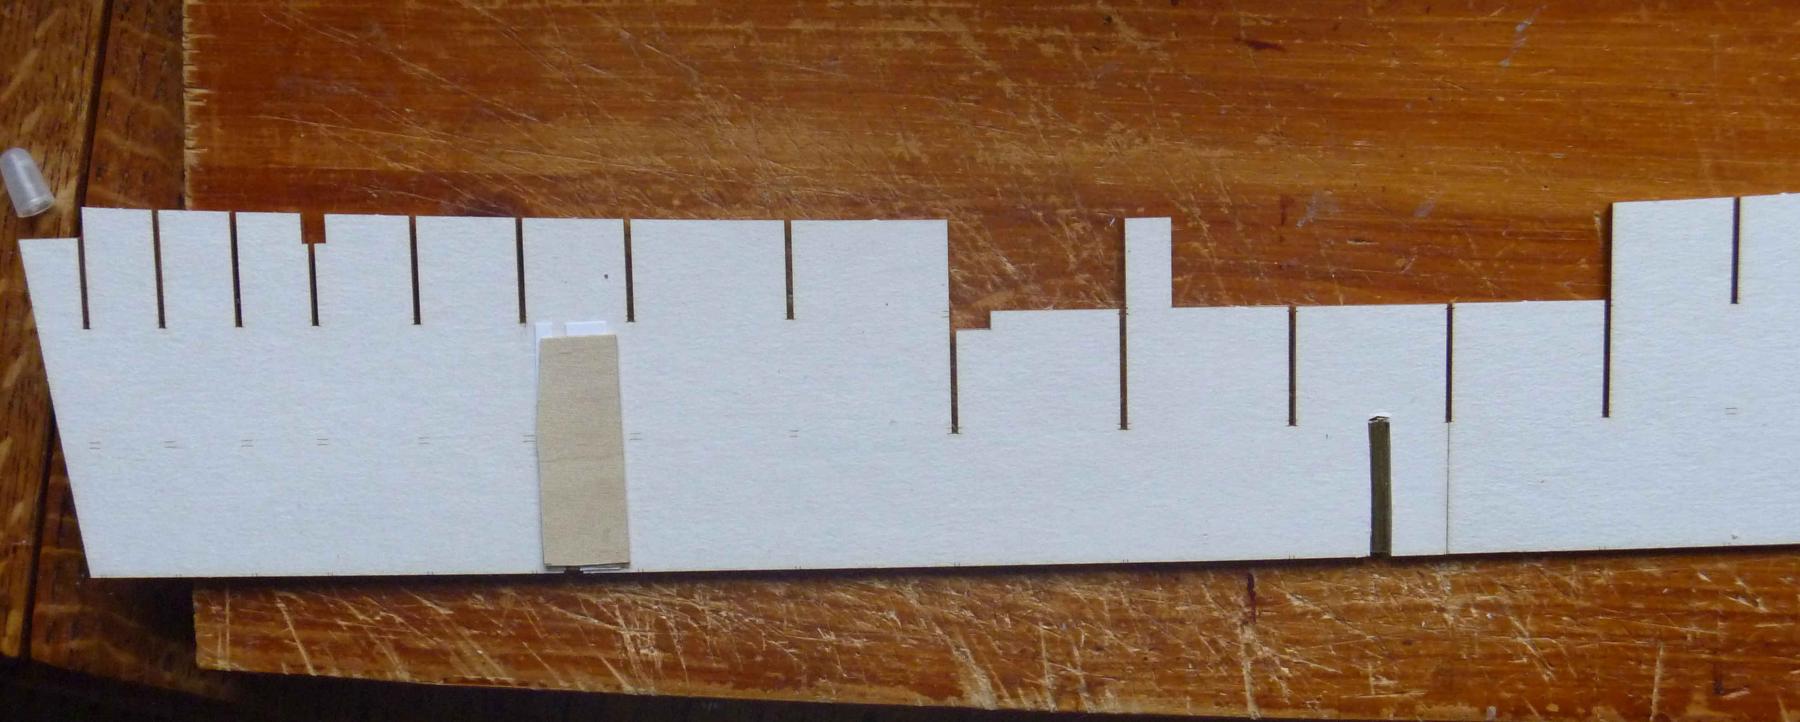
I glued on some guards for the thin horns on frames I and II, with a spot of glue low down. This compartment is hidden when it's finished so any scarring on removal won't show!
-
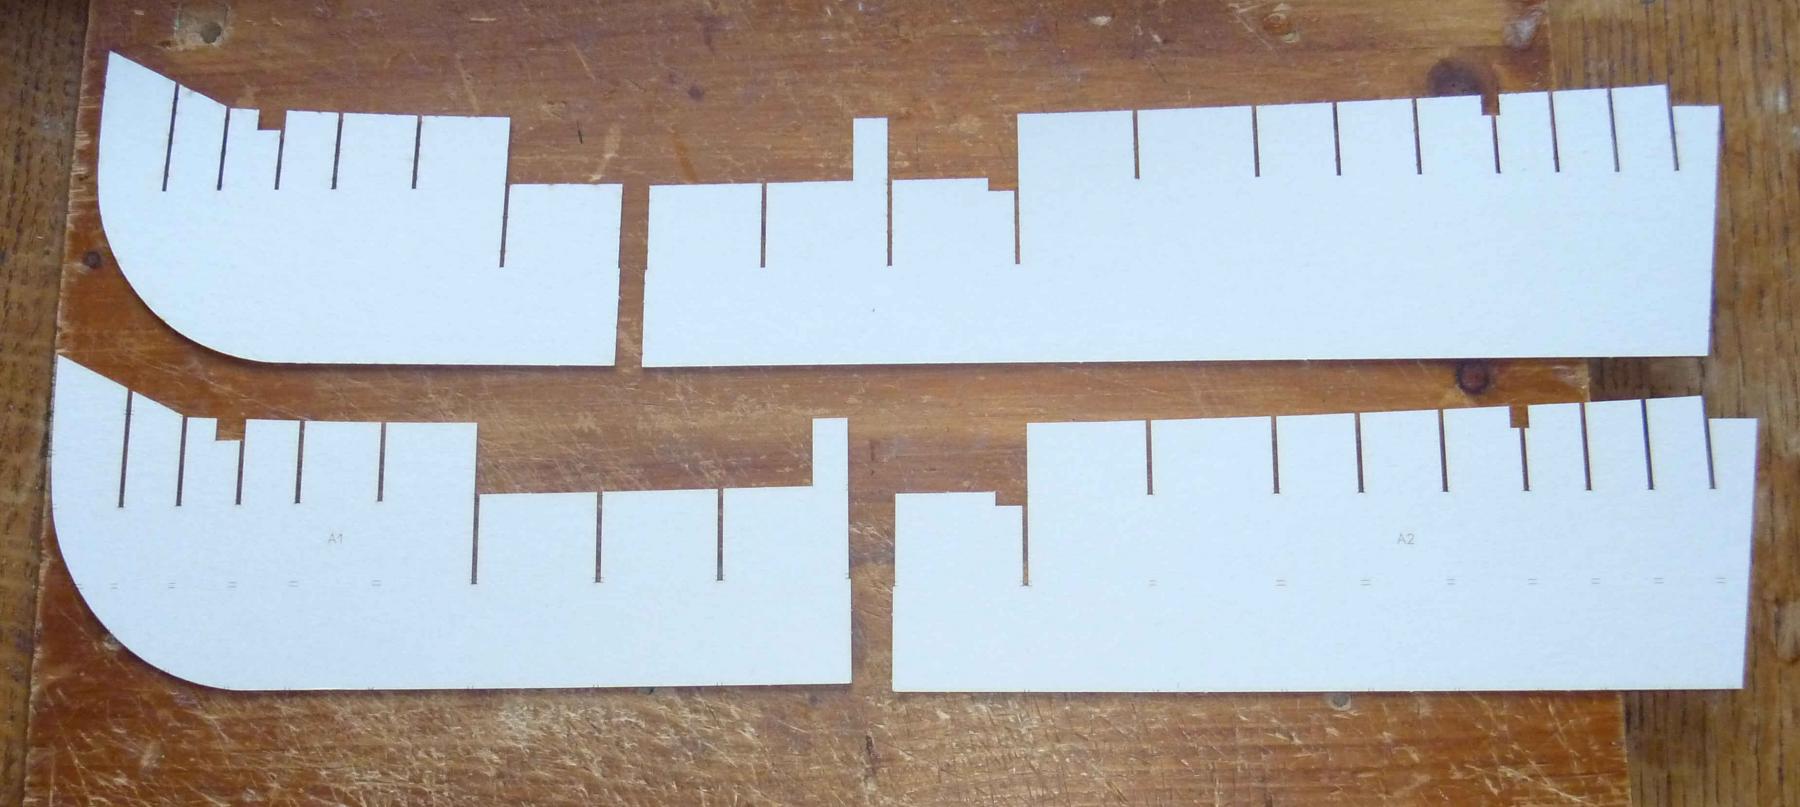
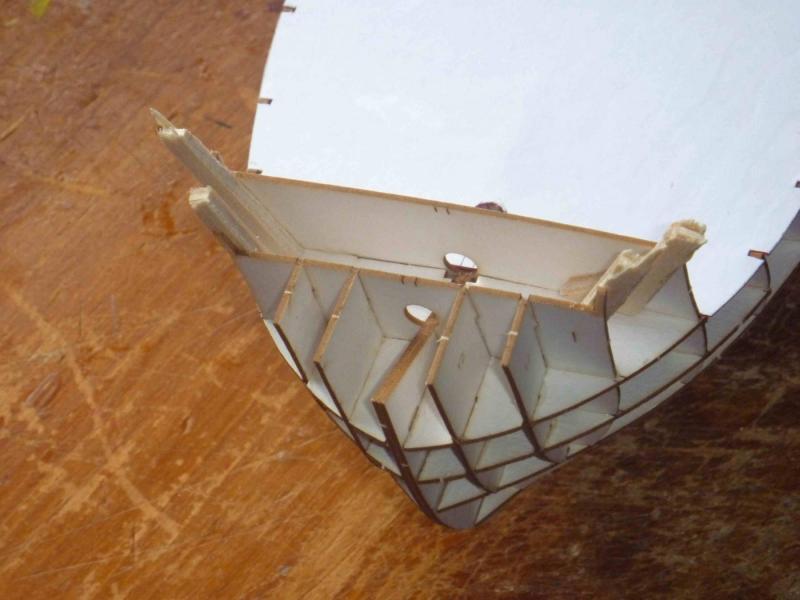
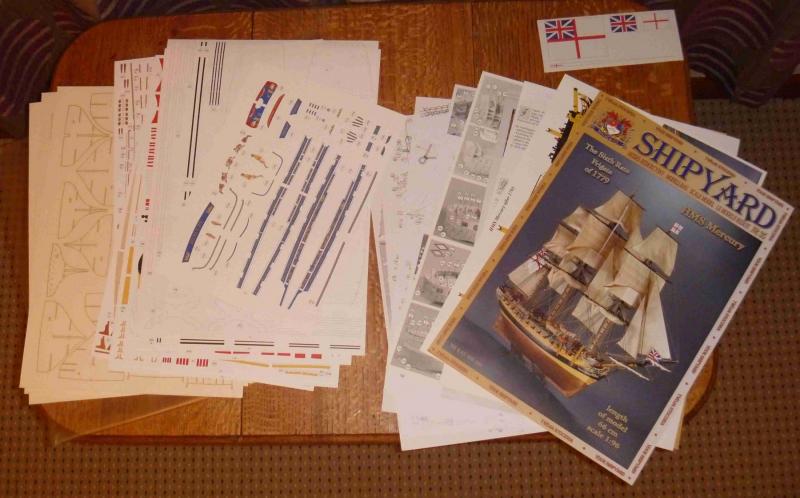
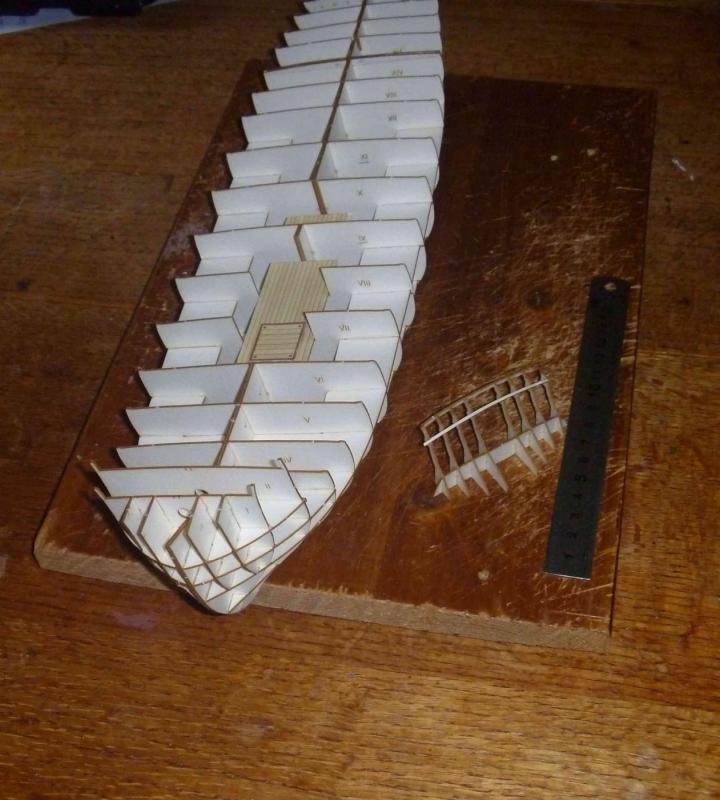
I've started this kit, which was a Christmas present to me from the First Mate (although she's not terribly enthused!). It's similar to the Enterprize kit also by Shiptard, but the Mercury version is slightly more expensive and includes a laser-cut skeleton although otherwise identical as far as I know; laser parts are available as extra for the Enterprize and there are extra kits of masts and of pre-made sails for both kits. I'm intending this as a hull-only model, loosely based on Admiralty models. I've previously done mainly wood kits, but also HMS Saumarez and Consul Pust in paper/card. This kit is considerably more complex and definitely not for beginners. It's 1/96 scale, and the skeleton is about 390mm with the kit claiming 660mm for the completed model It's an impressive kit: 15 pages of printed parts (1 x A4, 14 x A3) well-printed on good quality paper, 3 A3 sheets of laser-cut skeleton, 11 A3 sheets of instructions and photos and a sheet of flags. It includes printed parts for the 1779 original (decorative) and post-1795 (Nelsonic black-and-ochre), although the choice doesn't have to made for a while. The printing looks good and sharp, and the laser-cut parts (on 1mm card) are beautifully precise; my only minor gripe is that the card on the coarse side and needs a bit of care to avoid delaminating. I didn't have to make any adjustments to the skeleton to get things to fit, which is commendable. The instructions are non-verbal, with a series of photos of the kit being bullt and the instruction to add parts in the sequence shown, which is fairly clear with care, although the parts are clearly numbered but aren't in number order on the sheets so a lot of time is spent searching! Some also have to be doubled onto card of 0.5. 1.0 or 2.0mm. I started after Christmas and I am expecting it to take me well past Summer. Some photos: firstly the kit as unpacked (and I think keeping track of all the bits will be a major exercise in itself). Secondly the spine, which is two thicknesses of the 1mm card, with a substantial overlap. Thirdly, I've cut in two brass tube for a mount later - I may not use them but they need to go in now just in case; not very neat as they will be hidden inside. Lastly for now the skeleton ready for plating. Note how small the horns are on frames I and II, and the fiddly small pieces for the stern framework. The instructions say to build this off the ship and attach when done, which I haven't got to, but again they look fragile. PS I started this as a simple kit review last week, in the Card and paper models section, but it's going to be a buildlog, so I've re-started it here.


-
Both sound good, although your sailing season is nearly finished I'd imagine, with winter nearly on us in the Northern hemisphere? It'll be an interesting winter project, designing a scale model of the Star - what scale? And static or sailing? Owen
-
I'd seen your log, Simon, and very impressive, I hope I can get that good a result. I'll be double-planking and leaving the hull in natural wood, possible painted below the waterline, but otherwise you've given me some useful tips! I assume your 1:1 racing used something smaller than Bluenose, Rick? Owen
-
It's arrived, and I've had a quick look. Instructions quite comprehensive but need some translating; timber looks very good quality and well packed, and the second planking is a bit dark but I think it'll be good for leaving natural; other fittings seem to be well detailed. I haven't undone anything yet, I'm not starting for a couple of weeks and then I'll start a buildlog. I can see what you meant Rick: everything looks small, it's going to be new-glasses time!
-
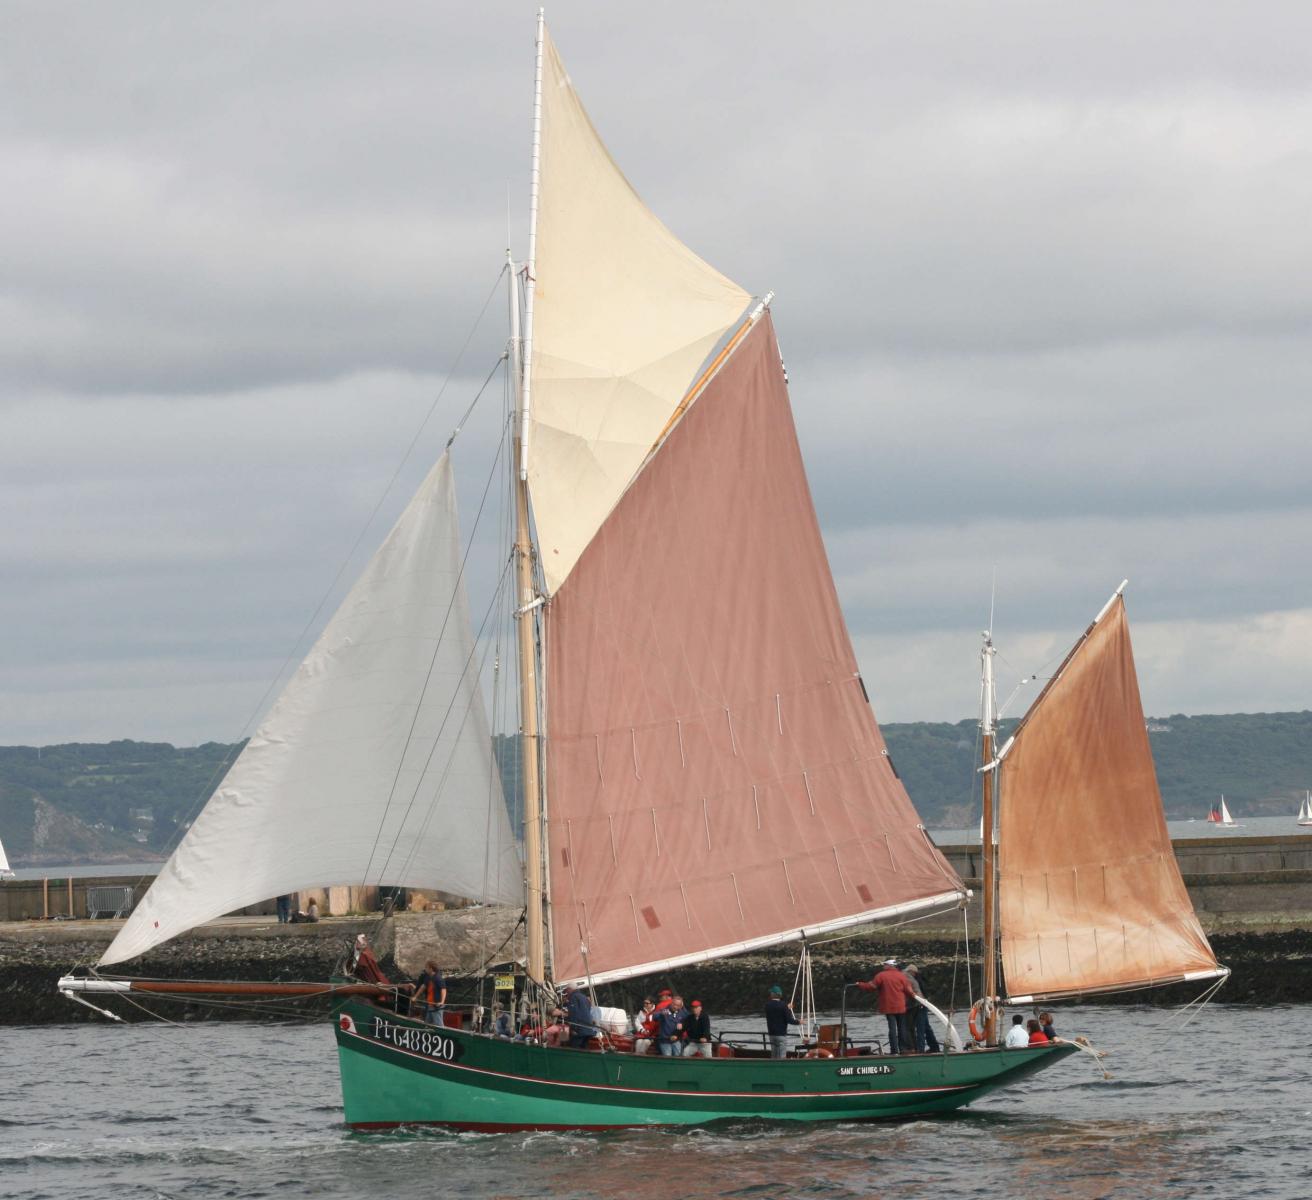
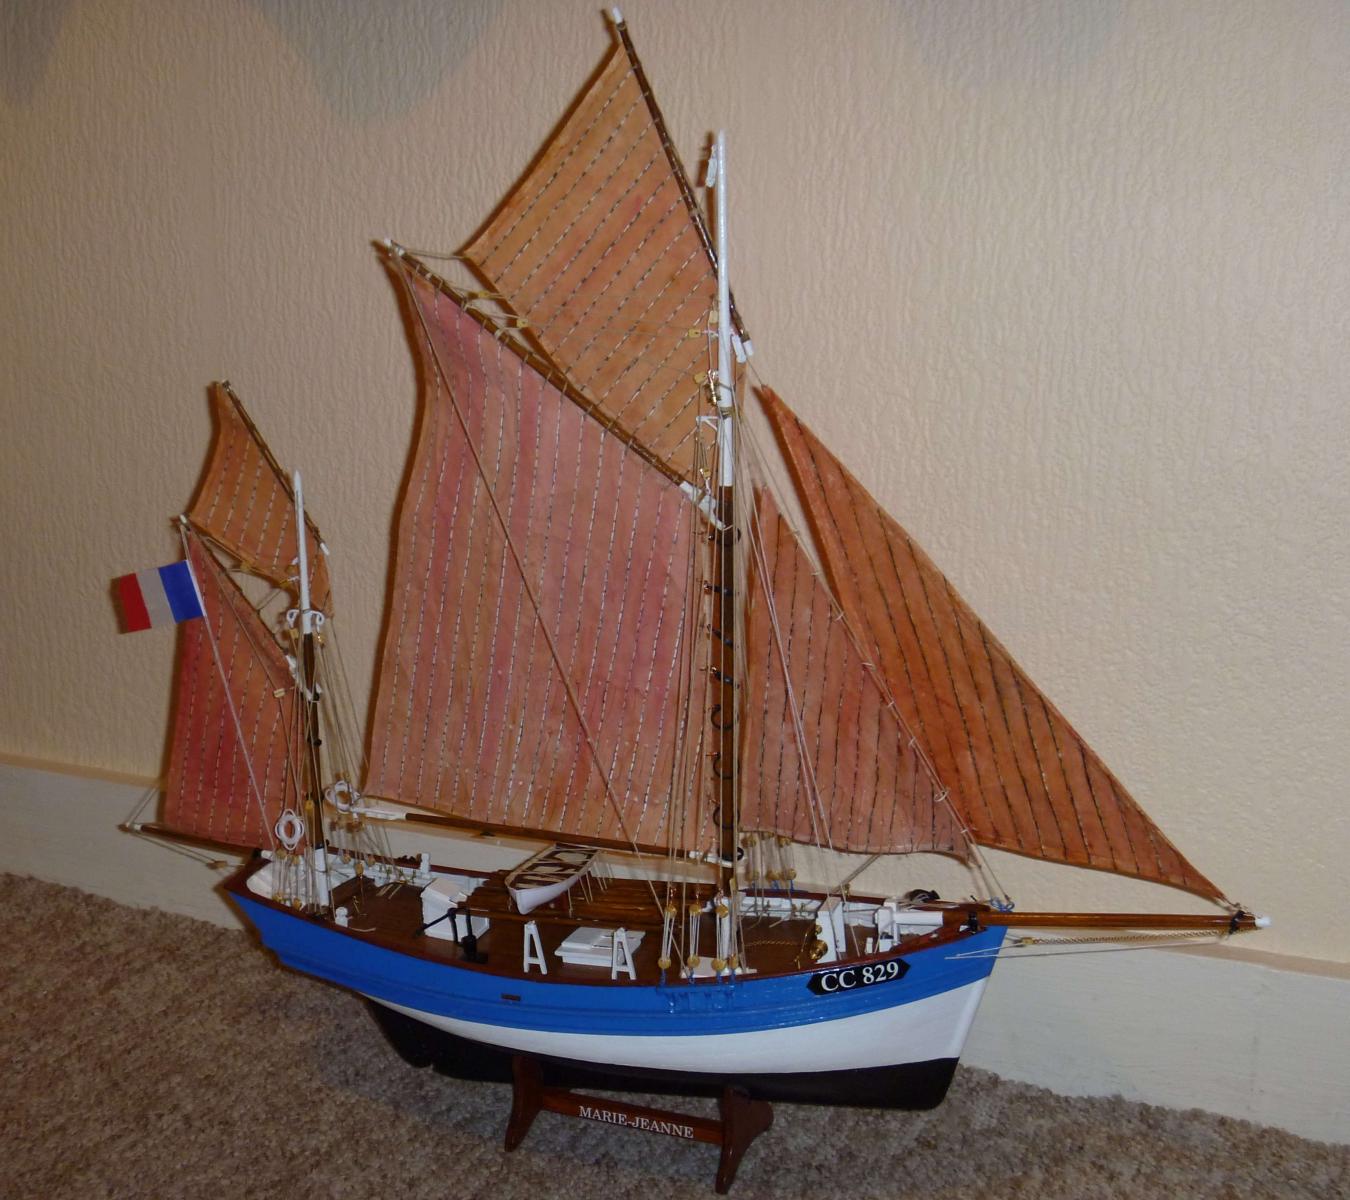
Thanks for the tips hamilton - it'll be a while before I'm there, so there's plenty of time for reading-up! I made a Marie-Jeanne from the Billings kit, my first kit, which included sails; I was quite pleased overall, but it was instructive to find how often the plans didn't fit reality, so I know what you're saying about possible errors on plans. The different-coloured sails was a deliberate move, there's a photo of a similar boat on the Net (Google Earth, from memory): Owen

-
Thanks for the photos, hamilton, I've been browsing buildlogs of various brands and scales on MSW, but not many Amatis out there. Did you do a buildlog for your Bluenose - I haven't found it? Yours looks really good - great folds on the sails. Are the sails from the kit? The kit's on order, should be here tomorrow or Tuesday, then I'll see how good the second planking timber is. It's been a slight gamble, as I intend to leave it unpainted, at least above the waterline. Owen
-
Thanks, all, especially Rick. I've just ordered the Amati kit; I'm not such a young lad as your customer, but I'm not a beginner, so I hope that compensates! I'll try to run a buildlog, not planning to start for a few weeks yet though. Owen
-
Thanks, all, that's really helpful. Frank: I want a natural timber finish, at least above the waterline, so the Model Shipways one sounds difficult if I have to replace the planking. drmac and thibaultron: I'll write off Constructo and Billings, and keep AL under consideration at 50%! Rick: thanks for the endorsement of Amati. I'll look deeper: have you built it? Or do you know what the second planking timber is - it's double-planked according to its kit details? Owen
-
Apologies if this isn't the right forum, but I'd like to appeal to builders of Bluenose/Bluenose II kits: I'm thinking of this as my next, winter (!), project, and I'm confused by the number of kits, from 1/135 to 1/64 scale. I can see kits from Amati, Artesania Latina, Billings, Constructo and Model Shipways, and perhaps others if I look deeper. Can anyone advise on the comparative merits? I want something with reasonable quality components, ideally precut sails as I'm not too good with cloth, and I'm intending to leave the above-waterline hull in wood so reasonable-quality planking. Any advise welcome, and Moderators, please move this post if you think fit! Owen
-
I'm starting a scratch-build of a Thames barge. These have near-vertical sides and for about 3/4 length and a near-flat bottom (for estuary work), with a sharp angle ("hard chine"). It's going to be planked, with a bare wood finish (no paint!). I can't find any clear information on planking patterns, most hard chine designs seem to be for ply or ply strip construction. I'm thinking of a strip along the bottom of the vertical side chamfered at the bottom, and planking up and down, with stealers towards the bottom, then turning over and doing the same to the bottom, with a plank at the chine chamfered to the bottom strip of the side, a garboard strake, then planking in and out with stealers. Does this sound right? Can anyone advise a more correct method? ANY help gratefully received! Owen
-
Thanks for the comments, Brian and hamilton, although it doesn't answer the clerestory/no clerestory dilemma! I'll leave it off for now, and see if it grows on me - it'll be easier to glue it on later than to peel it off later. Mario: yes, the original hull planking (described as Sapelly and 2mm thick) was too thick to get a good finish on both sides but its finish is very attractive. I second-planked with the 0.5mm veneer they included; they don't say what it is but it's very similar to the Sapelly and takes a light sanding and varnish well, and the end result is pleasing. Owen
-
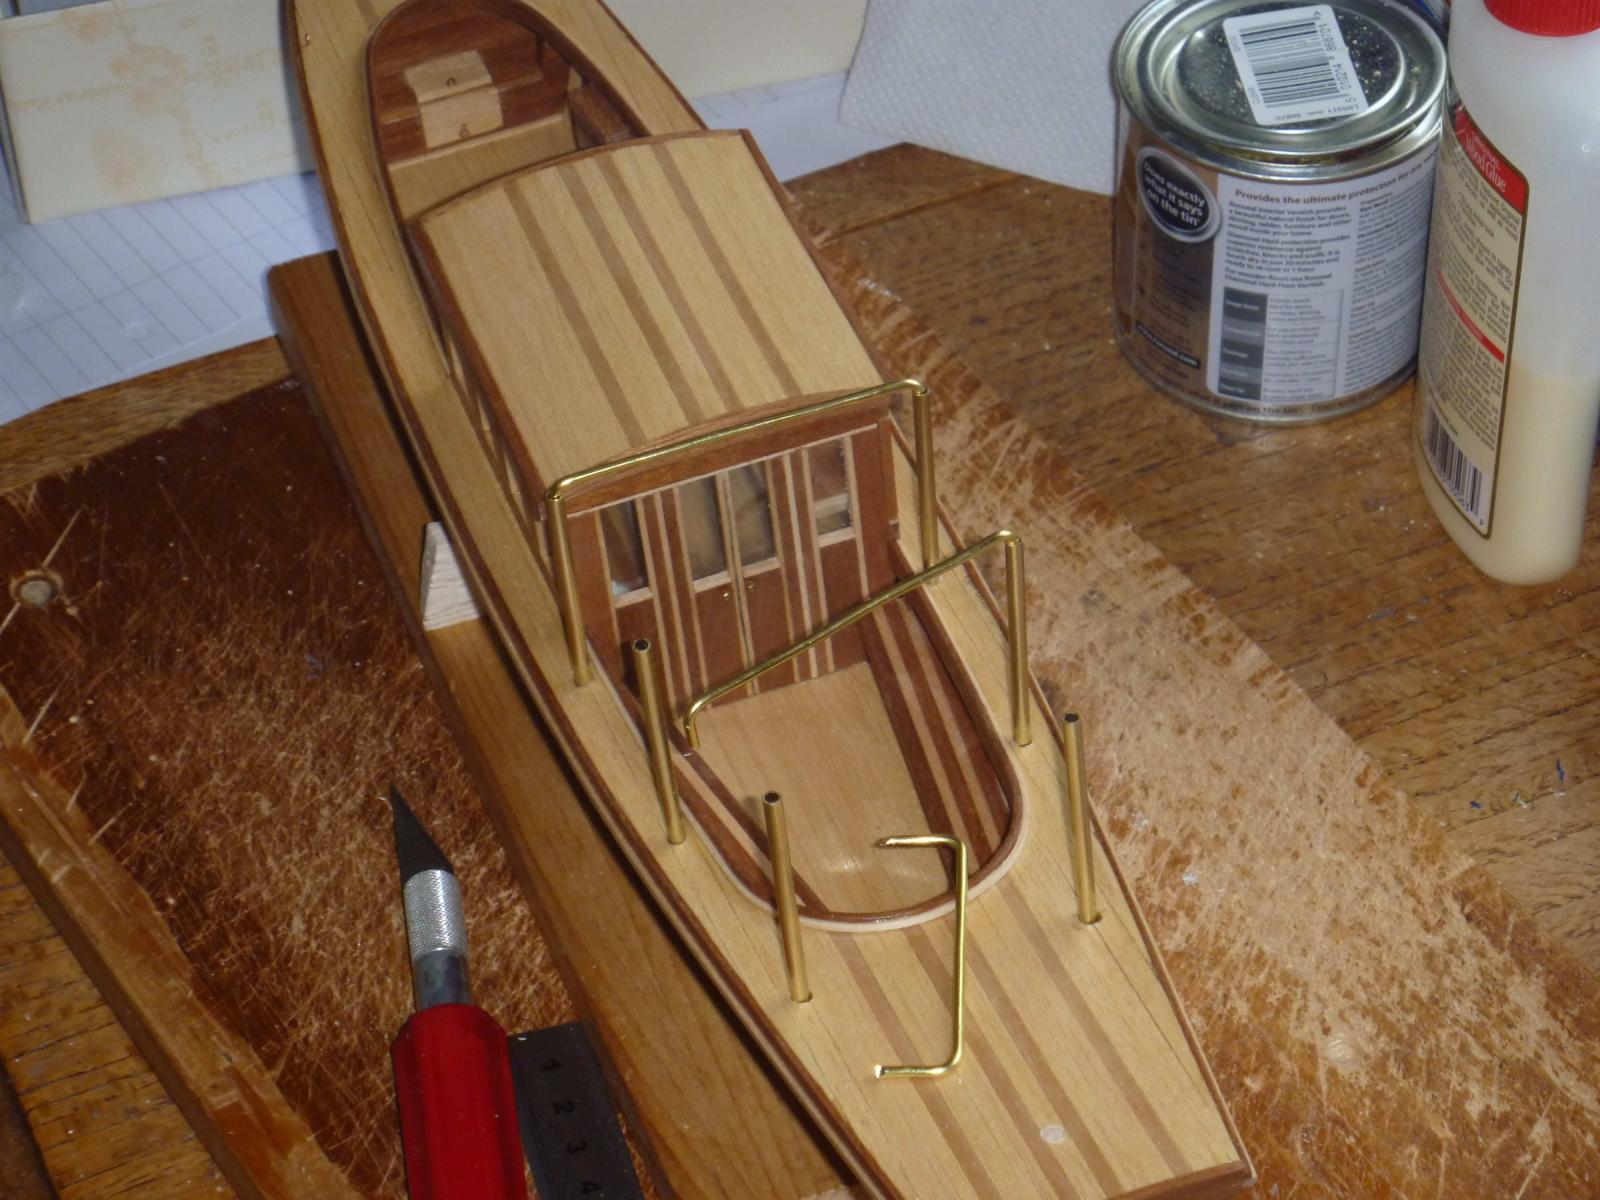
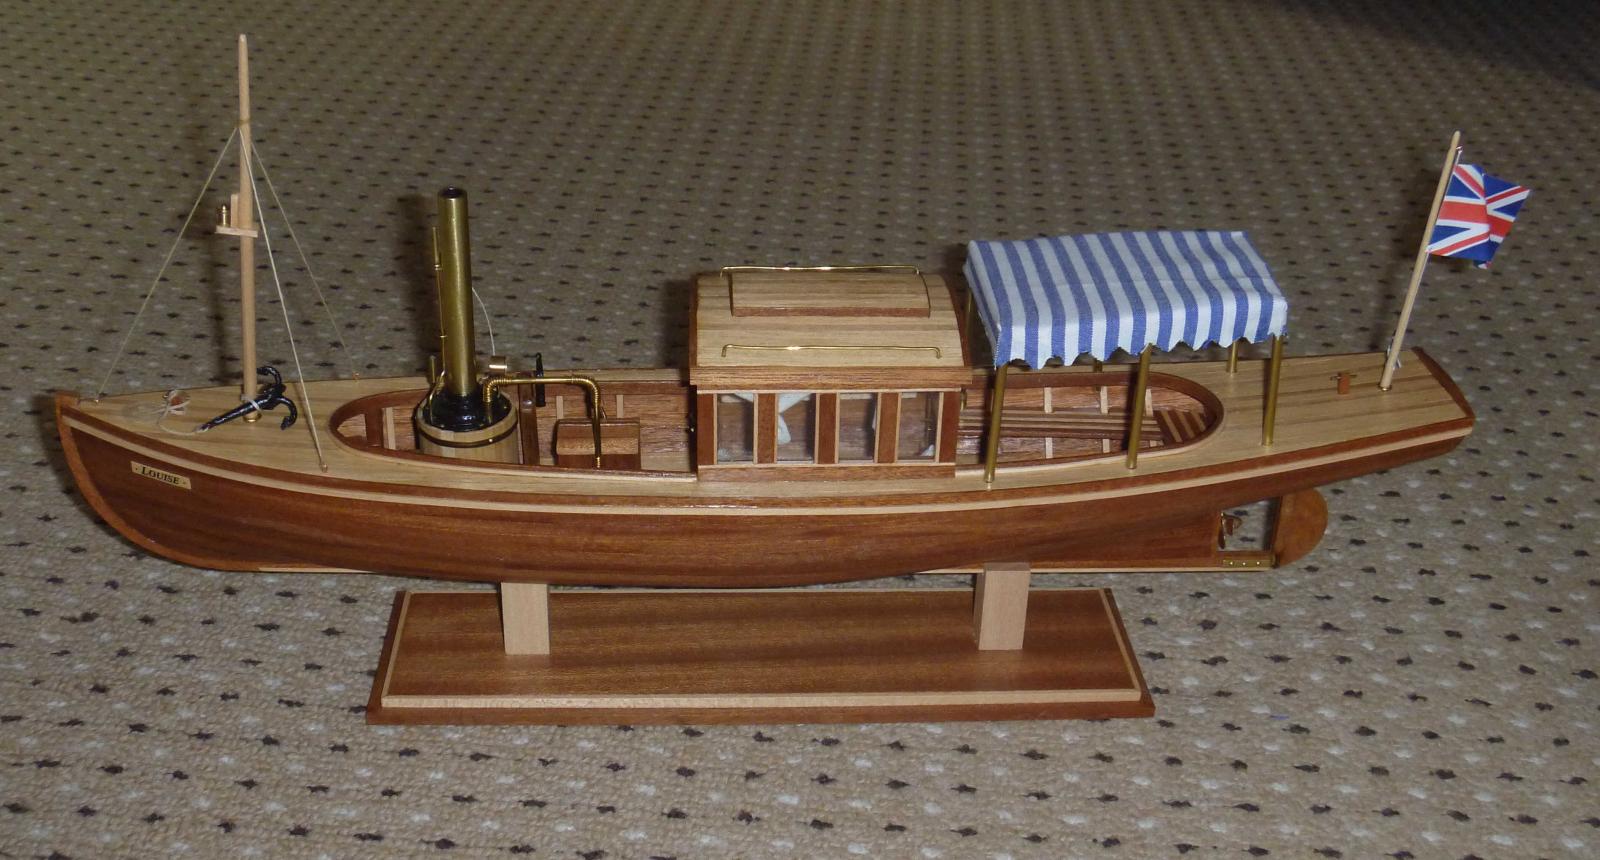
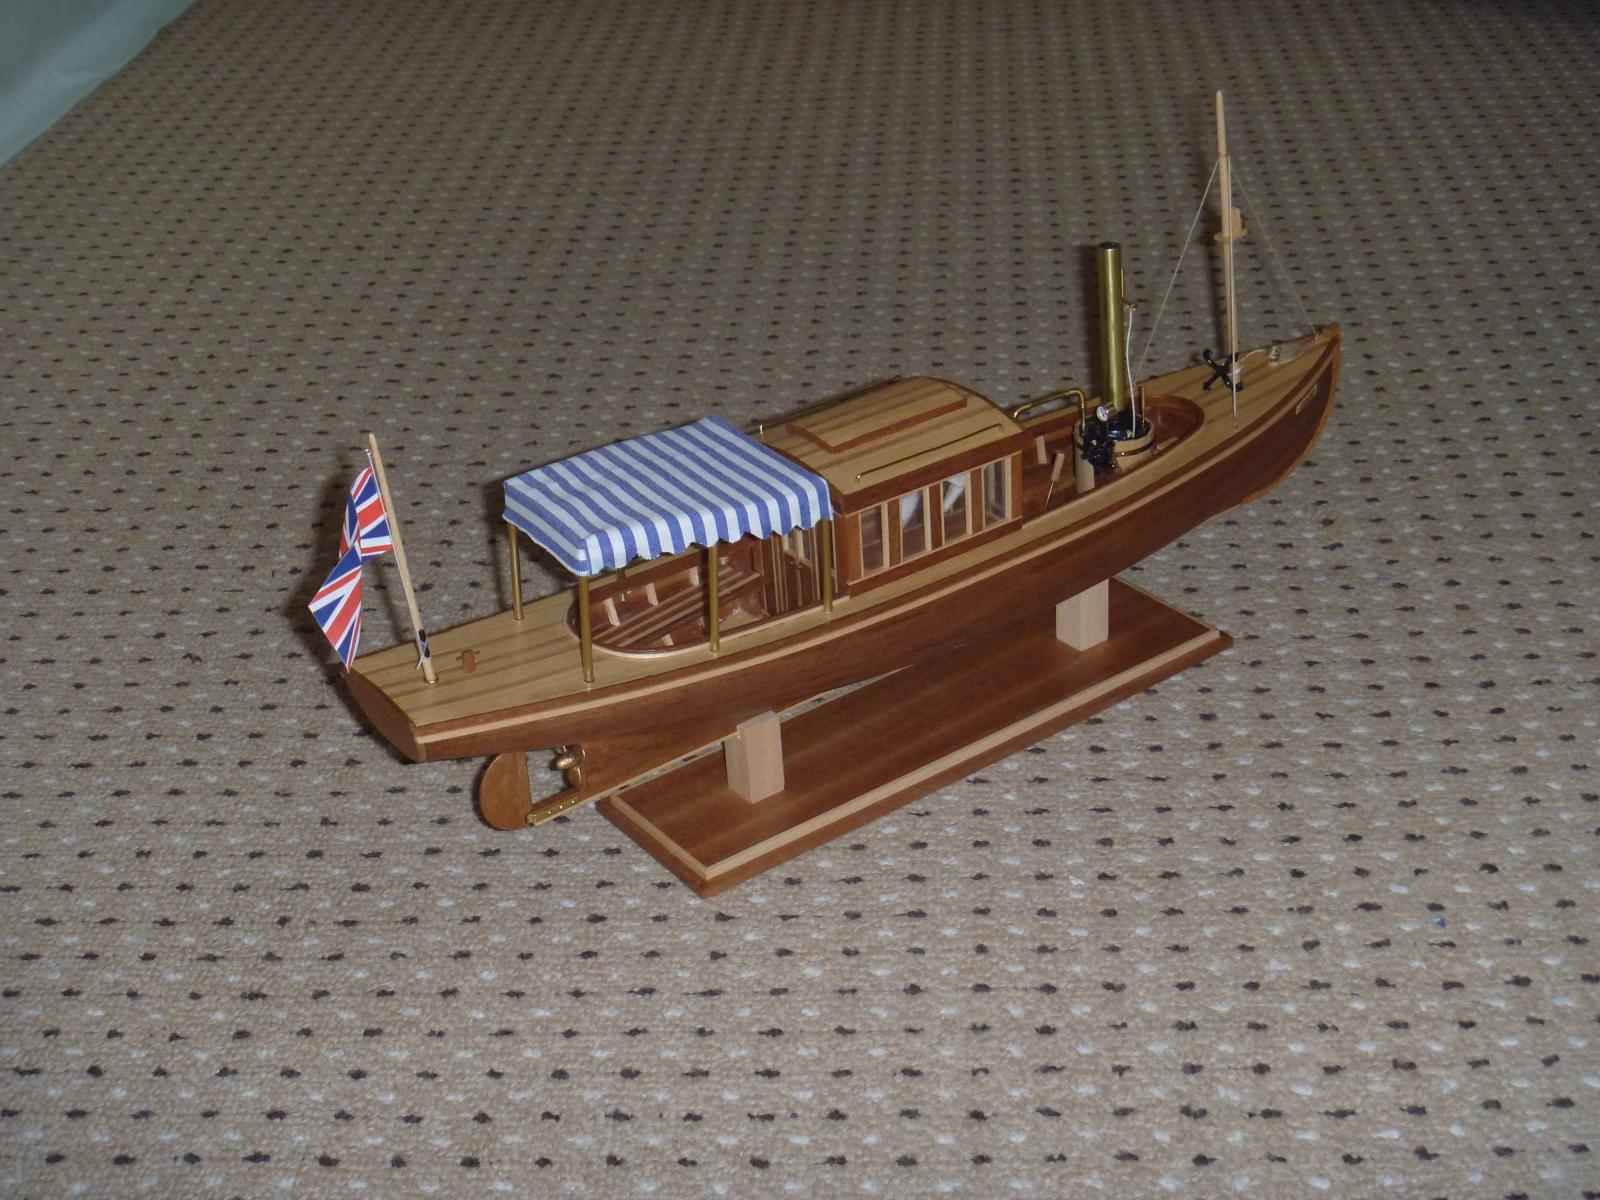
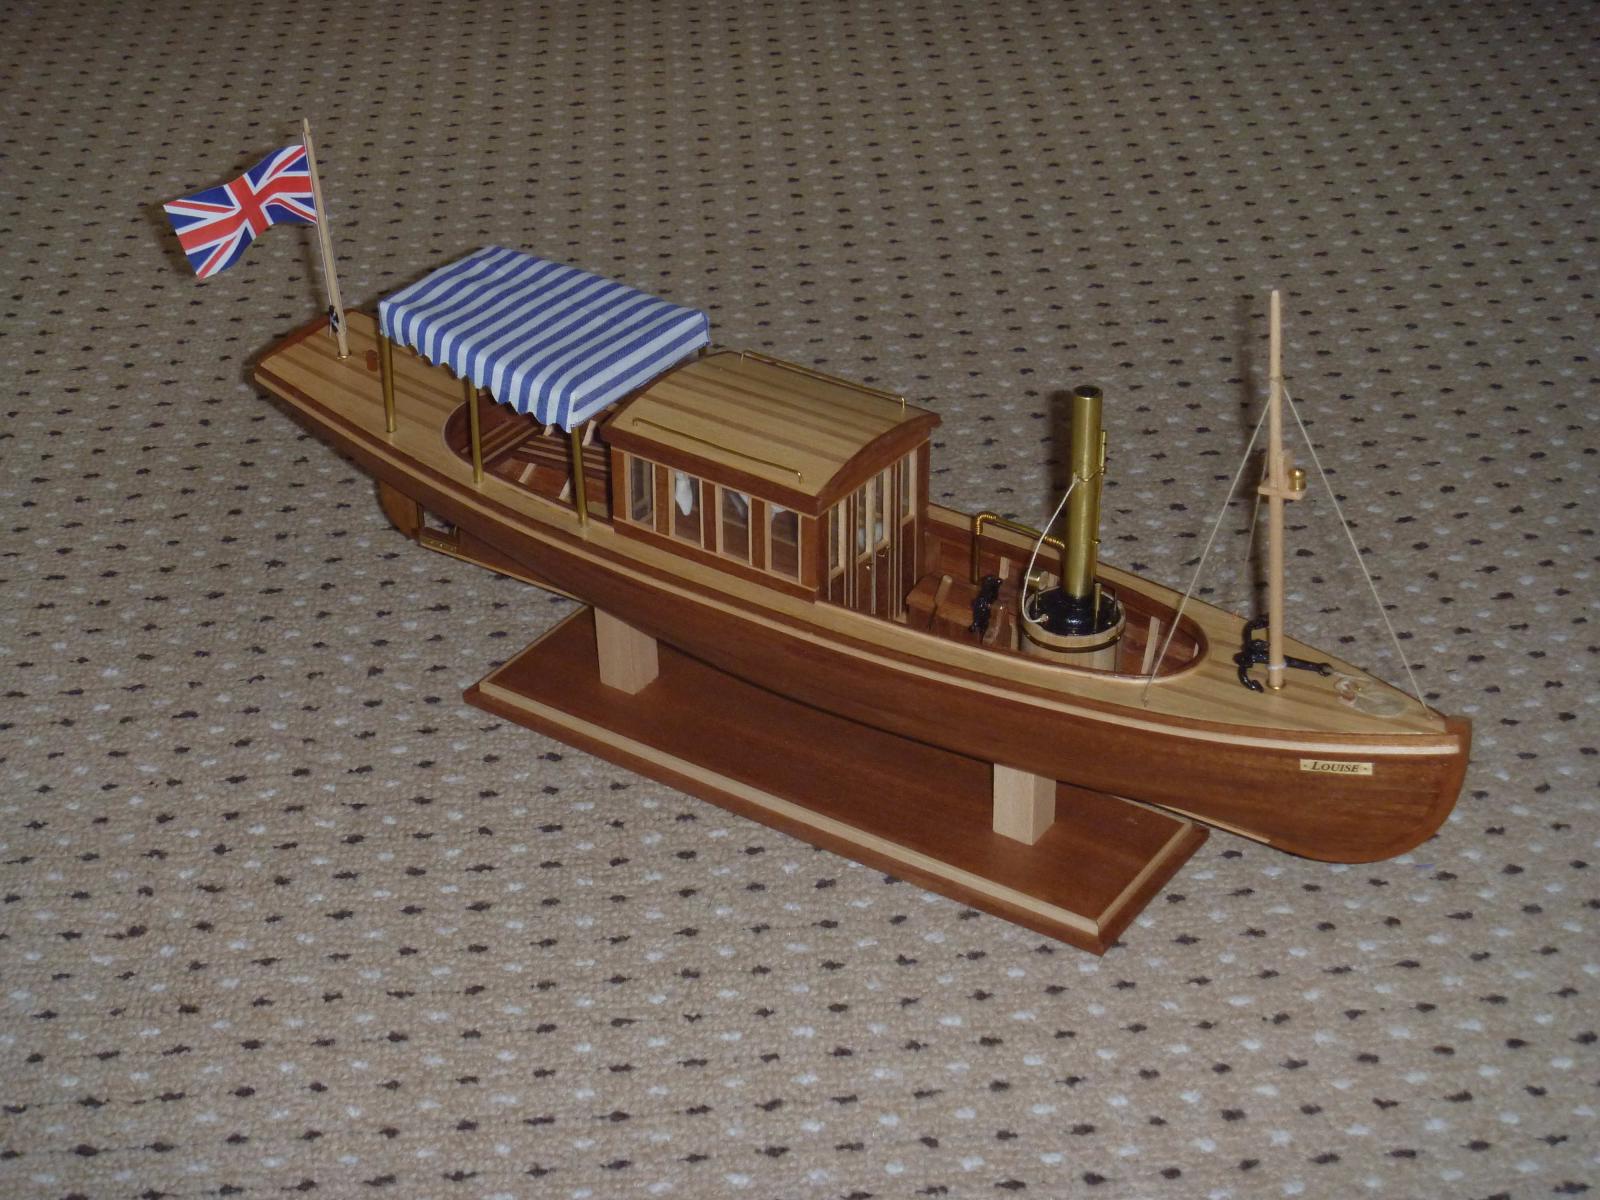
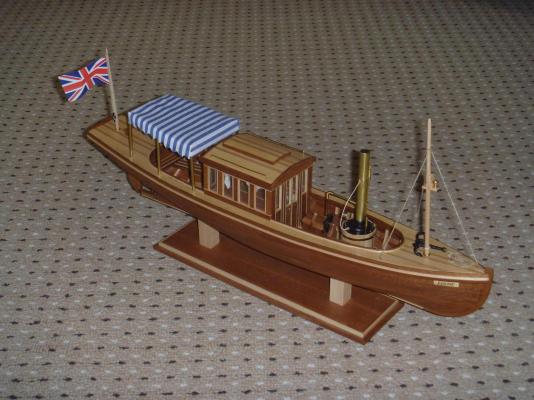
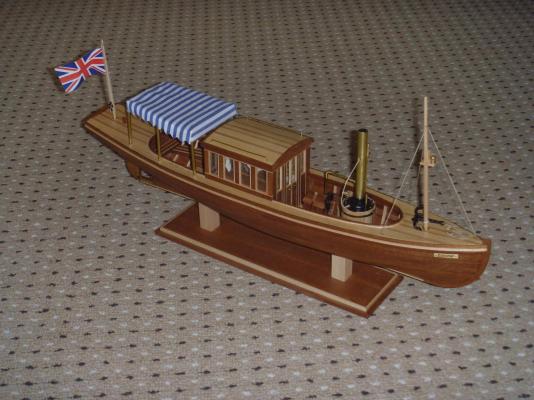
I'd seen your log, Mario, and it gave me a good bit of help - lovely marquetry! Thanks, Bob, you're quite right of course, I deliberately set the whistle at the front so I can warn anyone ahead of my approach Anyway, a last burst of building and she's almost there. The brass wire in the kit is supplied rolled up; it's nearly impossible to get it straight, so I used some hollow brass tube for the uprights, and the supplied wire fitted in for the crossbeams, held in with a spot of CA: And finished! I haven't put the collar (?) on the top of the chimney, I think it looked out of scale and possibly not very secure as it just sits on top. I may try an inverse-cone shape in the future. These photos are of her with and without the clerestory; I'm still not decided. It's only sitting there; if it's permanent I'll glue it on. Opinions welcome! Conclusion: I've enjoyed the build, the kit is basically good although some timber was missing and all the timber was hard to identify, especially as the instructions tell you to use,say, a 13mm piece of 2 x 3, but there are several other items from 2 x 3 and no clue as to cutting the 480mm length supplied (if that makes sense). Also, single-planking with 2mm strips was not the best design decision, although the extra veneer pieces were a good solution. The timber was all excellent quality as were the fittings, and the instructions, with step-by-step colour photos, were the clearest I've seen. And now for my scratch-build barge!


- 28 replies
-
- 8
-
-
- louise
- constructo
- (and 1 more)