


jack.aubrey
-
Posts
1,268 -
Joined
-
Last visited
Content Type
Profiles
Forums
Gallery
Events
Everything posted by jack.aubrey
-
 I'm sorry but I didn't finish this model. I sold the unfinished hull to another modeller that completed it, but I don't have photoes. Regards, Jack.
 -
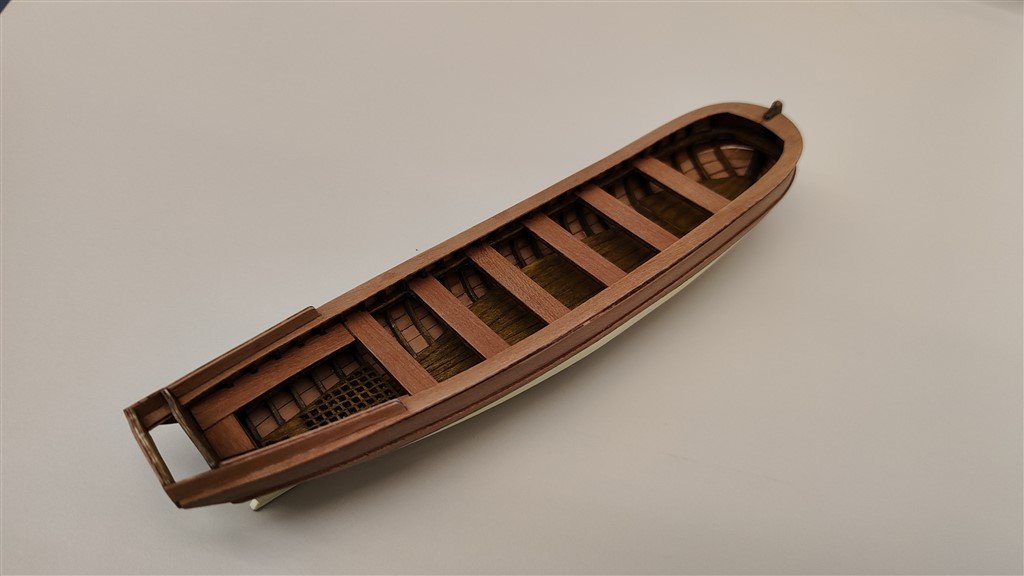
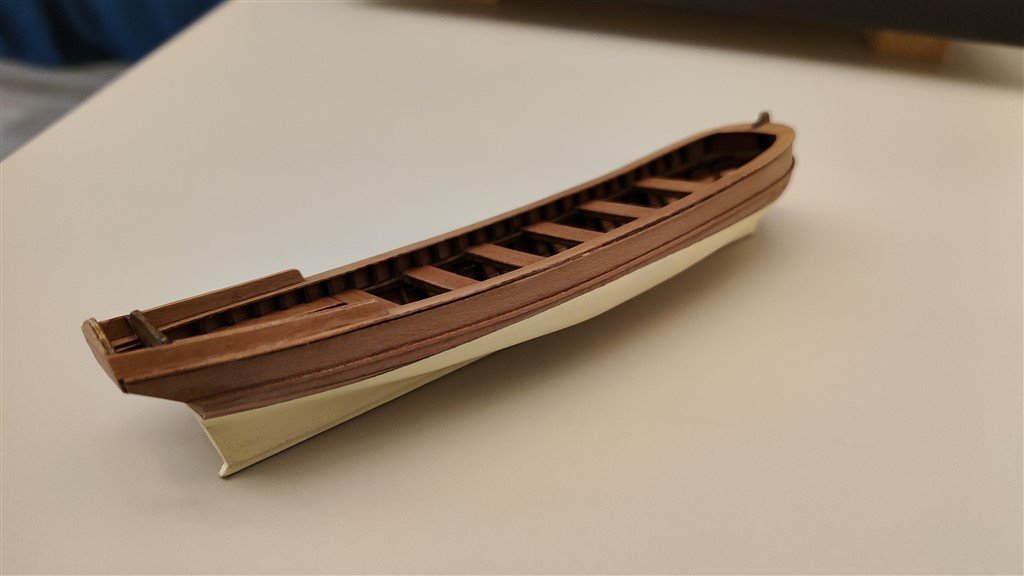
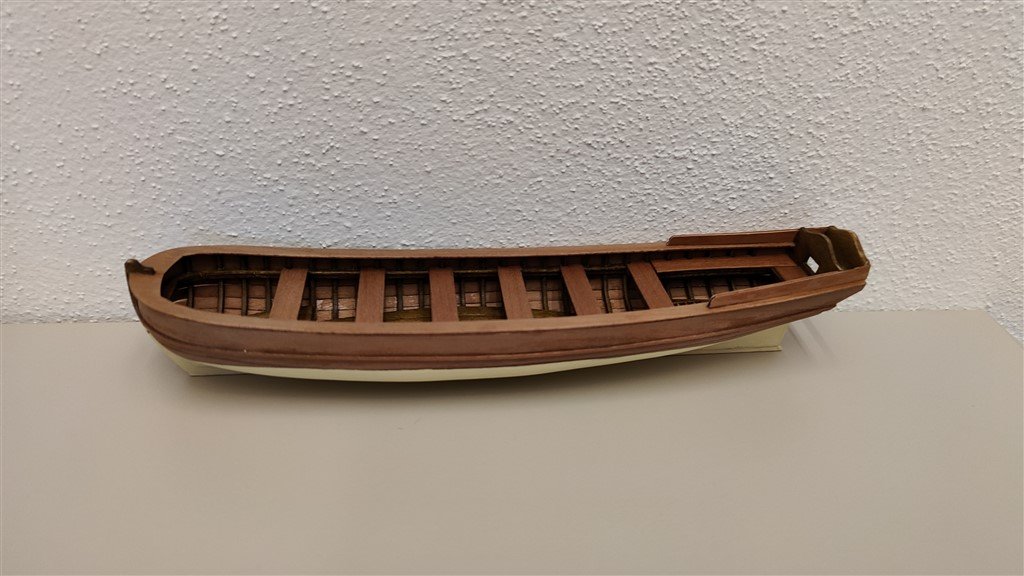
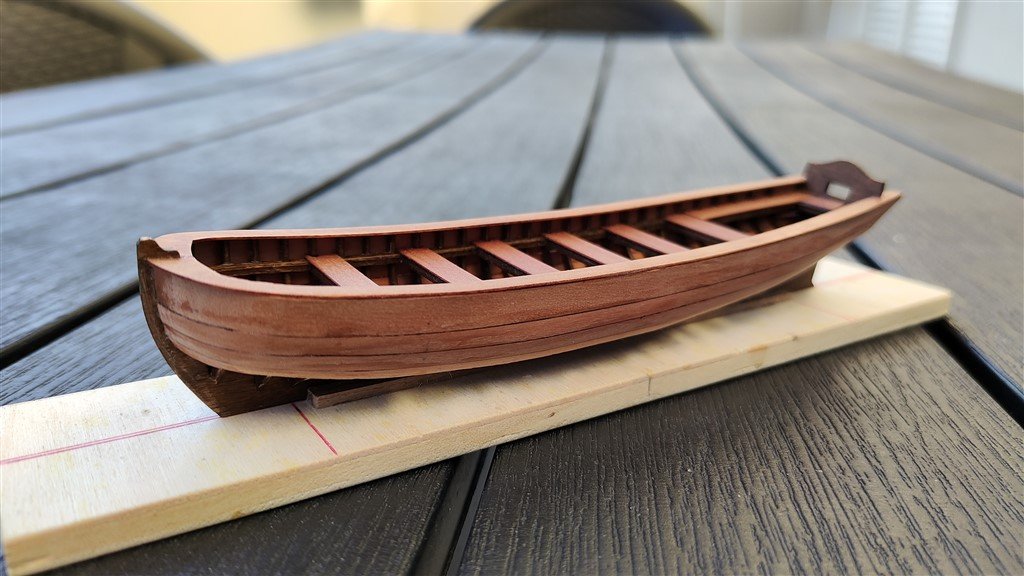
Saturday, October 1st, 2022 A nice step forward . . . 01 Brick de 24/28092022/IMG20220928164312.jpg 02 Brick de 24/28092022/IMG20220928164356.jpg 03 Brick de 24/28092022/IMG20220928164402.jpg 04 Brick de 24/28092022/IMG20220928164420.jpg See you next time, Jack Aubrey
-
Friday, September 22th, 2022 One more last effort . . . . 01 Brick de 24/22092022/IMG20220922092233.jpg 02 Brick de 24/22092022/IMG20220922092249.jpg 03 Brick de 24/22092022/IMG20220922092259.jpg See you next time, Jack Aubrey
-
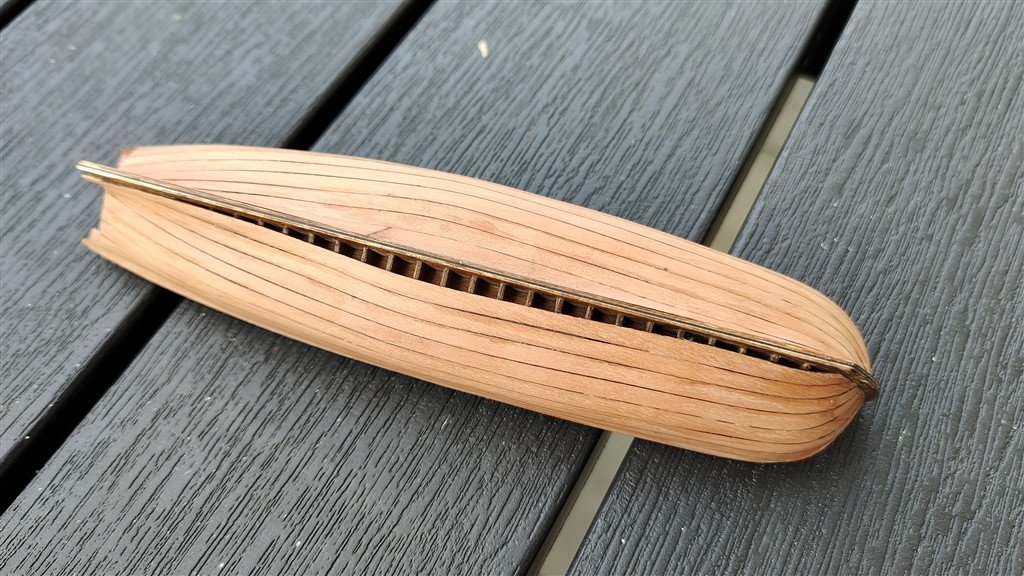
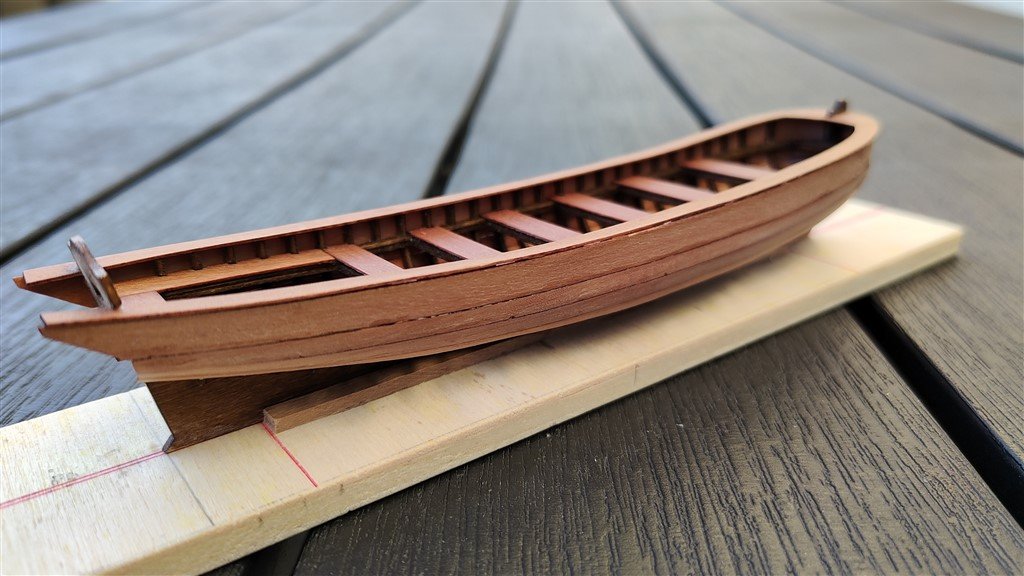
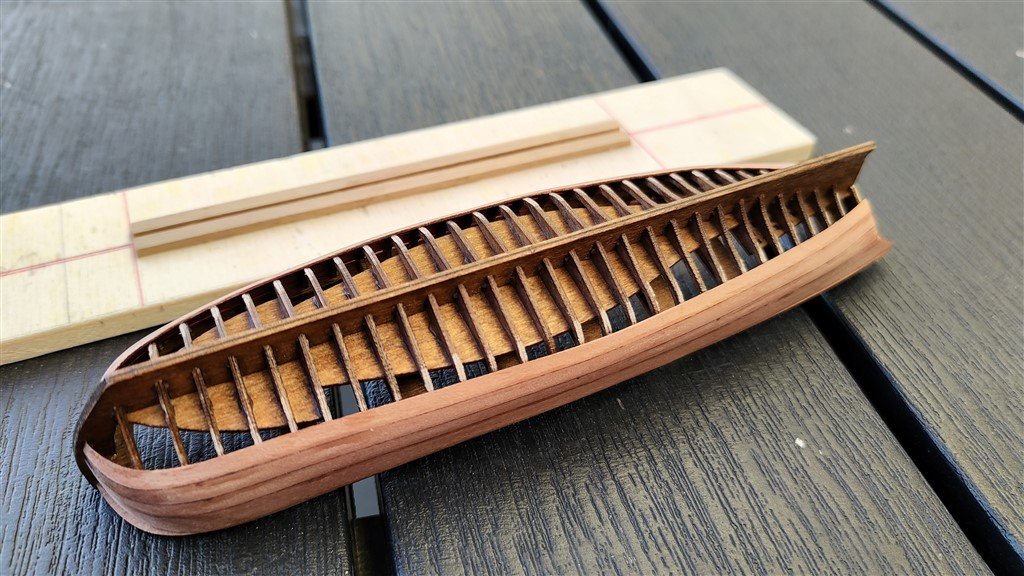
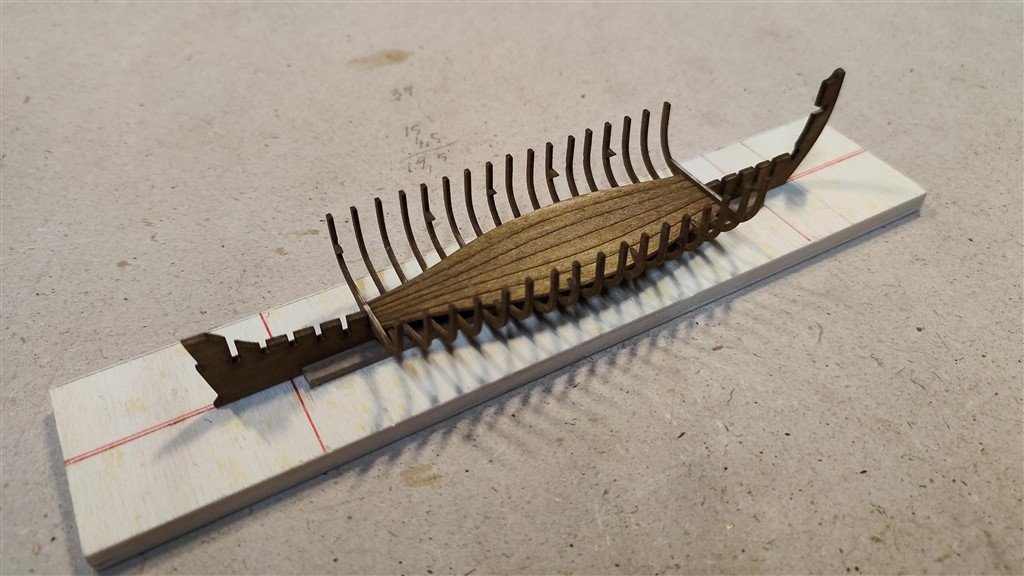
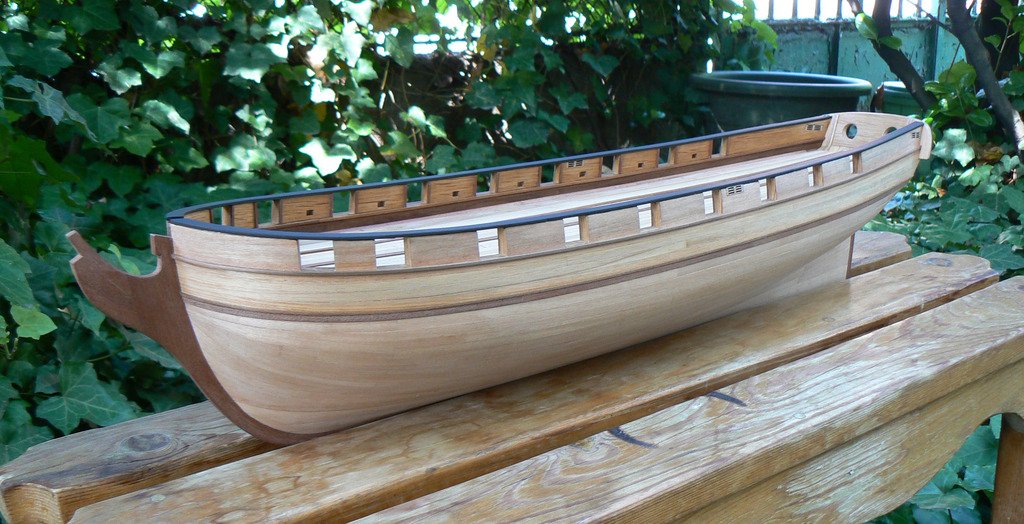
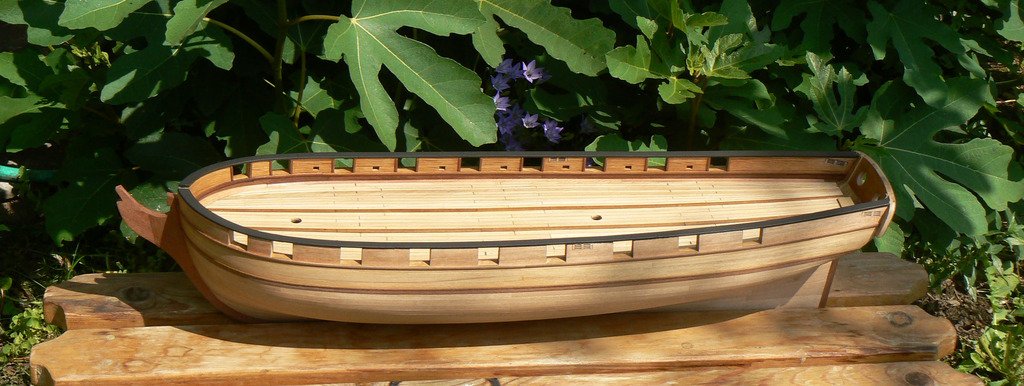
Friday, September 9th, 2022 I've been trying my hand with planking for a couple of days. The various courses of the planking are also laser pre-cut and therefore are quite precise in following the lines of the hull. However their installation is not a very simple task. First of all, it is necessary to hot-bend the strip in the bow area giving it the right curvature, then it is necessary to proceed very calmly and patiently so I am limited to installing a maximum of a couple of courses per session. However, until now, everything seems to be going well. There remains the concern for when I will have to install the last course: will it be accurate? will it be abundant? or will it leave an empty slot? We will see . . . 01 Brick de 24/09092022/IMG20220908184332.jpg 02 Brick de 24/09092022/IMG20220908184339.jpg 03 Brick de 24/09092022/IMG20220908184359.jpg See you next time, Jack Aubrey
-
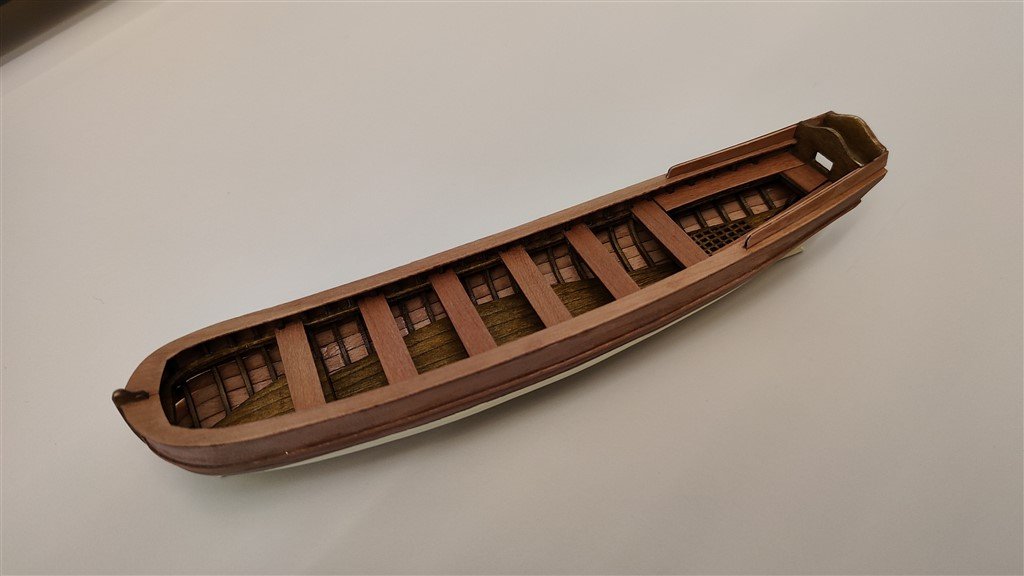
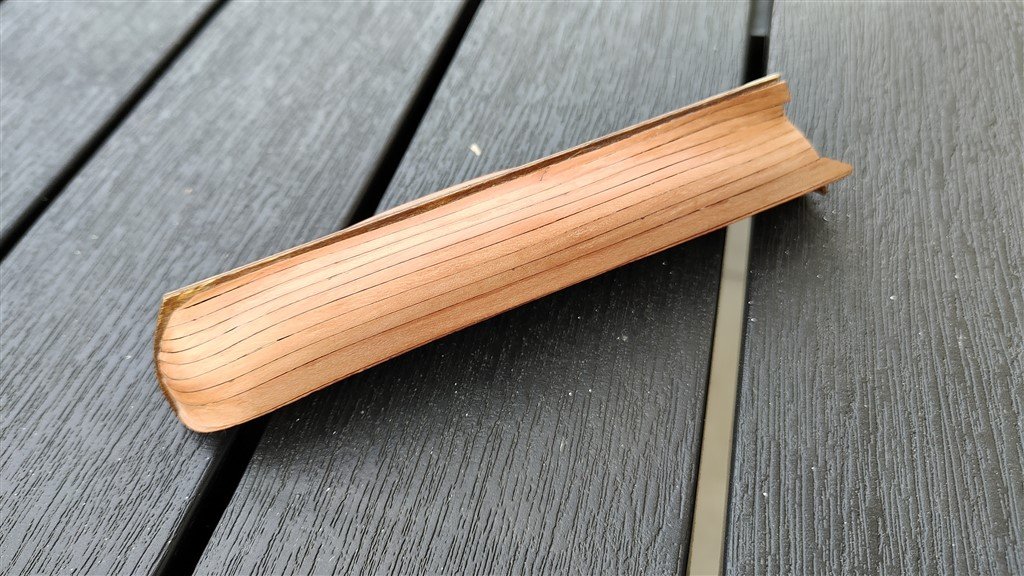
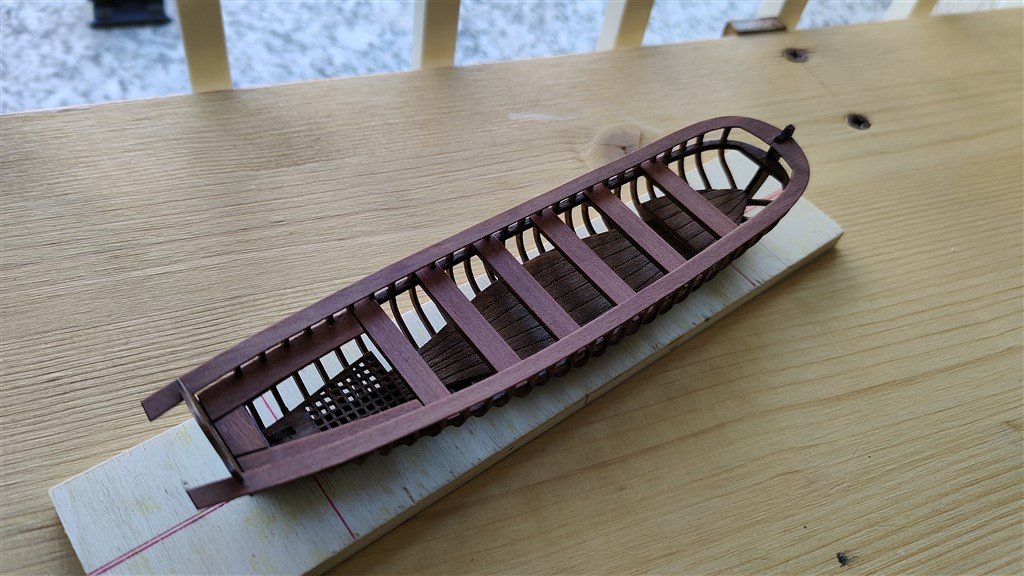
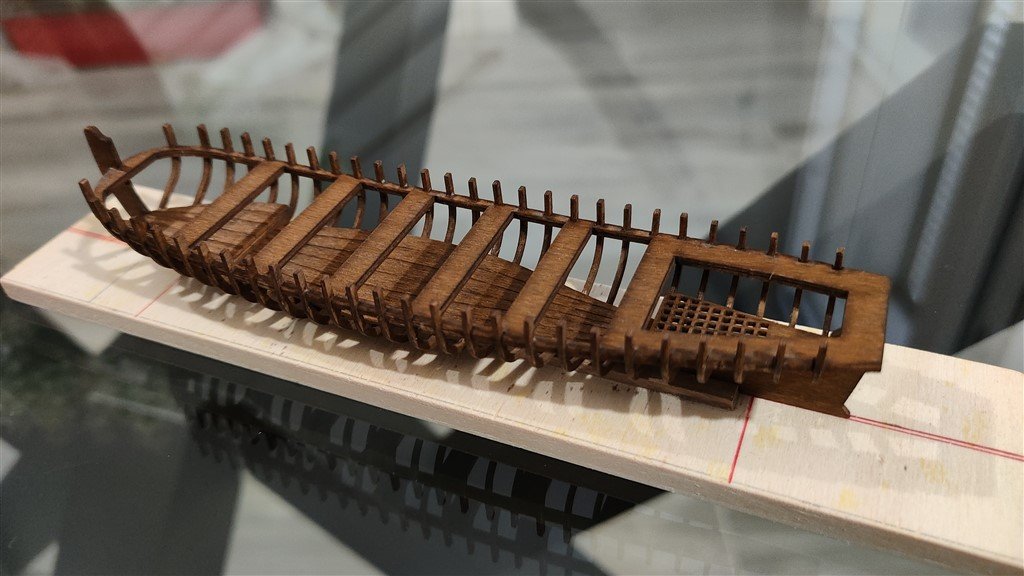
Monday, August 29th, 2022 Another element added to the lifeboat: these are two pearwood pieces that make up the gunwale. Its installation was not very easy but with a good amount of patience it succeeded very well. The boat structure should now be complete so that next step will be the installation of the planks. 01 Brick de 24/29082022/IMG20220829164723.jpg 02 Brick de 24/29082022/IMG20220829164755.jpg 03 Brick de 24/29082022/IMG20220829164806.jpg See you next time, Jack Aubrey
-
Sunday, August 28th, 2022 One of the preliminary operations to apply copper to the hull of the brick is to build a tool to trace the waterline, tool I built today. It is a quite simple and handcrafted object but it has all the necessary customization possibilities. 01 Brick de 24/28082022/IMG20220828174152.jpg 02 Brick de 24/28082022/IMG20220828174159.jpg Finally, I applied new elements to the lifeboat: in particular, these are pear elements that embellish the seats for the crew as well as reinforce them further. 03 Brick de 24/28082022/IMG20220828174313.jpg See you on the next time; a cordial goodbye from Jack Aubrey
-
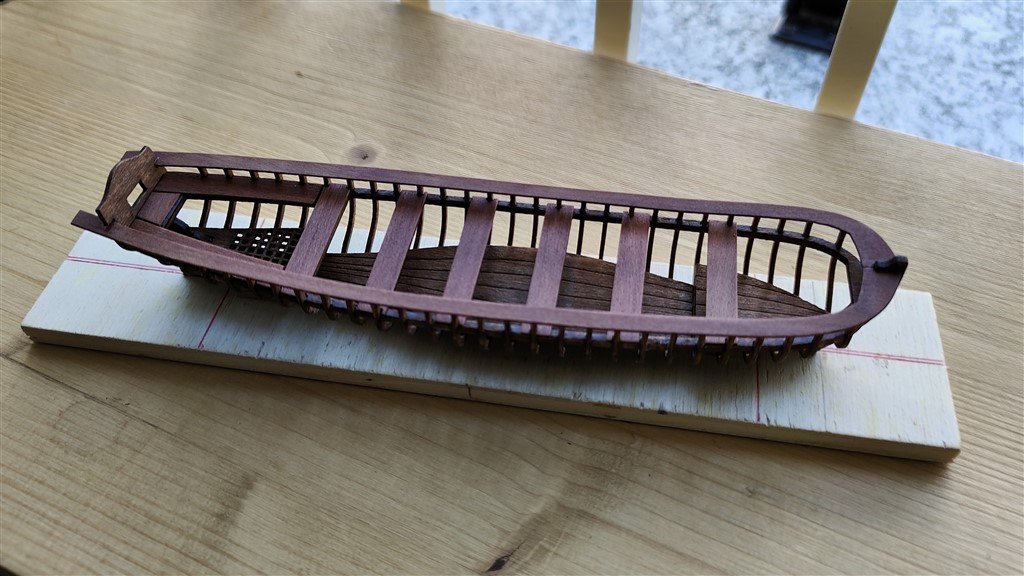
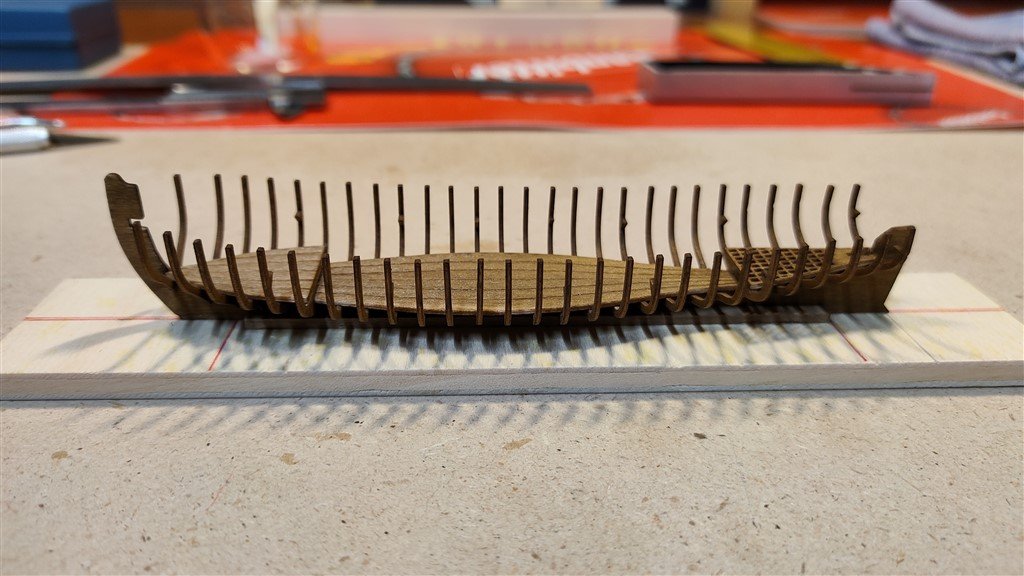
Friday, August 26th, 2022 The fact I was successful to precisely glue the lifeboat frames, all of them well aligned and spaced apart, has enormously simplified the assembly of the next element that you can see in the two following images. The installation of this new element has also strengthened the overall skeleton of the lifeboat which, you have to believe me, is really a very delicate object to handle. 01 Brick de 24/26082022/IMG20220826185138.jpg 02 Brick de 24/26082022/IMG20220826185151.jpg See you soon, Jack Aubrey
-
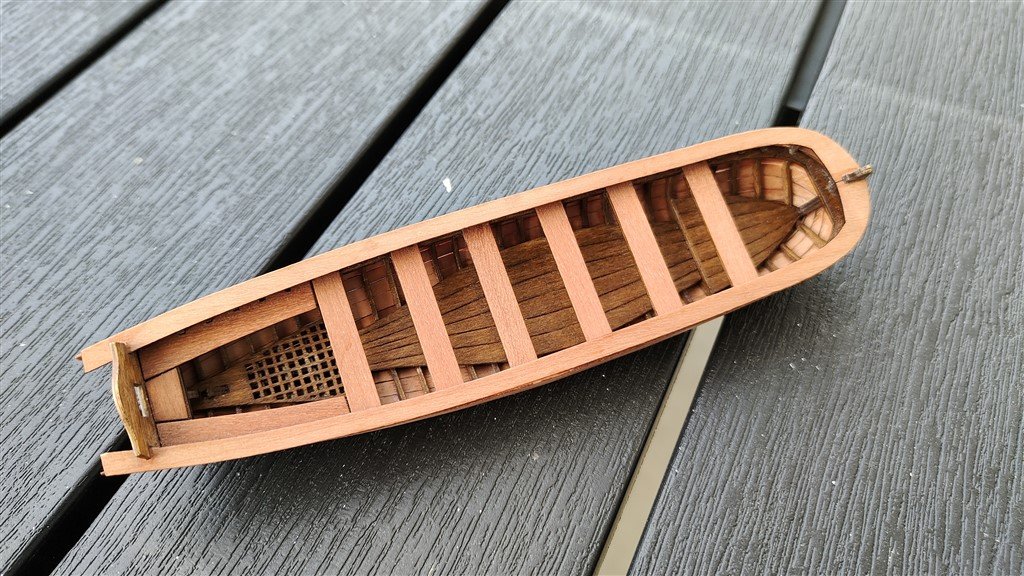
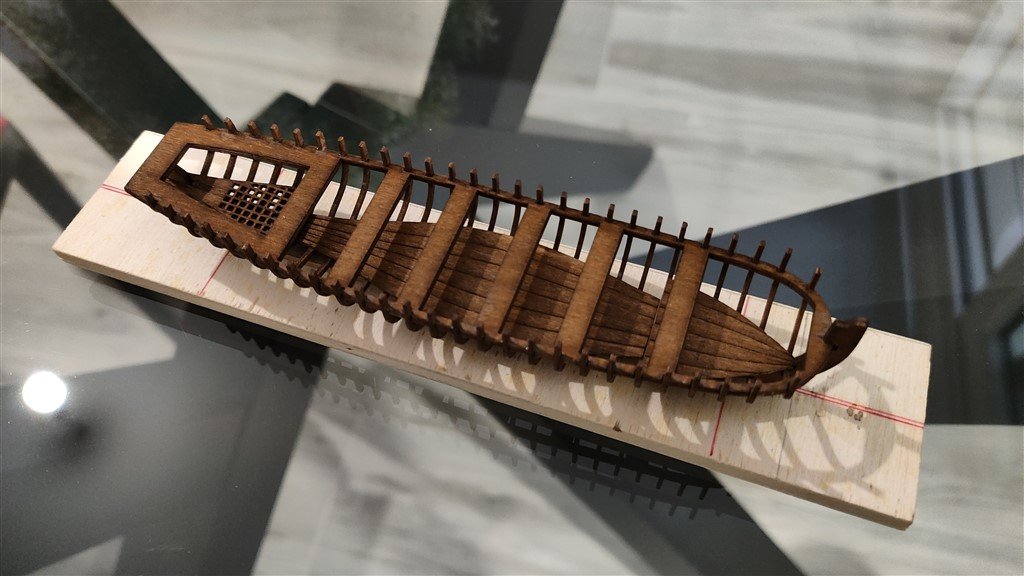
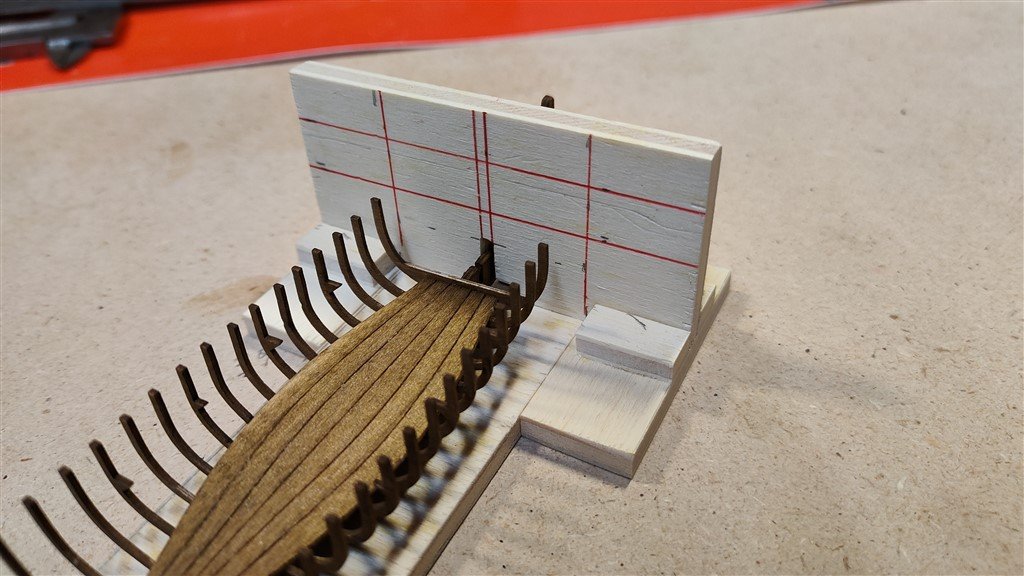
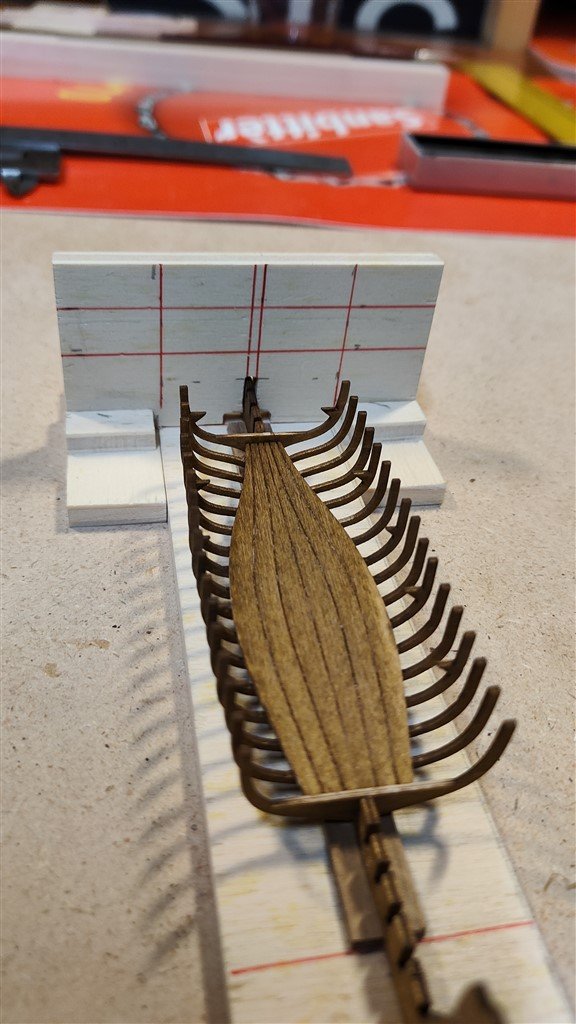
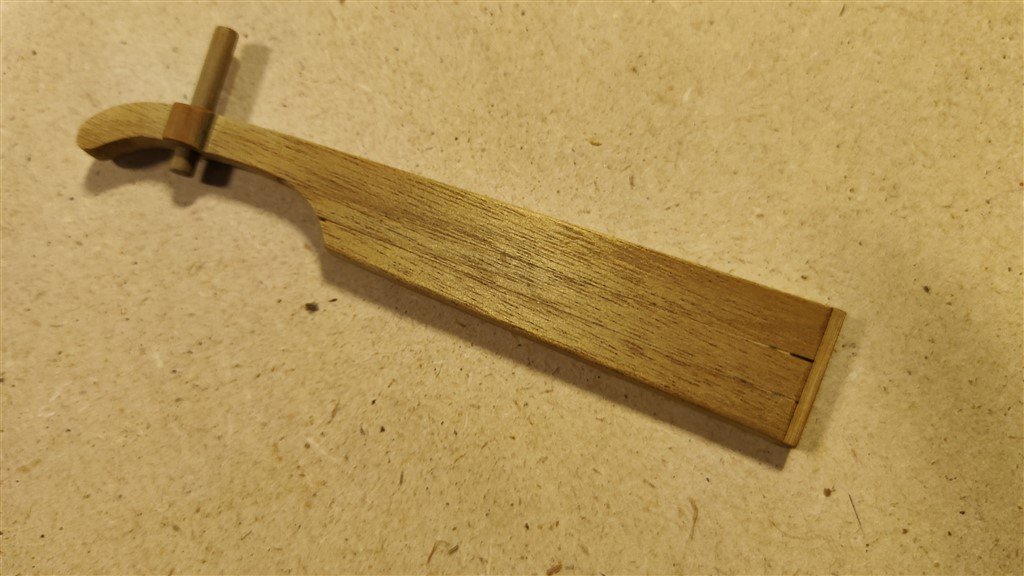
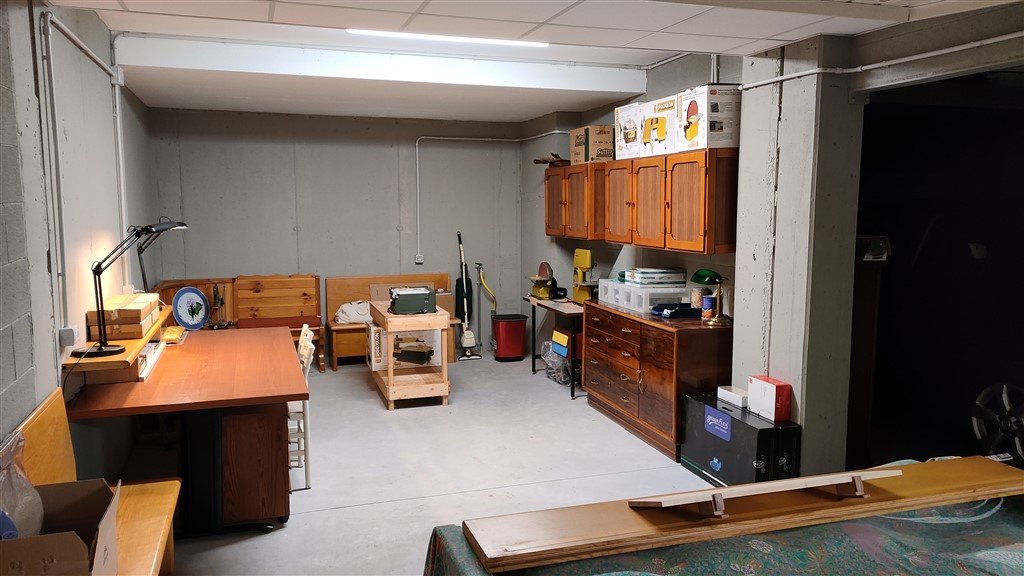
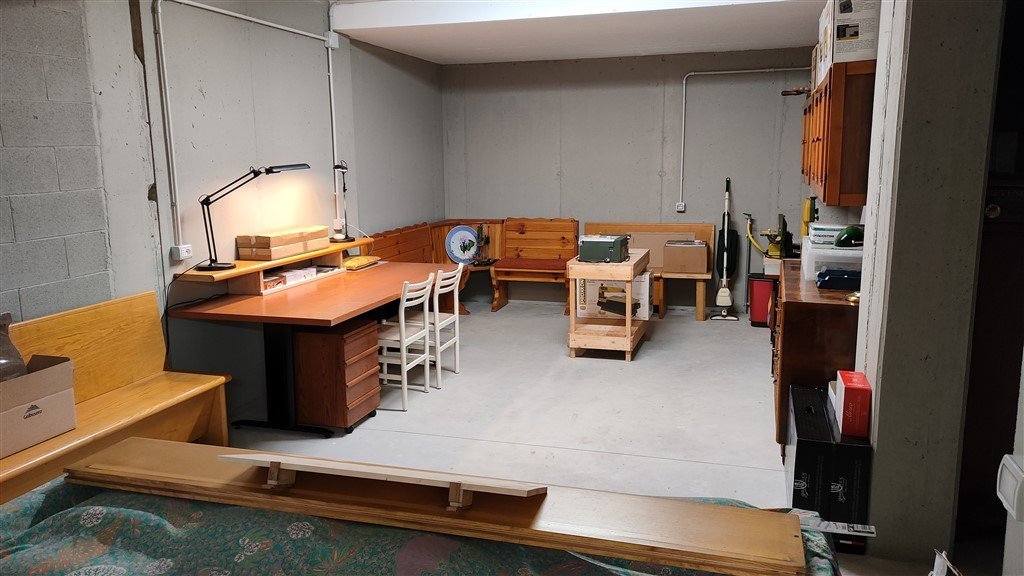
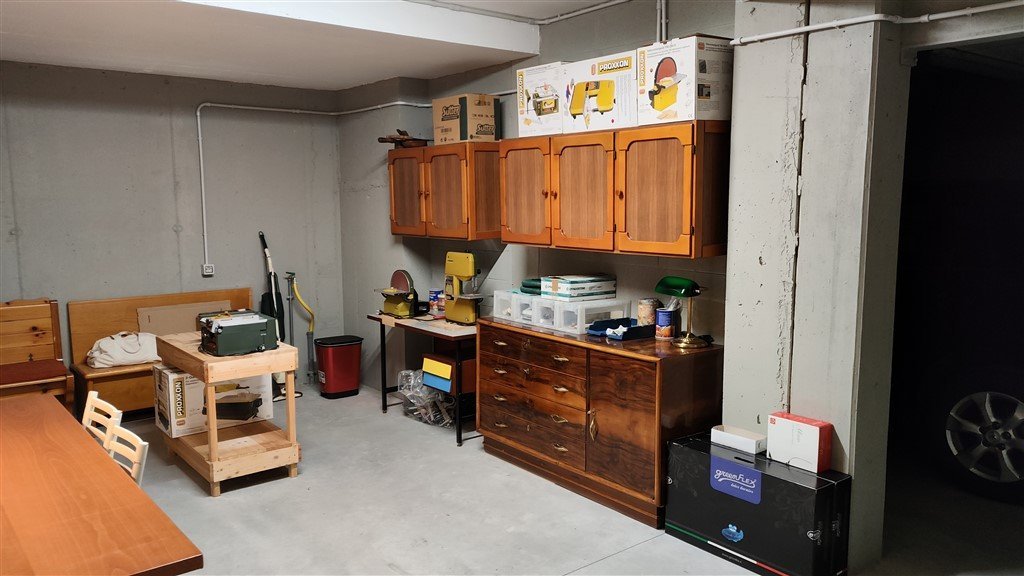
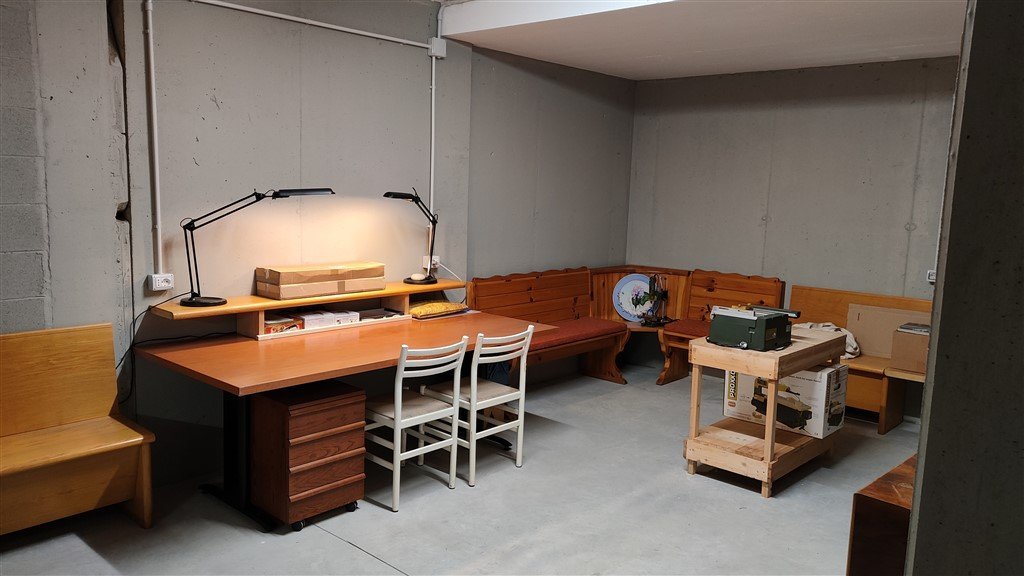
Thursday, August 25th, 2022 During the month of May I moved to my new house on Como Lake and I was able to setup my shipmodeling workshop in a garage under the house, garage purchased specifically for this purpose. Once the setting up was completed, setup which was not a simple task given the quantity of material to be arranged, I resumed the modeling activities. First of all I dedicated all myself in completing the model of the Ragusian Carrack; see also my specific build log for this model on this forum. Now I have finally finished the Carrack (only the plexiglass cover is missing, a job that will however be carried out by a specialist craftsman) and, finally, I can resume this model that has stood still for several years, I think since 2017 or maybe earlier. At the moment the situation of this model is exemplified in the following two images: the hull is almost ready to be covered with cooper. I wrote "almost" because there are still several preliminary tasks to do; we'll see them later. Brick%20by%20JackAubrey/P1100276_zpsg9mlx6or.jpg Brick%20by%20JackAubrey/P1100270_zpsyq8orfvd.jpg Unfortunately, the two lifeboats that I built with some difficulties for the brick are disappeared, used to complete the Ragusian Carrack display stand (I explain the reasons on my post dated Saturday July 2nd, 2022 on the same thread above) and then I'll have to redo them. By lucky chance I found on the internet a kit to build a lifeboat that has exactly the same size as one of the two I have to redo. The kit is very simple: it reproduces all the pieces on plywood of adequate thickness and on thin pear tree boards; all are laser cut. This saves me a lot of work for cutting the pieces. Instead, the assembly seems to me more complex than the ones I had built, but it is certainly not an insurmountable problem. So one of the two boats will be built using this kit. For the second boat I decided to proceed by scanning the laser pre-cut tablets and using them to reproduce the project with AUTOCAD. Once I have the project on the PC, I resize everything for the second lifeboat, print, cut, assemble and so on. Maybe, just to avoid making the same of the other, I will modify some details . . . But let's get to the first one: as I said, the assembly presents simple steps but to be carried out precisely. To ensure a precise assembly of the ribs in this very first phase, I had to prepare a simple keel clamper and a tool to glue the ribs that guaranteed me perpendicularity and horizontality. You can see the keel clamper in the following image: a very simple plywood board and a couple of wood strips. 01 Brick de 24/25082022/IMG20220824182050_BURST000_COVER.jpg The sliding element for gluing the ribs is illustrated in the next two photos: with this tool their assembly has been resolved in a routinary and patience task, without unexpected problems. 02 Brick de 24/25082022/IMG20220824182227.jpg 03 Brick de 24/25082022/IMG20220824182252.jpg Once the frames were glued, I then proceeded to install the elements of the bottom. this task also "strengthened" the whole. 04 Brick de 24/25082022/IMG20220825102558.jpg see you soon, Jack Aubrey
-
Martedì 16 Agosto 2022 A review of details that I have been working on the whole today afternoon . . . 01 Ragusian Carrack/16082022/XX.jpg 02 Ragusian Carrack/16082022/XX.jpg 03 Ragusian Carrack/16082022/XX.jpg 04 Ragusian Carrack/16082022/XX.jpg 05 Ragusian Carrack/16082022/XX.jpg 06 Ragusian Carrack/16082022/XX.jpg 07 Ragusian Carrack/16082022/XX.jpg 08 Ragusian Carrack/16082022/XX.jpg 09 Ragusian Carrack/16082022/XX.jpg See you soon, even if it's very close now, as far as I am concerned, to finish. Jack Aubrey

- 190 replies
-
- 4
-

-
- ragusian
- marisstella
- (and 1 more)
-
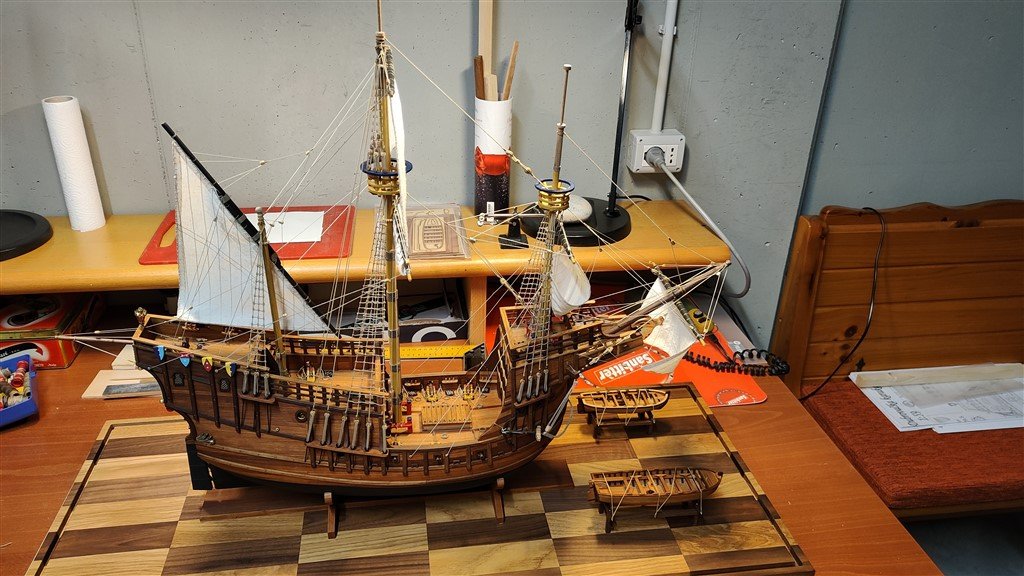
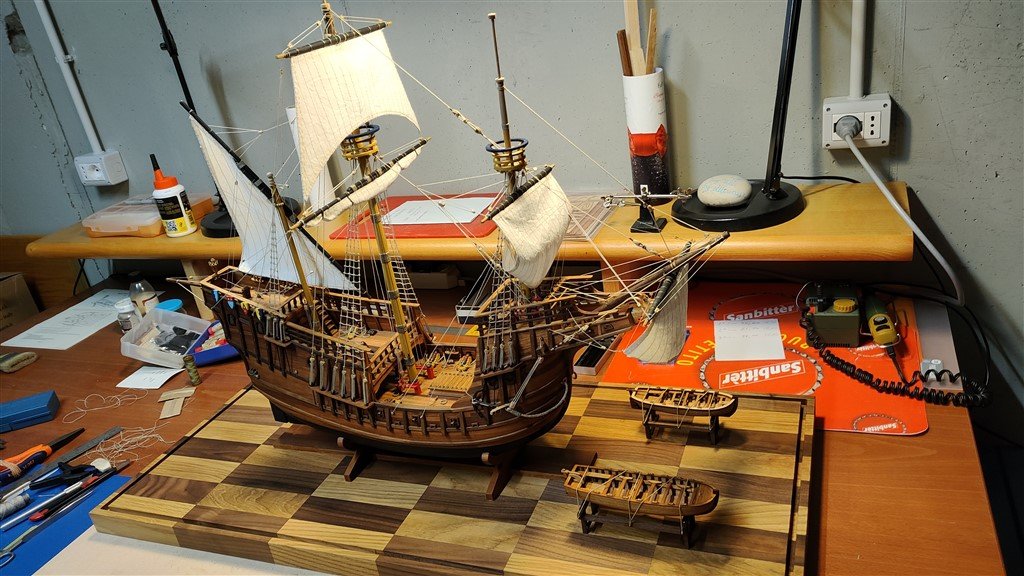
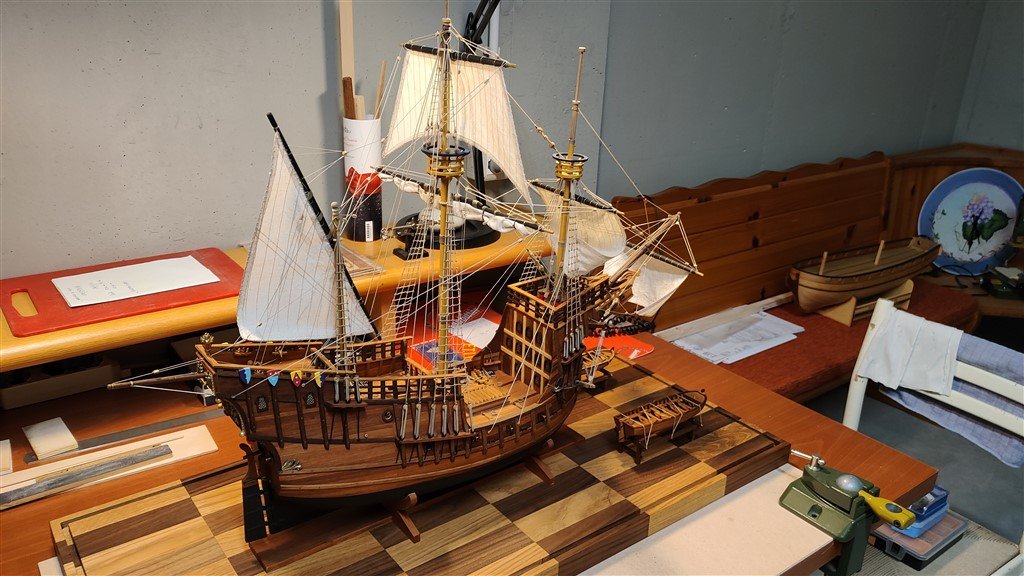
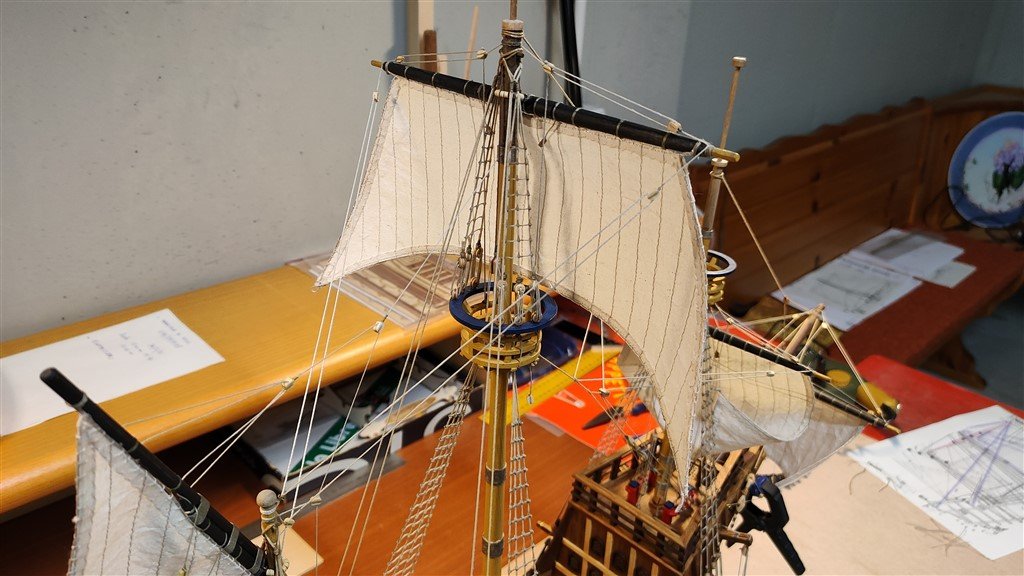
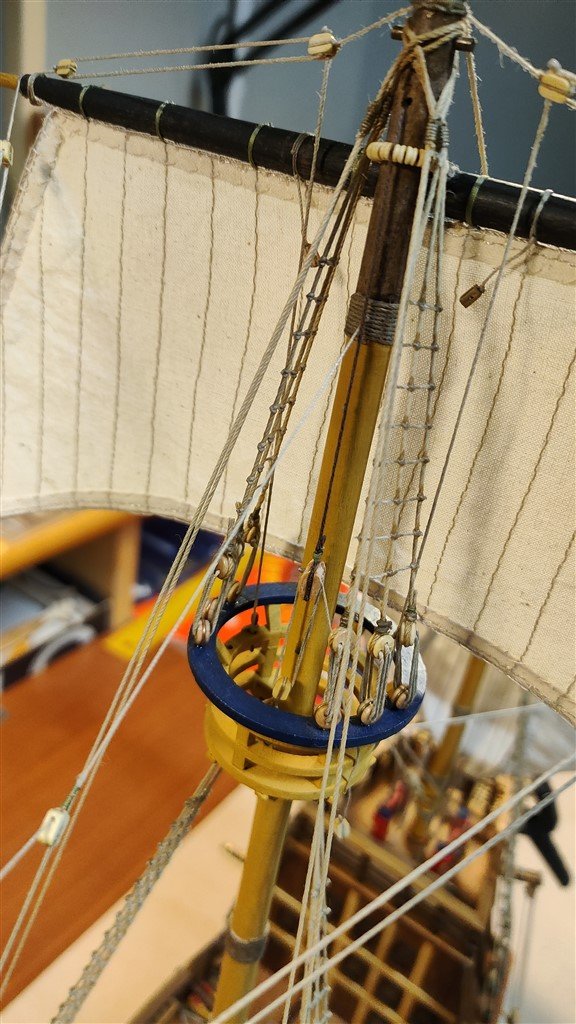
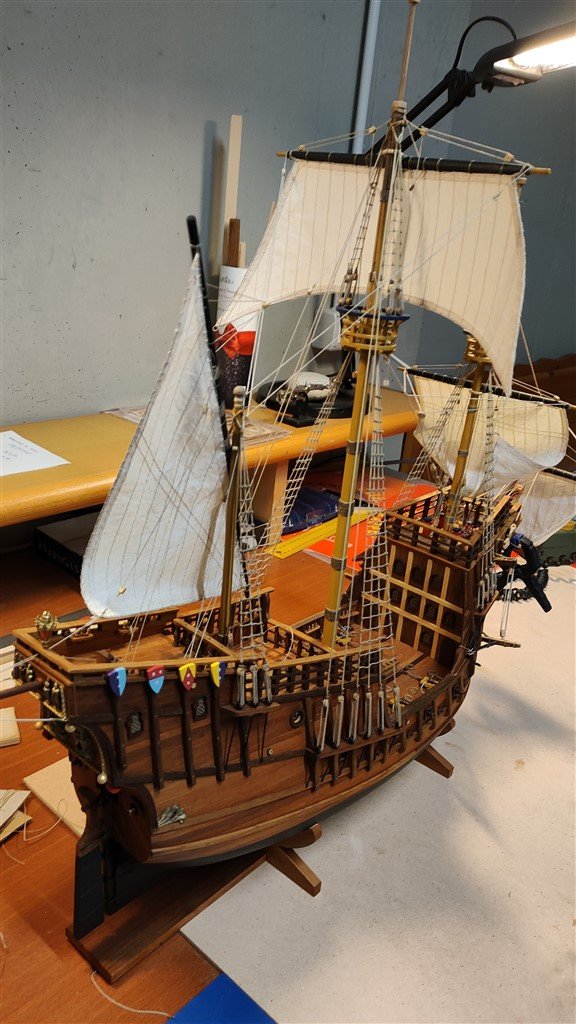
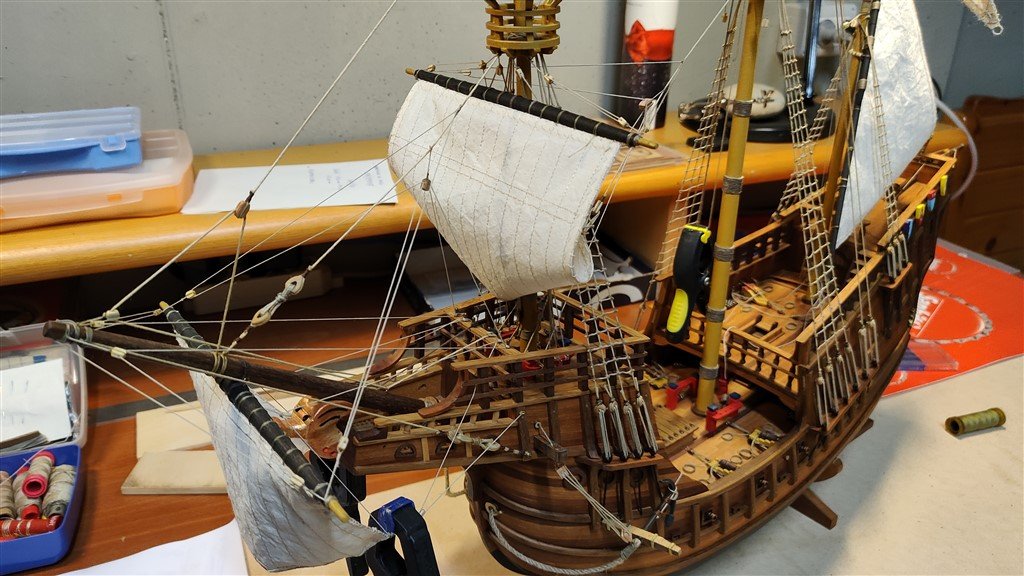
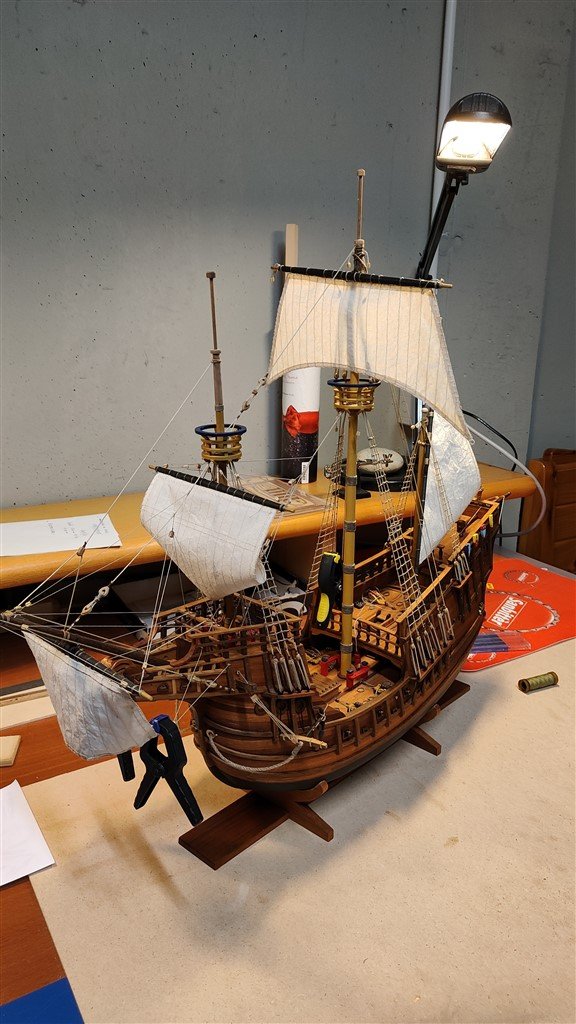
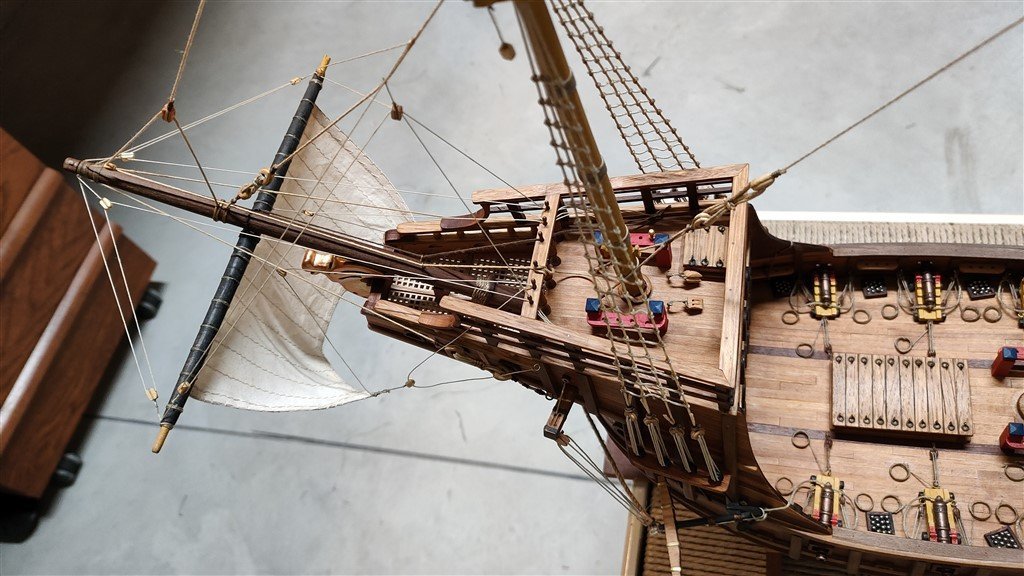
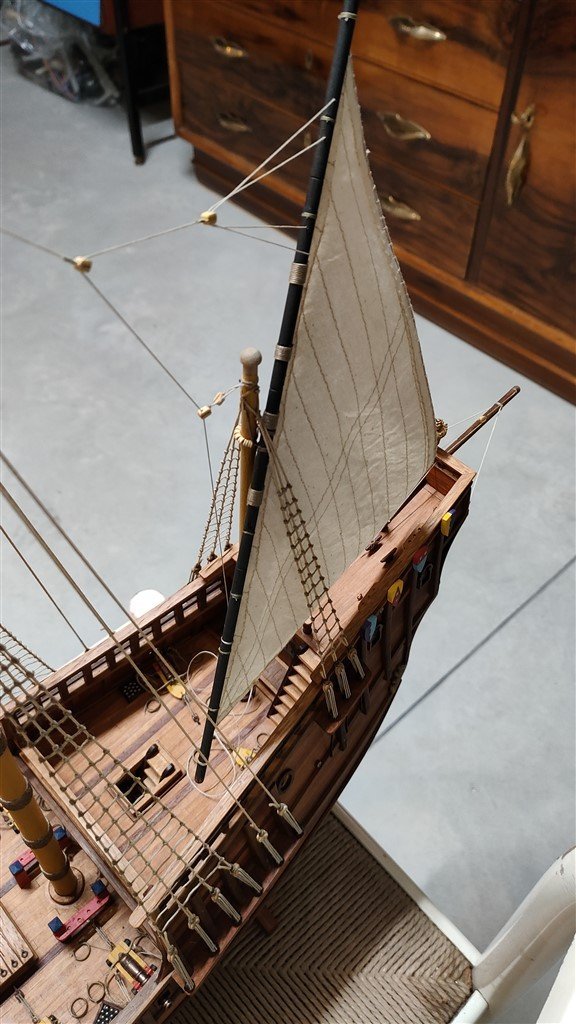
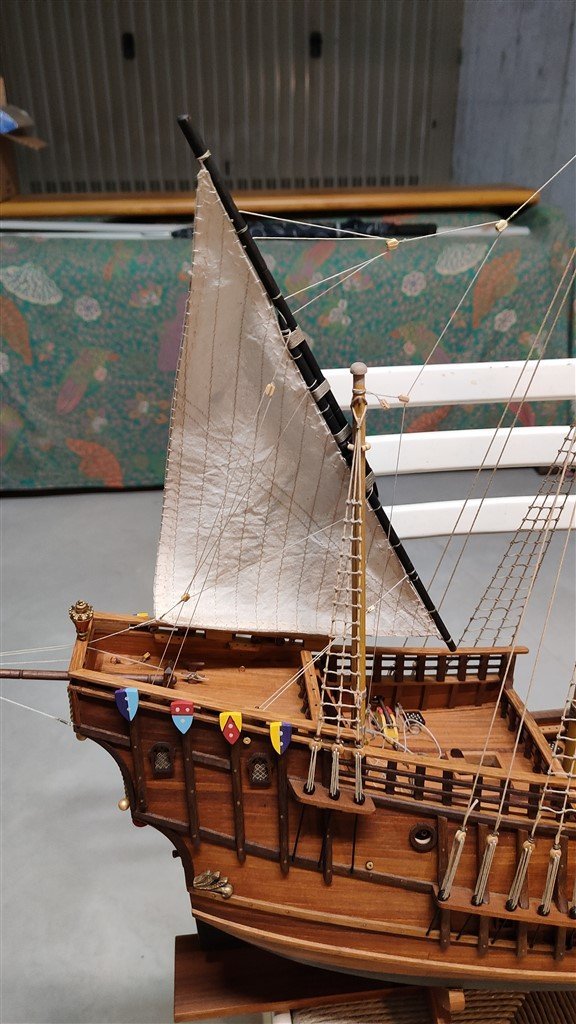
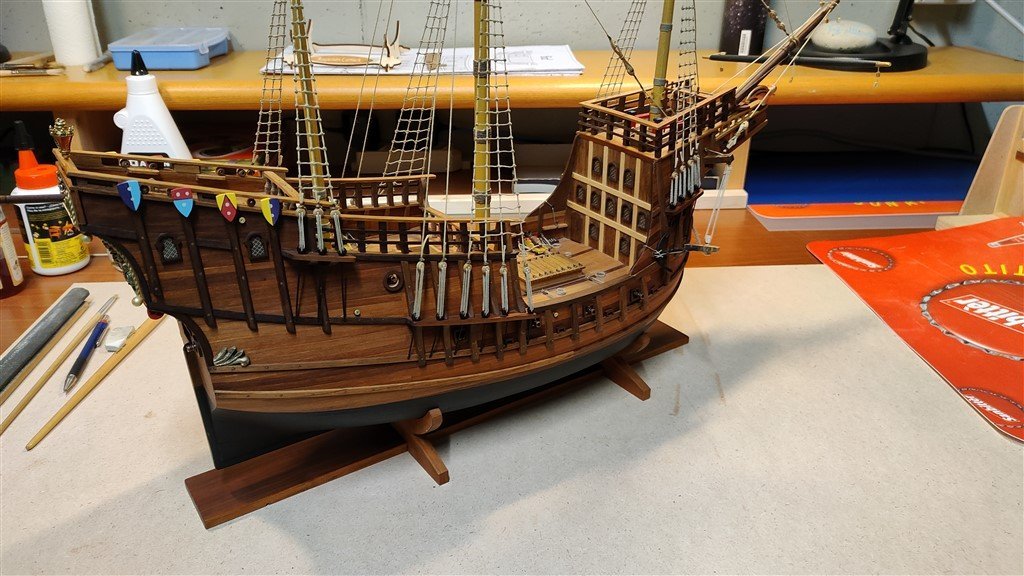
Friday, August 12, 2022 Yesterday I practically finished to install the yards, the sails and their running rigging. At this point the model is very close to be finished. In fact I'm missing few (however important) details to be able to officially declare that I have finished this model: 1) install the flags, 2) four falconets (pivoting cannons) still missing at poop and midship, 3) on the pinrailss I need to place some curls of rope to complete the aesthetic part of the rigggings, 4) the plexiglass cover; this detail will be performed by a specialist and I will almost certainly have to wait until the end of the vacation period to get it done. 01 Ragusian Carrack/12082022/IMG20220811184452.jpg 02 Ragusian Carrack/12082022/IMG20220811184527.jpg 03 Ragusian Carrack/12082022/IMG20220811184534.jpg That's all for today Cheers . . . see you soon Jack Aubrey
- 190 replies
-
- 5
-
-

-
- ragusian
- marisstella
- (and 1 more)
-
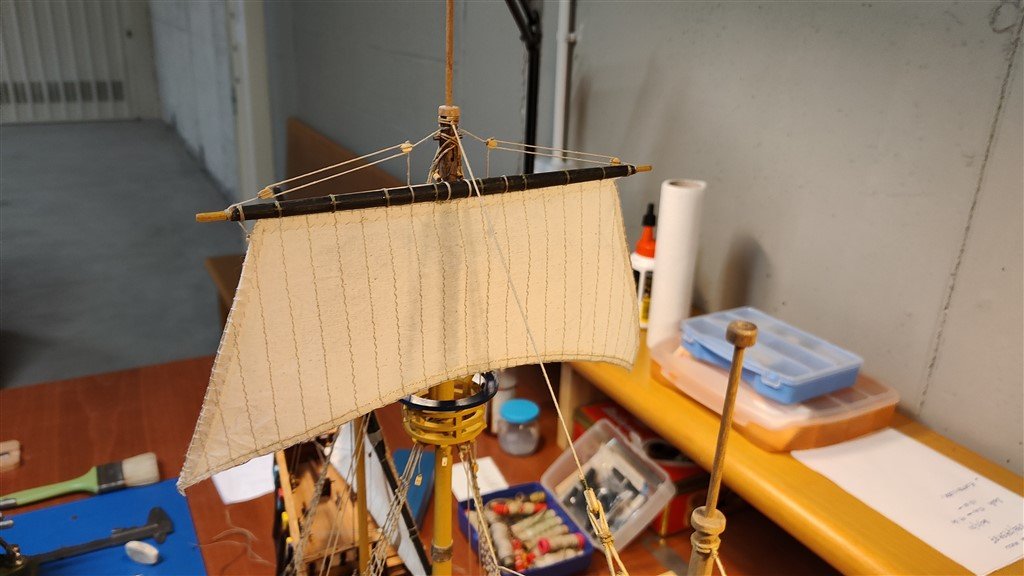
Sunday, August 8th, 2022 Yet another small step with the sails and related running rigging: mainmast topsail. 01 Ragusian Carrack/07082022/IMG20220807122408.jpg 02 Ragusian Carrack/07082022/IMG20220807122417.jpg 03 Ragusian Carrack/07082022/IMG20220807122425.jpg 04 Ragusian Carrack/07082022/IMG20220807122459.jpg Cordial greetings . . . See you soon. Jack Aubrey
- 190 replies
-
- 6
-
-
- ragusian
- marisstella
- (and 1 more)
-
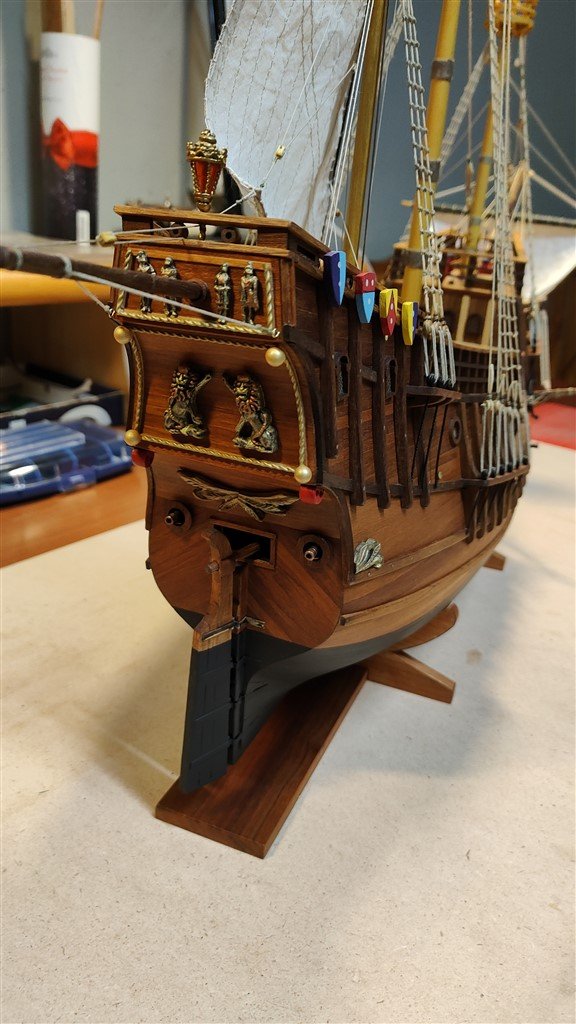
Thursday, August 4th, 2022 Another small milestone with the sails and their rigging . . . . 01 Ragusian Carrack/04082022/IMG20220803185950.jpg 02 Ragusian Carrack/04082022/IMG20220803185959.jpg 03 Ragusian Carrack/30072022/IMG20220803190013.jpg A cordial goodbye . . . . see you soon. Jack Aubrey
- 190 replies
-
- 4
-
-
- ragusian
- marisstella
- (and 1 more)
-
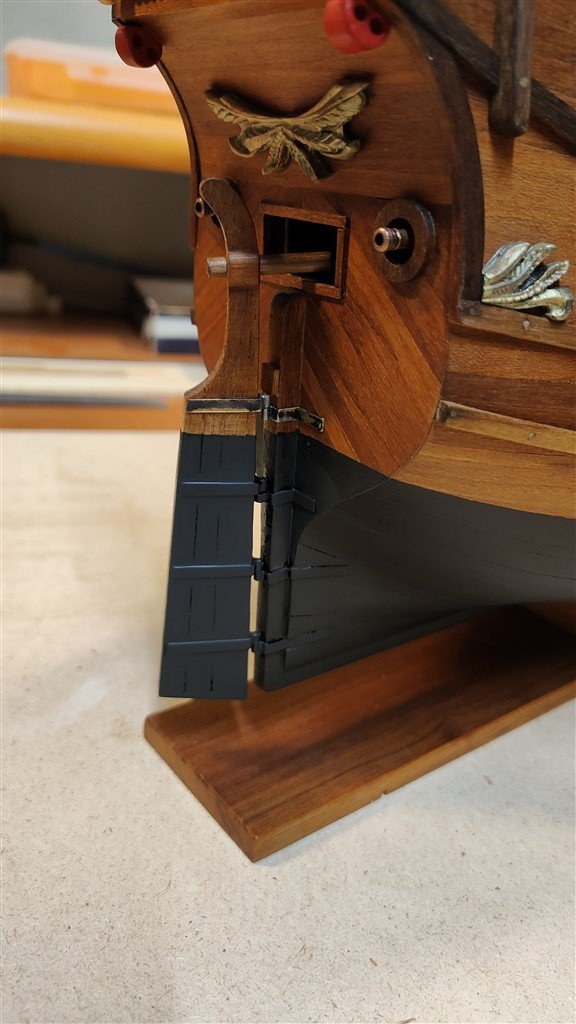
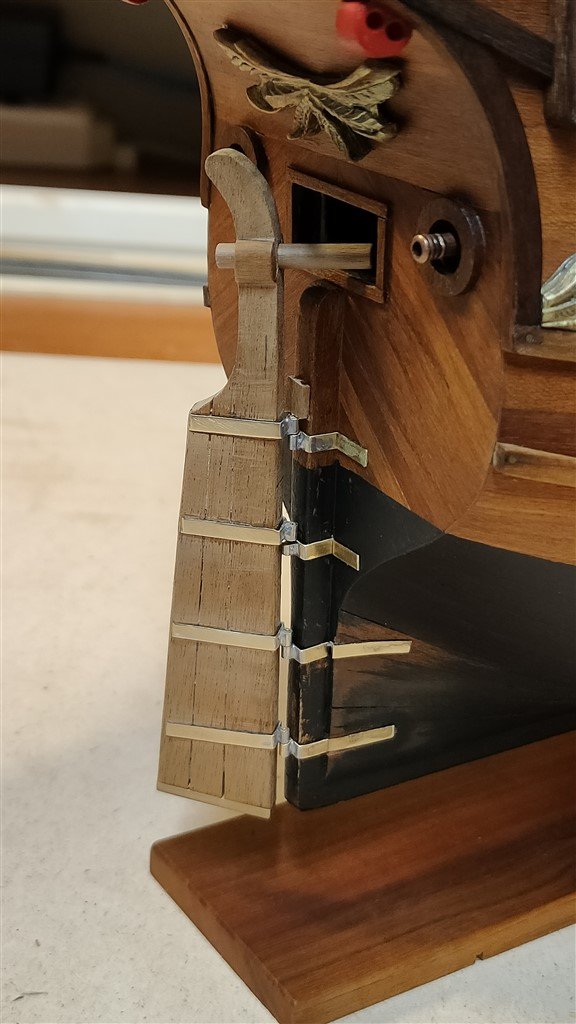
Saturday, July 30th, 2022 Finally, the rudder finished. Then I'll be back to the sails . . . . 01 Ragusian Carrack/30072022/IMG20220730164112.jpg 02 Ragusian Carrack/30072022/IMG20220730164245.jpg 03 Ragusian Carrack/30072022/IMG20220730164245.jpg A cordial goodbye. . . see you soon, Jack Aubrey
- 190 replies
-
- 5
-
-
-
- ragusian
- marisstella
- (and 1 more)
-
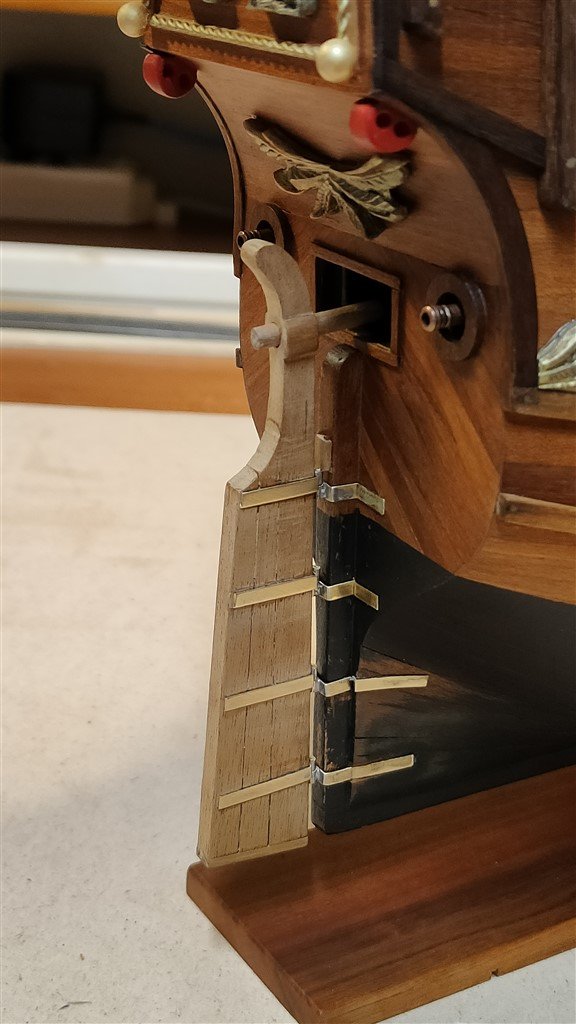
Wednesday, July 27th, 2022 Rudder: in this period of time I had many other things to follow and I wasn't been able to spend much time on this model. It was only this week that I was able to resume. And I decided to finish and install the rudder. The wooden base was already done, so I had to prepare the hinges that allow the rudder to move. I think the correct name is "gudgeon." and "pintle" even if I don't know which of the two is the part mounted on the rudder blade and which one is fixed on the hull. It turned out to be a job that requires great precision, both during the making of the pieces but, above all, during their installation on the rudder and the hull. The images below show the work done. Obviously now I have to retouch the areas of the hull painted in black. In fact, the paint has unfortunately proved to be a major weakness for the sealing of the cyanoacrylate glue and, to ensure a good seal, I had to remove it before gluing. 01 Ragusian Carrack/27072022/IMG20220727172135.jpg 02 Ragusian Carrack/27072022/IMG20220727172146.jpg A cordial goodbye. . . see you soon, Jack Aubrey
- 190 replies
-
- 4
-
-
- ragusian
- marisstella
- (and 1 more)
-
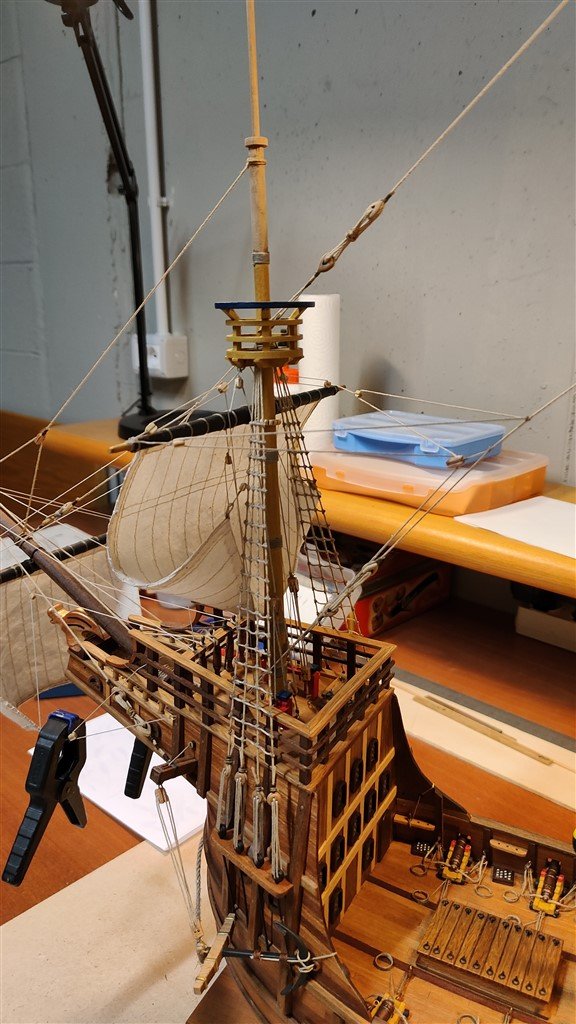
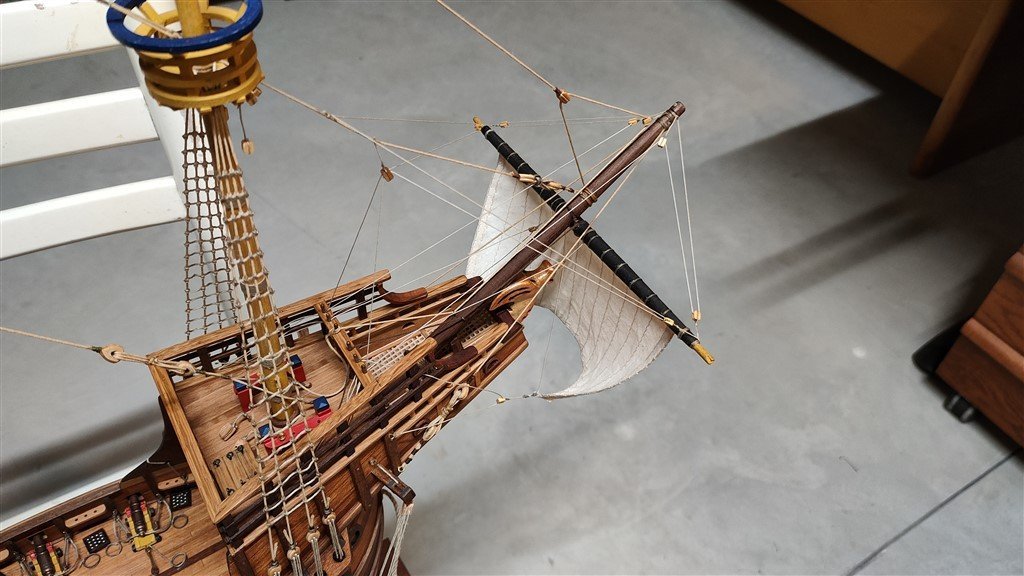
Monday July 6th, 2022 As anticipated, I started installing the sails. Spritsail and its yard: after studying the plans to understand the necessary rigging, after an afternoon of work I finally managed to install and position everything properly. Only the details of the terminations of the ropes near the fiferails are missing, activities that I will mamage all together at the end. At the moment some maneuvers are definitively fixed while others I have left for safety still modifiable. 01 Ragusian Carrack/06072022/IMG20220705172211.JPG 02 Ragusian Carrack/06072022/IMG20220705172220.JPG Then I started and completed the topmast studding sail at the mizzen. This was a little more complicated and took me two afternoons. Same procedure used for the spritsail even if the sail is totally different. The result can be seen in the next two photos. 03 Ragusian Carrack/06072022/IMG20220705172231.JPG 04 Ragusian Carrack/06072022/IMG20220705172302.JPG A final comment: this phase of period ship modeling is for me the one I like least. Even my patience, which is usually a lot, is critical and unstable in this situation. I console myself by thinking that this model has a sail plan relatively simple, I dare not imagine the rigging of a three decker . . A cordial goodbye. . . see you soon, Jack Aubrey
- 190 replies
-
- 4
-
-
- ragusian
- marisstella
- (and 1 more)
-
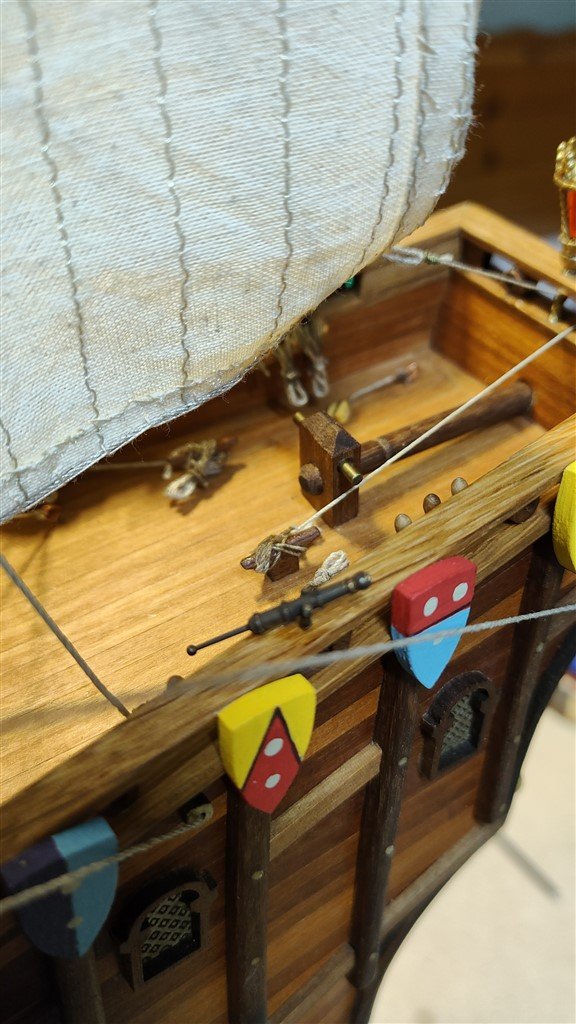
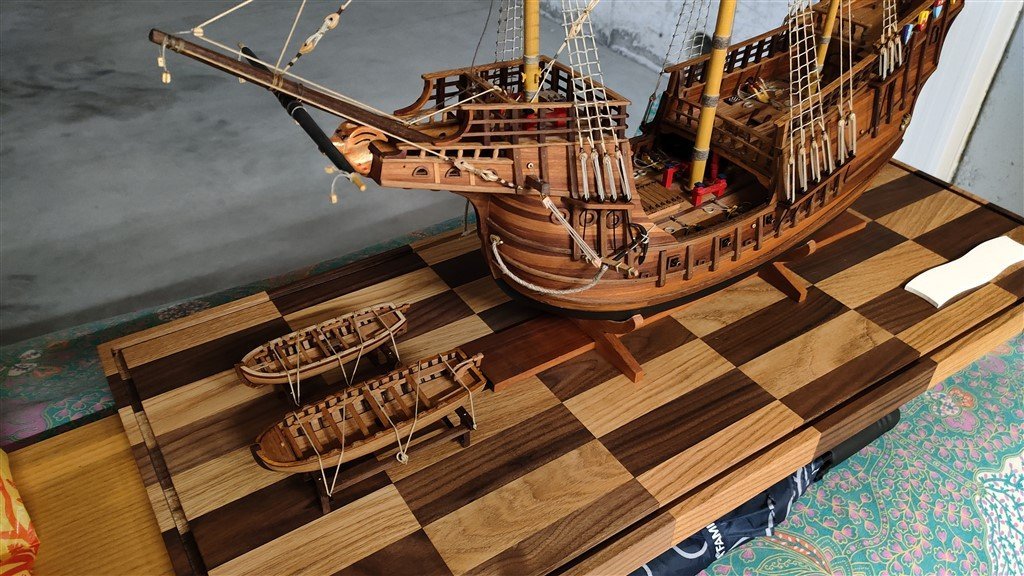
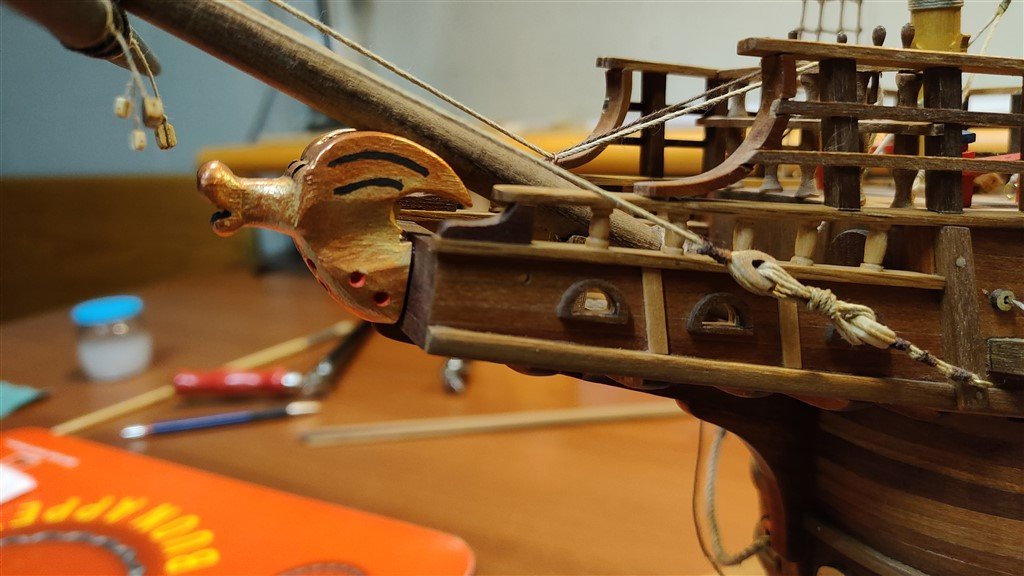
Saturday July 2nd, 2022 Let's talk a bit about the displaystand basement, built to house the model and its plexiglass cover. The measurements of this base were established taking into account the overall length of the model, but above all the width of the mainmast yard. Unfortunately the yard forced to define a base in which the excessive width affects a bit its aesthetics, where in the areas at the model sides they are perhaps too large and, above all, unused. To remedy this fact, I thought to add other elements, with the aim of filling these empty spaces: so I thought to place lifeboats more or less as shown in figures 01, 02 and 05. I have also prepared two plates, their color for now is light ivory, but it's still to be defined, where my wife will execute the writing shown in image 04 with acrylic colors in a way she has already done for other models. If the result will be satisfactory, fine, otherwise I could opt for a brass plate with the same writing. We will see. 01 Ragusian Carrack/01072022/IMG20220626174533.JPG 02 Ragusian Carrack/01072022/IMG20220626174541.JPG 03 Ragusian Carrack/01072022/IMG20220626174551.JPG 04 Ragusian Carrack/01072022/IMG20220626174725.JPG 05 Ragusian Carrack/01072022/IMG20220627122114.JPG In the next few days I will start adding sails. In the meantime, I await the delivery of brass material to build the needles and the rudder shanks. A cordial goodbye. . . see you soon, Jack Aubrey

- 190 replies
-
- 8
-
-
- ragusian
- marisstella
- (and 1 more)
-
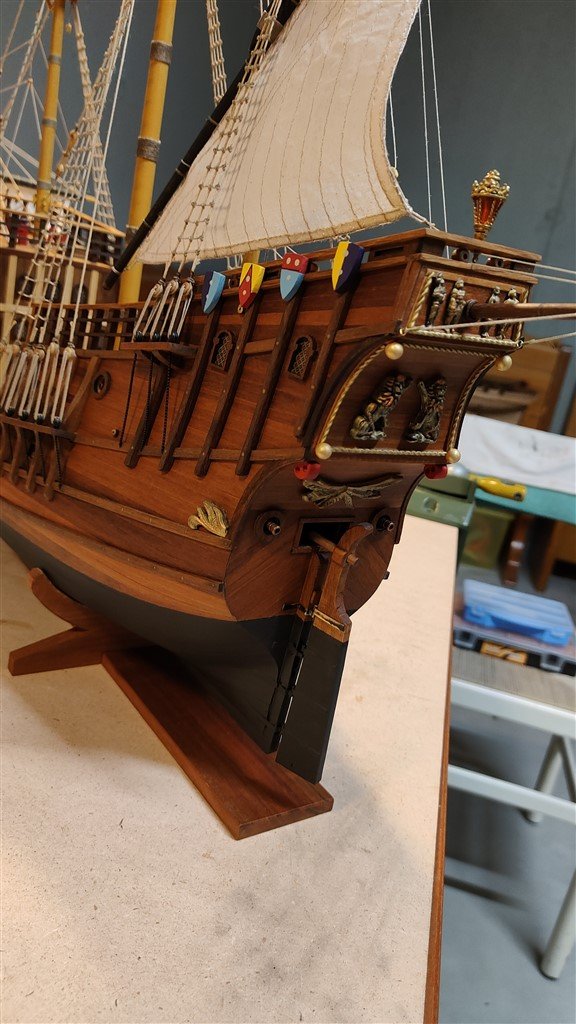
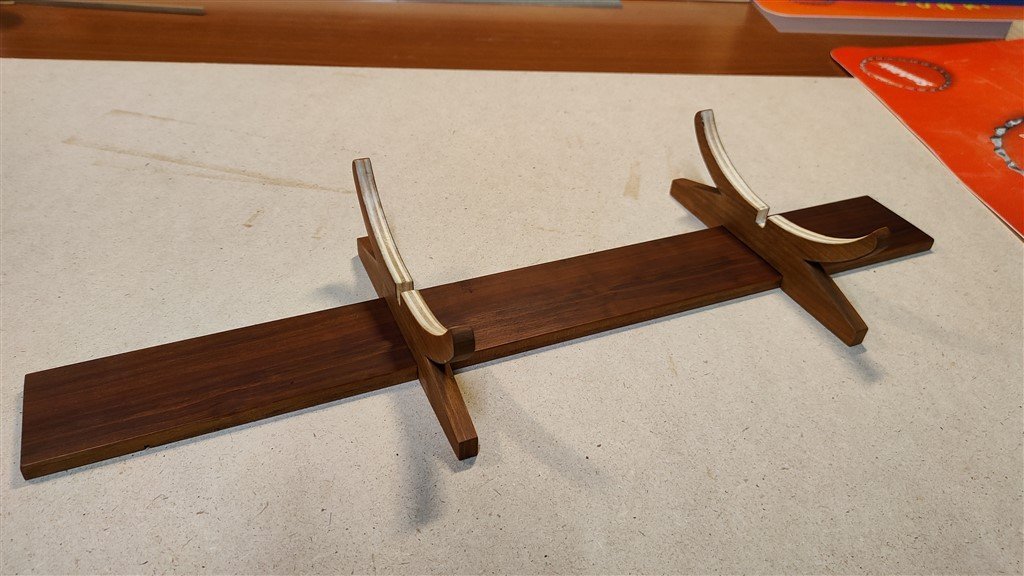
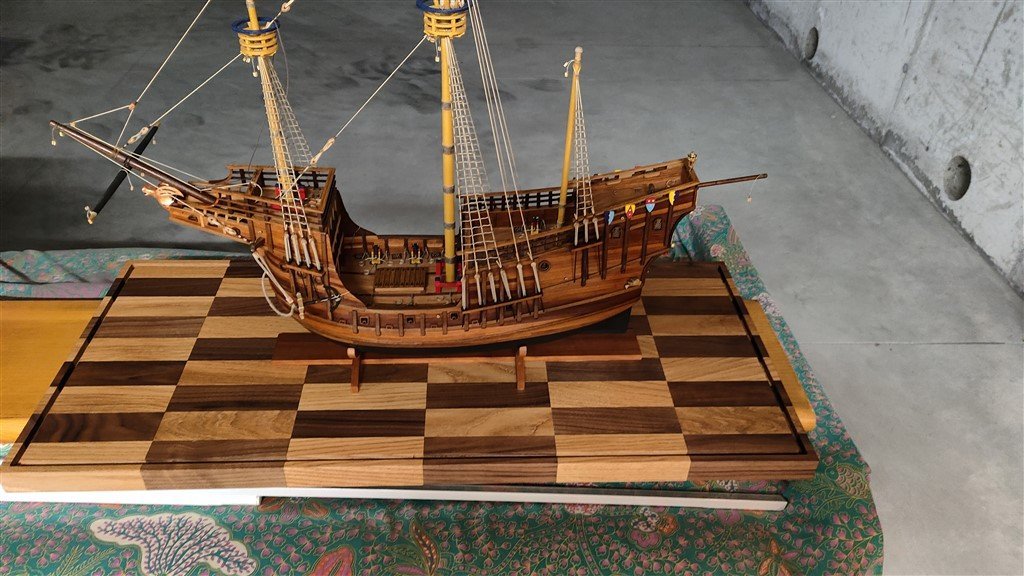
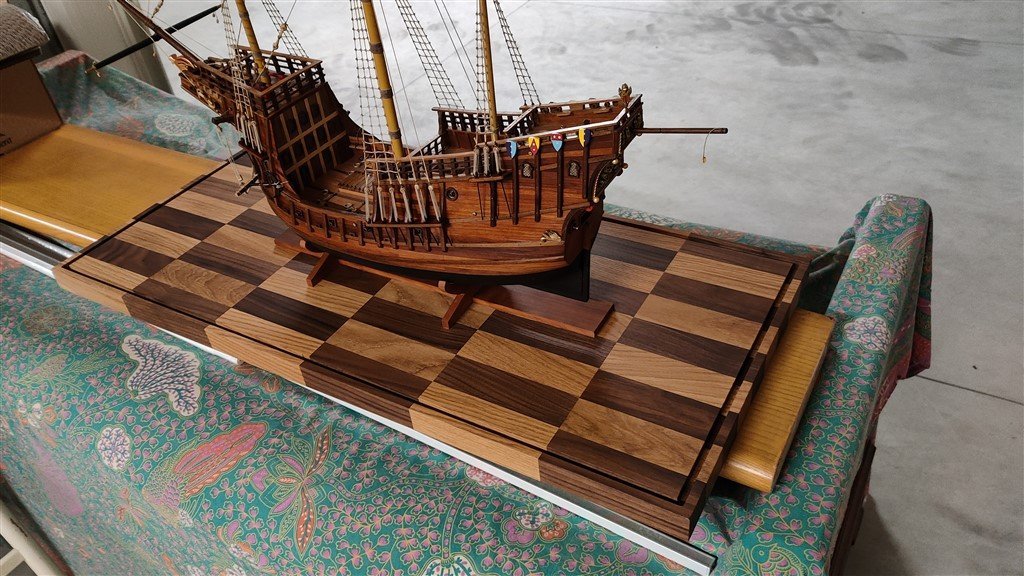
Tuesday June 21st, 2022 About a week ago I decided to reopen the Ragusian Carrack shipyard with the aim of finishing asap this model. The activities to be carried out to complete it are not many. Most of them consist of completing the installation of the yards, sails and all related rigging. Then, there are still some carpentry activities, for example build and install the rudder, carving the figurehead and prepare the stand to house the model and its clear plexiglass cover. Once completed these activities the model should be 99% finished, the remaining 1% will be identified along the way. All the yards and sails have been ready for months, perhaps even a couple of years, so it would seem a simple matter to start again but, as I see it, it is necessary to go back to study the running of all the rigging maneuvers and, therefore, this fact complicates my life . . . that's why in my previous message I had spoken of "mental preparation" to start again. For this need of "mental preparation" I opted to resume the shipyard from the carpentry activities I mentioned at the beginning. First I dedicated myself to the construction of the figurehead, to be obtained from a block of solid walnut. It was my first carving experience and I do not consider it a great success, also due to the wood used, which in my opinion is not suitable. But in any case this blessed figurehead has seen the life and thanks to the subsequent gilding I am moderately satisfied with the result. . 01 Ragusian Carrack/21062022/IMG20220615173024.JPG 02 Ragusian Carrack/21062022/IMG20220615173036.JPG Later I built the rudder, still a long way from completion. . . 03 Ragusian Carrack/21062022/IMG20220621155154.JPG Then the final hull support for the model. . 04 Ragusian Carrack/21062022/IMG20220621155120.JPG 05 Ragusian Carrack/21062022/IMG20220621155033.JPG Finally, lastly the basement for the plexiglass case, rather elaborate in terms of wood used (and built by an artisan, known here at the Como lake, who enjoys building cutting boards for the kitchen using precious woods essences. Its beauty consists in the different combinations of wood essences and color, even if one aspect that should not be underestimated is that it overshadows my model. . . 06 Ragusian Carrack/21062022/IMG20220621172936.JPG 07 Ragusian Carrack/21062022/IMG20220621173004.JPG A cordial goodbye. . . see you soon, Jack Aubrey
- 190 replies
-
- 7
-
-
-
- ragusian
- marisstella
- (and 1 more)
-
Tuesday, June 7, 2022 Two and a half years have passed since my last message, in which I informed all of you that I had to stop my shipmodeling activities. I think that the "WHY" was fully explained in my last message. Finally, after such a long time, I can write that I have now set up a new workshop in a large and comfortable garage right under my new house. In a short time I plan to resume making shipmodeling, starting with finishing this model of Ragusian Carrack . . . all I am missing now is the necessary mental preparation to restart after so much time of inactivity. While I'm reordering my ideas, a warm goodbye . . . see you soon, Jack.Aubrey 01 Miscellanea/07062022/IMG20220607135122.JPG 02 Miscellanea/07062022/IMG20220607135131.JPG 03 Miscellanea/07062022/IMG20220607135139.JPG 04 Miscellanea/07062022/IMG20220607135148.JPG
- 190 replies
-
- 8
-
-
- ragusian
- marisstella
- (and 1 more)
-
I'm going very well, for the moment. Unfortunately I'm forced at home and quite far from my model: when the rule to avoid moving away was issued I was in Tuscany at my daughter's house and I cannot return to Milan. This is anyway a big advantage 'cause Milan and surrounding towns are the main epicentre of he pandemic virus. I cannot forecast when I'll be able to return and finish this model. Sincerely, Jack.
- 190 replies
-
- 5
-
-
- ragusian
- marisstella
- (and 1 more)
-
Monday, December 9th, 2019 In the ten days since my last message I dedicated very little time to modeling: all I managed to do was finishing two of the five sails that would now be ready to be fixed on their respective spars. Unfortunately the day I have to leave my mother-in-law's house free (I remember that it was sold) is approaching and there are still many activities to do to free all the rooms. So, even if ahead of my original plans, I find myself in the need to dismantle my workshop and move everything inside it to a temporary location (I hope for as little time as possible) +/- by the end of the year. Consequence is a mandatory stop to the modeling activities related to the Ragusian Carrack for an indefinite period of time. Obviously, when I'll be less busy it should be possible to resume work on the sails and on the final set-up of the rigging, activities that I theoretically could perform at home, but now it's early to have a accurate plan. I am therefore greeting all those who are following or have followed my log hoping to write and read news soon. In the meantime, I offer all my best wishes for a Merry Christmas and a Happy New Year, in case we don't have to hear ourselves in the coming weeks. Best regards, Jack.Aubrey.
- 190 replies
-
- 4
-
-
- ragusian
- marisstella
- (and 1 more)
-
Friday 29 November 2019 I'm working to prepare the sails. In total there are five sails: one on the bowsprit, one on the foremast, two on the mainmast and finally a triangular sail on the mizzen mast. To consider them finished I have to wait for my wife to sew stitches around their perimeter, task I prefer to have her do as I don't feel enough good for it. The first image shows the main mainmast sail. I have greatly reduced the height of this sail because I want to present it curled up the main yard and therefore the task would be easier to manage with less amount of fabric. 01 Ragusian Carrack/28112019/IMG_20191128_155621.jpg Here the lateen sail of the mizzen mast . . I think I will present it wrapped on the yard. 02 Ragusian Carrack/28112019/IMG_20191128_155613.jpg Here is the upper sail of the mainmast that will be shown unfolded . . 03 Ragusian Carrack/28112019/IMG_20191128_155601.jpg The sail of the bowsprit, shown unfolded . . I think to redo some sewing here resulting too coarse. 04 Ragusian Carrack/28112019/IMG_20191128_155548.jpg The fore sail to be presented wrapped on the foreyard. 05 Ragusian Carrack/28112019/IMG_20191128_155553.jpg That's all for now, cheers, Jack.
- 190 replies
-
- 5
-
-
- ragusian
- marisstella
- (and 1 more)
-
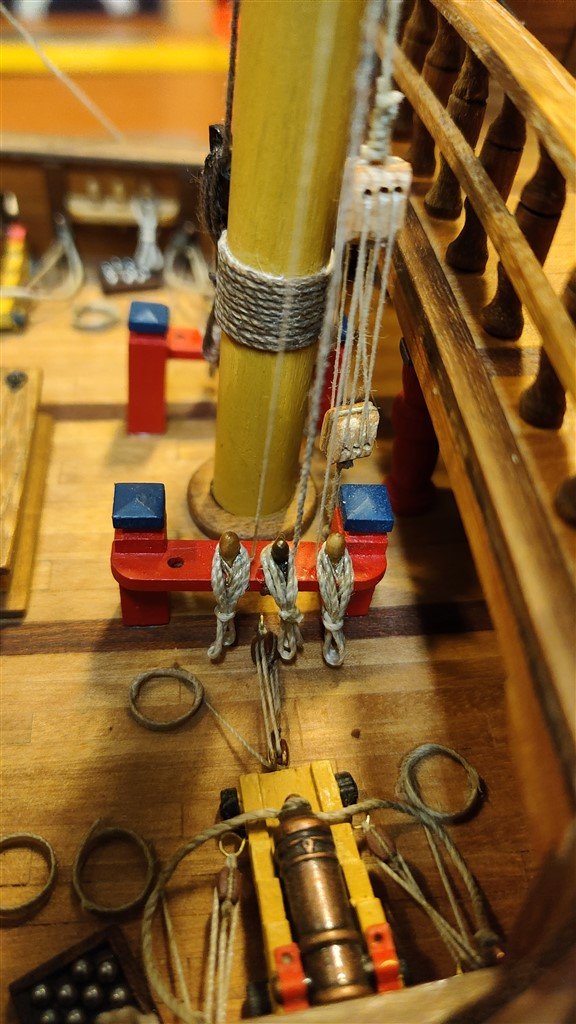
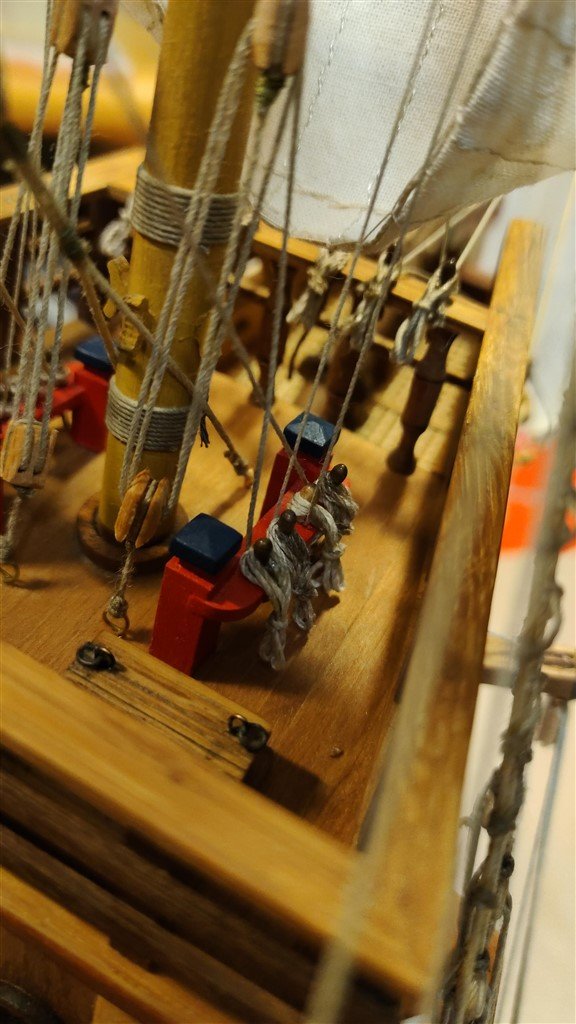
Monday 18 November 2019 Standing rigging is finally over . . . . rat lines obviously were the major, boring effort. 01 Ragusian Carrack/18112019/IMG_20191118_165745.jpg 02 Ragusian Carrack/18112019/IMG_20191118_165759.jpg 03 Ragusian Carrack/18112019/IMG_20191118_165809.jpg 04 Ragusian Carrack/18112019/IMG_20191118_165815.jpg 05 Ragusian Carrack/18112019/IMG_20191118_165818.jpg
- 190 replies
-
- 7
-
-
- ragusian
- marisstella
- (and 1 more)
-
Wednesday 6 November 2019 Further small progresses . . . . this time it's up to the mast. For the future I have decided that I will limit myself in posting messages only when significant steps in setting up the rigging are complete, otherwise I think to run the risk of being too much repetitive. So I give you a rendez-vous for other images and comments when I'll finish the installation of all the standing rigging, a milestone that seems to me adequately representative to show and explain. Greetings, Jack.Aubrey. 01 Ragusian Carrack/06112019/IMG_20191106_170332.jpg 02 Ragusian Carrack/06112019/IMG_20191106_170339.jpg 03 Ragusian Carrack/06112019/IMG_20191106_170342.jpg 04 Ragusian Carrack/06112019/IMG_20191106_170401.jpg
- 190 replies
-
- 10
-
-
- ragusian
- marisstella
- (and 1 more)
-
Tuesday 5 November 2019 I finally started, I fixed the masts and . . . . for now I'm working on standing rigging. It takes a lot of patience. 01 Ragusian Carrack/06112019/IMG_20191105_160027.jpg 02 Ragusian Carrack/06112019/IMG_20191105_160047.jpg 03 Ragusian Carrack/06112019/IMG_20191105_160144.jpg 04 Ragusian Carrack/06112019/IMG_20191105_160042.jpg 05 Ragusian Carrack/06112019/IMG_20191105_160150.jpg
- 190 replies
-
- 5
-
-
- ragusian
- marisstella
- (and 1 more)
-
Giovedì 31 Ottobre 2019 I'm working almost exclusively on masts and its rigging. For the moment my strategy is to prepare all the mast individual components in a separate way with all the blocks and other necessary elements. So, as you can see from the following two images, I worked mainly on applying the necessary pieces to each of the yards or masts independently of the rest. In this way all the points in which the running rigging will pass should be ready and in theory they would not need further additions once installed in their place. 01 Ragusian Carrack/31102019/IMG_20191031_173712.jpg 02 Ragusian Carrack/31102019/IMG_20191031_173718.jpg Then I started putting the pieces together. In the coming days, when I'll be 100% sure, I will definitely fix the three masts with glue and a new cycle of activities will start from there. In the meantime I started doing some experience with bowsprit and anchors. The following three images show the (almost) finished assembly of the anchors and a pair of definitive cables from the tip of the bowsprit to the hull sides. Little stuff compared to what awaits me but it is a good exercise to practice patience, the true virtue of the modeler. However, this is a job that I will have to carry out in the next few weeks together with that of completely emptying my mother-in-law's house, house we recently sold. Incidentally this fact will deprive me of the availability of my much appreciated workshop which (unfortunately) is in the house in object. So at some point I will have to interrupt every activity and park all the contents of the workshop in a temporary warehouse waiting to buy a new home, where surely there will be space for the future, a new facility that, at this point, will exist as long as I practice this hobby. I hope to finish this model just before that time. I should theoretically make it but in the negative case I think I can continue at my house. The remaining activities should be more than feasible even at home . . . apart from the four cats who are my assistants. 03 Ragusian Carrack/31102019/EFFECTS.jpg 04 Ragusian Carrack/31102019/IMG_20191031_173405.jpg 05 Ragusian Carrack/31102019/IMG_20191031_173417.jpg Sincerely, Jack.
- 190 replies
-
- 4
-
-
- ragusian
- marisstella
- (and 1 more)