jack.aubrey
-
Posts
1,268 -
Joined
-
Last visited
Content Type
Profiles
Forums
Gallery
Events
Everything posted by jack.aubrey
-
 Thursday 22 November 2018 Finally I finished to apply the second planking . . 😁😁😁 See you soon, Jack.
- 190 replies
-
- 6
-

-
- ragusian
- marisstella
- (and 1 more)
-
Friday 9 November 2018 The activities around the second planking are still ongoing, even if a bit slowly. I had an incredible sequence of boring setbacks that didn't allow me to spend more time on this model. However, the work seems to proceed very well. See you soon. Jack. 01 Ragusian Carrack/09112018/IMG_20181109_151651.jpg 02 Ragusian Carrack/09112018/IMG_20181109_151727.jpg 03 Ragusian Carrack/09112018/IMG_20181109_151657.jpg 04 Ragusian Carrack/09112018/IMG_20181109_151735.jpg 05 Ragusian Carrack/09112018/IMG_20181109_151712.jpg
- 190 replies
-
- 5
-
-
- ragusian
- marisstella
- (and 1 more)
-
Friday 26 October 2018 - the second planking, continued I'm adding some other images of the carrack model, nothing new with respect to my yesterday's post. Jack. 01 Ragusian Carrack/26/10/2018/IMG_20181026_173133.jpg 02 Ragusian Carrack/26/10/2018/IMG_20181026_173138.jpg 03 Ragusian Carrack/26/10/2018/IMG_20181026_173546.jpg 04 Ragusian Carrack/26/10/2018/IMG_20181026_173530.jpg
- 190 replies
-
- 3
-
-
- ragusian
- marisstella
- (and 1 more)
-
Friday 26 October 2018 - the second planking Having finished all preliminary works, finally, about ten days ago I started to apply the second planking to the hull. Today the situation of the works is well highlighted in the following images: the whole part of the hull above the main wale are now covered with veneer strips of cherry wood. There are two areas of joint of the planks, well highlighted in the part of the hull still to be covered. 01 Ragusian Carrack/26/10/2018/IMG_20181026_173115.jpg 02 Ragusian Carrack/26/10/2018/IMG_20181026_173423.jpg On the right side of the hull I began to finish the gun openings for the four guns onboard. In this case it is only necessary to trim the part covered by the veneer and finish with a pre-cut laser frame included in the kit. In the next photo are visible three of these pieces already installed. 03 Ragusian Carrack/26/10/2018/IMG_20181026_173123.jpg All the borders have already been finished, as evidenced by these stern details. 04 Ragusian Carrack/26/10/2018/IMG_20181026_173447.jpg Cheers, Jack.
- 190 replies
-
- 3
-
-
- ragusian
- marisstella
- (and 1 more)
-
Thursday 17 October 2018 At this point it's mandatory to finish to install the second planking on the external hull and, after, go further with new activities. But, before this, I should finish to refine the ground with a final and accurate sanding of the external hull. Unfortunately I do not want to dust everything and this leads me to delay. So I invented alternative tasks waiting for this will manifests itself. Building of the ordnance trucks: job of complete rest even if each truck is composed of 9 individual pieces that must be assembled to resemble the finished piece. All the pieces, including the wheels, are obtained from a 2mm walnut board, laser cut. Very well done, it didn't cause any problems. For the moment, I have prepared all the guns planned for the main deck, although I will need only two in a short time. 01 Ragusian Carrack/16102018/IMG_20181016_170402.jpg 02 Ragusian Carrack/16102018/IMG_20181016_170300.jpg 03 Ragusian Carrack/16102018/IMG_20181016_170251.jpg Then I started to prepare the beams for the next deck, immediately above the main deck. I installed the first two, not disturbing any future activity to see the result. Under this deck there will be two guns. They must be installed before building the deck itself. Plus a ladder and a supporting column between the first two beams. The idea is to have all the pieces ready for when it will be time to install the deck. 04 Ragusian Carrack/16102018/IMG_20181013_174404.jpg 05 Ragusian Carrack/16102018/IMG_20181015_165535.jpg 06 Ragusian Carrack/16102018/IMG_20181013_174503.jpg But now there are no more excuses: the next session will be dedicated to finishing the surface of the outer hull and then apply the second planking. Only at the end I will be able to resume work on the new deck. See you soon, Jack.
- 190 replies
-
- 3
-
-
- ragusian
- marisstella
- (and 1 more)
-
Steven, your answer seems pretty reasonnable. The artillery of that period was still rather primitive and it is possible that the builders were conservative in sizing these elements so as not to weaken the structure of the ship too much. Excellent contribution. Thanks, Jack.
- 190 replies
-
- 1
-
-
- ragusian
- marisstella
- (and 1 more)
-
Tuesday, October 9th 2018 Another short update . . Opening the gunports . . thank goodness they are few because it is a pretty boring activity. I strictly followed the dimensions of the drawing and they are 7mm. per side. Translated in full scale we are talking about openings of about 45 cm per side. Do not you feel them a little small? 01 Ragusian Carrack/09102018/IMG_20181009_175612.jpg The same ports seen from the inside. Here the work has been longer because the stays and stanchions had to be applied before. I applied a tiny coat of wood oil to see the chromatic effect of the various wood essences. 02 Ragusian Carrack/09102018/IMG_20181009_175551.jpg Even here I could not resist and I gave a coat of oil . . the wood color immediately appeared. 03 Ragusian Carrack/09102018/IMG_20181009_175559.jpg See you next time, Jack.
- 190 replies
-
- 2
-
-
- ragusian
- marisstella
- (and 1 more)
-
Friday 5 October 2018 With this new post in practice I've finished working on the foredeck . . . at least until I'll finish the second planking on the whole hull. Only then I will be able to resume works in this area and complete it. Below are some pictures of the work done. 01 Ragusian Carrack/05102018/IMG_20181005_113703.jpg 02 Ragusian Carrack/05102018/IMG_20181005_113727.jpg 03 Ragusian Carrack/05102018/IMG_20181005_113733.jpg Small columns made entirely by hand, and they are all of different height, although very little. 04 Ragusian Carrack/05102018/IMG_20181005_113740.jpg 05 Ragusian Carrack/05102018/IMG_20181005_113746.jpg Now other tasks await me . . I'm spoiled for choice. Need a planning weekend and then I'll restart again next week. Greetings, Jack.Aubrey
- 190 replies
-
- 4
-
-
- ragusian
- marisstella
- (and 1 more)
-
Friday 28 September 2018 After the sadness for the great fire in Calci, luckily without any physical consequences for me (in this period I do not live there) and even for my house (apart from 1cm. of ash deposited on the terrace and shutters) I resumed work on the Carrack. A first attempt of the second planking, in the area of the forecastle . . 01 Ragusian Carrack/28092018/IMG_20180927_181334.jpg The lower supports of the foredeck . . 02 Ragusian Carrack/28092018/IMG_20180927_181342.jpg Next activities will still be focused on the foredeck, where there is much to do and helps me to get familiar with the model . . 03 Ragusian Carrack/28092018/IMG_20180928_123951.jpg Below three images of how the model looks like now . . including one of my four feline assistants. 04 Ragusian Carrack/28092018/IMG_20180928_124046.jpg 05 Ragusian Carrack/28092018/IMG_20180928_124054.jpg 06 Ragusian Carrack/28092018/IMG_20180928_124105.jpg See you next time, Jack.
- 190 replies
-
- 2
-
-
- ragusian
- marisstella
- (and 1 more)
-
In fact, two days later, the damages seem huge: a thousand hectares of forest, vineyards and olive groves went up in smoke. Yesterday another fire broke out about twenty kilometers from Calci, still in the Monti Pisani area. It seems that it will take at least 5 years to restore the destroyed olive groves and vineyards and even 15 for the wooded area. Not to forget homes, animals and flora and fauna biodiversity that will disappear. When I'll come back there in early December it will be a sad day.
-
Tuesday 25 September 2018 Last night, around 10:00 pm a fire broke out, most probably of malicious origin, on Monte Serra, north-east of Pisa, near the small town of Calci. The damages are huge and incalculable, it seems there are 700 people evacuated and the fire is still ongoing, thanks to a strong wind that hinders the operations of firefighters and firefighting aircrafts. Calci is the country in Tuscany where I spent 9 months, before returning to Cinisello (Milan) at the end of June and where I plan to return the month of December to spend there winter and spring. It is the place where I started to build the Ragusian Carrack, the subject of this topic. What a mess . . I have no words 01 IncendioDiCalci/incendio-monte-serra-4-1-640x564.jpg 02 IncendioDiCalci/incendio-monte-serra-27-640x480.jpg 03 IncendioDiCalci/2060_8f76e9f43f7733733dcef7e67e4997c0.JPG 04 IncendioDiCalci/IMG-20180925-WA0030.jpg 05 IncendioDiCalci/5b69b1be20c11.jpeg
-
Saturday, September 22, 2018 Small update . . 01 Ragusian Carrack/22092018/IMG_20180922_082537.jpg 02 Ragusian Carrack/22092018/IMG_20180922_082552.jpg
- 190 replies
-
- 5
-
-
- ragusian
- marisstella
- (and 1 more)
-
Tuesday 18 September 2018 Finally, after months of total inactivity, on Monday, September 17 I started working again . . The work is now aimed to prepare the hull to receive the second planking: there is to perform the final sanding of the hull but also many other minor tasks that must be started before applying the second layer. I therefore focused on the prow and the foredeck, where there is still much to do. To begin I refined all the details left rough on the foredeck. 01 Ragusian Carrack/19092018/IMG_20180919_102258.jpg Then I started to prepare the grating at prow by assembling the elements supplied in the Marisstella kit and then joining them together to form a surface suitable for the required shape. In the picture below the composite of the grating and the template that will serve to shape the finished piece. 02 Ragusian Carrack/19092018/IMG_20180919_102221.jpg Thursday 20 September 2018 Having in mind the latest photos of the central area of the model I took months ago, it is clear that the new details added and visible in the picture below should be applied now, so as to cover them with the second planking. The pre-cut pieces have been modified to adapt them to my model. 01 Ragusian Carrack/20092018/IMG_20180920_162148.jpg I then finished the prow grating, shaped appropriately and finally I fixed it in position . . but there is still a lot to do, so the situation here is still evolving. 02 Ragusian Carrack/20092018/IMG_20180920_162310.jpg 03 Ragusian Carrack/20092018/IMG_20180920_162136.jpg 04 Ragusian Carrack/20092018/IMG_20180920_162121.jpg That's all for now, though not much. See you next time, Jack.Aubrey.
- 190 replies
-
- 5
-
-
- ragusian
- marisstella
- (and 1 more)
-
Friday, September 14th, 2018 Hi friends, After a long absence from this forum and shipmodeling in general I'm now, finally, free to restart the "Ragusian Carrack" shipyard. I stopped shipmodelling beginning of May and I'm trying first to define a preliminary activity plan: I've forgotten a lot of issues and so I need to replan the next task of the project. As soon as possible I'll resume posting on this forum. Regards, Jack.Aubrey
- 190 replies
-
- 2
-
-
- ragusian
- marisstella
- (and 1 more)
-
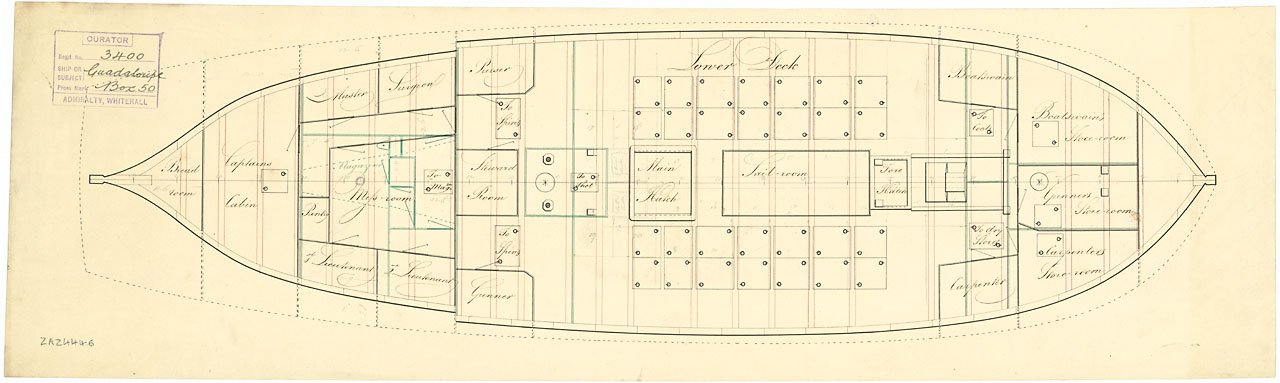
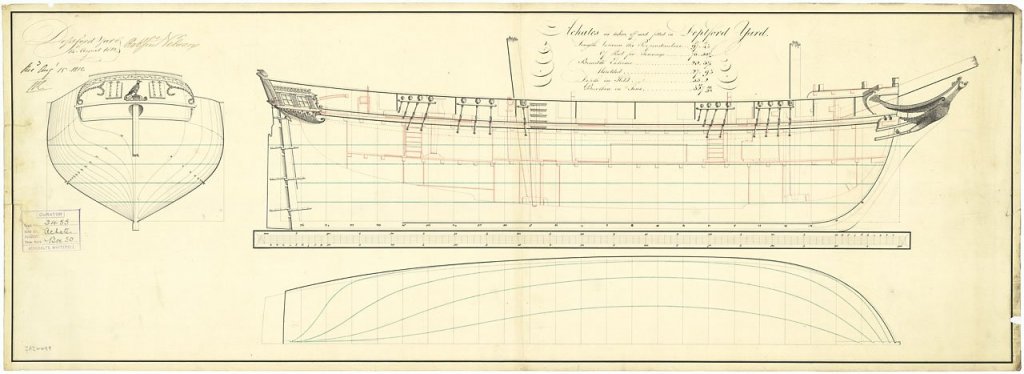
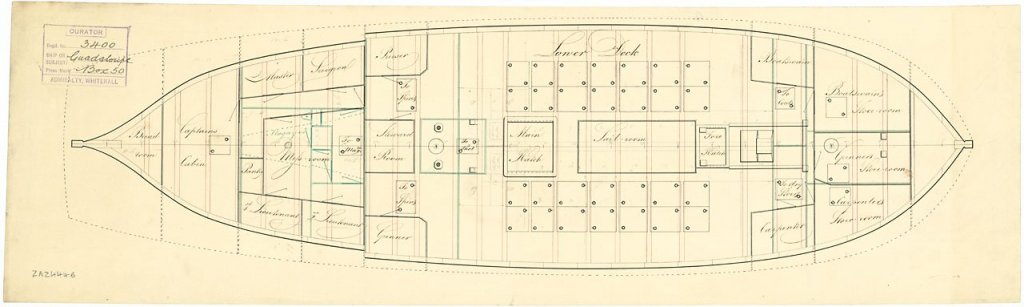
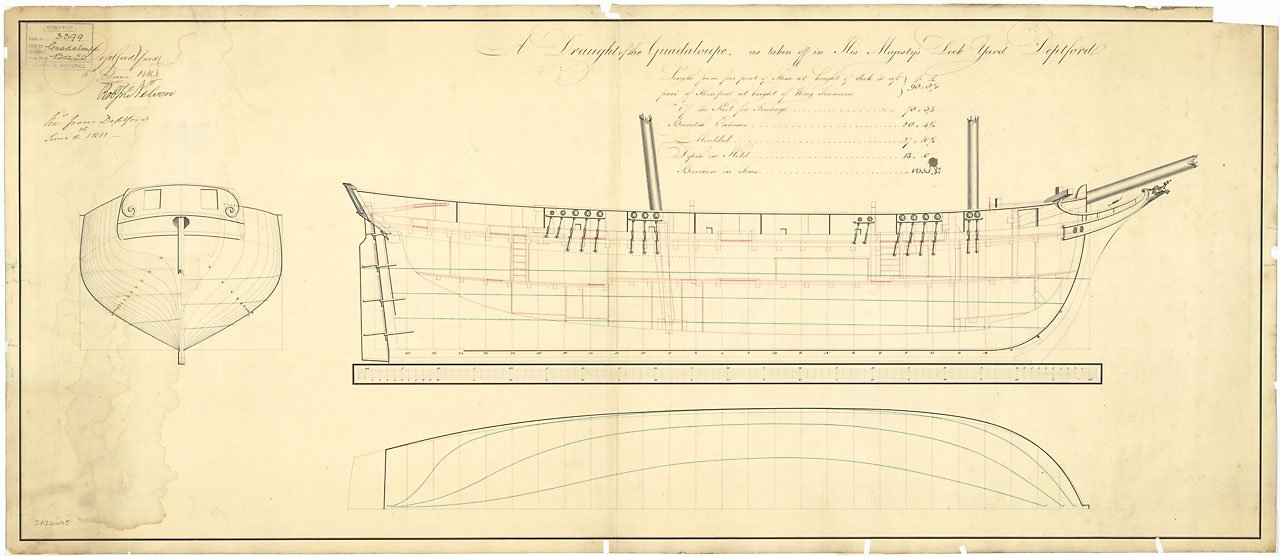
Hi Odival The ANCRE plans and other materials I researched do not show the lower decks for this class of ships. But at the National Maritime Museum of Greewich I found some plans that were taken by the Royal Navy after capture of some of them. In these plans there are somo additional details such as dispositions of the lower decks, as you ask. I attach some images of these plans, that you may request to NMM, where you can see these details, so you can evaluate if this is what you need of not. Regards, Jack.

.thumb.jpg.71dd0a659e6514d831b1a617245fd343.jpg)
.thumb.jpg.5dec61e3bf8403c40253e162a196fa50.jpg)
-
Thursday 3 May 2018 In view of my return to Cinisello Balsamo, planned for Friday, May 11th after eight months in Tuscany, I packed all the necessary material for the Ragusian Carrack I have here in Pisa. But, as a old italian proverb says, "the devil makes the pots but not the lids", and so a unplanned problem was born that forces me to postpone my return, probably until mid-June. Consequence of this is that I am forced to keep the shipyard closed for longer than I thought, so do not expect further progress on this log for some time, at least until the second half of June. Best regards, Jack.
- 190 replies
-
- 1
-
-
- ragusian
- marisstella
- (and 1 more)
-
Friday, April 16th, 2018 Today, let's try to complete the speech interrupted a few days ago, relating to the removal of the gaps between a plank and its adjacents without using putty. Once the preliminary tasks have been completed (glueing strip segments, fixing them with diluted vinyl glue, etc.), we proceed by sanding these sections to level them to the other parts of the hull. It is advisable to work gently, avoiding to use coarse grained sandpaper. It is important to use only sanding blocks, avoiding, until the desired result is achieved, the use of abrasive paper only with hands. The first two images show the work almost finished when this technique is used to eliminate the differences in height between one strip and another: depending on the height of the gap, the piece will be more or less thin, so that in some points the signs made with a pencil, to delimit the area, may appear, while in others not. 01 Ragusian Carrack/13042018/IMG_20180413_183457.jpg 02 Ragusian Carrack/13042018/IMG_20180413_183512.jpg In the next two images, instead, we see the results when using this technique to fill in depressions on the hull. Here the papersanding technique, although very similar, is slightly different but with a little practice and intuition you may easily learn how to proceed. 03 Ragusian Carrack/13042018/IMG_20180413_183432.jpg 04 Ragusian Carrack/13042018/IMG_20180413_183520.jpg Finally, an image from a particular perspectiv where it is possible to notice how the two slight depressions that were present are now disappeared. This is appreciable by observing the correct curve on the hull. 05 Ragusian Carrack/13042018/IMG_20180413_183540.jpg Finally, as last step, a new coat of diluted vinyl glue over the areas where we worked on and, when the mixture of water and glue will be perfectly dry, a light refinement with very thin abrasive paper to completely smooth the whole. To speed up drying and waste little time, you can use a hair dryer. Now that we have also fixed these problems we can move on to the final hull sanding which from now on becomes an ordinary matter, made of patience and sawdust. In some cases we could fill some small grooves in certain points of the hull with putty, but usually, having to apply above a second planking, this operation is not strictly necessary and could even be bypassed. A friendly goodbye, Jack.Aubrey.
- 190 replies
-
- 2
-
-
- ragusian
- marisstella
- (and 1 more)
-
Monday 9 April 2014 Now it's a matter to apply the filler. Personally I try to avoid using putty and I prefer to use wooden strips as a filler. For this purpose I have a supply of sweetwood strips of 0.5mm thickness which is usually good for almost all cases. The strips must be the same height as those used for the planking. I cutout a piece of strip with the length of the area to be filled, then, using the cyanoacrylate glue I paste it in place and move to another area until the operation is completed on all the previously highlighted parts. At this point, I cover these areas with a coat of vinyl glue diluted 50% with water. In this way I soak the strip and fill all the outer edges with glue. This operation adequately fixes the batten to the hull even in the most remote areas ensuring a bonding that covers 100% of the area ensuring a perfect seal. Images #03 and #04 show these strips applied and before the next sanding phase. I let, for safety, spend a day to dry and then I move to smooth the part of the wood strip in excess. At this point the problem is 99% solved. Once polished with ever finer abrasive paper, I proceed to stabilize the area by reapplying a second coat of diluted vinyl followed a few hours after by a slight smoothing with a fairly fine abrasive paper. In the most difficult cases only at this point I consider the application of a small amount of putty. 03 Ragusian Carrack/07042018/IMG_20180407_115552.jpg 04 Ragusian Carrack/07042018/IMG_20180407_115602.jpg PS: This technique can also be used to fix areas of the hull where there are slight dips. Photos #05 and #06 show two of these areas in the bow area in which I have implemented this technique. I think, instead, that for the bumps there is only one solution: prevent their formation by checking well the course of the plank before applying it. 05 Ragusian Carrack/07042018/IMG_20180407_115608.jpg 06 Ragusian Carrack/07042018/IMG_20180407_115625.jpg In the next message I will go on to show the result obtained when processing is finished.
- 190 replies
-
- 2
-
-
- ragusian
- marisstella
- (and 1 more)
-
Sunday 8 April 2014 Since I do not expect to have many things to show soon, I decided to discuss some aspects related to the finishing of the first planking, task mandatory to prepare the hull to receive the second planking. I remember that this second layer will be applied using strips from veneer of cherry wood. Now let's clarify better: once you have applied all the strips of the first planking, you need to smooth the hull because you will discover a lot of imperfections, some of them of very little importance but also some problems that could affect the subsequent tasks and the expected results. Usually in this phase we'll work with sandpaper and sanding blocks to smooth and level the entire hull. In the worst cases using even some kind of putty. One of the problems that occurs very often is the fact that two or more planks, placed side by side, are not properly aligned assuming the form of steps. They may be originated for different reasons, for example for a different thickness of the strips, maybe only for few tenths, or a curvature slightly different and so on. Regardless of the reason, during the finishing phase after the planking, you must resolve these aspects to get at the end a perfectly smooth hull, without steps, bumps or dips. The solutions for leveling these steps are substantially two: 1) lower the area of the most protruding strip to bring it to the same level as the deeper one or 2) fill the area of the most hollow strip to bring it to the level of the most protruding. In the first case it's a matter of sanding one strip in order to remove the excess part, in the second it is necessary to fill the missing part with a filler. Regarding the solution to be adopted from time to time there aren't precise rules, it's our sensitivity, experience and knowledge of how we have applied the plank. However, most frequently, we will use both methods because these differences in height are very, very common. Well, I have written that in the case of the solution #1 it is sufficient to smooth the affected area to achieve the result, while in the case #2, once the points to adjust are properly identified, we can choose between A) use putty as filler or B) glue some wood, in the form of strips of adequate thickness, in the area to be filled and then level it by sanding. Photos #01 and #02 here below show on the hull of my carrack some areas, highlighted with a pencil, where you need to apply the filler. Thanks to the high contrast of the images in daylight, many other areas with steps are also visible. If not marked with the pencil, it means that I have decided to use the #1 solution. After a preliminary roughing, I sat in a well lit area and proceeded to identify these critical areas and to highlight them, marking their right positioning. It's all for today, see you next time. I beg your pardon for my english, greetings, Jack., Jack. 01 Ragusian Carrack/07042018/IMG_20180407_105523.jpg 02 Ragusian Carrack/07042018/IMG_20180407_105529.jpg
- 190 replies
-
- 1
-
-
- ragusian
- marisstella
- (and 1 more)
-
Thursday, April 5th, 2018 The first planking is now definitely complete. The following three images show a small groove still to be closed in the connection between the hull and the forecastle. It is now closed but I didn't shoot other photos for such an insignificant detail. Now it is a matter of sanding and smoothing the whole hull to level the small differences in height between some strips and adjust a batch of small depressions in the lower area, below the WL, at the bow. 01 Ragusian Carrack/28032018/IMG_20180328_195638.jpg 02 Ragusian Carrack/28032018/IMG_20180328_195722.jpg 03 Ragusian Carrack/28032018/IMG_20180328_195757.jpg While I'm waiting to get the will to breathe some sawdust, I proceeded to complete the second planking, with cherry veneer, on the transom. Three images of the final result follow here below. 04 Ragusian Carrack/05042018/IMG_20180405_160542.jpg 05 Ragusian Carrack/05042018/IMG_20180405_160449.jpg 06 Ragusian Carrack/05042018/IMG_20180405_160225.jpg See you next time, even if I have a garden table with two chairs, a bit ruined by sun and rain to be repaired: sanding, a couple of paint undercoats and a final coat of clear paint with wax effect. This is to say that you probably shouldn't expect too many news soon. Greetings, Jack.
- 190 replies
-
- 2
-
-
- ragusian
- marisstella
- (and 1 more)
-
Monday 26 March 2018 Here below somme additional images of the model . . same day of previous message. Regards, Jack. 01 Ragusian Carrack/25032018/IMG_20180325_122538.jpg 01 Ragusian Carrack/25032018/IMG_20180325_122555.jpg 01 Ragusian Carrack/25032018/IMG_20180325_122546.jpg A nice present made of beers from Stockholm, hope they are good as beauty. I'll let them stand some days because of the journey and then . . . prosit. 01 Ragusian Carrack/25032018/IMG_20180325_184115.jpg
- 190 replies
-
- 4
-
-
- ragusian
- marisstella
- (and 1 more)
-
Sunday 25 March 2018 I almost finished the application of the first planking of my Ragusian Carrack. Due to my daughter's arrival at the airport of Pisa from Stockholm almost concomitant I had to stop and so a couple of "stealers" near the sternpost on both sides of the hull are missing. I think I will definitively close the matter shortly. The last half dozen planks (on each side) were not a simple task, and honestly, despite the experience gained with this first planking, I have no idea how to properly approach the second layer in this difficult area of the hull. We'll see. In the worst case, since it is an area below the waterline that should be colored (according to the plans of the kit) in black (but should it not be a dirty white?) I could hide with paint an incorrect arrangement of the strips. Once applied the four pieces of wood still missing, I expect a nice session (or more) of sanding, so . . . sawdust and even sawdust. Salutoni. Jack. 01 Ragusian Carrack/25032018/IMG_20180325_122425.jpg 01 Ragusian Carrack/25032018/IMG_20180325_122430.jpg 01 Ragusian Carrack/25032018/IMG_20180325_122439.jpg 01 Ragusian Carrack/25032018/IMG_20180325_122523.jpg
- 190 replies
-
- 1
-
-
- ragusian
- marisstella
- (and 1 more)
-
Hi Yves, I'll be back soon . . . I've almost finished the first planking . . . just a couple of strips . . . although it wasn't a simple task
-
Thursday 8 March 2018 ---------------- Creative Planking . . . Now that the cold weather of last days is over, I resumed the activities to conclude the first planking of the hull. As I had already mentioned, this task is giving me some troubles because of the particular shape of the bow and in part, though much less, of the stern. After having found that the installation of the new courses from the top to the keel became less and less practicable, I decided to continue starting from the keel to climb upwards. But the problem at the bow area remained unaltered and sincerely I regretted not having further filled the space between the first and the second bulkhead at prow with additional filler blocks. The space between the second and third bulkhead should instead be ok as it is now. But now it's too late. So here I introduced a little creativity in order to simplify the remaining work, at least until the next crisis. Hence the definition of Creative Planking of the title, a concept that will surely horrify the orthodox modeller, but that for me isn't a problem as the whole will be subsequently covered by the second planking, which obviously can not follow this unorthodox method . . What is it? Well, in this case, rather than spending a hundred words to explain it, I think that an image is enough to give the most of my idea . . Then I attach a couple of images I hope can be interpreted correctly. Finally, a couple of words about the pieces of wood glued above the strips, which in the picture can be seen in 3/4 points on the hull: these are fills of minimum thickness that serve to level a piece of hull with adjacent strips due to unevenness caused by various reasons. Once glued to the right places and properly sanded, they brilliantly solve the problem without using putty. At the end, with the fully closed hull, new ones will certainly be needed. A cordial greeting, Jack.Aubrey. 01 Ragusian Carrack/08032018/IMG_20180307_183813.jpg 02 Ragusian Carrack/08032018/IMG_20180307_183849.jpg
- 190 replies
-
- 5
-
-
- ragusian
- marisstella
- (and 1 more)
-
Friday 23 February 2018 Nothing new . . The only task performed these days was to apply a coat of oil for wood on the main deck, an activity that radically changed the color of the wood. And this is exactly what I want to point out. The first three photos were made with (little) daylight, while the remaining three were taken under the same artificial light conditions as my previous message and should allow you to better notice the difference between before and after. Regarding the next activities these will suffer a break of about a week, according to weather forecasts, due to the Siberian cold wave expected: I am not interested in spending hours in my workshop in the cold! 01 Ragusian Carrack/23022018/IMG_20180223_130847.jpg 01 Ragusian Carrack/23022018/IMG_20180223_130922.jpg 01 Ragusian Carrack/23022018/IMG_20180223_130956.jpg 01 Ragusian Carrack/23022018/IMG_20180223_192344.jpg 01 Ragusian Carrack/23022018/IMG_20180223_192500.jpg 01 Ragusian Carrack/23022018/IMG_20180223_192544.jpg
- 190 replies
-
- 4
-
-
- ragusian
- marisstella
- (and 1 more)

.jpg.75bbc7b4ee691a04b2630b08f12efb41.jpg)
.jpg.1d01361bed9d5bc102c9165faf32b1bf.jpg)