jack.aubrey
-
Posts
1,268 -
Joined
-
Last visited
Content Type
Profiles
Forums
Gallery
Events
Everything posted by jack.aubrey
-
 Wednesday 1 November 2017 The preliminary tasks before the bulkheads assembly continue . . On three of these bulkheads I preferred to do these finishing jobs now, where it is much easier to work when disassembled than when they have been mounted in their final position. These three bulkheads are almost over. 01 Ragusian Carrack/01112017/20171101_160550.jpg Only the one here below needs further finishing, since ten windows must be installed in the many rectangles delimited by the lighter strips. 02 Ragusian Carrack/01112017/20171101_160558.jpg There is also a kind of semicircular window in this other . . 03 Ragusian Carrack/01112017/20171101_160603.jpg The assistants TEAM is resting after a hard day's work . . 04 Ragusian Carrack/01112017/IMG-20171101-WA0001.jpg To next time, Jack.
- 190 replies
-
- 4
-

-
- ragusian
- marisstella
- (and 1 more)
-
Monday 30 October 2017 Soon I'm setting up for the proper installation of the bulkheads. These days I have prepared a device for correctly fixing the bulkheads. For "proper" I mean perfectly vertical and centered on the keel. Below two images of how this device should work. Obviously I need to leave the bulkheads locked in its position for half an hour until the glue has completely griped before proceeding further. 01 Ragusian Carrack/30102017/20171030_174632.jpg 02 Ragusian Carrack/30102017/20171030_174651.jpg However, before installing the bulkheads, it is necessary to apply walnut strips of 1.5 x 4 on some of them. These are characterized by the fact that they will remain partially in view on the finished model. 03 Ragusian Carrack/30102017/20171030_174729.jpg 04 Ragusian Carrack/30102017/20171030_182950.jpg That's all for today, see you soon, Jack.
- 190 replies
-
- 3
-
-
- ragusian
- marisstella
- (and 1 more)
-
Wednesday, October 25, 2017 The day was promising since the early hours of the morning. . maybe a little cold at the beginning but then it's so fine that . . 01 Ragusian Carrack/25102017/20171025_073245_HDR-PANO.jpg In the afternoon I decided to start building the mounting slip for this model. May seem strange but making these things is for me a great fun, and even this time I felt the same feelings. My feline assistant also agreed with me that it seems very good and that should do his job properly. 02 Ragusian Carrack/25102017/20171025_172802.jpg 03 Ragusian Carrack/25102017/20171025_172856.jpg 04 Ragusian Carrack/25102017/20171025_172811.jpg 05 Ragusian Carrack/25102017/20171025_172835.jpg Finally, the keel I assembled a few days ago is in the proper position to install the other hull elements. 06 Ragusian Carrack/25102017/20171025_173014.jpg Cheers, Jack.Aubrey
- 190 replies
-
- 8
-
-
- ragusian
- marisstella
- (and 1 more)
-
Wednesday, October 25th, 2017 I copied the bulkheads on a sheet of A4 paper and then I digitalized them. In this way, in case of need, I will be able to reproduce them . . . you can never say . . Here below a sample . . 01 Ragusian Carrack/Scansioni/Ordinata 04 05.jpg 02 Ragusian Carrack/Scansioni/Ordinata 10.jpg
- 190 replies
-
- 2
-
-
- ragusian
- marisstella
- (and 1 more)
-
Monday, October 23, 2017 Keel Assembly: I placed the drawing I prepared in the previous message on the back of a glass plate I keep in my workshop and often use for these purposes. I fixed the design, face down, with some adhesive tape so that it could not move. I then overturned the glass by laying it on the worktop and then I started to prepare the pieces to assemble the keel. Here I had to work very carefully to remove the wood burned by the laser cut and then I proceeded to glue the pieces with PVA glue. When, after one hour, the glue took hold, I removed the keel from the glass, where it obviously could not stick, and I fastened it to a thick multilayer wood board with clamps to hold it firmly. It is now in the lab to dry out definitively . . waiting for the next steps. Here's a bit of pictures of the work done. 01 Ragusian Carrack/23102017/20171023_172853.jpg 02 Ragusian Carrack/23102017/20171023_172900.jpg 03 Ragusian Carrack/23102017/20171023_172916.jpg 04 Ragusian Carrack/23102017/20171023_172921.jpg
- 190 replies
-
- 5
-
-
- ragusian
- marisstella
- (and 1 more)
-
Monday, October 23, 2017 I spent the weekend reading and understanding the building instructions of the hull. Matter that may not be considered a very simple task and, in order to better understand and know the various elements of the skeleton, I started to detach the precut bulkheads from their 4mm plywood board. In less than half an hour I did my nice little stack of bulkheads that must now be well cleaned from the laser burns. Then when they will be ready, I will copy them on A4 size sheets and archive all these drawings . . . You can't know if the will become useful in the future . . . I will do the same for the keel pieces that are 5 and are made from a 6mm solid walnut board. Here below the stack of the bulkheads just detached . . 01 Ragusian Carrack/23102017/20171023_173020.jpg 02 Ragusian Carrack/23102017/20171023_173035.jpg To assembly the keel I prepared a copy of its shape from the second drawing shipped in the kit. It will be used during the mounting of the 5 elements that make up the keel with the objective to ensure the correct alignment of the various pieces. 03 Ragusian Carrack/23102017/20171023_172928.jpg See you soon, a warm greeting. Jack.
- 190 replies
-
- 2
-
-
- ragusian
- marisstella
- (and 1 more)
-
The picture P5, on the plan sheet #2 is asimmetrical, most probably due to an error during printing or whatever else, but it doesn't matter, 'cause you confirmed me that it should be simmetrical. Regards, Jack.
- 190 replies
-
- 1
-
-
- ragusian
- marisstella
- (and 1 more)
-
Saturday, October 21, 2017 Let's continue to show the other materials contained in the kit: - the first board of pre-cut laser bulkheads; 01 Ragusian Carrack\21102017\20171021_105730.jpg - the second board of pre-cut laser bulkheads; 02 Ragusian Carrack\21102017\20171021_105744.jpg - the third board of pre-cut laser bulkheads; 03 Ragusian Carrack\21102017\20171021_105757.jpg - some fittings (gun barrels, anchors, etc.) and ropes for rigging. 04 Ragusian Carrack\21102017\20171021_105617.jpg That's all for today, regards, Jack.
- 190 replies
-
- 6
-
-
- ragusian
- marisstella
- (and 1 more)
-
Saturday, October 21, 2017 Let's start commenting the contents of the box, as if it was opened for the first time. We have already seen the two sheets of drawings in the previous message, so it is not the case to retrieve them again. The photo below shows the kit in its original, sober but eye-catching box with gold prints. 01 Ragusian Carrack\21102017\20171021_105325.jpg Once opened the package we find in a clockwise direction starting from the right: - the original instructions in English and Croatian, to which I mentioned in my first post; - the catalog of the main kits manufactured by Marisstella; - reproduction, in paper, of the carrack flags and a couple of A4-sized photographs of the finished model; - the buiding instructions in italian language sent me by email by Zoran. 02 Ragusian Carrack\21102017\20171021_105438.jpg - Pre sewn sails; - all strips and rods that will be used, walnut wood. 03 Ragusian Carrack\21102017\20171021_105928.jpg The components of the keel (and other minor details) on a 6mm solid walnut board. 04 Ragusian Carrack\21102017\20171021_105641.jpg Other laser pre cut element on walnut boards. 05 Ragusian Carrack\21102017\20171021_105835.jpg See you next time, Jack.
- 190 replies
-
- 4
-
-
- ragusian
- marisstella
- (and 1 more)
-
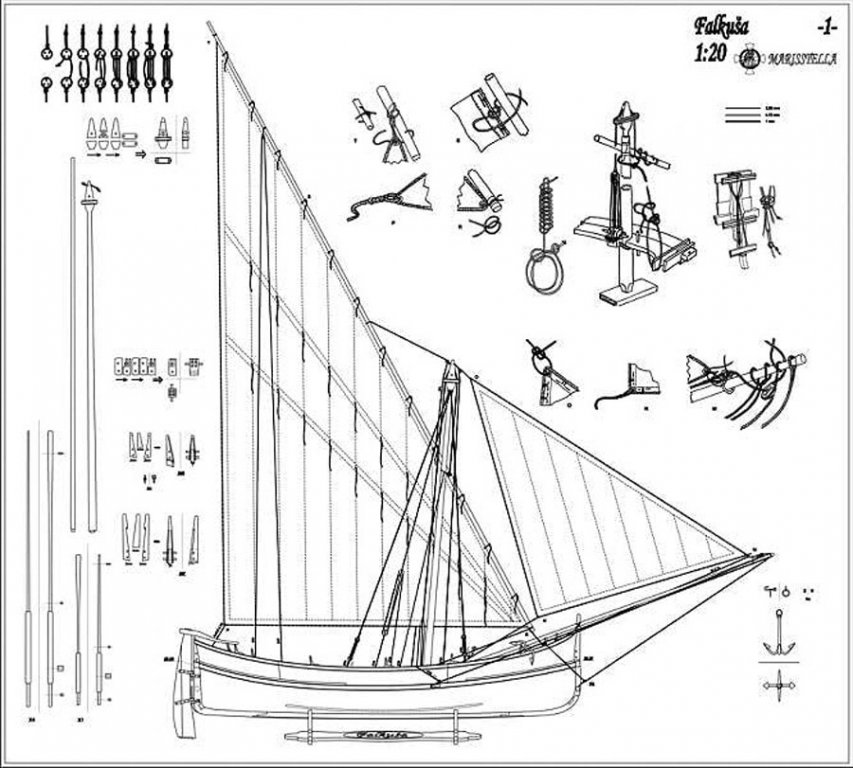
Friday 20 October 2017 Let's begin with a preview of the plans included in the kit. As drawings, they are well done and after a quick check, the numeric references to the various elements are perfect. Tables containing all the pre-cut laser parts are not available, so these plans are not useful if you want to scrath build this model. 01 Ragusian Carrack/Images/HPSCANNER0938.jpg I have some perplexity about the drawing P5 on the plan below. I do not understand if it's a mistake or something else. However, I do not think it can affect the work to build this model. 02 Ragusian Carrack/Images/HPSCANNER093.jpg Cheers, Jack. Ragusian Carrack for Mr Galli.pdf
- 190 replies
-
- 2
-
-
- ragusian
- marisstella
- (and 1 more)
-
Friday 20 October 2017 More pictures with details of the finished model. 01 Ragusian Carrack/Images/4CB_4621 DUBROVAČKA KARAKA 16. ST - Copy.jpg 02 Ragusian Carrack/Images/4CB_4626 DUBROVAČKA KARAKA 16. ST.jpg 03 Ragusian Carrack/Images/4CB_4632 DUBROVAČKA KARAKA 16. ST.jpg 04 Ragusian Carrack/Images/4CB_4635 DUBROVAČKA KARAKA 16. ST.jpg 05 Ragusian Carrack/Images/4CB_4639 DUBROVAČKA KARAKA 16. ST.jpg
- 190 replies
-
- 6
-
-
- ragusian
- marisstella
- (and 1 more)
-
Friday 20 October 2017 More pictures with details of the finished model. 01 Ragusian Carrack/Images/4CB_4592 DUBROVAČKA KARAKA 16. ST.jpg 02 Ragusian Carrack/Images/4CB_4601 DUBROVAČKA KARAKA 16. ST.jpg 03 Ragusian Carrack/Images/4CB_4604 DUBROVAČKA KARAKA 16. ST.jpg 04 Ragusian Carrack/Images/4CB_4607 DUBROVAČKA KARAKA 16. ST.jpg 05 Ragusian Carrack/Images/4CB_4613 DUBROVAČKA KARAKA 16. ST.jpg
- 190 replies
-
- 7
-
-
- ragusian
- marisstella
- (and 1 more)
-
Friday 20 October 2017 More images of the finished model. I would like to point out that these photos do not refer to my work but have been sent to me by the kit manufacturer, Zoran Pavlovic, to integrate the building instructions.. The following is a collection of pictures of the Ragusian Carrack. Later I will continue by showing the contents of the kit box. In the meantime I'm studying what to do, so do not expect soon details of my job. 01 Ragusian Carrack/Images/4CB_4554 DUBROVAČKA KARAKA 16. ST.jpg 02 Ragusian Carrack/Images/4CB_4555 B DUBROVAČKA KARAKA 16. ST.jpg 03 Ragusian Carrack/Images/4CB_4563 B DUBROVAČKA KARAKA 16. ST.jpg 04 Ragusian Carrack/Images/4CB_4583 DUBROVAČKA KARAKA 16. ST.jpg 05 Ragusian Carrack/Images/4CB_4586 DUBROVAČKA KARAKA 16. ST.jpg
- 190 replies
-
- 8
-
-
- ragusian
- marisstella
- (and 1 more)
-
Thursday 19 October 2017 A warm welcome to all users of this forum. A few days ago, I received from Zoran Pavlovic, the kit manufacturer, the material I ordered for my next model, a project I want to manage in the period of time I will spend in Tuscany. The kit is produced by a Croatian company, MARISSTELLA of Split, founded in 2008. I found it on the Modelshipworld forum where Marisstella is present with a advertisement banner. The company has a remarkably interesting product catalog, with typical boats of the Adriatic Sea. He is the same producer of the kit of my latest model, finished a few months ago: Gajeta Falkusa. The first impression is that the materials supplied with the kit are definitely valid, the timbers are of good quality and the two sheets containing the plans are very well done. Many pieces are laser pre-cut both on plywood and solid wood. Concerning the wood used, the walnut is used for each element: planking, masts and spars, detail of the decks. As I wrote the wood is of high quality but personally I would have preferred a mix of wood with different colors to make the model less monotonous. I do not exclude that during this project I do not invent something using different woods to obtain a more lively and chromatic results. We'll see. Again the biggest flaw in this kit is the assembling instructions: they are written in Croatian and English language. No comment on the Croatian, I do not know it, but for English it could be better. But Zoran Pavlovic has available a new version of them : he has reviewed the part in English and has also added instructions in Italian language. Zoran sent me them via email a couple of days after I received the kit and I have to say that they are very, very well translated. Unlike the instructions of the Gajeta Falkusa, my last model, in this case there are virtually no images showing the various stages of construction and this is a small problem because this model is also quite complex and the written instructions become critical. They must be read carefully and understood perfectly to avoid mistakes that could have heavy consequences. And here's a further thank to Zoran for the magnificent Italian instructions: I hope will make the job easier and more methodical. At the moment I'm going to read, understand, interpret and comment them with some personal notes that should help me at the right time. Here I would like to propose some images of the kit and the material contained inside. First, a little bit of data: Scale 1:59 Total Length 775 mm Size of the packaging cm 65 x 21.5 Let's start by looking at our kit before opening it: 01 Ragusian Carrack/13.jpg But let's describe what model is. This model represents a Ragusian Carrack, a sailing ship of the maritime republics of the period from the 14th to the middle of the 17th century, designed for freight transport. The Carrack appears in Venice at the beginning of the 14th century, but at the same time it begins to be built in the city of Dubrovnik (Ragusa), another maritime republic, less famous of the four Italian towns but not less important, as the largest type of Adriatic shipping vessel. In the fifteenth century, the Carrack spread from the Adriatic to the Mediterranean Sea and in the late 15th century to the Atlantic Ocean. Here they were built by the Spaniards, Portuguese, French and Dutch . It is therefore a vessel almost contemporary to the famous caravels and naos from the Iberian peninsula but still before the galleon, characterized by the high fore and aft castles. In the sixteenth century the Dubrovnik Carrack was one of the largest ships in the world and sailed to England. The large and spacious Carrack was called Argosia, a name derived from ragusia, the adjective of Ragusa. The level of popularity of Dubrovnik's carracks is demonstrated by the fact that the English created the literal expression Argosy ship. But let's post some pictures of this gorgeous finished model, pictures sent by Zoran, which worth more than a thousand words. 02 Ragusian Carrack/Images/4CB_4522 DUBROVAČKA KARAKA 16. ST.jpg 03 Ragusian Carrack/Images/4CB_4527 DUBROVAČKA KARAKA 16. ST.jpg 04 Ragusian Carrack/Images/4CB_4532 DUBROVAČKA KARAKA 16. ST.jpg 05 Ragusian Carrack/Images/4CB_4537 DUBROVAČKA KARAKA 16. ST.jpg See you next time with additional images of the Ragusian Carrack !! Cheers, Jack.Aubrey.
- 190 replies
-
- 8
-
-
- ragusian
- marisstella
- (and 1 more)
-
Tuesday, October 10, 2017 I've been in Tuscany for about twenty days now. In this period I started thinking about my next model, which will begin here and, most likely, will be finished when I'll return to Cinisello (Milan). I don't want to anticipate anything about the new project right now, just think that I have already purchased the materials and I'm waiting for its arrival. In the meantime, I arranged to complete the remaining two Guadeloupe's boats. I started with the intermediate size boat. In the first image we can see the boat still fastened to its building slip. It has been in this state for almost a couple of years. . 01 P1100390_zpszajvd15m.JPG The first activity I did was to unplug the boat in order to work inside. Thanks to the use of the mini drill with a cutting tool, this happened without any problems. Then I arranged to "fix" the outer wood color with a coat of oil for wood. This operation avoids that some drops of glue not properly removed, at a finishing stage may alter the wood color. The application of the oil, however, doesn't absolutely inhibit the use of vinyl glue. The picture below shows the color difference of the timber after having applied the oil. 02 20171001_215300.jpg Then the work inside the hull began: the first activity was to double the number of hull ribs; task long enough considering their number and size but it's quite well done. Subsequently the installation of the bottomwoods. . and the longitudinal seat supports. 03 20171001_215313.jpg Then, the central seats, including reinforcements where provided, bow and stern, and finally the gunwales. Now the bigger tasks are over, although there is still enough work to be done, including the final finishing of what has been done so far. 04 20171011_102921.jpg 05 20171011_102928.jpg 06 20171011_102949.jpg But this will be matter of the next posts . . Cordiality, Jack.
-
Tuesday, September 21th, 2017 Important Notice Today I successfully recovered all the images of this topic, so from now on all the images here published are well visible as before. It was a hard work, but should be complete and reliable. Thank you in advance for your patience. See you soon, Jack.Aubrey
- 106 replies
-
- 2
-
-
- deagostini
- finished
- (and 2 more)
-
Saturday, September 9th, 2017 Important Notice Today I successfully recovered all the images of this topic so, from now on, all the images here published are well visible as before. It was a hard work, but should be complete and reliable. Thank you in advance for your patience. See you soon, Jack.Aubrey
-
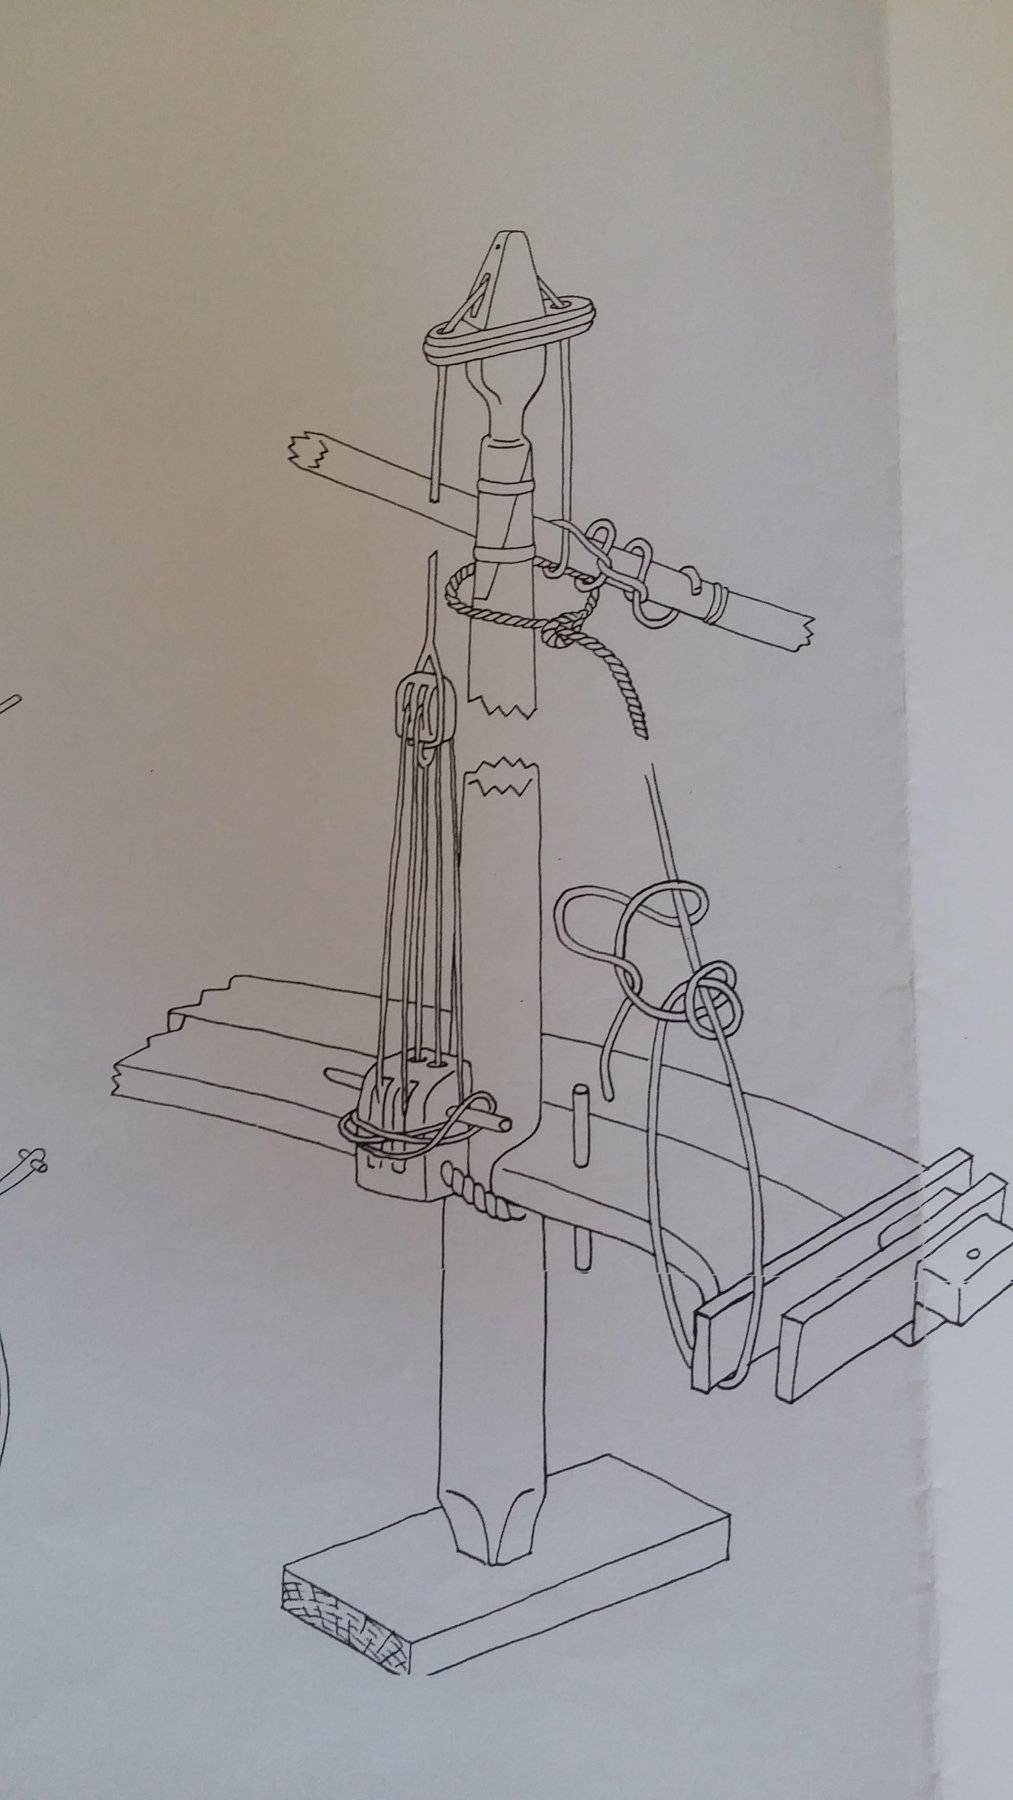
Hi Steven, this is a photo taken directly on the original plan, hope it's detailed enough . . Regards, Jack.

- 174 replies
-
- 1
-
-
- gaeta falcata
- marisstella
- (and 1 more)
-
Hi Steven, I've a question for you. What do you mean for "the fixing of the yard" ? You'd like a higher resolution images or what else ? Thanks in advance, jack.
-
Tuesday, September 5th, 2017 Today I finished restoring the images that disappeared thanks to Photobucket . . Now all the images in this topic are visible as before. If you discover some problems, please let me know via private message. Thank you. Jack.Aubrey
- 299 replies
-
- 2
-
-
- soleil royal
- le soleil royal
- (and 2 more)
-
Hi Yves, onestly I have not yet decided. But I've three options: Short time project: I've three boats to complete for my (idle) project HMS Guadelupe; a couple of months Medium time project: a Viking Knarr, a viking merchant ship, interesting to repeat a lapstrake planking, +/- one year Long Term project: HMS Revenge, Elizabethan Galleon I'll decide within a couple of weeks. Regards, Jack.
- 174 replies
-
- 2
-
-
- gaeta falcata
- marisstella
- (and 1 more)
-
Hi Steven, I think the best answer is to publish the plan where this joint with the mast is shown near the top-right side. Its quite simple and self explaining. Regards. Jack
- 174 replies
-
- 1
-
-
- gaeta falcata
- marisstella
- (and 1 more)
-
Continues, as promised, the publishing of the last images. And now the topic is over, Bye Bye to all of your. Jack. 20 20170830_102802.jpg 21 20170830_102758.jpg 22 20170830_102752.jpg 23 20170830_102747.jpg 24 20170830_102743.jpg 25 20170830_102736.jpg 26 20170830_102729.jpg 27 20170830_102717.jpg 28 20170830_102711.jpg 29 20170830_102700.jpg 30 20170830_102648.jpg
- 174 replies
-
- 9
-
-
- gaeta falcata
- marisstella
- (and 1 more)
-
Other images . . 15 20170830_102834.jpg 16 20170830_102827.jpg 17 20170830_102821.jpg 18 20170830_102811.jpg 19 20170830_102806.jpg
- 174 replies
-
- 10
-
-
- gaeta falcata
- marisstella
- (and 1 more)
-
As promised, here below a first batch of images, without the plexiglass cover. Jack. 05 20170830_103048.jpg 06 20170830_103036.jpg 07 20170830_103028.jpg 08 20170830_103018.jpg 09 20170830_103009.jpg 10 20170830_103004.jpg 11 20170830_102957.jpg 12 20170830_102953.jpg 13 20170830_102944.jpg 14 20170830_102902.jpg
- 174 replies
-
- 8
-
-
- gaeta falcata
- marisstella
- (and 1 more)