jack.aubrey
-
Posts
1,268 -
Joined
-
Last visited
Content Type
Profiles
Forums
Gallery
Events
Everything posted by jack.aubrey
-
 Monday, February 19, 2018 I finally completed the planking of the main deck. As with the other two smaller decks, I used tanganika veneer, reduced to strips of 4 or 5 millimeters in width and just over 7 centimeters long. The result is like a parquet with a pattern of junctions every four courses. Here are some pictures of the finished work. I must underline that all the finishing touches are still to be done, therefore any groove will be leveled and above all the color of the wood will change, and probably a lot, after the application of a couple of coats of oil for wood. See the color of the other two decks to get an idea. At this point I believe that the next activities will be totally aimed at the completion of the hull first planking: we are more or less straight ahead even if probably this could be the hardest part to perform. Anyway, cheers by Jack. 01 Ragusian Carrack/19022018/IMG_20180219_180631.jpg 02 Ragusian Carrack/19022018/IMG_20180219_180809.jpg 03 Ragusian Carrack/19022018/IMG_20180219_180847.jpg 04 Ragusian Carrack/19022018/IMG_20180219_180701.jpg 05 Ragusian Carrack/19022018/IMG_20180219_180710.jpg
- 190 replies
-
- 4
-

-
- ragusian
- marisstella
- (and 1 more)
-
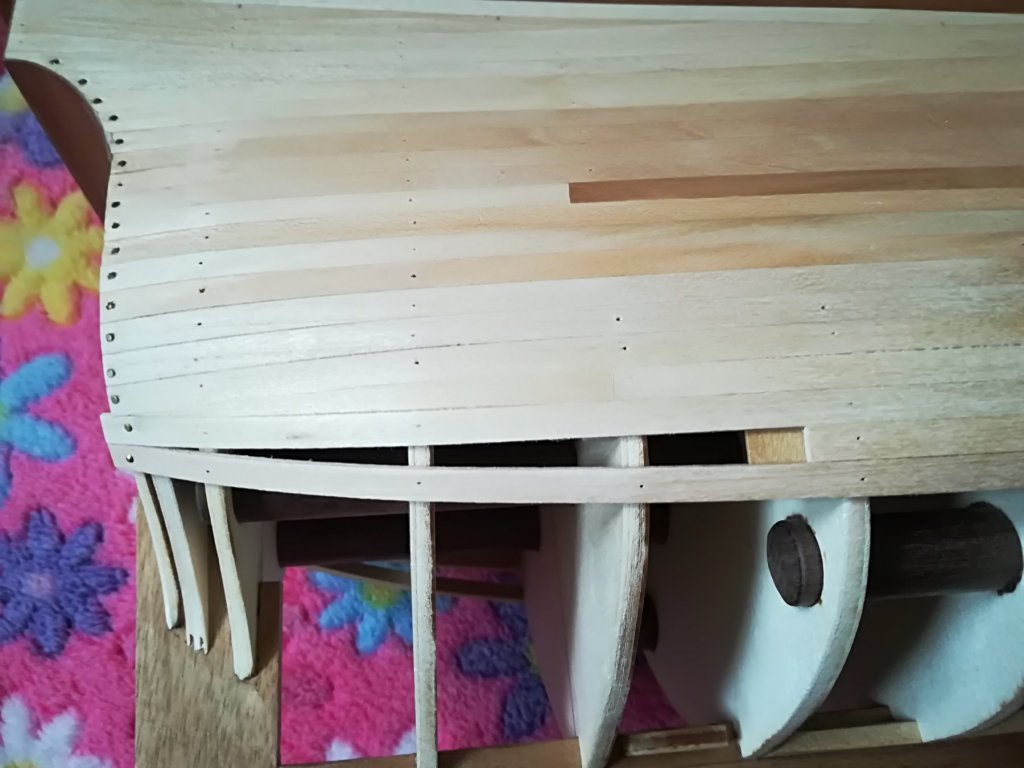
Hi Doug, here below two images of the hull as in my last post but with the upper two triangular spaces filled and the two lower ones with a small piece of wood glued inside the grove to provide a basement for the joint.

- 190 replies
-
- 3
-
-
- ragusian
- marisstella
- (and 1 more)
-
Hi, the answer is "yes". Usually I organize a join over a bulkhead but in this case I found some difficulties because the bulkhead is 4mm thick and it is quite problematic to nail a plank on a space of only 2mm. without breaking it while hammering the nail. For this reason I increased the length of the strip. But then it is strongly suggested to glue a small piece of wood strip under the protruding zone to strengthen the future joint. Regards, Jack.
- 190 replies
-
- 2
-
-
- ragusian
- marisstella
- (and 1 more)
-
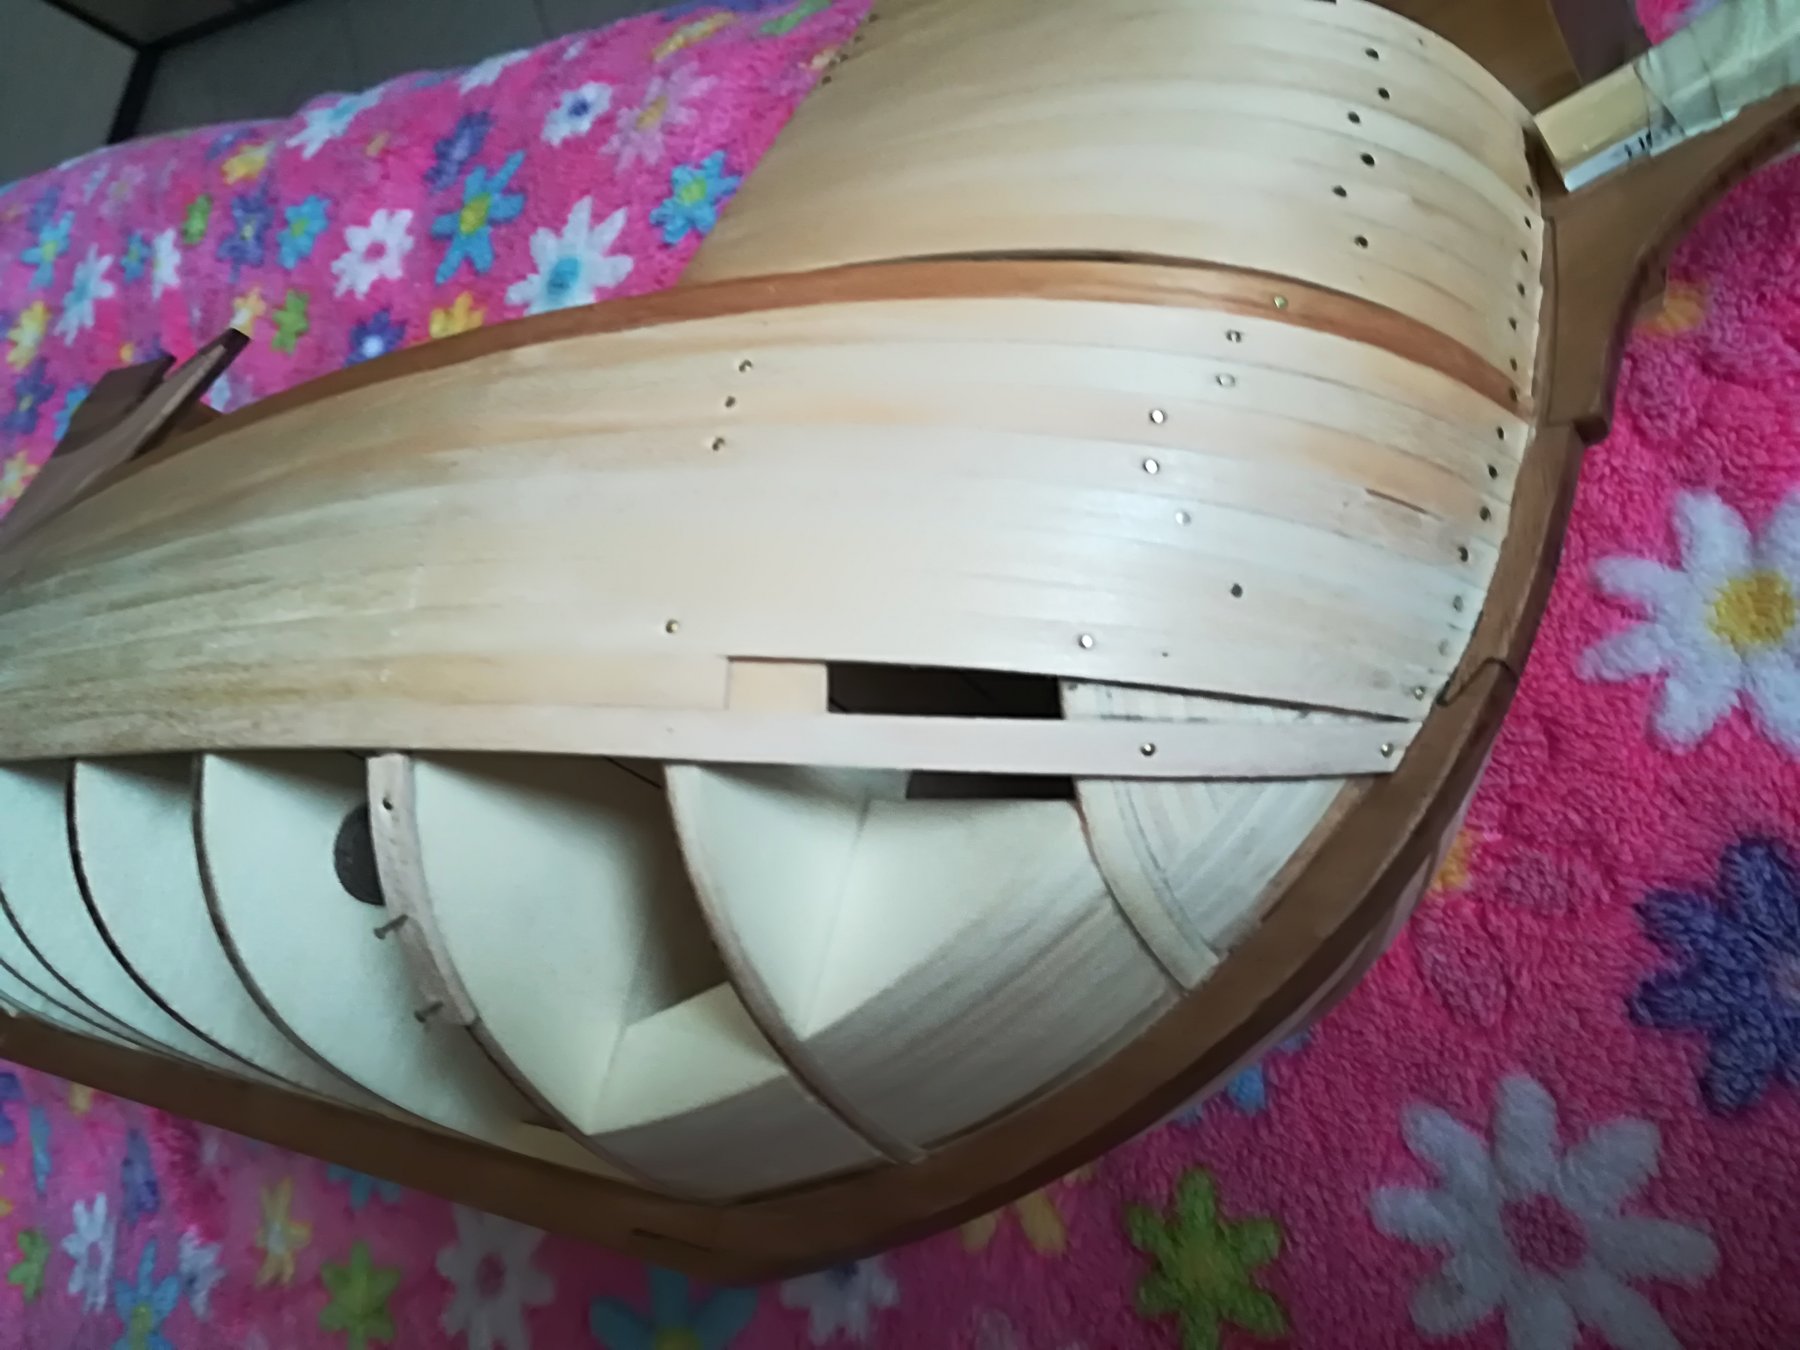
Friday 9 February 2018 I have not been online for a few days with messages . . but the problem is that, although I worked quite regularly and continuously, I, unfortunately, had no interesting material to show. And even now it's not like you probably may expect. But I still find it useful to post something because actually there were some important news. I left you in my last update while I was working to install the planking on the main deck. From the photos I show at that time you could see that there was still enough work to complete this activity. In the following picture you can now see how this is almost completely concluded. Only one last shaped plank is missing on the two external sides in order to say: "mission accomplished!". This happened about a week ago. Another activity that can be said complete is the battens of the internal part of the sides on the main deck: a last layer of cherry veneer has been laid horizontally. The strips are at the moment of the photo here below only laid down and not yet refined but in any case I'm still far from the final result on these elements. This achievement becomes the starting point for future activities. 01 Ragusian Carrack/09022018/IMG_20180203_103247.jpg At the same time I started thinking about the completion of the hull planking, so I began to verify that everything was ready and that there was not some bulkheads to "adjust". From the picture below it seems that, for now, there is nothing to do, with the olny exception of a tidy bulkhead at bow that will have to be slightly thickened before applying the next planks. 02 Ragusian Carrack/09022018/IMG_20180207_101751.jpg Still in parallel I started laying the second planking on the main deck. According to the drawings the pattern of this planking foresees the use of a 72mm long strip divided into four 18mm segments. The installation is staggered at each strake on a new segment and is repeated every four strakes. The central strakes are in tanganika and the two darker ones in mahogany. They are 5mm wide while the outer ones are (and will be all the way down) 4mm wide in tanganika. The next two images show the work done so far. It seems to me that everything is going well. For the color of the wood this will become equal to the two highest decks after the application of some wood oil. 03 Ragusian Carrack/09022018/IMG_20180209_163107.jpg 04 Ragusian Carrack/09022018/IMG_20180209_163114.jpg Finally I applied four strakes on the hull on both sides. To simplify my life I'm using the method that I usually use in presence of a second planking, without stylistic frills that will not be seen anyway. The empty spaces with "triangular" shape will be filled in the next few days with a little patience. I believe this method will end here in the stern area but will still continue at bow, where the bowl shape of this area requires more drastic measures. The three images that follow show the work carried out until yesterday. Today, however, no modeling, I've been around Pisa for some commissions and shopping and I hadn't time to spend. Tomorrow it's forecasted good weather and maybe I'll organize a quick trip to the seaside . . otherwise let's go with other new strips !! Kind regards, Jack.Aubrey. 05 Ragusian Carrack/09022018/IMG_20180209_163124.jpg 06 Ragusian Carrack/09022018/IMG_20180209_163133.jpg 07 Ragusian Carrack/09022018/IMG_20180209_163140.jpg
- 190 replies
-
- 4
-
-
- ragusian
- marisstella
- (and 1 more)
-
Hi Jorden, At the moment I'm installing the first planking on the hull and the second on the decks. Till now I did nothing to simulate tree nailing and caulking. I have not yet decided what to do but most probably at the end I will do nothing regarding these tasks. There are too many holes to drill to simulate tree nailing and, considering that each plank should be 4mm. high, there are a lot of reasons to do mistakes while drilling that potentially it can produce a negative effect on the final result. Regarding caulking I think should be enough to use, at the end, some judean bitumen just to fill the tiny grooves between a plank and the other to produce a adequate effect. But, I repeat, till now I did not ask myself anything about this matter.
- 190 replies
-
- 2
-
-
- ragusian
- marisstella
- (and 1 more)
-
Saturday 27 January 2018 Yes I know, the images are very poor but I just could not do better because there was a very strange daylight and I had to use the flashlight. But the result was unsatisfactory anyway. - I finished to apply the vertical strips inside the bulwarks and at the same time the fake stanchions on the bulkheads are now all removed. Now the area is completely smooth, ready to receive the last planking, made of cherry veneer, spread in the traditional, horizontal way. - In the meantime I am carrying out the installation of the main deck using the walnut strips supplied with the kit. I decided to use them as first layer for this deck because there are plenty of them. At the end of the operation I will apply the final layer in tanganika as for the other two decks, already completed. - I installed the waterways in the proper place, which will spread 1-1.5 mm from the deck. I enclose the usual roundup of (ugly) images, regards, Jack. 01 Ragusian Carrack/27012018/IMG_20180127_154827.jpg 01 Ragusian Carrack/27012018/IMG_20180127_154850.jpg 01 Ragusian Carrack/27012018/IMG_20180127_154901.jpg 01 Ragusian Carrack/27012018/IMG_20180127_154914.jpg 01 Ragusian Carrack/27012018/IMG_20180127_154929.jpg
- 190 replies
-
- 4
-
-
- ragusian
- marisstella
- (and 1 more)
-
Thursday, January 18, 2018 The model of the Ragusian Carrack, also known as Argosy, is growing quite well, even if it takes small steps, day after day. I particularly like the installation of the planks on the main deck. I remember, however, that this is only the first layer and some imperfections are admitted. I discover now, while I'm writing, that I forgot to open the hole for the mizzen mast . . Best regards, Jack. 01 Ragusian Carrack/18012018/IMG_20180118_233203.jpg 02 Ragusian Carrack/18012018/IMG_20180118_233248.jpg 03 Ragusian Carrack/18012018/IMG_20180118_233302.jpg 04 Ragusian Carrack/18012018/IMG_20180118_233310.jpg 05 Ragusian Carrack/18012018/IMG_20180118_233323.jpg 06 Ragusian Carrack/18012018/IMG_20180118_233442.jpg 07 Ragusian Carrack/18012018/IMG_20180118_233511.jpg
- 190 replies
-
- 6
-
-
- ragusian
- marisstella
- (and 1 more)
-
Monday, January 15, 2018 I'm working on three fronts, making some experimentation to see the possible results. 1) Planking of part of the stern post with the second and final cherry wood strips. The photo here below shows the final result of how the hull should 99% look in its outer part, after the second planking. Live is much more realistic and I like it very much. For now the experiment ends here, but the work will continue on this track at the right moment. 01 Ragusian Carrack/15012018/IMG_20180115_204048.jpg 2) Removal of fake bulwarks stanchios of the midship bulkheads and construction of the internal side of the bulwarks Here the work has just begun and consists in removing the fake stanchios on the proper bulkheads. In anticipation of this task I proceeded to make the bonding on these elements rather labile. Once the piece has been removed, I proceed to glue a strip (equal to that used for the planks) inside the bulwarks side, but positioned perpendicularly. The thickness now doubles but above all the strength of this area takes enormous benefit from the crossing of the wood grain. Work to be performed step by step. 02 Ragusian Carrack/15012018/IMG_20180115_204118.jpg 3) Start installation of the first planking on the main deck. This operation is similar, apart from the dimensions, to what was done on the higher deck at poop. For technical reasons, the planking will be applied in two pieces. At the moment I'm starting this activity and I still have to understand the best way to proceed, but I think everything will be pretty good. 03 Ragusian Carrack/15012018/IMG_20180115_204129.jpg 04 Ragusian Carrack/15012018/IMG_20180115_204245.jpg That's all for today, politely, Jack.
- 190 replies
-
- 3
-
-
- ragusian
- marisstella
- (and 1 more)
-
Saturday 13 January 2018 The works around the poop upper deck continues. After having applied the first layer of strips (walnut 4 x 1.5mm) on this deck and having made the appropriate smoothing, I proceeded to apply the final Tanganika planks, in the form of strips made from 4mm wide and 0.4mm thick veneers. In the first image you can observe an intermediate phase of the work in which you can see the great difference in color between the timber of the first layer and that of the second. In addition to deck planking I also applied the same material (but this time in cherry wood) on the internal sides of the bulwarks, in order to complete the finish of the entire area. The deck undergoing processing. . 01 Ragusian Carrack/13012018/IMG_20180110_152550.jpg The stern deck completed. I applied a couple of coats of wood oil that drastically changed the color of the two wood essences I used: tanganika and cherry. The colors of these images are unfortunately distorted by a reddish yellow reflection due to the curtains that cover my terrace but it is anyway good to remember that, unlike my expectations, there is not a great difference in color between the two essences. It seems that, with the oil, the two types of wood tend to look almost the same, and this fact is a small disappointment for me. 02 Ragusian Carrack/13012018/IMG_20180113_100730.jpg Another aspect to underline may be the fact, clearly visible in some photos, that the color of the decks appears slightly streaked, not uniform, with points that have absorbed the oil better than others, thus assuming a lighter color tone where the glue residues have not been perfectly removed. For personal experiences, it should not be worrying as it is only necessary to let some time pass and this oil will do its work from the inside rather than from the outside. Let me explain: what he has not managed to impregnate from the outside will now do it in the coming days from the inside, bringing the color equal to the other points. At most it will take another coat of oil to help the process. 03 Ragusian Carrack/13012018/IMG_20180113_100736.jpg 04 Ragusian Carrack/13012018/IMG_20180113_100747.jpg 05 Ragusian Carrack/13012018/IMG_20180113_100800.jpg 06 Ragusian Carrack/13012018/IMG_20180113_100809.jpg That's all for today, best regards, Jack.
- 190 replies
-
- 6
-
-
- ragusian
- marisstella
- (and 1 more)
-
Thanks to Zoran, Antony, Nils and all the other users who appreciate my wip of this intriguing model . . thanks again. Jack.
- 190 replies
-
- 3
-
-
- ragusian
- marisstella
- (and 1 more)
-
Wednesday 10 January 2018 Refined the external contours of the quarter deck and the poop deck . . Installed the planks for the poop deck. In this case I used strips of walnut as for the first planking of the foredeck. Today or at most tomorrow I will provide the second planking of the poop small deck with the same tanganika veneer. I am thinking to simulate the planks with a length of about 6-7 meters, which in a scale of 1:60 would mean 10-12cm. 01 Ragusian Carrack/10012018/IMG_20180110_094305.jpg 02 Ragusian Carrack/10012018/IMG_20180110_094322.jpg 03 Ragusian Carrack/10012018/IMG_20180110_094242.jpg 04 Ragusian Carrack/10012018/IMG_20180110_094255.jpg
- 190 replies
-
- 4
-
-
- ragusian
- marisstella
- (and 1 more)
-
Tuesday 9 January 2018 The works to install the first planking over the stern castles are now over. Yesterday I practically finished this task. Now I missed only a couple of finishes (ie. to trim the excess wood), and after I'll have to schedule next new activities. I believe that, before starting the planking of the quickwork, I'll concentrate on the tasks to arrange the inside of the bulwarks (read removal of the false stanchions and reinforcement of the sides internally) and the setup of the installation of the decks, in particular the main deck. But for now let's give a look to the work done so far. Sincerely, Jack.Aubrey. 01 Ragusian Carrack/09012018/IMG_20180109_075817.jpg 02 Ragusian Carrack/09012018/IMG_20180109_075905.jpg 03 Ragusian Carrack/09012018/IMG_20180109_075924.jpg 04 Ragusian Carrack/09012018/IMG_20180109_080031.jpg 05 Ragusian Carrack/09012018/IMG_20180109_080102.jpg
- 190 replies
-
- 5
-
-
- ragusian
- marisstella
- (and 1 more)
-
Friday, December 29, 2017 Here in Pisa, the cold weather gave a pause of a few days and this allowed me to resume the activities related to the (carrack) hull planking . . just the time to apply a dozen strips for each side in the area above the main deck. A new cold weather wave is expected in the coming days, so I can not guarantee any new progress soon. Below a series of images to show the work done till this date. Best regards and best wishes for a Happy New Year, Jack. 01 Ragusian Carrack/29122017/IMG_20171229_183932.jpg 02 Ragusian Carrack/29122017/IMG_20171229_183953.jpg 03 Ragusian Carrack/29122017/IMG_20171229_184007.jpg 04 Ragusian Carrack/29122017/IMG_20171229_184018.jpg 05 Ragusian Carrack/29122017/IMG_20171229_184227.jpg 06 Ragusian Carrack/29122017/IMG_20171229_184237.jpg
- 190 replies
-
- 5
-
-
- ragusian
- marisstella
- (and 1 more)
-
Thursday, December 14th, 2017 In absence of news about the building of the Ragusian Carrack, I want to wish to all of you my greetings for a Merry Christmas and a Happy 2018 . . Regards, Jack.Aubrey.
- 190 replies
-
- 2
-
-
- ragusian
- marisstella
- (and 1 more)
-
I was asked elsewhere to better explain my plank bender tool, cited by me in a previous message. Since I think it may be useful to somebody, I attach here the description of this simple but effective tool. I built my "homemade" plank bender, that is in fact a classic of its genre and that works 100 times better than all the electric tools that are sold in model shops to bend strips. Raw material needed for the tool: - a table of MDF or plywood of adequate size and thickness, - a metal can, eventually you can build many of them of different diameter and size, - two 3mm diameter countersunk-head bolts so that they sink into the MDF and do not protrude. Here below you see the finished tool. . 01 However, there are two other vital elements for proper use: - a gas lighter, - some candles like those shown below. 02 To use it just light the candle and place it inside the can, then take the strips to fold, previously soaked in water for enough time, for limewood about fifteen minutes, place them on top of the hot can, bend at will, waiting for the wood to dry (a handful of seconds) and you've finished. With a few experience this task becomes a game ! Here below one example of bent strips with this method . . 03 Hoping this explanation is clear to you, kind regards, Jack.
- 190 replies
-
- 5
-
-
- ragusian
- marisstella
- (and 1 more)
-
Monday 4th December 2017 The weather is definitely getting cold and working in the cold of my garage is not the best . . but the passion and, above all, the wish to see some few planking installed made me overcome this difficulty . . as long as it lasts . . As anticipated I started "to warm up the tires" by applying few planks in the upper part of the forecastle: first there is an area of 5/6 perfectly straight planking followed by a larger area of planks, previously bent, which connects to the real stem. To bend the strips, in limewood 1.5 x 5mm, I used the method of the iron can and the candle, a method that I learned to master at the time of the model of the 12 Apostles and I find it very simple and practical. From now on I could start to apply the planking on the whole hull, but first I still have to refine and get ready the stern area, in particular with regard to the well known bevel angle. Below, the usual roundup of images, see you soon, Jack. 01 Ragusian Carrack/04122017/IMG_20171204_182034.jpg 02 Ragusian Carrack/04122017/IMG_20171204_182053.jpg 03 Ragusian Carrack/04122017/IMG_20171204_182114.jpg 04 Ragusian Carrack/04122017/IMG_20171204_182252.jpg 05 Ragusian Carrack/04122017/IMG_20171204_182309.jpg 06 Ragusian Carrack/04122017/IMG_20171204_182327.jpg
- 190 replies
-
- 4
-
-
- ragusian
- marisstella
- (and 1 more)
-
Thursday, November 30th 2017 The preparatory activities for the hull planking are continuing . . At the moment I am focused on the prow zone and in particular on the forecastle. Here I saw the possibility of carrying out activities independently from the other areas of the hull, then, having previously assessed the situation, I decided to attack this area, just to "warm up the tires". In doing so I decided to move away from following the assembling instructions provided in the kit: they were very valid, if not absolutely necessary, in the work phases carried out so far but I think that from now on we can proceed quite freely. In particular my activities were the construction of the forecastle's top structure, the finishing of the front vertical wall and the application of the deck planks. To do this I used the walnut strips supplied in the kit. However, once again this essence seems to me decidedly dark to cover the decks, so even here I decided to proceed with my own head. This walnut planking will serve as a starting point for covering with self-made strips made with tanganika wood veneer, much clearer than walnut. . so do not look at the strange layout of the strips of the deck I used as a modeling heresy, 'cause it only serves as a background. Below a bit of pictures of the work done, kind regards, Jack. 01 Ragusian Carrack/30112017/IMG_20171130_174922.jpg 01 Ragusian Carrack/30112017/IMG_20171130_174940.jpg 01 Ragusian Carrack/30112017/IMG_20171130_174948.jpg 01 Ragusian Carrack/30112017/IMG_20171130_174958.jpg 01 Ragusian Carrack/30112017/IMG_20171130_175005.jpg
- 190 replies
-
- 7
-
-
- ragusian
- marisstella
- (and 1 more)
-
Sunday, November 26, 2017 I'm going to describe the latest developments. It's not a lot but at this time I'm a little conditioned by the outside temperatures that are starting to decrease and working with the cold inside a garage doesn't fit too much for me. So I work only in the warmer hours and, with the current short days, time is not much. I have finally finished installing and shaping the bow filler blocks . . since I didn't have usable wood blocks I used poplar plywood elements glued together. Even though this wood is fairly soft, because of the poor quality of the sanding paper I had available, I took more than expected even if at the end I got there. I'm evaluating a similar solution for the stern, though limited, by doubling the thickness of the last two bulkheads just in the lower zone, this to increase the surface in contact with the planks. 01 Ragusian Carrack/26112017/IMG_20171126_171735.jpg 02 Ragusian Carrack/26112017/IMG_20171126_171743.jpg 03 Ragusian Carrack/26112017/IMG_20171126_171752.jpg Cheers, Jack Aubrey.
- 190 replies
-
- 6
-
-
- ragusian
- marisstella
- (and 1 more)
-
Thursday 23 November 2017 Some pictures of the work made on the stern, aimed at the construction of the stern post. This element is definitely finished, ready to receive, in due course, the last layer of cherry wood strips. A view of the inside, left raw . . 01 Ragusian Carrack/21112017/IMG_20171121_152153.jpg And two exterior views, smooth and ready for the next steps . . 02 Ragusian Carrack/21112017/IMG_20171121_152137.jpg 03 Ragusian Carrack/21112017/IMG_20171121_152143.jpg The filling blocks in the bow area, still under construction and to be refined . . 04 Ragusian Carrack/21112017/IMG_20171121_152215.jpg 05 Ragusian Carrack/21112017/IMG_20171121_152230.jpg I have reinforced the tops of the 9th, 10th and 11th bulkheads that could break during the hull manipulations planned in the next steps . . 06 Ragusian Carrack/21112017/IMG_20171121_152201.jpg That's all, see you soon, Jack.
- 190 replies
-
- 4
-
-
- ragusian
- marisstella
- (and 1 more)
-
Tuesday 21 November 2017 It's some days without news from me since my last post because I had to spend several time on other matters. However I have not been completely inactive on this model. Not a lot but during these days I have: 1) finished the second of the HMS Guadeloupe lifeboats; now only another rather small one is missing, and then I'll finish with these boats; 2) I set up, in the prow area, some filling blocks, made of several layers of poplar plywood glued together; they are now rough, but still to be finished properly; 3) I'm building the stern post, especially at the top, made with 2x5 soft wood strips; also here I just have to refine before applying the last layer planks. Lastly, some considerations on the kit and subsequent decisions regarding the future tasks for this project. The wood available in the kit for planking the hull and decks consists exclusively of 4 x 1,5 walnut strips. They are of great wood, even if, for my opinion it's a wood too dark (you can have an idea by looking at the previous post where, in some photos, you can see them on the visible side of some bulkheads). Obviously, only one planking is planned. Recalling my previous experience with an identical approach based on walnut planking and evaluating the problems encountered during hull refinement and smoothing, I have considered the pros and cons of using this material. So I decided to proceed on my way using the double planking technique, also because I found the material I needed: a) in a model shop near to me (among other things, well-stocked) I bought some 1,5x5 mm lime strips to be used for the first planking; since lime is much sweet than walnut I should be able to work much more easily and quickly; in addition, being them wider strips, I should go furtherly faster. b) I have found veneer sheets, 0,4 mm in thickness, of CHERRY wood at a timber reseller. It's nearly a century I dreamed to use this kind of wood for a model of mine . . . so I decided right away. The technique is super tested having used it for two of my previous models and also for several boats, so it's like playing soccer in your own home field . . Of course I have no pictures of the work done on the carrack to show, but I don't think it's a big loss as there is not much to show. At most, I'll show you a couple of photos of the two Guadeloupe boats . . 01 Brick de 24/Brick by JackAubrey/IMG_20171115_154048.jpg 02 Brick de 24/Brick by JackAubrey/IMG_20171115_154030.jpg
- 190 replies
-
- 5
-
-
- ragusian
- marisstella
- (and 1 more)
-
Thursday 9 November 2017 New but latest images, with more focus on certain construction details . . At the moment I am applying a coat of diluted vinyl glue +/- to 50% over the entire structure. This operation helps to make the surface of the plywood more durable by saturating it with glue and preventing the various pieces from falling or jerking against sanding operations. It should also make the wood less subject to humidity changes, which, in these days here in Calci, is very strong because of recent rains. Soon I will have to prepare myself to shape the bulkheads with the correct camber and apply preshaped sweet wooden blocks where necessary, especially at bow and stern, to best fix the ends of the planks. In the idle time I'm trying to finish the second HMS Guadeloupe boat. Soon, Jack. 01 Ragusian Carrack/07112017/20171107_132826.jpg 02 Ragusian Carrack/07112017/20171107_132916.jpg 03 Ragusian Carrack/07112017/20171107_132926.jpg 04 Ragusian Carrack/07112017/20171107_132953.jpg 05 Ragusian Carrack/07112017/20171107_133005.jpg
- 190 replies
-
- 4
-
-
- ragusian
- marisstella
- (and 1 more)
-
Continuation with further images . . 01 Ragusian Carrack/07112017/20171107_132905.jpg 02 Ragusian Carrack/07112017/20171107_132735.jpg 03 Ragusian Carrack/07112017/20171107_132741.jpg 04 Ragusian Carrack/07112017/20171107_132816.jpg 05 Ragusian Carrack/07112017/20171107_132821.jpg
- 190 replies
-
- 3
-
-
- ragusian
- marisstella
- (and 1 more)
-
Tuesday 7 November 2017 I've terminated the assembly of the hull frames !! Aside from the time it took to fit everything in accordance with the written instructions, I had, for my choice, to do additional tasks to reinforce the whole assembly. Infact, in spite of the presence of some 14mm walnut rods that strengthen the lower part of the frames, I felt more appropriate to add further reinforcements to the upper part of the bulkheads. This area was too fragile for my thinking . . . then I worked out with "ad hoc" plywood pieces and wood strips to strenghten it. After this activity I feel more confident about the rigidity of this "building". . I want now add that I have not yet finished with this task, for example I still have to reinforce the top of the fourth, fifth and sixth bulkheads starting from the stern. Before anyone notices me, I inform you that the seventh bulkhead from the stern is not perfectly vertically mounted . . I must inadvertently shift it while it was not yet perfectly dry without I noticed it. However, there are no visible negative effects, so this is an error without any significant consequence. And now I attach here below the first five images of the work done. 01 Ragusian Carrack/07112017/20171107_132728.jpg 02 Ragusian Carrack/07112017/20171107_132806.jpg 03 Ragusian Carrack/07112017/20171107_132836.jpg 04 Ragusian Carrack/07112017/20171107_132849.jpg 05 Ragusian Carrack/07112017/20171107_132857.jpg To be continued . . see you soon, Jack.
- 190 replies
-
- 4
-
-
- ragusian
- marisstella
- (and 1 more)
-
Sunday, November 5, 2017 Saturday I took the decision to start assembling the framework of this model. Usual methodology but I need to be very careful about the alignment of the single bulkheads. A great deal of precision is needed because there are 14mm round longitudinal reinforcements that must be inserted into holes specially cutted in the bulkheads. By luck the pieces are really accurate and so far I hadn't any problem till now . . honor to the author of this kit. Let's hope this luck continues even for the pieces that have not yet been installed. I used the device I showed you a few days ago to hold and glue the bulkheads and I have to say it works pretty well, but I cannot proceed too fast . . so, "autogenic rush management training". Below the usual photo gallery . . to next time, Jack. 01 Ragusian Carrack/05112017/20171105_120539.jpg 02 Ragusian Carrack/05112017/20171105_120546.jpg 03 Ragusian Carrack/05112017/20171105_120558.jpg 04 Ragusian Carrack/05112017/20171105_120609.jpg 05 Ragusian Carrack/05112017/20171105_120637.jpg
- 190 replies
-
- 7
-
-
- ragusian
- marisstella
- (and 1 more)
-
Venerdì 3 Novembre 2017 I finished installing details on the visible parts of the bulkheads # 3, 12, and 13. Next step is a careful review of the building instructions to see if I can finally proceed with the bulkheads assembly or if there is any other preliminary task to execute. The part I covered on the bulkhead #12 will be visible with difficulty. The instructions only meant to paint it in black. I decided to cover it with strips and to install three doors as on the other two bulkheads. A little extra detail. 01 Ragusian Carrack/03112017/01 Ragusian Carrack/03112017/ Bulkhead #3, the most complex; it seems to me quite well, even though it was a hard business to unplug the edge of the windows (laser pre-cut) from the solid nut board. In fact they were very fragile. That is why I prefer 5-ply avionics plywood for this kind of detail. 02 Ragusian Carrack/03112017/20171103_172218.jpg To next time, Jack.
- 190 replies
-
- 4
-
-
- ragusian
- marisstella
- (and 1 more)