jack.aubrey
-
Posts
1,268 -
Joined
-
Last visited
Content Type
Profiles
Forums
Gallery
Events
Everything posted by jack.aubrey
-
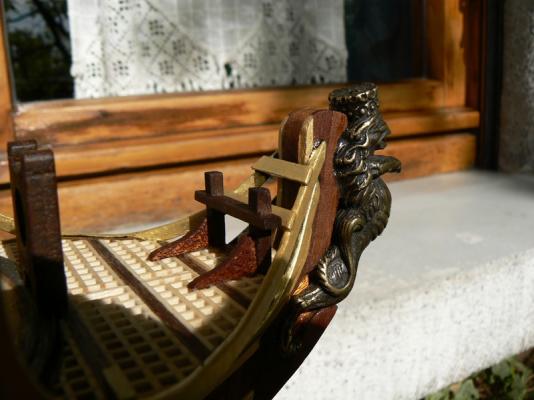
 Sunday, May 10, 2015 As promised Thursday, I took some photographs of the brick with the second planking completed. Also part of the keel, the stern post and the stem are in an advanced stage of completion. Although it may seem unnecessary when you consider that the underwater hull part will be covered with copper plates, I differentiated the wood that finishes the keel using mahogany instead of Tanganyika. Images are set in a rural agri-ecological or eco-agriculture environment, where you can even see wild strawberries . . . Power of biodiversity (but anyway it's now time to mow). Other images from different viewpoints will follow soon. Regards, Jack. 01 Brick%20by%20JackAubrey/P1100258_zpsguldtbcj.jpg 02 Brick%20by%20JackAubrey/P1100259_zpsj6uc8wuq.jpg 03 Brick%20by%20JackAubrey/P1100260_zpsgir9td03.jpg 04 Brick%20by%20JackAubrey/P1100261_zpsktj8tdkv.jpg
 -
Thursday, May 7, 2015 Today I have finished the application of the second planking on the remaining side, the left side. As I expected it took the time previously estimated. For the moment I haven't pictures to show but I'll arrange for asap. At the end of the day I also started to cover with veneer the keel and I'll continue with the stern and the stem. These will be the upcoming activities that will bring to completion next days. Sincerely, Jack. PS: thanks Yves, I'm happy you follow my log and appreciate it . . Jack.
-
Wednesday, April 29, 2015 Two days ago I completed the planking on the right side of the hull . . then, I had two days with some health problem and did not progress further. Now it remains to plank the left side, then finish the keel/stern/stem/breakwater. And finally a nice final sanding/smoothing. In view of my experience with the right side, I estimate in four, perhaps five sessions of three hours my efforts to finish. I do not think that I will post new messages or images until the end of the left side, except to answer to messages from other users: I would not have anything new to show, only a inverse photocopy of these images. And then I have another very important commitment: I must setup a plan on how to proceed further with this model, both as a sequence of tasks to be carried out but also as choices of presentation/colour scheme. Everything by studying in depth the ANCRE plans. So far I have proceeded almost with improvisation, now it's time to change the method. Cheers, Jack Aubrey. 01 Brick%20by%20JackAubrey/20150429_170628_zpscjk4khy4.jpg 02 Brick%20by%20JackAubrey/20150429_170720_zpsno9lcalx.jpg 03 Brick%20by%20JackAubrey/20150429_170733_zpschpr7voc.jpg
-
The tool is good and works well, the pity is that I made it too late to help much during the initial phase of this task . . will be more useful for the left hull side . . Thanks for your appreciatons, Jack.
-
Saturday, April 25, 2015 The implementation of the second planking, from the wales downwards, continues. . Till now I'm focused on the right side of the hull only. The area below the waterline will be covered with copper plates while the area above, I believe from the waterline to the lower wale or perhaps even the wales themselves, should be painted black. So the accuracy in the installation of the second planking may have a relative importance. But personally I'm trying to do a job as good as possible because I believe that the more you know about this matter the more it is better . . in this case I'm experimenting some techniques new to me that at the moment I feel useful to consolidate my skills for the future. The particular shape of the bow of this hull not certainly makes things simple, in particular the difficulties are concentrated in five or six strakes positioned below the lower wale. This implies an abundant use of the so-called "drop planks" although from the photos you probably see little. Cheers, Jack. 01 Brick%20by%20JackAubrey/20150425_183921_zpszmz6tznr.jpg 02 Brick%20by%20JackAubrey/20150425_183751_zpsgow6u73a.jpg 03 Brick%20by%20JackAubrey/20150425_183858_zpshqbkjppk.jpg 04 Brick%20by%20JackAubrey/20150425_183827_zps4w3zk61g.jpg
-
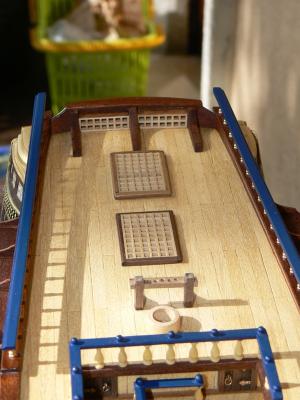
Thursday, April 23, 2015 other images dating back to yesterday. . from different viewpoints. Regards, Jack. Brick%20by%20JackAubrey/P1100255_zpsv9zo4pmy.jpg In the next two pictures, due to the rather flattened viewpoint, we can see how the deck planking is anything but perfect. . In fact, the strakes don't have a constant curved shape and tend to straighten amidships. This obviously cannot be noticed if you look at the model from other viewpoints. All this is originated by errors that, if I should repeat the same experience, I will now be able to avoid. Unfortunately this is the price to pay when you have to build an experience never done before. Of course I'm relatively not worried because with the deck fittings and the ordnance installed the line of each strake will be often interrupted and then you will not notice these imperfections. . which, anyway, remain such. Brick%20by%20JackAubrey/P1100254_zpspb7hq0xl.jpg Brick%20by%20JackAubrey/P1100253_zps5xnji8es.jpg Brick%20by%20JackAubrey/P1100251_zpsylsdp2qt.jpg Brick%20by%20JackAubrey/P1100250_zpsethkmuev.jpg Brick%20by%20JackAubrey/P1100247_zpsa90qd3lu.jpg
-
Wednesday, April 22, 2015 Both sides of the bulwarks, from the wales up are terminated . . I was impatient to see the true color of the wood I used for the second planking, so yesterday evening I applied a coat of oil for wood in the newly planked area. Today, the oil has already been absorbed and then the hull was again manageable for other works. Obviously, at first I resumed the works equipped with a digital camera and I took a lot of photos, also thanks to a proper daylight. This afternoon I started applying additional strips below the wale, for now only on the right side. . of course, from now the work gets longer. I have other images to display . . see you tomorrow with a new message. Jack. Brick%20by%20JackAubrey/P1100257_zps1iffnrlb.jpg Brick%20by%20JackAubrey/P1100256_zpslrbqwcht.jpg Brick%20by%20JackAubrey/P1100252_zpsujhfjzeu.jpg Brick%20by%20JackAubrey/P1100248_zpsxu0fmqn8.jpg Brick%20by%20JackAubrey/P1100246_zpsvfcr6c1i.jpg Brick%20by%20JackAubrey/P1100249_zps2ikdgjf7.jpg
-
Tuesday, April 21, 2015 Once I concluded the preparatory activities useful for the installation of the second planking (sanding the hull, keel application, preparation of the sternpost, etc.) I finally started this new long term task. I am currently working on the top of the hull, the outside bulwarks, from the wales up, then I'll address the remainder. The material used is mainly Tanganyika wood, in the form of strips 1mm thick plus self-produced strips, in various sizes, starting from sheets of veneer with thickness 0.4mm. Before applying the second planking I proceeded to "close" the speep ports on the outside, by inserting into the hole a piece of wood 4 x 6, 2 mm thick. Once installed the second planking, in due course I will reopen the speep ports that, I want to remember from a previous post, on the external side have a different shape from that of the internal side. The images below show the "work in progress", with planking already partly implemented and partly not. This work took me about three working sessions of three hours each. An overall view . . Brick%20by%20JackAubrey/P1100241_zpsjqpeuu7q.jpg Some details where the speep ports are shown closed outside. Brick%20by%20JackAubrey/P1100240_zpszxo9zoe4.jpg Brick%20by%20JackAubrey/P1100238_zpsj7pqicrv.jpg Detail of the second planking applied over the wales. . Brick%20by%20JackAubrey/P1100239_zpsy2xivwyz.jpg Cheers, Jack.
-
Wednesday, April 8, 2015 Dusty day today: I decided to finish the sanding of the hull, after the installation of the keel, in the area where the latter is connected with the hull. The bulk of the work was in the bow and stern area. Now, except for few last tasks, everything is ready to go with the second planking. 01 Brick%20by%20JackAubrey/20150408_180553_zpsymxleypx.jpg 02 Brick%20by%20JackAubrey/20150408_180426_zpsmkootwg5.jpg 03 Brick%20by%20JackAubrey/20150408_180541_zpsjwyhx5zy.jpg At poop, in addition to levelling the hull to the keel, I sanded the area close to the transom in such a way that, with the second planking, it will take the rounded shape this ship had. 04 Brick%20by%20JackAubrey/20150408_180515_zpslyotzcos.jpg Now only a last activity must be done before the second planking: apply the sternpost and open a proper hole in the transom for the rudder. . maybe tomorrow I'll perform these two steps. That's all for today. . Regards, Jack.
-
Tuesday, April 7, 2015 In this week of Easter days my hobbyist resolution to work was really gone, I "shot the shi-t" with the pedestal in the vain waiting that my will to work will come back . . . First I painted the piece in solid camel color . . 01 Brick%20by%20JackAubrey/20150405_183042_zpszjg1efe2.jpg Then my wife seized it to apply some special effects . . 02 Brick%20by%20JackAubrey/20150407_172825_zpspkys3uk7.jpg 03 Brick%20by%20JackAubrey/20150407_172837_zpsagzj1sbp.jpg Cheers, Jack.
-
Additional images I forgot to publish last week. no further work have been done till today. I wish to all of you a wonderful, relaxing, fantastic, amusing Easter & Easter Monday 2015 !!! Jack. 01 Brick%20by%20JackAubrey/20150401_162814_zpsqjoogqjp.jpg 02 Brick%20by%20JackAubrey/20150331_184436_zpsg0ttjrju.jpg 03 Brick%20by%20JackAubrey/20150401_162705_zpsejqhrvtz.jpg 04 Brick%20by%20JackAubrey/20150331_184446_zpsqyazofi9.jpg 05 Brick%20by%20JackAubrey/20150401_162808_zpsp8j0gnbh.jpg
-
Wednesday, April 1, 2015 Before the second planking, as I wrote, there are some things to do. First I applied the keel and the whole stem and breakwater. I planned to build these particular with MDF, 6mm thick, but now I found in my "personal" warehouse some plywood of the same thickness, five layers and I used it. These pieces are glued to the hull and I inserted, at regular intervals, some steel pins to ensure that everything was "strongly" fixed. I remember that the keel will be additionally covered with 0.4mm veneer. This will increase the overall thickness to near 6,8mm, close enough to the thickness in the design that is 6.5mm. Probably the final smoothing approach this adjust further. An overall photo . . 01 Brick%20by%20JackAubrey/20150401_163024_zpsge0v5q8l.jpg A detail of the stem and breakwater . . 02 Brick%20by%20JackAubrey/20150401_162837_zpst9fpcugb.jpg To fix the stem/breakwater at the bow I had to cut the bow railing . . This task was performed with the coping saw and a small sanding block . . In the future this particular will be the bed for the bowsprit. . 03 Brick%20by%20JackAubrey/20150401_162828_zpscl5cuvte.jpg Other images from various viewpoints . . I forgot: I decided to make a new pedestal, because the building slip used until some time ago, with the completion of the hull planking was no longer usable. This pedestal is certainly not for exibition: its purpose is to keep the model straight and stable . . not certainly to be nice. A profusion of table saw tasks . . . For the shape of the hull I made use of an ANCRE plan containing the bulkheads with the dimensions and the external forms, more precisely the bulkheads no. VII towards poop and no. III at prow. 04 Brick%20by%20JackAubrey/20150401_162756_zpshhnm4s1o.jpg 05 Brick%20by%20JackAubrey/20150401_162745_zpspe3lvjfm.jpg 06 Brick%20by%20JackAubrey/20150401_162620_zpskejfwl4c.jpg Photos were taken with a smartphone, so they are not very in focus . . That's all for today, let's hear something from you soon, Jack.
-
Another "set" of images, this time with the model in its normal position. I especially like the first two, where I can appreciate the fine lines of the hull. Jack. 01 Brick%20by%20JackAubrey/P1100214_zpsrvng2yhh.jpg 02 Brick%20by%20JackAubrey/P1100211_zpsbev9zeow.jpg 03 Brick%20by%20JackAubrey/P1100213_zps9lk1pbxd.jpg 04 Brick%20by%20JackAubrey/P1100216_zpsotybzky2.jpg
-
Thursday, March 26, 2015 After having spent a couple of hours sanding the hull, exclusively by hand with sanding blocks, I can, at this point, consider this hull, at least at 90-95%, fully ready for future tasks. I remember that it is planned a second planking, but before to start this new trek, there is still some work to do to 100% finish the hull, including the installation of the keel, the stern and the stem. I don't want to dwell anybody with details, as they will be addressed adequately in a near future. For now some pictures of the result of this main sanding activity. PS: I take the opportunity of this message for a collective thanks to Foz & Gibbo for their stimulating comments Sincerely, Jack. 01 Brick%20by%20JackAubrey/P1100218_zpsaqq6pkzx.jpg 02 Brick%20by%20JackAubrey/P1100217_zpsnfhjesmu.jpg 03 Brick%20by%20JackAubrey/P1100221_zpstohuaxks.jpg 04 Brick%20by%20JackAubrey/P1100219_zps0tpwnamc.jpg 05 Brick%20by%20JackAubrey/P1100220_zpstbvgxwym.jpg
-
Monday, March 23, 2015 Today I finally finished the first planking of my Brick !! Although the long trip is just at its beginning and the goal is still beyond the horizon, this is an important milestone . . I think not only for me but for all ship modelers in general. Now remains the rather "dusty" task to smooth the entire hull in order to prepare it to receive the second planking made with finest wood. For now satisfy yourself with a bit of images taken with the smartphone; they aren't perfect but still give a good idea of the beautiful shape and lines of this hull. Other than the paunchy vessels or galleons . . these ships were, in their times, racing boats !! Regards, Jack. 01 Brick%20by%20JackAubrey/20150323_182807_zps1gye5deo.jpg 02 Brick%20by%20JackAubrey/20150323_182911_zpsfxesf5t4.jpg 03 Brick%20by%20JackAubrey/20150323_182935_zpshh3imuul.jpg 04 Brick%20by%20JackAubrey/20150323_182952_zpsuurvn4sc.jpg 05 Brick%20by%20JackAubrey/20150323_183021_zpstt55plri.jpg
-
Wednesday, March 18, 2015 Last Friday I came back from my "short holiday" near Pisa and, when back, as usual, I had to follow other matters for some days instead of shipmodeling . . Finally today I found time, for this afternoon, to restart working on the Brick. Obviously the work is continued from where it was stopped about a month ago: the planking of the hull. For now, nothing to show, I'd like to publish some pictures when the planking will be completed . . I believe more/less within 8/10 days from here. A friendly greeting, Jack.
-
Sabato 21 Febbraio 2015 A couple of images without clamps and rubber bands . . left in the (photo)camera before leaving Milan. 01 Brick%20by%20JackAubrey/20150220_154728_zps4josgs2g.jpg 02 Brick%20by%20JackAubrey/20150220_154645_zpsb5qy8nl8.jpg Greetings from the leaning tower !!!!!!! piazza_duomo_pisa_zpsorrlkvol.jpg
-
Thursday, February 19, 2015 As mentioned in my previous posts, it was time to return to work on the outside hull planking. For the occasion, I preferred to begin applying strakes starting from the keel. In particular, seen that the shape of the midship and fore bulkheads is almost straight and allowed it, I preferred to use strips, always in limewood, 10 x 2mm. much wider than those used until now. However for the next strakes I'll come back to the original measure (6 x 2 mm). In all the photographs I'm showing four full courses and two broken at the two ends, all the same size. Because the use of clamps and elastic at the bow and stern areas, I could not proceed very quickly to apply the four full strakes; it took me four days, basically a strake per day. Having to wait every time the COMPLETE drying of the glue I thought to introduce a novelty to strongly weld the first course to the keel: I prepared a filler made of glue and fine sawdust (obtained preserving the sawdust produced by the usage of the circular saw) applied with a spatula inside the first course, in the acute angle between the keel and the strip. After the first experience I found the right quantitative mix between glue and sawdust obtaining in practice some new wood. In the picture number 03 you can see a corner in the bow area where it is visible, although in this case is not yet completely dry because I applied it recently. Now the time has come to close for some twenty days the shipyard because me, my wife and my cats we all move to Tuscany, exactly in Calci (Pisa), where one of my two daughters lives . . It's from the beginning of September that we do not meet. Well worth the sorrow of leaving the Brick to season for a bit. . hoping to find good weather. Sincerely, Jack.Aubrey. 01 Brick%20by%20JackAubrey/20150219_150537_zpshrknuezw.jpg 02 Brick%20by%20JackAubrey/20150219_150547_zps3mmr7lhn.jpg 03 Brick%20by%20JackAubrey/20150219_150727_zpsilzufm03.jpg 04 Brick%20by%20JackAubrey/20150219_162110_zpsn7os6oqq.jpg
-
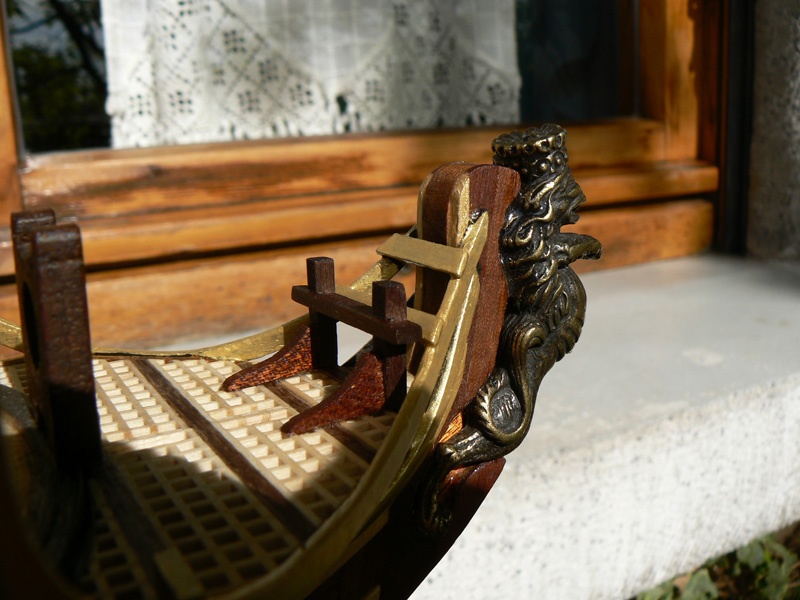
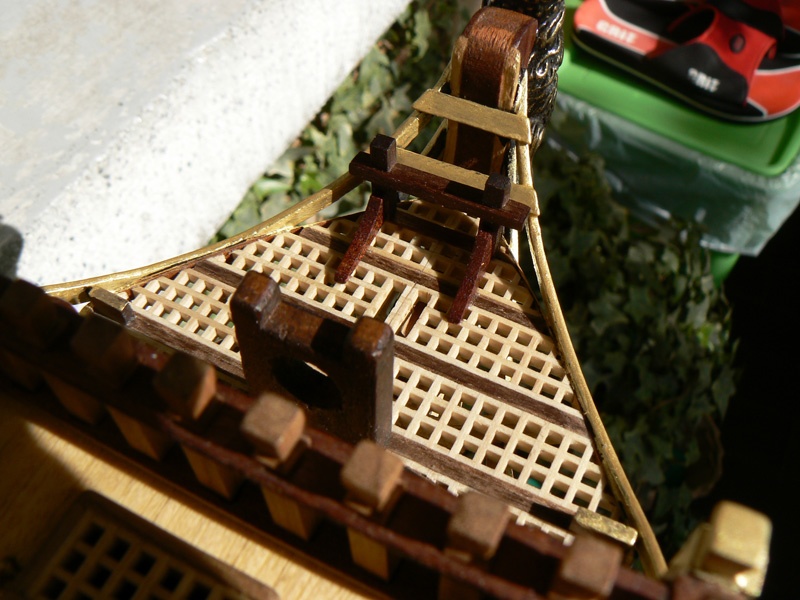
Posted: Mon Apr 21, 2008 Another small detail I have "creatively" added to the head: something callable "bowsprit bitt", made up of two bitt pins and the cross piece. I decided to apply this detail in this area in order to have something that could better strengthen the structure.

-
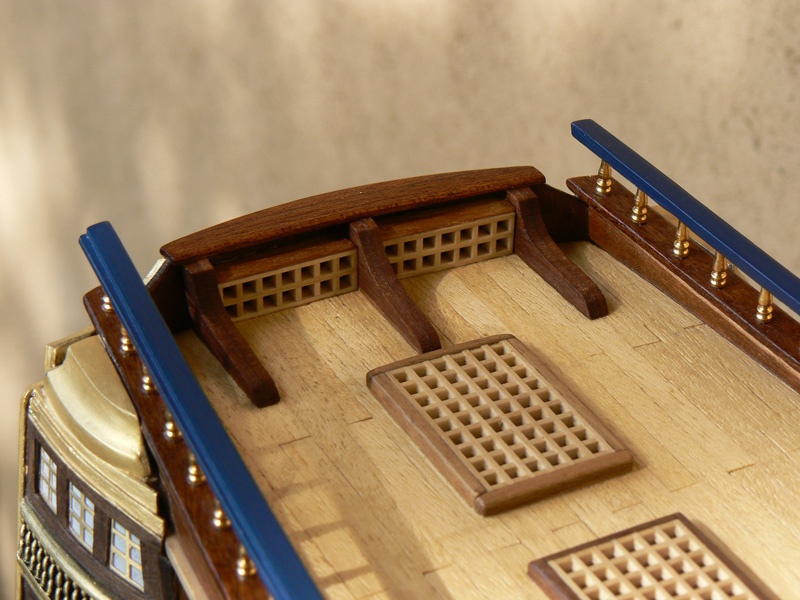
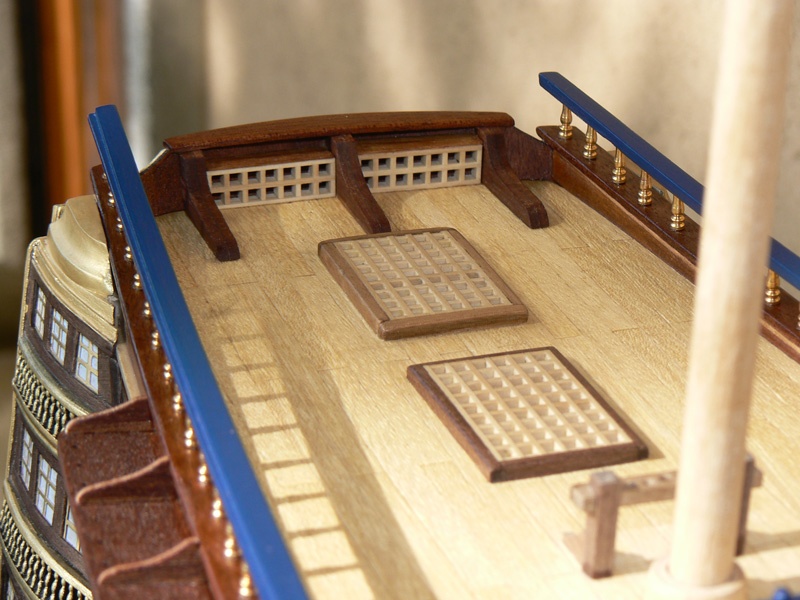
Posted: Sun Apr 20, 2008 Yesterday, Saturday, I resumed the work on the Santìsima Trinidad. But it was a day where my brain was creative so I didn't follow any established plan or instruction and I "literally" invented what you can see in the next three images. Everything started from the observation that the poop deck, looking aft, was quite empty so I remembered a photo seen on "the 100-gun ship Victory" of the Anatomy of the Ship series where in the same area are depicted the compartmented flag lockers and I decided to build them. More or less two hours of work but I am really satisfied. I have used recycled materials, so no additional cost on the budget. It should also be possible to add another small but interesting detail: the canvas shrouds, obviously pulled back. See you soon, Jack.Aubrey


-
Wednesday, February 11th, 2014 Yesterday I made some work to prepare the sheets that procured me a beautiful headache...... Cheers, Jack. Brick%20by%20JackAubrey/P1100192_zpsmvtwwdn5.jpg Brick%20by%20JackAubrey/P1100194_zpsfsozabtb.jpg
-
Good idea, Fam. This is surely possible and easy to implement . . Jack.
-
Hi Fam, happy you will restart soon . . Regarding the sheets blocks, what you wrote is exatcly what I decided to do. Yesterday I started the preliminary steps to prepare the sheet blocks, I think to continue today, but they will be installed after the second planking. I also made the ports for the oars on one side of the hull. I'll provide the external drop shape only to the second planking, although the right solution should be for the planking as a whole, but at this point it's not possible to achieve it. Monday, February 9, 2015 Today I opened the oar ports on the left side of the hull: mini drill, small files and patience is all you need. Regards, Jack. 01 Brick%20by%20JackAubrey/20150209_180756_zps4ho13yay.jpg 02 Brick%20by%20JackAubrey/20150209_180642_zpsfnrteuyc.jpg
-
Saturday, February 7, 2015 What to do now? In these past days I reviewed again the Cygne plans to assess whether I should do some other work in the internal and external bulwarks and deck before resuming the installation of the hull planking. First I immediately identified a new task to be accomplished at this stage of the build: it consists of opening new ports for the oars. Yes this vessel has oars! This small sailship could also be managed with oars, seven per side. The image below shown introduces these openings specific to the oars. Internally the ports have the shape of a rectangle. In scale 1:48, the longer side is 6mm while the shorter is 4mm. Externally the shape was rather different, as shown in figure 01, slightly drop-shaped, to allow the insertion of the oar blade, and with the lower part rounded to allow the action of rowing. The outside was then closed by a lid pivoting on a fulcrum on top to prevent the entry of water when the oars were not used. These 14 ports MUST be opened now, before the second planking. The latter will take the shape planned for the outside. I say now because I can still use the building slip to work more smoothly. I will use the same method used for the gun-ports at the stern to open the oar ports, except that here the finishing must be done with tools of appropriate size, given the smaller size of this ports. For the moment I merely draw outside the proper location where these openings are with a pencil, as you can see from the pictures 02 and 03. So everything is ready to start this new task, but I need before to find and/or prepare the right tools. 01 Brick%20de%2024%20Plans/1319280d-f0c4-4202-bfe7-752c34227bbe_zpsaqsnnjmj.jpg 02 Brick%20by%20JackAubrey/P1100190_zpsbitdmmpl.jpg 03 Brick%20by%20JackAubrey/P1100191_zpsdfkthm4m.jpg Another work involving the bulwarks is related to the presence of three sheets (is this term correct?) per side as shown inside the red rectangle in the next two figures. These details, however, should be carried out later, even if the openings dedicated to them could be prepared from now. The sheets are three per side. The poop sheet (Fig.04) contains six pulleys (is this the correct term?) with diameter 4mm and thickness 0.8mm. The mid-ship sheet (Fig.05) contains five of them, same measures, while the far forward is single. I have not yet decided when to do this task, but I think the first thing should be to prepare the blocks containing the pulleys and then, having determined the correct dimensions, drill the holes. Once finished with the openings for the oars I'll try to prepare these sheets, then I'll decide whether to include them now or after the second planking. As I think you may have guessed, my approach is not predefined as for kit or partwork models. I proceed by alternating phases of work with planning stages, taking into account and starting from the model situation at the given time. The matter has a lot of fun. 04 Brick%20de%2024%20Plans/b22d9996-5c19-4af3-b281-baa7e5d8d3b1_zpsmge1fbmm.jpg 05 Brick%20de%2024%20Plans/8f552736-a7ca-4fb5-97fb-7cdc97829969_zps7ykurvoy.jpg Cheers, Jack.Aubrey.
-
Friday, February 6, 2015 In this post I present some more detailed images of the new things presented yesterday. In the first image a close-up view of the poop outside. At the proper time the area should be completed with a second planking and a decorative frame on the rounded edge, etc. 01 Brick%20by%20JackAubrey/P1100186Cropped_zpsfopcaf41.jpg The same element from the inside. Here there are still some activities to do, we'll see when, if doing them now or later, after finishing the hull planking. The stability and the convenience coming by using the current building slip in keeping the hull (which would become unusable if I finish the planking) is something that I would not give up too soon. Maybe I should study the building of a suitable pedestal to be used in its place, but this new support must keep the same characteristics of stability and practicality. 02 Brick%20by%20JackAubrey/P1100183Cropped_zpsotmymkv3.jpg Here, a closer view of the bow inside. Also here many new details will come, including the bowsprit, so I fear that at the end you will see very little. . 03 Brick%20by%20JackAubrey/P1100184Cropped_zpsmx5t9tkk.jpg 04 Brick%20by%20JackAubrey/P1100189_zpstcer7fjf.jpg Cheers, Jack.Aubrey.