PMG
-
Posts
199 -
Joined
-
Last visited
Content Type
Profiles
Forums
Gallery
Events
Everything posted by PMG
-
 Hello Martin, Great to see your Aggie is going on. I could'nt too find balsa blocks, but I was lucky enough to find a balsa plank 1cm thick. And so I fiied the front and rear part of my ship with slices not too difficult to cut. I have a problem to see your pictures. Did you make a special treatment? I have no access to them. Pierre
 -
HMS AGAMEMNON by PMG - Caldercraft
PMG replied to PMG's topic in - Kit build logs for subjects built from 1751 - 1800
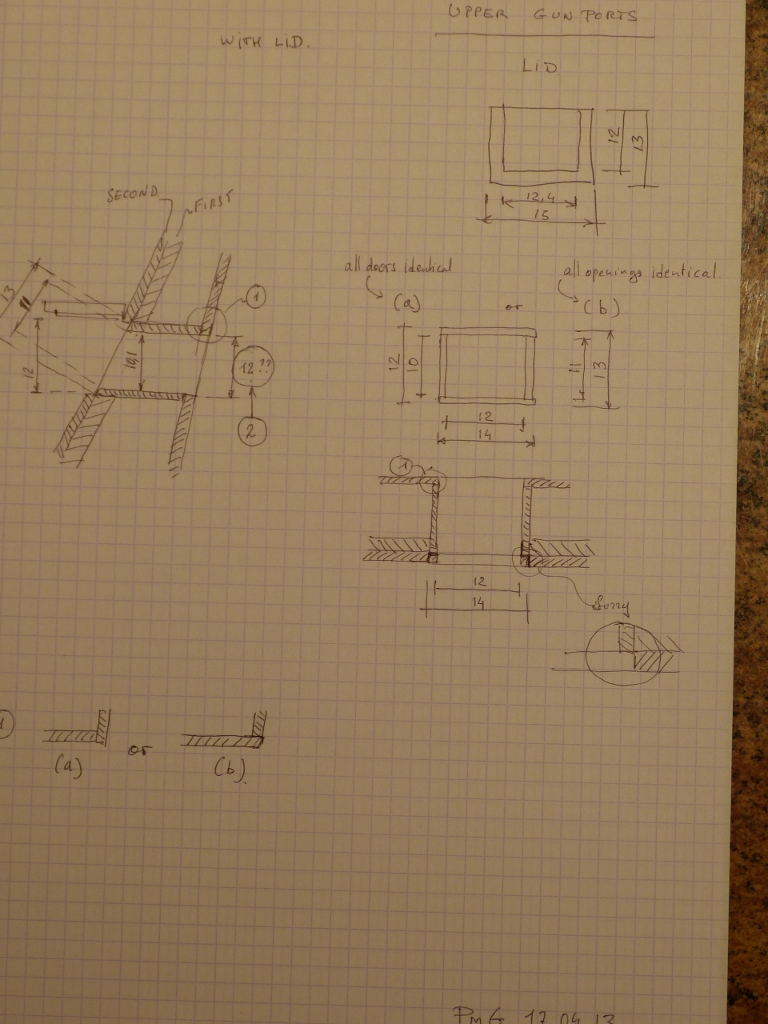
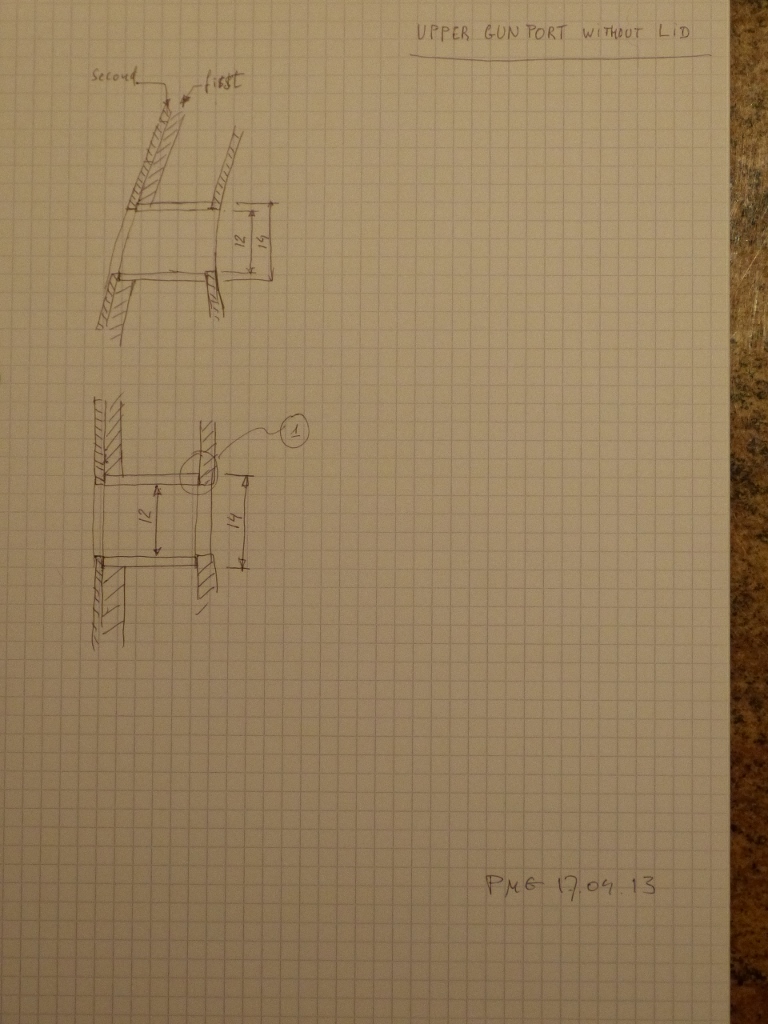
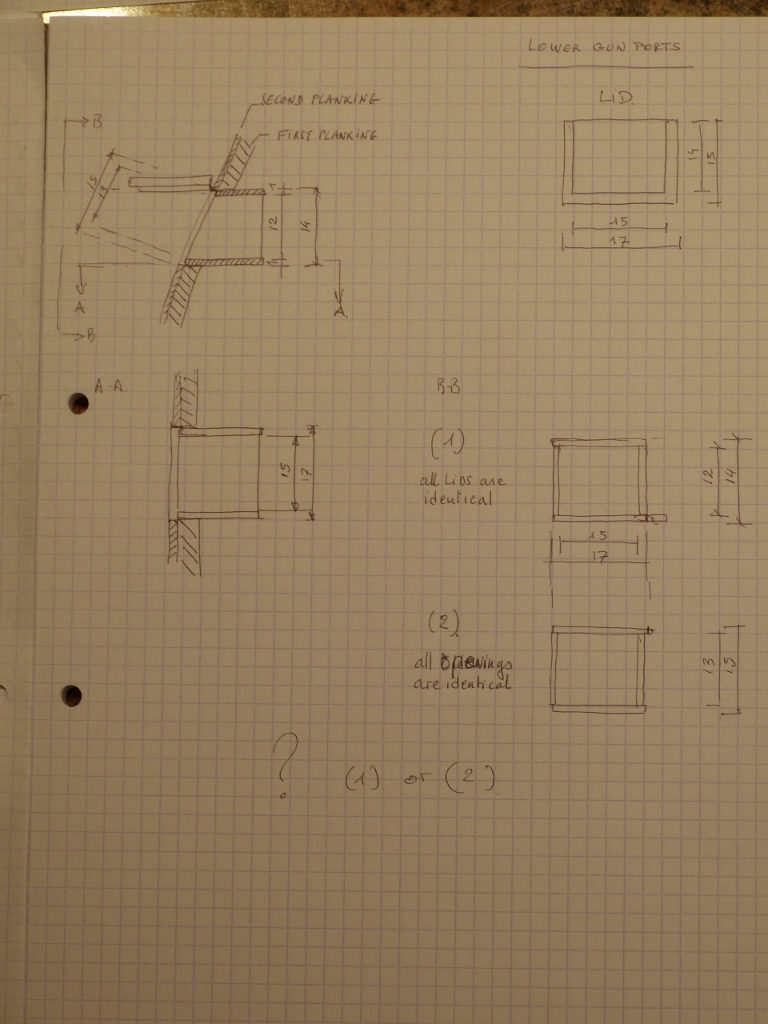
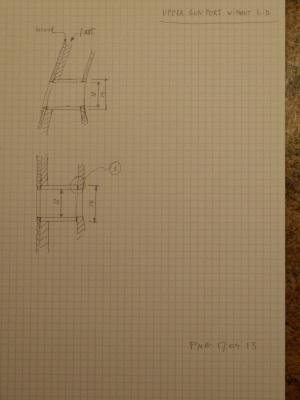
Here is fig. 41. ( I hope the images are large enough, otherwise I reload them with a better resolution). Here I have an additional question. How do you finish the liner against the inner bulkward. Passing through or just against? see options (1) or (2) on the drawing. Again the same problem, lids identical or openings identical?? Let's assume we choose the second case. Then Width of the opening is 14mm and finished 12mm and the height is 13mm (finished 11). Let's now have a look to the gunport without lid. Here, I have to tell that the manufacturer drawings are not always consisten (to me). Finally, I made fig 42. Here again, no problem for the width ( 14 and 12mm) what is consistent with the gunports with lids. But, in the vertical direction, I measure also 14mm (opening in the first planking) and 12mm (finished opening with the lining. And this is larger than any of the two solutions of fig 41. Should'nt all openings (with or without lids) be the same??? In this case, wich one is the wrong one 11mm or 12 mm (in finished condition)? Mobbsie, Rob, you are already at a further stage. What did you exactly do? I have to tell you that I don't understand what Mobbsie did with the 10x10mm tubes for lining the gunports. In any case it should be bigger, but, may be, I did'nt understand what he did. Anyway, thank you for your help. It will be greatly appreciated. Pierre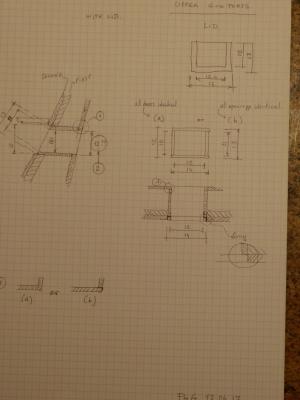
-
HMS AGAMEMNON by PMG - Caldercraft
PMG replied to PMG's topic in - Kit build logs for subjects built from 1751 - 1800
Hello friends, Now, I think I need some help. All your advises are welcome. As I am note home, I take the time to study carefully the sheets 2, 3 and 4 of the drawings supplied by Caldercraft in view of preparing the calliper blocks I am intended to use for the finishing of the gunports and their lining. And here I have a problem and some questions. Look here at fig. 040. The lids are 17x15mm and their inner part 15x14mm. No problem concerning the width of the opening. It will be 17mm and, once the liner is in position it will become 15mm. The complication arises in the vertical direction. If you assume that all lids are identical (and by the way, Caldercraft supplies them all identical) the opening in the wall will be different taking into account the slope of the wall of the ship. In such a case, the opening in the first planking shoud be 14mm high ( and lined, 12mm). On another hand, if you assume that all opnenings in the wall are identical (and that seems to me more logic because so all guns have the same possibility of adjusting the fire) the openings in the first planking should be 15mm high (and 13mm with the liner). I think that I shall choose this second solution. Nobody will ever see that there is a small discrepancy with the lenght of the lids as they will remain open. Your advises are welcome. I have, more or less the same question with the gunports of the upper gundeck with lids. See fig 41. Sorry, I have a problem for loading the picture and I continue on another message. Pierre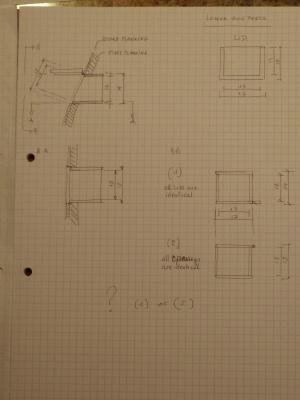
-
Nice, as usual! Pierre
-
HMS AGAMEMNON by PMG - Caldercraft
PMG replied to PMG's topic in - Kit build logs for subjects built from 1751 - 1800
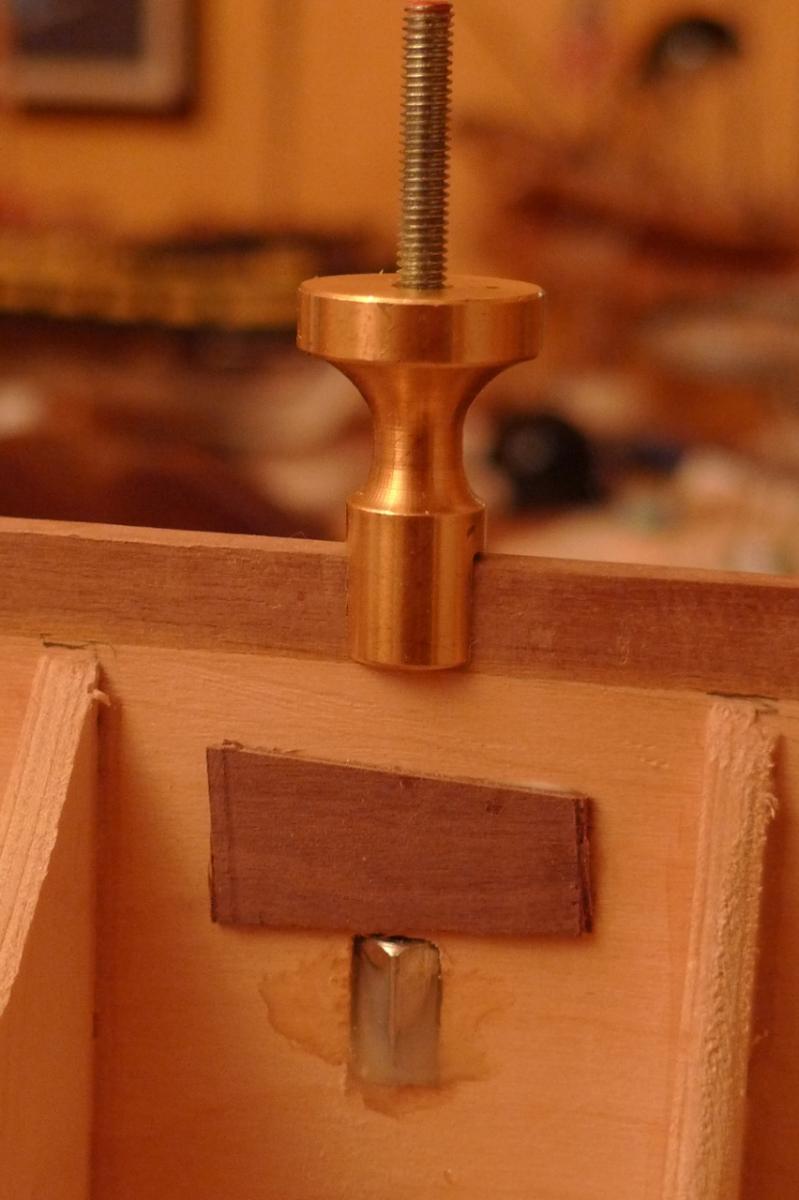
As I presently cannot work at my ship I take the opportunity to prepare the calliper blocks I am intended to use for adjusting the size of the gunports. I shall need some advise and in a couple of days I shall send you a detail drawing of what I mean. In the meantime, another of my sailrs... Regards, Pierre
-
Tremendous progress, Mobbsie! Pierre
-
HMS AGAMEMNON by PMG - Caldercraft
PMG replied to PMG's topic in - Kit build logs for subjects built from 1751 - 1800
I am now for a few weeks in the South of France and, of course, my shipyard is stopped. I was a little bit disappointed because I hoped to completely cover the hull with putty before leaving to have it absolutely dry when coming back. Unfortunately, the good putty I bought in Switzerland some years ago was almost completely dry and so I interrupted the process. I just bought here in France some putty that looks fine and I will test it soon. Pierre -
Have a nice W-E, Mobbsie and come back very angry to continue your Aggie. Pierre
-
HMS AGAMEMNON by PMG - Caldercraft
PMG replied to PMG's topic in - Kit build logs for subjects built from 1751 - 1800
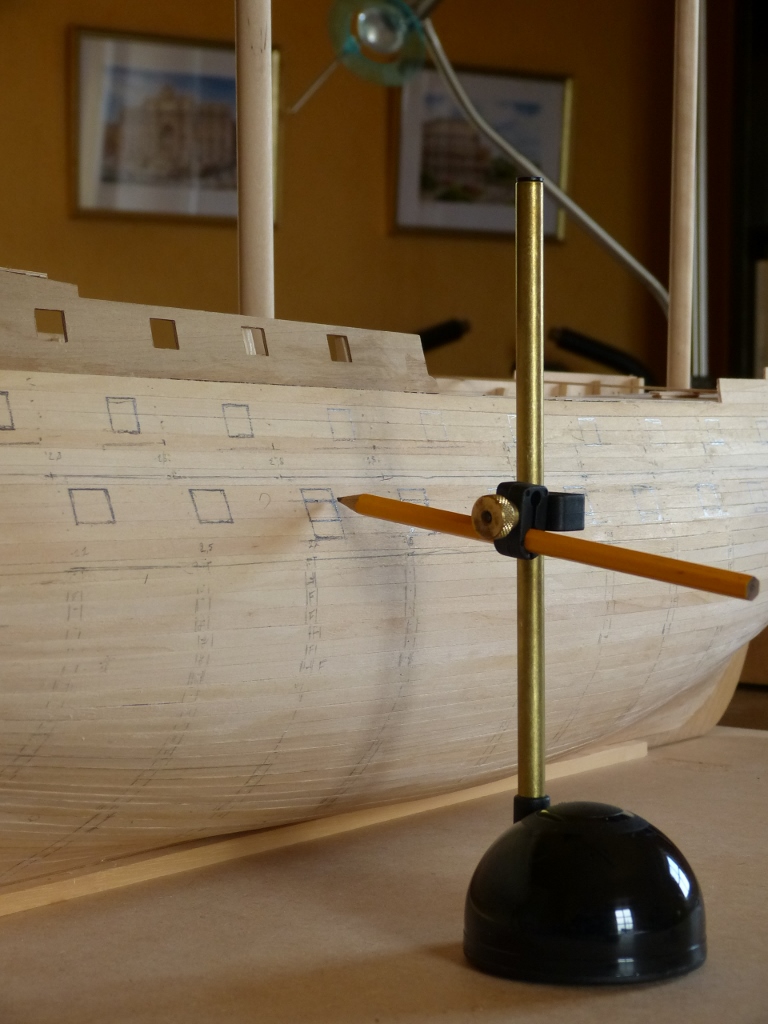
The building room is almost cleaned but I cannot wait final completion to continue my Aggamemnon. I told I was disappointed by the result obtained by using the template to (precisely) locate the gun ports on the walls. But, with the original drawings of Caldercraft, and using this very useful tool, no problem to master the situation. Just a question of patience. I relocated every gunport and sratrd to cut them off. I used the small drill you see on the next picture. Now, all holes are made, but, of course, not aligned. I can now start to put some putty on the hull, before sanding it. That's the next job. To spend the time, I give you here the picture of another of my crew members. This is a sailor in "sortie" dressing, just before inspection I suppose. Have a nice W-E. Pierre


-
Hello Mobbsie, I am back about the wheels of the gun carriages. I checked in Jean Boudriot's book and he is not speeking about a difference in diameter between front and rear wheels. Apparently, french ships have only one size of wheels. On another hand, I checked in Bryan Lavery's book and in "Arming british man-o-wars" and there it is clearly indicated that the front wheel of the carriage is defintively larger than the rear wheel. I suppose it should be the right choice. Good W-E, Pierre
-
Mobbsie, your progress is amazing as usual! Your guns are very very nice. I have just a question. Should the large wheel of the gun carriage not be at the front of the carriage instead of at the rear? I think it's so to take into account the curvature of the deck. But, I can be wrong too. I shall go and check in Jean Boudriot's 74 guns ship and I tell you. Have a good W-E. Pierre
-
HMS AGAMEMNON by PMG - Caldercraft
PMG replied to PMG's topic in - Kit build logs for subjects built from 1751 - 1800
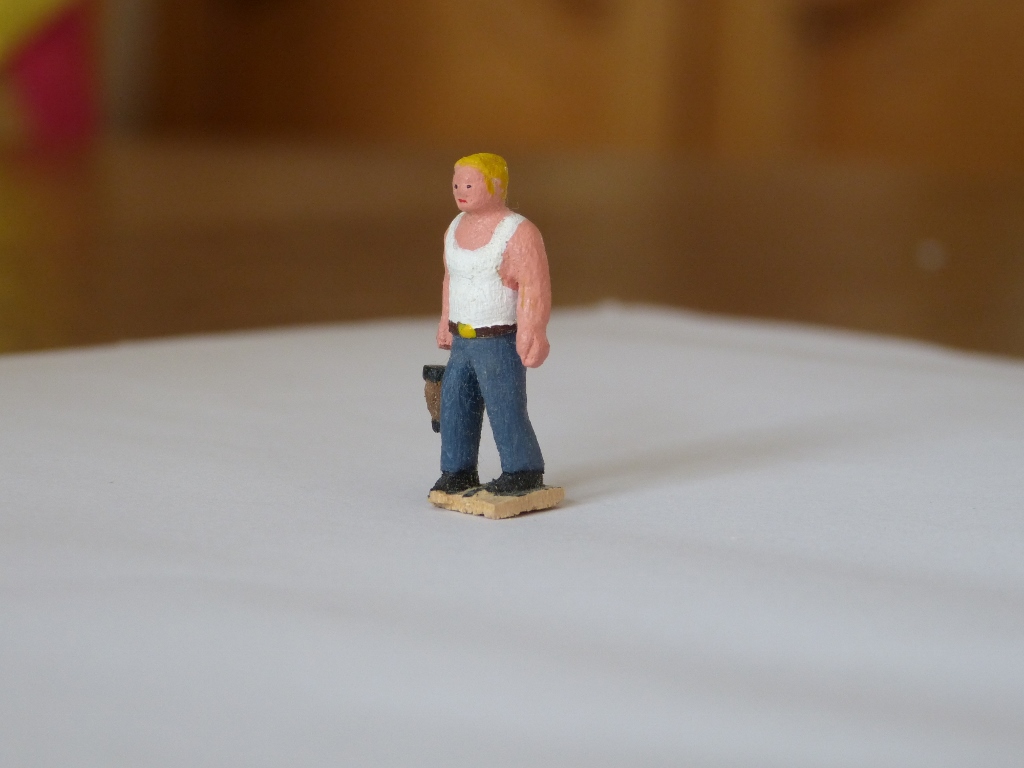
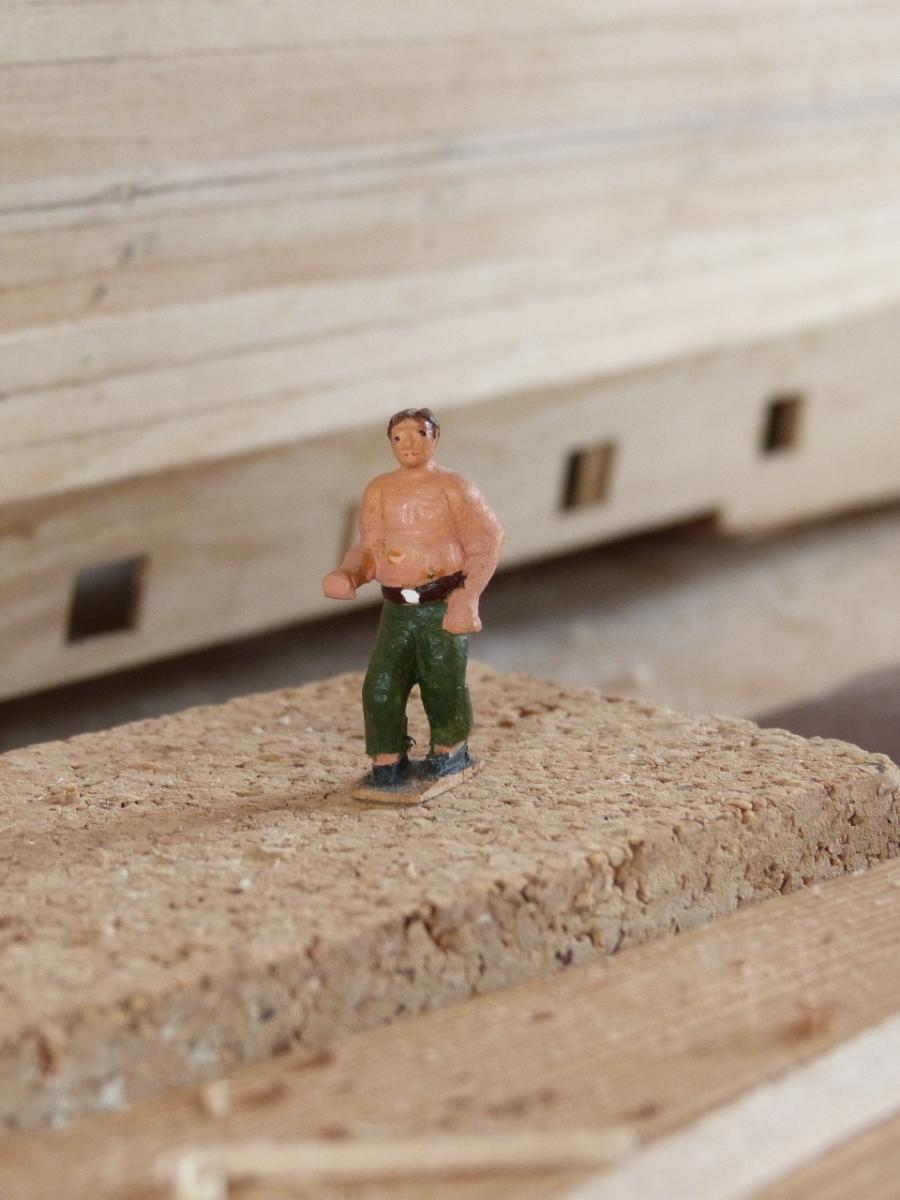
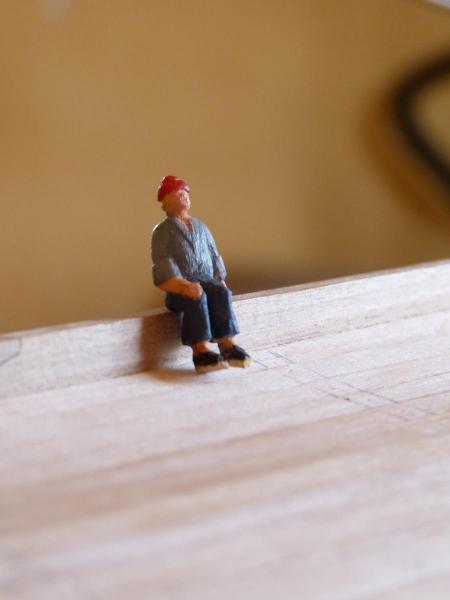
My construction yard is momently idle. I found it was too crowdy to begin the delicate phase of redrawing on the hull the gunports. So, I decided to clean the room and make more space available to deploy the drawings. They are very large end a lot of space is needed. Thus.... cleaning time. Any way, I post you the photography of another of my sailors. In actual size they are smaller than 3 cm and the photography is not so avantageous for them. Have a good and "constructive" W-E. Here we are in the snow again. Pierre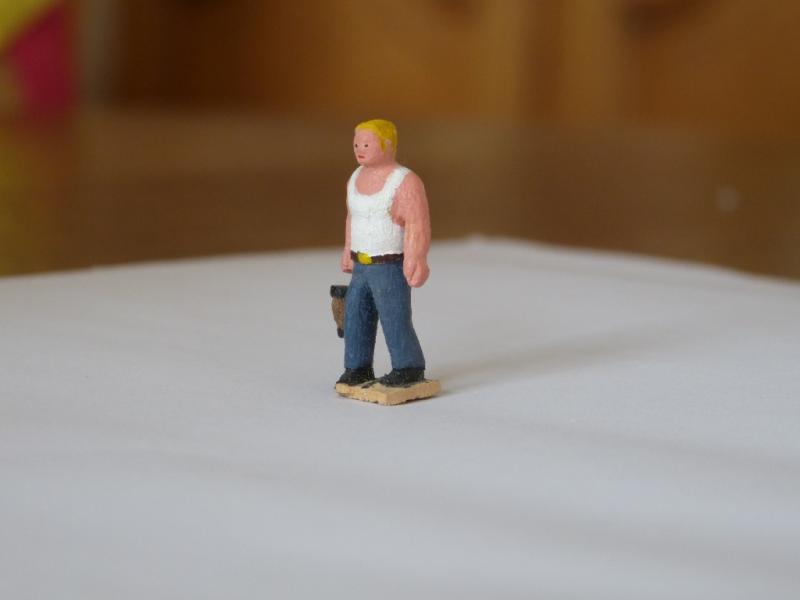
-
Very nice Mobbsie. The jig is a great idea. Pierre
-
HMS AGAMEMNON by PMG - Caldercraft
PMG replied to PMG's topic in - Kit build logs for subjects built from 1751 - 1800
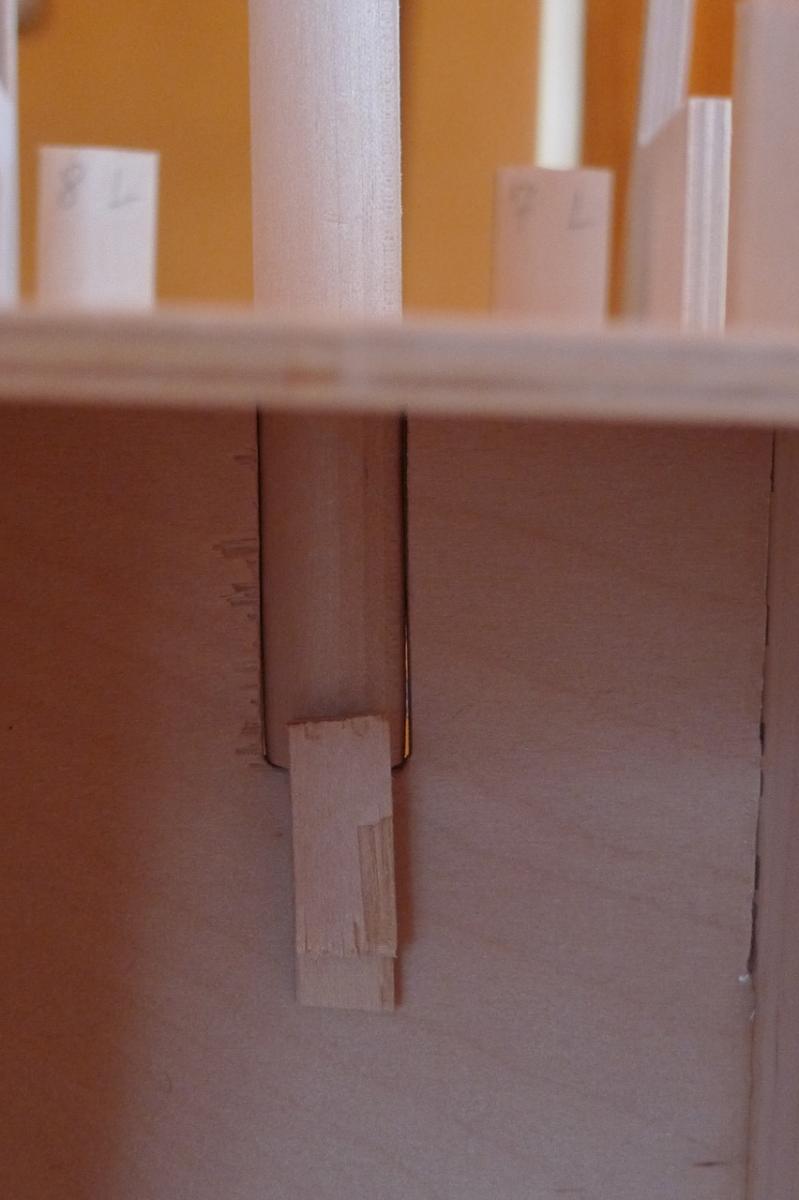
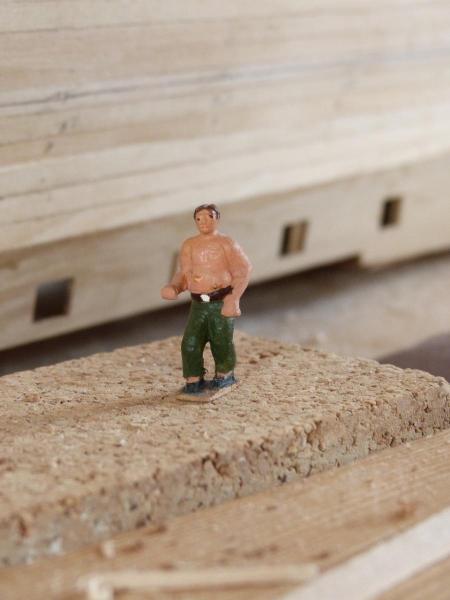
I started drawing the gunports on the walls using the supplied template. And I am not happy at all with the result. No problem in the longitudinal direction, but, big discrepancies against the drawings in height. I measured carefully. The upper deck level is correct: 180mm from the keel. For the gunports I measure sometimes differences a big as 2 or 3 mm. Hopefully, I still have the position of the two gundecks and I can check against the height of the port against a gun. I am intended to rechck every level against the official drawings using that useful tool with a pencil to draw the waterlines. Another "precision" work in sight before starting drilling the ports... Mobbsie, I checked the masts and I dry fitted them again. To avoid any problem in the lateral size you have seen that, at an early stage, I added small pieces of wood on the sides of the false keel. In the side view, my foremast lies perpendicular to the keel, what's correct. The mainmast and the mizzenmast have a certain rake (backwards). I measured it, and they have exactly the same, what's also correct. I have to add, that at the beginning of the construction I cared for and I slighty sanded the slots to be sure to achieve the result. Anyway, its important that the foremast should make a right angle with the keek ans that the two others have the same rake. Here is a third crewmember I made. A kinf of petty officer watching the construction with the hands in the pockets...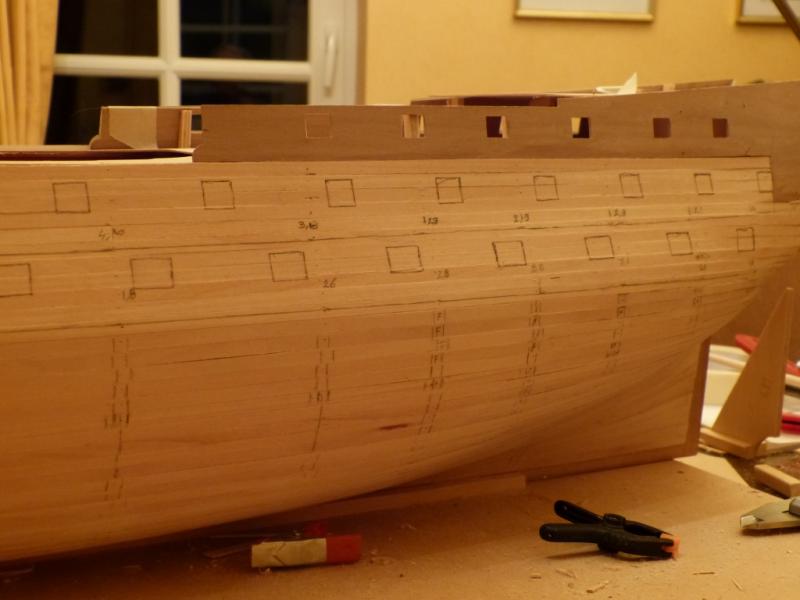

-
HMS AGAMEMNON by PMG - Caldercraft
PMG replied to PMG's topic in - Kit build logs for subjects built from 1751 - 1800
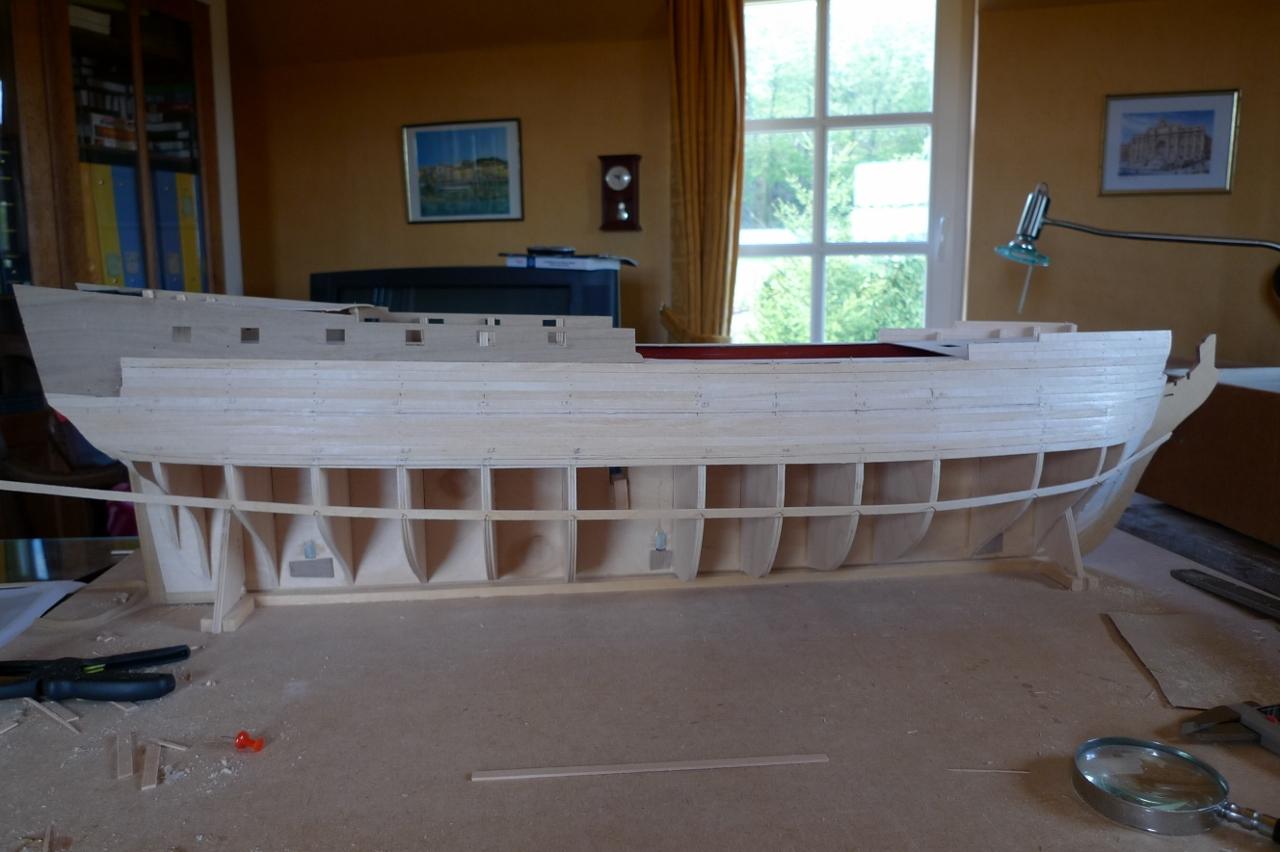
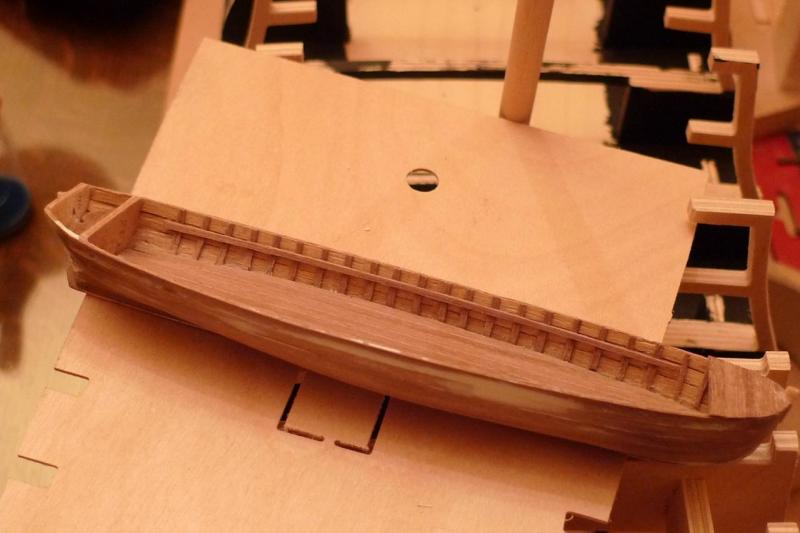
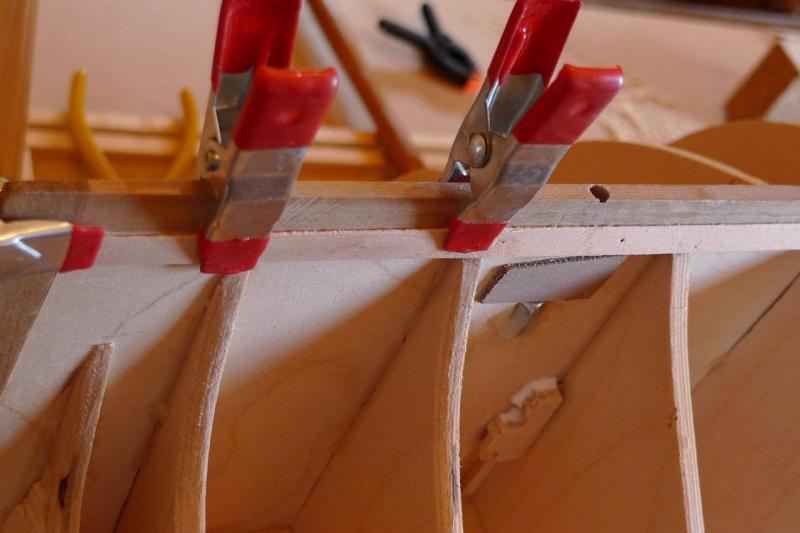
I am definitely the slowiest builder in the world, but here are some progress. I planked the first curve at the stern counter. I leave the second one for later because parts 80 are protruding and should make the sanding of the hull more difficult. (But, I pinned temporarly the first part 80 to set the limits). Then I coated completely the hull with diluted PVA. Here is the present status, awaiting for the template to position the gunports. This is the first sailor I made, about 25 years ago. And here is the second. The photographies are not too good, but they are very small and I am obliged to use macros. Pierre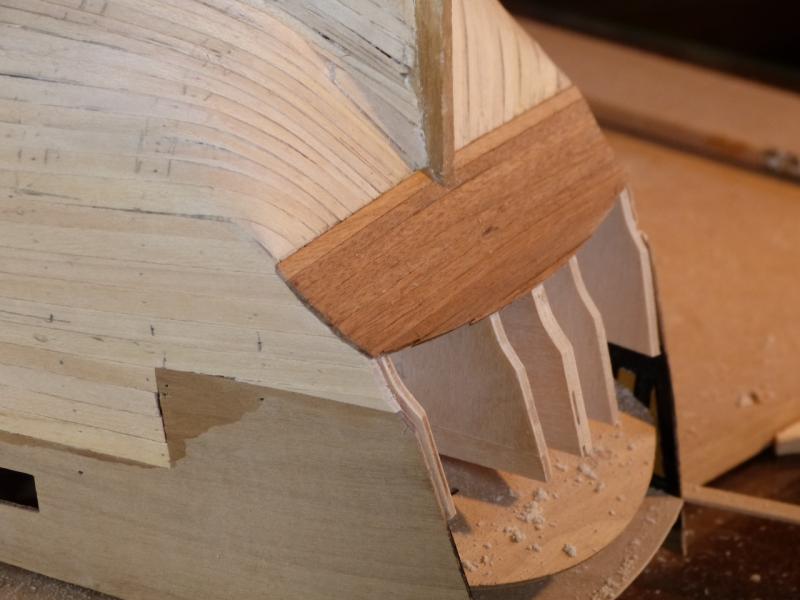

-
Hi Mobbsie, Nice work! You are building like a rocket... If you continue like that she will be sailing before Christmas. About the dip (not very visible on your photographies, it comes from the matching of the beautiful underwater lines (HMS Agamemnon was famous for her sailing qualities) and the heavy guns platform. Quite a challenge for the designers! But, I suppose that changes of curvature along a streamline were not allowed. Pierre
-
Hi Rob, Nice to see you again. Your Aggie is beautiful and inspired me to start building mine. Pierre
-
HMS AGAMEMNON by PMG - Caldercraft
PMG replied to PMG's topic in - Kit build logs for subjects built from 1751 - 1800
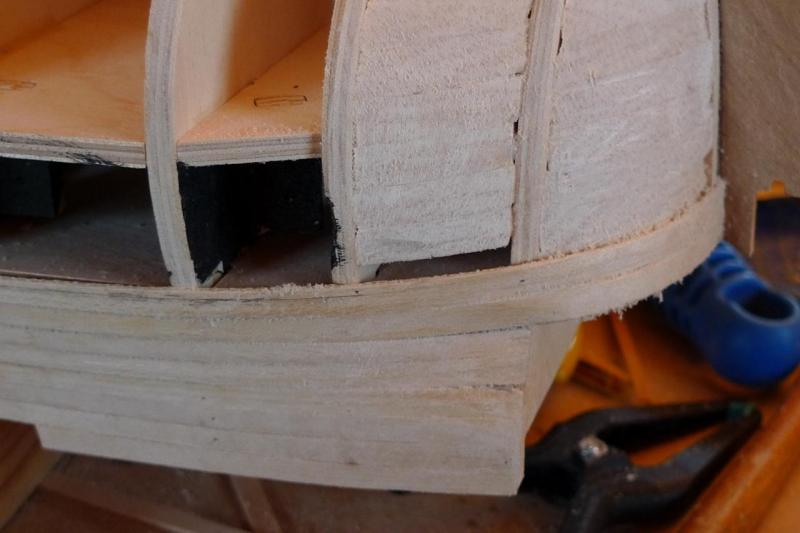
Hi Mobbsie, Thank you for the advise. I am now finishing some details (filling small holes and stealers), after that I am intended to put a layer of diluted PVA and I shall follow your idea. I shall use the template, position the gunports and eventually make four holes per port. And, after that, sanding... Anyway, with the weather we have here, there is no chance to go outside for sanding, and I am not sure my wife should appreciate a big sanding operation inside... Hello Karin, I had also some difficulty with the second bulkhead. But, no question about, you have to align the top with the gundeck. The easiest way ins to make a dryfit, with the foremast and the bowsprit. Don't care too much about the bottom of the bulkhead. It becomes very thin and will, anyway, be affected by the preparation of the edges. By the way, putting a filling block (in balsa) is always a good idea, and the question of the bottom of the bulkhead is automatically solved. Here are some pictures: First, the dry fit with the foremast and the bowsprit in place. Then, the filler block, the deck well in line on all the length and the sanding of the bottom of bulkhead Nr2. The next picture shows more or less the same. Next, a small useful trick. Add small pieces of scrap wood on both sides of the masts. They will so remain straight in any circumstances. I should like to come back on something that Mobbsie pointed in his Log. There is a little problem with bulkhead Nr4. I thnk it is necessary to "refill" it a little bit (not too much, less than 1 mm) below the "round" part. Otherwise a hollow appears in the hull. You can try to find the right thickness by checking with a flexible plank. If you encounter a "double curvature", it's wrong. The curvature has to evoluate smoothly and should never change of sense. The hollow is visible on the next picture. Try to avoid it taking care in advance (what I did'nt...) The sailors are home-made. I started making them about 20 years ago, and from time to time I work to. They are now 12. A 13th is always waiting for painting and a 14th is still far to be finished. I will progressively let you meet all the band... Pierre

-
HMS AGAMEMNON by PMG - Caldercraft
PMG replied to PMG's topic in - Kit build logs for subjects built from 1751 - 1800
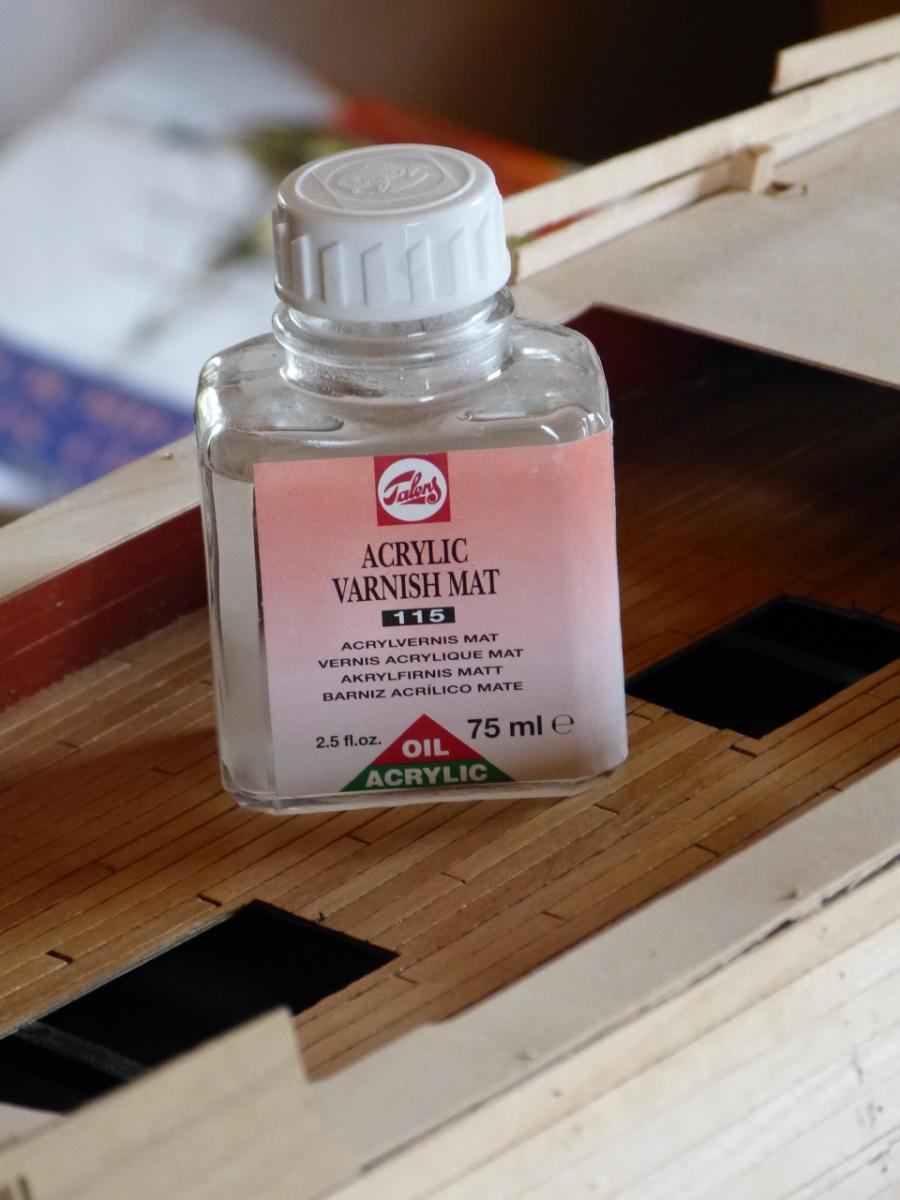
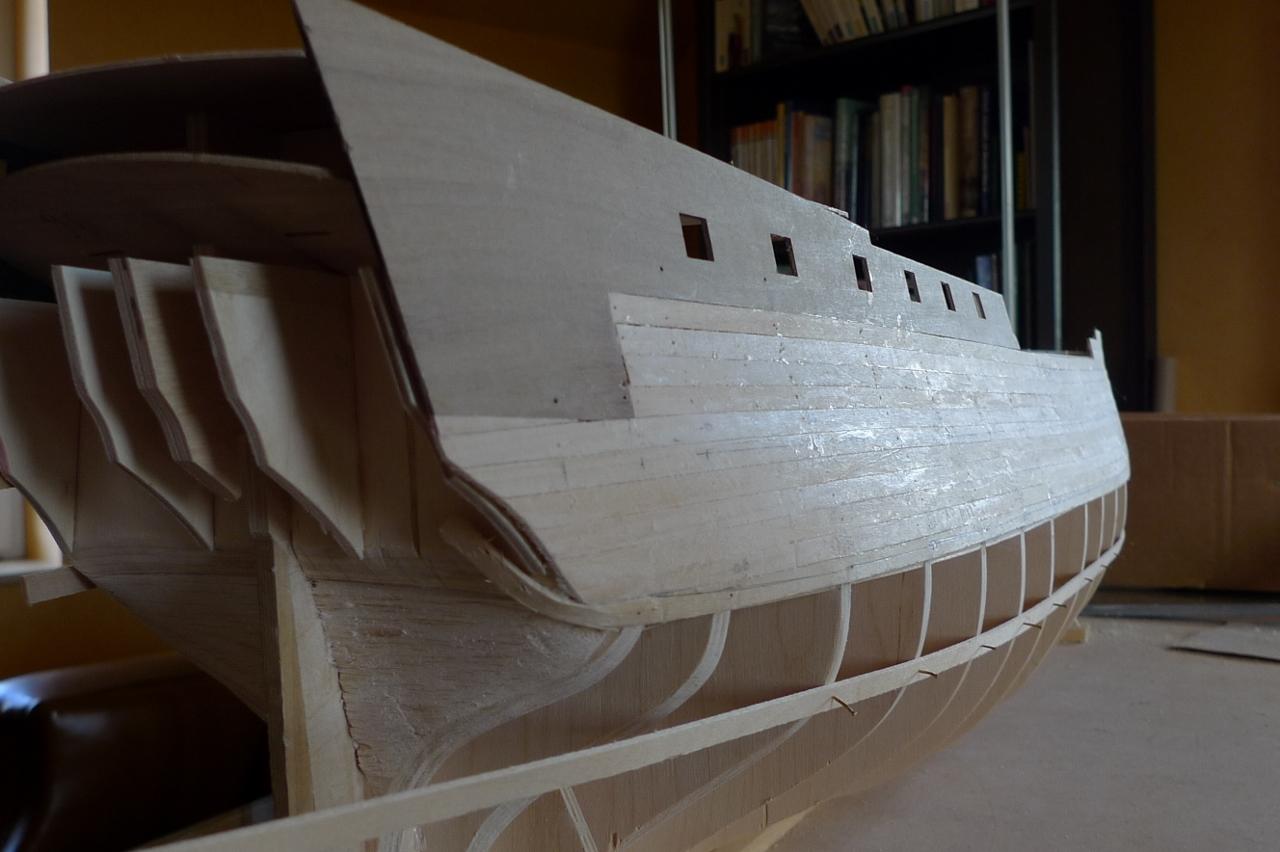
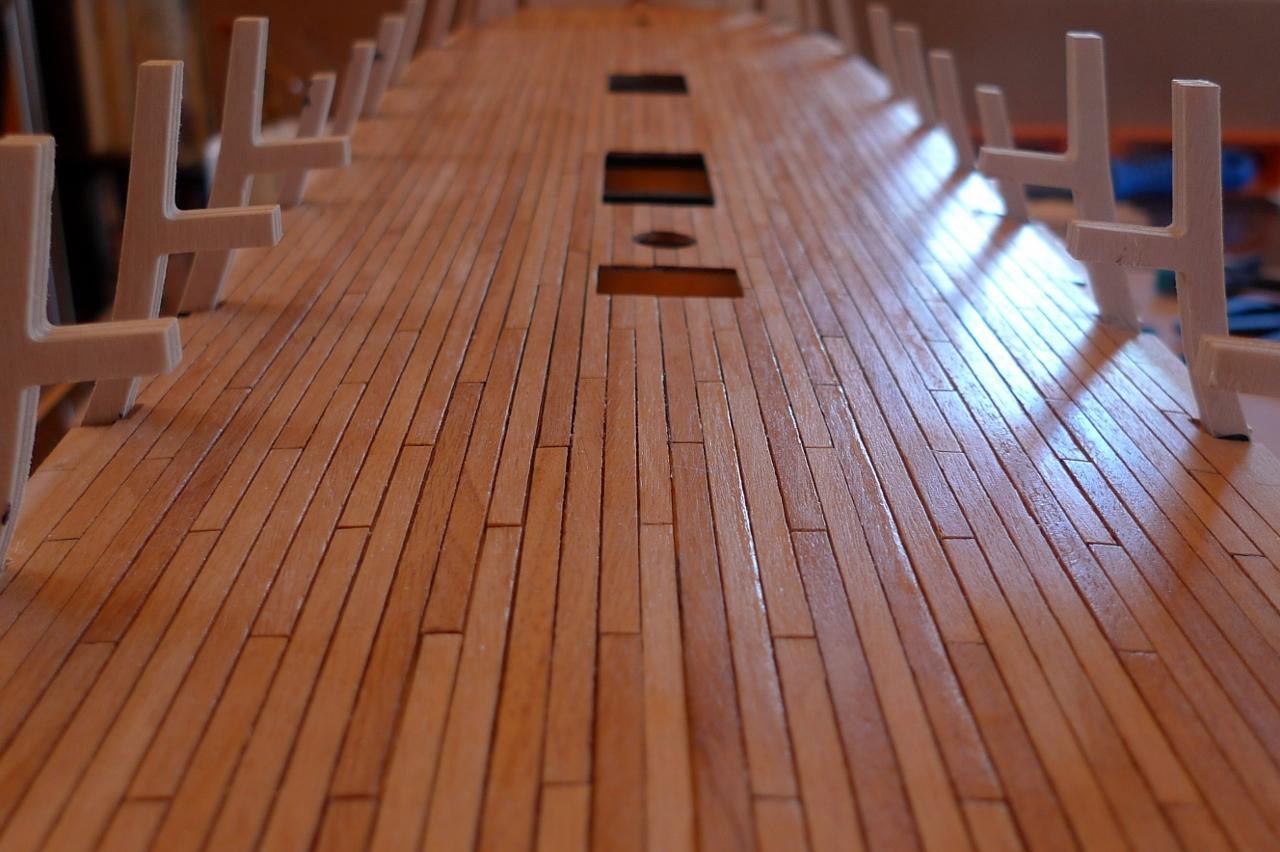
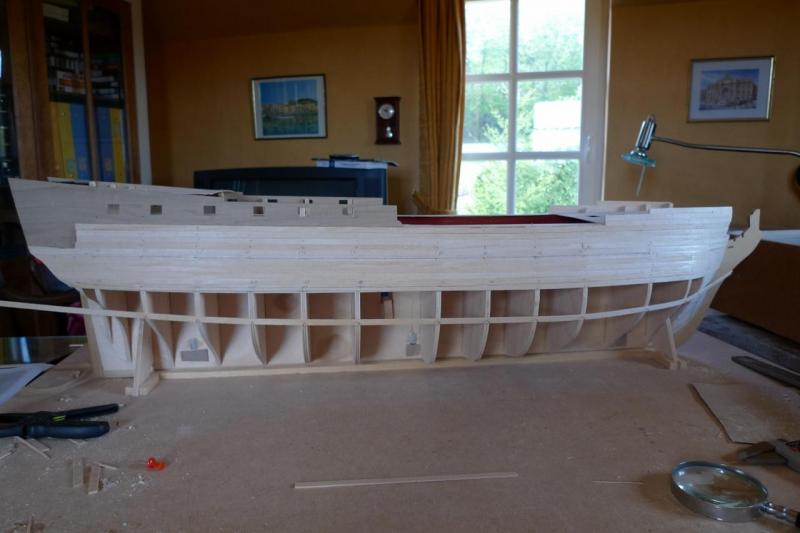
Thank you for all comments. Here is a picture of the varnish I am using. It's normally used on paintings, but I found the finish was very good . Not so glossy as it appears on the first photography of the upper gundeck (may be an effect of the flash). Another (little) tip. As I completed the first planking, I removed the front part of the building board. I can so maintain the ship square. It can be useful later. I am now finishing the last corrections to the hull before starting the sanding. I have here a little question. How do you protect the markings of the two gun decks? I am affraid they will disappear during the sanding operation. Bye, Pierre
-
HMS AGAMEMNON by PMG - Caldercraft
PMG replied to PMG's topic in - Kit build logs for subjects built from 1751 - 1800
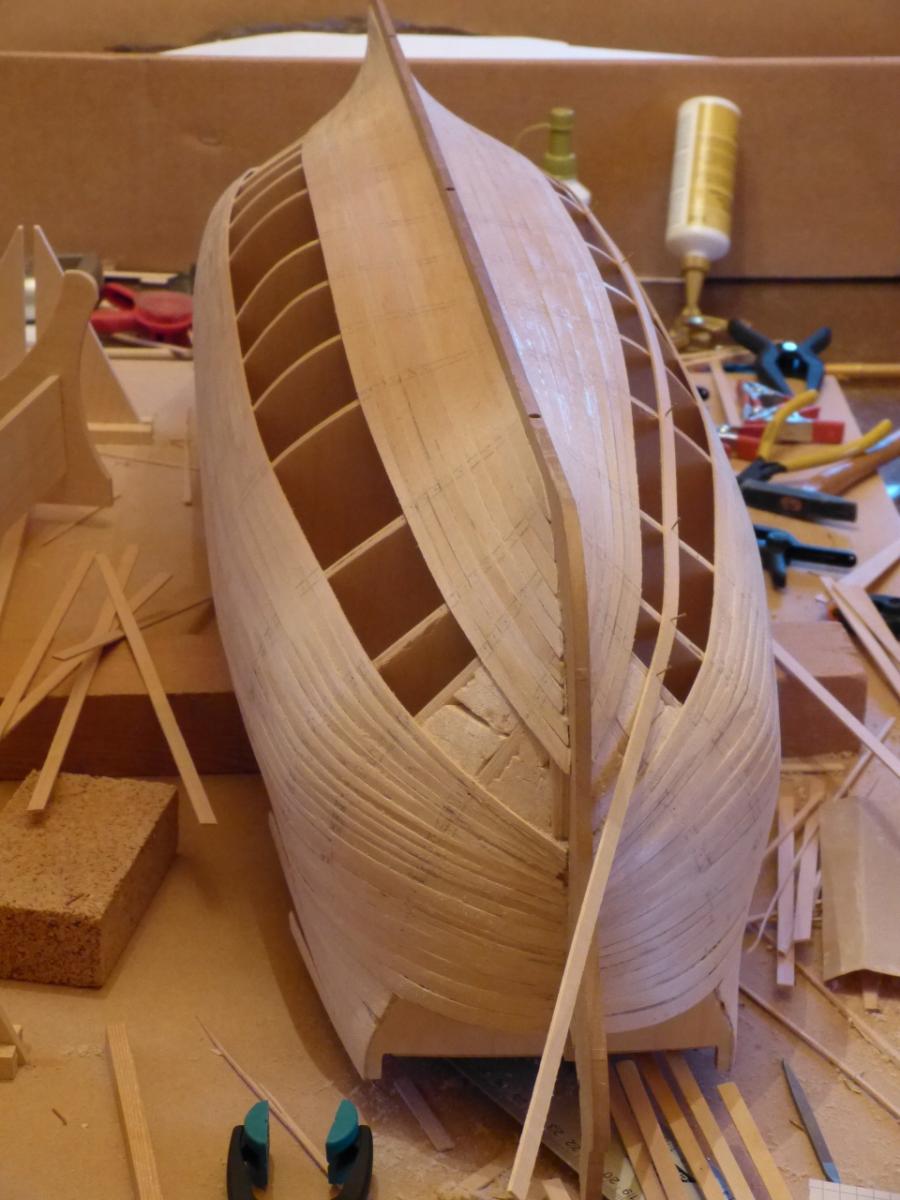
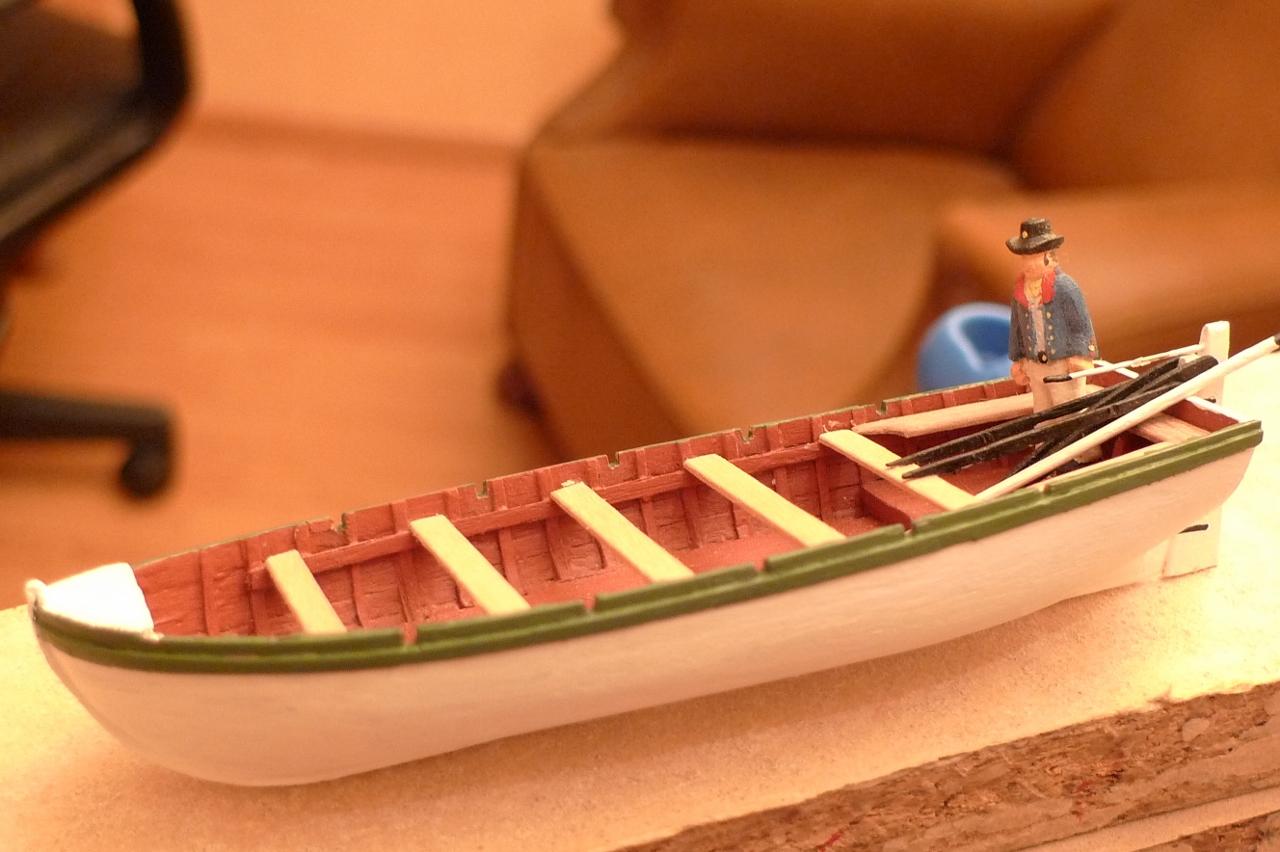
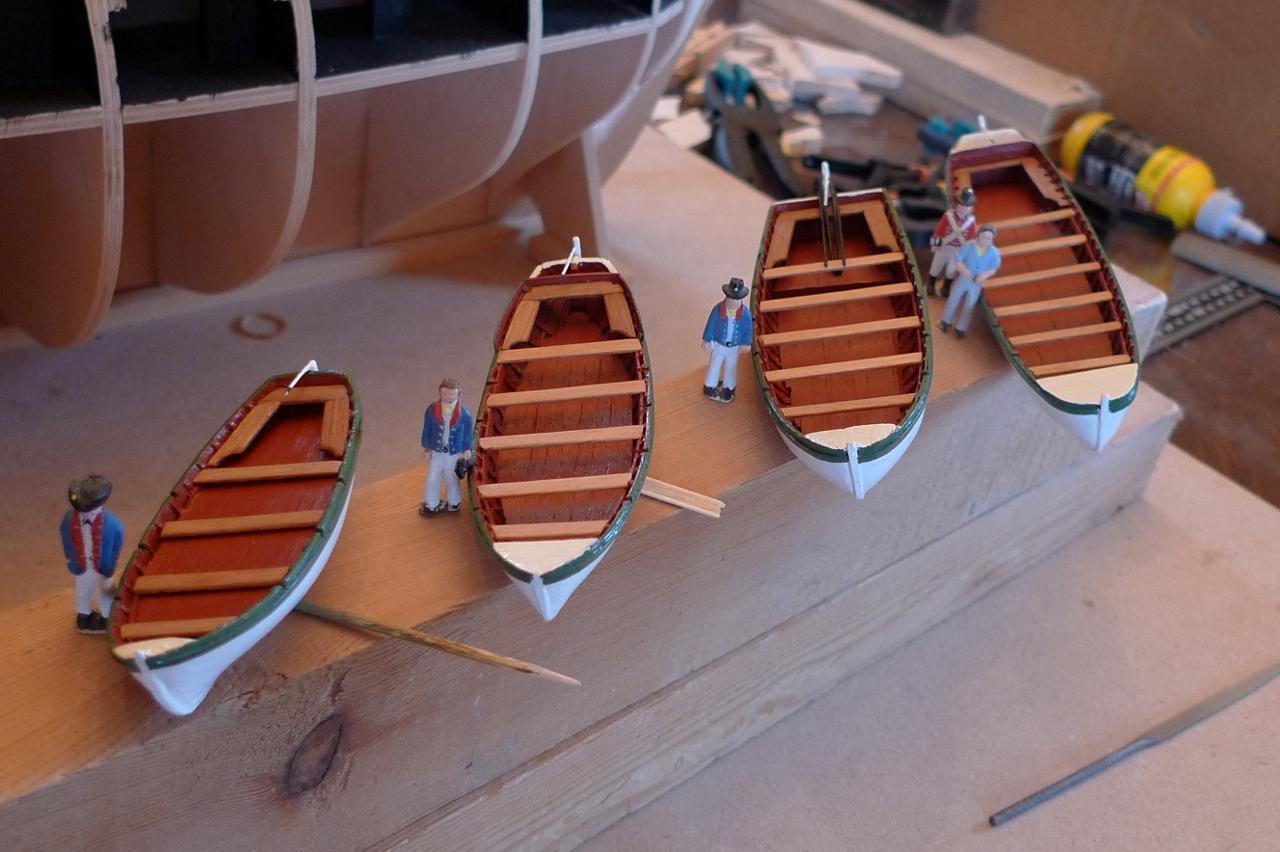
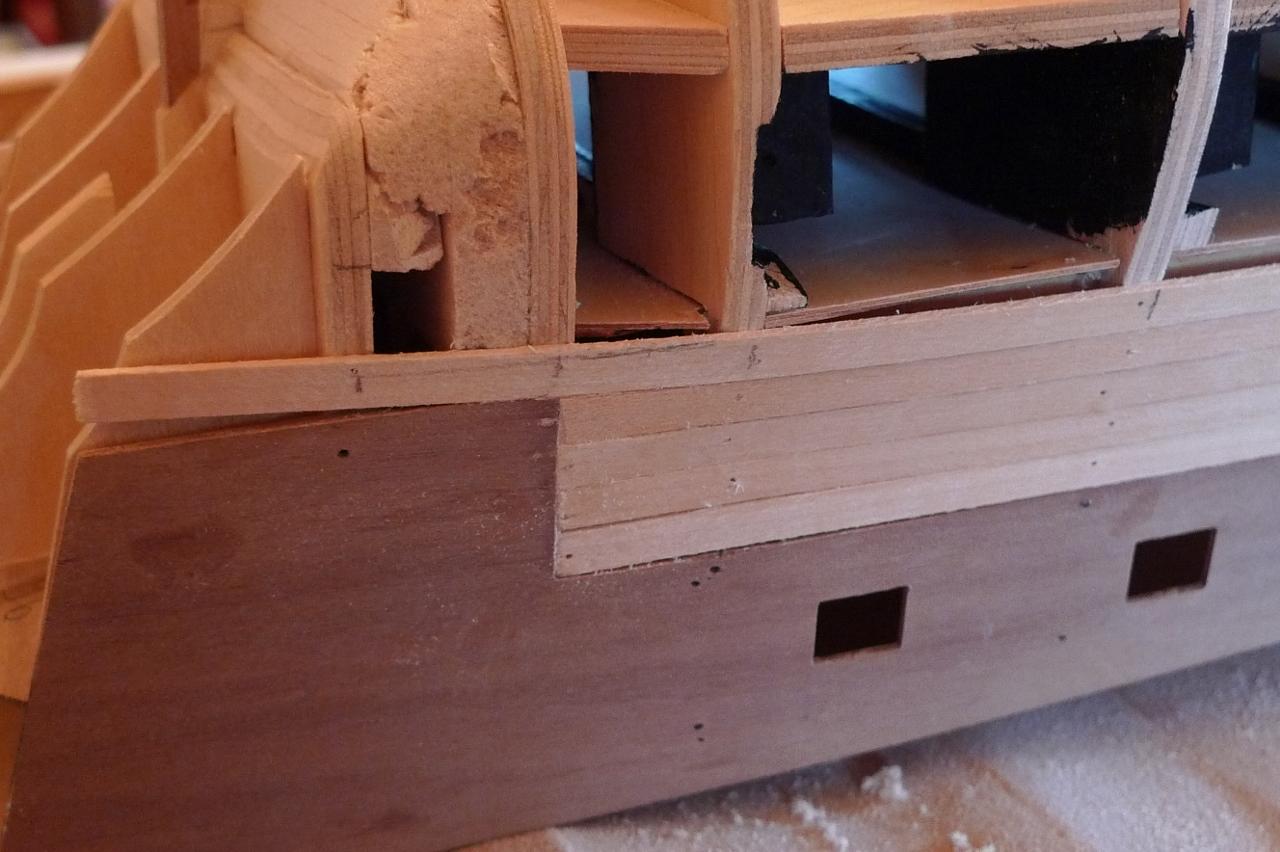
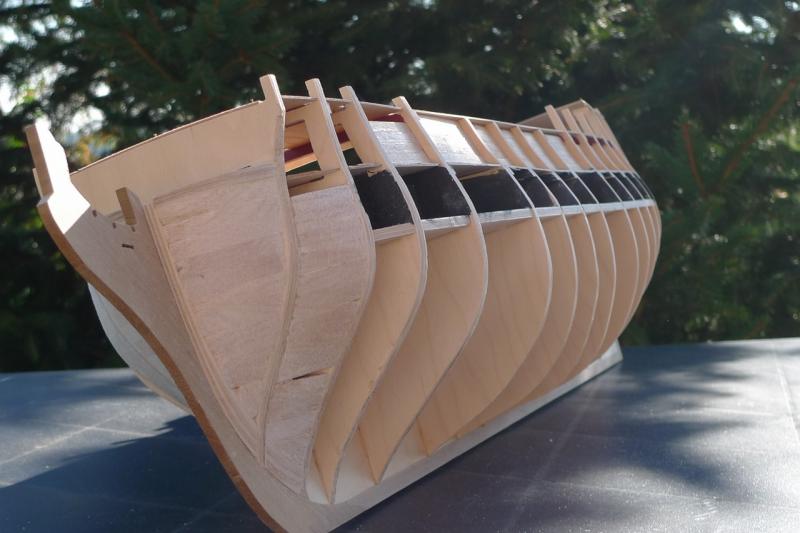
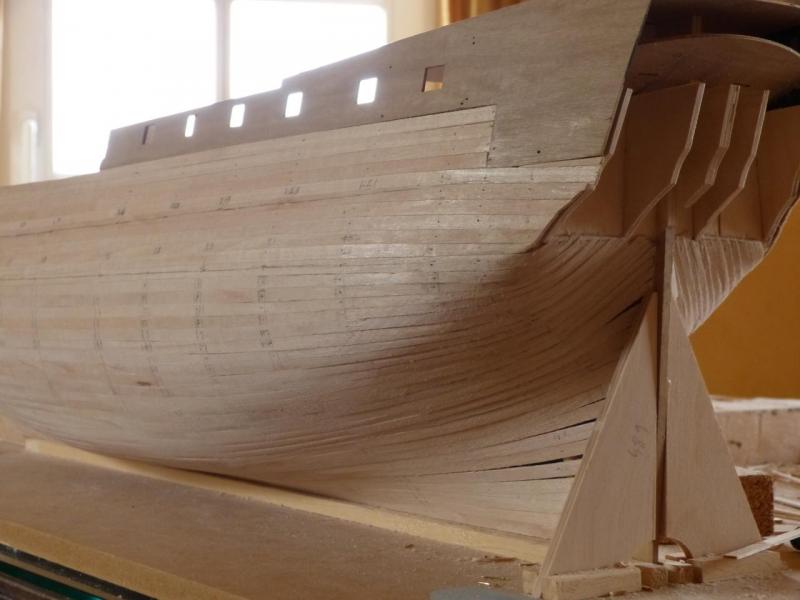
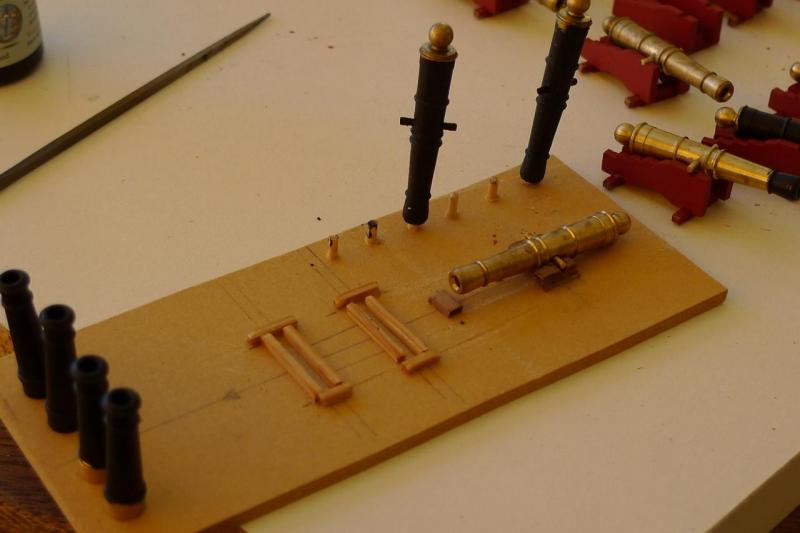
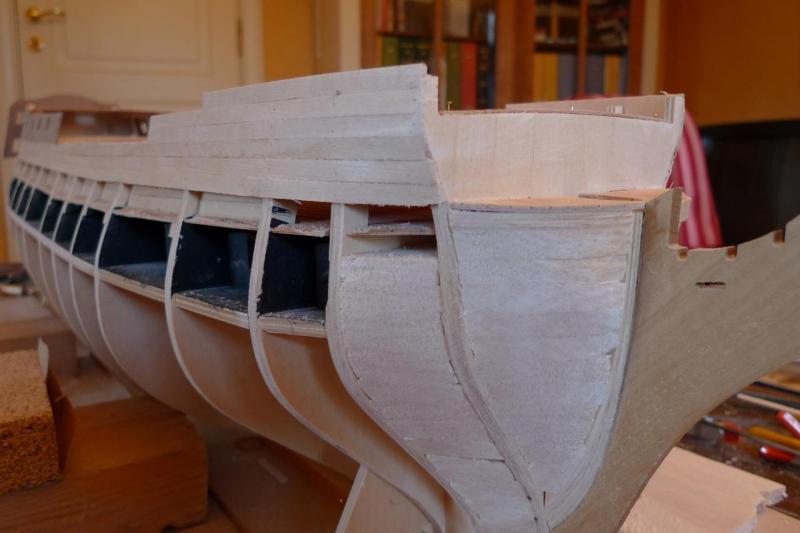
First planking nearly completed, When I was not at home, I started other "small" activities, like the boats, Here is the launch, and, here all four boats. I started also to make the guns. Here is a rig I made for the construction of the carriages. This is the present status of my ship. First planking almost completed. It still need some local corrections and then.... sanding.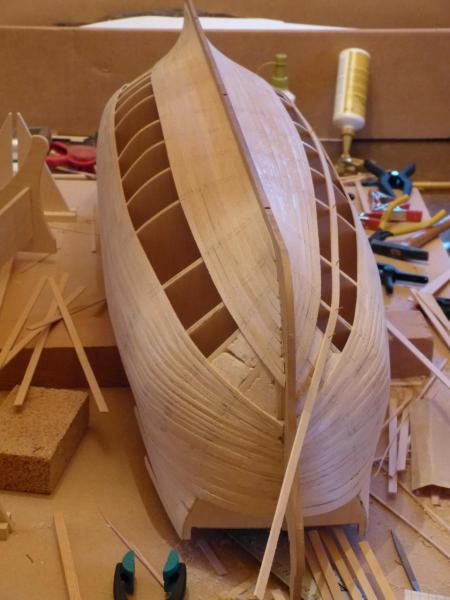


-
HMS AGAMEMNON by PMG - Caldercraft
PMG replied to PMG's topic in - Kit build logs for subjects built from 1751 - 1800
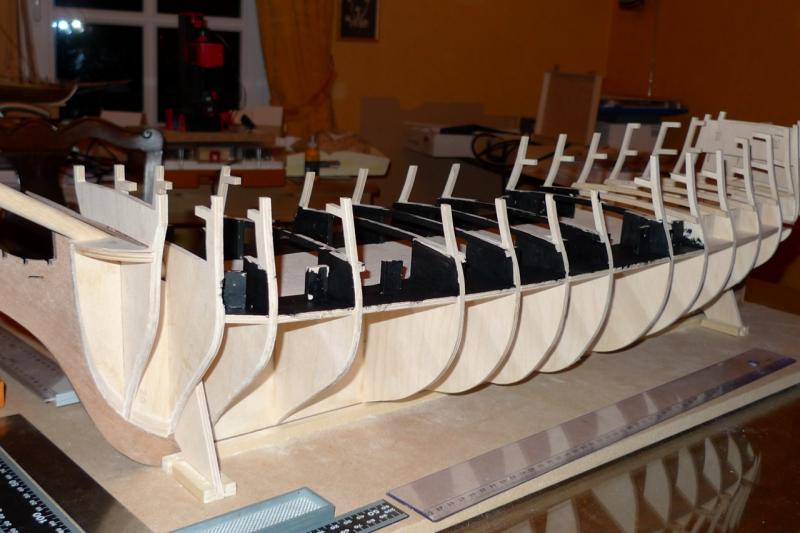
More pictures. Continuing the first planking. And again, Starting the rabbet plank,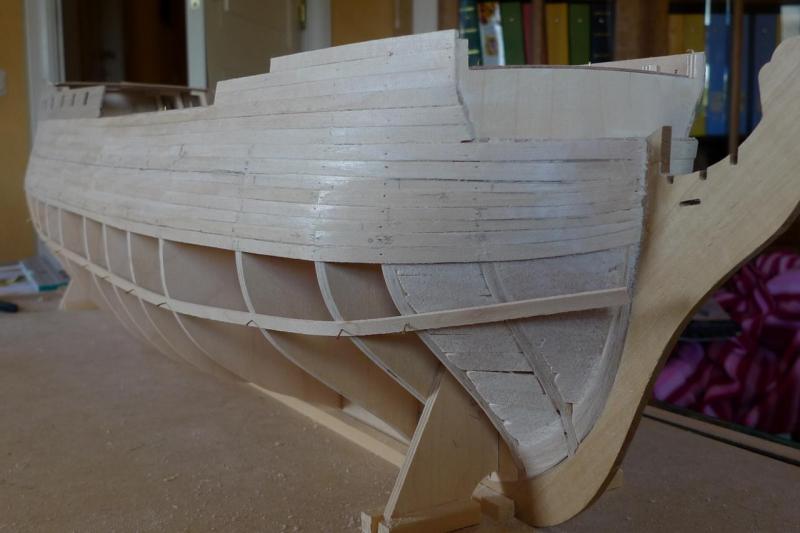

-
HMS AGAMEMNON by PMG - Caldercraft
PMG replied to PMG's topic in - Kit build logs for subjects built from 1751 - 1800
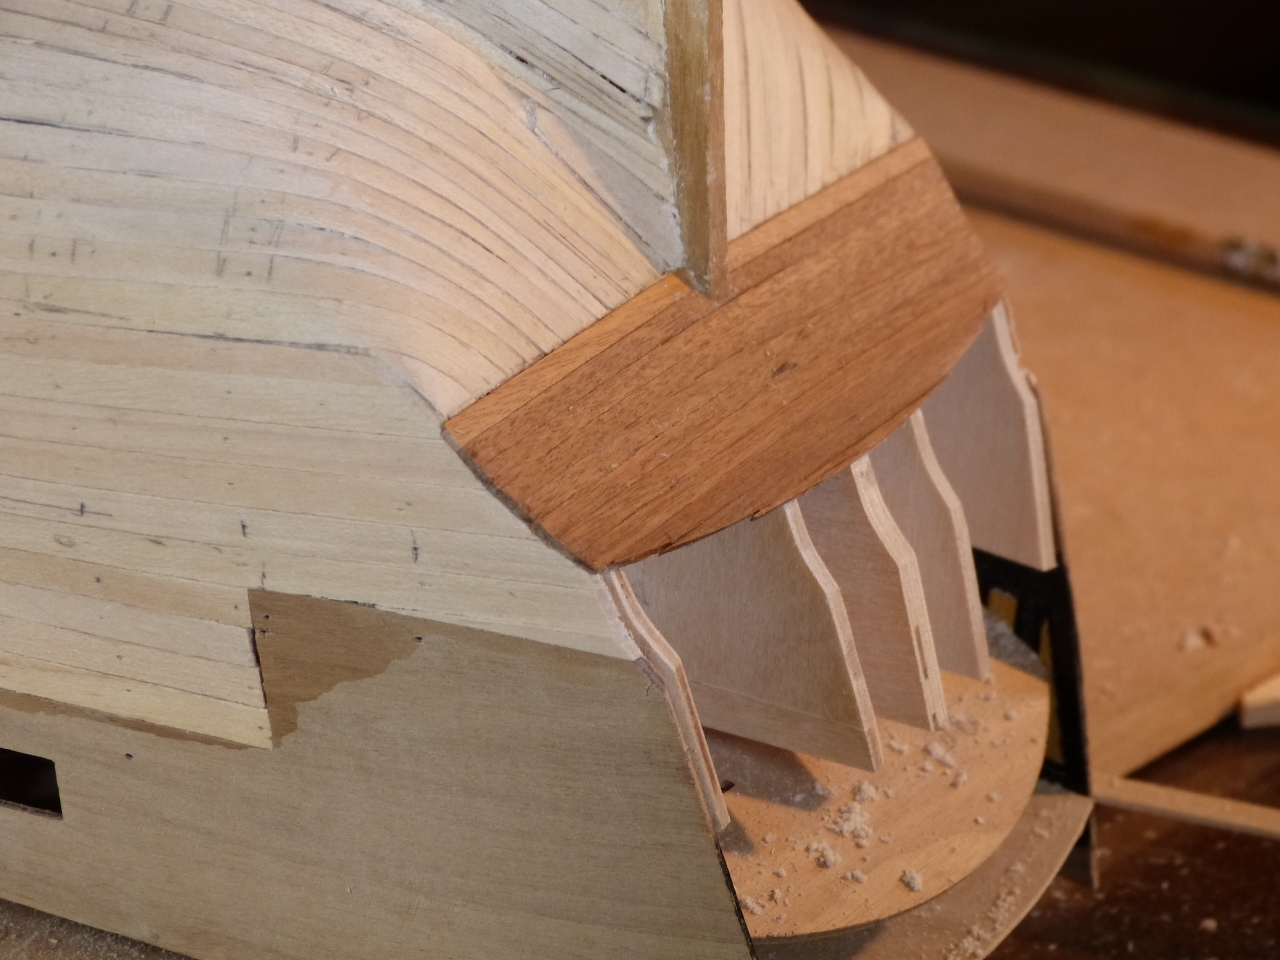
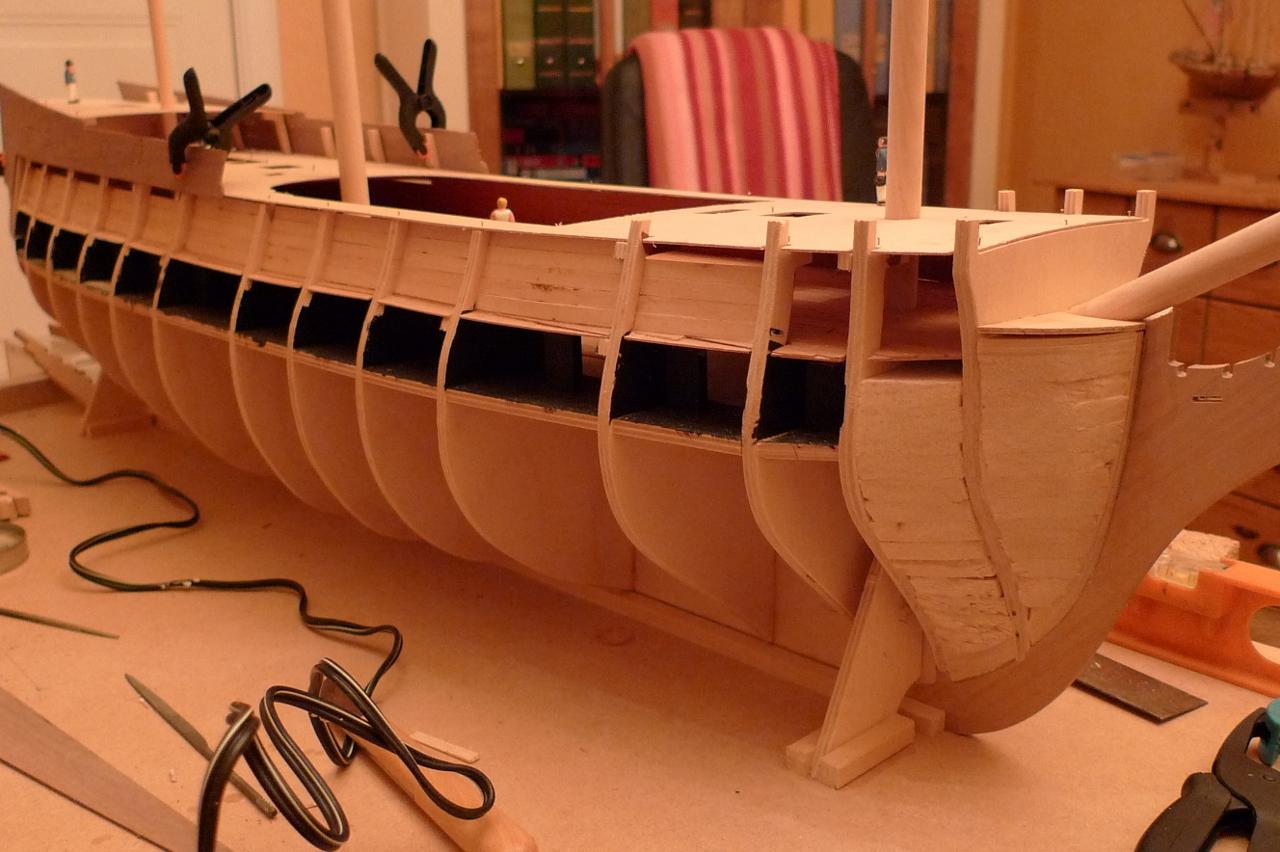
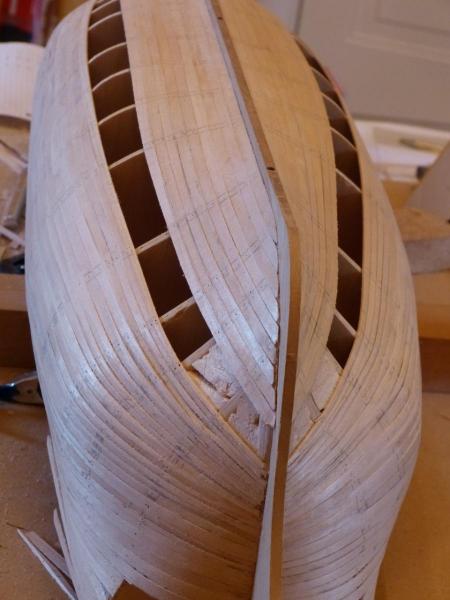
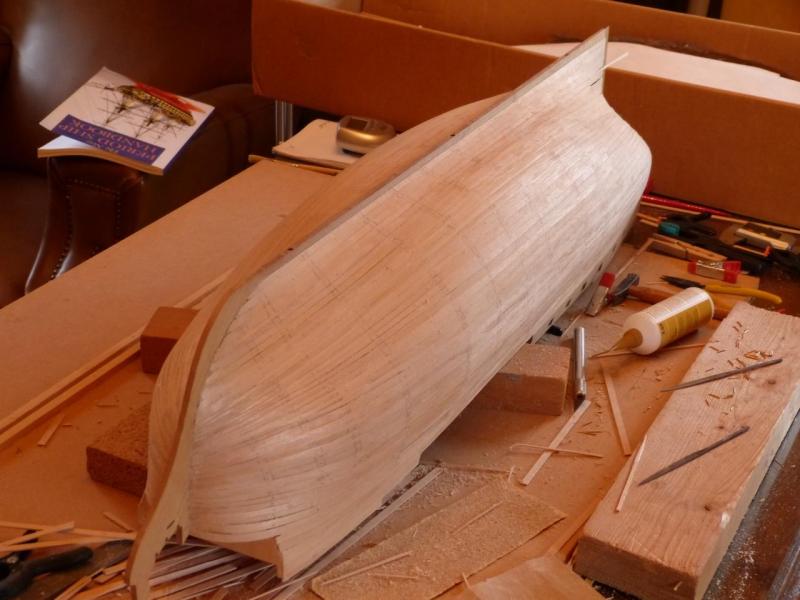
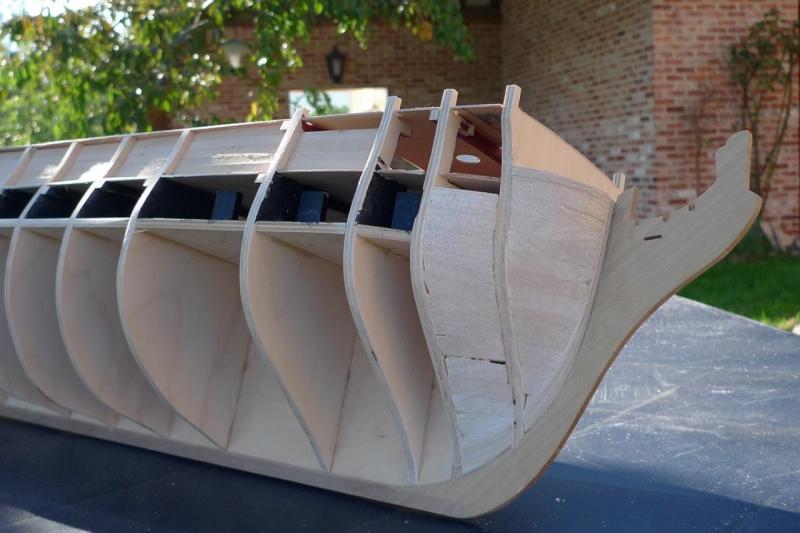
Thank you, David. Here are some more pictures. As you see, I used balsa filler blocks at both ends. Beginning of the first planking. And, some time later,

-
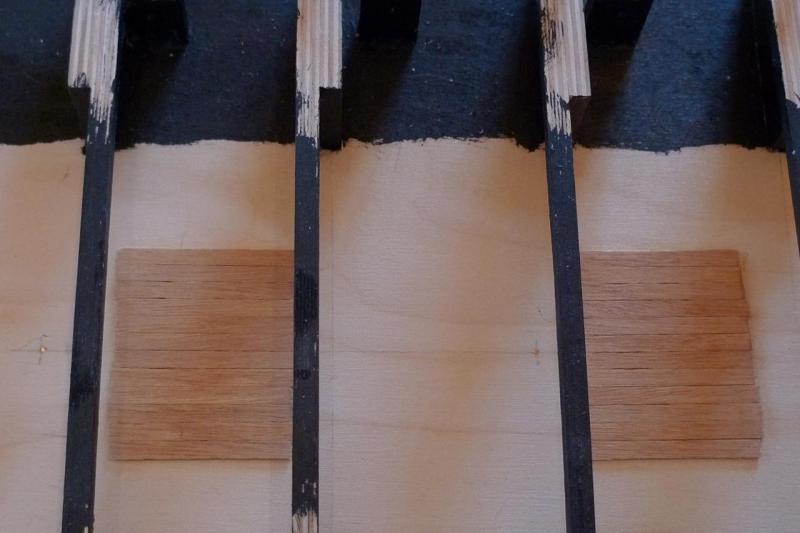
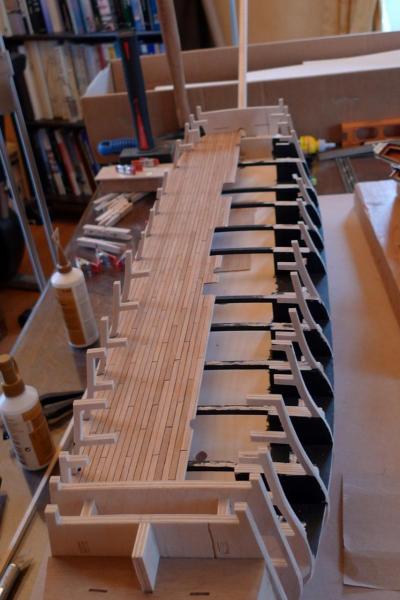
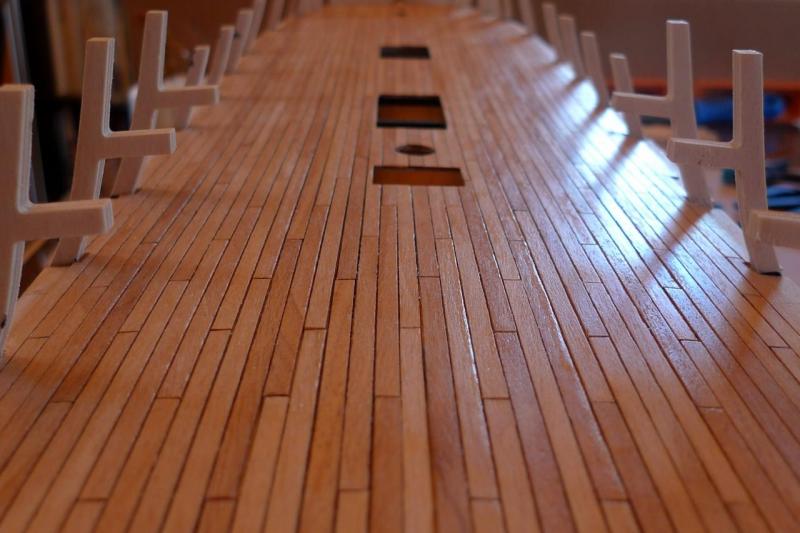
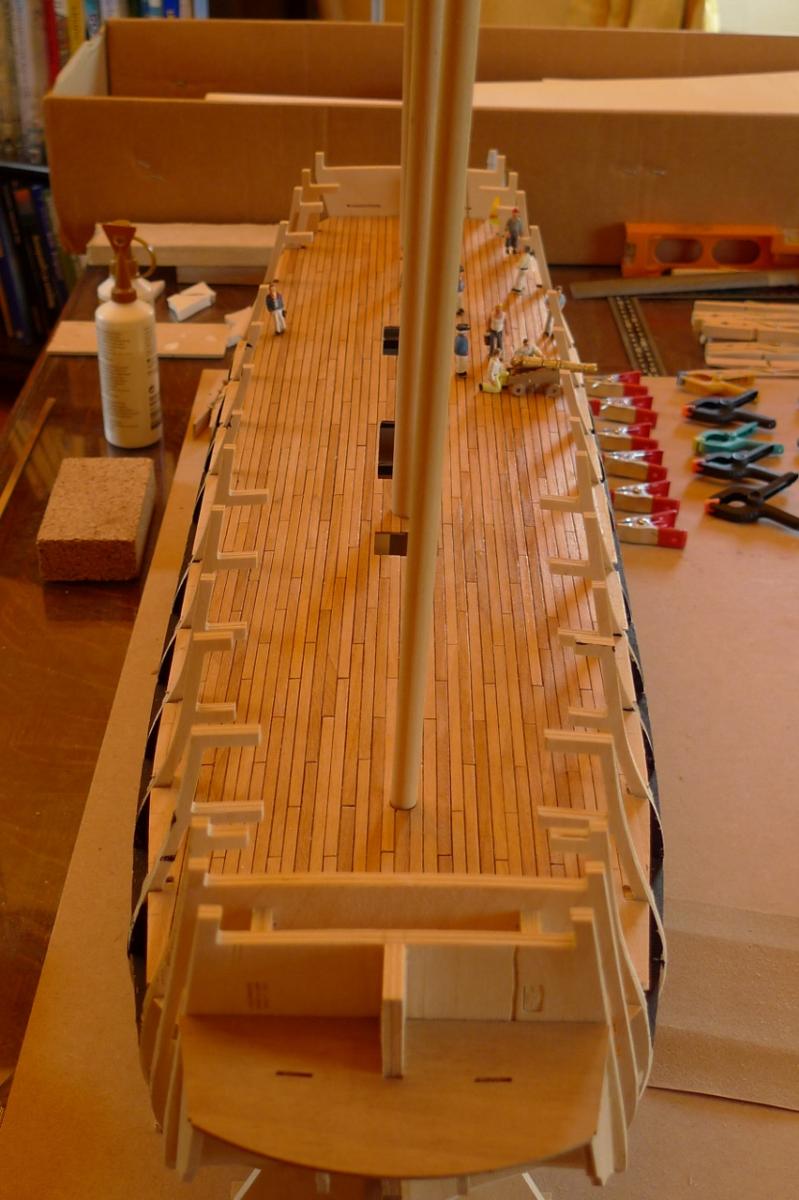
Hello, I am glad to be back on the new forum after a long silence. I am a very very slow builder. I started my Aggie in 2010... Here are somme pictures of some previous steps and the present situation. I am making a first test to see if I can properly use the new features of the site. It seems it works. You see here the way I installed (temporarly) the pedestals. Here, some planking on the main gun deck, in case they should be visible from above. First half of the upper gundeck in position. Planking of the upper gundeck completed. The same varnished. I stop now. This is a first test. More pictures are coming later. I just finished the first plankig of the hull.