HOLIDAY DONATION DRIVE - SUPPORT MSW - DO YOUR PART TO KEEP THIS GREAT FORUM GOING! (Only 69 donations so far out of 49,000 members - Can we at least get 100? C'mon guys!)
×


glennreader
-
Posts
136 -
Joined
-
Last visited
Content Type
Profiles
Forums
Gallery
Events
Everything posted by glennreader
-
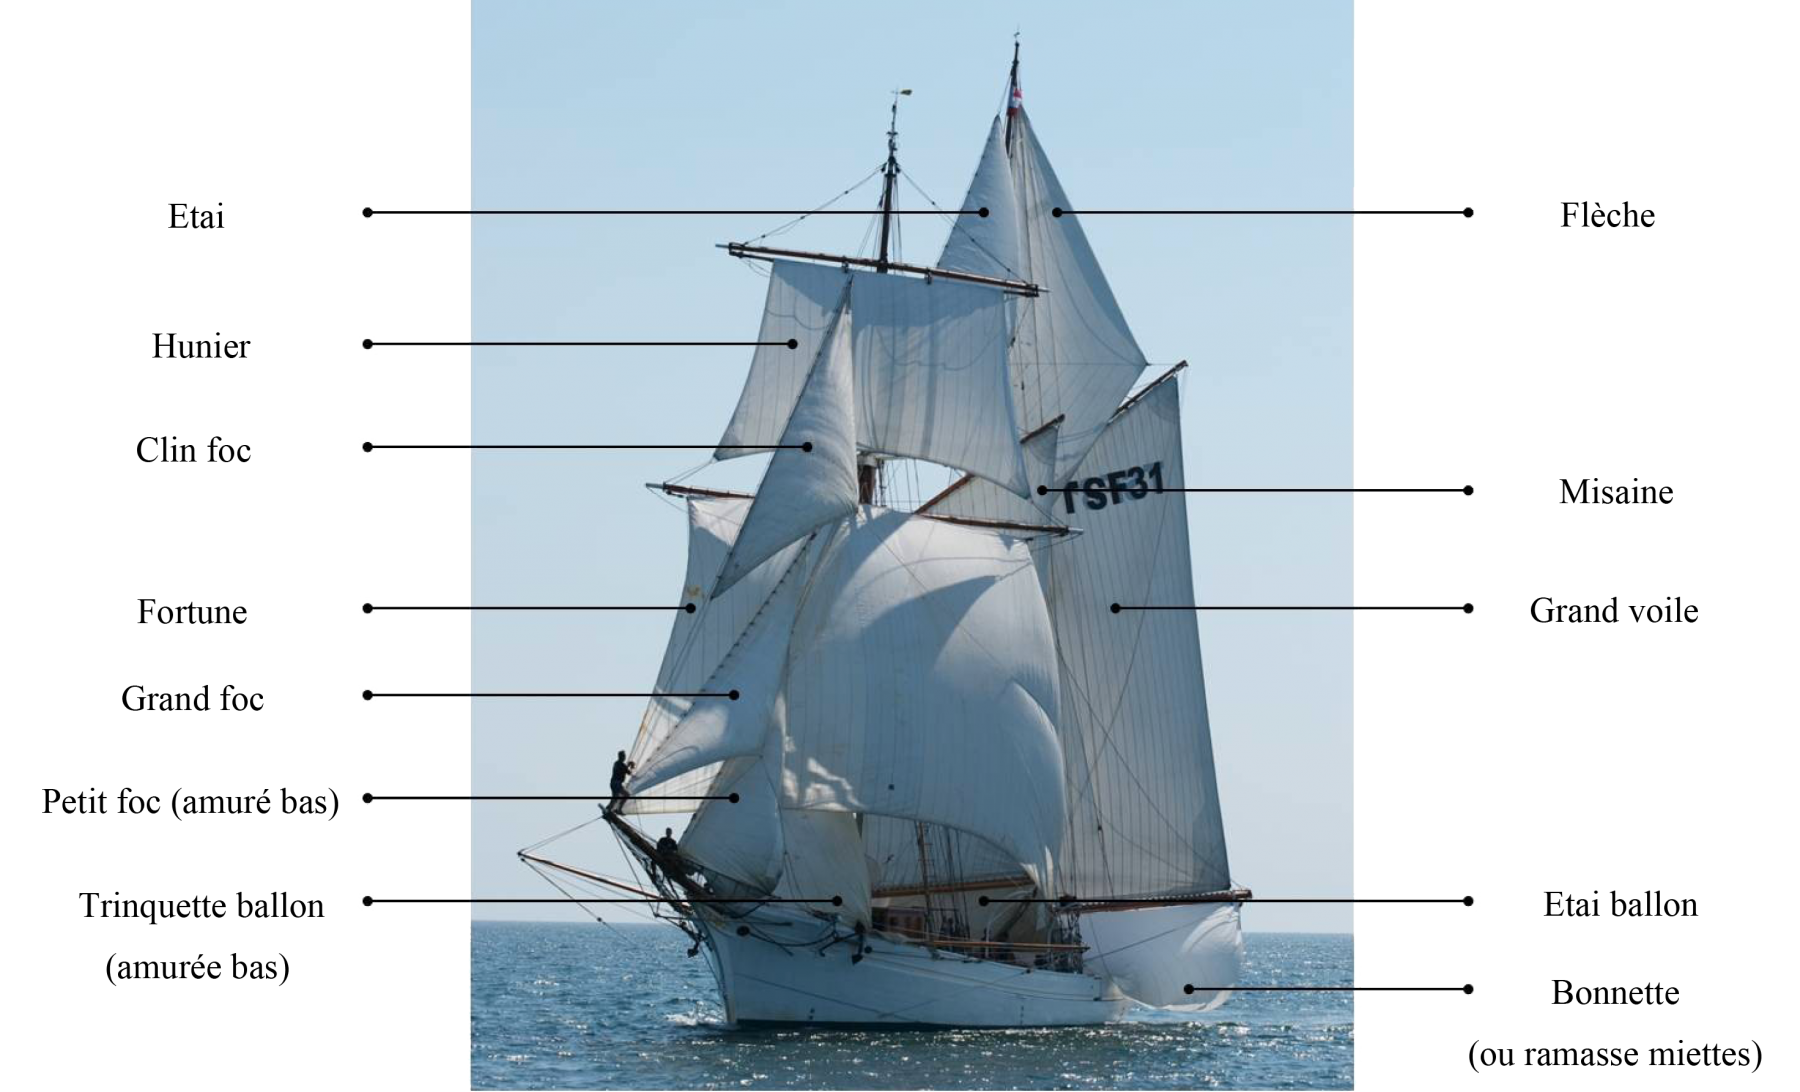
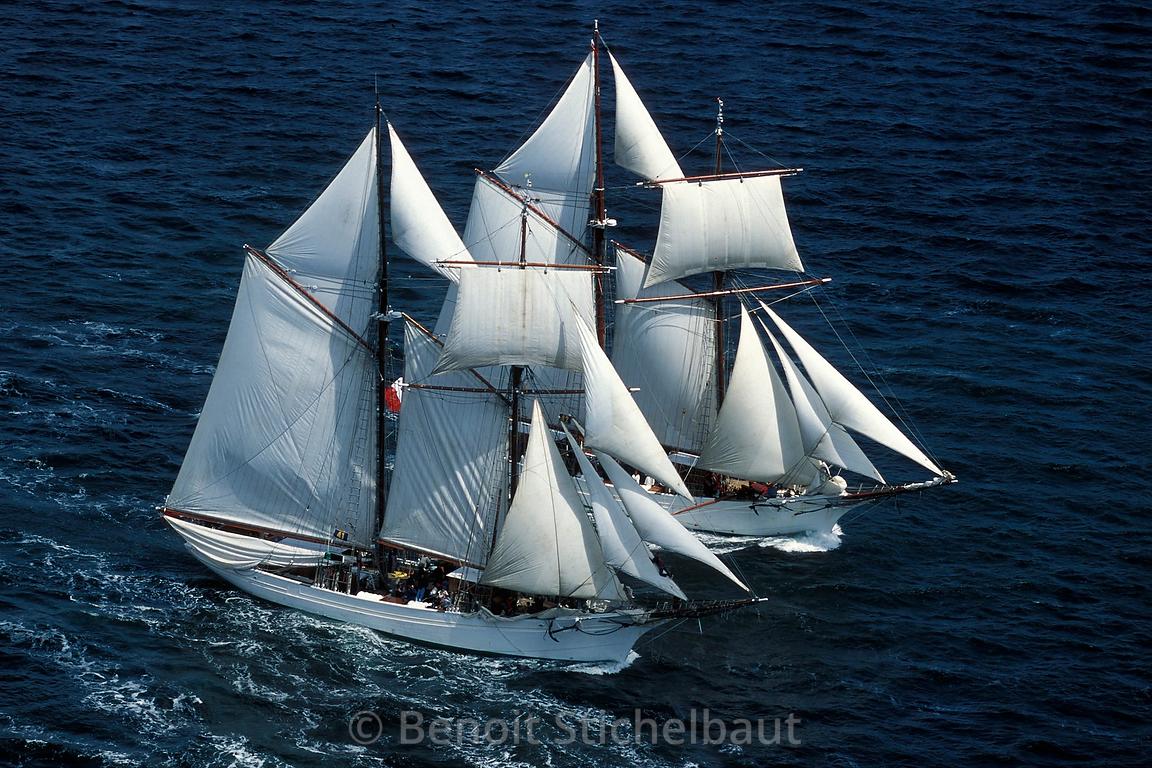
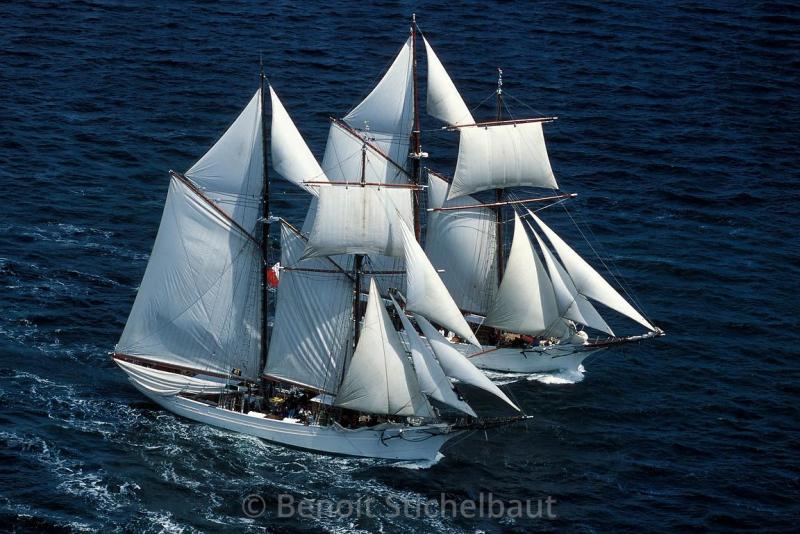
 reklein, Thank you. I intend to model her as she is now; after her last refit. However the problem with using pictures from the internet is that it can be difficult to date them. for instance, if you examine the second picture in my first post, near the bottom of the main mast, just forward and to the right, you can see a sort of white dish on a pole. That is an early radar system. Then go to the next picture and look at the top of the main mast, there is dish mounted on the front of the crosstrees. This is the radar system currently mounted. so I can date these pictures, but when you get to close ups which show the rigging in greater detail there may not be any similar information in the shot. Still that's part of the fun, at the moment I am doing more research than building. I am currently waiting for the plans to arrive after the tip from juhu. Here is another picture, someday I will have to translate all those sail names. Glenn
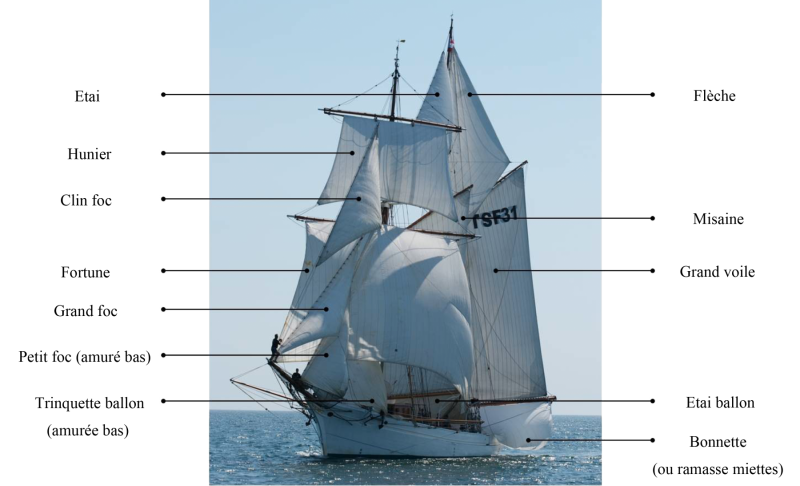
- 101 replies
-
- 4
-

-
- L Toile
- Billing Boats
- (and 1 more)
-
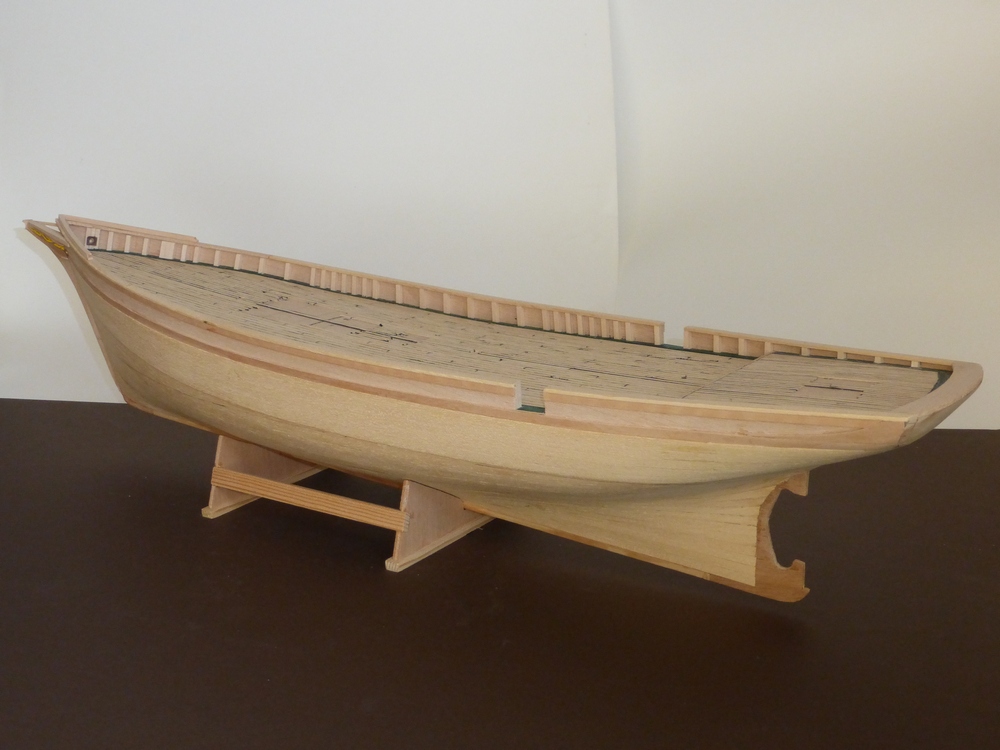
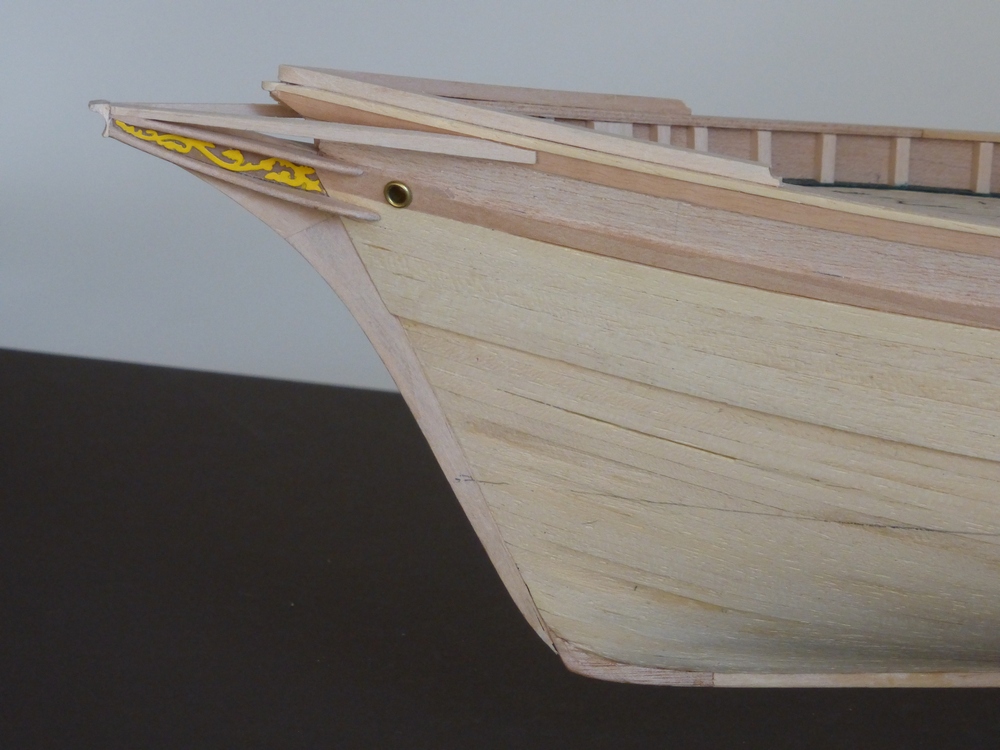
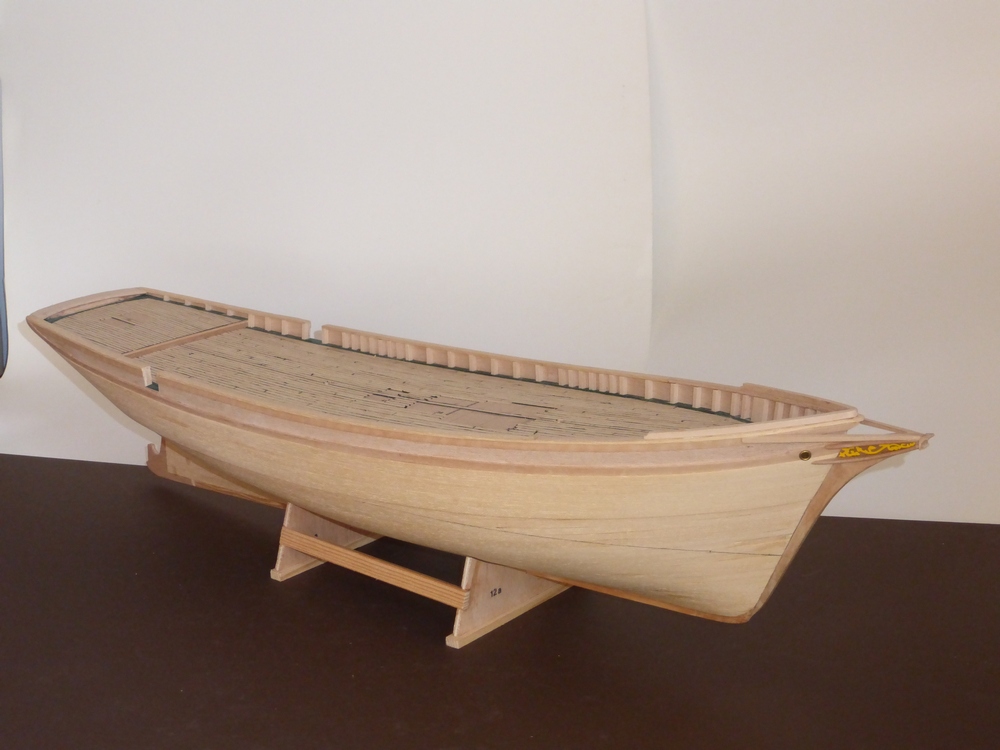
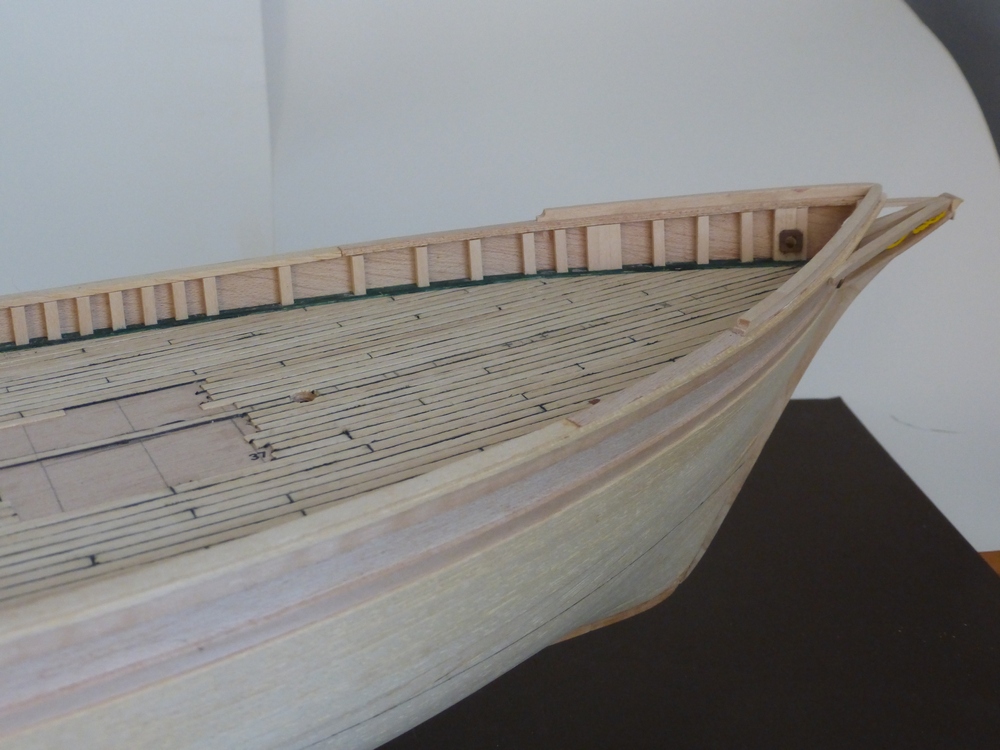
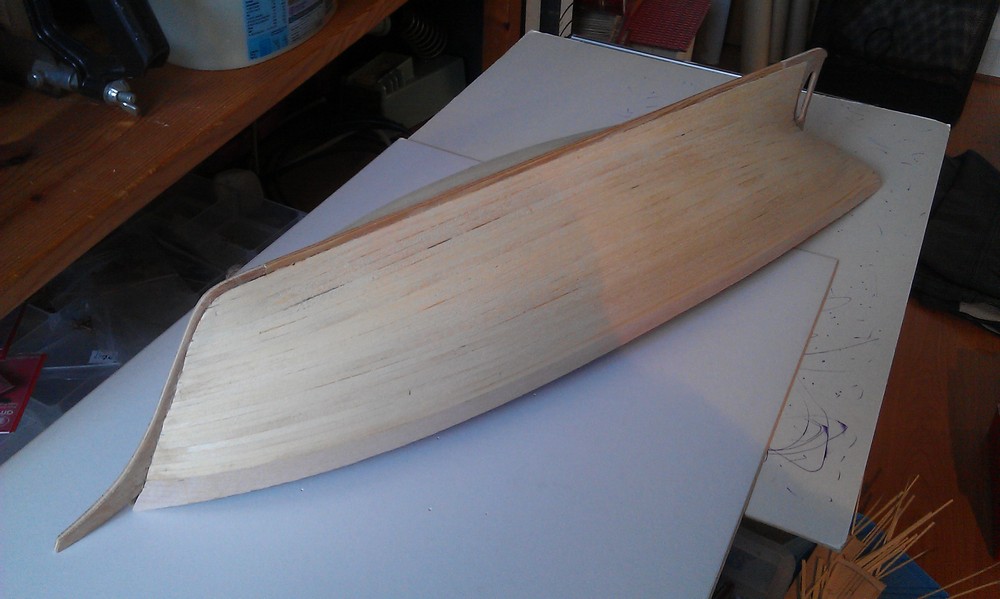
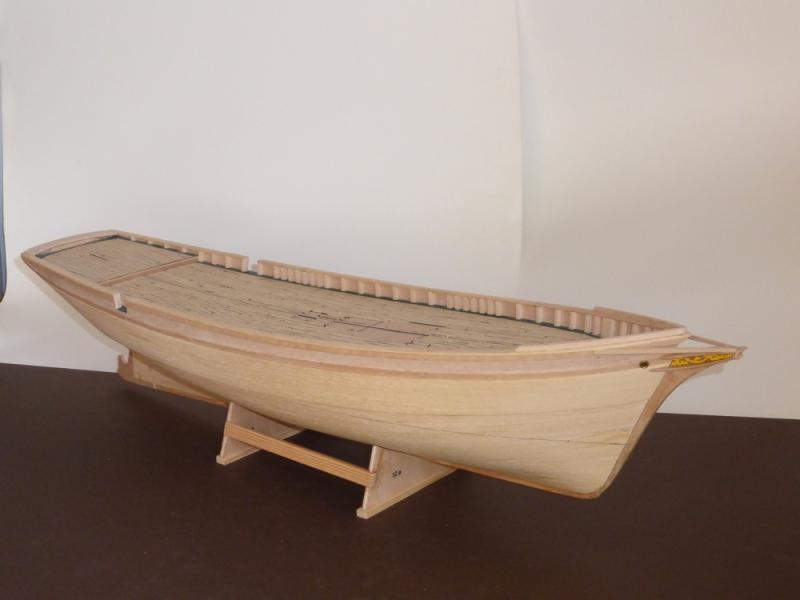
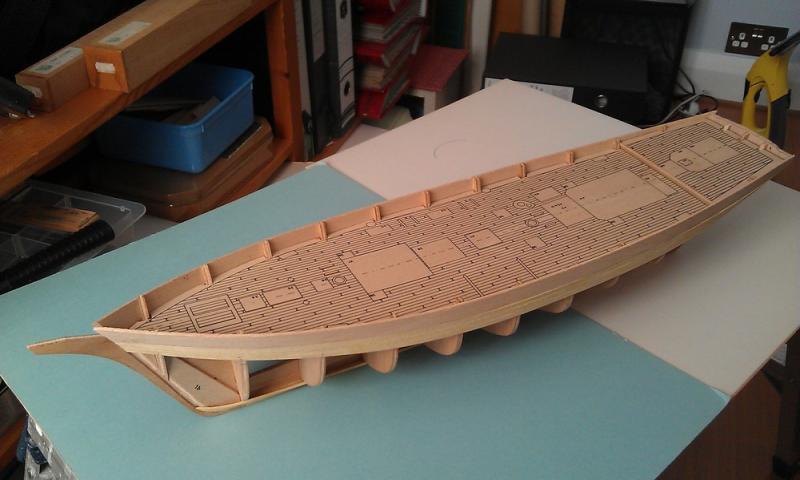
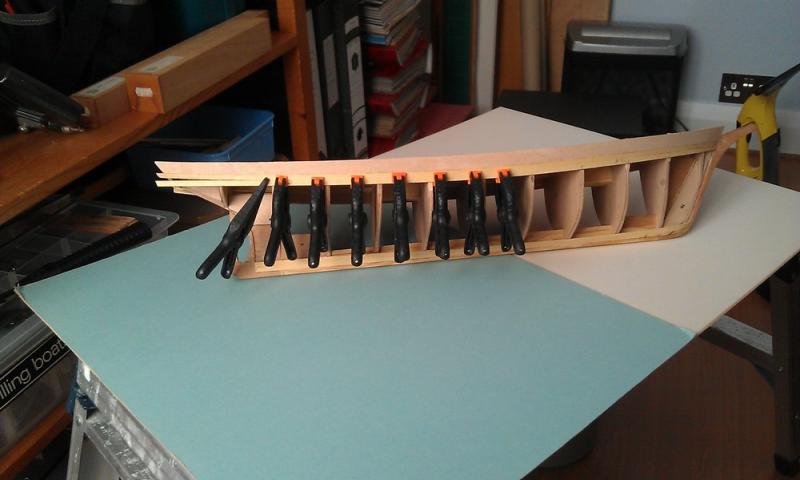
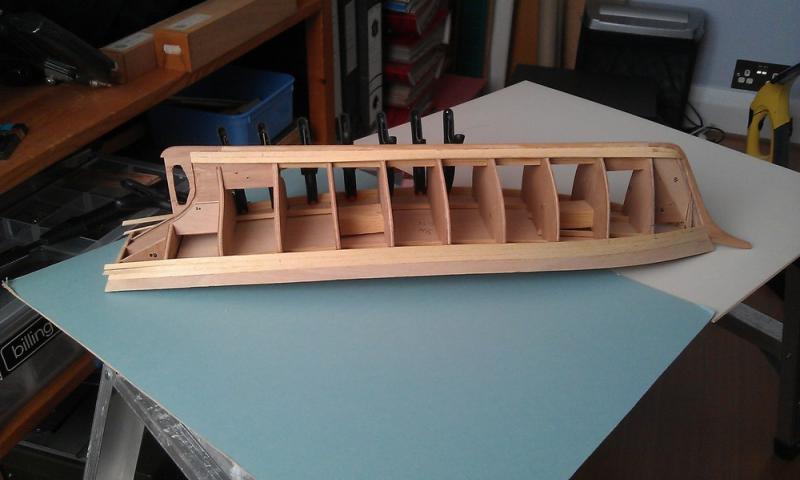
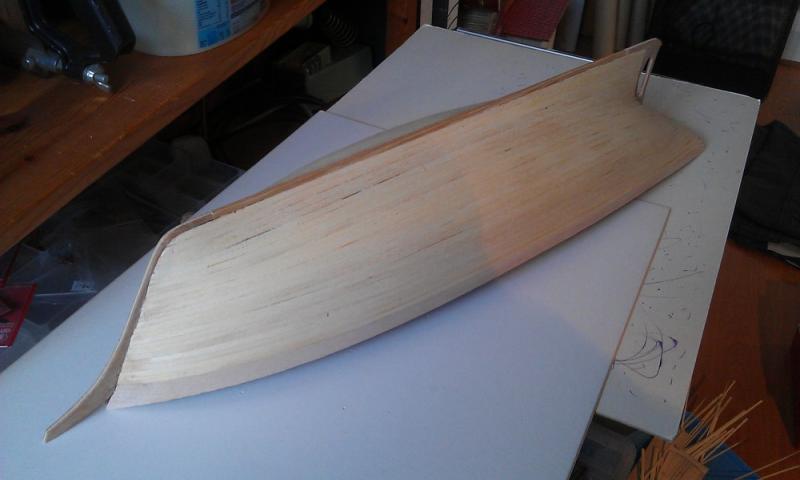
The Hull The following pictures show the hull as it is at present. I have added the stanchions and capping rail. The stanchions were not supplied in the kit and are from 3x3mm lime. The positioning came from the instructions for the Dursk kit. I have also added the wale, again this differs from the instructions in the kit, though it does conform to the supplied drawings. At the front I have cut off the ply stem and headpiece and replaced them with one from solid wood. Not sure what, it came from the scrap box. I have also replaced all the head timbers, which were supplied as 3mm ply, which fell apart as I tried to cut it to size or reduce it to the required thickness. These are all made with some lime that I had in stock. This also shows the wale a bit better. The pencil line is where the hull coppering extends to. I will neaten up the bottom of the stem before doing the coppering. That bit of lime on the front of the headpiece was my first attempt to carve the decoration there. I took off to much trying to carve the concave profile. I will remove it all and then try again. A view from the rear. I have cut off the bit of wood that would have held the rudder. It was getting in the way when trying to sand the hull. It will be easy to replace and the whole thing will be covered in copperplates. This shows a close up of the bows. In these last two pictures it is possible to see the deck planking. I am very unhappy with this and not sure whether just to do it again on top. I used the wood supplied in the kit, which was of very poor quality. It was very thin and impossible to get a clean edge. Trying to darken the edges in any way did not work, so I first tried gluing strips of black paper between the planks, which is how the raised stern in planked. But again the thickness/thinness of the wood made this very difficult. For the rest of the planking I glued black cotton between the planks. This was much easier to do, but the thinness of the planking meant that in places the cotton was so near the top that it was damaged when finishing. Also I had calculated that there was only just enough material supplied to do the planking if I omitted areas that would not be seen. Recently I had been working on the hull, but have stopped while I wait for the plans I have now ordered. I have gone back to making the various deck houses, winches and companion hoods. I will move onto these in my next instalment. Glenn


- 101 replies
-
- 12
-
-
- L Toile
- Billing Boats
- (and 1 more)
-
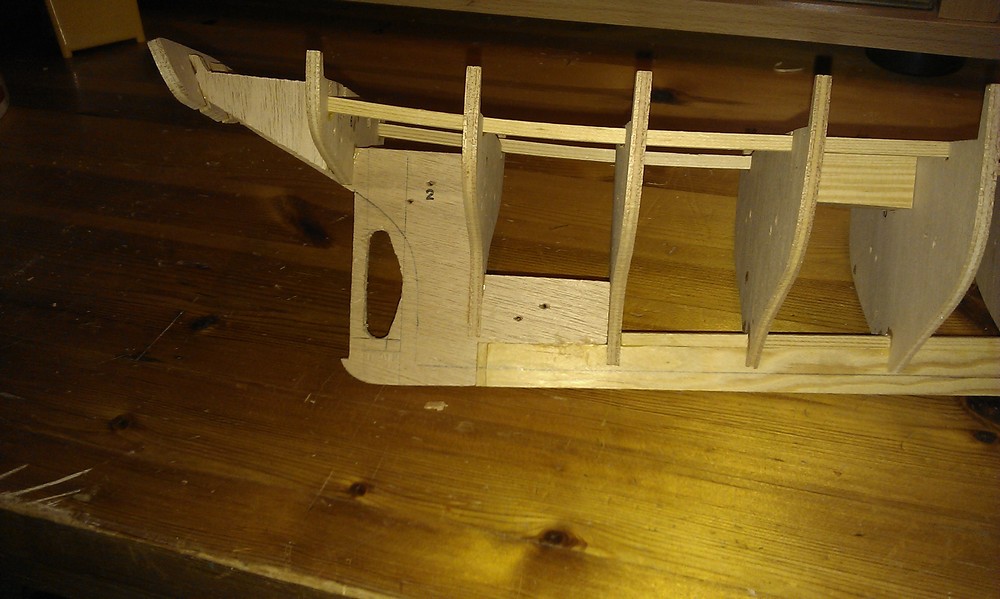
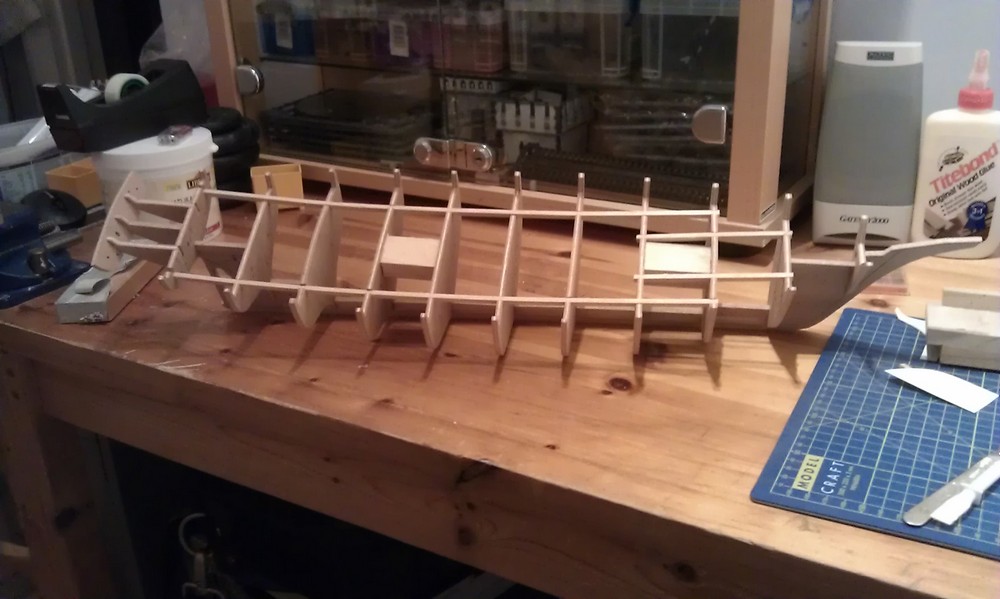
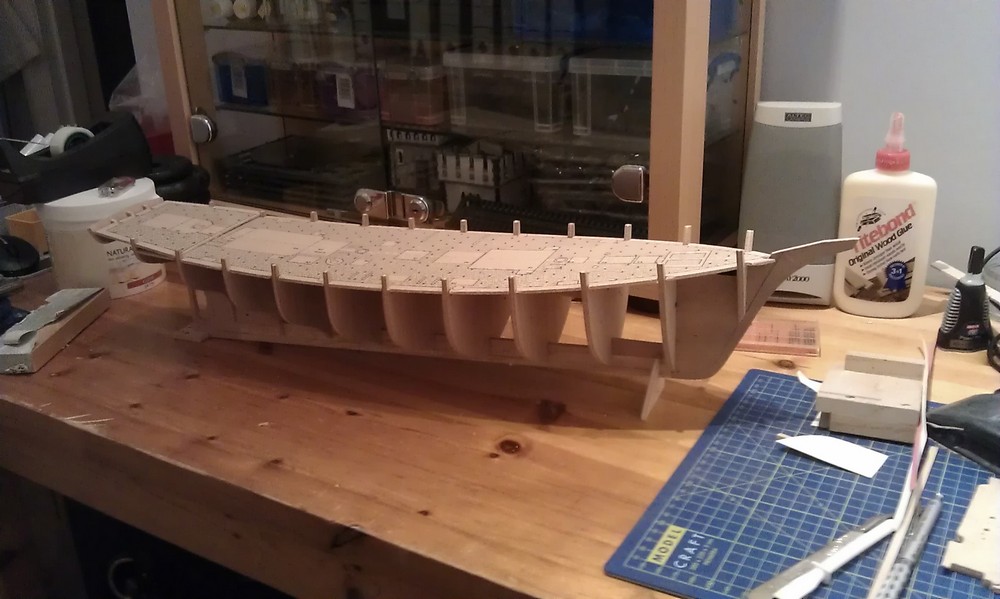
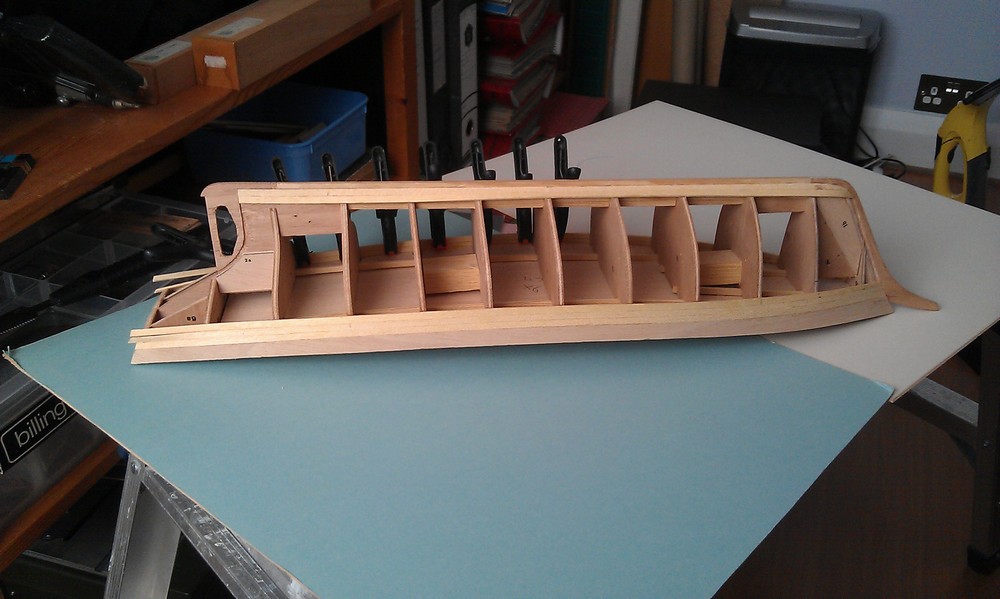
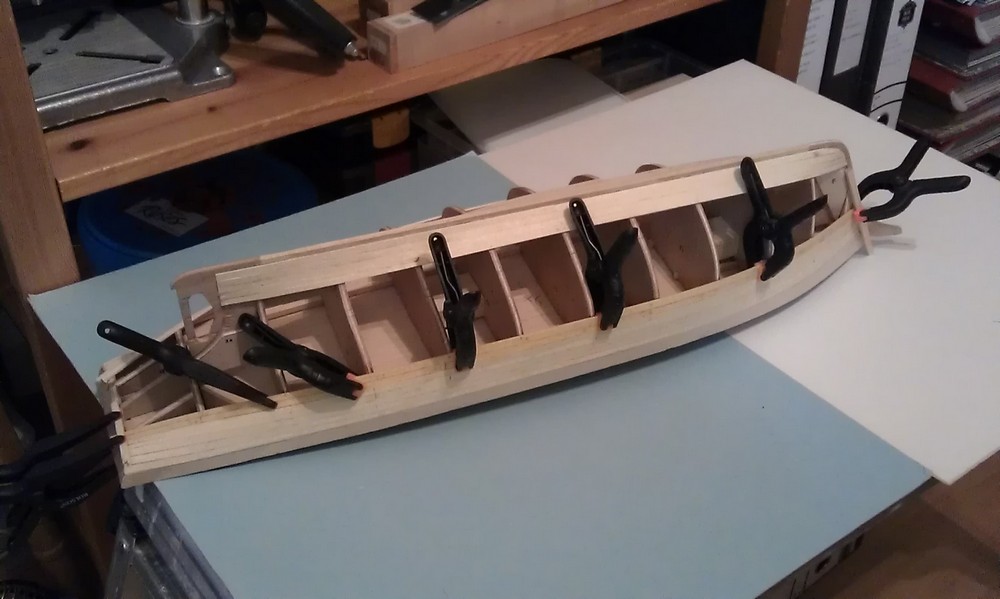
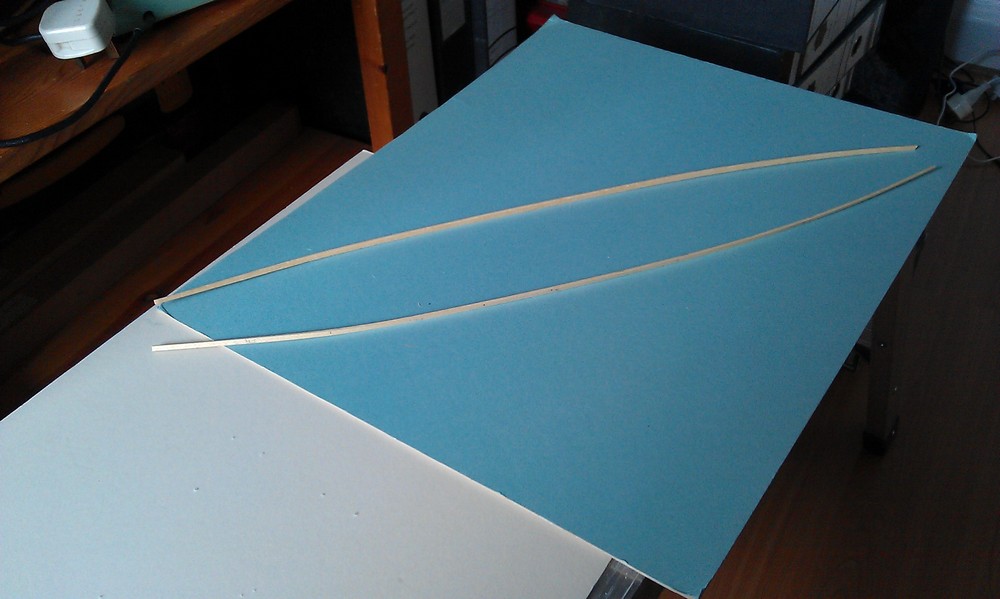
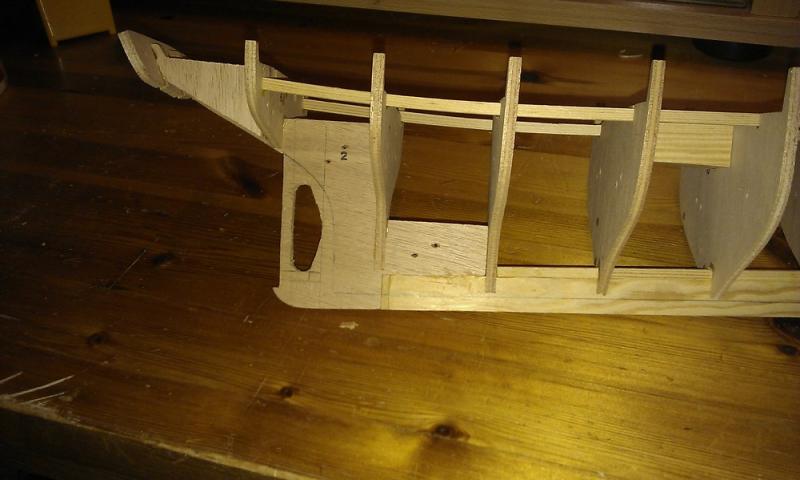
Starting the build. At this point my intention was still just to use this build to get in some practice before going back to the Shark. I started off by cleaning up all pieces required to make the framework. There are 3 pieces that represent the keel the bow and the stern, these are the first glued together on a flat surface. No problems with warping using this method. When this was dry I did a dry run. The frames are added to the keel using spacers to get the correct separation. Then some strips are added through slots on the top of the frames, followed by the false deck to hold everything in place and give it strength and rigidity. This seemed to work very well giving a strong and stable structure. I then marked out the line where the planking would meet the keel, bow and stern on each side. then took everything apart and chiselled a slot here to take the planking. I then reassembled everything, this time using glue. The next step was to add some padding provided to give a greater surface area for glue where the planking meets the bow and the stern, a whole extra 2mm. I sanded these to the correct angle as best as possible before fitting. I then got out the long sanding blocks and did the hull fairing. This really drove home to me the difference in shape between this hull and my previous 3 builds. There were no tight bends, except maybe in some small areas near the stern where some twisting is required. As I checked my progress by laying on planking strips they sat so easily. I think it was at this point that I began to get more interested in the build. I had been worried about the large gaps between the frames especially because there is only 1 layer of planking. However once faired the planks bent neatly over the frames and I concluded that this would not be a problem. Fairing complete the next step was to add the two pre-cut strips that go above the deck, then one strake below this. I would later come to realise I had just made my first mistake, but at this point I had still not got fully engaged and done enough research. If you look at the pictures of the real ship in my first post, you will see there are slots along the side where the hull meets the deck. These look like channels to let the water flow off the deck. It would have been easy to include them at this stage but by the time I found out it was too late. Mistake number 2. The instructions tell you to add the first strake below the deck without reducing its width. It would have made the next few strakes much easier if I had ignored this. I worked out how to do the planking before adding any more. At the bow all strips could be bevelled identically then cut to length when fitting. At the stern it was required to reduce the width of some planks, while in other places stealers would be required. I then applied the garboard strake on each side. Then added further strakes in pairs each side, going down from the top and up from the keel. My method of planking was to first clean up each strip by sanding to try and get a clean edge, then to soak them. I then clamped them in place and let them dry out. On taking them off they spring back a bit, but generally follow the shape required and are easy to glue in place without any worry of them springing out of place, no pins required. When gluing I found it difficult to glue a whole plank at once and did it in sections. In the end I was fairly pleased with the way things went, though on cleaning it up a number of problems did appear, mainly caused by the poor quality of the wood. For example in the picture of the completed hull you can see that the joint between the 4th and 5th strakes from the keel is not good. However most of this will be covered up by either the coppering of the wale. I was not happy about that bit of plywood sticking out the front and the line where the planks meet it looks a bit ragged. Something needs to be done there, but I will leave that for next time. At this point I would mention that generally I do not paint my models. There are two reasons for this: I like the bare wood finish and generally when I paint something it looks worse when I have finished than before I started. Also I apologise for the poor quality of the photographs. I never was much of a photographer, but I will try and improve, or at least find somewhere better to take pictures. Glenn


- 101 replies
-
- 9
-
-
- L Toile
- Billing Boats
- (and 1 more)
-
Thanks very much for the pointer, I had not found this. I should have realised there would be a French equivalent of the NMM. I know I said originally my intention was not to spend too much money on this, but as I have got into the build I have got more and more involved and interested. The cost of the plans now seems small, I have already spent over £50 on various bits and pieces and am compiling a long list for my next order. Only little things but it soon adds up. I have seen the differences in appearance in some of the online pictures I have found. I have quite a collection now. The addition of navigation aids and radar have changed significantly between refits. I think my biggest problem is trying to work out changes to the rigging from that given in the kit. Thanks again, Glenn
-
At the time I got this kit I had just starting building the Caldercraft Snake. Having not built anything for over10 years I thought it might be a good idea to get some practice building the Etoile, which is not really my type of ship, so if I messed up some bits it would not really matter. Also I would not spend much money replacing what is in the kit and try to use as much of the supplied material as possible, as it turns out, now I have started my attitude has changed somewhat, more on that later. The Kit This is an old Billings kit which I do not think is still available. I was offered it by a friend who had bought it as a present for her father, a railway modeller, who hardly touched it. When I got it I did a quick inventory to ascertain if it was all present, it appeared to be. The model was sold in two parts, the basic ship and a fittings kit, both of which were present. It would have looked a bit bare without the fittings kit. Examining it the wood seemed to be of poor quality. The edges of most planks were rough and splintering. Also the dimensions were poor. For example, there are strips of some dark wood which are supposed to be 1mm x 0.5mm x 600mm. The width varies from 1.3mm to 0.7mm along the length and this is consistent for all 14 strips. There are also a large number of plastic parts, where appropriate I will replace these with wood, if only because there are dimples caused by shrinkage during manufacture. However where these are of suitable quality and used to represent fittings made of metal I may use them. I will certainly discard all the plastic blocks and replace them. In general the brass fittings look reasonable or good, though there are some gears supplied for the winches that are a bit bulky and not well made. The ship Having got the Kit I then started to do a bit of research into it. The first thing I discovered was that it was still in service with the French navy and has a sister ship, La Belle Poule, of which there is a model produced by Dusek. They are schooners and were launched at Fecamp in 1932. They are 37.5m long and displace 225 tons. They are built to the design of the Paimpol schooners and were used for cod fishing off the coast of Iceland up until 1938. They were at Dunkirk and can fly the Free French flag. Both of these are now in the French navy and are part of the sea training school. Having discovered the ship was still active I got some pictures from the internet (see below). Sources of information I have also downloaded the instructions for the Dusek model (thank you), which represents the way these ships are currently fitted out. I am using these instructions and photographs from the internet to help me modify the model to look as the ships currently look. In reality there are only minor changes. The most notable are: · The ships wooden boat has been replaced with an inflatable. · Deck furniture – In most cases there are cosmetic differences, but in a few places they are more structural. · The anchor/chain gear has been updated. In my next post I will get into the build. Glenn


- 101 replies
-
- 6
-
-
- L Toile
- Billing Boats
- (and 1 more)
-
Hello, My name is Glenn Reader, I have been lurking on MSW for just over 2 years now, I just looked it up. My initial intention was to wait until I had more spare time then introduce myself. I have now concluded, like most things, its better to just get on with it. I am not a newcomer to the hobby, for about the past 35 years I have been making ship models, however there have been about 10 year gaps between each of them. Not good for honing ones skills. I have made (in order): HMS Shark, Sloop, Sergal, 1:50 La Sirene, Frigate, Coral, 1:75 Armed Pinnace, Panart, 1:16 I finished the last of these about 12 years ago having already bought the Caldercraft HMS Snake as my next model. About a year ago I started this, but did not get very far as I then got given the Billings kit of the Etoile. I thought, this is not normally my thing, but I am a bit rusty, I could just dash this off to get back into things. So I have put away the Snake and am now building the Etoile. My intention is to now start a build log for this in the next few days, I have some photos I have taken up to now and hope that starting a build log will encourage me to better document this build. Also to maybe get some advice on anything I am having a problem with; there are already a few of these. On the personal side, I left full time employment 9 months ago, it did not give me any more free time - if anything the reverse, and am now employed part time marking exam papers (maths). I used to be an electronic engineer working in the defence industry. For the last 13 years on aircraft, I do not have any real interest in aircraft as such, but some of the sub systems are interesting. I have a fairly long list of ships that I want to model. It should take me to at least the end of the century. These include, in no particular order: Thames Barge, Chapmans Water Hoy, Sloop 1776 (these last two are from plans published in Model boats March 1993 and July 1996 respectively), Trincomalee, though not as a frigate, but as she was with flush upper works during her second commission of 1852-1857. These will all be scratch builds, but there are a few kits in the list as well. That's it for the introduction, please look out for me starting my log in the next few days. Regards, Glenn