HOLIDAY DONATION DRIVE - SUPPORT MSW - DO YOUR PART TO KEEP THIS GREAT FORUM GOING! (Only 13 donations so far - C'mon guys!)
×


Jason Builder
-
Posts
219 -
Joined
-
Last visited
Content Type
Profiles
Forums
Gallery
Events
Everything posted by Jason Builder
-
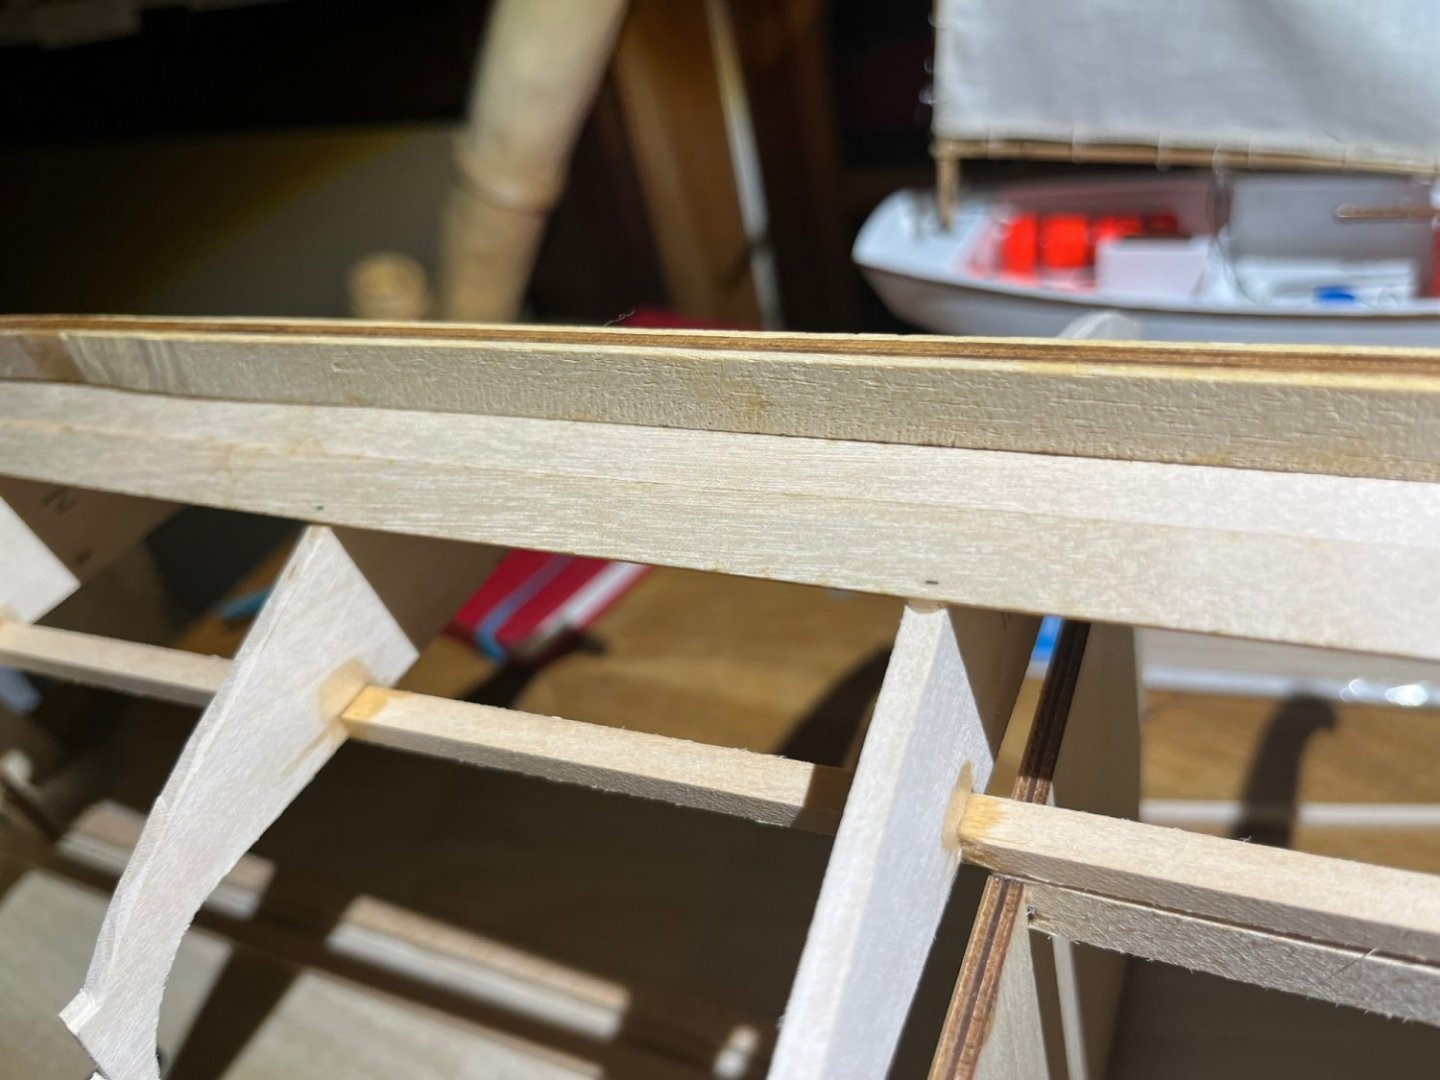
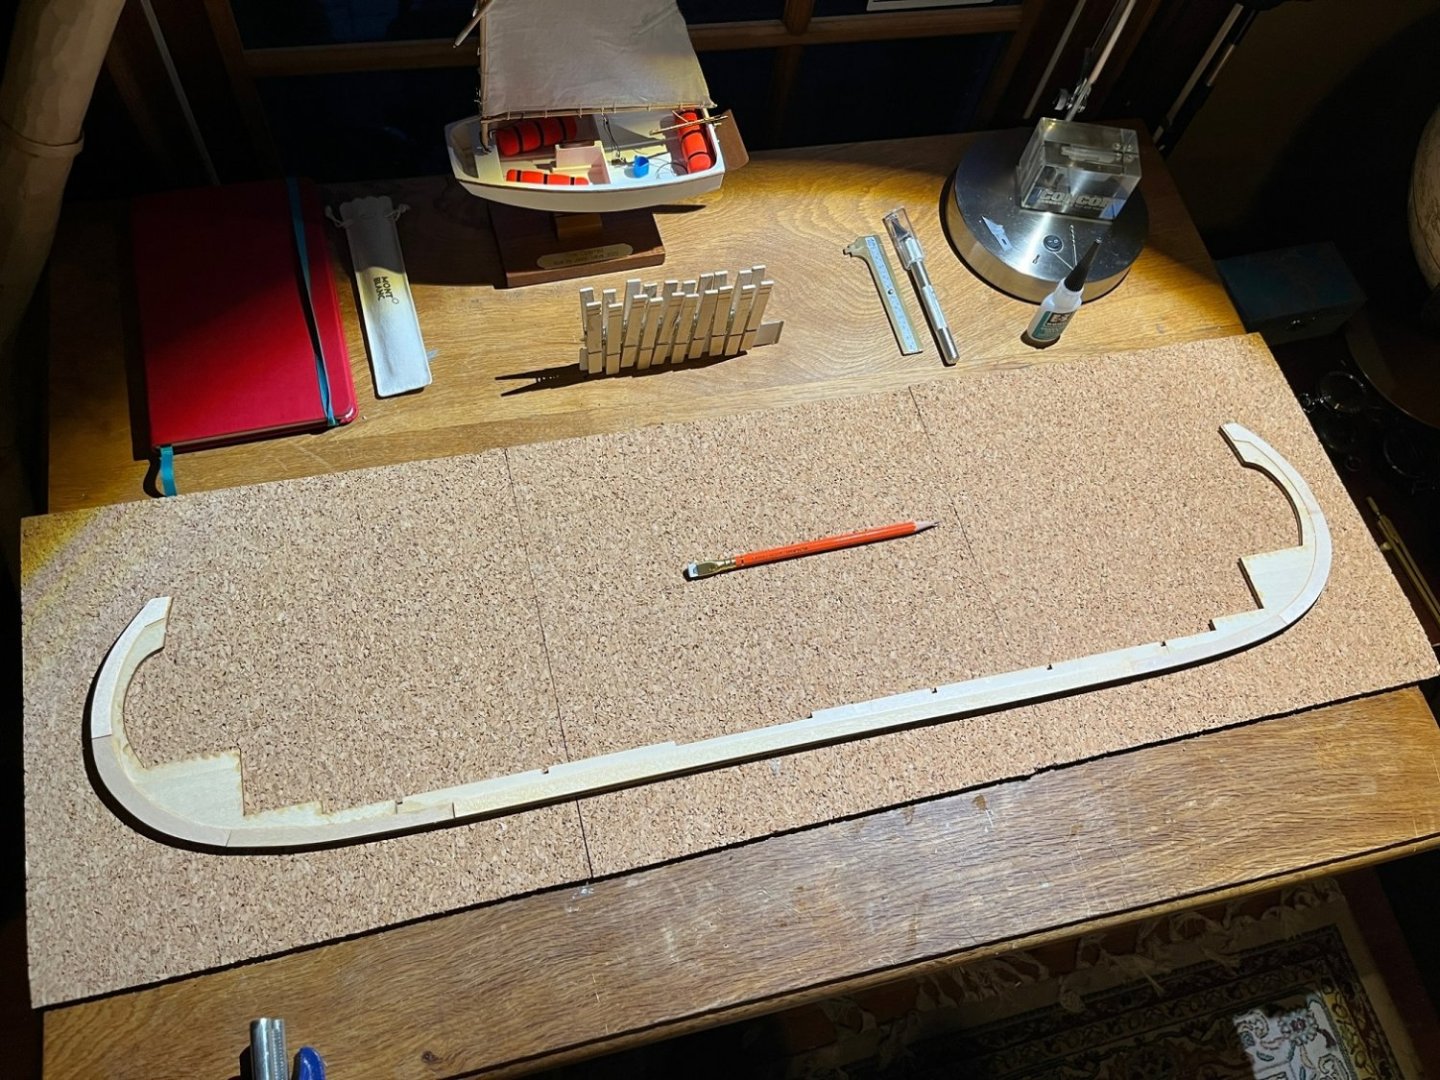
 Happy Monday Everyone! Haven't posted in a while, but I am still alive and kickin and making progress as limited time allows. Planking continues and now that I am 4 planks away from completing the lower planking section, I marked out the locations of the last 4 planks to ensure good spacing. I have been overlapping the planks by about 3/32" so far.
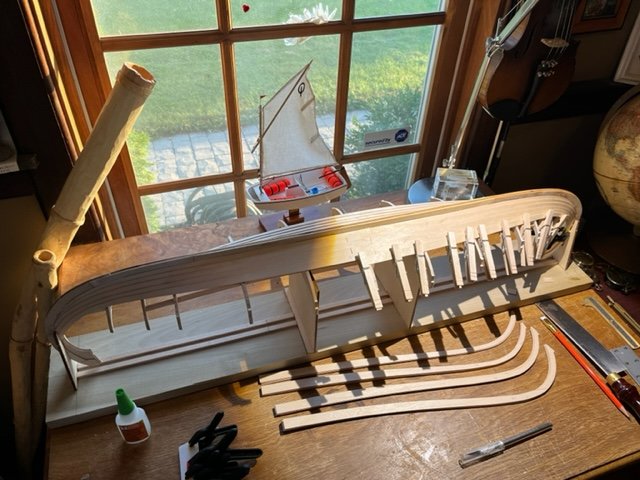

- 75 replies
-
- 6
-

-
- Oseberg
- Billing Boats
- (and 1 more)
-
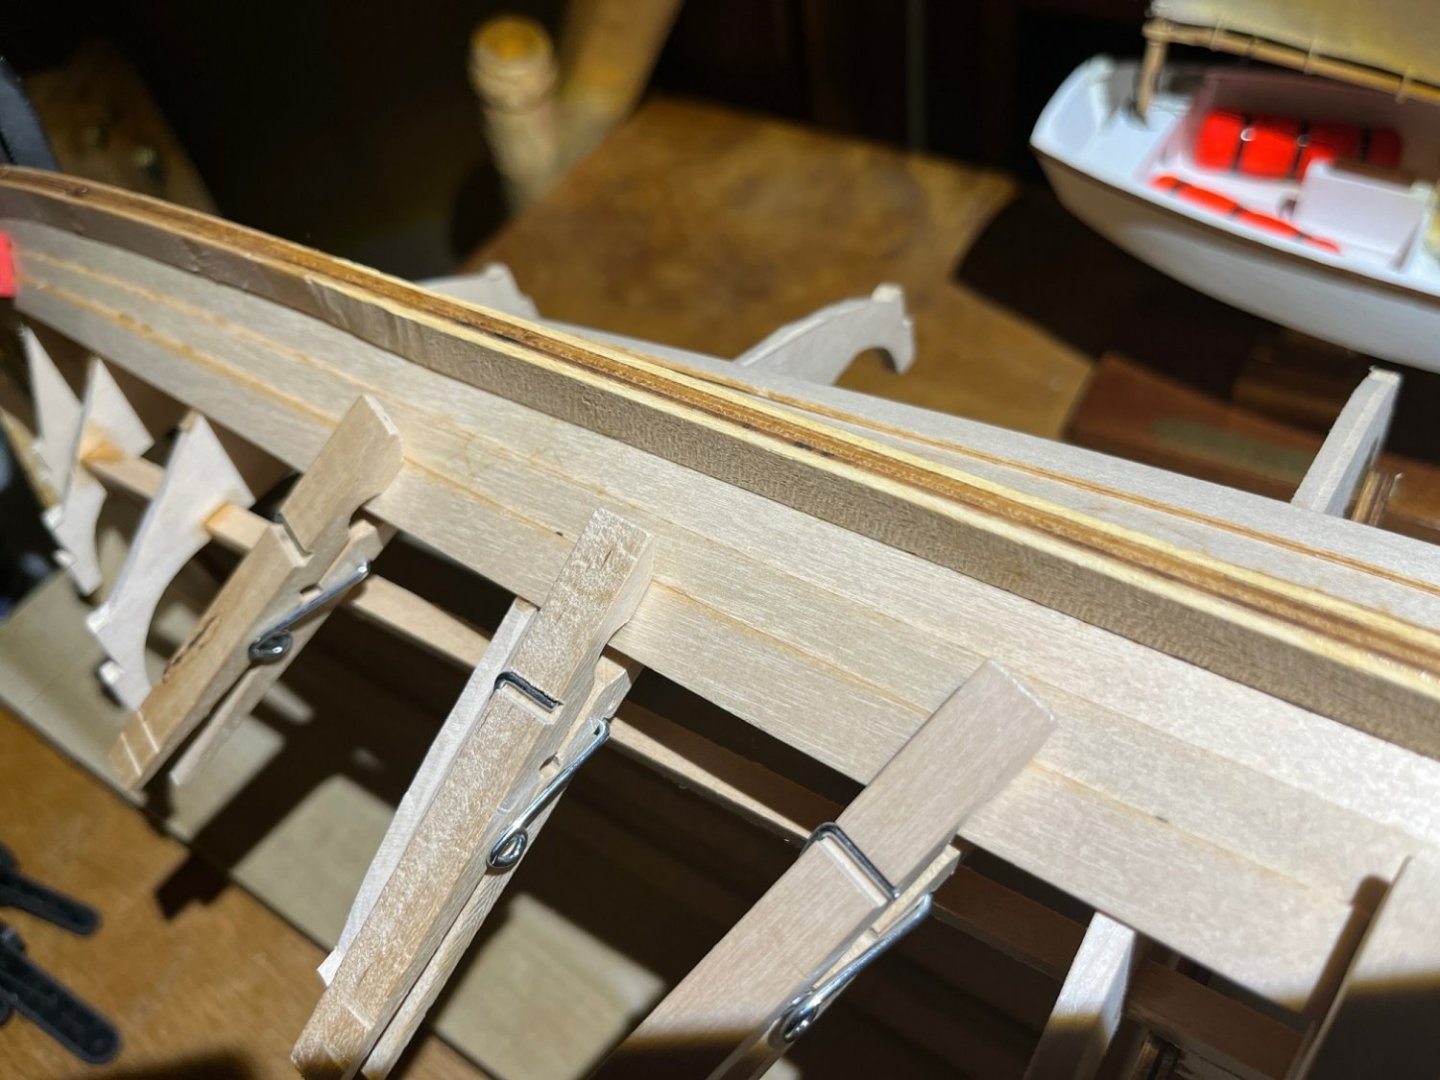
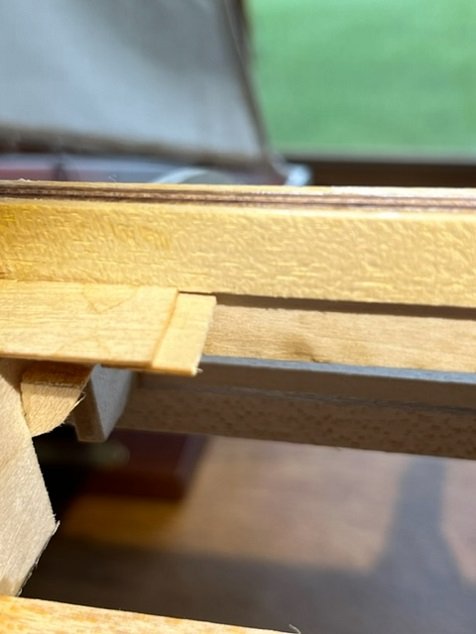
Hello Everyone, I am planking away, slowly. Planking this model is not difficult or time consuming, as the laser cuts planks fit very well, but I have had very limited time, so when I get a chance to plank, I plank one complete row of planking on both sides on the same night. This is to attempt to prevent warping of the framework while planking. So tonight, for example I glued on the third row of planking on both sides. Very fun model.
- 75 replies
-
- 10
-
-
- Oseberg
- Billing Boats
- (and 1 more)
-
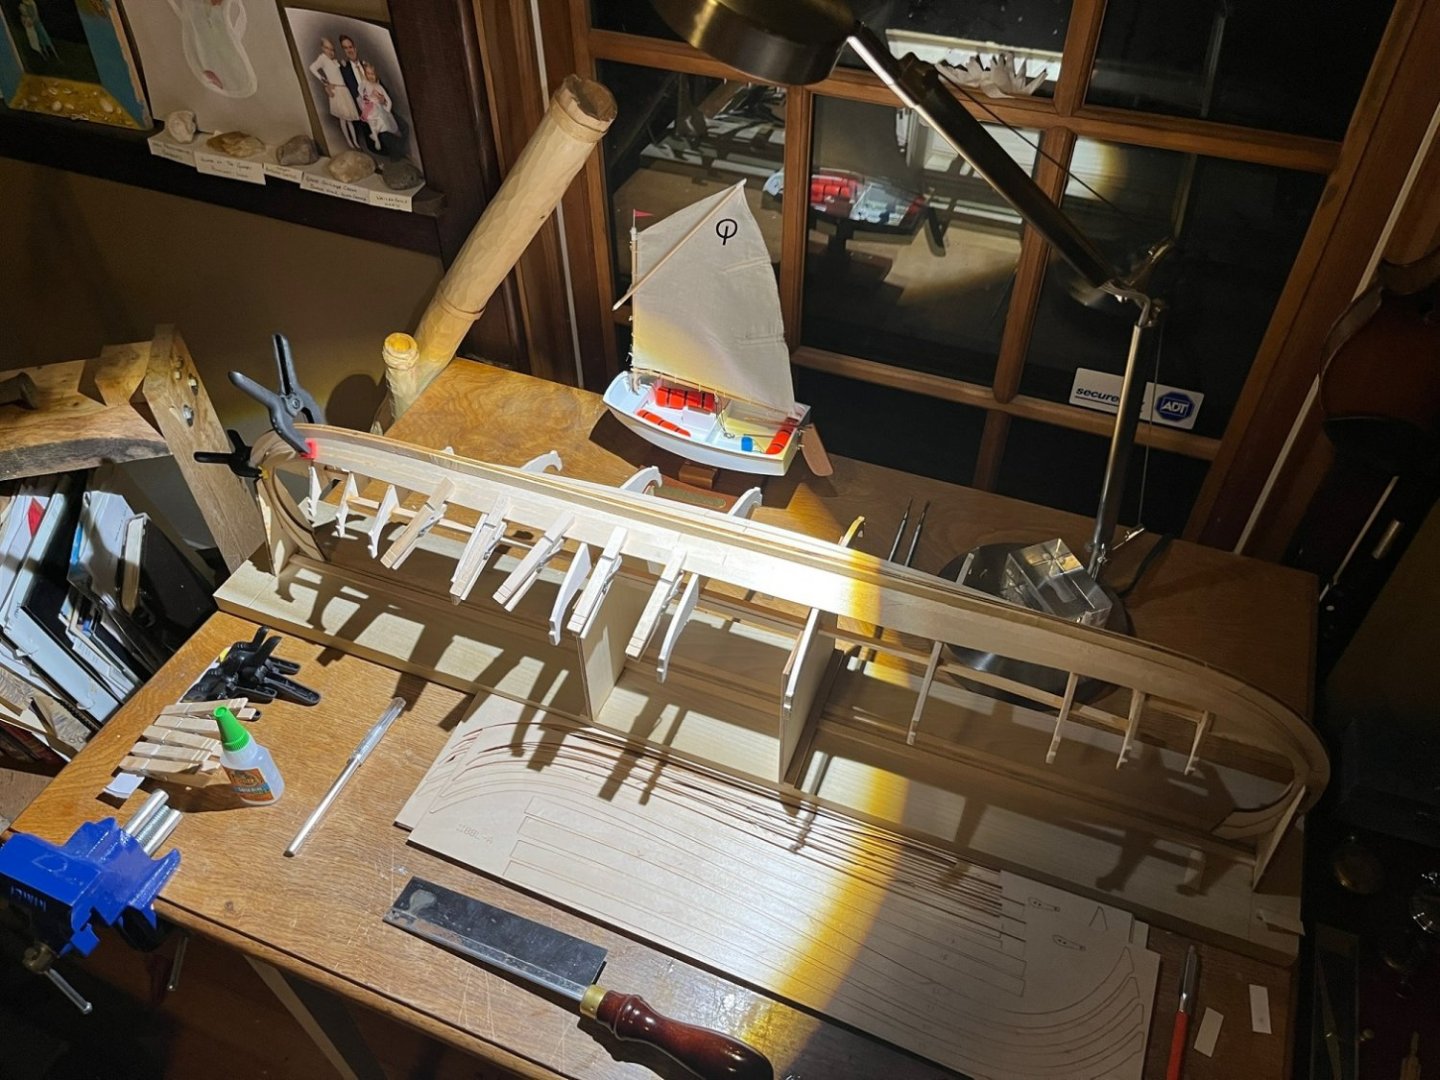
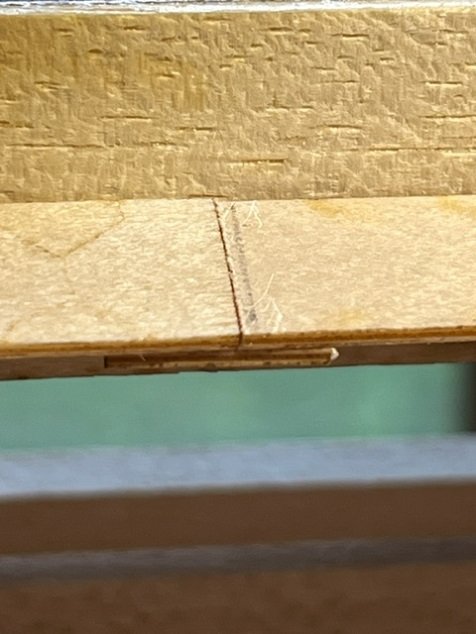
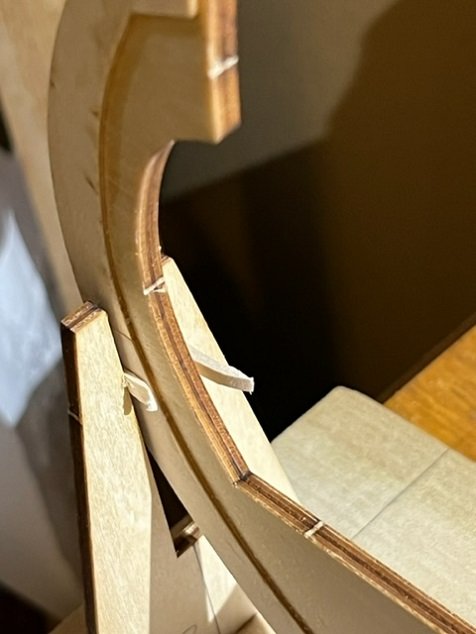
Bonsoir Mes Amis, Not much work on the 'ole ship lately but here's an update! This continues to be a very enjoyable project. Before planking I marked plank locations (measured from the print and marked on both sides of the keel stem & stern) on the keel and also chamfered the bulkheads. I also feathered in the transition from the plank-feel doublers to the curved plywood ones: Then I used a hopefully-just-right-sized, and properly located, drops of gel CA glue to glue down the planks. I will stain the hull planks and any glue on the outside of the planks will screw up the finish. The first planks did not have any ooze-out of glue, which is good. The plank end-to-end butt joints will be symmetrical looking at the hull from the bottom. The plank-joints wind up in open air, not on a bulk head, so I am gluing on a backer-plank behind each butt-joint: Bon Soiree! Jason


- 75 replies
-
- 7
-
-
- Oseberg
- Billing Boats
- (and 1 more)
-
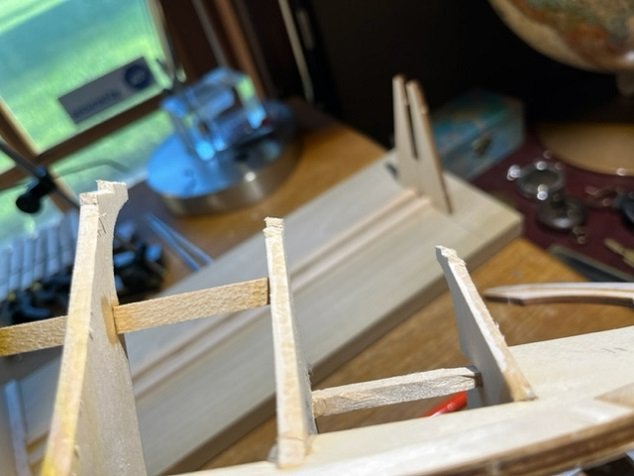
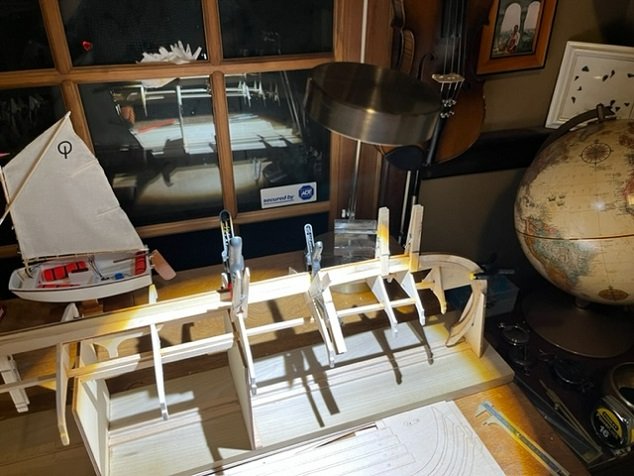
Wonderful model Ed! I hope mine turns out as well as all these build logs and photos I'm seeing. It is indeed a fun model to build so far, and I even like the way the frame looks at this point in the build. Now I need to chamfer the bulkheads. I did get a bit more work done this evening; I built the frame that supports the inverted hull for planking.


- 75 replies
-
- 11
-
-
- Oseberg
- Billing Boats
- (and 1 more)
-
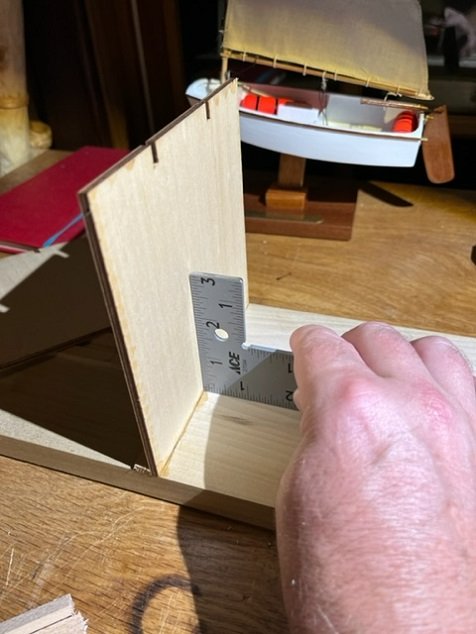
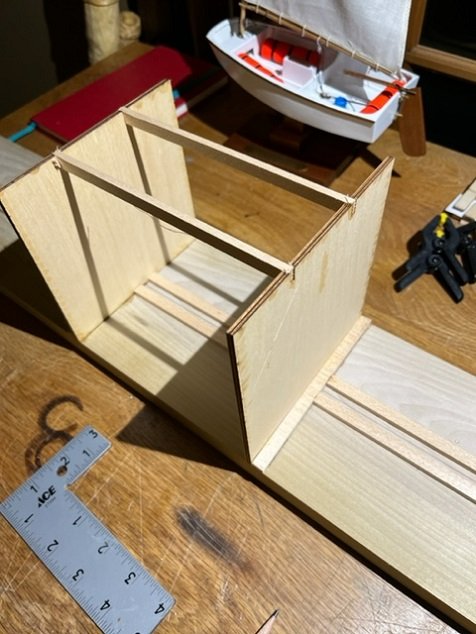
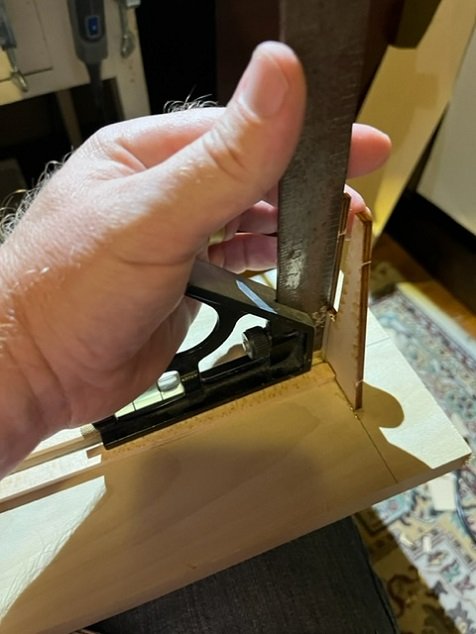
Bulkheads glued in place and stringers glued into bulkheads. I got a nice snug fit of the stringers into the bulkheads. Everything is nice and straight. Used a small square to true up bulkheads while gluing them in. That's all for today.

- 75 replies
-
- 5
-
-
- Oseberg
- Billing Boats
- (and 1 more)
-
Thanks for sharing Killickthere. Just read through your build log, nice job! Great decking and the custom stem, stern, rudder and anchor are fantastic. Congrats on a beautiful model. Hopefully mine turns out!
- 75 replies
-
- 2
-
-
- Oseberg
- Billing Boats
- (and 1 more)
-
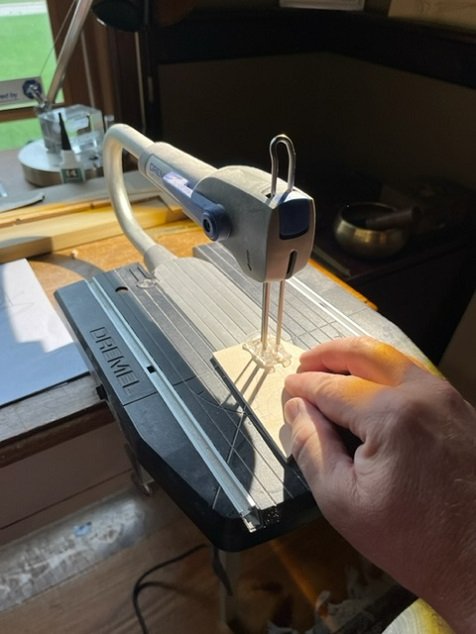
Hi! Short time to work tonight, but I did get the rest of the cleats cut out of solid basswood and also the cradles for the oars. At this point , I have all the 4mm ply wood pieces that could have had exposed ply wood edges, cut out of 4mm basswood. Next I will glue up the bulkheads to the keel.

- 75 replies
-
- 4
-
-
- Oseberg
- Billing Boats
- (and 1 more)
-
Hello! I have most of the 4mm plywood pieces now cut out of basswood. Couple cleats still left to cut out. I shimmed the keel evenly spaced in the jig and then dryfit the bulkheads.
- 75 replies
-
- 4
-
-
- Oseberg
- Billing Boats
- (and 1 more)
-
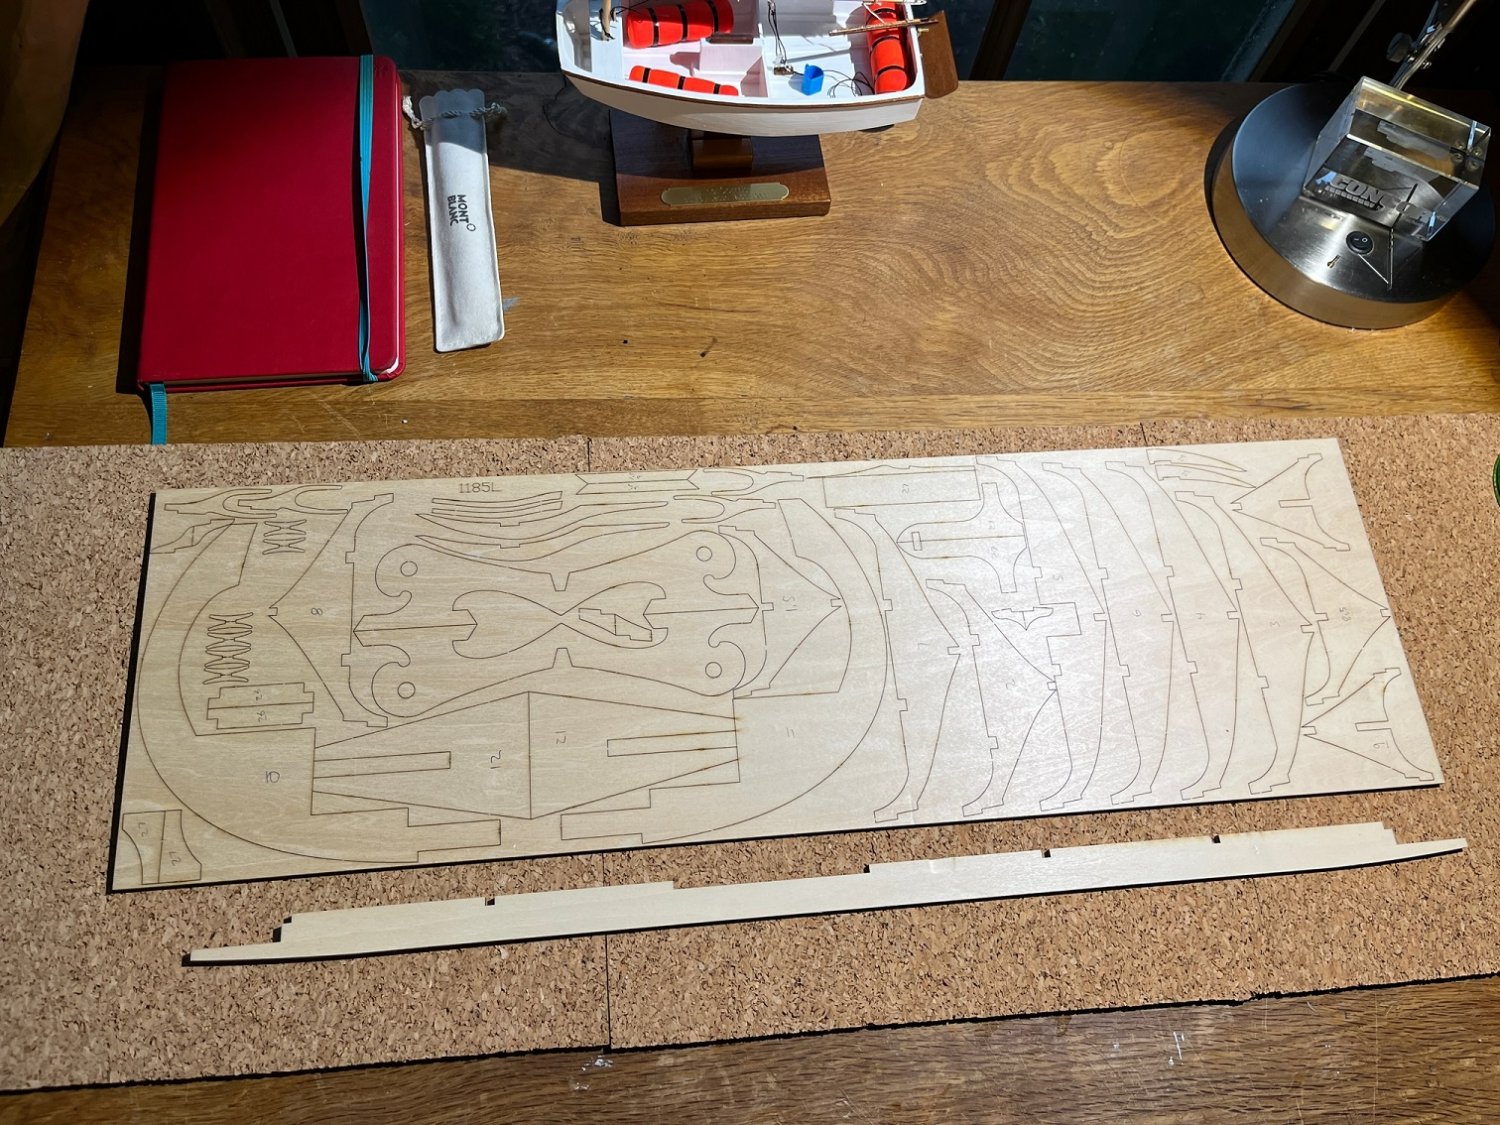
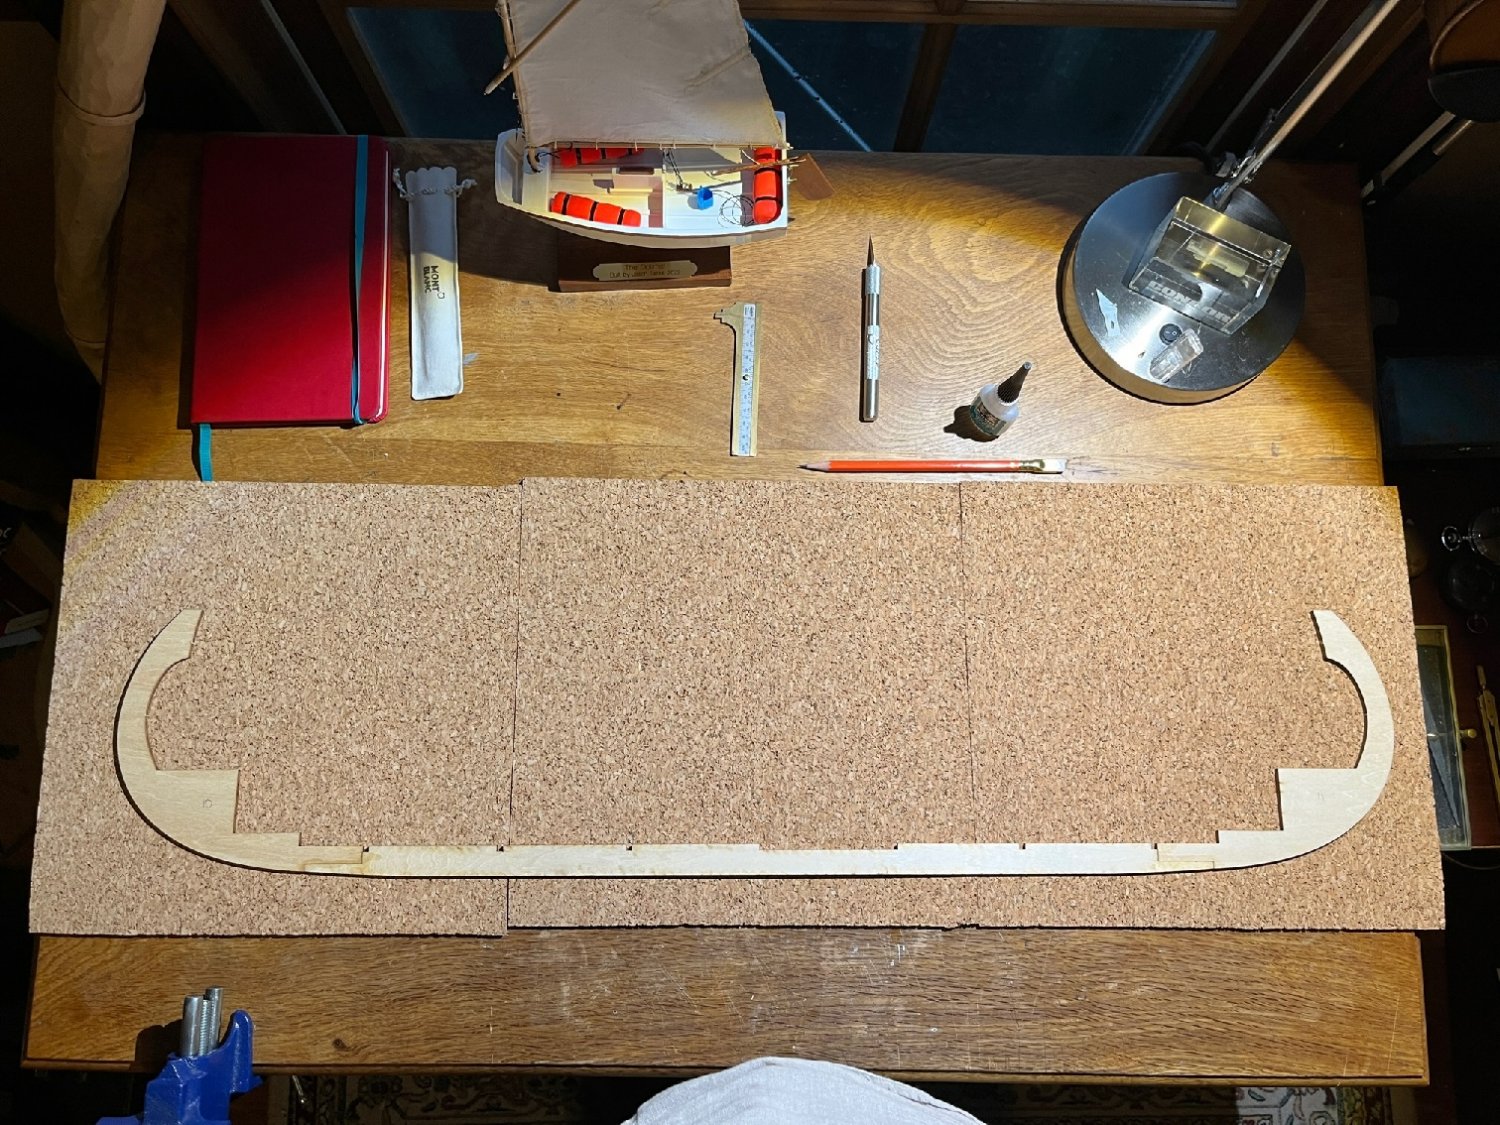
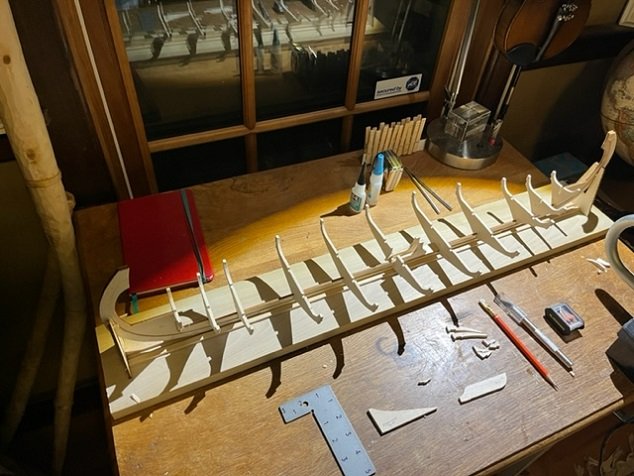
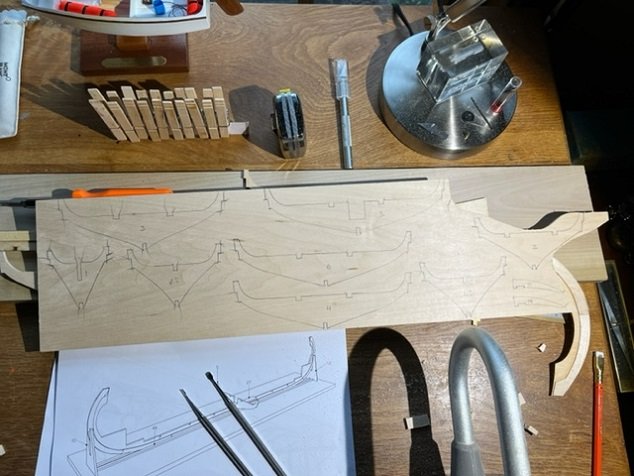
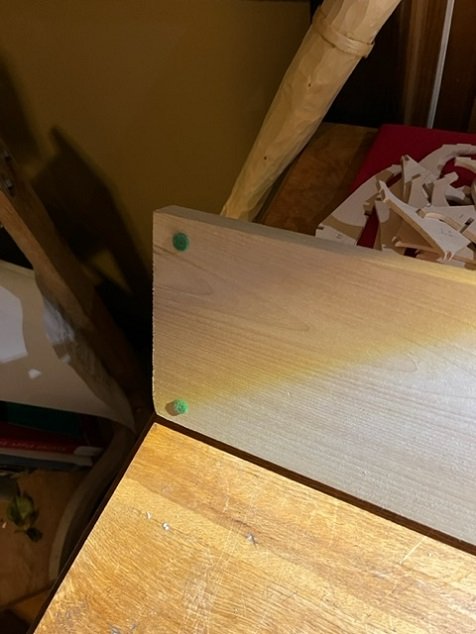
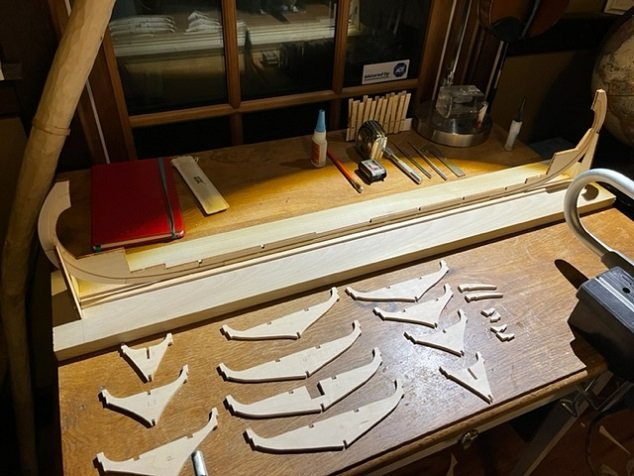
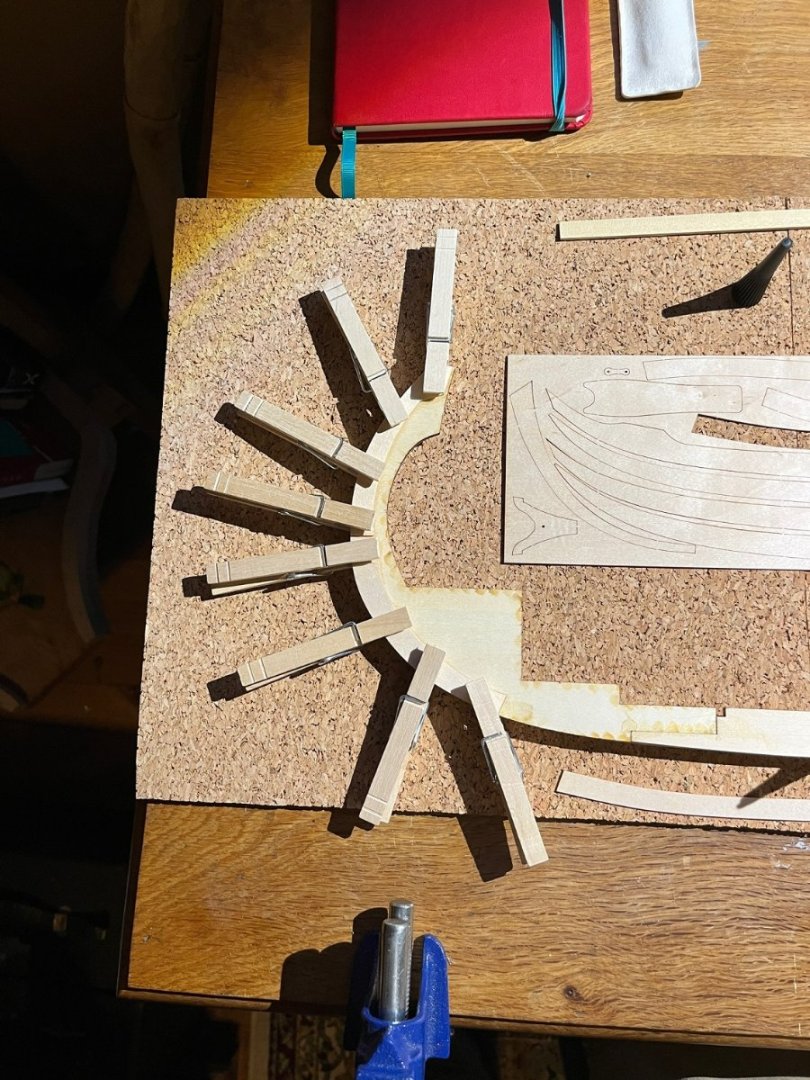
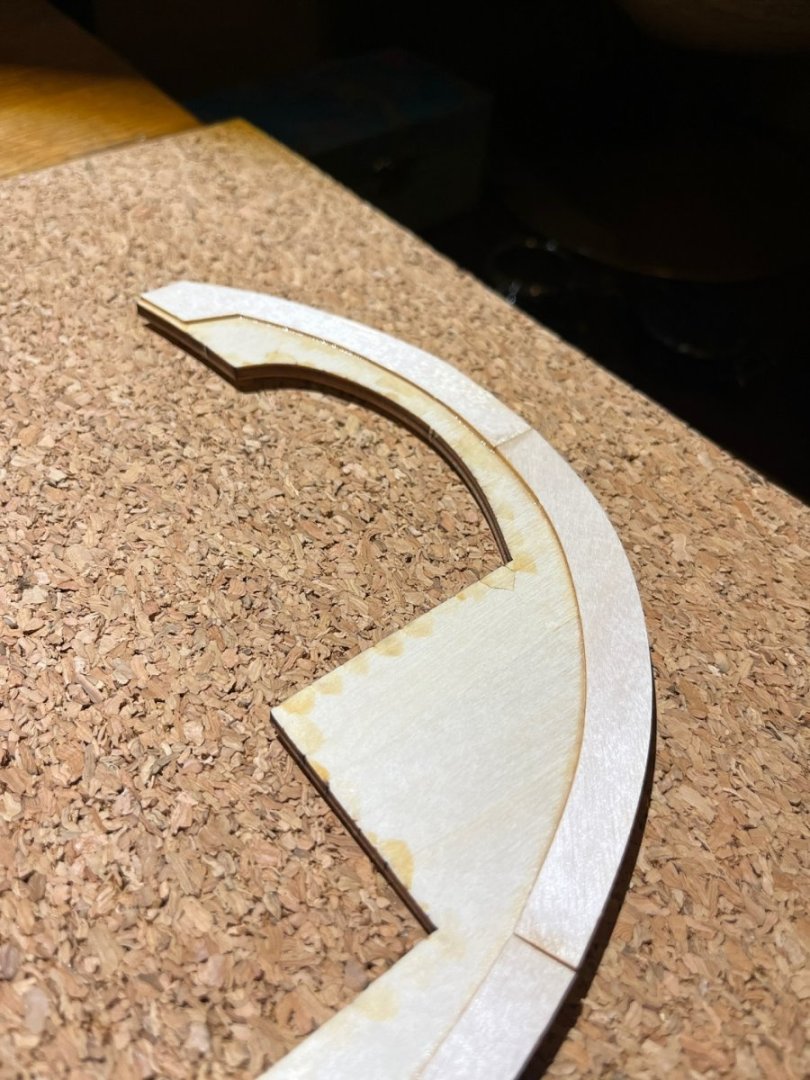
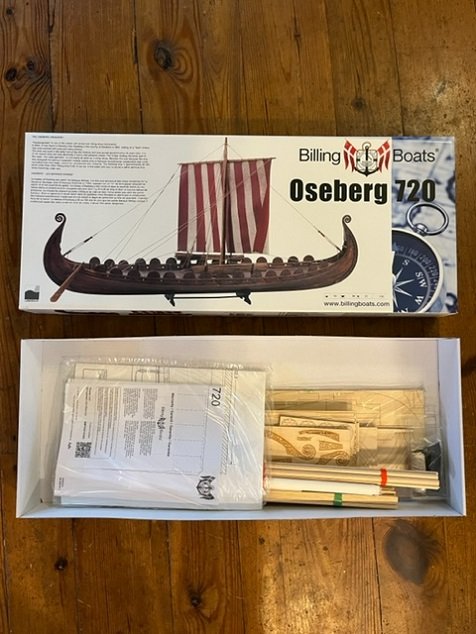
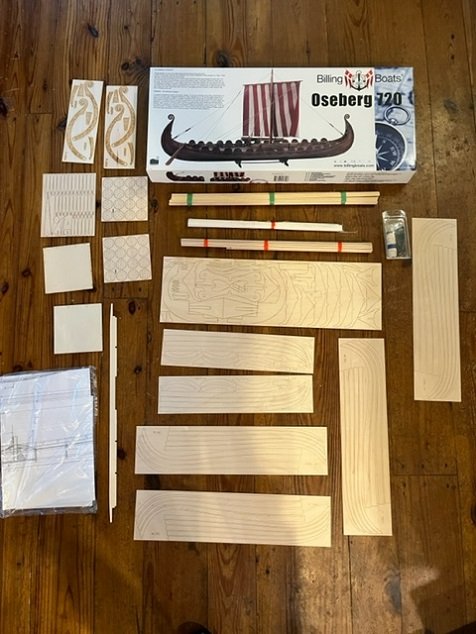
God kveld alle sammen, Permit me a small soap-box train of thought. I seek to minimize exposed plywood edges in my model, I also do seek to have reasonably accurately spaced bulkheads. The model from Billing Boats (Denmark) includes various plywood and plastic parts. I will be customizing my model, but I believe that a modeler could build the stock boat from the kit and wind up with an absolutely beautiful and admirable model. Kit manufacturers need to balance cost and time-to-build, and expectations of builders, and this would be a tough balance to strike. I am very thankful for the work done by the Billing folks; what a great model. I will use the pre-cut planks which will be fantastic, and the nice decorative burned scrollwork in the kit, and of course the plans are so nice and essential and hard earned by the designers. Buying the kit provides me with perfect laser cut wooden templates with which to make solid wood parts. Thanks Billing Boats designers!! This said, I will be recreating many plywood and plastic parts with solid wood, and I will be adding the visible parts of bulkheads that are missing from the kit plans. I utilized the plywood keel for stability and I will use the plywood parts in below-decks spots. Visible parts will mostly be recreated with solid wood parts, as will be seen in the build log as I progress. I am not a perfectionist so for example I may use the plywood shields from the kit, because I think they look cool, and also I do not yet know if I will place metal nails along all the hull planks as Von Kassa and Jack P did (their end results were truly amazing!). OK, enough writing, I will get to the fun part....pictures. I contemplated using the plywood bulkheads. They are made from very high quality plywood and are well-cut. I will not be staining my ship as dark as the ship looks in the museum in Norway, I will be shooting for a caramel colored lighter finish. I tested a stain similar to what I will use on the end-grain of the plywood bulkhead to see how visible the plys would be, and unfortunately I thought the plys were to visible so I need another solution: Previous builders whose build logs I have read have done masterful work with veneering the exposed plywood edges. I decided to make solid wood bulkheads instead of veneering the plywood ones from the kit for 2 reasons: 1. I'm not sure my veneering skills are good enough and I think I would get glue everywhere. 2. I think the time to cut solid wood bulkheads that need no veneering is less than the veneering. I love looking at all the ideas and outcomes.....we'll see if mine turn out! The down side is that perhaps my solid-wood bulkheads will expand and contract and be less stable than the plywood bulkheads? Time will tell. I traced out all the bulk heads onto solid clear basswood and cut them out. I looked for Obeche hardwood for the bulkheads, which is the wood that came with the kit for planks etc... But Obeche is not readily available in the USA. I found a source in the UK. Basswood looked similar in color to me, though visibly different grain, and basswood is readily available here, so that is what I will use for my solid wood parts. I got sheets of 1/4" basswood and planed then sanded them to 4mm exact thickness. Above are the bulkheads and other parts traced out onto my 4mm basswood sheet. I cut these on my Dremel scrollsaw. I traced these with a regularly sharpened pencil and when I cut them out I cut them to exactly remove the pencil line but not more. I checked vs the templates and am happy with the accuracy. I am keeping all original plywood templates! I used an extremely flat and level 3/4" x 5.5" x 36" piece of poplar for a base for the hull-building jig. I used my 3foot steel straight edge to lay out the location and width of the keel on the base, along with the location of the vertical supports. This is a big ship model....about 3' long. and I put little felt feet on the bottom of the jig for a nice smooth steady rest. Here are the 4mm thick basswood bulkheads and a couple other little pieces I made tonight. All there were traced from the 4mm thick plywood laser cut kit pieces. 1 night job including gluing up the jig-base.
- 75 replies
-
- 6
-
-
- Oseberg
- Billing Boats
- (and 1 more)
-
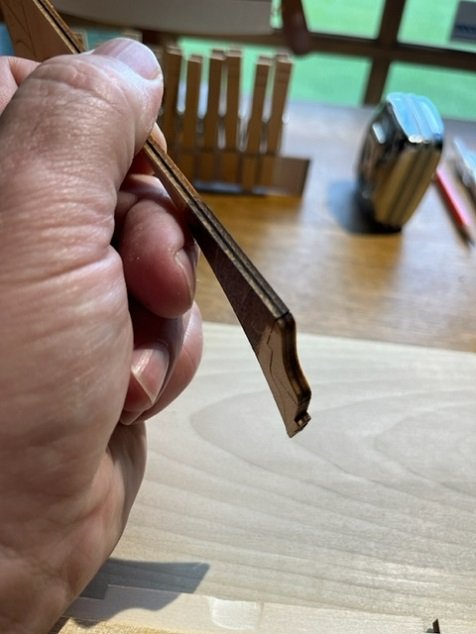
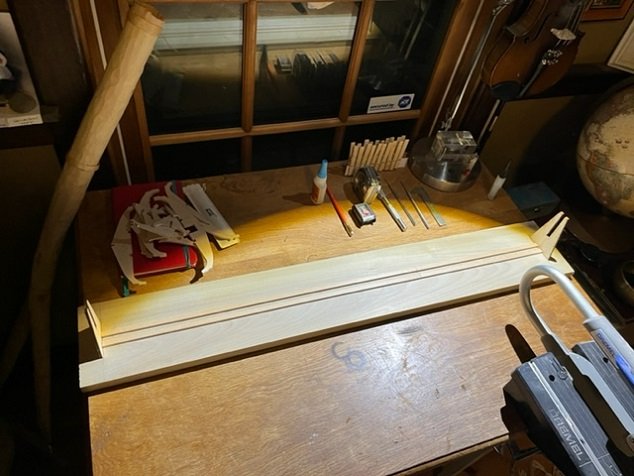
Hei folk som liker å bygge modellskip! Tonight , I got started building the ship. I lightly wrote the part# on many of the pieces first using a pencil. Then, I laid out the keel and glued up what I would call the keel-doublers, which are the reinforcing and thickness-adding pieces added to the both sides of the keel to build it up. I am using CA for gluing wood together. Here is the keel with the doubling strips on both sides. A strip of hardwood is used for the long piece in the middle. The curved doublers are from the laser cut hardwood sheets:


- 75 replies
-
- 7
-
-
- Oseberg
- Billing Boats
- (and 1 more)
-
Also, big thanks to Jack Panzeca and Von-Kossa who previously posted very impressive build logs of this model, which will be very helpful to me and which I have already read. Thank you!
- 75 replies
-
- 2
-
-
- Oseberg
- Billing Boats
- (and 1 more)
-
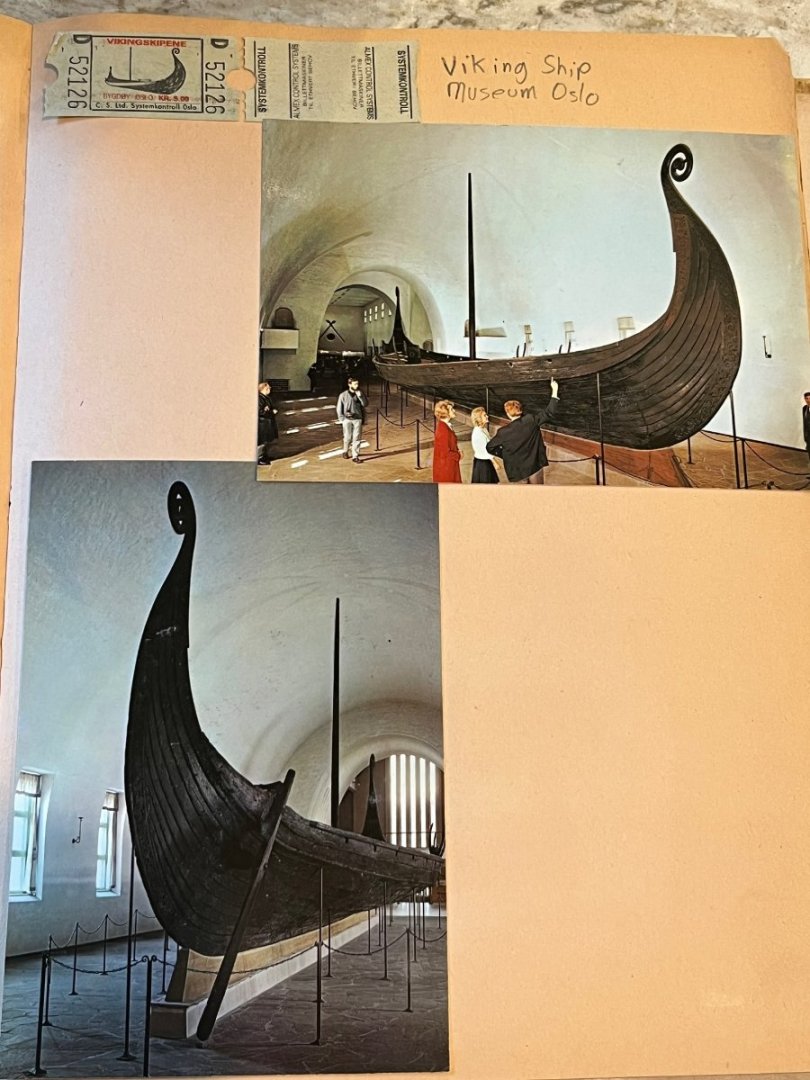
Hello Fellow Model Ship Builders! I am excited to be embarking on the construction of a model of the Oseberg Viking Ship! This ship was a ceremonial burial ship built around 800-834 AD and was excavated in Oseberg , Norway in 1904-1905. My great grand parents came from Sweden and my wife has significant Norwegian heritage, so with our bit of connection to Scandinavia, I thought this would be a fun model to build.....I also love the lines on these fast-looking Viking boats. I saw the actual Oseberg as a young teenager in the '80s in the museum in Norway, post cards (and entry ticket) from my scrapbook are posted below. I'm going to take my time, and as always I am not the fastest builder due to work and family commitments, but here goes! Wikipedia page on the Oseberg: https://en.wikipedia.org/wiki/Oseberg_Ship
- 75 replies
-
- 8
-
-
- Oseberg
- Billing Boats
- (and 1 more)
-
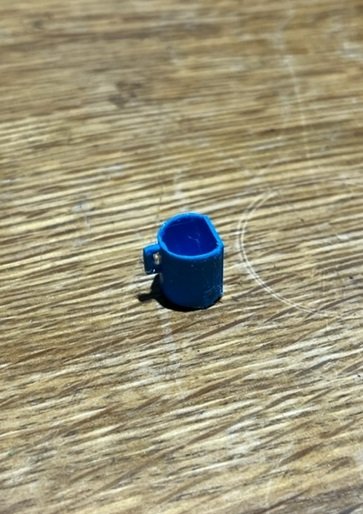
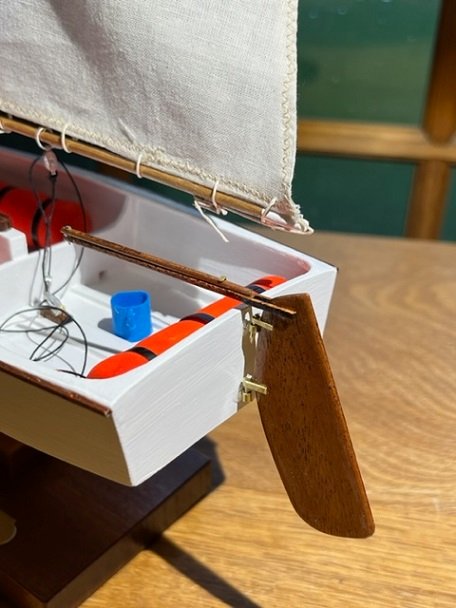
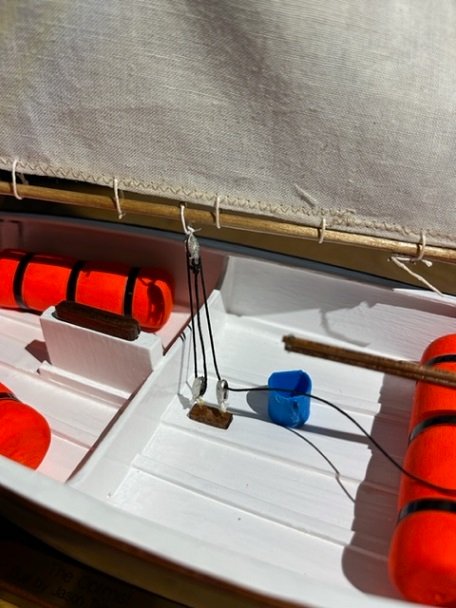
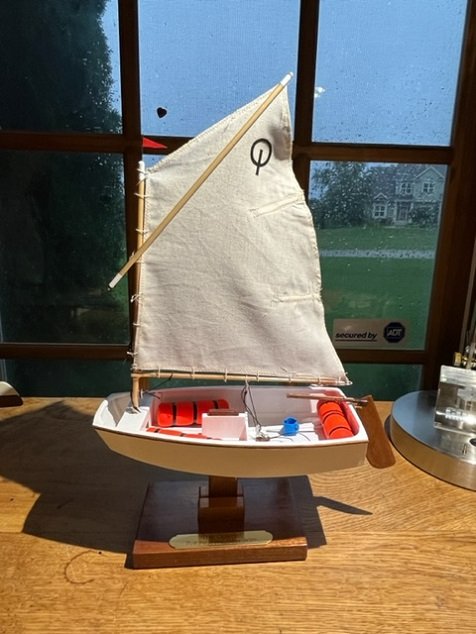
Greetings! I drew up and printed a bailing bucket for the Opti. I seem to remember these being blue in the kids boats so I printed it in blue. Applied a little self adhesive brass nameplate, and now the model is done. Here is the .stl file for this bucket in case you want to print it:Optimist Bail Bucket .stl
- 33 replies
-
- 5
-
-
- Optimist Dinghy
- BlueJacket Shipcrafters
- (and 1 more)
-
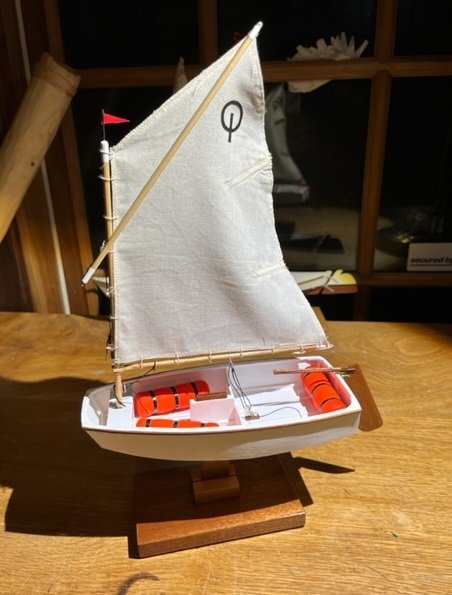
Thanks for the tip Mr. BlueJacket, just resized and re-inserted a number of the photos above and the orientation is now correct.....makes it much easier to look at the picture. This was a very fun model to build and the result is a fine, accurate, model of an opti. -Jason
-
Sorry for all the pictures at 90deg, not sure how to rotate pictures on the forum.....
-
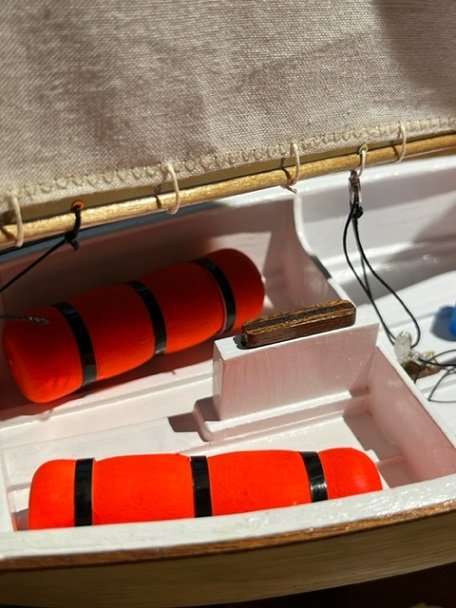
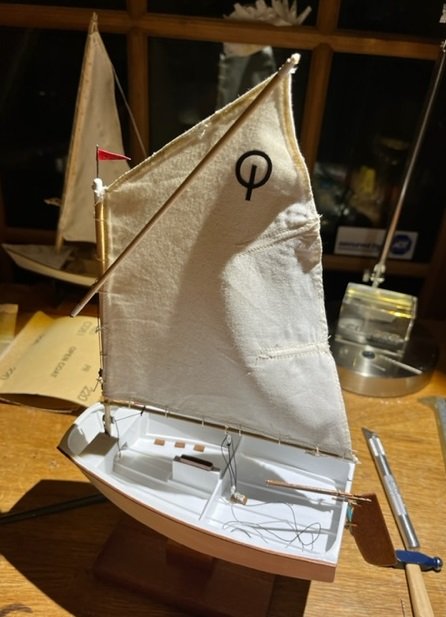
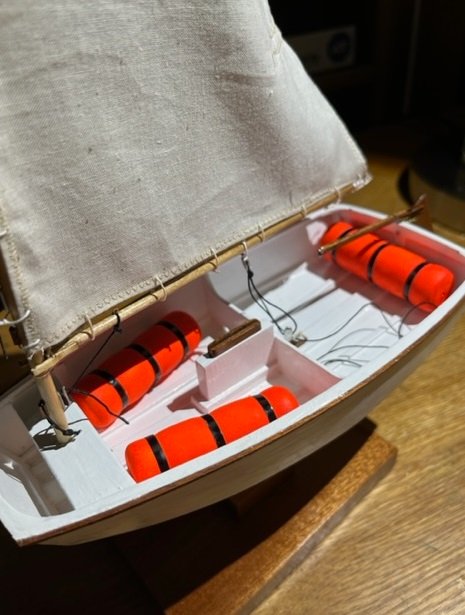
Rigged up the rest of the running and standing rigging per the kit, and installed the floatation cells. This was a very fun model to build and the mistakes I made taught me once again to pay attention more even when I think something is "easy". The kids enjoyed it as well and when it was done, my daughter said "where's the bailing bucket?!"...... all the opti's in the sailing school had bailing buckets and she had a clear memory of that. So before I can call the model complete I will make a bailing bucket. I'll 3D print it. stay tuned. Here's where the model is at now.

- 33 replies
-
- 6
-
-
- Optimist Dinghy
- BlueJacket Shipcrafters
- (and 1 more)
-
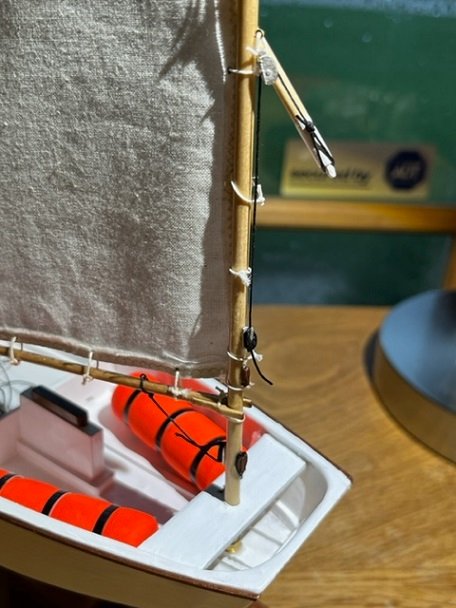
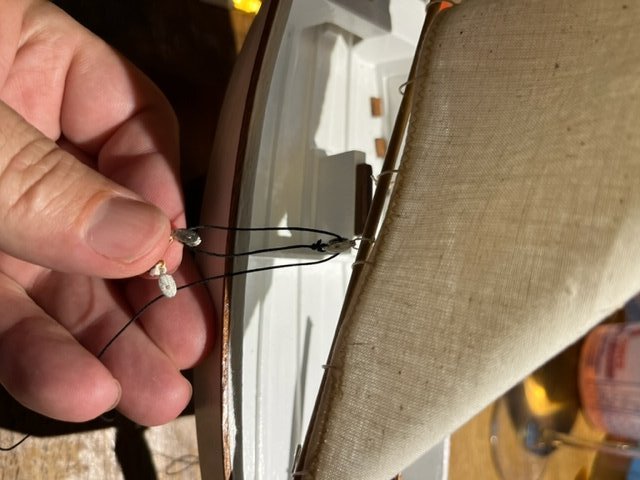
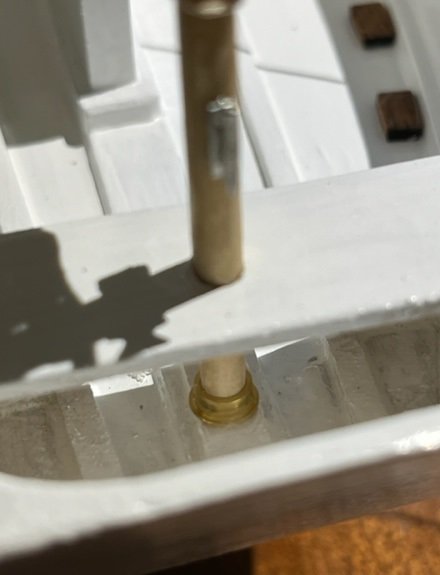
I drilled and used the sewing needle from the kit for the mast-head wind indicator pole. Snipped off the top of the needle with a steel wire cutter. Their is a nice brass ring that secures the foot of the mast, here it is installed at the floor of the hull: Here is the mainsheet block assembly. I drilled out the little cast blocks and installed them into the wooden block that mounts to the floor. Then I rigged the mainsheet prior to gluing this assembly down.


- 33 replies
-
- 1
-
-
- Optimist Dinghy
- BlueJacket Shipcrafters
- (and 1 more)
-
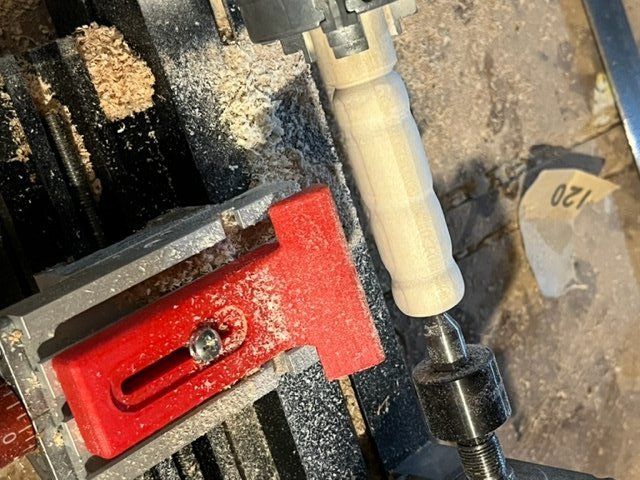
Bonjour! Making inflatable float-bags using my mini lathe. One could also easily carve these shapes with a knife, so if you are considering making this model.....you do not need a lathe, you can use a knife for this.

- 33 replies
-
- 2
-
-
- Optimist Dinghy
- BlueJacket Shipcrafters
- (and 1 more)
-
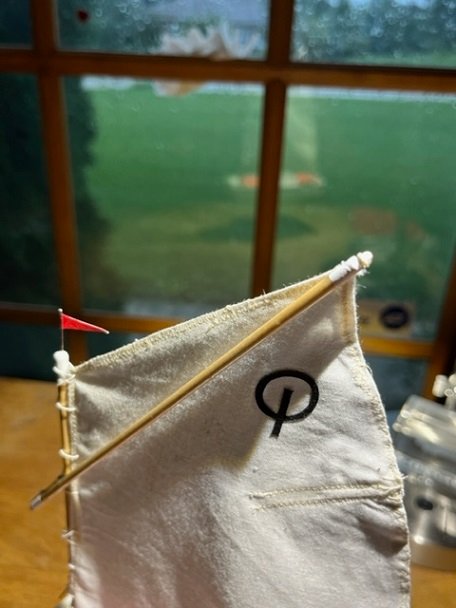
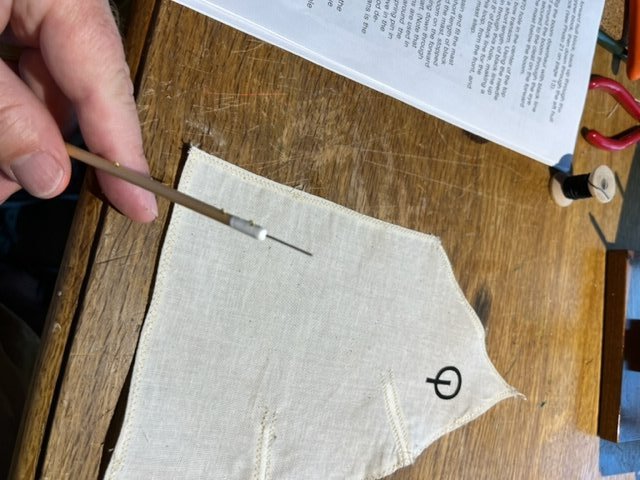
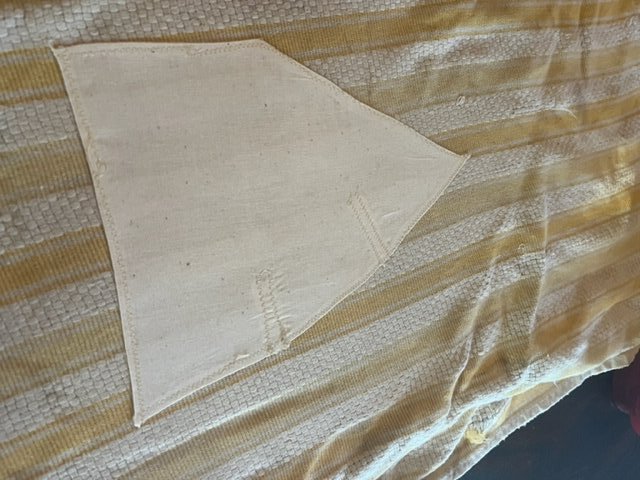
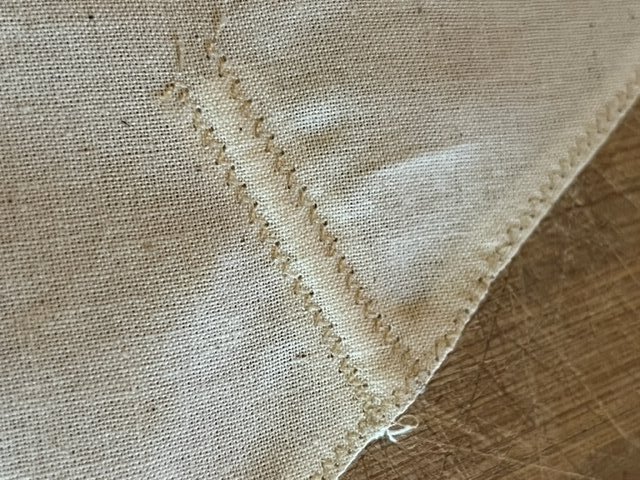
Hi All, here is the 2nd sail, correct size. Optimist decal applied to both sides. Note bolt-rope stitched into the hems.
- 33 replies
-
- 1
-
-
- Optimist Dinghy
- BlueJacket Shipcrafters
- (and 1 more)
-
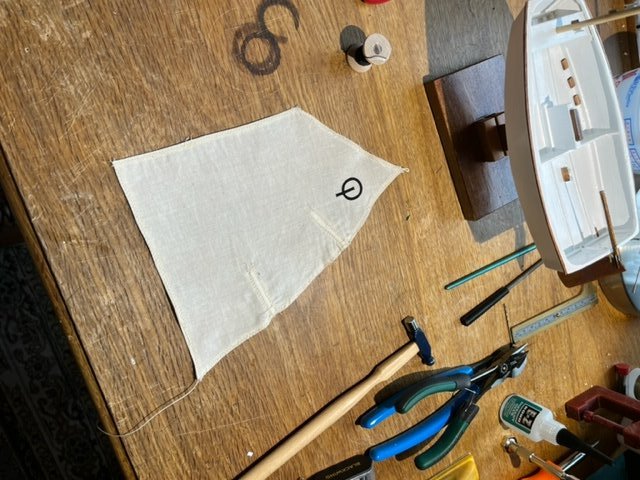
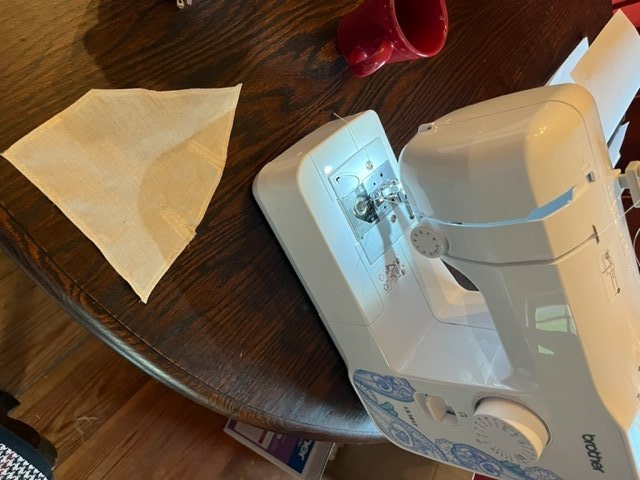
Someday I will learn the measure twice , cut once lesson, but it wasn't today.
-
Argh! I traced out the upper edge of the sail above, along the sprit, not along the top of the sail on the drawing, so my sail is the wrong shape. Will have to make another one. Silver lining....I get more practice on the sewing machine.
- 33 replies
-
- 1
-

-
- Optimist Dinghy
- BlueJacket Shipcrafters
- (and 1 more)
-
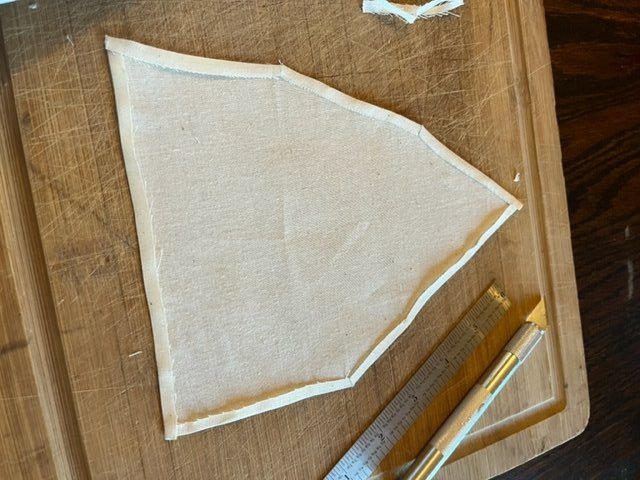
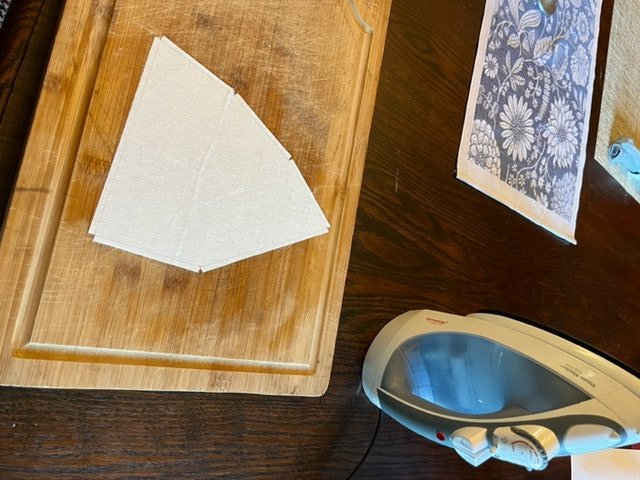
Closing in on the completion of this fun little model. Last night I made the sail. -Traced and cut out the sail with a scalpel. I left additional material for a 3/16" hem as can be seen in the photo. -Ironed the hems flat -Stitched all the hems on a sewing machine -Cut out strips of sail fabric for batten pockets, and stitched on the batten pockets -Ironed the sail again -Cut and installed the battens
- 33 replies
-
- 2
-
-
- Optimist Dinghy
- BlueJacket Shipcrafters
- (and 1 more)
-
Thank you all for the encouraging comments! The Optimist was designed by Clark Mills in Clearwater Florida in 1947 and was originally designed as an easy to build wooden boat. The initial optimists were wooden. Over 150,000 optimists have been built!
- 33 replies
-
- 1
-

-
- Optimist Dinghy
- BlueJacket Shipcrafters
- (and 1 more)
-
I used mahogany (not from kit) for the rub rail.
- 33 replies
-
- 4
-
-
- Optimist Dinghy
- BlueJacket Shipcrafters
- (and 1 more)
-
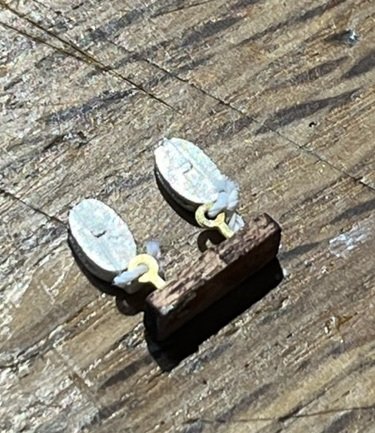
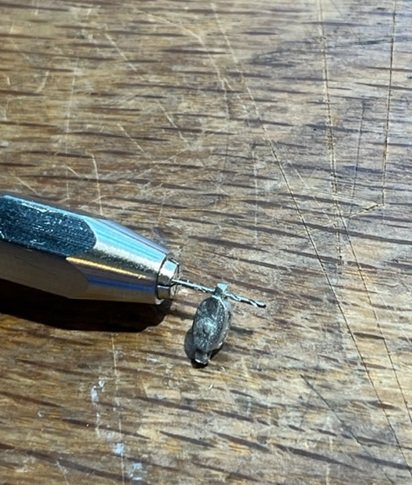
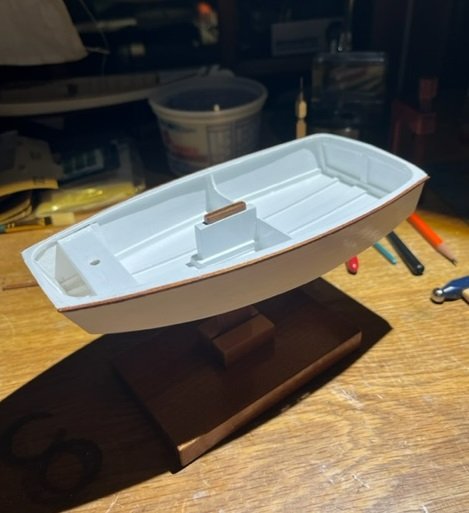
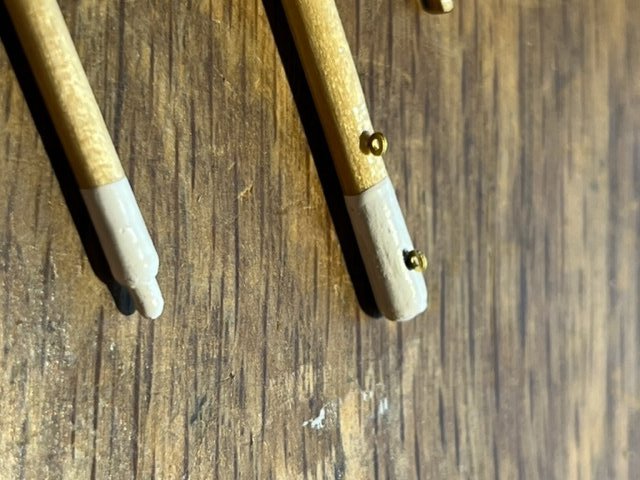
Good Evening, Painting and sanding and painting and sanding the hull. I am pleased with the gloss white vs matte white that came with the kit. Also finished painting and varnishing the spars tonight, along with attaching/installing the eyebolts and cleats. Eyebolts were installed by drilling a hole in the spars with the pin vise and then carefully gluing the trimmed eyebolts into the holes.
- 33 replies
-
- 2
-
-
- Optimist Dinghy
- BlueJacket Shipcrafters
- (and 1 more)