

RRLittle
-
Posts
69 -
Joined
-
Last visited
Content Type
Profiles
Forums
Gallery
Events
Everything posted by RRLittle
-
 Amazing work. Definitely. Great job! - Robert
- 962 replies
-
- 7
-

-
- sovereign of the seas
- ship of the line
- (and 1 more)
-
The anchors were carefully rigged as per the original Anderson/Pritchard design, tied to the fore ratlines. Two flags were made from cigarette paper (note; I'm a nonsmoker) with colors added with colored pens. Fine line was looped around the flagstaffs on the fore and main mast, and the flags glued into place, after pre-shaping them. All that remains in this shot is the nameplate on the now painted stand. The model itself is now finished. Construction time was estimated to be over 100 hours.
- 40 replies
-
- 2
-
-
- plastic
- r.c. anderson
- (and 2 more)
-
The last items on the ship itself that needed attention were the anchors. The kit includes a simple one that lacks stocks. Another anchor was cut from styrene sheet, a brass ring was added, and they were painted and weathered before colored cardstock stocks were added. This should give an idea of how small they are; this was shot through a large desk loupe. The scale is in inches. The scratch built anchor is on the right.
-
Meant to include this shot earlier. This is the bowsprit rigging while it was underway. To help keep the lines taut, I used these new miniature clothes pegs. They are fairly inexpensive for a large number of them. Highly recommended as an addition to your tool set.
- 40 replies
-
- 1
-
-
- plastic
- r.c. anderson
- (and 2 more)
-
The bowlines were made from 32 gauge brass wire, built up separately, and carefully installed in place. Finally, the sheets and mainsail tacks were added. This completed the bulk of the running rigging. As you can tell, by this point, my other camera was back up and running as well.
- 40 replies
-
- 3
-
-
- plastic
- r.c. anderson
- (and 2 more)
-
The mizzen tackle proved to be a challenge. Here, I failed, once more, to heed my own advice; work inside to outside, bottom to top. Failing to do that, I found myself having to work around rigging. It was tedious. It was completed, but took far longer than expected. As a result of my poor planning, I decided that some additional rigging details were going to be omitted altogether, though I don't think their absence has made too much of an impact.
- 40 replies
-
- 2
-
-
- plastic
- r.c. anderson
- (and 2 more)
-
Here is a shot of the mizzen sail and some of its rigging to give one an idea of how small this model really is.
- 40 replies
-
- 1
-
-
- plastic
- r.c. anderson
- (and 2 more)
-
5th December - Work is slow right now, doing what I can when I am able. The braces for the main mast yards are up. Due to my shaky hands, the process took longer than anticipated. Also, my main camera is still down, so this image's quality is not the greatest. Monday things should improve. Cheers, - Robert
-
Ironically, this is larger than the usual scale I build in! The eyes age, needing to go larger, even if a little. Thank you.
-
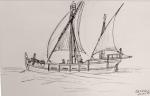
I am back to work on the Mayflower, though things have slowed down. Let me apologize for the images, however. Not only are they from my phone, my online storage site is being a bit cranky. Running rigging is underway. It is a combination of regular thread and 34 gauge copper wire. The mizzen lift was a complicated affair. It is a combination of copper wire and thread, and required very steady hands. More to come as I proceed. Cheers, - Robert
-
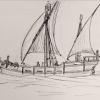
23rd November, 2015 - It has been a few days since I last posted. I've had some problems with my Kodak digital, and lost some images, but I will catch everyone up. The yards were made and laced with the sail "robands" before the sails were added. The reason here was that the sails are made with fine tissue, and running them through would have been a risky proposition. The robands were laced in such a way that one strip of the fine khaki line that made them faced forward, and the sails' heads were glued to these. Once I was satisfied, the sails (which feature penciled details and a watercolor wash) and yards were glued into place. Three of the sails, the sprit, fore, and main, are partially furled, as in the original model. The mizzen is slung to the port side of the mast, unlike the original (vive la differance?). As I began the running rigging, there was an accident. A large bottle of glue fell over and knocked the model to the floor, damaging several yards and the running rigging that was in place. The sturdier standing rigging held up fine. I implemented repairs, but unfortunately they show (the fore top yard was reshaped slightly by removal of some rigging, for instance). After re-rigging most of the sprit sail this evening (still need to add the sheets and clews), I decided to call it a night. The model will not meet the self imposed Thanksgiving deadline, I'm afraid.
- 40 replies
-
- 4
-
-
- plastic
- r.c. anderson
- (and 2 more)
-
A little video I shot explaining where I was at this point. Robert's Mayflower, 16th November, 2015
-
Once all the deadeye assemblies were completed, each received a coat of varnish to seal everything together. While certainly not perfect, especially when scrutinized, it certainly is better than foregoing them altogether. Unfortunately, I discovered at this point in the project that the bowsprit was now pointed a bit too high. Sadly, not much I can do about it without scrapping the entire project. Have to live with it, I'm afraid. C'est la vie.
- 40 replies
-
- 2
-
-
- plastic
- r.c. anderson
- (and 2 more)
-
The deadeyes posed a bit of a problem. On larger scale models, I use very small diameter brown card stock punch-outs. On smaller models, I use blobs of glue. This model fell effectively between those two. I decided to try an experimental method. As this version of the "Mayflower" used heart blocks, and as I lack an appropriately shaped punch, I decided instead to make two strips of brown card stock, one 3/16", the other 1/8". Down the center of each strip, I drew a thick black line, roughly 2/3 the strip's width. Then, 1/16" segments were cut from this, each segment given a triangular tip on the ends matching the height of the brown sections. These would serve as the backing for the deadeyes. The smaller strip (the 1/8") would serve as the mizzen and top masts, the wider naturally for the lower masts. Here, the smaller strip is cut for the assemblies. By themselves, they look okay from a distance. However, they are not really complete. Small sections of fine khaki thread were glued over the black sections; initially the outer pieces, and finally an inner line. This is the lower assemblies under way. White glue was used throughout, straightening as I went along.
- 40 replies
-
- 1
-
-
- plastic
- r.c. anderson
- (and 2 more)
-
Each completed ratline section was carefully cut and trimmed, and glued into place on the ship. Before this, the main and mizzen knight were made. I ended up making two smaller ones before discovering that the fore knight was actually hidden below the focs'l deck. These were still a little rough in this image. The matching ramsheads (not shown) were made in much the same way, using styrene sheet and brass wire. Here is the model at this stage again, with a Testors bottle for scale.
- 40 replies
-
- 2
-
-
- plastic
- r.c. anderson
- (and 2 more)
-
The shrouds and ratlines were laid out on what I refer to as a modified McCaffery Loom, named for famed miniaturist Lloyd McCaffery, who designed the initial unit. Two 1/4" - 20 6" carriage bolts hold the whole assembly together, which also uses sections of a yardstick. The measurements on the latter help with positioning the vertical lines when they are applied. Here, very fine polyester line is being used, with 34 gauge "copper" (really copper plated) wire for the shrouds. You can see how the threads in the the bolts help to guide the lines. The lines are glued down with thinned white glue (PVA). The loom allows for both sets of ratlines to be made together; simply turn the rig over once one side was down, and then use them as a guide to make the opposite side copy. This glue would also be brushed over each and allowed to dry for further reinforcement. Once the glue had set overnight, the ratlines were painted with Testors Flat Black. Once the paint had completely set, masking tape was put over the lines on the bolts, and the ratlines were cut en masse from the loom.
- 40 replies
-
- 2
-
-
- plastic
- r.c. anderson
- (and 2 more)
-
Normally, I try to replace the flimsy plastic masts found in some of these kits with wooden ones. However, I've chosen instead to keep the original in this case, to my detriment; they are not only warped (as well as having a fond memory of being thus), they truly are too flimsy. The masts were painted with Testors Flat Brown with Flat Back tops and details, wooldings added with painted tissue strips, and then stepped. The fore and mizzen were glued into place; generally, I try to avoid that and allow the standing rigging to hold the masts. I commenced with the stays. Here I made a mistake; the black thread I bought for the purpose was not a cotton blend, but 100% nylon. This made the work even more tedious, as I normally use white glue to set the seizings and knots. Instead, I had to use CA.
- 40 replies
-
- 1
-
-
- plastic
- r.c. anderson
- (and 2 more)
-
I've had some matters that had to be tended to this past week, so there was a slow down. However, I have made quite a bit of headway in the past two days. Images will be loaded this evening.
-
Final bit of work on the 4th November; hit the model with Dullcote and stepped the bowsprit. Also corrected the trim damage on the transom. Since the gammoning is really non-functioning, it had to be shaped and then fit into place. Mast color for this project is good old Testor's Flat Brown. There was a little bit of green ink bleed on the upper works, not far from where the shrouds should run, but still going to touch this up, probably by cutting tiny yellow triangles instead of painting (my hands are simply not that steady anymore).
- 40 replies
-
- 5
-
-
- plastic
- r.c. anderson
- (and 2 more)
-
Thank you. Considering these little projects "practice"; I am trying very hard to rebuild my skills.
- 40 replies
-
- 1
-
-
- plastic
- r.c. anderson
- (and 2 more)
-
The transom. There is no detail at all here in the original kit. To give you an idea of scale, the "marigold" is 1/4" in diameter. I have fumbled here; the upper trim was still drying and apparently moved a little. Also, discovered that there was still some white showing from where paint had been removed from the starboard quarterdeck railing. All of these little mistakes will be corrected before the next set of images, which will be taken with my regular camera, instead of these "in progress" shots taken with my phone.
- 40 replies
-
- 4
-
-
- plastic
- r.c. anderson
- (and 2 more)
-
4th November, 2015 - Hull painting commences. The decorative work was added using an old technique gleaned from McNarry and Hunnisett, painting on tissue and in essence making "decals". Not happy about some of it at the quarterdeck, but this will be partially obscured by shrouds. Wales were also added using the painted tissue technique. Hull color is Humbrol 29, Dark Earth Matt. Here, it has a sealing coat. Soon, it will be hit with Testor's Dullcote.
- 40 replies
-
- 3
-
-
- plastic
- r.c. anderson
- (and 2 more)
-
3rd November, 2015 - Looking down on the focs'l, we can see that the opening for the halyard falls has been framed. The stem is added at the bow, and a small rudder was fashioned for the shallop, though it is unshipped and laying on the stern thwarts. Still undecided about sweeps at this point.
- 40 replies
-
- 2
-
-
- plastic
- r.c. anderson
- (and 2 more)
-
The finished shallop was attached using white glue. At each corner of the main hatch, small holes were drilled directly into the deck. Four eyebolts were made from 32 gauge copper wire, painted black, and glued into each hole. Once they had set, a length of fine khaki cotton thread was beeswaxed and then used to "tie" the boat down. A small drop of white glue was added to each eye, and the excess material was cut. A chimney was shaped from a piece of black styrene sprue and glued into place. The date of this image is 31st October, 2015 (Halloween).
- 40 replies
-
- 1
-
-
- plastic
- r.c. anderson
- (and 2 more)