

RRLittle
-
Posts
69 -
Joined
-
Last visited
Content Type
Profiles
Forums
Gallery
Events
Everything posted by RRLittle
-
 Cabin windows were opened up in the stern of the model using a drill and square file.
- 40 replies
-
- 2
-

-
- plastic
- r.c. anderson
- (and 2 more)
-
A new shallop was made using cardstock and CA as a filler.
- 40 replies
-
- 1
-
-
- plastic
- r.c. anderson
- (and 2 more)
-
Here, most of the new deck details are down. Printed grid paper was used to make the grating in the beak. A new hatch was added as well, using the same "grating". New doors were added using the Avery self-adhesive material.
- 40 replies
-
- 2
-
-
- plastic
- r.c. anderson
- (and 2 more)
-
The kits capstan is the wrong design, as well as being a bit short. A new one was made from styrene, with a combination of sprue (for the core) and sheet (all other pieces). In total, there are twelve pieces, and across the bars it measures less than 3/8".
- 40 replies
-
- 1
-
-
- plastic
- r.c. anderson
- (and 2 more)
-
Each section of decking was cut out, the backing removed, and applied to the sub-deck.
- 40 replies
-
- 2
-
-
- plastic
- r.c. anderson
- (and 2 more)
-
Here, the decking is stained with a loose mix of acrylic paint, finger-streaked.
- 40 replies
-
- 1
-
-
- plastic
- r.c. anderson
- (and 2 more)
-
New decking was drawn using a hard pencil onto Avery name badge material.
- 40 replies
-
- 1
-
-
- plastic
- r.c. anderson
- (and 2 more)
-
The bowsprit needed to be moved a bit to starboard, about one diameter. The original mounting point was filled with a small piece of styrene rod that was glued into place with CA. Once it set, the area was filed, and the new mount drilled into place. A slot was also cut a slot into the beak's "floor" for the stem and gammoning. Some initial painting was done.
- 40 replies
-
- 1
-
-
- plastic
- r.c. anderson
- (and 2 more)
-
New holes were drilled for the rigging, chimney, and knights. Some deck and hull detail was removed.
- 40 replies
-
- 1
-
-
- plastic
- r.c. anderson
- (and 2 more)
-
This model has a very questionable pedigree. While visually based on the R.C. Anderson design, it really has detail and design more in common with the old Megow wooden kit from the 1930's-40's. This is my attempt to make it more like the Anderson version, which still exists at the Addison Gallery of the Phillip's Academy. It is also another step as I try to rehabilitate and rebuild my skills as a model builder. To start, I needed to find a scale for the model. Like so many of the plastic sailing ship kits from the 1960's, it has no real stated scale (indeed, the box art even depicts another version of the Mayflower!). Based upon Anderson's stated dimensions in "A Mayflower Model" (Mariner's Mirror, vol. 12, 1926), 64' keel, 26' beam, a scale of approximately 1/250 was determined. Construction began in earnest on 24th October, 2015. Initial construction consisted of making "timbers" from sheet styrene (an old garage sale sign). The two gunports were blanked as well.
- 40 replies
-
- 2
-
-
- plastic
- r.c. anderson
- (and 2 more)
-
Thank you, Steve. Currently having fun with the Life-Like (nee Pyro) "Mayflower". Expect a full report here and my blog. - Robert
- 9 replies
-
- 1
-
-
- Columbus
- Santa Maria
- (and 2 more)
-
Finished model. The blocks were made using the Tacky Glue blob technique. All running rigging was made using the fine copper-plated wire, glued into place with the Tacky Glue and Elmer's Glue-All. Model was hit with a coat of Testors' Dullcote matte varnish. Here it is with the 1/350 Zvezda Serrano version of the "Santa Maria". Clearly, it is a smaller ship, especially when one considers that the Airfix Guillen version is almost 10% smaller in scale.
- 9 replies
-
- 5
-
-
- Columbus
- Santa Maria
- (and 2 more)
-
The sails are too large on this model. I decided to try keeping the original sails and yards. The only sail that did not need reducing was the spritsail. The foresail was only shortened; it should have been reduced in width, but I chose to skid that. The lateen mizzen was also reduced by about 1/4" (6mm) along with the yard. As it would turn out, it would need further reshaping. All sails were shaped with a heavy file and sandpaper. The spritsail yard also needed some filling in, after the ring, that was supposed to hold it to the original bowsprit, was removed. These were painted with thinned khaki acrylic. Seams were added with a soft lead pencil. The yards were painted with brown acrylic. The sails were then sealed with a spray of Dullcote, and washed over with thinned white acrylic. The fore and mainsails were then given a coat of semi-gloss acrylic varnish. Before the decals could be used, they hung in a window facing the Sun for two weeks to reduce the yellowing. They also needed to be trimmed, now that the fore and mainsail had been resized. I removed as much clear decal film from around the crosses as possible. They went on well for the most part, but the cross on the foresail did break and chip. Here is the model with all the standing rigging in place. 32 gauge "copper" (really copper plated) wire was used, as well as fine khaki thread for some pieces. The footropes on the two forward shrouds for the mainmast were added with a modified McCaffrey loom. Deadeyes were made from blobs of Aileen's Tacky Glue.
- 9 replies
-
- 1
-
-
- Columbus
- Santa Maria
- (and 2 more)
-
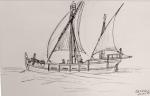
Another item missing from the model was a ship's boat (at least one). A new one was made from index card stock. Yet another item missing from the kit were anchors. Two were made from heavy brass wire, cardstock, and ample amounts of Aleene's Tacky Glue to help add shape. Anchor line was made from cabled 32 gauge copper wire. The halyard was made from fine, beeswaxed thread. A bead was used to simulate the halyard block. Other details made from the Avery self adhesive material are the front to the cabin and detail for the breaks between the forecastle and halfdeck (these should have been made open, but I chose to keep it a little simpler). The last detail was ladders for the forecastle and quarter deck. New masts were made from basswood, stained with Testors Flat Rust, and stepped into place. While somewhat smaller than the originals, they are still a bit out of scale in diameter. This is due to the decision to retain the kit's sails and yards. The mainmast was drilled for the halyard. The step for the bowsprit was difficult to add, due to the angle, something I should have considered before applying the deck. Small coils of the copper wire were painted khaki and added for belaying points. That process would continue through the construction. The top at this scale was going to be a challenge. I finally settled on making one from aluminum tubing that was slotted six times with a metal file. It was the splayed out a little at the top. A base was made from a small styrene disk, drilled for the upper mast. The upper rail from heavy (24 gauge) brass wire. This was then glued into place on the mast. The top was painted to match the mast. Only after I did this did I discover that the 1927 version had a closed top instead of this open design.
- 9 replies
-
- 1
-
-
- Columbus
- Santa Maria
- (and 2 more)
-
New channels were added. Here, the model has been primed and has its initial coat of paint, just regular craft acrylic. Second coat of the final paint. Main colors are Apple Barrel Burnt Umber and Barn Red acrylic. It was crucial that the model be sealed after completion, as these colors rub off easily. Here, a coat of Testors Dullcote had been applied for the purposes of working. Other colors are Testors Flat Green and Folk Art Light Gray. The deck tracings were cut out. These would be used as templates. The new decking was actually made from an Avery self adhesive badge. The planking (admittedly over scale) was drawn using a hard pencil. A thin coat of a loose mix of Folk Art Camel and Craftsmart Khaki acrylics was streaked over the decking. Decking completed.
- 9 replies
-
- 1
-
-
- Columbus
- Santa Maria
- (and 2 more)
-
New masts would need to be made, a bit smaller. In order to step these properly, plugs would need to be made with reduced diameter holes for the new masts. A length of sprue was bored out for the purpose. These were inserted into the original holes for the masts. These will soon be drilled out a little larger. The stern on the model was flat and completely lacked detail. New detail was added using the drawings as reference. The detail was made from thin styrene strips. New railing was added. A rudder was added; the kit lacked one altogether.
- 9 replies
-
- 1
-
-
- Columbus
- Santa Maria
- (and 2 more)
-
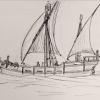
All of the detail was removed from the decks, and the quarterdeck was removed entirely due to how thick it was. Note the diameter of the mast steps (the hole between the fore and main is where the main hatch was). The decks were traced, a new quarter deck was made from thin styrene sheet, and the hull was assembled. I reduced some plans of the Guillen 1927 design to 1/384 to assist with the construction. Here, it is obvious that the masts are horribly out of scale.
-
When Airfix retooled their little "Santa Maria", they did a very nice job. There are some minor issues, such as improperly placed chainwales. These were removed. Please note, some of these shots were made with my ZTE smartphone camera, so they are a bit rough. Be that as it may, they are good enough to show adequate amounts of detail. In addition to the chainwales being removed, holes for the sheets and hawser were made using a spade drill. Also, the solid rail on the quarterdeck was removed.
-
Good Morning All, Normally, I would link to my Picasa album, but instead I think I will share the highlights and provide a link as well. As I mention over on my blog, this model is the one that finally got me into maritime historical research, way back in 1988. This is a link to my blog entry about the model and build - Building Airfix's "Santa Maria" And this is the link to my Picasa album - Airfix 1/384 "Santa Maria" Cheers, Robert