Karinmutter
-
Posts
103 -
Joined
-
Last visited
Content Type
Profiles
Forums
Gallery
Events
Everything posted by Karinmutter
-
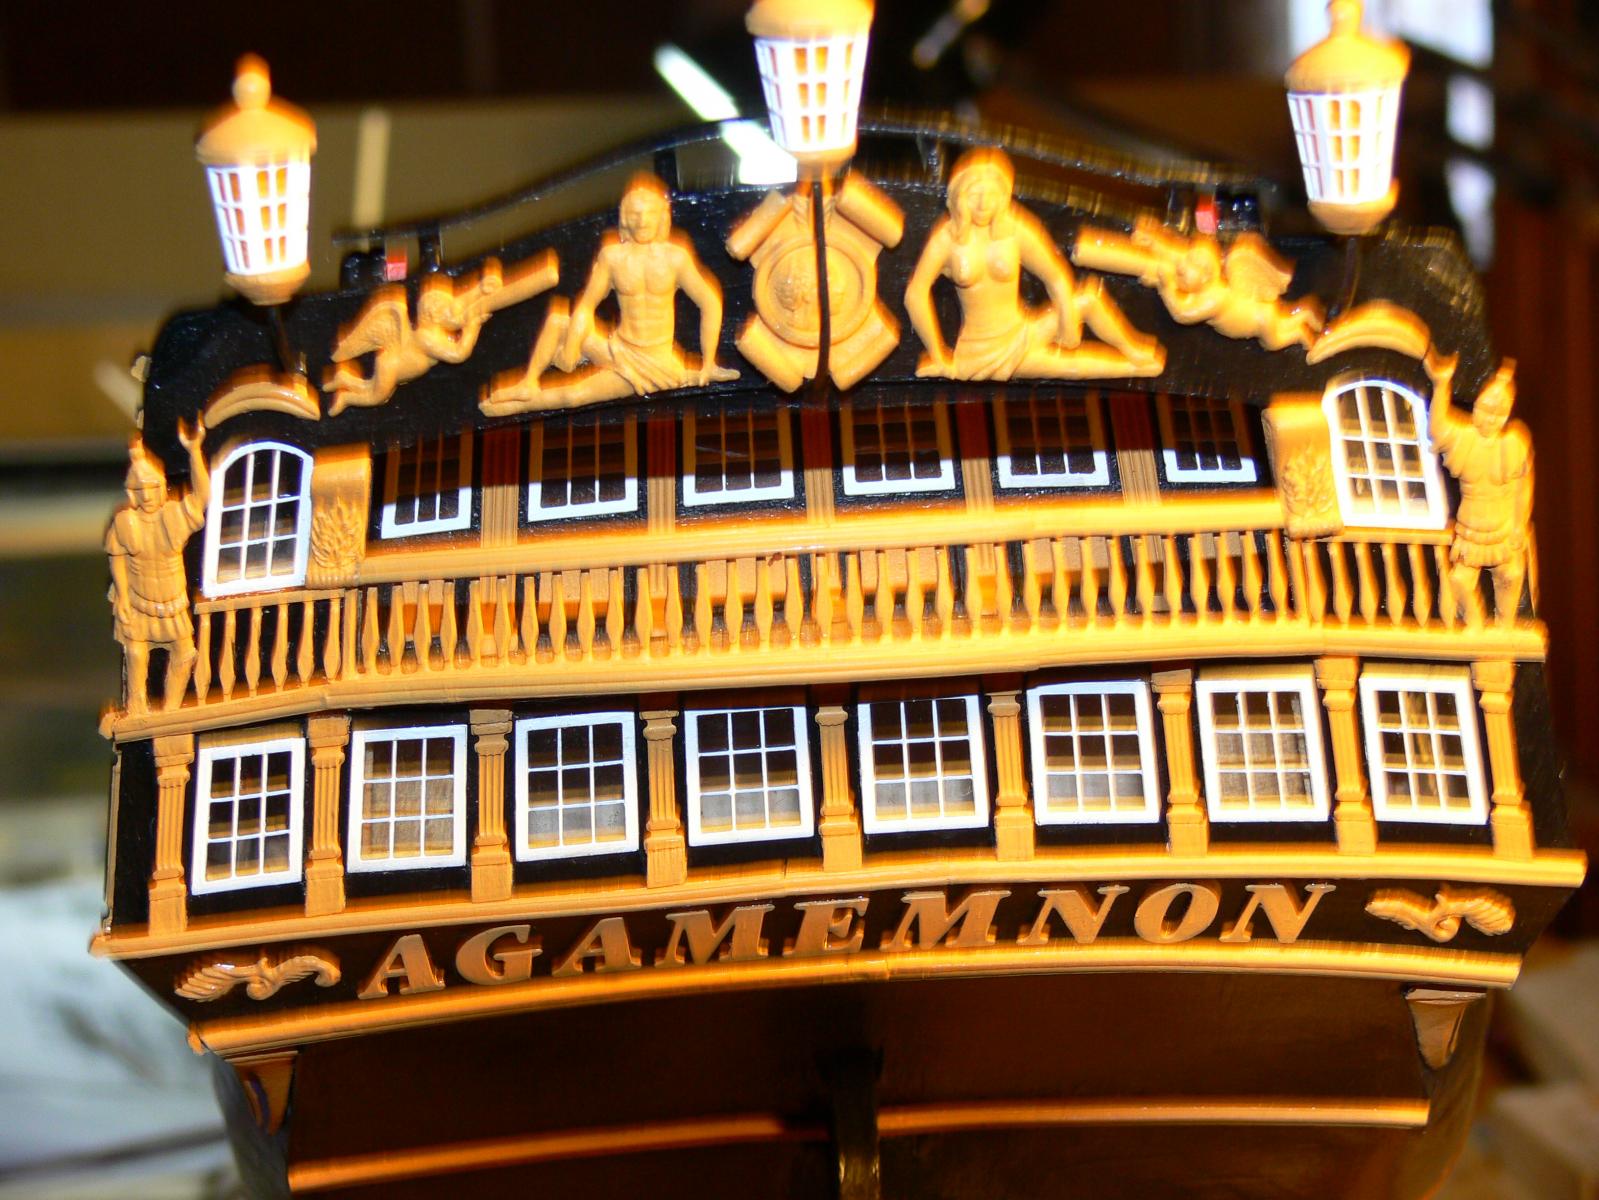
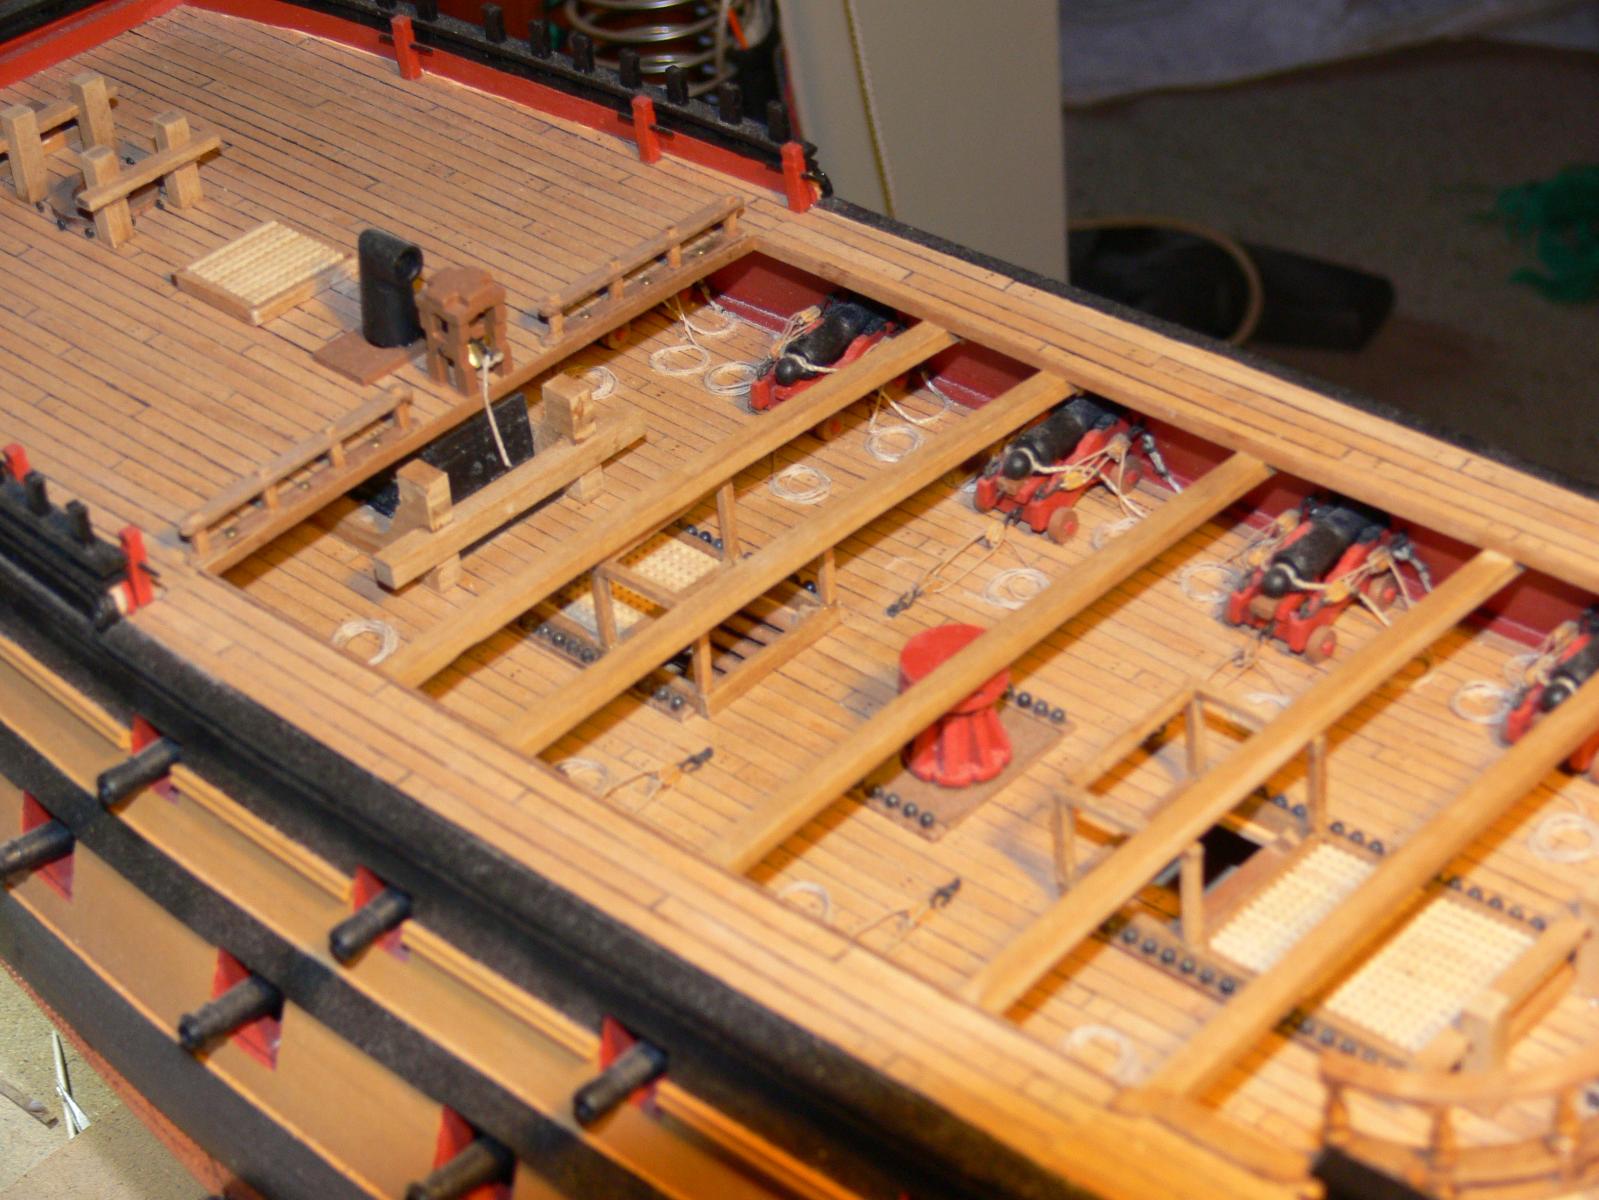
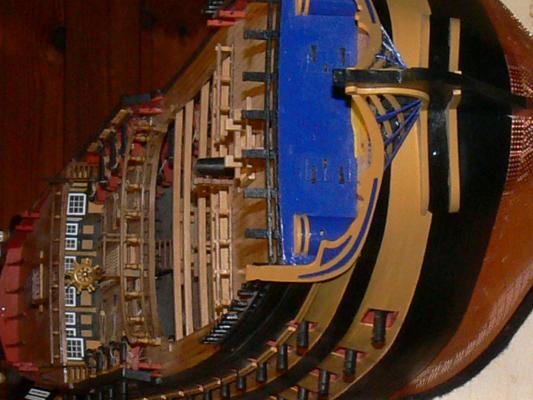
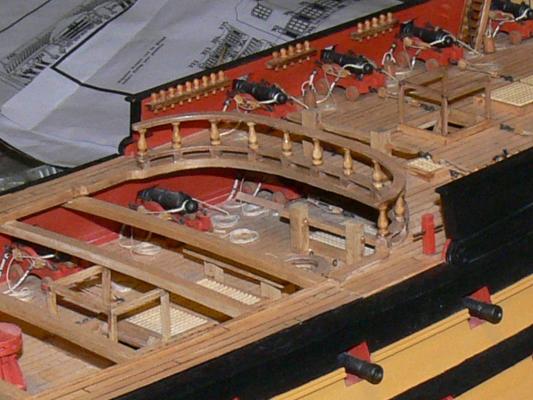
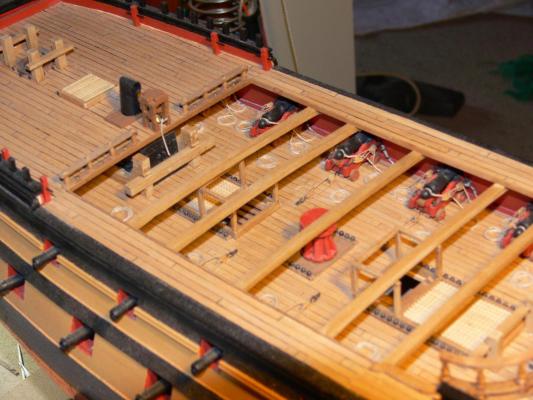
 A few more pictures. I still have not mastered my camera yet, but I hope I am gradually improving...
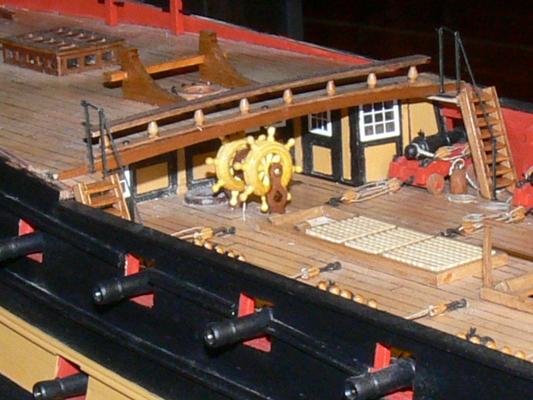


- 122 replies
-
- 6
-

-
- caldercraft
- agamemnon
- (and 1 more)
-
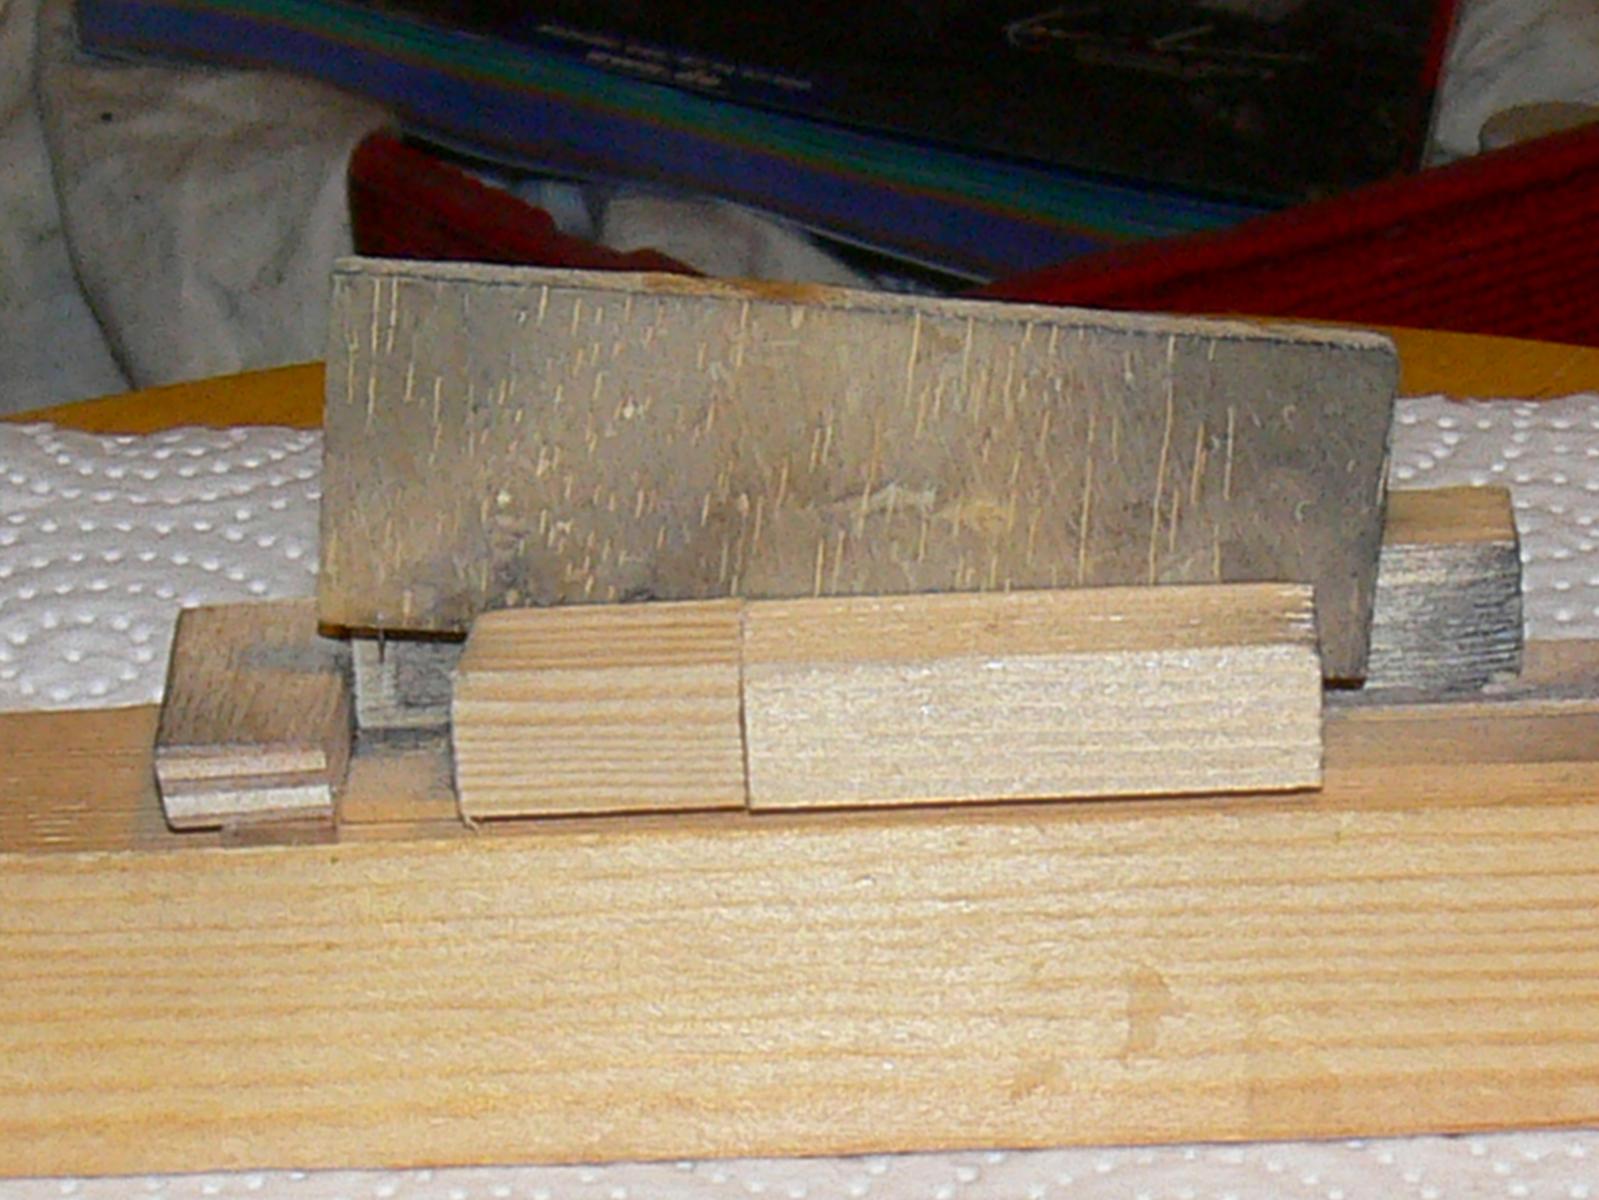
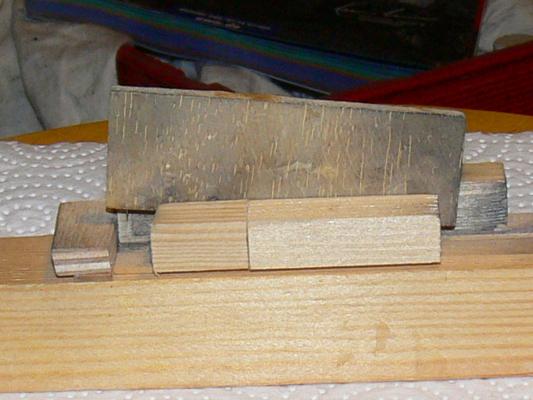
I appreciate that you like my work. It was a lot of effort, but sometimes that is neccessary to achieve what you have in mind. I sent a picture of the jig. The placing of the little needles (I cut sewing needles) is a bit trial and error, but once you have it you can use it for all the planks (unless you break one...)
- 122 replies
-
- 1
-
-
- caldercraft
- agamemnon
- (and 1 more)
-
Thx, good luck, I think it will be a good choice!
-
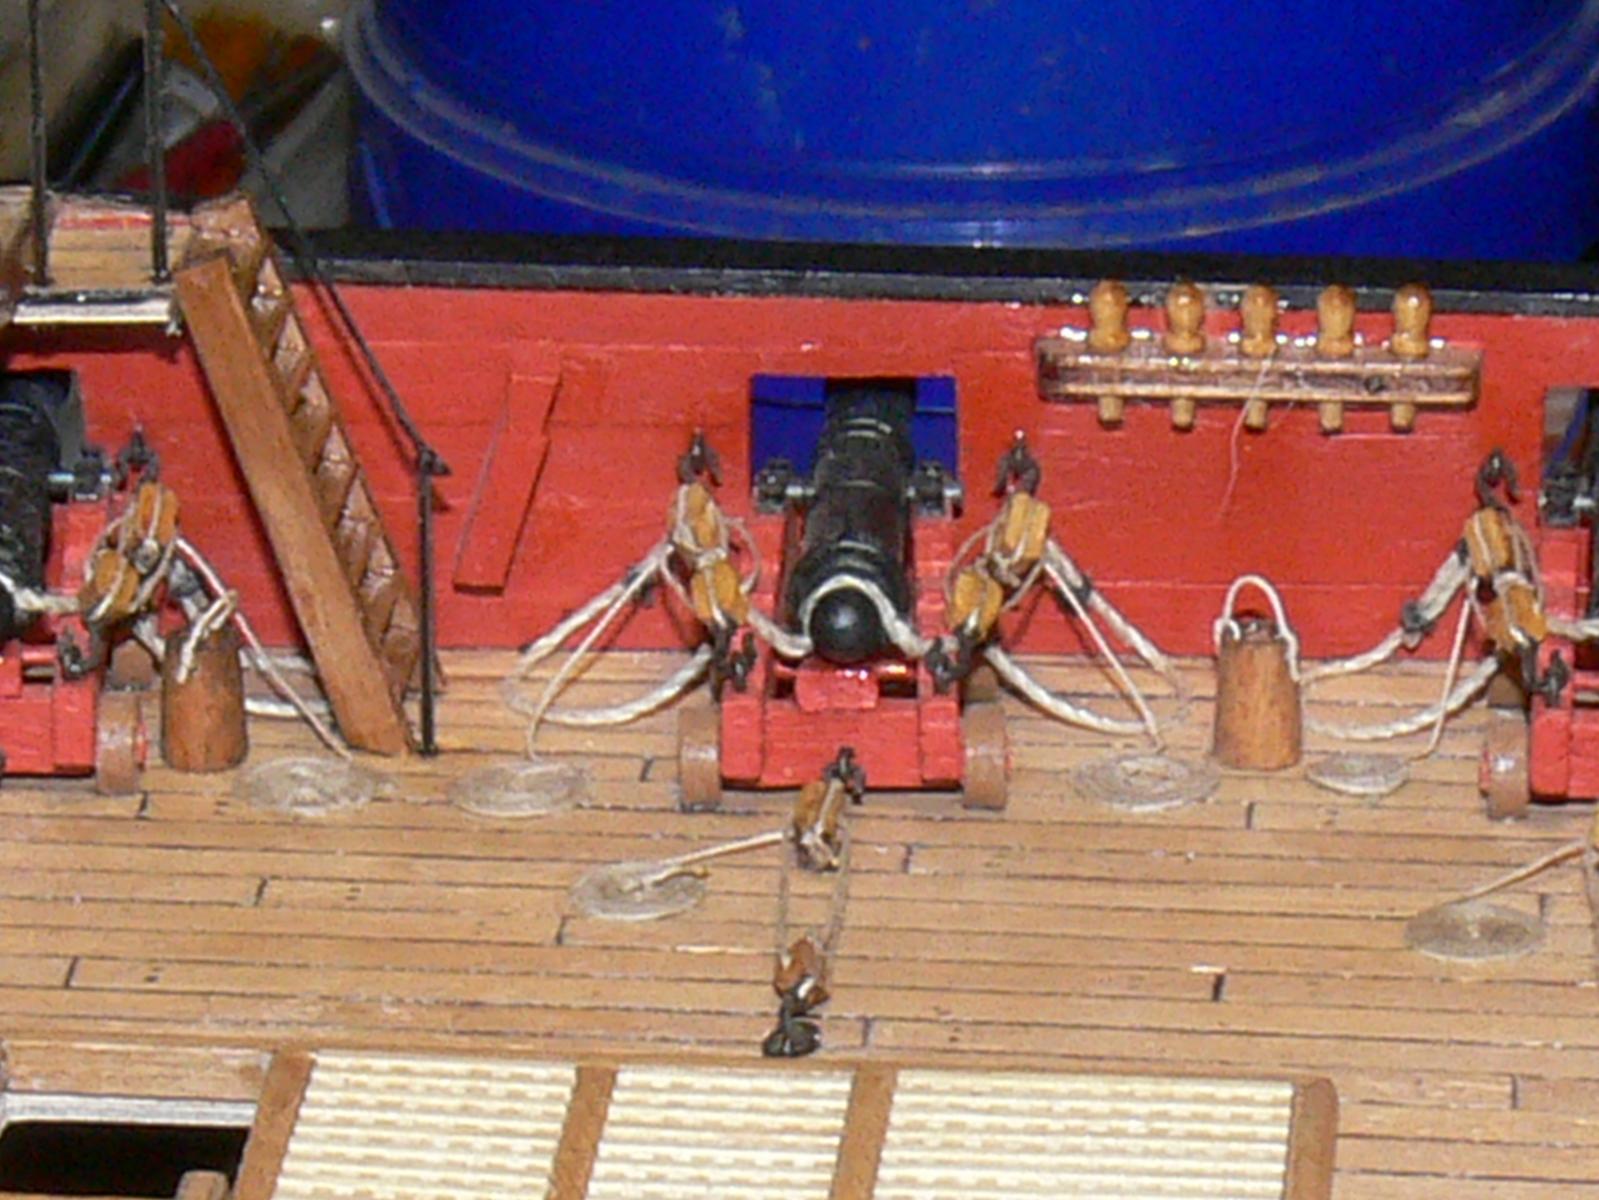
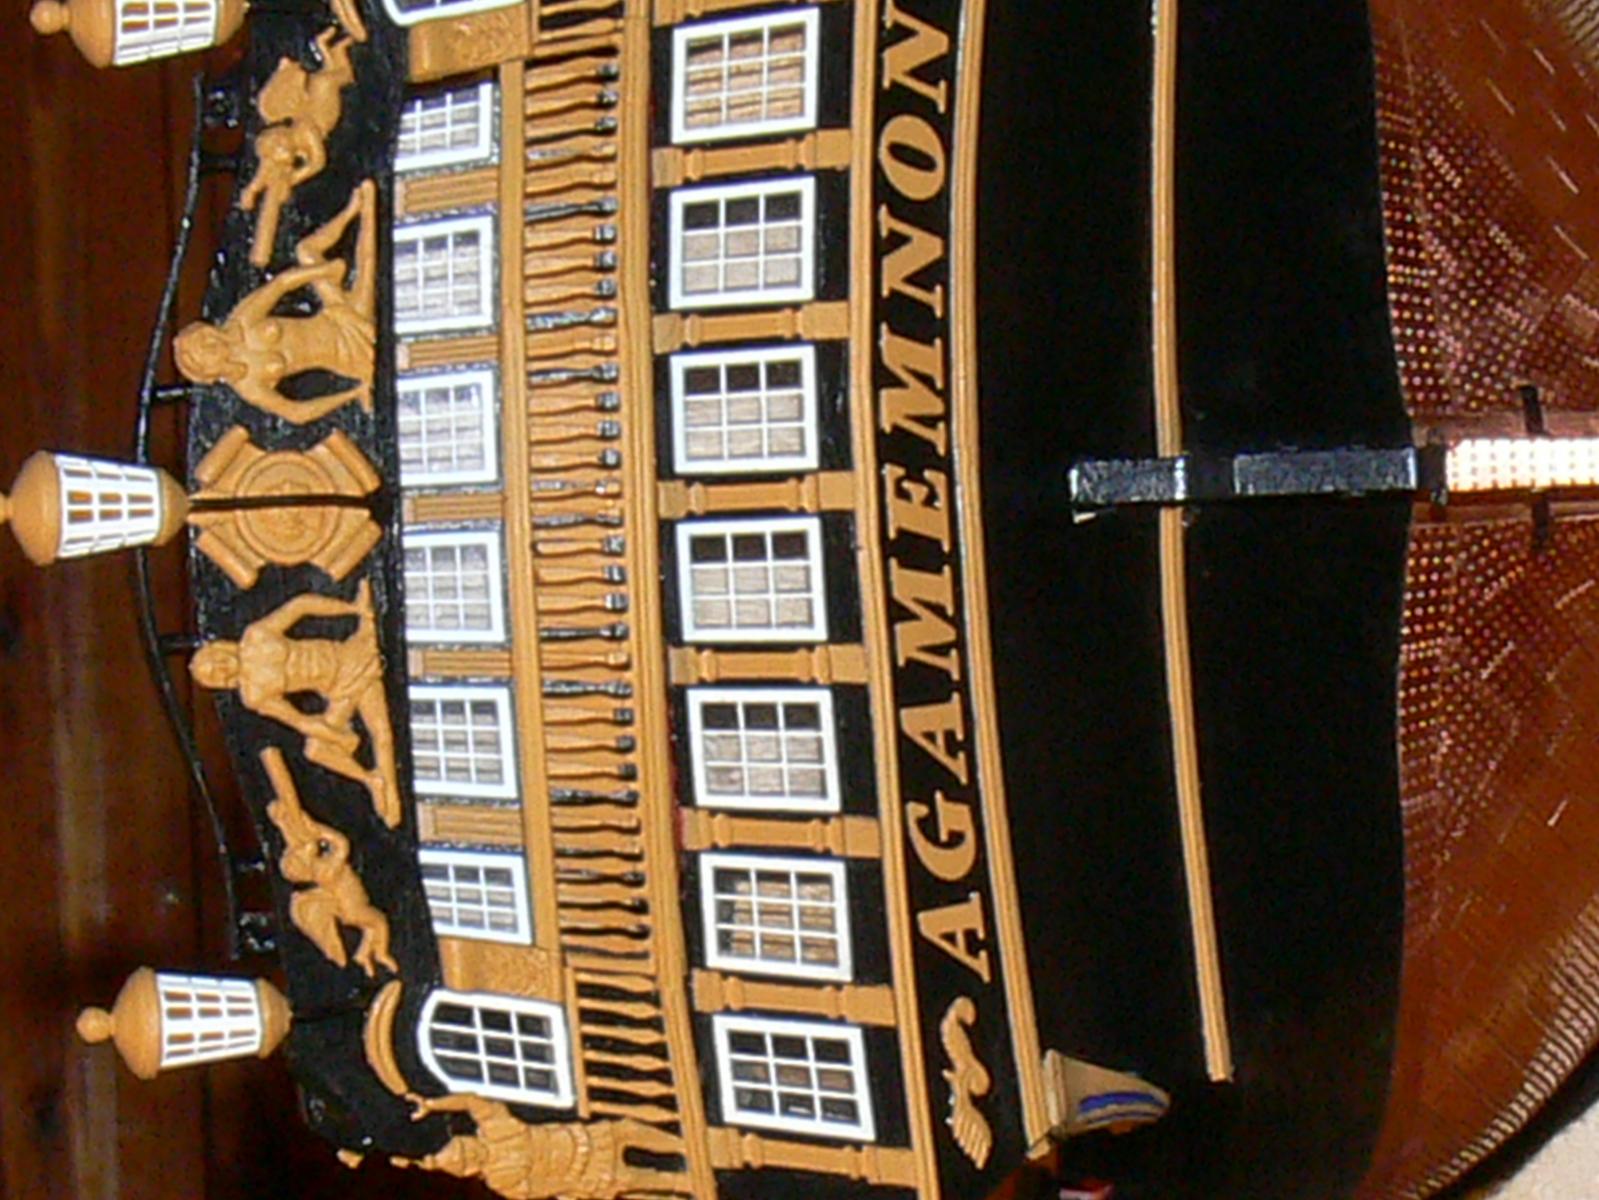
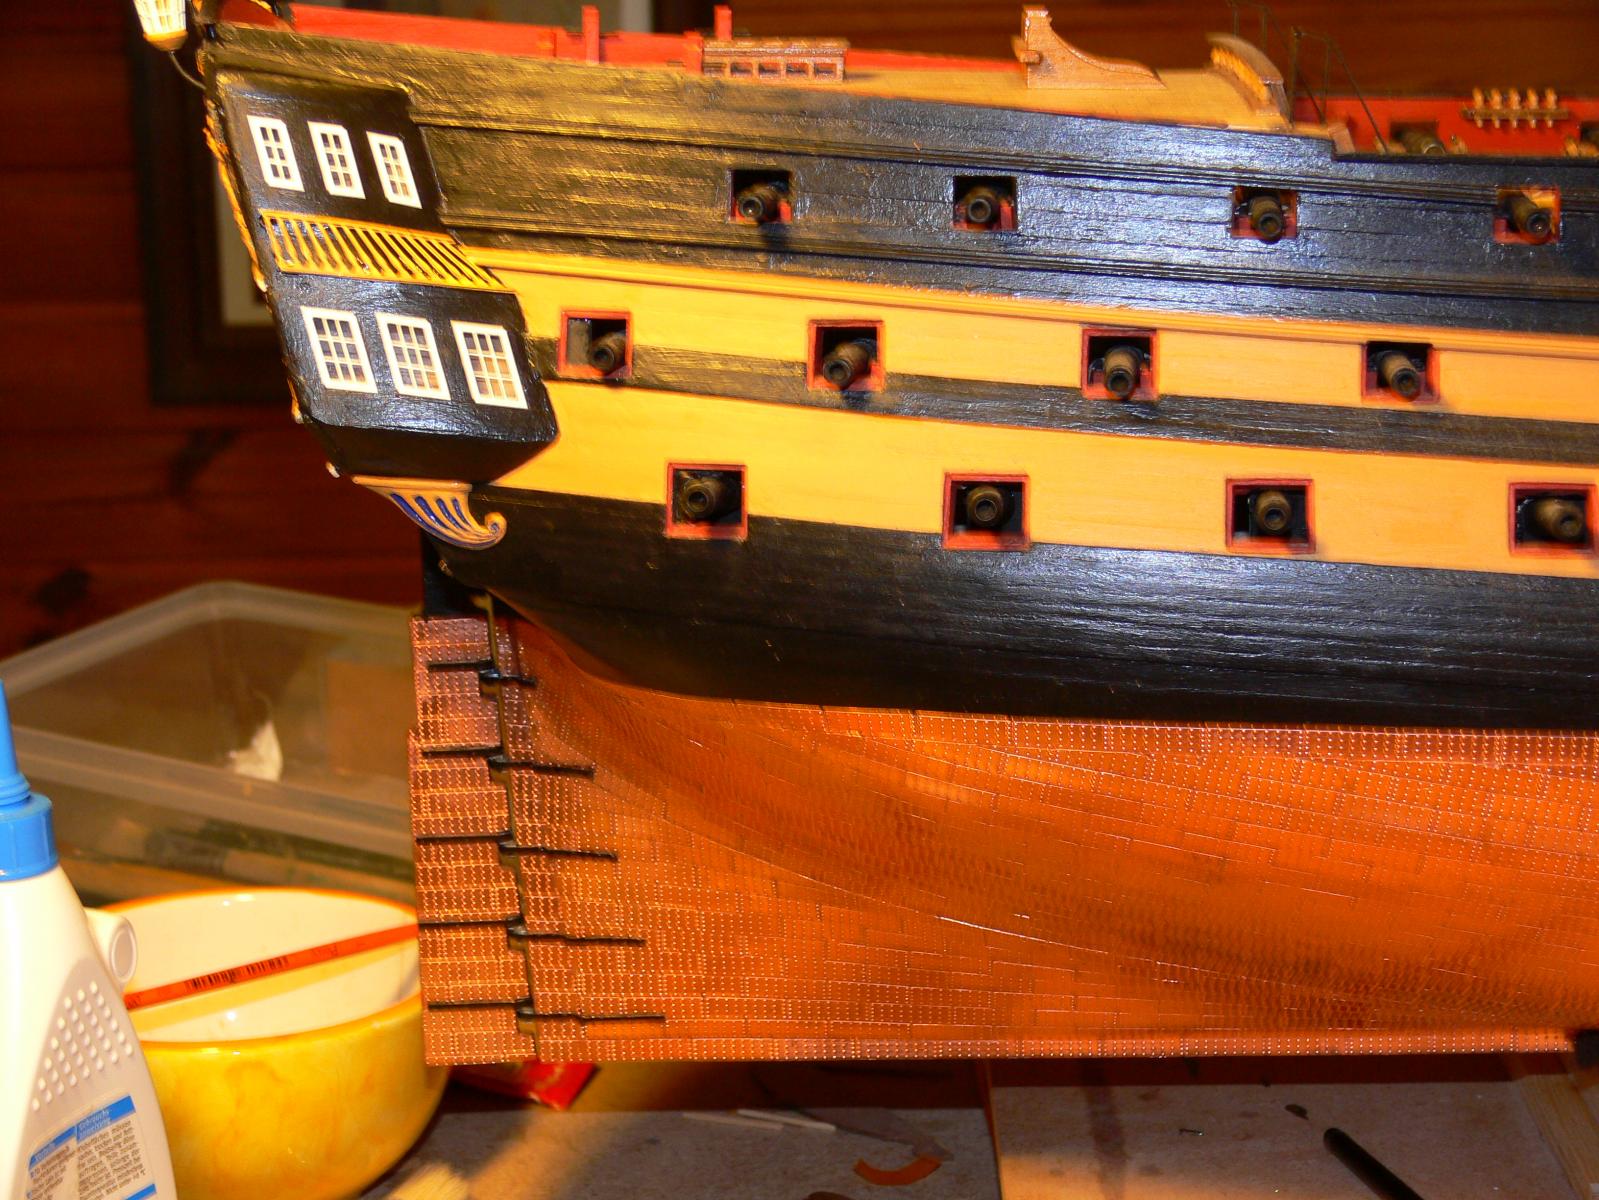
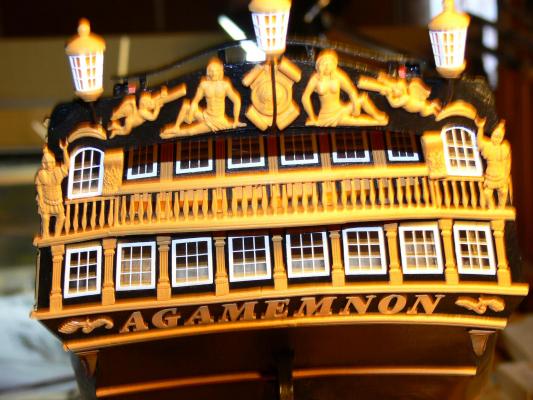
Thanks CPS and sygreen for the positive comments. To sygreen: The kit was in a very good condition so I did not see the need to deviate from the plans. The only thing I made different were the deck planks: I created a simulated caulking with a black marker (you have to prepare the planks with pore filer that it does not go in too deep) and created two holes on each side with a little jig ( I will send a picture later) later I added a little bit of paint on the hole, that it is better visible. I also rigged the cannons and changed the steering wheel . Apart from that i basically followed the original instructions. Greetings from Germany Martin
- 122 replies
-
- 4
-
-
- caldercraft
- agamemnon
- (and 1 more)
-
Finally I managed to start a building log. I have unfortunately already more than 2 years behind me, so it is too late for the early stages. I have not figured out how to make good pictures yet, so these pictures are kind of a test....


- 122 replies
-
- 14
-
-
- caldercraft
- agamemnon
- (and 1 more)
-
HMS AGAMEMNON by PMG - Caldercraft
Karinmutter replied to PMG's topic in - Kit build logs for subjects built from 1751 - 1800
Hello Pierre, Nice job on the planking, I know everyone does the bending differently. For me it worked best to put the planks for a few minutes in water and then use a plank bender from aeropiccola (I think they do not exist anymore) what is basically a soldering iron with a modified tip. Good luck for the future and happy modelling! Martin -
Hello Chuck and mobbsie, I guess I have to finally start a log. It will take some time, however. Because I will face probably more difficulties in creating a log than building the Agamemnon :-( , but I have the camera equipment here already . Unfortunately I completely left it to my former wife to use the camera and upload pictures. I think I will start by reading the instruction manual ...It is a Lumix panasonicDMC-FZ 30 by the way. Have fun everybody, Martin
- 1,279 replies
-
- 1
-
-
- agamemnon
- caldercraft
- (and 1 more)
-
Hello Mobbsie, Thank you very much for your positive encouragement. Of course I will do my best, but sometimes I have that fear that I might get stuck somwhere and the mistake cannot be corrected. I have not reached such a point yet, but who knows...But you are right. It is probably counterproductive to indulge oneself in these thoughts. Best wishes, Martin
- 1,279 replies
-
- 1
-
-
- agamemnon
- caldercraft
- (and 1 more)
-
Hello Mobbsie, Very impressive work. So many beautiful details, really amazing! I am still at the very early stages of my Agamemnon. Not sure,whether I will be able to complete that ship, but my attitude is:" The way is the goal" Happy modelling, Martin
- 1,279 replies
-
- 1
-
-
- agamemnon
- caldercraft
- (and 1 more)
-
Hello Mobbsie, Thx for the quick answer. I will most likely do it "your way" and leave the deck beam as it is. I had the same feeling that it might somehow weaken the structure... Have a nice day, Martin
- 1,279 replies
-
- 1
-
-
- agamemnon
- caldercraft
- (and 1 more)
-
Hello Mobbsie, At first I want to congratulate you for the great job you were doing. I am still building the same ship, but it does not look half as good, although I put a lot of effort and devotion into it. And I am not exaggerating, believe me!! May I ask you another question? I have been busy lately and have not found the time to create my own building log yet, but it is still something I want to do. My question is : There is an opening on the main deck directly after the oven towards the stern . According to plans the ladder should be on the bow direction and the gratings on the stern direction. But unfortunately (plan error?) there is a deck beam where the ladder should be. Keith Julier in his book solved the problem by cutting away that part of the beam. You solved it by exchanging the sides (hatchway, grating). Both ways seem reasonable to me, I just wonder what to do myself now...By the way the ropes on the ladders look great! Did you bend a brass wire for the supporting elements? Keep up the great work and happy modelling! Martin (Karinmutter)
- 1,279 replies
-
- 1
-
-
- agamemnon
- caldercraft
- (and 1 more)
-
HMS AGAMEMNON by PMG - Caldercraft
Karinmutter replied to PMG's topic in - Kit build logs for subjects built from 1751 - 1800
Hello Pierre, Thank you for answering. I will try my best Karin -
HMS AGAMEMNON by PMG - Caldercraft
Karinmutter replied to PMG's topic in - Kit build logs for subjects built from 1751 - 1800
Hello Mobbsie, Thank you for the offer to help me. I wanted to start a building log long ago and I guess I will do it in the near future. Although I do not work with the immaculate precision of you or Pierre... Karin -
HMS AGAMEMNON by PMG - Caldercraft
Karinmutter replied to PMG's topic in - Kit build logs for subjects built from 1751 - 1800
Hello Jean-Pierre, I started drawing the gunports on the walls using the supplied template. And I am not happy at all with the result. No problem in the longitudinal direction, but, big discrepancies against the drawings in height. I measured carefully. The upper deck level is correct: 180mm from the keel. For the gunports I measure sometimes differences a big as 2 or 3 mm. Hopefully, I still have the position of the two gundecks and I can check against the height of the port against a gun. I am intended to rechck every level against the official drawings using that useful tool with a pencil to draw the waterlines. Another "precision" work in sight before starting drilling the ports... 033.jpg Mobbsie, I checked the masts and I dry fitted them again. To avoid any problem in the lateral size you have seen that, at an early stage, I added small pieces of wood on the sides of the false keel. In the side view, my foremast lies perpendicular to the keel, what's correct. The mainmast and the mizzenmast have a certain rake (backwards). I measured it, and they have exactly the same, what's also correct. I have to add, that at the beginning of the construction I cared for and I slighty sanded the slots to be sure to achieve the result. Anyway, its important that the foremast should make a right angle with the keek ans that the two others have the same rake. Here is a third crewmember I made. A kinf of petty officer watching the construction with the hands in the pockets... 034.jpg I hope everything is fine. At what stage of the building are you right now? I started marking the gunports. Right now I have not encountered bigger problems. I followed the advice of Keith Julier in his book and created one template 17x15, the other 15x13 mms. However I noticed that the last gun-port in the upper row towards the stern fowls the bulkhead construction inside. I looked at the pland and they were according to it! I am afraid the inner construction becomes a bit unstable, if I just remove the part of the frame where it fowls. I wonder how you saved this problem Greetings, Karin -
HMS AGAMEMNON by PMG - Caldercraft
Karinmutter replied to PMG's topic in - Kit build logs for subjects built from 1751 - 1800
Thank you again for your advice, Pierre. I am a bit afraid that I might cause some damage to the ship, because it is obviously a tedious and complicated task.I plan to order the pedestals first and then I will decide on what to do. If I don`t use them so what, at least I tried...By the way I assembled the stand meanwhile, padded it with felt. It works quite good. And I altered the first building board like you suggested, removing the front triangles. It works good, too. Perhaps I will make some pictures later, although I have to admit that I like the look of your ship better than mine... Greetings, Karin -
HMS AGAMEMNON by PMG - Caldercraft
Karinmutter replied to PMG's topic in - Kit build logs for subjects built from 1751 - 1800
Greetings from Germany! -
HMS AGAMEMNON by PMG - Caldercraft
Karinmutter replied to PMG's topic in - Kit build logs for subjects built from 1751 - 1800
Thank you very much, your answer gives me a clue, what to do now. I had forgotten about the stand the kit provides... -
HMS AGAMEMNON by PMG - Caldercraft
Karinmutter replied to PMG's topic in - Kit build logs for subjects built from 1751 - 1800
Hello Pierre, I finally finished the first layer of the hull planking.I had planked mostly , when the ship was in an upside down position. I had created a simple stand for that task. When I wanted to turn the ship around again, I realized, that I could not use the previous stand, because the planking was in the way now...My question to you: Did you create a completely new building board, or did you alter the old one? Best wishes, Karin -
HMS AGAMEMNON by PMG - Caldercraft
Karinmutter replied to PMG's topic in - Kit build logs for subjects built from 1751 - 1800
Thx for answering, it made everything a lot clearer. For some reason I could not see my first post, so I repeated it... Greetings, Karin -
HMS AGAMEMNON by PMG - Caldercraft
Karinmutter replied to PMG's topic in - Kit build logs for subjects built from 1751 - 1800
Hello Pierre, I made a lot of progress with the first planking. It does not look as good as yours though... One question: Why didn`t you plank from the deck all the way down. I see in your Picture (28) that you started from the keel after planking the upper half. I wonder why you did this, has it to do with the run of the planks? I intended to go from deck level down to the keel, but now I have doubts. Good luck for the future , Karin (helps Martin) -
HMS AGAMEMNON by PMG - Caldercraft
Karinmutter replied to PMG's topic in - Kit build logs for subjects built from 1751 - 1800
Hello Pierre, I made some progress with my first planking meanwhile. It does not look as good as yours, but o.k. for me. Looking at your pictures, I noticed a gap between the top and lower part of the planking. I intended to plank all the way down from deck level. It would be great, if you could tell me, why you have planked the bottom (starting from the keel I guess) after having planked the upper part. Has it something to do with the run of the planks? Greetings, Karin -
HMS AGAMEMNON by PMG - Caldercraft
Karinmutter replied to PMG's topic in - Kit build logs for subjects built from 1751 - 1800
Hello Pierre, I have meanwhile made some progress with the first planking. It does not look as perfect as yours, but o.k. for me. I noticed something however: You have this gap between the upper and the lower planking. I intended just to plank it all the way down from deck level, but now I have doubts. It would be great, if you could tell me why you started planking from the keel upward (I suppose) after having planked the upper half. Has it something to do with the run of the planks? Greetings, Karin -
HMS AGAMEMNON by PMG - Caldercraft
Karinmutter replied to PMG's topic in - Kit build logs for subjects built from 1751 - 1800
This picture makes it a lot clearer. Without you people it would be a lot harder for me to understand the instructions. Thx, bye Martin -
HMS AGAMEMNON by PMG - Caldercraft
Karinmutter replied to PMG's topic in - Kit build logs for subjects built from 1751 - 1800
Hello Pierre, Just one more question, because I will put in parts 61 and 62 on soon: Did you paint everything black besides the engravings? It would be helpful, if they told you when to paint and how... Martin -
Hello Mobbsie, Thank you, too, for the advice. I meanwhile found the "engravings" on sheet 4, so I am fine (for the moment...) Martin