TUEL
-
Posts
55 -
Joined
-
Last visited
Content Type
Profiles
Forums
Gallery
Events
Everything posted by TUEL
-
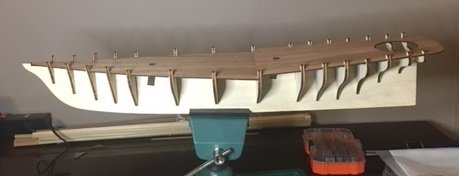
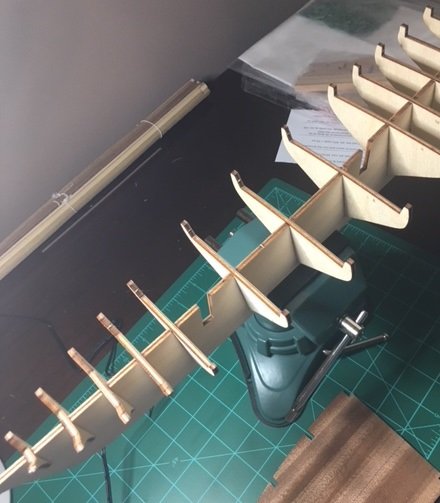
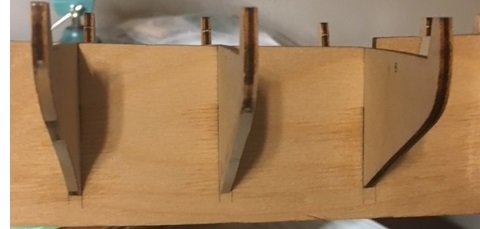
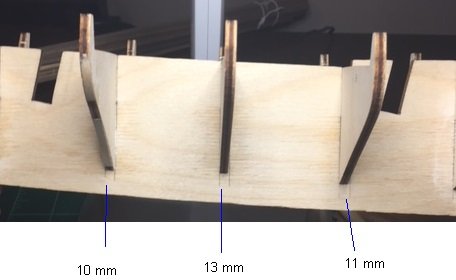
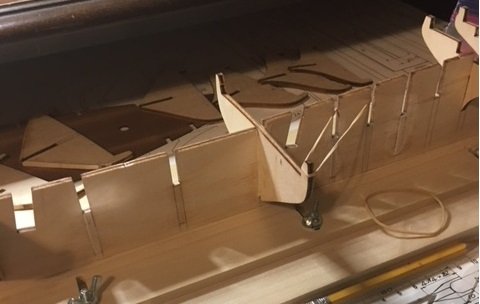
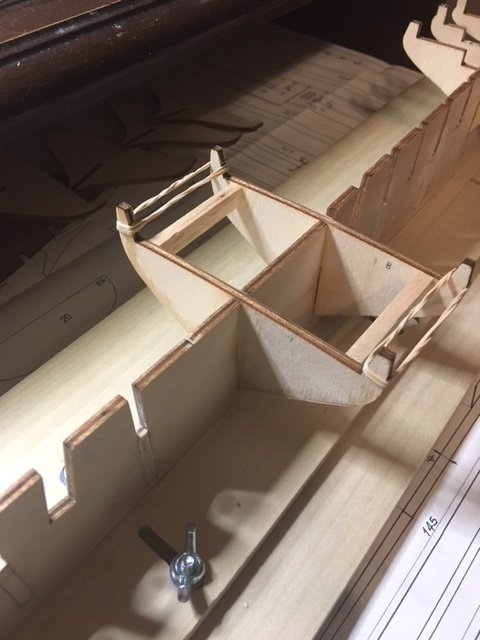
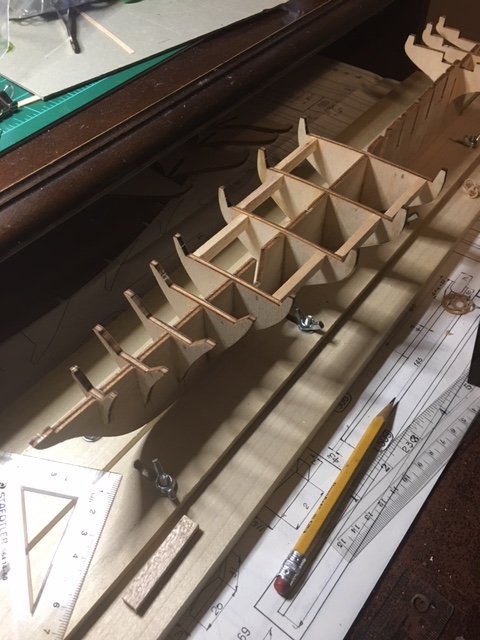
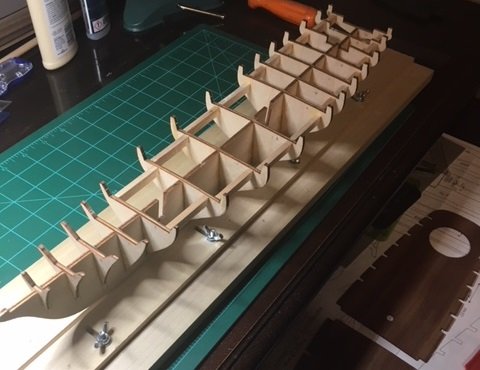
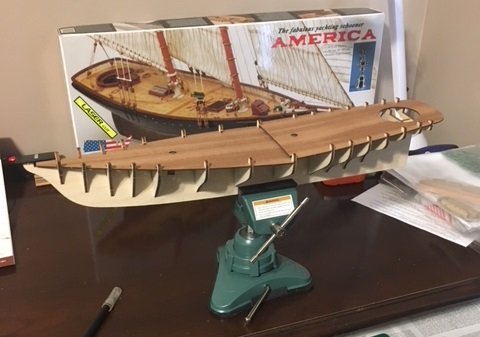
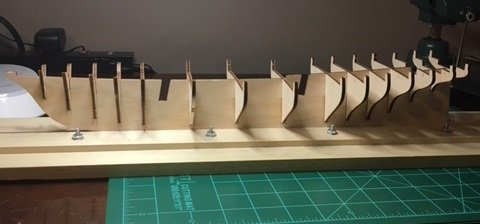
Travel for work and other things have kept me from working on my build over the past 4-6 weeks. I spent some time attempting to cut some mortise pieces as noted in my earlier post to support the mast. I had difficulty with the precision with my shop tools, and decided that there wasn’t much to gain and have decided not to include the mortises. After trying to make some mortise pieces, I realize I do not have the equipment I need. My drill press is a small bench top model, and the 8 mm drill bit was I will need to invest in a larger drill press and am also considering investing in a 3-1/8" mini miter saw I found on line. I see some of the same issues that Hamilton saw in his kit build. I have checked each bulkhead with the plans, but only found bulkhead 6 to have significant error as compared to the plans. I shimmed that bulkhead to correct it to the plans. As I mentioned in an earlier post, being a first-time kit builder I’m not sure how significant the issues are in regard to the planking. I see some very slight issues with other bulkheads but have decided these aren’t significant enough to require shimming. I see the same issue that Hamilton had with bulkhead 7 as you can see in this photo. The shims on bulkhead 6 are visible here. Bulkhead 6 is 10mm from the edge of the keel, bulkhead 7 is 13mm and bulkhead 8 is 11mm. It’s the same amount of error on both sides. I think bulkhead 7 is just poorly designed and cut. I will shim it on both the starboard and port sides to be 11mm from the keel edge, as that seems to line up appropriately. Hopefully this doesn’t impact me when I get to the planking. Below are the same bulkheads with bulkhead 7 shimmed. After another dry fit I felt it was time to glue the bulkheads onto the keel piece. Following Hamilton’s build log, I saw that he cut and installed cross pieces between each bulkhead. This has the benefit of squaring up each bulkhead and ensuring they are perpendicular to the keel, so I sis the same. I used balsa wood since they were used primarily for spacing and not support, and the softer wood was much easier to work with. The first I glued was bulkhead 8, so I made sure it was squared up, then the rest of them I based off of it. As I worked toward the bow, I decided that Bulkheads 1-4 did not need the bracing. After the glue set, I did a test fit of the the upper and lower decks and will need to make a few adjustments. That’s all for this entry.

-
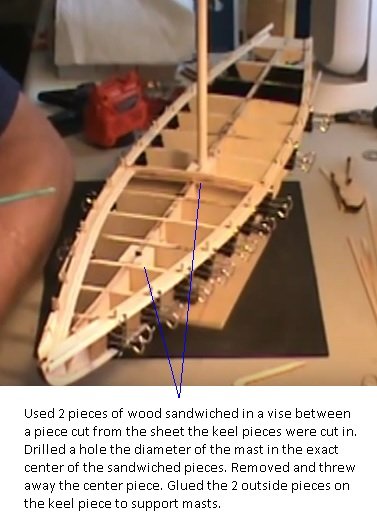
I mentioned in an earlier post that I found a series of YouTube's by Gary Brinker for his ModelExpo Bluenose build. There are 40 videos that are his build log. In his "Bluenose Part 7" video, he begins it with discussing some bracing he used for the masts. He cut a piece from the laser cut plywood piece that the keel pieces were cut from. He sandwiched that piece between two other pieces of thicker wood (I don't think he mentioned what kind of wood and don't think it matters) in a vise. He drilled a hole the diameter of the mast in the exact center of the "sandwich". He removed the center piece and discarded it, then glued the 2 outside pieces to the keel piece where the masts are mounted. Here's a screen print from the video showing what I'm talking about: I like that, so I'm going to do the same to my America, but have a dilemma. The mast has a diameter of 8mm. I soon discovered that Lowes, Home Depot, Harbor Freight, etc. don't stock metric drill bits, so I ordered one on line about 10 days ago and was supposed to have receive it this past Thursday. Still don't have it. This needs to be installed before I proceed with gluing the bulkheads and deck pieces. I'm traveling the whole week on business starting tomorrow so it will be next weekend at the earliest before I can continue working. Hopefully I have the 8mm drill bit by then. I'll post up pictures of this once I can work on it. - Regards everyone.
-
Tim (Mojofilter) - Thanks for noticing my build log and I welcome any comments and guidance. Your America build log, and those of Hamilton, Flyer and Greatgalleons, are good and I'm reading and re-reading each of them. Hamilton's is real good because his kit is identical to mine and he progresses from beginning to complete with good comments and explanation. I saw the comments you mentioned: several books, discussions of the blocks and the use of Syren blocks and ropes, etc. I purchased American Sailing Ships and The Low Black Schooner: Yacht America so I have them for reference. I'll definitely be placing an order with Syren. Some 14-15 years ago my wife and I passed a fella set up on the side of the road, selling ship models. We stopped and looked, and I told my wife: "I can do that." She has wanted a model ever since for the great room. I've finally taken the plunge and thoroughly enjoying this, wishing I had started before now. She has in mind what she wants, as most wives do, and it doesn't include a copper plated hull. She prefers finished wood, so since historical accuracy is not going to be too big of a concern here, I'm not going to put the copper on it. I am going to include the sails. I'll post along at various frequencies based on how much time I have to work on it. Thanks
-
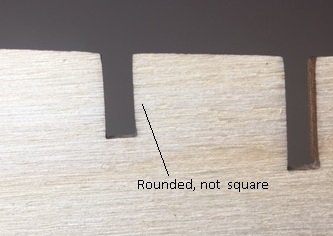
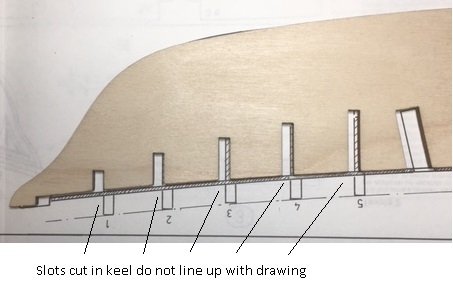
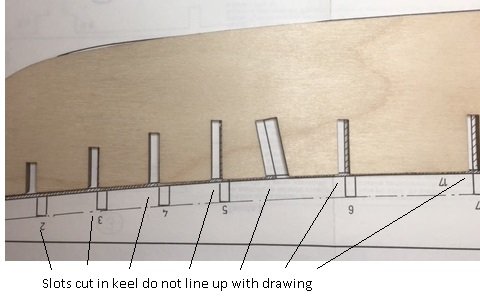
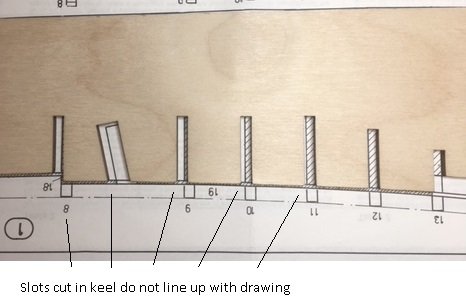
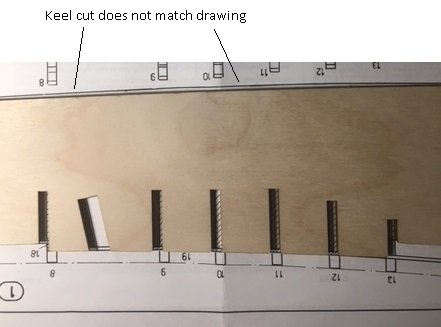
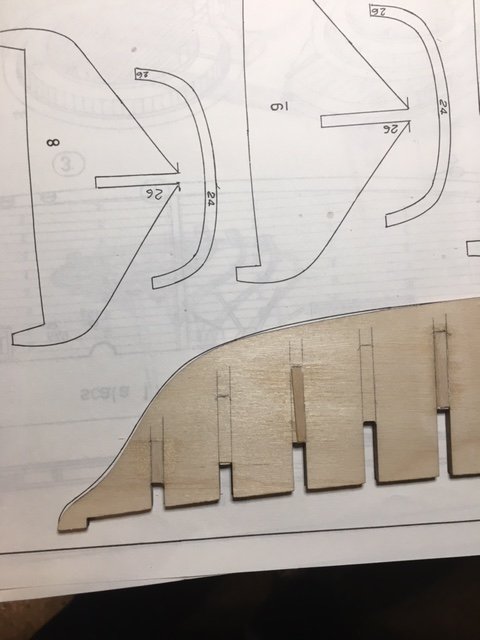
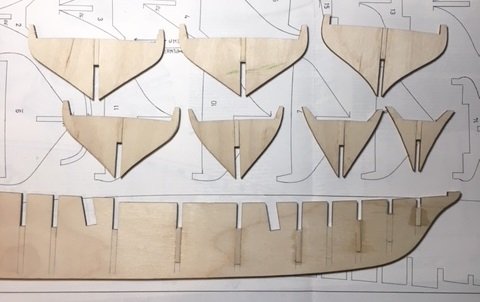
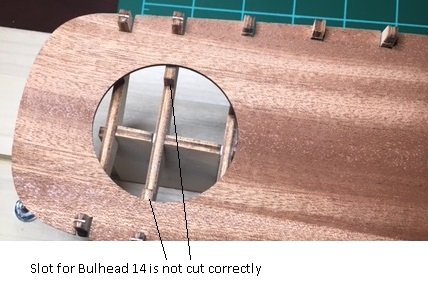
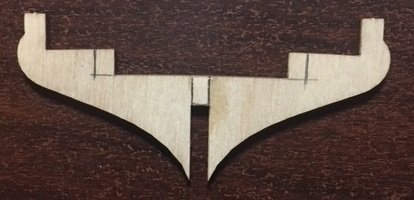
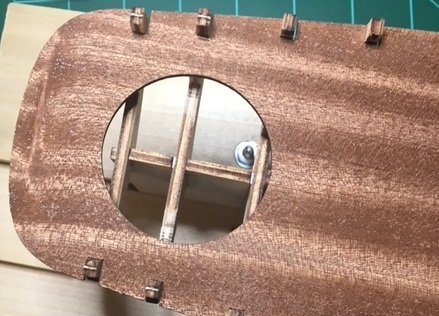
This is my first kit build. I've dabbled with RC planes for a few years so maybe some of that experience will help me as I come up to speed building ships. I started in late December and kept my build log off-line. I meant to start the log here earlier, but just didn't take the time until now. The dates when I made my first entries are noted as follows. 12/27/2017 I purchased the Mamoli Yacht America as my first kit and received it on 12/18/2017. I selected this kit because I think it is a beautiful ship with great lines, and I also thought it would be a reasonable kit to start with as it did not appear to have extensive rigging. I considered selecting the Constructo America kit, but chose to go with Mamoli’s Amrerica kit because Constructo’s kit did not have a jib boom which to me is significant to the lines and the appearance of the ship. I realize that I could have added it, but this being my first kit build, I thought it was best to rely on the contents of the kit and follow the instructions. I also spent some time on the internet and found ModelShipWorld.com. After reading through the build logs posted by Hamilton, Mojofilter, and Flyer, and then reviewing the documentation provided with the kit, I’m thinking I may have selected the wrong kit maker. I’ll move forward with it and do the best I can. However, as I progress with reviewing the great information I’m finding in this forum and other places on line, and then using some of that information to assess this kit, I have to say I am not impressed with this Mamoli kit. I read about the fire some time back and realize the company is out of business, but I don’t see myself building any other Mamoli kits that are still avilable. Today I saw a new build log started by Greatgalleons that looks to be a good resource. The ModelShipWorld forum is outstanding, especially for us guys who are new to this. 12/28/2017 Separated keel and bulkheads. Began reviewing instructions and drawings. Labeled bulkheads. 12/29/2017 I have found an excellent resource on Youtube. Gary Brinker has posted 40 videos of his Model Expo Bluenose build (titled “Bluenose 1” through “Bluenose 40”, averaging about 30 minutes each). These videos have some great discussion and a lot of good info and insights to consider. His ModelExpo kit appears to be far superior in quality and completeness to my Mamoli kit. Completed first dry fit of keel and bulkheads. Forward bulkheads and deck fit was okay, but has some looseness. Rear deck and bulkheads were another matter. The 3 bulkheads closest to stern did not fit well and required trimming. I’m stopping to return to build logs and re-read and re-check photos. 01/01/2018 ModelShipWorld.com appeared to have a server problem and was down for a couple of days. I have not been able to re-read the build logs, but remembered some of Hamilton’s comments. I disassembled the bulkheads and keel and checked each against the drawings. I’m under-whelmed. As I look at the laser cuts, many of them are of very poor precision. For example, the slot in the keel for the second bulkhead back from the bow is not straight on either side. With the cost of this kit, and the technology of CNC machines today, the quality of these cuts is unacceptable to me. These cuts should be perfectly straight and should be cut to the correct width so that there is no looseness with the bulkheads. Perhaps there needs to be some looseness to adjust the fit, but in reading Hamilton’s build log for this kit, he seems to have reached the same conclusion. Very poor quality in my opinion. I also see the same issues as Hamilton did with the laser cut parts not matching the drawings, leaving one to ponder which is correct. I am assuming Mamoli used a CNC machine, and if so it’s obvious the CNC programming for the laser cuts did not match the drawings provided with the kit. Lining the tip of the bow up on the drawing, the following photos show the poor laser cuts. Hamilton mentioned in his log that he would shim the keel to fill in the gaps per the drawing. The dry fit with the keel, the bulkheads and the deck pieces line up relatively well, they just do not match the drawings. My concern is, where is the inaccuracy and how does this affect the build later on such as when I begin planking the hull? Did they use an entirely different drawing to program the laser cuts? Should I trust the drawings? This kit cost too much for this level of quality, or lack thereof. I’d fire these guys if they worked for me. 1/25/2018 This entry to my build log covers several weeks of work. I spent time laying each bulkhead and the keel piece on the drawings to check alignment of the cuts. I found that if I align the stern up exactly on the drawing then the slots for the bulkheads and the masts line up fairly well. However, it shifts the error to the bow as you can see below. After several dry fits with the deck pieces, it seems that the bulkheads line up very well with the slots in the forward and aft deck pieces. It doesn’t seem that the issue with the bulkhead slots in the keel piece not matching the drawing will have much impact to the overall alignment of the kit. Also, I could spend time shimming the keel piece to fill in the gaps in the picture above, but how much does that change the appearance of the model to the naked eye? I’ll give it some more thought, and might go ahead and shim it up to match the drawing. There was more looseness with the bulkheads than I realized at first, and based on the other build logs I’ve read I decided that I should shim them up to fit better. The problem I realized was that I had no spare or scrap wood since this is my first kit. Also, there is only one hobby shop within 25 miles of where I live, and that shop did not have supplies for ship modeling. They are mainly a RC shop for cars and planes. At this point, I decided I would order a supply of wood and did so from Agesofsail.com (various widths in mm, 0.5 mm thick and 1 mm thick, 36” bundles of 10). It took 7-8 days to receive so I was somewhat dead in the water until then. I’ve now trimmed, sanded, shimmed, etc., all 15 bulkheads and the keel piece, where needed and have a pretty tight fit on all 15 bulkheads. Here is the dry fit with the shimming completed. Here are the pieces showing some of the shims. I noted from the other build logs that bulkhead 14 is not cut correctly.


-
Greatgalleons, I also have the same Mamoli kit. This is my first kit (i.e. I'm a rookie with a lot to learn), and I've started a build log off line that I'll soon post. Here are a couple of photos of my dry fit. Why does my wood look different from yours? I don't see any burn marks on your keel or bulkheads. Also, your bulkheads seem to be thicker. Is this the original wood that was in your kit? Great build log and I appreciate your creativeness. Thanks, Tim Decatur, AL