JamesBhm
-
Posts
142 -
Joined
-
Last visited
Content Type
Profiles
Forums
Gallery
Events
Everything posted by JamesBhm
-
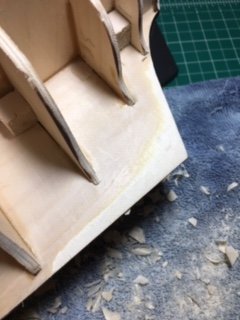
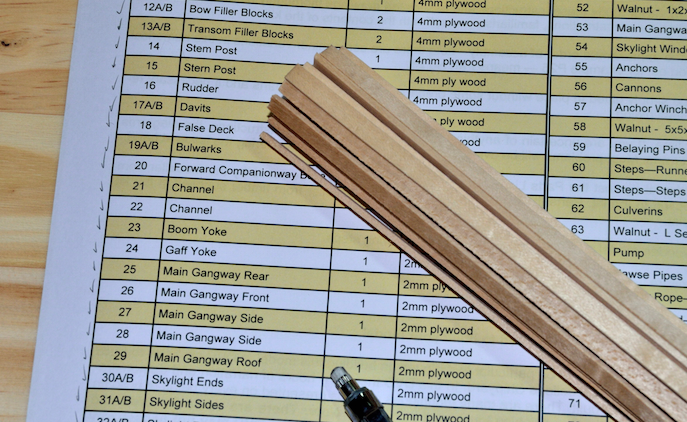
 Question for anyone passing through: is there a preferred method of thinning down the deadwood area of the keel (4mm thick down to 2mm in this case)? The instructions are pretty vague (“reduce thickness”) and the DVD doesn’t really cover it. Sanding seemed to take forever. I planed/carved a bit on one side with a hobby knife, but that was clunky. A small wood chisel or Dremel tool would have required a 10-step walk out to the workshop (and let’s be reasonable!) plus I didn’t want to do anything too aggressive and take off more material than I intended. I’m hoping the first layer of limewood planking will be easier to finesse to get the final thickness right.
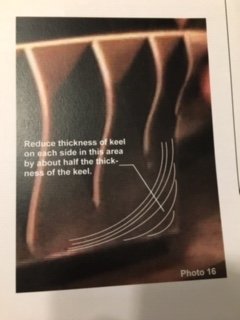
- 241 replies
-
- 1
-

-
- mermaid
- modellers shipyard
- (and 1 more)
-
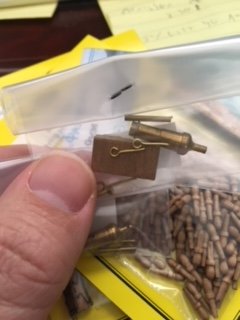
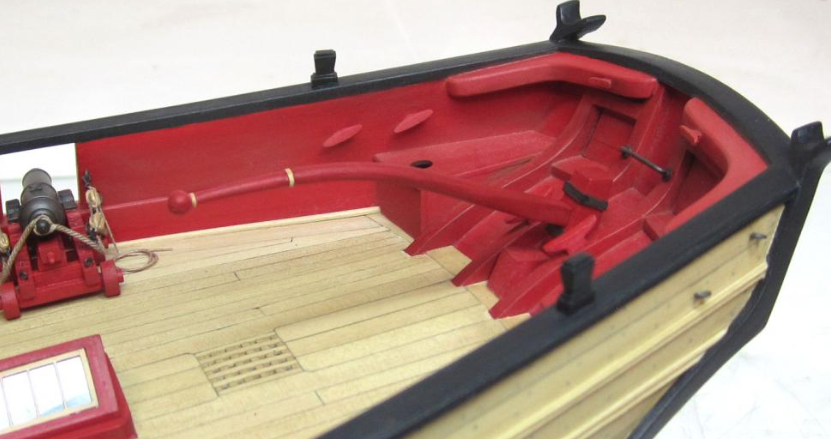
I also got carronades in! King's journal specifically mentions the boat having two carronades (although the weight was apparently illegible and not transcribed). The journal of Cunningham (the botanist) also makes reference to carronades. I'll ditch the cannon that came with the kit in favor of the carronades. The journals make no reference to culverins or any kind of swivel guns, and they aren't pictured in King's drawings, so I plan to leave them off.
- 241 replies
-
- 3
-
-
- mermaid
- modellers shipyard
- (and 1 more)
-
Not much progress this past weekend. Took a trip down to Biloxi, Mississippi and took the ferry out to Ship Island. I waded around south of the old fort with stingrays (and an ungodly number of jellyfish) trying to picture the 60-ship British fleet at anchor near the island in 1814 before attacking New Orleans (and facing a couple of my ancestors in the process!) I came home nautically inspired and managed to start working on fairing the bulkheads on one side of the Mermaid. A little tedious, but not nearly as bad as I was thinking it might be. I still need to sand and smooth a little bit, then tackle the other side. I just might be planking soon, but I don't want to rush this phase.
- 241 replies
-
- 3
-
-
- mermaid
- modellers shipyard
- (and 1 more)
-
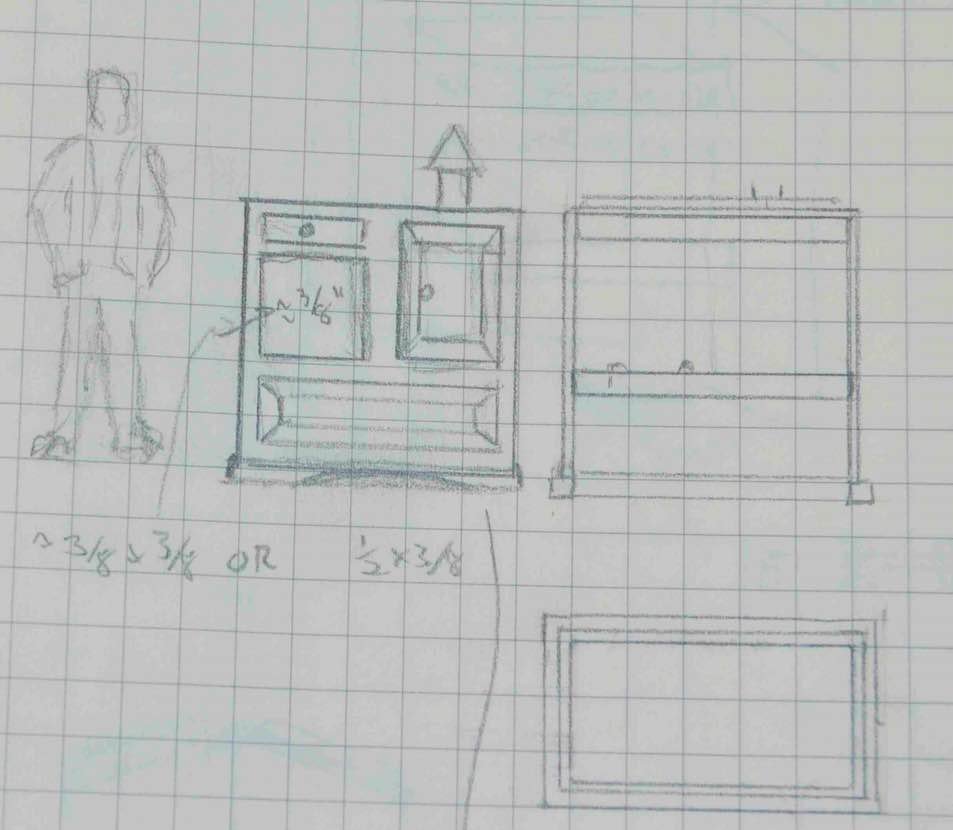
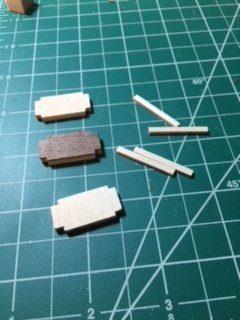
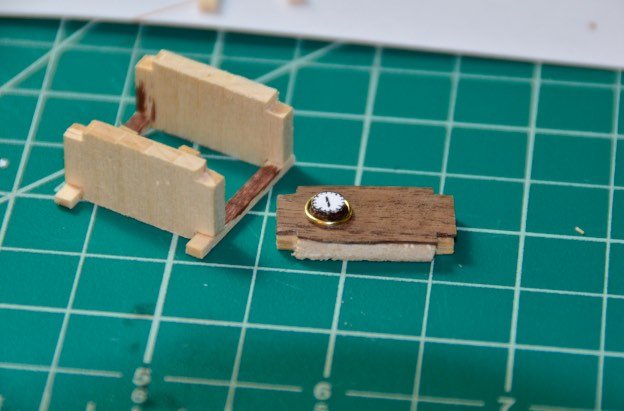
I’ve lined up a few side builds to have little things to keep idle hands busy while I’m waiting for glue to dry on more important things (and to build up a few building skills on the side). I had sketched out an idea for a little binnacle and have been playing with it. It’s basically a little frame of basswood stock with 1/32” walnut sheet stock attached. I still need to add the top panel, some drawer/cabinet pull hardware, maybe some painted on hinges, and some additional decorative molding at the base. The little window frame also needs to be painted brown. It’s not the best looking thing out there, but I don’t think it’s the worst either! Makes me a little more open to customizing some of the other deck fixtures. To give an idea of scale, the front of the binnacle is 1" square.

- 241 replies
-
- 5
-
-
- mermaid
- modellers shipyard
- (and 1 more)
-
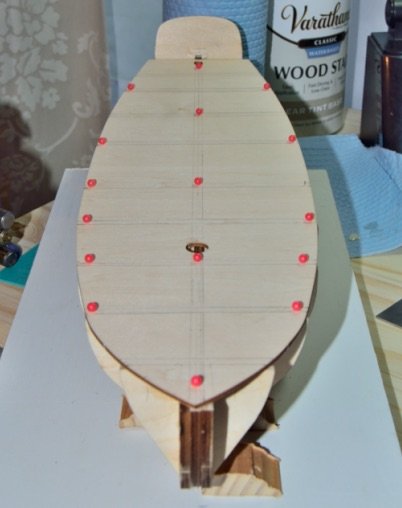
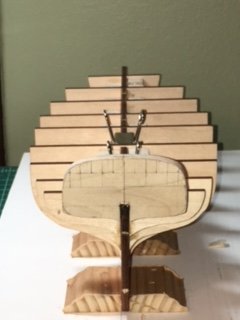
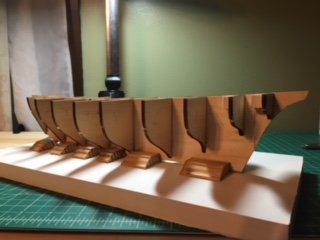
The shipyard workers were up early and ready to go this weekend. I’m taking lots of precautions, but go ahead and start the betting pool for a feline-related debacle of some sort. I already learned not to let the loose end of strip stock wave wildly off the side of your table while trimming one end. I attached the bow and stern filler blocks this week and this weekend I sanded the tops of the bulkheads down just a bit and glued on the false deck. The deck went on well with just one slightly high spot on the outer edge of one bulkhead. Barely perceptible except when looking at the sheer of the deck from the side, but I think I can take it down a bit with some careful sanding of the false deck before planking. Lesson for the future: don’t just focus on the tops of the bulkheads around the keel. Use a batten or something to check the outer edges as well. While that started drying, I also spent some time testing a wood conditioned and stain I’m considering using for the outer planking. I’ve read up and realize there are lots of opinions on the subject of natural vs. stain vs. paint, but wide agreement that it needs to be water based and stained before planking. I want to keep the character of the wood but bring it down just a bit darker to be closer to King’s paintings of the boat. I found a Varathane water based stain that knocked it down just a bit without losing the wood grain. I’ve got a little time to mull it over, but will have to make a decision at some point.


- 241 replies
-
- 4
-
-
- mermaid
- modellers shipyard
- (and 1 more)
-
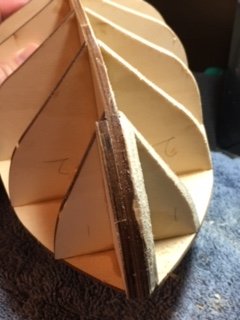
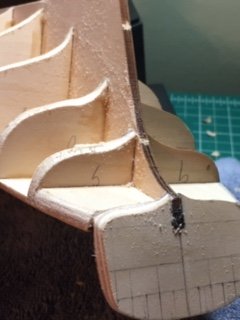
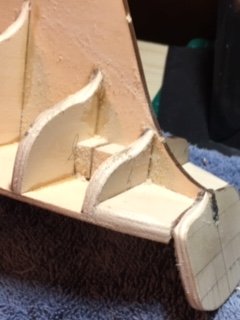
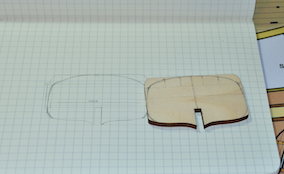
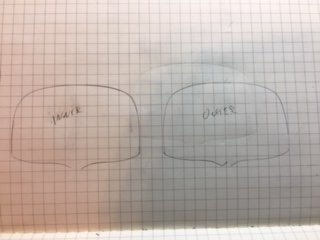
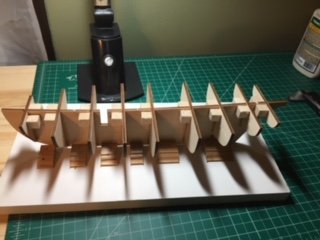
Spent the last two days removing and re-gluing two bulkheads that weren’t quite square/level. Two lessons: 1), check things with a good strong light from above. Lighting from one side can create some weird optical illusions as to alignment of bulkheads due to differences in light/dark contrast on each side, and 2) my eyes picked up misaligned bulkheads much quicker in a photo than in “real life.” Not sure why, but I've started to use the camera to double-check my judgment. Also spent a couple of days tinkering with the transom, which is one thing I knew I wanted to modify, even before I ordered the kit. It comes with a basically rectangular transom with rounded corners. King’s paintings and drawings include some baffling and inconsistent versions of the transom, but most are rounded on top. I think part of the problem was that he seemed to have trouble with proportions on a 3/4 view of the boat (i have the same problem in my drawings, so I know it when I see it!). I sketched out a rounded version of the transom that I think will work after reading carefully and trying to anticipate any downstream complications. I think my shape is closest to King's "careening bay" painting (upper left in the images below). It will require a slight inward lean of the bulwarks where they attach to the transom, which may make fitting a few other parts (and planking the transom) tricky. Before gluing, I traced the front and back of the transom so I’ll have a template to help figure things out. I really had to fiddle around to find the best way to stabilize the transom for gluing (the DVD just edits over that part). I finally ended up flipping the boat over on my board, leveling and squaring everything, then stabilizing the dangling transom with binder clips while 5-minute epoxy cured.

- 241 replies
-
- 6
-
-
- mermaid
- modellers shipyard
- (and 1 more)
-
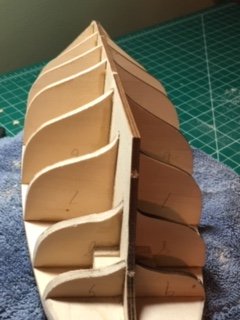
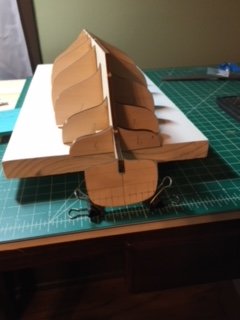
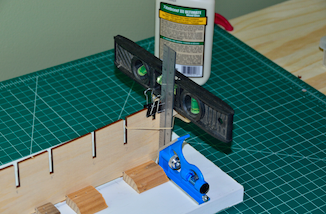
Building started in earnest this past weekend. (Also, I’m working on getting images down to more reasonable sizes!) This weekend I worked on keel/bulkheads and built a jig to hold the keel. I checked the bulkheads for symmetry by flipping them over in the laser cut ply sheet, then did a lot of dry fitting along with some shimming and sanding to get them just right. I’ve read the cautionary campfire tales of builders who rushed through gluing their bulkheads and I have a mortal fear of accidentally creating a hull shaped like a french horn. The system that worked best for me was shimming my work board/jig until it was level, using a carpenter’s square to true up the keel (it has a little play in the jig), then using a couple of .5” x .5” scrap blocks glued against the bulkhead to help square them up and to leave room for a level to rest on the bulkhead. As a beginner, they also helped me by giving me something with a good glue surface I could “tack” on and fiddle with a bit before clamping it tight with a binder clip. I managed not to glue my level to the frame, so that’s a plus. The tops of the bulkheads seem reasonably level and flush with the top of the keel (with a bit of sanding here or there). There may be a very slight bend in the keel (but not a twist, luckily). I think I can address it through careful glueing on of the deck. I haven’t attached the transom yet because it’s a little tricker and I don’t want to rush it.

- 241 replies
-
- 7
-
-
- mermaid
- modellers shipyard
- (and 1 more)
-
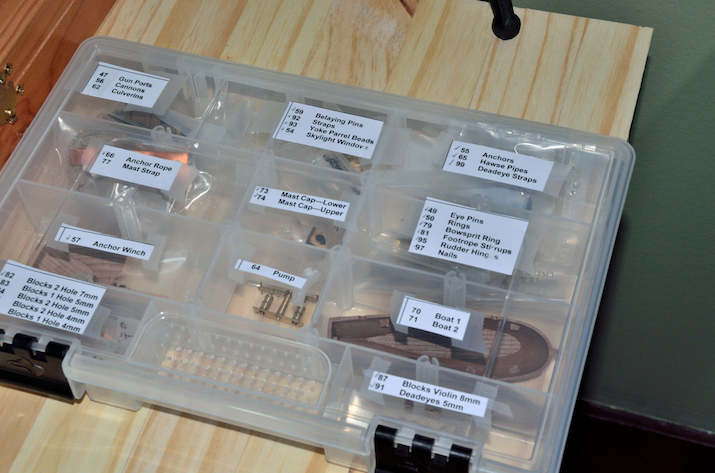
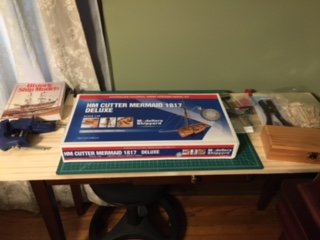
Next Stage - Prep work The kit made its way from Australia to the deep south of the US in reasonable time. I ordered the deluxe kit (with hull copper) so I could have the parts and instructions to copper if I want, although I haven’t decided (not leaning in that direction at the moment). One part (deadeye straps) was back ordered, but arrived about a week later. I did a detailed inventory and sorting of all the kit contents. I was short just a few blocks of a particular size, but that was it. I ordered some replacements along with a few upgrades including: 1. Nicer cleats in walnut (a lot of parts in this kit just come in plywood, and I forsee other similar upgrades) 2. Walnut belaying pins (I want more darker woods in the build) 3. 20mm Carronades (King’s journal and letters specifically mentions the Mermaid had two carronades, not clear what size) 4. Some sheet and strip stock to possibly get creative with deck fittings, etc. I’m not so sure about the ship’s boats. I may revisit replacing those. I also spent last week reading the instructions, watching the instructional DVDs, and looking over the MSW build logs for the Mermaid (thank you to those builders!). The DVDs were helpful but glossed over a couple of things I was hoping to see more closely. The production values weren’t great, but I liked the guy building and for a first time builder (and visual learner), I think they were worth the price.
- 241 replies
-
- 2
-
-
- mermaid
- modellers shipyard
- (and 1 more)
-
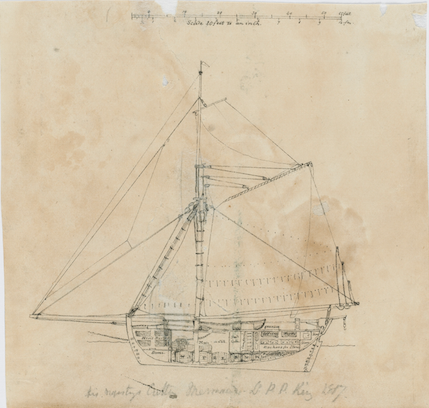
First Stage - A little Research One reason I settled on the Mermaid was some of the historical information I ran across (interesting and woefully incomplete!). I loved the watercolors and sketches in Phillip Parker King’s field journal. They’ve got some good information, but there are also a lot of contradictions in his own portrayals of the boat. I’ve attached a couple of the most helpful images (no longer under copyright, but found in the digital collection of the State Library of New South Wales). I’ve also found logbooks and journals by King, the botanist on board (Cunningham), and one of his midshipmen (J.S. Roe). These are presumably the same sources the designers of the kit used. Since there are no definitive plans of the Mermaid, the kit designers apparently also used “The Naval Cutter Alert (Anatomy of the Ship) by Peter Goodwin. I suspect the kit is actually a hybrid that captures generalities of the Mermaid and details from the Alert. I’ve seen discussions about deck fixtures that don’t seem to match King’s drawings, but there are a lot of other little things that don’t always match the drawings. I’ll probably be asking for the collective wisdom on some of those things along the way and then maybe deviating from the kit on some small things. I’ll wait and see how my skill level seems to play out. The beauty of it is that unless I do something horribly wrong or anachronistic, there’s no singe definitive Mermaid so I can take some artistic license. For anyone doing research, here is the State Library of NSW full collection of King’s images: https://search.sl.nsw.gov.au/primo-explore/fulldisplay?docid=ADLIB110326801&context=L&vid=SLNSW&lang=en_US&search_scope=EEA&adaptor=Local Search Engine&tab=default_tab&query=any,contains,cutter mermaid&sortby=rank And his account of the journey (with links to online Project Gutenberg text): https://search.sl.nsw.gov.au/primo-explore/fulldisplay?docid=SLNSW_ALMA51172343820002626&context=L&vid=SLNSW&lang=en_US&search_scope=EEA&adaptor=Local Search Engine&tab=default_tab&query=any,contains,phillip parker king


- 241 replies
-
- 3
-
-
- mermaid
- modellers shipyard
- (and 1 more)
-
Hi all, With a little trepidation I'm opening a build log on my HM Cutter Mermaid kit. This is a first build, not counting the hull of an A.L. Swift model I managed to build when I was 13 or so with hardly any tools, expertise, or instructions. I was pretty impressed with myself at the time, but I'm sure it looked appalling. I used to build plastic models back then (planes and ships mostly), and had a couple of model railroads. I've had some fun doing "real sized" projects on my house (furniture finishing, trim carpentry, window restoration) but we'll see if I have any skills that scale down. I'm starting the Mermaid because I've been looking for a nice quiet winter project to putter with in the evenings and on weekends. Job demands can be unpredictable, so I really don't have a feel for the pace I'll work at, but I'm not on any kind of timetable so I'm not worried. Hopefully this log will help keep me on track and be a source of good input. I've already got a lot of questions, but I'll try to pace myself and ask them as I reach them in the build. My workspace is a bit unusual. I've set up a modest little work bench in the corner of a dining room that I had already pretty much taken over as an art studio. I've got a nice sheet of wood clamped to a cheap console table, and I've commandeered several drawers in the china cabinet for tools and supplies. Luckily, I also have a rougher workshop out back where I can do a few things if needed. If the workspace looks freakishly neat in pics, that's partially because having three cats lurking around makes me clean up after each work session! I'm not very far into the build at all, but will post a few catch-up pics shortly to get up to speed. James
- 241 replies
-
- 3
-
-
- mermaid
- modellers shipyard
- (and 1 more)
-
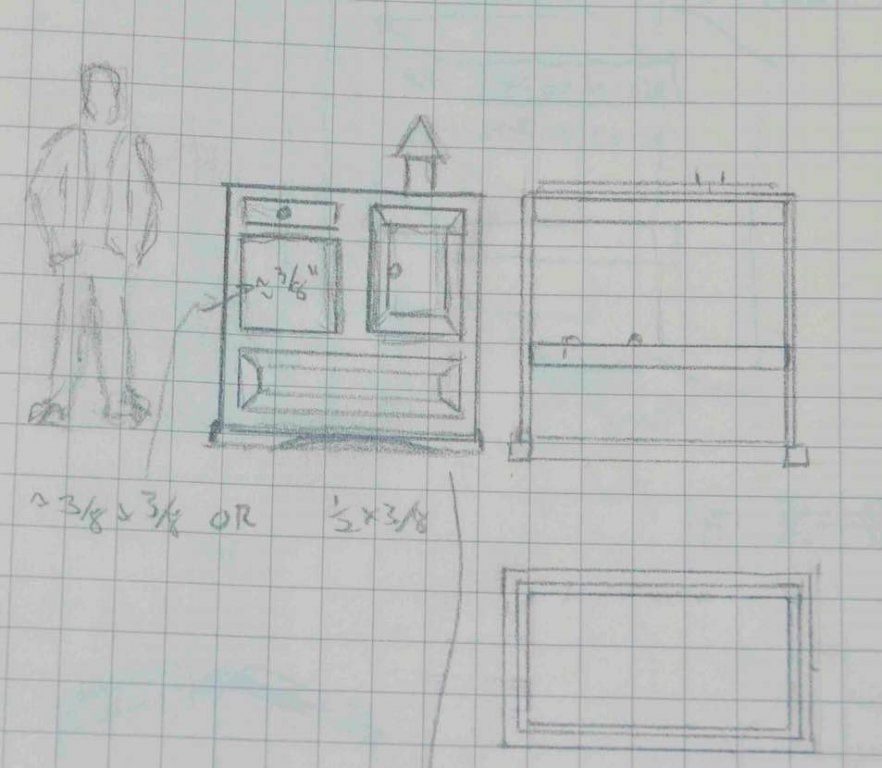
Thank you. This is the only other cutter image I could find with something clearly placed there (photo credit to Chuck Passaro, from his build of the cutter Cheerful...hopefully with forbearance for posting the image for reference!). I thought it looked like a seat of ease but the one in the King drawing looks awfully high and precarious for that. I was thinking maybe a locker. It did get me wondering where the "facilities" were on something like a cutter that lacks a traditional head.
-
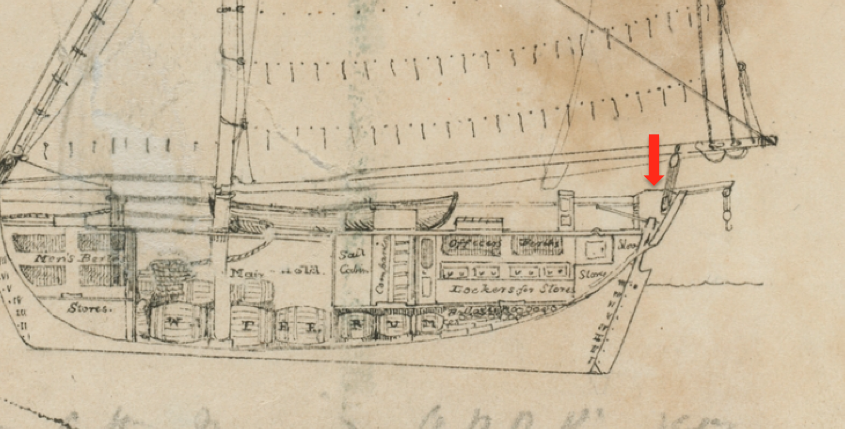
Hi All, I'm doing a little background research in advance of an HM Cutter Mermaid build, including looking over P. P. King's drawings and written descriptions. Can anyone help me identify this fixture to the side of the tiller (presumably on both sides)? Thanks - James
-
Beautiful work (and inspiring), Jim. I like how the paint and copper haven't drowned out the wood. It still very much "reads" as a wooden ship.
-
Fernando, thanks for the welcome and good to hear the kit was manageable. I placed my order last night. The deluxe kit was only a few dollars more, so I went ahead and ordered it partially out of curiosity, and to have the option on the copper. My love for a nice wood finish will have to battle it out with my love of historical detail, but for now I just need to worry about the basics and not get ahead of myself. It's a bit like worrying what kind of cherry you're going to put on top of your cake when you've never baked one and you have yet to crack an egg. If my planking ends up being a disaster, I may need all the copper, duct tape, chewing gum, hot glue, and pine cones I can get my hands on.
-
Chris, thank you for the welcome. Speaking of "everything in do-able quantities," is copper plating (i.e., the "deluxe" Mermaid kit) usually feasible for relatively new builders or is that kind of thing best left for a future build?
-
No problem Jim. I'm a Louisiana native so I'm with you! When it comes to the Crimson Tide, I just smile and nod (for my own physical safety). Looking forward to benefitting from the experience of this group.
-
Hi All, My name is James and I'm coming to MSW from the "Steel City" of Birmingham, Alabama in the US. After lurking for a while and reading some really great posts, I decided to join and step out into the daylight. I usually cringe at hobby-related forums because there can be a little too much eye rolling and WAY too much use of the word "noob." I'm very impressed with the constructive and supportive tone here. Good membership, but I think the moderators set a good "top down" tone also. My background is a pretty common story: modeling experience in other areas (plastic models, dioramas, couple of model railroads when I was younger, etc). I also have a story of "the one that got away" (from me). I was given a Artisania Latina (I think) Swift kit when I was about 13 or 14 years old. Had a great time building the hull and deck, but had very little money, underdeveloped skills, and very few suitable tools for wood ship building. I never considered it a failure, just had to stop when I realized I'd hit my limit and dream about building another one someday. 30+ years later, I think I'm ready to take another shot as a good Fall/Winter project. As for a build, I've been doing a lot of research. I decided on something along the lines of a naval cutter to work on a decent range of basic skills (single mast, gaff rig plus a couple of square yards, reasonable hull shape). I'm pretty sure I've settled on the MH Cutter Mermaid kit by Modeller's Shipyard. I like all the historical information available about it (including ship's logs, letters, drawings, etc), and there are a couple of good build logs for reference. The clincher was going through all the sketchbook drawings and paintings by P. P. King (thanks to the New South Wales State Library digital collection). I'm a pen & ink artist who has kept a field sketchbook at times, so that spoke to me. I'm also learning a little bit of Australian history and geography, so there's that! For now, I'm getting a modest little workspace together and stocking up on a few basic tools. I'll be ordering the kit soon and hope to muster the courage to start a build log.