HOLIDAY DONATION DRIVE - SUPPORT MSW - DO YOUR PART TO KEEP THIS GREAT FORUM GOING! (Only 13 donations so far - C'mon guys!)
×


JamesBhm
-
Posts
142 -
Joined
-
Last visited
Content Type
Profiles
Forums
Gallery
Events
Everything posted by JamesBhm
-
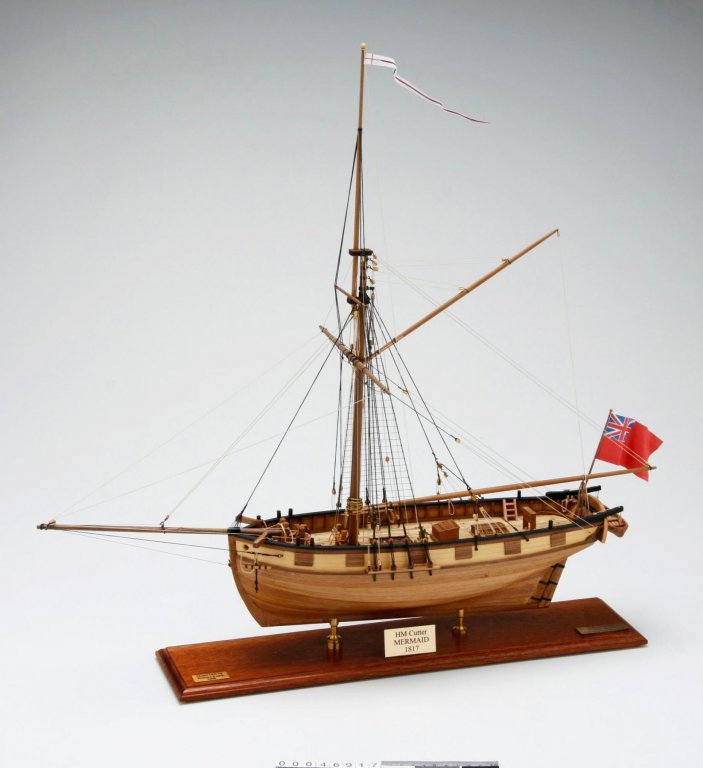
 This may be more of a hull finishing question than a construction question. Having the ship's name on the transom seems to be common for larger ships (especially well known), but it seems to be much more variable on smaller ships and boats, even when looking at contemporary historical models. Is this preference of the modeler or are there any formal or informal conventions for this? I'm particularly interested in 19th century British Naval vessels as I am working on a build of HM Cutter Mermaid. James
 -
Had to Google that one. I think I ended up with three full width stealers at the stern on either side and then two thin slivers where the curve is tight at the top of th stern post. As for the other planks, I either needed to spile, or just let the battens fall more naturally when I was blocking off the sections to plank (per the Chuck Passaro tutorial). For both layers of planking I tried to make them go a little more where I wanted them and I paid a price in that tricky area of the hull. Definitely glad I went with a more forgiving hull shape for a first model.
-
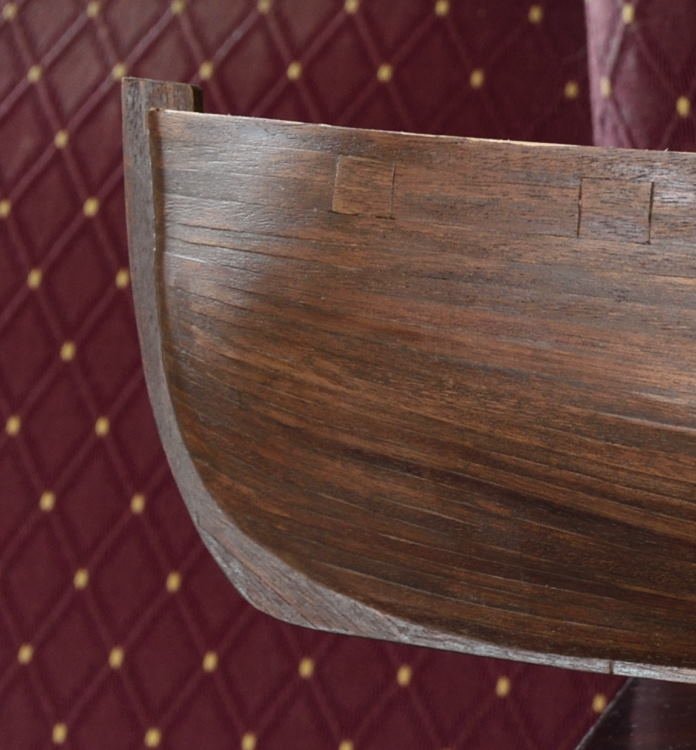
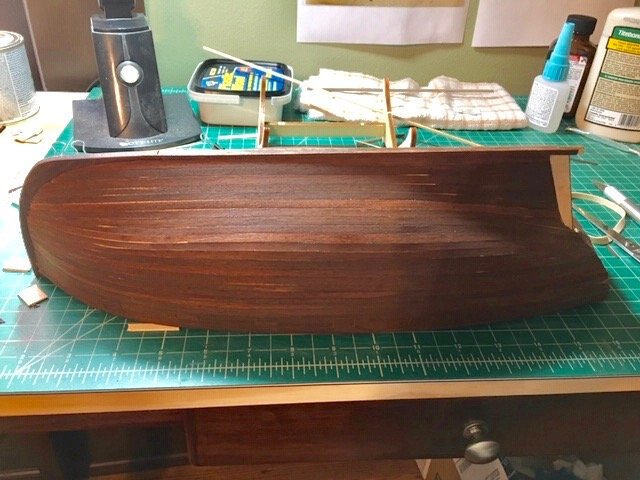
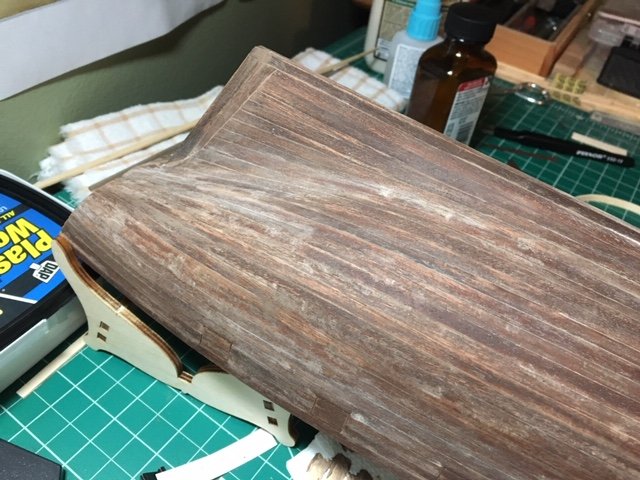
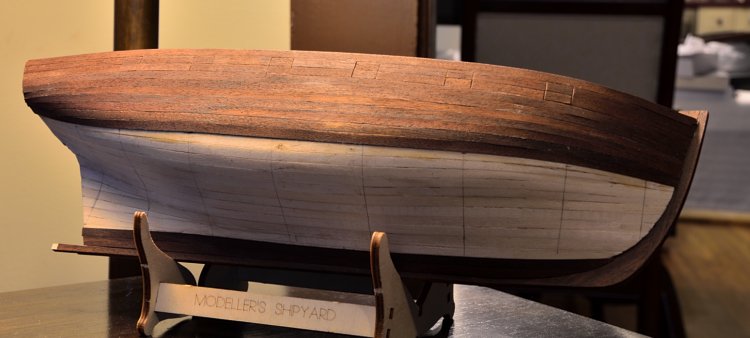
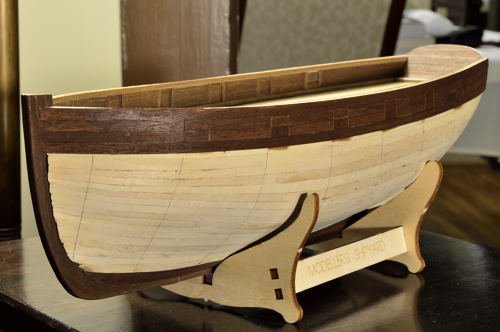
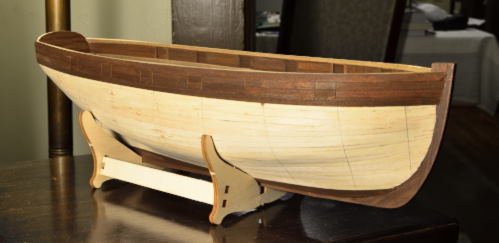
Below are the “after” pics. I’m pretty pleased with the overall smoothness of the hull. The stern is still the best looking, midship is decent, and the bow area has the most imperfections. I’m not thrilled with how the planks look as they touch the stem, but I was able to clean it up substantially. I like the color and the planks seem to have a good timber-y character.

- 241 replies
-
- 3
-

-
- mermaid
- modellers shipyard
- (and 1 more)
-
So where do I collect my “I survived my first outer planking job” t-shirt? It was a stressful process, but I learned a lot. Could have been much worse, but still more imperfections than I’d hoped for. I ended up with some small gaps and buckles…especially around the bow area. The awkward butting up of the planks onto the stem (as I described above) was also an issue. I also had a few planks that butted together awkwardly such that one edge didn't sit totally flush. Here are a before photo an a “during” photo. I used a chisel blade hobby knife and contact cement to deal with buckles, etc. I ended up sanding the whole thing before filling in gaps with the color matched sanding filler, then gave it another good sanding with a finer grit. The dust in the image is mostly sanding dust.

- 241 replies
-
- 2
-
-
- mermaid
- modellers shipyard
- (and 1 more)
-
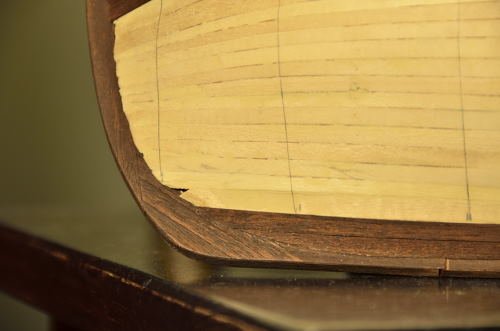
A build note for future builders who may be reading this: It gets mentioned that the whole false keel build method for this boat is different than some others. There's no cutting of a rabbet for hull planks to fit into, and the plywood keel and the stem pieces are planked plywood instead of solid wood. The instructions say to first plank the hull (outer layer), then install the plywood keel and stem unplanked, then plank the keel and stem. That sounded like a nightmare (although he makes it look easy in the DVD!). I planked the keel and stem fully first, but then ended up with the outer hull planks butting awkwardly against them with gaps that I've had to fill and sand. In hindsight, I would consider this: fully plank the keel and stem, then trim the first layer of planking to dry fit them. Trace where the outer planks should some in contact (especially with the stem), then trim away some of that planking to effectively make a rabbet.
- 241 replies
-
- 2
-
-
- mermaid
- modellers shipyard
- (and 1 more)
-
Chris, sounds like a lot of "battle damage" for a survey vessel! Hopefully not too much backtracking necessary. Right now, I think my worst case "nuclear option" would be to have to paint the hull, but I really don't think things are that bad. The shape and surface of the hull are looking good...I'm just hoping I don't run into any staining/color matching issues. I'm doing things the same way I did them for my jolly boat mini-build a couple of pages back, so hopefully it should all work out. I'll be sanding and re-staining tomorrow and will know soon.
-
Thanks for the words of encouragement! Once you get something started, I highly recommend opening a build log. I was a little unsure at first, but it's been worth it not only for the advice, but also encouragement and motivation.
-
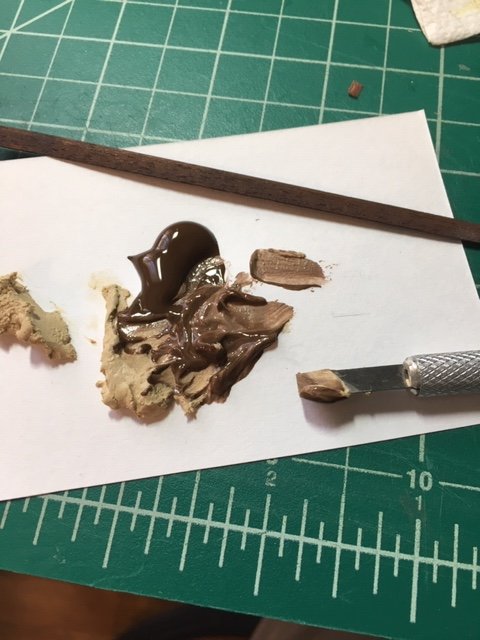
Just a teaser pic for the moment. I completed the outer planking, and am now in "post-production." I used a chisel blade hobby knife and contact cement to re-glue some buckled areas that didn't adhere well. I'm mixing some wood filler with gel stain to color match my planks and touch up little gaps. I'm also giving the whole things some sanding passes. Once I'm satisfied with that, I'll apply a final touch-up stain coat, a matte finish, and hopefully post some before, during, and after photos (unless it looks awful...in which case I'll close the log, change my name, and move to Mexico). I know my planking skills need work so I'm being very slow and painstaking in my touch-up efforts.
-
I've always been baffled by that too. I wondered if maybe that was some rough blocking off of the sketch before he painted and he repositioned the gunports as he painted? Who knows. Sounds as defensible as anything else we've come up with!
-
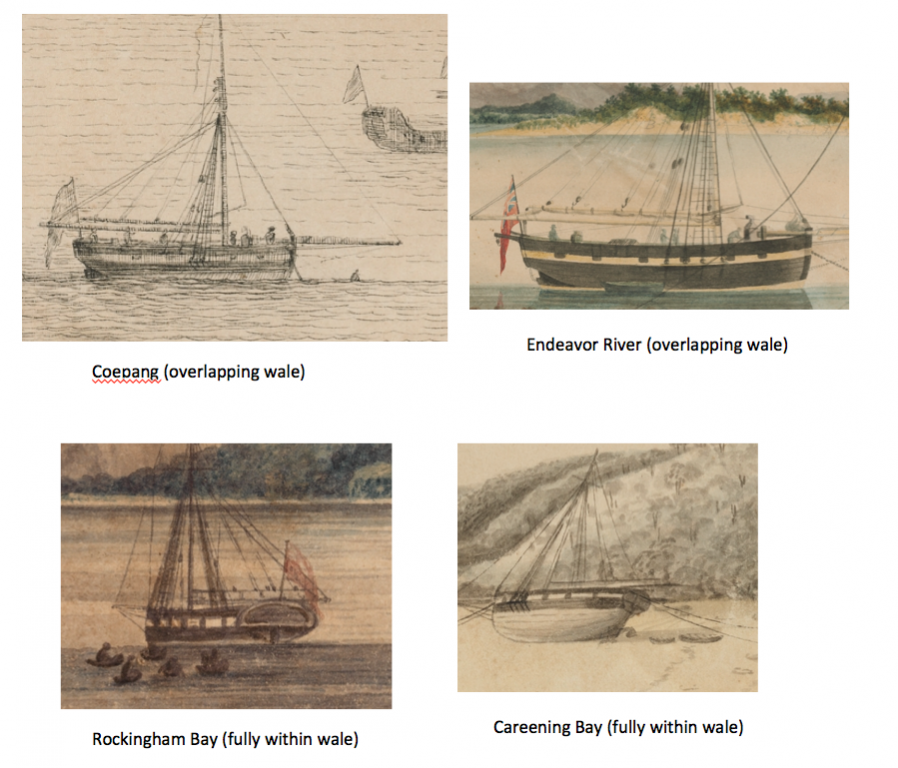
One of the maritime museum models went with placing the lighter area above the actual timber of the wale, but way higher than any of King's sketches. Note the transom, btw. (sorry if I'm clogging up your log with pics, Chris!)
-
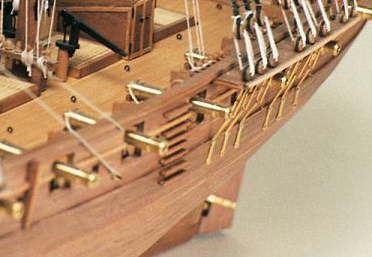
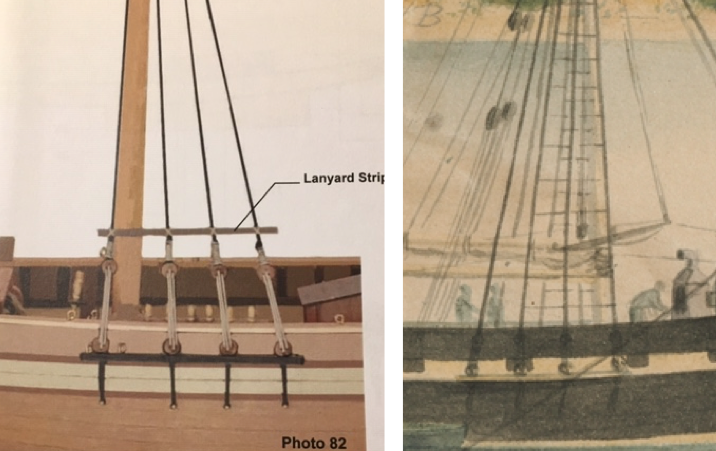
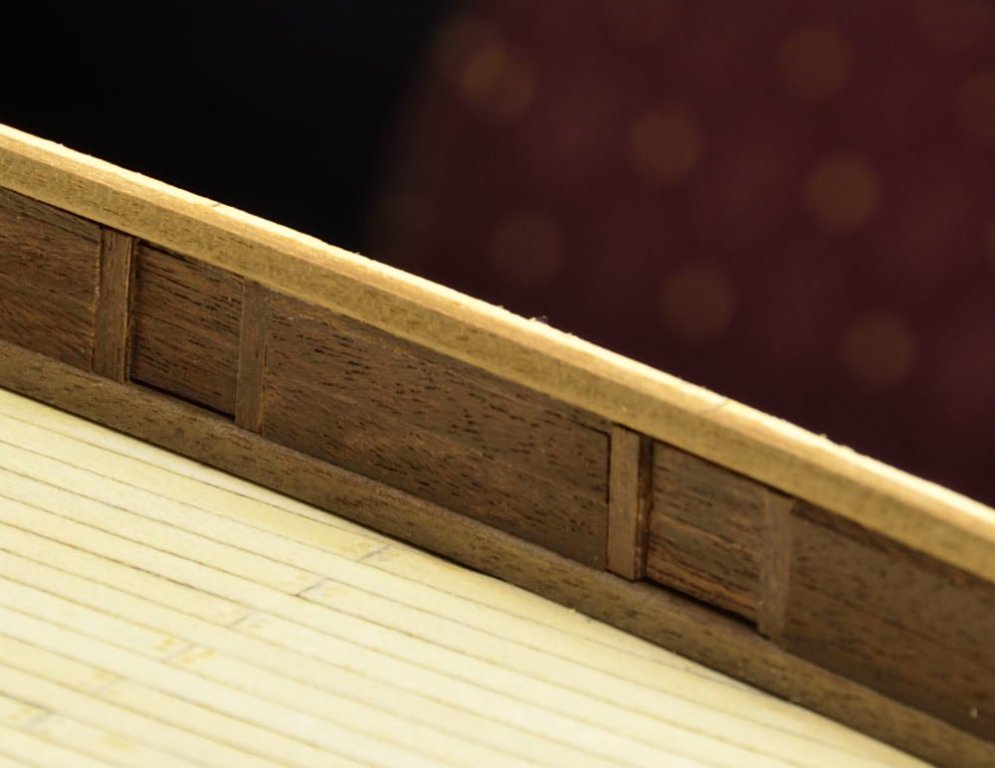
Chris, Glad there are a couple of us to discuss this. I've been worried I'm overthinking things or missing something obvious. The careening bay pic you posted is almost identical to King's original. The confusing part of his drawings is that of the four sketches that clearly show the gunports, two show them completely within the "stripe" of the wale and two show them halfway overlapping. I've found images of other ships both ways, although crossing the wale seems less common. I think for the Mermaid, having the ports fully within the wale would either require the wale to be way too high or for guns to sit below the level of the deck. I found an example of a gunport straddling the wale in "Historic Ship Models" by Wolfram zu Mondfeld (below, labeled as "crossing the wale, 1600-1830). For me, the gunport straddling the wale makes the most sense (although certainly wouldn't argue with other interpretations). I'm shooting for the gunport as pictured. Rick has also mentioned that these could just be painted on fake gunports that don't have to line up with the deck, so we could be jousting with windmills! Also...just to add to the fun...the transom davits don't appear in all of the drawings. Would those have been removable or did King just omit them for simplicity?
-
Chris, Honestly? It's giving me fits! I'm down to the key plank on either side and then some stealers. I'm not posting any photos until I can do some touch-up work. I've got a few buckles to touch up and seams to fill in a bit. Then I'll give it a light sand and touch up the stain. I'm eager to be past this part! James
-
Chris, I've also struggled a bit with this and certainly don't have a clear answer. Based on some of King's drawings, the ports do cross the wales (although the lower timber of the whale would be unbroken) -- but his drawings are not consistent. I haven't been able to figure out how to have the ports between the two whale timbers while keeping other proportions correct (level of the deck, position of the channels). I found at least one general reference to gunports indicating that they might cross the wale. The channels in the kit directions also appear to be placed wrong. They are below the wales, whereas in King's drawings they're above. If the whale is too far down, the channels are halfway down the full of the ship! My placement of the wales will be two planks down form the rail, with the channel placed below. That will allow for the gunports to be about as they're pictured in King's drawing "at anchor" and Coepang drawings (but not consistent with the Careening Bay and Rockingham Bay pics). They'll be crossing the wale, but it seems like there's no easy win. James
-
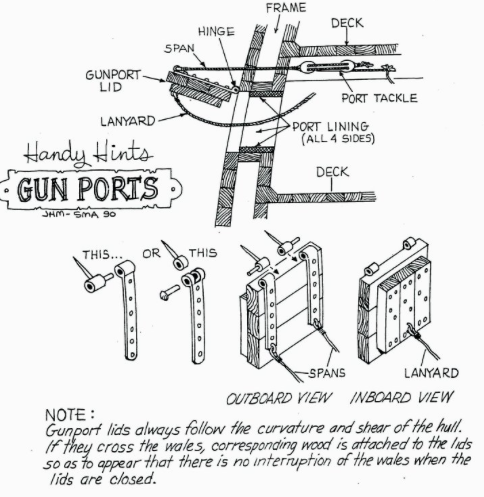
Very nice looking Chris...makes me wish I had made "real" ports instead of modeling them by making false port lids. As for slow going....you'll have to fight me for that title. - James
-
Thanks Fernando. It never hurts to pick the most forgiving photo! I just finished another run of 6 planks on each side and I'm feeling some frustration. I wasn't expecting perfection, but maybe not quite this many imperfections! I've got more hairline gaps and slightly uneven joints than I was hoping for, in part because the grain of the wood is just so splintery (even with sanding). Hopefully I can whip it into shape with a little TLC after all the planks are in place. It's been stressful!
- 241 replies
-
- 1
-
-
- mermaid
- modellers shipyard
- (and 1 more)
-
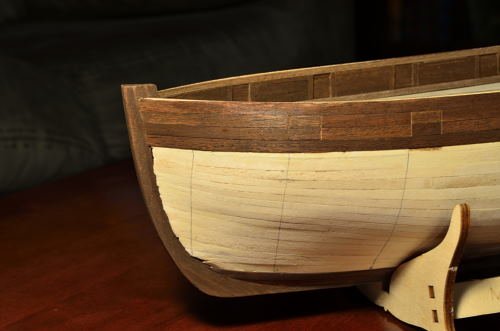
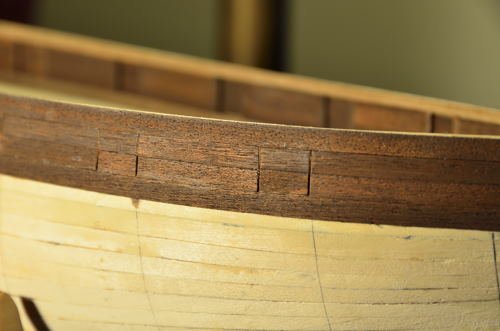
Time to start attaching tapered outer planks. Last week I cut and tapered six planks for each side based on the Chuck Passaro planking tutorials rather than the kit instructions. I found the outer planking wood tricky to work with due to the grain (which is nice aesthetically, but does not always play nice with a blade and straight edge). I taped them all together and sanded for maximum consistency, then I took the plunge with the contact cement (my first attempt). A little tricky, but not nearly as bad as I thought it was going to be. Tip for other beginners: make sure you’re putting glue on the side of the planks corresponding to the side of the ship you put it on (funny how that works!). Placing the planks wasn’t difficult. I got 6 on each side pretty quickly. The bond wasn’t completely instantaneous and permanent until a little pressure was applied, which was a relief. The hull will definitely need some “post processing.” Where my tapers aren’t perfect I’ve got little slivers of light wood peeking through, but I can fill those spots. I’ve got a few spots of contact cement that I’m just rubbing and/or sanding off a bit, plus the junctures of a few planks need to be sanded smooth.
- 241 replies
-
- 3
-
-
- mermaid
- modellers shipyard
- (and 1 more)
-
Chris, No intrusion at all. Discussion is absolutely welcome. I'm also following your build now. Maybe we can save Rick the trouble of having to repeat himself as we raise similar issues...ha. I also found the reference to two carronades and if you look at King's Careening Bay painting, you can see one of them on the beach. Looks like a carriage type rather than a slide. I bought two carronade barrels and plan to slightly modify the carriages that came with the kit. I've also got plans to make changes with the deck layout and fixtures. Curious to see if we're thinking along similar lines. James

-
Chris, I actually JUST took a closer look at that image (it was sitting on my computer desktop) and was coming back here to post that you're absolutely right. I had missed that in my earlier looks, although this was done by a later artist and I wonder where he got that. He may have been doing the same guesswork we're doing based on King's sketches. This is one reason I'm enjoying my Mermaid build. It would be nice to have more definitive answers on some things, but I enjoy the historical detective work with other builders.
-
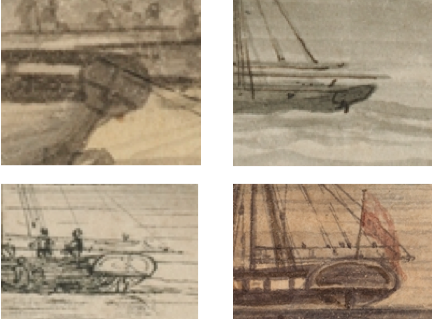
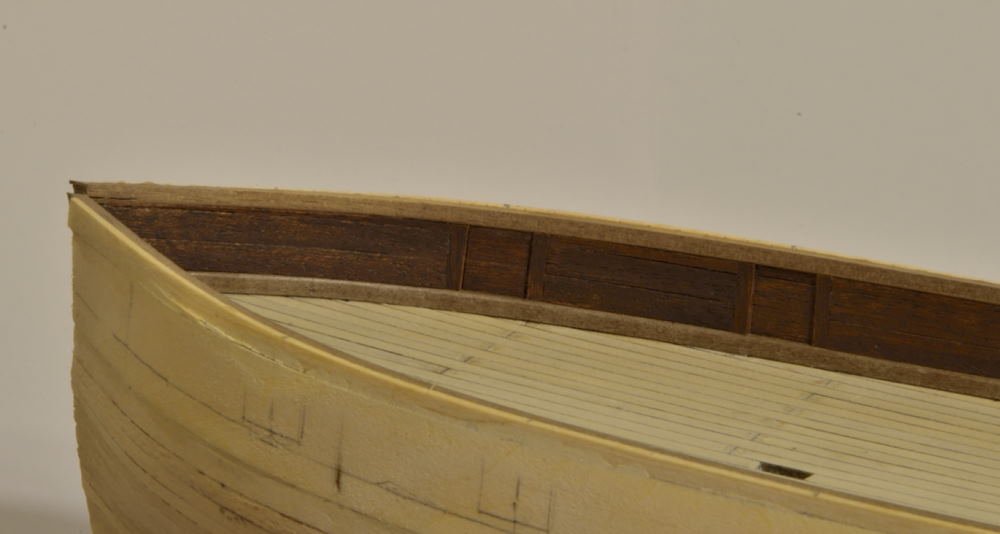
Chris, I've also struggled a bit with the transom. Have you looked at other images from King's sketchbook? It never seems to look exactly the same way twice. I do some field sketching and I know that 3/4 views of curved objects in perspective can be tricky. I think King had a little trouble capturing it consistently. Of all the images in his journal, the one from Careening Bay (upper left in the attached image) is the one I'm going for (with some artistic license). It mostly involved rounding down the upper edge. I think the transom the kit comes with it too "square" (even though the corners are rounded). I've debated whether it's just a bit wider than the bulwarks at the stern, but in the image link you posted I think I agree with Rick that it may be the launch. If it's a bit wider, I don't think it would be quite that much. The model in the Australian National Maritime Museum does have a wider transom though: http://collections.anmm.gov.au/en/objects/details/163203/scale-model-of-hm-cutter-mermaid;jsessionid=DFEB011276CA4734E62564B5C7E6B7FA?ctx=612c42a7-1b8c-43d9-b603-3d8a4c006c21&idx=0 James
-
Thanks Cabbie...good thoughts. The stuff I bought is the consistency of maple syrup and came with this awful applicator brush that reminded me of the ones we used in grade school for thick paste. Is the "grab" pretty instant with that stuff? I can see the value in having something fully adhering the plank (no edged curling up) but the idea of instant grab with any time to fiddle or adjust is daunting.
-
I’m planking in earnest now. I started by “planking” the stem and keel pieces and fitting them to the hull. The look isn’t as bad as I feared. The stem sortof looks like it was built from several large pieces of timber, just not quite….accurately. Oh well. I’ve put down four planks on the outer bulwark (including the outer aspect of my closed gunports. Fiddly and a pain!), plus the garboard strake and an adjacent strake along the keel. For the remainder of the planking, I’ll probably deviate from the kit instructions and follow the Chuck Passaro planking tutorials as best I can. Meanwhile, I’m struggling a bit adhesive-wise. I bought some contact cement (used in the kit DVDs), took one look and decided it looked like a goopy unworkable mess. Maybe I don’t have the right kind. For what I’ve done so far, I’ve used my same trusty wood glue with spots of CA in key spots to hold the plank in place as the wood glue dries. Not sure if this will continue to be workable as I make my way around the curves of the hull.
- 241 replies
-
- 2
-
-
- mermaid
- modellers shipyard
- (and 1 more)
-
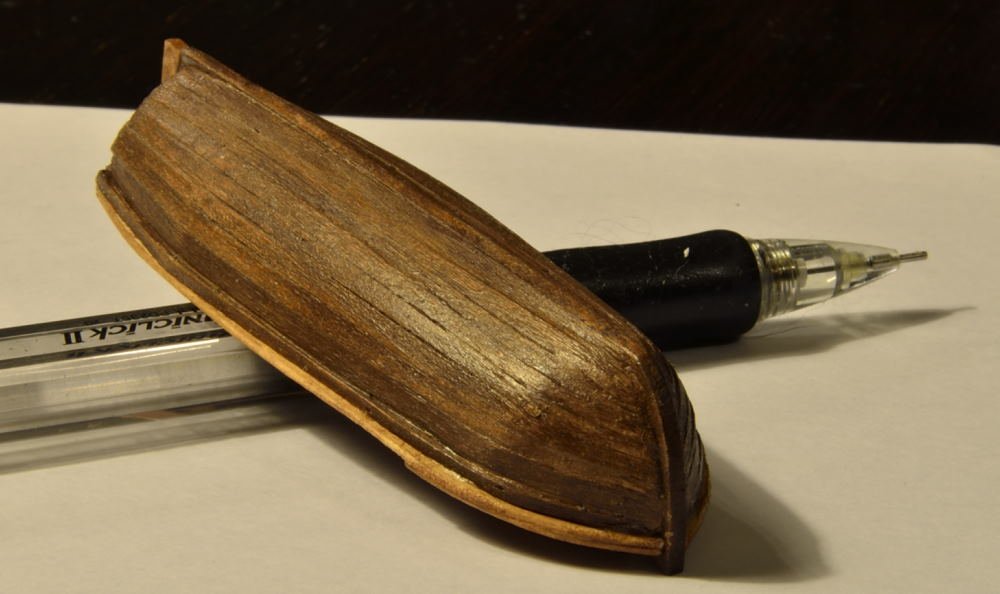
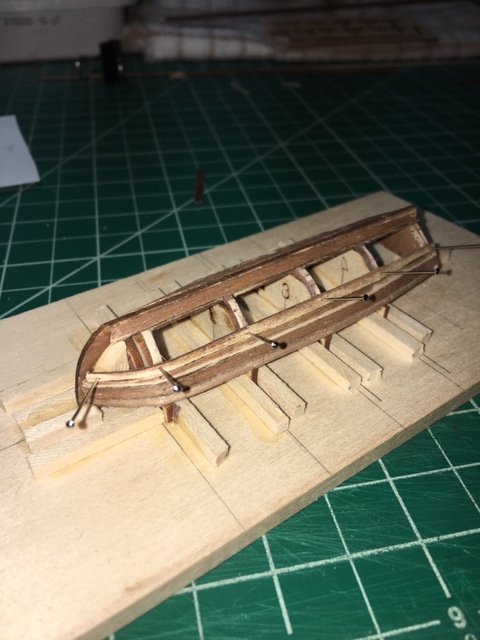
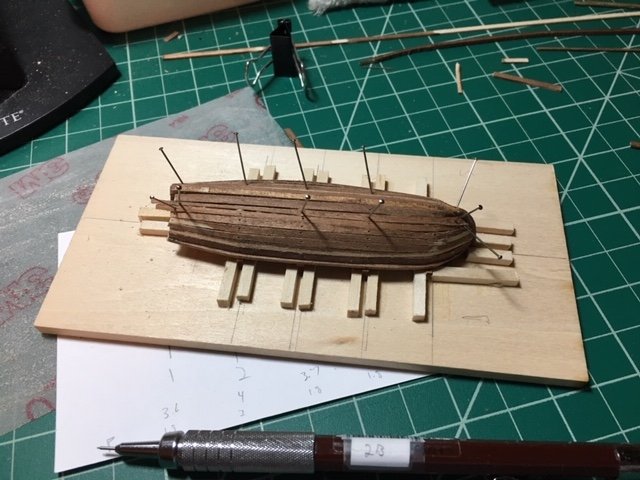
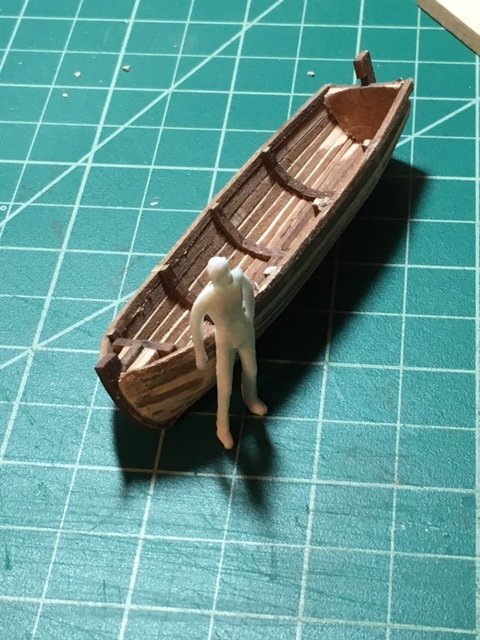
I’m anticipating some uninterrupted build time this weekend and I really need to get moving on the outer layer of planking (which has me a little nervous). To that end, I worked this evening to wrap up the jolly boat build. Turns out it stained pretty well (even with wood filler), although I may still eventually paint the hull at least. I like the look of finished wood, but I also don’t want finished wood overkill on the final model. We’ll see how the aesthetics work out when I get further along. For now, I’m pretty pleased with the jolly boat considering it seemed like it was going off the rails at a couple of points. Not bad for a cheap kit with sketchy instructions.
- 241 replies
-
- 3
-
-
- mermaid
- modellers shipyard
- (and 1 more)
-
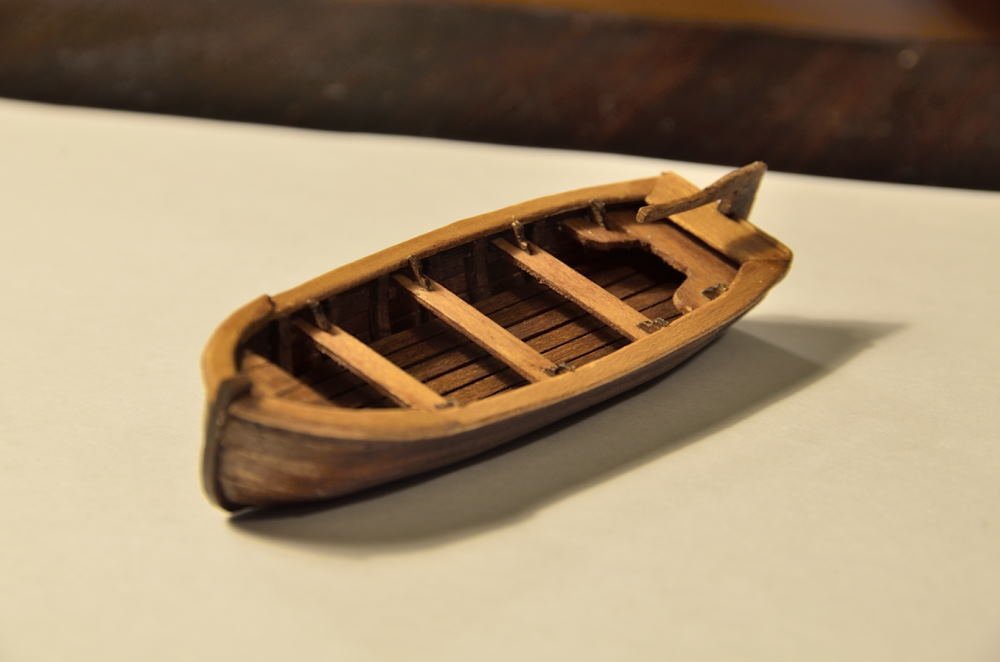
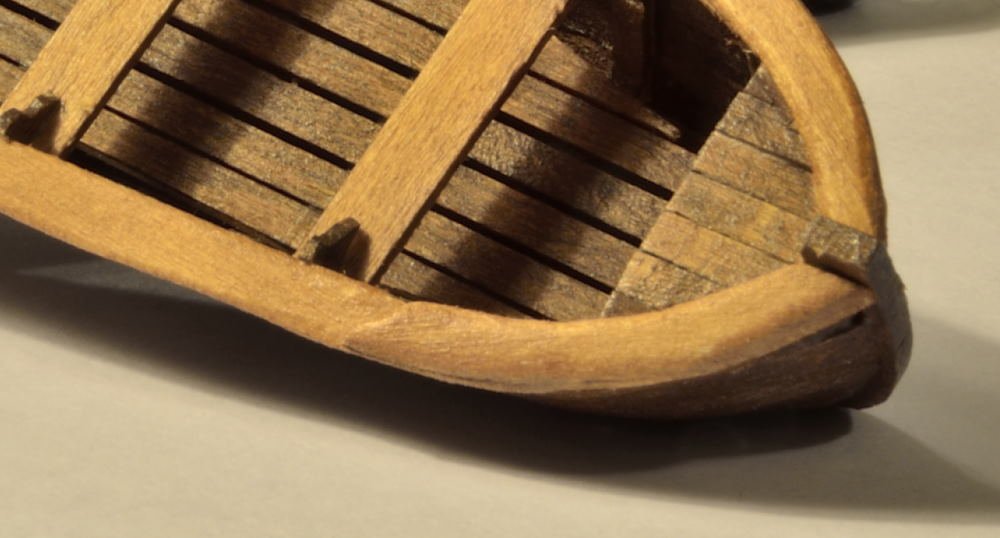
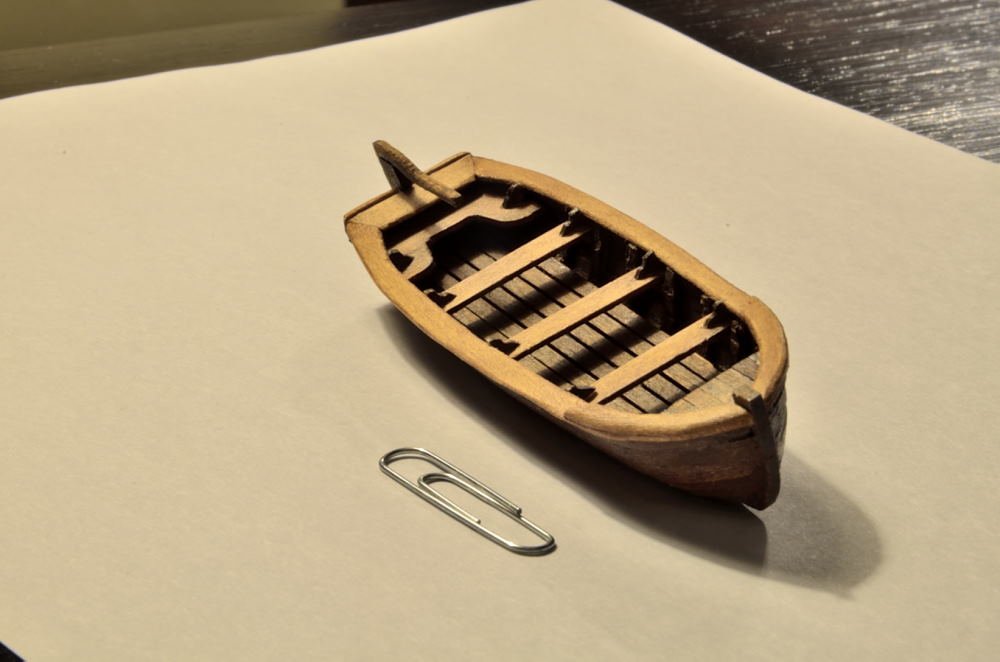
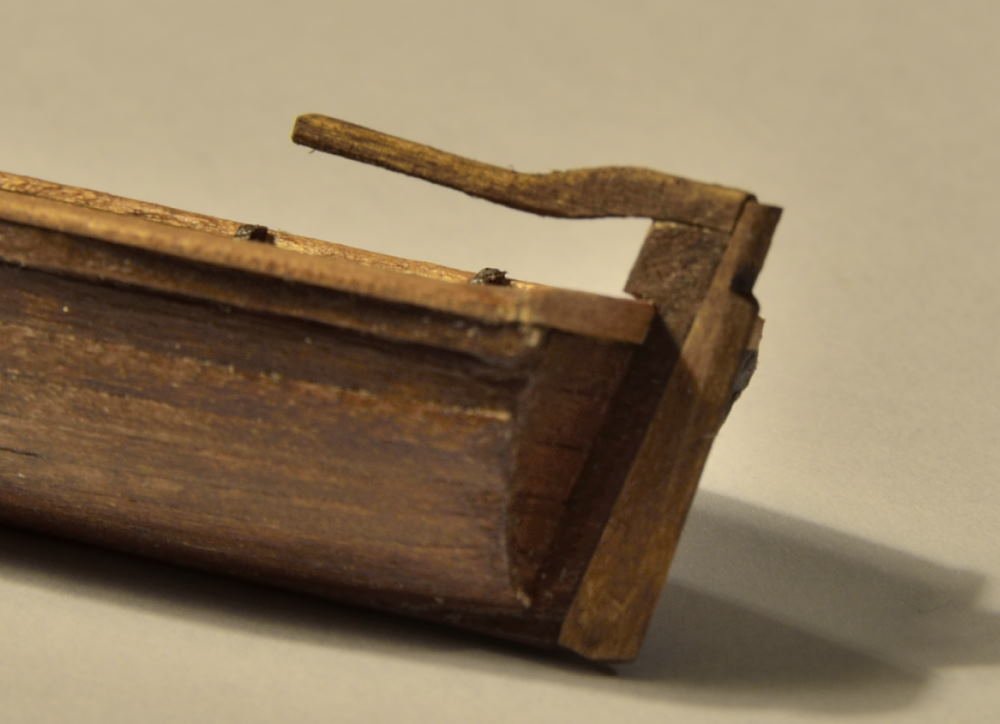
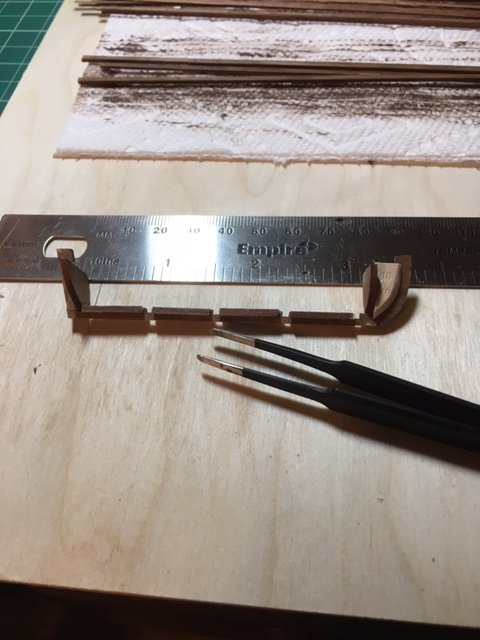
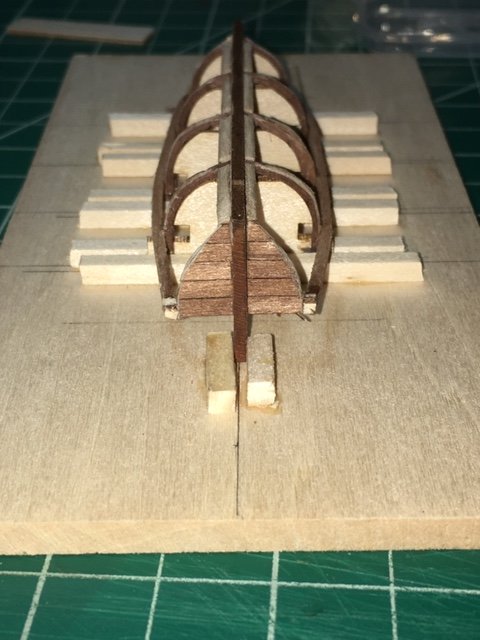
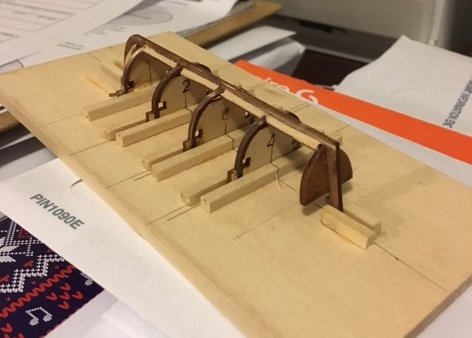
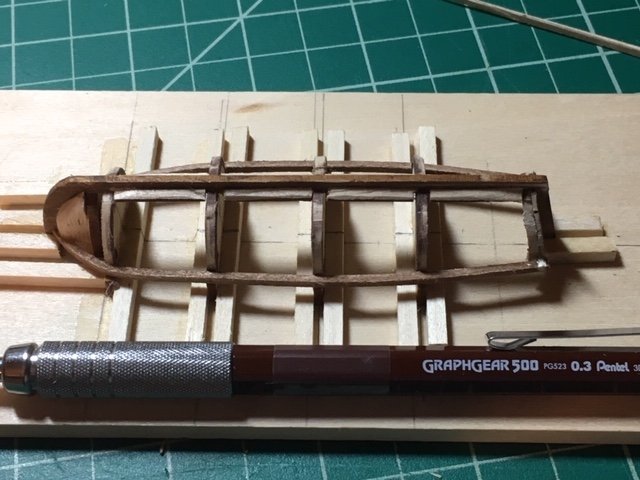
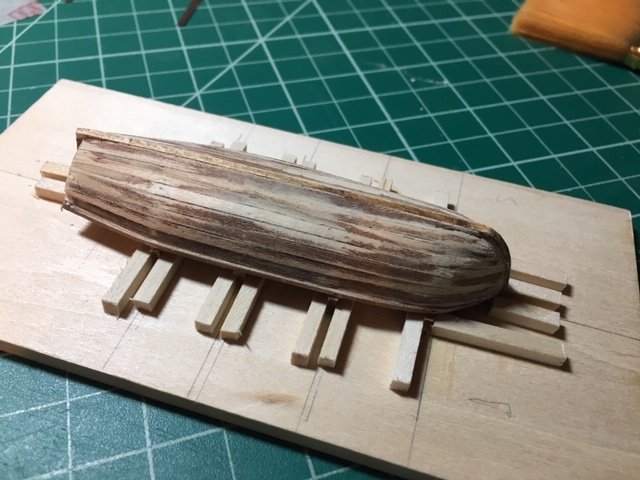
Now for a build log within a build log. I’m actually ready to start the outer layer of hull planking, but I’ve had a hard time finding long chunks of time to sit down and work on it thoughtfully (and with a well-rested brain). I’ve needed something I could just putter with lately. According to King’s records, the Mermaid had a 14-foot jolly boat and two whale boats (about 20-21 foot, based on my calculations from his cross section drawing). They also shipped a "whaleboat in frame" in case of mishaps. I’m not fond of the boats that came with the kit. I had seen the Model Shipways plank-on-frame ship’s boat kits and I HAD to try one. A 14-foot boat translates to abut 3.5 inches so I ordered their 3 3/16” kit for a whopping USD$8.99. I’ve hesitated to post pics until I was sure it wasn’t a disaster (and it’s been close a couple of times). It could still go south, but here it is. It’s become known affectionately at the “wee fiddly boat.” The kit is lacking in some ways, but fascinating at the same time and definitely a nice little skill building challenge. I’ll end up painting the exterior but may leave the interior as stained/natural wood. It still needs a lot of work (additional ribs, rails, thwarts, floorboards, etc) but a nice little side diversion for a few minutes each evening. If I can finish it off in good shape I have in mind to try to scratch build the whaleboats using the same construction techniques. We’ll see.
- 241 replies
-
- 3
-
-
- mermaid
- modellers shipyard
- (and 1 more)
-
Fernando, Sorry to hear about the disaster. I had just started following the build to see what other wisdom and skills I could poach! As an owner of three cats (and no separate room for my workbench), I can appreciate the challenges of dockyard security. Good luck on the recovery. Would love to see more progress.
-
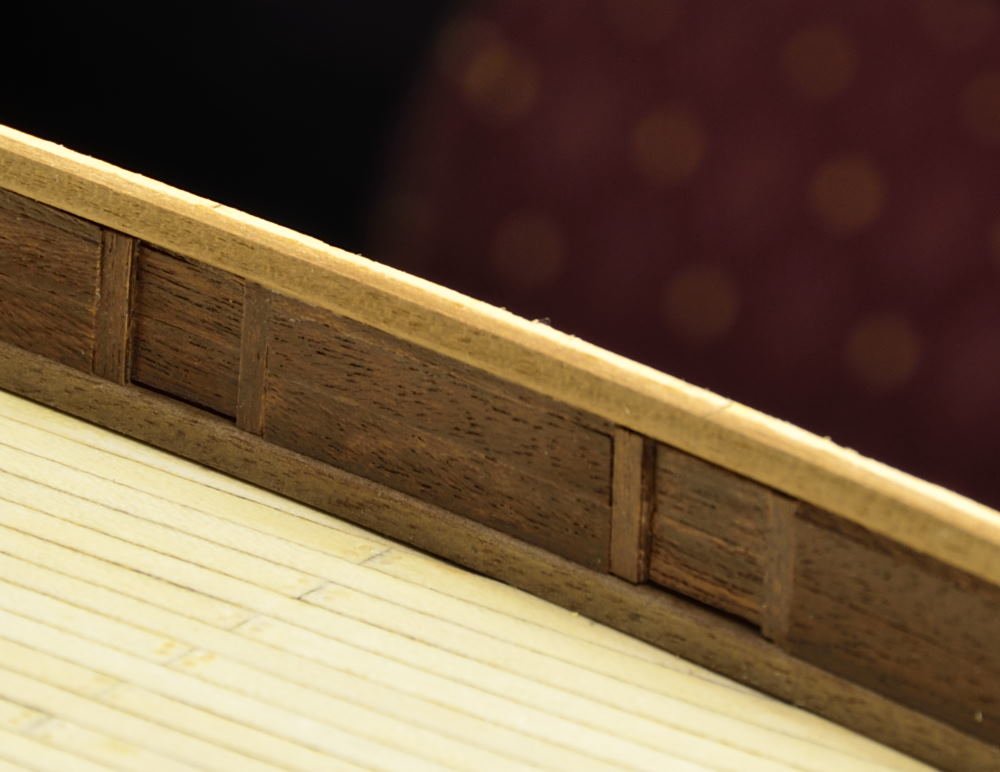
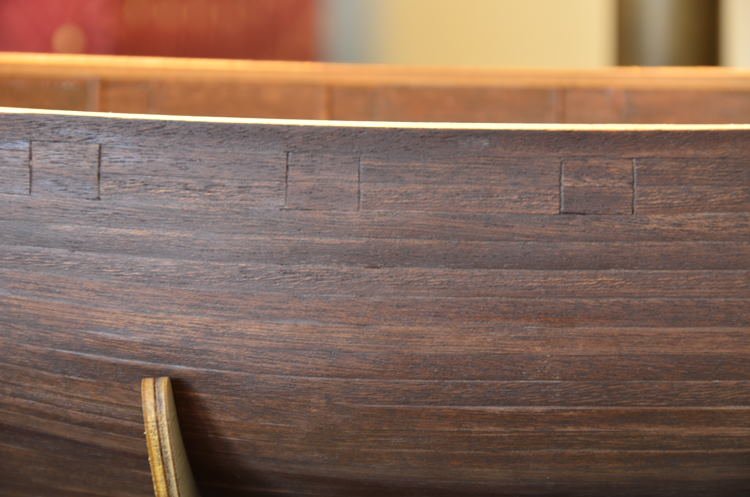
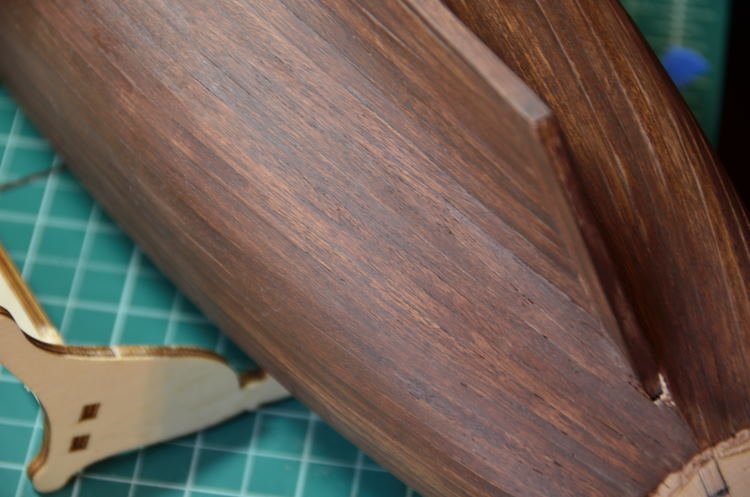
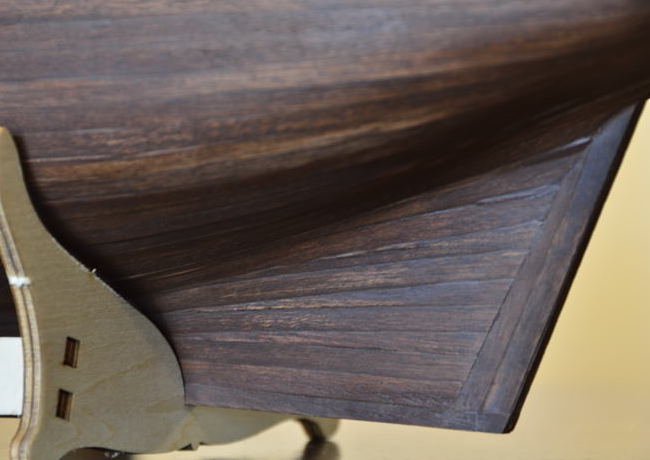
Finished the forward aspect of the starboard inner bulwark, but also took some time tonight to play with photography...so here are a few gratuitous shots. I'm an amateur photographer and have been wanting to work on taking some better shots with the "good" camera.

- 241 replies
-
- 4
-
-
- mermaid
- modellers shipyard
- (and 1 more)