HOLIDAY DONATION DRIVE - SUPPORT MSW - DO YOUR PART TO KEEP THIS GREAT FORUM GOING! (89 donations so far out of 49,000 members - C'mon guys!)
×

JamesBhm
-
Posts
142 -
Joined
-
Last visited
Content Type
Profiles
Forums
Gallery
Events
Everything posted by JamesBhm
-
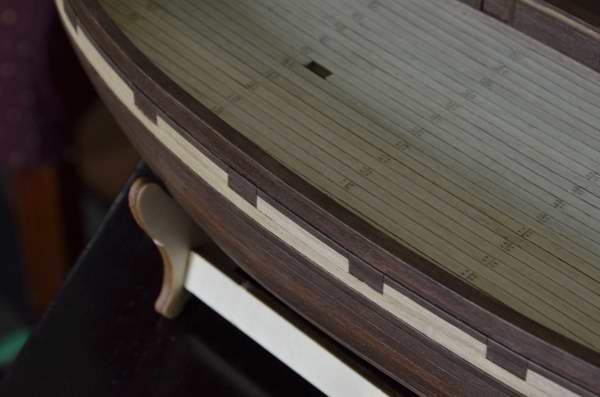
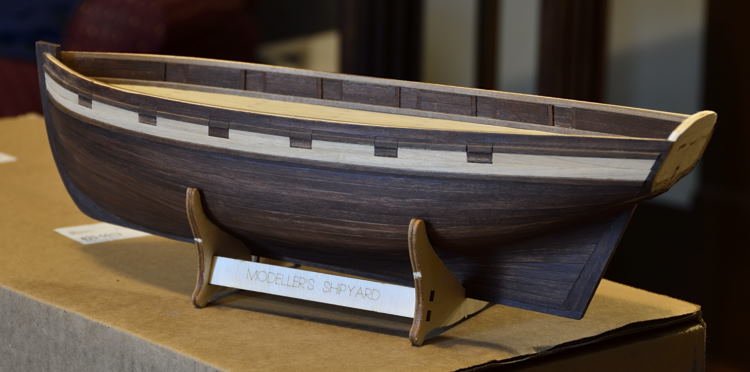
 Well, not the work day I had planned on, but productive. The rudder was already attached to the stern post with superglue. Luckily, I was able to gently remove it with a few small explosive charges. Seriously, it wasn't too bad. Gently pried it loose with a chisel blade, then carefully scraped the glue away and did some filling/sanding/staining touch-up. I think the stern post and rudder have been saved without need for replanking. The hinges could probably be salvaged but I ordered a new set for a couple of dollars to start fresh. Special thanks again to Blue Ensign for saving me bigger headaches down the road! The good news is that this is the kind of mistake you make exactly once. Meanwhile, I completed the placement of the cap rails. The total height of the bulwarks is just a tad high, so I may have to recess the bowsprit just a bit more when I get to it.
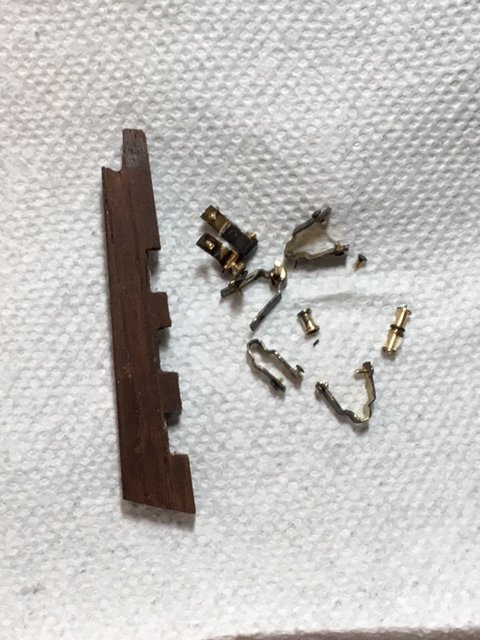
- 241 replies
-
- 2
-

-
- mermaid
- modellers shipyard
- (and 1 more)
-
Wait! Wait! Is this better!!?!?! Rookie mistake and a kick in the teeth. Doubly so now that the rudder is firmly attached to the stern post (ouch!). I had thought I was following the DVD instructions but obviously missed something and common sense didn't kick in. I'll see how much reconstruction is necessary once I remove it. I might need to strip and replank the rudder and stern post. Thanks for the catch, BE. Far less hassle to deal with it now than later.

- 241 replies
-
- 2
-
-
- mermaid
- modellers shipyard
- (and 1 more)
-
Yes...but hoping to carve out at least a little bit of build time this weekend! Rick...thanks for that. I had wondered a bit about the bowsprit but figured I would cross that bridge when I came to it. The build you linked shows the bowsprit slightly inset into the bulwark (maybe just the depth of the cap rail). That seems consistent with King's cross section drawing, although the Endeavor River painting seems to show it more sitting on top of the bulwark (hard to tell). I think you can (sortof?) see the ring you're talking about.

-
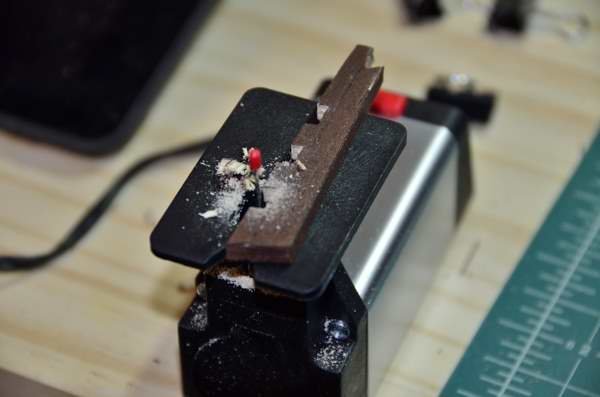
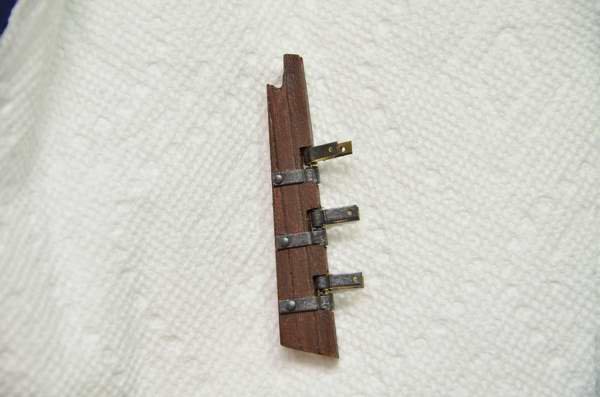
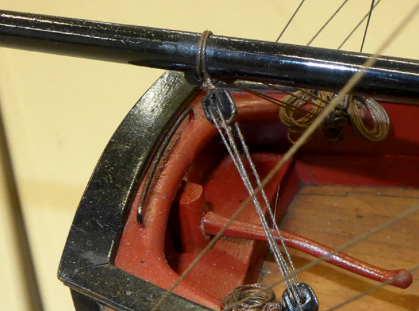
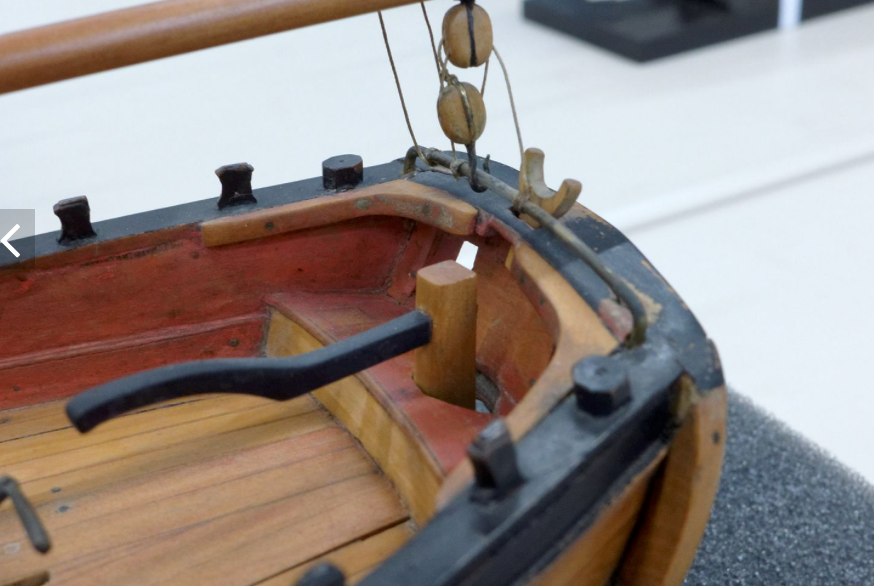
One of those weeks. Too much work and not enough play time. I managed to spend some time getting the rudder hinges in place. I got to use a new toy - a Micro-Make mini jig/scroll saw that clamps to the table. It was decent (FYI, I have no affiliation with the product or company). Ran into a few issues. The hinges were too long (hanging off the back of the rudder and extending into awkwardly curved areas on the hull. I just trimmed them down with a Dremel cutting wheel. I painted the hinges with Tamiya Dark Iron and then dry brushed a few highlights on with Tamiya Chrome Silver. Same thing I plan to do with the carronade barrels and I like the effect. My rudder post is obviously pretty short. Rather than drilling through and actually attaching the tiller, I’ll just let it disappear into the hull and then attach a little carved tiller and false rudder post on deck. I’m trying to get away from the plywood fittings from the kit as much as possible. Once the cap rails are attached, it will be time to shift gears to deck furniture. Very excited!
- 241 replies
-
- 3
-
-
- mermaid
- modellers shipyard
- (and 1 more)
-
Still looking really, really, nice, Chris. Aside from more accurate appearance, is it easier planking in shorter segments? For some reason I assumed it would be harder, but planking in full lengths was just a pain and I think I may need to do it differently in the future.
-
Kenneth - Yes...was just down this weekend to take the ferry out to Ship Island (used to go years ago when I was in school and have started going back). Just learned about the schooners and did a walk-on sail on the Glenn L Swetman (I think). Very little wind. We motored out of the channel, hoisted sails, drifted aimlessly, caught a great sunset, and motored back. Very nice crew running the boat and enjoyed being out on the water even without any dramatic sailing action.
-
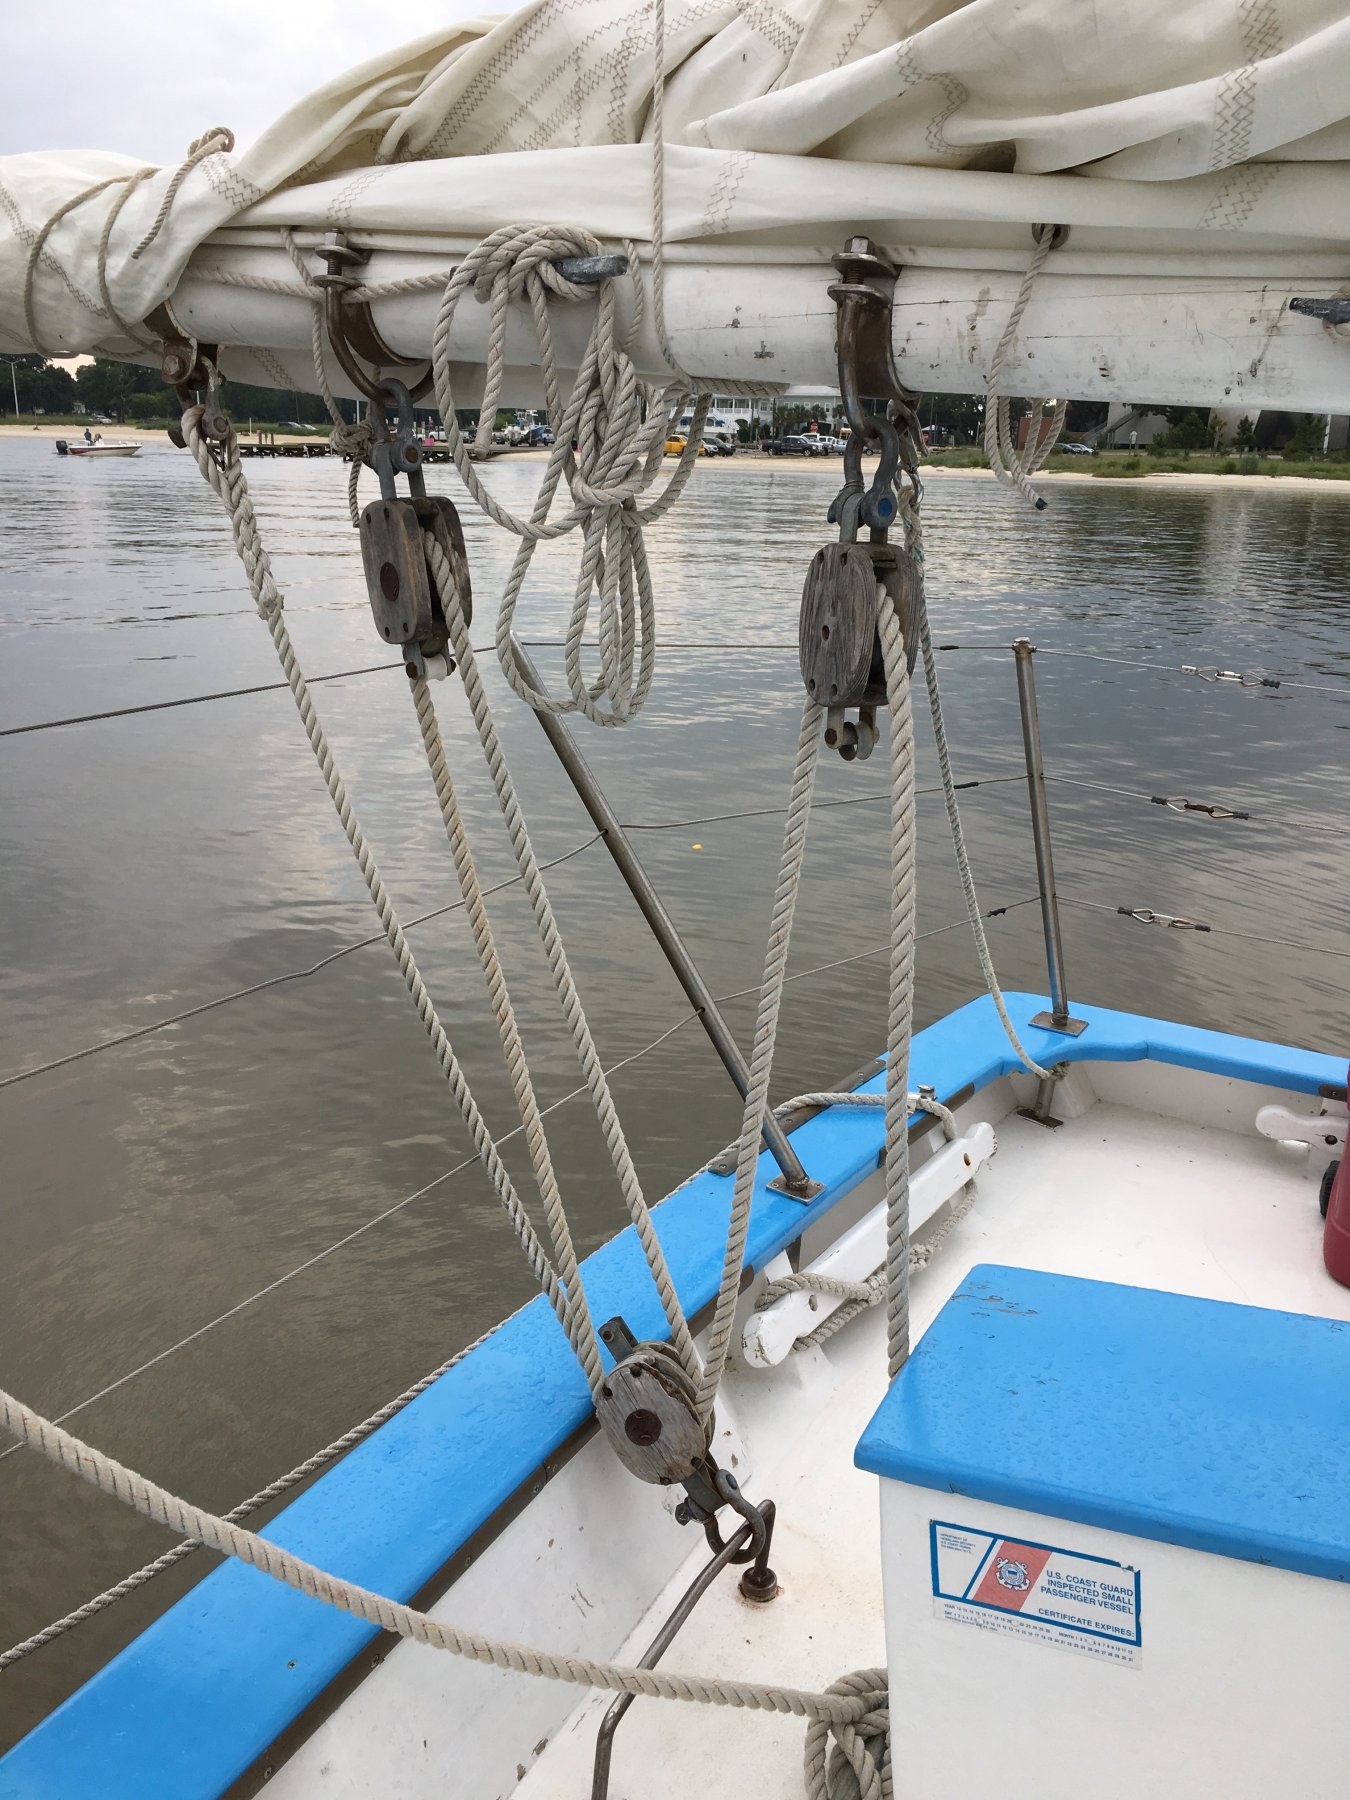
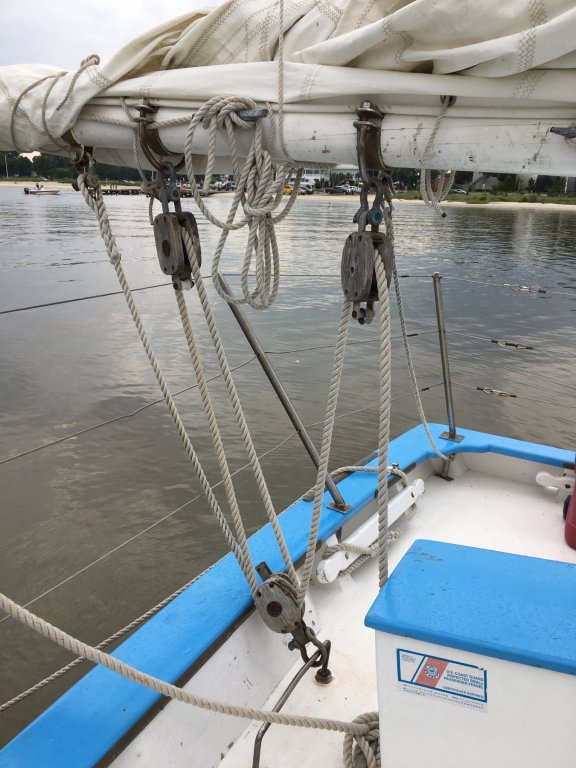
No building accomplished this weekend, but the latest "research" involved an evening sail on a replica of a late 1800s gaff rigged oyster schooner on the Gulf of Mexico. Got some nice pics of rigging and got to watch hoisting/furling of the sails, which was helpful to visualize. Not exactly the same period/origin as the Mermaid, but I think some aspects of gaff rigging are pretty universal. Rick and Chris...check out the horse/traveller. It was the first thing I noticed.
- 241 replies
-
- 2
-
-
- mermaid
- modellers shipyard
- (and 1 more)
-
Nice. If I can't guarantee historical accuracy I'll settle for historical plausibility. Gunports are nice too. I was worried that many of the cutters I've seen have open ports with no lids.
- 241 replies
-
- 1
-
-
- mermaid
- modellers shipyard
- (and 1 more)
-
Chris - I didn't realize it was called a horse (I think it's also a traveler), but here are a couple of good images from the gallery. It's the metal bracket that allows the boom to swing a little more to leeward on each tack. I just found that second image. It may actually be close to what is depicted in King's cross section drawing (the little storage locker thing). Now that I've opted to put those knees in, I may have some limits on where/how I can put a horse in.

- 241 replies
-
- 3
-
-
- mermaid
- modellers shipyard
- (and 1 more)
-
Rick, another very interesting thought. I saw that on a couple of cutter models in the contemporary models gallery...from a range of timeframes. Hard to definitively rule it in or out based on King's cross section sketch, so it's fair game to add it as far as I'm concerned. Very impressive job on the Enterprize, btw. I don't think I'll be ready to tackle a scratch build anytime soon. Thanks vossiewulf. I'm trying to build some skills by customizing a few things as I go. I think the white knuckles were worth it on this one. Technical execution not perfect, but passable for a first model, and of course It doesn't hurt that he who posts the build log gets to choose the more flattering photos! I've got plans to reconfigure the deck layout a bit as well, but that shouldn't be as hair raising (I hope). I'm eager to wrap up the hull and move on to new things.
-
Rick, that's a great suggestion, and I like the look of that in those pics. Just checked and looks like there are a couple of belaying points back there in the instructions (cleats or rings, maybe?). I haven't really looked at the rigging except to try to make sure my added gunports didn't foul a belaying point. Looks like the Lennarth Petersson rigging book has three belaying pins in each knee. I'm sure I can work out how to use a few belaying pins. That should add even more visual interest. I've actually got a few pieces of a binnacle put together and will (hopefully) finish at some point!
-
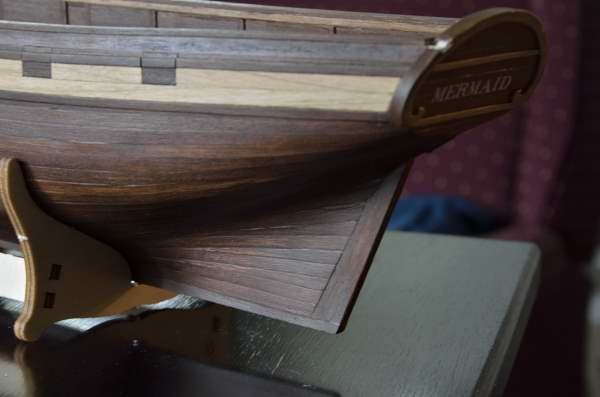
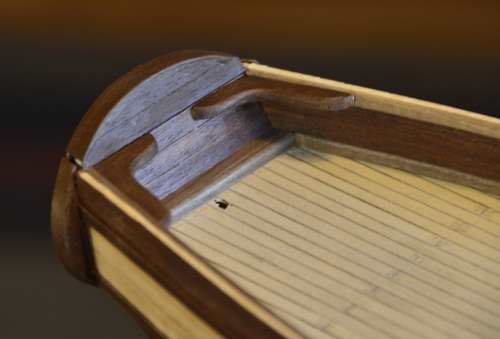
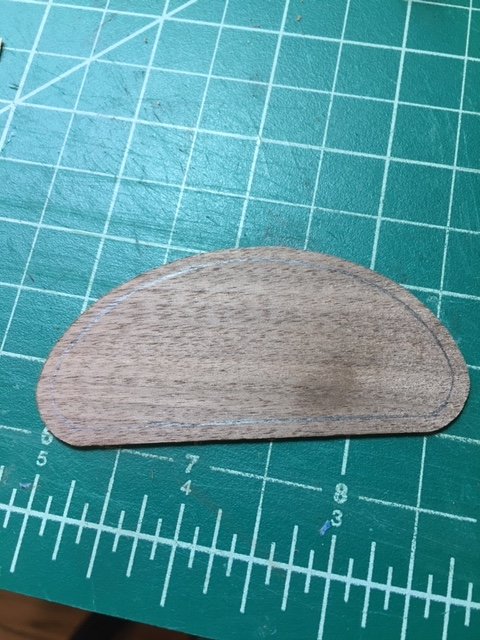
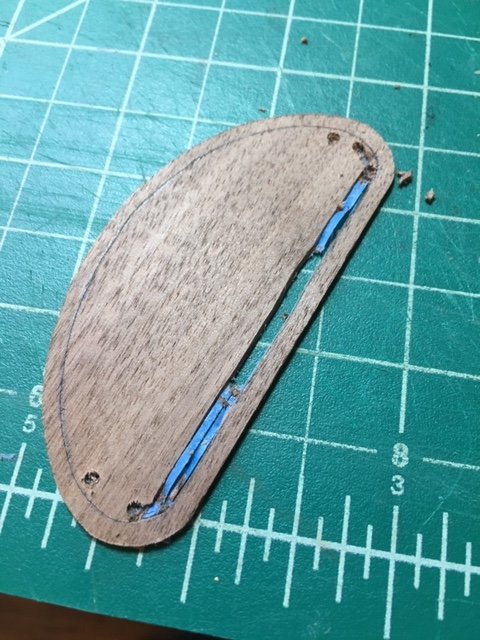
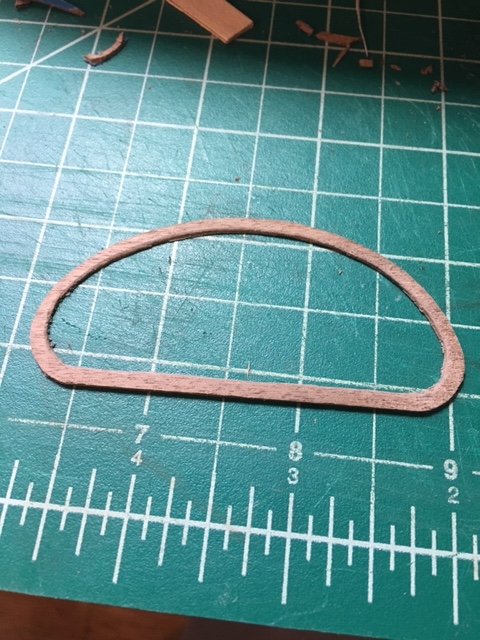
I think I got myself in a bit over my head with this modified transom. I don’t think I went about it the most efficient way, but patience (and re-bending the same pieces repeatedly) may have paid off. I made a cap and side trim for the transom using 1/32” walnut sheet stock. I had to spile the pieces (first time for everything). The walnut bent reasonable well after a few minutes in boiling water. I made some bending forms with thick balsa. The fit of the pieces wasn’t exactly perfect, but what I lack in joinery skills I make up for in color matching wood filler! Bending & attaching it in three pieces was definitely easier, and the little gaps are where the davits will go so they shouldn't be an issue. Then...I made one deviation from what I think is historically correct by adding the bracket pieces (would those technically be knees in that position?). I can’t make out what is in the transom area in King’s cross section…looks like maybe a cabinet or locker type of thing? I know I can’t build that but the transom area was feeling a bit naked. I've seen things like that in other cutter models (current and contemporary), so I put them in for added visual interest (plus for woodworking practice). Just some carved, sanded, and stained basswood. I'm worn out, but glad to put the stress of this transom behind me!

- 241 replies
-
- 5
-
-
- mermaid
- modellers shipyard
- (and 1 more)
-
Chris, Just catching up on the log. Looks nice. I'm impressed with your ability to cut and fit planks in different custom shapes with such tight tolerances and clean fits. I had trouble getting two straight planks to cooperate, and my stealers were pretty simplistic wedges. James
-
Fernando - Interesting idea. I had toyed with the idea of painting the cap rail on the bulwarks black just for some interesting visual contrast and to break up the "mathcy-matchy" effect of all the finished wood. I've seen one version of the model like that. If I have trouble capping the transom and need to break out the wood filler, I may have no choice for the transom and might do the cap rail as well. Rick - Definitely a concern. Luckily, I just recently went on a buying spree and stocked up on some strip and sheet stock for my possible attempt at building whaleboats (and to play with). I've got walnut, beech, cherry, mahogany, and limewood. Limewood wasn't bad to work with at all when I built the jollyboat - especially with a little boiling water. Chris - Thanks for the compliment (Google came through for me) and the addition to my vocabulary! It pairs nicely with the geography lessons reading King's journal.
- 241 replies
-
- 2
-
-
- mermaid
- modellers shipyard
- (and 1 more)
-
Rick, that's actually a great idea. I've got some .5 walnut strips that match the other trim. I thought that would be too thin but didn't think of using a couple of layers. - James
- 241 replies
-
- 2
-
-
- mermaid
- modellers shipyard
- (and 1 more)
-
I've never met a rabbit hole I didn't want to go down. With the latest research, I’ve settled on the final design for my transom. It’s a bit of a composite of several of King’s sketches and paintings (no two of which seem to be exactly alike!) It looks good enough, but I’ve created some other headaches that are tricky for my skill level. The transom in the pics is just a thin piece attached to the existing plywood transom. I need to build out the thickness of the overhang areas on each side, then bend some wood to trim/cap it all the way around. I’m a bit worried about that part. After that, I may have to build some custom davits (which I was thinking of doing anyway, because I don't like the plywood ones that came with the kit).
- 241 replies
-
- 5
-
-
- mermaid
- modellers shipyard
- (and 1 more)
-
Rick, would that upper squaresail be referred to as a flying topsail or is that something different? The log makes references to the gaff topsail, squaresail, and flying topsail. I understand the first two but wasn't quite sure on the flying topsail.
-
Rick, I definitely have a lot to learn about the finer points of rigging and sails (which I'm hoping to learn when I get to that part!). Definitely nice to have some reference images and I jotted down the names of the sails I saw mentioned in the log so I can dive deeper later. I think I got this file from the digital collection of one of the libraries out there, so it probably hasn't been easily accessible for all that long. James
-
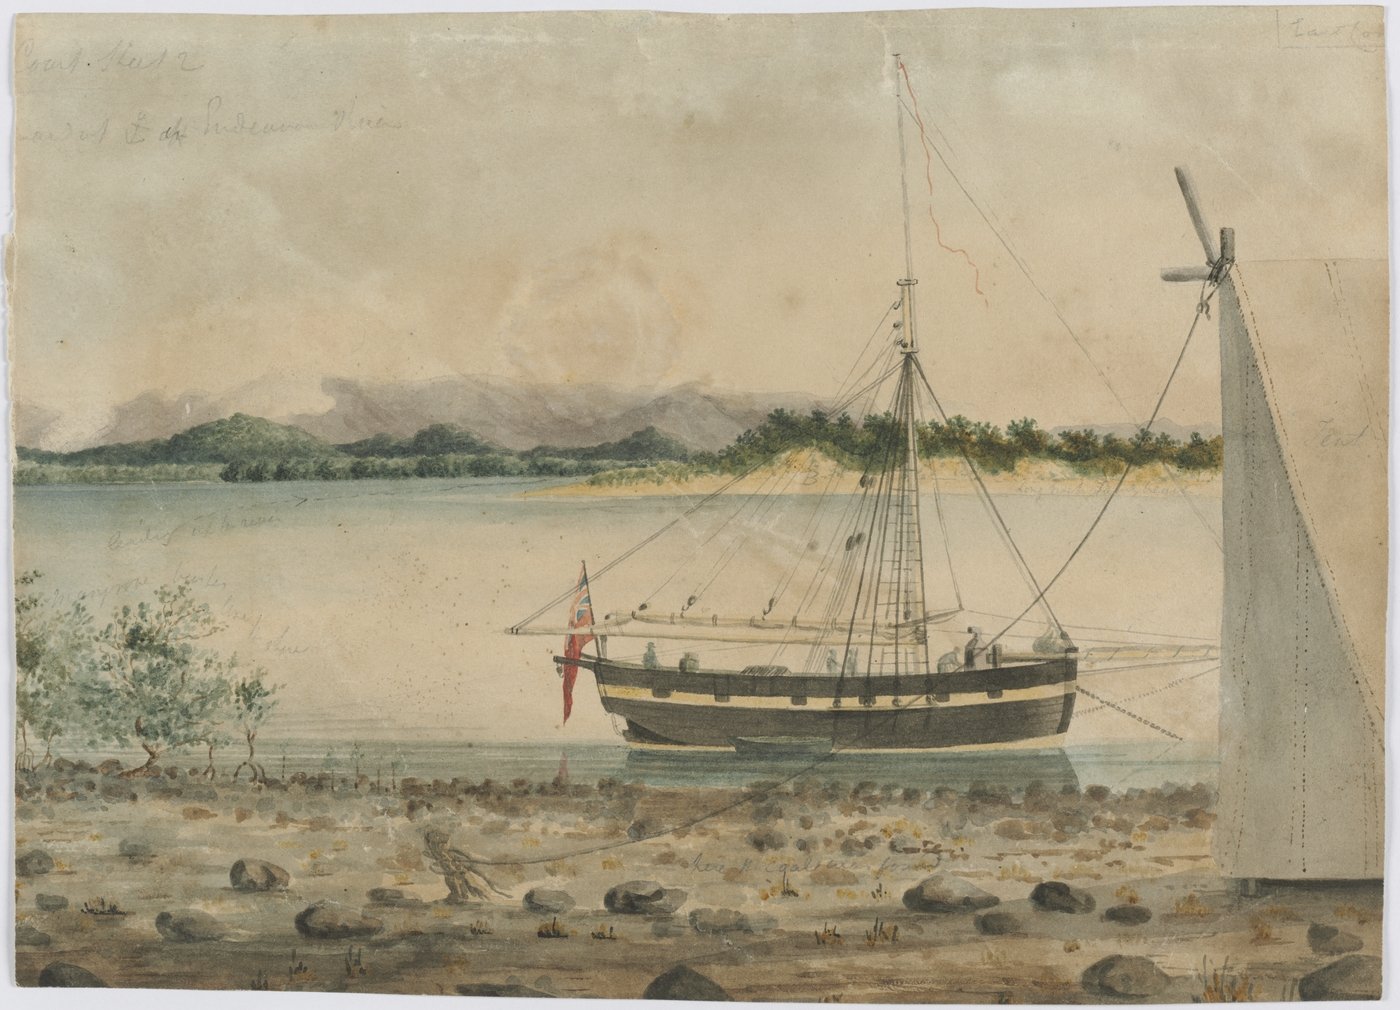
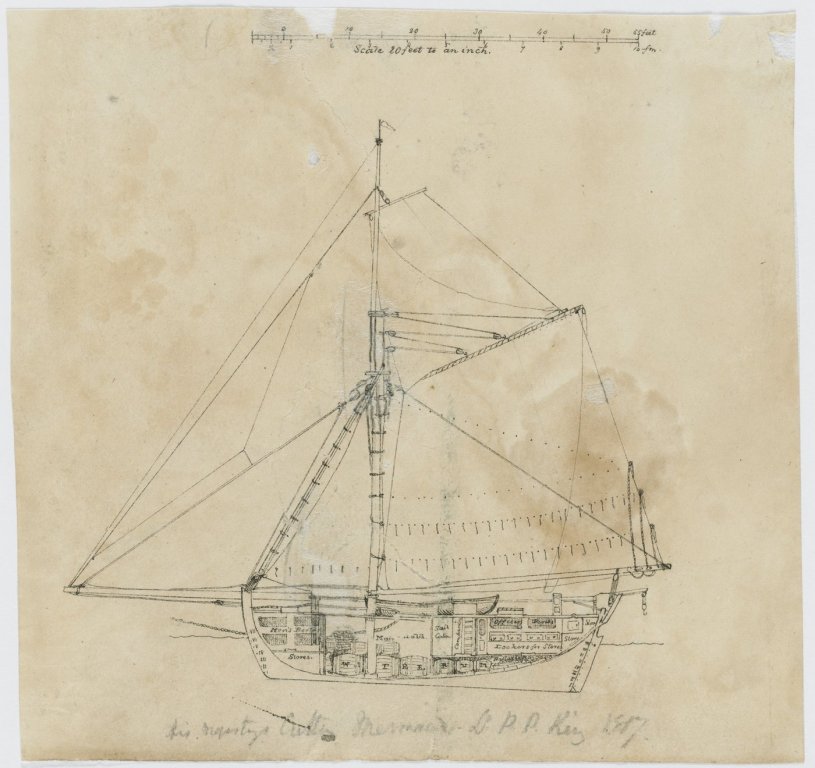
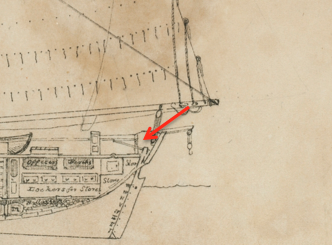
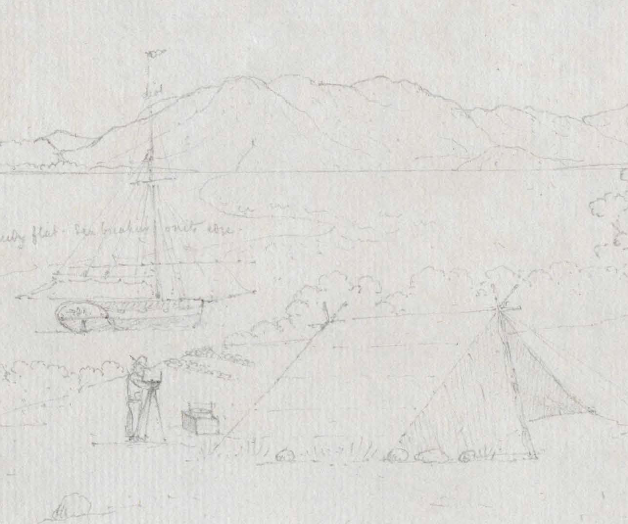
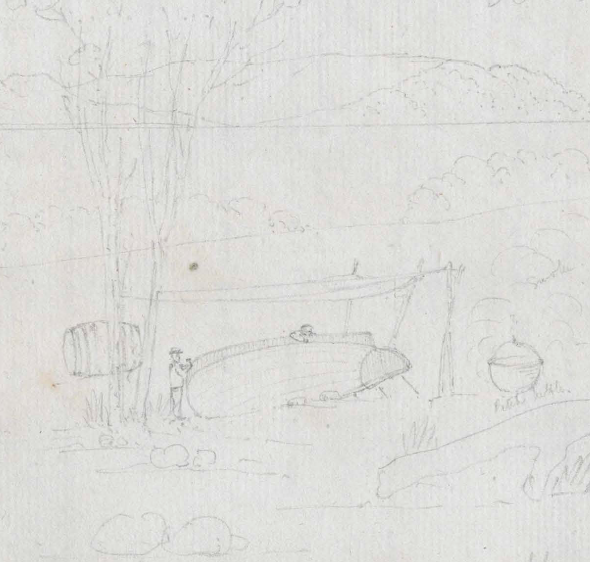
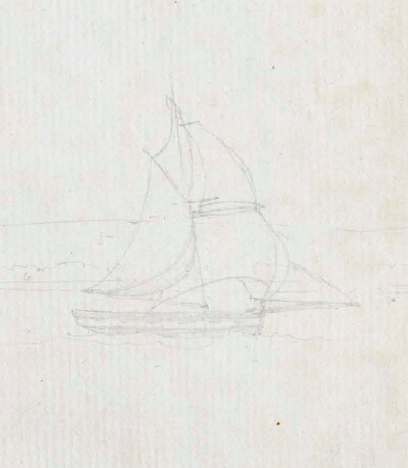
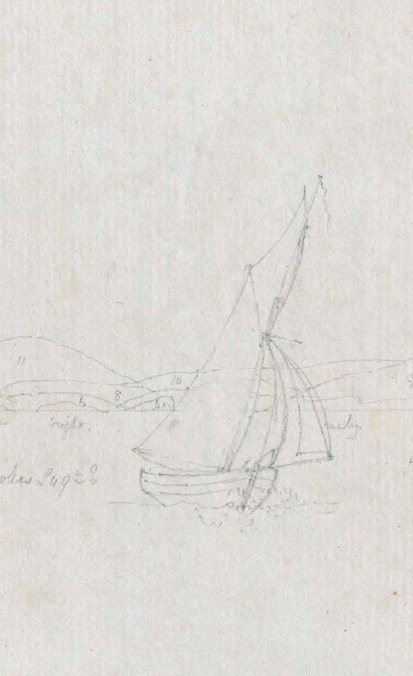
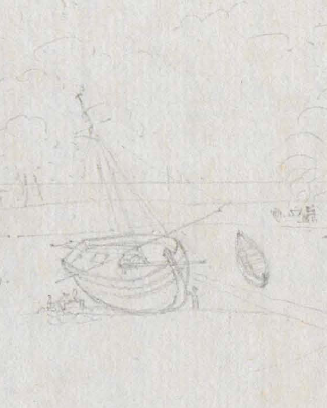
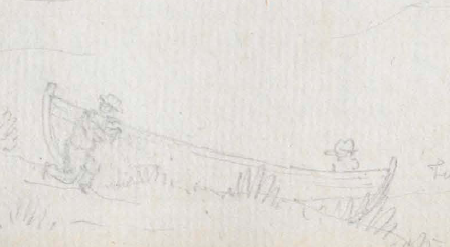
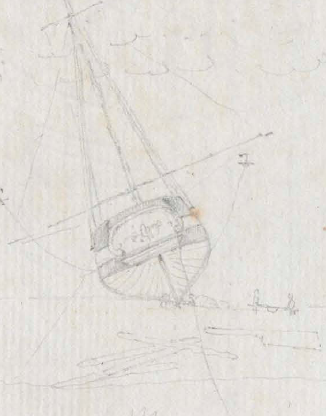
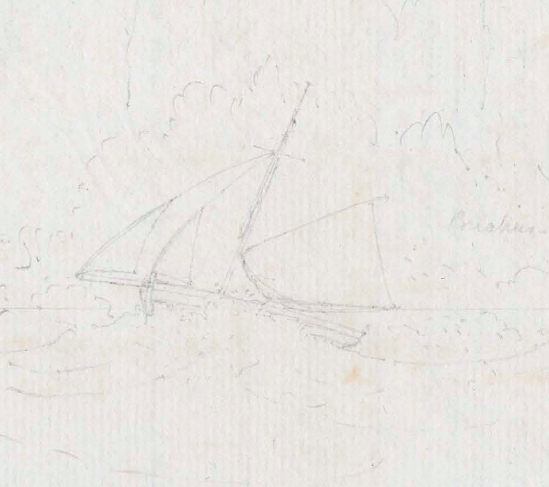
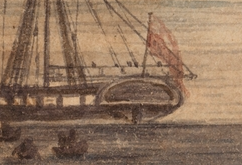
I’ve just finished a fun little historical diversion. I had downloaded a PDF file of P. P. King’s handwritten log of the Mermaid, covering a return from Coepang to Port Jackson and then his circumnavigation of Australia. My hope was to find any little details that might be of value for historically accurate modeling of the cutter. I found a number of things, PLUS some very light pencil sketches of the cutter that I had never seen before (including the best detail of the transom I’ve found yet). Reading it was a lot of fun. I followed along tracing the coast of Australia in Google Maps, so I got a good geography lesson too. Here are some interesting finds: 1. King’s letters mentioned two whaleboats. The log repeatedly references the “large” and “small” whaleboats. I’m hoping to model both of them so now I know they’ll need to differ in size a bit. 2. Two jollyboats were washed away from the stern davits by heavy seas (including oars) and new ones had to be built. I’ve read conflicting comments as to whether a boat would actually be stored on davits while under way. Apparently so for the Mermaid. 3. In the journey from Coepang to Port Jackson, the guns were struck into the hold, then brought back out upon arrival at Port Jackson to salute the fort. 4. One of King’s letters makes reference to the cutter having been “sunk” to deal with a severe rat, cockroach, and vermin problem. The log details a pretty interesting process. They basically unloaded everything at a sheer hulk, warped the cutter into shallow water, sunk it, then pumped the water out. Vinegar had to be sprinkled afterward due to the smell of rats that had been trapped in voids in the timbers. This was part of a pretty extensive refit, re-caulking, repainting, etc. 5. There are frequent references to studdingsails and studdingsail booms, which are not modeled with the kit. I’ll give that more thought when I get to the masts and rigging. Images I found are below. The bottom two were done at Endeavor River, where he painted the classic profile image of the boat. The image of the transom is from Careening Bay, and there appears to be some kind of awning rigged (mentioned in the log).
- 241 replies
-
- 3
-
-
- mermaid
- modellers shipyard
- (and 1 more)
-
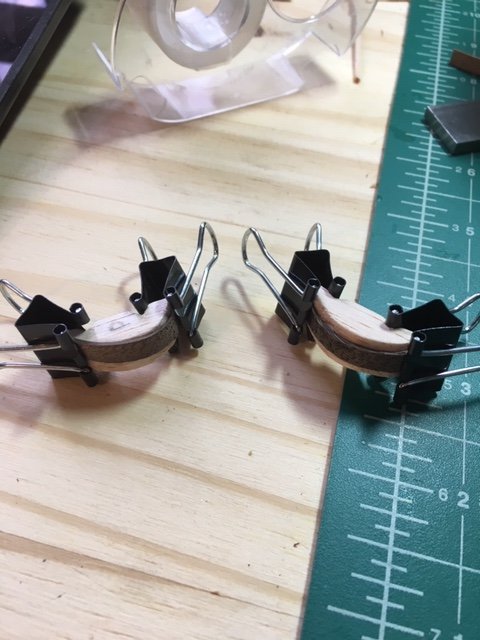
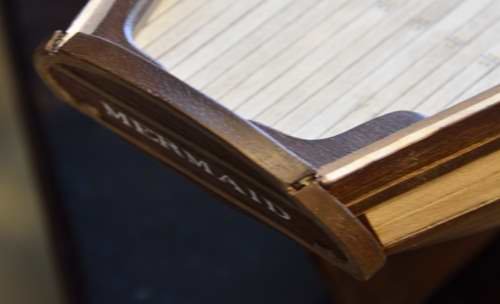
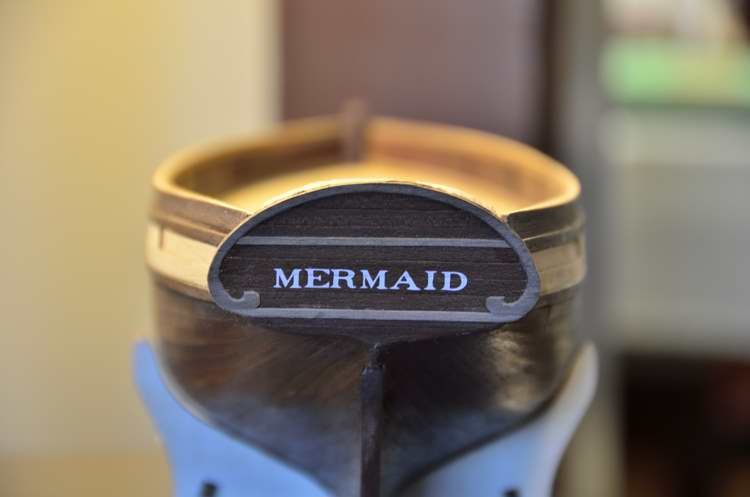
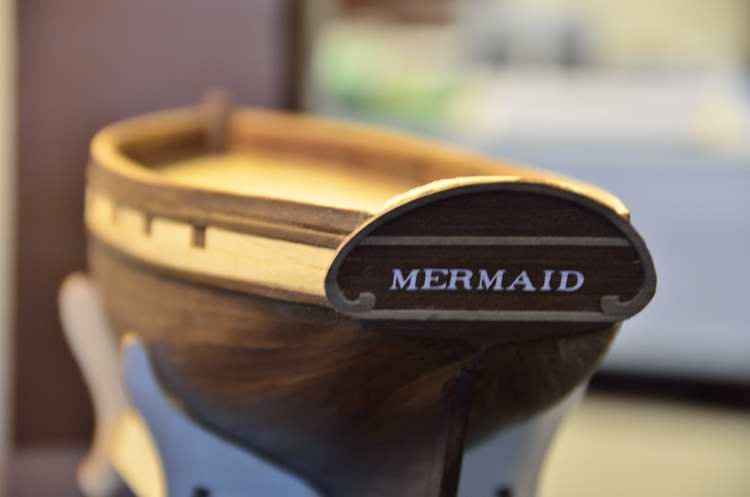
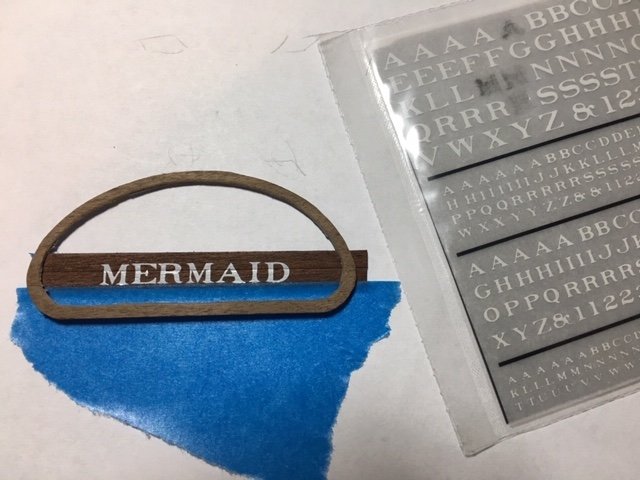
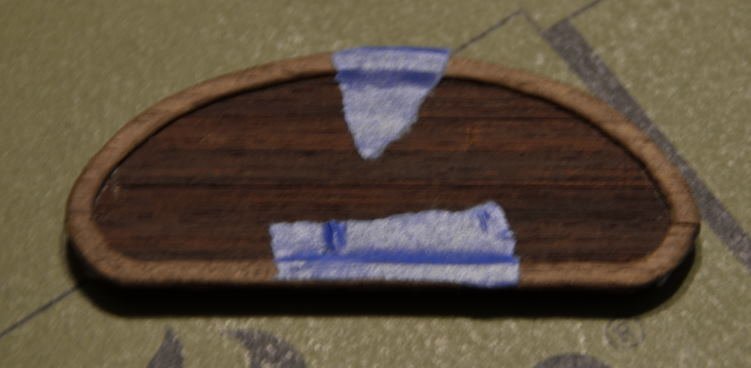
Spent today getting the wales in place on the other side. They’ll need a touch of sanding and some topcoat. Meanwhile, the transom I had mocked up before had some minor symmetry and fit issues, so I’m re-doing it. It’s a piece of walnut trim cut from sheet stock with planks behind it. I’m playing with some methods of putting the cutter’s name on it. This is dry transfer lettering, although I also have some white paint on the way and some lettering stamps of similar size and style. There will still be some logistical issues of attaching it all to the existing transom since it’s “after market” (making the transom cap, davits, etc). The overhang on each side is actually pretty modest.
- 241 replies
-
- 3
-
-
- mermaid
- modellers shipyard
- (and 1 more)
-
Chris, I've been meaning to ask...how is your stem so high over the bulwarks at the bow? Is that the piece that came with the kit or did you fabricate a new one? James
-
It's true...any expression not using the words "shrimp" and "barbie" is bound to be lost on an American, but glad to expand my horizons a bit in the Mermaid club! Meanwhile, I’ve got the wales in place on one side…with the first glimpse of how the cannon ports look. I’m still not sure if they’re historically accurate, but I think it looks as much like King’s paintings as anything else out there. I went with strips of cherry for the wales themselves as opposed to the wood supplied in the kit (which is the same as the decking, and was a little too bright with my darker hull). I also used a slightly thinner strip of walnut for the wale trim and stained it to match the hull to keep the same color pattern as King’s painting. I’m also mocking up an experimental transom that I may or may not use. I call it “The Rockingham Bay” after King’s painting with the very curved transom. We'll see.
- 241 replies
-
- 5
-
-
- mermaid
- modellers shipyard
- (and 1 more)
-
Ship's name on transom
JamesBhm replied to JamesBhm's topic in Building, Framing, Planking and plating a ships hull and deck
Thanks Mark, that's very helpful, and it sounds like it accounts for some of the variability and narrows down the possible appearance a little bit (i.e., no compartment). Thank you. I'm definitely leaning in that direction and exploring ways to model it...just wanted to make sure there's no definitive reason it would be historically inaccurate. -
Ship's name on transom
JamesBhm replied to JamesBhm's topic in Building, Framing, Planking and plating a ships hull and deck
You're right...didn't quite answer the question but an interesting read and I got pulled into some of the other blog posts as well. Thanks for sharing!