HOLIDAY DONATION DRIVE - SUPPORT MSW - DO YOUR PART TO KEEP THIS GREAT FORUM GOING! (Only 13 donations so far - C'mon guys!)
×


JamesBhm
-
Posts
142 -
Joined
-
Last visited
Content Type
Profiles
Forums
Gallery
Events
Everything posted by JamesBhm
-
 Chris: I hear you. Also self-employed and only getting some build time in because I took my first full week off in a few years. I tell people that self-employment means you can work whatever hours you want as long as it's all the time. Hopefully I can keep the momentum up and I hope you can find some time too. I've enjoyed watching your build and have learned a few things.
- 241 replies
-
- 1
-

-
- mermaid
- modellers shipyard
- (and 1 more)
-
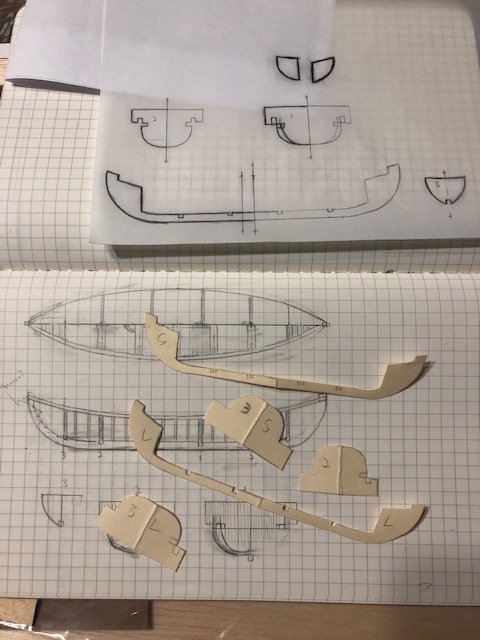
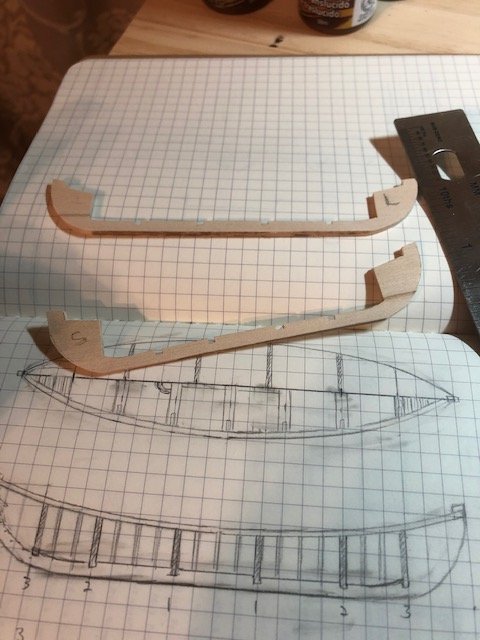
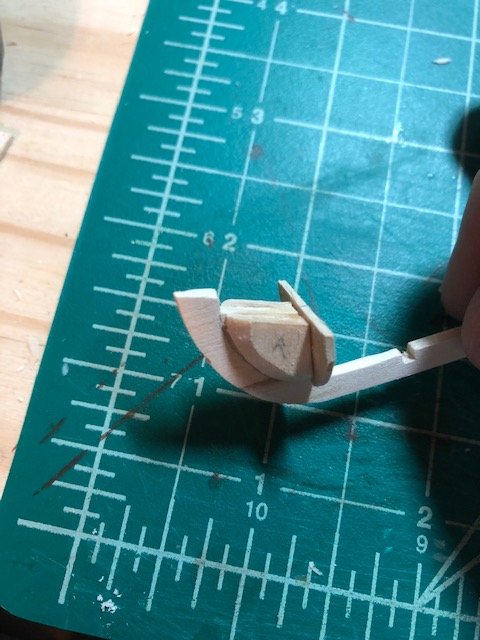
And now for a trip down another little rabbit hole. I’m going to try to scratch build two whaleboats as described by King in his log (one “large” and one “small”). I’m assuming the cutaway drawing depicts one of them and the other one was on the other side. It’ll make for a crowded deck, which I suspect was the case in reality with a jolly boat and two whaleboats on a cutter. I had already made the jolly boat from a plank-on-frame lifeboat kit from modelexpo-online.com (I have no affiliation with them). Actually a lot of fun for $10 - deceptively easy and deceptively hard at the same time. I’m going to try to mimic the same construction technique for the whale boats (planks on ribs set on upside down formers). I sketched out a design based on some internet images and plans, then have been tracing, templating, and cutting a keel, the formers, and some bow blocks. Bending the wood for the ribs is a pain but do-able. The real test will be whether the shape of the ribs makes for a plankable hull.
- 241 replies
-
- 1
-
-
- mermaid
- modellers shipyard
- (and 1 more)
-
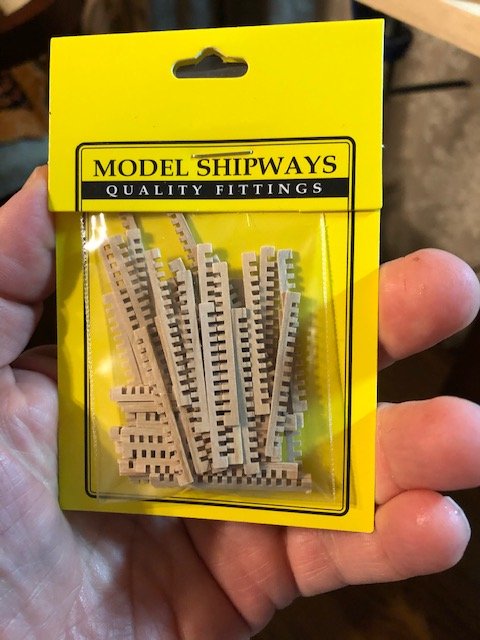
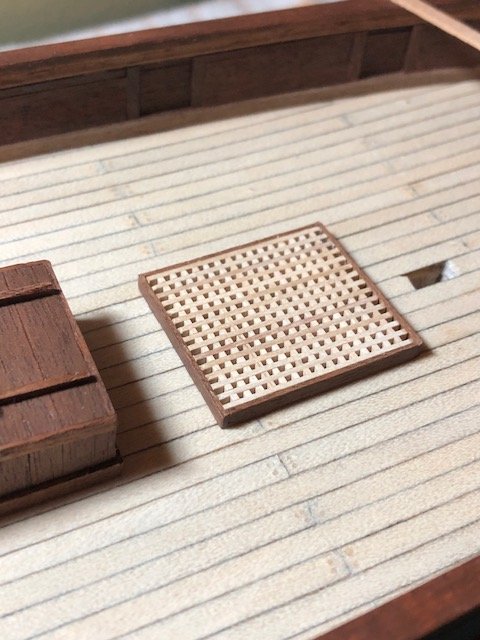
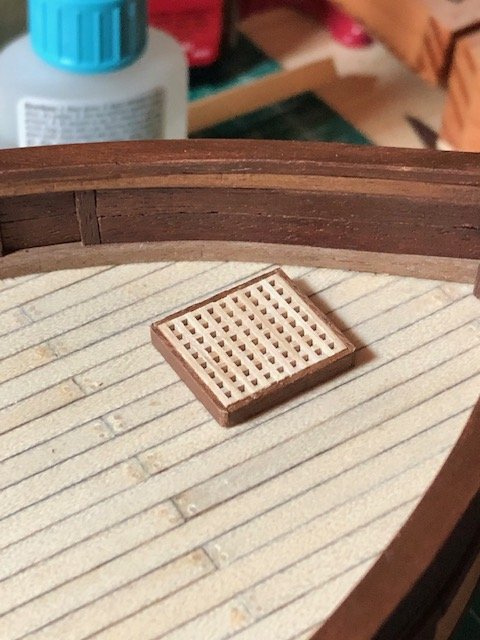
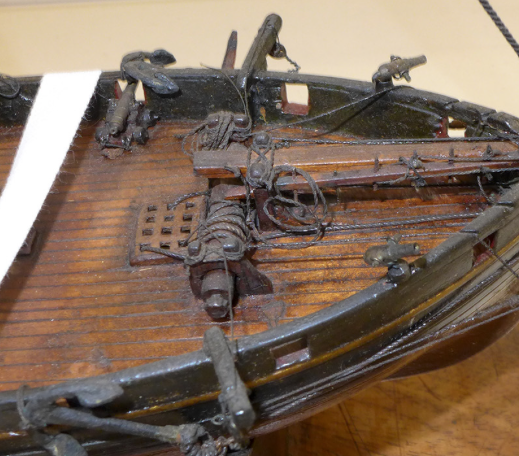
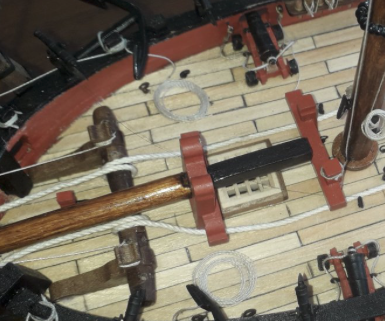
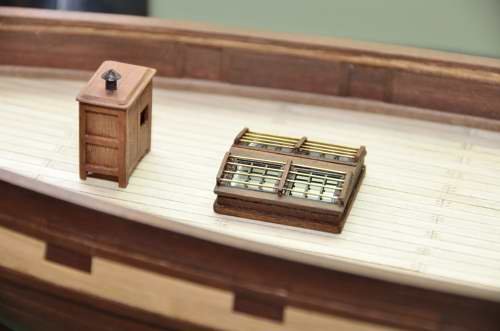
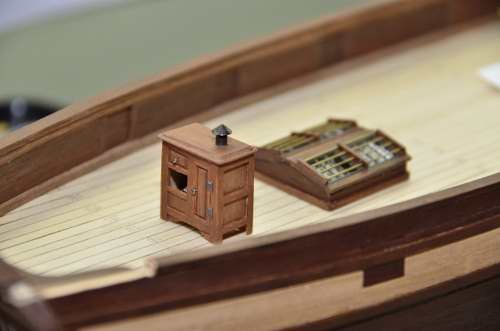
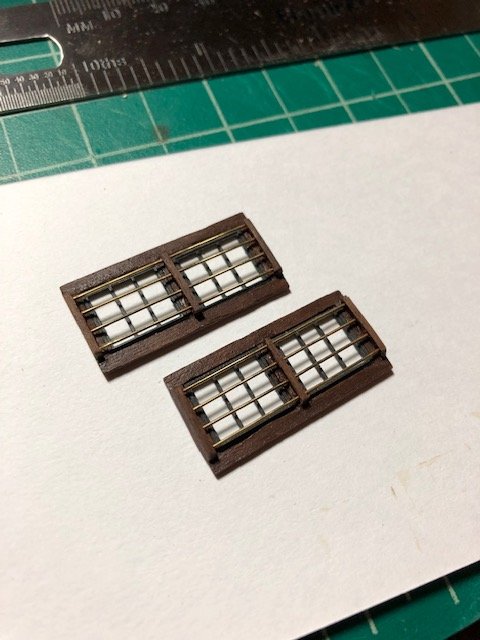
Couple of gratings done. No great skill level required...just a little grating kit from Model Shipways. As for the forward grating, I'm assuming it would be battened down in bad weather. Seems fairly common on cutters.
- 241 replies
-
- 2
-
-
- mermaid
- modellers shipyard
- (and 1 more)
-
Rick, I'm still mulling that over and it will probably have to be at least offset a bit. The kit has it as a slide access hatch but I'm making it more of a ventilation grating based on what I've seen in the contemporary models gallery. I did find one example of a grating under the bowsprit, but that does seem a little odd. I like the grating just behind the windlass (seems the most common configuration), but from the cutaway drawing that would put it over the main hold. Whether it was access, ventilation, or both, I'm pretty sure it would have been over the crew's bunk area. Just don't give up on it. I had no intention of being away from it for so long (I was thinking a few weeks, not a few months), but eventually just accepted that life intervenes sometimes and I'll do what I can when I can.
- 241 replies
-
- 1
-
-
- mermaid
- modellers shipyard
- (and 1 more)
-
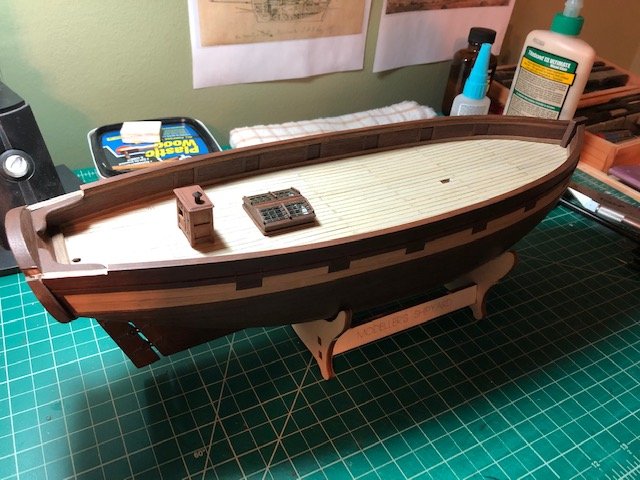
Trying to get my head back in the game by building the main companionway. I’m taking a cue from Rick and went for a low profile with a very subtle slope, consistent with King’s cutaway drawing. Instead of modifying the plywood pieces that came with the kit I just built up a scrap block of balsa and finished it out with walnut strip stock that I keep on hand in a couple of sizes. The faux hinges are the tips of some cannon port hinges I never used. They’re probably a bit large and I still might paint them black, but added some extra detail.
- 241 replies
-
- 3
-
-
- mermaid
- modellers shipyard
- (and 1 more)
-
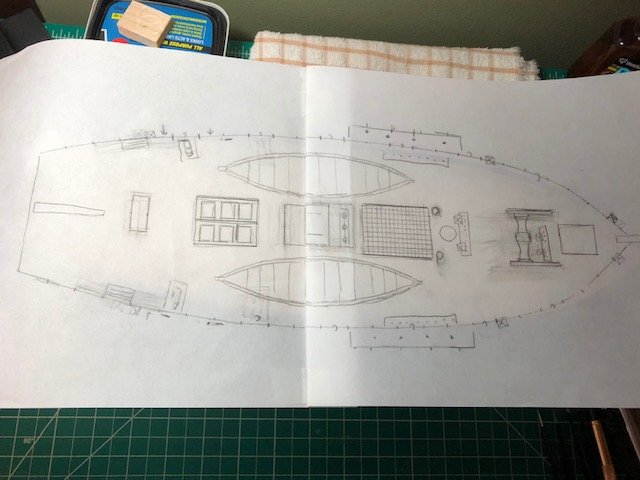
Whew. I'm coming off of several months of long work hours, a bathroom remodel, and other house projects. I've got a little holiday time off and I'm hoping to regain some lost momentum on the build. I started with a good cleaning of my work area and the boat (which I foolishly left uncovered during the remodel....coated in dust!). I had last been working on deck furniture and had a decent binnacle and skylight. I've been looking back at a sketch I had made (and have repeatedly modified) of other adjustments I was thinking of making to the deck layout. The main ones are: 1. A grating for the main hatchway 2. Two scratch-built or kitbashed whaleboats, consistent with King's journals 3. A kitbashed windlass that is a bit smaller than the one in the kit 4. Slight repositioning of the forward hatch 5. Slightly lower profile main companionway I just need to pick one to start puttering with it. I might start with the companionway. I'm off to look at some gallery images for inspiration.
- 241 replies
-
- 3
-
-
- mermaid
- modellers shipyard
- (and 1 more)
-
Rick, The carronades look sharp. I'm consumed with the chaos of a bathroom remodel at the moment but hope to be back in the game with the boat in a couple of weeks. Stay tuned! James
- 241 replies
-
- 2
-
-
- mermaid
- modellers shipyard
- (and 1 more)
-
BTW Rick...I noticed that it looks like you skipped the pumps? I don't care for the ones that came with the kit. I've looked at some others or considered scratchbuilding. The deck is feeling a little crowded so the size would have to be right. I've been meaning to go back through the cutters in the contemporary model gallery for ideas.
-
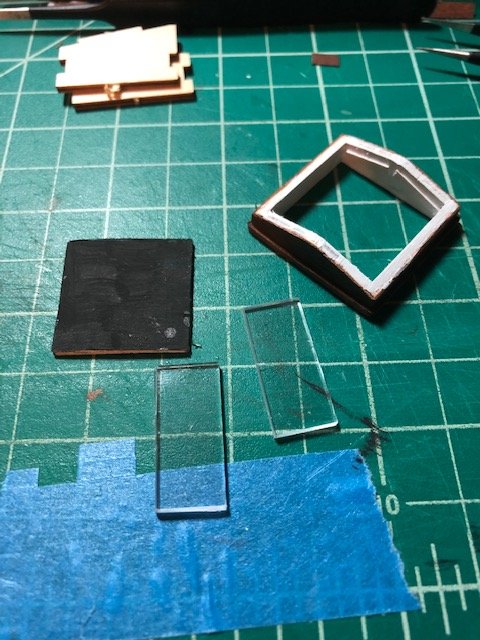
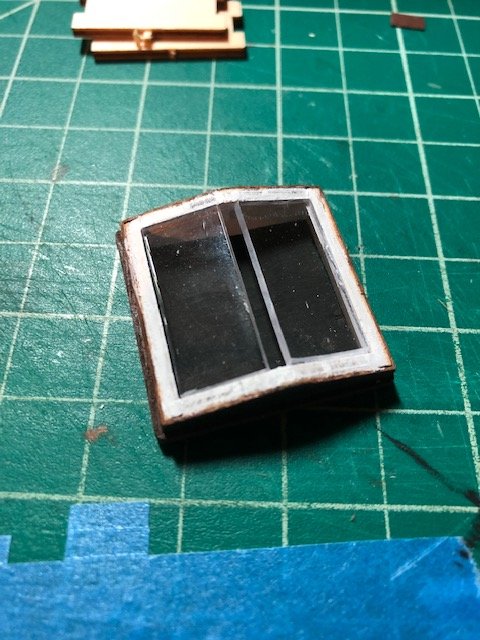
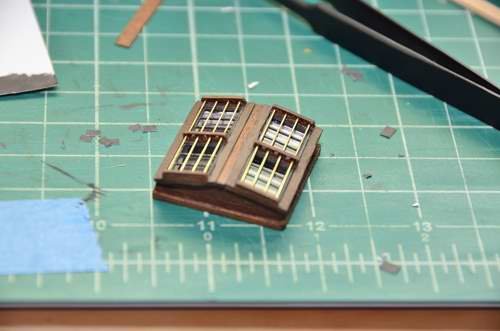
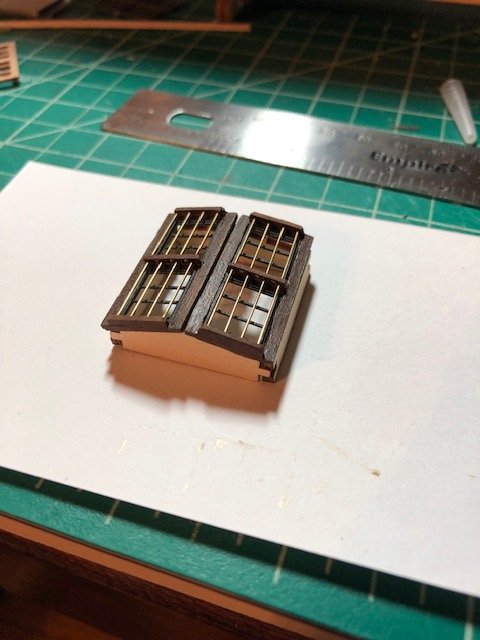
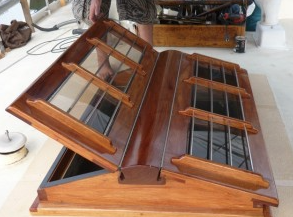
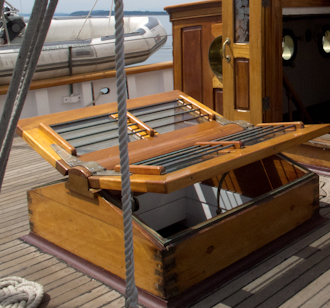
Finally have the skylight together. I like windows as an architectural detail for whatever reason, so I really wanted it to be a nice point of visual interest on the deck. Still not sure if the bars are historically accurate, but I like them. The glass is 2mm plexiglass that catches the light nicely. I painted the interior sides white and added a flat black bottom to create an illusion of an actual opening in the deck. It works because it's hard to see too much in there with the bars. Hard to appreciate in the photos below because the light is catching the windows.
- 241 replies
-
- 3
-
-
- mermaid
- modellers shipyard
- (and 1 more)
-
Rick, Looks nice. I like the pin rail on the windlass. I'm planning to kitbash the windlass that came in the kit with a smaller one I had ordered, and I might also add a pin rail. I may also do my main hatch cover as a grating instead. I like the anchor cables going into the hatch (like the cutaway drawing) rather than through eyelets in the deck. I'll have to look closer at the catheads when I get to that part. My progress is at a crawl for the moment. I've been busy with work and trying to get a bathroom remodel off the ground (which will be a little chaotic). I've almost got the skylight done and hope to have pics shortly. Slow, but I'm not out of the game! James
-
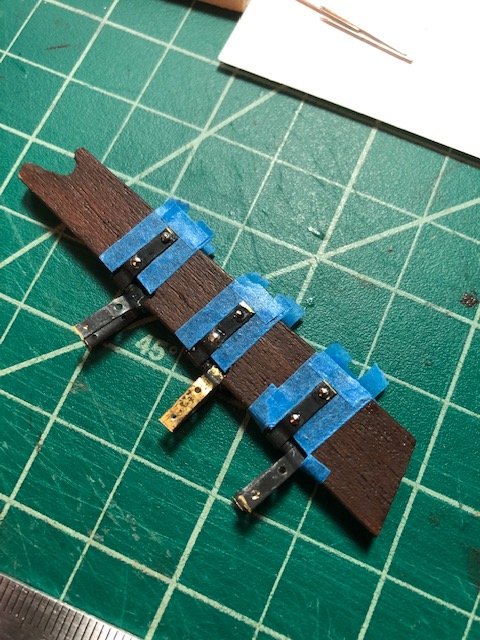
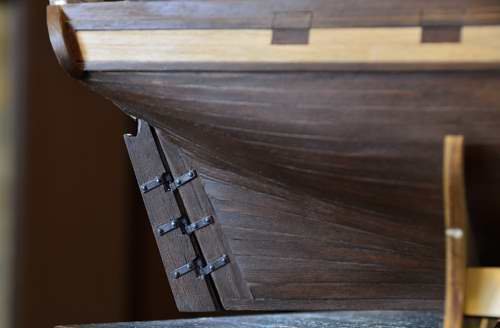
So I think the great rudder saga is wrapping up. The new hardware came in, along with some drill bits for the Dremel tool. I cut the bracket pieces to length (which lopped off one of the two holes), then drilled a new hole with the Dremel tool. Got them attached and painted, then mounted the whole thing onto the boat. The nail heads are the heads of sewing pins. Getting the whole thing attached to the boat was trickier than I thought and isn’t the neatest job (you're seeing the more photogenic side!) I wish the DVD covered that a bit more, or maybe I missed it? On the transom, you can see the notches I cut out to fit the stern davits.

- 241 replies
-
- 2
-
-
- mermaid
- modellers shipyard
- (and 1 more)
-
Rick, Very nice work. We may be interpreting the cutaway drawing differently. I had thought the companionway entrance was aft (as you have it modeled) so it's right over the ladder. I assumed the drawing showed the hatch slid into the open position. Is there a convention as to which way they're usually oriented? I agree that it should be shorter based on the drawing. James
-
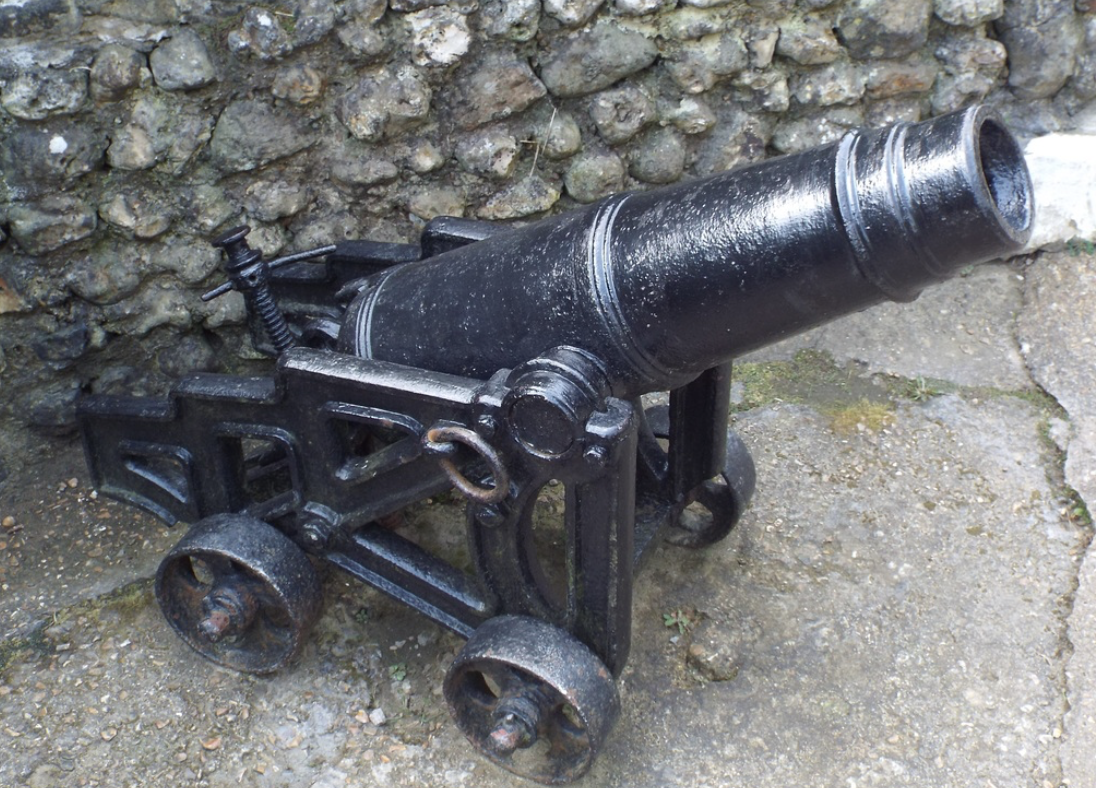
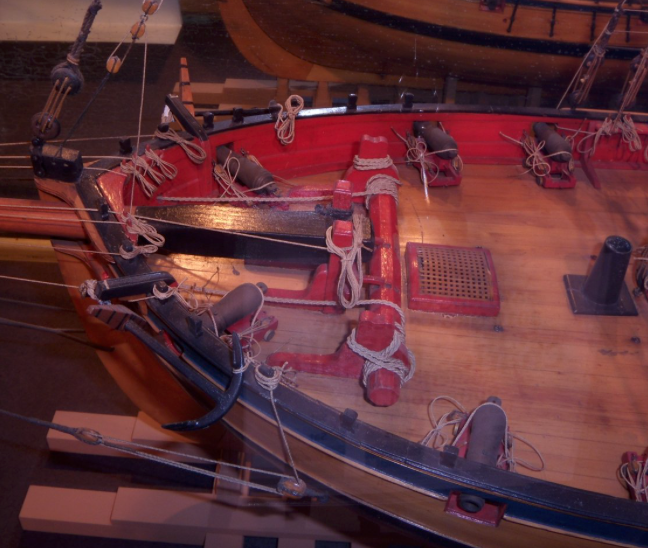
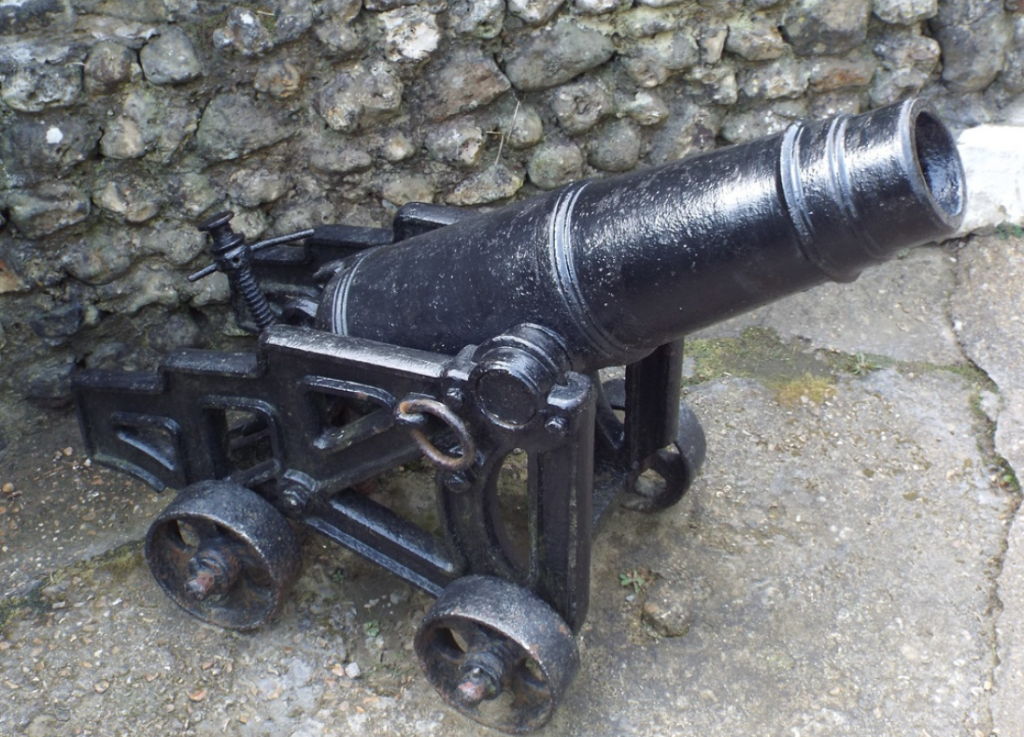
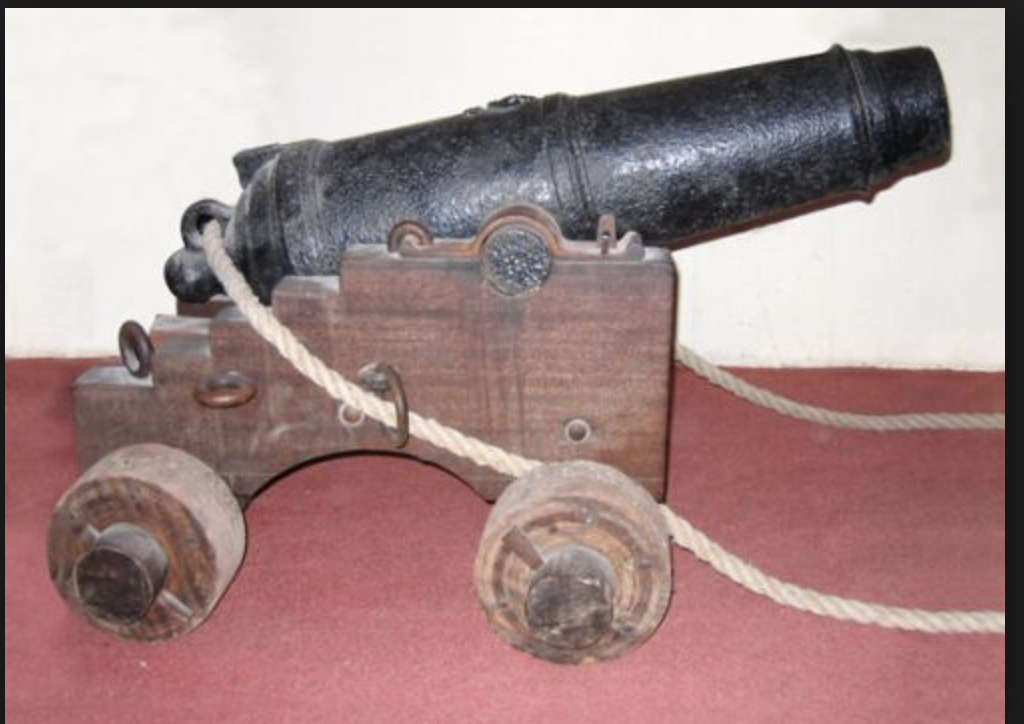
Rick...wow...really cool resource but I'm trying to wrap my head around that size! Seems awfully small, although I just took a second look and I think it's 2' 4" (so maybe 28-30") That's still awfully short, but the carronade in the Careening Bay painting is pretty stubby (barely hangs over the front of the carriage). I think we saw the same online image of the Isle of Wight gun, and I found a couple of others that indicate a 43" barrel length (assuming they are, in fact, 6 pounders). I may have to go with something in that neighborhood because I can't find something smaller and I think scratch building a gun (even from non-metal materials that are painted) is beyond my skill set for now! The only other thought I had was cutting down a long gun and trying to make it look like a carronade, but I don't think I can pull that off either.


- 241 replies
-
- 1
-
-
- mermaid
- modellers shipyard
- (and 1 more)
-
Rick, I'll keep the heavy black paper in mind if I can't get the holes the way I want them. Similar to what I did with the hinges on the binnacle but I hadn't thought to impregnate the paper with glue. Also good to cknow the size of the carronades. I figured they were probably on the lighter side. I think the ones I ordered are 20mm, so the length is right but they'll look a little hefty for 6 pounders. They'll be carriage mounted rather than slide mounted (which I don't think is unusual for lighter carronades). If you check out the Careening Bay drawing, you can see one of them sitting on the beach. As for port lids, I've found one or two contemporary models with lids, but open ports seem to be more common. I still go back and forth (not that I can change things on my model at this point!) Let me know what you do with the companionway. I plan to modify it on mine (I'm doing a lot of modifying with deck fixtures). The skylight bars were worth the fiddly-ness. Not sure if the original boat had them, but definitely a neat visual detail with aesthetic value. Phil, That's a really interesting approach I'll have to consider for future builds. The possible peeling issue has worried me a bit, although I usually found the Woodland Scenic dry transfer products to hold up well back in my model railroading days (what could possibly have changed in 35 years, right?). After transferring them I covered them with a piece of card stock and rubbed them down good with a stylus, then hit them with a coat of matte poly to hopefully hold them in place. I like the look of finished wood on this model but may try painting for realism on future builds.
-
I'm a little bogged down with the rudder at the moment. I ordered slightly smaller hinges that I like because I can go with smaller notches in the rudder. They have two holes instead of three, and when trimmed to fit the rudder there is only one hole for a nail head. I also couldn't get the smaller hinge pieces to stay put in the bracket. SO...I've got a new (very slightly thinner) rudder fabricated and planked, I re-ordered the same hinges with the little fiddly pieces pre-welded in place, and I ordered the drill bit and chuck I need to drill another nail head hole. I think the effort will pay off. Aside from being correct, the new rudder hardware should look a little less beefy.

- 241 replies
-
- 1
-
-
- mermaid
- modellers shipyard
- (and 1 more)
-
I'm procrastinating getting back to the rudder and played with the skylights. Not sure if I'll get much else done this weekend. We'll see.
- 241 replies
-
- 3
-
-
- mermaid
- modellers shipyard
- (and 1 more)
-
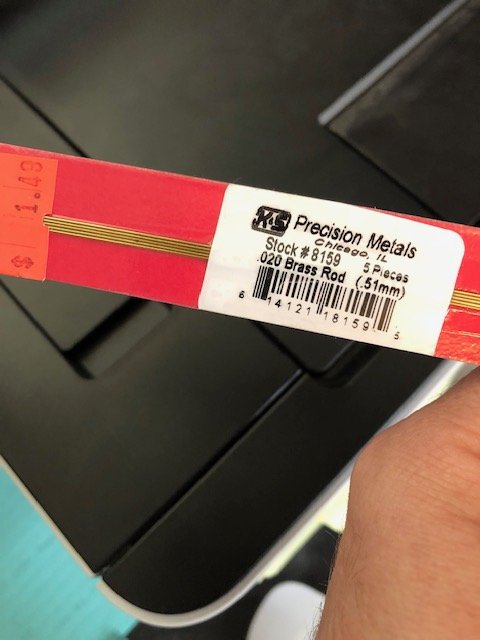
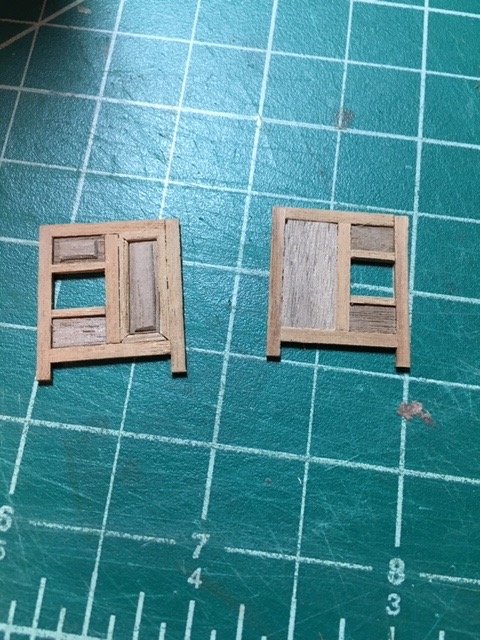
Thanks for the input...helpful to know I'm on the right track. I've got some .51 brass bars that I'm going to attempt to mount lengthwise, I just have to figure out exactly how to mount them.
- 241 replies
-
- 2
-
-
- mermaid
- modellers shipyard
- (and 1 more)
-
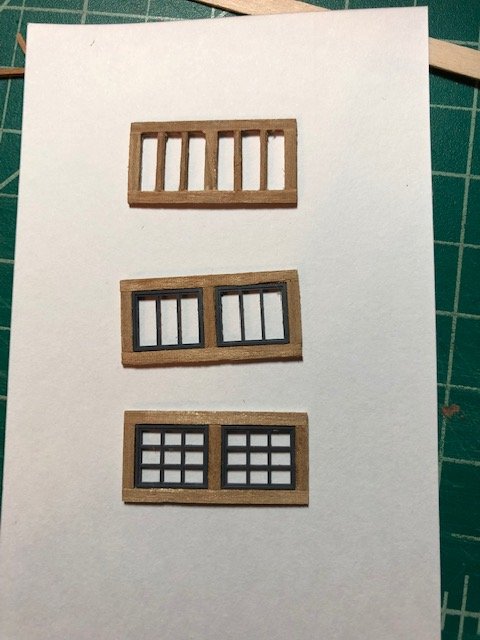
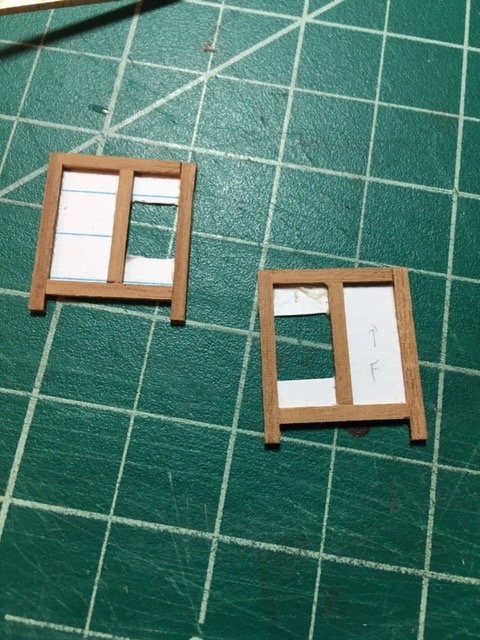
Rudder hardware has arrived and will probably be the focus of build time this weekend. Meanwhile, I've mocked up three possibilities for the skylight using the same wood strips-on-cardstock technique I used for the binnacle. One is all wood strip stock, the other two have variations of a plastic model railroad window frame. I think I'm leaning toward the middle one but am open to thoughts/suggestions.
-
Mark, I hadn't thought of that and it makes a lot of sense...especially for a larger ship where the cabin below would become part of the gun deck. They would probably need good ventilation and I can't imagine a window faring well with cannons being discharged nearby on deck or on the deck below.
-
Chris, I haven't found anything to suggest the windows in the kit are incorrect, but I'm not a big fan of the look. There are really no good drawings of the skylight so I may customize a bit. I bought a few model railroad window frames to play with. As for the protective bars, we'll never know if they're for sure accurate for the Mermaid but I'm hoping to narrow it down to "likely," "possible," or "unlikely." If they're possible or likely, I may take a shot at adding them.
-
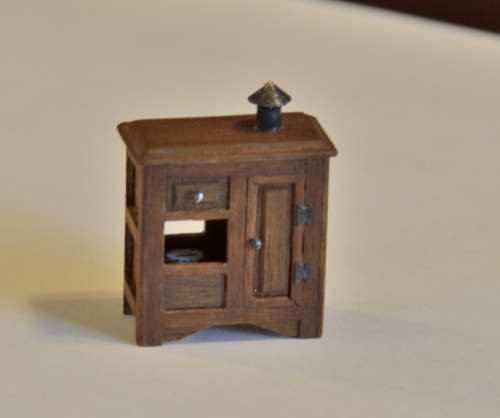
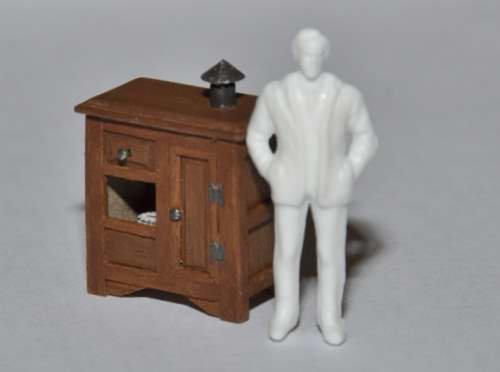
Thanks Chris...definitely an improvement from my two previous attempts. The vent on top is a model railroad fitting from the local hobby store. The binnacle is 24mm high (including the "legs"), 22mm long, and 12mm wide. The compass inside is actually a piece of round punch-out scrap from the laser cut plywood sheets (I think it was for the tiller hole in the deck) with a face put on it.
- 241 replies
-
- 2
-
-
- mermaid
- modellers shipyard
- (and 1 more)
-
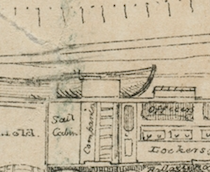
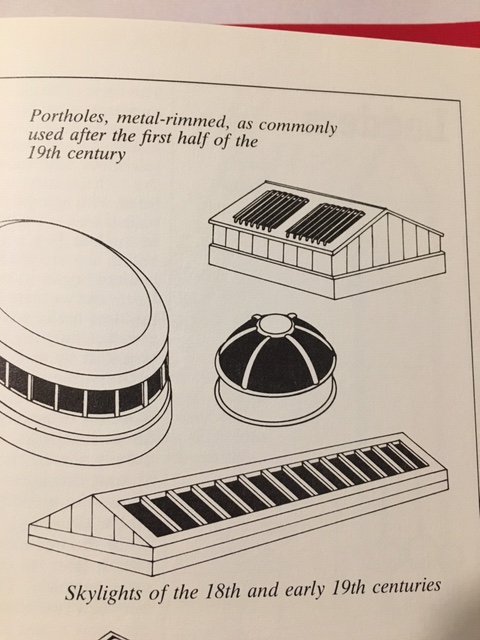
Hi All, Can anyone offer some historical context on the use of bars to protect skylight windows? In "Historic Ship Models" zu Mondfeld just says they were "sometimes fitted" (pic below is from the book), seeming to imply that included late 18th/early 19th century British naval ships (I'm working on HM Cutter Mermaid, 1817). Seems like glass would be pretty vulnerable without some protection (especially on a man-of-war)? Any conventions for how (or how extensively) they were implemented in the British Navy in that time period? Pics below are just some random images I found. Not British navy from that period. James

-
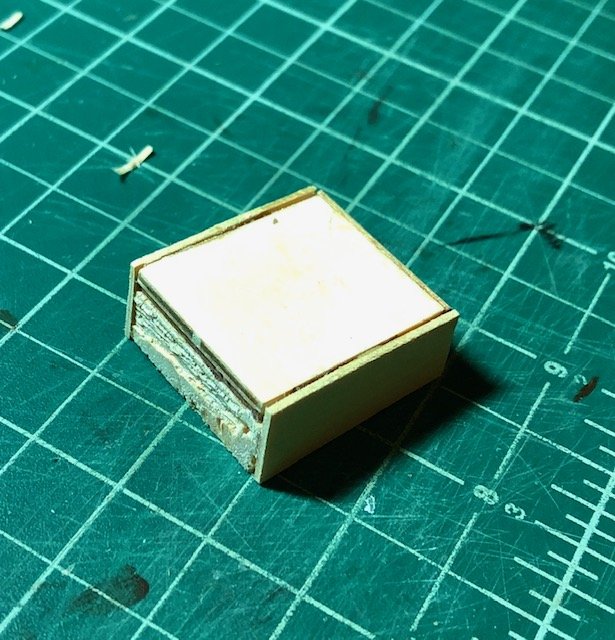
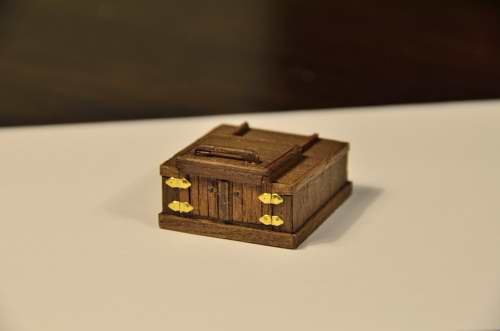
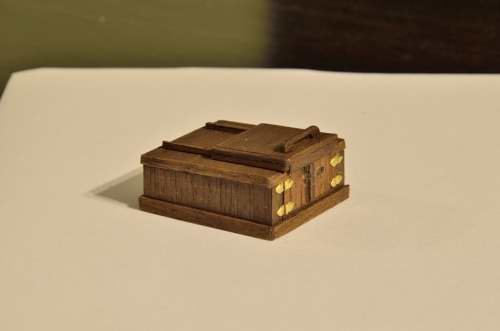
Still waiting on new rudder hardware, but other than that it’s time to start playing with deck furniture and fittings. Chris and Rick put the binnacle back on my mind. I’ve had two previous attempts that I wasn’t happy with. I was trying to make a box out of 1mm walnut sheet stock then attach trim to it, but it wasn’t working. While bored at work I had a better idea of how to engineer it. I cut two templates out of an index card for the front and back. I glued the trim (2mm x 1mm walnut strip stock) directly to the card templates, with 1mm and .5mm stock to fill in the panels. I had planned to leave it as plain walnut but there were color differences in the stock so I hit it with a light maple stain. The drawer and cabinet pulls are the heads of straight pins. The butterfly hinges were cut from painted cardstock. At some point I’ll add some ring bolts on the side so it can be lashed to the deck. I think the height and profile are a good match for King’s cross section drawing. Not sure about the rest, but I’m happy with it.

- 241 replies
-
- 7
-
-
- mermaid
- modellers shipyard
- (and 1 more)
-
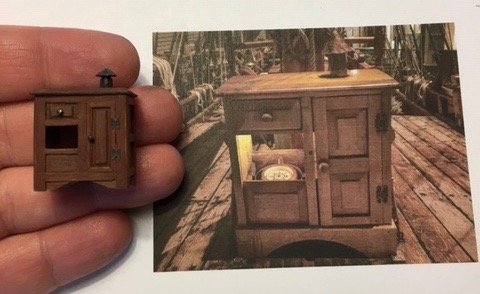
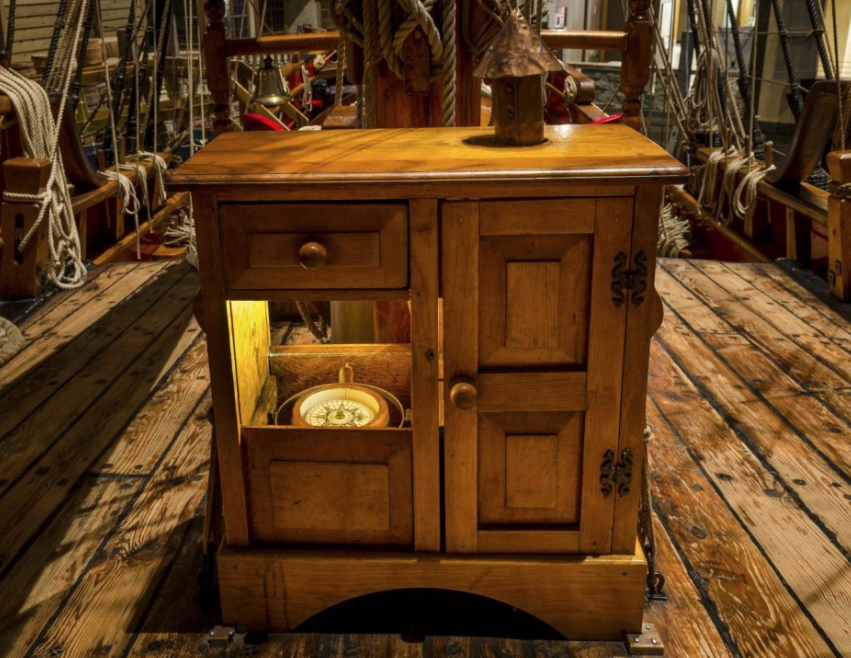
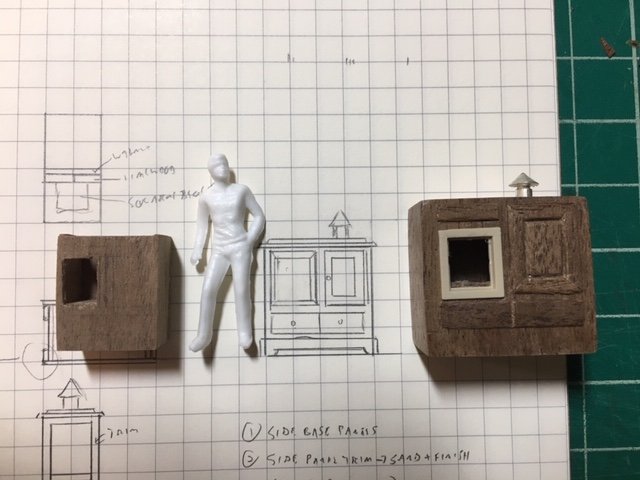
Chris, sounds like we're thinking on similar lines. I saved the text of King's letters but lost the link where I got them. There's only one reference to a binnacle in the letters plus a couple of references in the handwritten log, but nothing with any descriptive details. I saw those plans you posted and wanted to make a "double-wide" variant. After looking at a lot of pics online I found the one below that I've roughly used as a model. I had started making one as a side build but it turned out to be way too big (the one on the right in the pic below). When I set it on deck it looked like an industrial kitchen freezer unit. I sketched out a smaller one that I've puttered with in my down time but it's not easy working that small. As I shift to deck furniture I'll have to figure out what I can do with it. As for the rudder...it's an Australian boat. I just assumed the gudgeons and pintles were reversed in the southern hemisphere! I just got in the new hardware but I don't entirely like it so I ordered more in a slightly different size.
- 241 replies
-
- 4
-
-
- mermaid
- modellers shipyard
- (and 1 more)
-
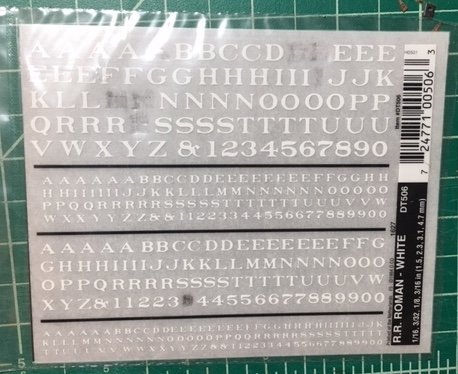
Chris, you've definitely got a cleaner and more symmetrical cut on that trim. I've still got some woodworking skills to develop. As for lettering, I used Woodland Scenics brand dry transfer letters from the model railroading world (white Roman font, 1/4"). Not sure if they're easy to get down your way. The letters transferred well and conformed to the texture of the wood nicely.