
The Bitter End
-
Posts
284 -
Joined
-
Last visited
Content Type
Profiles
Forums
Gallery
Events
Everything posted by The Bitter End
-
 This is a great idea! I just emailed them. I will report back on what they say. Apparently it takes up to 8 weeks for an answer, but hopefully that Is not the case. I am very much realising that you are right about now being the time for modifications. I think this model will be decidedly unforgiving in the future. Thanks Haiko
- 233 replies
-
- 1
-

-
- Model Shipways
- constitution
- (and 5 more)
-
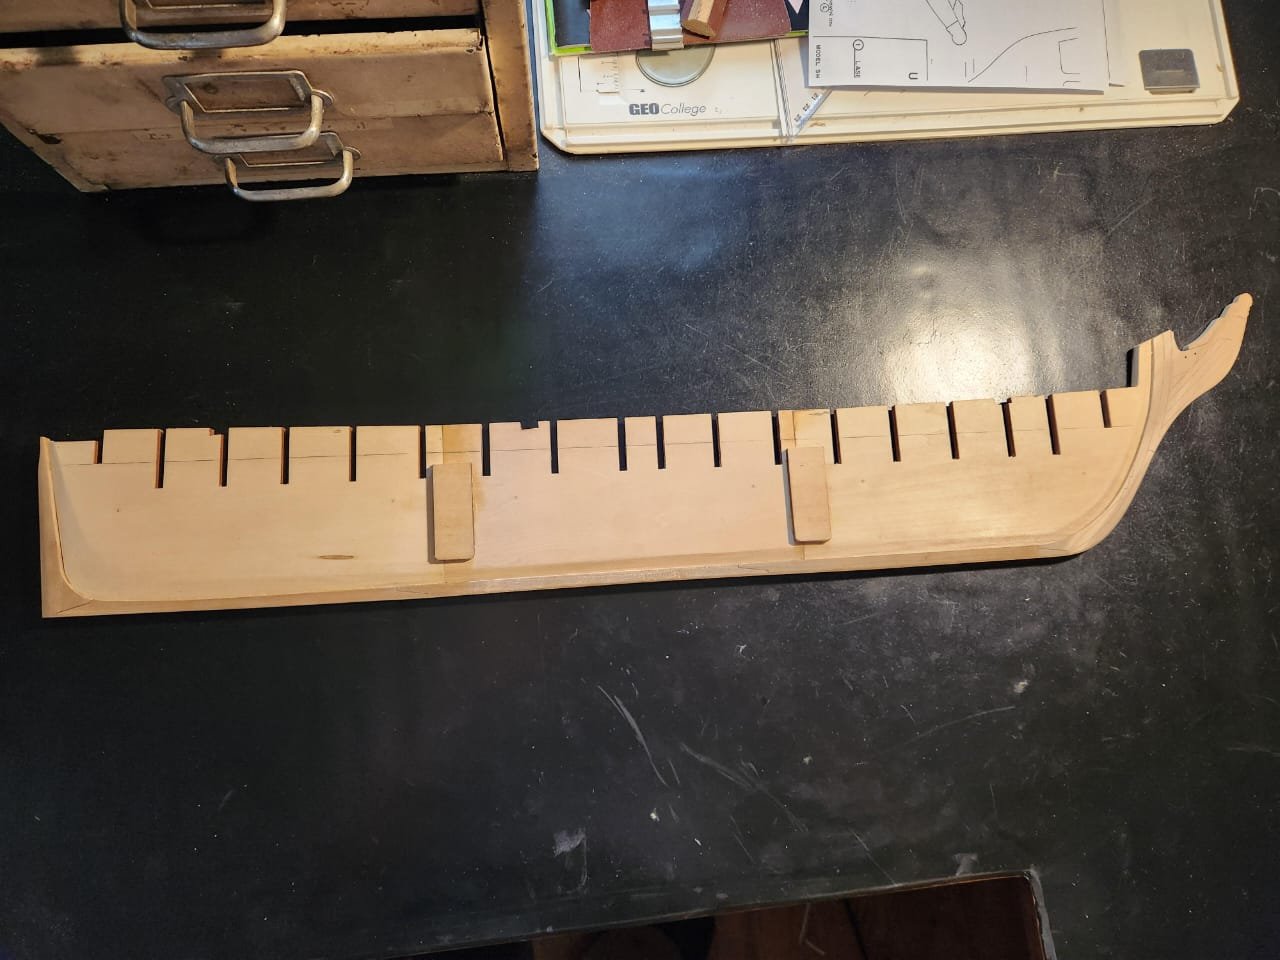
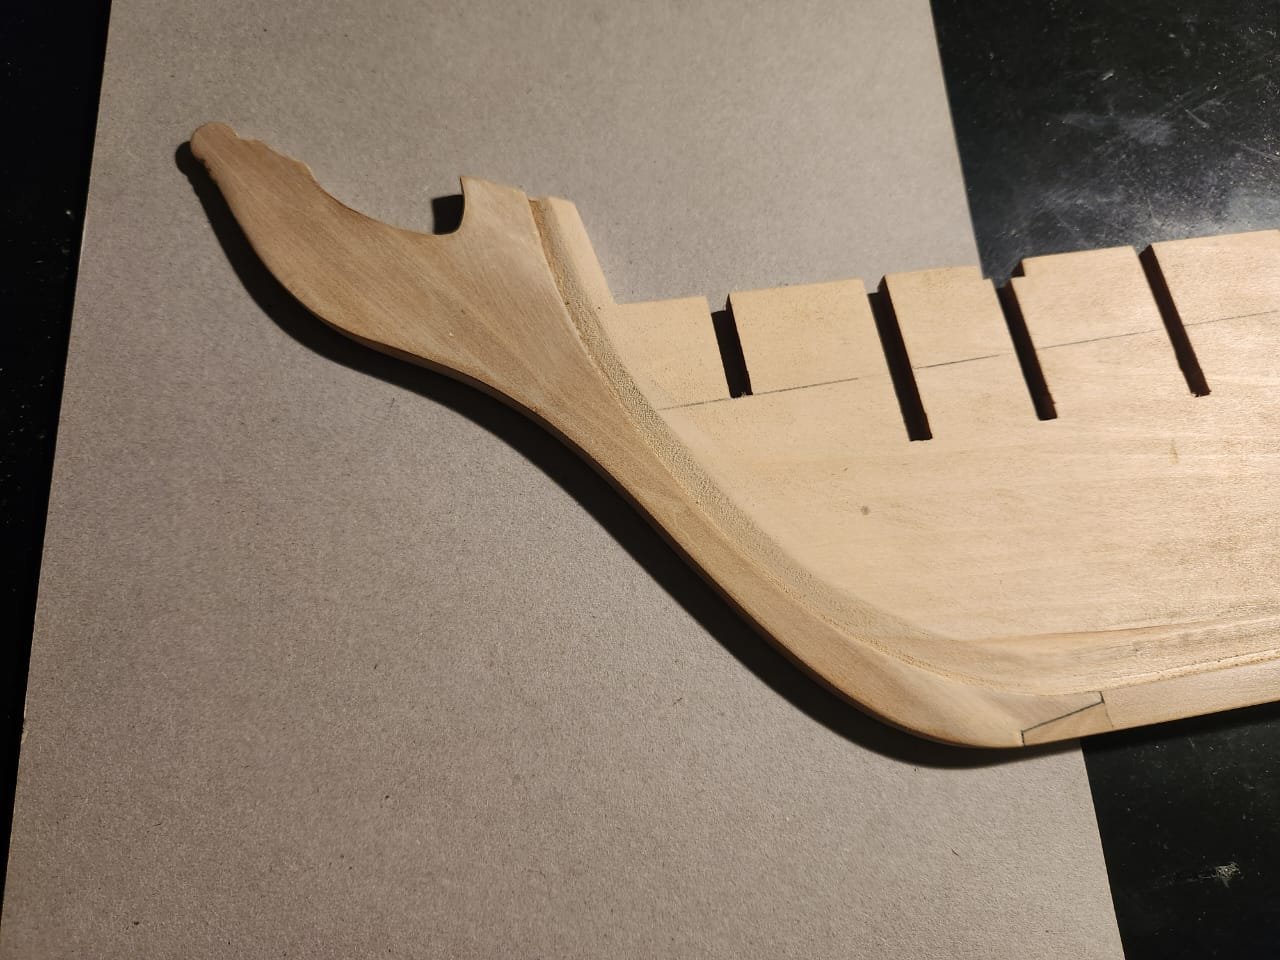
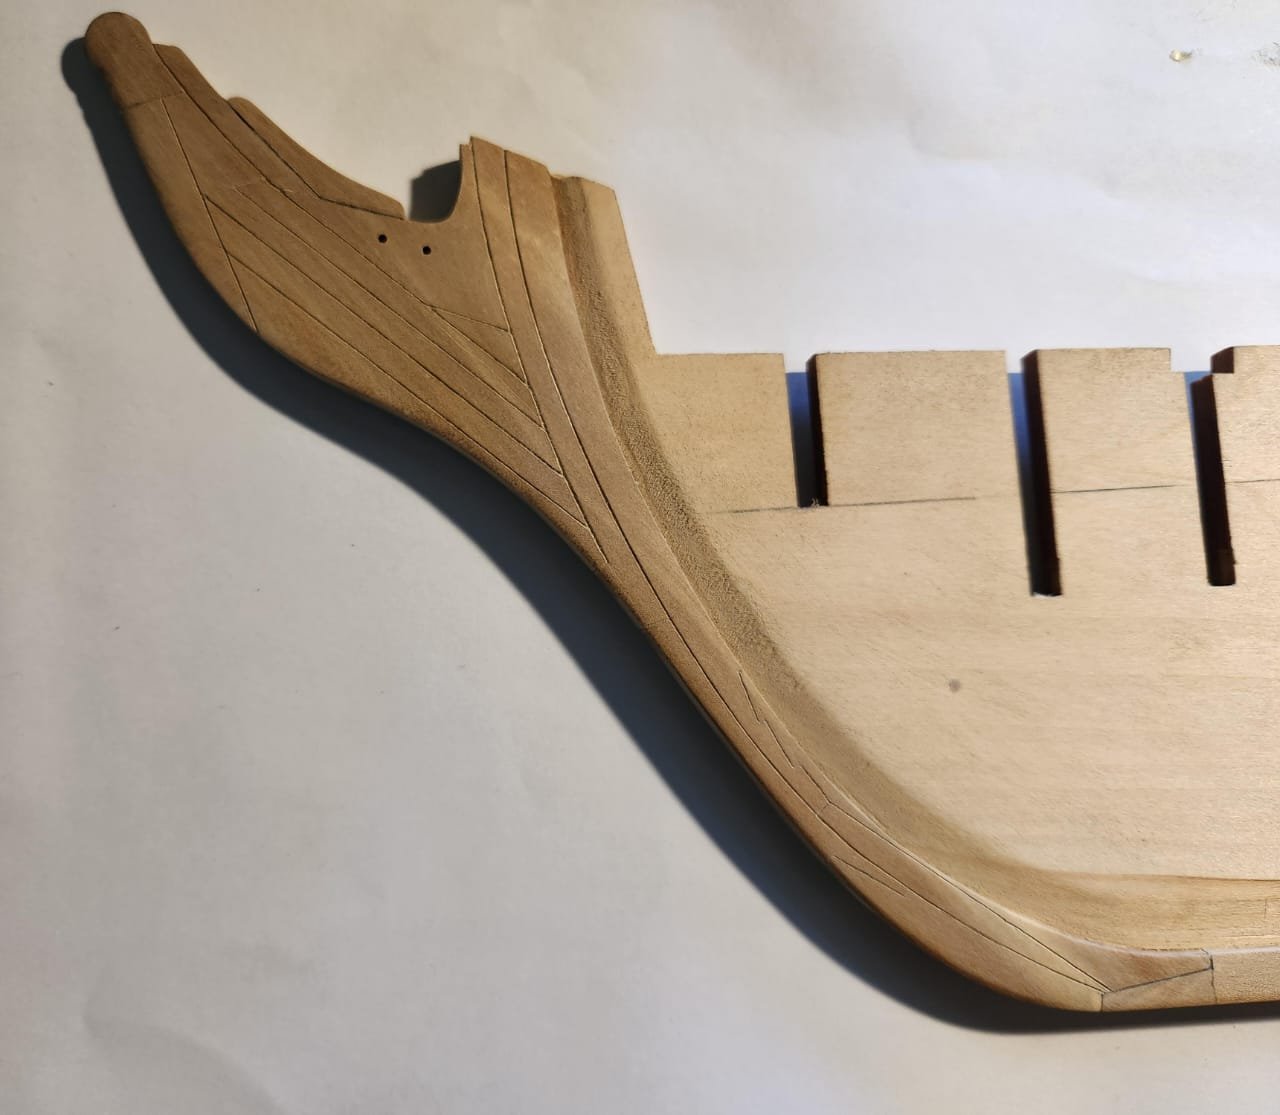
Last Keel post for now. After making copies of the plan and transferring the closest possible layout onto the plans, I made copies, scanned and mirrored the image and reprinted the set at the right size. I then cut out the layout and glued the template onto the stem using rubber glue as suggested by JSGerson. I then Cut along the relevant lines with a scalpel, removed the paper and deepened the grooves with a micro chisel. After this I filled in the lines with a lead pencil, cleaned the wood up with an eraser then sanded and cleaned the grooves. The final step was to cut away the portions of the stem indicated in my previous post and replace this area with a new cutout of wood to match the plans I have access to. I am not totally happy with the outcome, but a fair section of the stem will end up being painted black with the design I am going for, so hopefully it will hide the defects I don't like. I also etched and applied pencil to the other joints in the keel, which somewhat improved their appearance, too.
.thumb.jpeg.04a3aa2895f834a27e5eb4c834499471.jpeg)


- 233 replies
-
- 5
-
-
- Model Shipways
- constitution
- (and 5 more)
-
This is a good point. I hadn't even thought about the figurehead. I really hope that I don't have to undo what I have done to accommodate the figurehead. I also don't know here I will even get a figurehead at this scale. I don't think carving one is in my skill set. I asked Copilot AI and you are absolutely right. I am alarmed by how often AI is completely wrong about even basic things. But it can sometimes be a fun tool, not to be taken very seriously at all.
- 233 replies
-
- 1
-
-
- Model Shipways
- constitution
- (and 5 more)
-
I love these discussions, thank you for the photos, It really is interesting. This has also made me feel slightly better about the layout I am using I think you make an excellent point on the size of the timber relative to the workers. The sheer size of this cut water would create a need for an awkwardly large number of pieces, which look to our eye almost incorrect. I quickly checked the length of the cut water as per the model shipways kit, and it would be almost 18 meters long, an exceptionally large chunk of timber. I don't know if it was a consideration at the time, but maybe repairs were a consideration, to have to replace this single giant piece of timber every time it gets damaged is maybe not very practical? I asked AI what the explanation may be, and here are some interesting suggestions. 18th-century frigate cut waters were made from many pieces of wood for several reasons: 1. **Strength and Durability**: Using multiple pieces of wood allowed shipbuilders to create a stronger and more durable structure. The different pieces could be arranged in a way that distributed stress and impact forces more effectively, which was crucial for withstanding the harsh conditions at sea. 2. **Flexibility**: Multiple pieces of wood provided some flexibility to the cutwater, which helped absorb the shock from waves and collisions with floating debris or other ships. This flexibility reduced the risk of structural damage. 3. **Repairability**: If part of the cutwater was damaged, it was easier to replace or repair individual pieces rather than having to rebuild the entire structure. This was especially important during long voyages, when repairs might need to be made quickly and with limited resources. 4. **Construction Techniques**: The shipbuilding techniques of the time often involved using smaller, more manageable pieces of wood that could be shaped and fitted together precisely. This method allowed for more intricate and robust designs. 5. **Material Availability**: The availability of different types of wood and the need to use locally sourced materials also influenced the construction. Shipbuilders would use the best-suited wood for each part of the cutwater based on its properties, such as strength, resistance to rot, and workability. Thank you for your interest and input. It is a great help
- 233 replies
-
- 1
-
-
- Model Shipways
- constitution
- (and 5 more)
-
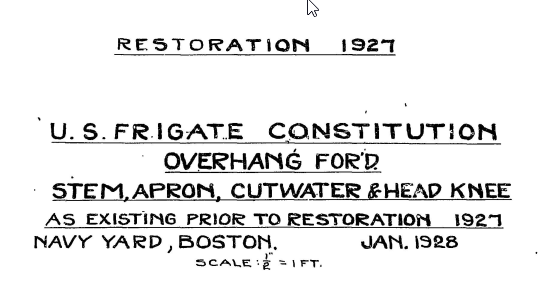
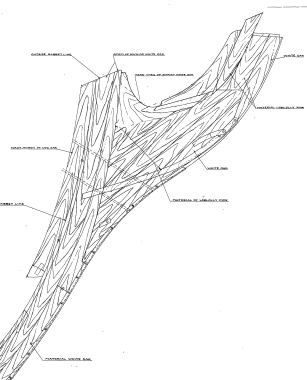
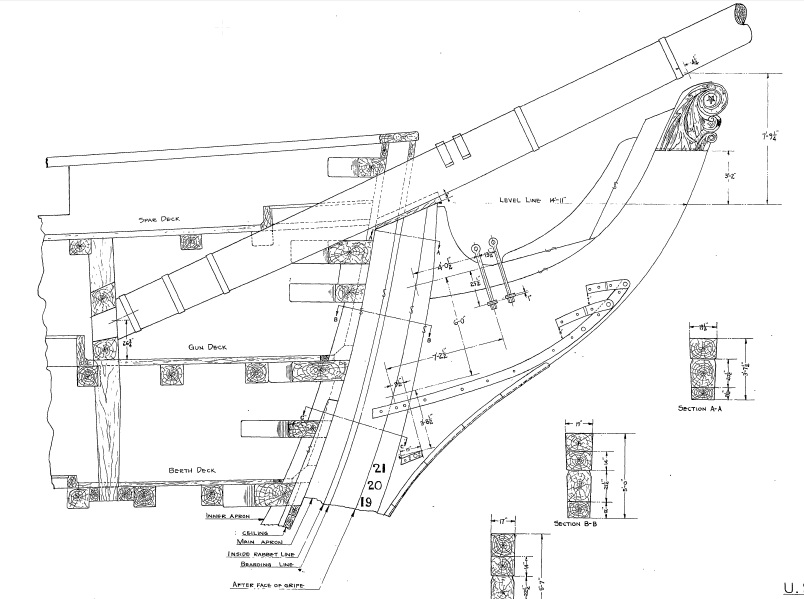
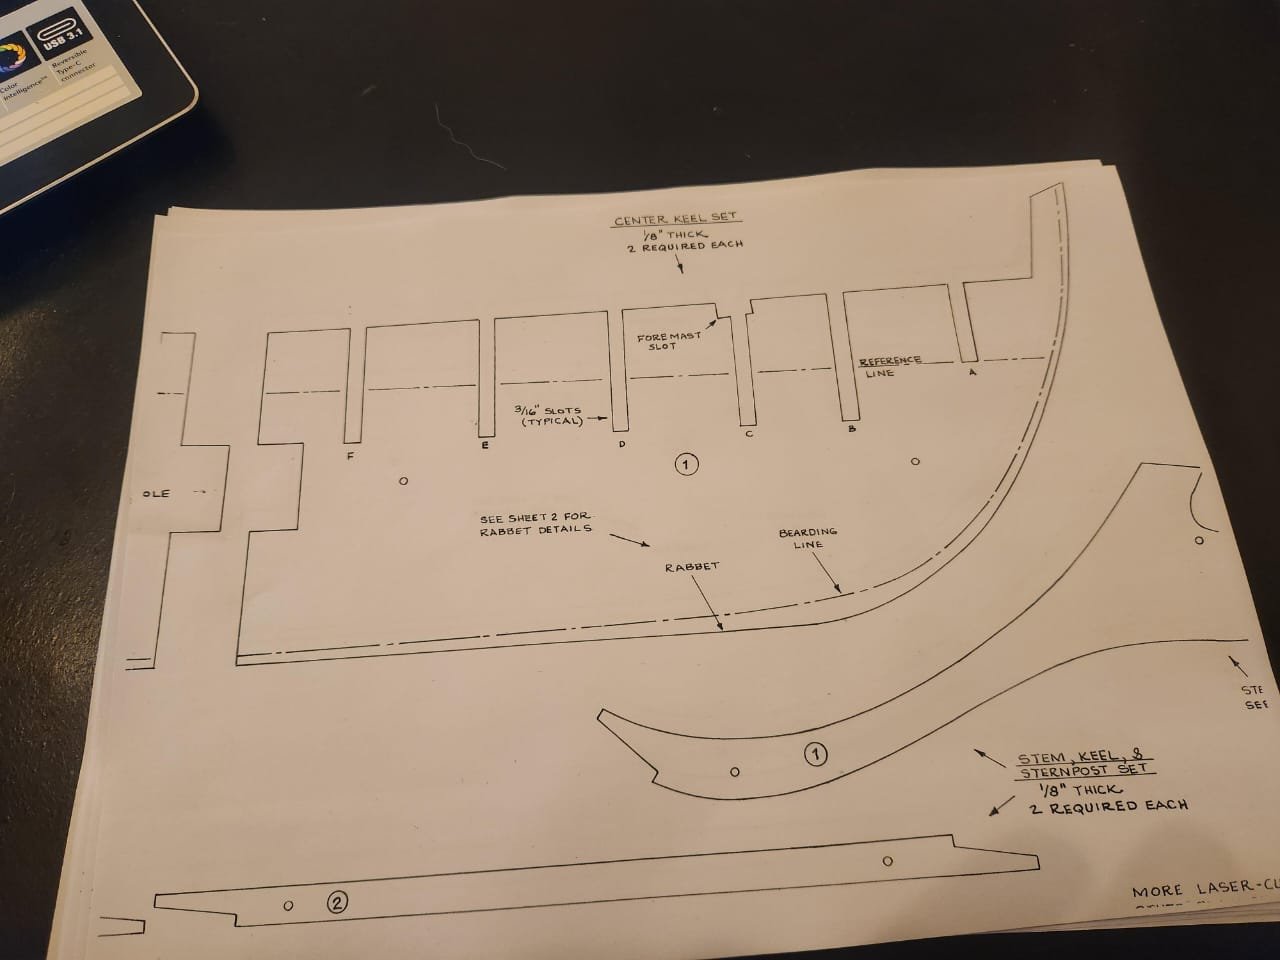
Hi Marcus I am not entirely sure what I don't like about it. Something just doesn't look quite right, the joints don't look that realistic to me, but you may well be correct in saying that the grain of the wood is part of the issue. The plans that I am referring to come from the US naval database of plans. The plan I used has the following footnote and if you look closely then you can see the divisions of the plans in the drawing. I am sure the carpenters of the time had an incredible set of skills, but perhaps it was just easier to work with a series of small sections instead of a few large ones. Regards Haiko
- 233 replies
-
- 1
-
-
- Model Shipways
- constitution
- (and 5 more)
-
Here is my attempt at etching sections into the stem. I'm not that happy with the result. does anyone have any suggestions on how to make this look a bit better?

- 233 replies
-
- 2
-
-
- Model Shipways
- constitution
- (and 5 more)
-
OK, Final stem design... I think. I looked at what was apparently the layout of the stem prior to restoration. This original layout appears to have had far more individual pieces than the restored stem, It was incredibly difficult to see where the divisions lay due to the wood grain patter drawn on the plans. Hopefully I can transfer this design to my Stem in an acceptable manner. I have also realized that the only way to get this layout to work is to cut out 2 small sections of the stem, which I have marked with hatched pencil on my drawing.

- 233 replies
-
- 1
-
-
- Model Shipways
- constitution
- (and 5 more)
-
Thank you to all of you gentlemen, I will do experiments with all of your suggestions and see what behaves the best on this particular wood. Be good! TBE
-
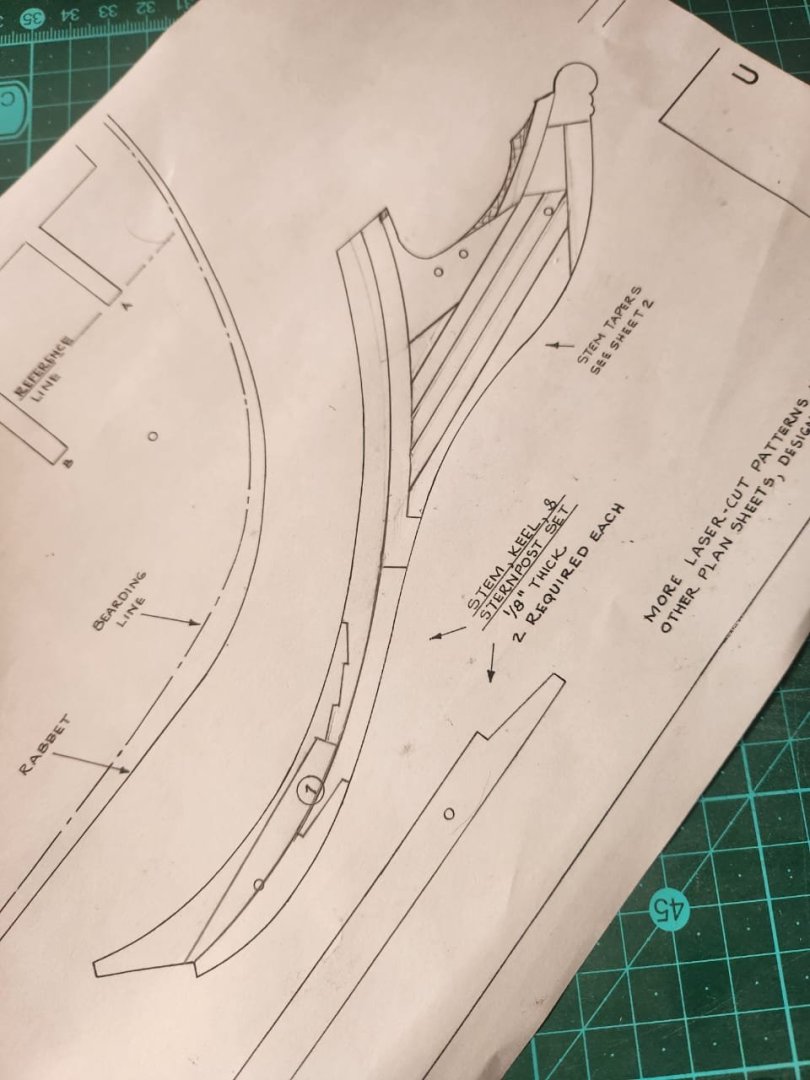
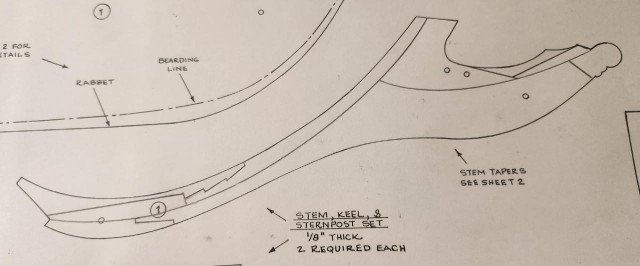
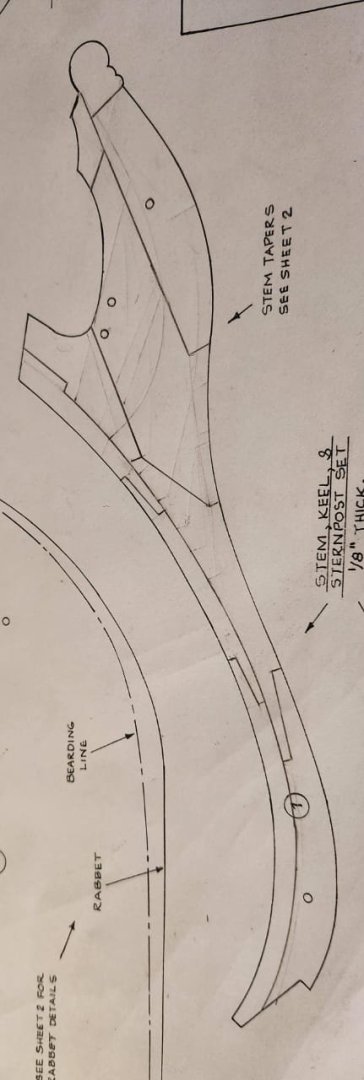
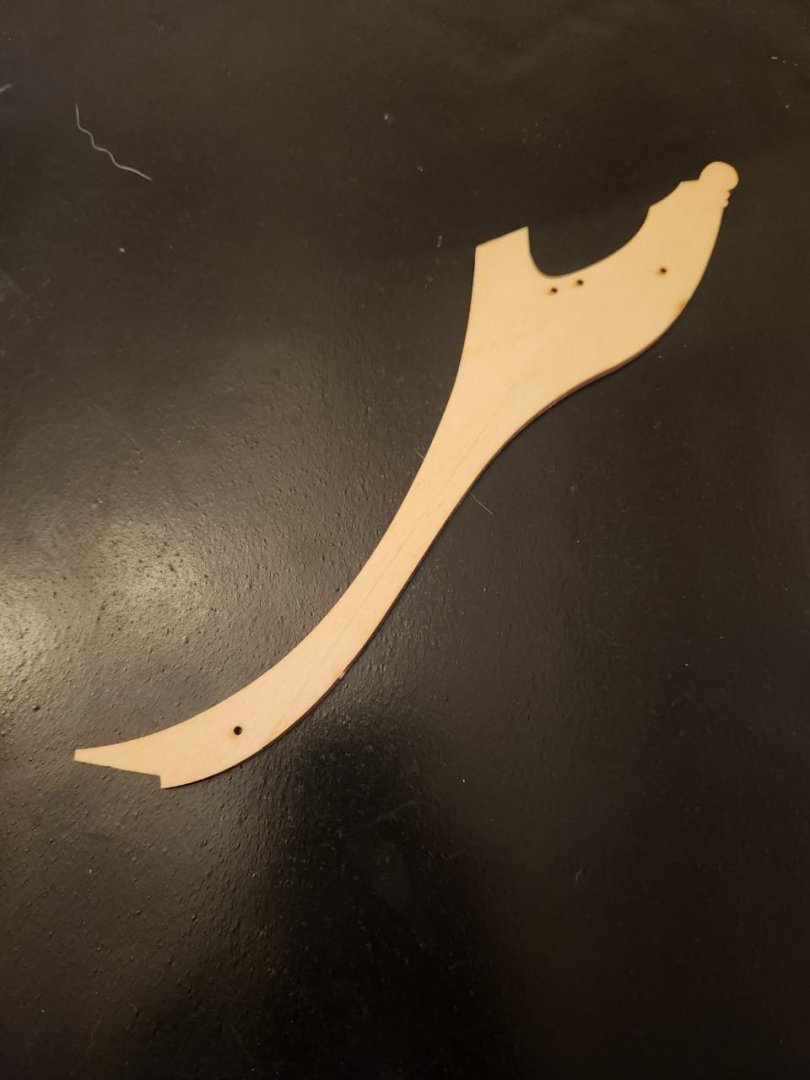
Thanks to the help of @JSGerson who sent me copies of some additional stem plans, this is the second version I have come u with on layout. It involved some compromises as the blank stem shape provided is not identical to the outline on the plans, but I think it's as close as I can get. If anyone has any suggestions, they are as always most welcome. I have also attached my 2 reference drawings in case I have misinterpreted something on them.

- 233 replies
-
- 1
-
-
- Model Shipways
- constitution
- (and 5 more)
-
Hi Jon This is a great method, thank you. I will give it a try this evening. Do you have any views on the template I made, I wont take any offense i promise! I partially made it up as I went along and I don't know if I made all the right choices. Haiko
- 233 replies
-
- 1
-
-
- Model Shipways
- constitution
- (and 5 more)
-
Good day to you all I am looking for some advice on getting the most out of pear wood. I am busy building a model shipways Uss Constitution and I would like to leave the hull unpainted. I have therefore decided to go with pear wood. The wood in question does not come from Standard swiss pear but rather from pear tress that I cut down on my farm(Early BC is the variety). This is a wood with an incredibly tight grain and a certain degree of beauty. I would like to know what the procedure would be to get a really nice even well protected and realistic finish on this wood. I have attached an image of the partially completed stem in pear wood as a sample of what I am working with.
-
I am having a little trouble with the stem of this vessel. Due to the fact that I am not painting this model, the wood of the keel will be visible. I would therefore like to scribe the lines of the stem section into the wood. Despite the great information offered on here by various members, I am really struggling to decide on how to lay out these divisions. The images available differ dramatically, and none of the stems shown are exactly the same as the stem provided with the kit. I have also crossed the Rubicon in terms of changing the design of the stem entirely to match one of the drawings available. Any help on this would be hugely appreciated. I tried to sketch up a possible layout on a copy of the plans, but it still doesn't sit quite right with me. Please take a look!
- 233 replies
-
- 1
-
-
- Model Shipways
- constitution
- (and 5 more)
-
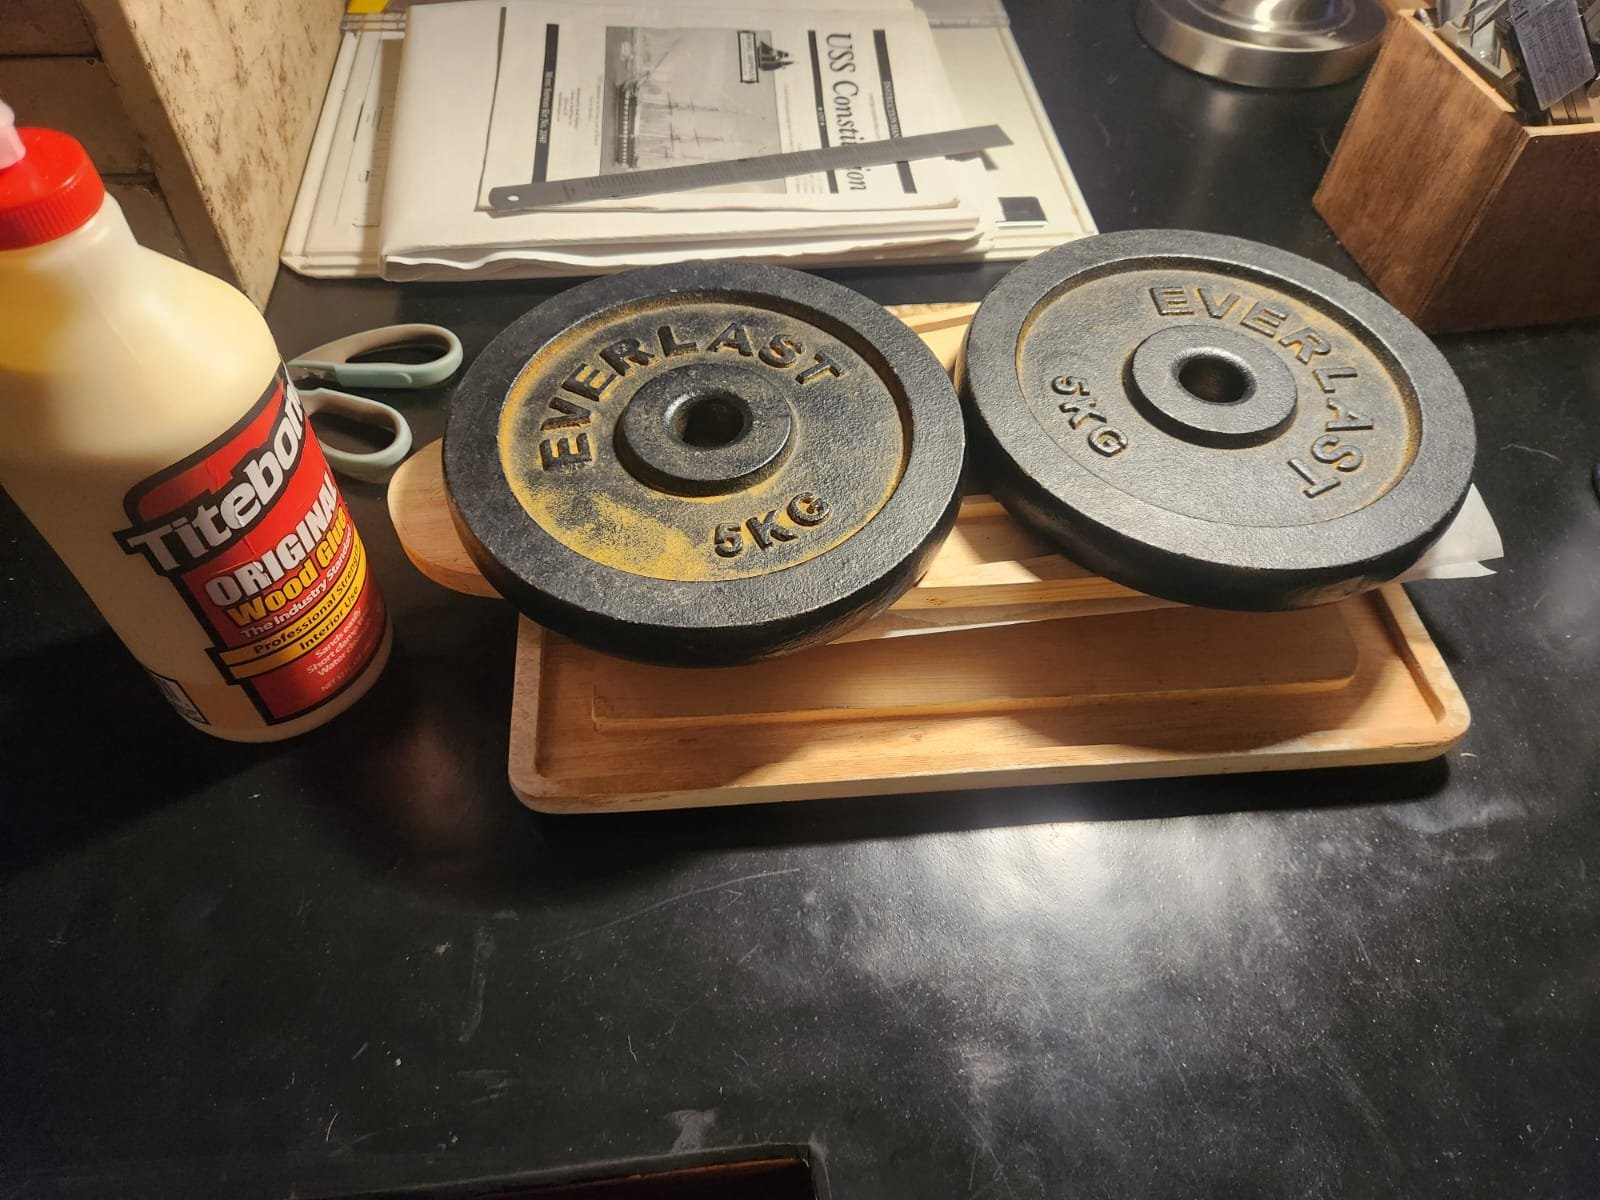
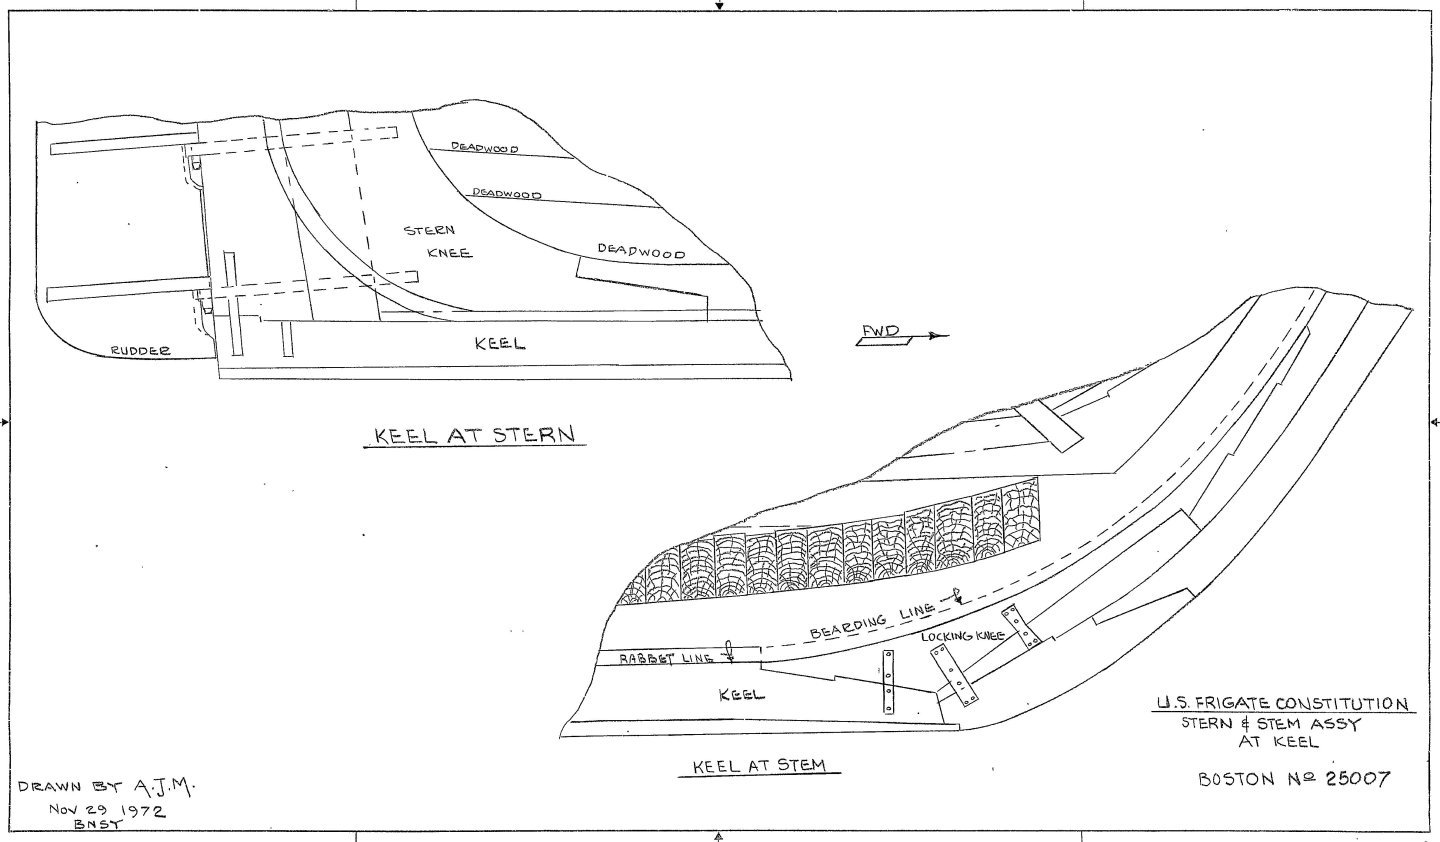
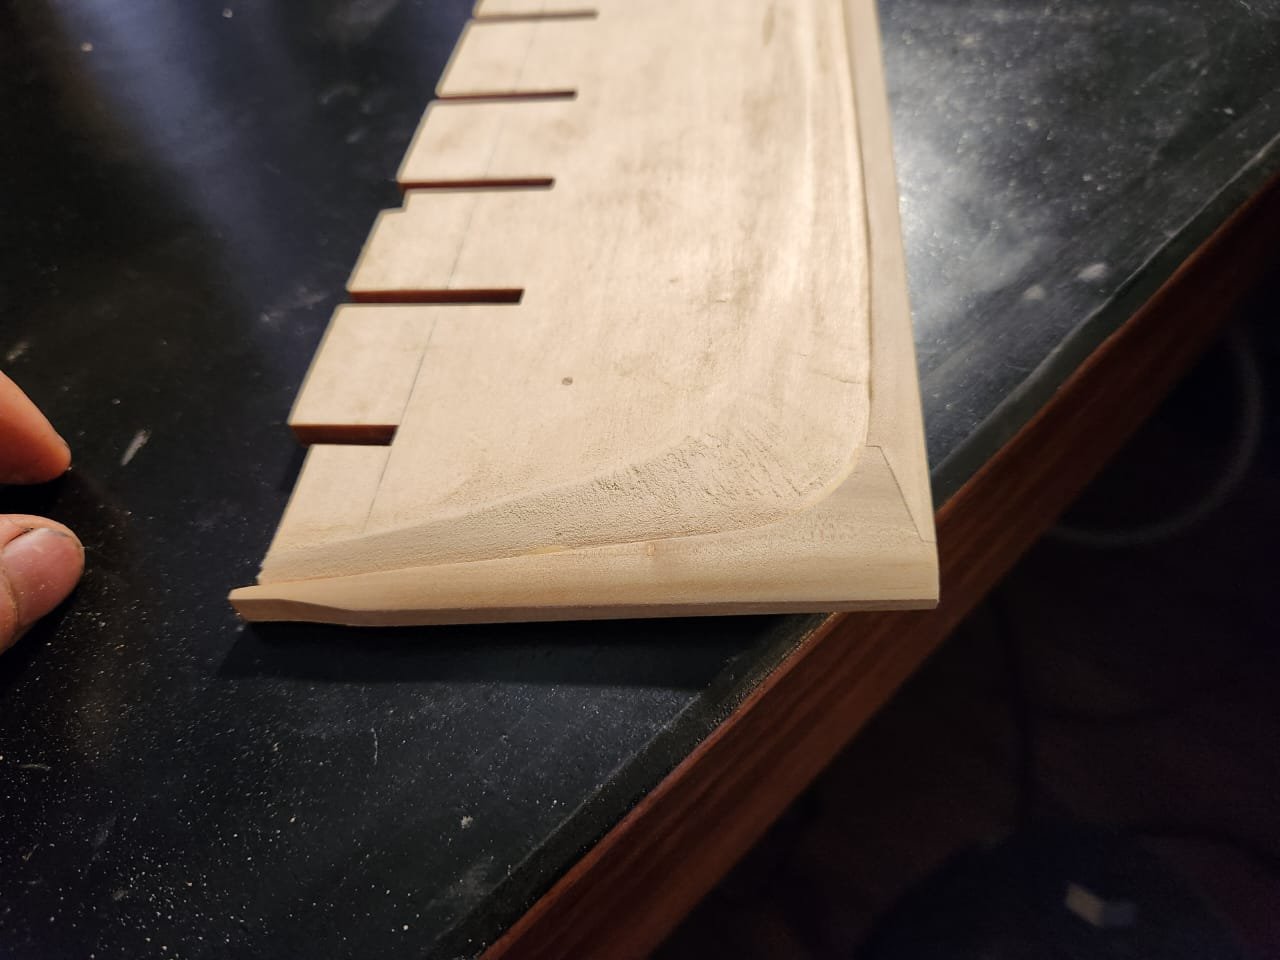
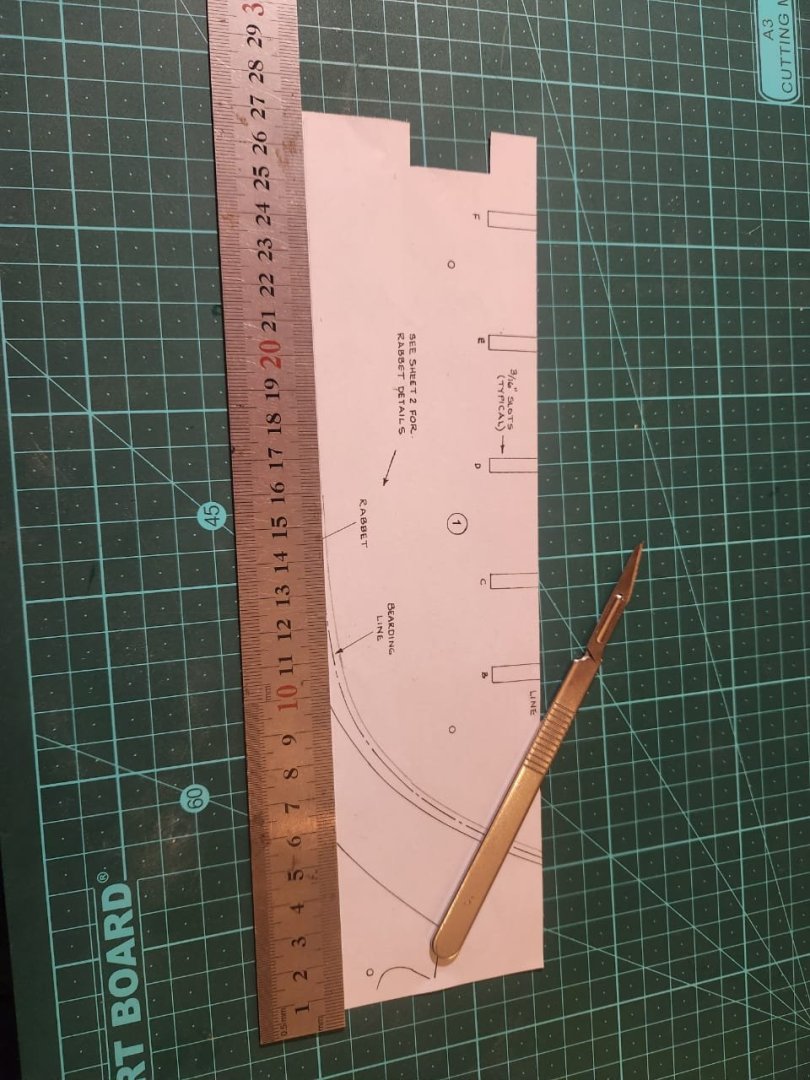
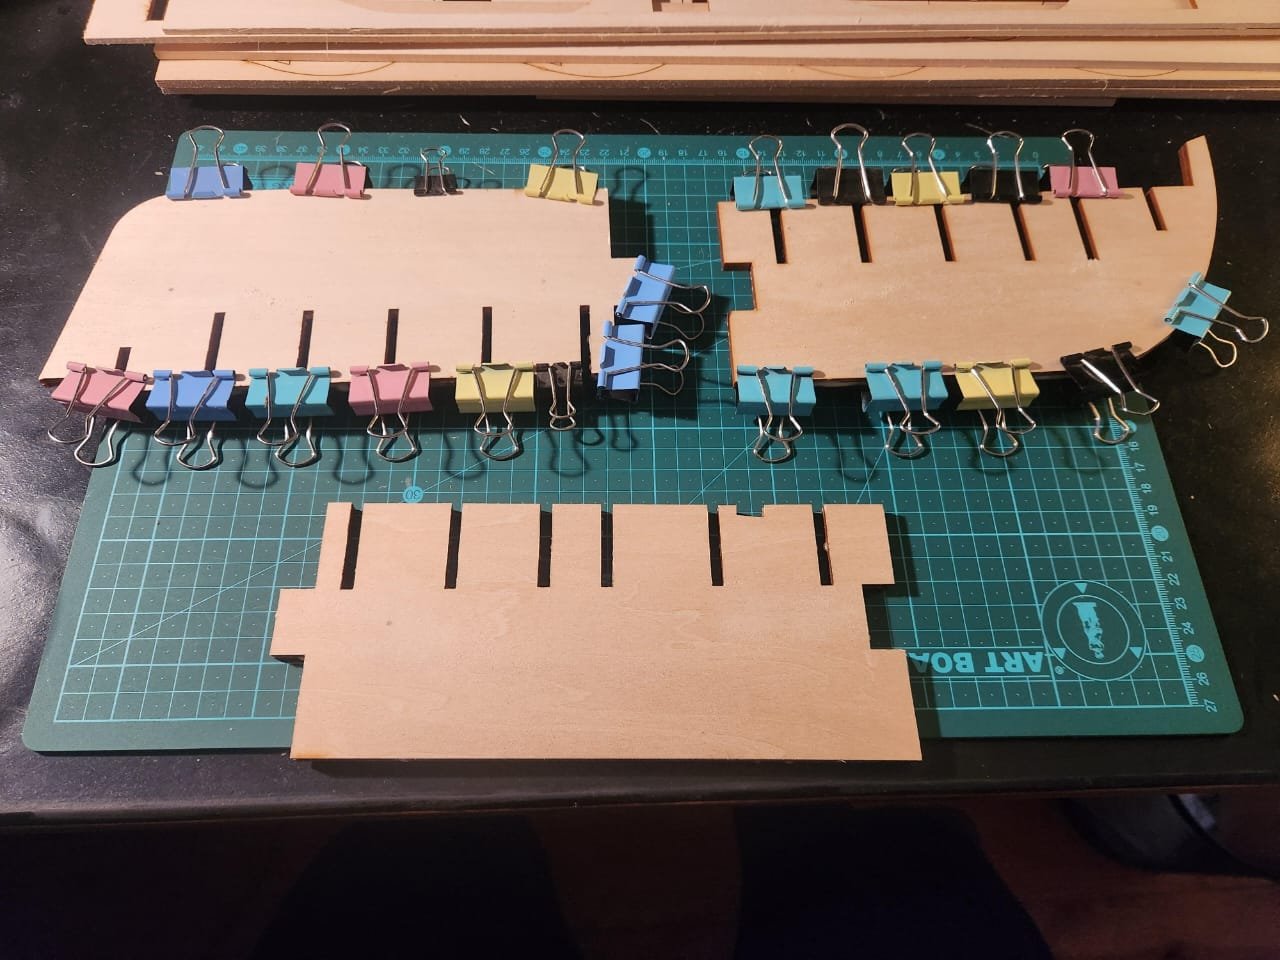
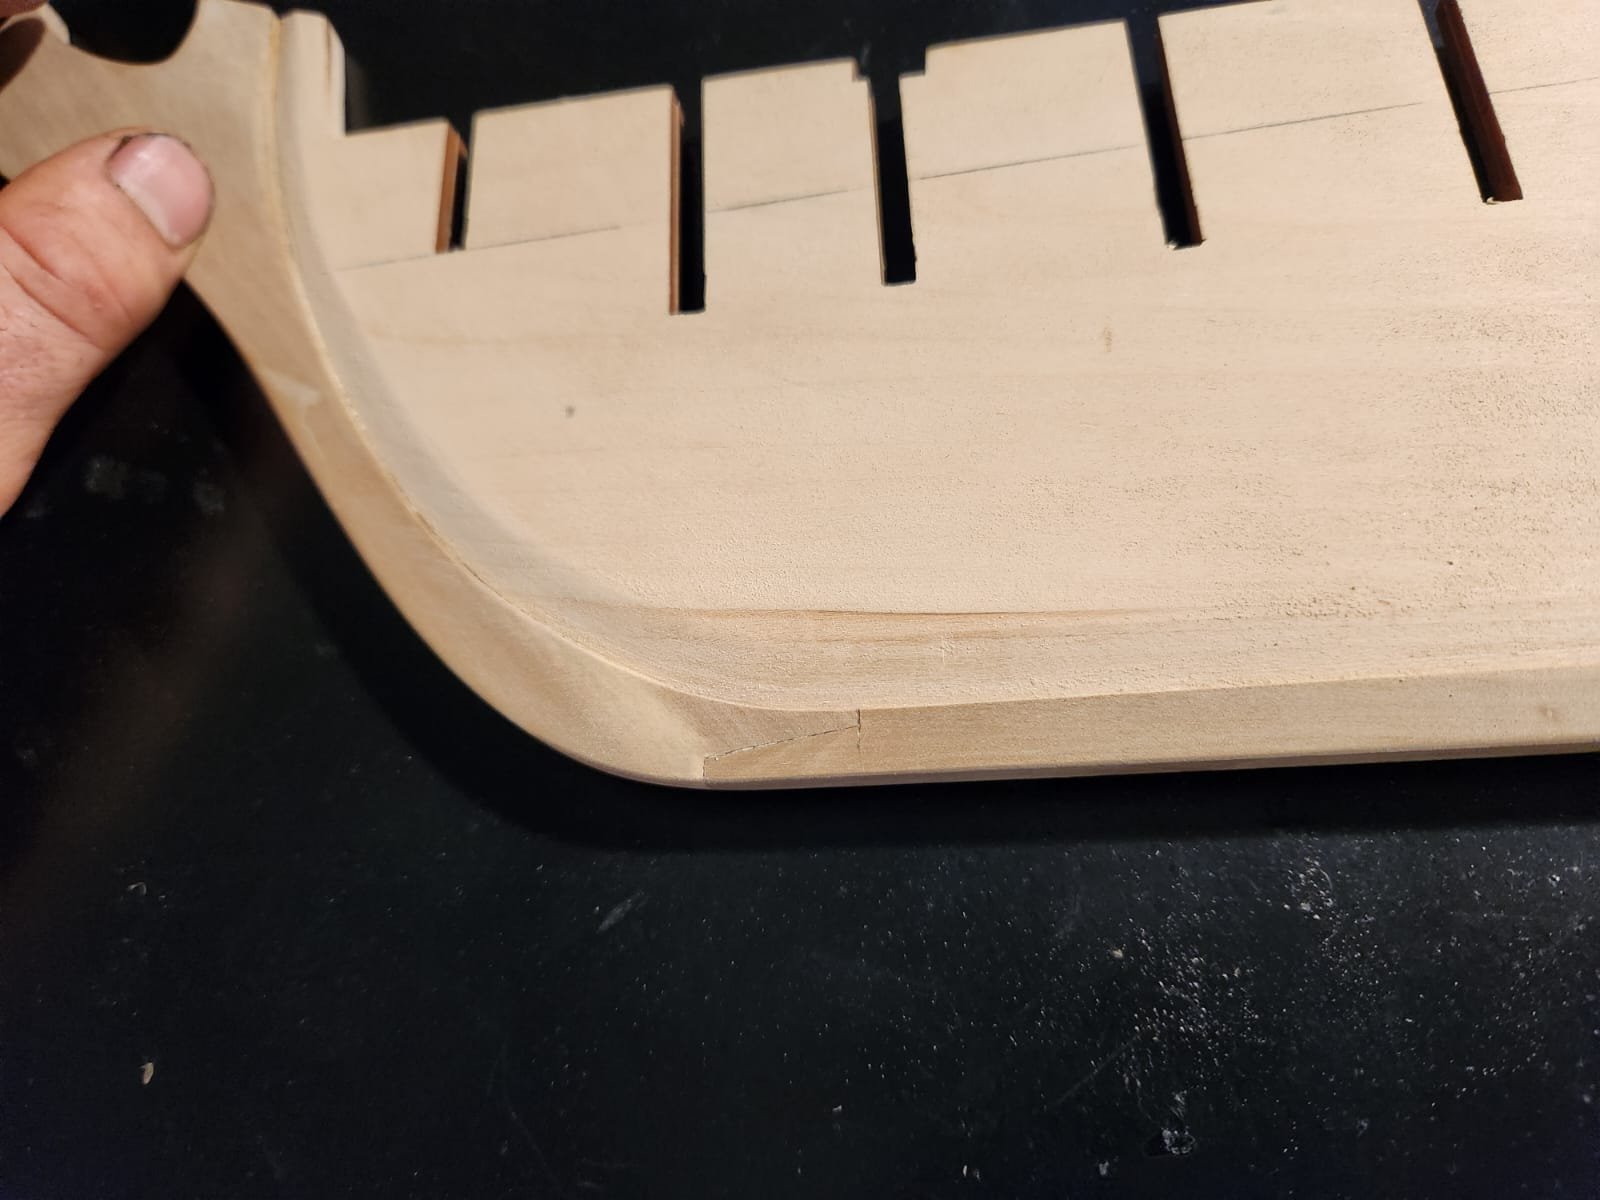
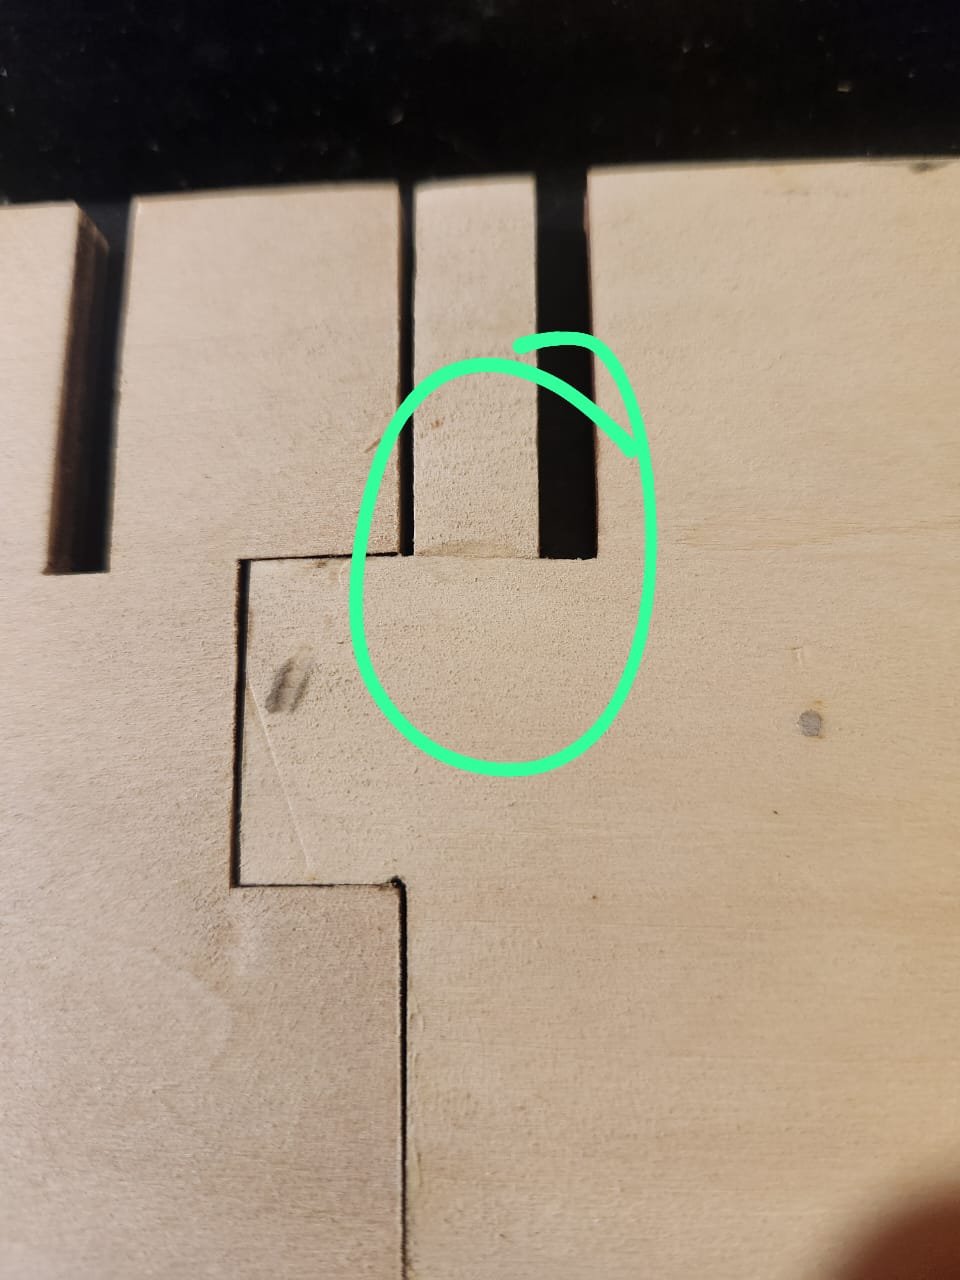
Hello Ladies and Gentlemen I apologise for the rather scattered approach to this build log, I hope things will become a bit more linear in the near future. Here are the next few glacial steps I have taken. Once I had photocopied the relevant keel section drawings I placed the matching wood section over the image and marked where the reference line started and ended, then simply joined the 2 marks using a pencil. Next, I took a strip of my homemade keel planking and used it to raise the bearding line by its thickness. I hope that this strategy will result in the double planking of the hull fitting correctly, but we will have to see. I then cut out the paper template using a ruler and scalpel and held each cutout onto its matching keel section and traced the bearding line along the edge of the paper with a pencil. It made the most sense to me to rough cut the bearding while the sections were separate, giving me more control and reducing the risk of breaking something. Technically speaking, the rabbet is too narrow for the double planking due to the width of the false keel material provided, but I am hoping to address this by sanding the last few strakes a little thinner on both layers of planking to allow them to fit flush. I achieved the rabbit cut with a combination of a small hand plane, some knives and a bunch of sanding. I then glued the three sections together, clamped them to the cutting mat and waited for them to dry. It's worth pointing out that I did not install the reinforcements recommended by various please at this point. I felt it would make my life difficult, as the protruding wood would prevent me from laying the false keel completely flat onto my work surface. Careful observers will also see that I inserted a small spacer on the lower forward tab where sections 1 and 2 are joined. This was to correct for sanding that had to be done to get everything aligned, and had the added benefit of tightening up the fit while holding everything together. This was followed by neatening up the bearding line so it ran from bow to stern without any stepping between sections. On the keel section side of things, I finished the shaping of the components, tapering the stem and stern sections and cutting the joints to fit. The instructions are slightly unclear on how much to taper and from where to where. If anyone thinks I have done this incorrectly based on the photos below, please let me know. Things are still a bit rough, but I will do final sanding once the hull planking is in. I then added keel sections using a series of rubber bands and clamps. I have begun using titebond original for the first time (it is not a common glue in South Africa) I love how the product behaves, creating a pretty firm grip on the material in very short time, freeing up clamps for use elsewhere. Unfortunately, I am not yet very adept at cutting parts from scratch, and I ended up with a gap in of my keel joints that I was not happy with. I attempted to fix this with a filler strip but didn't bother to match the wood colour, producing an unsatisfactory result once everything was assembled. I then realised the only way to fix this issue would be to cut out that area and try to patch it. I must say I don't love how the repair came out, but it's better than it was before. The final step-up to this point was to glue the reinforcements onto the joints. Something which I feel is best left to last, but I may be wrong. The pear wood I am using for the keel sections is also significantly stronger than the wood provided, which may have played a role in keeping everything sturdy enough to leave the reinforcements to last. That's it for now. Does anyone have any advice on making my keel joints neater? Should there be tree nails in the keel? What can I do to improve what has been done so far? Are there any mistakes which I should be addressing at this point? TBE
.jpeg.c6f2332a69e0a230c9417b61c91d818e.jpeg)
.thumb.jpeg.96bdde5706bca0a23aca0ef470e359cb.jpeg)
.thumb.jpeg.a053be6f090ebf015e608275220bce87.jpeg)
.thumb.jpeg.e6951daf62f6c635383e1ac3451fecd3.jpeg)
.thumb.jpeg.e0b1520ae4da70a6305c6923e603ebcc.jpeg)
.jpeg.d621afd3c44a576c1f9a81dc9b01190d.jpeg)
.jpeg.cc3c3ae80f1b6b2d1a94d9f1743c5a68.jpeg)
.thumb.jpeg.e8397a596f04712d60cd380c58570c52.jpeg)
.thumb.jpeg.d148f4807f4034c84ec1ffcd04e95e07.jpeg)
.thumb.jpeg.4e37f798b55c88c574e38cc6dc1ac491.jpeg)

- 233 replies
-
- 3
-
-
- Model Shipways
- constitution
- (and 5 more)
-
Thank you Jon I think I made a bit of an error and forgot to mention that I meant the planking for the deck. It sounds like you are referring to the hull planking. Haiko
-
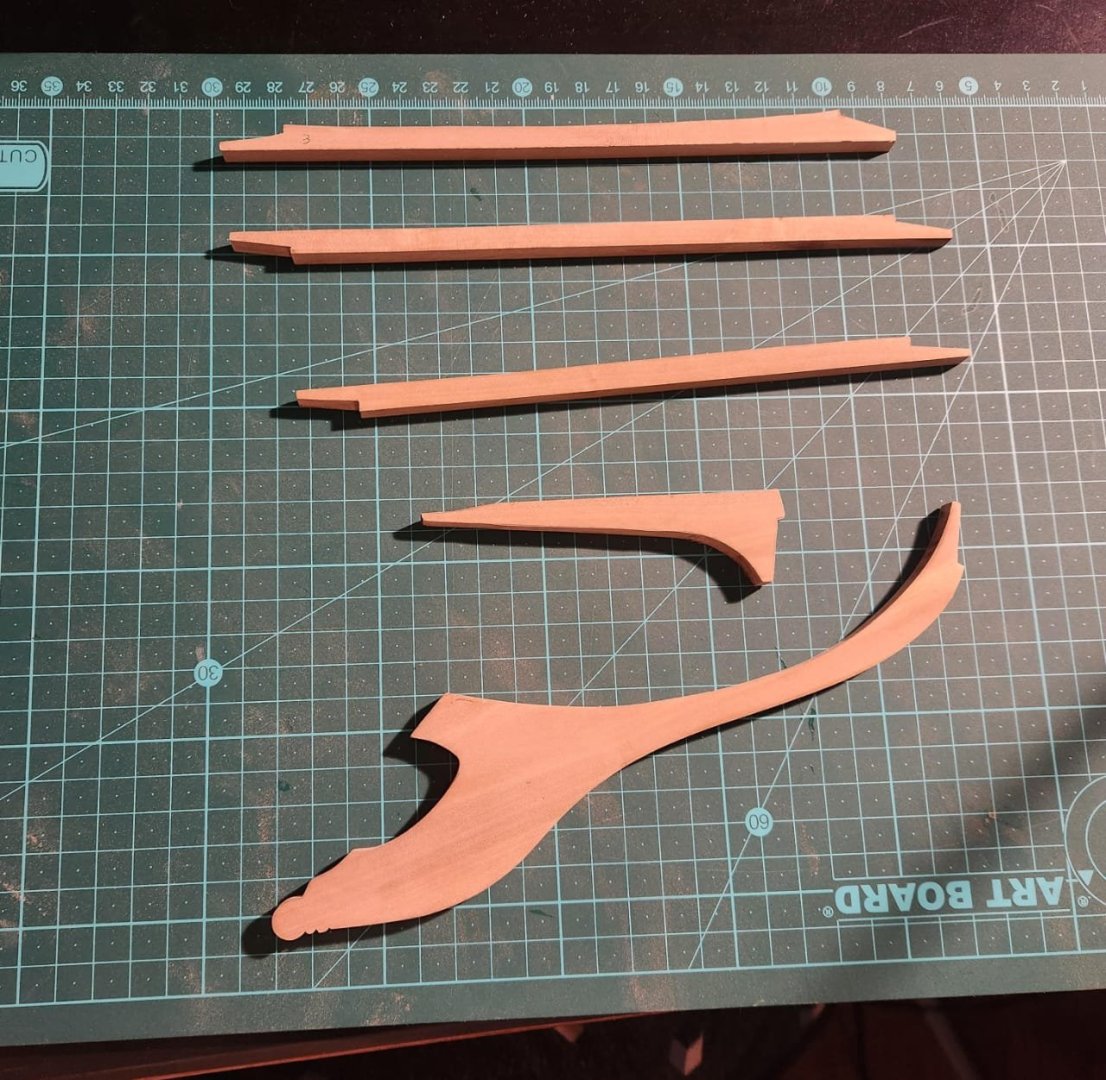
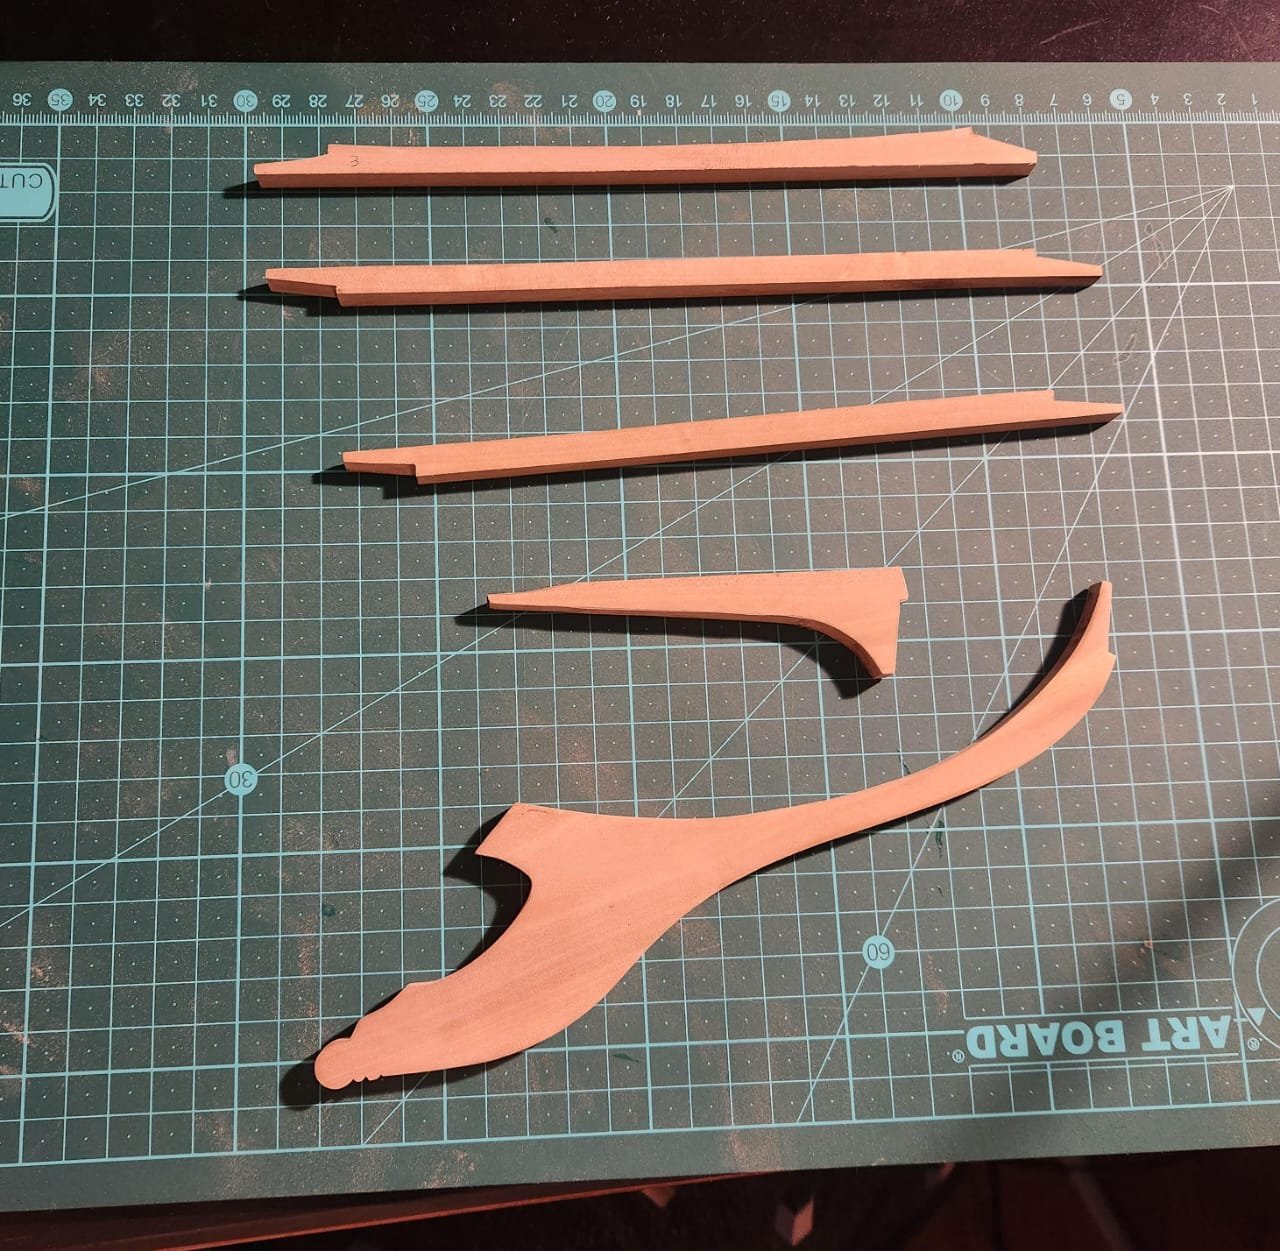
Not a terribly exciting or informative post today... I took a break from marking up the false keel as I needed to produce the hull planking to see what thickness I could consistently produce. I then churned out about 600 planks of 4.5mm x 1.5mm and will sand them back to their correct thickness as I need them. Because they are cut from raw trunks, there is a lot of wastage, so there will be a fair amount of culling happening. While I was in the "big" workshop, I also cut some pear wood planks of 6.7mm on the table saw and simply traced the outline of the provided keel components onto those planks, being sure to avoid any knots and major inconsistencies in the wood. I then cut close to the line with my 1970s delta Rockwell 14 inch bandsaw with a blunt bent blade and then sanded back to the line on the belt sander and with a Drexel. This has produced reasonable results and with a bit of tweaking one can get a nice neat fit on the false keel. I hope all this extra work pays off. It is not that obvious in the photos, but the pear really is a beautiful wood once it has been given a little bit of attention It is probably worth repeating the warning that the parts provided in my kit were very fragile and broke exceptionally easily. The kit I have is apparently at least 15 years old, which may have played a role in this fragility. These parts still obviously need cleaning up and fitting, but here are the rough cuts
- 233 replies
-
- 4
-
-

-
- Model Shipways
- constitution
- (and 5 more)
-
Thanks again for this information. I have been looking at the plans in your link, and they certainly are excellent food for thought. It is interesting to see the evolution of this vessel over her long history. Perhaps you can answer a question for me with your greater access to information. I have the original deck planking at 40ft by 7 inches length and width (thickness is not so relevant for me in this case. This scales to 2.3mm or 1/11" does that sound correct to you?
-
Hi Gregg! I am happy to have you tagging along, please keep an eye out for mistakes for me. I am also following these builds, I am truly amazed by the quality of the workmanship that exists on this forum. I hope you start your log soon, and we can struggle along together. Regards Haiko
- 233 replies
-
- 1
-
-
- Model Shipways
- constitution
- (and 5 more)
-
Hi Jon Firstly, thank you for your input. That set of drawings of the stem definitely help. I ended up making the stem from a single piece of pear wood, but I think I will cheat a bit and carve these divisions into the wood. The images of the constitution you reference on used to sail's log are absolutely beautiful, and this is exactly the style that I am aiming for. Achieving this is another story. I would really appreciate your offer of additional drawings, it would be amazing if you could send them my way. Thanks again Haiko
-
I hope it stays that way, without your build log I would be completely lost too!
-
In principle, I do agree entirely. My motivation for making the stem from scratch is that I am leaving the model unpainted, and a pear wood stem should be easier on the eyes than the basswood one provided. I also want to do it in sections to increase the chances that I can get the stem out of as uniform a piece of wood as possible, a challenging task with all the tiny knots in these trees. I am still talking a big game about doing this, but It may not happen. The pear wood I have is presenting some significant challenges due to the incredibly cold winters and very hot summers where these trees grew, creating a very uneven wood density across the grain and this is exaggerated by the fact that they were farmed to bear fruit and not produce timber, so there are plenty of knits to contend with....that being said please keep the opinions coming, I give them all serious consideration
- 233 replies
-
- 2
-
-
- Model Shipways
- constitution
- (and 5 more)
-
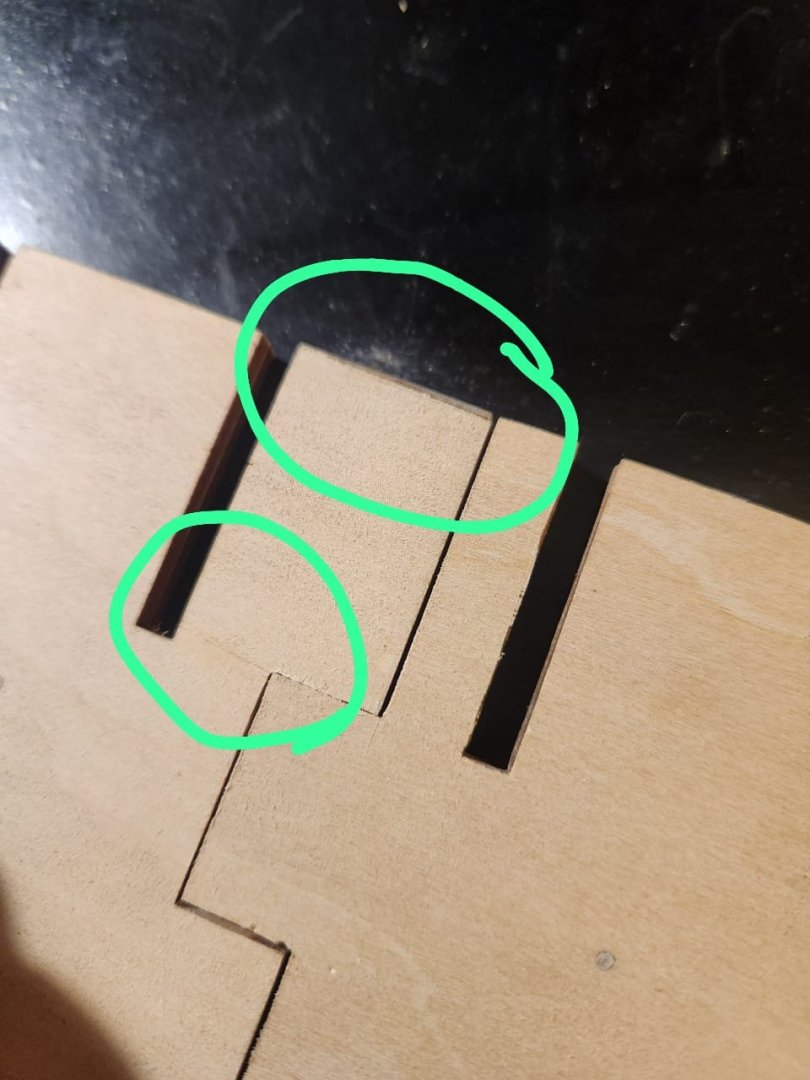
I have removed all clamps and sanded and scraped off all the excess glue and char. Nothing too notable about this process but it is worth mentioning that the wood provided in the kit is very delicate so it breaks easily and can easily be over sanded, especially at the edges, as a result I have had 2 glue back 2 broken sections indicated below as well as put in a bit of a filler strip where I had removed too much material during sanding. I have also simply photocopied the plans to transfer the bearding lines to the false keel, My intention is to do this using carbon paper, but I will still have to see if this actually works. If anyone has any tips or pointers at this point on how to go about double planking the hull, any help would be very welcome. When I transfer the bearding line I am working from the assumption that I will have to raise the bearding line by the thickness of the additional layer of planking that I will be adding....so far that is all that I have on the subject. The rest of the day was spent cutting more pear wood in preparation for milling. Hopefully I am not being over ambitious.\ On an unrelated note, I have been looking for plans for the keel stem so that I might make my replacement stem in pieces as it would have been made in reality. I found plans from 1929, but they are significantly different from the provided stem pieces that I cannot really make use of them. I am not sure if that is because the kit plans are incorrect or if the 1929 plans are just a modern version of the stem, but I am at a loss. If anyone has any suggestions or access to plans for a stem or era appropriate stem, I would jump at the opportunity.


- 233 replies
-
- 2
-
-
- Model Shipways
- constitution
- (and 5 more)
-
I have finally begun this build process in earnest. I began With opening up the box and going through all the parts, removing the small items from their packaging and transferring them to my small parts organizers. I make use of these units which have small sub boxes with individual lids, which I absolutely love. https://share.temu.com/vMlcL3WUfmA (Please let me know if this link breaks forum rules and I will remove it). Next was a quick stock take and parts inspection. It has been mentioned in other builds, but Utmost care must be taken when removing parts from their frames, I managed to break a keel section before it was even properly out of the box. I will spare you all another set of photo of the box contents, which consist of vast quantities of bass wood and a multitude of bits and pieces. For now, I have packed everything back in the box and just removed the 8 sheets which contain hull frame sections. I will begin by removing the central keel sections with an Exacto knife and number 11 surgical blade(I bought about a million of them for next to nothing, so I might as well use them). It is surprisingly hard to remove these sections without doing any damage. I intend to leave the hull unpainted and planked in a second layer of pear wood, so I will make the visible keel sections from scratch using the same. The keel sections below have been removed for use as templates for scratch making these parts (Hopefully) Moving on to doing the glue-up on the portions which won't be visible once the hull is planked. I am doing the glue-up with titebond original. Alignment was done by gently hammering a standard toothpick into the alignment holes of the sections and then sanding them flush (hot tip - you can save money by breaking the toothpick in half and using 1 toothpick for both holes ) I then placed the sections between 2 sheets of wax paper and pressing them between various boards that were floating around the kitchen. That is it for now while I wait for the glue to dry and figure out how to make the keel sections T.B.E. EDIT! I lifted the weights after an hour or so to clear any squeeze out with a scalpel before it completely dries... and noticed that the warping of the bass wood caused the seams to open on 2 of the pieces. I therefore forced some glue into these gaps and re clamped with office clips. The lesson here is so either be more aggressive with the weight on a flat press or go with clips from the beginning.
.thumb.jpeg.f2210f32313aeed04c90610fb5408aae.jpeg)
.thumb.jpeg.280d25fc0820983d4449d502ff11552e.jpeg)

.jpg.04516d753bcf6dd5c305d356b8b73a22.jpg)
.jpg.e494d46508ded2b9fe4aa10ded432f72.jpg)
- 233 replies
-
- 5
-
-
- Model Shipways
- constitution
- (and 5 more)
-
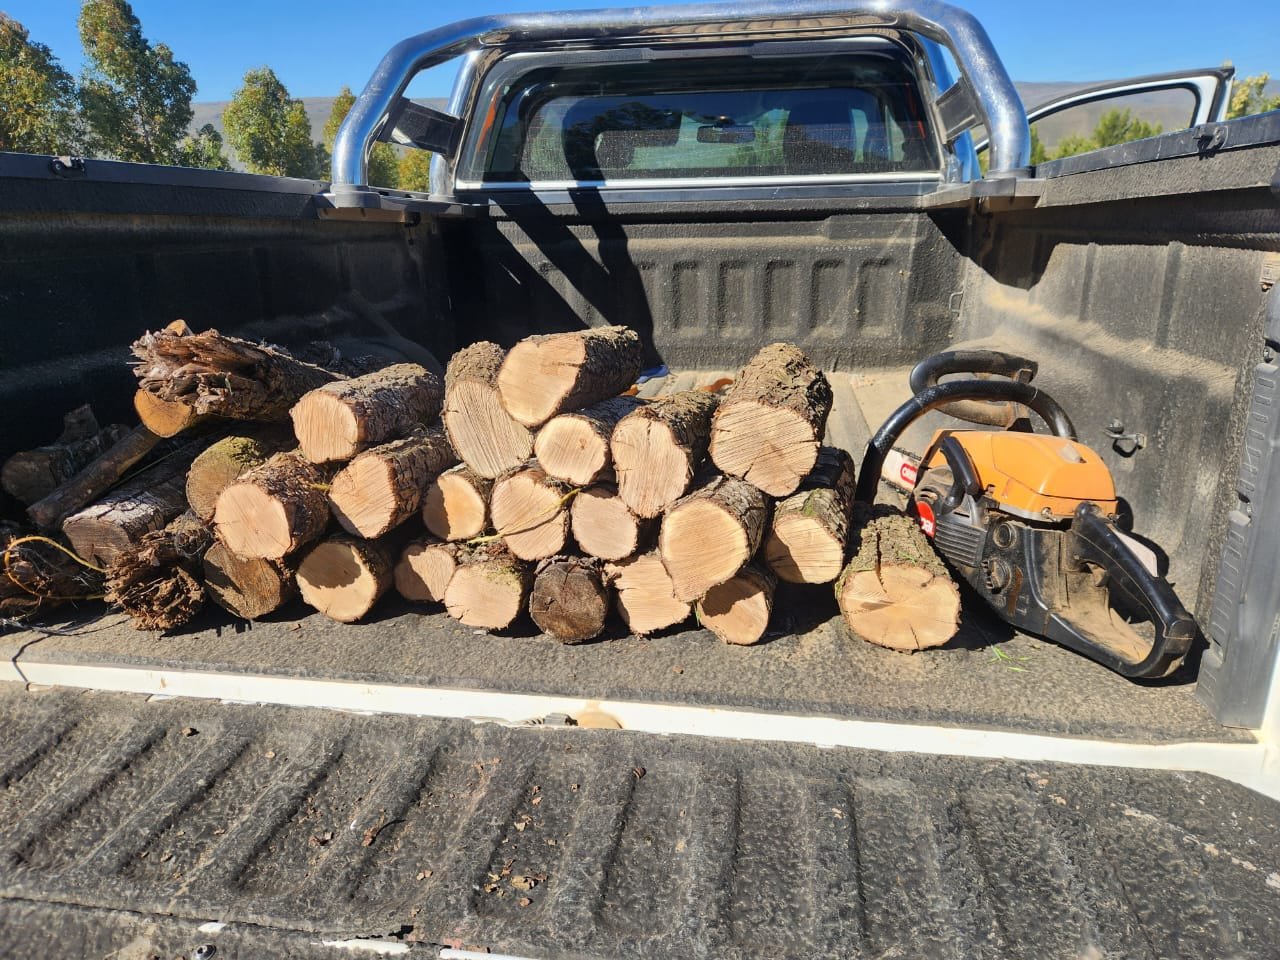
Hi again Herr Renter! I am actually doing the strips on a table saw believe it or not, it produces pretty good results, but I will certainly try and get them neatened up with a drum sander as you suggest. I have also only cut about 30% of the hull planking that I need, so I might attempt the next batch on the bandsaw. I'll be spending the morning in the woodpile with a chainsaw tomorrow, so I should have more wood to experiment on during the week if my schedule allows it. I decided to get started on the hull this evening so...here we go....
-
Thanks for the advice and welcome. I will definitely do exactly that, I think I will need as much time as possible to figure out how to get those planks as thin as I can.
.jpeg.e2236600f94f94124c675d979d8aac9a.jpeg)

.jpeg.7f6a521c7e461b75e08acae8e1d07ef2.jpeg)
.jpeg.bb3d6d268b497d5a5062db750a0b6e72.jpeg)
.jpeg.c48fb1686a3862d6c75766d41d710f56.jpeg)
.jpeg.4a88b22c8fcf95f664dd18c7cac2064f.jpeg)
.jpeg.b630621d33470d7f0e16d1cc9d4d4061.jpeg)
.jpeg.245bae70d743332f4db5c6b7ef82b147.jpeg)
.jpeg.c57476e6ca4e3ae4bbe45475d125dcb8.jpeg)


.jpeg.55f55939921126408f3afdd13703353a.jpeg)
.jpeg.fe2cf6d092295130b5b613be58778d2f.jpeg)