oneslim
-
Posts
202 -
Joined
-
Last visited
Content Type
Profiles
Forums
Gallery
Events
Everything posted by oneslim
-
I have been asked via a PM from Len about the use of Kodak 'Photo-Flo' and RIT dye for the coloring of line. I borrowed the idea from the online article by N. Roger Cole, Alert Provenence and Construction (www.craftsmanshipmuseum.com/Cole.htm), that Greg Herbert. linked to. Mr. Cole stated he obtained the colors of RIT from Walmart. My two local stores don't carry it in their sewing departments. I ordered the RIT colors from amazon along with the Kodak 'Photo-Flo', everything came from different vendors. It seems that RIT has changed some of their colors, I couldn't find gold, only a yellow gold. This is way too strong as yellow. So I tested the mix until I obtained a good match to the Hemp color of Coats and Clark Dual Purpose polyester thread. Here is the blend I came up with for running rigging: 2 teaspoons of Tan 1/8 teaspoon of pearl grey 1/8 teaspoon of golden yellow These are added to 16 ounces of hot water and mixed until dissolved. Mr. Cole's blend for standing rigging looks to be on the chocolate side, I haven't as yet tried to correct this. Here is His blend for standing rigging: 1/2 teaspoon of Cocoa Brown 3/4 teaspoon of Dark Brown 3/4 teaspoon of Black These are added to 16 ounces of hot water and mixed until dissolved. The Kodak 'Photo-Flo acts as a wetting agent. It comes in a 16oz. bottle. The directions call for 1 part of 'Photo-Flo' in 200 parts of warm water, I added half a capful to 16oz.of water, works just fine. I put a 20ft. hank of line in the 'Photo-Flo' solution and let it sink to the bottom for 5 min. Remove it, and while still dripping wet place it in the dye blend. It only takes about twenty for the dye to work. Remove it a place on paper toweling to drain and dry, which I leave over night. In a few days when I've done more rope making and testing I'll post some photos. Hope this Helps Bob W .
-
 OK Mark, But, how do I do a cut and paste to a new subject in the rigging topic? I can't even get a hyper-link to work. Bob W
 -
I have been asked via a PM from Len about the use of Kodak 'Photo-Flo' and RIT dye for the coloring of line. I borrowed the idea from the online article by N. Roger Cole, Alert Provenence and Construction (www.craftsmanshipmuseum.com/Cole.htm), that Greg Herbert. linked to. Mr. Cole stated he obtained the colors of RIT from Walmart. My two local stores don't carry it in their sewing departments. I ordered the RIT colors from amazon along with the Kodak 'Photo-Flo', everything came from different vendors. It seems that RIT has changed some of their colors, I couldn't find gold, only a yellow gold. This is way too strong as yellow. So I tested the mix until I obtained a good match to the Hemp color of Coats and Clark Dual Purpose polyester thread. Here is the blend I came up with for running rigging: 2 teaspoons of Tan 1/8 teaspoon of pearl grey 1/8 teaspoon of golden yellow These are added to 16 ounces of hot water and mixed until dissolved. Mr. Cole's blend for standing rigging looks to be on the chocolate side, I haven't as yet tried to correct this. Here is His blend for standing rigging: 1/2 teaspoon of Cocoa Brown 3/4 teaspoon of Dark Brown 3/4 teaspoon of Black These are added to 16 ounces of hot water and mixed until dissolved. The Kodak 'Photo-Flo acts as a wetting agent. It comes in a 16oz. bottle. The directions call for 1 part of 'Photo-Flo' in 200 parts of warm water, I added half a capful to 16oz.of water, works just fine. I put a 20ft. hank of line in the 'Photo-Flo' solution and let it sink to the bottom for 5 min. Remove it, and while still dripping wet place it in the dye blend. It only takes about twenty for the dye to work. Remove it a place on paper toweling to drain and dry, which I leave over night. In a few days when I've done more rope making and testing I'll post some photos. Hope this Helps Bob W
- 26 replies
-
- 2
-

-
- Ropewalk
- Linen Thread
- (and 1 more)
-
Part 5 Thread Most sewing thread is 'Z' twist or to the right. To make rope it first must be spun with a 'S' twist or to the left, and then spun again with a 'Z' twist to the right. I've found that thread for lacemaking is mostly of a 'S', twist because lace made from 'Z' twist will curl. One can purchase lacemaking thread in Linen, Cotton, or Silk. I have tried Linen and have not had much success because it still has clumps even in 120/2 size. Also, I used some 'IRISH' Linen that I obtained off of eBay many years ago (5,000 yard cone). My guess is that it's 160/2, but it too has clumps. The Egyptian Cotton is very fine with some fuzz, and can be had as small as 240/2. A larger number is smaller in diameter, the second number are the plies. I have tried 100/2, 140/2, and 170/2, they all worked very well. I'm waiting on some 36/2,60/2, and 80/2, just to see how they sin up. If it is listed as 'gassed' it means that it has been passed through a gas flame to remove fuzz. The only drawback is that it only comes in white or maybe ecru. Which means that it will need dying. Using 'RIT' brand dye I tested a few ropes to see just how it works. One must use Kodak 'Photo-Flo' as a pre-soak to wetting agent on the thread. The dying is not a problem. I buy the lacemaking thread from; www.finethreads-vermontlace.com/thread.html Also from; www.vansciverbobbinlace.com./2Threads.html Summary Overall I couldn't be more pleas with Alexey's Ropewalk. It works as advertised, and is simple to operate, with excellent service. The only reason I modified the machine is to add features I needed. With full bobbins of 100/2 thread it may run for over an hour hands free. Once the spinning is set the only adjustment is to reduce the take-up speed as the spool fills and forms a larger diameter. Thank You Alexey for a great machine.
- 26 replies
-
- 3
-
-
- Ropewalk
- Linen Thread
- (and 1 more)
-
Michael, You are correct! I did not count the gear teeth or do anything fancy. The whorl was viewed from the top with a mark on one of the felt spacers that center the bobbins on the whorl shaft. All I did was rotate the disc by hand and watch the mark while checking the direction of twist. MY BAD, the mark does move from the outside of the solar disc at the top to the outside of the solar disc at the bottom of the rotation and back to the outside as it returns to the top. The whorl is making two turns for each rotation of the solar disc. The twist is tightened as the thread moves to the guide bar. So if one is applying the wrong twist to the thread it actually un-winds as it moves to the guide bar. To check the movement of the line I just marked it with a sharpie and counted the turns of the solar disc it took to move from the bobbin to the guide. Thanks for picking that up. Bob Wescott
- 26 replies
-
- 1
-
-
- Ropewalk
- Linen Thread
- (and 1 more)
-
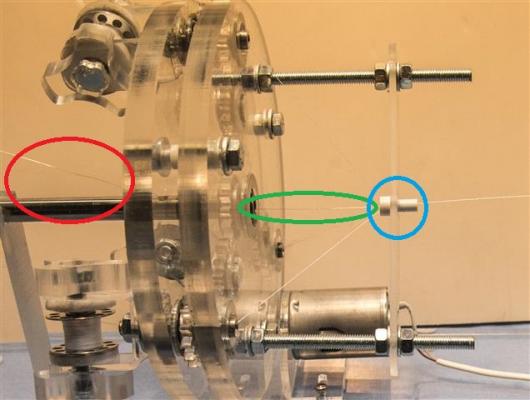
Part 4 Here is a close up shot of spinning wire-cored rope. The thread is 140/2 Egyptian Cotton which come out as 0.008 rope. Shown in the red circle is the wire going into the shaft, while the green circle is the wire exiting and passing into the guide button circled in blue with the thread wrapping around it. This wire is from Orvis, extra small (x sm), for fly tying. I plan on buying some small gauge wire to test this further.
- 26 replies
-
- 3
-
-
- Ropewalk
- Linen Thread
- (and 1 more)
-
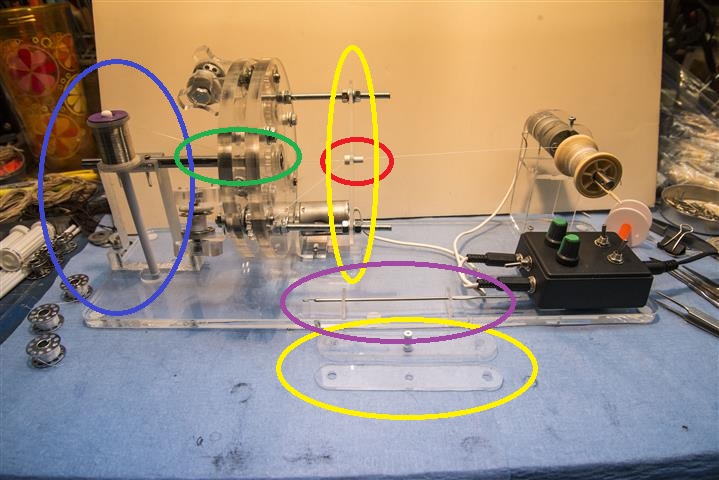
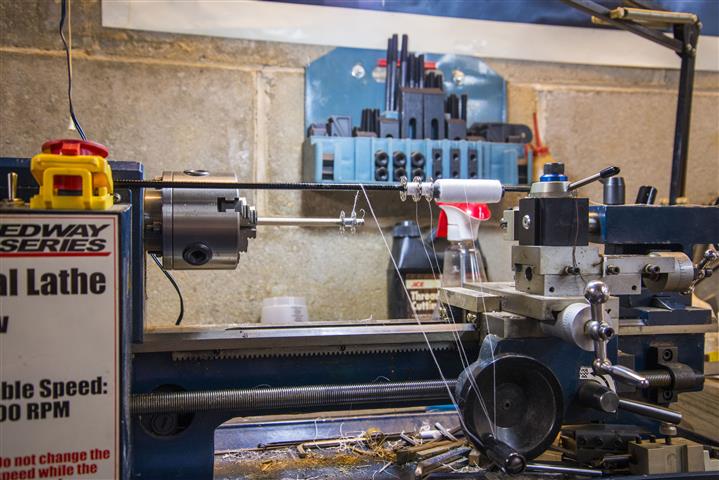
Part 3 This shot shows more of the mods I've made. I chucked the main shaft in the 9 X 14 mini lathe and bored a 3/32" hole in the length of the shaft about 3" deep. This was then met by a perpendicular 3/32" bore, circled in green, so it would be possible to feed a fourth thread without it spinning, or a small gauge wire for wire cored rope. Next is the spool holder, circled in blue, for mounting the spool of thread or wire. It's two 3/16" Plexiglas plates glued wit MEK substitute that support a 0.225" styrene rod. The yellow circled items are new guide bars. They are fitted with styrene buttons that I turned as winding guides. The feed side of these buttons have a 60° chamfer that helps in the winding. The red circled button has a bore of 0.046", the one on the bench has a bore of 0.081", and the one without a button has a 0.081 hole. These guide buttons really seem to keep the point of winding from jumping around. Last I made a simple holder for the included threading tool, circled in purple. this tool makes it a breeze to thread lines through the whorls. The photo also shows the take-up spool fixed in place with a couple of toothpicks.

- 26 replies
-
- 3
-
-
- Ropewalk
- Linen Thread
- (and 1 more)
-
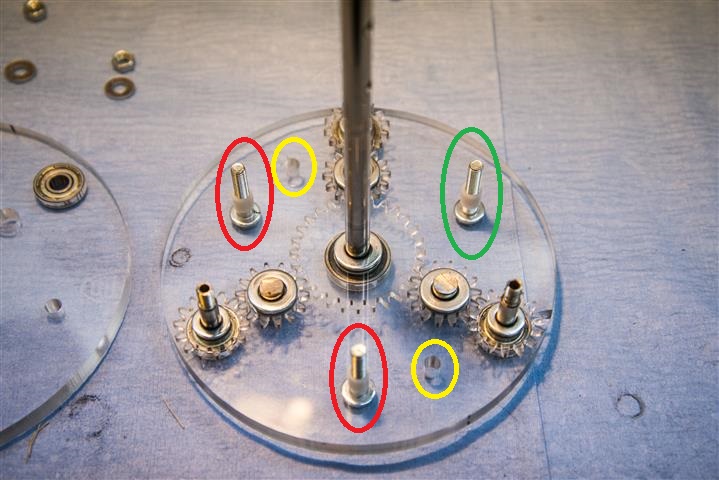
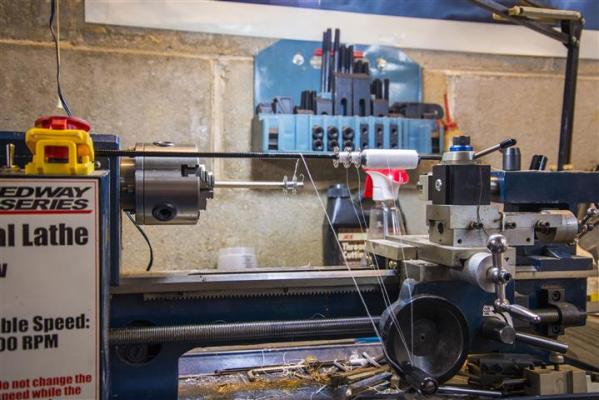
Part 2 This photo of the disc that faces the take-up spool, it shows one of the mods I did. I added two 4mm X 30mm bolts to even the clamping pressure on the discs. These are circled in red and have the original white plastic spacers installed. As supplied there is one bolt shown circled in green. The yellow circles indicate where the all-thread rods pass through the discs to support the guide bar, I made two spacers for these rods. The machine worked just fine, but there was a wobble of the discs. The disc were not parallel, and this annoyed me. The next photo shows my method for winding bobbins. A 1/4" dowel is chucked in my 9 X 14 mini lathe which I run in reverse. Bobbins are a press fit, if not a piece of thread is used to between the bobbin and dowel. The black rod is a length of Fiberglas from the scrape box. It just rests on the switch panel and the cross slide, and is free to pop off if the need arises. Also the dowel has a split cut into the end to secure the thread. Once started for a few turns I can run the speed up about 2000 RPM to fill the bobbin. I guide the winding with two fingers just before the black rod. The shows three threads being wound on one bobbin. The thread is 140/2 Egyptian Cotton for lace making.

- 26 replies
-
- 4
-
-
- Ropewalk
- Linen Thread
- (and 1 more)
-
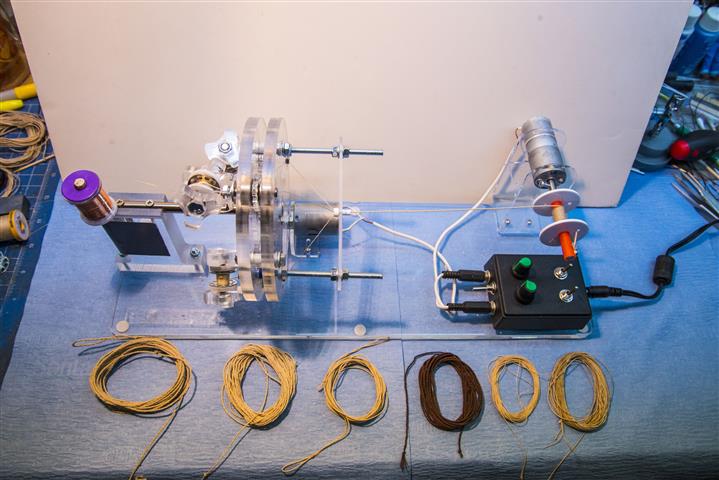
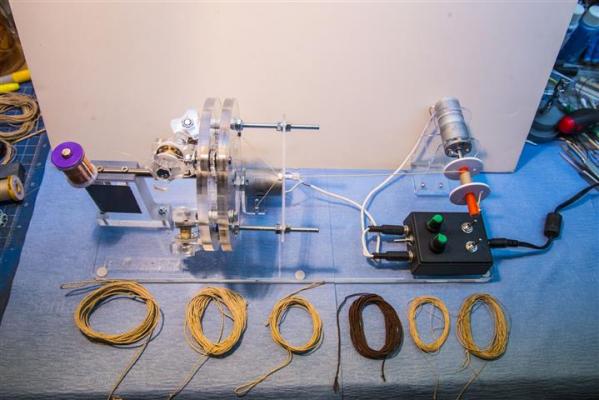
This is a mini review of Alexey Domanoff's Planetary Ropewalk. First, let me say I'm very pleased with the ropewalk and how well it works. I've made a few changes that suite my needs, more on them later. Mine took about a month to arrive from Belarus. Alexey said that normal shipping is seven to ten days, I think the X-mas holidays slowed it down. The machine comes in a flat pack and is to be assembled. I spent about an hour on the assembly of the machine, wanted to be sure not to mess it up. The machine consists of a base plate that is 15 1/2" long, 5" wide, and 5/16" thick, made of Plexiglas. A Plexiglas pedestal 1 1/2" long, 3/4" thick, and 3 1/2" high. The pedestal supports the main shaft which is fixed and is of steel 1/4" diameter by 5" long. Two 'Solar' discs 5 1/8" in diameter, and 5/16" thick are mounted to the main shaft with ball bearing races. They trap the gears between them and are the heart of the machine. A 'Sun' gear is pre-pressed onto the main shaft and does not move. This 'Sun' gear has three 'Planet' gears that mesh with it. They act as idler gears that then mesh with the 'Moon' gears. The 'Moon' gears are pressed onto the hollow whorl shafts that support the bobbin holders. The whorls rotate twice in the direction of twist for each rotation of the 'Solar' discs. Depending on thread size and the speed of the take-up spool, the thread moves from the bobbins to the guide bar in about ten rotations. Two all-thread rods, 4mm X 10cm pass through both "Solar' discs and support the guide bar which is made of 3/4" wide, 4" long, and 3/16" thick Plexiglas. A 12v variable speed motor with a rubber drive button spins the discs via contact with the outside diameter. The take-up is by a 12v variable speed motor with a gear reduction head, Both motors are independently controlled. A steel shaft is fitted to the take-up motor shaft, on which a take-up spool slides, and is fixed with a set screw. The control box has a main power on/off switch, an input for the wall mounted transformer, adjustable speed pots for each motor as well as a direction switch for each. The first photo is a overall view of the machine and a few samples of the early attempts of spinning thread into rope. these samples are of cotton and linen that was on hand. They started as "Z" or right twist. So they were spun into a "S" or left twist and wound onto bobbins to then be spun into a "Z" twist rope. Bob Wescott To Be Continued
- 26 replies
-
- 4
-
-
- Ropewalk
- Linen Thread
- (and 1 more)
-
Miniature Spindle Sander
oneslim replied to ChrisLBren's topic in Modeling tools and Workshop Equipment
ChrislBren, I have the Shop Fox from Amozon. Love it, the only downer is it is very loud. Also, You'll need a shop vac for the dust. The best thing is You can get free shipping from Amozon, everybody else wants more than $40 to ship. Bob W -
Echo by oneslim - cross-section
oneslim replied to oneslim's topic in - Build logs for subjects built 1751 - 1800
mtaylor, chuck, and Greg, Thanks for the best wishes. Maury, You are so right, if something is worng don't wait. It may not go away, or go down fast. Anja, thank You for the B'day wish. Bob W -
Echo by oneslim - cross-section
oneslim replied to oneslim's topic in - Build logs for subjects built 1751 - 1800
druxey, Jim L, Trussben, and Rusty, Thanks for the kind words. I do have four frames 'Raised', along with three fillings. Hope to have a few photos up by next week, when I can move around more. Bob W -
Echo by oneslim - cross-section
oneslim replied to oneslim's topic in - Build logs for subjects built 1751 - 1800
Well,,,, I've been offline since the 17th. The good news is I survived the 'BIG ONE' . After a day working in the yard with 50lb. bags of sand I had masive chest pain that night. Went to the local hospital and was put on heprin in a flash. Had to waite for the blood chemistry to come back, It was A heart attack for sure. They transported me to Our Lady of Lourdes in Camden,NJ for an emergency cath. It showed a double blockage. They did the surgeury all day Friday. Was released today. SO,,,, nothing for the next four weeks have to take it real easy. I'm going to be slow in getting back to You for a while. Bob W -
Echo by jml1083 - cross-section
oneslim replied to jml1083's topic in - Build logs for subjects built 1751 - 1800
Jim, Looking real nice. Bob W -
Echo by oneslim - cross-section
oneslim replied to oneslim's topic in - Build logs for subjects built 1751 - 1800
Jim, I'm not sure what thinner to use. My bottle of rubber cement is by Best Test from Hobby Lobby. The label lists n-Heptane and Natural Rubber Latex. n-Heptane is a bad actor, (http://www.sciencelab.com/msds.php?msdsId=9924237). Have no idea where one might buy this solvent. Bob W -
Echo by oneslim - cross-section
oneslim replied to oneslim's topic in - Build logs for subjects built 1751 - 1800
Thanks Greg. Jim, glad You can use this info. BTW, I forgot to mention that to remove the small amount of residue from the tape, a Q-Tip wet with acetone brings it right off. Bob W -
Echo by oneslim - cross-section
oneslim replied to oneslim's topic in - Build logs for subjects built 1751 - 1800
42rocker and Trussben, Hope You find this useful. druxey, Thank You. Bob W -
Echo by oneslim - cross-section
oneslim replied to oneslim's topic in - Build logs for subjects built 1751 - 1800
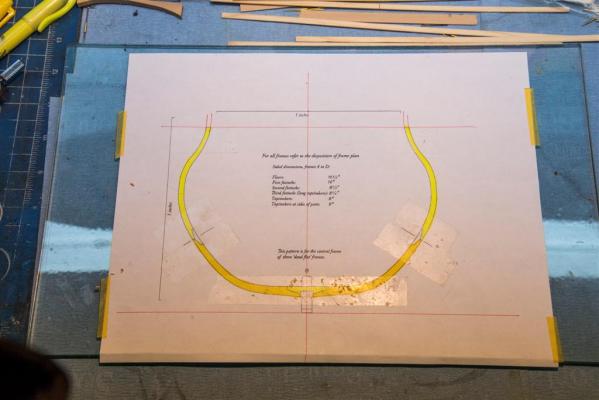
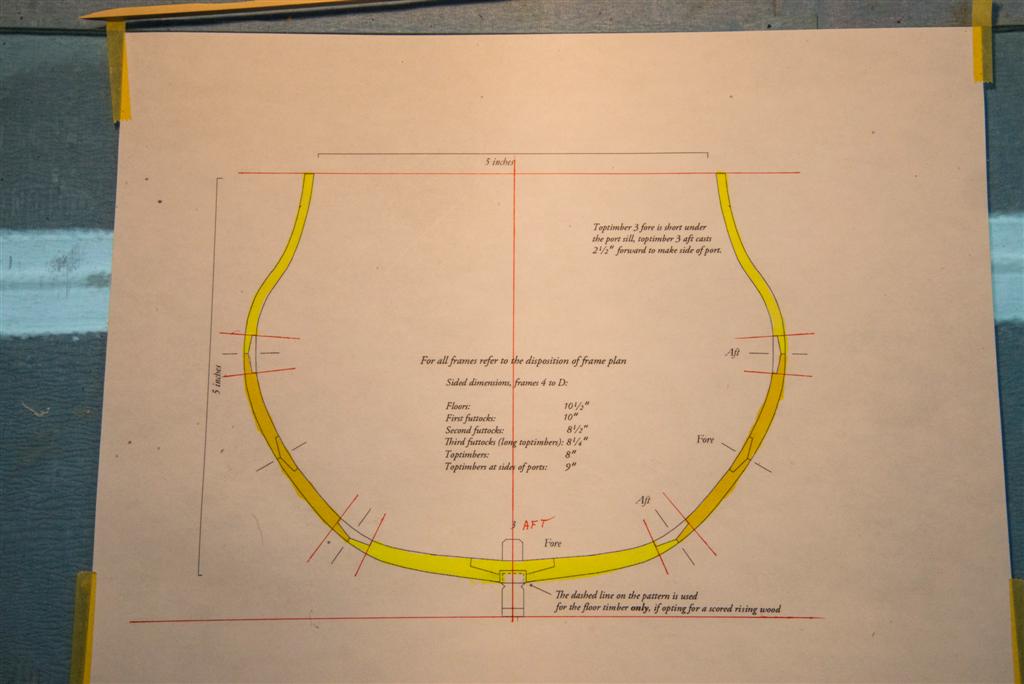
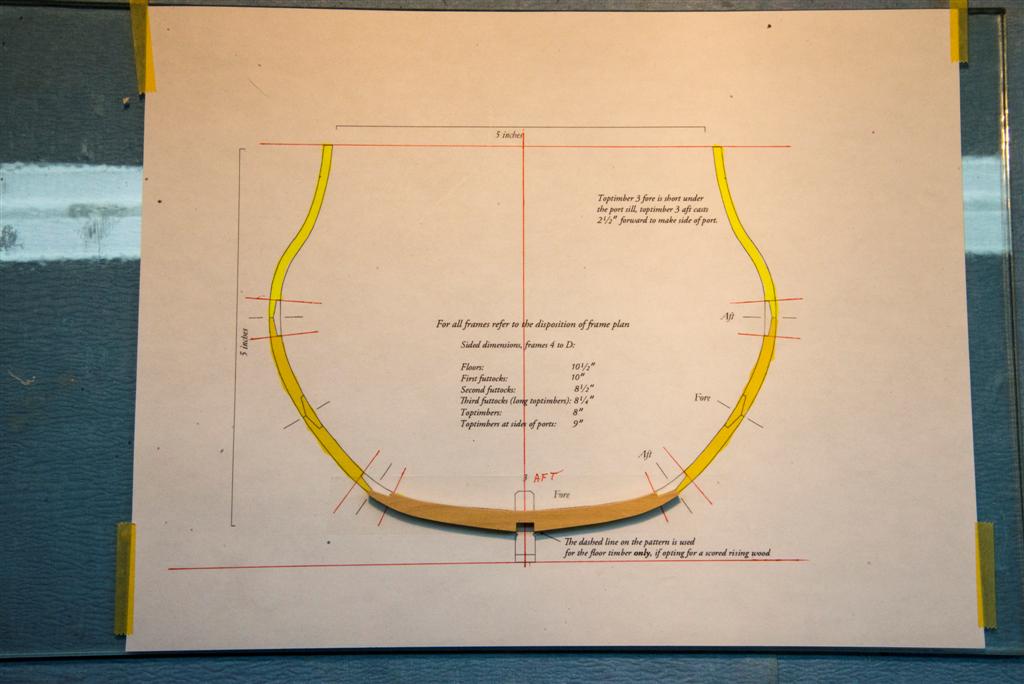
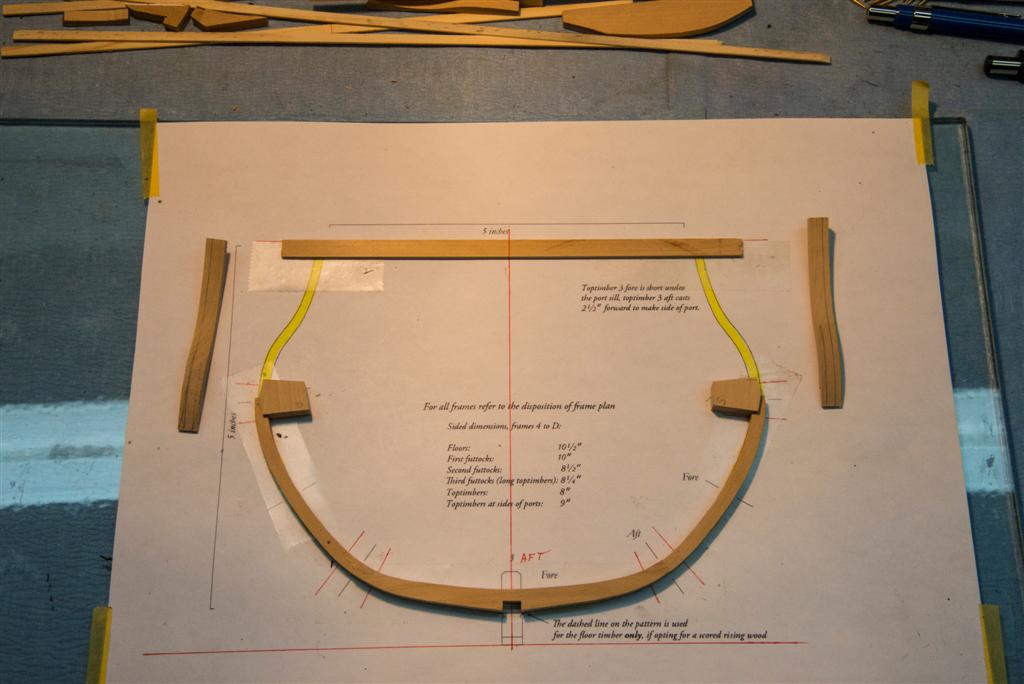
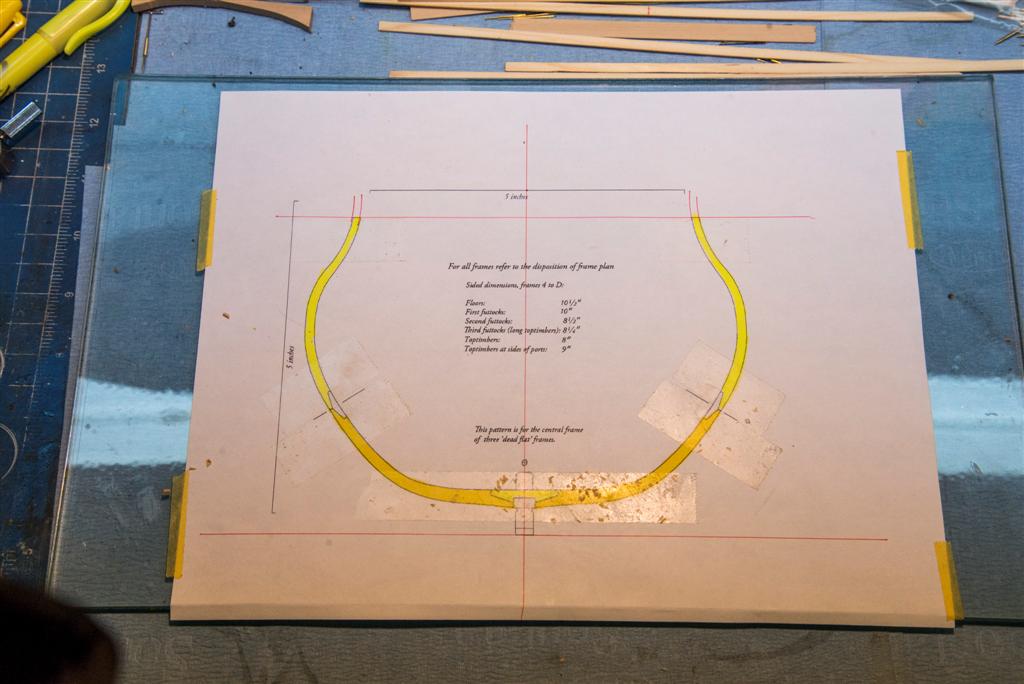
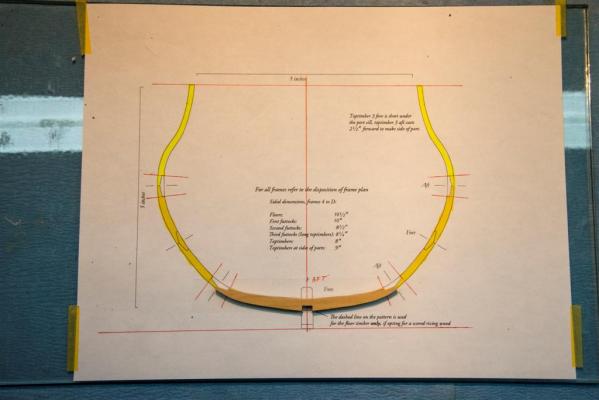
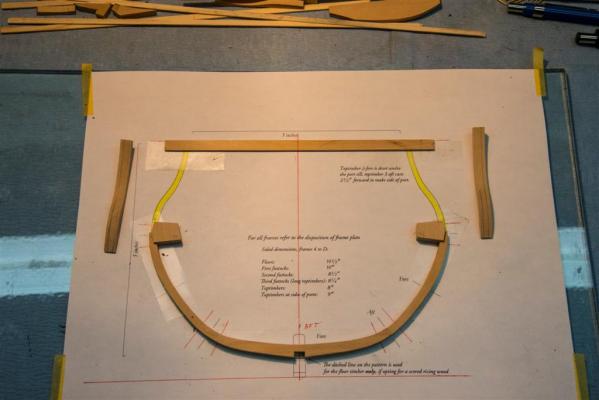
I though I'd show my system of frame building. Here is how I mark out the frame drawing. The red lines that cross the frames are the angles of the chock edges. these are used to mark the chock itself for fitting to the frame members. The red line across the top is to find the center of the frame. The frame parts are in yellow and gold to keep the fore and aft parts straight in my head. This shot shows the floor in place held by removable double sided tape. The tape allows me to remove the part so adjustments can be made for fitting. Also the tape can be removed and replaced without damage to the drawing if needed. The chock is first given a straight edge on the disc sander. It's fitted to the drawing and the angle of the end marked with a pencil that is lined up with the red lines. Then it's sanded for a tight fit to the floor. The second futtock is placed on the drawing with the use of spacers and the other end marked and sanded. The chock for the top timber is done in the same manner. This is frame 3 Aft so it has the foreward cast for the gun port. The cast is marked with a compass foreward and aft. The pattern is taped to the timber and excess trimed. Then to the oscillating sander where it is sanded to profile making sure to keep it square. Here is the finished frame. Bob W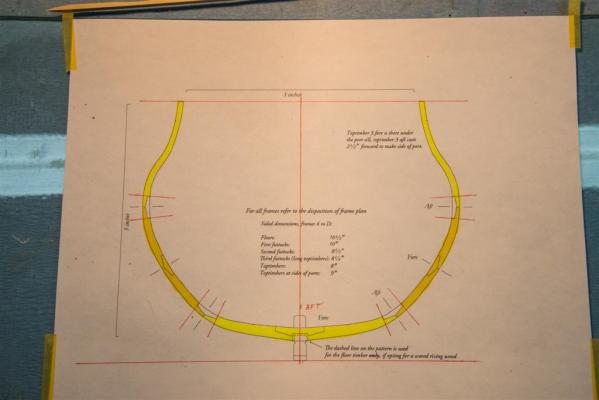


-
Echo by oneslim - cross-section
oneslim replied to oneslim's topic in - Build logs for subjects built 1751 - 1800
Greg, I was wondering if the floors were made solid with filling pieces like the Swan Class. Bob W -
Echo by oneslim - cross-section
oneslim replied to oneslim's topic in - Build logs for subjects built 1751 - 1800
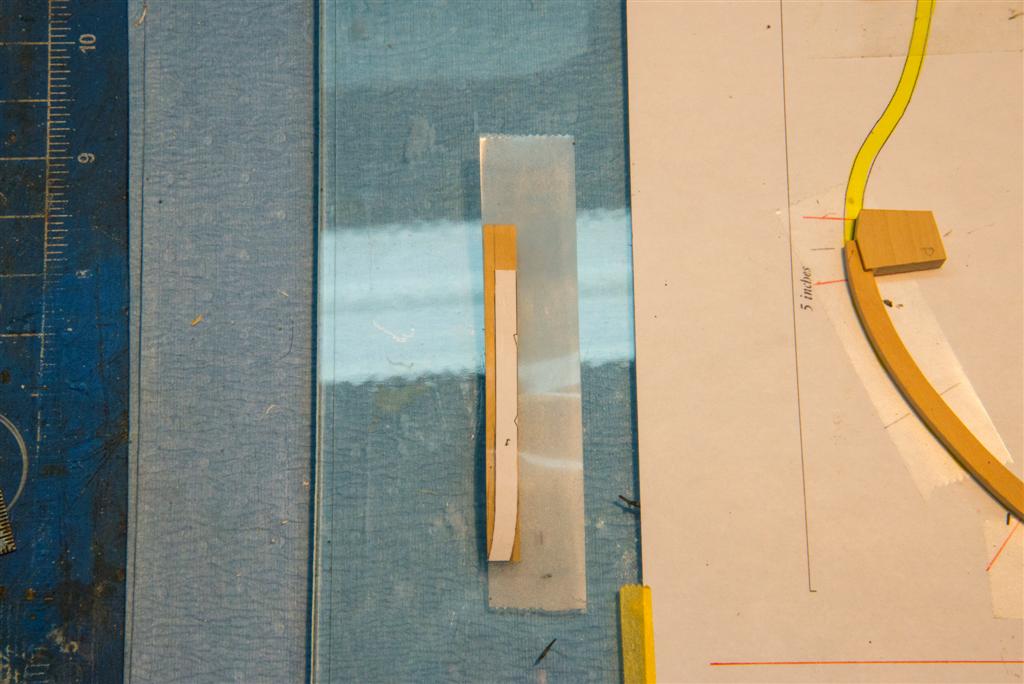
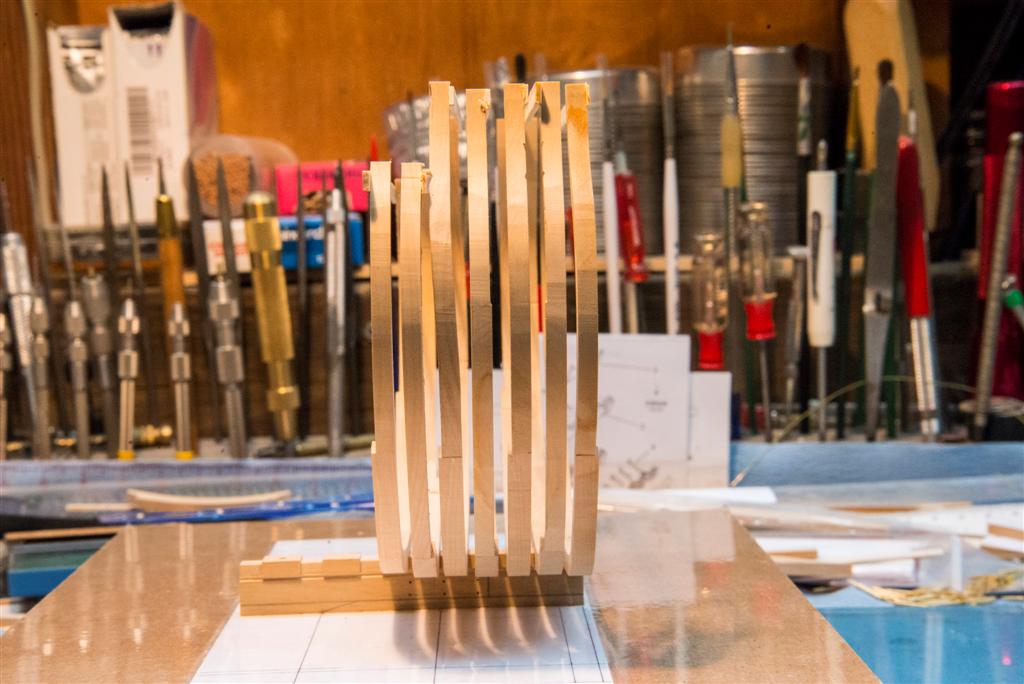
Update, Here are afew shots of current work. This is a block I made to hold a lead to mark the where the frames are to be cut for the ports. Profile of seven frames, not 'raised' as yet. End view. Bob W

-
Echo by jml1083 - cross-section
oneslim replied to jml1083's topic in - Build logs for subjects built 1751 - 1800
Jim, Very nice. Keep it up. Bob W -
Echo by oneslim - cross-section
oneslim replied to oneslim's topic in - Build logs for subjects built 1751 - 1800
Thanks Tarjack. Jim, be aware that it comes in yellow package two ways. Removeable and Permanent, I'm using the removeable. Bob W -
Echo by oneslim - cross-section
oneslim replied to oneslim's topic in - Build logs for subjects built 1751 - 1800
Thanks Ben, Iwill. Bob W -
Echo by oneslim - cross-section
oneslim replied to oneslim's topic in - Build logs for subjects built 1751 - 1800
druxey, No, give me a few weeks at least. Greg, It's a Shop Fox. Came with 5 spindles sizes from 3" to 1/2", I have the 2" mounted. Works great, just makes a lot of noise. Bob W -
Echo by oneslim - cross-section
oneslim replied to oneslim's topic in - Build logs for subjects built 1751 - 1800
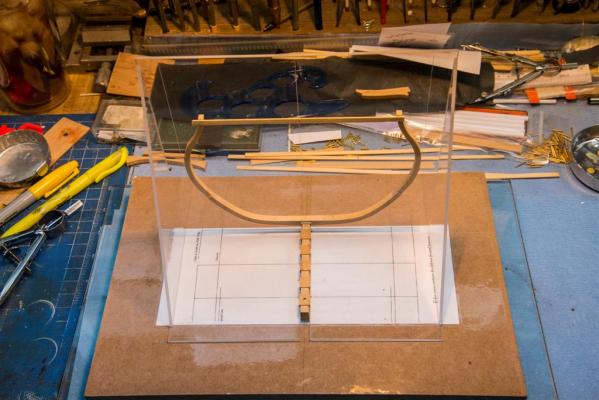
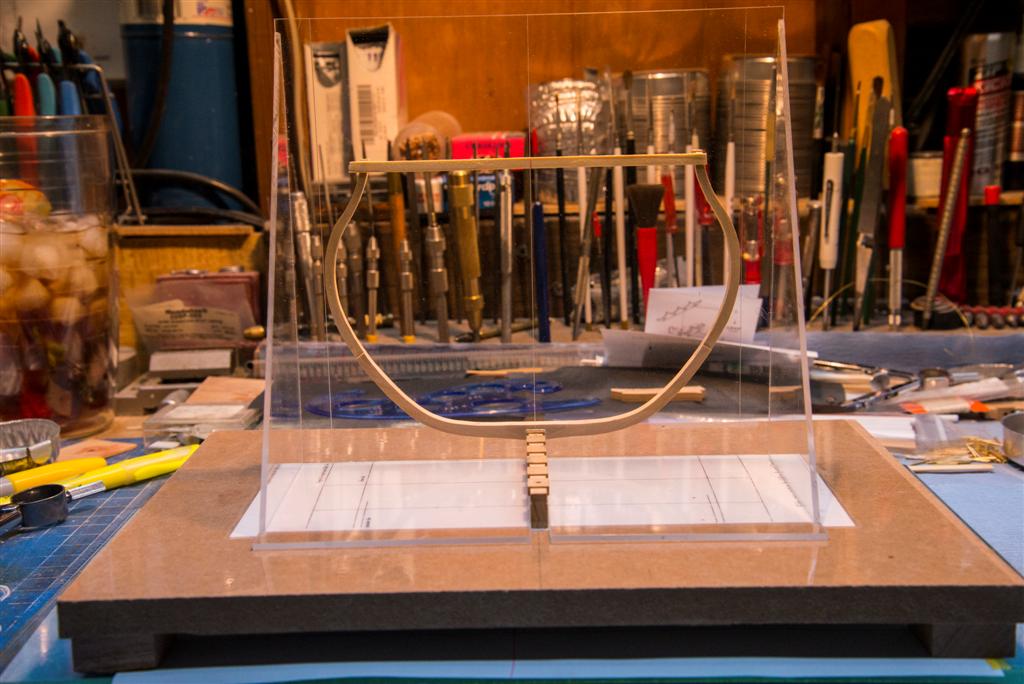
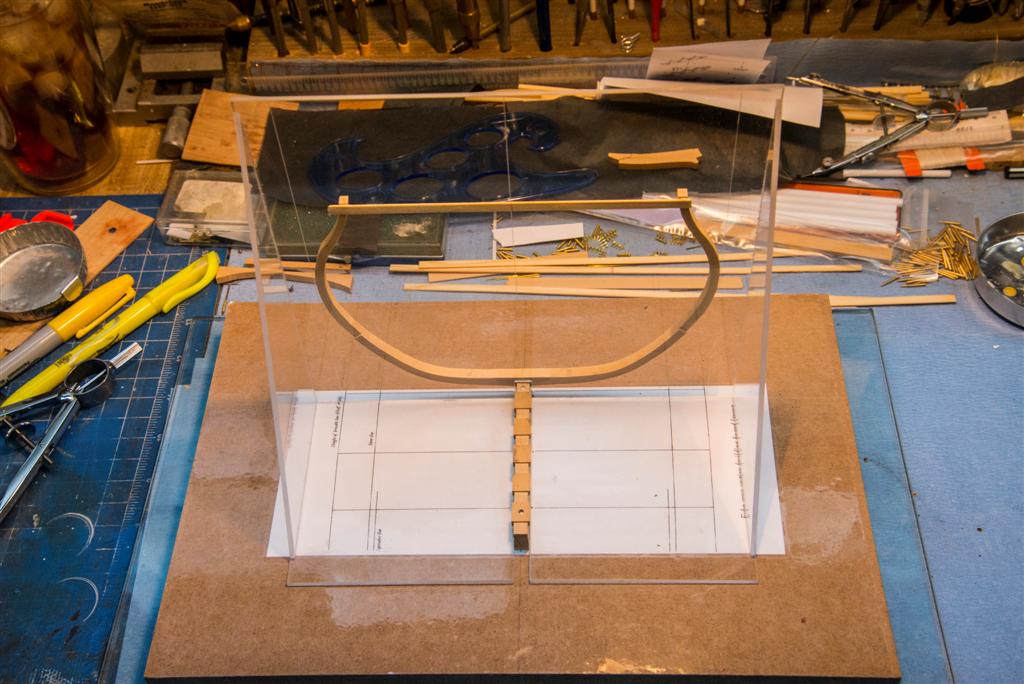
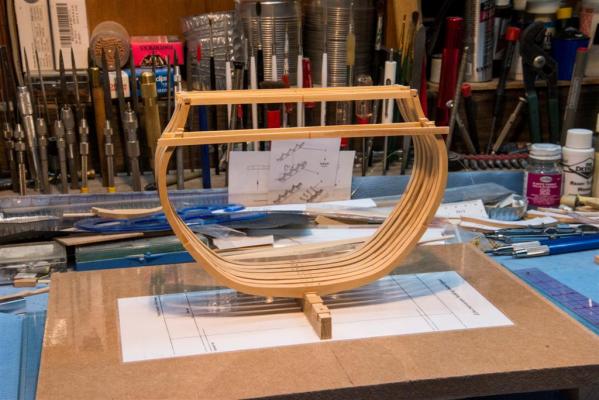
Made a new keel from the kit wood. This is the Mark II framing jig. 71/2" high, very snug fit to the keel. The only thing to watch for is that the temporary cross bar at the top of the frame must be a thickness that is equal to the offset of the frame thickness difference in the top timber. Here is the build board covered with a clear protective sheet. A shot of the layout sheet. mounted to the glass lapping plate from the sharpening pond. I've been using Scotch Brand double stick tape to keep the parts in place and for the pattern cut outs, no residue to clean up. Bob Wescott