

ZyXuz
-
Posts
429 -
Joined
-
Last visited
Reputation Activity
-

 ZyXuz got a reaction from john2013 in HMS Unicorn by ZyXuz - Corel - Scale 1:75
Some quick updates of recent works before Christmas.
Rudder & Deck Modification
Rudder
I've done the rudder together with its hinges over the weekends, and also the painting. The rudder was done by using three 5mm x 5mm walnut strips, and tapper the last one to get into shape.
Then, I continued to the hinges.
Due to my silly mistake on the hull planking, I had to widen the hinges so that they can fit to the hull. Pictures below show the thicker hull compared to the rudder, not so noticeable from both sides; but from behind, it's really obvious.
Here you can see the mistake of the planking... the sunken keel
Deck Modification
For the deck, I've decided to remove the gangways at the waist area. I also had some times to put some planking on, and cut the skylight portion off. Anyway, I've a little bit concern on the ladder position of the quarter deck.. My current plan is to locate the ladders facing towards bow direction and end between 2 guns, but I can't find any ship has similar design. Or should I make a jog plank like the HMS Pegasus (or Ian's modification)?? Hope anyone can help
As previously mentioned, the bow of ship as shown on the box is different from the instruction. There are two gun port lids instead of just the ladder. I'm following the box's version and this is how she looks like now
This should be the last update of this year and since I'm going off for a short vacation in Thailand again tomorrow (actually in few more hours ).. so, wish you all have a Merry Christmas in advance!!
-
 ZyXuz got a reaction from Foultide in HMS Unicorn by ZyXuz - Corel - Scale 1:75
Belfry Making
I've lost track of my updates since some photos of mine are missing... =.= So, I'll just upload part by part. Up till now, I've basically done the forecastle fittings including the catheads.
Anyway, this is how I make my belfry. I used the beech woods for the bits that came with the kit and 2mm x 5mm walnut strip for the rail. To produce the bits, I mill them with a reverse milling bit to create the head, and then cut them into half.
I really don't like the color of the beech wood, but since I'm gonna paint them any wood will do.
For the crown on the belfry, I cut the original one into 5mm width.
The rail..
For the headstock, I used the 6mm x 5mm walnut strip which is the same as the cat head, and sand it manually to the shape.
Well.. it was taller, because I forgot to add the width of the rail in.. So, I trimmed them down another 4mm.
And I added a copper piece on the head stock.
Install the bell and Done.
This is an older photo actually.. compared to my previous post, you can actually see I had added a one more strip at the concave area.
Thanks for viewing
-
 ZyXuz got a reaction from ken thomson in HM Colonial Cutter Mermaid by olliechristo - FINISHED - Modellers ShipYard -
well done on the ladder
-
 ZyXuz reacted to ianmajor in HMS Unicorn by ianmajor - Corel - Scale 1:75, 1748 to 1771
I glued my remaining sprocket wheel in to the starboard cistern. To secure the chain I (permanently) hooked lengths of wire in to the end links.
I also drilled two 4mm holes in the cluster base for the inboard pipes to fit. The outboard pipes will simply sit on the deck surface.
The wires were then fed down in to the tubes drawing the ends of the chain with them. To secure the wires I turned up two 2mm diameter bungs from bamboo, then drilled 0.5mm holes through their centres. These were threaded on to the wire from the bottom then pushed in to the bottom of the tubes. The bungs were glued to the tubes leaving the wire free for now.
The chain could then be adjusted and pulled taught by the wires then the wires secured by a drop of superglue. The wires could then be trimmed off.
This ensures the chain is secure at both ends. The bungs also line the chains up centrally within the tubes.
The photo shows this almost completed. The left hand wire is yet to be trimmed.
Next was a dry run in the waist area of the ship. The cisterns cleared all the surrounding items such as cannon rigging. Unfortunately I have drilled the two holes in the cluster base too close together. This results in the two cisterns being jammed together. Also the crank handles would be too far away from the uprights to which they should be attached. I will have to ease the two holes outwards by 1mm.
When I have rigged out the second pump I will make some rodings in the same way as the cannon caps.
I keep looking at the chain and thinking I could have made the links finer.
I have been giving more thought to the second mechanism and doing some reading on the subject.
One document that I consulted was a thesis by Thomas James Oertling called "The History and Development of Ships' Bilge Pumps, 1500-1840" which can be found here . Thomas Oertling has developed this further and published it in a book "Ships' Bilge Pumps - A History of Their Development, 1500 - 1900" ISBN 978-0-89096-722-5.
In his thesis he describes the Burr Pump in Chapter IV page 24, the Common (Elm Tree) Pump Chapter V page 32 and the Chain Pump Chapter VI page 73.
On page 77 he quotes Blankley (1750) who describes a cylinder of wood with "Y" shaped sprockets set in its periphery. The chain being made of circular, oval or "S" shaped links.
At this time the saucers were made of metal. Earlier they were made of wood and referred to as burrs.
On page 78 he quotes the London Magazine (1768) which refers to the new improved Cole/Bentinck design that has a spoked sprocket wheel with "cycle" type chain.
This suggests that the spoked sprocket type was introduced during the lifetime of Unicorn and that the original pumps would have been of the old type. Did Unicorn ever have the new type of pump? Who knows. Since Unicorn and Lyme could be regarded as experimental ships then perhaps it is feasible that towards its end Unicorn carried one of each type. So.....I think I will attempt to make one of the old type mechanisms.
One fly in the ointment - most of the info I have seen suggests the old type mechanism simply emptied directly on to the deck, then the water drained across the deck and out of the scuppers.However if I model one pump with and one without a cistern it is going to look odd. Needs more thought.
Still that will have to wait - a few pleasant distractions are coming up in the next few weeks - so no modeling and I will have little Web access which will stop my ramblings for now.
-
ZyXuz reacted to ianmajor in HMS Unicorn by ianmajor - Corel - Scale 1:75, 1748 to 1771
Hi folks,
Thank you for your words of encouragement and likes. All of you who have commented are modelers that I look up to on this forum.
Nenad, I hope I don't make you too breathless - I don't want you to stop breathing!
Grant, I am glad you enjoyed my ramblings - I hope you were not sent off to sleep by them.
JP, the lids are removable so that the detail can be seen. However I am wondering how practical it will be to remove/replace the lids when the rigging is in place. Well in my old model railway club I had the reputation of making details like working locomotive inside valve gear that was impossible to see once the boiler is fitted - so I am just continuing with my old lunacy!
John, thanks for looking in. I am looking forward to more developments on your Unicorn.
Piet, my metal work is put in the shade by that on your 0 19.
BE, as you say searching for "pinged" items always results in finding previously lost items. In this case it was bits for the quarter deck rail that I made some time ago. I love your replacement figures on your Pegasus. Before you did them the originals looked good but the new ones are a huge improvement.
Mike, I am expecting that you will improve on my chain pump efforts. Something to look forward to.
ZyXuz, good to hear from you again. Your Unicorn has come on in leaps and bounds. Not sure why the hull has started cracking. Perhaps someone with more experience then me could offer a view. I am sure you will sort it.
-
 ZyXuz got a reaction from IgorSky in HMS Unicorn by ianmajor - Corel - Scale 1:75, 1748 to 1771
Breathtaking Ian!! I must say the details of the chain is simply awesome!
and surprise... I'm BACK!!! lol
I was busying with my new job.. and recently, Chinese New Year..
I got my new job last September, but the bad side is that it's in Singapore.. so, I can't continue with my Unicorn anymore. She's now resting in shelf.
My plan is to work here for like 4-5 years for a better savings, and then only return to Malaysia. Hope everything goes smooth.
Seeing your works really 'turn me on' back on this hobby, haha.. now i'm considering making a smaller model here like a boat or sloop which use only minimum tools and take up lesser space. It's time to visit cornwallmodelboat again!!!
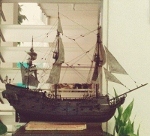
Anyway, just a pic of my unicorn before I put her in shelf. I did a quick + full time work on her before i got to Singapore. Hope you don't mind
You can see that hull started cracking...
Mike,
I also just learned that you started your Pegasus, nice work so far! The hull looks well after sanding
-
 ZyXuz got a reaction from Landlubber Mike in HMS Unicorn by ianmajor - Corel - Scale 1:75, 1748 to 1771
Breathtaking Ian!! I must say the details of the chain is simply awesome!
and surprise... I'm BACK!!! lol
I was busying with my new job.. and recently, Chinese New Year..
I got my new job last September, but the bad side is that it's in Singapore.. so, I can't continue with my Unicorn anymore. She's now resting in shelf.
My plan is to work here for like 4-5 years for a better savings, and then only return to Malaysia. Hope everything goes smooth.
Seeing your works really 'turn me on' back on this hobby, haha.. now i'm considering making a smaller model here like a boat or sloop which use only minimum tools and take up lesser space. It's time to visit cornwallmodelboat again!!!
Anyway, just a pic of my unicorn before I put her in shelf. I did a quick + full time work on her before i got to Singapore. Hope you don't mind
You can see that hull started cracking...
Mike,
I also just learned that you started your Pegasus, nice work so far! The hull looks well after sanding
-
 ZyXuz got a reaction from Piet in HMS Unicorn by ianmajor - Corel - Scale 1:75, 1748 to 1771
Breathtaking Ian!! I must say the details of the chain is simply awesome!
and surprise... I'm BACK!!! lol
I was busying with my new job.. and recently, Chinese New Year..
I got my new job last September, but the bad side is that it's in Singapore.. so, I can't continue with my Unicorn anymore. She's now resting in shelf.
My plan is to work here for like 4-5 years for a better savings, and then only return to Malaysia. Hope everything goes smooth.
Seeing your works really 'turn me on' back on this hobby, haha.. now i'm considering making a smaller model here like a boat or sloop which use only minimum tools and take up lesser space. It's time to visit cornwallmodelboat again!!!
Anyway, just a pic of my unicorn before I put her in shelf. I did a quick + full time work on her before i got to Singapore. Hope you don't mind
You can see that hull started cracking...
Mike,
I also just learned that you started your Pegasus, nice work so far! The hull looks well after sanding
-
 ZyXuz got a reaction from mtaylor in HMS Unicorn by ianmajor - Corel - Scale 1:75, 1748 to 1771
Breathtaking Ian!! I must say the details of the chain is simply awesome!
and surprise... I'm BACK!!! lol
I was busying with my new job.. and recently, Chinese New Year..
I got my new job last September, but the bad side is that it's in Singapore.. so, I can't continue with my Unicorn anymore. She's now resting in shelf.
My plan is to work here for like 4-5 years for a better savings, and then only return to Malaysia. Hope everything goes smooth.
Seeing your works really 'turn me on' back on this hobby, haha.. now i'm considering making a smaller model here like a boat or sloop which use only minimum tools and take up lesser space. It's time to visit cornwallmodelboat again!!!
Anyway, just a pic of my unicorn before I put her in shelf. I did a quick + full time work on her before i got to Singapore. Hope you don't mind
You can see that hull started cracking...
Mike,
I also just learned that you started your Pegasus, nice work so far! The hull looks well after sanding
-
 ZyXuz got a reaction from ianmajor in HMS Unicorn by ianmajor - Corel - Scale 1:75, 1748 to 1771
Breathtaking Ian!! I must say the details of the chain is simply awesome!
and surprise... I'm BACK!!! lol
I was busying with my new job.. and recently, Chinese New Year..
I got my new job last September, but the bad side is that it's in Singapore.. so, I can't continue with my Unicorn anymore. She's now resting in shelf.
My plan is to work here for like 4-5 years for a better savings, and then only return to Malaysia. Hope everything goes smooth.
Seeing your works really 'turn me on' back on this hobby, haha.. now i'm considering making a smaller model here like a boat or sloop which use only minimum tools and take up lesser space. It's time to visit cornwallmodelboat again!!!
Anyway, just a pic of my unicorn before I put her in shelf. I did a quick + full time work on her before i got to Singapore. Hope you don't mind
You can see that hull started cracking...
Mike,
I also just learned that you started your Pegasus, nice work so far! The hull looks well after sanding
-
ZyXuz reacted to Landlubber Mike in HMS Pegasus by Landlubber Mike - Amati/Victory Models - Scale 1:64
Thanks very much guys. Well, I was able to get outside to do most of the sanding on the starboard side. Thankfully temps hit 50 this afternoon, so I didn't need to wear mittens or glue sandpaper to my hands The starboard side came out pretty well, almost identically to the port side.
Still need some filler in a couple of areas and need to fix the gunport patterns at the jigsaw connection and bow, but I'm really happy with how the first planking went. I have to figure out the stern area with the stern counter, as well as the rabbets. But like Martin said, it's nice to see the actual shape of the hull take form.
-
 ZyXuz got a reaction from schnu in HMS Unicorn by ZyXuz - Corel - Scale 1:75
Cont'
For the head and foot, I used balsa block to shape them. I think there is certainly better wood for it, but balsa is the current wood material I have enough to build them.
Now, the head on the stern gallery is added. Again, to ease my work I removed the club shape on the head, and made it smooth instead.
By using leftover wood from the stern filler, I added them at the bottom. That little curve might help designing my gallery
And again, plank them all using 0.2mm x 4mm walnut strips which left from my Pearl.
Up till now, it's already a week.
When every piece is glue, it looks like this. Anyway, it's still not glued to the ship.
After painting...
Now it's time to add the white border line to the gallery. By using unused (due to modification) 2mm x 5mm walnut strip from the kit, I profiled a 'U' shape it like what we can see on the Trincomalee.
So, this is now the gallery looks like now.
I'm running out of extra wood strips and couldn't continue already. Anyway, I've just placed an order from CMB and it might take around 2 weeks to reach Malaysia. I also included some cast metal of Amati, which at least looks better than the Corel kit ones in the website. Let's hope for the best!
Whilst waiting, I'll continue on the bulwark planking and other fittings first.
Thanks for viewing!
-
 ZyXuz got a reaction from maddog33 in Royal Caroline by marsalv - FINISHED - Panart
awesome details!!! I can watch them all day!!
-
ZyXuz reacted to Landlubber Mike in HMS Lyme (1748-1760) by Landlubber Mike - bash of Corel Unicorn - Scale 1:75 (CLOSED TO START SCRATCH BUILD)
I've made a little more progress. I sanded in a bearding line, and chiseled out the rabbet by building off the rebate from adding the thin piece of strip wood along the outside of the keel former. I also glued on the keel pieces, and constructed the gripe (lower left part of the stem area) and the stern post (not glued yet).
Ian and John, you can see how adding the stern post and pushing out the angle of the fore side of the stern post seems to help align the stern area a little better for consistency with Chapman.
In Chapman's plans, the stem extends above deck level to serve as a post for the bowsprit to sit on top of. I went ahead and did that, as well as drill a hole into bulkhead 1 and sand the corner of the keel just in front of bulkhead 1 so that I can run the bowspirit through the bulkhead. Two reasons for this - first, I think the joinery of the bowsprit will look a lot better than trying to shape the end of the bowspirit to sit flush against the deck and bulkhead in the beakhead area as the kit instructs. Second, with three points of contact (the stem, the bulkhead, and the deck/keel just behind the bulkhead, I hopefully will have an easier time aligning the bulkhead properly For what it's worth, I think the bowsprit was at about a 28 degree angle from the bottom of the keel.
I spent a little time tonight plotting out the remaining items of the bow area. I think the figurehead sits a bit too low, so I'm planning to raise the figurehead a bit so that it is sitting closer to the bowsprit. All this is easier said than done, particularly since I'm planning to add rails more like Chapman's plans, and I'm not sure yet whether I will use the cast bronze figurehead, or possibly construct my own. I'm thinking that I will build the remaining six or so pieces, but not install the piece the figurehead sits on - that I can easily add later, with the advantage of customizing it off the ship to fit the figurehead.
Thanks for looking in!
-
 ZyXuz got a reaction from ollyweb in HMS Unicorn by ZyXuz - Corel - Scale 1:75
Belfry Making
I've lost track of my updates since some photos of mine are missing... =.= So, I'll just upload part by part. Up till now, I've basically done the forecastle fittings including the catheads.
Anyway, this is how I make my belfry. I used the beech woods for the bits that came with the kit and 2mm x 5mm walnut strip for the rail. To produce the bits, I mill them with a reverse milling bit to create the head, and then cut them into half.
I really don't like the color of the beech wood, but since I'm gonna paint them any wood will do.
For the crown on the belfry, I cut the original one into 5mm width.
The rail..
For the headstock, I used the 6mm x 5mm walnut strip which is the same as the cat head, and sand it manually to the shape.
Well.. it was taller, because I forgot to add the width of the rail in.. So, I trimmed them down another 4mm.
And I added a copper piece on the head stock.
Install the bell and Done.
This is an older photo actually.. compared to my previous post, you can actually see I had added a one more strip at the concave area.
Thanks for viewing
-
ZyXuz reacted to ianmajor in HMS Unicorn by ianmajor - Corel - Scale 1:75, 1748 to 1771
Moving on from cross-eyed cannon I am trying to improve certain parts of the 30+ year old hull before fitting any of the less ocularly challenged barrels.
First up was the steps either side of the waist and in the heads area. Corel supply "L" shaped beech strip to make these. I used them as supplied but they were rather heavy in appearance. I would rather have replaced them with something neater. However, since they have been in place a long time my concern was that any exposed planking would look considerably lighter than the adjacent parts that have had long term exposure to the elements.
So I used a chisel and files to carve them back and to round all the edges except the tops of the treads. The photo is a before (left) and after (right) montage.
I gave the steps behind the heads the same treatment. The lowest of these steps I cut a recess to take the bowsprit.
In one of my discussions with Mike he pointed out the the Corel plan has two sets of gammoning. Lees says that most ships only had one set, the exception being the largest. I had already made provision for the two sets so the rear of the two holes I covered with extra grating. The second hole in the keel part will stay open - hopefully no-one will notice it.
The next photo shews the trimmed steps and the extra grating fitted. It also has a couple of arches on the cutting mat waiting to go on to the gallery.........
I would love to replace the transom and galleries with something nearer the mark but this would involve major surgery. So I am going to content myself with cosmetic improvements.
The galleries being too narrow and positioned incorrectly result in the top and bottom castings being too big giving large overhangs. I trimmed the castings back which loses some of the detail. The sides of the galleries look drab anyway.
So I looked around the various galleries produced by the likes of Chuck, Dan Vadas, Remco, BE and others to get some ideas. I decided on arches over the lights/windows and columns between them. The missing detail on the top casting was replaced by some Coral decorative strip which is made of hard brass. I have a small amount of filling to do and the castings need to be painted.
Getting the shapes of the arches over the windows correct is interesting. They are a skewed elipses. To copy these I use a soft pencil on thin paper to do a sort of brass rubbing. From this I can cut out a template from the paper to use on the wood.
The next photo is another before (left) and after (right) montage. Of note is the colour of the new sill under the lights/windows and the colour of the wood between the ebony. These are both lime strip supplied with the kit. The strip between the ebony had had 4 decades of exposure the other sat in the Corel kit box for that period of time.
I am intending to do something around the rear lights/windows.
I toyed with the idea of carving new figures for the transom but I don't have any suitable wood, or skills for this. I opted on trying to improve the Corel supplied casting. This is a fairly large, guilded white metal job. It looks crude because it is so thick - 2mm or so. The detail is within the outer 1mm of this depth. To give it rigidity the individual figures have thick webbing between them.
So I prized the casting off the transom and clamped it to the milling table face down with thick card under it to protect the detail. Then I milled off about 1mm of its depth. The indication of when I had gone far enough was the webbing starting to drop out. The rest of the webbing was then easily removed. Again another before (upper) and after (lower) montage.
Now to attempt the production of matching arches for the rear lights.
-
ZyXuz reacted to Landlubber Mike in HMS Lyme (1748-1760) by Landlubber Mike - bash of Corel Unicorn - Scale 1:75 (CLOSED TO START SCRATCH BUILD)
Hi folks, a bit of radio silence over the last week and a half, but I have been busy. I cut the pieces for the keel, false keel, stern post and stem out of swiss pear from Hobbymill. I've been using Jim's table saw and my Dewalt scroll saw to cut pieces out, and Jim's disc sander to shape and finish pieces, along with a sanding band on my Dremel for finishing inside curves. So far, all my appendages are intact From there, it's a lot of hand work with sanding blocks and needle files to work out the joints. The scarph joint for the two stem pieces in particular took me forever (as well as a couple of attempts) to try and get a halfway decent result. As with almost everything, making these pieces was a lot harder than it looks I also used Jim's thickness sander to slim down the keel, as the plywood I used was about 5.75mm in thickness, whereas the kit pieces and the pear I'm working with are 5mm. Jim's tools have been a real pleasure to work with. In particular I am in love with his disc sander, as I never could seem to sand straight lines by hand.
The pieces aren't fully finished yet, but are reasonably close. Before I glue the pieces to the keel, I am going to finish the rabbet joint and sand along the bearding line (which, I'll need to guess at as the kit instructions did not seem to include one). I'll glue the stern post after the second planking, just to ensure a smooth joint. I have to say that working with Jeff's pear really is a fantastic experience. It machines and sands very well, and is world's better at holding an edge over the walnut in the kit wood that I had with my Badger.
The upper stem piece looks like a lollipop at the moment, as I wanted to leave a little extra material to finish it. From what I can tell from the Chapman plans and other similar vessels, the stem rose above the beakhead area to support the bowspirit. It looks like the bowspirit was at a 25 degree angle or so, so not only will I need to angle the very top of the stem piece, but will also need to groove it a bit since the bowspirit is a cylinder sitting on a rectangular piece.
I need to construct six more pieces for the stem. I'm using the AOTS Pandora book as a model for what the pieces looked like. I think at this stage I'm going to start building in brackets in the keel for the masts and bowspirit to help secure and position them. The kit has you insert the masts through holes in the foredeck and quarterdeck, and then sit on the upper deck. I'm sure I could get away with doing that, but I liked how the Badger kit had pre-cut slots in the keel for the masts to sit in. Anything I can do now to get the masts more easily positioned is probably well worth doing.
-
ZyXuz reacted to ianmajor in HMS Unicorn by ianmajor - Corel - Scale 1:75, 1748 to 1771
A bit of progress around the rear end. I have now added arches, pillars and sills around all the lights.
I will soon be re-attaching the thinned, rear casting. Before doing so I am trying to decide whether to paint it as per John's version above or whether to 'guild' it. Will the guilded version be more in keeping with the natural wood effect of the rest of the ship? I am not sure. Below is a photo with the casting held temporarily in place with clothes pegs. Any views on this point?
Also I think the galleries should have been mounted about 2mm lower to make the lights line up better. Something else for others to look out for.
The arches and pillars also unfortunately highlight the higgledy-piggle nature of the glazing bars on early Corel plastic casting.
-
ZyXuz reacted to JohnB40 in HMS Unicorn by ianmajor - Corel - Scale 1:75, 1748 to 1771
Hi Ian,
It looks like we have been working on the same part of the Unicorn lately. I have decided to use the Corel's pot metal transom,I just couldn't see my way to making a scratch built one. I would rather spend the time opening up the ships waist as you have done. Your work is a real pleasure to view.
As I discussed on Mike's build log,I went ahead and shortened the window length by boarding over the lower set of panes. The transom is now curved with a backing of 2mm basswood sheet cut to contour. I will use veneer strips on the forward face showing above the stern rail to finish that side. I now have to sand bulkhead 17 to get the right 16 degree rake and curve for the transom to mount against. I plan to use the same approach on the gallery windows.
Take care, John
-
ZyXuz got a reaction from Landlubber Mike in HMS Lyme (1748-1760) by Landlubber Mike - bash of Corel Unicorn - Scale 1:75 (CLOSED TO START SCRATCH BUILD)
Mike and Ian, I really love how you guys study the Unicorn plan to make this a more accurate model.
The stern part took some of my times too. I also made the degree of the stern more 'gradual' (like what shown by Ian, 1st picture 2nd image), because I feel that the original one was too steep. The captain would have problem walking toward the stern direction
Take your time on your scratching, Mike. We'd really like to see more discussion here.. it helps us a lot on knowing more about ships and of course, Chapman's Plan
-
ZyXuz got a reaction from ianmajor in HMS Unicorn by ianmajor - Corel - Scale 1:75, 1748 to 1771
well done on the cranks, Ian! nice and neat take a shot of your full deck view, I can sure it looks awesome!
Anyway, sorry about your cannons.. Glad Corel didn't no produce any real ones for ship battles
-
ZyXuz reacted to Landlubber Mike in HMS Lyme (1748-1760) by Landlubber Mike - bash of Corel Unicorn - Scale 1:75 (CLOSED TO START SCRATCH BUILD)
For a quick update, I finally got my workshop set up and new plywood in. Thankfully I was able to find a plywood sheet that was flat
I've been working through the plans for the Unicorn and using other reference material I have (e.g., AOTS books for Pandora, Blandford and Diana) to figure out what, if any, other modifications I should make to the keel now, so that I can build the model closer to the Chapman plans. One thing I noticed was that the stern galleries on the Corel plans seem to fit fairly far back on the ship, whereas on Chapman's plans, they sit fairly close to the last gunport. So, I'm thinking of shortening the keel a bit to move the last bulkhead closer in (probably, up to where the second to last bulkhead sits). That should not only make it more consistent with Chapman, but other similar ships of that period as well. One issue in looking at the plans is that the keel part is longer at the stern area on one of the plans and shorter on the other Since the deck templates seem to fit the keel piece as is now, I'm going to work with the outline of the keel piece and just modify it a bit.
I'm realizing that I'll also have to modify some of the bulkheads a bit to change the angle of the quarterdeck so that the portholes gradually open up as you proceed toward the bow. That's going to be fairly tricky I think, especially as other builders have had trouble lining up the quarterdeck portholes with the guns. Wish me luck
-
ZyXuz reacted to Landlubber Mike in HMS Lyme (1748-1760) by Landlubber Mike - bash of Corel Unicorn - Scale 1:75 (CLOSED TO START SCRATCH BUILD)
While looking up figurehead pictures, I just so happened to come across this 1:48 scratch build of a Unicorn. The builder carved the figurehead himself, which looks incredible. He also made some modifications to the rest of the ship, including a completely different stern, an open waist, open portholes on the quarterdeck (connected by rails rather than a wall), and a crane-type setup off the stern off which a small boat is hung. Very nice build.
http://shipmodeling.net/photopost/showgallery.php?cat=1318
-
ZyXuz reacted to Landlubber Mike in HMS Lyme (1748-1760) by Landlubber Mike - bash of Corel Unicorn - Scale 1:75 (CLOSED TO START SCRATCH BUILD)
Here are a few pictures of plans DM1 and DM2. I made five photocopies of each to mark up and use as templates.
To get to Chapman's plans regarding the stern galleries, they need to be moved forward so that they forward of the stern post, rather than sit over the rudder. I took a tracing of the stern gallery from the plans, and moving it forward 10mm, it looks much more in conformity with Chapman. Chapman, however, shows the stern gallery almost butting up against the last gunport (indicated by the arrow in the picture below). So, not only would I need to move the stern galleries forward relative to the stern post and rudder, but I would have to actually reduce the keel length by probably another 15mm or so to move the full stern area closer to the last gunport.
However, I have a slight problem in using the plans. The kit supplied keel does not match either plan DM1 or plan DM2, and it's not due to creases in the plans. In DM1, the keel is too short at the stern post (almost like it contemplates the addition of a stern post), but the keel matches the plans at the transom area:
In DM 2, the keel is too long relative to the plans:
What to do? If I go with the keel as is, looking at DM1, the stern and stern galleries will hang even further out from the stern post and rudder than is shown in the plans. That's the opposite result from Chapman where the stern galleries sit forward of the stern post and not over the rudder. At this point, I'm thinking that the stern area of the keel is going to need a complete makeover. It will need to be shortened a bit so that the stern gallery sits closer to the last gunport. I will also have to shorten the extension on which the transom will fit so that the galleries sit further forward. Furthermore, since I'm not including the flag lockers on the quarterdeck I will need to modify the top area of the keel at stern and remove material from the last bulkhead just above the quarterdeck line so that the plywood is not visible.
Too late in the evening to make any final decisions. I'll sleep on it and come back to it tomorrow. A bit frustrating that I haven't started building yet, but hopefully all this advance preparation will have been well worth it.
-
ZyXuz got a reaction from Landlubber Mike in HMS Unicorn by ZyXuz - Corel - Scale 1:75
Belfry Making
I've lost track of my updates since some photos of mine are missing... =.= So, I'll just upload part by part. Up till now, I've basically done the forecastle fittings including the catheads.
Anyway, this is how I make my belfry. I used the beech woods for the bits that came with the kit and 2mm x 5mm walnut strip for the rail. To produce the bits, I mill them with a reverse milling bit to create the head, and then cut them into half.
I really don't like the color of the beech wood, but since I'm gonna paint them any wood will do.
For the crown on the belfry, I cut the original one into 5mm width.
The rail..
For the headstock, I used the 6mm x 5mm walnut strip which is the same as the cat head, and sand it manually to the shape.
Well.. it was taller, because I forgot to add the width of the rail in.. So, I trimmed them down another 4mm.
And I added a copper piece on the head stock.
Install the bell and Done.
This is an older photo actually.. compared to my previous post, you can actually see I had added a one more strip at the concave area.
Thanks for viewing