Whitebeard
-
Posts
18 -
Joined
-
Last visited
Content Type
Profiles
Forums
Gallery
Events
Everything posted by Whitebeard
-
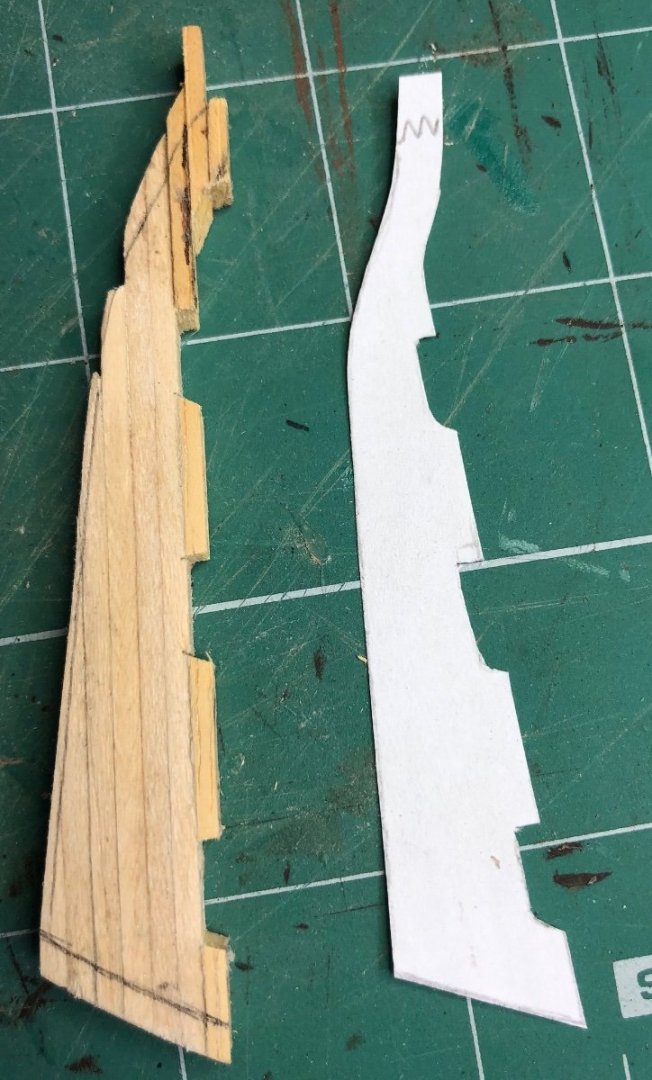
That's what I love about modeling - you invent 99 ways how not to make something, and only then do you get the perfect recipe. In hindsight, after using thin paper to make my doors, I'd try try using veneer. If you sand it down you get even thinner layers and they retain the wood fire structure. At times I've also found thin double-sided self-adhesive tape very helpful.
-
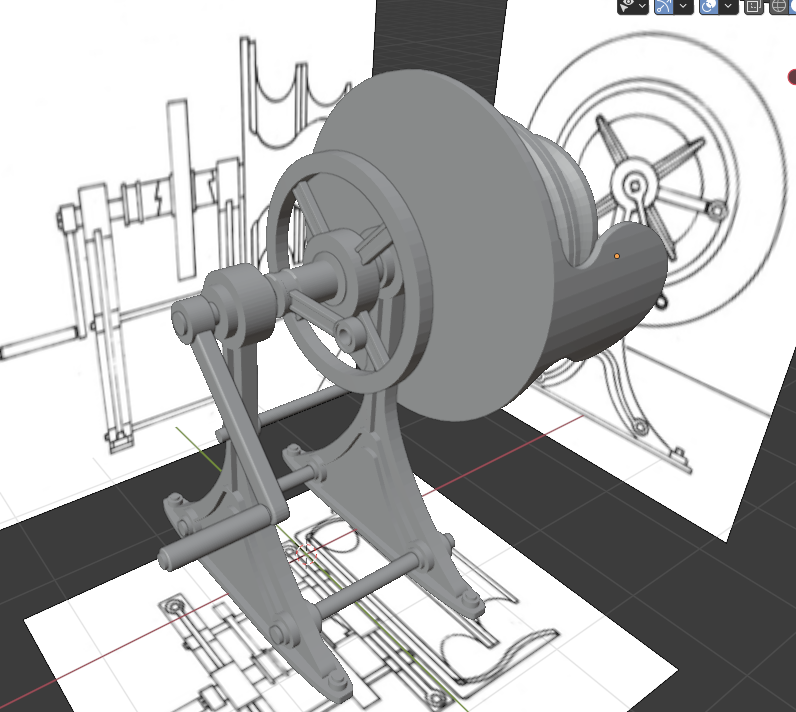
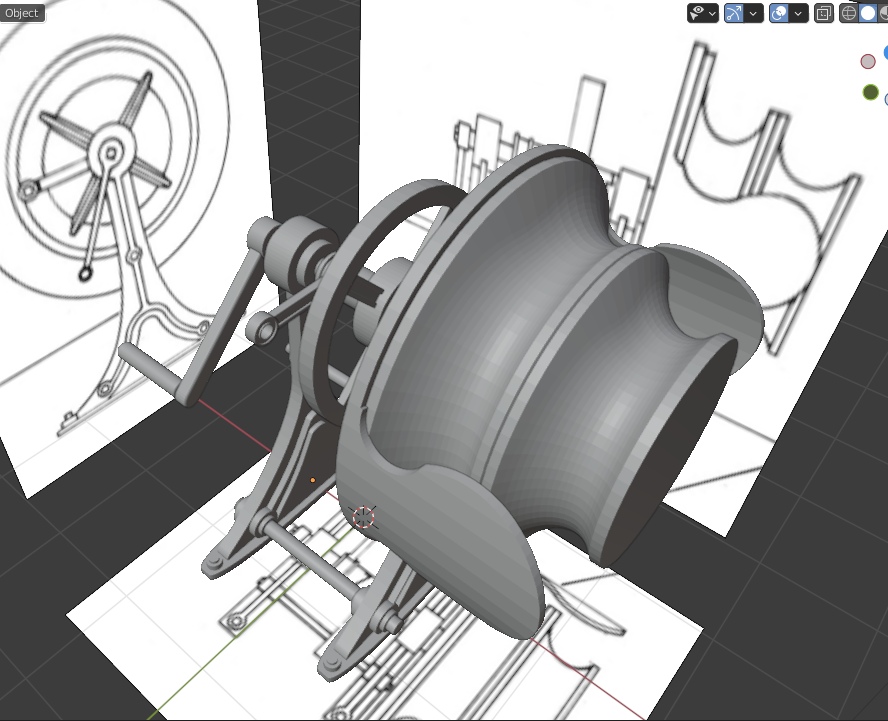
To continue with the winch on the stern and the pumps on the main deck I needed to sit back down to blender and start drawing, since the kit winch, well... I don't think so, and neither were the pumps. Both elements based on the Anatomy of Ship book, I'll just need to print them in parts to assemble in the very end. As always, printing in a few copies to ensure that if something goes sideways I'll have spares. Printing in parts to have better detail and to orient the pieces better for the layers. The only question now is the scale for print, but that's no issue. If anyone might know how this winch monstrosity actually worked, please let me know, as I'd be glad to put on it some rope or anything of the type to make it even more authentic.
-
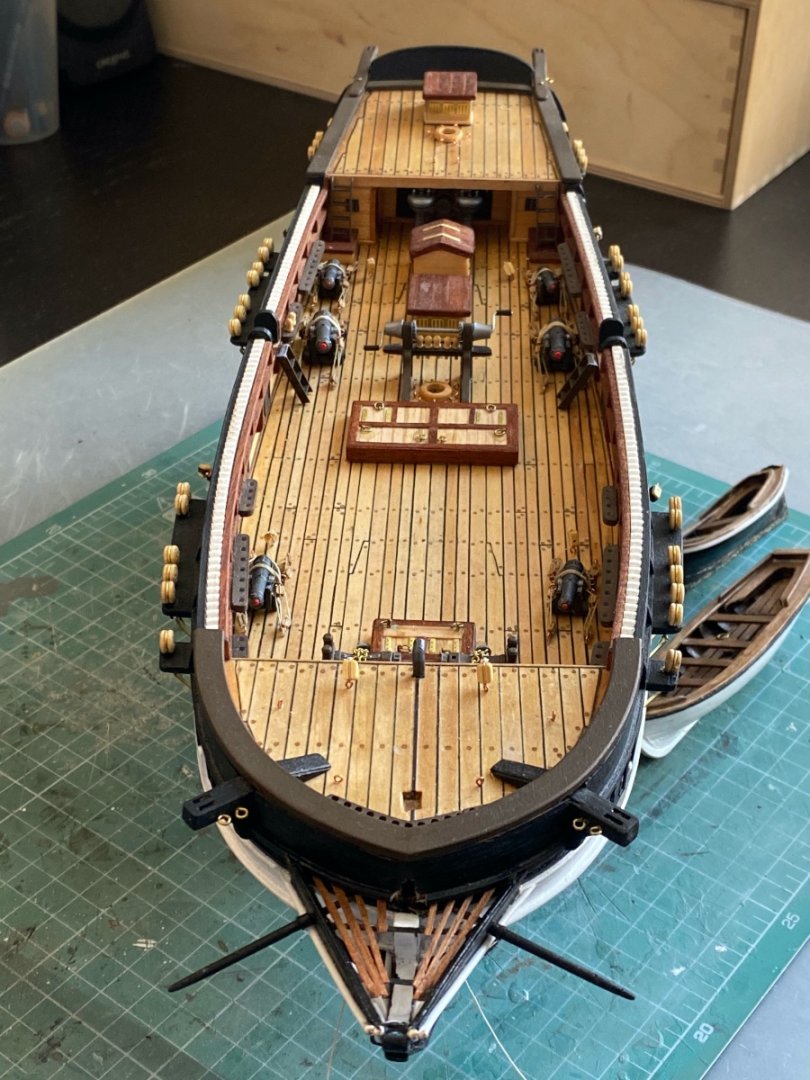
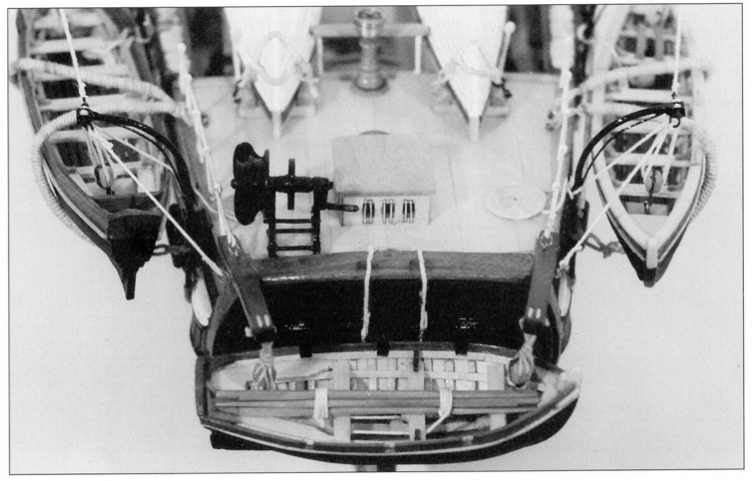
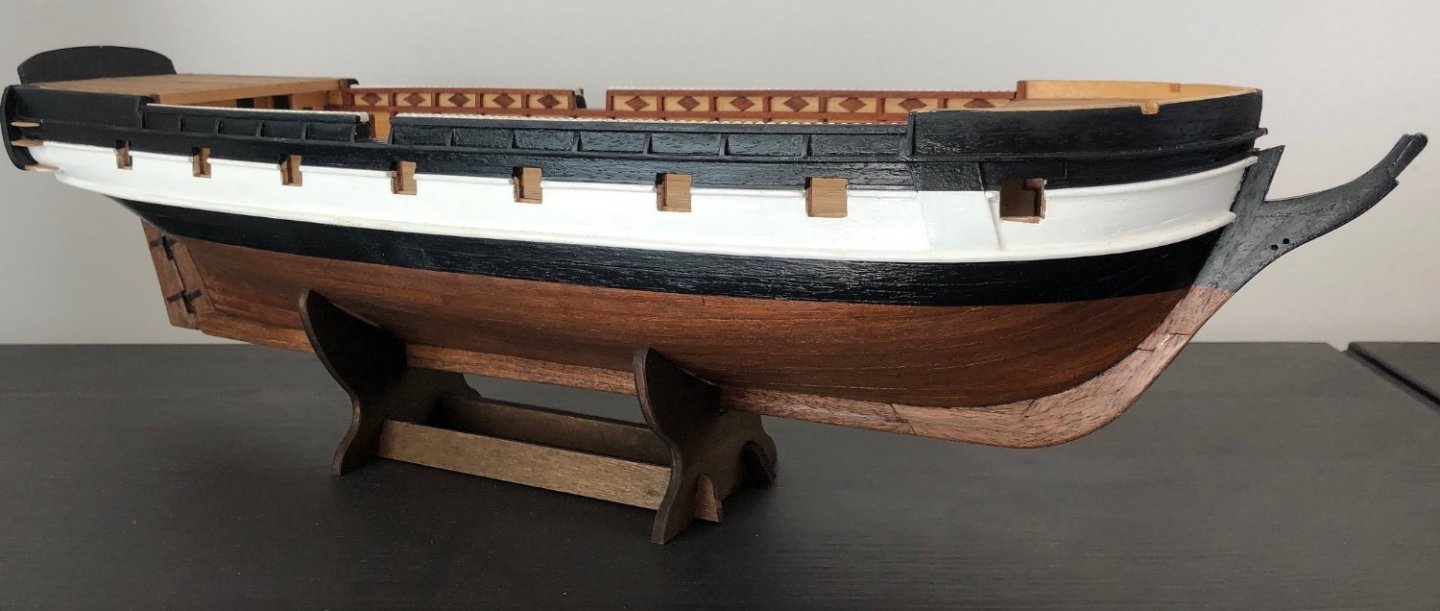
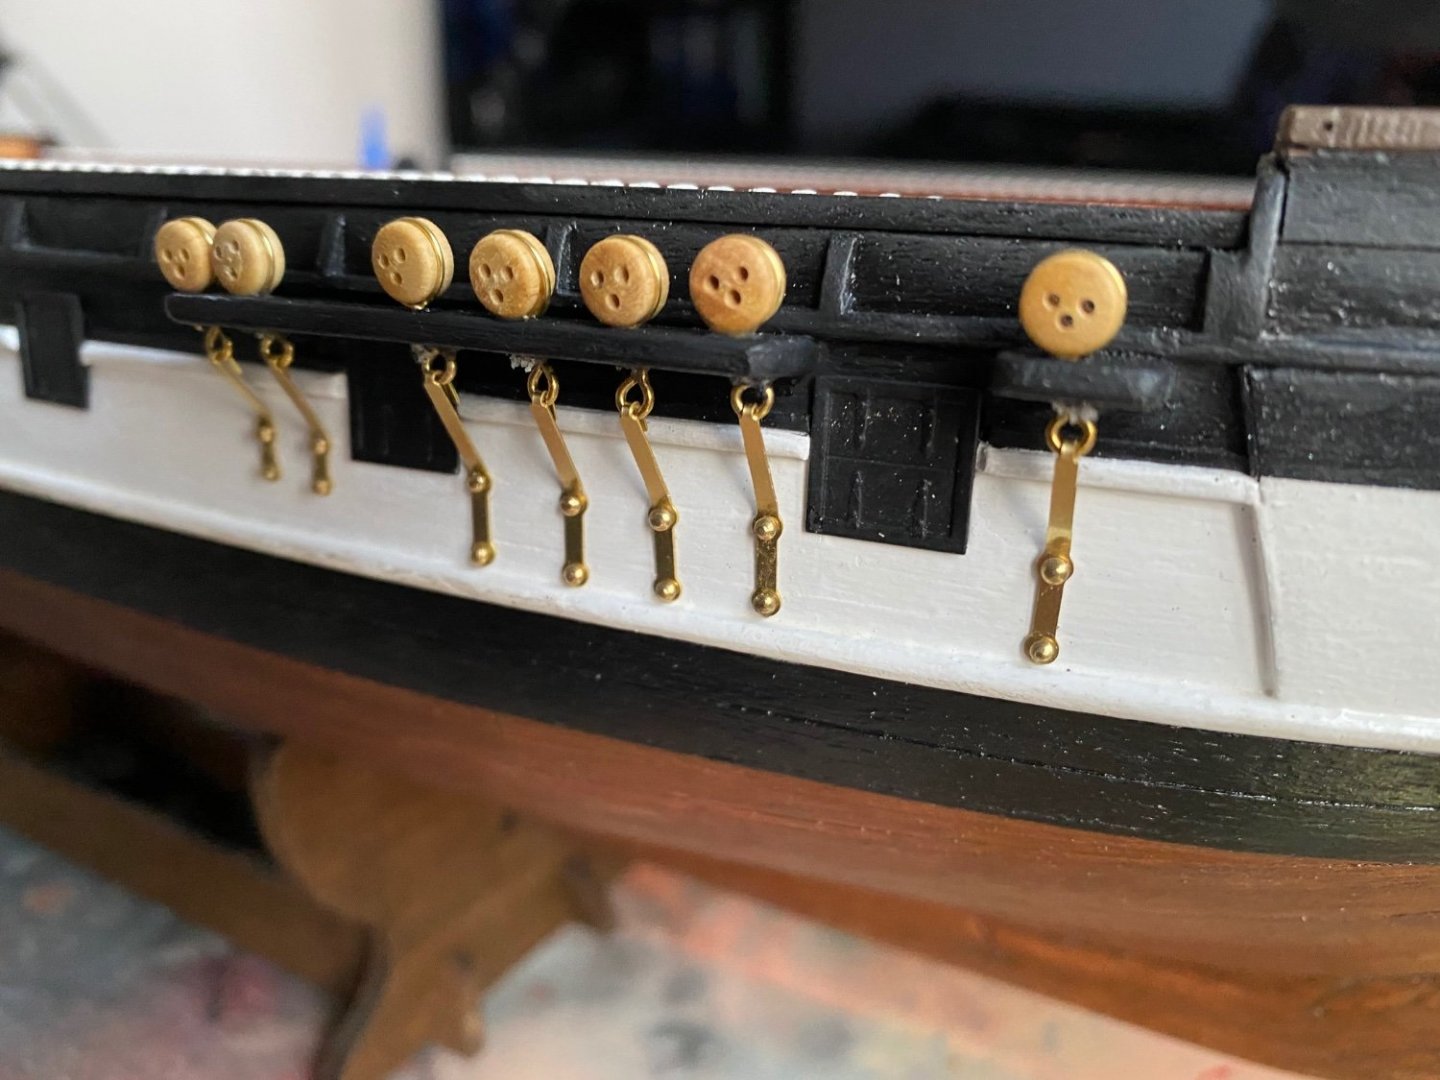
A little bit of an update here, since I haven't posted anything for some time. Practically done with all of the deck "furniture" and it's almost all in place, along with the anchor chains. I'm currently experimenting with fabrics for the sails and for styling them. Still wondering what to do with the little hiccup on the front deck, so if you guys have any ideas, let me know. Also, toying with a few ideas about the anchors, and fastening them, as the kit instructions seem a bit simplified in comparison to what AOS Beagle book says. The launches are also attached (though not in the photos below - yet). Updates coming soon as these photos are a bit oldish. I'm leaving the aft deck clear for the time being, and once the masts are in place I'll be fixing the details there - I'm leaving as much open space to make the rigging easier.
-
Hey, thanks for posting your update. Like I said before, I admire your precision and attention to detail, ans the fact that you're making your own pieces rather than relying on the kit in total. When it comes to the deck paint question, I only washed my decks with some linseed oil and airbrushed it with some satin varnish, worked nicely (here it is half-painted for comparison before adding one final plank to the front). I totally get your idea with the doors (Not Jim Morrison's)...I've made mine as well, though at the time I still made the bits and bobs by hand. Now I'd just design them and 3d print them like I did with the canons and other smaller elements. The kit guns and other kit details are quite low quality in my opinion. If you'd like, I can send you the stl files for print.
-
I keep looking at your work and wish I hadn't started work on my kit before you did. Great stuff. Correct me if I'm wrong, but have you made the same mistake as me, and made the second hole in the forecastle deck up in the very front, or was that intended?
-
A really nice job with the deck so far. As I've been working with this kit as well for some time now, I think you're the second person I know who's been using the AOS - Beagle book for such details. A really nice job!
-
Looking good with the deck. I experienced the same decisions while planking the Beagle. All in all, I decided to use 5mm for the kings planks, and 3mm for the remaining ones, and tried to follow the patterns in the Anatomy of Ship as well. Looking forward to the next post.
-
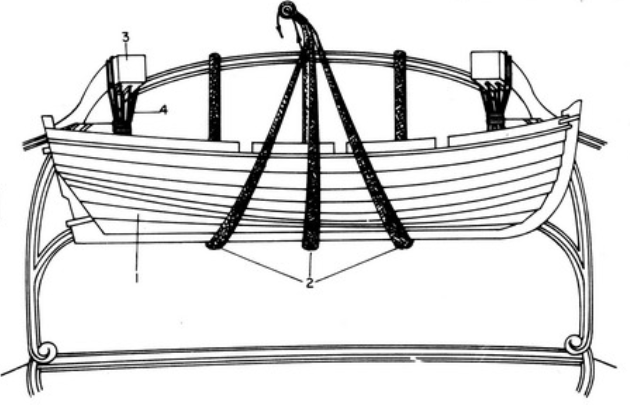
Ok...So here's a question to anyone out there...I'm trying to wrap my head around the stowage of the dinghy on the stern on the Beagle. I've got almost everything mounted, including the horn davits and all...but...According to the following drawing in the Anatomy of Ship, the dinghy is additionally secured with three gripes (makes sense)...but none of the drawings indicate where and how these gripes are mounted or secured. What's more, the photos of the model itself show a completely different (simplified) mounting. I'd like to use the drawing as it seems to be more realistic, but am lost as to where to begin and end the gripes. Anyone?
-
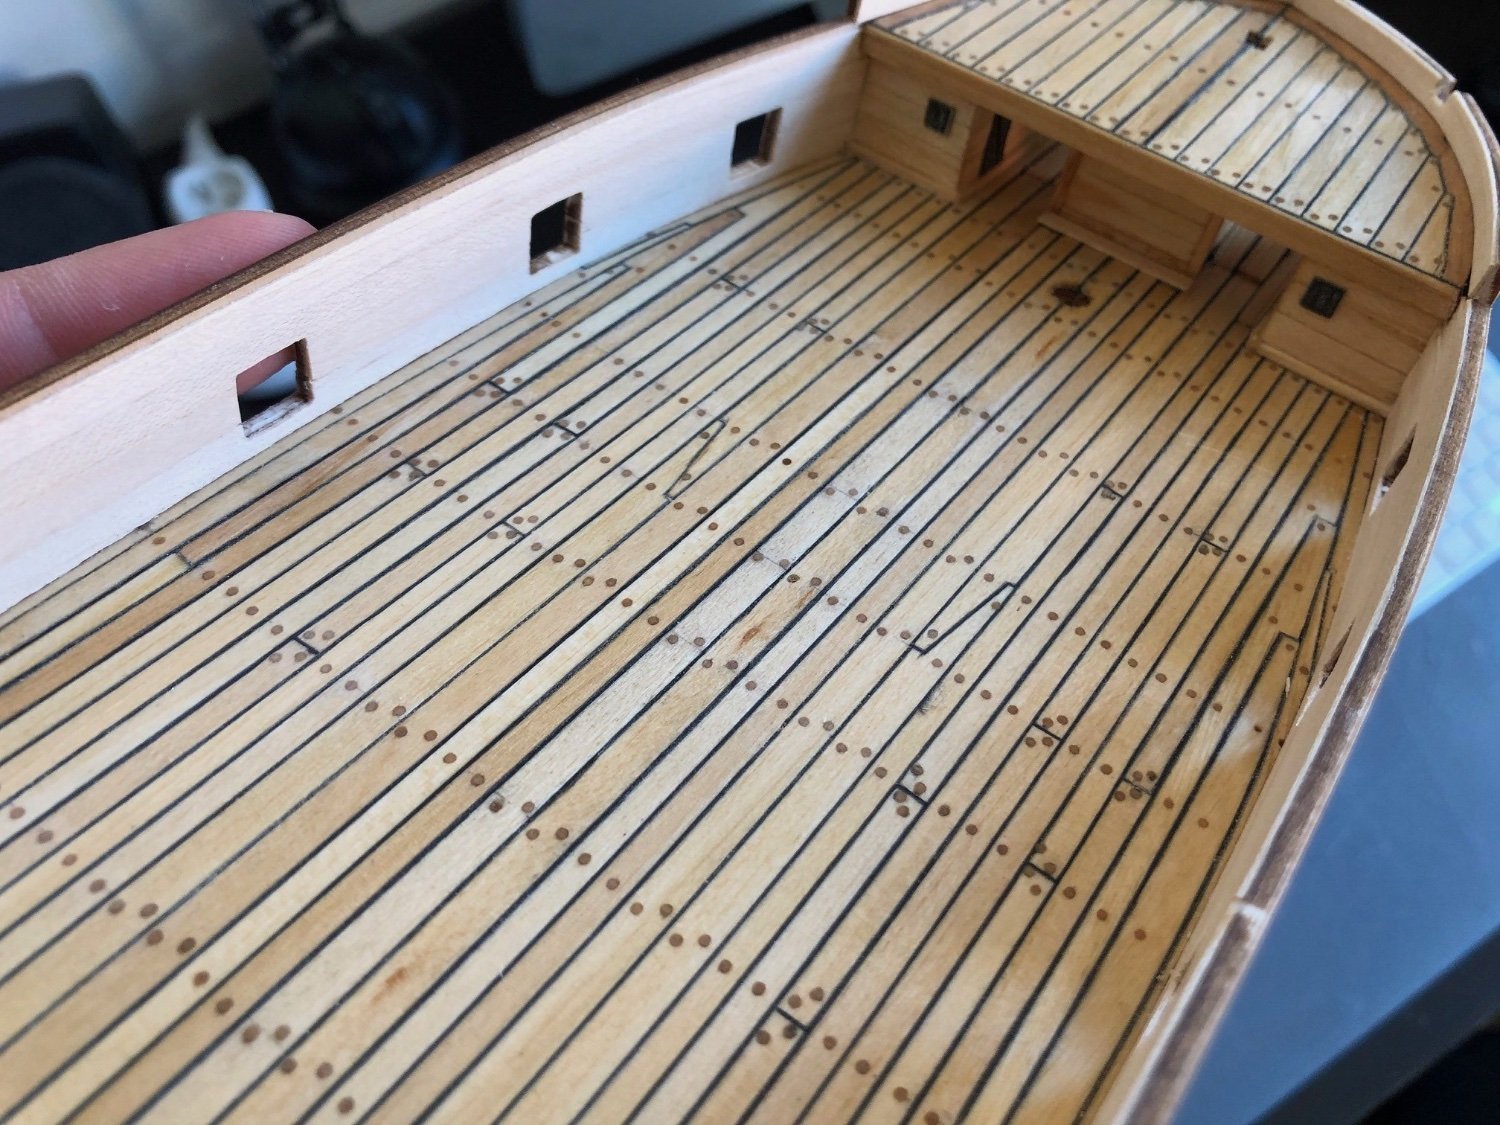
Thanks for the comments! The decking pins are a bit out of scale, but the caukling is an easy technique with black paper glued to the edges of the planks - a way better method than painting, drawing with a marker or sketching with a pencil. Get your hand on the Anatomy of Ship - Beagle if you can - lots of useful drawings and diagrams. If you can't, PM me, and we'll arrange something. Next week I'm leaving for Dublin for a month, and this will halt any work, don't wait up for me. Cheers!
-
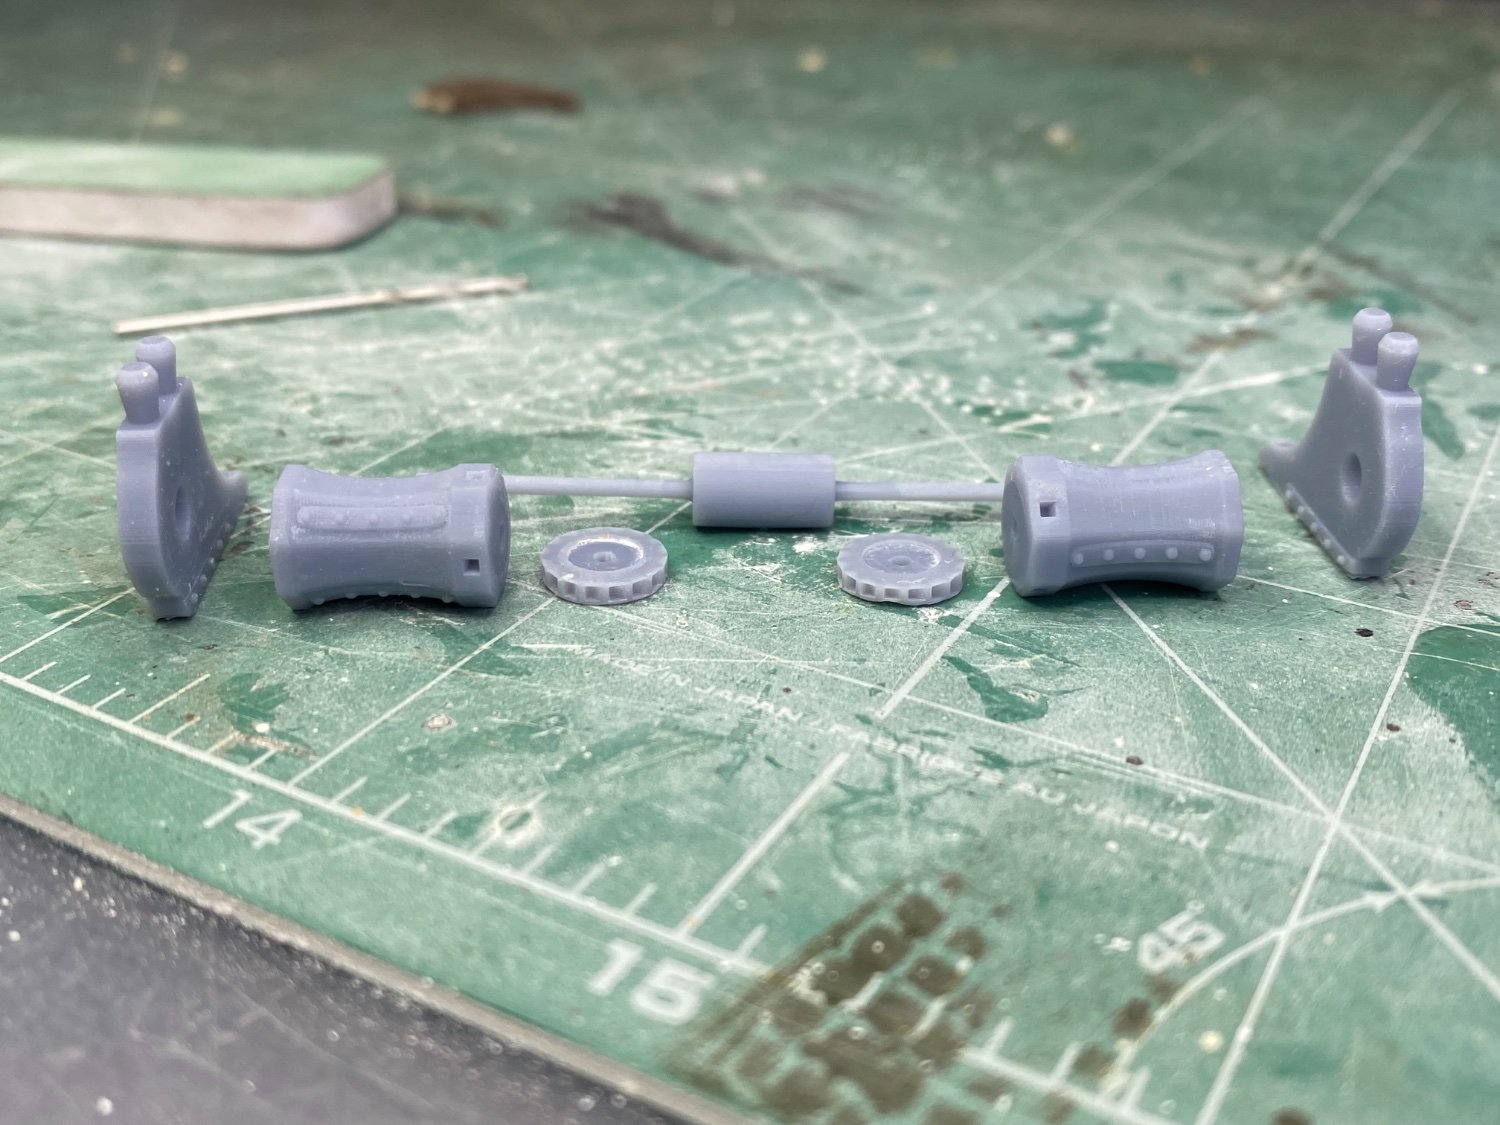
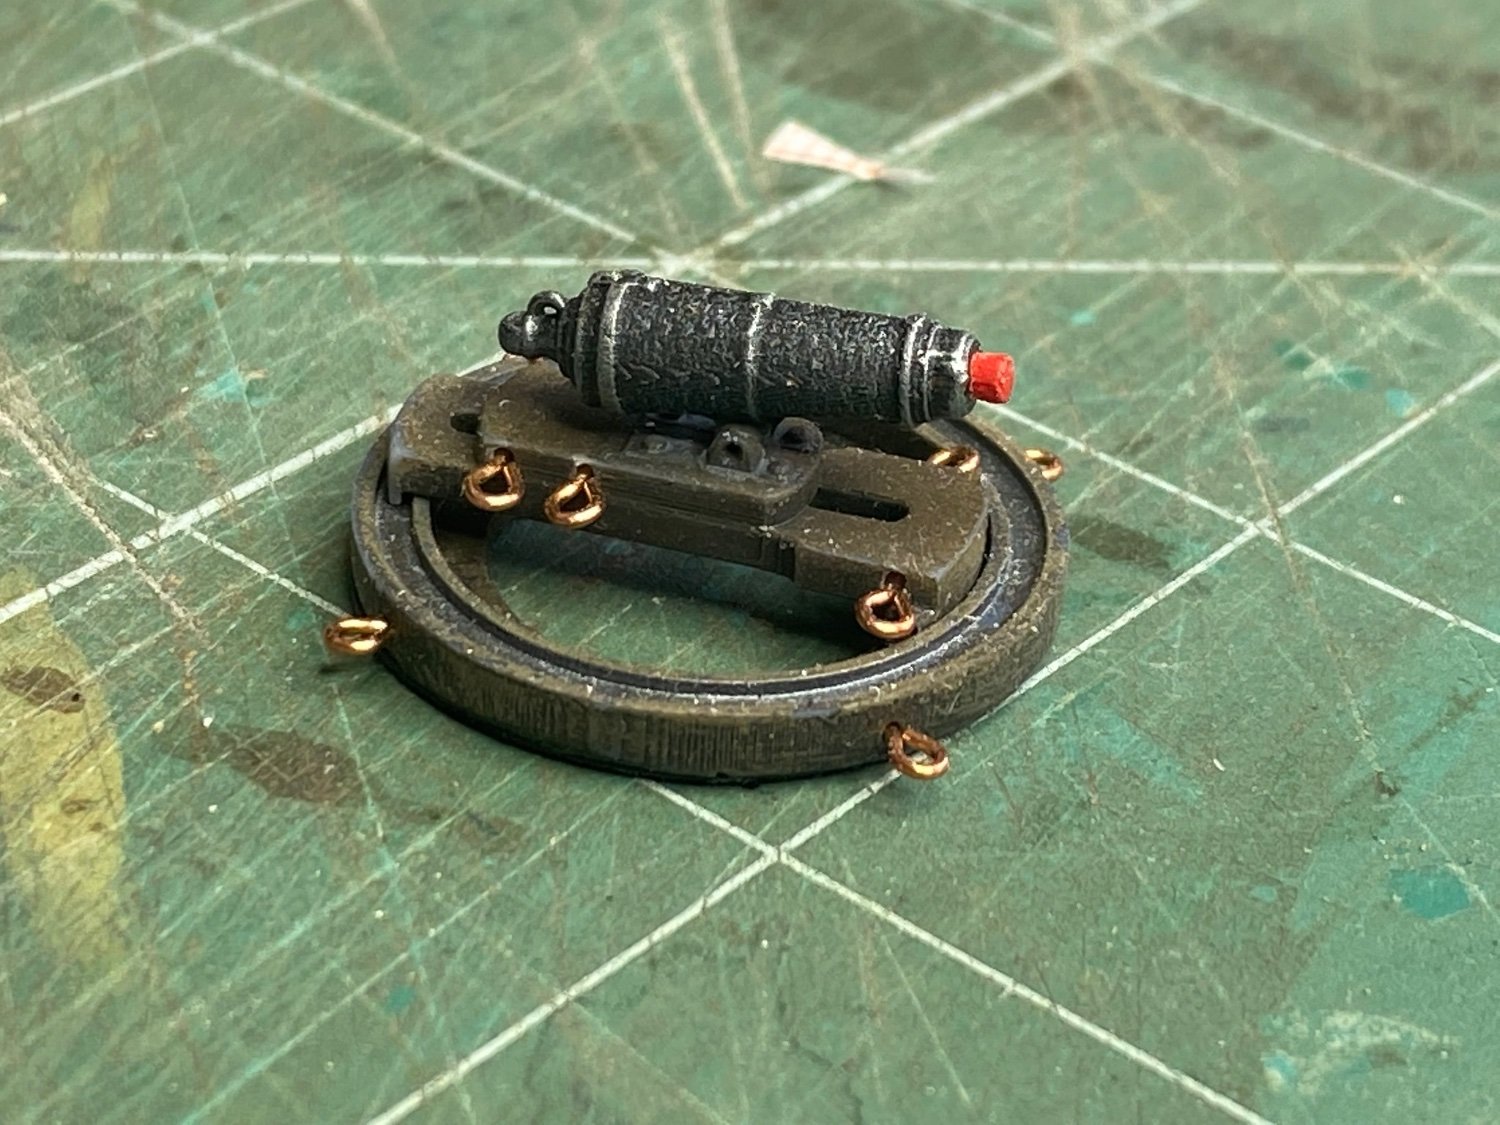
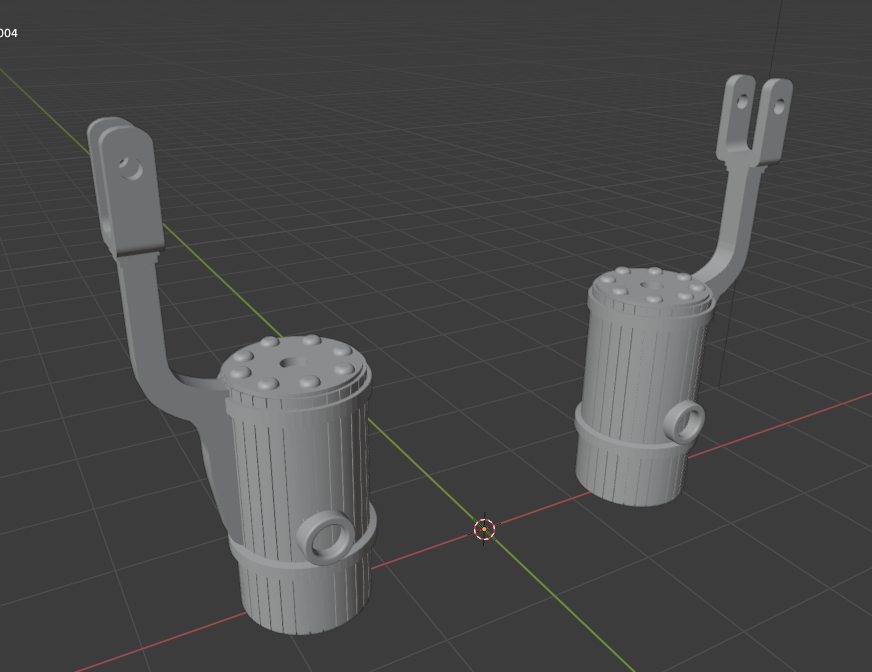
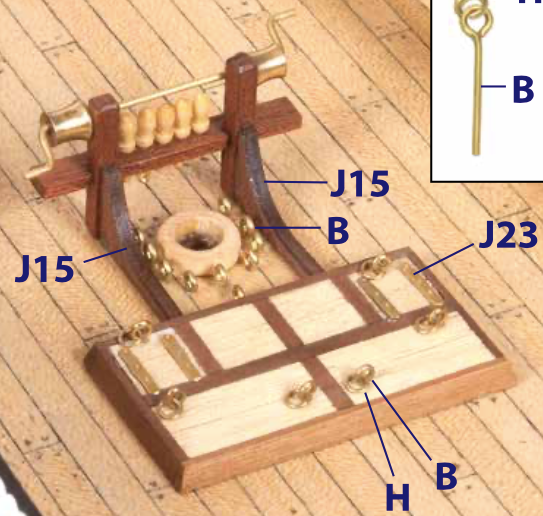
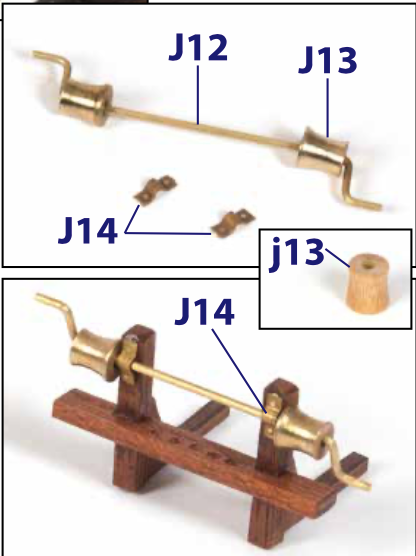
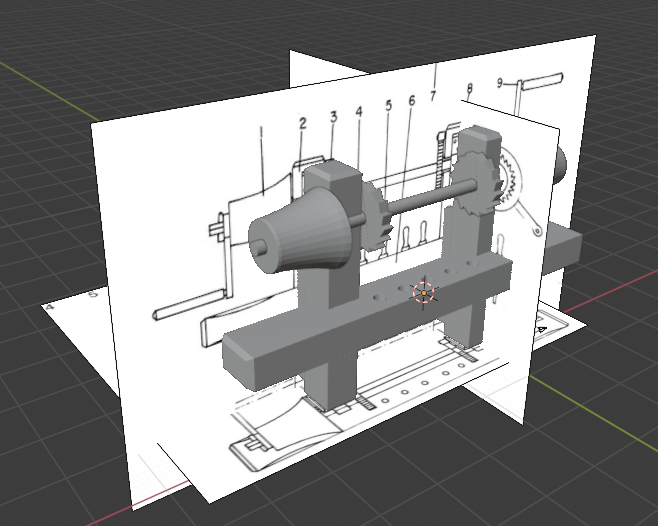
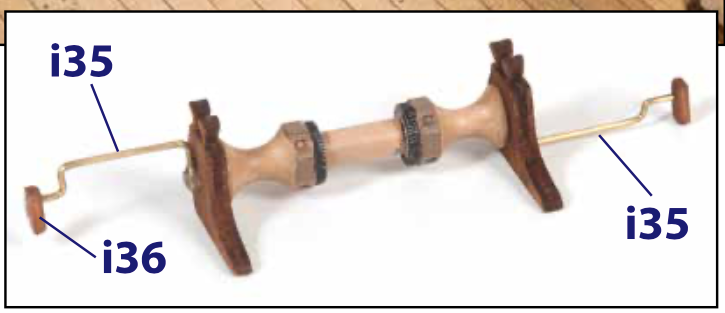
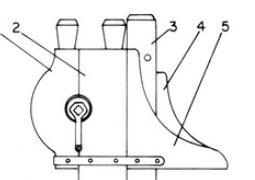
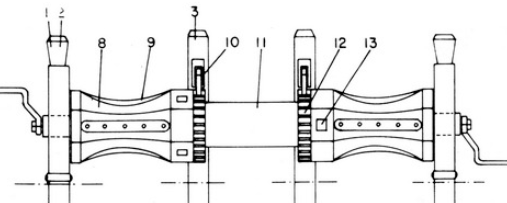
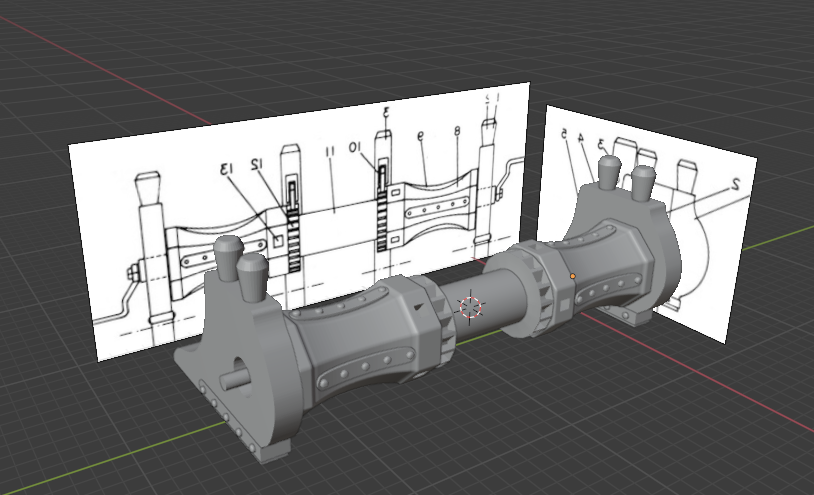
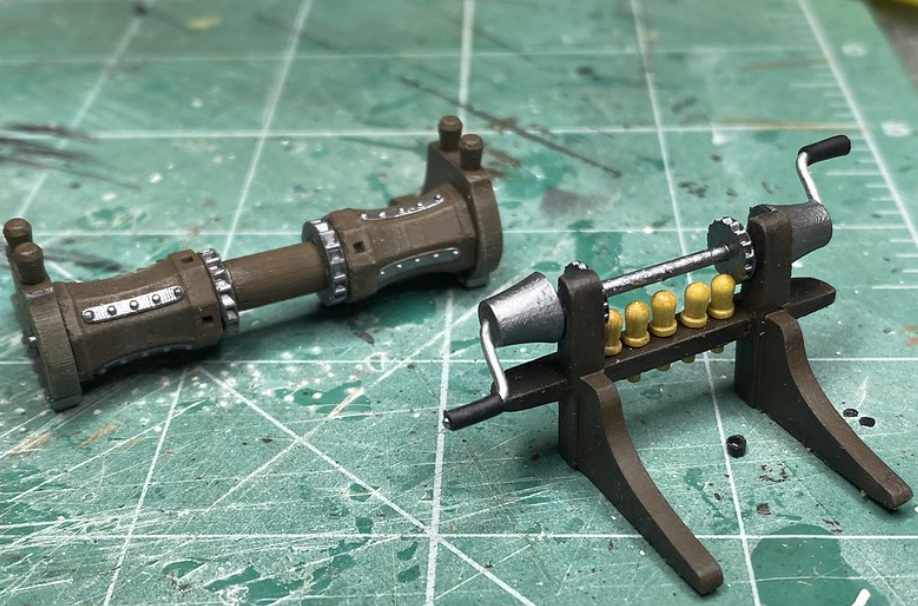
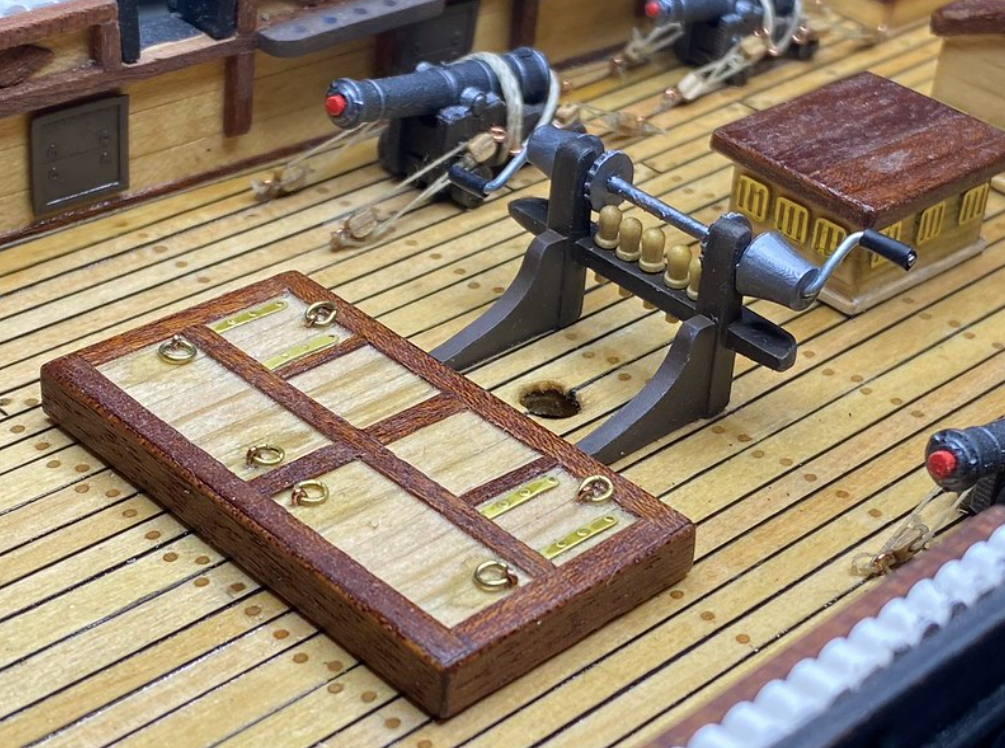
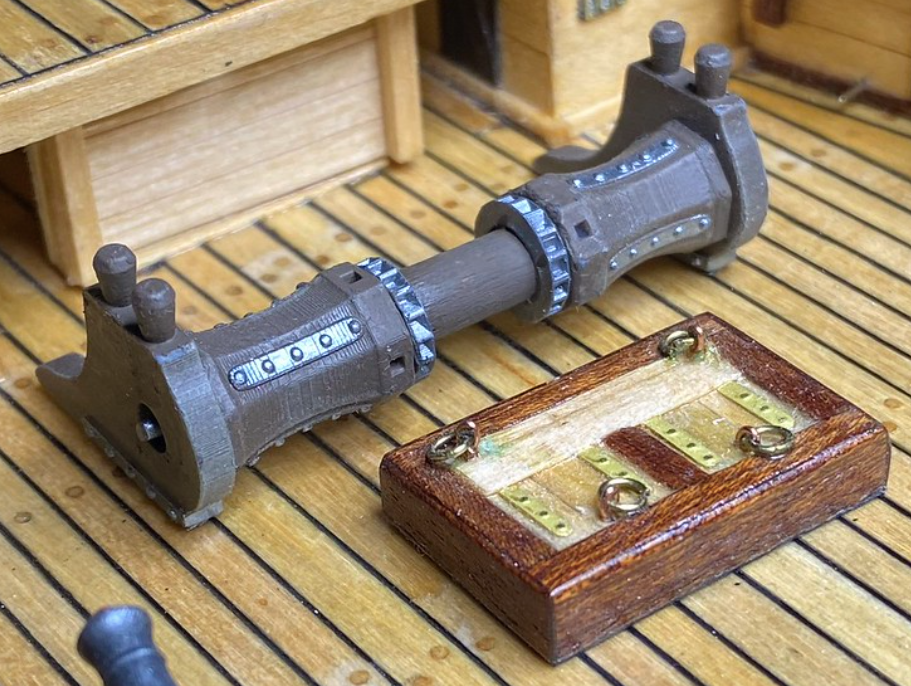
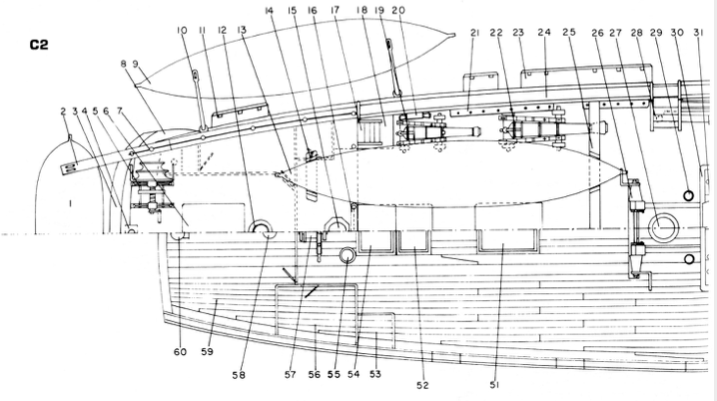
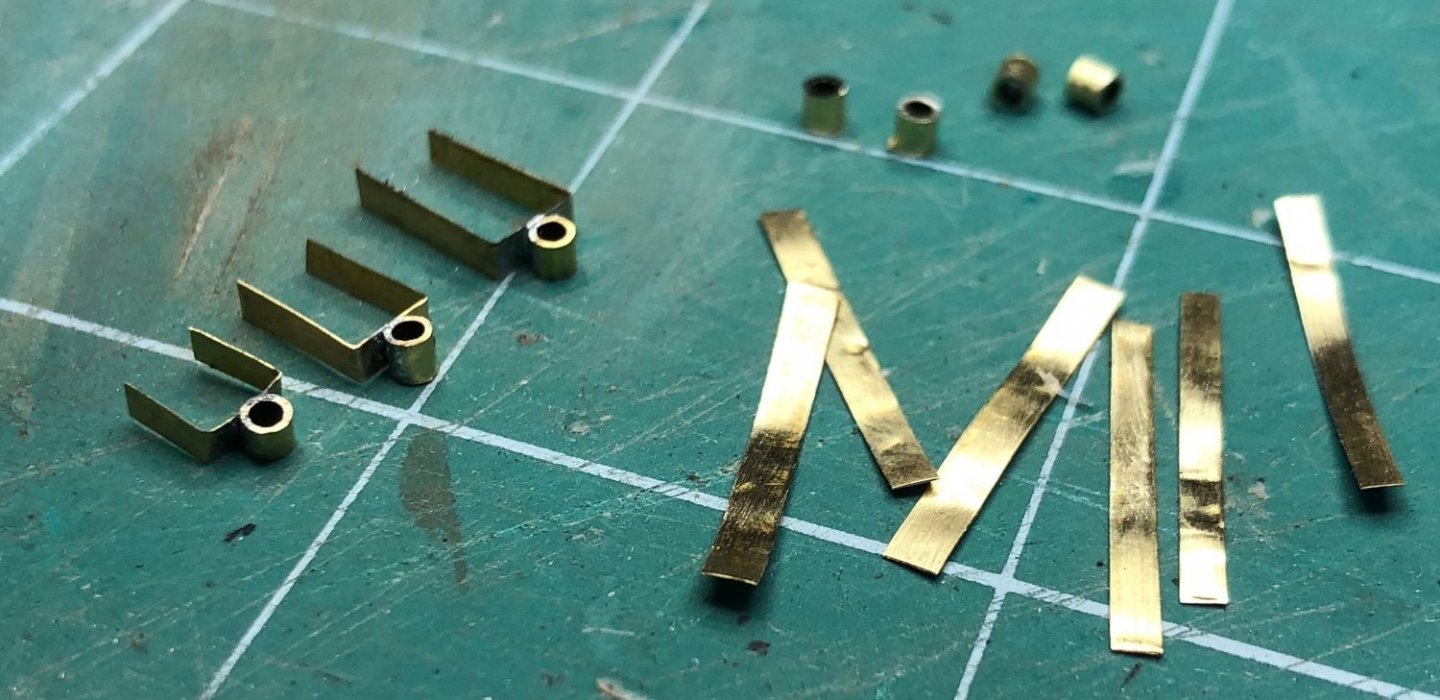
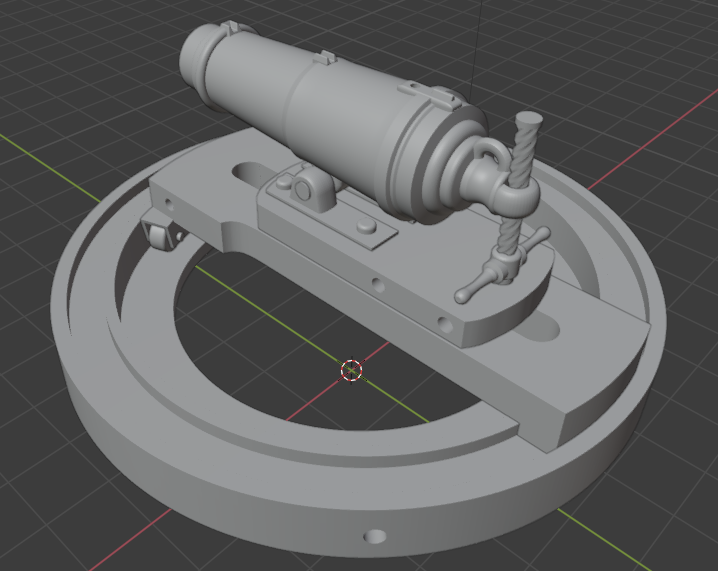
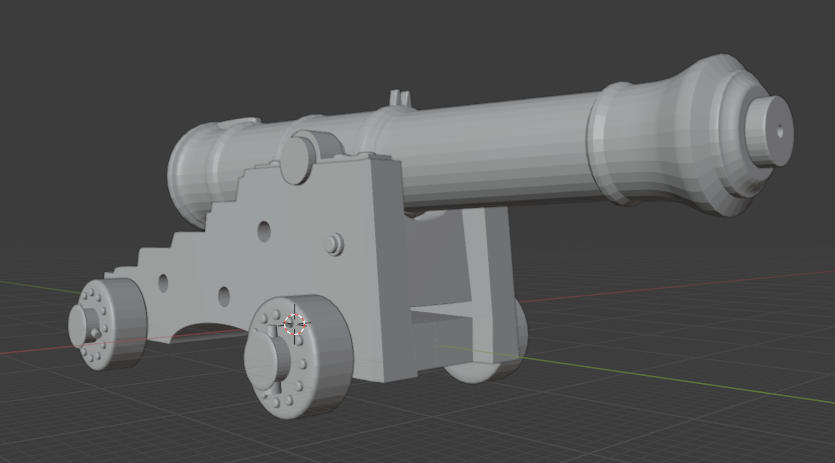
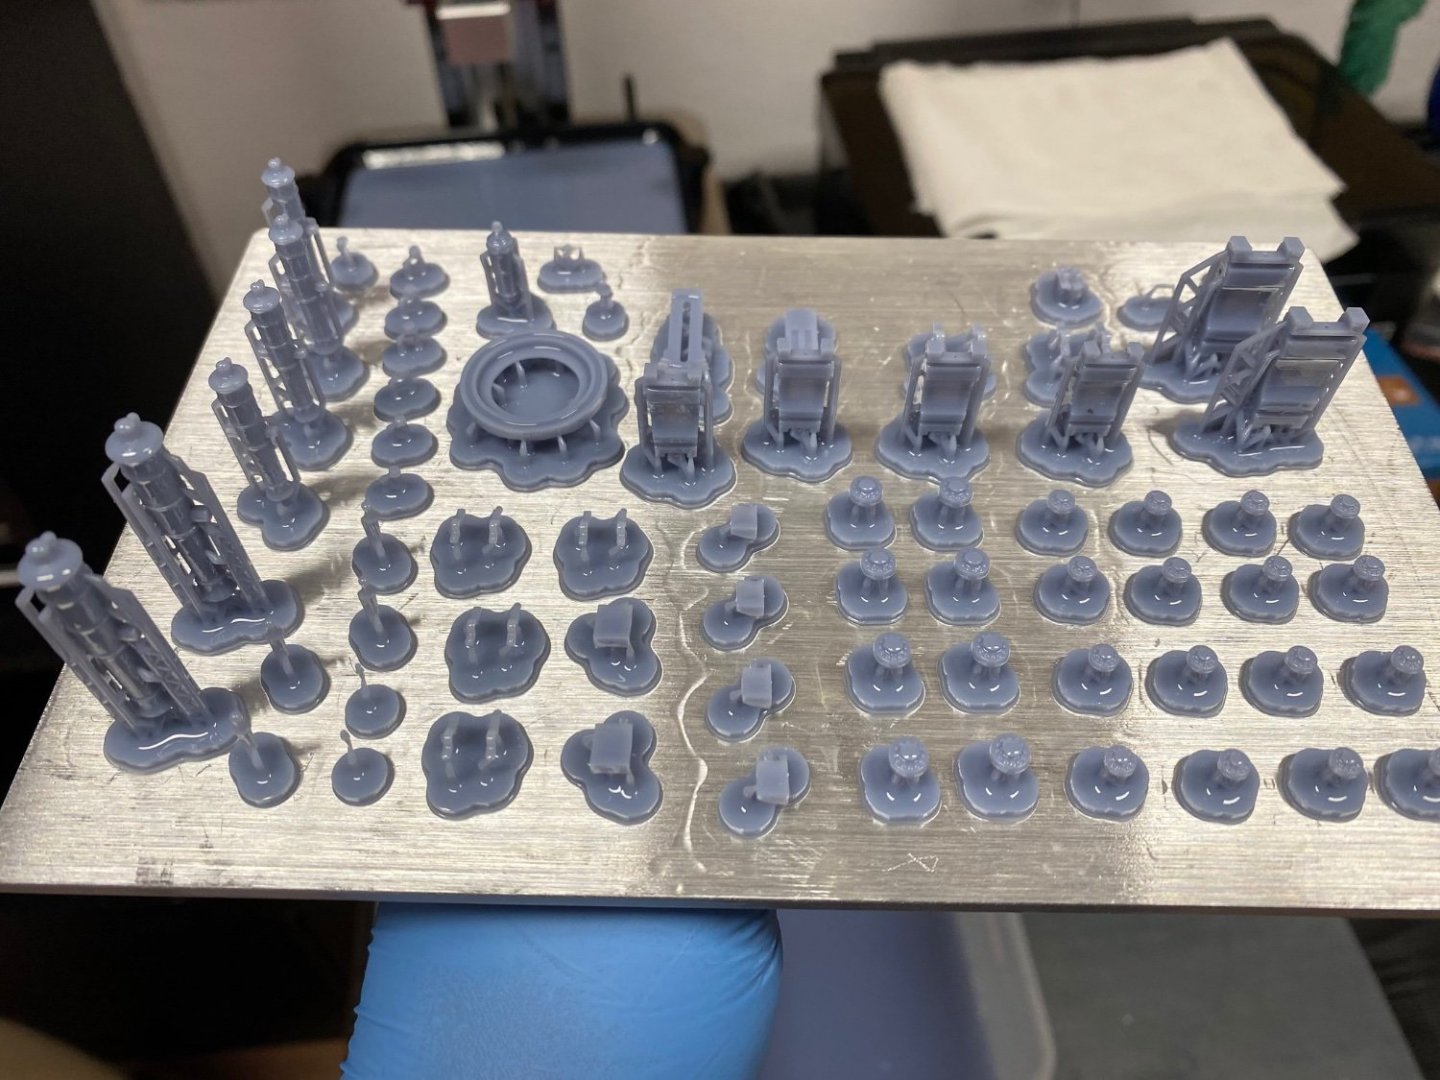
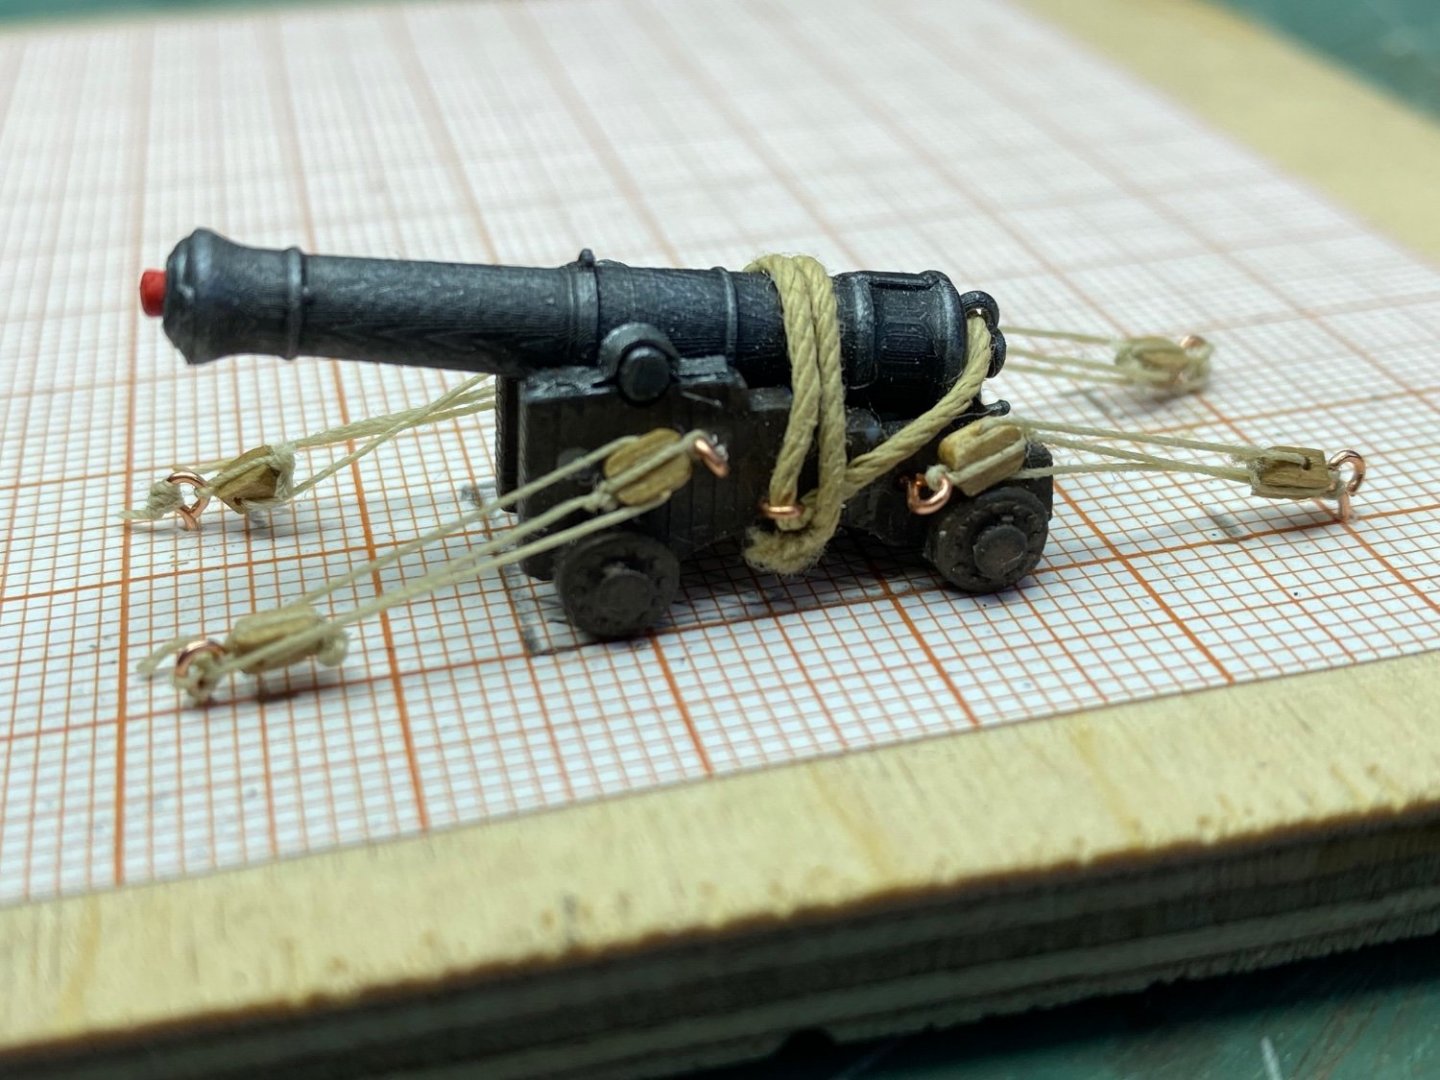
A little bit of development... Since drilling holes at regular distances and pinpoint locations seems a bit tricky for me, and because the kit elements seemed a bit, well... of lower quality than I would see fit, I've decided to employ Blender to make a few more components for the deck. The first element was the main jeer bits with winch. The kit presents this as below: All seemed ok, but as I've written, drilling the holes was a bit tricky, and wether by some bad luck, or kit elements economy quality, [ j13 ] was not made of brass but wood. Furthermore, compared to the sketch in AOS - Beagle, the kit winch lacked the ratchet wheels and paws... So, what to do? Well... Printing, assembly, and it was practically ready. The next element was the windlass. Here the kit element was quite ok, but again, comparing it to the drawings, I discovered a few details missing. ...and the drawings... The main missing elements were the iron plates (whelps - 9) that prevent any slipping on the main piece (8). Additionally, I do admit that I butchered the kit pieces - the cheeks - while attempting to install the pins on top. So...yeah...Blender time again... Drawing it did take some time, but it was time well spent. I decided to modify the ratchets (a.k.a. Pawl rims - 12) to prevent the teeth from damage while in printing. Also, it was printed in pieces to make the detail painting easier. .. Some painting, assembling, and...I broke it... I snapped the centre piece and had to install them on a wooden roll. All in all, the finished elements were to my satisfaction, though some elements still need some paint... Neither the winches nor the hatches have been placed permanently on the deck yet. I still need to pull the chains from beneath the forecastle and finish a few bits and pieces that are in front of the windlass. Doing it in a different order would limit access to others - working from the outside in seems to be a good idea. Oh right...the cannons are installed with the red plugs in the barrels... I'm contemplating one more thing with those, but that demands a little bit of weighing pros and cons... Till next time!

-
Le Sinagot, Bon Retour and Cotre Kurun by Heller
Whitebeard replied to Williamo's topic in Plastic model kits
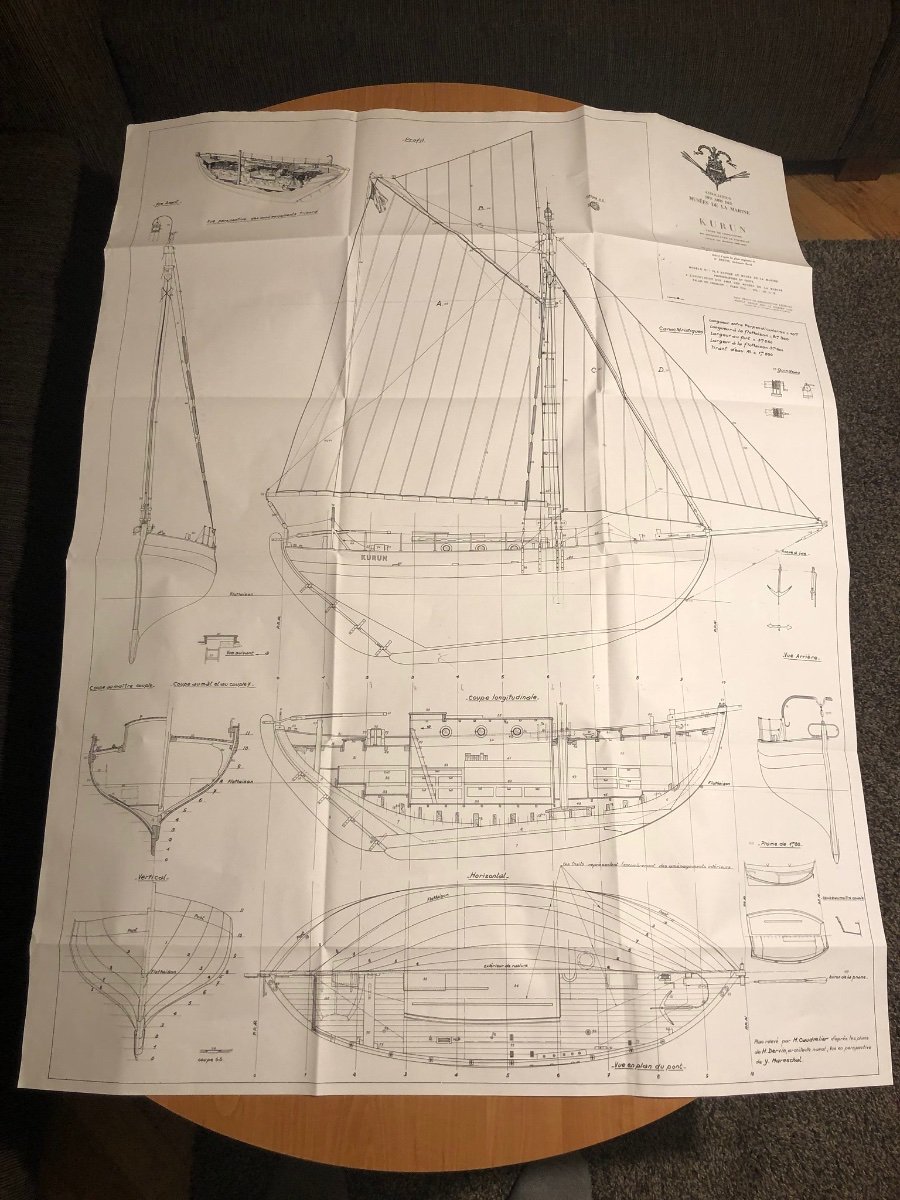
I've had the same problem once, as I botched my Kurun build and wanted to have another bite at the apple. No luck, but... I did some digging and got in touch with the skipper of the Kurun (which still sails as a museum SV), who was happy to send me detailed build plans on an A1 format. The man did this out of the kindness of his heart on the condition that I send some of the photos once the model is built. I stil owe him the build... Sinagot... I saw one of those in my local modeller shop some time ago.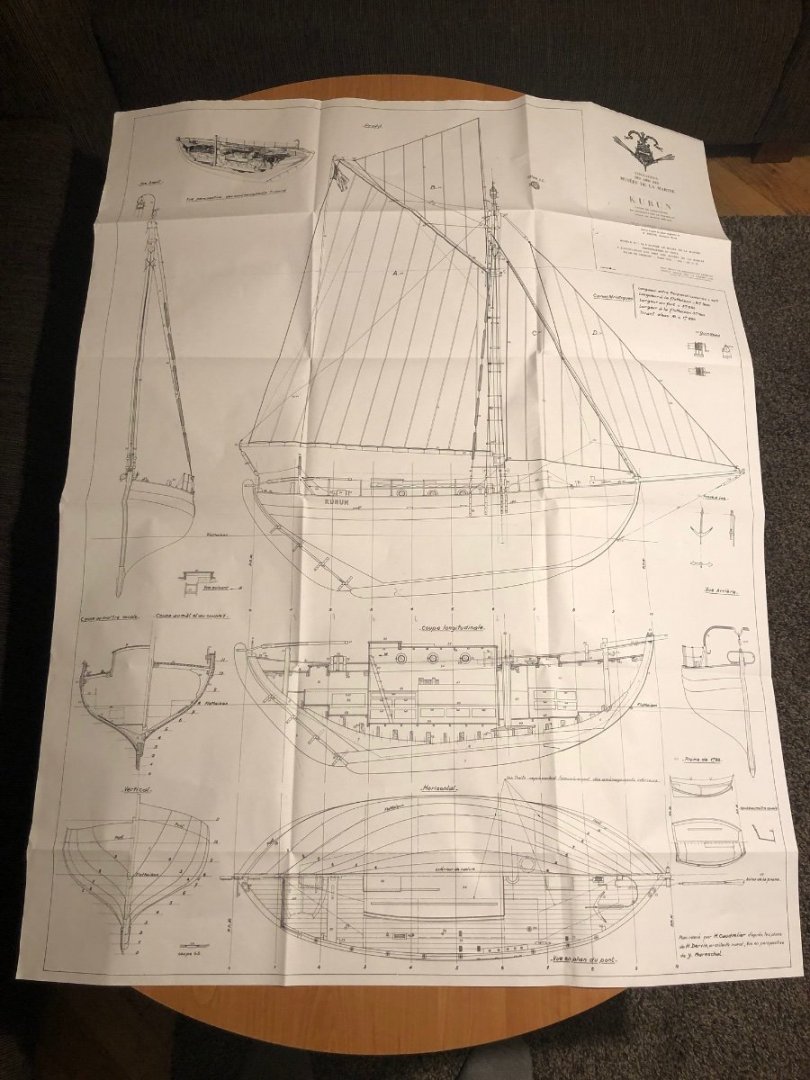
- 5 replies
-
- 2
-

-
- sinagot
- bon retour
- (and 2 more)
-
It is a nice machine, I admit - the prints are fine in detail. In comparison with the Anycubic Photon S that I had used in the past, the hood in tandem with the effective fans limits the level of resin smell to a non-existent one. The printing is done fairly quickly, and the cleaning is much easier than in the Photon S... However: - The fans seem to be quite noisy, especially in the beginning, once it fires up properly, they tend to quiet down, but sometimes the rattling continues. - There is a dedicated app for it... I'm still either too dumb to figure out how it works, or it just doesn't. - Wear n' tear - The plastic on the screws securing the build plate tend to crack and break up.
-
Hey Todd, Cheers for the compliment. The beast responsible for those prints of mine is the Anycubic Photon x, with the settings for 0,002mm a layer. The painting is a regular Vallejo acrylic flat black, and the shadowing is a dry brush with Vallejo gunmetal. Quite a useful technique for plastic kits.
-
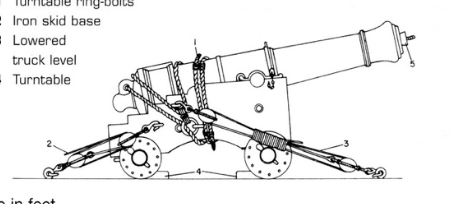
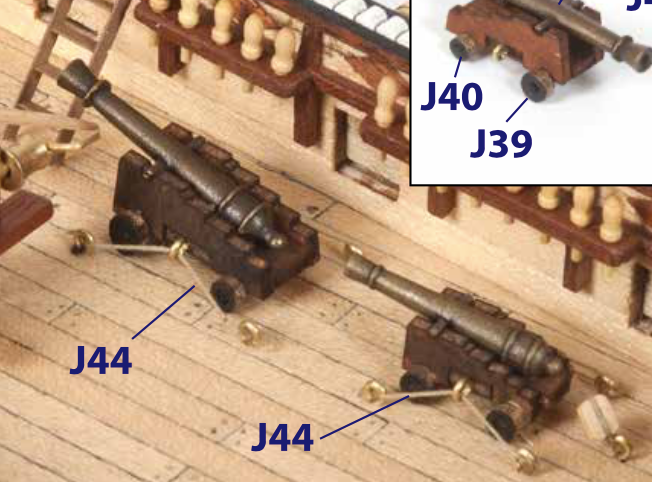
Thanks for the complements Allan, really appreciate it! The kit? Ha ha ha... Here's a snapshot of the kit instructions (simplified beyond satisfaction), and some from the AOS book for comparison... The gun rigging would have been in fact incorrect if they were to be placed in the ports ready to see some action, but these are to be fastened to the deck for transport only (as the kit instructions AOS publication presents). I may have simplified the fastening of the gun itself to the carriage, but Having compared these sketches to other illustrations of 6 and 9-pound guns on museum ships, I've seen that the breeching wrapped around the gun and carriage does vary. Also, there is a piece of rope on the front rigging piece missing, but I'm yet to add that once the gun is on the deck, and I guess the blocks were to be double hole blocks, but mine are only 2mm in length to accommodate the scale... The deck treenails and measles ...You're absolutely right - I have in fact made them too big. Like I said - it's only the second wood build, and next time I'll be sure to consider the scale there as well. I've sen some people use brush hair for that - maybe that will look better for such a scale.
-
Basic rigging lines on shrimp boat
Whitebeard replied to Fright's topic in Masting, rigging and sails
I'm looking for the hull plans to make a scratch build for this craft - to have a "Jenny" of my own, would you happen to know or have a pdf or such? I've got the Lindberg model kit, but it's only for reference regarding the cabin and other elements. I'm missing the grid lines for the hull. -
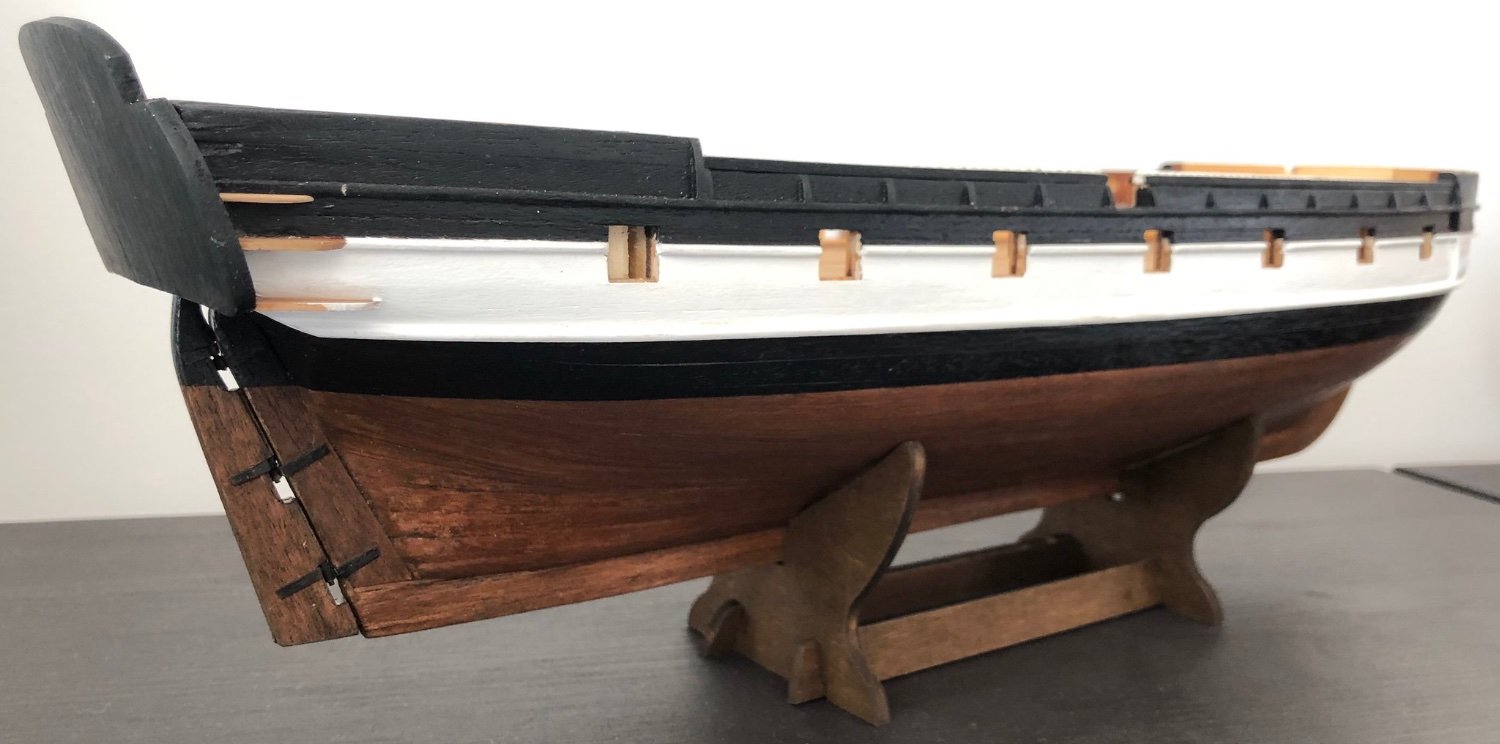
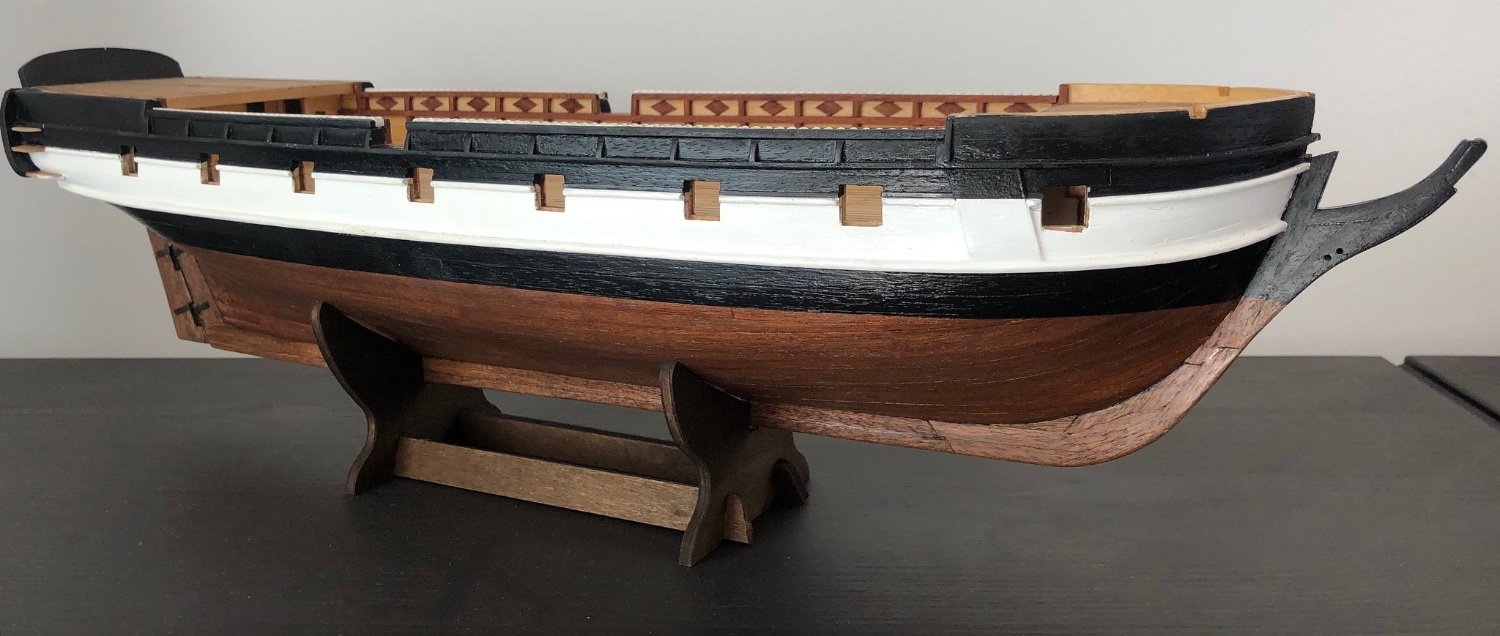
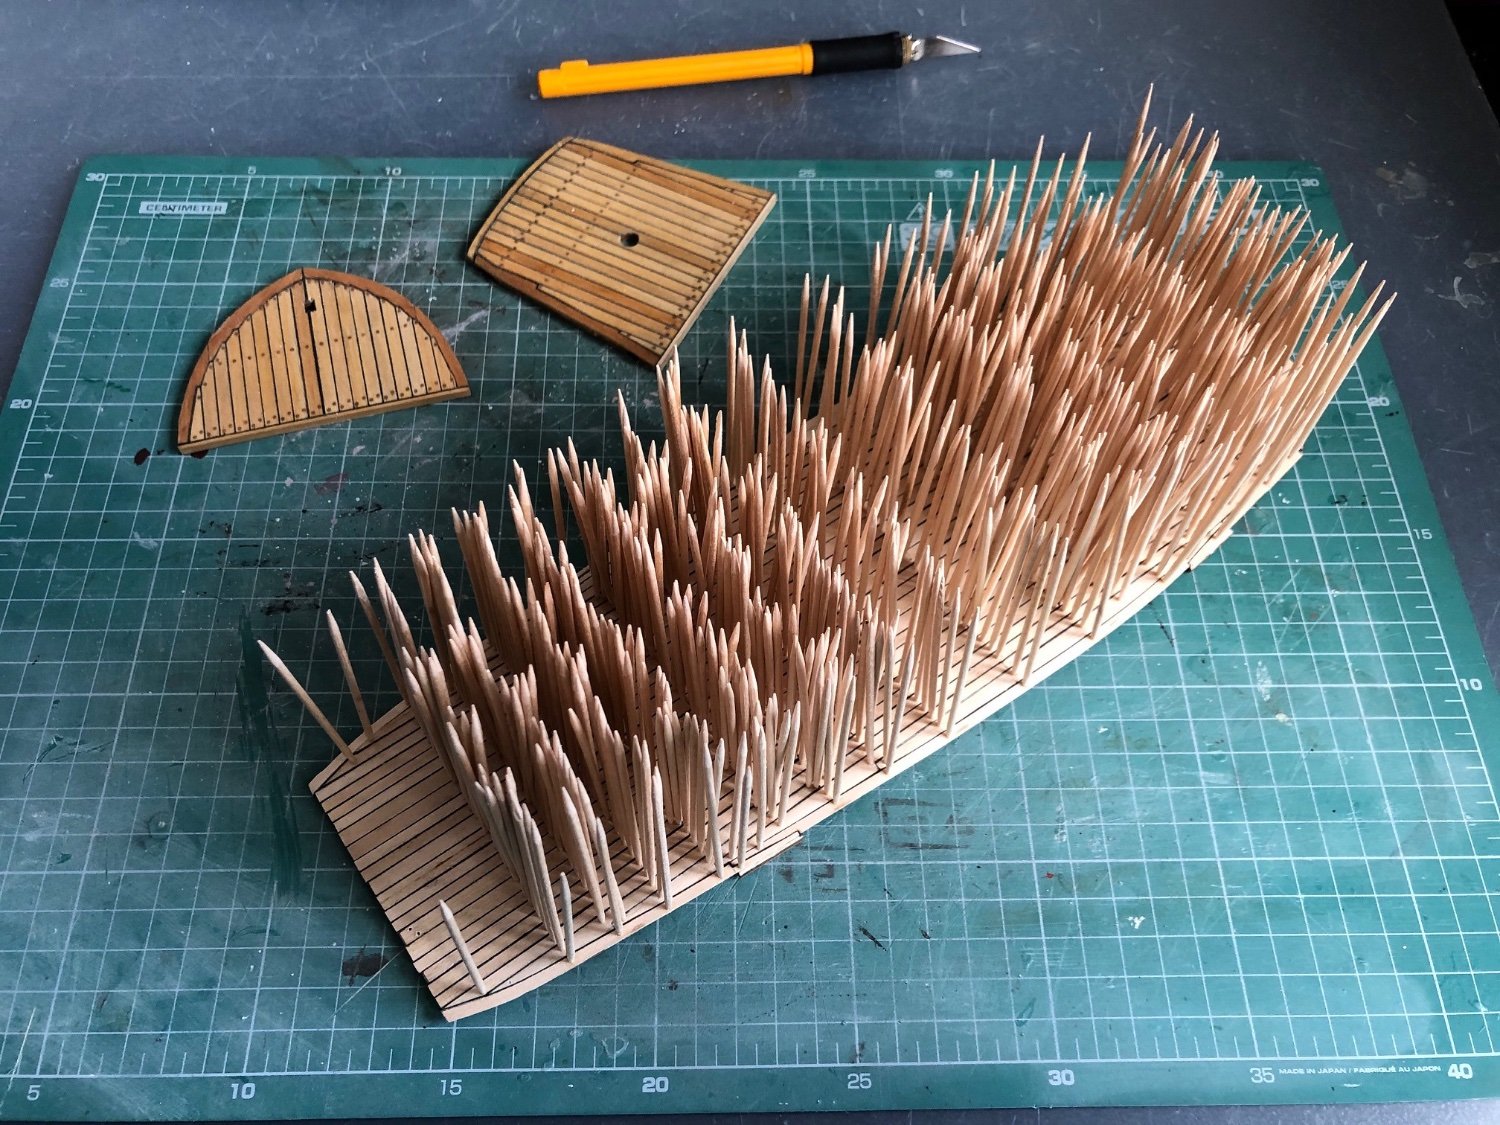
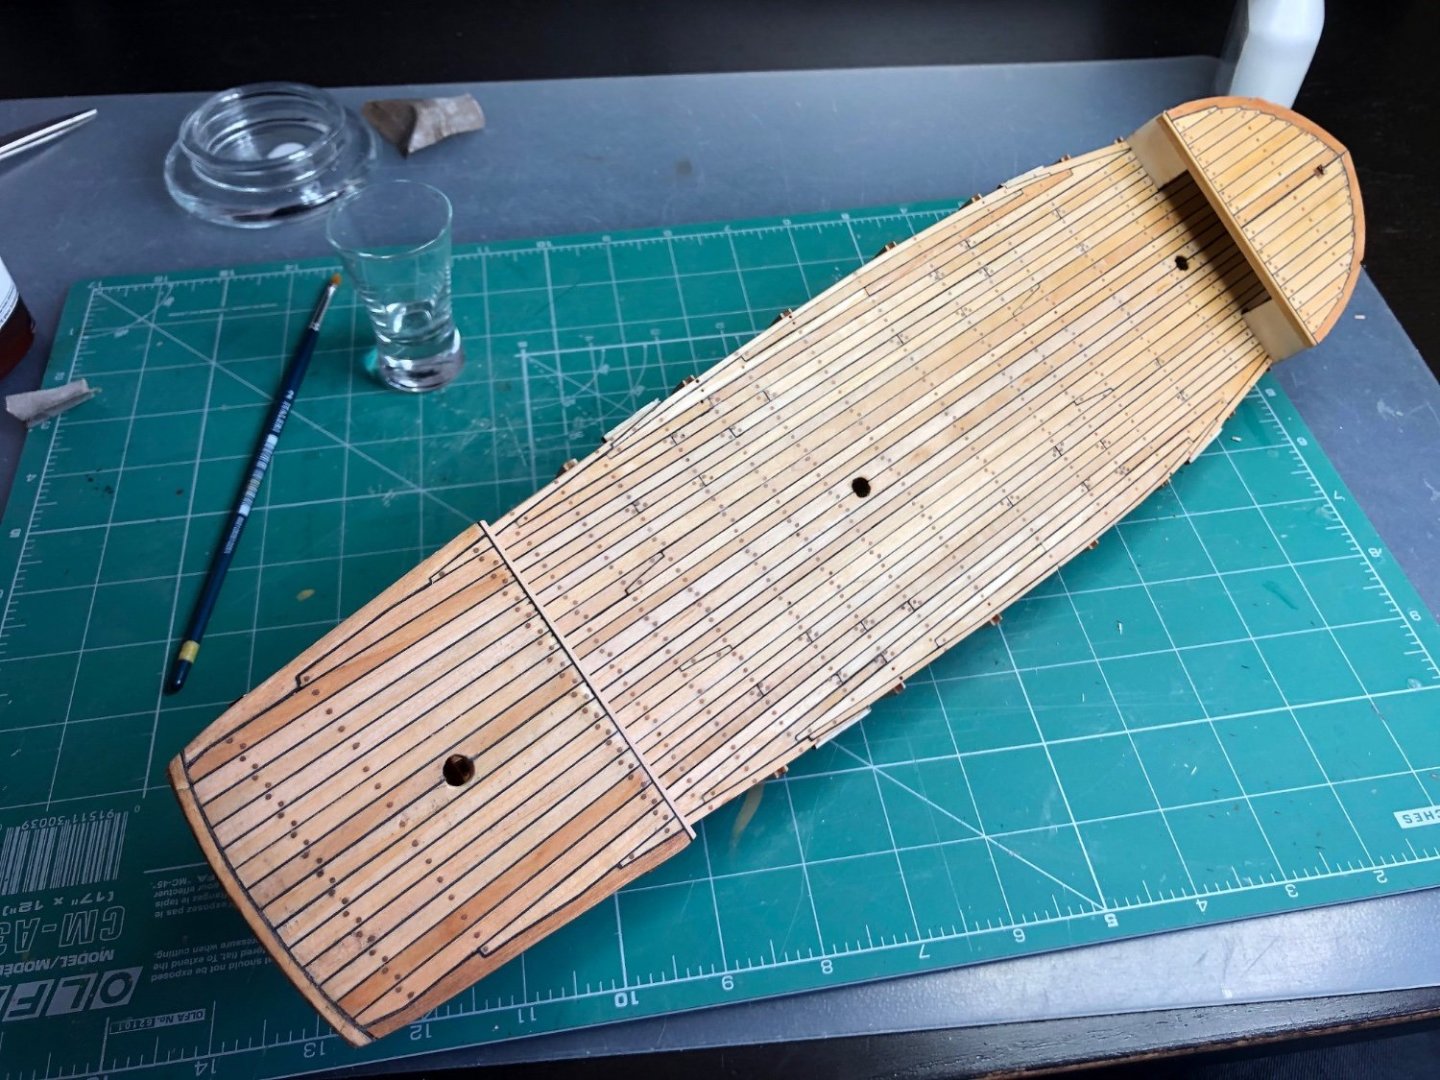
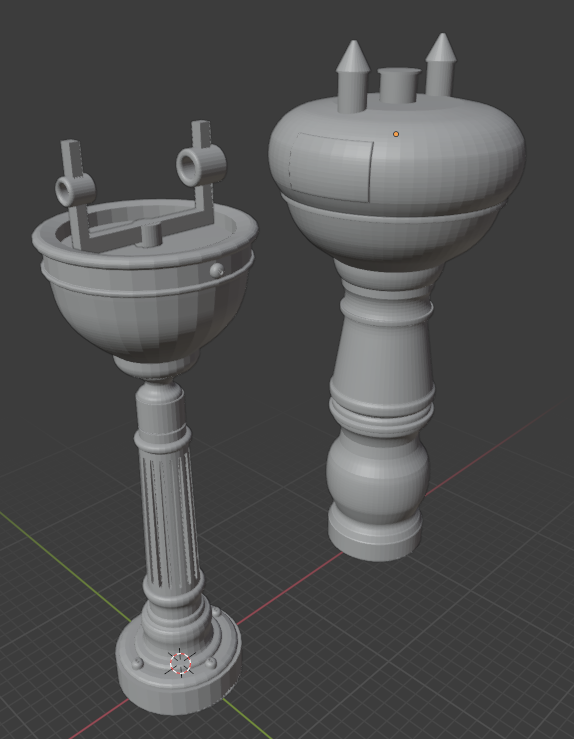
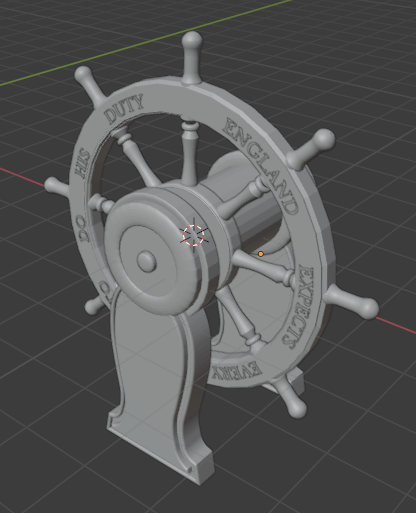
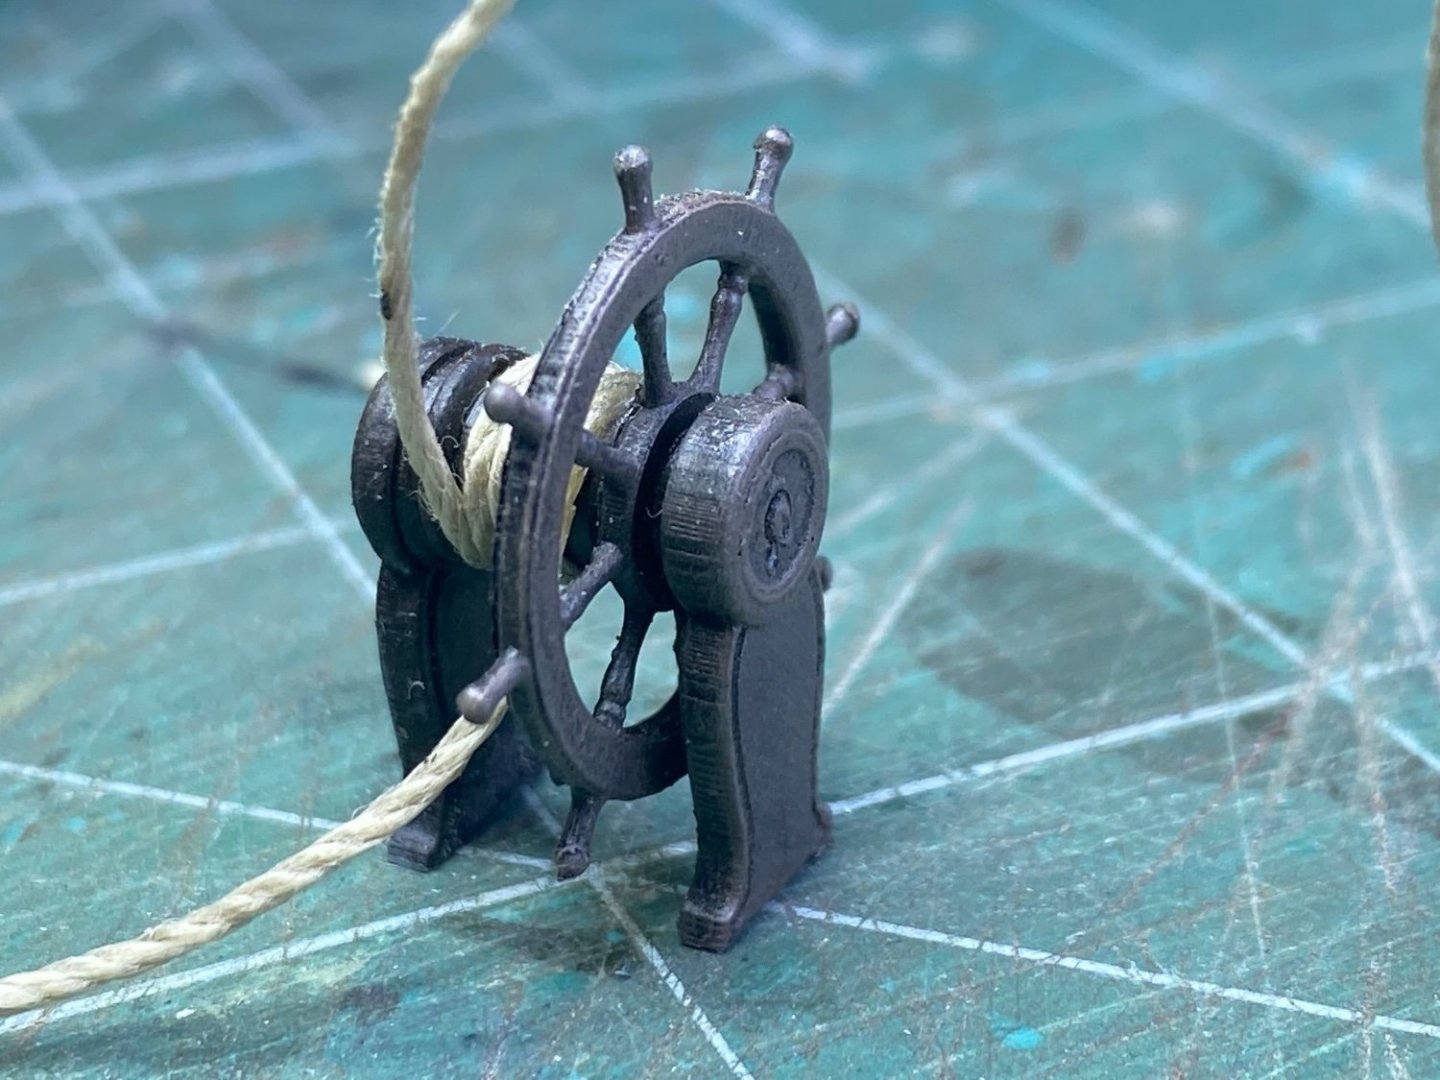
So, here it goes. It's my first complex build after having completed the Billing Boats Colin Archer, and my only second wood kit. The kit does come with a nice picture instruction, and with a video one at that, however, as I had gotten my hands on one specific book, I realized that alike all model kits, this one was also simplified. I'm trying my best to pull out as many additional details as possible and follow the drawings the book provides, but I won't lie, my abilities still have much to be desired... I'm skipping the part with the keel and the first general elements of construction to the moment where it starts to look like something interesting. Here's a set of photos that briefly illustrate what has taken place so far... I took some plans from Anatomy of Ship - Beagle to figure out the planking on the decks and tried my best to imitate it with different widths, and completed the caulking by means of black paper... ...and used a ton of toothpicks as well. The sanding was relatively simple, and covering the deck with some oil brought the wood out nicely. Next came the final planking of the hull, and the rudder - Here's where I botched it (not the first time) and had to make a new one on my own, and decided to include hand-made hinges on the way... The hinges is where I first used the Dremel soldering iron - a nice toy to play with... The final result of the hull planking, painting and first details are as follows. And here's my mistake nr 2 - the planks on the stern are vertical according to OCCRE, but horizontal according to Anatomy of Ship. I discovered this a tad too late, so it stayed the same...Here, also I tried my luck with the false gallery, but in the end decided to use the kit pieces, as this did not go too well... The bow still needs some work, but it's on the way... ...and then along came the deadeyes, which were a bit of a pest to deal with. They're not finally fixed in place yet, thus some of them are tilted. It's going to be secured when I get to the rigging part...Also here, the first element which came along with the 3D printer - I've designed a few parts, including the gunports, in Blender, which have been installed and painted... As for the moment, it's time to make my way from the outside with the "furniture" on deck. The kit did have canons for assembly, but... ...printing them would bring out a few more details as well. so... ...printed, assembled, shaded, with rigging, and temporarily installed on a jig to have the same lengths of ropes... The cannonade still needs some finishing touches before the blocks and ropes are installed. The compasses and wheel, well, let's just say that Blender's a fun tool to work with, and the AOS book showed a few more details (again) that were omitted in the kit... And once assembled and painted... I know it might irritate the purists out there, as I may have reduced the quality of the kit by bringing in resin prints to the equation, but I do lack a proper woodworking shop, and the printer is a way of making up for it. All for now... Stay tuned...


-
Nice work. I've been making my own Beagle from the same set, and great to see that someone has paid attention to the planks on the decks and not followed the kit instructions. Are you using the Anatomy of Ship series book? Good job with the doors and frames - I was too ignorant to do that - shame on me.