Brinkman
-
Posts
154 -
Joined
-
Last visited
Content Type
Profiles
Forums
Gallery
Events
Everything posted by Brinkman
-
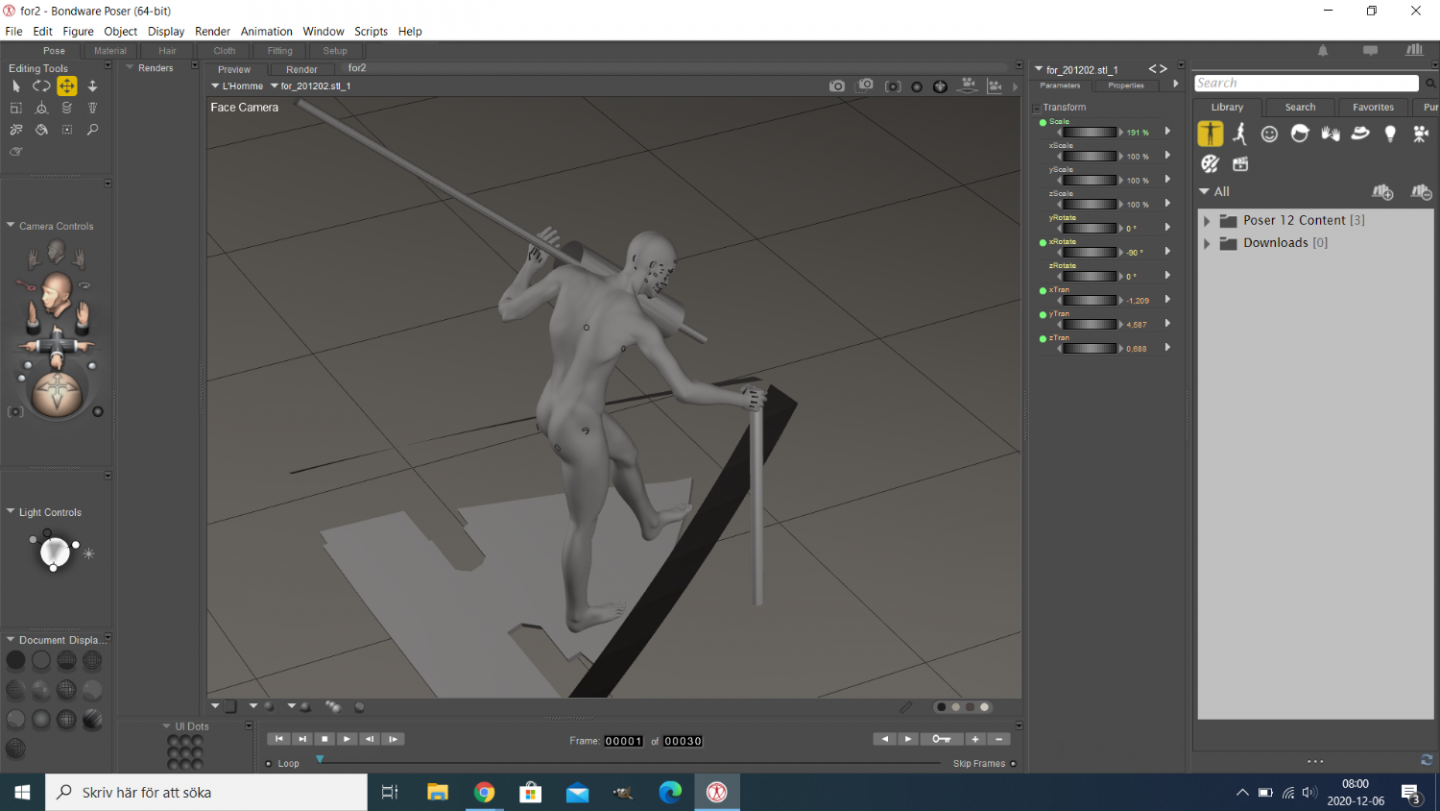
 Very impressive build! And I love your wooden mannequin! Regarding 3D printing roars men one way would do something similar to what I did in my previous build. I built parts of the ship in CAD and imported it in a program called Poser. There one can manipulate the mannequin to any position you want so it interacts with the CAD of the ship and then export and 3D print just the human. These mannequins are naked, but perhaps the roars men didn't wear a lot of clothes anyway so that would save you some time
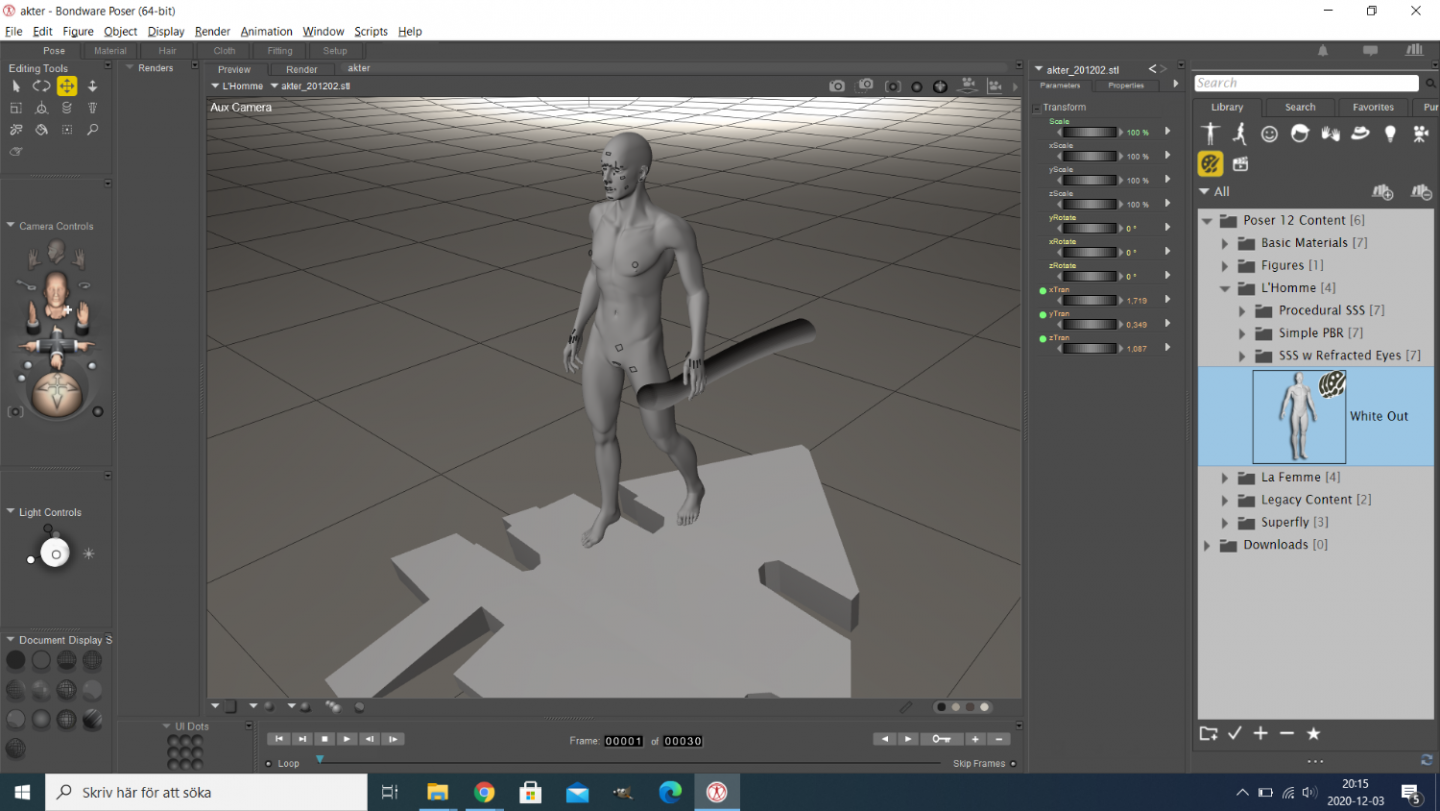
-
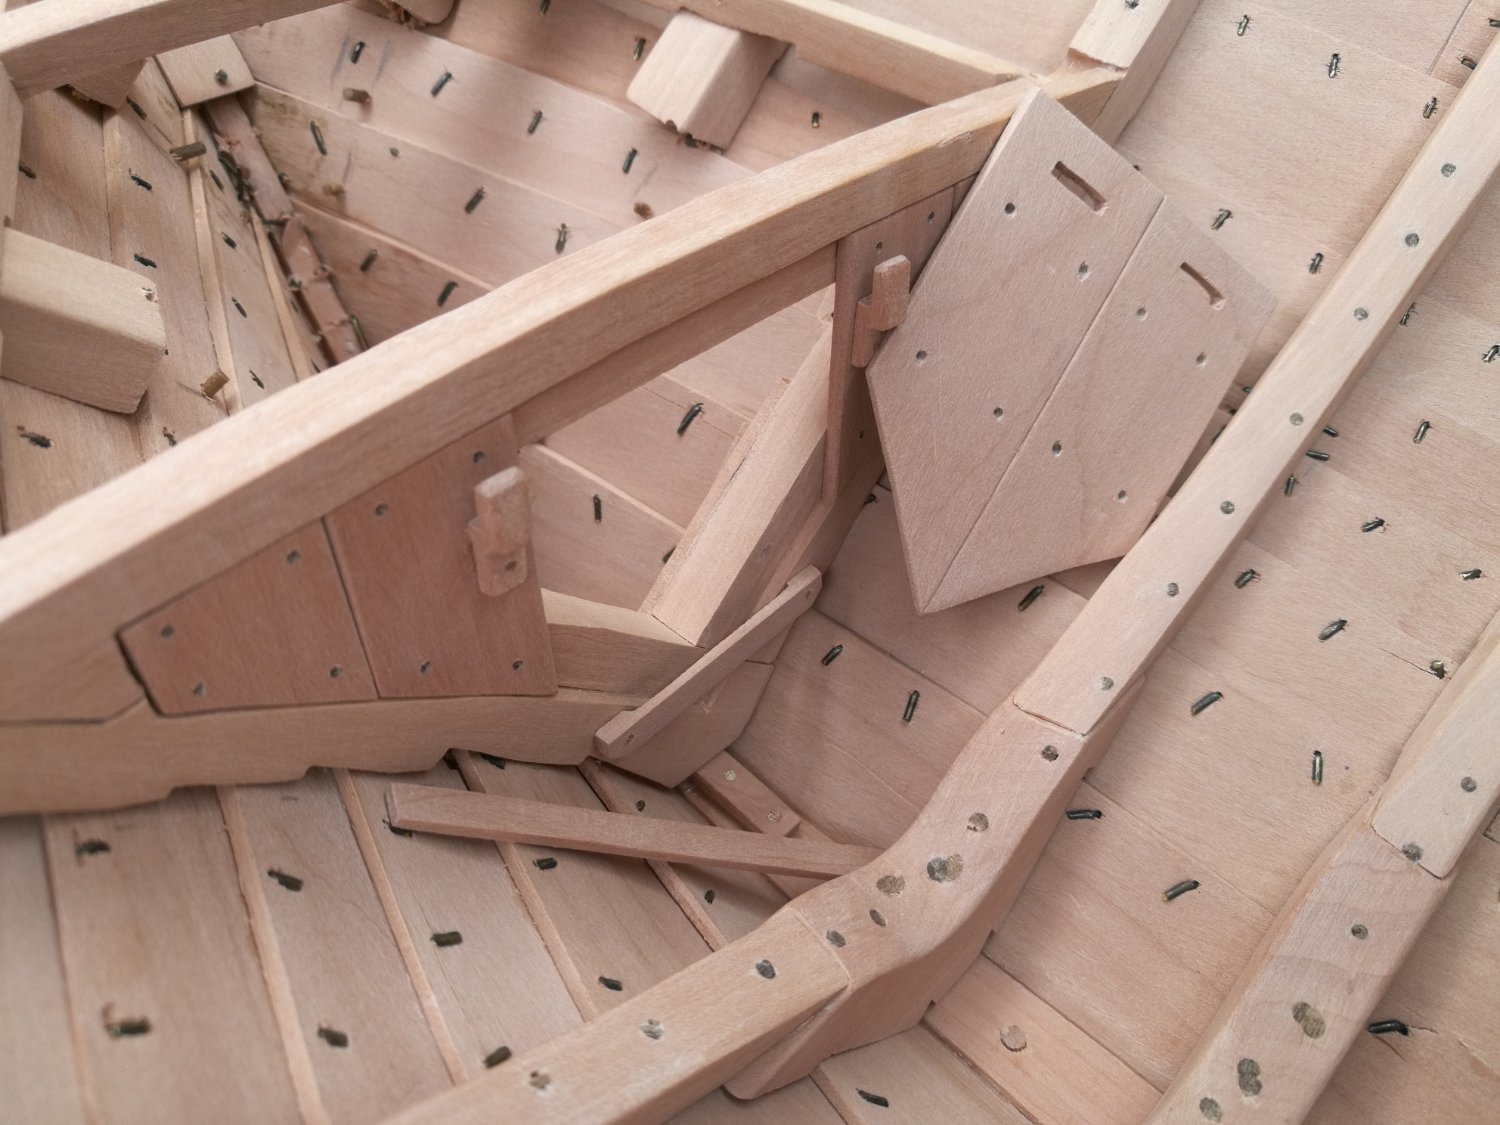
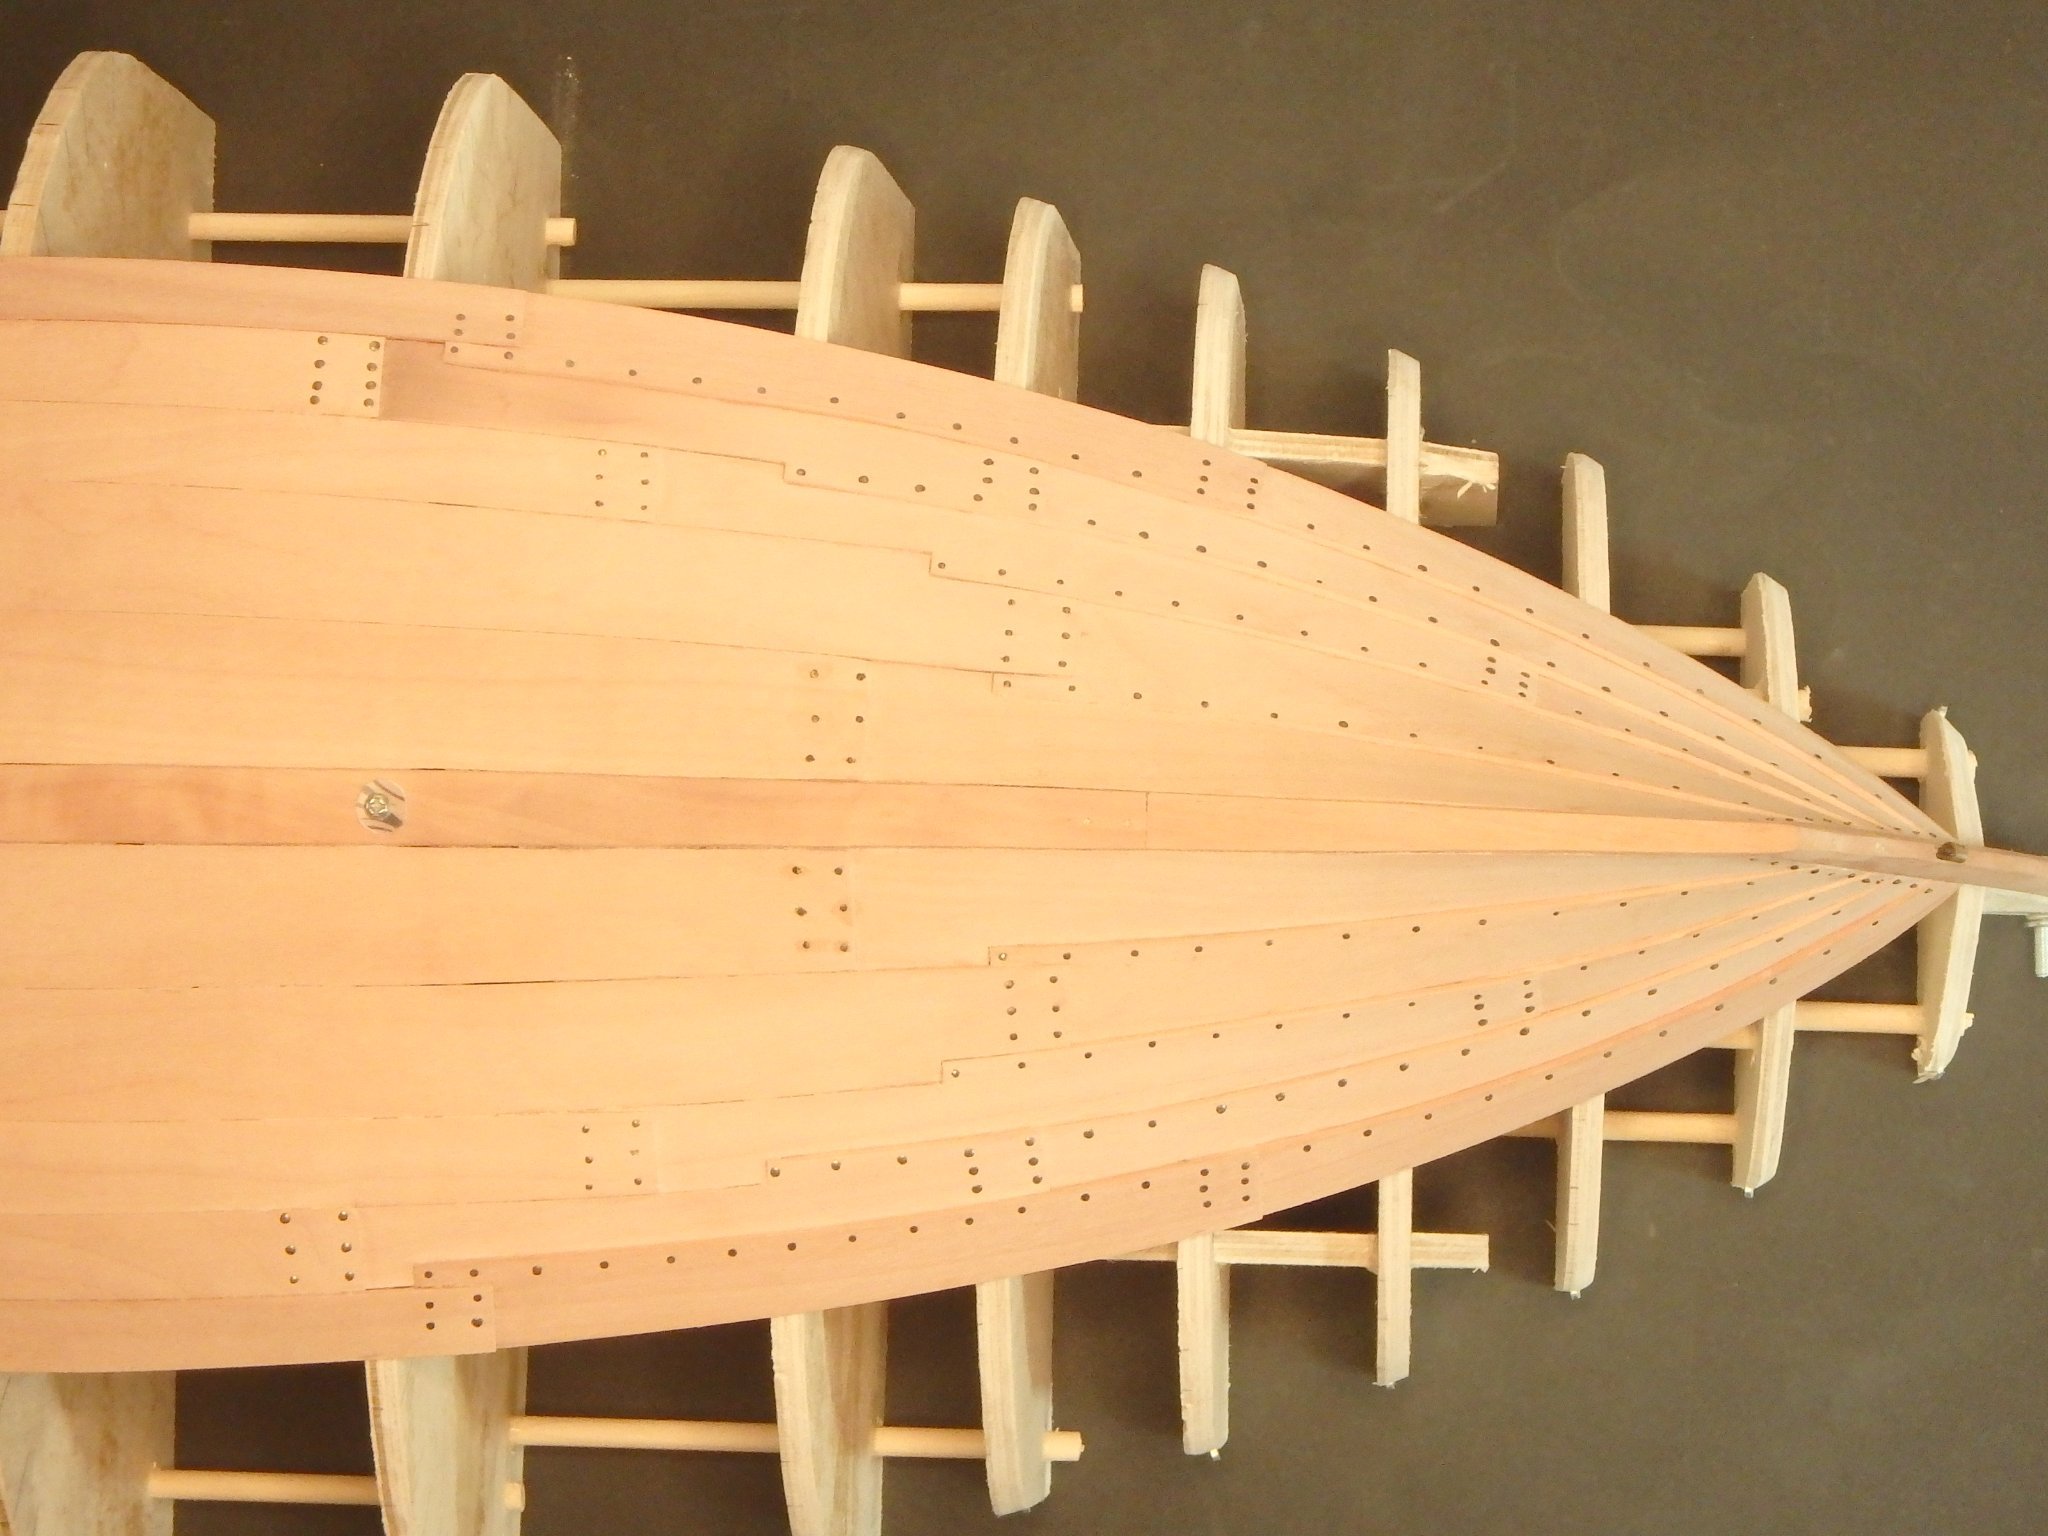
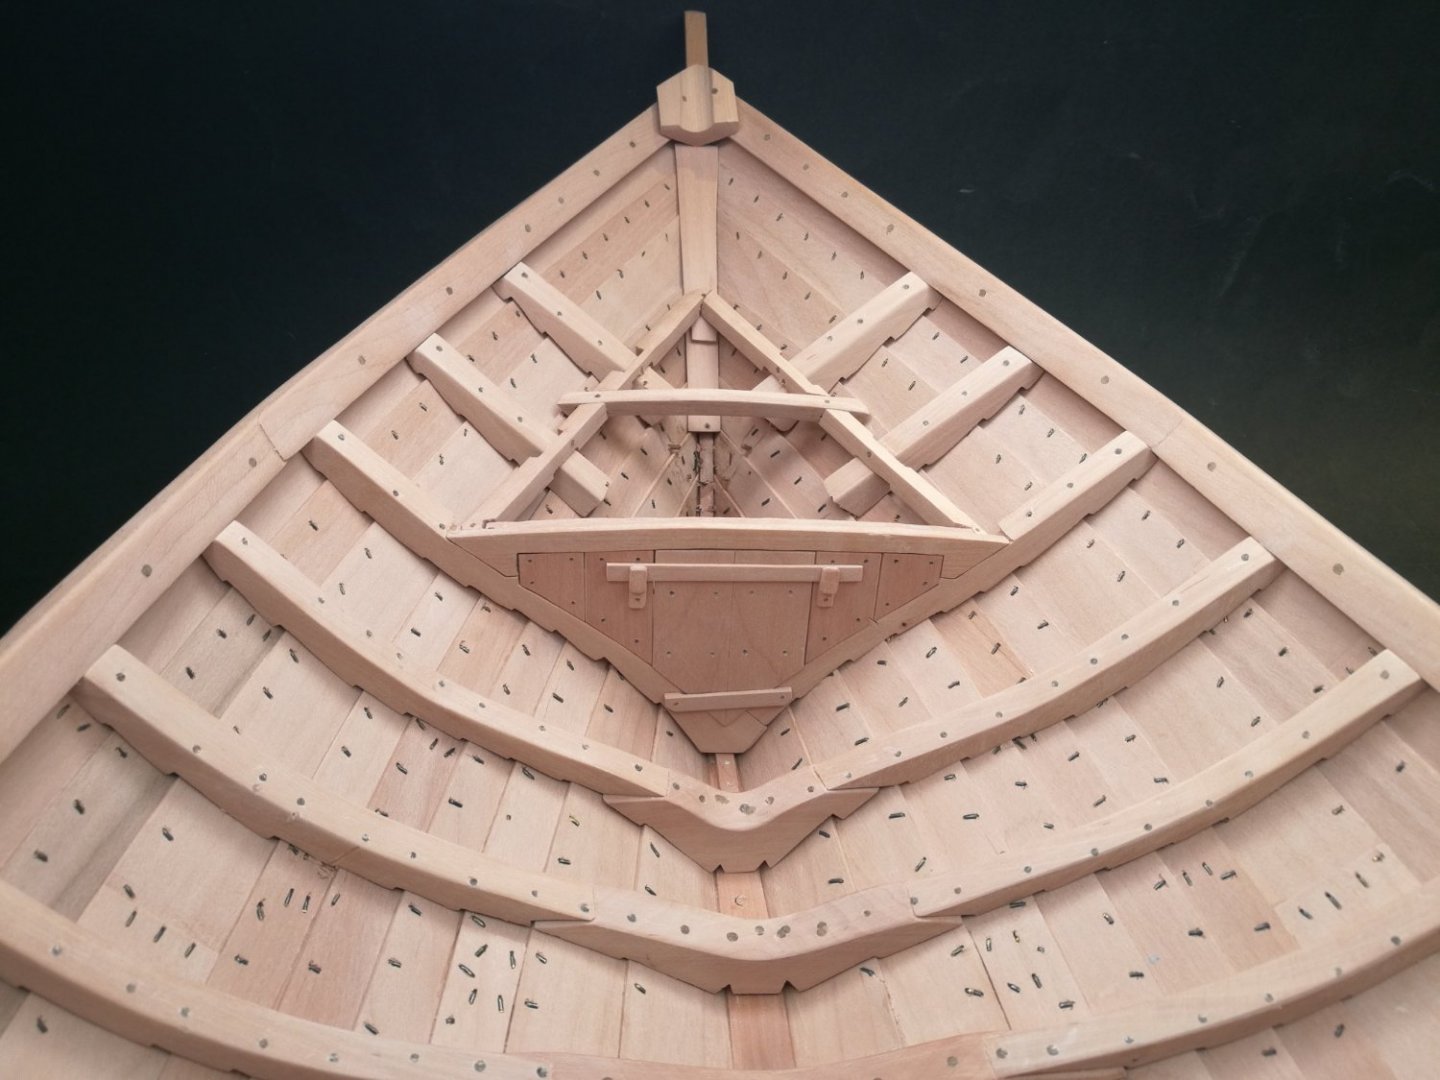
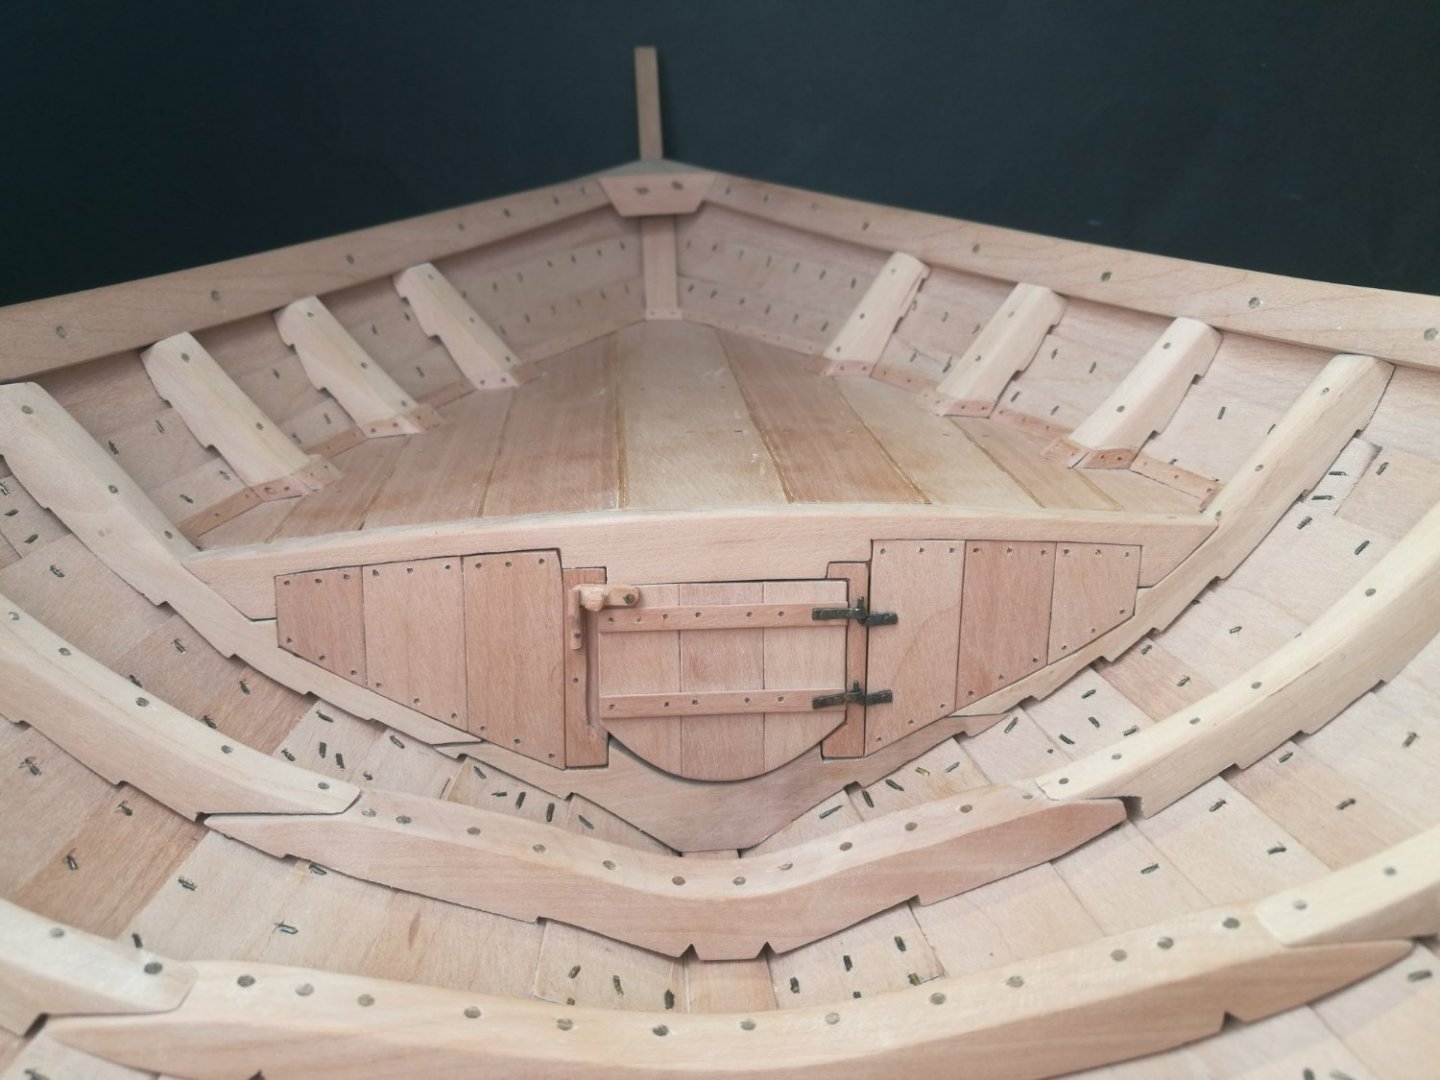
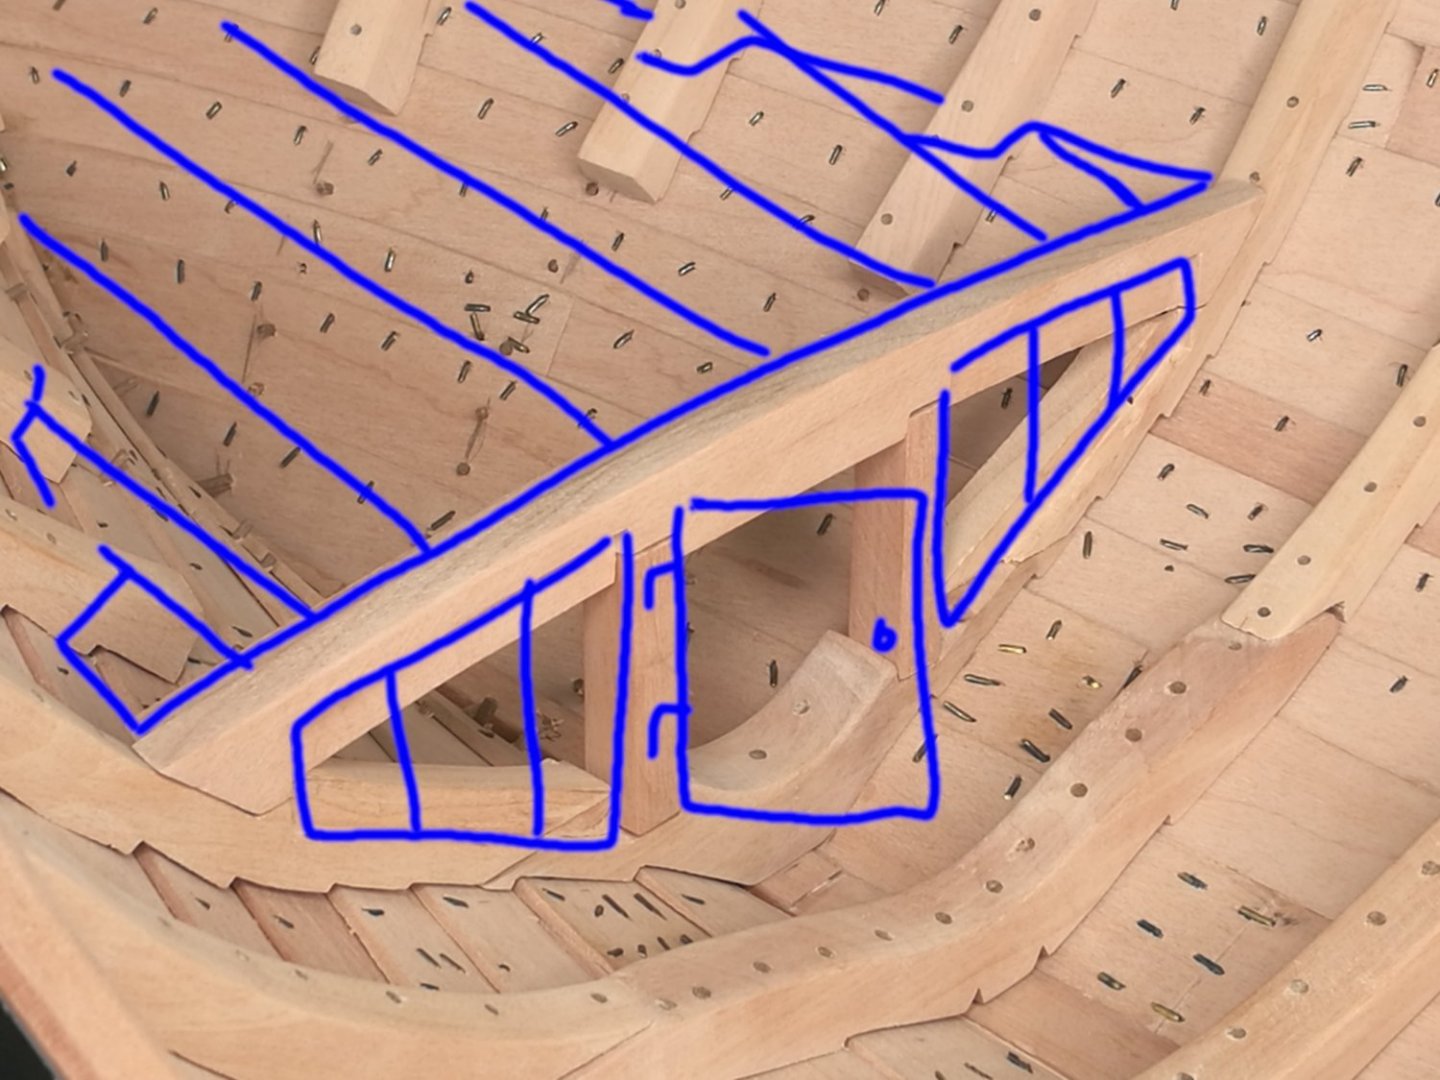
Now all the futtocks are in place. The space under the fore deck is much smaller than the aft space and I made a more simple door. This one isn't hinged but just kept in place by a bar. Holes used as handles are hidden under the bar. I have no idea if something like this was used, but it seems plausible to me. And on a last note there is news of the masts I saw being cut. A couple of days after I posted about it I saw this news article about how they are preparing the sailing ship Götheborg for hopefully another trip to China. In the link there is a clip of them making the yards. The article and clip is in swedish but you can still see how they fasten the two pieces together to form a yard. https://www.svt.se/nyheter/lokalt/vast/ostindiefararen-gotheborg-far-ny-rigg


- 87 replies
-
- 12
-

-
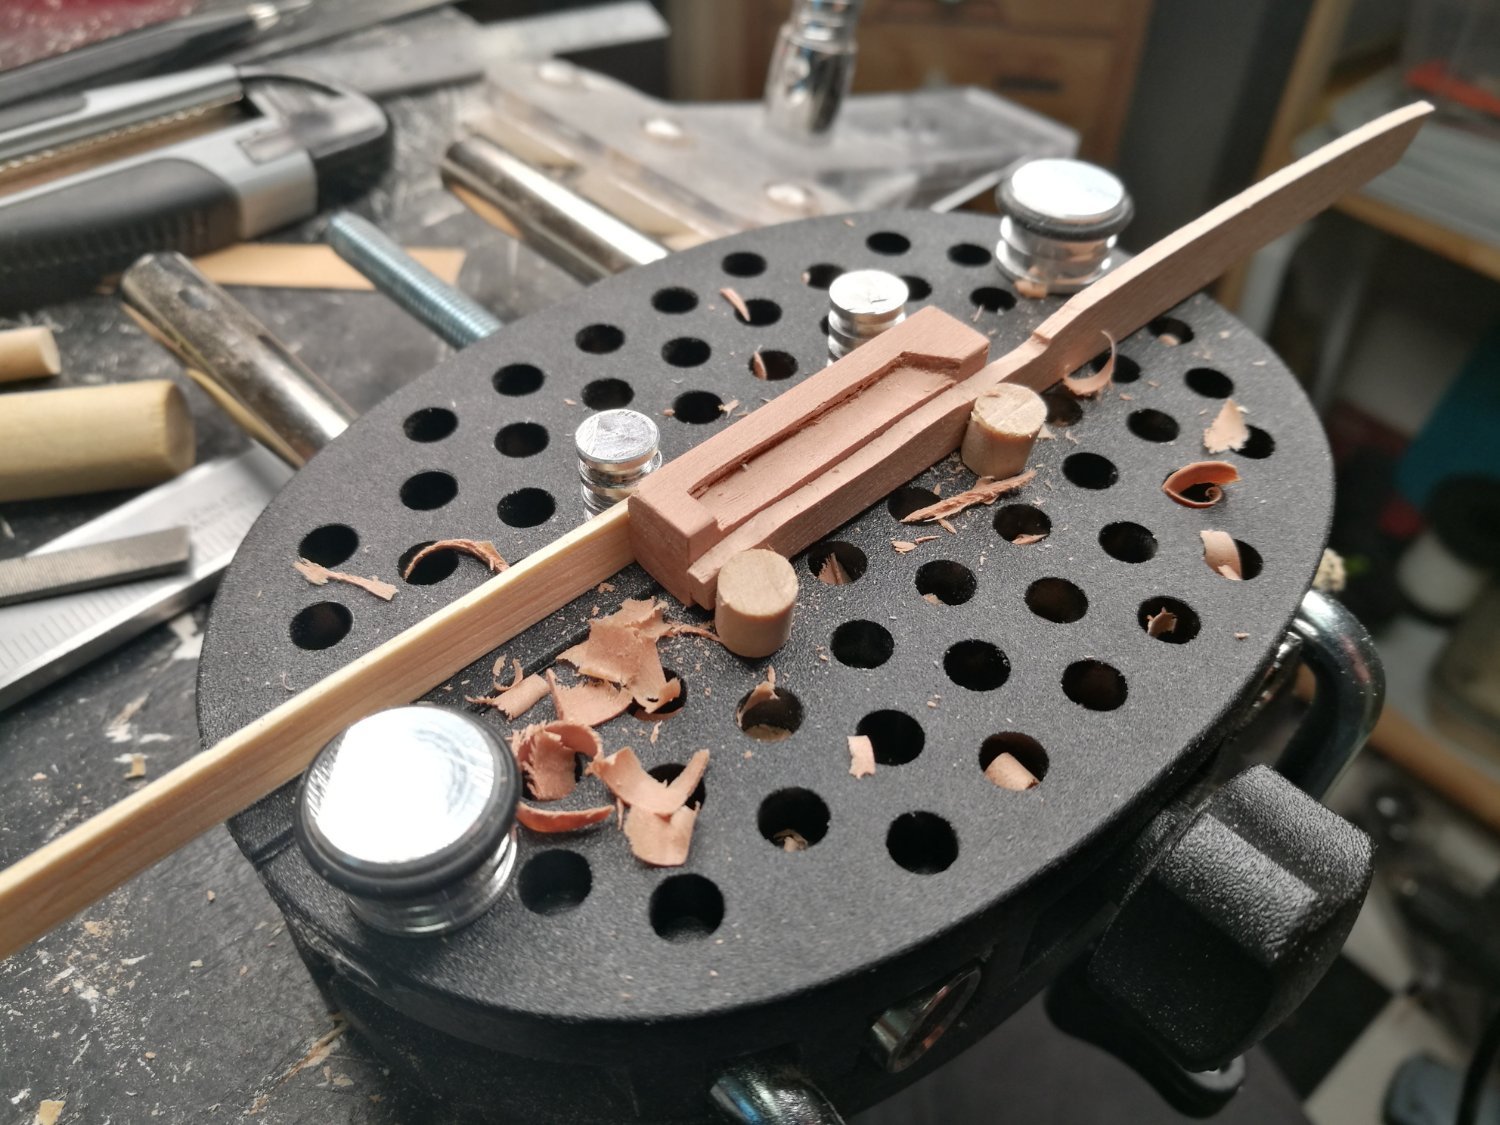
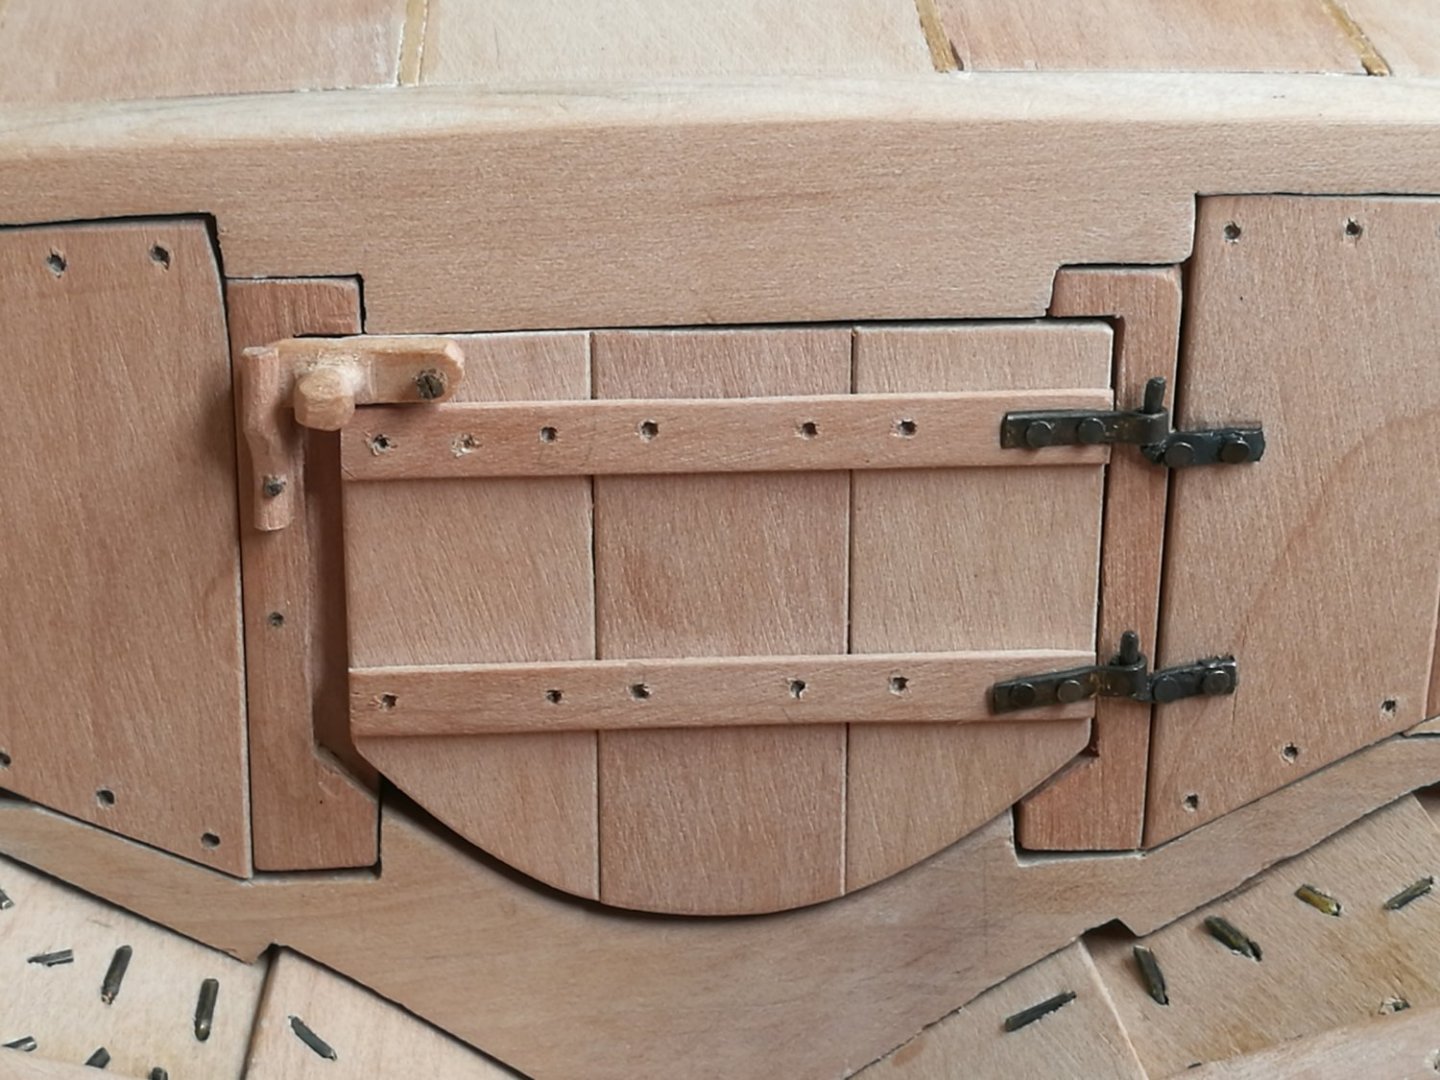
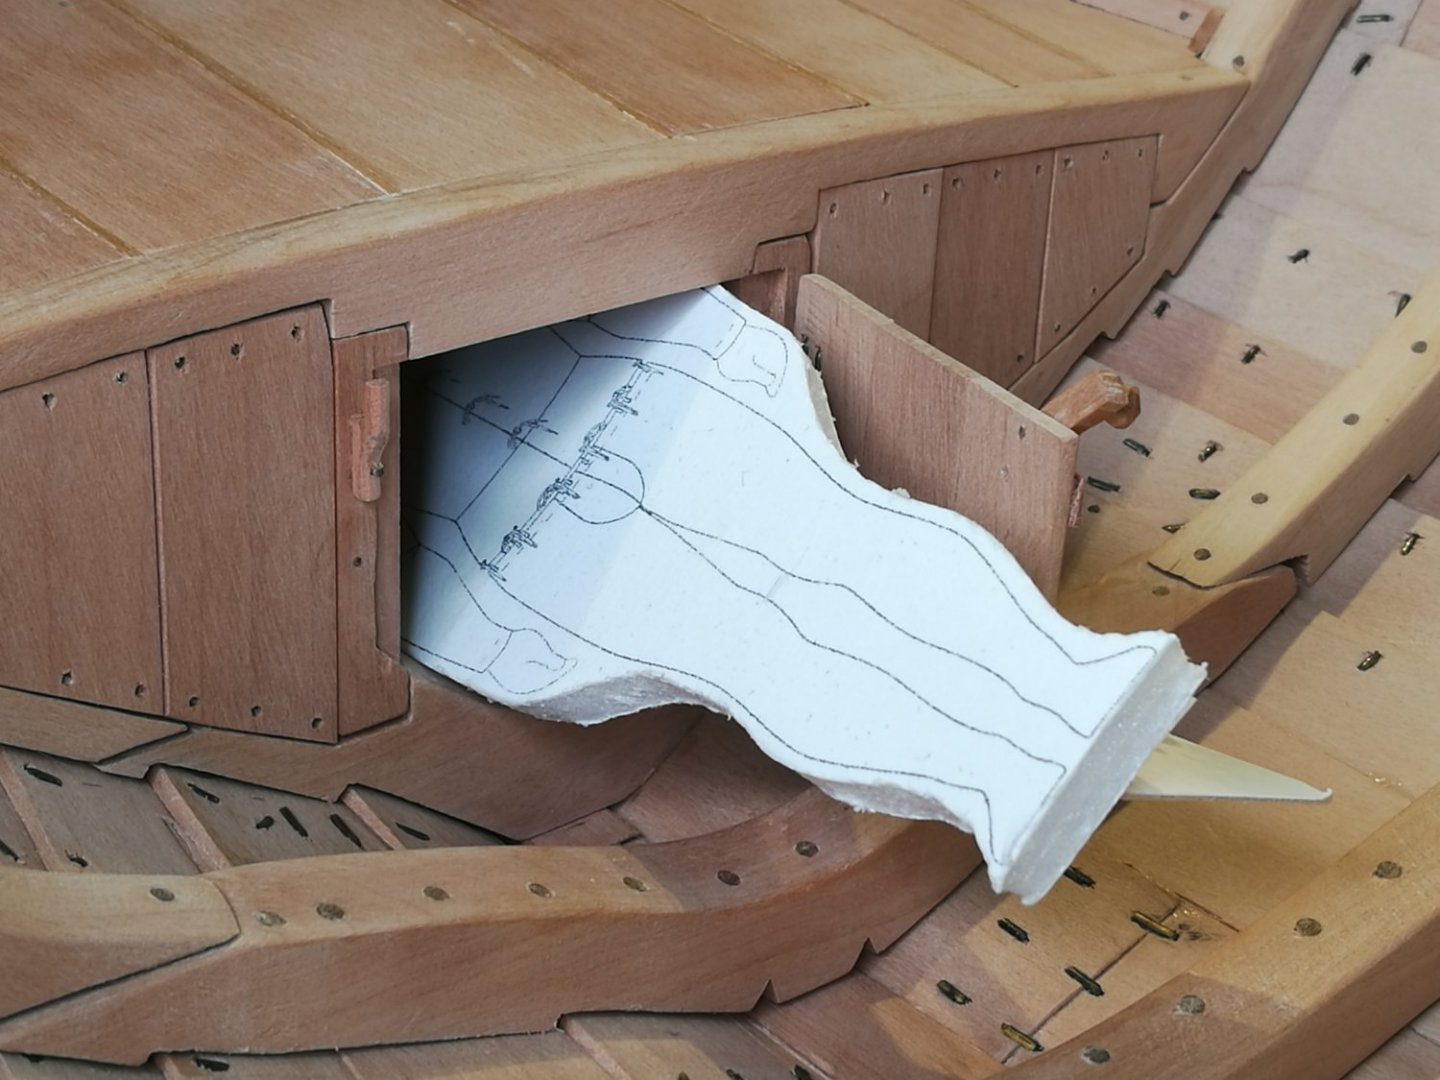
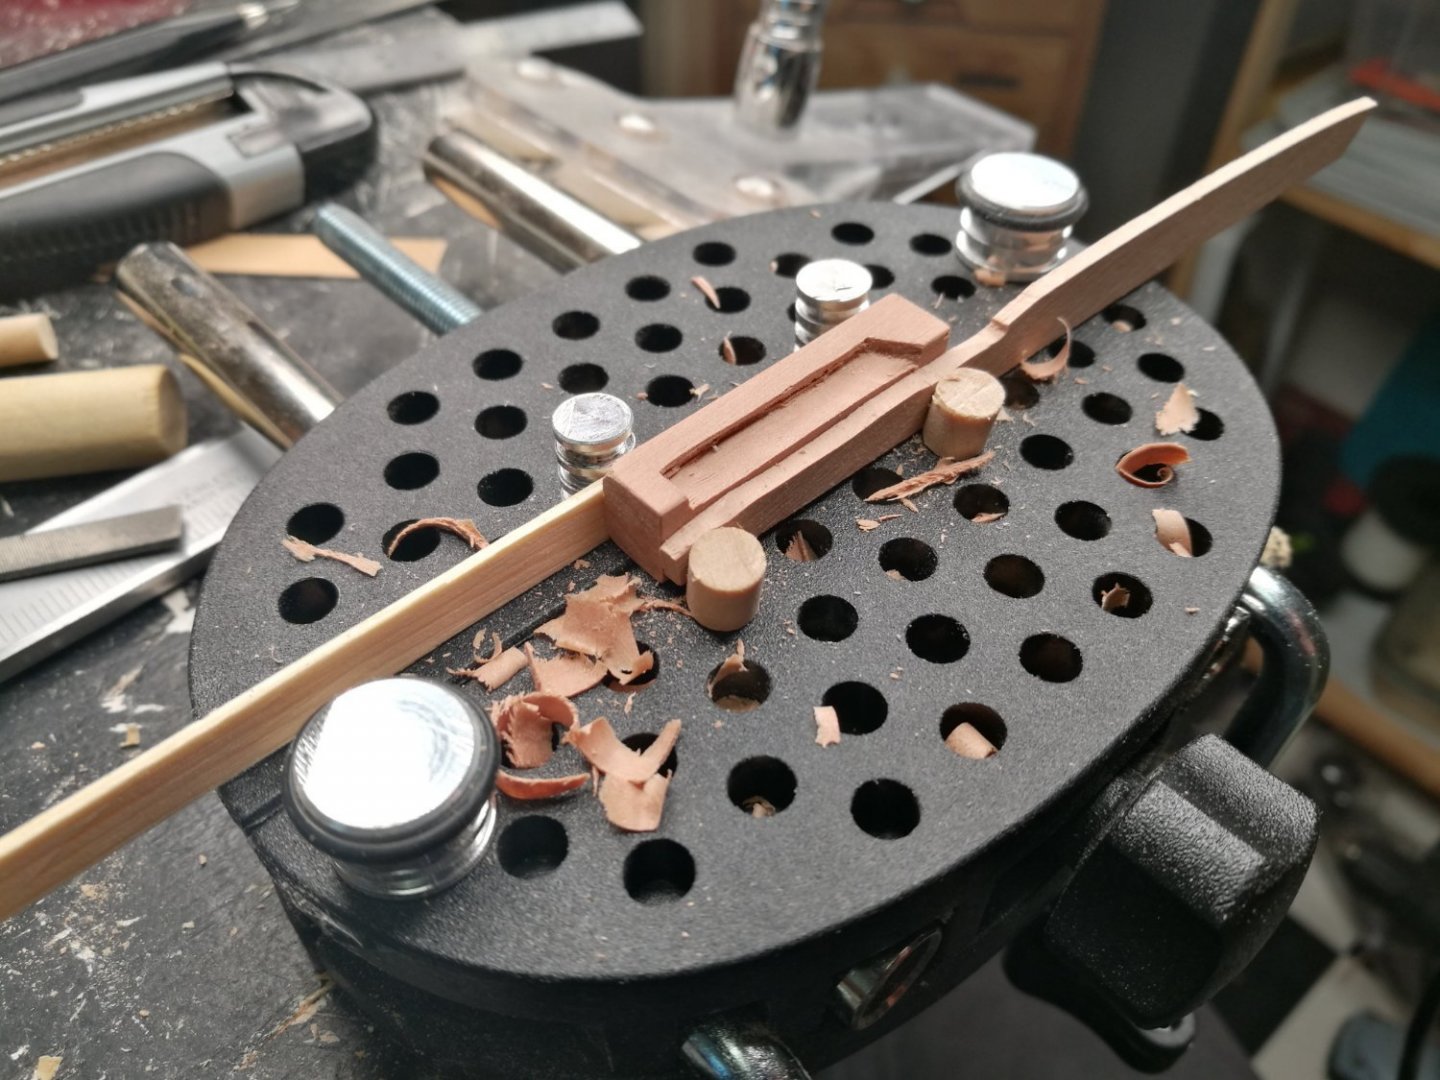
Thank you Håkan and Steven! Yes, the gap between deck and hull is really bothersome. I really do not know how (or if) they fixed it, but a simple molding sounds plausible to me. But yeah, it's really hard to do on your smaller scaled ships but I bet nobody notices those gaps unless they are pointed out. Now the bulkhead is planked. It was interesting to make the planks as I first made a cardboard template and then glued together three over sized planks and cut them to size as one piece to match the template. But then I broke them apart again and glued them in place one by one to harmonize the gaps between them and the gaps around them. The hinges and latch were quite fiddly. The pintles were 1,5mm stock I hammered flat on one end for what apparently is called the strap and then filed it to 1mm for the pintle. And when I see this blown up picture I see that I really need to clean up the extra hole I got from a first iteration of the latch The door isn't large, but you can crawl to get inside the (relatively) dry storage space. It isn't a large hold, but I guess you can store sensitive and small items there. And yeah, it's hard to open the door when the main hold is full of goods, but it's better then having the door opening inwards and get it stuck by something inside blocking it. I live in Gothenburg that used to have thriving shipyards and when biking through the area where they used to be but now holds normal industries and offices, they actually were cutting new masts for a ship! The pile you see behind the old masts are the ratlines.

- 87 replies
-
- 13
-
-
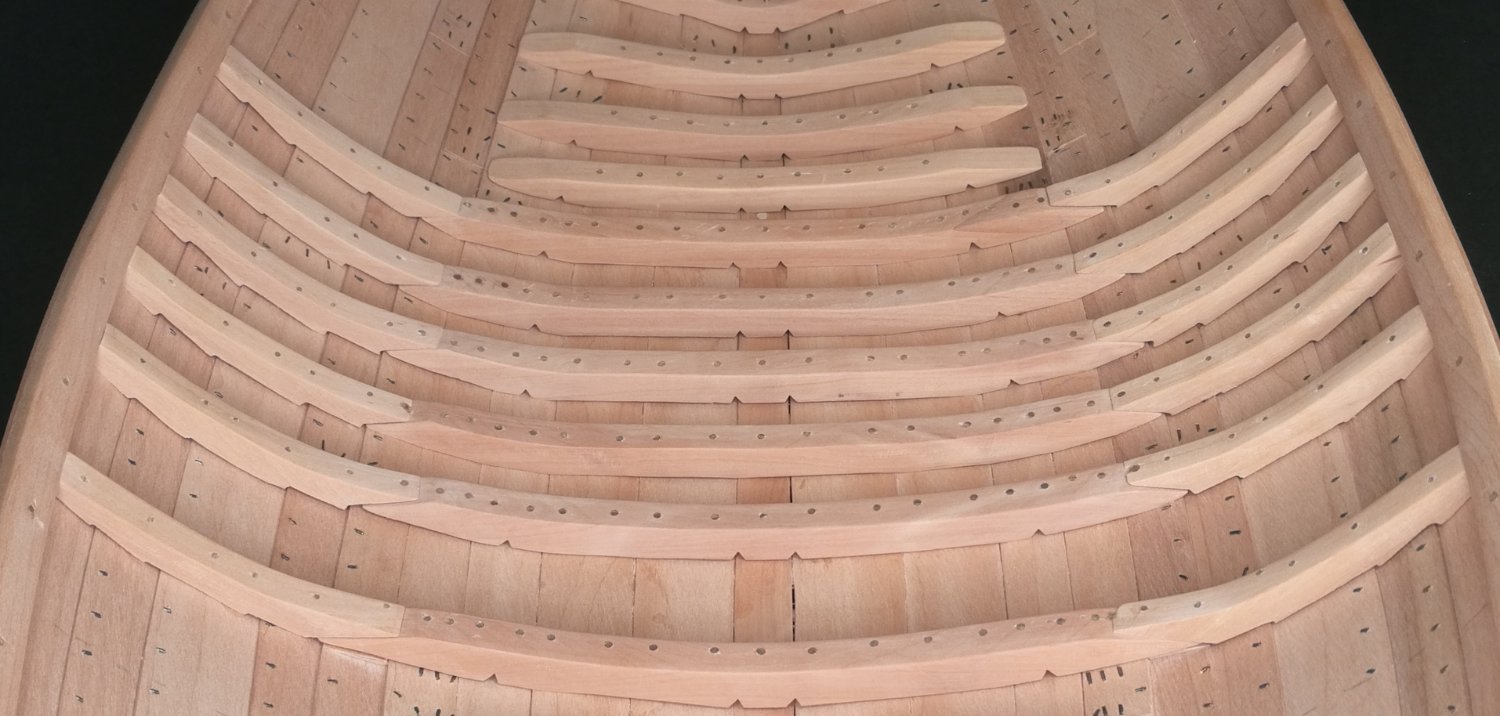
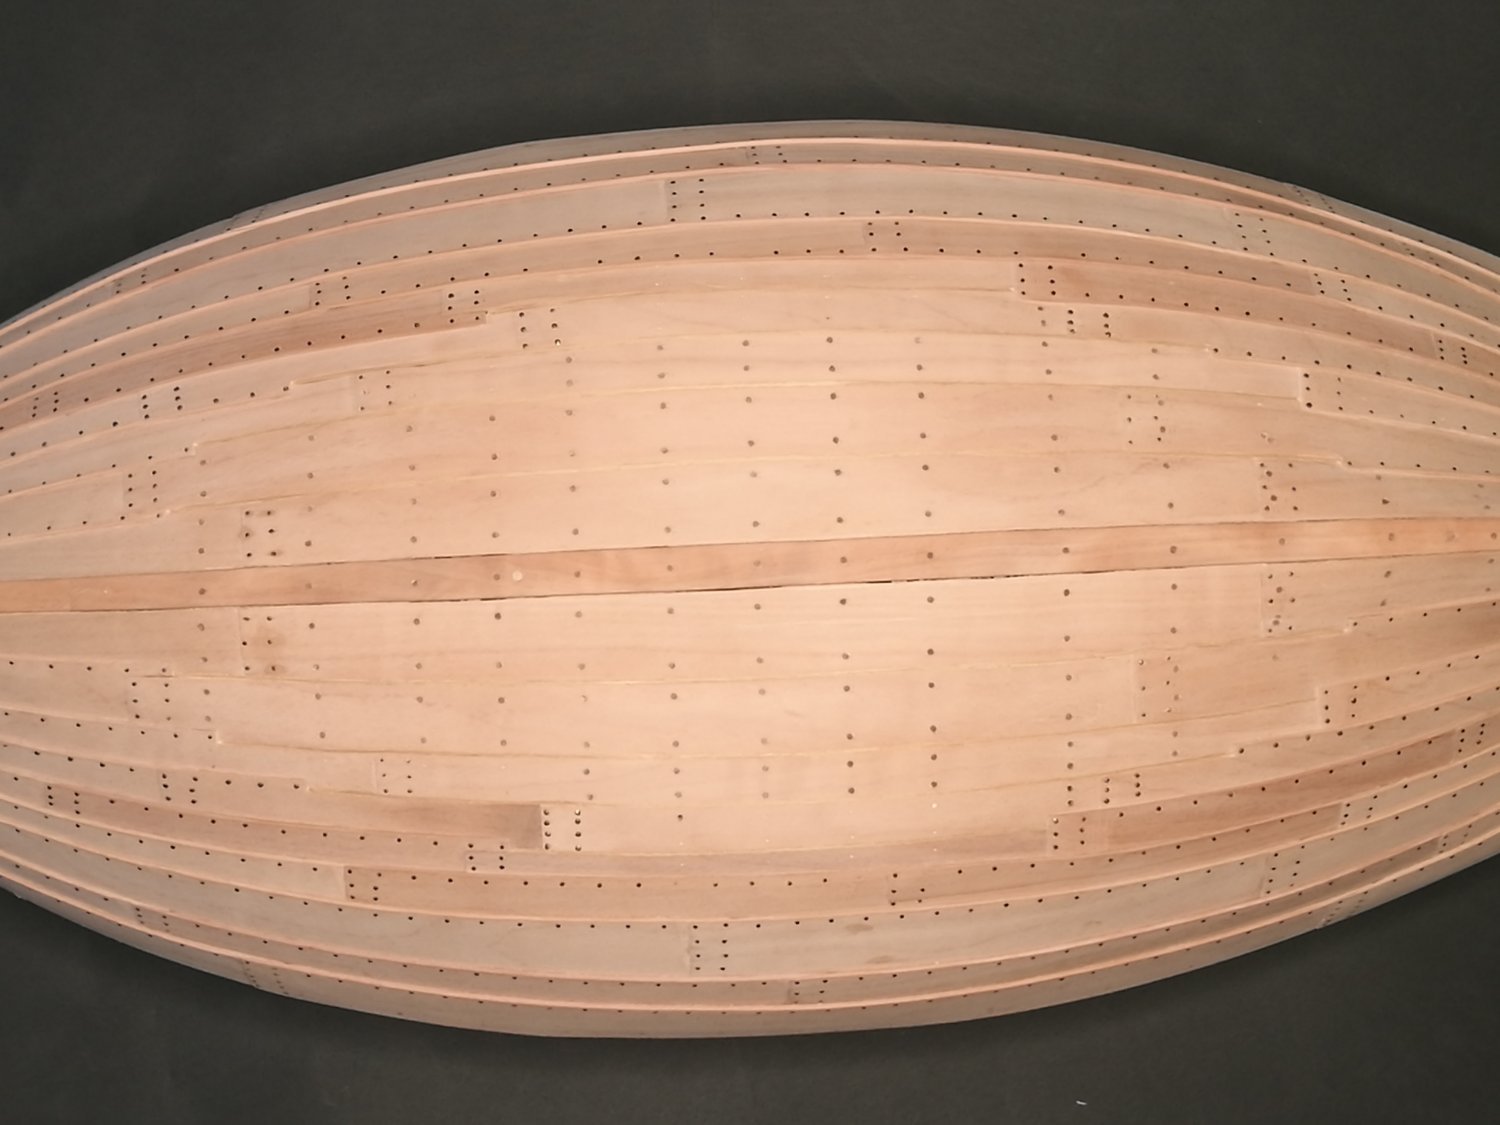
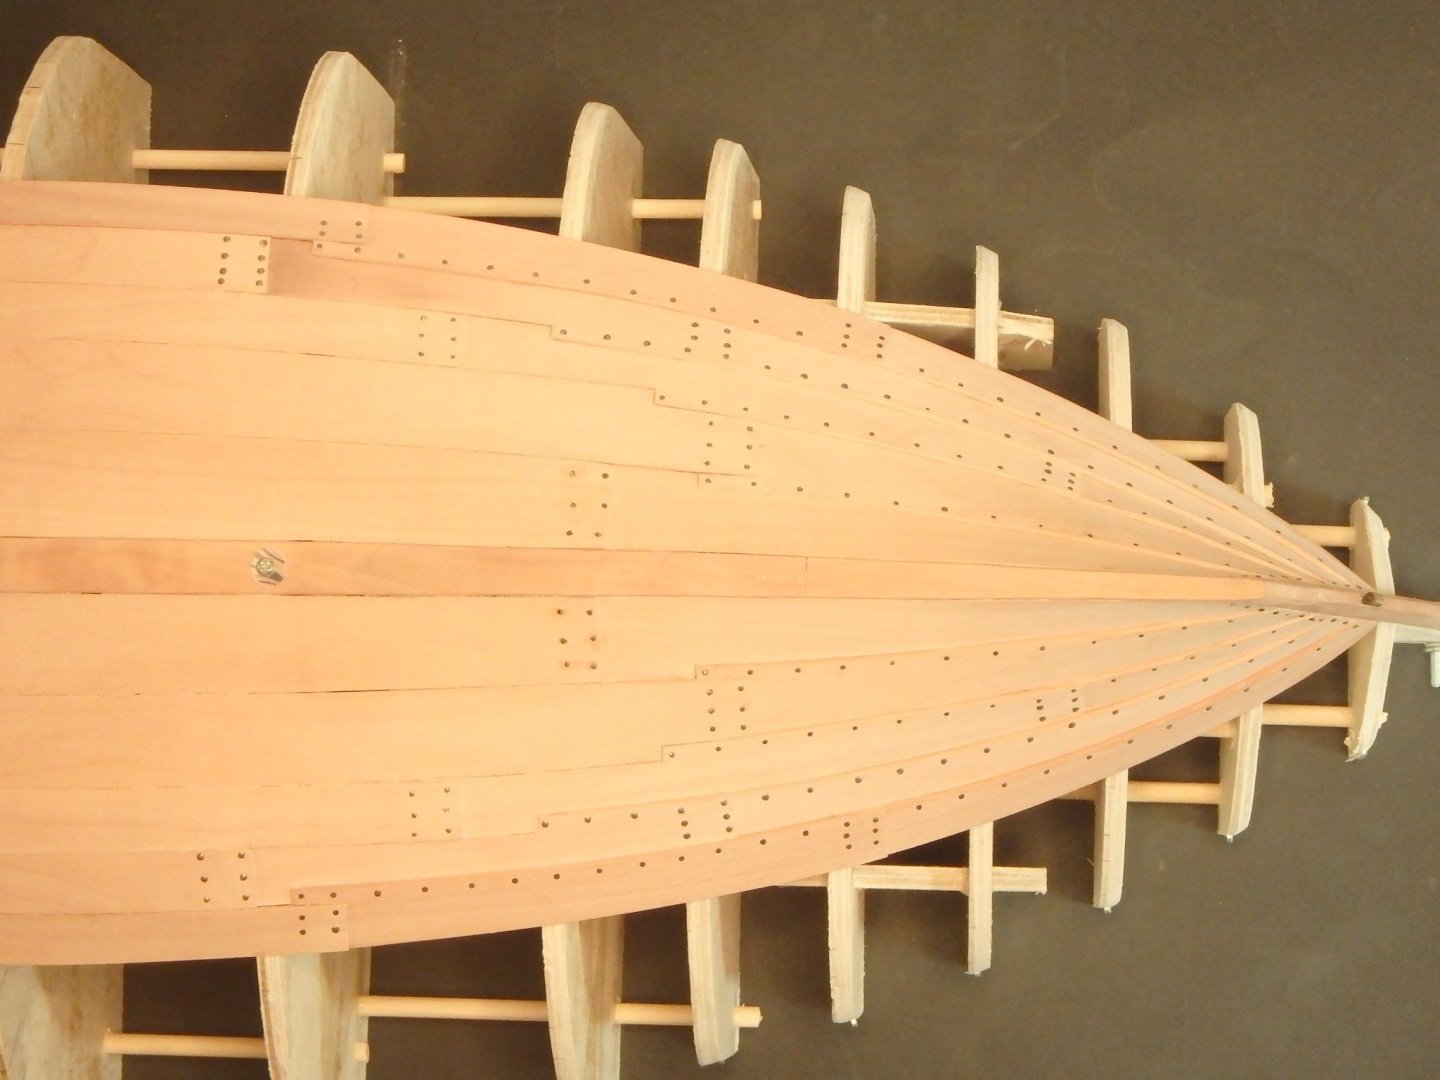
Thank you for all the likes! The planks are in place and treenailed to the beams. These planks are really big, up to 40cm (16") wide. It's one of those things that really feels medieval in my eyes. The timber were probably sawn at the site and therefore they didn't rip the planks more than they needed too to save time. The deck is weatherproofed with laths between the planks like the hull and there's a molding around the edges. I sometimes find it hard to do the floor molding in an apartment, but here no angles were anywhere near 90 degrees. The nails in the molding are fake. They would be too small for 'real' nails so I did the trick where I drilled a shallow hole and colored it with a pencil. I went overboard with the nailing, some pieces got double the amount than needed... The molding is not something I've seen in any find, but seemed like a credible solution to seal the edges.
-
Thank you Håkan and Steven! Håkan, I remember seeing your kåg when I started work on my first cog and I'm glad you reminded me of it now when it's finished as I had forgotten about it. It's really nice and you definitely see the resemblance in it to older cogs! I will take some inspiration for some parts
-
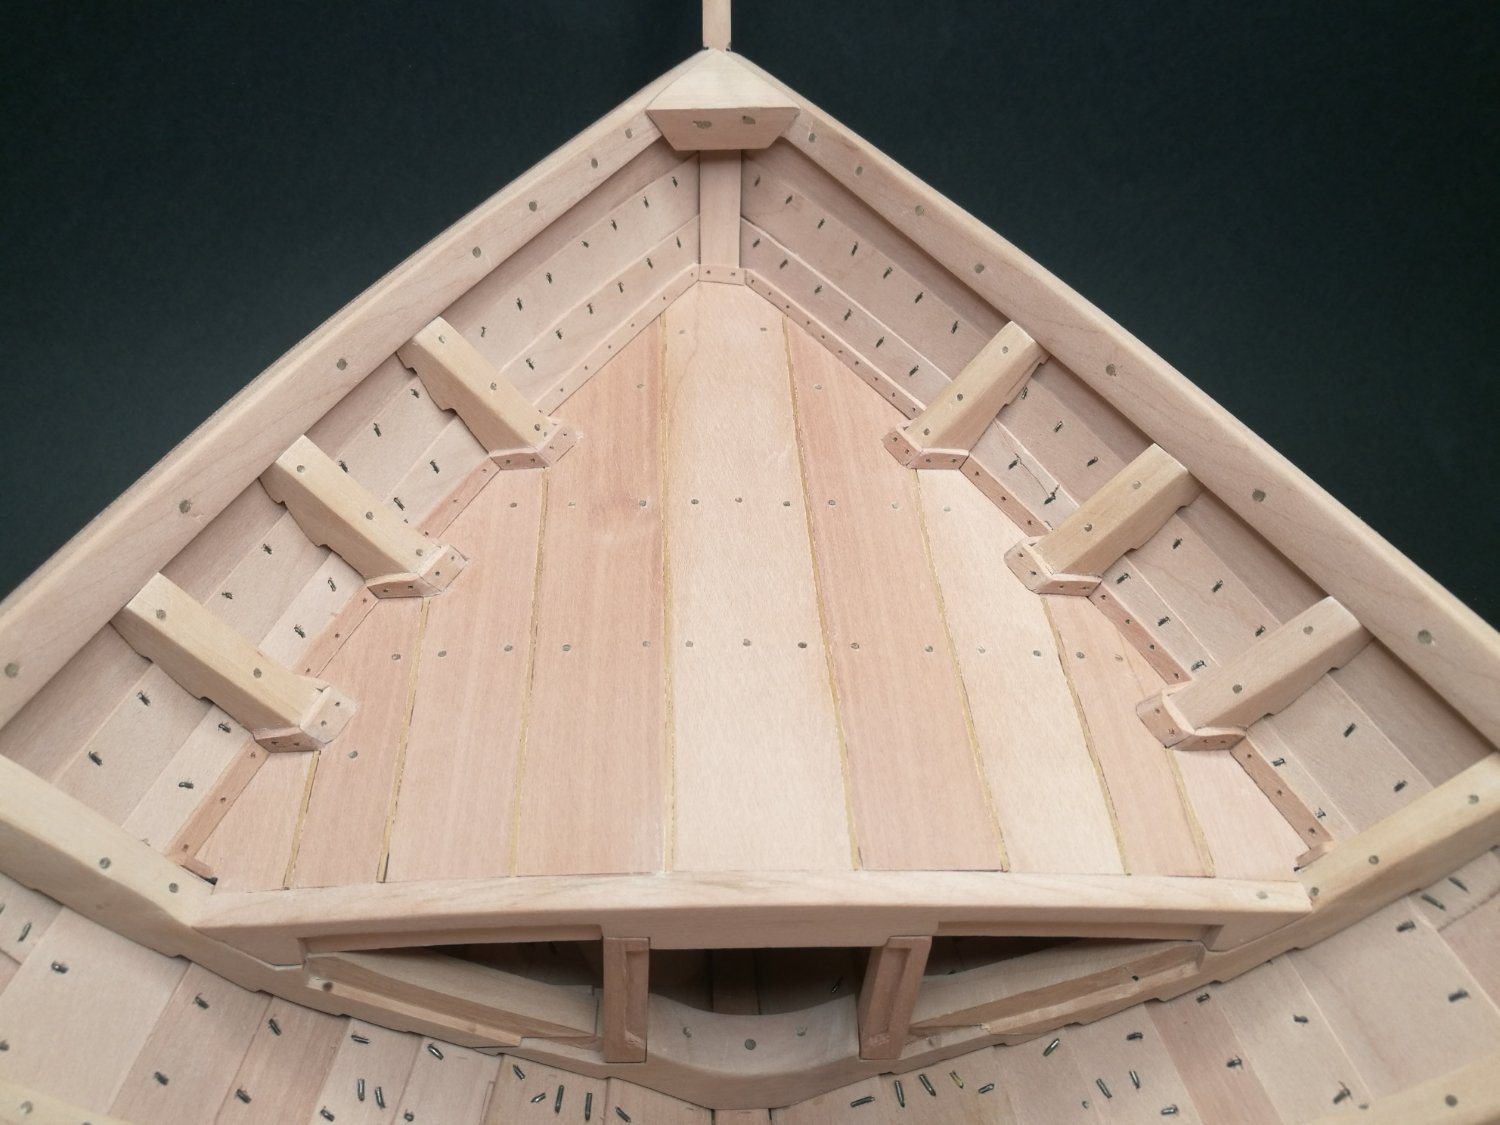
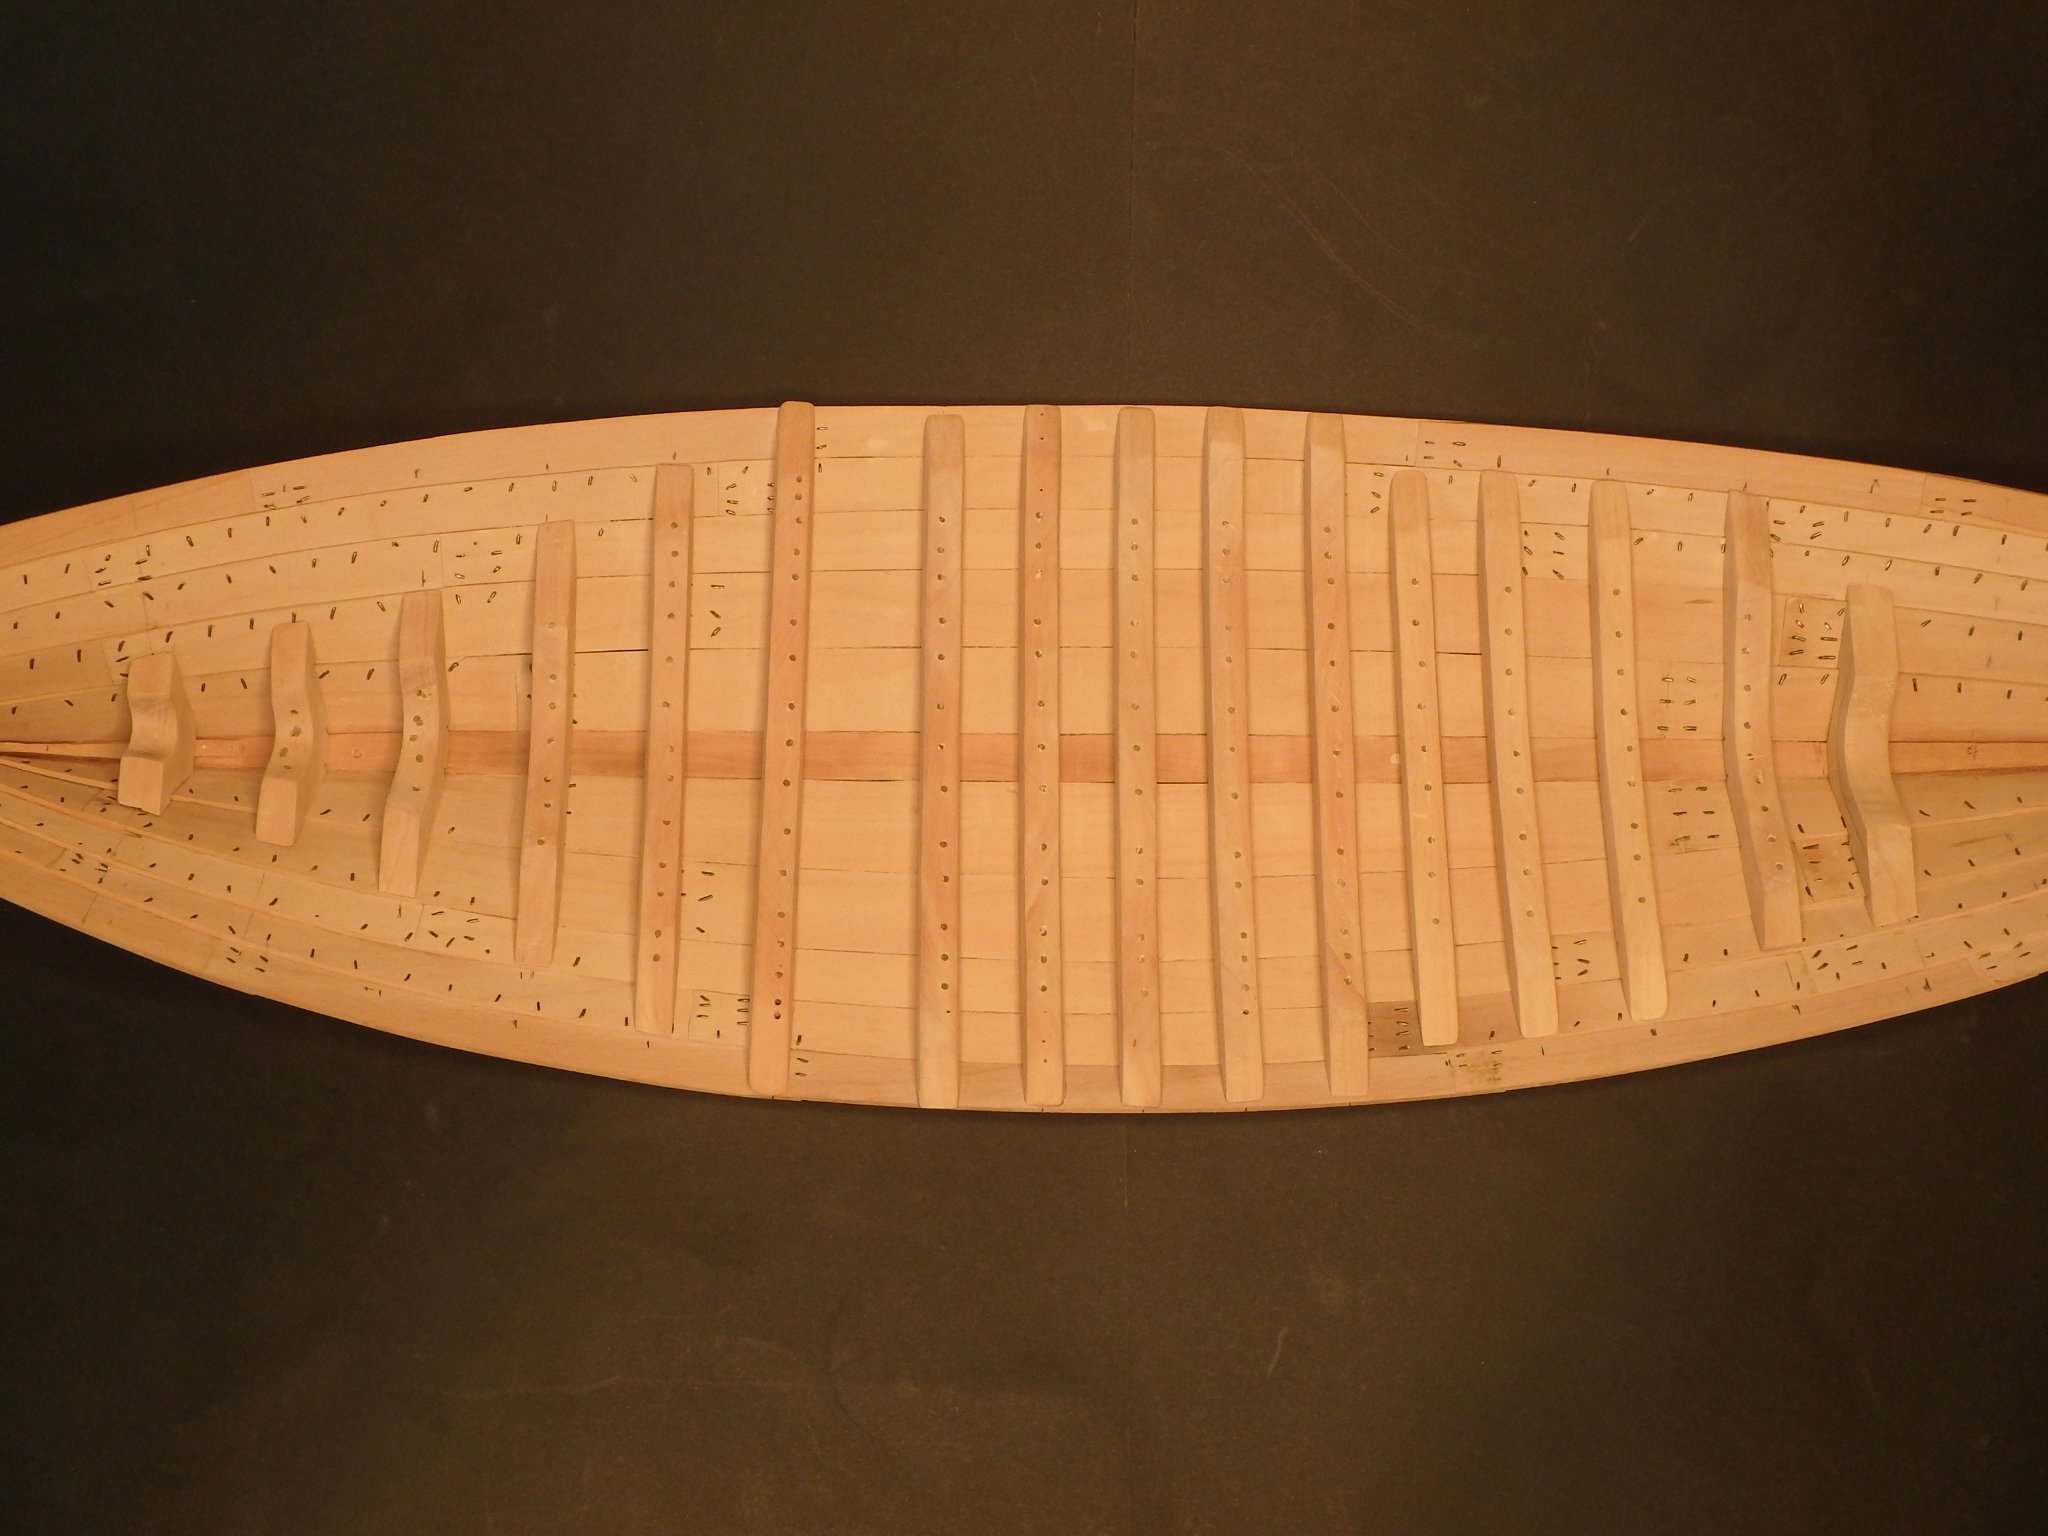
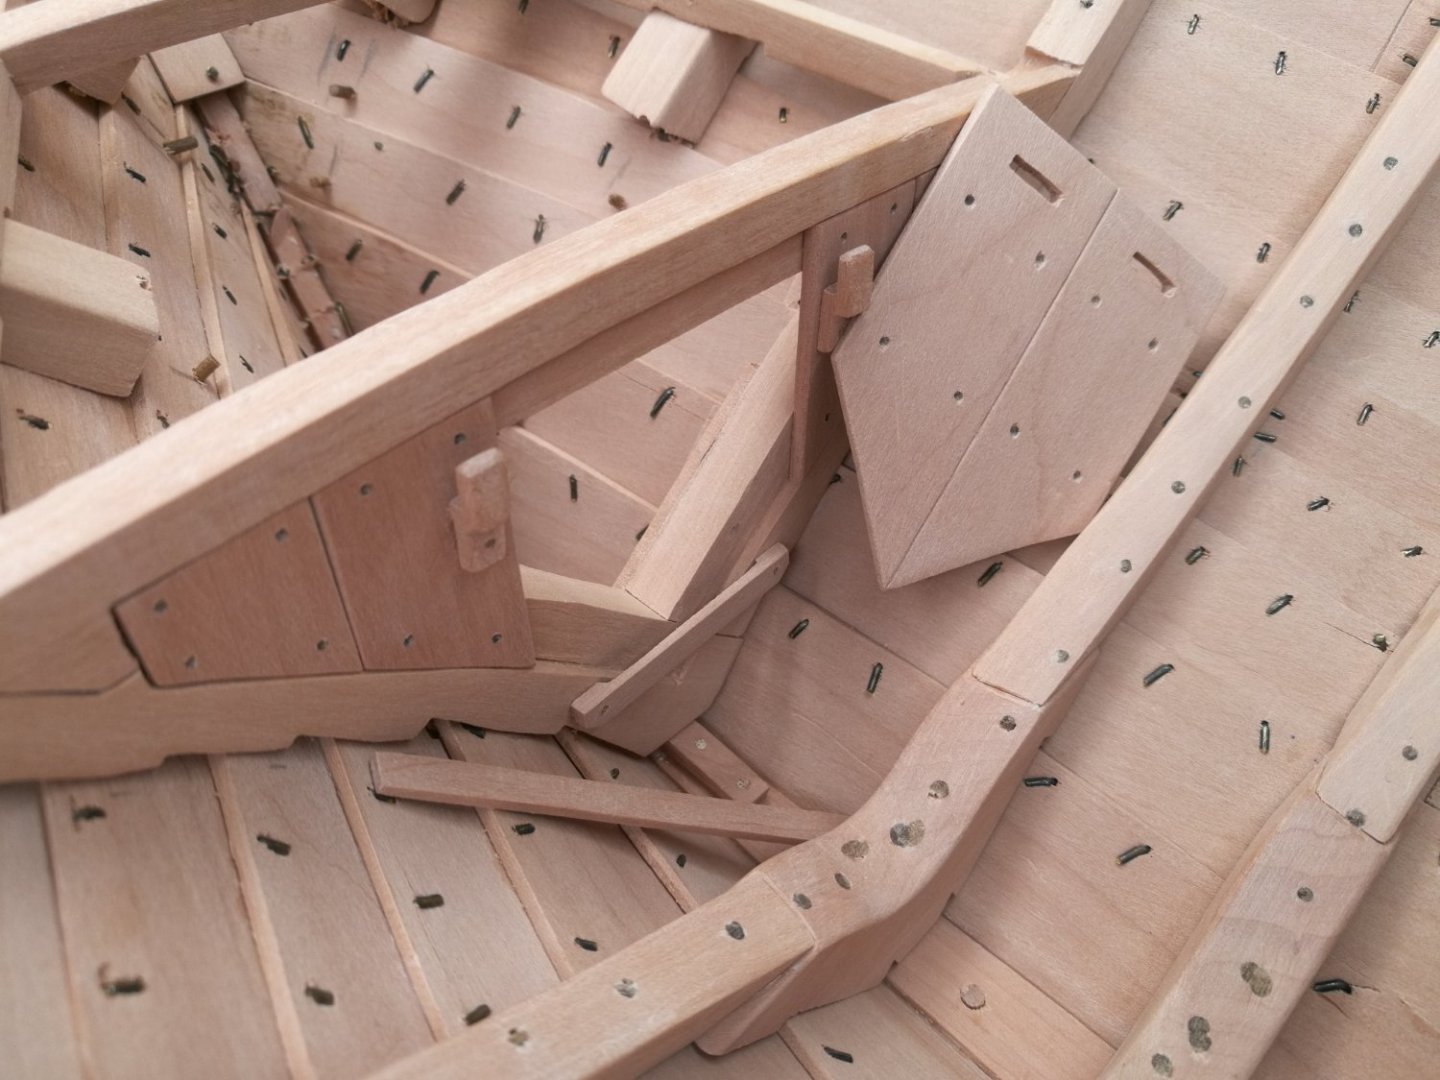
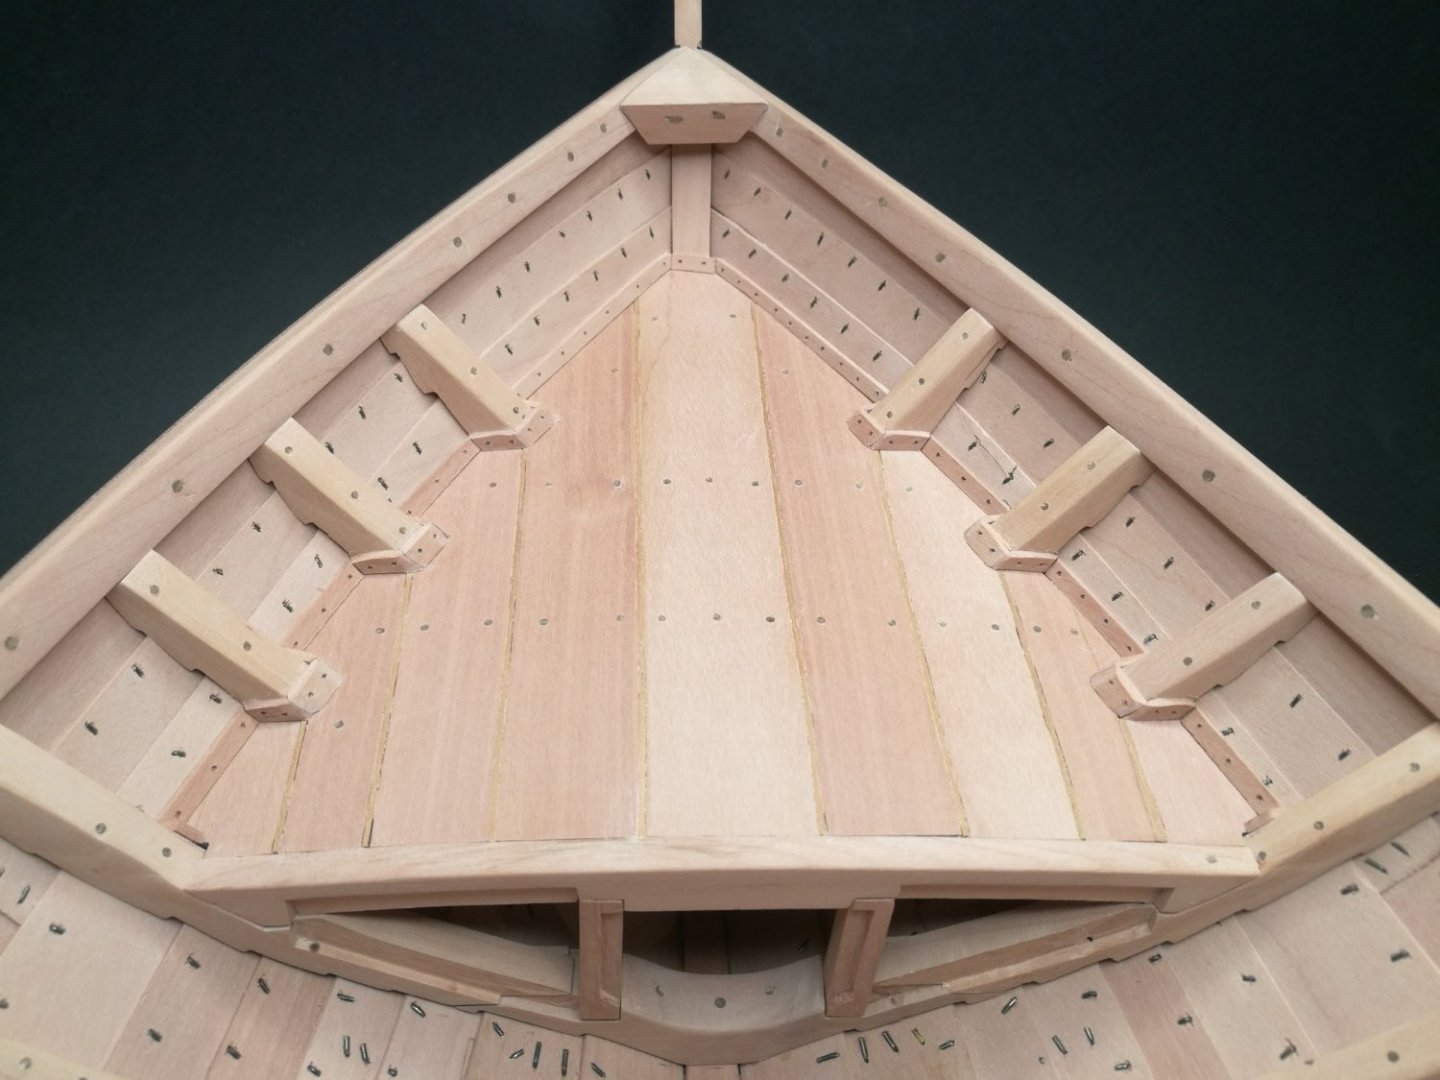
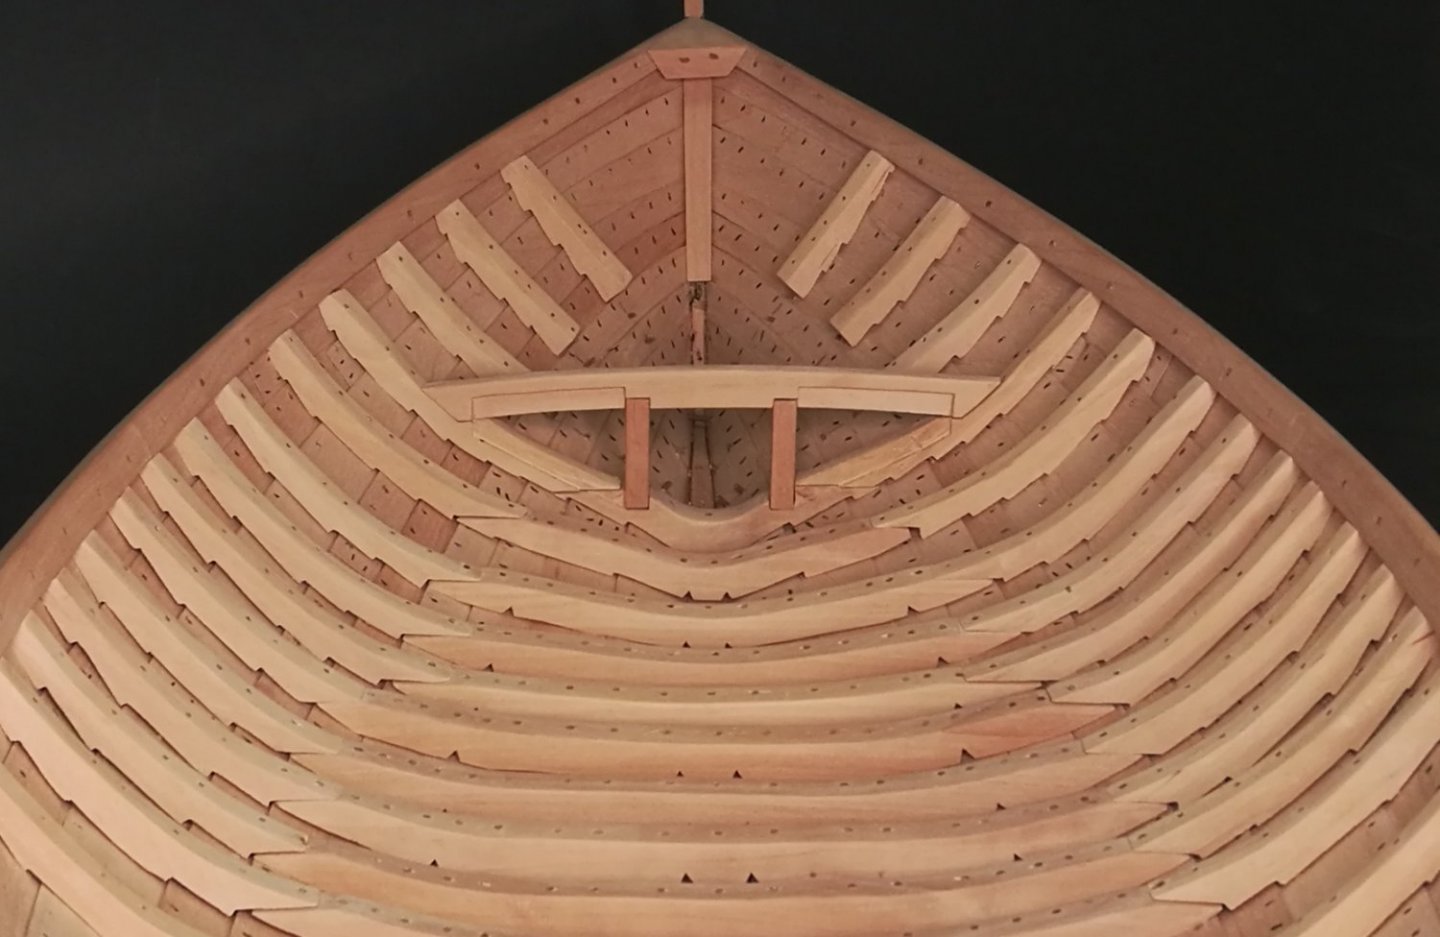
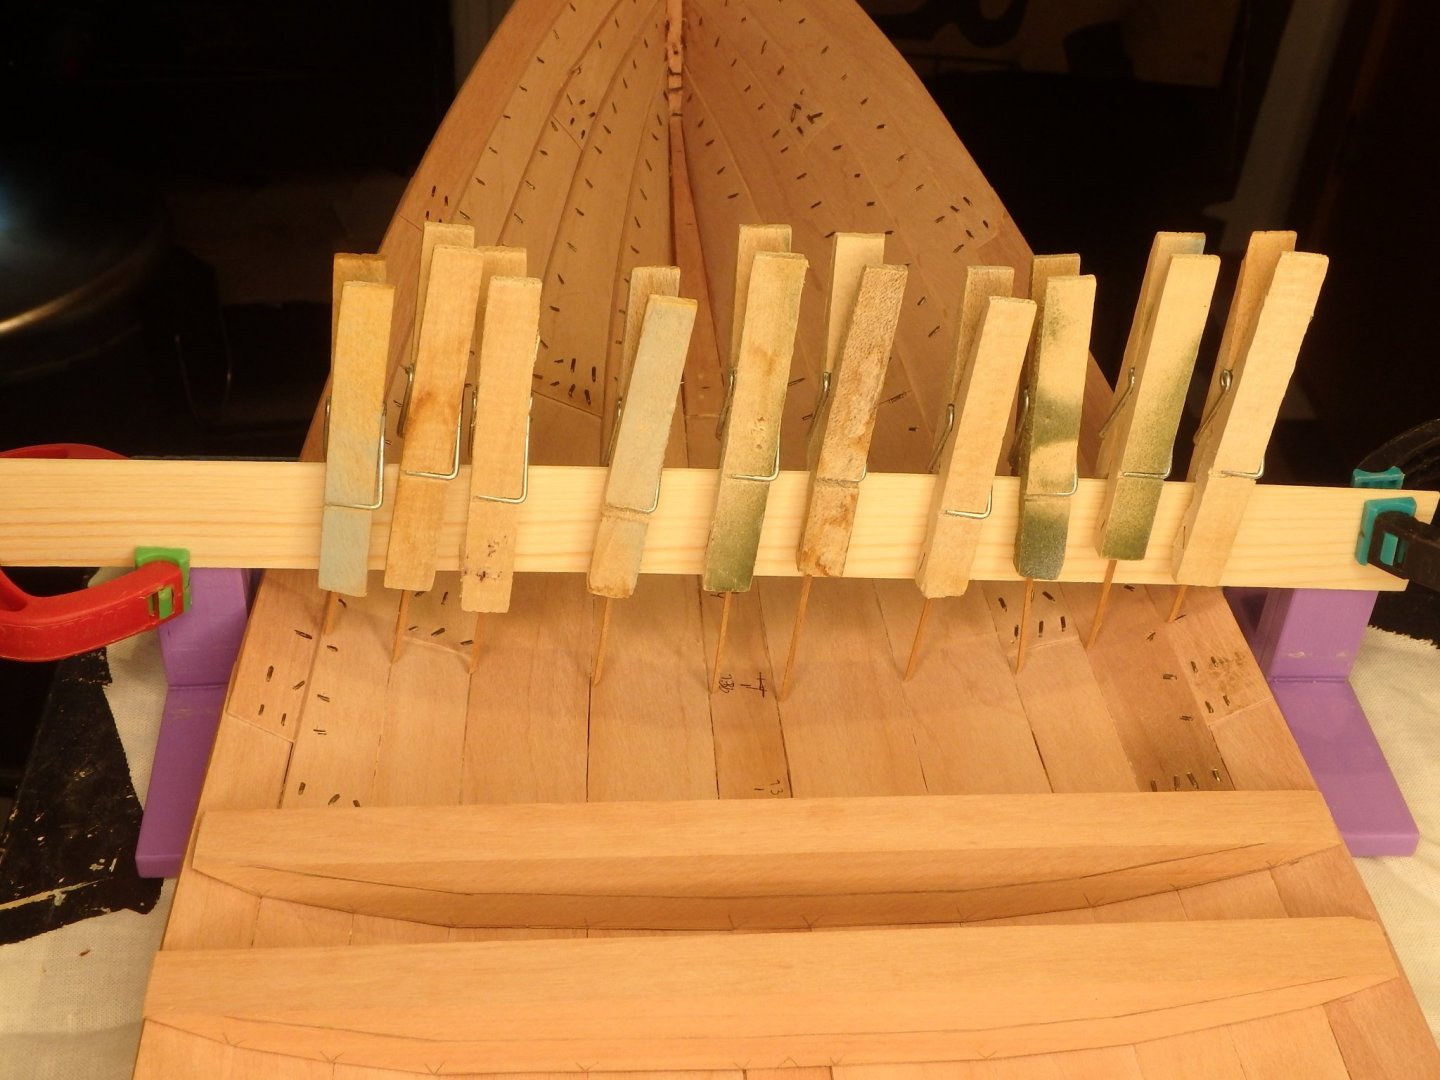
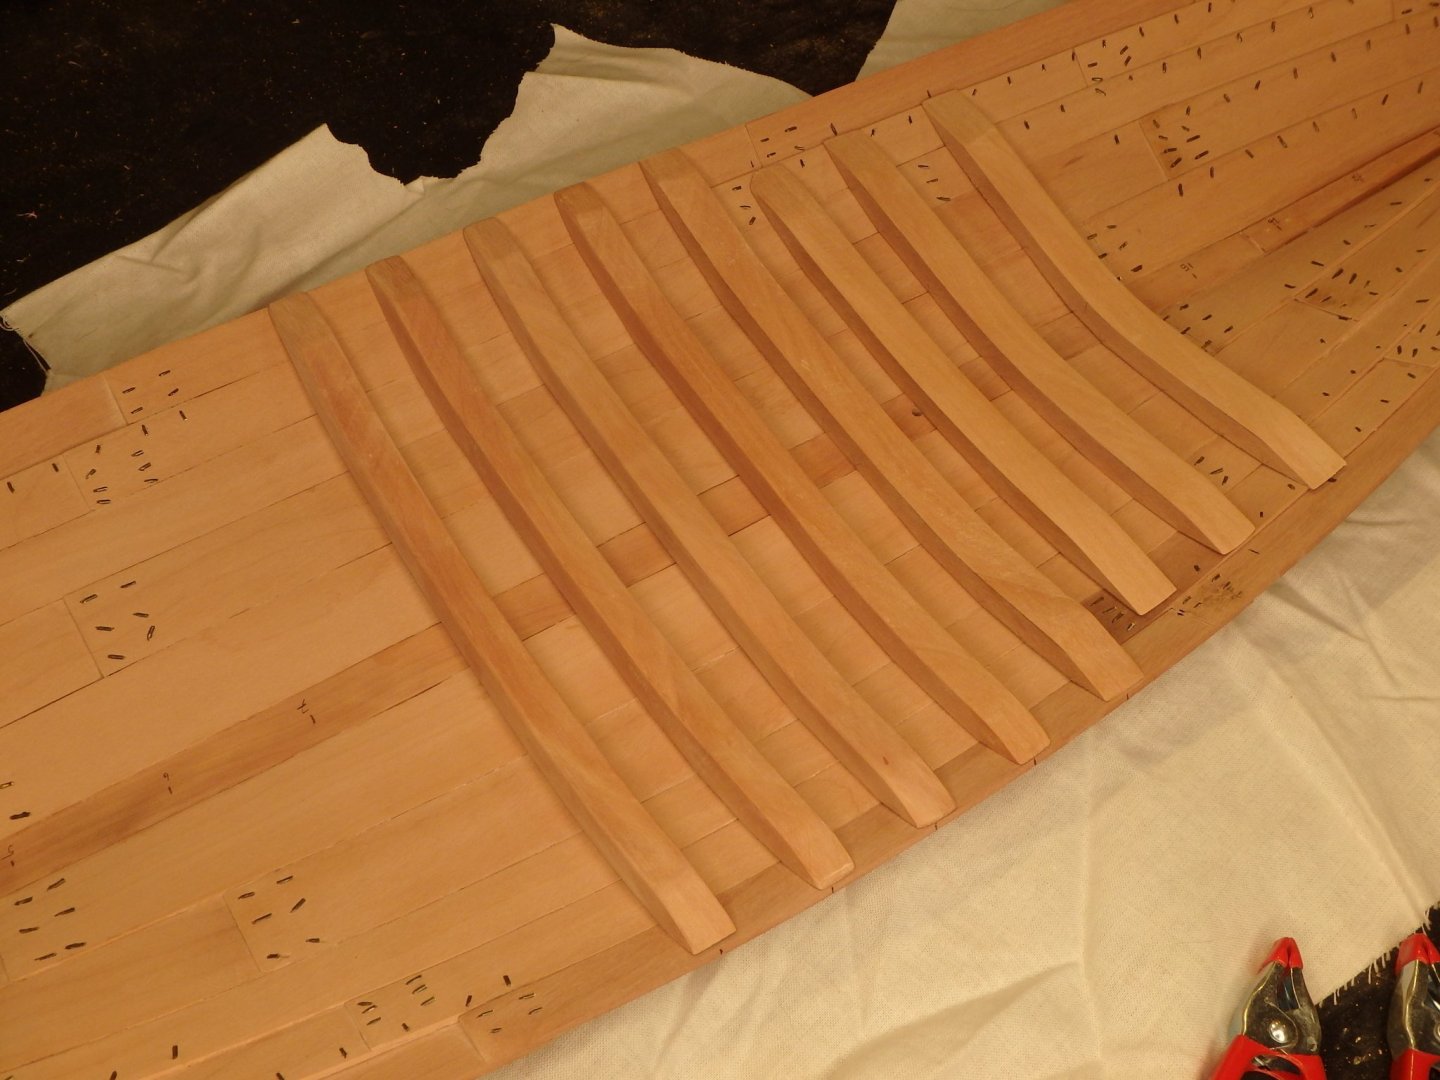
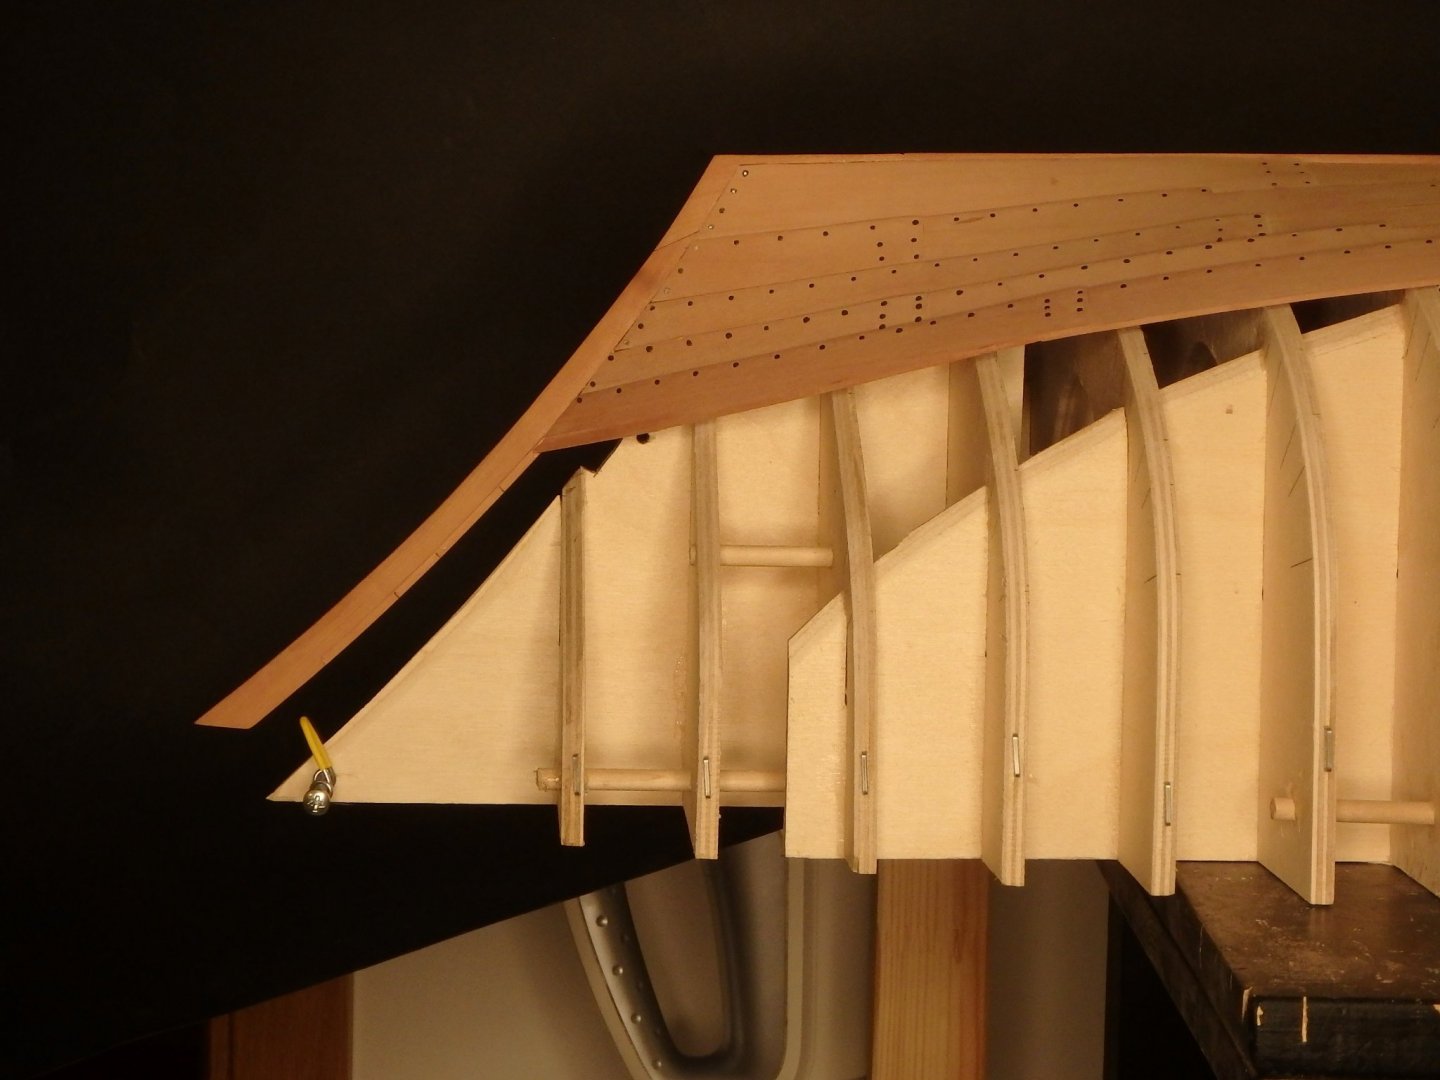
My first thought for the substrate for the aft deck was stringers bent to the futtocks. But I didn't like the idea for several reasons, among them the difficulties of shaping the top surface of it flat to the deck - too much work for something that will not be seen. So I thought of a simple system with straight beams forming a triangle. But as I started I saw that I needed to make recesses in these beams to fit around the futtocks. And the result was actually something I think looks quite reasonable as I treenailed the structure in place. Then I added two small beams to support the deck. Their curvature was done by trial and error.

- 87 replies
-
- 10
-
-
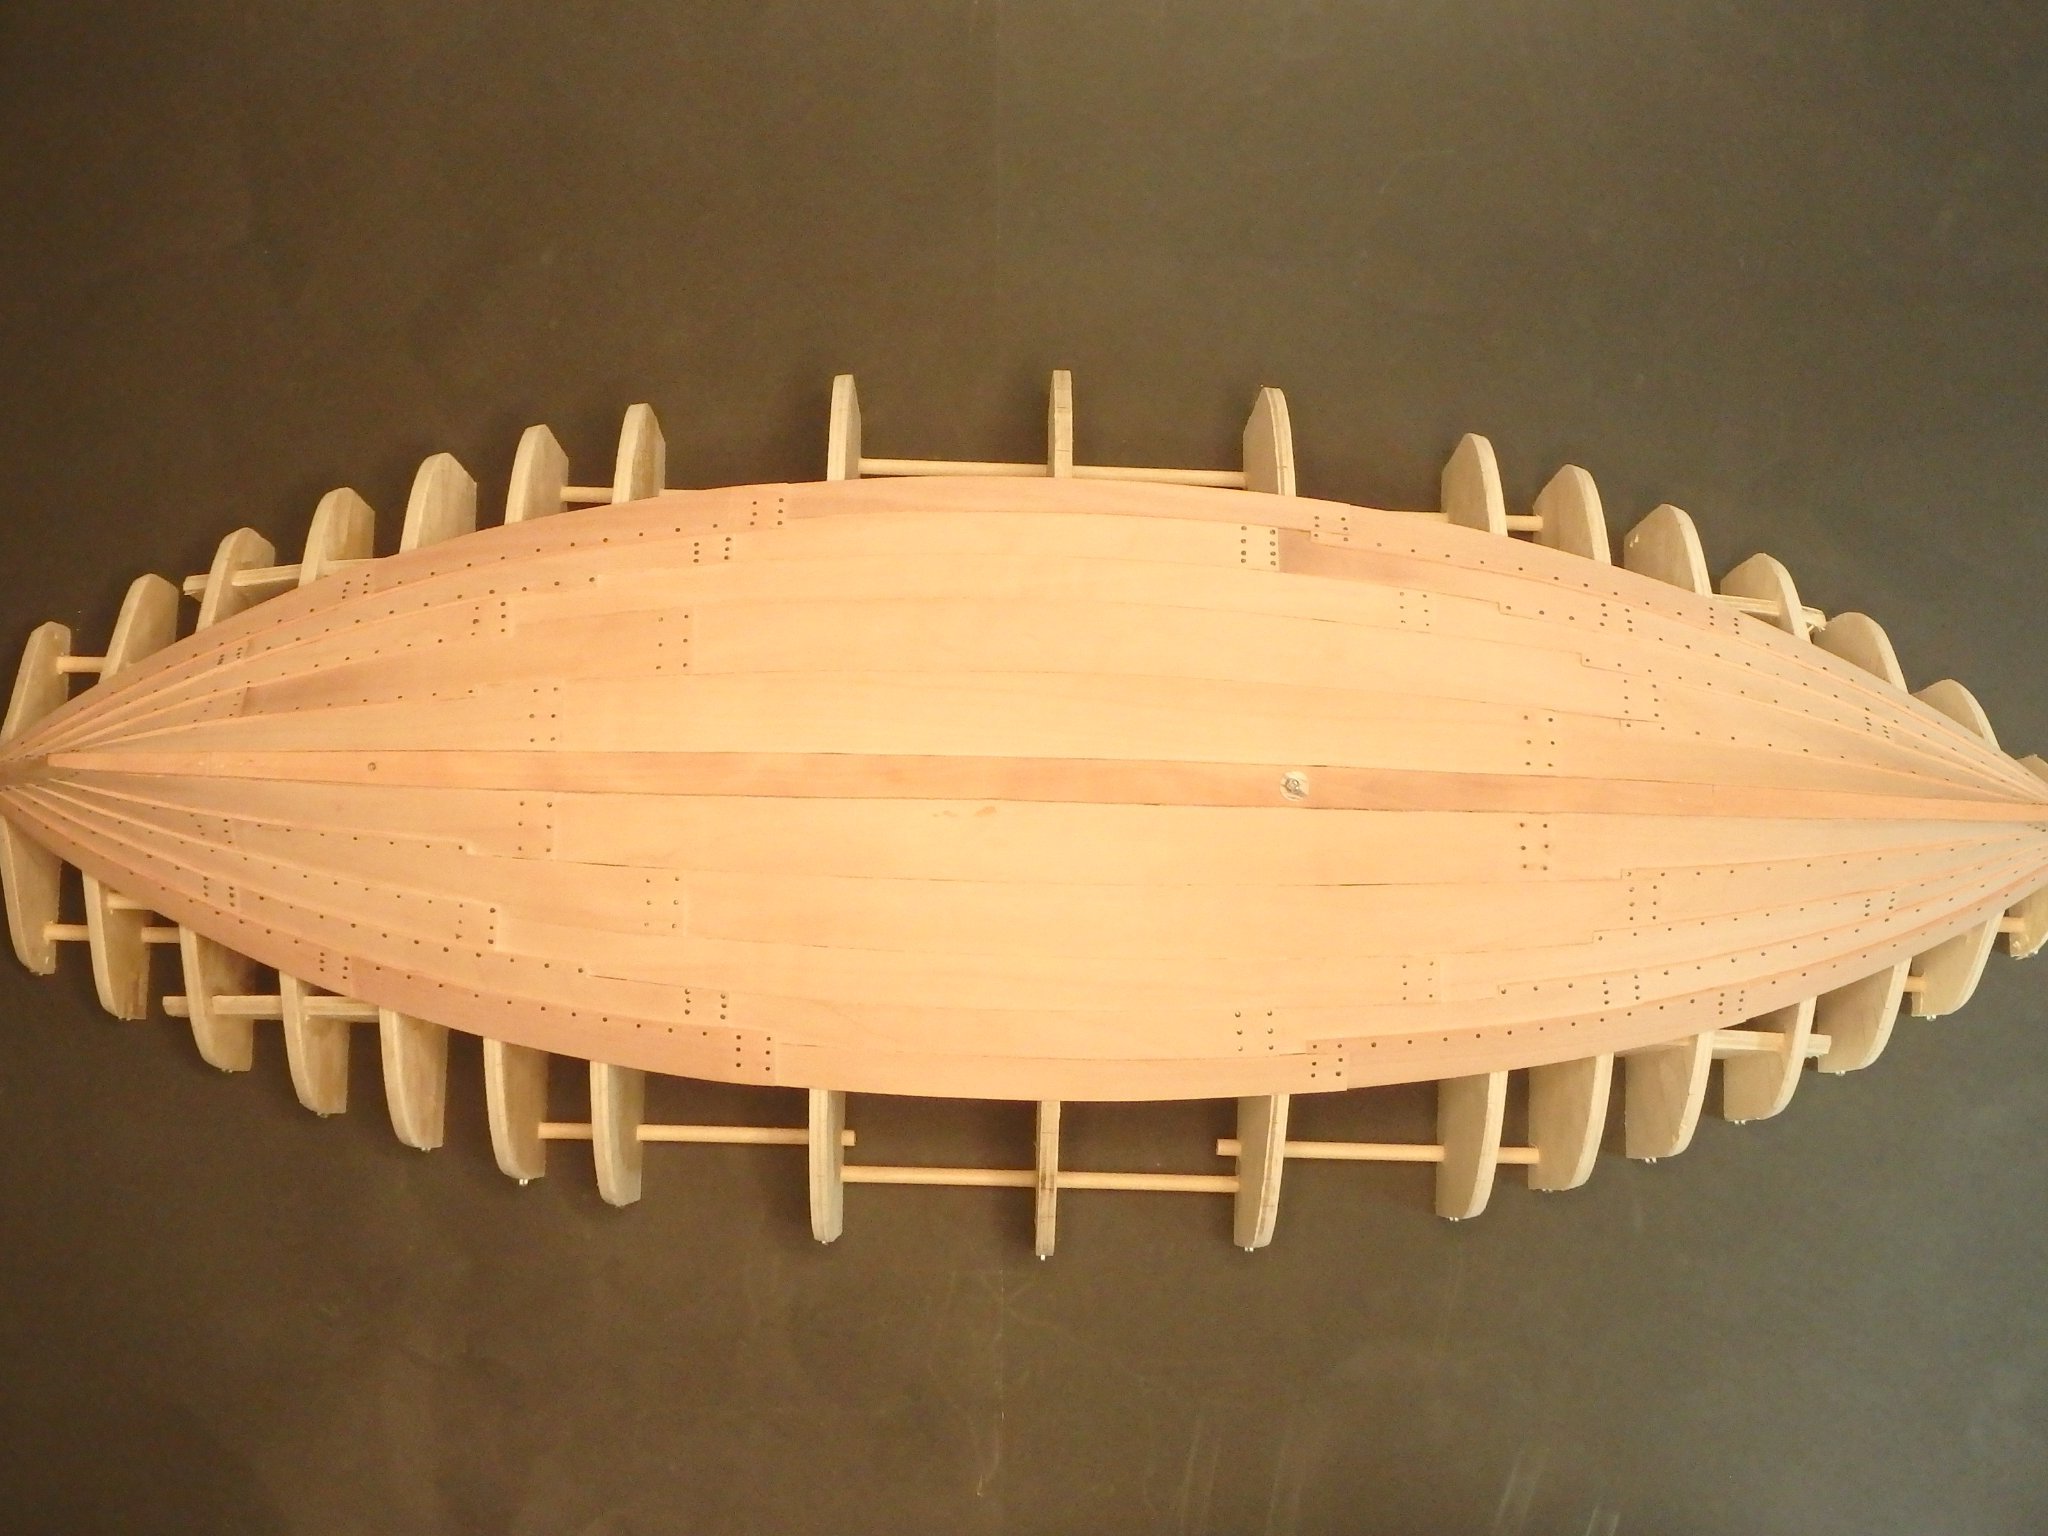
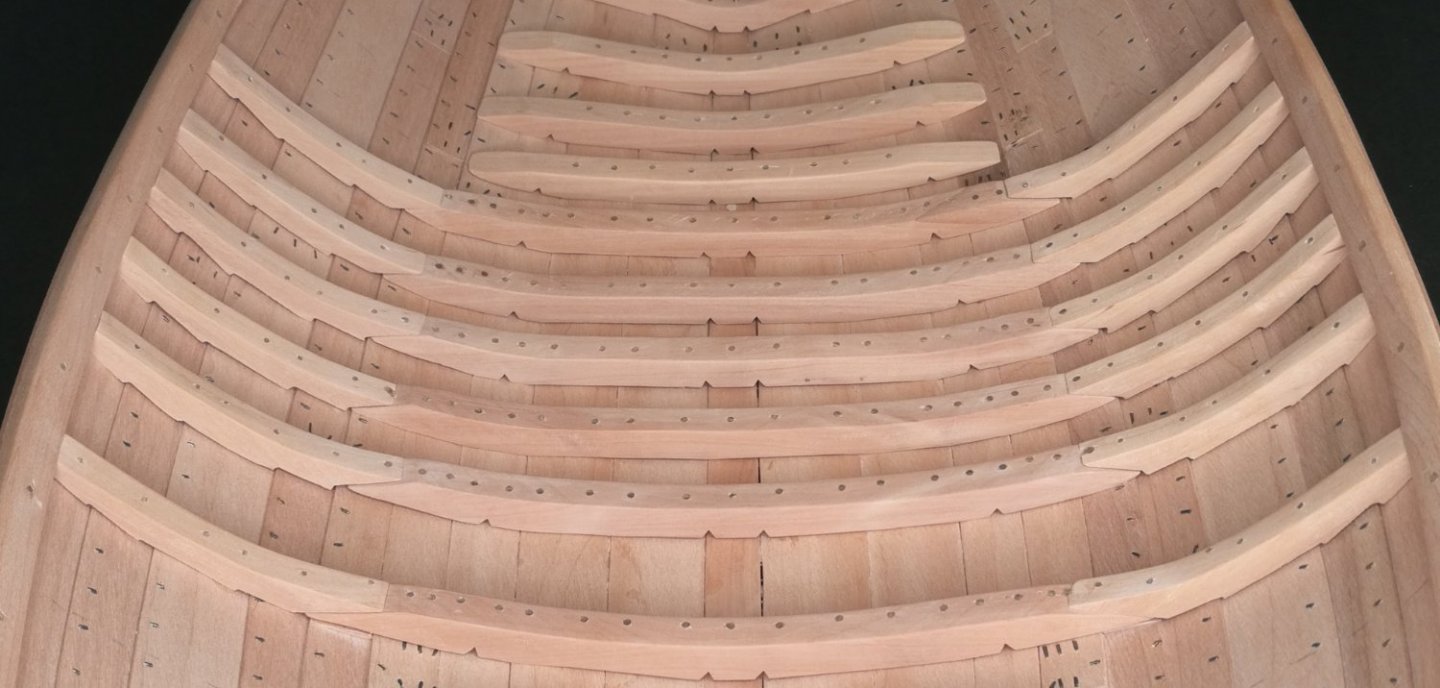
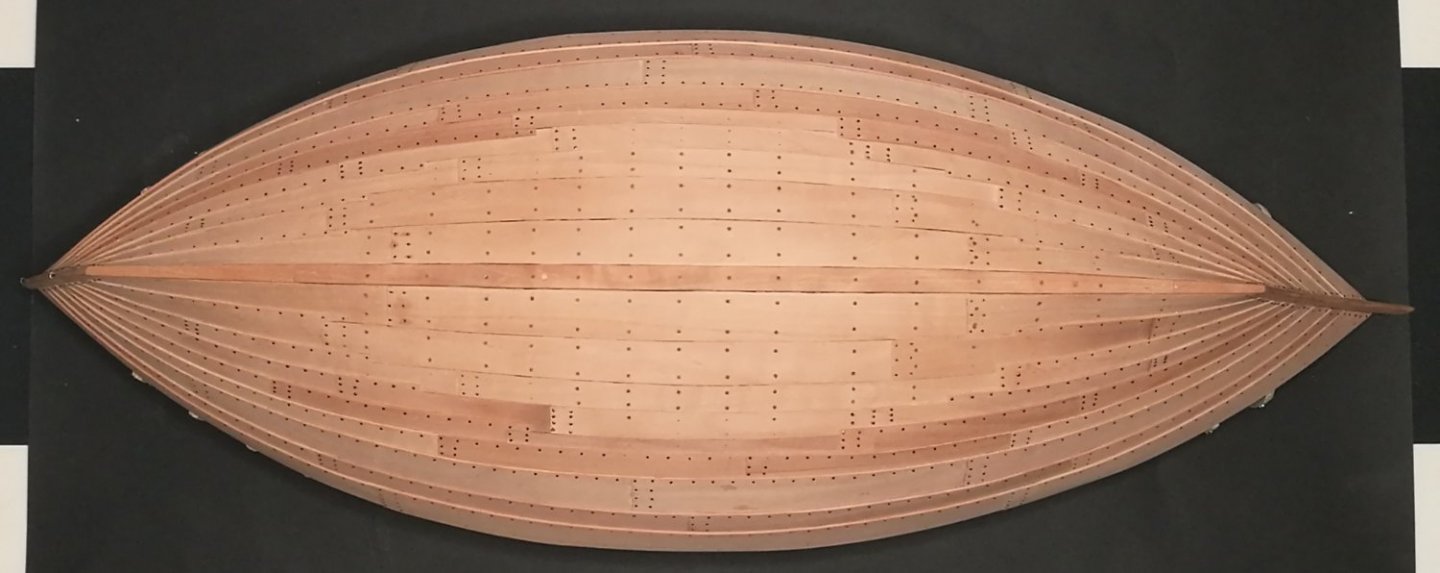
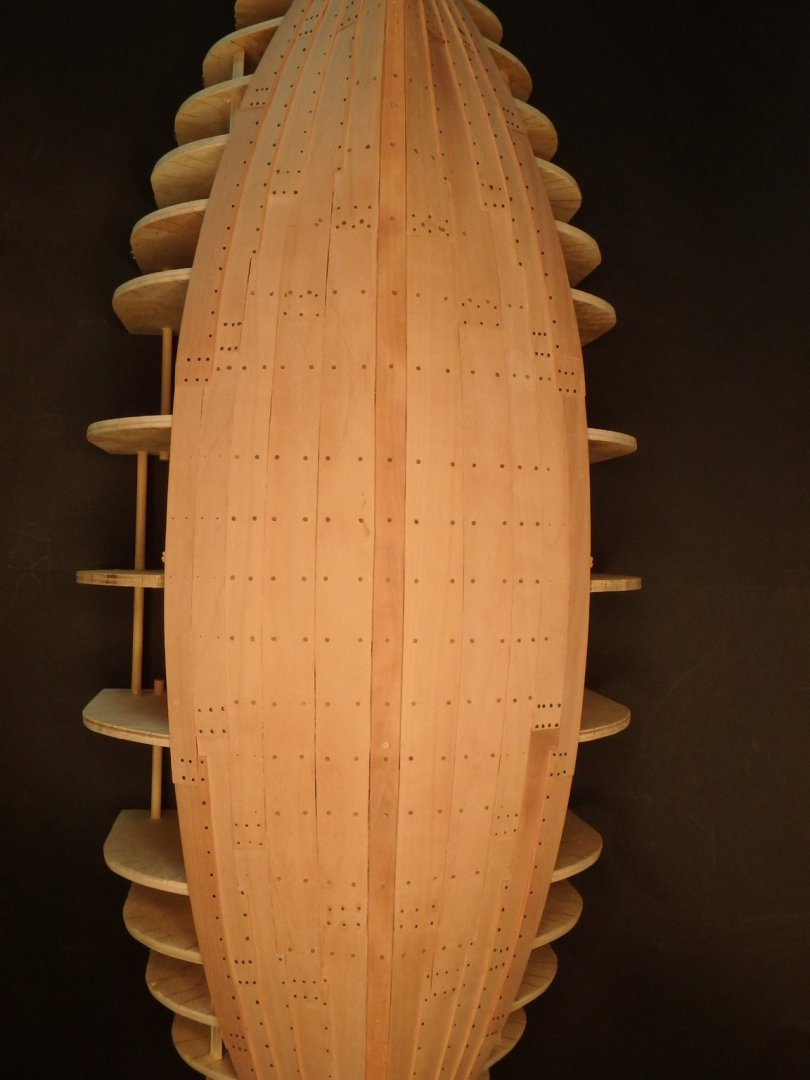
The hull has now even more dots as the aftward futtocks are in place. I cheated and didn't build them all the way down where they will be hidden by the aft deck. This deck will be styled as the Almere wijk 13 find with twin stanchions with a door in between. I don't have a figure for scale here but the space under the deck is just a crawl space. The bulkhead will have vertical planking. When I would do the last of the futtocks I remembered that I had an old set of cheap chisels. They will be great for making the steps in the forward futtocks and other small other details in the wood.

-
It will be a pleasure to follow along and it will be interesting to see how you incorporate the story into the build.
-
Speaking of waterproof servos, have you seen how peoply DIY it? I think it's something like filling them with oil and they can be used fully submerged on submarines and the like.
- 502 replies
-
- 2
-
-
- Quadrireme
- radio
- (and 1 more)
-
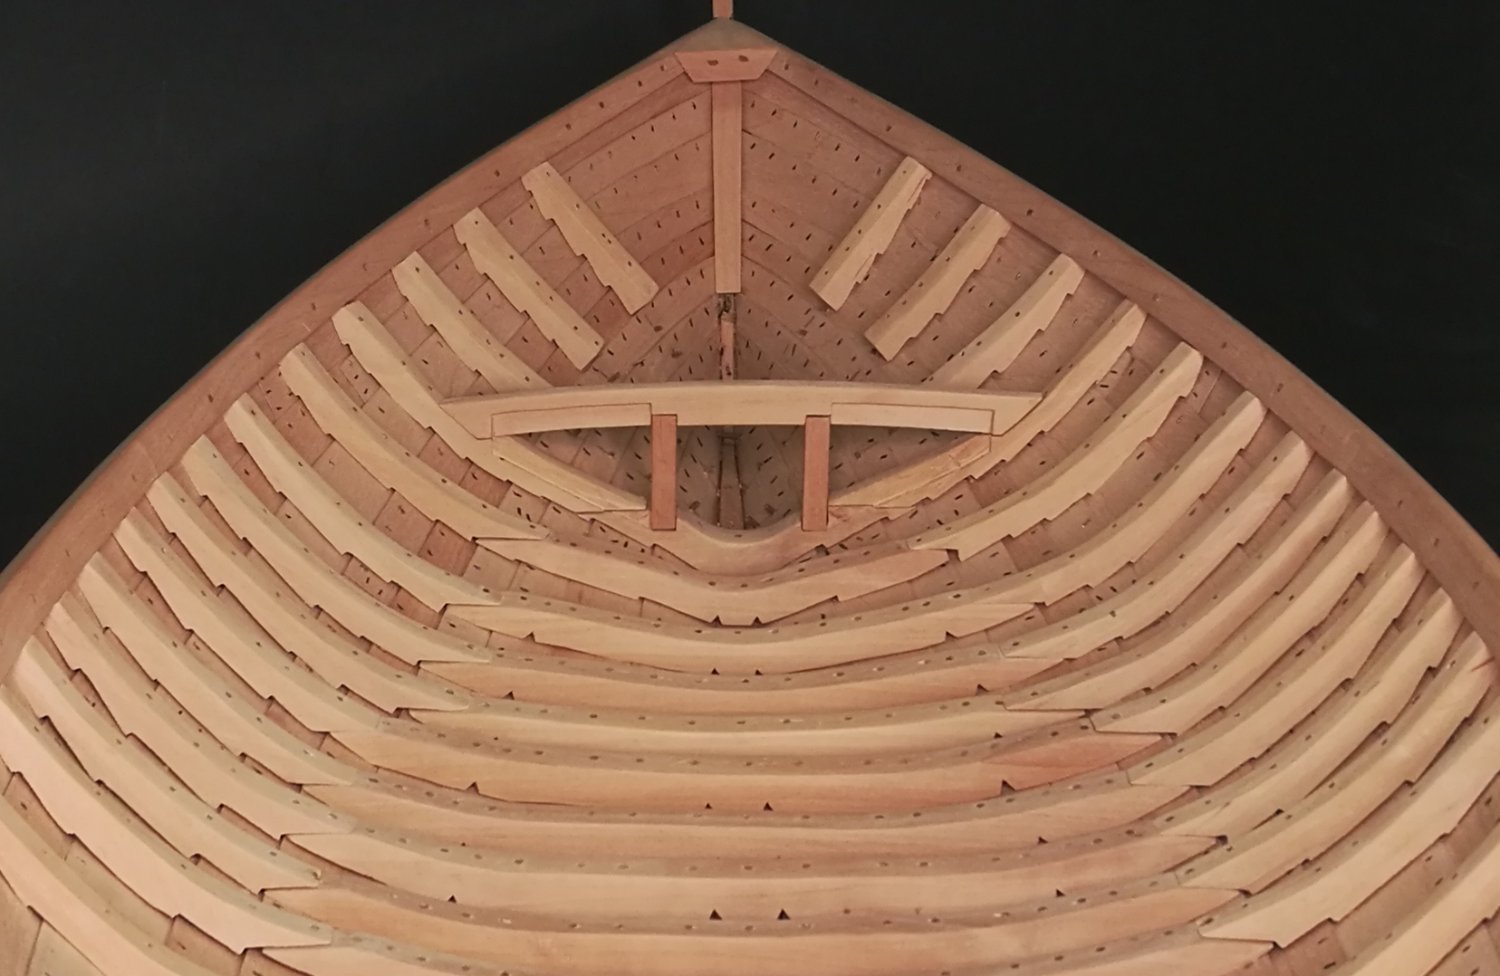
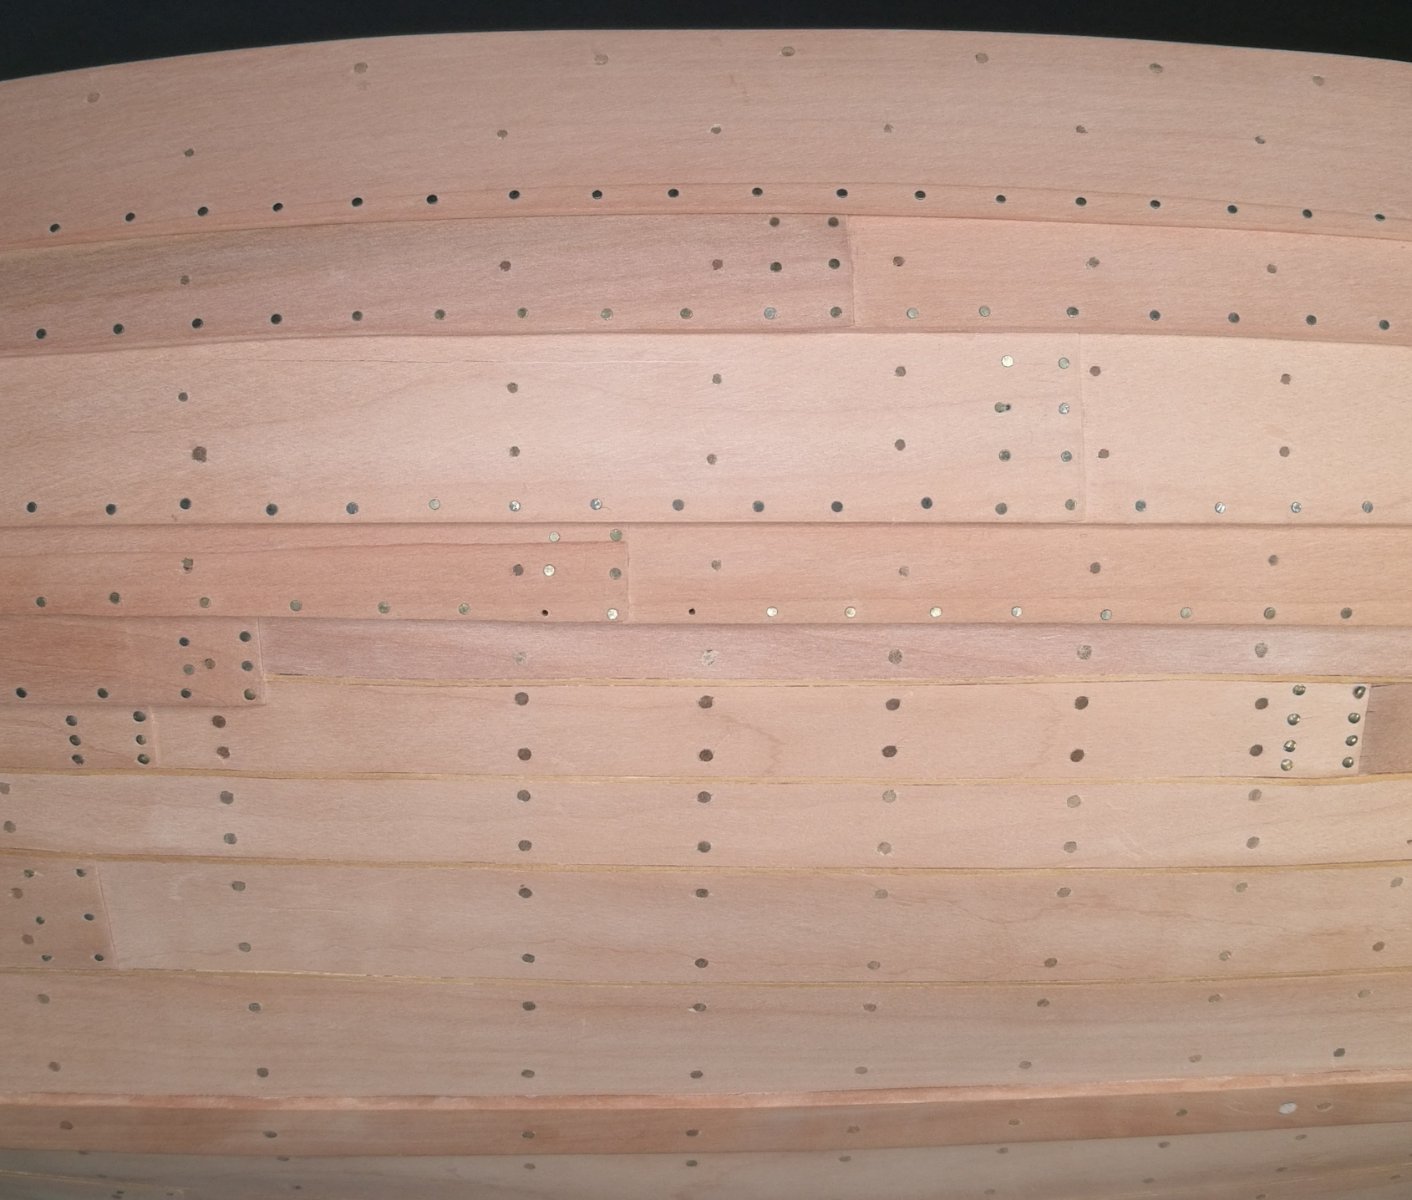
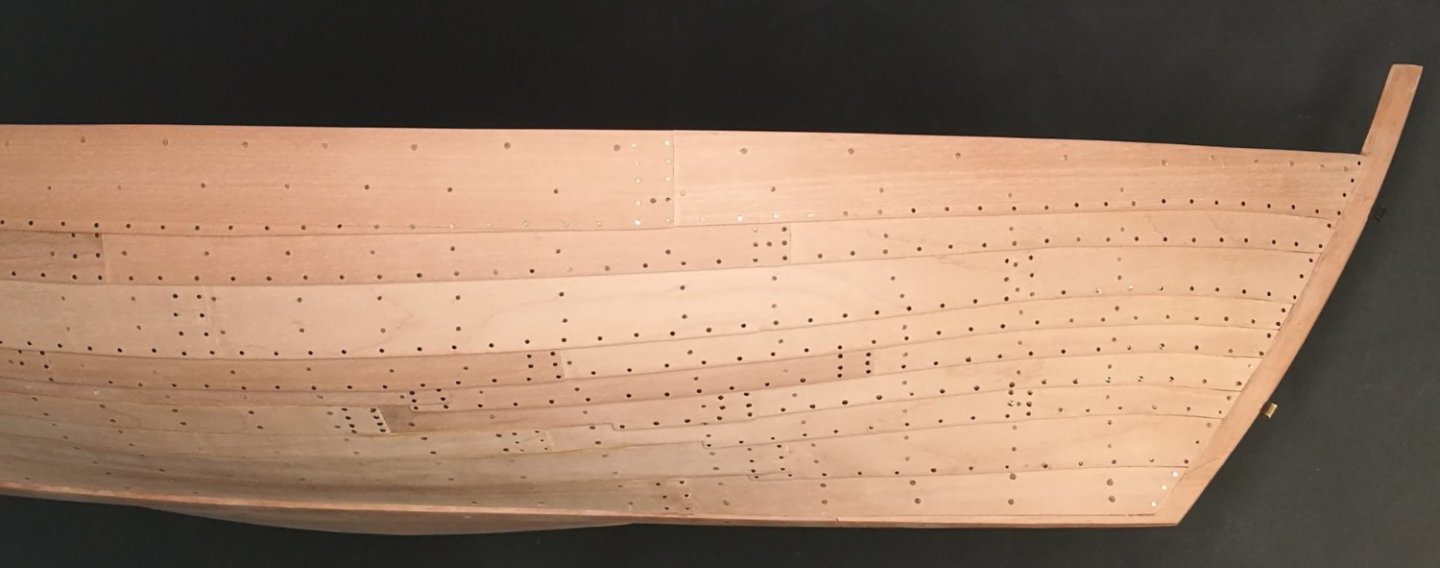
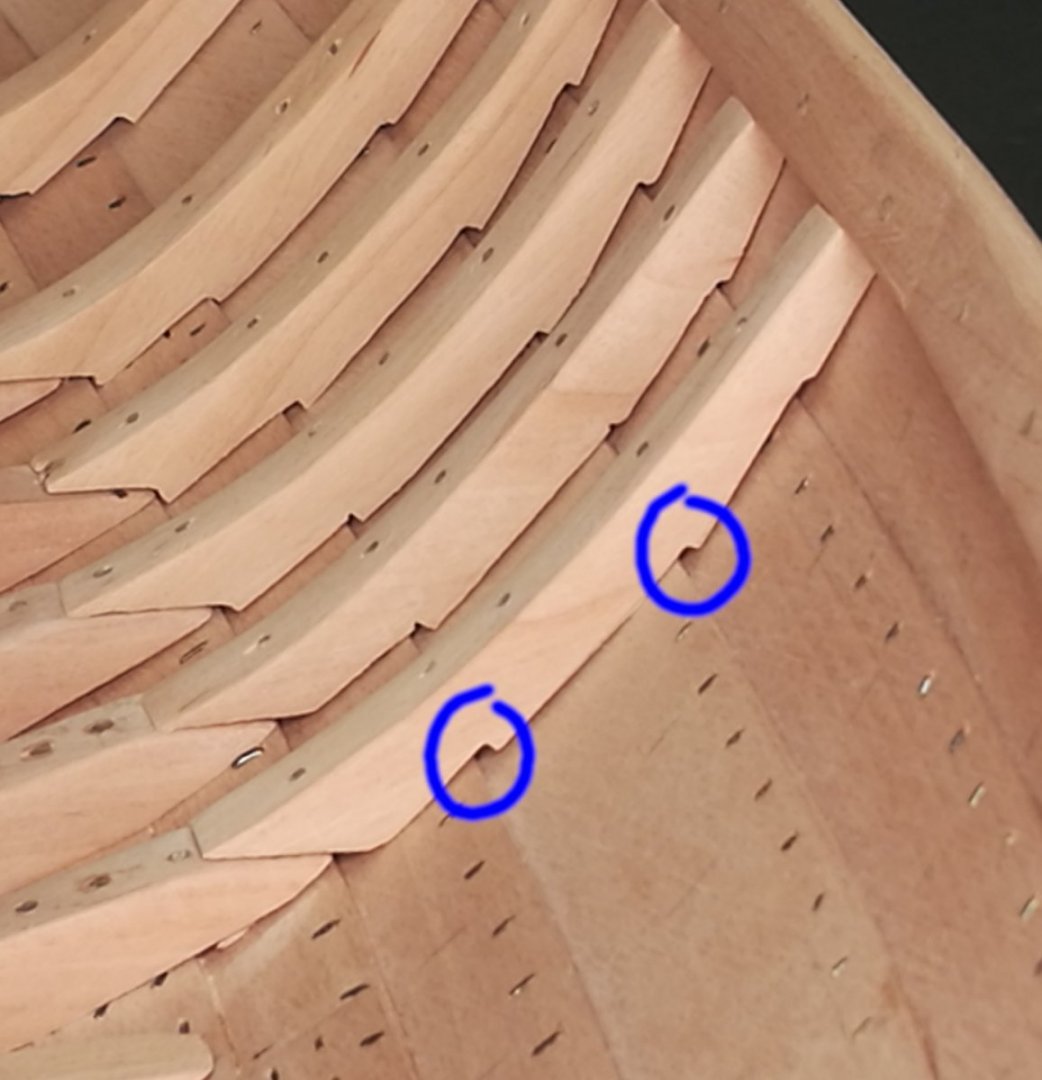
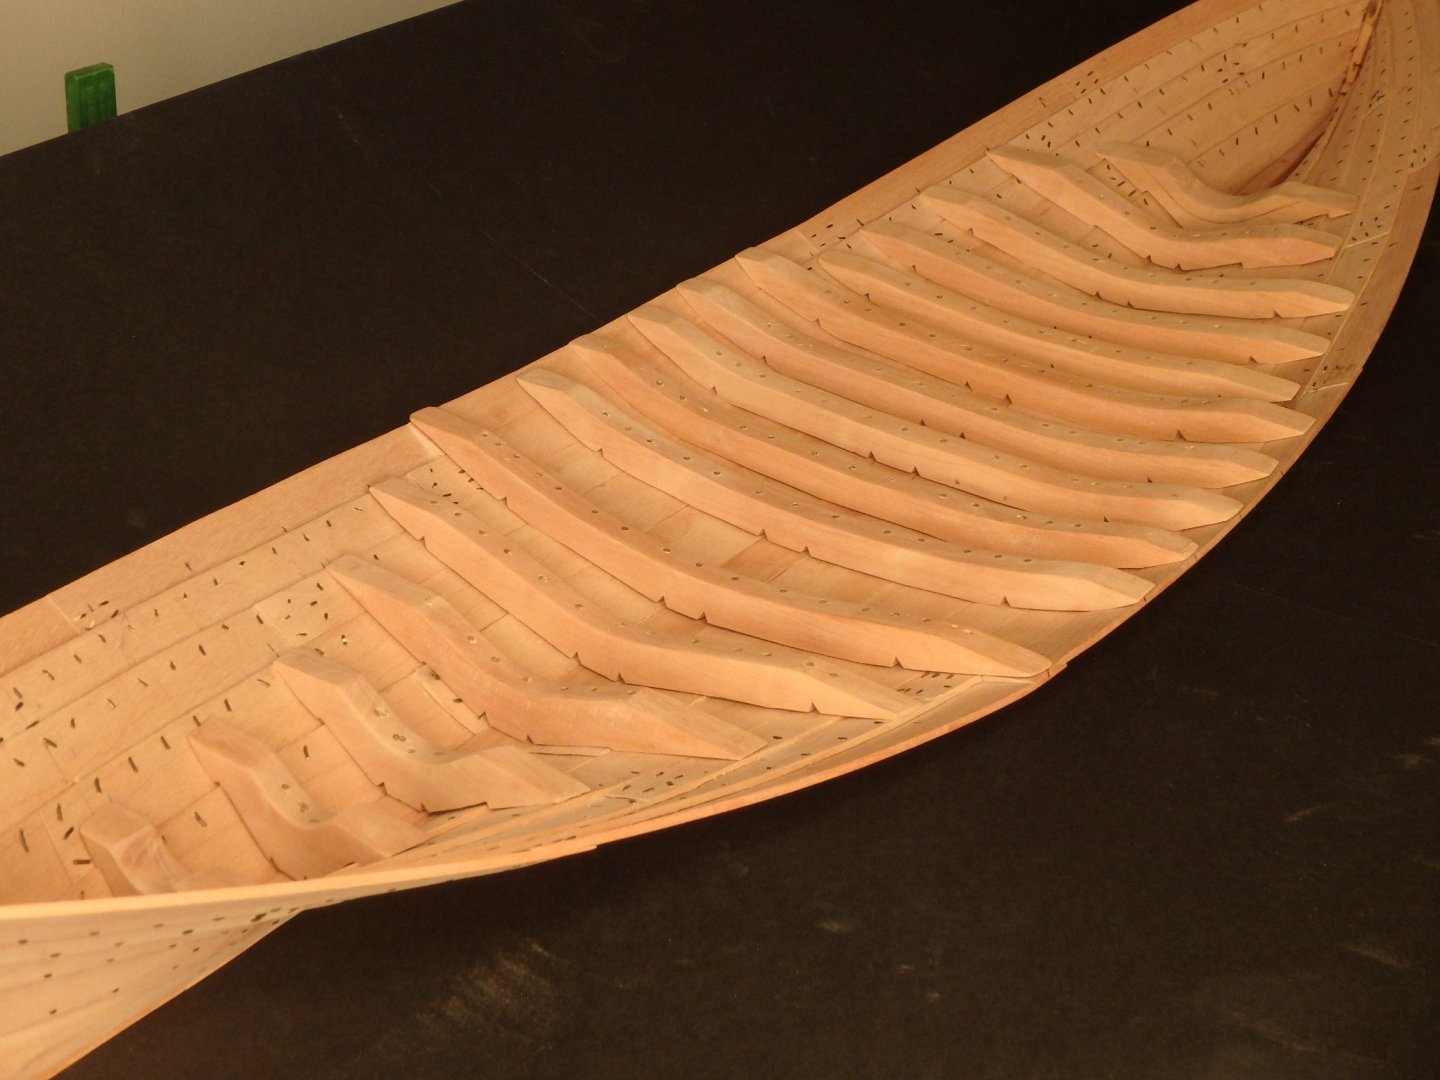
The center futtocks are in place. (yes, one of the floors are missing its watercourses, but I hope the ceiling will hide it) The floors are heavy and densely fastened with wide treenails while the futtocks are lighter and have less and smaller treenails. I think this not only has to do with the forces being greater on the bottom but also that the clinker sides inherently are stronger. These holes sometimes got a bit on the small side I think as they can be used for tie downs. I can hear you say 'Hey, you shouldn't put the scarf joints in one line, that will cause stress concentrations!' then I say 'Yes, you're right, it does'. This could actually be why the ship sank as the starboard side was broken off at this line. The hull is now seriously pockmarked but a dark tar colour should calm it down.

-
I just realised that you made one more guy on the ship then there is on the engraving. But that guy is kneeling so he wouldn't be visible on the seal, very clever way to add more details but still staying true to the engraving!
-
It's very impressive to see your machining skills! Very often you see people who seem to think that you just insert a piece into a mill and out comes the finished piece - this shows how much ingenuity that is needed.
-
Thank you all for the likes and Steven and Christian for your encouraging words! One major thing I have deep regrets about my scale. Why in the world did I choose 1:13 and not 1:12? It makes sense from an engineering point of view - 7.5% scale is a neat and round number. But of course in a traditional modelling context it's a ridiculous number. Can I change the scale now? The model is 86cm which is 11.5 meters when using 7,5% scale. Which would be 10.3 meters if it was 1:12. The model would have been 10cm longer if I would have built it in 1:12 from the start. I guess the choice is mine to make, but it feels really wrong to lie about the scale so I guess I will stick to 1:13, or rather 7,5% to be precise. And talking about sticks, a couple of months ago I ordered more pear wood for the build. But I didn't order a specific thickness suitable for the futtocks but just one big beam that should last for the remainder of the build. I'm ripping it by hand which takes a while, but I didn't want to buy one of those fancy small table saws in case I don't build any more models. At least I'm glad that I didn't rip the planks for the hull as well as my original plan was.

-
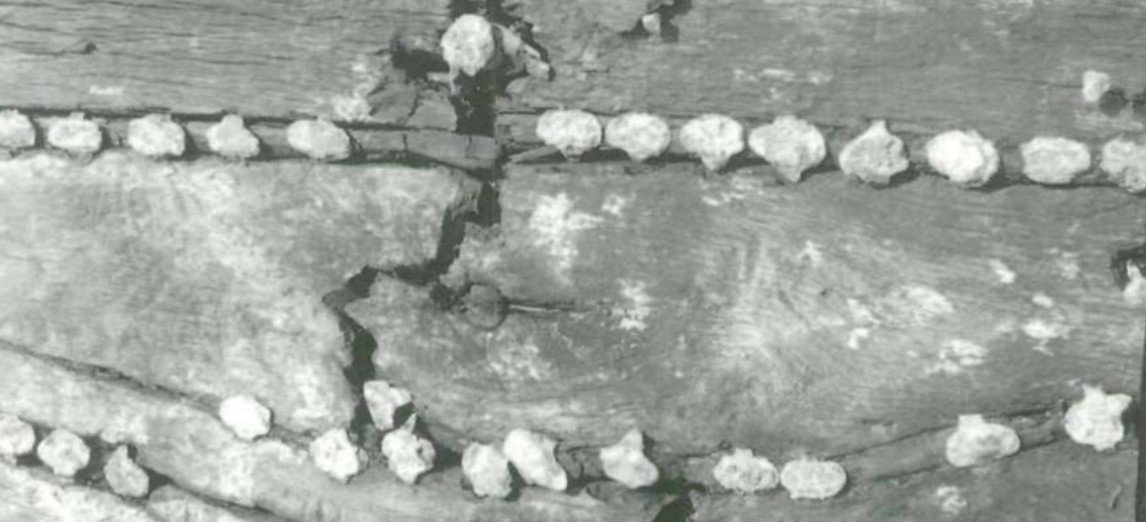
You saw in the last post that the cracks between the planks in the flush carvelbuilt section were uneven and they now looks nicer after I inserted the laths between the planks. I hoped the walnut strips would show up a bit more, but I guess it's nice that they are discreet. These laths should then be protected by iron clamps called sintrels. Here is a picture from another ship from the same period. I have looked into manufacturing them by photo etching brass, but I think it will be hard to secure them without gluing and it would look very busy so perhaps I will omit them.

-
Thank you Bolin and Chuck! The rope will not unravel if you cut it and let it be, but it will if you handle it so the end must be secured with a whip, knot or splice.
-
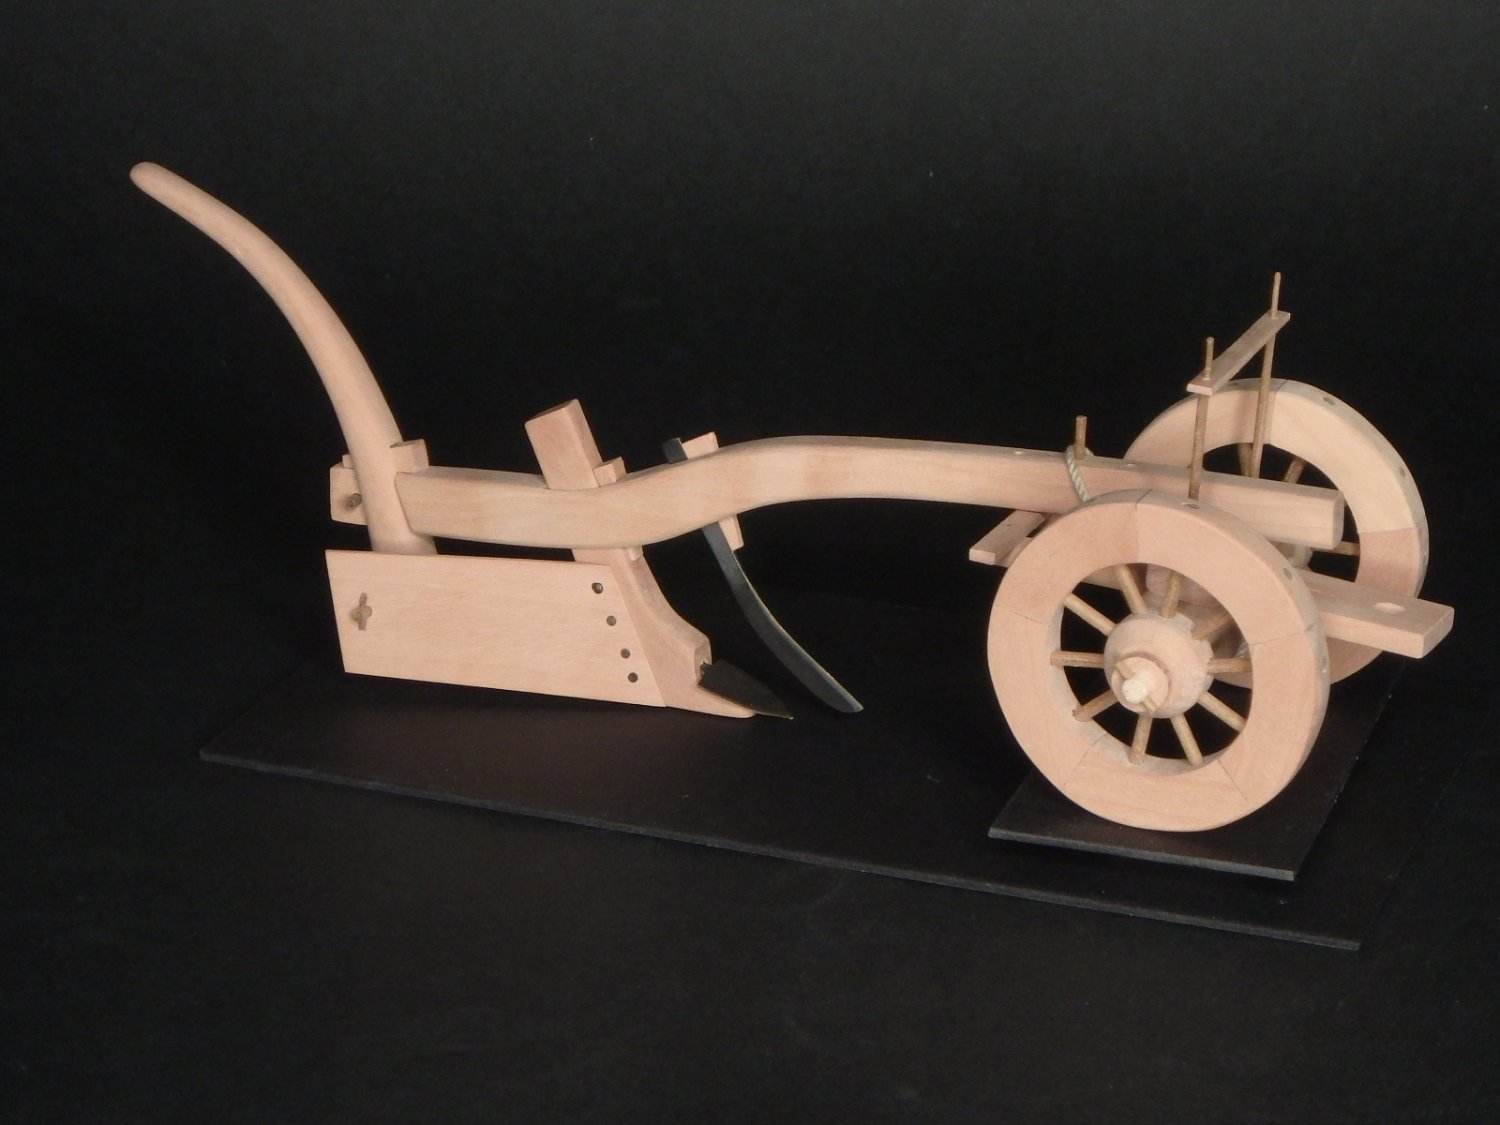
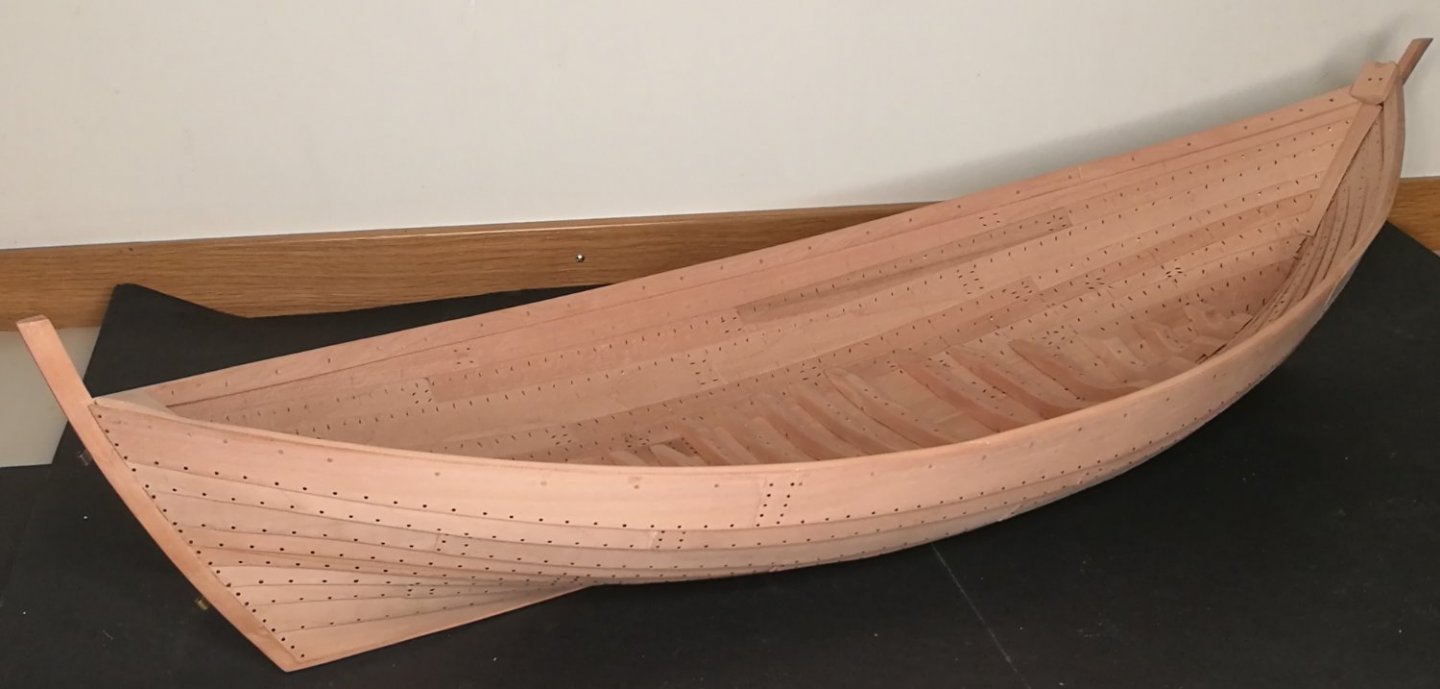
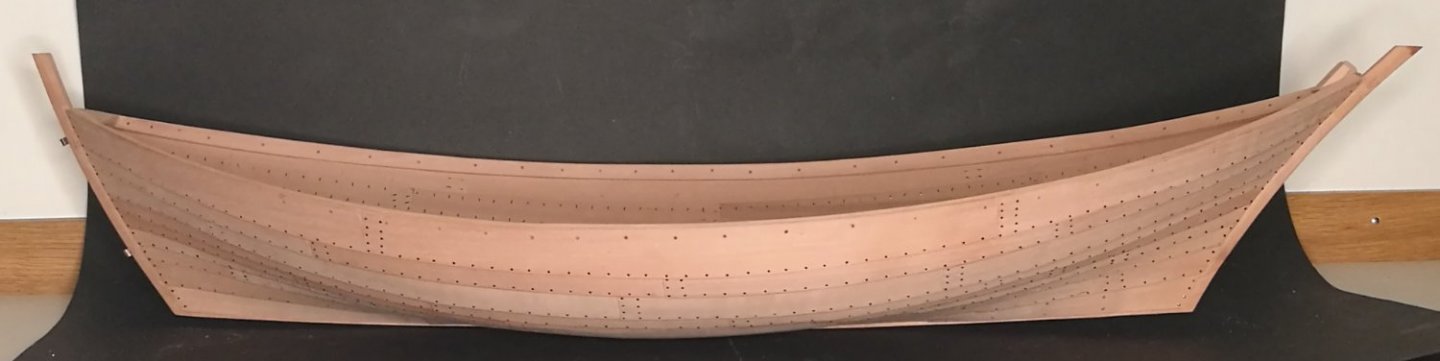
It's almost half a year since I last posted here. You see, I got a bit tired of the planking and took a break to make something to use as cargo for when it's finished. So I made a plough. It can be disassembled to take up less space. It's based on a danish find from this period. But as I browsed through books in the library for inspiration for ploughs (all Swedish university libraries are free to the public) I found a picture of a medieval rope that I couldn't wrap my head around as I couldn't see how it had been made. So I fell down another rabbit hole investigating rope making before the rope walk was invented. This resulted in this video if you are interested. And then I got energy for finishing the planking! The remaining strakes were clinker built and I finished off the sheer with a clamp like in the find. This clamp is attached with treenails. I placed these treenails between every frame, but they should really be placed every 12 cm (5")! And I also made them thinner as they really were up to 5cm (2") thick! I placed blocks in the end of the clamp for reinforcement. The one in the bow is based on the block from Almere Wijk 13 and it has a cavity for the bowsprit. This block and both posts will be adjusted in size later. You really can't turn your back to the kittens without them finding something new to use as a bed! Next up is finishing the seams in the carvel built section as these were caulked with mosslaths between the planks.

- 87 replies
-
- 16
-
-
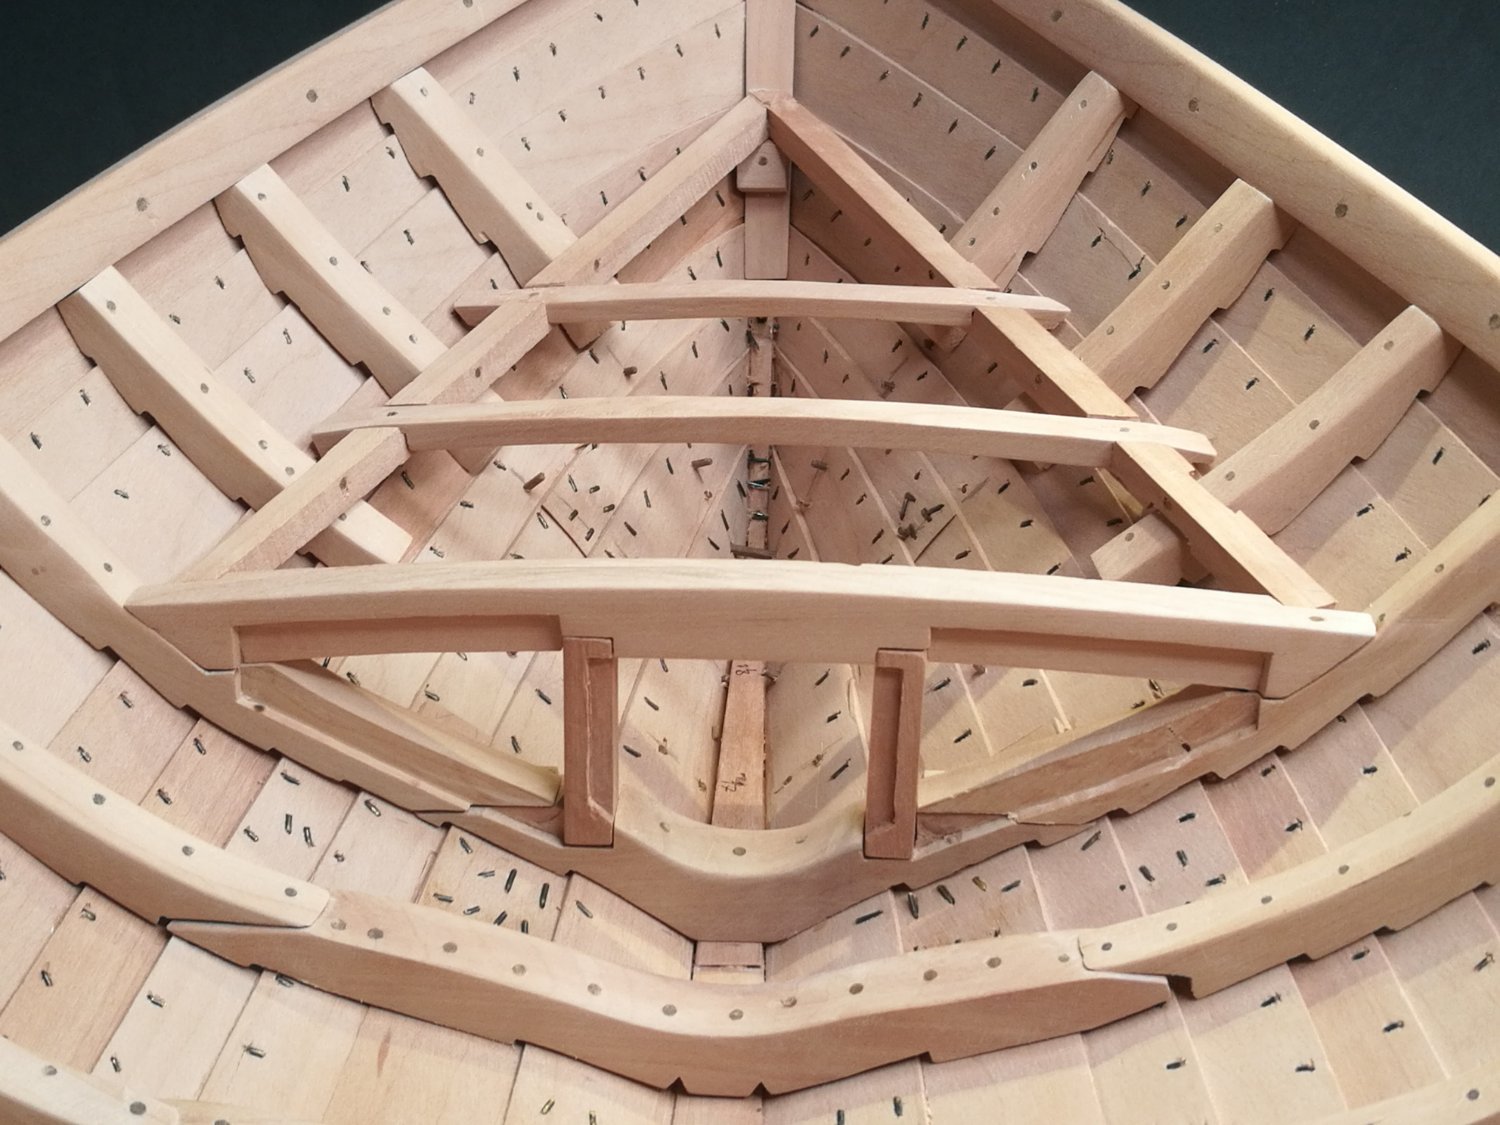
All visable floors are done. The aftmost is shaped to the hull but not treenailed as I want to make the futtocks before finishing it as it will have a bulk head on it. The foremost of the visible frames will perhaps only be futtocks and also have a bulk head why I'm also waiting with it.

- 87 replies
-
- 13
-
-
@Roger Pellett, @turangi and @Bob Cleek thank you for the responses! I couldn't remember the grain raising on my last model on the unbent pieces and of course it's as you said that oil paint doesn't do it.
-
I'm building a ship and most pieces are bent in hot water, so the grain is raised and then sanded smooth. I will later on stain everything with oil based paints. I guess I should I also put the pieces I don't paint in water to raise the grain to prevent it from happening after painting when it will be hard to sand? PS: I guess you want to know that I'm using pear wood.
-
@Mark Pearse Thank you! Joggle stick, that's a good word for it. It looks good now after having the floors in tension through the night, what a relief.
-
So I started doing the floors. The ceiling covers eight floors in the middle so that's a good starting point. As I remove the hull from the mould there is a slight deformation, but nothing to worry about there. I copy the hull shape using this method I've seen here and it works out nicely and I spend a couple of days of the vacation almost finishing all eight floors. It looks pretty good and I clamp some of the floors to the hull and put it back on the mould. It doesn't fit!!! I was ready to throw away the floors and do at least a couple of them with the hull on the mould (I made it quite spacious with this in mind...), but after I have stepped back for a while and taken a fresh look I will try and bend the floors sligthly to get the correct shape. The plan is to have the hull on the mould and then clamp the floors to it. Let's see how that goes. Post script: I think this error was always there when I removed it from the mould, but it was so easy to bend it back that I didn't think so much about it. But the floors solidified the error and now it took a lot more power to bend it back.
-
Five out of nine strakes done. These are the strakes that is carvel built midships. And now I will take a break from planking and do some frames. Most of the frames are of three parts; floor and two futtocks. Looking at the drawings of the wreck I see that one could say that the floor parts cover the carvel built areas and the futtocks are used for the clinker built parts of the strakes. I enjoyed making the cargo in the last build and I have already started some of that work by reading books with titles like 'The ploughs of medieval Denmark' and such like. I never thought the history of ploughs was this exciting! My partner is amazed of how I seem to be able to be enthral by almost any subject...

- 87 replies
-
- 11
-
-
@Chuck Seiler yes, I'm using brass black and it kind of failed on these nails. I read instructions of diluting the solution but didn't think it was importent. It is. I think the nails I'm nailing now will stay darker.