Gazzarian
-
Posts
42 -
Joined
-
Last visited
Content Type
Profiles
Forums
Gallery
Events
Everything posted by Gazzarian
-
Thanks Alan. I will try with steam, sounds like a good idea.
-
That makes sense, thank you.
-
Hi. I'm just a couple of rows into a second planking and starting to see the same issues with bowing that the edge bending method relieved on the first. Will it work with 0.5mm wood? Should I cut shorter planks? Advice gratefully received.
-
Sorry this is not a very good pic, but just an update on what happen when crazy Swedish lady takes charge of your woodwork.... The top layer, the mahogany, is the bulwark and is just temporarily clamped there to give an idea of the intended ultimate effect; it can't be installed until second planking is complete as it's too delicate for much handling. The next is, surprisingly as it's not usually used for decoration, is limewood but stained with White Ash stain. THere is another one under the wale, or forming part of the wale, but hard to see in this pic. The intention was to bring some highlights in the otherwise dark woods and, as they are not parallel (the wale is deeper from the top at the waist) emphasise the curvature. Other layers are walnut plank and strip (intended to replicate the different protuberances you see on wooden ships) and the wale itself which is set against the first planking as opposed to on top of the second planking as indicated in the kit (I didn't think that would look quite right, I preferred it to be inset). The wale is the obligatory black (stained) but I will sand the edges off the slightly highlight the shape and simulate weathering. At the bottom is the first plank of second planking, went on easily with the dry PVS / iron technique (like making one's own iron on veneer!) It all needs to be carefully sanded and tidied up. Any suggestion re finish: varnish, oil, shellac etc gratefully received.

-
A couple of things I will mention in case they're helpful. The false deck has a series of tiny holes drilled out for the ringbolts (we need ringbolts so that the sailors have more things to trip over). However I couldn't see any reference in the manual to transferring these locations through the deck planking, rendering them pointless. I opted for the laser etched single deck piece so was able to align that with the false deck and drill through with a tiny bit in a pin vice, with a block of wood on the other side to prevent splintering the etched deck surface. If you are going the planking route, you could plank the centre portion and drill through in the same way before installing the false deck. Also, contrary to the instructions, my first step was to glue the keel and stem post parts to the false keel. It's much easier to do a butt joint flat on the work surface rather than in mid air later on, and it gives you a keel piece to clamp onto when framing etc. Just a thought.
-
Thank you Ryland! Might be triumph or disaster, will treat those two inposters just the same.... I didn't manage to achieve the symmetry I'd hoped for on these diagonal planks; I did try using tick marks on a bit of masking tape to match up the centre planks distance out either side, but the reference points were rendered null and void by my haphazard planking and sanding, I see I have more tidying up to do.

-
Well, having converted most of the plankage into enough sawdust to heat a small village, I decreed that the sandpaper had removed sufficient evidence (the analogy is appropriate; there were criminal mistakes in my planking but I got away with it) that I can move on. I'll put up some pics when I get to something interesting to share. Please allow me to outline the history of this imaginary craft, partly because it amuses me but also more seriously in the hope that it might elicit ideas and suggestions. In 1801 she was caught by a French frigate emerging from a fogbank, and before managing to use her superior speed to escape was badly battered around the topsides. Before she got to the top of the queue for repairs, the peace treaty of Amiens was signed and she, like many ships, officers and seamen was declared surplus to requirements. So as I mentioned earlier, she was bought by a wealthy naturalist (he inherited his money from the founder of a bank that exploited arms manufacturers and wanted to assuage his inherited guilt by counting frog spawn in Norwegian fjords and pastimes of that nature). Anyway (if I'm boring you already, have pity on my future house guests) his wife, disgusted by such non alpha male behaviour, ran off with her Prussian fitness instructor (best we don't delve too deeply into that). This freed him to bring his Swedish naturist girlfriend out of the woodwork to, ahem, do the woodwork. On the refit. So late one night, after a laudanum fuelled meeting of views, they agreed that they both hated this navy business of slapping paint on everything and would go for a totally, er, naturist wood look. Well, in fact he just agreed with her because, with a girl like that, that's basically what a bloke does. So, this sets the scene for all sorts of creative fun. I have in mind the use of walnut, mahogany, tanganyka, the included pear wood and anything else that inspires me (I have a little collection of wood I bought for an architectural project I then lost interest in). And textures. I have had nice results in the pas from blending different colours of wood stain in layers and then using sandpaper to bring depth and relief. A couple of other things spring to mind. I made a little ladder now installed beneath the aft companion way; as the aft end of the ship will be reserved for the owner and his lady, this will be for their use only and I'm planning a yacht type raised coaming / sliding hatch affair with little doors, and maybe leave it open so you can see the little ladder going down. I also need to add scuppers as pointed out by Chuck in the other thread. An additional stove vent as they'd have had a separate one in their aft quarters. I'm wondering about: (a) A wheel rather than the tiller? I've read that this was a common upgrade in those times, and (b) would he have had her coppered? If you've read this far then apologies for the long post but if anybody does have any thoughts they would be gratefully received.
-
Your build is looking great and I appreciate this log, it's helpful with my own attempts at this model, where I am some way behind you, so thank you!
- 436 replies
-
- 2
-

-
- vanguard models
- alert
- (and 1 more)
-
Hi All. There have already been some great build logs of this, which have really helped. It's my first time attempting something of this nature (I have done other sorts of model making but my only boat was an Amati Viking boat which had a single plank layer made from floppy bits of plywood). The kit really is a thing of beauty, it's like model ship kit making arrives in the 21st Century. The precision with which the parts fit, the self jigging, the immensely helpful manual. It's been an absolute joy so far. It's a shame therefore that I'm going to massacre it. Oh, OK, I'm not. My planned alterations will be only superficial and reflect the fact that I don't like guns, I don't like paint, and I do like creative reimagining of history. So in my imagination, this vessel gets pacified. Bought out of navy service by a wealthy naturalist. Some on here were very helpful when I raised this idea in the History section, and if you're interested here is a link to that https://modelshipworld.com/topic/25831-historical-fantasy-oh-and-heresy/ Anyway, we can return to that later if it's of interest to anyone; an alternative history. I can't fill in all of the details entailed in executing that and maybe you can help. Here are a couple of pics as she is at the moment, with sanding of the first planking just started. I haven't done this before and had some issues, especially as I managed with extraordinary idiocy to misinterpret Chuck's brilliant edge bending tutorial. I got it back to front, and realised my mistake about half way down and finally got the point on board. My excuse is that the 3D geometry of this is counter intuitive if you look at a profile plan. But the truth is I'm an idiot. I got it in the end though.

-
Historical Fantasy. Oh, and Heresy.
Gazzarian replied to Gazzarian's topic in Nautical/Naval History
Thank you so much folks. These comments are really helpful and encouraging. Alan that is a pretty vessel, something kind of Viking-esue in the planking at the stem. Intriguing. Chuck thanks for posting the pic of the scuppers, something I shall copy I think. I had wondered about that. Craig yes indeed, you must be right to say 'less crowded'. Apparently the Alert's crew went up to 80 or so after she was equipped with more guns. I can't imagine! Roger that's very interesting re the rigging, hadn't even thought of that. And of course it will be a while before I will get to that! But I will follow up on your suggestion. Again all these comments are encouraging and helpful and I am very grateful to you for posting them. -
Historical Fantasy. Oh, and Heresy.
Gazzarian replied to Gazzarian's topic in Nautical/Naval History
I don't think they were adequate for the deluge. I'm going to attempt to put a link to Harry Thompson's book. https://www.amazon.co.uk/This-Thing-Darkness-Harry-Thompson/dp/0755302818/ref=sr_1_1?adgrpid=100884600622&dchild=1&gclid=CjwKCAjwn9v7BRBqEiwAbq1EywQzEVqDCKh0TugvkX7CfMoeRCk4mbm6LBmjGBxrQHZXERAwNzYqPBoCpvMQAvD_BwE&hvadid=445797441300&hvdev=c&hvlocphy=9046008&hvnetw=g&hvqmt=e&hvrand=4850461530939432838&hvtargid=kwd-314975292366&hydadcr=24431_1748949&keywords='this+thing+of+darkness'&qid=1601701234&s=books&sr=1-1&tag=googhydr-21 -
Historical Fantasy. Oh, and Heresy.
Gazzarian replied to Gazzarian's topic in Nautical/Naval History
Tony that is totally fantastic. Thank you! I will look for that thread. And your plans look amazing. I am awed by replications of actual framing, and although i shouldn't walk before I can toddle I might have long term aspirations.... Thank you again for an incredibly helpful reply, I really appreciate it. -
Hello. I appreciate that this is probably the wrong site, and most certainly the wrong forum, to raise this but as none of you know where I live.... If you're a historical purist look away now. But if your imagination can help me then please read on. I'm embarking on a build of the Vanguard kit of the British naval cutter Alert. It looks very pretty and about the right level of experience required for me. But, the thing is...it has guns. I don't like guns. So, in my deranged imagination, what I'm thinking is that it - or a sister ship it could be, really - wasn't lost at sea in 1779 or whatever but was bought from the Admiralty as surplus to requirements by a wealthy naturalist. (Think Maturin and the Surprise, kind of, a bit.). So while the Brits and the French etc were busy creating widows, he was pottering round the Scottish islands, Norwegian fjords and so on looking at gannets eggs or whatever these people do. Having fun with luscious Lapp ladies and road testing aquavit. Whatever. What would the cutter look like after he'd civilianised it? Clearly the gun ports would be made back into continuous bulwarks. (There is a scene in the fantastic book This Thing of Darkness where the Beagle almost founders because in his refit Capt Fitzroy has raised the bulwarks and when it takes on board a massive green sea the master can't open the gun ports, jammed solid through lack of use, to let the water off the deck.) So that's a thought. As also recounted in the Fitzroy / Darwin novel (did I mention it's brilliant?) the Beagle needed lots of boats, for its surveying duties but also so that Maturin - whoops, sorry, Darwin - could go and collect crabs and spiders. . So our civilianised Alert will need at least one. Maybe a 16' or similar on stern davits? Would a civilian owner using it for these purposes add a little house on the deck, or some additional skylights? Obviously there would be a lot more room on board as she wouldn't need to carry gun crews. But the owner is a wealthy guy and will like his comforts. Also something to impress the Lapp ladies, perhaps. What do you think?
-
Thank you for the kind comments and advice. Much appreciated. I will think about where to go next. Once the trauma has faded 😄
-
Hi back Mark and thank you. Was joking re the Victory!
-
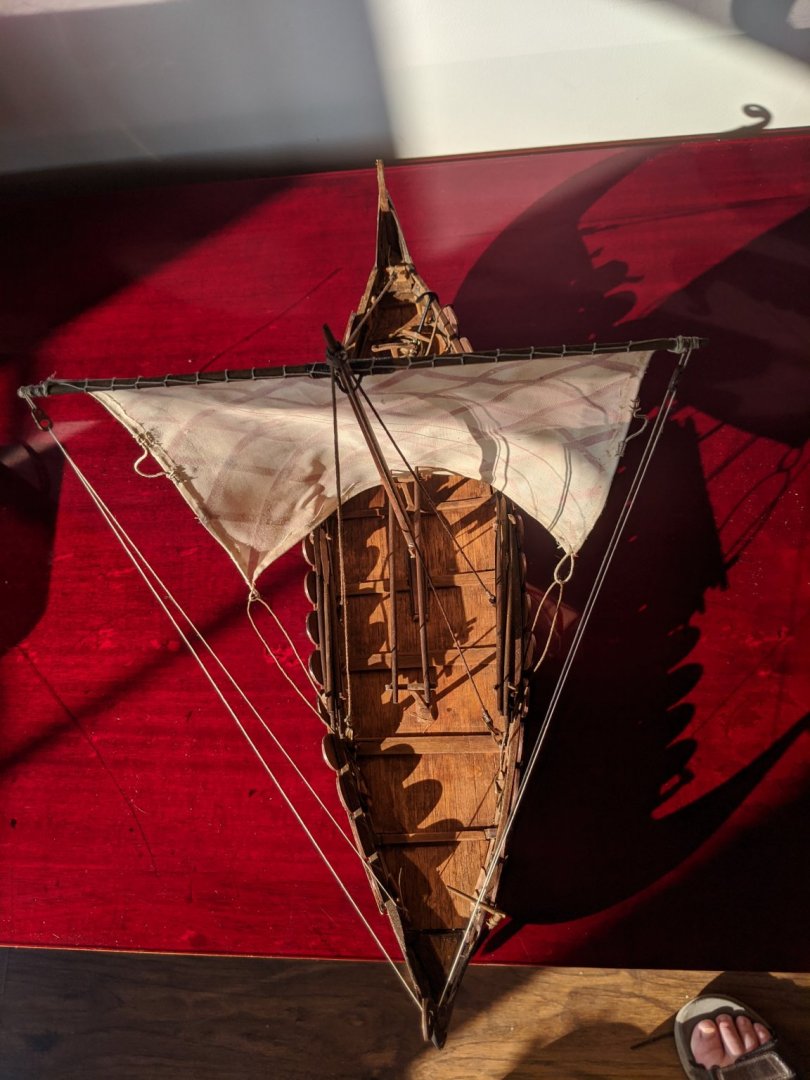
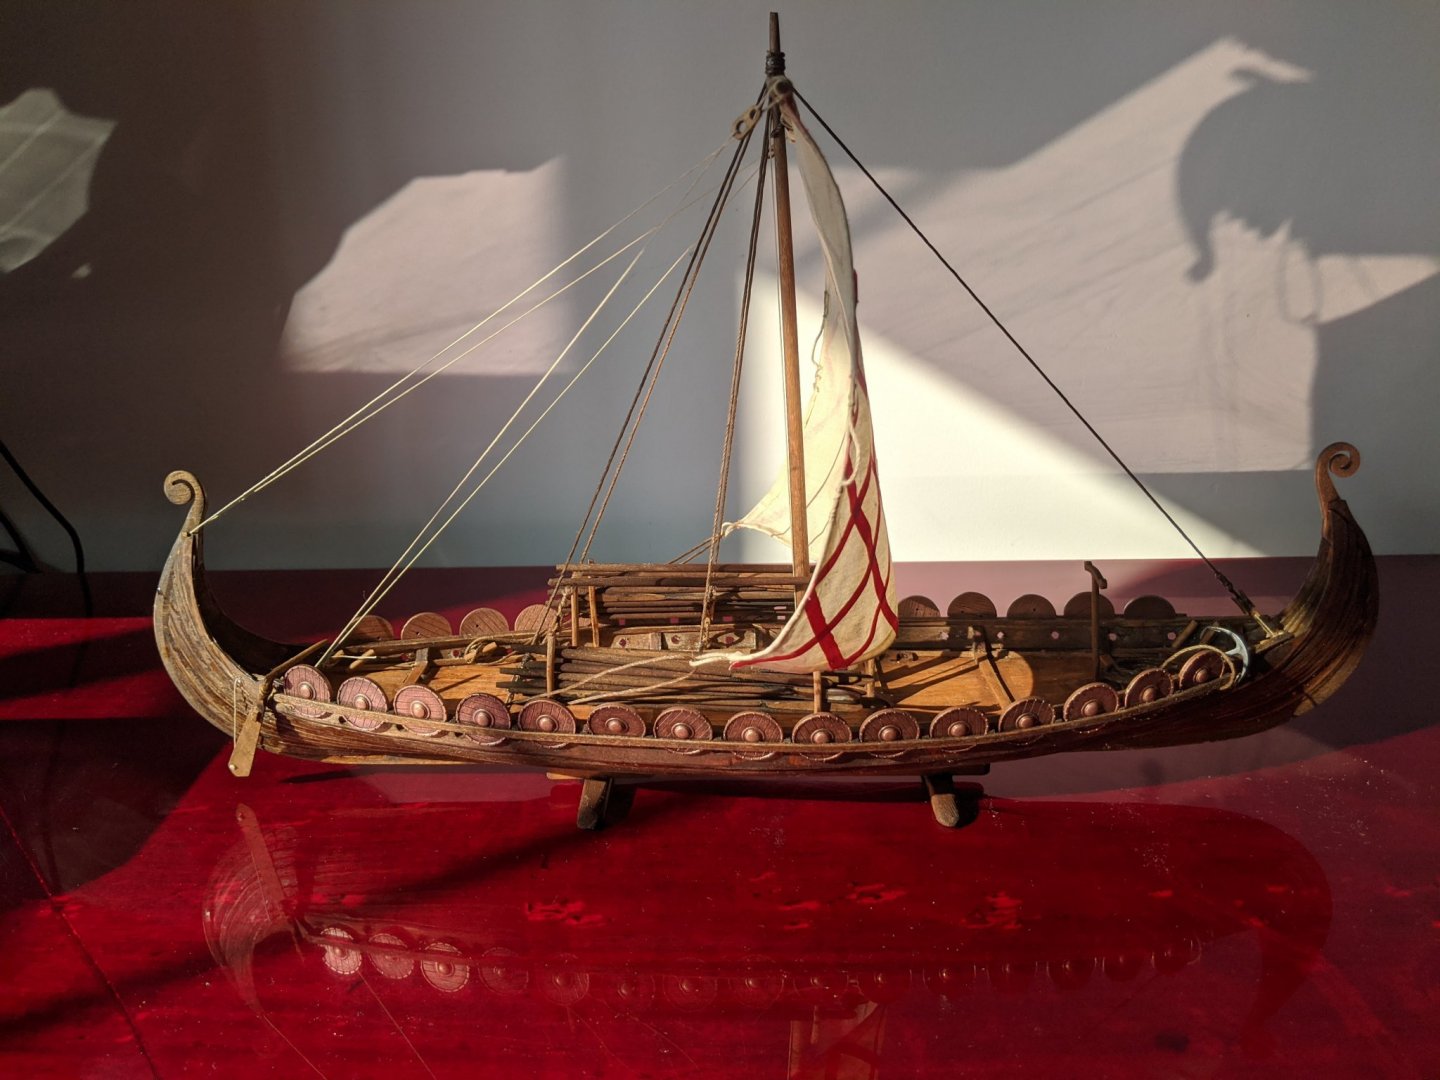
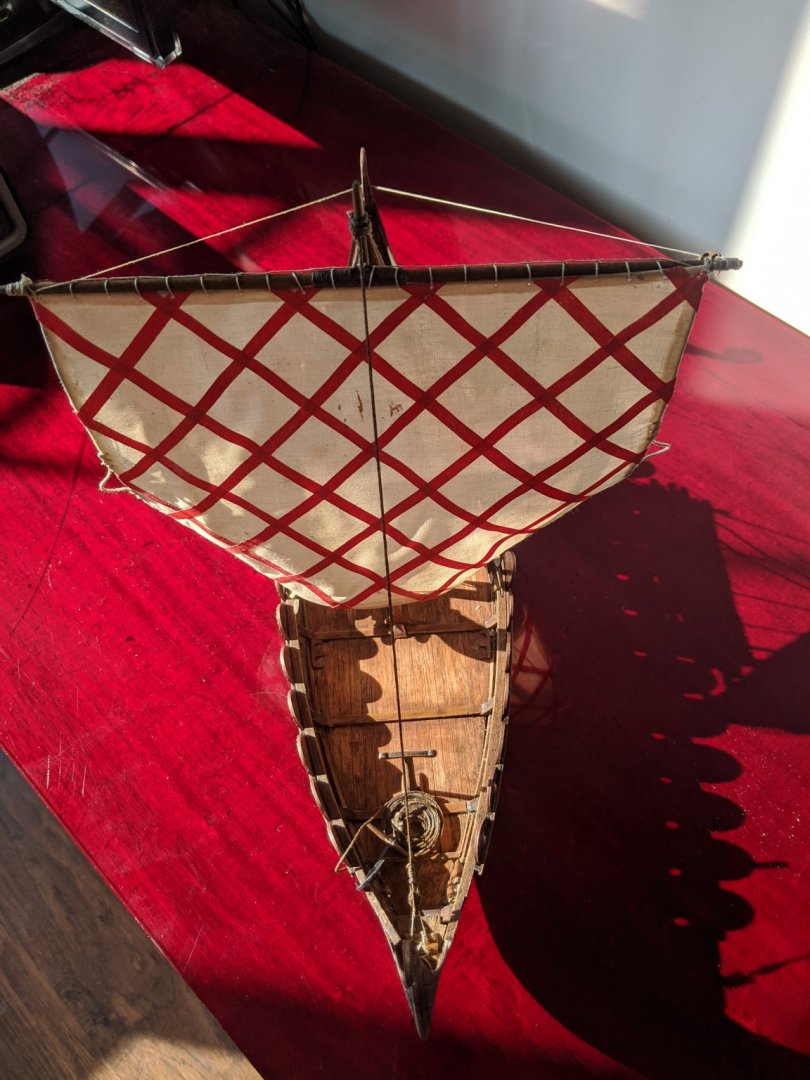
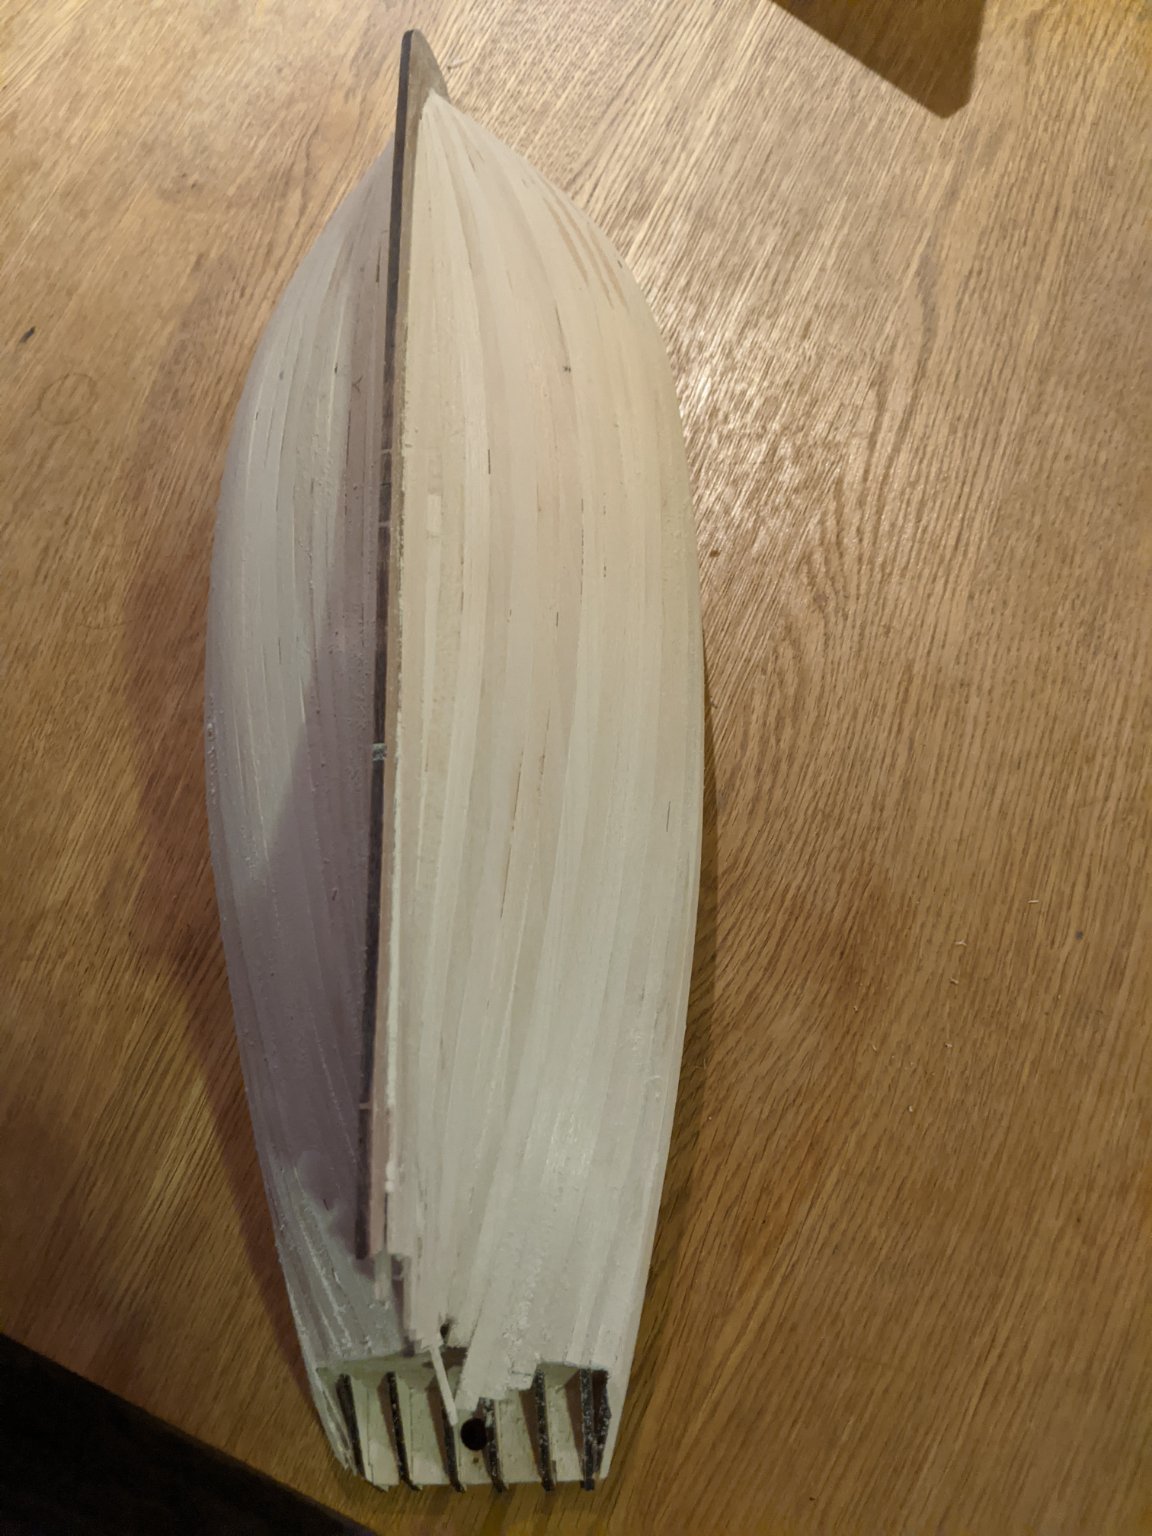
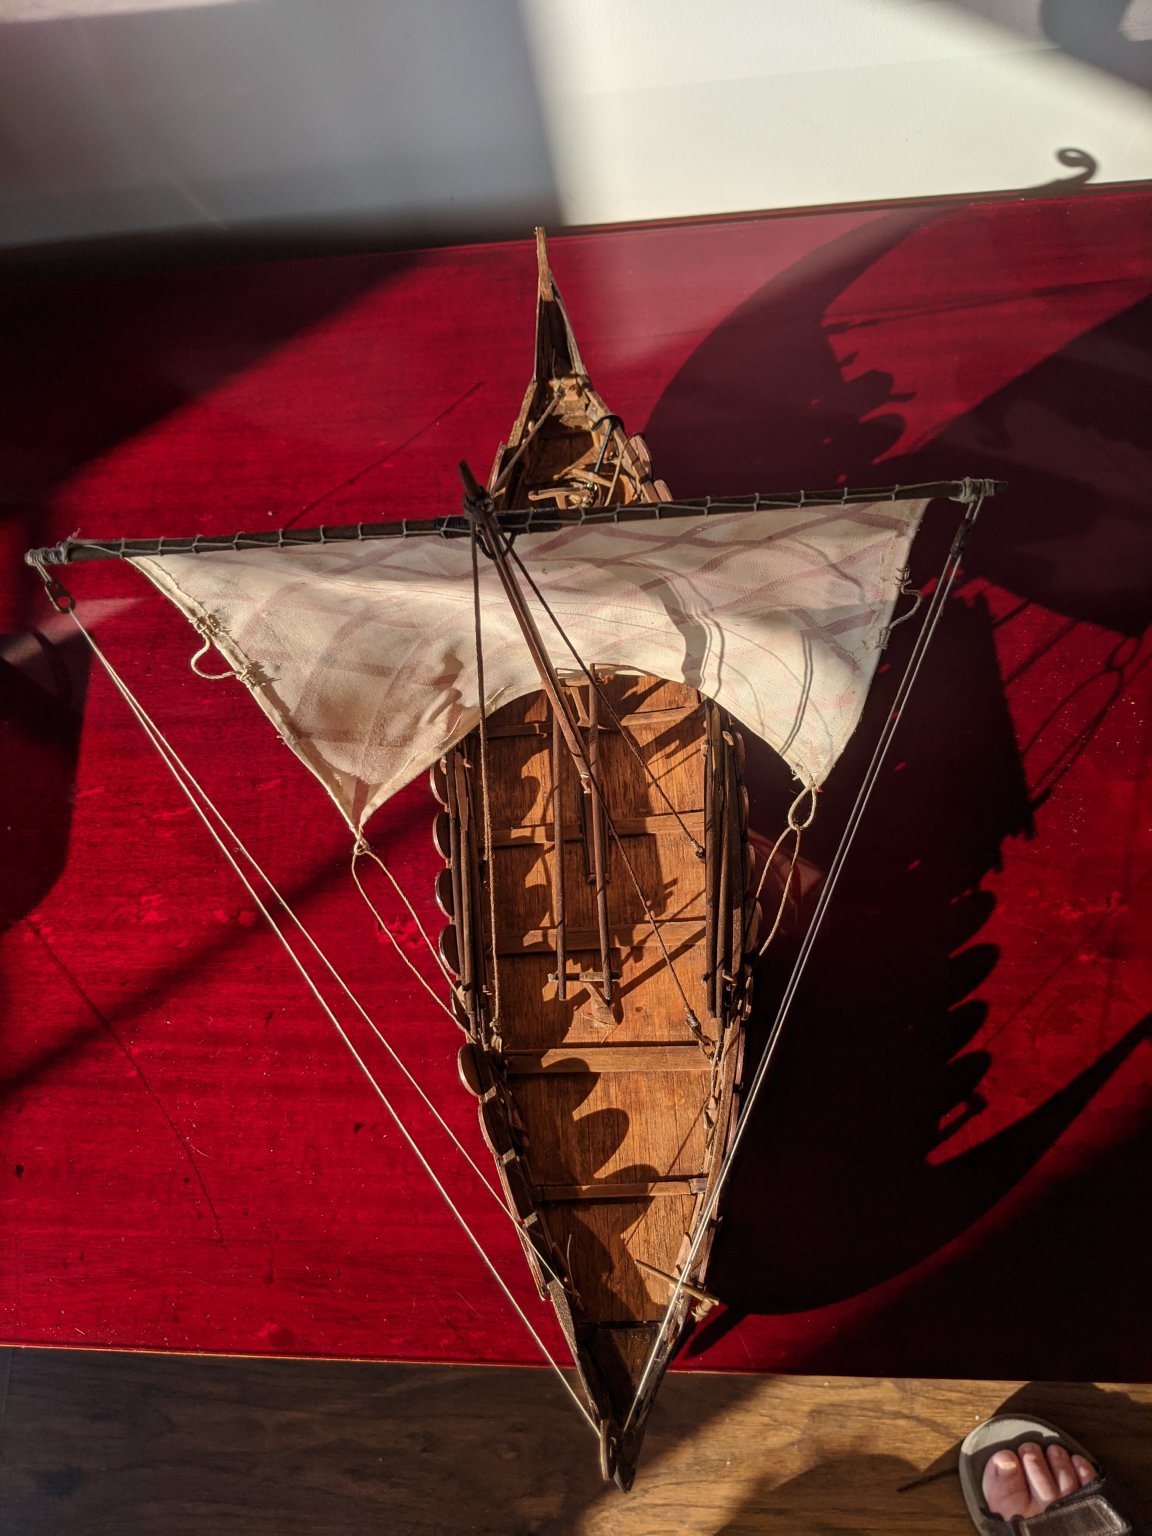
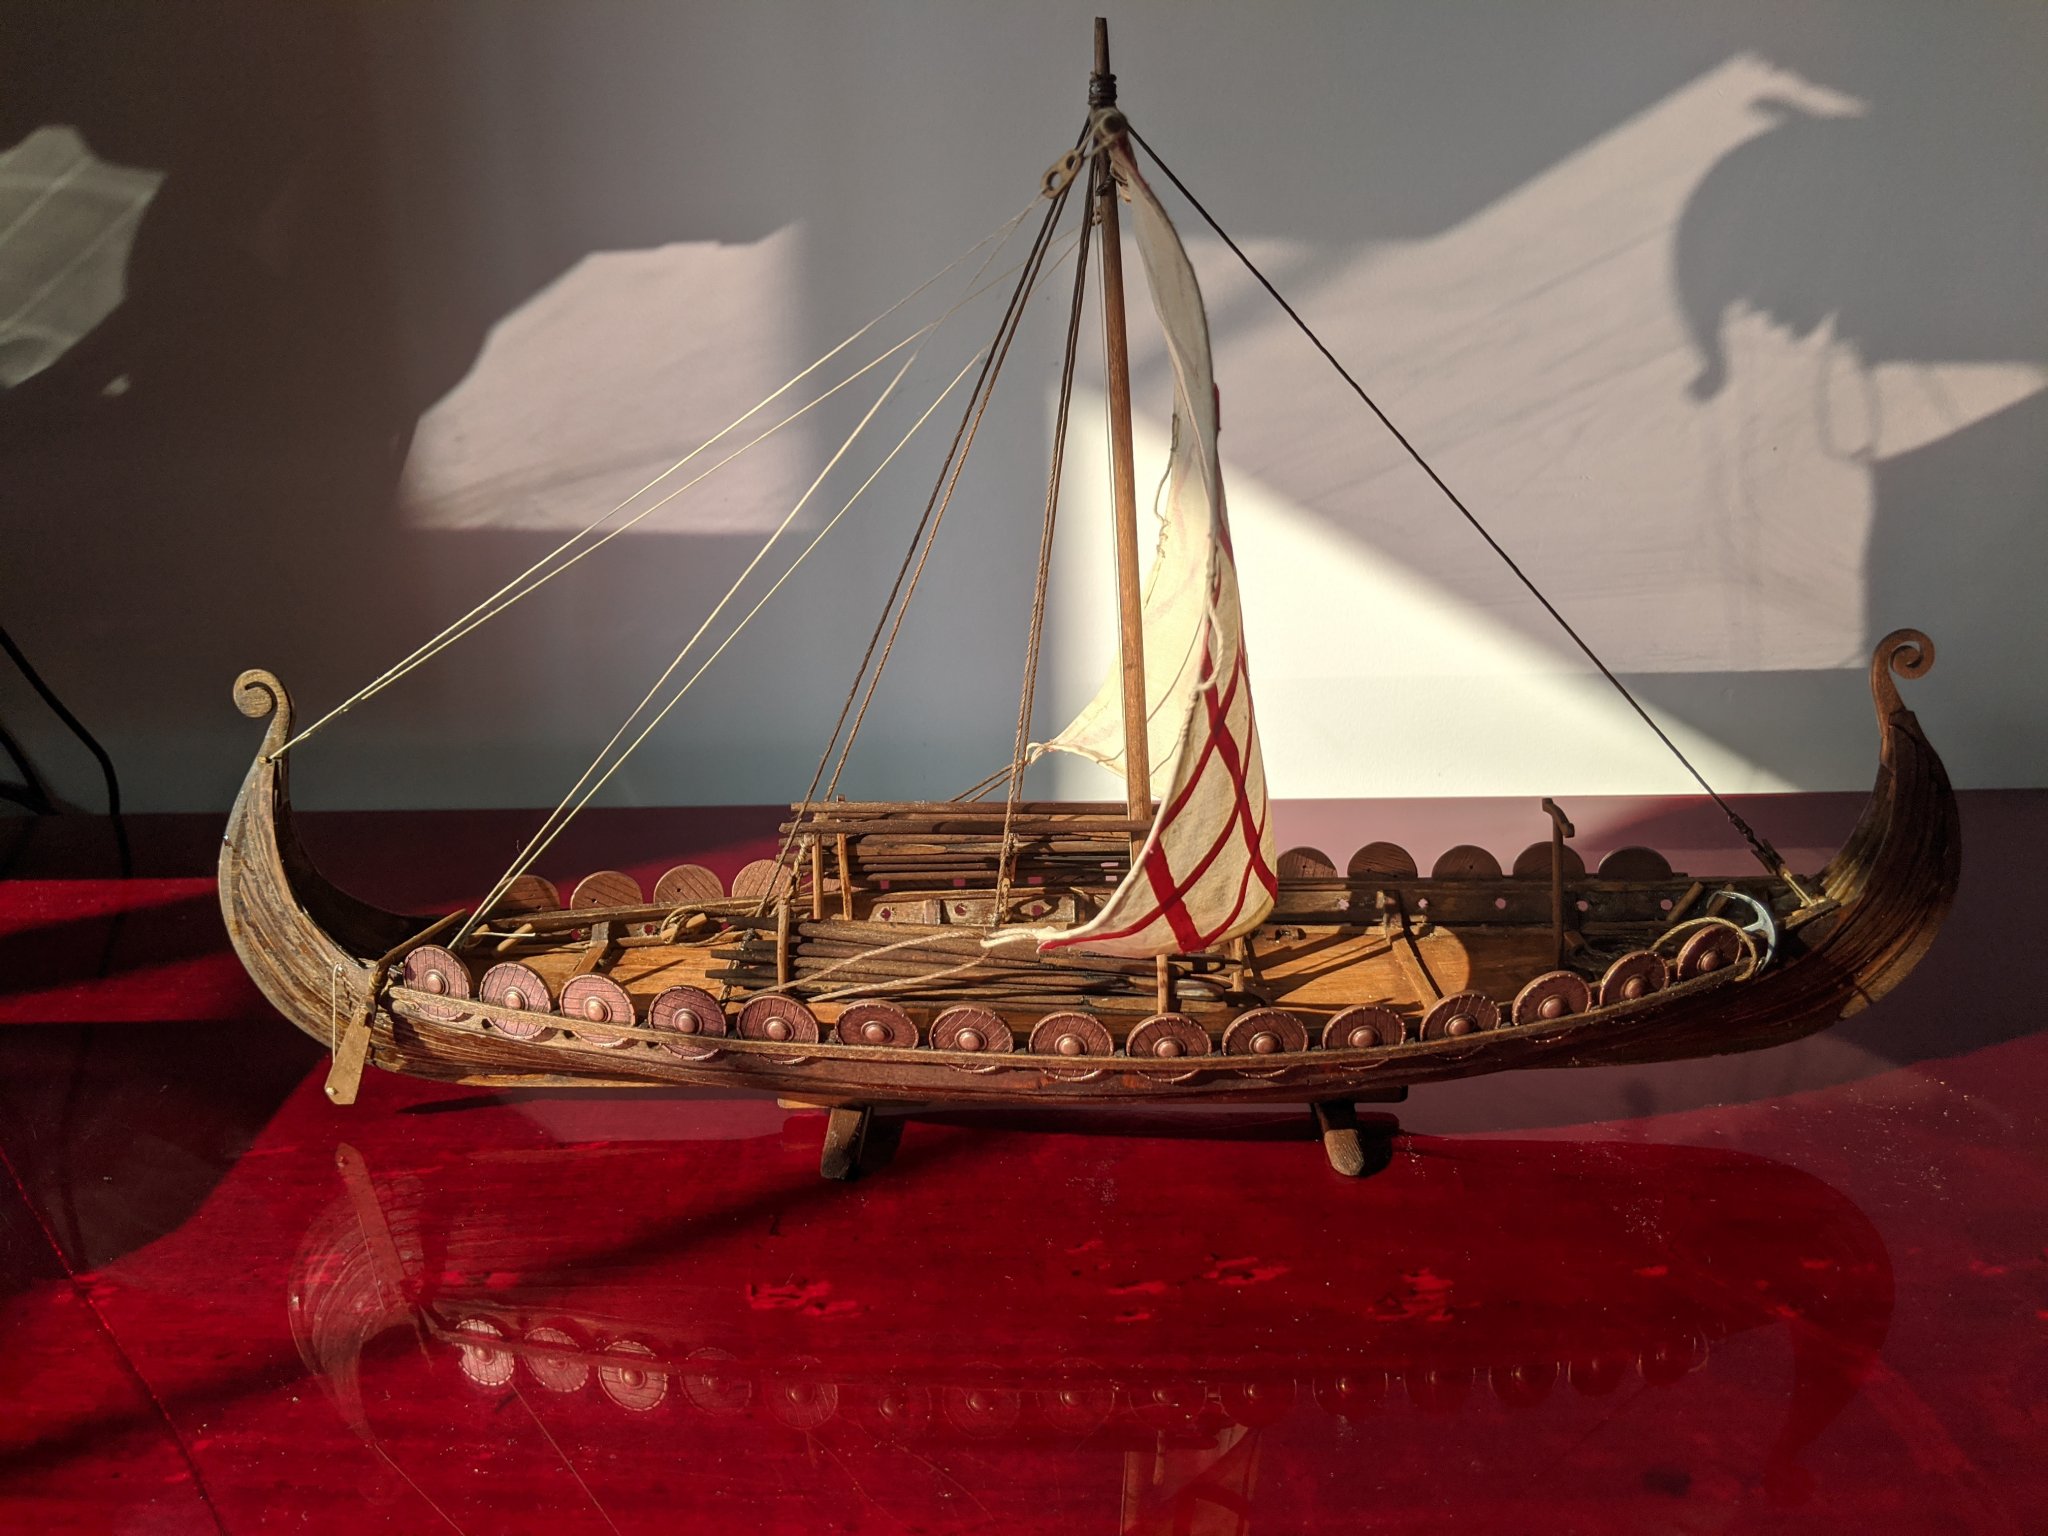
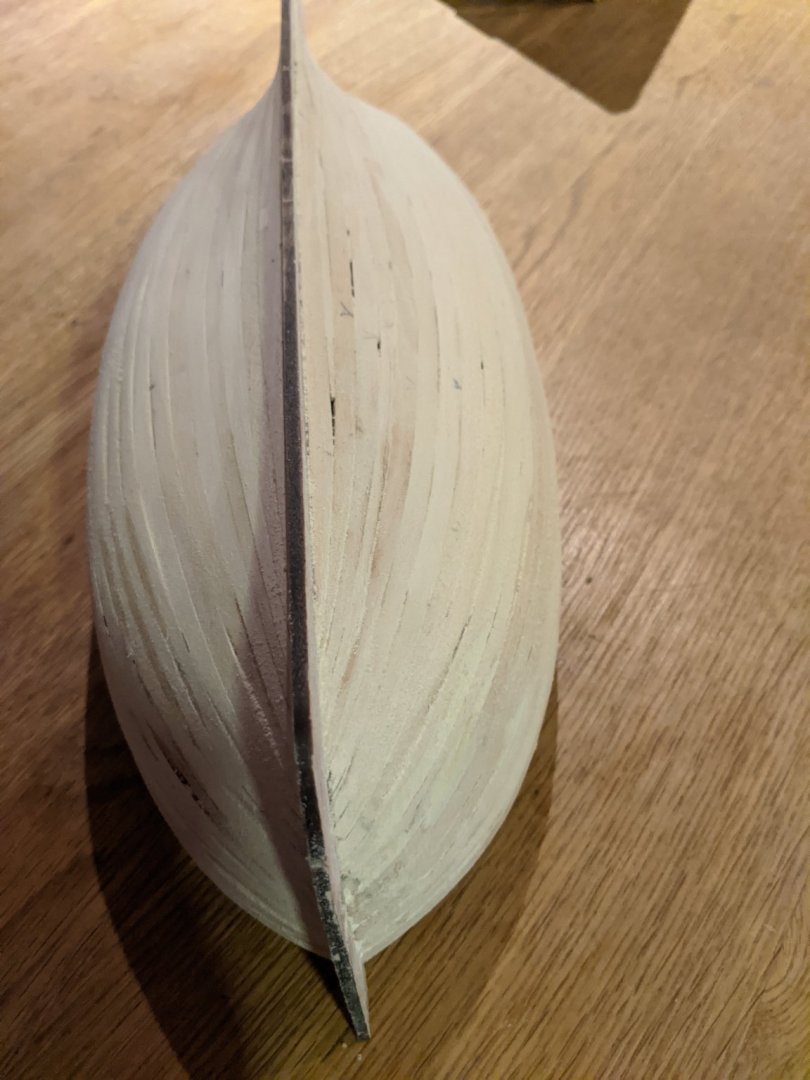
First Time Bodge Thought I’d chip in on this as a newbie as I have made a terrible mess of everything….but it was fun. (This is not to be read by, er, perfectionists. Or indeed anybody who minds the arrival of a blithering idiot to their hobby world.) So I thought the Amati Viking Drakkar looked a lovely shape, and the box said ‘Easy to Assemble’. Well, I don’t want to get all ‘false advertising’ on you, but, I mean, really chaps. To be fair there were instructions, but whoever translated them from Italian was clearly not happy in their work. They might just as well have said ‘assemble the pieces in the box following the pictures on the plans until they look like the picture on the box’. Actually the plans themselves looked nice, I thought I might frame them and hang them in the bathroom but glue stains, general tears (pronounce that word either way and it suits) and accumulated scrunchiness, also blood smears from when I cut my finger put paid to that plan. The plan for the plan. So I don’t have any build pictures to share, sorry. Actually I did take a couple but I don’t want to get into trouble for posting upsetting images online. But what I can share for the benefit of this vast audience are a few labour saving tips. Ask a lazy man if you want to know the easiest way to do something and, boy, am I lazy. I mean, this deck planking, right? Install the false deck and then plank it? Are you kidding? Messing around with wedging tiny bits of corners and radii in the nether regions of the bulwarks or whatever they’re called? No, put the planks on first with the false deck flat on the worktop, leave them slightly hanging over the edges, then you can trim and jiggle to fit. Oh, I see….right. Ahem. Oh well, never mind. I mean, the Vikings would wedge bits of cordage, pitch, uneaten biscuits into gaps to make them watertight so my equivalent will just be more authentic. Although I ate all the biscuits. Similarly, the top hull plank needs holes cut in it for the oars to poke out through. So far as I could make out, the instructions say to do this after you’ve installed the plank on the frame. What? Drill holes in mid air and expect to get a neat row? No chance. L and R planks taped together for symmetry, masking tape on top so you can draw a neat centre line and line the hole locations up from the plan. Perfect. Oh, that’s why they perforate stamps. If you drill holes in very thin ply and then try to sand it….oh well, never mind, I’m sure Viking ships suffered battle damage. Things were getting so desperate at this stage that I had to resort to my genius for creativity, which I have traditionally applied to the field of corporate financial accounting. The major issue was that, viewed from above, the hull looked rather like the outline of a horse which had been on the diet of a fashion model. (It looked worse from any other angle.) So I thought I’d shape a sort of gunwale rail thing to disguise it. The kit just had gunwales that were paper thin plywood anyway which, truly, is not a good look. This required me to put some bits of sawn off tree in the bath, cleverly remembering to turn on the tap for a bit, until I could tack them into a nice curvy bendy shape on my trusty piece of MDF worktop. Sadly the tacks left holes in them, which I hadn’t anticipated, but I don’t think they’re too visible. It almost worked but, tragically, I then glued the shield rack to the horse bones beneath the nice new perfectly bent shape of my new gunwale top thing. There are some pictures but if you could, perhaps, close your screen and your eyes before viewing them I’d be ever so grateful. As you can also see from the pics that you are definitely not looking at, I totally gave up on the rigging. Stupid little misbehaving brats of thread. I’m a father and have never experienced such outrageous behaviour. They are in the bin where they belong. Anyway, I learnt from my mistakes. Which was a lot of learning. Even for an idiot. HMS Victory next….