
Supplies of the Ship Modeler's Handbook are running out. Get your copy NOW before they are gone! Click on photo to order.
×


BANYAN
-
Posts
5,869 -
Joined
-
Last visited
Reputation Activity
-

 BANYAN reacted to wefalck in Gluing Paper to wood and sealing Paper
In addition to artists' fixatives that also often have UV-filter built in, there are 'mounting' spray-glues. Not sure how long these will last though. I also believe that there are self-adhesive films for mounting. Another option are films impregnated with melting-glue - you can iron-on your drawing etc. While I have some 3M mounting spray-glue, I can't point you to any specific products for the latter two options.
Finally, if the copy is made with a laser-printer/-copier, it may be possible to mount it with some plain wallpaper glue. It is important to press it while drying and depending what the backboard material is, you may need to laminate its back also in order to avoid warping.
wefalck
-
 BANYAN got a reaction from PeteB in HMB Endeavour by BANYAN - FINISHED - Artesania Latina - 1:60 - circa 1768
The Builder's Yard (Workshop)
I originally started building this model in a spare room in the house. I have since built a workshop (aand many more "honey please do! small jobs) which have contributed to the extended model build time. However, finally, I can concentrate on the build!
-
 BANYAN got a reaction from AKRYPTO in HMB Endeavour by BANYAN - FINISHED - Artesania Latina - 1:60 - circa 1768
Boats
Longboat: After several unsuccessful attempts to build a plug (see picture) on which to build the boats, I was fortunate to be offered a 1/64 scale version of Chuck's 26 longboat templates. I have included photos of some of these plugs which were designed for the cutter; I may still use one of them. These are all sandwich constructed with two of them using vertical slices ('sliced bread loaf') and the other the more tradition 'bread and butter' horizontal slices.
When I received the smaller laser cut template from Chuck (many thanks), I did not have intentions of using it; rather, I was more interested in the larger 1:48 version he had created. However, when I looked more closely at the smaller scale version provided by Chuck, I noted that, with very little modification, it fitted nicely to the dimensions of Endeavour's Longboat as described by both Ray Parkin and Karl Marquardt.
Both authors agree that a shorter and fatter (in the beam) design would have been required, with the shorter length to allow it to be stowed without interfering with the workings of the ship. The wider beam allowed the boat to carry the required cargo, especially water casks. By removing a couple of the middle frames from Chuck's design, the length and beam of the resulting longboat was correct to 1:60 scale for Ray Parkin's version for the construction of the longboat (94 mm x 35mm x 20mm). However, I used Marquardt as the reference for the most likely fitting-out of the boat.
According to Parkin, the longboat would have been clinker built rather than carvel to provide a more robust boat that could be used to conduct the intended close-in coastal surveying (which I am assuming Cook would have wanted). I have also adopted the two mast design with a sliding gunter rig, as this is what was clearly shown by the embarked artist, Sydney Parkinson (expedition artist/illustrator), in his sketches of the ship's boats.
The following photographs show the construction process for the longboat using Chuck's sacrificial bulkhead system to create the
skeleton/ribs of the boat.
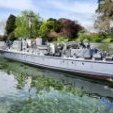
The following photograph shows the near completed longboat; I have still to complete the oars, grapnel, masts etc. I have painted the longboat mainly white as I believe it would have assisted with temperature control in the tropics, and provided higher visibility for the Endeavour's crew to monitor her movements during survey and coastal work.
-
BANYAN got a reaction from PeteB in HMB Endeavour by BANYAN - FINISHED - Artesania Latina - 1:60 - circa 1768
Stern Work
There is still some debate as to whether Endeavour's central window was a fully-functioning window or a dummy placed for aesthetics. The shape of a window is definitely shown in contemporary drawing; however, it is very unlikely it was a functioning window due to its proximity to the Rudder post trunk in the main cabin.
The stern windows were made from beech wood and glazed with Liquid Gloss. This is a two part compound comprising resin and a hardening agent. There are several types of this product; I used Craft Smart which is available at Spotlight in Australia (see picture). The mixture has a slow drying time so allows some time to fill/flow into the window panel spaces. The mixture heats as it is mixed forming some bubbled. These can be removed by using a straw to blow across the surface of the compound after pouring. As with similar compounds, it contracts slightly as it dries tending to leave a hollow in the middle of the area. This can be filled with a second application.
The figurines and counter decorations between the windows are the white metal versions provided in the kit, but cleaned up and painted. I had enough on my plate (as a first build) learning all the other skills yet alone trying to carve. This is something I will need to attack in the future though.
The stern decoration is not representative of Marquardt or the Endeavour Replica and reflects my attempt to try something different to the metal (nasty) looking decoration provided. The base design was ordered from Double 'O' laser cutting service, I then made some further alterations to provide a stylised version of what I thought they may have looked like, rather the very heavy look of the decorations on the replica vessel.
The quarter badges are the white metal version provided with the kit; however, I carefully removed the cast window frame and replaced it with wood which I then glazed.
-
BANYAN got a reaction from PeteB in HMB Endeavour by BANYAN - FINISHED - Artesania Latina - 1:60 - circa 1768
Rudder
The rudder is made from three pieces of walnut glued longitudinally and shaped to conform to the pattern depicted in Marquardt's drawings. The following picture shows the rudder fitted; however the chain rudder pendants have yet to be fitted. I'll do this after the rigging as they will be quite prone to damage.
The collar for the rudder is made from calico cloth which will eventually be treated with a diluted PVA solution stained a very pale/light grey and weathered to simulate canvas. In the following photo you can see where I am starting to clean the edges and touch-up the paint. This will all be second coated to give a uniform deeper colour.
-
 BANYAN got a reaction from NMBROOK in HMB Endeavour by BANYAN - FINISHED - Artesania Latina - 1:60 - circa 1768
Chains and Channels
The channels proved to be a very challenging job for me until I realised that by using brass pins on the inner edge I could get a stronger
and tighter fit with the hull. I had to do the job twice, as at first I had fitted them perpendicular to the hull side rather than parallel to the water. The channels have an outer hardwood (walnut) edge which was glued to the inner channel plate after rebating the deadeye chain recesses.
The chain plates have turned out reasonably well, but are a little ordinary in some places. The walnut deadeyes were the ones provided with the kit; however, I used different chain plates to those provided, and these had to be modified to suit (a lot of silver soldering).
-
BANYAN got a reaction from PeteB in HMB Endeavour by BANYAN - FINISHED - Artesania Latina - 1:60 - circa 1768
Ports and Hull Fixtures
The airing and loading ports were cut into the hull planks with a sharp chisel and the hinges applied. The port hinges are photo etched shim brass which have been blackened and glued with CA. These were drawn up in Corel Draw and etched by a contact in the Railway modelling world. I was quite pleased with most the etched pieces and will definitely use this process in future builds; maybe even try etching myself.
I decided to apply the hinges to the airing ports opposite to that normally fitted to most models. I have based this decision on intuition, but I should check this against contemporary models and references for accuracy. My thoughts were that these would have been used mainly in port where when the ship was laying into the wind, the wind would be funnelled into the port. This principle also works if the ports were opened in calm seas in the tropics where the ship's motion would funnel the wind into the ship as the port lid would open aft.
The gangway steps were made from a single length of walnut which was shaped by scraping with a profile cutter made from a hacksaw blade with a mould shape cut into it. Individual steps were then cut off to length and glued into place. The following photo shows the gangway steps, boat skids and the starboard sheets fairlead (with brass sheaves).
-
BANYAN got a reaction from PeteB in HMB Endeavour by BANYAN - FINISHED - Artesania Latina - 1:60 - circa 1768
Deck Planking
I have tried to remain true to scale with the planking. The size of planks in ships was determined by the availability of timber stock at the time, so I opted for something in the mid-range for a typical plank length in this era. The plank size I used was based on boards of 12 inches width by 25 feet long (actual), which at 1:60, equates to 5mm wide by 125mm long. This proved very convenient as the kit supplied deck 'Mukall' planking plank strips, were 0.5 x 5mm wide.
For the deck planking, I again opted for a 4 plank butt shift, centred from a slightly wider king plank. This was a relatively straight forward activity, and with her bluff bow, there was no need to worry about nibbing and joggling into a margin plank. I was not sure whether to use a waterway or not, but in the end decided not to, as at this scale it would have been a little too awkward (for my skills at that stage and as a first build). I now regret that decision, but I have learned a valuable lesson. I have not ruled out the option of a retro-fit just yet.
The mast holes were drilled at this stage. I had placed filler blocks of poplar pine between the bulkheads in these areas to provide additional support for the masts. These were pre-drilled and then redrilled under a very large mill working with ever increasing drill bit sizes until achieving the correct diameter. I used a protractor to determine the correct rake from the kit plans, and reconfirmed with Marquardt (based on dockyard drawing/plans). Dummy masts (dowels) and a digital angle level were used to ensure the masts were correctly raked and aligned (fore-to-aft) on the model.
The model is shown in her working cradle which is made from pool spaghetti (available at Clarke Rubber for the Aussies). This has proved a very versatile building cradle since completing the first layer of planking. I used the Amati keel holder during the assembly of the skeleton and first layer of planking.
-
BANYAN got a reaction from PeteB in HMB Endeavour by BANYAN - FINISHED - Artesania Latina - 1:60 - circa 1768
Wales and Anchor Lining
The wales were glued to the first layer of hull planking before applying the second layer. I used continuous run planks of the appropriate thickness which I butt jointed. I do not think that the owners/builders of a collier would have expended money on the Admiralty preferred anchor stock joinery. As the wales were to be painted, I did was not overly concerned with the joinery; a good sand and coat
of paint hid most of my poor quality joints .
The anchor lining and bolster were applied over the second layer planking and sanded down to be flush with the thickness of the
wales. The side view of plans and drawings provided with the kit are very misleading as this feature is, by the nature of a 2D drawing, shown flattened or fore-shortened as this feature is located at the start of the curvature of the hull. As such, the drawings do not truly reflect the actual curve imposed to these strakes.
To achieve the positioning and sweep of these planks, I temporarily fitted the anchor where it would ride when hoisted in and lashed to the fish davit; I then let the anchor swing through its path watching the end of the flukes as it swung after it would have been released from the davit to hang from the cathead.
-
BANYAN got a reaction from PeteB in HMB Endeavour by BANYAN - FINISHED - Artesania Latina - 1:60 - circa 1768
Hull Planking
The planking timber supplied in the kit (limewood) was used for the first layer, and Sapele (Entandrophragma Cylindricum) which is in the Mahogany family/genus, was used for the veneer second layer (5mm wide strips). I decided to use a 4-butt shift planking pattern which have been aligned to fall on the closest frame (estimated only).
The darker colour showing below the wale is the fortunate result of a failed experiment in which I had attempted to simulate the tar based 'brown stuff' used on Endeavour as a protective layer against 'worm'. I tried a bitumen based coating applied to car bottoms (anti-rust) which resulted in a great and authentic looking bottom. However, with time and a little hot weather, it soon became apparent this was a major error as the bitumen based coating started to melt. After scraping it back and re-sanding it, the bitumen that had soaked into the wood and crevices gave it a very nice look.
After some sanding and a coat of Testor's DullCote, it came up quite nicely. I decided not to simulate the trennels in the side planking as it made the model look a bit busy, and most would have been covered by paint anyway.
-
 BANYAN got a reaction from Whizgig in HMB Endeavour by BANYAN - FINISHED - Artesania Latina - 1:60 - circa 1768
Constructing the Hull
Unfortunately I did not keep any of my photographs taken during the construction of the skeleton of the hull; the hull is shown here with both planking layers completed.
The backbone and bulkheads were plywood but I found them to a good fit with no warping which was a real bonus. I filled the space between forward bulkheads with balsa fillers which I then shaped as part of the fairing process. A valuable lesson learned here was to seal the balsa with a diluted PVA solution as the glue I applied to the planks was being rapidly absorbed and not bonding to the planks.
I also fitted pine blocks to either side of the backbone at the points where the masts would be fitted to provide greater strength when I drilled the mast holes later.
-
 BANYAN got a reaction from dashi in HMB Endeavour by BANYAN - FINISHED - Artesania Latina - 1:60 - circa 1768
Lower Masts
The next task was to make a start on the masts. Unfortunately, in my early days of construction I did not fit partners. I am currently trying to determine a good way to add these without making them an obviously tacked on afterthought – another valuable lesson learned.
After some experimenting with turning on the lathe etc, I found the best method to create the compound tapers of the masts was:
Reduce square stock to an octagon, and then to 16 sided, using a v-channel and small jack plane. I put the marked square stock into v-channel which is held in a vice. A small bolt at one end provides a stop for the stock while I shoot; the bolt head is set at a height that will not catch the blade at the smallest dimension of the reduced stock. Chuck and spin the reduced stock in the lathe while using various grades of sandpaper to create the round at the appropriate diameters. I used a digital calliper to measure the diameter, stopping more frequently to check measure the closer I arrived to the required dimension. I then used the mill to cut the flat faces for the fish and cheeks and upper flats. The angle plate attachment is ideal for adjusting the spar to a angle that when held in a machine vice, produces an even cut along to the tapered angle of the mast, to ensure a level cut.
I have used vinyl pin stripe tape (used to simulate racing strips for RC cars) to simulate the recessed steel bands, and thin strips of negative plates (used in the printing industry) to simulate the iron bands where they stand proud. The negative has a flat black finish which looks like blackened brass, and is to handle and glue with CA (gel).
-
BANYAN got a reaction from NMBROOK in HMB Endeavour by BANYAN - FINISHED - Artesania Latina - 1:60 - circa 1768
Bowsprit and Jib Boom
The first spars to be produced were the bowsprit and jib-boom. I have used the design of the solid/joined knightheads found on the Endeavour replica. As this was to be painted I made it as a solid piece rather than constructing the chock between the knightheads.
After dimensioning the bowsprit, I soaked it in boiling water for 20 minutes and left it to dry on a former under clamping pressure. I have used brass sheaves in the bee, and
created a recess with and iron clasp in the bowsprit cap to hold the Jack staff which will be fitted when I have completed the rigging.
I have used Huon Pine for the jib boom and masts and stained them with Bushman's stain. This is an Australian product made from natural products found in our bush. The resulting finish is very close in appearance to the varnished masts seen on the Endeavour replica.
-
BANYAN got a reaction from dashi in HMB Endeavour by BANYAN - FINISHED - Artesania Latina - 1:60 - circa 1768
Catheads, Fish Davit and Boomkins
To determine the correct positioning of the catheads and boomkins, I scanned and overlayed then scaled the Marquardt drawings over a scanned copy of the plan from the kit. By resizing these in Photoshop to ensure I was using the correct scale (1:60), I was able to determine their relative position on the forecastle as shown in the graphic. I also tried to ensure the fixings for these aligned with longitudinal beams (strength).
The boomkins are made from Huon Pine that have been reduced to a dowel from square stock, then tapered with sandpaper while spinning the dowel in the lathe. I then bent the completed dowel around a former after soaking in boiling water and leaving to dry under clamping pressure.
The fish davit is made from 4mm square walnut stock and is fitted with brass sheaves. The difference in the photo colour and brightness is the result of a change in camera and I am still trying to get the white balance right for the new one.
-
BANYAN got a reaction from dashi in HMB Endeavour by BANYAN - FINISHED - Artesania Latina - 1:60 - circa 1768
Belfry
The belfry is scratch built from a 4mm square walnut stock with hand shaped shoulders and caps. The small bell was acquired as an after-market accessory. The pawls for the windlass brake, are fitted either side of the aft side of the belfrey post.
-
BANYAN got a reaction from dashi in HMB Endeavour by BANYAN - FINISHED - Artesania Latina - 1:60 - circa 1768
Windlass
This was an interesting exercise that resulted in acceptable (but not great) result. I have learned a lot from this activity, and I will use a harder wood for the barrel in future efforts. The windlass barrel was formed by grinding/sanding flats along the length at an angle to create the camber; next time I will use a cutter. I did this using a mill with angle table attachment to have a level grinding surface but apply the correct degree of bevel. I am also a little unhappy with the alignment of some of the pawl holes in the finished product.
I recut the carrick pieces from wood rather than use the metal versions provided in the kit; however, I did retain the carved heads and refitted them (too lazy to carve them myself ). The pawl notches are a small cog taken from an electric cordless drill (thanks Neptune for this idea and for the cog). I have not fitted the cable cleats yet as they will be too delicate and would suffer during the rigging process. They will need to be fitted before I fit the foremast shrouds.
-
BANYAN got a reaction from dashi in HMB Endeavour by BANYAN - FINISHED - Artesania Latina - 1:60 - circa 1768
Armaments
Endeavour sailed with 10 x 4-pounder canon, 6 were mounted on deck and four in the hold which were brought up for shore defence when the ship was in Tahiti. The actual positioning of the deck canon is open to conjecture; some depictions have a pair on the quarterdeck. I think this latter configuration unlikely as it would have interfered with the working of the ship, especially during survey.
In the following photograph, the canon are shown mounted in-situ with barrels blackened (old photo - before I replaced the breech ropes). Only the breeching ropes have been fitted as fitting the various tackles etc looks a little too 'busy' at this scale. However, I may yet be tempted to have them fitted in a 'stowed-for-sea' configuration.
The ship was also fitted with 12 swivel guns, the posts for which I have made from Huon pine and shaped to octagonal before notching to fit against the cap rails, and bolted to the outside of the quarterdeck. I simulated the bolts at the base and cap rails of these posts, and elsewhere, with brass pins for which I had filed the round heads flat and square. I was able to do this using a hand-vice (pictured) and needle files. The swivels will be fitted after completion of the rigging.
-
BANYAN got a reaction from dashi in HMB Endeavour by BANYAN - FINISHED - Artesania Latina - 1:60 - circa 1768
Boat Stowage
The boats are mounted to the gallows rails which are lashed (still to be done) to the spar gallows in the waist, as shown in the following photograph. One of the perils (or advantages depending on how you look at it) of close-up photography is that it shows blemishes much more clearly than viewed by the naked eye under ambient light. One further touch-up job I have is to put another coat of blue on the upper strake of the longboat and then add the yellow ochre rubbing strakes.
The Cutter and the Yawl are yet to be made and will be nested on/within the existing boats using chocks sitting on the thwarts. Gripes and sea lashings will be fitted on completion.
-
 BANYAN got a reaction from Pat Lynch in HMB Endeavour by BANYAN - FINISHED - Artesania Latina - 1:60 - circa 1768
Pinnace: The pinnace was made using the more traditional method of a plug (or mould) to build the shell (planking) into which subsequently the ribs were added. Chuck was kind enough to reduce the plans for his pinnace design for me to build from. However,, this tie I was not able to use his construction techniques, as unless the sacrificial bulkheads are cut by laser, they are too fragile to use at this scale.
Chuck's pinnace design with the false/extended transom removed, was an almost identical fit to that proposed by Marquardt, so these plans were a great start to this mini-project.
-
BANYAN got a reaction from PeteB in HMB Endeavour by BANYAN - FINISHED - Artesania Latina - 1:60 - circa 1768
Boats
Longboat: After several unsuccessful attempts to build a plug (see picture) on which to build the boats, I was fortunate to be offered a 1/64 scale version of Chuck's 26 longboat templates. I have included photos of some of these plugs which were designed for the cutter; I may still use one of them. These are all sandwich constructed with two of them using vertical slices ('sliced bread loaf') and the other the more tradition 'bread and butter' horizontal slices.
When I received the smaller laser cut template from Chuck (many thanks), I did not have intentions of using it; rather, I was more interested in the larger 1:48 version he had created. However, when I looked more closely at the smaller scale version provided by Chuck, I noted that, with very little modification, it fitted nicely to the dimensions of Endeavour's Longboat as described by both Ray Parkin and Karl Marquardt.
Both authors agree that a shorter and fatter (in the beam) design would have been required, with the shorter length to allow it to be stowed without interfering with the workings of the ship. The wider beam allowed the boat to carry the required cargo, especially water casks. By removing a couple of the middle frames from Chuck's design, the length and beam of the resulting longboat was correct to 1:60 scale for Ray Parkin's version for the construction of the longboat (94 mm x 35mm x 20mm). However, I used Marquardt as the reference for the most likely fitting-out of the boat.
According to Parkin, the longboat would have been clinker built rather than carvel to provide a more robust boat that could be used to conduct the intended close-in coastal surveying (which I am assuming Cook would have wanted). I have also adopted the two mast design with a sliding gunter rig, as this is what was clearly shown by the embarked artist, Sydney Parkinson (expedition artist/illustrator), in his sketches of the ship's boats.
The following photographs show the construction process for the longboat using Chuck's sacrificial bulkhead system to create the
skeleton/ribs of the boat.
The following photograph shows the near completed longboat; I have still to complete the oars, grapnel, masts etc. I have painted the longboat mainly white as I believe it would have assisted with temperature control in the tropics, and provided higher visibility for the Endeavour's crew to monitor her movements during survey and coastal work.
-
BANYAN got a reaction from PeteB in HMB Endeavour by BANYAN - FINISHED - Artesania Latina - 1:60 - circa 1768
Pumps and Bitts
The pumps are made from accessories I purchased and modified slightly; overall I am happy with the result. The bits and rails are made from walnut and fitted with after-market belaying pins (walnut). Although not very clearly shown in these shots, I have fitted brass sheaves (2 per riser). I just hope I have fitted all of the deck bolts required as it will be an nightmare trying to place them around the mast in the future.
There is a big colour difference shown in the photos here as I have just bought a new digital SLR camera and I am still trying to get the white balance right.
-
 BANYAN got a reaction from Mirabell61 in HMB Endeavour by BANYAN - FINISHED - Artesania Latina - 1:60 - circa 1768
Capstan
The capstan is a heavily bashed version of the kit supplied accessory. I have enlarged and squared the capstan bar holes and added the ratchet pawl slots and pawls. There is a pawl fitted on either side to create the 'brake' for controilling movement in either direction of rotation. I am not sure yet whether I will make capstan bars for this build.
-
BANYAN got a reaction from PeteB in HMB Endeavour by BANYAN - FINISHED - Artesania Latina - 1:60 - circa 1768
Binnacle
The binnacle shown is my second attempt as the first was a little oversized. It is based on the design shown by Marquardt but with some modifications. This will be secured to eyebolts when the rigging to the mizzen mast has been completed so as not to damage it.
-
BANYAN got a reaction from PeteB in HMB Endeavour by BANYAN - FINISHED - Artesania Latina - 1:60 - circa 1768
Aft Deck Furniture
The tiller arm was made from 4mm square walnut soaked in hot-water and bent n a fomer to provide the curvature. This was not easy and I had several attempts at it until I understood I needed a curved former rather than pegs in a board to use as the shape former.
The horse-shoe extension provides clearance for the 'charlie noble' for the Captain's cabin stove. The 'iron horse' rail abaft the rudder is for the mizzen boom sheet tackle block. As a test of my metal working, I made the Ensign staff bracket to open and close (at scale 1:60) - a complete waste of time but very self-satisfying . All metal work in this build has been blackened using Brass Black which I have described in a Tutorial located here; however, in some places I have needed to touch-up with a bit of black paint, where I have damaged the finishin while fitting the part.
I have mostly shown the deck furniture arrangements as depicted by Marquardt, but modified it in some places as built for the replica. Some items in particular that differ are the rudder head house, the platform over the tiller, and the bowsprit arrangement between the knightheads at the stem.
The ship's wheel is a mix of the kit provided metal support posts and wood barrel, and a modified after-market accessory (boxwood) wheel to which I thinned down and added the brass shim circular trims. I have punched the brass to simulate the screw fastenings. I really should have used a scale device or object in some of these photos as the size (at 1:60) caused me some difficulty which sometimes proved very disheartening.
The circular 'quadrant or rim straps' were cut by sandwiching the brass shim between two very thin pieces of Medium-Density Fibreboard (MDF), cutting the circles with a coping saw, and filing to finish the edges and then punched to simulate the screws. And yep, I got a little carried away, even put a fancy rope work on the centre or 'king' spoke of the wheel.
Whether the skylight protective bars looked like the ones I have built, or in the more popular/traditional vertical bars will never be known. I went with this option as this design would allow for more light through the windows while still protecting against falling spars etc (and to be truthful, easier to solder . The skylight and companionway would have been removed when working the capstan, with the companionway adjusted as required to maintain the entry doors aligned to leeward.
-
BANYAN got a reaction from AKRYPTO in HMB Endeavour by BANYAN - FINISHED - Artesania Latina - 1:60 - circa 1768
Lantern
This was an accessory I purchased (Amati I think) and assembled and painted. I chose it as it was relatively the right size. This proved a bit fiddly as I had to edge glue the wired frames between the edges of adjoining plastic panes. I am thinking of rebuilding this from scratch.